BFE1 - Elliptical bike Best Fitness - Free user manual and instructions
Find the device manual for free BFE1 Best Fitness in PDF.


| Product Type | Elliptical Bike |
| Brand | Best Fitness |
| Model | BFE1 |
| Dimensions (L x W x H) | 150 x 70 x 170 cm |
| Weight | 70 kg |
| Maximum User Weight | 120 kg |
| Power Supply | 2 x AA batteries (for console) |
| Resistance Levels | 16 levels (magnetic) |
| Programs | 12 preset programs + manual |
| Display | LCD screen: time, distance, speed, calories, pulse |
| Heart Rate Monitoring | Hand grip pulse sensors |
| Flywheel Weight | 8 kg |
| Stride Length | 40 cm |
| Pedals | Oversized with anti-slip surface |
| Transport Wheels | Yes |
| Leveling Feet | Yes, adjustable |
| Water Bottle Holder | Included |
| Maintenance | Clean with damp cloth; lubricate moving parts every 3 months |
| Safety | Emergency stop switch; stable frame; non-slip pedals |
| Spare Parts Available | Pedals, resistance motor, console, handlebar grips |
| Warranty | 2 years on frame, 1 year on parts |
| Assembly Required | Yes, tools included |
Frequently Asked Questions - BFE1 Best Fitness
User questions about BFE1 Best Fitness
0 question about this device. Answer the ones you know or ask your own.
Ask a new question about this device
Download the instructions for your Elliptical bike in PDF format for free! Find your manual BFE1 - Best Fitness and take your electronic device back in hand. On this page are published all the documents necessary for the use of your device. BFE1 by Best Fitness.
USER MANUAL BFE1 Best Fitness
natural_image
Technical line drawing of a stationary exercise machine (no text or symbols present)v. 092209
BFE1
Owner's Manual
table Of cOntents
Table of Contents.... 2
Introduction.... 3
Important Safety Information.... 4
Safety Guidelines.... 5
Before You Begin.... 6
Assembly Instructions.... 7
Assembly 8 - 23
Console Overview 24 - 25
Console Operation.... 26 - 33
Monitoring Your Heart Rate 34 - 35
Hardware.... 36
Parts List.... 37
Exploded View.... 38
Best Fitness ^® continually seeks ways to improve the performance, specifications and product manuals in order to ensure that only superior products are released from our factories. Please take the time to carefully read through this manual thoroughly. Instructions contained in this document are not intended to cover all details or variations possible with Best Fitness ^® equipment, or to cover every contingency that may be met in conjunction with installation, operation, maintenance or troubleshooting of the equipment. Even though we have prepared this manual with extreme care, neither the publisher nor the author can accept responsibility for any errors in, or omission from, the information given. Should additional information be required, or should situations arise that are not covered by this manual, the matter should be directed to your local Best Fitness ^® representative, or the Service Department at Best Fitness ^® in Forest Park, Illinois.
intrOductiOn
Congratulations!!
Thank you for purchasing your new Best Fitness® Elliptical.
With state-of-the-art technique, robust frame structure and superior ergonomic design, Best Fitness® Ellipticals set a new standard for excellence. Best Fitness® Ellipticals can improve your quality of life by keeping you fit and healthy, increasing your energy levels and enhancing your lifestyle.
Best Fitness® wants to ensure years of quality workouts with your new Elliptical so we recommend that you read this manual carefully and thoroughly to fully understand proper use and maintenance of this product. Retain this Owner's Manual for future reference.
Please use this Owner's Manual to make sure that all parts have been included in your shipment. When ordering parts, you must use the part number and description from this Owner's Manual. Use only Best Fitness® replacement parts when servicing this machine. Failure to do so will void your warranty and could result in personal injury.
For information about product operation or service, check out the official Best Fitness® website at www.BestFitness.com or contact an authorized Best Fitness® dealer or a Best Fitness® factory-authorized service company or contact Best Fitness® Customer Tech Support at one of the following:
Toll Free: 1-800-556-3113
Phone: 1-708-427-3555
Fax: 1-708-427-3556
Hours: M-F 8:30-5:00 CST
E-Mail: service@bodysolid.com
Or write to:
Best Fitness® Service Department
1900 S. Des Plaines Ave.
Forest Park, IL 60130 USA
iMpOrtant safety infOrMatiOn
When using exercise equipment, you should always take basic precautions, including the following:
- Read all instructions before using the BFE1. These instructions are written to ensure your safety and to protect the unit.
- Do not allow children on or near the equipment.
- Use the equipment only for its intended purpose as described in this guide.
- Do not use accessory attachments that are not recommended by the manufacturer. Such attachments might cause injuries.
- Wear proper exercise clothing and shoes for your workout, no loose clothing.
- Use care when getting on or off the unit.
- Do not overexert yourself or work to exhaustion.
- If you feel any pain or abnormal symptoms, stop your workout immediately and consult your physician.
- Never operate the unit when it has been dropped or damaged. Return the equipment to a service center for examination and repair.
- Never drop or insert objects into any opening in the equipment.
- Always check the unit and its cables before each use. Make sure that all fasteners and cables are secure and in good working condition.
- Do not use the equipment outdoors or near water.
The BFE1 is designed for your enjoyment. By following these precautions and using common sense, you can have many safe and pleasurable hours of healthful exercise with your Best Fitness® BFE1.
After assembly, you should check all functions to ensure correct operation. If you experience problems, first recheck the assembly instructions to locate any possible errors made during assembly. If you are unable to correct the problem, call the dealer from whom you purchased the machine or call 1-800-556-3113 for the dealer nearest you.

safety guidelines
Successful resistance training programs have one prominent feature in common ...safety. Resistance training has some inherent dangers, as do all physical activities. The chance of injury can be greatly reduced or completely removed by using correct lifting techniques, proper breathing, maintaining equipment in good working condition, and by wearing the appropriate clothing.
- It is highly recommended that you consult your physician before beginning any exercise program. This is especially important for individuals over the age of 35, or persons with pre-existing health problems.
- Always warm up before starting a workout. Try to do a total body warm up before you start. It is especially important to warm up the specific muscle groups you are going to be using. This can be as simple as performing a warm up set of high repetitions and light weight for each exercise.
- Use proper form. Focus on only working the muscle groups intended for the exercise you are doing. If there is strain elsewhere, you may need to re-evaluate the amount of weight that is involved with the lift. Keeping proper form also includes maintaining control through an entire range of motion.
- Breath properly. Inhale during the eccentric phase of the exercise, and exhale during the lifting, or concentric phase. Never hold your breath during any part of an exercise.
- Always wear the appropriate clothing and shoes when exercising. Wearing comfortable athletic shoes with good support and loose fitting, breathable clothing will reduce the risk of injury.
- Maintaining equipment in proper operating condition is of utmost importance for a safe resistance training program. Pulleys and cables should be checked for wear frequently and replaced as needed. Equipment should be lubricated as indicated by the manufacturer.
- Read and study all warning labels on this machine. It is absolutely necessary that you familiarize yourself and all others with the proper operation of this machine prior to use.
- Keep hands, limbs, loose clothing and long hair well out of the way of all moving parts.
- Do not attempt to lift more weight than you can control safely.
- Inspect the machine daily for loose or worn parts. If a problem is found do not allow the machine to be used until all parts are tightened or worn or defective parts are repaired or replaced.
befOre yOu begin
The Best Fitness ^® is carefully tested and inspected before shipment. We have shipped the unit in several pieces that require assembly. Carefully unpack the unit in a clear area and lay the pieces on the floor near the area where you plan to use the equipment. Remove the packing material. Do not dispose of the packing material until assembly is complete and the unit is working properly. Place the unit on a clean level surface for assembly. Make sure there is easy access to an electrical outlet. Before assembling, the unit should be placed as close as possible to its final location. Be careful to assemble all components in the sequence presented in this guide.
persOnal safety during asseMbly
Before beginning assembly, please take the time to read the instructions thoroughly.
- Read each step in the assembly instructions and follow the steps in sequence. Do not skip ahead.
If you skip ahead, you may learn later that you have to disassemble components and that you may have damaged the equipment which will void the warranty.
○ Assemble and operate the Best Fitness ^® Elliptical on a solid, level surface. Locate the unit a few feet from the walls or furniture to provide easy access.
befOre yOu begin
Locate all hardware bags, labeled Figure 1 through Figure 9, with the exception of Figure 8. Tools have been provided to assist you with assembling the Best Fitness® If you are missing any hardware bags, please call Best Fitness® Customer Tech Support Hot Line at 1-800-556-3113.

ASSEMBLY INSTRUCTIONS
Assembly of the BFE1 takes professional installers about 1 hour to complete. If this is the first time you have assembled this type of equipment, plan on significantly more time.
PROFESSIONAL INSTALLERS ARE HIGHLY RECOMMENDED!
However, if you acquire the appropriate tools, obtain assistance, and follow the assembly steps sequentially, the process will take time, but is fairly easy.
ASSEMBLY TIPS
Read all "Notes" on each page before beginning each step.
While you may be able to assemble the BFE1 using the illustrations only, important safety notes and other tips are included in the text. Some pieces may have extra holes that you will not use. Use only those holes indicated in the instructions and illustrations.
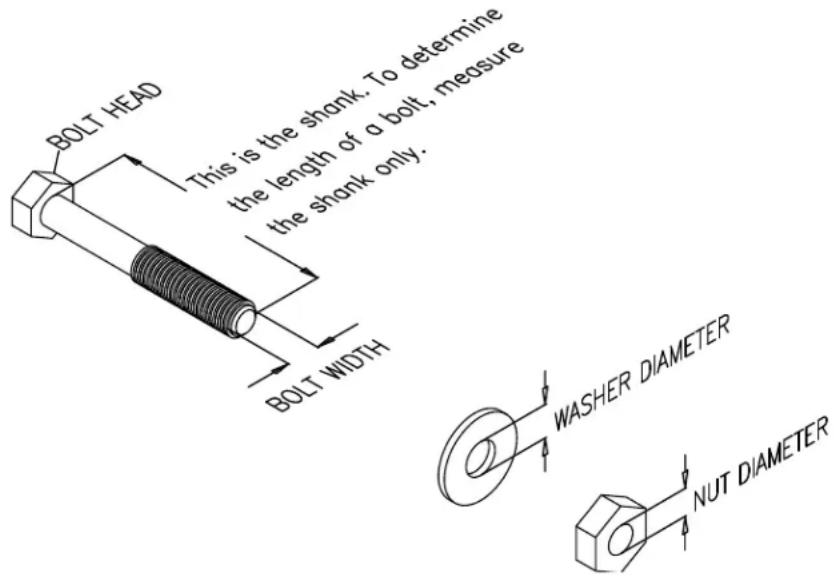
NOTE: To find out the length of a particular bolt, measure its shank (the long, narrow part beneath the head). Refer to the following diagram:
Do not fully tighten bolts until instructed to do so.
NOTE: After assembly, you should check all functions to ensure correct operation. If you experience problems, first recheck the assembly instructions to locate any possible errors made during assembly. If you are unable to correct the problem, call the dealer from whom you purchased the machine or call 1-800-556-3113 for the dealer nearest you.
Be careful to assemble all components in the sequence they are presented.
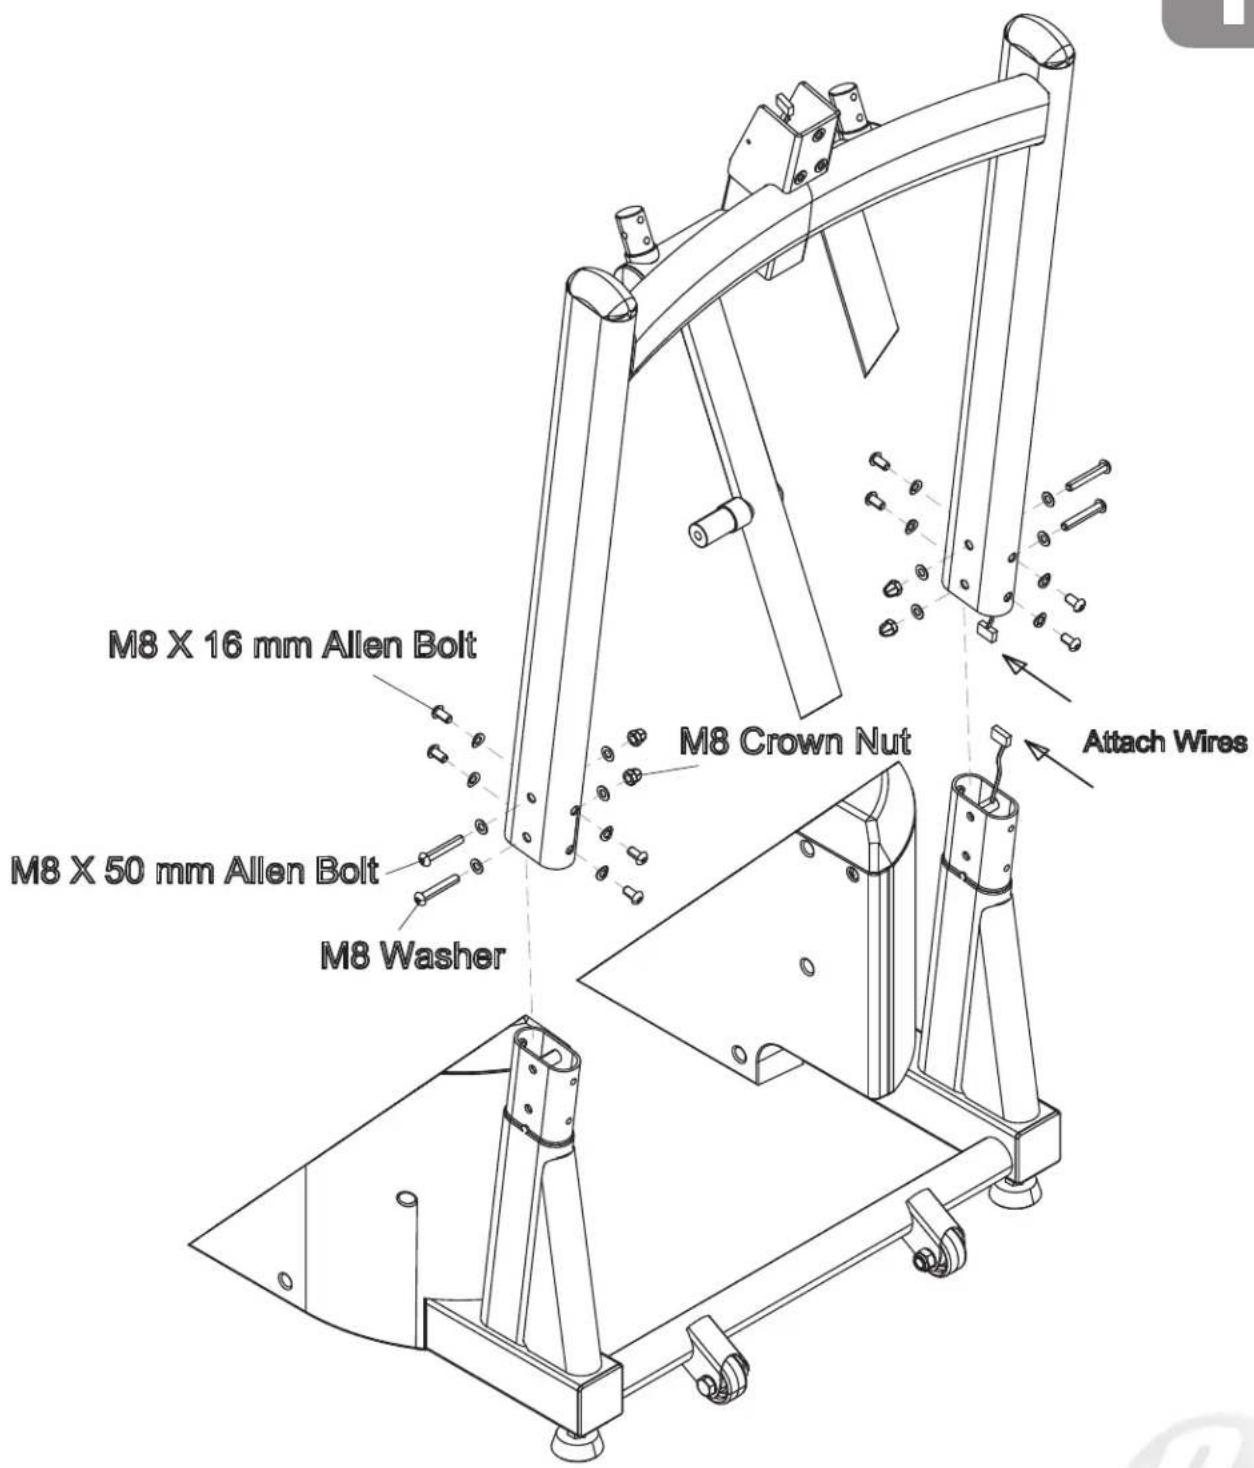
A. Carefully lift the Upright Frame Assembly above the front of the Base Frame.
B. Attach wire harness as shown.
NOTE: A second person is required.
C. Slide the Upright Frame onto the Base Frame.
D. Insert the hardware as shown.

STEP
1
Be careful to assemble all components in the sequence they are presented.
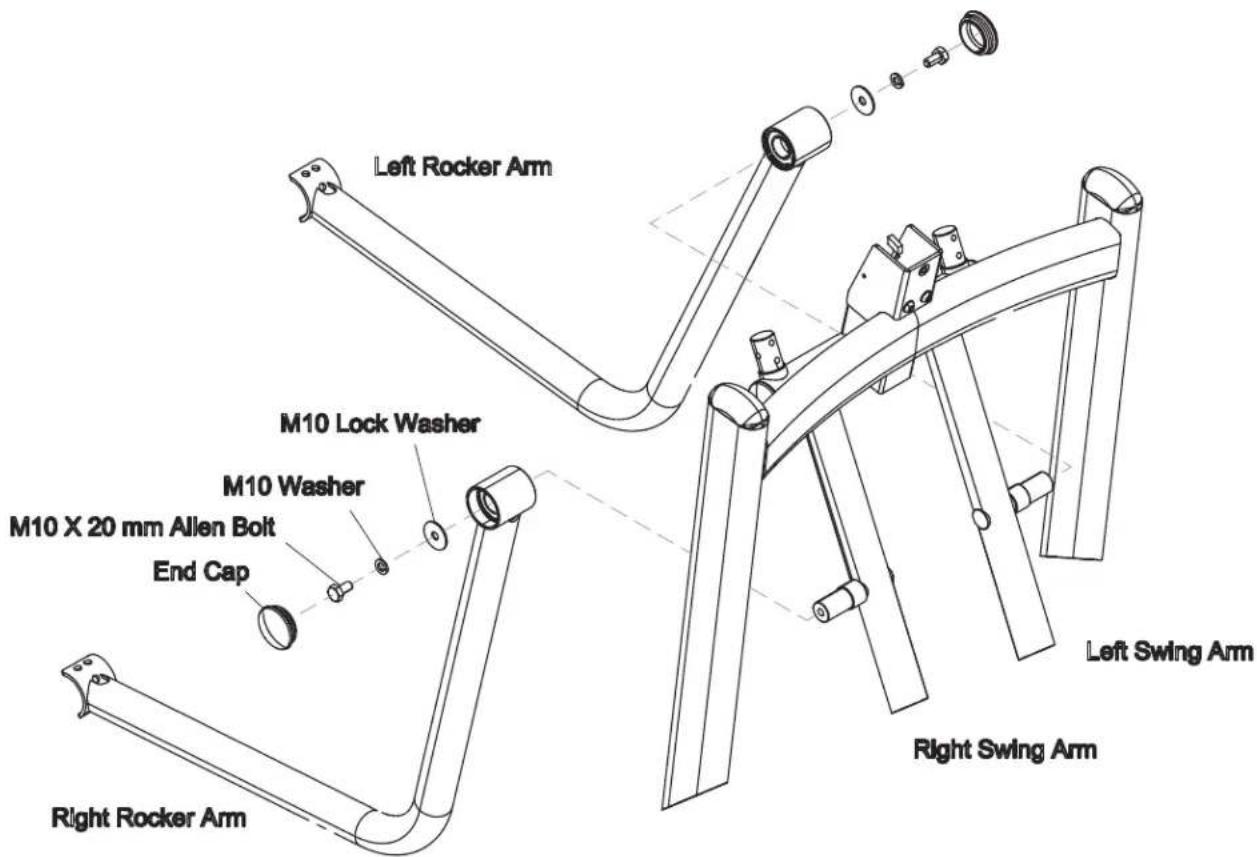
A. Insert Right Rocker Arm into Right Swing Arm and secure using:
One M10x20 Allen Bolt
One M10 Washer
One M10 Lock Washer
B. Insert End Cap into Right Rocker Arm.
C. Insert Left Rocker Arm into Left Swing Arm and secure using:
One M10x20 Allen Bolt
One M10 Washer
One M10 Lock Washer
D. Insert End Cap into Left Rocker Arm.

STEP
2

STEP
3
Be careful to assemble all components in the sequence they are presented.
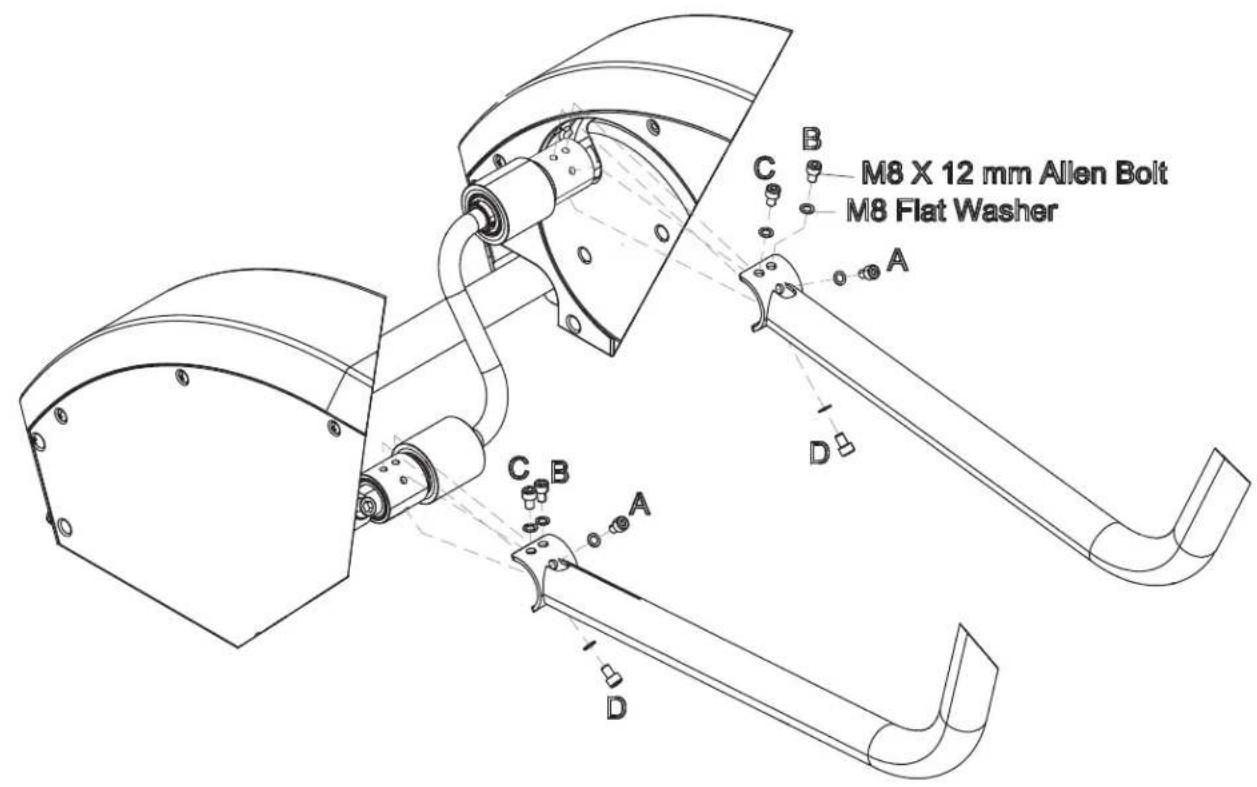
A. Connect the Rocker Arms as shown.

STEP
3

STEP
4
Be careful to assemble all components in the sequence they are presented.
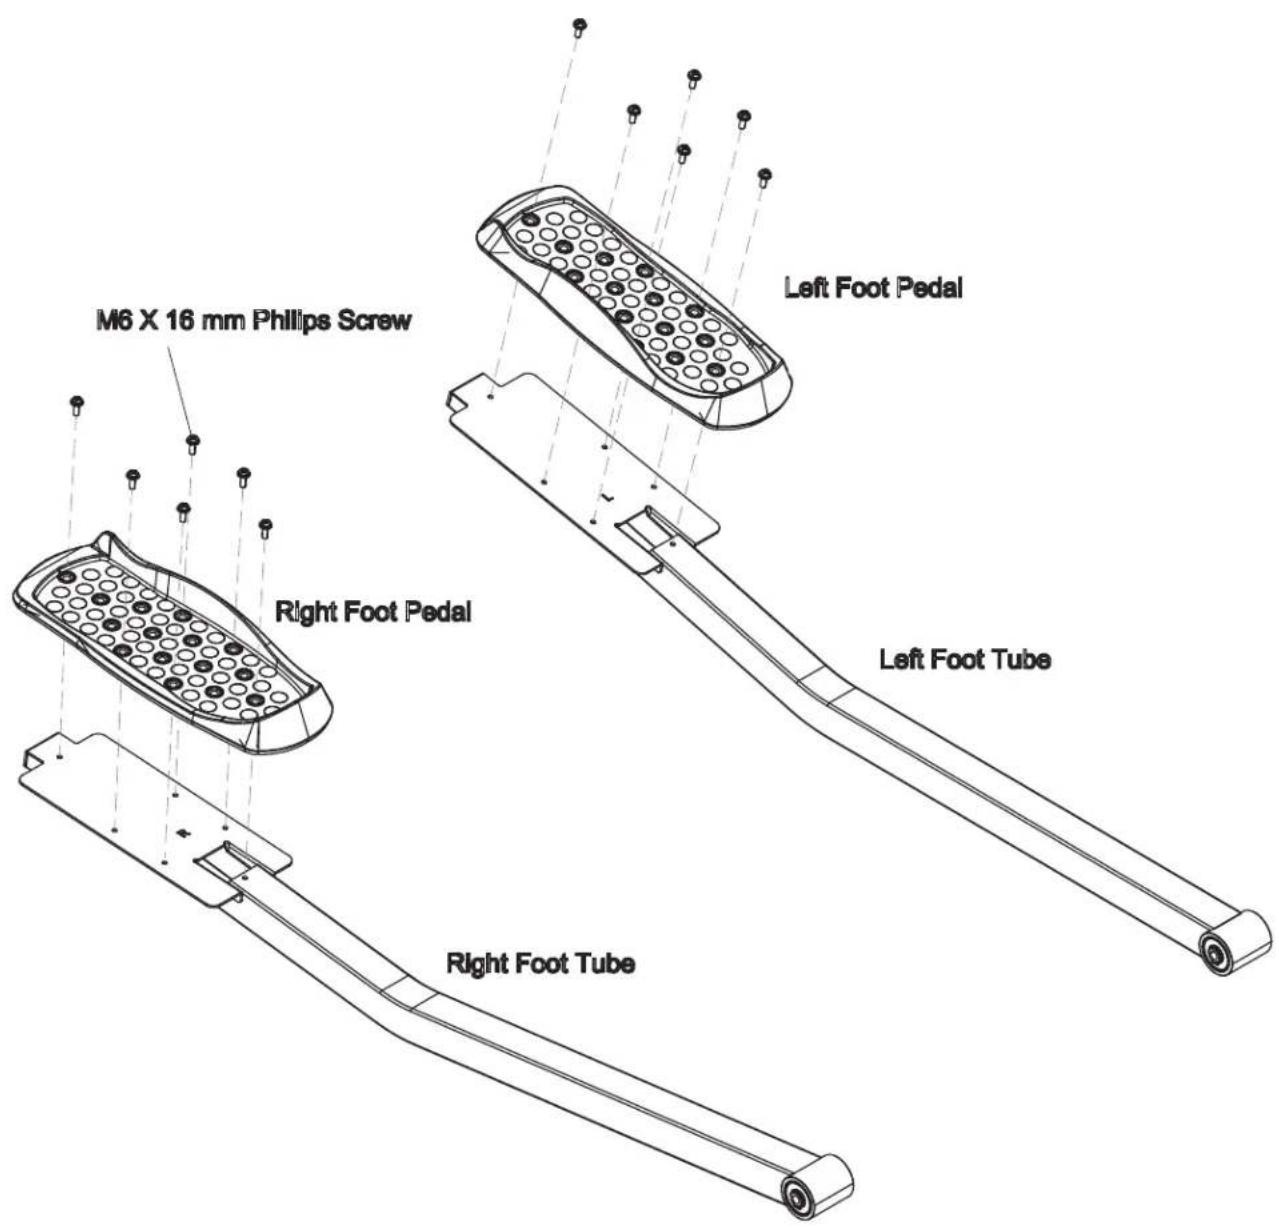
A. Connect the Right Foot Pedal to the Right Foot Tube using Six M6x16 Phillips Screw
B. Connect the Left Foot Pedal to the Left Foot Tube using Six M6x16 Phillips Screw

STEP
4

STEP
5
Be careful to assemble all components in the sequence they are presented.
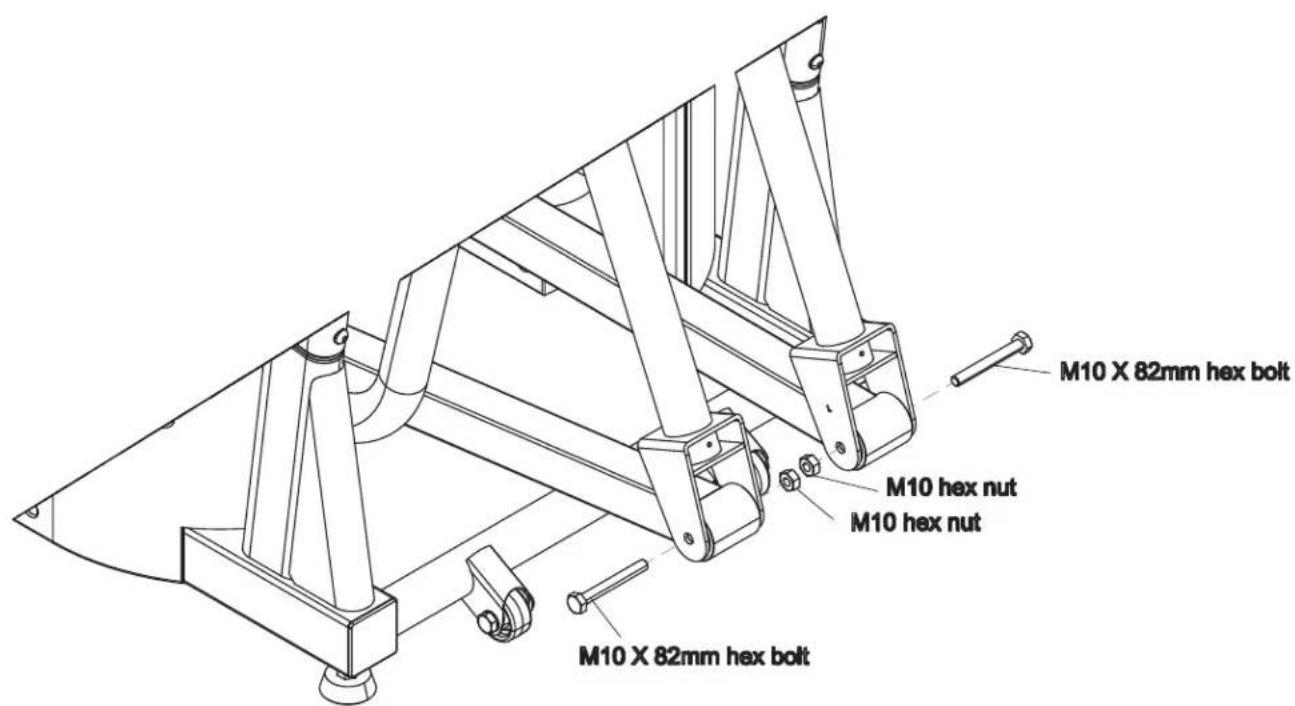
A. Connect the Foot Tubes as shown.

STEP
5

STEP
6
Be careful to assemble all components in the sequence they are presented.
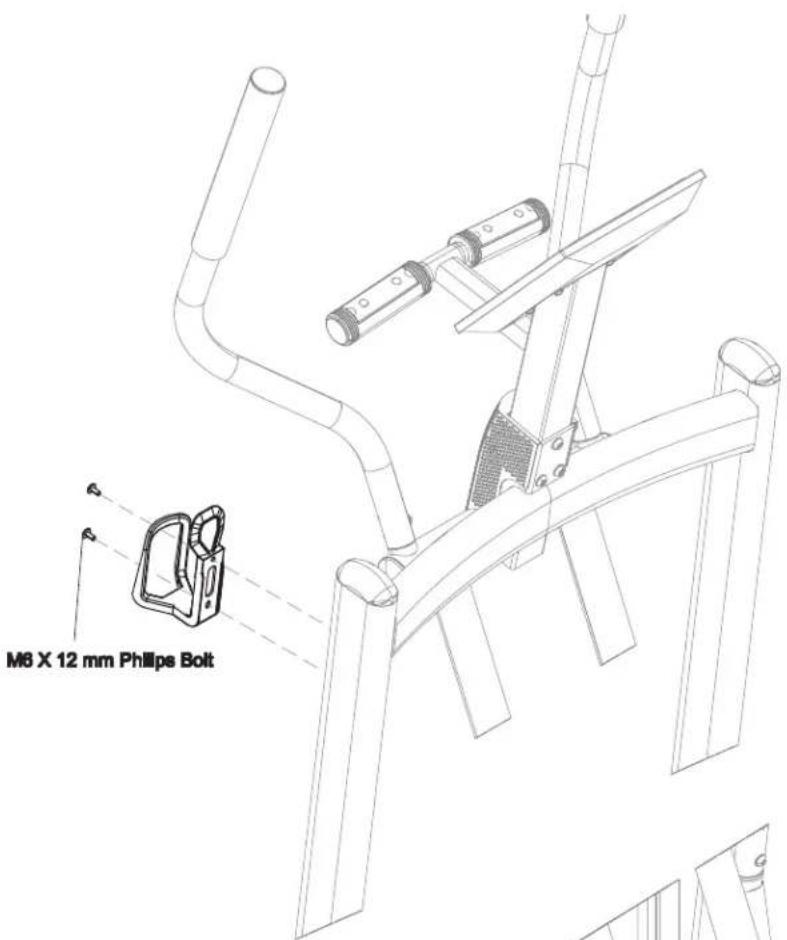
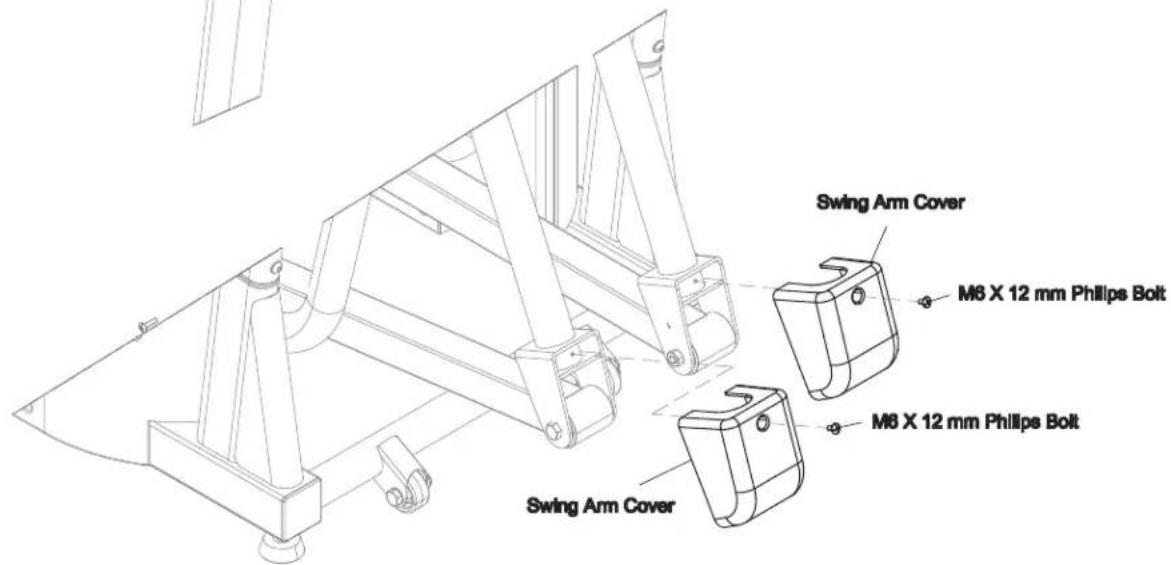
A. Attach the Water Holder using: Two M8x12 Phillips Bolt
B. Connect the Swing Arm Cover as shown using: Two M8x12 Phillips Bolt

STEP
6

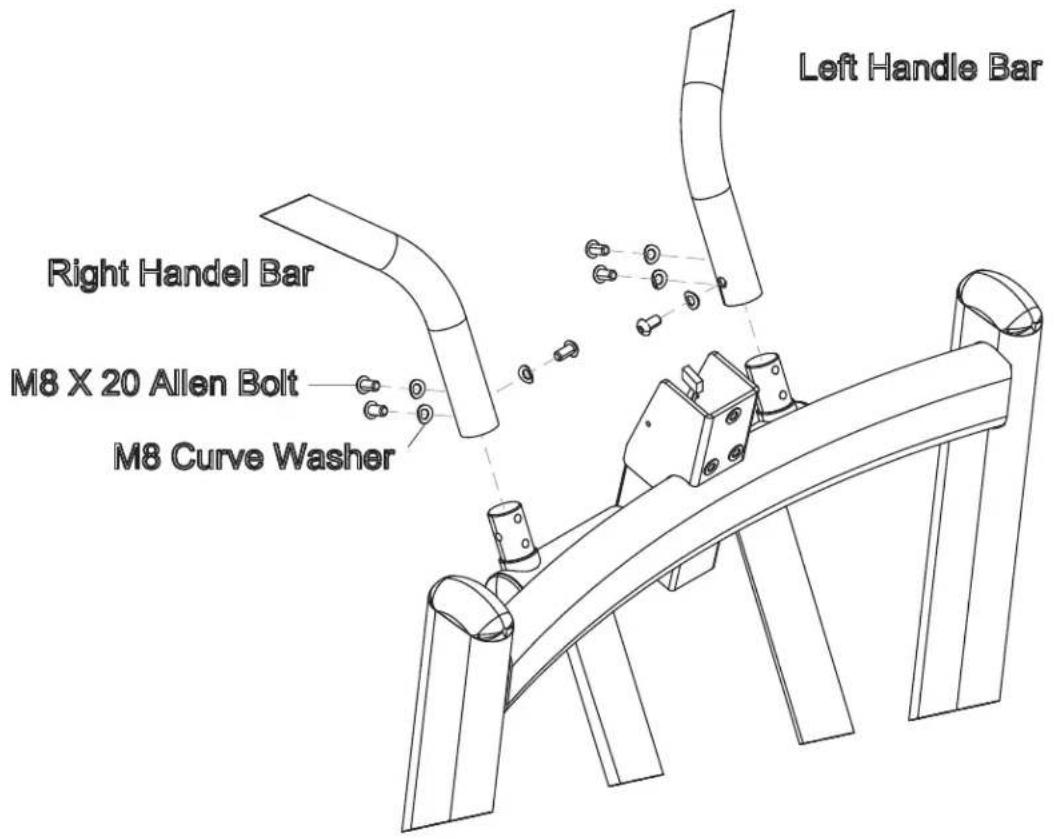
Be careful to assemble all components in the sequence they are presented.
A. Connect the Right Handle Bar using: Three M8x20 Allen Bolt Three M8 Lock Washer
B. Connect the Left Handle Bar using: Three M8x20 Allen Bolt Three M8 Lock Washer

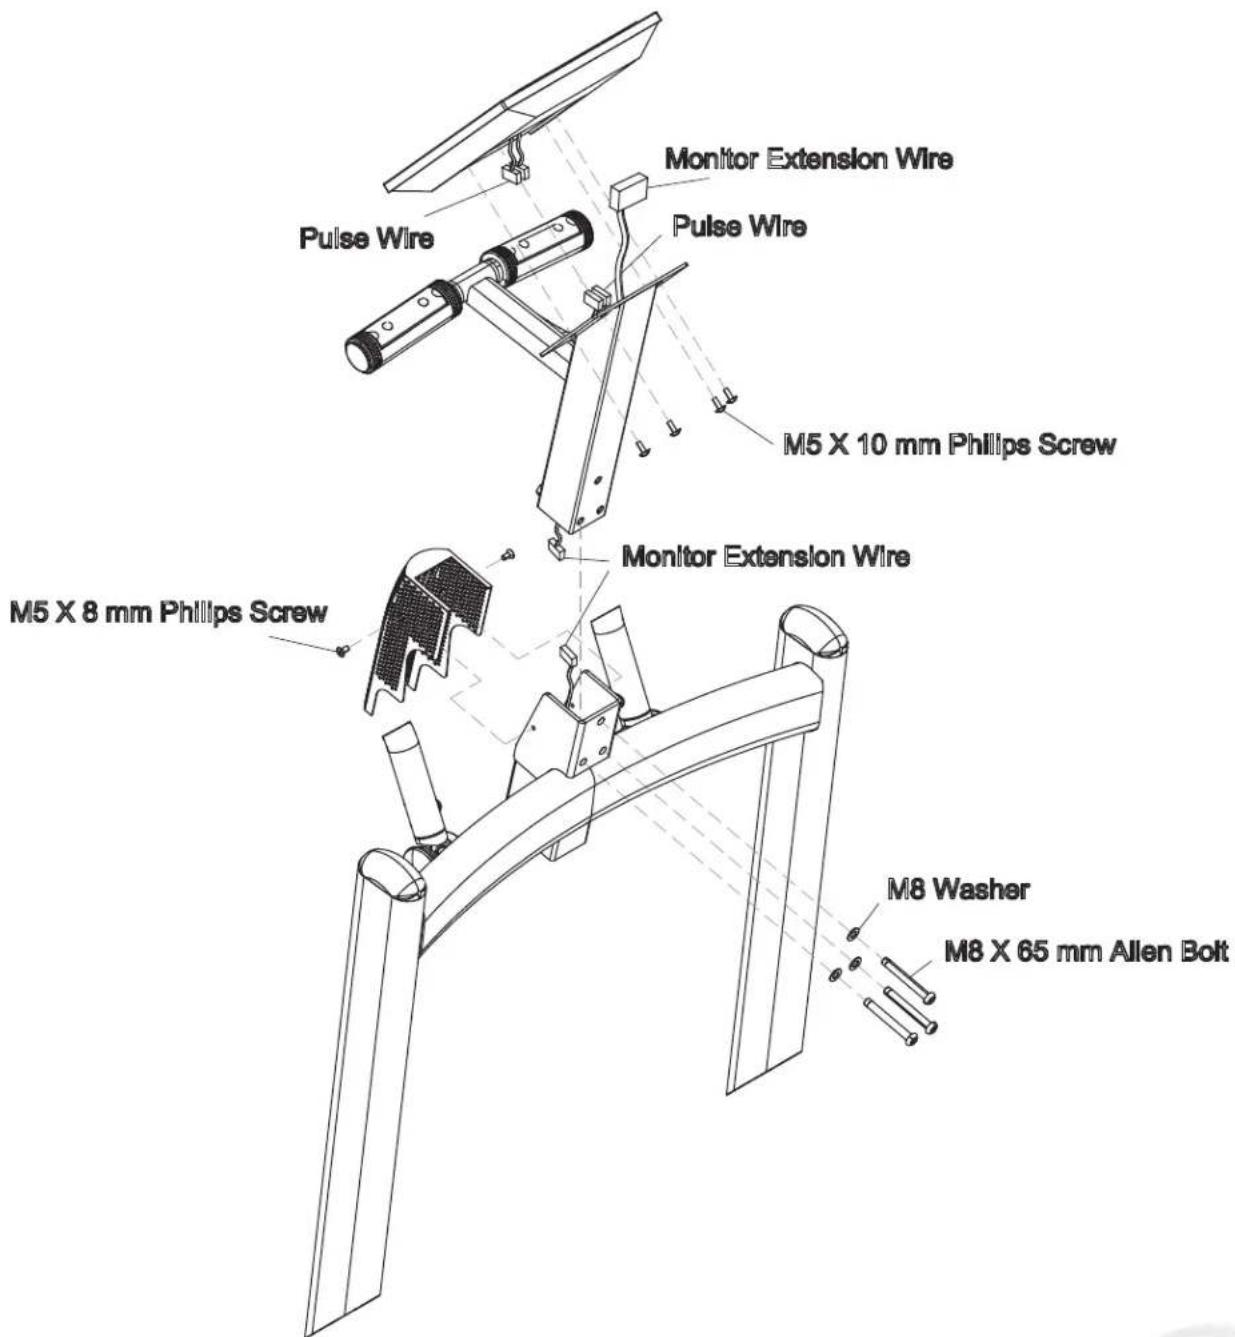
Be careful to assemble all components in the sequence they are presented.
A. Connect the harness from the Console Frame to the Main Frame then secure using: Three M8x65 Allen Bolt Three M8 Washer
B. Slide the Net Cover Frame onto the Main Frame and secure using: Two M5x8 Phillips Screw
C. Connect the harnesses from the Console to the Console Frame then secure using: Four M5x10 Phillips Screw

STEP
8
cOnsOle Overview
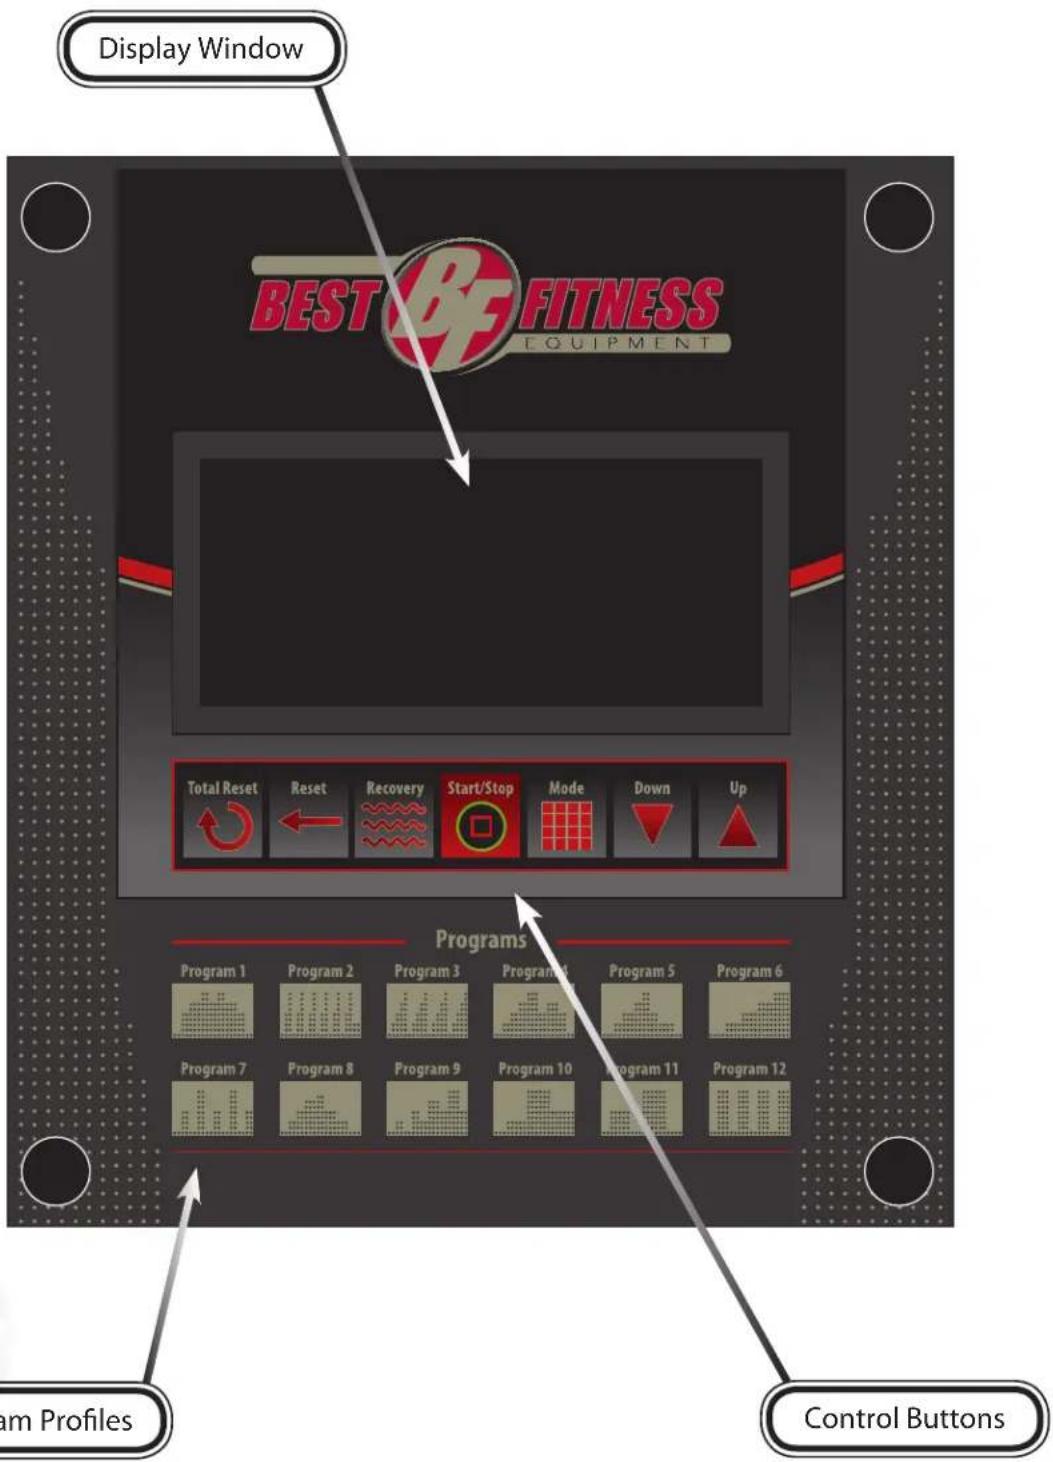
Take a few moments to review the console layout. Below is an overview of the console buttons and their different functions.
CONSOLE OVERVIEW
MODE

Press the MODE button to set the values for TIME, DISTANCE, CALORIES and PULSE.
RESET

The REsEt button clears all preset values to zero except in user programs. Returns to the Training Mode screen.
START/STOP

Press the staRt/stOP button to either start or stop a workout.
RECOVERY

Press the REcovery button to test Heart Rate recovery status. See the Recovery Mode section for further details.
UP/DOWN


During exercise, the UP/DOWN ▲ button is used to scroll through training modes and increase or decrease function values.
TOTAL RESET

Use the t0tal REsEt button to reset the display to the Calendar and Clock Set Up Mode. The t0tal REsEt button clears all preset values except data stored into the console's RAM memory
Console Functions
Displays Time-Eximate duration of workout from 00:00 to 99:00.
Count up - If no Time is set, Time will count up from 00:00 to maximum 99:00 in 1 second increments.
Count down - If Time is set, Time will count down from the user's preset time to 00:00.
Increment or decrement is in minutes in the range of 1:00 to 99:00.
Display SPEED approximate current training speed from 0.0 to 99.9 mph.
DRPMy approximate current training rotation per minute.
Distance traveled during workout from 0.0 to 99.9 miles.
Count up - If Distance is not set, Distance will count up from 0.0 to 99.9 miles in 0.1 mile increments.
Count down - If Distance is set, Distance will count down from user's preset to 0.0.
Each preset can be incremented or decremented by 0.1 miles in the range of 0.0 to 99.9 miles
CALORIES says approximate calories burned during workout from 0.0 to 990.
Count up - If Calories are not set. Calories will count up from 0 to 990 in 1 Calorie increments.
Count down - If Calories are set, Calories will count down from the user's preset number of Calories to 0.
Each preset can be incremented or decremented by 10 Calories in the range of 0 to 990 Calories.
Display ( \beta_{1} ) 450 ( \beta_{2} ) 450 ( \beta_{3} ) 450 ( \beta_{4} ) 450 ( \beta_{5} ) 450 ( \beta_{6} ) 450 ( \beta_{7} ) 450 ( \beta_{8} ) 450 ( \beta_{9} ) 450 ( \beta_{10} ) 450 ( \beta_{11} ) 450 ( \beta_{12} ) 450 ( \beta_{13} ) 450 ( \beta_{14} ) 450 ( \beta_{15} ) 450 ( \beta_{16} ) 450 ( \beta_{17} ) 450 ( \beta_{18} ) 450 ( \beta_{19} ) 450 ( \beta_{20} ) 450 ( \beta_{21} ) 450 ( \beta_{22} ) 450 ( \beta_{23} ) 450 ( \beta_{24} ) 450 ( \beta_{25} ) 450 ( \beta_{26} ) 450 ( \beta_{27} ) 450 ( \beta_{28} ) 450 ( \beta_{29} ) 450 ( \beta_{30} ) 450 ( \beta_{31} ) ( \beta_{32} ) ( \beta_{33} ) ( \beta_{34} ) ( \beta_{35} ) ( \beta_{36} ) ( \beta_{37} ) ( \beta_{38} ) ( \beta_{39} ) ( \beta_{40} ) ( \beta_{41} ) ( \beta_{42} ) ( \beta_{43} ) ( \beta_{44} ) ( \beta_{45} ) ( \beta_{46} ) ( \beta_{47} ) ( \beta_{48} ) ( \beta_{49} ) ( \beta_{50} ) ( \beta_{51} ) ( \beta_{52} ) ( \beta_{53} ) ( \beta_{54} ) ( \beta_{55} ) ( \beta_{56} ) ( \beta_{57} ) ( \beta_{58} ) ( \beta_{59} ) ( \beta_{60} ) ( \beta_{61} ) ( \beta_{62} ) ( \beta_{63} ) ( \beta_{64} ) ( \beta_{65} ) ( \beta_{66} ) ( \beta_{67} ) ( \beta_{68} ) ( \beta_{69} ) ( \beta_{70} ) ( \beta_{71} ) ( \beta_{72} ) ( \beta_{73} ) ( \beta_{74} ) ( \beta_{75} ) ( \beta_{76} ) ( \beta_{77} ) ( \beta_{78} ) ( \beta_{79} ) ( \beta_{80} ) ( P' \$ when not in use.
DisplayLOAD:(levels of resistance) when programming.
DisplaysWATTurrent training wattage data. Target values range from 10 - 350.
TEMPERATURE play room temperature in Fahrenheit when in Sleep Mode.
SCALENDIARsplay year/month/day when in Sleep Mode.
CLOCK: Screen will display time when in Sleep Mode.
cOnsOle OperatiOn
setting up the cOnsOle
When plugging in the power cord or after having pressed the tOtaL REsEt button, the DisPLaY WiNDOW will reset by activating the LCD completely for 2 seconds followed by a long beep. The room temperature will display shortly.
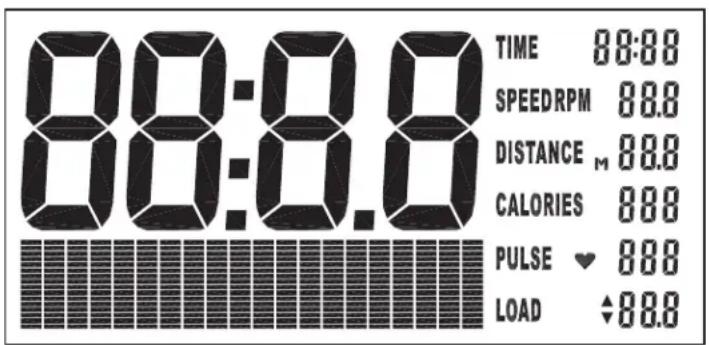
Display Window During Reset
The DisPLaY WINDOW now will be in Calendar Set Up Mode. The YEAR will be blinking and is ready to be set. Press the UP/DOWN ▲▼ buttons to select the current year. Press the MODE button and the MONTH will be blinking and is ready to be set. Press the UP/DOWN ▲▼ buttons to select the current month. Press the MODE button again and the DAY will be blinking and is ready to be set. Press the UP/DOWN ▲▼ buttons to select the current day.
NOTE: If NO INpuT daTa Is ENTEREd, The display will swITch TO ScrEEN SavEr MDeE IN 30 sEcONds.
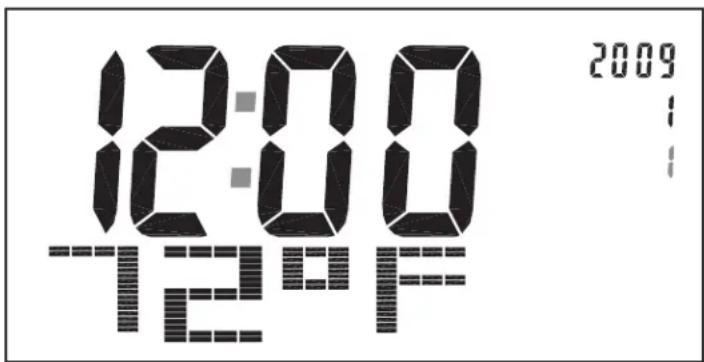
Calendar Setting Mode
Again, press the MODE button and the DisPLaY WINDOW now will be in Clock Set Up Mode. The HOUR will be blinking and is ready to be set. Press the UP/DOWN buttons to select the HOUR.
cOnsOle OperatiOn
Press the MODE button again and the MINUTES will be blinking and is ready to be set. Press the UP/DOWN buttons to set the minute.
Now, press the MODE button to exit the Clock Setting Mode and enter Training Mode.
NOTE: If NO INpuT daTa Is ENTEREd, ThE display will swITch TO ScrEEN SavEr ModE IN 30 sEcONds.
training MOde prOgraMs
Training Mode gives the user several exercise options that allow for a complete and custom workout. There are five Training Modes which include Manual Mode, Program Mode, User Mode, and Watt Mode.
In Training Mode, when 'MAN' is blinking on the DisPLaY WiNDOW, press the UP/DOWN
buttons to cycle through the options to select the desired Training Mode program. The Training Modes are displayed as MAN/PROG/USER/WATT. Press the MODE button to complete your selection. Without a selection, the DisPLaY WINDOW will enter in Screen Saver Mode in 4 minutes.
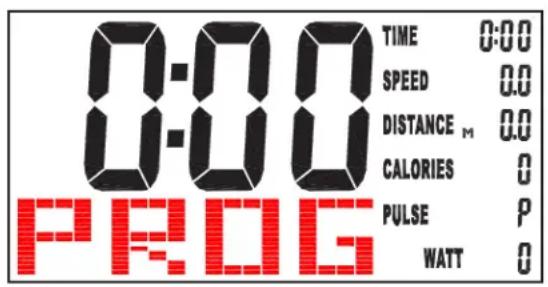
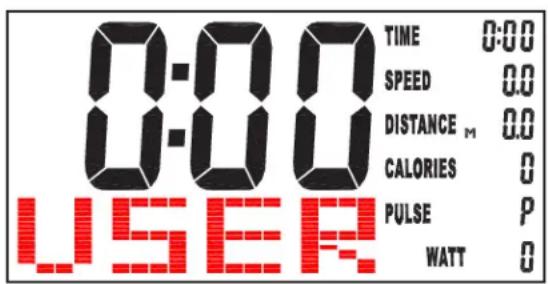
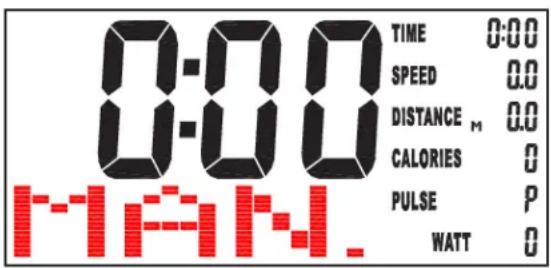
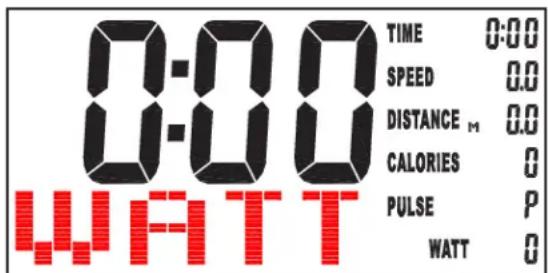
Training Program Overview
cOnsOle OperatiOn
Manual MOde
To access Manual Mode, see the Training Mode Programs section. While in Manual Mode, press the UP/DOWN 🔊 buttons to select a 'LOAD LEVEL' from 1 to 16. The preset load level is 1 and the LOAD readout is flashing on the DisPLaY WINDOW. As the 'LOAD LEVEL' increases it will be displayed onto the 'LOAD LEVEL' readout on the DisPLaY WINDOW. 'LOAD LEVEL' allows for a custom resistance level set by the user. After choosing the desired 'LOAD LEVEL', press the MODE button to confirm the setting.
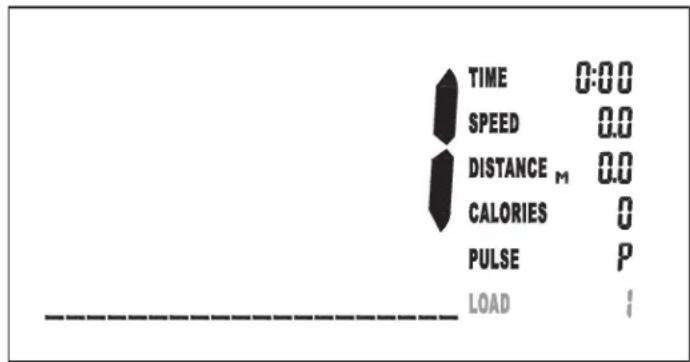
Manual Mode Display
After the desired 'LOAD LEVEL' is selected, you may preset function values for TIME, DISTANCE, CALORIES, and PULSE by using the UP/DOWN buttons. After choosing the desired function value, press the MODE button to confirm the setting.
Press the staRt/stOP @button to start training. During exercise, the user selected preset values will count down. If no preset values were selected, the display values will count up. 'LOAD LEVEL' can be adjusted at any time during the workout.
prOgraM MOde
To access Program Mode, see the Training Mode Programs section. There are twelve programs to select from Program Mode. Press the UP/DOWN 🔊️ 📋️ buttons to select programs P01-P12. The selected program will be shown on the DisPLaY WINDOW for 2 seconds and then the DisPLaY WINDOW will show the Program Profile accordingly. Press the MODE button to confirm the selection.
After the desired program has been selected, the preset 'LOAD LEVEL' value is set at one. The 'LOAD LEVEL' can be easily adjusted to select the starting load by pressing the UP/DOWN 🔊 buttons. The 'LOAD VALUE' can be increased from 1 to 8 by pressing the UP button. The 'LOAD LEVEL' can also be adjusted during training with the selected program. Press the MODE button to confirm the selection.
cOnsOle OperatiOn
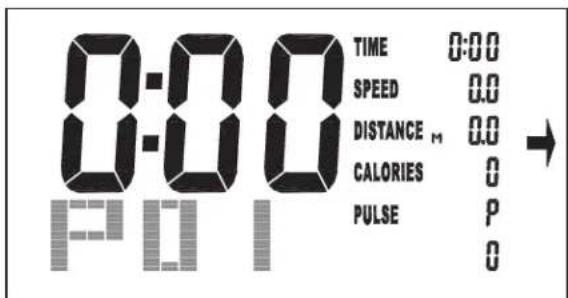
Program Profile Display
After the desired 'LOAD LEVEL' is selected, you may preset function values for TIME, DISTANCE, CALORIES, and PULSE by using the UP/DOWN buttons. After choosing the desired function value, press the MODE button to confirm the setting.
Press the staRt/stOP button to start training. During exercise, the user selected preset values will count down. If no preset values were selected, the display values will count up. 'LOAD LEVEL can be adjusted at any time during the workout.
Below are the different Program Profiles that the user can select from. Choose a program that fits your current workout requirements.
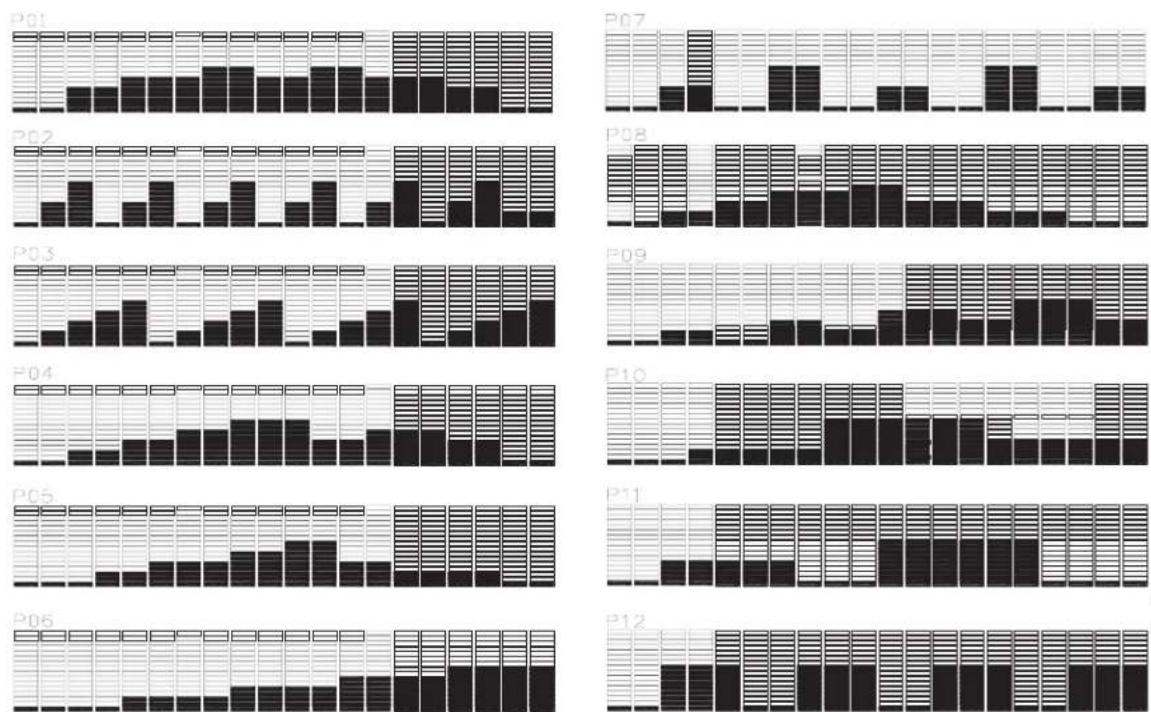
Program Profiles
cOnsOle OperatiOn
user MOde
To access User Mode, see the Training Mode Programs section. User Mode allows the user access to create a workout program to tailor fit their exercise requirements. The user can adjust up to 20 workout intervals within the program as well as set customized count-down workout goals.
When User Mode is selected, the display will flash the first of twenty customizable workout intervals within the program as well as flash the currently active 'Load Level'. 'Load Level' in each step is adjustable from 1 to 16 using the UP/DOWN buttons.
Press the MODE button to advance to the next workout interval to be set.
NOTE: The usEr MOdE workout level parameTers are sTored inTo The console's ram memory and remain sTored in memory after a 'Total reset' or after power To The sysTem has been lost.
Once the 20 workout levels have been set, press and hold the MODE button for 2 seconds to confirm the selection. Function values may be preset for TIME, DISTANCE, CALORIES, and PULSE by using the UP/DOWN buttons. After choosing the desired function value, press the MODE button to confirm the setting.
Press the staRt/stOP @button to start training. During exercise, the user selected preset values will count down. If no preset values were selected, the display values will count up. 'LOAD LEVEL can be adjusted at any time during the workout.
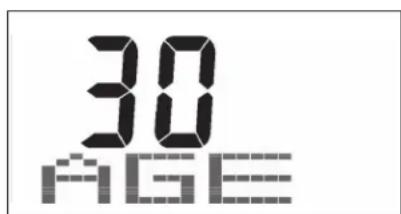
User's Age Display

cOnsOle OperatiOn
Use the UP/DOWN ▲ buttons to set age.
Once the age has been set, press the MODE button to confirm the selection. The display will calculate the preset Heart Rate value automatically according to the age setting entered. The display will show Heart Rate percentages of 55%, 75%, 90% and TARGET according to the user's weight. Target allows the user to input a custom heart rate goal. Select one of the options by pressing the UP/DOWN buttons.
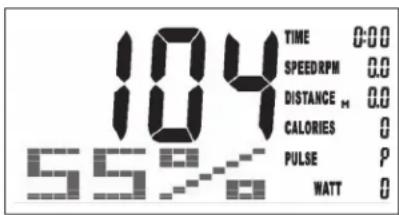
Target Heart Rate at 55% For A 30 Year Old User
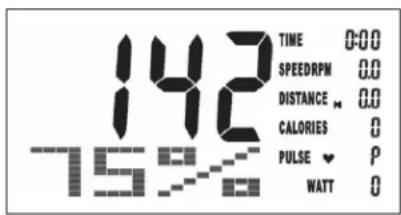
Target Heart Rate at 75% For A 30 Year Old User
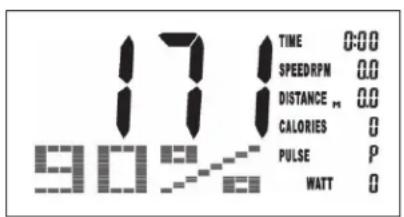
Target Heart Rate at 90% For A 30 Year Old User
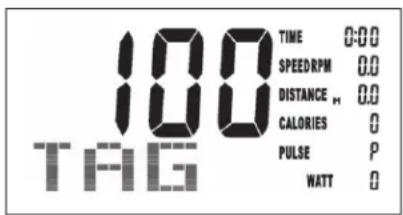
Target Heart Rate at 100% For A 30 Year Old User
Once the Heart Rate percentage or the TARGET feature has been set, press the MODE button to confirm the selection. If TARGET has been selected, set the target heart rate by using the UP/DOWN buttons then confirm the selection by pressing the MODE button. Function values may be preset for TIME, DISTANCE, and CALORIES by using the UP/DOWN buttons. After choosing the desired function value, press the MODE button to confirm the setting.
Press the staRt/stOP button to start training. During exercise, the user selected preset values will count down. If no preset values were selected, the display values will count up.
For more information, see the section 'Monitoring Your Heart Rate'.
cOnsOle OperatiOn
watt MOde
To access Watt Mode, see the Training Mode Programs section. Watt Mode allows the user to output a constant power during a workout. This means that if you pedal quickly, the resistance will decrease, if you pedal slowly the resistance will increase to maintain the Watt value entered.
When Watt Mode is selected, the preset value of 120 (watts) is flashing. Use the UP/DOWN ▶ buttons to set the target value from (10-350). Once the wattage target has been set, press the MODE button to confirm the selection.
After the desired wattage target has been confirmed, you may preset function values for TIME, DISTANCE, CALORIES, and PULSE by using the UP/DOWN ▲ buttons. After choosing the desired function value, press the MODE button to confirm the setting.
Press the staRt/stOP button to start training. During exercise, the user selected preset values will count down. If no preset values were selected, the display values will count up. Wattage can be adjusted at any time during the workout.
recOvery MOde
Recovery Mode compares the heart rates during the workout and during the Recovery Mode to give the user a simple and straightforward method to judge physical fitness. Exercise for at least 10 minutes while holding on to the heart rate contact grips for the entire workout. When ready to enter recovery mode, press the REcovERy button, then keep holding on to the heart rate contact grips. The REcovERy button can only be used at the end of an exercise. The console's TIME readout will measure the user's recovery heart rate for 60 seconds in a count down mode while the remaining display functions remain inactive. A readout with the recovery rate calculation will appear in the DisPLaY WiNDOW. After the count down, the console will provide a fitness rating of F1 to F6; F1 being the best. Press the REcovERy button again to return to the previous workout.
Recovery Mode Workout Rating
F1 = Excellent F4 = Below Average
F2 = Good F5 = Not Good
F3 = Fair F6 = Poor
cOnsOle OperatiOn
sleep MOde
If there is no signal input (you stop pedaling and do not press any buttons for four consecutive minutes, the backlit display will turn off. During Sleep Mode, the display will show the current room temperature, clock and calendar. All workout data is preserved in RAM memory.
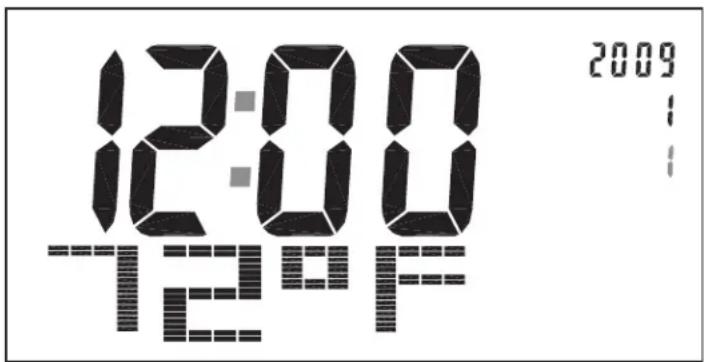
Sleep Mode Display
waKe up MOde
To bring the console into Wake Up Mode, press any button or begin pedaling to turn the display on. At this point you can restart your workout from where you left off, make changes to the current program or press RESET to choose a different program.
The Heart Rate or 'Pulse' in the console's DisPLaY WiNDOW works in conjunction with the heart rate sensors found on the handlebars. To read your pulse place both hands firmly on the heart rate sensors. For the most accurate reading, it is important to use both hands and to temporarily stop moving. Look at the PULSE section of the DisPLaY WiNDOW, when the reading is active, the small heart will begin to blink. The PULSE section of the DisPLaY WiNDOW will display 'P' if there isn't a pulse reading or there is poor contact with the pulse sensors. Your estimated heart rate will appear in the window approximately 6 seconds after you grasp the heart rate sensors. For additional information about the importance of working within certain heart rate ranges, see the section 'Monitoring Your Heart Rate'.
The heart rate information is only a reasonably accurate estimate and is not exact. Individuals with medical conditions and/or a specific need for accurate heart rate monitoring should not rely on the estimations provided. Bear in mind that any of the console's calculated values are only for reference and should only be used as a reference when using the equipment.
MONITORING YOUR HEART RATE
To obtain the greatest cardiovascular benefits from your exercise workout, it is important to work within your target heart rate zone. The American Heart Association (AHA) defines this target as 60% -75% percent of the Maximum Heart Rate. The Maximum Heart Rate may be roughly calculated by subtracting the user's age from 220.
The Maximum Heart Rate and aerobic capacity naturally decreases as the user ages. This may vary from one person to another, but use this number to find your approximate effective target zone. For example, the Maximum Heart Rate for an average 40 year-old is 180 bpm. The target heart rate zone is 60%-75% of 180 or 108-135 bpm. See the Fitness Safety section.
Before beginning a workout, check the normal resting heart rate. The user can place their fingers lightly against the neck or wrist over the main artery. After finding the pulse, count the number of beats in 10 seconds. Multiply the number of beats by six to determine your pulse rate per minute. It is recommend to take a heart rate measurement at rest, after warming up, during the workout and two minutes into cooling down after the workout, to accurately track progress as it relates to better fitness.
During your first several months of exercising, the AHA recommends aiming for the lower part of the target heart rate zone - 60%, then gradually progressing up to 75%. According to the AHA, exercising above 75% of the Maximum Heart Rate may be too strenuous unless the user is in top physical condition. Exercising below 60% of the maximum will result in minimal cardiovascular conditioning.
Check your pulse recovery rate
If your pulse is over 100 bpm five minutes after stopping exercising, or if it's higher than normal the morning after exercising, the user's exertion may have been too strenuous for their current fitness level. Rest and reduce the intensity next time.

MOnitOring yOur heart rate
fitness safety
The Heart Rate chart indicates average rate zones for different ages. A variety of different factors (including medication, emotional state, temperature and other conditions) can affect the target heart rate zone that is best for you. Your physician or health care professional can help you determine the exercise intensity that is appropriate for your age and condition.
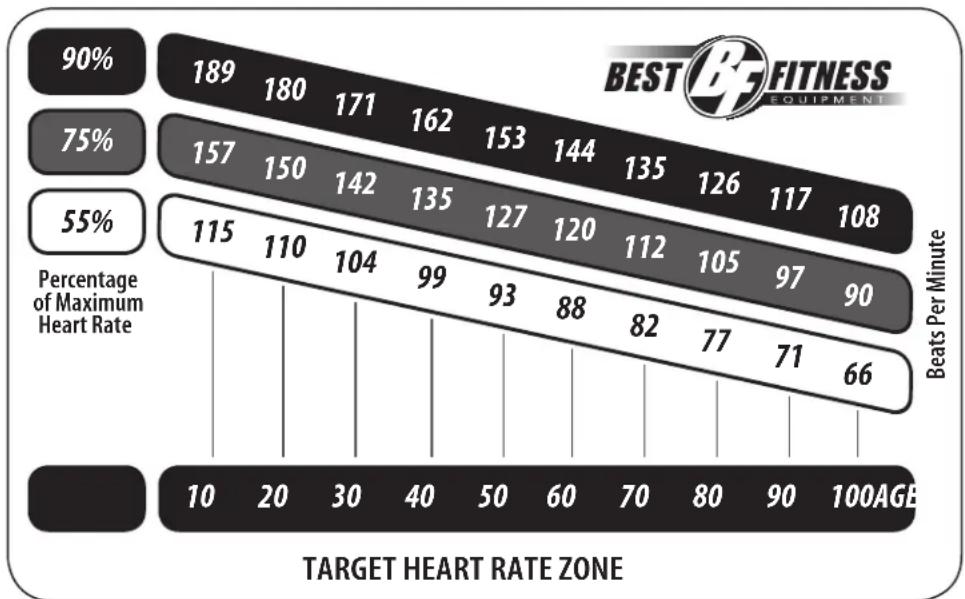
bar
| TARGET HEART RATE ZONE | Beats Per Minute (%) | |---|---| | 10 | 90 | | 20 | 75 | | 30 | 55 | | 40 | 115 | | 50 | 110 | | 60 | 104 | | 70 | 99 | | 80 | 93 | | 90 | 88 | | 100AGE | 82 | | 115 | 127 | | 120 | 120 | | 127 | 127 | | 135 | 144 | | 144 | 153 | | 157 | 157 | | 162 | 162 | | 171 | 171 | | 180 | 180 | | 189 | 189 |The calculations below will assist the user to calculate a specific target heart rate.
(MHR) = Maximum Heart Rate
(THR) = Target Heart Rate
220 - Age = Maximum Heart Rate (MHZ)
MHZ x .60 = 60% of your Maximum Heart Rate.
MHZ x .75 = 75% of your Maximum Heart Rate.
For example, if you are 30 years old, your calculations will be as follows:
220 - 30 = 190
190 x .60 = 114 (Low End or 60% of MHZ)
190 x .75 = 142 (High End or 75% of MHZ)
30 Year-Old (THR) Target Heart Rate would be 114-142
Maximum Heart Rate (MHR) Calculation
HARDWARE
(Actual Size Shown)

best fitness ^® e1 parts list
TBA
Part numbers are required when ordering parts.

eXplOded view diagramM

Serial Number is Located on the Frame
Model Name : BFE1
Purchase Date: ____
Serial Number: ____
1900 S. Des Plaines Ave.
Forest Park, Il 60130
1 (800) 556-3113
Hours: M-F 8:30 - 5:00 CST

FITNESS
EQUIPMENT
www.BestFitness.com
- BFE1
- Owner's Manual
- table Of cOntents
- intrOductiOn
- Congratulations!!
- iMpOrtant safety infOrMatiOn
- safety guidelines
- befOre yOu begin
- persOnal safety during asseMbly
- ASSEMBLY INSTRUCTIONS
- ASSEMBLY TIPS
- Do not fully tighten bolts until instructed to do so.
- Be careful to assemble all components in the sequence they are presented.
- STEP
- 3
- 4
- 5
- 6
- cOnsOle Overview
- MODE
- RESET
- START/STOP
- RECOVERY
- UP/DOWN
- TOTAL RESET
- Console Functions
- cOnsOle OperatiOn
- setting up the cOnsOle
- training MOde prOgraMs
- Manual MOde
- prOgraM MOde
- user MOde
- watt MOde
- recOvery MOde
- Recovery Mode Workout Rating
- sleep MOde
- waKe up MOde
- MONITORING YOUR HEART RATE
- Check your pulse recovery rate
- fitness safety
- HARDWARE
- best fitness ® e1 parts list
- eXplOded view diagramM
- Serial Number is Located on the Frame
Brand : Best Fitness
Model : BFE1
Category : Elliptical bike