
Enhanced Performance USB Keyboard - Keyboard LENOVO - Free user manual and instructions
Find the device manual for free Enhanced Performance USB Keyboard LENOVO in PDF.


| Product Type | Wired USB Keyboard |
| Brand | Lenovo |
| Model | Enhanced Performance USB Keyboard |
| Connectivity | USB 2.0 Type-A |
| Cable Length | 1.8 m (6 ft) |
| Keyboard Layout | Full-size with numeric keypad |
| Key Switch Type | Membrane |
| Dimensions (W x D x H) | 450 x 160 x 25 mm |
| Weight | 600 g |
| Power Source | USB bus-powered |
| Compatible OS | Windows, macOS, Linux |
| Main Functions | Typing, media keys, function keys |
| Special Keys | Multimedia shortcuts, volume control |
| LED Indicators | Caps Lock, Num Lock, Scroll Lock |
| Anti-ghosting | Yes, 2-key rollover |
| Care and Cleaning | Wipe with a soft, dry cloth; avoid liquids |
| Spare Parts Availability | Replacement keycaps available via Lenovo support |
| Repairability | Limited user-serviceable parts; contact support |
| Safety Compliance | CE, FCC, RoHS |
Frequently Asked Questions - Enhanced Performance USB Keyboard LENOVO
User questions about Enhanced Performance USB Keyboard LENOVO
0 question about this device. Answer the ones you know or ask your own.
Ask a new question about this device
Download the instructions for your Keyboard in PDF format for free! Find your manual Enhanced Performance USB Keyboard - LENOVO and take your electronic device back in hand. On this page are published all the documents necessary for the use of your device. Enhanced Performance USB Keyboard by LENOVO.
USER MANUAL Enhanced Performance USB Keyboard LENOVO
Lenovo Enhanced Performance USB Keyboard User Guide
i http://www.lenovo.com/safety
Note: Before installing the product, be sure to read the warranty information in Appendix B “Lenovo Limited Warranty” on page 19.
Fourth Edition (September 2014)
© Copyright Lenovo 2013, 2014.
LIMITED AND RESTRICTED RIGHTS NOTICE: If data or software is delivered pursuant a General Services Administration "GSA" contract, use, reproduction, or disclosure is subject to restrictions set forth in Contract No. GS-35F-05925.
Contents
Chapter 1. About the keyboard ..... 1
Product description. 1
Front view 1
Rear view. 4
Bottom view 5
System requirements 5
Chapter 2. Installing the keyboard . . . 7
Installing the device drivers. 7
Uninstalling the device driver . . . . . . . . . . 7
Installing the keyboard 9
Chapter 3. Using the keyboard . . . . 11
Enabling or disabling the hot keys ..... 11
Enabling or disabling the on-screen display . . . 11
Customizing the rapid access keys. ..... 11
Chapter 4. Troubleshooting ..... 13
Appendix A. Service and Support. . . 17
Online technical support. 17
Telephone technical support ..... 17
Appendix B. Lenovo Limited Warranty. 19
Part 1 - General Terms 19
Part 2 - Country-specific Terms ..... 21
Part 3 - Warranty Service Information. . . . . . 24
Appendix C. Electronic emission notices 27
Federal Communications Commission Declaration of Conformity 27
Appendix D. Notices....31
Recycling information . . . . . . . . . . . . 31
Recycling information for China ..... 31
Recycling information for Brazil ..... 31
Important WEEE information ..... 32
Export Classification Notice 32
Trademarks 32
Appendix E. Restriction of Hazardous Substances Directive (RoHS) ..... 33
European Union RoHS 33
China RoHS. 33
Turkish RoHS 33
Ukraine RoHS 33
India RoHS 33
Chapter 1. About the keyboard
This chapter provides product information and system requirements for the Lenovo® Enhanced Performance USB Keyboard (hereafter called the keyboard).
Product description
The keyboard helps keep you productive and comfortable with the designed hot key functionality. The hot key functionality enables one-touch control to lock your computer desktop, launch the Calculator program, play media files, and so on.
Your option package includes the following:
• Lenovo Enhanced Performance USB Keyboard
- Warranty poster
• Rapid access key labels
Front view
The following illustration shows the front view of the keyboard.
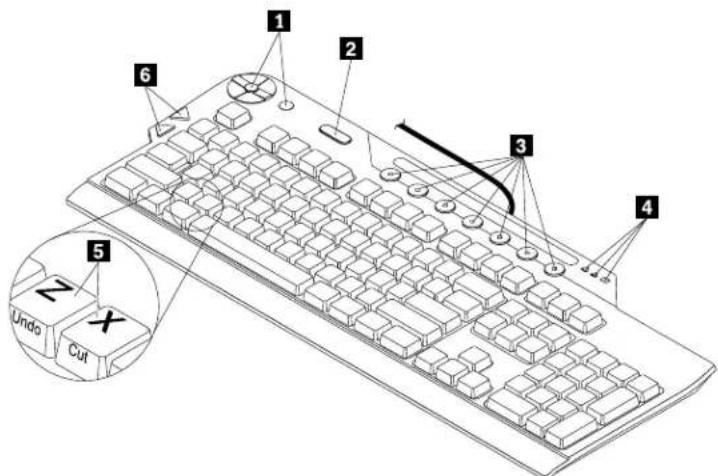
Figure 1. Front view of the keyboard
| 1 Media control center | 4 Status indicators |
| 2 ThinkVantage® button | 5 Shortcut keys |
| 3 Rapid access keys | 6 Internet navigation keys |
1 Media control center
The media control center enables you to launch media applications, control track selection, adjust the volume, and mute your computer speaker.
The media control center consists of eight keys. The following table introduces each key of the media control center.
| Icon | Key name | Function description |
| ♪ | Media launch key | Launch the default media player on your computer. |
| ■ | Stop key | Stop the playing media file. |
| ▶ | Play/pause key | Play or pause a media file. |
| - | Volume-down key | Decrease the volume of your computer speaker. |
| + | Volume-up key | Increase the volume of your computer speaker. |
| ◀ | Track backward key | Go back to the previous track. |
| ▶ | Track forward key | Go to the next track. |
| ◀ | Mute key | Mute the computer speaker. |
Notes:
- When you press one of the media control center keys, an on-screen display appears for a few seconds to verify your selection. For more information about the on-screen display, see “Enabling or disabling the on-screen display” on page 11.
- If you mute the computer speaker and then turn off your computer, the speaker will remain muted when you turn on your computer again. To turn on the speaker, press the mute key again or press the volume-up key or volume-down key.
2 ThinkVantage button
Depending on your operating system, you can do the following by pressing the ThinkVantage button:
- For the Microsoft® Windows® XP or Microsoft Windows Vista® operating systems, whenever you have a question about your computer or want to view Lenovo Web sites, press the ThinkVantage button to open the ThinkVantage Productivity Center or the Lenovo Care™ program for comprehensive help and information for your computer.
- For the Microsoft Windows 7 operating systems, press the ThinkVantage button to open the Lenovo SimpleTap, Lenovo Solution Center, or Lenovo ThinkVantage Toolbox program. The Lenovo SimpleTap program provides a quick way to customize the basic settings and personalized features of the computer. The Lenovo ThinkVantage Toolbox program is your one-stop diagnostic solution for quickly identifying and resolving system performance and security problems.
- For the Microsoft Windows 8 or Microsoft Windows 8.1 operating systems, press the ThinkVantage button to open the Lenovo Device Experience program.
Note: The ThinkVantage Productivity Center program, Lenovo Care program, or Lenovo ThinkVantage Toolbox program comes with your computer. If you do not have any of the programs installed on your computer, pressing the ThinkVantage button will open the Windows System Information window.
3 Rapid access keys
The rapid access keys are preprogrammed to launch commonly used applications, such as the Microsoft Word Document or Microsoft Excel Worksheet program. You can customize each of the seven multi-colored keys to use as a shortcut to a computer program, a file, or a Web site. For more information, see "Customizing the rapid access keys" on page 11.
4 Status indicators
The keyboard has the following three status indicators:

Numeric Lock indicator: when the Numeric Lock indicator is on, the numeric keypad on the keyboard is enabled. When the Numeric Lock indicator is off, the cursor control on the numeric keypad is enabled. Press the Num Lock key to switch back and forth between these two modes.

Caps Lock indicator: when the Caps Lock indicator is on, the Caps Lock mode is enabled. In this mode, you can type all alphabetic characters (A-Z) in upper case without pressing Shift. When the Caps Lock indicator is off, the Caps Lock mode is disabled. Press the Caps Lock key to enable or disable the Caps Lock mode.

Scroll Lock indicator: when the Scroll Lock indicator is on, the Scroll Lock mode is enabled. The arrow keys can be used as screen-scroll function keys and the cursor cannot be moved with the arrow keys. Not all application programs support this function. When the Scroll Lock indicator is off, the arrow keys can be used for cursor control, not as screen-scroll function keys. Press the Scroll Lock key to switch back and forth between these two modes.
5 Shortcut keys
The keyboard comes with Microsoft shortcut keys. On U.S. English keyboards, the shortcuts are labeled on the front face of the keys in green. On keyboards for other languages, the shortcuts are labeled on the front face of the keys in white.
To use the shortcut keys, hold the Ctrl key and then press a shortcut key. For example, on a U.S. English keyboard, press Ctrl+P for print function.
Notes:
- The shortcuts are only available for certain language layouts.
- Some software applications do not respond to the shortcut keys.
6 Internet navigation keys
The Internet navigation keys, located near the Tab key on the left side of the keyboard, are used with your Internet browser. They function like the forward and back arrows in the browser that move you forward and backward to pages you have viewed in the order that you opened them.
Rear view
The following illustration shows the rear view of the keyboard.
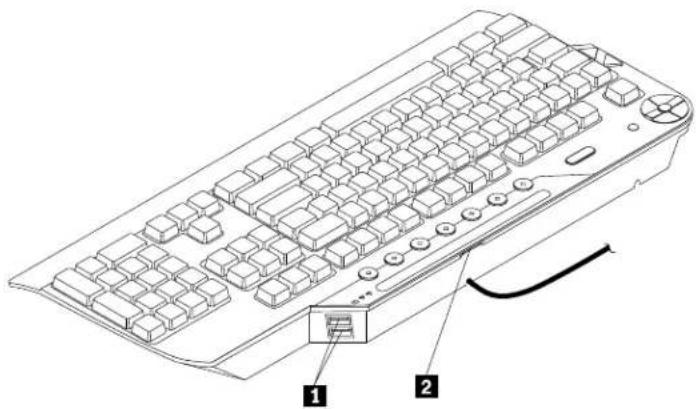
Figure 2. Rear view of the keyboard
1 USB connectors
The two Universal Serial Bus (USB) connectors are used for connecting USB-compatible devices, such as a mouse or printer. The USB connectors are intended to be used with USB 2.0 low-power, full-speed devices. High-speed devices, such as USB cameras, may exhibit slower performance when connected to these USB connectors.
2 Rapid access key label slot
You can create a new rapid access key label when you customize your rapid access keys. To do this, you need to remove the existing label from the rapid access key label slot. After you create and print the new rapid access key label, insert the new label into the slot.
Bottom view
The following illustration shows the bottom view of the keyboard.

Figure 3. Bottom view of the keyboard
1 Tilt feet
The keyboard has three tilt feet positions with which you can adjust the angle of the keyboard to provide maximum comfort. The three keyboard angles are as follows:
• 3.5 degrees: when none of the feet are raised, the keyboard is at a 3.5-degree angle.
- 6 degrees: when the small tilt feet are raised, the keyboard is at a 6-degree angle.
- 9 degrees: when the large tilt feet are raised, the keyboard is at a 9-degree angle.
2 Cable slot
The cable slot provides a convenient way to change the location where the cable leaves the keyboard. You can press the keyboard cable into the left or right slot to reduce the cable clutter and optimize desk space.
3 Palm rest connectors
The two palm rest connectors enable you to connect the palm rest to the keyboard. For instructions on how to connect the palm rest to the keyboard, see "Installing the keyboard" on page 9.
4 Non-skid feet
The non-skid feet are used to prevent the keyboard from unexpected movement.
System requirements
Before using the keyboard, make sure that your computer meets the following system requirements:
• One of the following operating systems installed
- Microsoft Windows XP (32-bit)
- Microsoft Windows Vista (32-bit or 64-bit)
-
Microsoft Windows 7 (32-bit or 64-bit)
-
Microsoft Windows 8
- Microsoft Windows 8.1
- An available USB connector
Chapter 2. Installing the keyboard
This chapter provides instructions on how to install the device driver, uninstall the device driver, and install the keyboard.
Note: Be sure to install the device driver before installing the keyboard. Otherwise, some functions of the keyboard cannot work.
Installing the device drivers
To install the device drivers, do the following:
- Go to http://www.lenovo.com/support/keyboards.
- Locate and click the link for your keyboard, and then locate and download the driver installation files.
- Double-click the installation file, and then follow the instructions on the screen to complete the installation.
Uninstalling the device driver
To uninstall the device driver for the keyboard from the Windows XP, Windows Vista, Windows 7, Windows 8, or Windows 8.1 operating system, do the following:
For the Windows XP operating system:
- Click Start → Control Panel or Start → Settings → Control Panel.
- Depending on your Control Panel mode, click or double-click Add or Remove Programs.
- Select the Lenovo Enhanced Performance USB Keyboard software and then click Remove.
- Follow the instructions on the screen to uninstall the device driver.
For the Windows Vista or Windows 7 operating system:
- Click Start → Control Panel or Start → Settings → Control Panel.
-
Depending on your Control Panel mode, do one of the following:
-
Click the Uninstall a program option under the Programs menu.
-
Click Programs and Features.
-
Select the Lenovo Enhanced Performance USB Keyboard software and then right-click your mouse. The Uninstall option is displayed.
-
Click Uninstall.
-
Follow the instructions on the screen to uninstall the device driver.
For the Windows 8 operating system:
-
Go to Control Panel by doing one of the following:
-
From the desktop, move the pointer to the top-right or bottom-right corner of the screen to display the charms, and then click Settings → Control Panel.
• From the Start screen, do the following:
a. Move the pointer to the top-right or bottom-right corner of the screen to display the charms.
b. Click Search.
c. On the Apps screen, scroll to the right side, and click Control Panel in the Windows System section.
-
Depending on your Control Panel mode, do one of the following:
-
Click the Uninstall a program option under the Programs menu.
-
Click Programs and Features.
-
Select the Lenovo Enhanced Performance USB Keyboard software and then right-click your mouse. The Uninstall option is displayed.
-
Click Uninstall.
-
Follow the instructions on the screen to uninstall the device driver.
For the Windows 8.1 operating system:
-
Go to Control Panel by doing one of the following:
-
From the desktop, move the pointer to the top-right or bottom-right corner of the screen to display the charms, and then click Settings → Control Panel.
• From the Start screen, do the following:
a. Click the arrow icon ⏻ in the bottom-left corner of the screen to go to the Apps screen.
b. Scroll to the right side, and click Control Panel in the Windows System section.
-
Depending on your Control Panel mode, do one of the following:
-
Click the Uninstall a program option under the Programs menu.
-
Click Programs and Features.
-
Select the Lenovo Enhanced Performance USB Keyboard software and then right-click your mouse. The Uninstall option is displayed.
-
Click Uninstall.
- Follow the instructions on the screen to uninstall the device driver.
Installing the keyboard
To install the keyboard, do the following:
-
Adjust the tilt feet to set the keyboard near your computer to your preference.
-
Connect the keyboard cable to an available USB connector on your computer. The keyboard will be ready for use after it is identified by the operating system.

natural_image
Diagram of a USB connector with internal pinout and external connector (no text or symbols)Figure 4. Connecting the keyboard cable to a USB connector
Note: Route the keyboard cable into the cable slot if necessary.
- Connect the palm rest to the keyboard if necessary.

natural_image
Line drawing of a computer keyboard with a black arrow pointing to the left side (no text or symbols present)Figure 5. Connecting the palm rest to the keyboard
Chapter 3. Using the keyboard
This chapter provides information about using the keyboard.
Enabling or disabling the hot keys
To enable or disable your desired hot keys, do the following:
- Double-click the USB Enhanced Performance Keyboard icon in the Windows desktop notification area. The keyboard configuration wizard is displayed.
- Click Next until you reach the page for your desired hot keys.
- Select the corresponding radio button to enable or disable the hot keys.
- Click Next until you reach the Summary page.
- On the Summary page, click Finish to save your settings.
Enabling or disabling the on-screen display
By default, when you press one of the media control center keys or rapid access keys, an on-screen display appears for a few seconds to verify your selection. You can enable or disable the on-screen display to your needs.
To enable or disable the on-screen display, do the following:
- Double-click the USB Enhanced Performance Keyboard icon in the Windows desktop notification area. The keyboard configuration wizard is displayed.
- Click Next until you reach the On-Screen Displays page.
- Select Enable the on-screen display or Disable the on-screen display.
Note: After you select Enable the on-screen display, you can configure the font, size, and color of the on-screen display text by following the instructions on the screen.
-
Click Next.
-
Click Finish to save your settings.
Customizing the rapid access keys
The rapid access keys are preprogrammed to launch commonly used applications. You can customize each of the seven rapid access keys to use as a shortcut to a computer program, a file, or a Web site.
To customize the rapid access keys, do the following:
Note: Before you customize the rapid access keys, ensure that the rapid access keys are enabled.
- Double-click the USB Enhanced Performance Keyboard icon in the Windows desktop notification area. The keyboard configuration wizard is displayed.
- Click Next until you reach the Customize Keys page.
- Select the rapid access key that you want to customize.
Note: If a program has already been assigned to a rapid access key, the program name appears above that key on the screen. If no program is assigned to a rapid access key, the label area above the key will be blank.
- Select one of the following options, and then select the program, file, or Web page which you want to assign to the rapid access key from the list box.
• Programs available to all users
• Programs available to current user
- Open a file
• View a web page
Notes:
- For a Web page, you also can type the Internet address into the Or Enter Internet address field, and then verify if the Internet address is correct by clicking Test. An Internet or intranet connection is required to use the test function.
- You can edit the name of the selected program, file, or Web page address displaying in the label name field. Then, click Apply to save the setting. The rapid access key that you selected is successfully reprogrammed and the new name appears in the label area above the rapid access key.
-
To customize another rapid access key, repeat the above steps.
-
When you have finished the customization, click Next. The Print Label page is displayed.
- Click Print a new RapidAccess Key label.
- Click Next to print your new rapid access key label. Follow the instructions on the screen to complete the printing.
- Click Next until you reach the Summary page.
- On the Summary page, click Finish to save your settings.
Chapter 4. Troubleshooting
This chapter provides some troubleshooting hints and tips to assist you if you experience any problems with the keyboard. Check the following items first to try to solve the problem.
Problem: When I customize the rapid access keys, I cannot find my desired program or file.
Solution: To solve the problem, do the following:
- Ensure that you select Programs available to all users or Programs available to current user in the Customize Keys page. After you select this option, you can see a list of folders and programs is displayed. You might need to open one or more folders to view a program.
- If you still do not see the desired program, select Open a file in the Customize Keys page. When you select this option, a list of all the drives, the folders, and the files on your system is displayed.
Problem: The ThinkVantage button does not work correctly.
Solution: Ensure that one of the following programs is installed on your computer, or the Windows system information window will be displayed when you press the ThinkVantage button:
- Lenovo Care
- Lenovo Device Experience
- Lenovo SimpleTap
- Lenovo Solution Center
- Lenovo ThinkVantage Toolbox
• ThinkVantage Productivity Center
Problem: The media launch key, volume down key, volume up key, or mute key does not work.
Solution: The media launch key, volume down key, volume up key, or mute key on the keyboard works only with computers that have audio software and a sound card installed.
If you have audio software that does not come from Microsoft or if you installed your own audio software, the audio software program might not be compatible with the keyboard. Close your audio software and press the media launch key again. Pressing the media launch key automatically opens the Windows CD Player or the Windows DVD software. If the media launch key does work with the Windows CD Player or DVD software but not with your audio software, your audio software is not compatible with the keyboard.
If you do not have a sound card or if the sound card is not detected, you will receive an error message indicating that there is a problem with the sound card. For more information on your sound card, see the documentation that comes with your computer or sound card.
Problem: The rapid access keys do not work.
Solution: Ensure that the rapid access keys are enabled. See “Enabling or disabling the hot keys” on page 11 for more information.
Problem: My computer game locks up or is interrupted when I use the rapid access keys.
Solution: The on-screen display for the rapid access keys might interfere with some computer games. If your computer games are not functioning correctly when you use the rapid access keys, disable the on-screen display. For instructions to disable the on-screen display, see “Enabling or disabling the on-screen display” on page 11.
Problem: I press a key once, but the computer responds as if I pressed the key twice.
Solution: You might need to change your keyboard repeat delay or repeat rate settings.
To change the repeat delay or repeat rate settings, do the following:
For the Windows XP operating system:
- Depending on your Start menu mode, click Start → Control Panel or Start → Settings → Control Panel.
-
Depending on your Control Panel mode, do one of the following:
-
Double-click Keyboard.
-
Click Printers and Other Hardware → Keyboard.
-
On the Speed tab, move the Repeat delay slider left to increase the repeat delay time or move the Repeat rate slider left to set a slower repeat rate.
- Click OK to save the settings.
For the Windows Vista or Windows 7 operating system:
- Depending on your Start menu mode, click Start → Control Panel or Start → Settings → Control Panel.
-
Depending on your Control Panel mode, do one of the following:
-
Click Keyboard.
-
Click Hardware and Sound → Devices and Printers. Then, right-click the keyboard icon and select Keyboard settings.
-
On the Speed tab, move the Repeat delay slider left to increase the repeat delay time or move the Repeat rate slider left to set a slower repeat rate.
- Click OK to save the settings.
For the Windows 8 operating system:
-
Go to Control Panel by doing one of the following:
-
From the desktop, move the pointer to the top-right or bottom-right corner of the screen to display the charms, and then click Settings → Control Panel.
• From the Start screen, do the following:
a. Move the pointer to the top-right or bottom-right corner of the screen to display the charms.
b. Click Search.
c. On the Apps screen, scroll to the right side, and click Control Panel in the Windows System section.
-
Depending on your Control Panel mode, do one of the following:
-
Click Keyboard.
-
Click Hardware and Sound → Devices and Printers. Then, right-click the keyboard icon and select Keyboard settings.
-
On the Speed tab, move the Repeat delay slider left to increase the repeat delay time or move the Repeat rate slider left to set a slower repeat rate.
-
Click OK to save the settings.
For the Windows 8.1 operating system:
-
Go to Control Panel by doing one of the following:
-
From the desktop, move the pointer to the top-right or bottom-right corner of the screen to display the charms, and then click Settings → Control Panel.
• From the Start screen, do the following:
a. Click the arrow icon ⏻ in the bottom-left corner of the screen to go to the Apps screen.
b. Scroll to the right side, and click Control Panel in the Windows System section.
-
Depending on your Control Panel mode, do one of the following:
-
Click Keyboard.
-
Click Hardware and Sound → Devices and Printers. Then, right-click the keyboard icon and select Keyboard settings.
-
On the Speed tab, move the Repeat delay slider left to increase the repeat delay time or move the Repeat rate slider left to set a slower repeat rate.
-
Click OK to save the settings.
Problem: The USB performance is slow.
Solution: Do not activate resource-intensive devices at the same time because USB limitations might cause a degradation in the performance and speed of the devices. The keyboard is intended for use with full-speed USB devices. High-speed devices, such as USB scanners or USB cameras cannot operate at their optimum performance level.
Problem: A device does not operate after I connect it to one of the USB connectors.
Solution: Ensure that you connect one device to a USB connector once. If a device does not work, connect it to the other USB connector to determine if there is a problem with a USB connector. The two USB connectors are low-power connectors. High-power devices or other USB devices cannot be connected with these USB connectors.
Problem: I have a problem not listed in this chapter.
Solution: For all other problems with your keyboard, try to uninstall and then install the device driver again. For instructions on how to uninstall and install the device driver, see “Uninstalling the device driver” on page 7 and “Installing the device drivers” on page 7.
Appendix A. Service and Support
The following information describes the technical support that is available for your product, during the warranty period or throughout the life of your product. Refer to the Lenovo Limited Warranty for a full explanation of Lenovo warranty terms.
Online technical support
Online technical support is available during the lifetime of a product at: http://www.lenovo.com/support
Product replacement assistance or exchange of defective components also is available during the warranty period. In addition, if your option is installed in a Lenovo computer, you might be entitled to service at your location. A Lenovo technical support representative can help you determine the best alternative.
Telephone technical support
Installation and configuration support through the Customer Support Center will be available until 90 days after the option has been withdrawn from marketing. After that time, the support is canceled, or made available for a fee, at Lenovo's discretion. Additional support is also available for a nominal fee.
Before contacting a Lenovo technical support representative, please have the following information available: option name and number, proof of purchase, computer manufacturer, model, serial number and manual, the exact wording of any error message, description of the problem, and the hardware and software configuration information for your system.
Your technical support representative might want to walk you through the problem while you are at your computer during the call.
Telephone numbers are subject to change without notice. The most up-to-date telephone list for Lenovo Support is always available at http://www.lenovo.com/support/phone. If the telephone number for your country or region is not listed, contact your Lenovo reseller or Lenovo marketing representative.
Appendix B. Lenovo Limited Warranty
L505-0010-02 08/2011
This Lenovo Limited Warranty consists of the following parts:
Part 1 - General Terms
Part 2 - Country-specific Terms
Part 3 - Warranty Service Information
The terms of Part 2 replace or modify terms of Part 1 as specified for a particular country.
Part 1 - General Terms
This Lenovo Limited Warranty applies only to Lenovo hardware products you purchased for your own use and not for resale. This Lenovo Limited Warranty is available in other languages at www.lenovo.com/warranty.
What this Warranty Covers
Lenovo warrants that each Lenovo hardware product that you purchase is free from defects in materials and workmanship under normal use during the warranty period. The warranty period for the product starts on the original date of purchase as shown on your sales receipt or invoice or as may be otherwise specified by Lenovo. The warranty period and type of warranty service that apply to your product are as specified in "Part 3 - Warranty Service Information" below. This warranty only applies to products in the country or region of purchase.
THIS WARRANTY IS YOUR EXCLUSIVE WARRANTY AND REPLACES ALL OTHER WARRANTIES OR CONDITIONS, EXPRESS OR IMPLIED, INCLUDING, BUT NOT LIMITED TO, ANY IMPLIED WARRANTIES OR CONDITIONS OF MERCHANTABILITY OR FITNESS FOR A PARTICULAR PURPOSE. AS SOME STATES OR JURISDICTIONS DO NOT ALLOW THE EXCLUSION OF EXPRESS OR IMPLIED WARRANTIES, THE ABOVE EXCLUSION MAY NOT APPLY TO YOU. IN THAT EVENT, SUCH WARRANTIES APPLY ONLY TO THE EXTENT AND FOR SUCH DURATION AS REQUIRED BY LAW AND ARE LIMITED IN DURATION TO THE WARRANTY PERIOD. AS SOME STATES OR JURISDICTIONS DO NOT ALLOW LIMITATIONS ON THE DURATION OF AN IMPLIED WARRANTY, THE ABOVE LIMITATION ON DURATION MAY NOT APPLY TO YOU.
How to Obtain Warranty Service
If the product does not function as warranted during the warranty period, you may obtain warranty service by contacting Lenovo or a Lenovo approved Service Provider. A list of approved Service Providers and their telephone numbers is available at: www.lenovo.com/support/phone.
Warranty service may not be available in all locations and may differ from location to location. Charges may apply outside a Service Provider's normal service area. Contact a local Service Provider for information specific to your location.
Customer Responsibilities for Warranty Service
Before warranty service is provided, you must take the following steps:
- follow the service request procedures specified by the Service Provider;
- backup or secure all programs and data contained in the product;
• provide the Service Provider with all system keys or passwords;
• provide the Service Provider with sufficient, free, and safe access to your facilities to perform service; - remove all data, including confidential information, proprietary information and personal information, from the product or, if you are unable to remove any such information, modify the information to prevent its access by another party or so that it is not personal data under applicable law. The Service Provider shall not be responsible for the loss or disclosure of any data, including confidential information, proprietary information, or personal information, on a product returned or accessed for warranty service;
- remove all features, parts, options, alterations, and attachments not covered by the warranty;
- ensure that the product or part is free of any legal restrictions that prevent its replacement;
- if you are not the owner of a product or part, obtain authorization from the owner for the Service Provider to provide warranty service.
What Your Service Provider Will Do to Correct Problems
When you contact a Service Provider, you must follow the specified problem determination and resolution procedures.
The Service Provider will attempt to diagnose and resolve your problem by telephone, e-mail or remote assistance. The Service Provider may direct you to download and install designated software updates.
Some problems may be resolved with a replacement part that you install yourself called a "Customer Replaceable Unit" or "CRU." If so, the Service Provider will ship the CRU to you for you to install.
If your problem cannot be resolved over the telephone; through the application of software updates or the installation of a CRU, the Service Provider will arrange for service under the type of warranty service designated for the product under "Part 3 - Warranty Service Information" below.
If the Service Provider determines that it is unable to repair your product, the Service Provider will replace it with one that is at least functionally equivalent.
If the Service Provider determines that it is unable to either repair or replace your product, your sole remedy under this Limited Warranty is to return the product to your place of purchase or to Lenovo for a refund of your purchase price.
Replacement Products and Parts
When warranty service involves the replacement of a product or part, the replaced product or part becomes Lenovo's property and the replacement product or part becomes your property. Only unaltered Lenovo products and parts are eligible for replacement. The replacement product or part provided by Lenovo may not be new, but it will be in good working order and at least functionally equivalent to the original product or part. The replacement product or part shall be warranted for the balance of the period remaining on the original product.
Use of Personal Contact Information
If you obtain service under this warranty, you authorize Lenovo to store, use and process information about your warranty service and your contact information, including name, phone numbers, address, and e-mail address. Lenovo may use this information to perform service under this warranty. We may contact you to inquire about your satisfaction with our warranty service or to notify you about any product recalls or safety issues. In accomplishing these purposes, you authorize Lenovo to transfer your information to any country where we do business and to provide it to entities acting on our behalf. We may also disclose it where required by law. Lenovo's privacy policy is available at www.lenovo.com/.
What this Warranty Does not Cover
This warranty does not cover the following:
- uninterrupted or error-free operation of a product;
- loss of, or damage to, your data by a product;
- any software programs, whether provided with the product or installed subsequently;
- failure or damage resulting from misuse, abuse, accident, modification, unsuitable physical or operating environment, natural disasters, power surges, improper maintenance, or use not in accordance with product information materials;
- damage caused by a non-authorized service provider;
- failure of, or damage caused by, any third party products, including those that Lenovo may provide or integrate into the Lenovo product at your request;
- any technical or other support, such as assistance with “how-to” questions and those regarding product set-up and installation;
- products or parts with an altered identification label or from which the identification label has been removed.
Limitation of Liability
Lenovo is responsible for loss or damage to your product only while it is in the Service Provider's possession or in transit, if the Service Provider is responsible for the transportation.
Neither Lenovo nor the Service Provider is responsible for loss or disclosure of any data, including confidential information, proprietary information, or personal information, contained in a product.
UNDER NO CIRCUMSTANCES, AND NOTWITHSTANDING THE FAILURE OF ESSENTIAL PURPOSE OF ANY REMEDY SET FORTH HEREIN, SHALL LENOVO, ITS AFFILIATES, SUPPLIERS, RESELLERS, OR SERVICE PROVIDERS BE LIABLE FOR ANY OF THE FOLLOWING EVEN IF INFORMED OF THEIR POSSIBILITY AND REGARDLESS OF WHETHER THE CLAIM IS BASED IN CONTRACT, WARRANTY, NEGLIGENCE, STRICT LIABILITY OR OTHER THEORY OF LIABILITY: 1) THIRD PARTY CLAIMS AGAINST YOU FOR DAMAGES; 2) LOSS, DAMAGE OR DISCLOSURE OF YOUR DATA; 3) SPECIAL, INCIDENTAL, PUNITIVE, INDIRECT OR CONSEQUENTIAL DAMAGES, INCLUDING BUT NOT LIMITED TO LOST PROFITS, BUSINESS REVENUE, GOODWILL OR ANTICIPATED SAVINGS. IN NO CASE SHALL THE TOTAL LIABILITY OF LENOVO, ITS AFFILIATESS, SUPPLIERS, RESELLERS OR SERVICE PROVIDERS FOR DAMAGES FROM ANY CAUSE EXCEED THE AMOUNT OF ACTUAL DIRECT DAMAGES, NOT TO EXCEED THE AMOUNT PAID FOR THE PRODUCT.
THE FOREGOING LIMITATIONS DO NOT APPLY TO DAMAGES FOR BODILY INJURY (INCLUDING DEATH), DAMAGE TO REAL PROPERTY OR DAMAGE TO TANGIBLE PERSONAL PROPERTY FOR WHICH LENOVO IS LIABLE UNDER LAW. AS SOME STATES OR JURISDICTIONS DO NOT ALLOW THE EXCLUSION OR LIMITATION OF INCIDENTAL OR CONSEQUENTIAL DAMAGES, THE ABOVE LIMITATION OR EXCLUSION MAY NOT APPLY TO YOU.
Your Other Rights
THIS WARRANTY GIVES YOU SPECIFIC LEGAL RIGHTS. YOU MAY HAVE OTHER RIGHTS ACCORDING TO THE APPLICABLE LAWS OF YOUR STATE OR JURISDICTION. YOU MAY ALSO HAVE OTHER RIGHTS UNDER A WRITTEN AGREEMENT WITH LENOVO. NOTHING IN THIS WARRANTY AFFECTS STATUTORY RIGHTS, INCLUDING RIGHTS OF CONSUMERS UNDER LAWS OR REGULATIONS GOVERNING THE SALE OF CONSUMER GOODS THAT CANNOT BE WAIVED OR LIMITED BY CONTRACT.
Part 2 - Country-specific Terms
Australia
“Lenovo” means Lenovo (Australia & New Zealand) Pty Limited ABN 70 112 394 411. Address: Level 10, North Tower, 1-5 Railway Street, Chatswood, NSW, 2067. Telephone: +61 2 8003 8200. Email: lensyd_au@lenovo.com
The following replaces the same section in Part 1:
What this Warranty Covers:
Lenovo warrants that each hardware product that you purchase is free from defects in materials and workmanship under normal use and conditions during the warranty period. If the product fails due to a covered defect during the warranty period, Lenovo will provide you a remedy under this Limited Warranty. The warranty period for the product starts on the original date of purchase specified on your sales receipt or invoice unless Lenovo informs you otherwise in writing. The warranty period and type of warranty service that apply to your product are set forth below in Part 3 - Warranty Service Information.
THE BENEFITS GIVEN BY THIS WARRANTY ARE IN ADDITION TO YOUR RIGHTS AND REMEDIES AT LAW, INCLUDING THOSE UNDER THE AUSTRALIAN CONSUMER LAW.
The following replaces the same section in Part 1:
Replacement Products and Parts:
When warranty service involves the replacement of a product or part, the replaced product or part becomes Lenovo's property and the replacement product or part becomes your property. Only unaltered Lenovo products and parts are eligible for replacement. The replacement product or part provided by Lenovo may not be new, but it will be in good working order and at least functionally equivalent to the original product or part. The replacement product or part shall be warranted for the balance of the period remaining on the original product. Products and parts presented for repair may be replaced by refurbished products or parts of the same type rather than being repaired. Refurbished parts may be used to repair the product; and repair of the product may result in loss of data, if the product is capable of retaining user-generated data.
The following is added to the same section in Part 1:
Use of Personal Contact Information:
Lenovo will not be able to perform our service under this warranty if you refuse to provide your information or do not wish us to transfer your information to our agent or contractor. You have the right to access your personal contact information and request correction of any errors in it pursuant to the Privacy Act 1988 by contacting Lenovo.
The following replaces the same section in Part 1:
Limitation of Liability:
Lenovo is responsible for loss or damage to your product only while it is in the Service Provider's possession or in transit, if the Service Provider is responsible for the transportation.
Neither Lenovo nor the Service Provider is responsible for loss or disclosure of any data, including confidential information, proprietary information, or personal information, contained in a product.
TO THE EXTENT PERMITTED BY LAW, UNDER NO CIRCUMSTANCES AND NOTWITHSTANDING THE FAILURE OF ESSENTIAL PURPOSE OF ANY REMEDY SET FORTH HEREIN, SHALL LENOVO, ITS AFFILIATES, SUPPLIERS, RESELLERS, OR SERVICE PROVIDERS BE LIABLE FOR ANY OF THE FOLLOWING EVEN IF INFORMED OF THEIR POSSIBILITY AND REGARDLESS OF WHETHER THE CLAIM IS BASED IN CONTRACT, WARRANTY, NEGLIGENCE, STRICT LIABILITY OR OTHER THEORY
OF LIABILITY: 1) THIRD PARTY CLAIMS AGAINST YOU FOR DAMAGES; 2) LOSS, DAMAGE OR DISCLOSURE OF YOUR DATA; 3) SPECIAL, INCIDENTAL, PUNITIVE, INDIRECT OR CONSEQUENTIAL DAMAGES, INCLUDING BUT NOT LIMITED TO LOST PROFITS, BUSINESS REVENUE, GOODWILL OR ANTICIPATED SAVINGS. IN NO CASE SHALL THE TOTAL LIABILITY OF LENOVO, ITS AFFILIATESS, SUPPLIERS, RESELLERS OR SERVICE PROVIDERS FOR DAMAGES FROM ANY CAUSE EXCEED THE AMOUNT OF ACTUAL DIRECT DAMAGES, NOT TO EXCEED THE AMOUNT PAID FOR THE PRODUCT.
THE FOREGOING LIMITATIONS DO NOT APPLY TO DAMAGES FOR BODILY INJURY (INCLUDING DEATH), DAMAGE TO REAL PROPERTY OR DAMAGE TO TANGIBLE PERSONAL PROPERTY FOR WHICH LENOVO IS LIABLE UNDER LAW.
The following replaces the same section in Part 1:
Your Other Rights:
THIS WARRANTY GIVES YOU SPECIFIC LEGAL RIGHTS. YOU ALSO HAVE OTHER RIGHTS AT LAW, INCLUDING UNDER THE AUSTRALIAN CONSUMER LAW. NOTHING IN THIS WARRANTY AFFECTS STATUTORY RIGHTS OR RIGHTS AT LAW, INCLUDING RIGHTS THAT CANNOT BE WAIVED OR LIMITED BY CONTRACT.
For example, our products come with guarantees that cannot be excluded under the Australian Consumer Law. You are entitled to a replacement or refund for a major failure and compensation for any other reasonably foreseeable loss or damage. You are also entitled to have the products repaired or replaced if the products fail to be of acceptable quality and the failure does not amount to a major failure.
New Zealand
The following is added to the same section in Part 1:
Use of Personal Information:
Lenovo will not be able to perform our service under this warranty if you refuse to provide your information or do not wish us to transfer your information to our agent or contractor. You have the right to access your personal information and request correction of any errors in it pursuant to the Privacy Act 1993 by contacting Lenovo (Australia & New Zealand) Pty Limited ABN 70 112 394 411. Address: Level 10, North Tower, 1-5 Railway Street, Chatswood, NSW, 2067. Telephone: 61 2 8003 8200. Email: lensyd_au@lenovo.com
Bangladesh, Cambodia, India, Indonesia, Nepal, Philippines, Vietnam and Sri Lanka
The following is added to Part 1:
Dispute Resolution
Disputes arising out of or in connection with this warranty shall be finally settled by arbitration held in Singapore. This warranty shall be governed, construed and enforced in accordance with the laws of Singapore, without regard to conflict of laws. If you acquired the product in India, disputes arising out of or in connection with this warranty shall be finally settled by arbitration held in Bangalore, India. Arbitration in Singapore shall be held in accordance with the Arbitration Rules of Singapore International Arbitration Center (“SIAC Rules”) then in effect. Arbitration in India shall be held in accordance with the laws of India then in effect. The arbitration award shall be final and binding on the parties without appeal. Any award shall be in writing and set forth the findings of fact and the conclusions of law. All arbitration proceedings, including all documents presented in such proceedings shall be conducted in the English language. The English language version of this warranty prevails over any other language version in such proceedings.
European Economic Area (EEA)
The following is added to Part 1:
Customers in the EEA may contact Lenovo at the following address: EMEA Service Organisation, Lenovo (International) B.V., Floor 2, Einsteinova 21, 851 01, Bratislava, Slovakia. Service under this warranty for Lenovo hardware products purchased in EEA countries may be obtained in any EEA country in which the product has been announced and made available by Lenovo.
Russia
The following is added to Part 1:
Product Service Life
The product service life is four (4) years from the original date of purchase.
Part 3 - Warranty Service Information
| Product Type | Country or Region of Purchase | Warranty Period | Type of Warranty Service |
| Lenovo Enhanced Performance USB Keyboard | Europe, the Middle East, Africa, the United States, and Canada | 3 years | 1, 4 |
| Lenovo Enhanced Performance USB Keyboard | Others | 1 year | 1, 4 |
If required, your Service Provider will provide repair or exchange service depending on the type of warranty service specified for your product and the available service. Scheduling of service will depend upon the time of your call, parts availability, and other factors.
Types of Warranty Service
1. Customer Replaceable Unit ("CRU") Service
Under CRU Service, the Service Provider will ship CRUs to you at its cost for installation by you. CRU information and replacement instructions are shipped with your product and are available from Lenovo at any time upon request. CRUs that are easily installed by you are called "Self-service CRUs". "Optional-service CRUs" are CRUs that may require some technical skill and tools. Installation of Self-service CRUs is your responsibility. You may request that a Service Provider install Optional-service CRUs under one of the other types of warranty service designated for your product. An optional service offering may be available for purchase from a Service Provider or Lenovo under which Self-service CRUs would be installed for you. You may find a list of CRUs and their designation in the publication that was shipped with your product or at www.lenovo.com/CRUs. The requirement to return a defective CRU, if any, will be specified in the instructions shipped with a replacement CRU. When return is required: 1) return instructions, a prepaid return shipping label, and a container will be included with the replacement CRU; and 2) you may be charged for the replacement CRU if the Service Provider does not receive the defective CRU from you within thirty (30) days of your receipt of the replacement CRU.
2. On-site Service
Under On-Site Service, a Service Provider will either repair or exchange the product at your location. You must provide a suitable working area to allow disassembly and reassembly of the product. Some repairs
may need to be completed at a service center. If so, the Service Provider will send the product to the service center at its expense.
3. Courier or Depot Service
Under Courier or Depot Service, your product will be repaired or exchanged at a designated service center, with shipping at the expense of the Service Provider. You are responsible for disconnecting the product and packing it in a shipping container provided to you to return your product to a designated service center. A courier will pick up your product and deliver it to the designated service center. The service center will return the product to you at its expense.
4. Customer Carry-In Service
Under Customer Carry-In Service, your product will be repaired or exchanged after you deliver it to a designated service center at your risk and expense. After the product has been repaired or exchanged, it will be made available to you for collection. If you fail to collect the product, the Service Provider may dispose of the product as it sees fit, with no liability to you.
5. Mail-In Service
Under Mail-In Service, your product will be repaired or exchanged at a designated service center after you deliver it at your risk and expense. After the product has been repaired or exchanged, it will be returned to you at Lenovo's risk and expense, unless the Service Provider specifies otherwise.
6. Customer Two-Way Mail-In Service
Under Customer Two-Way Mail-In Service, your product will be repaired or exchanged after you deliver it to a designated service center at your risk and expense. After the product has been repaired or exchanged, it will be made available to you for return shipping at your risk and expense. If you fail to arrange return shipment, the Service Provider may dispose of the product as it sees fit, with no liability to you.
7. Product Exchange Service
Under Product Exchange Service, Lenovo will ship a replacement product to your location. You are responsible for its installation and verification of its operation. The replacement product becomes your property in exchange for the failed product, which becomes the property of Lenovo. You must pack the failed product in the shipping carton in which you received the replacement product and return it to Lenovo. Transportation charges, both ways, shall be at Lenovo's expense. If you fail to use the carton in which the replacement product was received, you may be responsible for any damage to the failed product occurring during shipment. You may be charged for the replacement product if Lenovo does not receive the failed product within thirty (30) days of your receipt of the replacement product.
Appendix C. Electronic emission notices
The following information refers to the Lenovo Enhanced Performance USB Keyboard.
Federal Communications Commission Declaration of Conformity
Lenovo Enhanced Performance USB Keyboard - 73P2620
This equipment has been tested and found to comply with the limits for a Class B digital device, pursuant to Part 15 of the FCC Rules. These limits are designed to provide reasonable protection against harmful interference in a residential installation. This equipment generates, uses, and can radiate radio frequency energy and, if not installed and used in accordance with the instructions, may cause harmful interference to radio communications. However, there is no guarantee that interference will not occur in a particular installation. If this equipment does cause harmful interference to radio or television reception, which can be determined by turning the equipment off and on, the user is encouraged to try to correct the interference by one or more of the following measures:
- Reorient or relocate the receiving antenna.
- Increase the separation between the equipment and receiver.
- Connect the equipment into an outlet on a circuit different from that to which the receiver is connected.
- Consult an authorized dealer or service representative for help.
Lenovo is not responsible for any radio or television interference caused by using other than specified or recommended cables and connectors or by unauthorized changes or modifications to this equipment. Unauthorized changes or modifications could void the user's authority to operate the equipment.
This device complies with Part 15 of the FCC Rules. Operation is subject to the following two conditions: (1) this device may not cause harmful interference, and (2) this device must accept any interference received, including interference that may cause undesired operation.
Responsible Party:
Lenovo (United States) Incorporated
1009 Think Place - Building One
Morrisville, NC 27560
Phone Number: 919-294-5900

Industry Canada Compliance Statement
CAN ICES-3(B)/NMB-3(B)
European Union - Compliance to the Electromagnetic Compatibility Directive
This product is in conformity with the protection requirements of EU Council Directive 2004/108/EC on the approximation of the laws of the Member States relating to electromagnetic compatibility. Lenovo cannot accept responsibility for any failure to satisfy the protection requirements resulting from a non-recommended modification of the product, including the installation of option cards from other manufacturers.
This product has been tested and found to comply with the limits for Class B Information Technology Equipment according to European Standard EN 55022. The limits for Class B equipment were derived
for typical residential environments to provide reasonable protection against interference with licensed communication devices.
Lenovo, Einsteinova 21, 851 01 Bratislava, Slovakia
CE
German Class B compliance statement
Korea Class B compliance statement
B급 기기(가정용 방송통신기자재)
Japan VCCI Class B compliance statement
Lenovo product service information for Taiwan
台灣 Lenovo 產品服務資訊如下:
荷蘭商聯想股份有限公司台灣分公司
台北市內湖區堤頂大道二段89號5樓
服務電話:0800-000-702
Appendix D. Notices
Lenovo may not offer the products, services, or features discussed in this document in all countries. Consult your local Lenovo representative for information on the products and services currently available in your area. Any reference to a Lenovo product, program, or service is not intended to state or imply that only that Lenovo product, program, or service may be used. Any functionally equivalent product, program, or service that does not infringe any Lenovo intellectual property right may be used instead. However, it is the user's responsibility to evaluate and verify the operation of any other product, program, or service.
Lenovo may have patents or pending patent applications covering subject matter described in this document. The furnishing of this document does not give you any license to these patents. You can send license inquiries, in writing, to:
Lenovo (United States), Inc.
1009 Think Place - Building One
Morrisville, NC 27560
U.S.A.
Attention: Lenovo Director of Licensing
LENOVO PROVIDES THIS PUBLICATION "AS IS" WITHOUT WARRANTY OF ANY KIND, EITHER EXPRESS OR IMPLIED, INCLUDING, BUT NOT LIMITED TO, THE IMPLIED WARRANTIES OF NON-INFRINGEMENT, MERCHANTABILITY OR FITNESS FOR A PARTICULAR PURPOSE. Some jurisdictions do not allow disclaimer of express or implied warranties in certain transactions, therefore, this statement may not apply to you.
This information could include technical inaccuracies or typographical errors. Changes are periodically made to the information herein; these changes will be incorporated in new editions of the publication. Lenovo may make improvements and/or changes in the product(s) and/or the program(s) described in this publication at any time without notice.
Recycling information
Lenovo encourages owners of information technology (IT) equipment to responsibly recycle their equipment when it is no longer needed. Lenovo offers a variety of programs and services to assist equipment owners in recycling their IT products. For information on recycling Lenovo products, go to: http://www.lenovo.com/recycling
Recycling and disposal information for Japan is available at: http://www.lenovo.com/recycling/japan
Recycling information for China
Recycling information for Brazil
The WEEE marking on Lenovo products applies to countries with WEEE and e-waste regulations (for example, the European WEEE Directive, India E-Waste Management & Handling Rules, 2011). Appliances are labeled in accordance with local regulations concerning waste electrical and electronic equipment (WEEE). These regulations determine the framework for the return and recycling of used appliances as applicable within each geography. This label is applied to various products to indicate that the product is not to be thrown away, but rather put in the established collection systems for reclaiming these end of life products.
Users of electrical and electronic equipment (EEE) with the WEEE marking must not dispose of end of life EEE as unsorted municipal waste, but use the collection framework available to them for the return, recycle, and recovery of WEEE and to minimize any potential effects of EEE on the environment and human health due to the presence of hazardous substances. For additional WEEE information go to: http://www.lenovo.com/recycling
Export Classification Notice
This product is subject to the United States Export Administration regulations (EAR) and has an Export Classification Control Number (ECCN) of 5A992.c. It can be re-exported except to any of the embargoed countries in the EAR E1 country list.
Trademarks
The following terms are trademarks or service marks of Lenovo in the United States, other countries, or both:
Lenovo
Lenovo Care
The Lenovo logo
ThinkVantage
Microsoft, Windows, and Windows Vista are trademarks of the Microsoft group of companies.
Other company, product, or service names may be trademarks or service marks of others.
Appendix E. Restriction of Hazardous Substances Directive (RoHS)
European Union RoHS
Lenovo products sold in the European Union, on or after 3 January 2013 meet the requirements of Directive 2011/65/EU on the restriction of the use of certain hazardous substances in electrical and electronic equipment (“RoHS recast” or “RoHS 2”).
For more information about Lenovo progress on RoHS, go to: http://www.lenovo.com/social_responsibility/us/en/RoHS_Communication.pdf
China RoHS
The Lenovo product meets the requirements of the Republic of Turkey Directive on the Restriction of the Use of Certain Hazardous Substances in Electrical and Electronic Equipment (EEE).
RoHS compliant as per E-Waste (Management & Handling) Rules, 2011.
lenovo®
Part Number: 57Y3997
Printed in China
(1P) P/N: 57Y3997




- Contents
- Chapter 1. About the keyboard ..... 1
- Chapter 2. Installing the keyboard . . . 7
- Chapter 3. Using the keyboard . . . . 11
- Chapter 4. Troubleshooting ..... 13
- Appendix A. Service and Support. . . 17
- Appendix B. Lenovo Limited Warranty. 19
- Appendix C. Electronic emission notices 27
- Appendix D. Notices....31
- Appendix E. Restriction of Hazardous Substances Directive (RoHS) ..... 33
- Chapter 1. About the keyboard
- Product description
- Front view
- Media control center
- Notes:
- ThinkVantage button
- Rapid access keys
- Status indicators
- Shortcut keys
- Internet navigation keys
- Rear view
- USB connectors
- Rapid access key label slot
- Bottom view
- Tilt feet
- Cable slot
- Palm rest connectors
- Non-skid feet
- System requirements
- Chapter 2. Installing the keyboard
- Installing the device drivers
- Uninstalling the device driver
- For the Windows XP operating system:
- For the Windows Vista or Windows 7 operating system:
- For the Windows 8 operating system:
- For the Windows 8.1 operating system:
- Installing the keyboard
- Chapter 3. Using the keyboard
- Enabling or disabling the hot keys
- Enabling or disabling the on-screen display
- Customizing the rapid access keys
- Chapter 4. Troubleshooting
- Appendix A. Service and Support
- Online technical support
- Telephone technical support
- Appendix B. Lenovo Limited Warranty
- Part 1 - General Terms
- What this Warranty Covers
- How to Obtain Warranty Service
- Customer Responsibilities for Warranty Service
- What Your Service Provider Will Do to Correct Problems
- Replacement Products and Parts
- Use of Personal Contact Information
- What this Warranty Does not Cover
- Limitation of Liability
- Part 2 - Country-specific Terms
- What this Warranty Covers:
- THE BENEFITS GIVEN BY THIS WARRANTY ARE IN ADDITION TO YOUR RIGHTS AND REMEDIES AT LAW, INCLUDING THOSE UNDER THE AUSTRALIAN CONSUMER LAW.
- Replacement Products and Parts:
- Use of Personal Contact Information:
- Limitation of Liability:
- Use of Personal Information:
- Dispute Resolution
- European Economic Area (EEA)
- Russia
- Product Service Life
- Types of Warranty Service
- Customer Replaceable Unit ("CRU") Service
- On-site Service
- Courier or Depot Service
- Customer Carry-In Service
- Mail-In Service
- Customer Two-Way Mail-In Service
- Product Exchange Service
- Appendix C. Electronic emission notices
- Federal Communications Commission Declaration of Conformity
- CE
- German Class B compliance statement
- Korea Class B compliance statement
- Japan VCCI Class B compliance statement
- Lenovo product service information for Taiwan
- Appendix D. Notices
- Recycling information
- Recycling information for China
- Recycling information for Brazil
- Export Classification Notice
- Trademarks
- Appendix E. Restriction of Hazardous Substances Directive (RoHS)
- European Union RoHS
- China RoHS
- lenovo®
Brand : LENOVO
Model : Enhanced Performance USB Keyboard
Category : Keyboard