2 x USB 2.0 Host, SD Card Reader, Ethernet (RJ-45), WiFi via USB dongle
Internet Features
Web browser, YouTube, Facebook, Twitter, Picasa, Internet Radio, Weather, Maps
Media Playback
MP3, JPEG, Video files from USB/SD/Network
Electronic Program Guide
7-day EPG with series recording support (IceTV compatible)
Remote Control
NEC-IR, up to 7 meters, includes full DVR and smart functions
Cleaning Instructions
Unplug the unit. Clean with a soft, dry cloth. Do not use liquids or aerosols.
Safety Precautions
Do not open cover (risk of electric shock). Avoid water and moisture. Ensure adequate ventilation.
Included Accessories
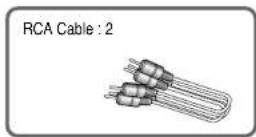
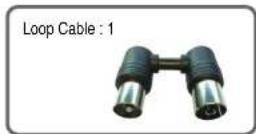
Remote control, RCA composite cable, Loop cable for tuner, User manual, Quick start guide
Repairability
No user-serviceable parts. Refer to qualified service technician for repairs. User can change batteries in remote and update firmware via USB.
Frequently Asked Questions - SRT 7014 STRONG
How do I record a TV program on the STRONG SRT 7014?
You can record in four ways: Instant Recording (press REC on current channel), EPG Recording (select program in Electronic Program Guide, press REC), Manual Timer Recording (press MENU, then Timer Manager, set date/time), or Series Recording (press BLUE in EPG to record entire series). Recordings are saved to the internal 500GB HDD.
How do I connect the SRT 7014 to the internet?
Connect via Ethernet cable to the LAN port on the rear panel. For WiFi, insert the supplied USB WiFi dongle and go to MENU > System Settings > IP Settings, select WiFi, then scan and enter your network password using the on-screen keyboard.
How do I set up channels on my SRT 7014?
The first time you power on, the Installation Wizard will prompt you to select language and scan channels. You can also manually scan via MENU > Channels > Auto Scan. Ensure antenna is connected to Tuner 1 input.
How do I use the Picture-in-Picture (PIP) function?
Press the PIP button on the remote. A sub-channel list appears; select a channel for the smaller window. Use PIP+/- to change the PIP channel, and P.SWAP to swap main and PIP pictures. Press PIP again to reduce window size, or twice to remove.
Can I transfer recorded files from the internal HDD to a PC or USB drive?
Yes. Connect both devices to the same network. On the SRT 7014, go to MENU > Media Manager > File Manager, press YELLOW to add a network connection, enter your PC’s IP address, then select files and press COPY to transfer. For USB, select the external drive as destination.
How do I update the firmware on my SRT 7014?
Download the latest firmware from www.strong.com.au onto a USB drive (root directory). Insert the USB into the receiver. Go to MENU > Media Manager > File Manager, select the USB drive, choose the firmware file, and press OK to update. Do not turn off power during update. After update, perform a factory reset via MENU > System Settings > Database Reset.
What is the AV Input feature and how do I use it?
The AV In allows you to record from external devices like gaming consoles or camcorders. Connect the device via Component or Composite cables to the rear AV inputs. Go to MENU > Channels > AV In, set AV Input to ON, choose input type (YCbCr or CVBS), then press AV IN on the remote to access. Press REC to start recording.
How do I set a timer recording?
Press MENU, select Timer Manager, press RED to add a new timer. Use arrow keys to set date, start time, end time, channel, and recurrence (Once, Daily, Weekly, Mon-Fri, Series). Confirm to save. You can also set lead-in/lead-out times by pressing YELLOW in Timer Manager.
How do I use the Electronic Program Guide (EPG)?
Press GUIDE on the remote. The EPG displays channels on the left and program schedules for 7 days. Use arrow keys to navigate. To record a program, select it and press REC. To reserve a program, press OK on it. Press INFO for details. Switch between single-channel and multi-channel view with the INFO button.
How do I reset the receiver to factory settings?
Go to MENU > System Settings > Database Reset. Choose 'Factory Set' to erase all channels and restore defaults. Confirm with OK. A factory reset is recommended after a firmware update. Note: This deletes all recordings and settings.
User questions about SRT 7014 STRONG
0 question about this device. Answer the ones you know or ask your own.
Ask a new question about this device
No questions yet. Be the first to ask one.
Download the instructions for your DVD player in PDF format for free! Find your manual SRT 7014 -
STRONG and take your electronic device back in hand. On this page are published all the documents necessary for the use of your device. SRT 7014 by STRONG.
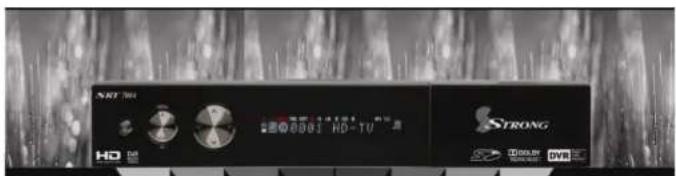
High Definition Digital Terrestrial Television Receiver and Recorder
□ SRT 7014
Contents
Introduction .... 1
1.1 Overview
1.2 Main Features
Safety/Precautions 3
2.1 Safety
2.2 Precautions
2.3 Positioning
Points to Check before Use 5
3.1 Accessories
Controls/Functions 6
4.1 Front Panel
4.2 Rear Panel
4.3 Remote controller
4.4 Front Display
How to Connect .... 11
Operation 12
6.1 Getting Started
6.2 System Setting
6.3 Channels
6.4 Electronic Program Guide
6.5 Entertainment
6.6 Media Manager
6.7 System Information
6.8 DVR
6.9 MEDIA
6.10 PIP Function(Picture In Picture)
Troubleshooting 58
Specifications 59
Introduction
1.1 Overview
The SRT7014 is a High Definition Digital Video recorder with Internet Connectivity features to turn your TV into a SMART CONNECTED TV. You will enjoy being able to record up to 3 channels at once and watch a 4th channel from 2 networks to the inbuilt 500GB HDD as well as having access to apps including Youtube, Facebook, Twitter and Picasa. The inbuilt web browser also allows you to surf the internet directly on your TV while controlling your receiver from your iPhone/iPad or Android device. You can also stream recorded content from the inbuilt HDD to your iPhone or iPad.
To ensure the correct operation of this product the user manual must be read by any person that is installing, connecting, operation or cleaning the unit.
* Note: All products that are marked either directly or labeled on the packaging with the following icon:
Cannot be disposed of through the normal household waste channels and must be disposed of through specialized collection centers that recycle electric and electronic devices.
By disposing of such products as required by law, you are contributing to the protection of the environment.
Incorrect disposal can be hazardous to human health and the environment.
1.2 Main Features
▶ Digital Video Recorder with Twin Tuner
▶ Built In 500GB Hard Drive
▶ Time Shift, Record & Playback (Max. 3 channels recording simultaneously)
▶ Media Playback via external storage devices (HDD, SD Card Reader)
▶ 2 X USB 2.0 Host for MP3 Playback, JPEG Viewing & Firmware Update
▶ Ethernet Port for Internet Connectivity, File transfer and Ice TV functionality
▶ 16:9 Full Screen, 4:3 Letterbox & 4:3 Full Screen
▶ Electronic Program Guide
▶ Subtitle
▶ Auto Voltage (AC 100 - 250V) SMPS
▶ Support MEPS(Minimum efficiency performance standard)
DOLBY
DIGITAL PLUS
Manufactured under license from Dolby Laboratories.
"Dolby" and the double-D Symbol are trademarks of Dolby Laboratories.
▶ Compatible with Icety Electronic Program Guide
Safety Precautions
2.1 Safety
Please thoroughly read the following safety precautions before operating this receiver. You are required to read all notes, instructions and warnings contained in this User Manual.
2.2 Safety Precautions
▶ Only connect the receiver to a properly installed 100-240V, 50-60 Hz mains socket.
▶ During electrical storms it is recommended the receiver be unplugged from the mains.
To avoid any risk of fire and electric shock, do not expose the receiver to any water. If objects or liquids enter the receiver, immediately unplug power from the mains. Contact a qualified service technician before using the receiver again, or there may be a risk of electric shock.
▶ Do not open the cover as there is a risk of electric shock.
▶ When the receiver is not in use for extended periods, disconnect the plug from the mains.
▶ Never use the receiver with a damaged mains cable as there is a risk of electric shock.
▶ Should the mains cable be damaged, refer to a qualified service technician or contact an authorized Strong technician to arrange repair or replacement before using the receiver again.
▶ Do not allow children to use the receiver without supervision.
▶ Always refer maintenance to a qualified service technician or contact Strong for an authorized representative.
2.3 Positioning
▶ Ensure the receiver is placed on a stable, even surface.
▶ Do not place heavy objects on top of the receiver.
▶ Install the receiver in a well ventilated location and avoid direct sunlight.
▶ Avoid dusty locations.
▶ Never cover the ventilation holes in the cover of the receiver.
▶ Humidity can occur inside the receiver when moving from a cold to a warm place. In this case, wait approximately one hour before operating the unit.
Points to Check before Use
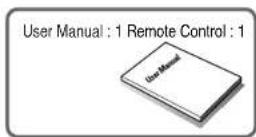
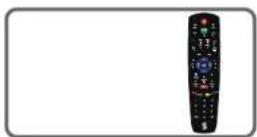
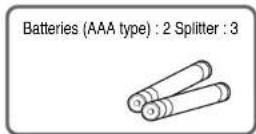
3.1 Accessories
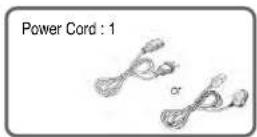
Unpack the unit and ensure that all of the following items are included in the pack.
If any of the above listed accessories are missing, please contact your sales representative.
Controls/Functions
4.1 Front Panel
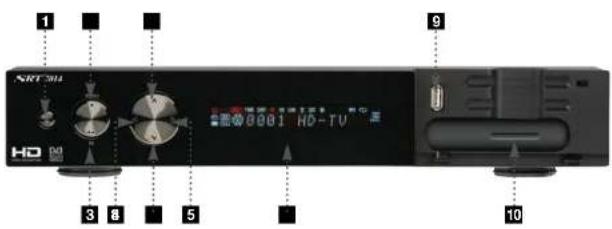
1 Power: Switches the receiver between "Standby" and "Power ON"
2 Menu : To enter or exit the main menu.
3 OK: To display the channel list or select and confirm an item in the menu mode.
4 - 5 VOL (◄/►) : To adjust the volume.
6 - 7 CH (▼/▲): To change channels or position the cursor on the application screen
8 Passive Standby / Power on indications Lamp : Flashes blue light in "Passive Standby" mode and shows no light in "Power ON" mode.
9 USB: To connect a USB device (ex. Memory stick or external hard drive)
10 SD Card Reader : To read and write data to SD media.
4.2 Rear Panel
No.
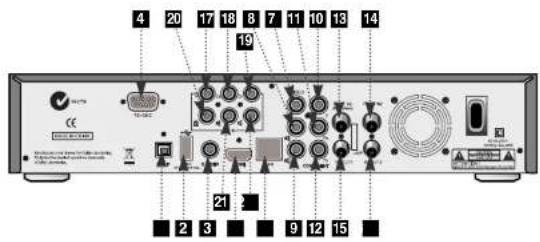
Name Connector Function
1
SPDIF Fiber Optic Digital audio output (Optical)
2
USB USB A-type USB 2.0
3
S-VIDEO
MINI-DIN
S-VHS Output
4
RS-232C DB-9
Low speed serial port
5
HDMI
HDMI
Digital Video/Audio Output
6
LAN
RJ-45
10/100Mbps Ethernet
7
VIDEO
RCA clinch Composite video output
8
AUDIO L RCA clinch
Left audio output
9
AUDIO R RCA clinch
Right audio output
10
Y
RCA clinch Component video output(Y)
11
Pb
RCA clinch Component video output(Pb)
12
Pr
RCA clinch Component video output(Pr)
13
ANT IN1
IEC 169-2 FEMALE Input from terrestrial antenna
14
ANT IN2
IEC 169-2 FEMALE Input from terrestrial antenna
15
ANT OUT1
IEC 169-2 MALE
Loop-through output from digital tuner and Output to TV
16
ANT OUT2
IEC 169-2 MALE
Loop-through output from digital tuner and Output to TV
17
Y
RCA clinch
Component video input(Y)
18
Cb
RCA clinch
Component video Input(Cb)
19
Cr
RCA clinch
Component video Input(Cr)
20
VIDEO
RCA clinch
Composite video input
21
AUDIO
L RCA clinch
Left audio input
22
AUDIO
R RCA clinch
Right audio Input
4.3 Remote controller
4
2
7
10
11
14
15
17
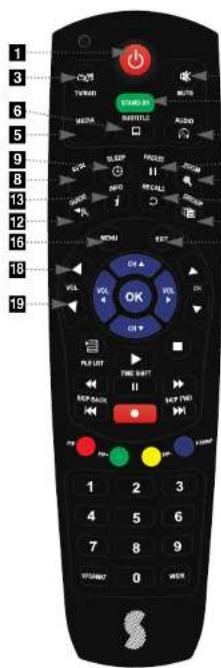
1 POWER : Turns the unit on and off
2 STAND BY : Places the receiver in standby mode
3 TV/RADIO: Switches between TV and Radio functions
4 MUTE: Turns the sound on and off
5 MEDIA : To access media file playback menu
6 SUBTITLE: To turn the closed captions on and off
7 AUDIO: To display the Multi-language audio track, stereo/mono mode and subtitle Information
8 AV IN : To view the AV In channel directly
9 SLEEP: To turn the unit off after a pre-set time
10 FREEZE: Press once to pause live TV. Press again to resume play
11 ZOOM : Activates the zoom function
12 GUIDE : Displays the TV/Radio Electronic Program Guide
13 INFO : Displays information about the selected program. Press twice for additional detail
14 RECALL :To return to the previous channel
15 GROUP : To select set channel favorite groups
16 MENU: To enter or exit the main menu
17 EXIT: To exit the current menu and move to the previous menu
18 - 19 Vol Up & Down : To change volume setting
4.3 Remote controller
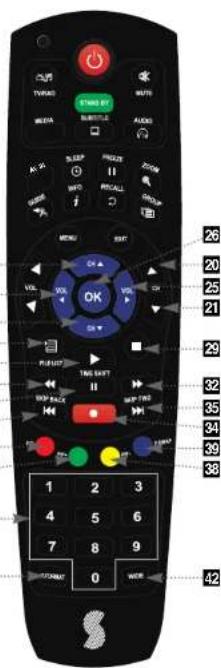
20 - 21 CH Up/Down : To change channels
22 - 23 Up & Down : To change channels or move the cursor up and down in menu mode
24 - 25 Left & Right : To change the volume level. Also modifies a setting in menu mode
26 OK : To show the channel list or to select or confirm an item in menu mode
27 FILELIST : Displays the file list
28 PLAY: Press to play content
29 STOP: Press to stop playback
30 RWD : Playback in rewind mode
31 PAUSE: Pauses playback and begins timeshift
32 FWD : Starts playback
33 SKIP BACK: To skip back while watching recorded programs
34 REC: To start recording
35 SKIP FORWARD : To skip forward while watching a recorded program
36 PIP : To activate the Picture in Picture Function
37 PIP+ : To change the PIP channel up
38 PIP-; To change the PIP channel down
39 P.SWAP : To swap the PIP picture and the main picture
40 Numeric Keys (0-9): To enter numerical setting such as channel numbers
41 V.FORMAT : To change video output resolution
42 Wide: To select an aspect ratio with Pan Scan or Letterbox (4.3) (Full screen or Pillar box)
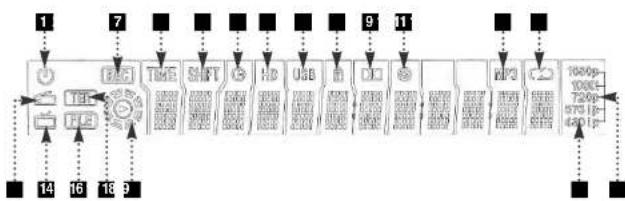
6 Lights when a High Definition signal is received
7 Lights when a USB device is connected
8 Indicates the current channel is set in Lock mode
9 Lights when the current channel is Dolby audio format
10 Lights when the current sound is set to Off
11 Lights when Mp3 player is enabled
12 Lights when an Mp3 player is set In loop mode
13 Lights when the current channel is in Radio mode
14 Lights when the current channel is in TV mode
15 Lights when the signal is being received via the antenna
16 Indicates the current playback mode in the file list
17 Lights when a recorded file is being played
18 Indicates the resolution of video output
19 Indicates Progressive or Interlaced scanning mode
How to Connect
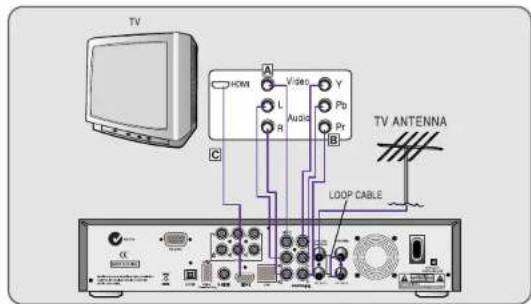
1 Connect the antenna lead coming from the wall plate to the input marked "Tuner 1"
2 Connect the Loop Cable provided to the Input marked Tuner 1 RF then to the Tuner 2 input as shown in the diagram below
3 There are a number of methods to connect your receiver to your television
A. Using the Composite cable provided (red, white and yellow leads)
For video, connect the yellow lead to the yellow socket on back of the receiver and to the corresponding Video Input socket on the back of the TV. For Right Audio, connect the red lead to the red socket on the back of the receiver and to the corresponding Right Audio Input socket on the back of the TV. For Left Audio, connect the white lead to the white socket on the back of the receiver and to the corresponding Left Audio Input socket on the back of the TV.
B. Using the Component cable (Sold separately) (green, blue and red leads) paying attention to the color coding, connect the three color coded leads to the matching sockets in the back of the receiver and Video In sockets of the TV. You will also need a connection for Right and Left audio via the audio socket. This may be achieved using the Composite cable supplied and connecting the red and white leads as described in Step A above.
C. If your TV has a HDMI input, you can use a HDMI cable (sold separately) from the back of the receiver to the TV. A HDMI cable supplies both video and audio signals through a single cable so no other leads are required. Please ensure your TV is set to the HDMI input mode to detect the receiver.
Operation
6.1 Getting Started
After your receiver is powered on, proceed with installation as follows:
1) Installation Wizard
① Plug in the receiver and position the power switch to "on"
② Turn on your TV
③ A pop-up menu will appear for language selection Select the desired language and press button to proceed
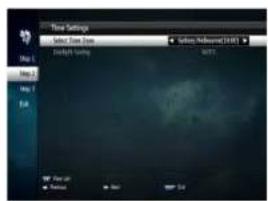
④ The time setting menu will now be displayed . Once again use the / Elect the desired time and confirm by pressing button (see also Page 21??)

⑤ The Auto Scan menu will now appear
In this mode the receiver will scan for all available channels and save them.

6.1 Getting Started
2) Auto Scanning
Press the Ⓞ on Auto Scan in Installation menu.
with the ALL Channels highlighted
press the Ⓞ button to start
the scan. Scanned channels will be shown on screen
To manually scan a channel select the channel number using the and key on the remote control
and press OK

text_image
SCANNING
OK 6
LT 3.9%
LT
TV
MUSTOP
Savings - Please Wait 1
Quality
80%
6.1 Getting Started
4) Channel Selection
You can use the and or old keys navigate between channels to select desired channels.
▶ if you know the channel number you can enter it using the NUMERIC buttons on the remote control and wait 2 seconds for the change.
▶ Detailed information about the selected channel will be displayed on the right hand side of the screen
▶ You can use the following buttons to navigate between channels
- CIA : Move one channel up or down
- click : Moves one page up or down
- RED : Shows all channels in the current group
- Green : Shows all channels alphabetically
- Yellow : Shows all channels by transponder
- Blue : Shows all channels by CAS.
▶ Press OK en the selection bar is positioned on the desired channel.
6.1 Getting Started
5) Other Functions of the Remote Control
▶ Volume Control
① Press to adjust the volume while watching a program
② Pressing the Mute button will remove the sound and the mute icon will be displayed. Pressing the Mute button again will restore the sound.
▶ Channel Information
① Pressing the INFO button will briefly display the channel information
② Pressing the INFO button a second time will display a more detailed program information
▶ TV/RADIO switching
Press this button to change from a TV to a Radio channel. Pressing the button again will return the unit to the TV channel.
▶ RECALL
Pressing this button returns the unit to the previously viewed channel
▶ Audio
Use this button to adjust the subtitles or audio status of the current channel
- Audio Mode : Select from Stereo → Mono Left → Mono Right
- Audio Track : Select between tracks available in this program
- Audio Level : Use to select High → Medium → Low
\* Note : Subtitle and audio settings are only available when the selected channel supports these functions.
FREEZE
Press this button to freeze video. Pressing the button again will restore the video.
▶ GROUP
This button is used to view the list of favorite channel groups. Only registered groups are displayed.
6.1 Getting Started
▶ ZOOM
By pressing the button you can zoom in video.
① By pressing the PAUSE button and you can zoom in on sections of video on Freeze
② While watching a program press to zoom in on sections of a video
③ To cancel the freeze status release it by pressing the ZOOM button continuously.

By pressing 📄 can select the subtitle language of the current channel
▶ SLEEP
You can set your receiver to turn off after a period of time. Available timer selections are 10,20,30,60,100 and 120 minutes. To activate press and set the timer.
\- To cancel the sleep timer press until the minutes are set as "0 min"

You may select the video resolution by pressing available selections are 1080p
→1080l→720p→576p→576l
▶ WIDE
Pressing WIDE changes the aspect ratio. Available ratios are:
\- 4.3 Pan-Scan or Letter-Box
\- 16.9 Full-Screen or Pillar-Box

These can be accessed by pressing the button and then scrolling to the "System" section and pressing OK.
1) Internet Connection Setting
If the Network supports DHCP, IP settings can be allocated automatically. If the Network does not support DHCP, the Addresses must enter manually (Static IP).
- Select Connection Type: Ethernet or WiFi. Select Ethernet if you are connecting the receiver to the network via a LAN cable. Select WiFi if you wish to connect to your home wireless network using the wireless USB dongle supplied with your receiver. (Please note the wireless USB dongle is already inserted into the rear USB port or the receiver)
- Network Detection : Auto/Manual to receive IP settings automatically
- IP Address : Enter the IP address
- Subnet Mask : Enter Subnet Mask Number from your Network
- Gateway : Enter IP address of Gateway (e.g. router)
- DNS : Enter IP address of main DNS Server
- Mac Address : Mac Address display

- SCAN : Press the RED button to SCAN for the IP address and network details. If they do not appear automatically.
- WiFi Wizard: When connecting to your home network using WIFI press the RED button to view the list of available wireless networks. Select the desired wireless network you wish to connect to using the 📄 and 📄 arrow buttons and press the ⬣ button to select your network.
- WIFI Setting: Once you have selected the wireless network you wish to connect to in the WIFI Wizard press the YELLOW button to access the WIFI Setting menu. In this menu you can enter the network key to connect to your wireless home network. Highlight Key using the 📄 and 📄+arrow buttons and press the OK button to bring up the virtual keyboard. Using the 📄, 📄+, 📄+and 📄+buttons select the characters of your wireless network security and press the OK button. Once you have entered your wireless network key press the OK button to save and exit. Now highlight connect and press the OK button to connect to your wireless network.
\- Firmware update : Support download from a LAN.
① BLUE button, appear input target IP address.
② RED button to Scan after inputting a target IP.
③ Choose a update software and action for downloading
\* Note : The PC tool STB Daemon must be installed on your PC before you can connect your receiver the PC. Please refer to the "Connecting your receiver via LAN to a PC" section for PC Tool download instruction

1. Follow these instructions prior to connecting your receiver to your PC:
a) Run the PC Tool program (STB Daemon) before connecting to your PC, this can be downloaded from www.strong.com.au/faq tech.html.
b) Click Browse and select a sharing folder on your PC.

c) Press "OK" then select STB Daemon and the window will be hidden. You can still see the icon on bottom right of the windows screen.
2. Connect an Ethernet cable or wireless USB dongle from your DVR to your network port.

6.2 System Setting6.2 System Setting
3. Press menu, Select System Settings, Select IP Settings
a) Depending on your connection select either Ethernet of WIFI.
b) If your Network supports DHCP, IP settings can be allocated automatically by turning Network Detection Auto and pressing the red colored key

c) If your Network does not support DHCP, the IP Address must be entered manually (Static IP). EG. If your computers IP is 192.168.168.114, you can allocate the unit an IP of 192.168.168 any other number not used on your network.
d) Click the network icon on the bottom of your desktop.

e) Now select the Support Tab, you can allocate your IP Address.

4. You can now go into Media Manager, then File Manager menu (on your DVR) and press the yellow coloured key (on remote) to type in the IP address of the computer which has STB Dadmon running.
\* Please see page 42 for instructions on how to transfer files.
2) Time Settings
The sub menu allows you to set your local time, wake up timer, wake up channel and sleep time.
Use the scroll buttons to select the following options
- Time Setting : Set this ON for the local time to be determined by adjusting the time difference with GMT.
- Current Date : If Time Setting is Manual, you can change the date by pressing OK
- Current Time : If Time Setting is Manual, you can change the time using the NUMERIC buttons
- Select Time Zone : If Time Setting is Manual, Local time is GMT + Local offset.
- Daylight Saving : Select the time during which summer time is applied

6.2 System Setting6.2 System Setting
3) A/V Output Settings
This menu lets you specify the audio and video output settings of your receiver
Use the scroll buttons to select your desired setting
- Audio Language : set the audio language
- Subtitle Language : Select the subtitle language
- Screen Format : Select the screen format (16.9/ 4.3)
- Display Format : Select the aspect ratio
- Video Format : Select the video format from 1080p, 1080i, 720p, 576p or 576i
- Digital Audio : Selects the audio output type
After making your selection press the ✕ confirm

4) Security Settings
To prevent unauthorized access to classified programming, you can set a personal PIN number for your receiver. (Note that the factory set default password is : 0000. PIN and password are the same)
By setting any of the following functions to find this menu, the PIN will be required to access them:
\- Receiver Lock, Install Lock, Channel Lock, Lock Channel Confirm
▶ Parental Lock
Under this menu you may select a Rating of programs you choose to block.
All available ratings are listed in the menu and when the program information regarding the rating available from the broadcaster exceeds the selection, a PIN number is required to access the program.
Use the scroll buttons to make your selection and press button to confirm.
This section also contains options to change and enter new passwords.

6.2 System Setting6.2 System Setting
5) ICE TV Settings
Connect your receiver via LAN to an internet connection to receive the Ice TV EPG service.
IceTV is an independently compiled electronic program guide (EPG) for digital free-to-air television delivered via the internet. The IceTV EPG service gives you access to the online EPG and enables you to set timer recordings via the Ice TV online EPG.
To activate your Ice TV account you will need to Input the Information in the Ice TV settings menu. To purchase an Ice TV subscription please visit the Ice TV website at www.icefv.com.au

You will need to connect your receiver to an Internet connection via the LAN port on the back panel. Connect the LAN cable from your Modem or Router to the receiver. You will then be required to enter you home network details in the ice TV settings menu as below:
- ICETV Usage : Select On/Off to activate or de activate the IceTV feature
- Account : Enter your IceTv account name
- Password : Enter your iceTv account password
- Login: Once you input your Ice TV account details and connected the LAN cable to the receiver press OK to check the status of your connection. When your receiver is connected to Ice TV the status will state "Authorized"
- Device : Select 0,1,2 or 3 depending on how many receivers are linked to the IceTV account
- Status : Displays the current status of your ice TV account
If you are experiencing problem connecting to your Ice TV account and you are receiving "Unauthorized" message in the Status section please contact Ice TV to ensure your account details are correct and has been activated.
6) On Screen Settings
Using this menu, you can select the menu language and the duration that the display and volume bars are shown on the screen.
Use the scroll buttons to highlight and adjust your selections and press button to confirm.

6.2 System Setting6.2 System Setting
7) Front Display Setting
This function enables you to set the front display settings.
Moving text can be enabled or disabled and Channels can be set to display Channel Name or Name and Numbers.
Use the scroll button to highlight and adjust your selection and press the ⏻ button to confirm.
\- Standby Mode (Selecting Power Saving or Normal)
Highlight standby mode using the 📄️ arrowkeys. Use the / arrow keys to adjust your selection.

\- Power Saving: Set Power Saving to ON using the left and right arrow keys for the receiver to consume less power whilst in standby
\- Normal: Should you wish to access your televisions in built tuner whilst your STRONG DVR is in standby you will need to set the Standby Mode to Normal. Using the overnight keys set Standby Mode to Normal.
Press the button, you will be prompted whether you wish to save the settings select
Yes using the arrow buttons and press the buttock
6.2 System Setting
8) Database Reset
This section allows you to reset the receiver to the factory settings.
\- Delete Radio Channels : Erase all radio channels in the database.
\- Delete All Channels : Erase all channels.
\- Factory Set : Erase all channels and restore the factory default settings.
Please note that a factory reset is required to be performed after a software upgrade

6.3 Channels
1) AV In (AV Input Channel)
- Your STRONG SRT7014 incorporates an AV input feature that will allow you to record from any external video source to the Internal HDD, such as Pay TV, Gaming consoles, Camcorders and many others
- You can connect your external audio/video source either via Component or Composite Video cables and Audio Left and Right RCA cables
- To activate the AV in feature press using the arrow buttons highlight Channels and press the button. You will be prompted to enter your PIN (the default PIN number is '0000') to access this menu.
- Using the arrow buttons highlight AV In and press the button, the AV In menu screen will be displayed
- With AV Input highlighted, using the arrow buttons select ON
- To set the Input Selection, use the arrow down button select Input Select, now using the arrow buttons select the appropriate connection type.
- If you have connected your external video source via Component (Red, Green and Blue RCA cables) select YCbCr
- Video source must be set to 576 when connecting via component.
- If you have connected your external video source via Composite (Yellow RCA cable) select CVBS
- Now press the button, you will be prompted to save these settings. Using the arrow buttons select Yes and press the button.
The AV Input channel will be added in the channel list at the last position. To access the AV In channel press the AV IN button on the remote control. You can also access the AV In channel by pressing the OK button and until it is displayed or alternatively press the button to bring up the Channel List. And select AV In by pressing the button.
6.3 Channels
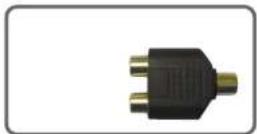
- The RCA Splitters have 1 x RCA Socket on one side and 2 x RCA Sockets on the other side.
- Connect the Yellow (Video Signal). Red (Audio Output Right) and White (Audio Output Left) into the single RCA socket of each splitter.
- Using the supplied RCA Composite cables, connect both sets of RCA cables into the RCA Splitters.
- The 2 x Yellow (Video Signal) plugs should be connected to the 2 x RCA sockets of the splitter that has the Yellow (Video Signal) plug connected to it from the gaming console.
- The 2 x Red (Audio Output Right) plugs should be connected to the 2 x RCA sockets of the splitter that has the Red (Audio Output Right) plug connected to it from the gaming console.
- The 2 x White (Audio Output Left) plugs should be connected to the 2 x RCA sockets of the splitter that has the White (Audio Output Left) plug connected to it from the gaming console.
- Now connect the RCA Composite cable to the corresponding Video Input socket on the back of the TV.
- For Right Audio, connect the red lead the corresponding Right Audio Input socket on the back of the TV.
- For Left Audio, connect the white lead to the corresponding Left Audio input socket on the back of the TV
Once you have connected the desired device to the AV Input channel of the receiver, select the AV In channel using the 📄 keys 🐦 pressing the AV IN button.
To record press the button, the receiver will immediately begin recording the AV in channel for the default time of 3:00 Hours. To change the default time, press the Record button again to bring up the record duration setting. Using the slide arrow buttons highlight Duration and then using the key array keys increase or decrease the recording duration.
Press the button to leave this menu.
Now using your TV remote control select the AV Channel that you have connected the RCA cables to from the splitter. Once you have selected the AV Channel you can view the camcorder or game play in real time while the SRT7000 records simultaneously.
6.3 Channels
2) Setting Favorite Channels
This section allows you to select up to 16 groups of favorite channels in either TV or Radio.
1 Press OK "Set Favorites" and the group lists will be displayed
2 Press 🔒 button to choose a group and a new menu will appear
To change the name of the group press the RED button
③ Press add or remove a channel from the list
4 PressButton to return to the previous menu.

By navigating through this section you can change the channel sequence.
① Choose the channel list by pressing the button, use the cursor keys to select the desired options.
② Press the button to return to the previous menu.

6.3 Channels 6.3 Channels
4) Lock Channels
This feature allows you to lock a specific channel so it will require a password to access it.
① Press OKtion on the "Lock Channels" and follow the on-screen prompts to set the function.
② Press return to the previous menu.

5) Delete Channels
This function allows you to delete a channel selection.
\* NOTE : Deleting a channel means you will not be able to access it until you rescan.
① Press the on "Delete Channel" and follow the screen prompts to activate this feature.
② Press the button to delete all channels in the current list; you will be asked to enter your password.
③ Press return to the previous menu.

.... 31 ....
6) Edit Channels
This section lets you rename and edit channels. You can select from Radio or TV by pressing the button or a channel by pressing the button.
1 Press OK button on "Edit Channels" and a new menu will appear
② Press button on the desired channel
③ Press button on "Edit Name" to rename the channel using the displayed keypad

7) Skip Channels
This feature skips a set channel when using the button to navigate channels.
1 Press ok the "Skip Channels" and follow the on-screen prompts to activate the feature on the selected channels.
② Press return to the previous menu.

32
6.4 Electronic Program Guide
1) EPG
An EPG (Electronic Program Guide) is an on screen list displaying scheduling information for current and upcoming programming from all Free To Air broadcasters for the next 7 Days.
② To access the EPG press the button, the list of channels will be displayed in the left window and the programming information for the selected channel will be displayed in the right window
② You can change the EPG mode by pressing the button. By pressing Info the EPG mode will change from single channel display. Please note single channel display is the default setting.
4 Use the arrow buttons to select the desired channel. Press the arrow button to access the programming information for the desired channel
⑤ By selecting the desired program, detailed program information will be displayed in the top pane of the EPG screen
⑥To Record a selected program press the button (Refer to the 'How To Record on your STRONG SRT 7014 Digital Video Recorder' section for recording instructions via the EPG
To Reserve a program for viewing, select the program by pressing the button. This will highlight the program. You receiver will now automatically display this program when it begins even if you are watching another channel

1 C:\ / CH7 : To select Youtube feature.
② ok : To play desired clip.
- Option: Allows you to set search parameters by Category. Viewed, Time, Location.
- Search : Use this to search by key word. Use the virtual keyboard to enter the search name using the 📄, 📇, 📖 and your arrow buttons and press the OK button to select. Once you have entered the search name press OK to save and OK to start search.
- Next : To move to the Next page of the search results.
- Previous: To move to the previous page of the search results.
- REPLAY: To replay the current clip.
- PAUSE : To pause the playing clip.
- STOP : To stop the clip.
- Fullview: To view the clip in full screen.

6.5 Entertainment
2) Internet Radio
\- Search : Press the OK button to display the virtual keyboard to search by key word.
Use the OK, OK, OK and OK arrow buttons, press the OK button to select.
Once you have entered the search name press on to save and then press the RED button to begin search.
\- Genres : Press the OK button to view the list or use the 📋 and 🌘 arrow buttons to
select the Genre you wish to search by. Once you have selected the Genre press the RED button to begin search.
Search results will be displayed in the Station List. Use the SLL and CT arrow buttons to select the desired station and use the AND to arrow buttons to move to the next page of stations in the list. Once you have selected the station press the ON button to load this radio station. Playback will begin once buffering is complete.
\- Favorites: To set favorite channels highlight the channel you wish to add to your favorites list and press the GREEN button. Channels you have selected as favorites will be added to your favorites list.
\- Record: To record Radio that you are currently listening to press the Record button.
To stop recording press the record button agian.
Recorded radio programs can be accessed via the Media Manager menu under file manager and selecting Music.
① Search Radio channel by Key word or Genre.
② Select a channel by 📊/ 📊
③ Press OK to play Radio.
To exit and return to the main menu press the button on the remote control.

① Press BLUE button to be begin search for a city.
② Enter the City name using the virtual keyboard.
③ Press to save and exit the window.
Your selection will be displayed.
- View List : Press the OK button to view and select the saved list of cities.
- Fahrenheit / Celsuis : To display the temperature in your desired measurement.
- Add City : Press the YELLOW button to add a City to the list.
- Del : Press the BLUE button to delete the City in list.
To exit and return to the main menu press the button on the remote control.

6.5 Entertainment
4) MAP
Searching the MAP for City.
① Press BLUE button to begin search.
② Enter the City or Country name using the virtual keyboard.
③ Press to save the search and exit the window.
- View List : Press the OK button to view the saved search list.
- Move: To move around the map use the CHA, CHY, VOL and VOL buttons.
- Zoom In : To enlarge the size of the MAP press the RED button
- Zoom Out - To reduce the size of the MAP press the GREEN button.
- Add City: Press the YELLOW button to add a City to the save list
- Del: Press the BLUE button to delete the City in list.
To exit and return to the main menu press the EXIT button on the remote control.

6.5 Entertainment
5) Web Browser
The SRT7014 has an inbuilt web browser similar to what you will find on your PC.
You can navigate the internet by either connecting an external USB wireless keyboard and mouse or via your iPhone / iPad or Android device.
Press Enter to close Key board.
For instructions on how to turn your handheld device into a remote control and keyboard please refer to the separate instructions supplied titled, Remote Apps for SRT7014.
You can also access the web browser feature using the virtual remote control built in to your SRT7014.
Press the button on the remote control to display the virtual keyboard on the screen.
Using the 📄, 📄, 📅 and 📅 arrow buttons you can navigate around the screen and around the virtual keyboard.
To select an option or and item from the virtual keyboard, place the cursor over the desired Item and press the OK button.
To close the virtual keyboard, press the i button on the remote control.

6.5 Entertainment
6) Facebook
The SRT7014 has an Inbuilt Facebook app.
As in the web browser you can navigate your Facebook page by either connecting and external USB wireless keyboard and mouse or via your iPhone/iPad or Android device. For instructions on how to turn your handheld device into a remote control and keyboard please refer to the separate instructions supplied titled, Remote Apps for SR7014.
You can also access your Facebook page using the virtual remote control built in to your SRT7014. Press the button on the remote control to display the virtual keyboard on the screen. Using the card card and arrow buttons you can navigate around the screen and around the virtual keyboard.
To select an option or an item from the virtual keyboard, place the cursor over the desired item and press the button.
To close the virtual keyboard, press the button on the remote control.

7) Twitter
The SRT7014 has an inbuilt Twitter app.
As in the web browser you can navigate your Twitter page by either connecting and external USB wireless keyboard and mouse or via your iPhone/iPad or Android device. For instructions on how to turn your handheld device into a remote control and keyboard please refer to the separate instructions supplied titled, Remote Apps for SRT7014.
You can also access your Twitter page using the virtual remote control built in to your SRT7014. Press the button on the remote control to display the virtual keyboard on the screen. Using the ▼, ▼, ▼ and □ arrow buttons you can navigate around the screen and around the virtual keyboard.
To select an option or an item from the virtual keyboard, place the cursor over the desired item and press the OK button.
To close the virtual keyboard, press the button on the remote control.
The SRT7014 has an inbuilt Picasa app.
Picasa allows you to share your photos with friends and family online.
As in the web browser you can navigate your Placa account by either connecting and external USB wireless keyboard and mouse or via your iPhone/iPad or Android device. For instructions on how to turn your handheld device into a remote control and keyboard please refer to the separate instructions supplied filled, Remote Apps for SR17014.
You can also access your Picasa account using the virtual remote control built in to your SRT7014. Press the button on the remote control to display the virtual keyboard on the screen. Using the SLA, SLY, and SLA arrow buttons you can navigate around the screen and around the virtual keyboard.
To select an option or an item from the virtual keyboard, place the cursor over the desired item and press the OK button.
To close the virtual keyboard, press the button on the remote control.

6.6 Media Manager
1) Disk Manager
Use the cursor keys to activate the desired functions from this menu.
- Default Disk: If you have additional Storage devices connected to your receiver (i.e. USB HDD, SD Card Reader) you can select which storage device is to be the default drive for playback and recording
- Disk Information: Select the Hard disk volume, USB device or SD Card Reader. Information of the storage devices will be displayed (i.e. used size, total size, free size)
- Check Disk : Checks the status of the selected Storage device.
- Format Disk : Format disk enables you to delete all information stored on the selected storage device. There are 2 options in this section.
- NTFS (Recommended) : Selecting NTFS will format the storage device to this format which is recommended for use with the SRT7014.
- EXT3 : EXT3 is a format used with the Linux operating system which the SRT7014 runs on. We do not recommend that you format storage devices in this format type if you wish to connect the storage device to a PC. If connected a separate program will be required for your PC to recognize the drive.
\* Warning : If you select Format Disk all data on the storage device will be deleted
- Testing USB Speed : Press to test USB speed for DVR.
- Auto Timeshift : Set Auto Timeshift to On or Off. When set to on unit will automatically begin Timeshift for pre-determined time set in the Timeshift Rec Time menu.
- Timeshift Duration: Set the preferred Timeshift Recording Time. (10Min/30Min/60Min/90min/120min)
- Skip Time: Set the preferred amount of Skip Forward and Back time during playback (5sec/10sec/30sec/1Min/2Min/3Min/5Min/10Min/20Min/30Min)

.... 41 ....
6.6 Media Manager
2) File Manager (Transferring Files from your SRT7014 to a PC or external USB HDD)
\* Note : Follow instructions in the "Connecting your receiver to a PC via your network" section on page 19 if you have not already connected a PC to the SRT7014
1 Press the YELLOW button on the remote control to create a new Network Connection or to select the external USB HDD that you would like to transfer to. Use the numeric keys to enter your PC's IP Address
② Press the button after inputting your IP address to add it into the File Manager section.
③ Select/HDD0 by pressing the button, use the arrow buttons to highlight records on the right hand side menu and press review the list of recorded files on the receivers hard drive.

④ Press the RED button on the remote control to select the desired files to be transferred or press the GREEN button to select all files on the HDD.
⑤ Once you have selected the files press the button to select the desired function of Move/ Copy/New Folder/Delete/Rename by pressing the button
⑥ Select your created Network drive or external USB HDD using the arrow buttons and press the button
7 Press the button to transfer the selected files to your Network Drive by selecting Copy, Paste or Move

The File Manager menu gives you access to all Media files you have stored on the internal HDD or any external storage devices you have connected to your SRT7014. To select the storage device you wish to access press the YELLOW button.
To access the Internal HDD select / HDD0
To access an external HDD select / USB0
Please note if you have no external device connected the receiver will display all the contents on the internal HDD.
Once you have selected your storage device by pressing the ok button all files and folders will be displayed in the list.
To sort files into their appropriate types, use the Group button to select from MUSIC, PHOTO, VIDEO and SWDATA.
Once you have selected the file type you wish to access, these file types will be displayed in the list.
Use the 📄 and 📄 arrow buttons to select the file you wish to access and press the OK button.
- MP3 Playback
Using the GROUP button select MUSIC.
① Select the MP3 file you wish to play using the 📄A / 📄V, OK in the file list.
② Press the button to hide the file list. Select and option using 📄 / 🎯, OK
③ Adjust the volume using ▲ / ▼
④ Press the ☐ button to display the MP3 file list.
5 Press the button to display information about the selected MP3 file
sould further information be available.
• LIST : Displays / hides the file list.
\- INFO : Displays Information about the selected file should further information be available.
\- YELLOW: Allows you to select which drive you wish to access should an external USB HDD be connected.
Using the GROUP button select MUSIC.
1 Press OK / OK to select a picture then press OK button to display the selected Image
.
2 Press the button to hide the file list. Select and option using . / . , .
③ Press the button to display the JPG file list.
4 Press the i button to display information about the selected MP3 file.
- HIDE infobar bar : Press the RED button to hide the info bar.
- -90 Degrees : Rotates the image anticlockwise.
• +90 Degrees Rotates the Image clockwise
• Press the Left arrow button to skip to the previous image.
• Press the Right arrow button to skip to the next image.
- SLIDE: Select SLIDE using the arrow buttons and press the OK button to adjust the slide show interval time from 3 seconds, 5 seconds, 10 seconds and OFF.
- INFO : Shows information about the selected file.
- Hide InfoBar: Hide all menu in screen except picture.
- Select Disk: Selects the hard disk or USB device on which images are stored on.
- Set as Background : set a background picture.
LIST: Shows / Hides the JPEG file list.

Using the GROUP button select VIDEO.
① Select the video file you want to play using the CHA / CHY , OK in the file list.
Press the OK button to begin playback of the selected video file. Once playback
has commenced all standard DVR buttons are active, Play, Pause, FF, RW, Skip Fwd,
Skip Back and Stop.


natural_image
Illustration of a person standing next to a large grid-patterned panel with a small sphere above, displayed on a platform (no text or symbols visible)
- Update (Firmware, Channel)
① You can find software updates for this model on our website at www.strong.com.au,
② Go here to download the latest version and place it onto the root directory of a USB drive do the following with the unit turned on and running, go to Menu → Media Manager → File Explorer → External USB
③ Select the software you want to update by using CHA /CHY In the menu.
4 Press the OK button to start the update.
Warning : do not switch off your receiver before the download is complete.

.... 45 ....
6.6 Media Manager
3) iShare
The iShare feature of the SRT7014 allows you to stream, view and access content from Apple and Android mobile devices.
For full instructions on the IShare feature please refer to the separate IShare flyer that came with your SRT7014.
46
6.7 System Information
Your receiver displays current information
regarding model name, software version and date of manufacture. This info is useful when downloading new software. Please note if you have performed a software update you must also perform a factory reset of the receiver. Please see Database Reset section in the Systems settings menu for instruction on page 23.

6.8 DVR
1) How to record on your STRONG SRT 7014 Digital Video Recorders internal HDD
The SRT7014 allows you to record 3 channels simultaneously while watching a 4th or a previously recorded program via 2 networks. E.G. Record Channel 7,
7 TWO, Channel 9 and watch GO. Or a previously recorded program. There are 4 ways to record TV programs on your STRONG DVR:
- Instant Recording
This method can be used if the program you wish to record is currently showing.
\- Switch your DVR to the channel that you wish to record.
- Press the button on your STRONG remote. The receiver will automatically begin recording.
- Please note that the default record duration is 3 hours. If you wish to change this, press the button again and a banner will appear where you can set your desired record start and stop duration using the set arrays.
- To stop the recording press the n button on the remote control. You will be prompted to confirm that you wish to stop recording. Select Yes and press the OK button.
- If you are recording more than one program, select the recording you wish to stop by pressing the button on that recording. A tick will be placed in the box next to that recording. Once you have selected the recording(s) you wish to stop, press the button. You will then be prompted to confirm the stop operation. Select Yes using the arrow buttons and press the play to stop recording
- EPG (Electronic Program Guide) Series Recording
This method of recording is unique feature that allows you to set the receiver to record a whole series with the touch of button.
- Press the button on your Strong remote.
- Press the button to select EPG mode.
- Use the 📂 Button to highlight the channel for the program you wish to record. Press OK
- Use the button to highlight the program name section of the EPG menu.
- Use the 📂 button to highlight the program you wish to record.
- Press the button while this program is highlighted. The selected program will then appear in orange. All subsequent programs in this series still have a blue dot with a white S next to the program name indicating that it is set to record as part of the series. This series will record every program when it is aired until the series record is cancelled. A series recording can be cancelled by either selecting the program in the EPG and pressing the BLUE button again or by deleting the timer setting in the Timer Manager menu.
- Once you have set the series record press the main key to return to normal viewing.
- Please Note: Setting series recordings may create undetected timer conflicts as EPG data is only available for 7 days in advance.
6.8 DVR
- Manual Timer Record
This method can be used to record at specific times.
- Press the button on your STRONG remote.
- Press the RED coloured key on your STRONG remote.
- Use the 📂 button to highlight a slot that is "OFF".
- Press your STRONG remote to select this timer slot
• Use the button to highlight Yes and press the button
- Press the any twice to return to normal viewing.
\- Use the # to change the "State" to how often you want the DVR to record at the desired time (Once, Daily, Weekly, Mon-Fri or Series).
\- Use the button to highlight the next option, and the or buttons to change the setting for each option.
\- If you want the receiver to power off once the recording has finished, in the Power Off section select Yes by pressing the key array keys
\- Once the last option is set and the button is pressed, you will see "Do you want to save?".
2) Timer Lead In and Lead Out Times
- Lead In and Lead Out Times can be set on your DVR to apply to all Timer recordings. Lead In and Lead Out times add specified amounts of time to the beginning and the end of Timer recordings so you dont miss the beginning or end of recorded programs.
- To set Lead In & Out times press and then press yellow key.
This will display the popup menu, and allow you to set the Lead In & out times to either 5,10 or 15 minutes.
6.8 DVR
3) Record on your STRONG SRT 7014 Digital Video Recorder using an external HDD via USB
- You can expand the storage capacity of your STRONG DVR by connecting an external HDD via the front or rear USB ports
- Before connecting the external HDD you will need to format the drive. Instructions on how to do this can be found on our website www.strong.com.au in the FAQ section.
• To record to the external HDD you will need to select it in the Menu. Press the button and using the @40 arrows select Media Manager by pressing @ button. This will display the Media Manager Menu. Using the @40 arrows select HDD Manager and press the @ button. This will display the HDD Manager Menu. The first item in the list is Default Disk. This will currently be displaying /Internal which corresponds to the internal HDD. To set the default disk to your external HDD press the @ arrow buttons until /External USB0 is displayed. This corresponds to your external USB. Once you have selected /External USB0 press the @ button, you will be prompted to save the changes made. Select Yes using the @ arrow button and press the @ button. The default disk is now set to the external HDD
- You can now perform all the recording options listed above using the external USB
• To set the default HDD back to the internal drive simply remove the external USB.
- Should you wish to have the external drive permanently connected follow the above instructions to select which HDD to record onto.
4) Playing Recorded TV programs:
• To access any programs you have recorded press the button on your remote control. The full list of the programs you have recorded will be displayed on the screen.
- To play these programs highlight them by using the button, arrow buttons and select them by pressing the button, this will preview the program. To watch the program full screen press the button again.
- Your recorded program will begin playback
During Playback the Following Options are available
• i
This displays the time- banner showing the progress of the recorded program
•
This button will pause playback of the program. To resume viewing either press the PAUSE or PLAY button
• (Fast Forward)
When playing a file you can search through the program by pressing the FF Button. By pressing the FF Button multiple times you can adjust the speed from x2, x4, x8, x16 and x32. To resume normal playback press the PLAY button.
(Rewind)
When playing a file you can search back through the program by pressing the RWD Button. By pressing the RWD Button multiple times you can adjust the speed from x2, x4, x8, x16 and x32. To resume normal playback press the PLAY button.
\- Slow Motion(1/2x, 1/4x)
While playing back a file you can select slow motion. By pressing the ▶ on multiple times you can adjust the speed to slow motion 1/2 or 1/4 speeds. To resume normal playback press the ▶ on again.
6.8 DVR6.8 DVR
\- Skip FWD & BCK
You can skip forwards or backwards through a file by pressing the SKIP FWD & SKIP BCK buttons.
The default skip time is 30 seconds
You can adjust the amount of skip time from 30secs, 1Min, 2Min, 3Min, 5Min, 10Min, 20Min and 30Min
To set the desired skip time press Select Media Manager using the arrow keys and then select Disk Manager by pressing the button.
Highlight Skip Time. Using the 'end arrow buttons' select the desired Skip Time. To store this setting press the button and select Yes using the button.
5) Deleting Recorded TV programs:
- To delete a recorded TV program press the button, when the list of recorded files is displayed select the file you wish to delete by pressing the arrow button.
- Press the BLUE button to enter delete mode. Now press the OK button and a "X" will be placed next to the file you have selected to delete. (You can select more than one program at a time to delete)
- Press the BLUE button again to delete the file. You will be then prompted to confirm the deletion of file(s). To confirm deletion select Yes and press the button. You will now be returned to normal viewing.
6.8 DVR
6) Lock Recorded TV programs:
• To protect a recorded program from accidental deletion or to restrict the viewing of recorded programs to specific audience, programs can be locked.
• To Lock a program press the button to display the recorded programs
- Press the GREEN button, you will be prompted to enter your PIN (the default PIN is "0000"), this will put the receiver into File Lock Mode. (To set your own personal PIN number for the receiver please refer to the Security Settings, Parental Lock Section in this manual on page 23.
- Select the recorded program you wish to lock use the arrow buttons and press the button. A padlock will appear next to the selected file. This file is now locked.
- To return to normal mode either press the button.
- Once a recorded file has been locked you will be required to enter the PIN number to view or delete this program
7) Rename Recorded TV programs:
- Recorded programs can be renamed once recording is complete
- To Rename programs press the button to display the recorded programs
- Select the recorded program you wish to rename by using the arrow keys and press the Yellow button
- The file name will be highlighted. Now press the button to bring up a virtual key board.
- Using the arrow keys select the desired letters to make up the new file name and press the button
- Once you have completed the new file name press the .441ton. You will be
prompted to save the changes, select Yes and press OK save
6.8 DVR
8) Bookmarking Recorded Programs
- The SRT 7014 will set auto bookmarks to each recorded program. Once a recorded program has been viewed, a bookmark will be set at the position playback was stopped. If the recorded program is watched in full a bookmark position will not be set. If selected to be viewed again playback will begin at the beginning of the program.
- When the program is re selected for playback it will resume form the last viewed position.
- You can also set manual bookmarks during playback of recordings
- During playback press the RED button, a red triangle will appear on the playback progress bar indicating the bookmarked position. You can set multiple bookmarks in a program. (Maximum 20)
- Press the GREEN button and the current position will jump to the first bookmarked position and commence playback from this point.
- Press the YELLOW button and the current position will jump to the next bookmarked position and commence playback from this point.
- To delete the bookmarks press the RED button again and the red triangle will be removed. This needs to be performed for each bookmark
9) Editing Recorded Programs
- File Cut Feature
• The SRT 7014 allows you to cut sections out of recorded programs.
- While playing back a recorded program press the button twice. A menu will appear at the bottom of the screen.
- Press the Blue key will place the unit into the File Edit mode.
- Pressing 📂I input the start position of the file to be cut or copied.
- A small window will be displayed in the top left hand corner showing the time and frame of when the cut was started. You can now fast forward or skip to the desired position you wish cut or copy.
- Press the button to mark the end of the section to be cut or copied. You will then be asked whether you wish to Cut or Copy.
- By selecting Cut the selected portion will be deleted. Selecting Copy, copies this portion into a separate file in the File List.
- This file will be listed by the same name as the original file but will have E and digit in front of the name (e.g. E2-ONE HD)
6.8 DVR
10) Time Shift (Pause & Rewind Live TV)
- Timeshift allows you to Pause and Rewind Live TV. Timeshift can be set to Automatic or manual and can be activated as required
- To set TimeShift to Automatic press and select Media Manager, then select HDD Manager using the arrow buttons. Here you can set the AutoTimeshift function to ON or OFF.
- With Auto Timeshift set to ON your DVR will allow you to Pause or Rewind the current channel you have been viewing for a pre-determined time. The default Timeshift time is 60 minutes. You can adjust this time in the same HDD Manager menu under Timeshift Record Time. The options are 10min, 30min, 60min, 90min and 120min
- To activate Timeshift manually press the ☐ on on the remote control.
- This will pause the currently viewed program and allow you to resume watching from this point by pressing the ▶on.
- Your DVR will record the program to a buffer for the default time you have set in the menu
- Please note that if you have Auto Timeshift on it will reset every time you change the channel
6.9 MEDIA
Playing Media Files On Your SRT 7014:
• The SRT 7014 is compatible with most PC type media files
• These files can be played back on your receiver via the USB ports or SD Card Reader
• To Playback media files, firstly connect the storage device where files are stored
- Then press the MEDIA button on the remote control, this will bring up the list of connected storage devices. Select the desired storage device by pressing the button
- The list of files on the storage device will now be displayed on the screen. Select the file by pressing the OK or SHT arrow buttons and to play press the OK button. If the file is supported playback will begin. If the file is not supported you will be returned to the Media file list
- To stop playback press the button, this will bring you back to the list of files on your storage device
- Please note as there are many variations of file types and various audio codecs within certain file types, all media files may not be supported
6.10 PIP Function(Picture in Picture)
- PIP is the feature where one program (channel) is displayed on the main screen at the same time as another program (channel) is displayed in a smaller inset window
• To activate the PIP function press the PIP button
- This will bring a up Sub Channel List. From this list select the channel you wish to be displayed in the PIP window by pressing the button. Press the button again to remove the Sub Channel List
- To change the channel displayed in the PIP window press the PIP+ button to change the channel up, or press the PIP- button to change the channel down.
• To decrease the size of the PIP window press the PIP button
• To remove the PIP window (if window is at largest size) press the PIP button twice
- To remove the PIP window (if window is at the reduced size) press the PIP key once
- To switch between the main channel and the PIP channel press the PIP Swap button
Troubleshooting
There may be various reasons for the abnormal operation of the unit. Therefore, if the unit does not work properly, check it according to the procedures shown in the table below:
Problem
Possible causes
Remedy
The LED light on the front panel does not light
The AC power cord is disconnected.
Connect the power cord properly into the power socket.
No Picture or sound.
Wrong connection of the video/audio output to the TV input terminal.Wrong connection of the terrestrial cable.No signal or weak signal.Wrong setting of channel information in the MENU screen.
Connect the two terminals correctly with RCA or RF cable(s), HDMI cable(s).Connect the antenna cable correctly.Adjust the direction of the antenna.Check the cable connectionsType the setting values correctly.
Black-and-white screen or V-Hold.
Your TV mode (PAL/NTSC) is different from the terrestrial broadcasting mode.
Use a TV of the same mode.Connect a NTSC/PAL converter between the receiver and the TV.
The remote controller is not working.
Batteries are exhausted.Fluorescent light is Interfering with the remote controller.Remote controller is Incorrectly aimed.
Change the batteries.Switch off the light.Alm the remote control at the receiver.
Unit will not operate.
No Power or Switched off.
Check mains supply and ensure that the unit is witched on both at the mains and at the power switch on the rear of the receiver.
Specifications
System capabilities
Fully DVB compliant
TERRESTRIAL System capabilities Tuner & Channel Decoder
Input connector
IEC 169-2, Female
Loop-through out
IEC 169-2, Male
Frequency range
170 - 230 MHz, 470 - 862MHz
Input impedance
75 Ohms Nominal
Signal level
7.8MHz(-78dBm~25dBm) switchable by software
IF Bandwidth
7.8MHz(-3dB) switchable by software
Waveform
OFDM
Carrier Mode
2k and 8k hierarchical/non-hierarchical
Code Rate
1/2, 2/3, 3/4, 5/6, 7/8
Guard Interval
1/4, 1/8, 1/16, 1/32
System resource
Processor
32bit processor (450MHz)
DDR SDRAM
128Mbyte X 2
FLASH
NOR 8Mbyte, NAND 256Mbyte
EEPROM
256Kbit
Video decoder
MPEG-2
MPEG-2, MPEG-4, H.264
Data Rate
up to 15M bits/s
Resolution
1920 X 1080P/I, 1280 X 720P, 720 X 576P/I
Video format
PAL
Aspec Ratio
4:3,16:9
Teletext
DVB compliant
MPEG Audio
MPEG 1 layer I/II, MPEG 2 layer II, AC3 Dolby Digital
Type
Mono, Stereo, Joint Stereo
Sampling rates
32, 44.1 and 48 KHz
MPEG2 Video encoder
Video input
1x CVBS, 1x Component (YCbCr)
Support Video resolution
460L576I Only
Audio input
1x Audio R/L
Video Encoding method
Compliant to ISO/IEC13618-2 (MPEG2 video)MP@ML and ISO/IEC11172-2 (MPEG1 video)
Audio Encoding method
ISO/IEC11172-3 (MPEG1 audio) layer 1/2 compliant
Audio Sampling frequency
48KHz
Serial data interface
Connector
9pin D-sub male, Max 115K bps
Remote control
Code
NEC-IR
Operating condition
up to 7 Meter
SD card reader
Support SD spec
up to ver. 2.0(SDHC)
USB
USB Supply
DC 5V Max 500mA
Terrestrial ant Input
Antenna Supply
DC 5V Max 100mA
Power supply
Power consumption
max 50W
Passive standby
<1W(Compliance with MEPS)
Supply voltage
100V ~ 250V
Supply frequency
50Hz ~ 60Hz
Rear Panel connectors
Video
1 X RCA cinch
Audio L/R
2 X RCA cinch
Component(Y/Pb/Pr)
3 X RCA cinch
Video IN
1 X RCA cinch
Audio IN
2 X RCA cinch
Component(Y/Cb/Cr) IN
3 X RCA cinch
Serial data
9pin D-sub
IEC 169 - 24
IEC 169 - 24
Terrestrial ant input
IEC 169 - 2
Terrestrial ant output
IEC 169 - 2
S/PDIF
Fiber Optic
HDMI
Digital Video/Audio Output
USB
USB A-type
S-VIDEO
MINI-DIN
LAN
RJ-45
PhysicalSpecification
Size (W X H X D)
335 X 58.5 X 247(mm)
Weight (Net)
3 Kg

Disposal of Old Electrical & Electronic Equipment (Applicable in the European Union and other European Countries with separate collection systems)
This symbol on the product or on its packaging indicates that this product shall not be treated as household waste. Instead it shall be handed over to the applicable collection point for the recycling of electrical and electronic support. By using this product is disposed of correctly, you will help prevent potential negative consequences for the environment and human health, which could otherwise be caused by inappropriate waste handling of this product. The recycling of materials will help to conserve natural resources.
For more detailed information about recycling of this product, please contact your local city office, your household waste disposal service or the shop where you purchased the product.
💬 Hi! I'm your manual assistant.I know your STRONG SRT 7014.
How can I help you? (use, settings, error codes, maintenance, explaining a step from the manual, etc.)💡 Examples :
• How do I use it ?
• Error code E3 ?
• How do I clean it ?