CLR12W - Tumble dryer Creda - Free user manual and instructions
Find the device manual for free CLR12W Creda in PDF.


| Product Type | Tumble Dryer |
| Brand | Creda |
| Model | CLR12W |
| Capacity | 8 kg |
| Drying Type | Condenser |
| Energy Efficiency Class | C |
| Dimensions (H x W x D) | 85 x 60 x 60 cm |
| Weight | 40 kg |
| Power Supply | 230 V ~ 50 Hz |
| Power Consumption | 2500 W |
| Noise Level | 65 dB(A) |
| Programs | Cotton, Synthetics, Delicates, Quick 30 min, Anti-crease |
| Drying Temperature Options | High, Low, Cupboard Dry, Iron Dry |
| Lint Filter | Yes, removable and washable |
| Condenser Unit | Self-cleaning condenser |
| Child Lock | Yes |
| Delay Start | Up to 24 hours |
| End of Cycle Signal | Audible |
| Drum Material | Stainless steel |
| Maintenance | Clean lint filter after each use, empty water tank after each cycle |
| Spare Parts Availability | Contact Creda customer service or authorized dealers |
| Warranty | 2 years |
Frequently Asked Questions - CLR12W Creda
User questions about CLR12W Creda
0 question about this device. Answer the ones you know or ask your own.
Ask a new question about this device
Download the instructions for your Tumble dryer in PDF format for free! Find your manual CLR12W - Creda and take your electronic device back in hand. On this page are published all the documents necessary for the use of your device. CLR12W by Creda.
USER MANUAL CLR12W Creda
Important Safety Advice
WARNING - THE SURFACE OF THIS RADIATOR CAN BE HOT.
In order to be effective the towel rail will get hot, however momentary contact with any part of it should not cause injury.
The heater is to be installed so that switches and other controls cannot be touched by a person in the bath or shower
CAUTION - This appliance can be used by children aged from 8 years and above and persons with reduced physical, sensory or mental capabilities or lack of experience and knowledge if they have been given supervision or instruction concerning use of the appliance in a safe way and understand the hazards involved. Children shall not play with the appliance. Cleaning and user maintenance shall not be made by children without supervision.
Children of less than 3 years should be kept away unless continuously supervised. Children aged from 3 years and less than 8 years shall only switch on/off the appliance provided that it has been placed or installed in its intended normal operating position and they have been given supervision or instruction concerning the use of the appliance in a safe way and understand the hazards involved. Children aged from 3 years and less than 8 years shall not plug in, regulate and clean the appliance or perform user maintenance.
CAUTION: Some parts of this product can become very hot and cause burns. Particular attention has to be given where children and vulnerable people are present.
Precautions should be taken to ensure that prolonged contact with the towel rail cannot occur. Particular care should be taken in confined areas where accidental prolonged contact with the rail could be more likely to occur.
This appliance should only be used to dry fabrics washed in water using commonly available detergents.
A means for disconnection must be incorporated in the fixed wiring in accordance with the wiring rules. The supply circuit to the heater must incorporate a double pole isolating switch having a contact separation of at least 3mm.
If the supply cord is damaged, it must be replaced by the manufacturer, its service agent or similarly qualified persons in order to avoid a hazard.
IMPORTANT - If the towel rail is to be installed in a place used by the public, a warning notice should be placed adjacent to the rail advising that the surface can be hot.
WARNING - the towel rail is a sealed unit and is filled and sealed under controlled conditions. Under no circumstances should the seal of the unit be compromised
WARNING - In order to avoid a hazard for very young children, this appliance should be installed so that the lowest heated rail is at least 600mm above the floor.
General
The towel rail is designed to provide an all year round service for airing towels and articles of clothing. It is not intended to provide a sole heating service, but will take the chill off a small size bathroom, lavatory or en suite.
No routine maintenance is necessary apart from occasional cleaning. The unit is splashproof to IPX5 standard.
Electrical
WARNING - This appliance must be earthed
The electrical installation of this towel rail must be carried out by a competent electrician in accordance with the current I.E.E Regulations. The towel rail is suitable for use on an A.C.\~ electrical supply. Before installation check that the supply voltage corresponds with that marked on the rail.
IMPORTANT - The wires in the mains lead are coloured in accordance with the following code:
BLUE - NEUTRAL
BROWN - LIVE
GREEN/ YELLOW - EARTH
As the colours of the wires in the mains lead of this appliance may not correspond with the coloured markings identifying the terminals in your plug, proceed as follows:
The wire which is coloured GREEN and YELLOW must be connected to the terminal in the plug which is marked with the letter E or by the earth symbol ⊕ or coloured green or green and yellow.
The wire which is coloured BLUE must be connected to the terminal which is marked with the letter N or coloured black.
The wire which is coloured BROWN must be connected to the terminal which is marked with the letter L or coloured red.
This appliance must only be used on A.C. mains supply of 230/240 Volts\~.
Installation
If fitted in a room containing a bath or shower, to comply with the current I.E.E. Regulations, a cable outlet will be necessary with the supply to the heater controlled by a double-pole pull-cord switch having a contact separation of 3mm in each pole. The body of the switch should be situated as to be normally inaccessible to a person using a bath or shower. Alternatively the switch can be located outside of the bathroom.
IMPORTANT - Protect the electrical connection whilst handling the towel rail.
The towel rail must be permanently fixed to the wall using the wall brackets supplied.
WARNING - to ensure safe, correct operation the rail must only be mounted vertically as shown in Fig. 1, observing the minimum clearances stated.
WARNING - The towel rail is heavy. Care must be taken when lifting and fitting the towel rail.
Wall mounting
The wall mounting accessory pack contains the following:
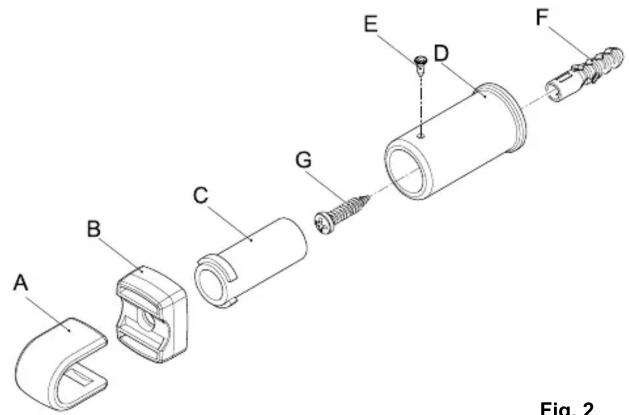
Fig. 2
(A) 4 Mounting collars,
(B) 4 Rail seats,
(C) 4 Inner wall bracket sleeve,
(D) 4 Outer wall bracket sleeve,
(E) 4 Position locking screws,
(F) 4 Wall plugs,
(G) 4 Wall mounting screws,
Procedure for wall mounting
Wall mounting dimensions:
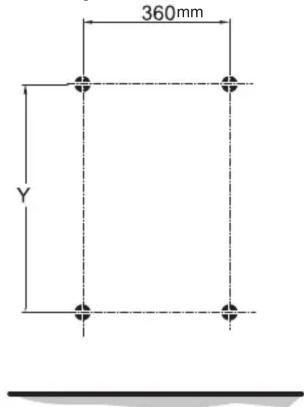
| Model Y (mm) |
| CLR5 300 |
| CLR7 500 |
| CLR10 800 |
| CLR12 1000 |
Fig. 3
Step 1
Mark suitable mounting hole positions for the fixing brackets (ensuring they are horizontal) - see Fig. 3, ensure to allow enough room above and below to maintain the minimum clearance stated in Fig. 1.
Step 2
Drill and plug (F) the wall to suit. Fix the outer wall bracket sleeve (D) to the wall using the screws provided (G). Ensure to align the bracket so that the fixing hole is accessible once the towel rail is fitted - see Fig. 4.
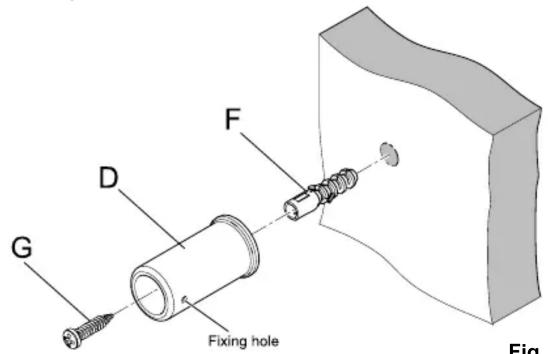
Fig. 4
Note: we recommend that the fixing hole is positioned horizontally, towards the side of the towel rail. This will allow easy access with a screw driver when fixing the rail in its final position.
Step 3
Carefully assemble the four mounting collars (A) and rail seats (B) to the towel rail and secure in the positions by inserting and turning the inner bracket sleeve (C) through 90 degrees as shown in Fig. 5. The brackets should be placed on the bottom and second from top rails and separated by a distance of 360mm. Ensure the inner bracket sleeves are facing directly backwards.
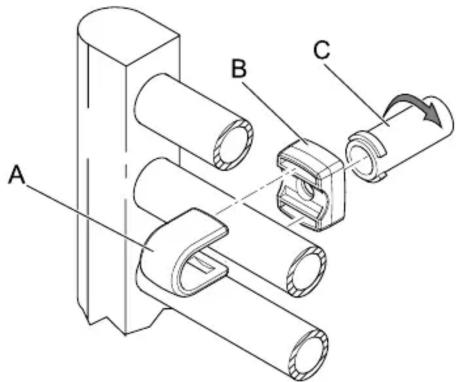
Fig. 5
Step 4
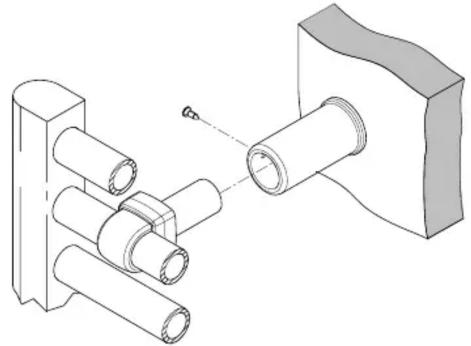
Lift the towel rail complete with the bracket assemblies and align with the outer bracket sleeves which were previously fixed to the wall. Insert the inner sleeve brackets into the outer sleeve brackets and fix in place using the position locking screws (E). The rail is then locked in place by rotating the pins a quarter turn - see Fig. 6.
natural_image
Technical illustration of a mechanical assembly with cylindrical components and a block (no text or symbols)Fig. 6
Drying and airing towels
It is recommended that for efficient drying, no more than two layers of towels or similar fabric should be draped over the rail. Items should be placed evenly over the whole surface of the rail where possible.
It is not advisable to leave very damp towels or clothes on the towel rail when not in use, as this may in time, affect the paint finish.
The rail, although hot to the touch is not hot enough to scorch or burn fabrics. However, soap and detergents remaining in articles after washing can cause discoloration. Therefore care should be taken to thoroughly rinse articles before airing.
Operation (Electrical)
Heat will be distributed along each of the rails.
Some variation in the temperature across the surface of the rail is normal. When the appliance is covered the heating pattern of the rails may alter, and generally temperatures at the upper part of that rail will rise.
The towel rail may be switched on and off at the isolating wall switch which must be positioned outside the bathroom, or operated by means of a pull cord switch.
A further means of control would be to link the towel rail to a room thermostat and/or timer. A room thermostat will ensure that the rail automatically switches off in warmer weather. A timer will allow for short periods of use.
Note: If the towel rail is located in a bathroom the adjustment for these controls must be located outside the bathroom.
Maintenance
There are no user serviceable parts on the towel rail.
The rail is filled with a precise quantity of specified liquid and should never need draining or refilling. Repairs requiring the opening of the liquid-tight seal must only be made by the manufacturer's Service Agent. Any leakage must be reported to the manufacturer's Service Agent.
The element and cable are a single unit and any maintenance must be carried out by the manufacturers Service Agent using the recommended parts.
Cleaning
The finish on your towel rail can be maintained by occasionally wiping over with a damp cloth and lightly finishing with a soft dry cloth. This should only be carried out when the rail is cold. Do not use abrasive cleaning powders as this could damage the surface finish.
Recycling
For electrical products sold within the European Community.

At the end of the electrical products useful life it should not be disposed of with household waste. Please recycle where facilities exist. Check with your Local Authority or retailer for recycling advice in your country.
After Sales Service
If this product appears damaged when first received or does not function correctly contact us by e-mail customer.services@credaheating.co.uk or call 0844 879 35 88 and we will be able to help.
Do Not Return the product in the first instance as this may delay us providing you with a satisfactory service.
ACCIDENTAL DAMAGE IS NOT COVERED UNDER THE WARRANTY.
Your product is guaranteed for two years from the date of purchase. Within this period, we undertake to repair this product free of charge provided it has been installed and operated in accordance with these instructions.
Should you require assistance with this product please go to www.credaheating.co.uk and click on "Customer Support" or e-mail us at customer.services@credaeheating.co.uk
Alternatively call our contact centre on 0844 879 35 88 (UK only). This is a Lo-call no from a BT landline - other providers including mobile phones may charge you more.
To assist you, we will need the following information: model number & serial number (these can be found on the product), nature of the fault and date of purchase. Please retain your receipt as proof of purchase. Your rights under this guarantee are additional to your statutory rights, which in turn are not affected by this guarantee.
Spares can be purchased on line, go to www.credaheating.co.uk Please retain your receipt as proof of purchase.

The product complies with the European Safety Standards EN60335-2-43 and the European Standard Electromagnetic Compatibility (EMC) EN55014, EN60555-2 and EN60555-3 These cover the essential requirements of EEC Directives 2006/95/EC and 2004/108/EC
CREDA HEATING
MILLBROOK HOUSE
GRANGE DRIVE
HEDGE END
SOUTHAMPTON
SO30 2DF
TEL: 0844 879 3588
FAX: 0844 879 3583
WEBSITE: www.credaheating.co.uk
[c] GDC Group Ltd,
All rights reserved. Material contained in this publication may not be reproduced in whole or in part, without prior permission in writing of GDC Group Ltd,
- Important Safety Advice
- General
- Electrical
- WARNING - This appliance must be earthed
- BLUE - NEUTRAL
- BROWN - LIVE
- GREEN/ YELLOW - EARTH
- Installation
- IMPORTANT - Protect the electrical connection whilst handling the towel rail.
- Wall mounting
- Procedure for wall mounting
- Step 1
- Step 2
- Step 3
- Step 4
- Drying and airing towels
- Operation (Electrical)
- Maintenance
- Cleaning
- Recycling
- After Sales Service
- ACCIDENTAL DAMAGE IS NOT COVERED UNDER THE WARRANTY.
Brand : Creda
Model : CLR12W
Category : Tumble dryer