
403BT - Convector DIMPLEX - Free user manual and instructions
Find the device manual for free 403BT DIMPLEX in PDF.


| Product Type | Convector Heater |
| Brand | Dimplex |
| Model | 403BT |
| Heating Power | 1500 W (1500 Btu/h equivalent) |
| Power Supply | 240 V ~ 50 Hz |
| Current Draw | 6.25 A |
| Heating Element | Sealed convection element |
| Dimensions (W x H x D) | 24.0 x 16.5 x 8.5 in (610 x 419 x 216 mm) |
| Weight | 8.8 lb (4.0 kg) |
| Control Type | Adjustable thermostat and power switch (low/high/off) |
| Safety Features | Overheat protection sensor, tip-over safety switch |
| Mounting | Freestanding or wall-mounted (brackets included) |
| Finish | White powder-coated steel |
| Certifications | cULus listed, ENERGY STAR qualified |
| Warranty | 3 years limited |
| Recommended Room Size | Up to 150 sq ft (14 m²) |
| Noise Level | < 25 dB (near silent) |
| Energy Efficiency | 99% efficient electric resistance heating |
| Maintenance | Wipe with dry cloth; do not use water or solvents |
| Spare Parts Availability | Thermostats, switches, fan motors available through service centers |
Frequently Asked Questions - 403BT DIMPLEX
User questions about 403BT DIMPLEX
0 question about this device. Answer the ones you know or ask your own.
Ask a new question about this device
Download the instructions for your Convector in PDF format for free! Find your manual 403BT - DIMPLEX and take your electronic device back in hand. On this page are published all the documents necessary for the use of your device. 403BT by DIMPLEX.
USER MANUAL 403BT DIMPLEX
Dimplex Convector Heater
Models : 403BTB & 403BT

Intertek
INDCUK40BT Issue 4
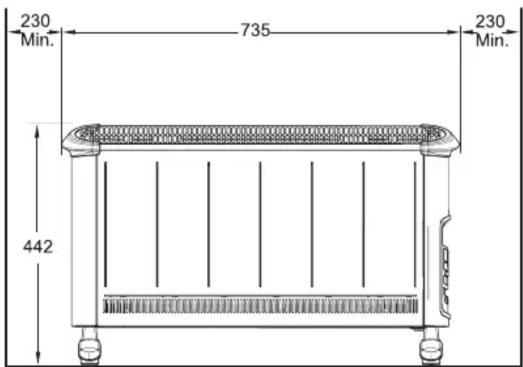
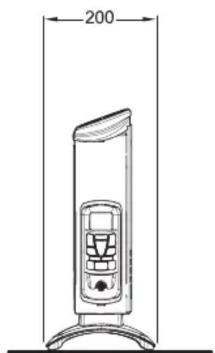
Dimensions (Millimetres)
natural_image
Line drawing of a portable electronic device with a 200-unit height dimension (no text or symbols on the device itself)Fig. 1
IMPORTANT : THESE INSTRUCTIONS SHOULD BE READ CAREFULLY AND RETAINED FOR FUTURE REFERENCE
As with all portable heating appliances - This product is only suitable for well insulated spaces or occasional use
Important Safety Advice
WARNING: This appliance must not be used in a bathroom.
WARNING: Do not use this heater in the immediate surroundings of a bath, a shower or a swimming pool.
WARNING: This heater must not be located immediately below a fixed socket outlet.

The heater carries a warning symbol to alert the user to the risk of fire that exists if the heater is accidentally covered.
WARNING: In order to avoid a hazard due to inadvertent resetting of the thermal cut-out, this appliance must not be supplied through an external switching device, such as a timer, or connected to a circuit that is regularly switched on and off by the utility.
This appliance can be used by children aged from 8 years and above and persons with reduced physical, sensory or mental capabilities or lack of experience or knowledge if they have been given supervision or instruction concerning the use of the appliance in a safe way and understand the hazards involved. Children shall not play with the appliance. Cleaning and user maintenance shall not be made by children without supervision.
Children of less than 3 years should be kept away unless continuously supervised. Children aged from 3 years and less than 8 years shall only switch on/off the appliance provided that it has been placed or installed in its intended normal operating position and they have been given supervision or instruction concerning the use of the appliance in a safe way and understand the hazards involved. Children aged from 3 years and less than 8 years shall not plug in, regulate and clean the appliance or perform user maintenance.
CAUTION: Some parts of this product can become very hot and cause burns. Particular
attention has to be given where children and vulnerable people are present.
WARNING: Do not use the heater in small rooms when they are occupied by persons who are not capable of leaving the room on their own, unless constant supervision is provided.
WARNING: To reduce the risk of fire, keep textiles, curtains or any other flammable material a minimum distance of 1m from the air outlet.
Do not use the heater if it has been dropped. Do not use the heater if there are any visible signs of damage.
If the mains lead is damaged, it must be replaced by the manufacturer or its service agent or a similarly qualified person in order to avoid hazard.
The heater should only be used on a horizontal and stable surface with the feet securely fitted
Electrical connection
WARNING – THIS APPLIANCE MUST BE EARTHED
The use of an extension lead or multi-plug adaptor is not advised when connecting this product to the mains. Connection through these devices could lead to a risk of overloading, overheating and even fire at the extension lead or adaptor due to inadequate connection quality.
This heater must be used on an \~ supply only and the voltage marked on the heater must correspond to the supply voltage. This heater is fitted with a rewireable plug incorporating a 13 amp fuse. In the event of replacing the fuse in the plug supplied, a 13 amp fuse approved by ASTA to BS 1362 must be used. If any other type of plug is used, a 15 amp fuse must be fitted in the plug, the adaptor, or at the distribution board.
IMPORTANT : If the plug is not suitable for your socket, the 13 amp plug should be removed. Before wiring the appropriate plug, please note that the wires in this mains lead are coloured in accordance with the following code : GREEN AND YELLOW: EARTH
BLUE
BROWN
[Non-Text]
NEUTRAL
LIVE
Connect the GREEN AND YELLOW wire to the terminal marked 'E' or by the earth symbol 🌐 or coloured GREEN or GREEN AND YELLOW. Connect the BROWN wire to the terminal marked 'L' or coloured RED. Connect the BLUE wire to the terminal marked 'N' or coloured BLACK.
Using the heater
WARNING: DO NOT USE THE HEATER UNTIL THE FEET ARE FITTED CORRECTLY.
The product can be used as an installed or portable unit. Once the desired application has been decided upon and the requirements below have been met the product is ready to be used. Simply plug in and switch on at the wall socket.
Please note – the element has been coated with a protective film which will burn off during the first few minutes of use and may cause a small amount of fuming. This is quite normal – the fumes are non-toxic and will quickly disappear.
We recommend that you open a window to ventilate the room when using the heater for the first time.
Positioning the heater
Always ensure that the heater is stood on a firm, level base near to, but not directly beneath, a suitable mains supply socket.
Ensure that curtains and furniture are not positioned close to the chosen position, as this would create a potential fire hazard.
Product Assembly
WARNING: THE HEATER SHOULD NEVER BE USED WITHOUT THE FEET SECURELY FITTED.
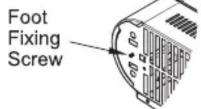
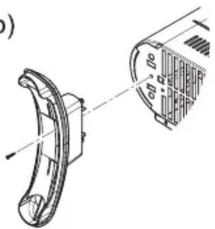
Lay the heater on its back so the underneath of the product is accessible. Locate and remove the foot fixing screw - see Fig. 2(a). Clip the foot in place and secure using the foot fixing screw - see Fig. 2(b).
(a)
(b)
natural_image
Technical illustration of a mechanical component with cross-sectional view (no text or symbols)Fig. 2
Controls
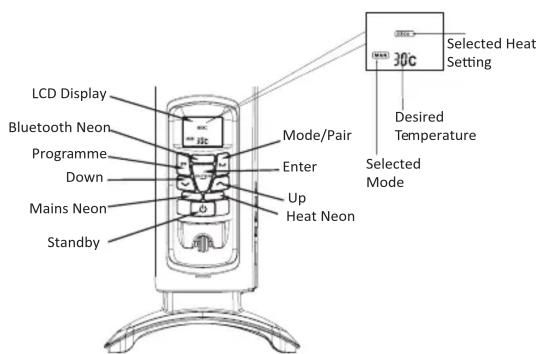
Fig. 3
NOTE: When using the appliance or setting appliance controls always ensure that the heater is stood on a firm level base. Do not tilt the appliance at any time.
Operational modes
The electronic control has four control modes: AUTO, MANUAL, BOOST and STANDBY mode.
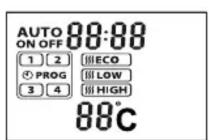
Auto Mode
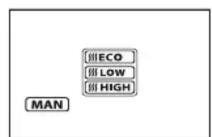
Manual Mode
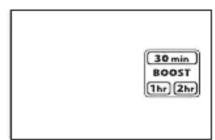
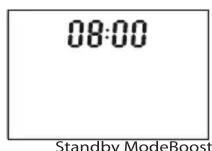
Fig. 4
In both MANUAL and AUTO mode there are three heat settings options:
'Intelligent' Eco Mode - This is the initial default setting, the convector will automatically start up in this setting once power is applied. The convector will automatically regulate the room temperature accordingly. In this mode the convector operates at full power, however the output of the convector is automatically reduced and regulated as the room temperature approaches the desired level. This mode optimises energy use by calculating the most efficient and effective way to achieve the desired temperature setting. The desired room temperature can be adjusted at any time during operation by pressing the appropriate key.
Low Heat - In this option, the appliance will operate at a low heat setting, the appliance will automatically cycle at this setting to maintain the room temperature setting.
High Heat - In this option, the appliance will operate at a high heat setting, the appliance will automatically cycle at this setting to maintain the room temperature setting.
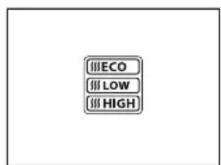
Fig. 5
Press the Mode key, 'Mto toggle through the modes and the ENTER key to confirm the mode selection. Note: when selecting the mode if the ENTER key is not pressed, after 5 seconds the heater will activate the mode shown on the LCD display.
Initial Operation
When the heater is initially connected to the mains the heater will power up in MANUAL mode with a set temperature of 30^ C. The Mains and Heat indication neon will be lit and the LCD display will be as per Fig.6. For subsequent operations the unit will power up in its previous state, i.e. if it was in the boost mode when the unit was plugged out when power is reinstated it will resume in boost mode.
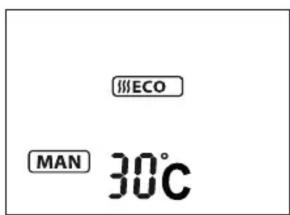
Fig. 6
Setting the Time
To set the time press and hold 'for two seconds, the time digits will begin flashing (Fig. 7). Press the ‘^’ or ‘√’ buttons to set the time and press ENTER to confirm. The heater will revert to the previous operational mode.
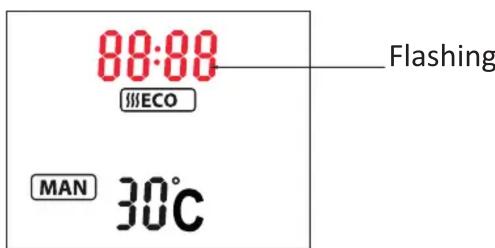
Fig. 7
Standby Mode
With the heater ON, if the button is pressed, the heater will go into standby mode; the heater switches off, the LCD will display the current set time, only the mains neon remains illuminated. On pressing the button again the heater will come on in Manual mode and with a set point setting of 25 °C.
Manual Operation
Repeatedly press the Mbutton until the manual mode is visible on the LCD and confirm the mode selection by pressing ENTER. Use the arrow keys to select the desired heat setting (see Operational modes for heat setting details) and confirm the selection by pressing the ENTER key. The desired temperature can be adjusted at any point during the Manual mode operation, see Setting the Desired temperature.
Auto mode Operation
Repeatedly press the 'Button' until the Auto mode is visible on the LCD (see Fig.8) and confirm the mode selection by pressing ENTER. The heater will operate as per the pre-programmed time and temperature profile (see - Setting the Timer Profile). Note: if no timer profile has been set it will not be possible to select 'Auto' mode, it is necessary to set up a time program before Auto mode can be selected.
During Auto mode operation the LCD display will show the current heat status, the active programme segment, the time for the next status change, the heat setting and the set temperature, see Fig.9 for details.
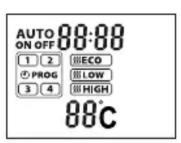
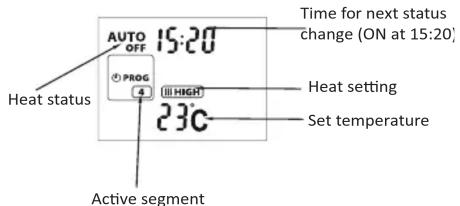
Fig. 9Fig.
Boost mode Operation
Repeatedly press the 'button until the Boost mode is visible on the LCD (see Fig.10) and confirm the mode selection by pressing ENTER. Once the boost mode is activated it will be necessary select the boost period, there are three periods available to choose from, 30 minutes, 1 hour and 2 hours. Use the arrow keys to select the desired boost period and confirm the selection using the ENTER key. The default heat setting is ECO mode and the set temperature is 25°C. The set temperature can be adjusted if desired, see Setting the Desired temperature. When the boost mode is active the LCD display will show the boost mode, timer period selected and the desired set temperature. The time display will toggle between the current time and time remaining for the selected boost period.
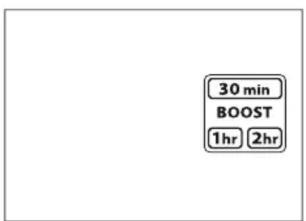
Fig. 10
Frost protection mode
The appliance has a frost protection mode. This setting is useful in areas such as garages to assist in the prevention of frost damage. In Manual mode, if the thermostat is set to its minimum setting '5°C', the heater will cycle ON and OFF to maintain a temperature of approximately 5°C and help protect against frosty conditions. The frost protection symbol will be displayed on the LCD display when frost protection mode is activated.
Indicator Neons
Mains On Neon: The mains neon, (see Fig. 3), remains illuminated when the power is supplied to the product. Note: This does not indicate whether the heating elements are on.
Heat Neon: Heat neon remains on when the heating element is active. Once the desired temperature is reached and the element turns off, the heat neon will indicate this by remaining off.
Bluetooth Neon: The Bluetooth neon will remain illuminated while successfully paired to another device.
Setting the Desired Temperature
The desired temperature can be set using the ‘or’ keys. The temperature can be set from 5^ C to 30^ C and this will be shown on the display. When the temperature is reached the heater will automatically switch OFF. If the ambient temperature drops the heater will come on again automatically.
Setting the Timer Programmes
There are four program segments available, P1, P2, P3 and P4. For each segment it is possible to set a desired 'On' time, 'Off' time, Heat mode and set temperature. It is not necessary to set all four segments if not required. The default setting is for all segments to be Off. To turn off a pre-programmed segment it is necessary to set both the 'On' time and the 'Off' time to 00:00. In order to set up a time/temperature profile the following steps must be completed:
- To activate the programming screen press the ⏻ key. The program settings screen for P1 will be displayed and the time will be flashing. This flashing time is the 'On' time for P1 and can be adjusted using arrow keys. Once the desired 'On' time has been set press the ENTER key to confirm the time.
- Select a heat setting using the arrow keys and confirm the selection using the ENTER key.
- Set the desired temperature using the arrow keys and confirm the setting using the ENTER key.
-
The 'Off' time must then be set by using the arrow keys, it is necessary to then press the ENTER key to confirm the 'Off' time setting.
-
The setup screen will then revert to the P1 'On' time set up screen, at this point it is possible move to the P2 segment by pressing the 'Pkey.
-
If required P2, P3 and P4 segment can be set up using steps 1-4 above.
-
If it is not required to set up P2, P3 and P4 segment at this stage, continue to press the 'P' key until the heater reverts to the previous operational mode. Alternatively if no keys are pressed the programming mode will time out and revert to the previous operational mode. Remote Bluetooth Operation
The appliance can be controlled remotely using a smartphone or similar device. To facilitate this remote operation it is necessary to first download the Dimplex F app. The app is available on both android and IOS devices and is available free from the Apple or Android App store. The App is compatible with Android version 4.3 and above and IOS version 5 and above.
Once the App has been downloaded it is necessary to pair the appliance with the smartphone to complete the remote setup. Please follow the steps shown below:
- Launch the Dimplex app on the smartphone or similar device.
- To initiate pairing mode on the appliance press and hold the 'button for two seconds. The LCD screen will go blank with the exception of the Bluetooth logo flashing in the bottom right hand corner, See Fig.11.This indicates that the device is advertising to be paired with the app.
- On the smart phone the appliance should now be visible on the pairing screen, this will be a unique 6 digit code but will always start with EC, for example 'ECBC17'. Select this device and press connect to initiate pairing.
- Once the paring process is complete the app can be used to control the appliance.
- Once paired successfully the Bluetooth logo will stop flashing and the Bluetooth neon will be illuminated.
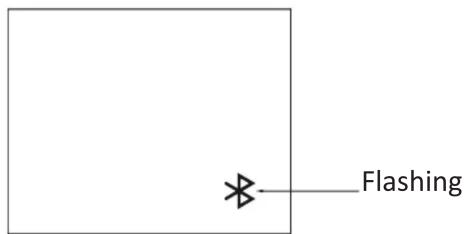
Fig. 11
Safety – overheat protection
For your safety, this appliance is fitted with a thermal cut-out. In the event that the product overheats, the cut-out switches the heater off automatically. To bring the heater back into operation, remove the cause of the overheating, then unplug or turn off the electrical supply to the heater for a few minutes. When the heater has cooled sufficiently, re-connect and switch on the heater.
Important Notes
Although this heater is manufactured to comply with the relevant safety standards, certain types of carpets could become discoloured by the temperatures under a portable heater. If you are concerned about this, we recommend that you contact the carpet manufacturer for guidance. Alternatively, either stand the heater on a suitable base to shield the carpet – call our Helpline for further advice.
You may notice some parts of the element appearing to be hotter from time to time because of the variable airflow through the heater. This does not cause a safety hazard.
The heat outlet grille may become discoloured with use – this is caused by airborne pollution and is not a fault.
Recycling
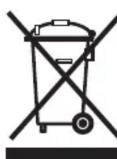
*For electrical products sold within the European Community. At the end of the electrical products useful life it should not be disposed of with household waste.
Please recycle where facilities exist.
Check with your Local Authority or retailer for recycling advice in your country.
Cleaning
WARNING – ALWAYS DISCONNECT FROM THE POWER SUPPLY BEFORE CLEANING THE HEATER.
Before commencing cleaning, switch off the heater and allow it to cool. Disconnect the electricity supply to the appliance.
The outside can be cleaned by wiping it over with a soft damp cloth and then dried. Do not use abrasive cleaning powders or furniture polish, as this can damage the surface finish.
After Sales Service and Guarantee terms and conditions
Your product is guaranteed for 3 years from the date of purchase. If you experience a problem with our Dimplex product, which is found to be defective due to faulty materials or workmanship within the Guarantee Period, this Dimplex Guarantee will cover repair or - at the discretion of Dimplex- replacement with a functionally equivalent Dimplex product.
Within the guarantee period we undertake to repair or exchange this product free of charge providing:
a) Proof of purchase such as a sales receipt should be provided, showing that the appliance was bought within the 36-months prior to registering the defect/fault.
b) The appliance was correctly installed and operated in accordance with the manufacturer's instructions and used solely for domestic purposes.
c) The defect/fault was not as a result of accident, misuse, unauthorised modification or inexpert repair
Your rights under this guarantee are additional to your statutory rights, which in turn are not affected by this guarantee.
If after following these steps your product still does not operate you should return it to your point of purchase. Please do not return a faulty product to us as this may result in loss or damage and delay in providing you with a satisfactory service.
Please retain your receipt as proof of purchase.
What is not covered by a Dimplex Guarantee?
The Dimplex Guarantee does not cover any of the following:
Any fault or damage to your Dimplex product due to faulty materials or workmanship occurring outside the [three year] Guarantee Period.
Normal wear and tear including parts that might wear out over time or consumables, such as [filters].
Any fault or damage occurring to any pre-owned Dimplex product or to any other equipment or property.
Accidental damage to your Dimplex product or damage to your Dimplex product from external sources (for example, transit, weather, electrical outages or power surges).
Fault or damage to your Dimplex product which is:
- not due to faulty materials or workmanship or which is due to circumstances outside Dimplex's control.
- caused by use of your Dimplex product for anything other than normal domestic household purposes in the country where it was purchased.
- caused by any misuse, abuse or negligent use of the Dimplex product, including but not limited to any failure to use it in accordance with the Operating Instructions supplied with the product.
- caused by any failure to assemble, install clean and maintain your Dimplex product in accordance with the Operating Instructions supplied with the product unless this was carried out by Dimplex or its authorised dealers.
- caused by repairs or alterations to your Dimplex product not carried out by Dimplex service personnel or its authorised dealer(s).
Terms and Conditions
The Dimplex Guarantee is valid for three calendar years from the date of purchase of your Dimplex product from a recognised retailer in the country of purchase and use, or the date of delivery of the product if later, always provided the original receipt has been retained and is produced as proof of purchase.
You must provide to Dimplex or its authorised agents on request the original receipt as proof of purchase and - if required by Dimplex - proof of delivery. If you are unable to provide this documentation, you will be required to pay for any repair work required.
Any repair work under the Dimplex Guarantee will be carried out by Dimplex or its authorised dealer(s) and any parts that are replaced will become the property of Dimplex. Any repairs performed under the Dimplex Guarantee will not extend the Guarantee Period.
Any replacement of your Dimplex product by Dimplex during the Guarantee Period will start the three-year Guarantee Period afresh from the date of delivery of the replacement Dimplex product to you.
The Dimplex Guarantee does not entitle you to recovery of any indirect or consequential loss or damage including but not limited to loss or damage to any other property.
The Dimplex Guarantee is in addition to your statutory rights as a consumer and your statutory rights are not affected by this Dimplex Guarantee.
Contact Dimplex
If you have any questions about what the Dimplex Guarantee covers and does not cover or how to claim under the Dimplex Guarantee, please contact us:
GDC Group LTD, Millbrook House, Grange Drive, Hedge End, Southampton SO30 2DF
Telephone: 0844 879 3588
Email: customer.services@gdcgroup.co.uk
Visit: www.gdcgroup.co.uk
| Model Identifier(s): | 403BTB 403BT | |||
| Heat output | ||||
| Nominal heat output Pnom 3.0 3.0 | kW | |||
| Minimum heat output (indicative) Pmin 1.0 1.0 | kW | |||
| Maximum continuous heat output Pmax,c 3.0 3.0 | kW | |||
| Auxiliary electricity Consumption | ||||
| At nominal heat output elmax 0.0 0.0 | kW | |||
| At minimum heat output elmin | 0.0 0.0 | kW | ||
| In standby mode | eISB | 0.0005 | 0.0005 | kW |
| Type of heat output/ room temperature control | ||||
| With mechanical thermostat room temperature control | Yes | |||
| Contact details | GDHV, Milbrook House, Grange Drive, Hedge End, Southampton, SO30 2DF | |||
- Dimplex Convector Heater
- Models : 403BTB & 403BT
- Important Safety Advice
- Electrical connection
- WARNING – THIS APPLIANCE MUST BE EARTHED
- Using the heater
- WARNING: DO NOT USE THE HEATER UNTIL THE FEET ARE FITTED CORRECTLY.
- Positioning the heater
- Product Assembly
- WARNING: THE HEATER SHOULD NEVER BE USED WITHOUT THE FEET SECURELY FITTED.
- Operational modes
- Initial Operation
- Setting the Time
- Standby Mode
- Manual Operation
- Auto mode Operation
- Boost mode Operation
- Frost protection mode
- Indicator Neons
- Setting the Desired Temperature
- Setting the Timer Programmes
- Safety – overheat protection
- Important Notes
- Cleaning
- WARNING – ALWAYS DISCONNECT FROM THE POWER SUPPLY BEFORE CLEANING THE HEATER.
- After Sales Service and Guarantee terms and conditions
- What is not covered by a Dimplex Guarantee?
- Terms and Conditions
- Contact Dimplex
Brand : DIMPLEX
Model : 403BT
Category : Convector