MX500 - VHF Radio Oricom - Free user manual and instructions
Find the device manual for free MX500 Oricom in PDF.


| Product Type | VHF Marine Radio |
| Brand | Oricom |
| Model | MX500 |
| Frequency Range (TX) | 156.000 - 161.450 MHz |
| Frequency Range (RX) | 155.000 - 163.425 MHz |
| Output Power | 5W / 1W selectable (High/Low) |
| Battery | 1500 mAh Lithium-Ion (DC 3.7V) |
| Dimensions (H x W x D) | 140 x 65 x 41 mm |
| Weight | 247 g |
| Operating Temperature Range | -15°C to +55°C |
| Waterproof | Floats on water; LED flash indicator; not submersible if seals damaged |
| Channel Groups | USA, International, Canada |
| Scan Types | Normal scan (all TAG channels) and Priority scan (with Channel 16 monitoring) |
| Dual/Tri-Watch | Monitors Channel 16 (and call channel) while on another channel |
| Lock Function | Electronic key lock (except PTT, VOL/SQL, ▲/▼) |
| Volume Levels | 31 levels plus OFF |
| Squelch Levels | 11 levels (0 open, 10 maximum) |
| Backlight | Automatic, activated by any key except PTT; turns off after 5 seconds |
| Water Draining Function | Vibration clears water from speaker grill |
| Supplied Accessories | Transceiver, battery pack, AC adaptor, belt clip, handstrap, antenna, instruction manual |
| Customer Support (Australia) | 1300 889 785, Mon-Fri 8am-6pm AEST |
| Customer Support (New Zealand) | 0800 674 268, Mon-Fri 10am-8pm NZST |
Frequently Asked Questions - MX500 Oricom
User questions about MX500 Oricom
0 question about this device. Answer the ones you know or ask your own.
Ask a new question about this device
Download the instructions for your VHF Radio in PDF format for free! Find your manual MX500 - Oricom and take your electronic device back in hand. On this page are published all the documents necessary for the use of your device. MX500 by Oricom.
USER MANUAL MX500 Oricom
If you need assistance setting up or using your Gricorn
product now or in the future, call Orixom Support.
Australia 1300 889 785 or [02] 4574 8888
www.cricom.com.au
Mon-Fri 8am – 6pm AEST
New Zealand 0800 67 42 68
www.oricom.co.nz
Mon-Fri 10am - 8pm NZST
Thank you for purchasing this Oricorn 5watt VHF Marine Radio.
Please ensure you read this user guide carefully before using the MX500 Radio to ensure you familiarise yourself with the functions and operation.
PLEASE RETAIN THE USER GUIDE FOR FUTURE REFERENCE.
NEVER connect the radio to the AC power adaptor when well as this
may pose a fine hazard or result in an electric shock. ONLY crown the radio in the upper supply and battery provided with
ONE + Can't reach the radio to the power supply and battery providers with this product.
KEEP the radio at least 1 meter away from your vessel's magnetic
navigation compass.
DO NOT use or place the radio in direct sunlight or in areas with
temperatures below -15°C or above +55°C
NEVER modify your radio in any way as this will void warranty and
could cause damage to your radio
ALWAYS charge your radio at normal room temperature
ALWAYS turn off your radio when in any area with a potentially
explosive atmosphere
Radio Antenna
Do not use any radio that has a damaged antenna. If a damaged
antenna comes in contact with the skin, a minor bum may result.
Unauthorized antennas, modifications, or attachments could damage
the radio and violate compliance. Do Not change or modify the antenna
Do not hold the antenna when the radio is "in use.
Holding the antenna reduces range and may cause bodily harm.
Lithium-ion Battery Pack Warning
• This equipment contains a Lithium-ion Battery pack.
- Do not short circuit the Battery pad
- Only use the original Orixom AC adaptor supplied with this product to
charge the battery pack.
- Remove battery pack when equipment will not be used for an
extended period of time.
- Dispose of the battery pack according to local regulations, never in
your household rubbish.
- The Lithium-ion Battery pack may explode it disposed of in a tire.
Ever since every case when handling better in order not to sheet the
Exercise: Economic care which natural bottles with and wits, materials
Battery with conducting materials. The battery or evaporation material may overheat, open and open
The battery of conduction material may overheat explode and of cause buts.
- If the battery league, do not let the battery liquid touch skin or ovea. If
this hanger, immediately flush, the affected areas with water, and see
medical assistance. Released electrolyte is corrosive and may cause
damage to the eyes and skin. It may be toxic if swallowed
(二) 2017年 ,
- Do not immerse or expose the battery to water or other liquids.
- If you believe the battery is damaged, remove product from the
charger and stop using the product. Contact Oricom for assistance
- Never use damaged batteries as they may explode.
EU Regulatory Conformance
As certified by the qualified laboratory, the product is in compliance
with the essential requirements and other relevant provisions of the
Directive 1989/5/EC. Please note that the above information is
applicable to EU countries only.
OPERATING RULES
Priorities
- Read all rules and regulations relating to priorities and keep an up-
to-date copy. Safety and distress calls take priority over all other
calls.
- You must always monitor Channel 16 when you are not operating on
another channel.
- False or fraudulent distress calls are prohibited by law.
Privacy
• Information overheard but not intended for you cannot be used in
any way by law
• Offensive or disrespectful language is prohibited.
RADIO LICENCES
RADIO LICENCES Ship Station License
Ship Station License When your profit is on
When your craft is equipped with a VHF FM radio, you must have a current radio station license before using the radio.
current radio station licenses before using the radio. It is unlawful to operate a chip station which is not
It is unclear to operate a ship station which is not licensed. Invairs through your dealer or the appropriate government
inquire through your dealer of the appropriate government agency for a Ship-Badiotelerhone license. This license includes the call sign
a chip-to-satellite telephone license. This licence includes this call eighth which is your profile identification for radio purances.
Under normal circumstances this radio should only be operated by a
qualified person
More information regarding qualified persons can be found at
(1) 2017年1月1日
"http://www.acma.gov.au/theACMA/marine-radio-qualifications"
www.scma.gov.au/theACMA/marine-radio-qualifications.
The Ground Truth image displays a single, solid horizontal line. According to Rule 2 (UNDERSCORE & LINE RULES), if the GT contains lines used for stylistic emphasis or as background elements (like ruled paper), the OCR result must ignore them. The line in the GT is clearly a stylistic or background line, not a placeholder for text. Therefore, the OCR should not have output any underscores. Outputting `____` constitutes an error under Rule 2, as it hallucinates placeholder symbols where none are semantically intended. Hence, the OCR result is inconsistent with the Ground Truth.
A restricted Radiotelephone Operator Permit is the license most often
held by small vessel radio operators when a radio is not required for
safety purposes. The restricted Radiotelephone Operator Permit
must be posted near the radio or be kept with the operator. Only a
licensed radio operator may operate a radio. However, non-licensed
individuals may talk over a radio if a licensed operator starts.
supervises, ends the call and makes the necessary log entries.
A current copy of the applicable government rules and regulations is
only required to be on hand for vialsals in which a radio telephone is
compulsory. However, even if you are not required to have these on
handit is your responsibility to be thoroughly acquainted with a participant rules and regulations.
pear A: Kim
RANGE
The range of VHF transmissions depends on antenna height.
transmitter power and the terrain over which the signals pass. For a 5
wall handheld radio, ship to ship communications up to 5 nautical
miles should be possible. Ship to shore ranges will often be greater
due to the increased height of the shore antenna.
■ Recommendation
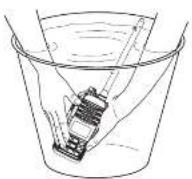
Clean the transceiver thoroughly with fresh water after exposure to saltwater, and dry it before operating. Otherwise, the transceiver's key switches and controllers may become unusable due to salt crystallization.
NOTE:DO NOT submerge the transceiver in water if there is any reason to suspect the waterproof protection may not be effective, for example, in cases where the battery cover or DC Jack cap rubber seal is damaged, the transceiver/battery cover:DC Jack cap is cracked or broken, or the transceiver has been dropped, or when the battery cover, antenna or DC Jack cap are detached from the transceiver.
Features
◆ Floats on Water
The radio floats in fresh or salt water when the supplied accessories
When a third-party battery pack, strap, antenna, etc. is used, it may sink.
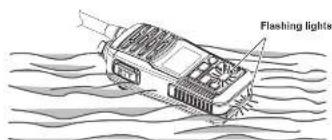
◆ Floats and Flashes
An LED sends out intermittent light from a transparent section on the bottom of the radio, while floating in the water.
CONTENTS
| SETUP | |
| Setup | 1 |
| Supplied Accessories | 1 |
| Charging the Battery Pack | 1 |
| Battery Pack | 2 |
| Flexible antenna | 2 |
| Bell clip | 2 |
| CONTROLS AND INDICATORS | |
| Controls and Indicators | 3 |
| Display | 4 |
| Turn ON/OFF | 5 |
| Adjusting the Volume Level | 5 |
| Adjusting the Squelch Level | 5 |
Receiving and Transmitting 5
Receiving
Transmitting.
Channel Group Selective 5
Channel Selection 6
Channel 16...
Golf Crustine Worthing Gas
Call Channel Programming....6
Monitor Function....7
Volume Loud Function 7
Volume Mute Function....7
Automatic Backlight
Vibration Water Draining Function 7
(四)中国证券报
Scan Types 8
Setting TAG Channels 8
Setting (or cleaning) a TAG channel 8
Setting (or cleaning) all tagged channels....8
Caching
Description 9
Operation
SETMOUE
Set Mode Programming....10
Set Mode Operation 10
Set Mode Items 10
Beep Tone Function 10
Weather Alert 10
Priority Scan Function....10
Scan Resting Time....10 Auto Scan Execution.
DualTri-scratch Function 11
Monitor Key Action 11
Automatic Backlighting 11
LCD Contrast Setting 11
Power Save Function....11
VHF Marine Channel List....12
Specifications 13
Troubleshooting....14
SETUP
Setup
◆ Supplied Accessories
Carefully unpack your MX500 Radio. We recommend that you identify items listed in the following table before discarding the pecking materials. If any item is missing or has been damaged, please contact your place of purchase.
| Items | Qty |
| Transceiver | 1 |
| Battery Pack | 1 |
| AC Adaptor | 1 |
| Salt Clip | 1 |
| Handstrap | 1 |
| Instruction Manual | 1 |
| Antenna | 1 |
◆ Charging the Battery Pack
- Rotate the connector cap on the top of the transceiver to expose the charging socket. Plug the AC Adaptor plug into the socket on the top of the transceiver. LCD appears "CHG" and "Jus" to indicate charge
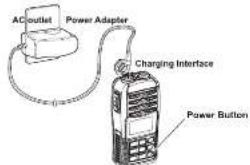
- If battery charging is full, LCD appears FL*, you should remove the adaptor.
NOTE: If you have not inserted the battery pack, the LCD will show "EF".
- WARNING: The AC adaptor is not waterproof.
- When charging is complete, remove the plug from the radio and replace the cover ensuring it is fitted correctly.
Accessories/spare parts can be purchased directly from Oricom. Visit oricom.com.au or call 1300 889 785.
◆ Battery Pack
To insert the battery pack:
Place the battery into the transceiver so it fills flat, and then securely attach the battery cover, as shown. Push the cover until the latch
re
Power contacts
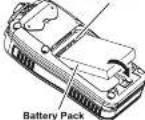
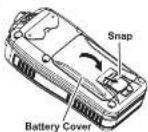
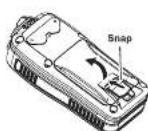
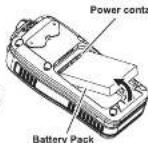
To remove the battery pack
Slide the latch and then lift the battery cover to remove it, then remove the battery pack, as shown.
◆ Flexible Antenna
- Connect the supplied flexible antenna to the antenna connector, rotate it clockwise until it
- To remove it, rotate it counter-clockwise.
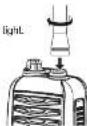
♦ Belt Clip
Attach the bell clip to, or detach the bell clip from the transceiver.
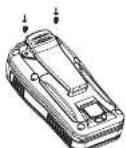
- WARNING: The battery pack and antenna must be installed correctly to prevent water ingress.
- IMPORTANT: Prior to using the transceiver for the first time, the battery pack must be fully charged for optimum life and operation. To avoid damage to the transceiver, turn the power OFF while charging.
CONTROLS and INDICATORS
Controls and Indicators
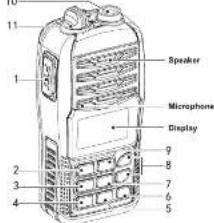
- PTT
● Hold down to transmit; release to receive.
- CH 16/Call CH
● Push to select channel 16.
- Hold for 1 second to select the call channel (factory default: channel 9)
- When the call channel is selected, hold for 3 seconds to enter the call
channel programming mode.
● While in the set mode, push to return to the normal operation mode.
- FAV/TAG
- PUSH to sequentially select to the favourite channels, while
ignoring untagged channel, in a channel group.
- Press and hold and turn radio ON to clear or set all TAG channels in the selected channel group.
- SCAN/DUAL
- Push to start or stop a normal or priority scan.
● Hold for 1 second to enter the DualTri-watch mode.
- Push to exit the watch mode
- Hold this key and Hi/LO key for 1 second, to activate the AquaQuote
Function
- [HI/LO]/[→O]
- Push to select the high or low output power.
- Hold for 1 second to turn the Lock function ON or OFF.
- POWER[⏻]
● Hold to turn power ON or OFF
- VOL/SOL/MONI
- Push to enter the volume adjustment mode or the squelch adjustment
mode
- Press and hold for 1 second to active the Monitor function.
- While hold this key, hold [1] key to turn ON the power and enter the
set mode.
● While in the Set mode, push to select an item.
- While holding this key, push[▼]to turn ON the Volume Mute function
Do the same steps again to turn OFF the function.
● While hold down this key, pushed ▲ to turn ON the Volume Load function.
Do the same steps again to turn OFF the function.
- [▲]/[▼]UP/DOWN
- Push to select an operation channel.
- While in the Set mode, push to select the setting or value of an item,
- Push to check TAG channels or change scanning direction during a
scan.
- [CH]
● Hold for 1 second, one or more times, to select a channel group from
USA, International, and Canada.
● Push to return to the previous channel before selecting Channel 18 or
the Ceiling channel
10.ANTENNA CONNECTOR
■ Connect the supplied antenna here.
11.CHARGING SOCKET
- Connect the AC adaptor baro.
NOTE: Ensure the can for the DC charging connector is affixed
correctly to avoid water ingress.
■ Display
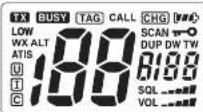
| Icon | Description |
| TX | Transmit Indicator... Appears while transmitting |
| LOW | Low Power Indicator1) "LOW" appears when low power is selected2) "LOW" sinks when switching forced low power mode because of a high temperature arrow or low voltage |
| ATIS | Appears while working in ATIS Channel |
| U | Appears when U.S.A. |
| I | Appears when International |
| C | Appears when Canadian channel group is selected |
| BUSY | Appears when receiving a signal or when the squash opensBinks while monitoring |
| TAG | Appears when a TAG channel is selected |
| CALL | Appears when the call channel is selected |
| CHG | Appears when the radio is charging |
| WD | Battery Indicator, remaining battery power |
| SCAN | Binks while scanning |
| -0 | Appears while the lock function is activated |
| DUP | Appears when a duplex channel is selected |
| DW | Appears when dual-watch |
| TW | Appears when tri-band watch |
| 88c | Channel number readoutIndicates the selected operating channel numberIn set mode, indicates the selected condition |
| 89 | In dual-watch-and-search appears ONTD during priority scanAppears while volume selectingAppears while SQL selectingAppears while mode selecting |
| SQL | Show the squash level |
| VOL | Show the volume levelBinks when the volume made is activated |
BASIC OPERATION
Turn ON/OFF
- Press[①] for 1 second to turn ON
- Press agar( ⏻)for 1 second to turn OFF.
Adjusting the Volume Level
The volume level can be adjusted using [VOL/SQL] and [▼] or [▲].
- Push [VOL/SQL] once to enter the volume adjustment mode. Then
press [▼] or [▲] to adjust the volume level.
The "VOL" con starts blinding
• The transceiver has 31 volume levels and OFF
- When no key operation is performed for 5 seconds, then transceiver
returns to the normal mode.
2. Push[VOU/SQL] twice to sell the volume adjustment more
■ Adjusting the Squelch Level
The squelch level can be adjusted using [VOL/SQL] and [▼] or [▲] in the order to properly receive signals. As well as for the scan to effectively function, the squich must be adjusted to the proper level.
- Push [VOL/SQL] twice to enter the squen adjustment mode, then
push [▼] or [▲] to adjust the sculpch level.
• The "SOL" icon starts printing
• The radio has 11 squibb levels; CP is completely open:
10 is maximum square; 1 is minimum square. - When no key operation is performed for 5 seconds, the transceiver
returns to the normal mode - Push [VOL/SQL]again to exit the saucich adjustment mode.
■ Receiving and Transmitting
◆ Receiving
-
Set the volume levels by pushing [VOL/SQL], [▼] or [▲].
-
Set the squich levels by[▼] or [▲].
- when receiving a signal, "BUSY" appears and audio is heard from
the speaker.
- The conservative battery power, the transceiver's power save function
automatically activates when no signal is received for 5 seconds.
▲Transmitting
Transmitting
- Plan [HVLO] to select output power. • 10V/45mm pump when low power is injected
- LOW appears when low power is selected. - Choose low power for short-range communications; cheaper web
• Choose the power for short-range communication power for longer distance communications.
- Some channels are for only low power communication.
- Hold down [PTT] to transmit, then speak into the microphone.
• "TX"appara.
- Channel 70 cannot be used for transmission
- Release [PTT] to receive.
NOTE:
- Transmitting without an antenna can damage the transceiver.
- To maximize the readability of your transmitted signal, pause for a
second after pushing [PTT] hold the microphone 5-10cm from your
mouth and speak into the microphone at a normal voice level.
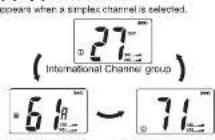
■ Channel Group Selective
This radio is pre-programmed with USA, International, Canadian
channels. The default setting for use in Australia is International.
- Push [CH] to select a regular channel.
- Hold down [CH] for 1 second, one or more times, to select the desired
channel group. - The selectable channel groups are different, depending on
the version. - Push [▲] or [▼] to select a channel.
■ Channel Selection
◆ Channel 16
Channel 16 is the distress and safety channel. It is used for
establishing intel contact with a station end for emergency
communications. Channel 16 is monitored during both dual
Watch and Tri-Watch while standing by, you must monitor channel 16.
1. Push [16/C] momentarily to select Channel 16.
2. Push [CH] to return to the channel used before Channel 16, or push [▼]

◆ Call Channel
Each regular channel group has separate leisure-use call
channels. The call channel is monitored during tri-wetch. The call
channels can be programmed and are used to store your most
frequently used channel in each channel group for quick recall.
1. Push and hold [16/c] for 1.5 seconds to select the call channel of the
selected channel group, "CALL" and call channel number appears.
2. Push [CA] to return to the channel used before call channel, or push [▼] or [▲] to select a channel

◆ Weather Channels
Weather channels may not be available in all countries
(Australia does not use the weather channels please check channel 57 for positive weather)
channel of for weather reports; This presentation, see 12:40 am
This transceiver has to pre-programmed weather channels. They are used for monitoring businesses.
1. Park [CH] to select weather
1. Post [CH] to select weather channels or normal channels
• Answers "MOS" who weather channel selected
- Appear 'WX ALT' when the western alert function is ON.
2. Push [▼] or [▲] to select channel.
(一)2017年1月1日至2018年1月1日
◆Call Channel Programming
Call channel is used to access Channel 16 (default is channel 67)
You can program the call channel with your most frequently used
channel in each channel group for quick recall.
1. Push [CH] to select a desired channel group to be programmed
2. Push [16/C] for 1sec.to select a call channel.
3. Push [16/C] for 3sec. till you hear a "BEEP" tone and "DUDU"
tone to enter call channel programming mode.
• Charter number 182963

-
Push [▼] or [▲] to select desired call channel
-
Push [16/C] to confirm and save it. Push [CH] to cancel and sell

Monitor Function
The monitor function opens the squelch.
- Push [MONI] to activate monitor function.
● "BUSY" will flash and sound while monitor function actives.

Volume Loud Function
The volume loud function temporarily maximizes the volume loud level, it has
no effect when the volume level is 31.
-
Push [VOL/SQL] and [▲] to turn ON the function
-
Push [VOL/SQL] and [▲] to turn it OFF
Volume Mute Function
The volume mute function can be activated temporarily.
- Push [VOL/SOL] and [▲] to active
The audio is mixed
■ The volume load indicator will start flaching
-
Push [VOLI EOL] and [A] to turn the universe or the solution off
-
Fish [VOL/SQL] and [▲] to turn the volume more longitudinal sl
■ Automatic Backlight
This function is convenient for night time operation. The automatic backlighting can be activated in set mode.
- Push any key except for [PTT] to turn the backlighting ON.
- The backlighting is automatically turned OFF after 5 seconds of in-
activity.
■ Lock Function
This function electronically locks all keys (except for [PTT][▼][▲][VOL]SQL][▼]to prevent accidental changing of the channel and function access.
- Push and hold for 1 seconds to turn the function ON and OFF.

■ Vibration Water Draining Function
This transceiver uses a new technology to clear water away from the speaker grid; Vibration. Vibration helps drain water away from the speaker housing (water that might otherwise muffle the sound coming from the speaker). This transceiver emits a vibrating beep when this function is activated.
- Push and hold [SCAN]and [HVLO]
- A low beep tone sounds for 9 seconds to drain water, regardless of volume level setting
- The transceiver does not perform key operations while the Vibration function is activated.
SCAN OPERATION
Scan Types
Scanning is an efficient way to locate signs quickly over a wide frequency range. The transceiver has priority scan and normal scan.
In addition, the weather alert and auto-scan functions are available for stand-by-convenience. These functions can be activated simultaneously, depending on the setting in set mode.
Normal Scan
It searches through all TAG channels in sequence. However, unlike priority scan, Channel 16 is not checked unless channel 16 is set as a TAG channel. Priority Scan
A priority scan sequentially searches through all TAG channels while monitoring Channel 16, when a signal is detected on Channel16, the scan pauses until the signal disappears; when a signal is detected on a channel other than Channel 16, the scan switches to Dualwatch, until the signal disappears.
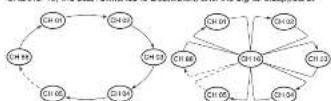
NormalScan
Priority Scan
Setting TAG Channels
For more efficient scanning, set the desired channels as TAG channels or clear the TAC setting from unwanted channels. Channels that are not lagged will be skipped during scanning.
◆ Setting (or clearing) a TAG channel
-
Push [CH] to select desired channel group.
-
Push [▼] or [▲] to select the desired channels to be set as a TAG
Channel.
- Push and hold "TAG" for 1 second, to set the displayed channel as
a TAG Channel
*TAG* appears in the function display.
- To cancel the TAG channel setting, push and hold "TAG" for 1sec.
• TAG * disappears.
Setting (or clearing) all tagged channels
- While pushing and holding [TAG], turn power [ ] ON to clear all
TAG channels in the selected channel group.
- Repeat above procedure to set all channels as TAG channels
■ Scanning
Set the priority scan function, scan resume timer and auto scan function in the set mode.
- Push [SCAN] to start normal scan or priority scan.
• "SCAN" Blinks.
- "16" appears on the sub channel readout during a priority scan.
- When a signal is received, the scan pauses until the signal
disappears or resumes @ar paualing 5 seconds, depending on
the set mode setting.
- Push [▼]or[▲] to sequentially select TAG channels, change the
scanning direction or manually resume the soap.
- Push [SCAN] to stop the scan, or push [PTT],[16/C], [CH]or[FAV] also can stop the scan.
DUALWATCH/TRI-WATCH
■ Description
Dialwatch monitors Channel 16 while you are receiving on another channel; Tri-watch monitors Channel 16 and the call channel while receiving another channel. Dialwatch/Tri-watch is convenient for monitoring channel 16 when you are operating on another channel.
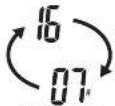
Dual-band duty
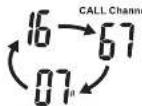
Tri-band duty
Operation
- Push [SCAN/DUAL] for 1 second to start dual watch or in-watch:
- "DW" blinks during dust watch; "TW" blinks during Tri-watch
- A beep tone sounds when a signal is received on Channel 16.
- 1d-watch
- Push [SCAN/DUAL] to cancel dualwatch/fri-watch.
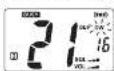
Dust-band duty
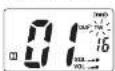
Tri-band duty
SET MODE
■ Set Mode Programming
The set mode is used to channel the settings of the transceiver's function: keep tone function, priority scan function, scan resume, timer, auto scan function, dual-tri-watch function, monitor key action, automatic backlighting, LCD contrast setting and power save function.
◆ Set Mode Operation
- While holding down [VOL/SQL]turn ON the power to enter the set
mode - Release [VOL/SQL], appears "Bp"
- Push [VOL/SOL] to select the function.
- Push [▲][▼] to select change the setting
- To exit the set mode, push [16/C]
| No. | Show | Set Project | Set parameter options | The default value |
| 1 | IP | Basp | of lon | on |
| 2 | AL | Weather Warning | of lon | of |
| 3 | Pr | Priority Scan | of lon | of |
| 4 | St | Scan Resume Timer | of lon | of |
| 5 | AS | Automatic Scanning | of lon | of |
| 6 | d | Dual-band / Tri-band Duty | d=/- | d- |
| 7 | Sq | Mentor key Functions | Pu/Ho | Pu |
| 8 | bL | Automatic Backlight | of lon | on |
| 9 | LC | LCD Contrast | Hi/Lo | Hi |
| 10 | PS | Automatic Power | of/on | on |
■ Set Mode Items
◆ Beep Tone Function
Turn the key touch beep sound ON or OFF.
◆ Weather Alert
Weather channels may not be available in all countries
(Australia does not use the weather chemicals please check
When there is significant weather information, the U.S. NOAA broadcast stations will transmit an alarm weather. When the weather alert function is turned on, walks-talkes will sound the alarm at the same time "WXALT" symbol flashes. During the scan, the current weather channel in use will be scanned.
- With this function enabled, when you select the Weather Channel, the screen displays "WX AI.T" symbol.
◆ Priority Scan Function
The transceiver has 2 scan types—normal (OFF) and priority (ON) scan. A normal scan searches all TAG channels in the selected channel group. A priority scan sequentially searches all TAG channels while monitoring Channel 16.
◆ Scan Resume Time
The scan resume timer can be set as a pause (OFF) or timer scan (ON).
- OFF: when a signal is detected, the scan pauses on the channel until the signal disappears, and then resumes.
- ON: When a signal is detected, the scan pauses on the channel for 5 seconds, and then resumes.
◆ Auto Scan Function
The auto scan function automatically starts a normal or priority scan when
no signal is received, and no operation is performed for 30 seconds.
◆ Dual/Tri-watch Function
Set the watch type to Dualwatch or Tri-watch.
◆ Monitor Key Action
The monster key temporarily opens the squash. This item sets the key
action.
- Pu(PUSH): The monitor function is activated by holding down[MONI].
The squich remains open while holding down the key.
- Ha(Holt): The monitor function is activated by holding down (MON) for 5 seconds the electrical step open until otherwise cured.
◆ Automatic Backlighting
This function is convenient for night-time operation. The backlight can be selected from ON and OFF.
- The backlighting is automatically turned OFF after 5 seconds, of inactivity.
◆ LCD Contrast Setting
Set the LCD contrast level to high contrast or Low contrast
Power Save Function
The power save function reduces current drain by turning
OFF the receiver circuit for preset intervals
- OFF: Function is turned OFF
- ON: Function is turned ON and will be activated when no signal is received, and no operation is performed for 5 seconds.
■ VHF Marine Channel List
| Channel number | Frequency(MHz) | Channel number | Frequency(MHz) | Channel number | Frequency(MHz) | Channel number | Frequency(MHz) | |||||||||
| USA | INT | CAN | Transmit | Receive | USA | INT | CAN | Transmit | Receive | USA | INT | CAN | Transmit | Receive | USA | INT |
| 01 | 01 | 156.050 | 160.650 | 21 | 21 | 157.050 | 161.650 | 68 | 68 | 68 | 156.425 | 156.425 | 95A | |||
| 31A | 156.050 | 156.050 | 21A | 21A | 21A | 157.050 | 157.060 | 69 | 69 | 69 | 156.475 | 156.475 | 87 | 87 | ||
| 02 | 02 | 156.100 | 160.700 | 216 | RX only | 161.650 | 70 | 70 | 70 | RX only | 156.525 | 87A | 87A | |||
| 03 | 03 | 156.150 | 160.750 | 22 | 157.100 | 161.700 | 71 | 71 | 71 | 156.575 | 156.575 | 88 | 88 | |||
| 33A | 156.150 | 160.850 | 22A | 22A | 157.100 | 161.100 | 72 | 72 | 72 | 156.625 | 156.625 | 88A | 88A | |||
| 04 | 156.200 | 160.800 | 23 | 23 | 157.150 | 161.750 | 73 | 73 | 73 | 156.675 | 156.675 | |||||
| 94A | 156.250 | 160.700 | 23A | 157.150 | 161.800 | 74 | 74 | 156.725 | 156.725 | |||||||
| 05 | 156.350 | 160.850 | 24 | 24 | 24 | 157.200 | 161.800 | 75** | 75** | 75** | 156.775 | 156.775 | ||||
| 35A | 95A | 156.250 | 156.250 | 25 | 25 | 25 | 157.250 | 161.850 | 76** | 76** | 76** | 156.825 | 156.825 | |||
| 08 | 08 | 08 | 156.300 | 156.700 | 25b | RX only | 161.850 | 77** | 77** | 77** | 156.875 | 156.875 | ||||
| 07 | 156.350 | 160.950 | 26 | 26 | 26 | 157.300 | 161.900 | 78 | 156.925 | 156.925 | ||||||
| 97A | 97A | 156.350 | 156.350 | 27 | 27 | 27 | 157.350 | 161.960 | 78A | 78A | 156.925 | 156.925 | ||||
| 08 | 08 | 08 | 156.400 | 156.400 | 28 | 28 | 28 | 157.400 | 162.000 | 79 | 156.975 | 156.975 | ||||
| 09 | 09 | 09 | 156.450 | 156.450 | 28b | RX only | 162.000 | 79A | 79A | 156.975 | 156.975 | |||||
| 10 | 10 | 10 | 156.500 | 156.500 | 60 | 80 | 156.625 | 160.625 | 80 | 157.025 | 157.025 | |||||
| 11 | 11 | 11 | 156.550 | 156.550 | 61 | 156.675 | 160.675 | 80A | 80A | 157.075 | 157.075 | |||||
| 12 | 12 | 12 | 156.600 | 156.600 | 61A | 61A | 156.675 | 156.675 | 81 | 157.075 | 157.075 | |||||
| 13* | 13* | 13* | 156.650 | 156.650 | 62 | 156.125 | 160.725 | 81A | 81A | 157.075 | 157.075 | |||||
| 14 | 14 | 14 | 156.700 | 156.700 | 62A | 156.125 | 156.125 | 82 | 157.125 | 157.125 | 1 | |||||
| 15* | 15* | 15* | 156.750 | 156.750 | 63 | 156.175 | 160.775 | 82A | 82A | 157.125 | 157.125 | 2 | ||||
| 16 | 16 | 16 | 156.800 | 156.800 | 63A | 156.175 | 156.175 | 83 | 83 | 157.175 | 157.175 | 3 | ||||
| 17* | 17* | 17* | 156.850 | 156.850 | 64 | 84 | 156.225 | 160.825 | 83A | 83A | 157.175 | 157.175 | 4 | |||
| 18 | 156.900 | 161.500 | 64A | 64A | 156.225 | 156.225 | 83b | RX only | 161.775 | 5 | ||||||
| 18A | 18A | 156.900 | 156.900 | 65 | 156.275 | 160.875 | 84 | 84 | 84 | 157.225 | 157.225 | 6 | ||||
| 19 | 156.950 | 161.550 | 65A | 65A | 65A | 156.275 | 156.275 | 84A | 157.225 | 157.225 | 7 | |||||
| 19A | 19A | 156.950 | 156.950 | 66 | 156.325 | 160.925 | 85 | 85 | 85 | 157.275 | 157.275 | 8 | ||||
| 20 | 20 | 20* | 157.000 | 161.600 | 96A | 66A* | 66A* | 156.325 | 156.325 | 85A | 157.275 | 157.275 | 9 | |||
| 20A | 157.000 | 157.000 | 67* | 67* | 67* | 156.375 | 156.375 | 86 | 86 | 86 | 157.325 | 157.325 | 10 | |||
*Only a low power.
SPECIFICATIONS
| General | |
| Frequency Range | TX: 156,000-161.450MHz |
| RX: 155,000-163.425MHz | |
| Type of Emission | FM (10KDG3E) |
| Battery Pack | 1500mAh LH-Ion (DC 3.7V) |
| Frequency Stability | ±10 PPM |
| Operating Temperature Range | -15°C ~ +55°C |
| Antenna Impedance | 50 |
| Dimensions (H x W x D) | 140mm x 65mm x 41mm |
| Weight | 247g |
| Transmitter | |
| Output Power | 5W/1W |
| Maximum Frequency Deviation | ±9dB |
| Spurious Emissions | 0.25W |
| Adjacent Channel Power | >70dB |
| Audio Harmonic Distortion | <10% |
| Current Drain | <1.5A(High power) >0.9A (Low power) <0.35A (Max audio output) |
| Receiver | |
| Receive Sensitivity | ≤slant 0.22 V |
| Squech Sensitivity | ≤slant 0.22 V |
| I-UM and Noise | ≥slant 40dB |
| Adjacent Channel Selectivity | ≥slant 70dB |
| Spurious Response | ≥slant 70dB |
| Intermodulation | ≥slant 68dB |
| Audio Output Power | ≥slant 0.6W( 10% ) |
issues described in the following table are some common operational failure.
TROUBLESHOOTING
| PROBLEM | POSSIBLE CAUSE | SOLUTION | REF. |
| The transceiver does not turn ON. | The battery is exhausted.The battery pack is not correctly inserted. | Recharge the battery pack.Correctly insert the battery pack. | 12 |
| No sound from speaker. | The squich level is too high.Volume level is too low.Speaker has been exposed to water. | Set the squich level to the threshold level.Adjust the audio level to a suitable level.Remove water from the speaker grill. | 5,6156 |
| Transmitting is impossible, or high power can not be selected. | Some channels are limited to low poweror only receive.The output power is set to low.The battery is exhausted. | Change the channel.Push [H/Lo] to select high power.Recharge the battery pack. | 7 |
| The displayed channel cannot be changed. | The Lock function is activated. | Hold down [→0] (H/Lo) for 1 second to turn OFF the function. | 9 |
| Scan does not start | *TAG'channels are not programmed. | Set desired channels as *TAG' channels. | 66 |
| No beep sounds. | Beep Tons function is turned OFF. | Turn ON the Beep Tons in the set mode. | 11 |
Customer Support
If you have any problems setting up or using this product you will find useful tips and information in the Improbleshooting section of this user guide as well as Frequently Asked Questions on our website www.or.com.com.au
If you have further questions about using the product after reviewing the resources above or would like to purchase replacement parts or accessories please call our Customer Support Team. Our dedicated local support team are more likely to be able to help you than the retailer where you made your purchase.
Important
Please retain your purchase receipt and attach to the back page of this user guide as you will need to produce this if warranty service is required. Take a few moments to register your product online: www.or.com.com.au
Express Warranty (Australia)
This Express Warranty is provided by Orlcom International Pty Ltd ASN 46 086 118 369, Unit 1, 4 Sovereign Place, South Windsor NSW 2750, herein after referred to as Orlcom.
Orcorn products come with guarantees that cannot be excluded under the Australian Consumer Law. You are entitled to a replacement or refund for a major failure and compensation for any other reasonably foreseeable loss or damage. You are also entitled to have the goods repaired or replaced if the goods fail to be of acceptable quality and the failure does not amount to a major failure. Orcorn warrants that the product is free from defects in materials or workmanship during the Express Warranty Period. This Express Warranty does not extend to any product from which the serial number has been removed or was purchased outside of Australia.
Nothing in the Express Warranty excludes, restricts or modifies any condition, warranty, guarantee, implied terms, right or remedy pursuant to the Australian Consumer Law and which may not be so excluded, restricted or modified. For such conditions, terms, guarantees and warranties that cannot be excluded, restricted or modified, Exclom limits the remedies available to extent permitted in the relevant legislation.
The Express Warranty Period will be 2 years (including battery cells and rechargeable battery packs) from the date of purchase of the product evidenced by your rated sales receipt. You are required to provide proof of purchase as a condition of receiving Express Warranty services.
You are entitled to a replacement product or repair of the product at our discretion according to the terms and conditions of this document. If your product is found to be faulty within the Express Warranty Period, This Express Warranty extends to the original purchaser only and is not transferable.
Products distributed by Oncom are manufactured using new materials or new and used materials equivalent to new in performance and reliability. Spare parts may be new or equivalent to new. Spare parts are warranted to be free from defects in material or workmanship for thirty (30) days or for the remainder of the Express Warranty Period of the Oncom branded product in which they are installed, whichever is longer. During the Express Warranty Period, Oncom will where possible repair and if not replace the faulty product or part thereof. All component parts removed under this
Express Warranty become the property of Oricom. In the unlikely event that your Oricom product has a recurring failure, Oricom may always, subject to the Competition and Consumer Act 2010, at its discretion, elect to provide you with a replacement product of its choosing that is at least equivalent to your product in performance.
No change to the conditions of this Express Warranty is valid unless it is made in writing and signed by an authorized representative of Orlcom. Orlcom will not be liable under this Express Warranty, and to the extent permitted by law will not be liable for any defect, loss, damage or injury arising out of or in connection with a:
-
Failure by you to adhere to the warnings and follow the instructions set out in this user guide for the proper installation and use of the product.
-
Any external cause beyond our control, including but not limited to power failure, lighting or over voltage; or
-
Modification to the product or services carried out on the product by anyone other than Orom or Oroms author and service provider.
How to make a claim under your Express
Warranty in Australia
Oriom has a simple warranty process for you to follow.
* Please call or email our Customer Support Team, 1300-889-785 or support@otcom.com.au.
* A Customer Support Team member will verify after troubleshooting with you if your product qualifies under warranty. If so, they will give you a Product Return Authorisation number.
* We will then email or fax a Return Authorization form and a Repair Notice (if necessary), together with instructions on how to return the goods for warranty service.
Please note that if a Customer Support Team member advises that your product does not qualify for return, this warranty does not apply to your product. Products that are authorised to be returned to Oncom In Australia must include all of the following:
* A completed Return Authorization form
* A copy of your Proof of Purchase (please keep your original copy) * The faulty product, including all accessories.
Send the approved returns to
Oricorn International Pty Ltd
Locket Bag 055 South Honduras NC
Please note that this Express Warranty excludes expenses incurred by you in returning any faulty product to us. You must arrange and say any expenses incurred (including postage, delivery, freight, transportation or insurance of the product) to return the faulty product to us, however, we will arrange delivery of the repairs or replaced faulty product to you.
Important Information
Repair Notice
Please be aware that the repair of your goods may result in the loss of any user-generational data (such as stored telephone numbers, last messages and contact information). Please ensure that you have made a copy of any data saved on your goods before sending for repair. Please also be aware that goods presented for repair may be replaced by unfurnished goods or parts of the same type rather than being repaired.
Contact Details for Oricom Support and Express Warranty Claims in Australia
Oricom International Pty Ltd
Locked Bag 658
South Windsor, NSW 2756
Australia
Email: support@oricom.com.au
Phone: 1300 889 785 or (02) 4574 8888
(Monday to Friday 8am to 6pm AEST)
Web: www.oncom.com.au
Fac (02) 4574 8898
Contact Details for Orlcom Support and Express Warranty Claims in New Zealand
Email: support@prccom.co.nz
Phone: 0800 674 266
(Monday to Friday 10am to 8pm NZST)
Web: www.oricam.co.nz

Ref:11072016
- Radio Antenna
- EU Regulatory Conformance
- OPERATING RULES
- Priorities
- RADIO LICENCES
- RADIO LICENCES Ship Station License
- pear A: Kim
- RANGE
- ■ Recommendation
- Features
- ◆ Floats on Water
- ◆ Floats and Flashes
- CONTENTS
- SETUP
- ◆ Supplied Accessories
- ◆ Charging the Battery Pack
- ◆ Battery Pack
- ◆ Flexible Antenna
- ♦ Belt Clip
- CONTROLS and INDICATORS
- BASIC OPERATION
- Turn ON/OFF
- Adjusting the Volume Level
- ■ Adjusting the Squelch Level
- ■ Receiving and Transmitting
- ◆ Receiving
- ▲Transmitting
- ■ Channel Group Selective
- ■ Channel Selection
- ◆ Channel 16
- ◆ Call Channel
- ◆ Weather Channels
- ◆Call Channel Programming
- Monitor Function
- Volume Loud Function
- Volume Mute Function
- ■ Automatic Backlight
- ■ Lock Function
- ■ Vibration Water Draining Function
- SCAN OPERATION
- Scan Types
- Setting TAG Channels
- ■ Scanning
- DUALWATCH/TRI-WATCH
- ■ Description
- Operation
- SET MODE
- ■ Set Mode Programming
- ◆ Set Mode Operation
- ■ Set Mode Items
- ◆ Beep Tone Function
- ◆ Weather Alert
- ◆ Priority Scan Function
- ◆ Scan Resume Time
- ◆ Auto Scan Function
- ◆ Dual/Tri-watch Function
- ◆ Monitor Key Action
- ◆ Automatic Backlighting
- ◆ LCD Contrast Setting
- Power Save Function
- Customer Support
- Important
- Express Warranty (Australia)
- How to make a claim under your Express
- Warranty in Australia
- Important Information
- Repair Notice
- Contact Details for Oricom Support and Express Warranty Claims in Australia
- Contact Details for Orlcom Support and Express Warranty Claims in New Zealand
Brand : Oricom
Model : MX500
Category : VHF Radio