
SM4204 - Range hood SILVERLINE - Free user manual and instructions
Find the device manual for free SM4204 SILVERLINE in PDF.


| Product Type | Island Chimney Range Hood |
| Brand | Silverline |
| Model | SM4204 |
| Voltage | 220-240 V, 50 Hz |
| Motor Insulation Class | F |
| Isolation Class | Class I |
| Number of Speeds | 5 |
| Timer Function | Yes, 15-minute auto shut-off |
| Illumination | 2 LED lamps with dimmer function |
| Duct Diameter | 120 mm or 150 mm |
| Minimum Distance to Electric Hob | 65 cm |
| Minimum Distance to Gas Hob | 75 cm |
| Filter Type | Aluminum cassette filter (dishwasher safe) and optional carbon filter |
| Aluminum Filter Cleaning Interval | Every 2-3 weeks or when "C" signal appears |
| Carbon Filter Replacement Interval | Every 3-5 months |
| Control Type | Digital control panel with speed increase/decrease and timer |
| Venting Options | Ducted (chimney) or recirculating (with carbon filter) |
| Material | Stainless steel (inox) |
| Mounting | Island ceiling mount |
| Special Features | 5-speed digital control, timer, dimmable LED lights, aluminum filter cleaning indicator |
Frequently Asked Questions - SM4204 SILVERLINE
User questions about SM4204 SILVERLINE
0 question about this device. Answer the ones you know or ask your own.
Ask a new question about this device
Download the instructions for your Range hood in PDF format for free! Find your manual SM4204 - SILVERLINE and take your electronic device back in hand. On this page are published all the documents necessary for the use of your device. SM4204 by SILVERLINE.
USER MANUAL SM4204 SILVERLINE
natural_image
Illustration of green leaves with water droplets on branches against a light green background (no text or symbols)
green-tech
collection
Kontaktoplysninger
Jilmas Group Nordic ApS Hi Park 399 7400 Herning Denmark
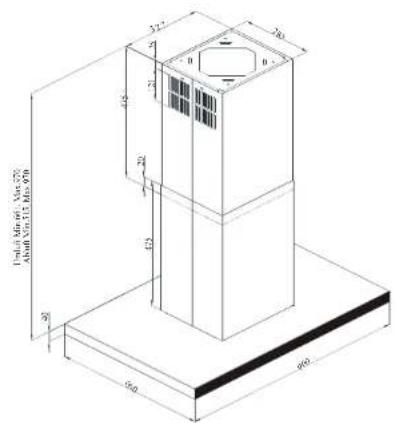
1-Internal chimney
2-External chimney
3-Control panel
4-Lighting
5-Split extraction plate
| Check water connection (middle of the electric network should be between 220 kW, cooler hood would be connected to and above 4 kg) | Check motor status (motor status should be at or putter) | Check lamp switch (lamp switch should be at or putter) | Check aluminum foil (Aluminum glass cover (light should be reserved inside a wire, or internal conditions)) | Check glass foil (film) | Check card (clock should be open) | Check copper filter (copper filter should be replaced with a wire inside a 25 minute x 1 minute with carbox filter at normal conditions) | |
| Cooker hood does not work | X | X | |||||
| Illumination Lamp does not work | X | X | X | ||||
| Cooker-hoods air suction a week | X | X | X | ||||
| Cooker hood does not check air out (set please without chimney) | X | X |
If the product does not work:
Before you contact the technical service:
Make sure that the product is plugged in and the electric fuse of the electric wiring is running. Do not take any action that will damage the product. Before you contact with technical service, check your cooker hood according to Table 1. If the problem goes on, contact the seller or the most authorized service.
TECHNICAL SPECIFICATIONS
| Feeding Voltage | 220-240 V 50Hz |
| Motor Isolation Class | F |
| Isolation Class | CLASS I |
In order to use the cooker hood efficiently;
*Use ducts of 150/120mm diameter and as few bends as possible when you make the chimney connection.
*Pay attention to aluminum filters' cleaning periods and changing periods of carbon filters.
*Use the product at middle speed if high suction power is not necessary.
* In order to ensure that ventilation occurs correctly, windows of the kitchen should be kept closed.
WARNINGS AND SAFETY PRECAUTIONS
| *This product is designed for usage at home. | *Flaming foods should not be cooked under the product. |
| *Your products usage voltage is 220-240 Volts~50Hz | *Start your product after you put pot, fry-pan etc. on the hob. Otherwise high temperature may cause some parts of your product to get deformed. |
| *Grounded plug is used at your product's electric network cable. This cable should definitely be plugged in a grounded socket. | *Before you take pot, fry-pan etc. from the hob, put their lids on. |
| *All electrical networks should be set by a qualified electrician. | *Do not leave hot oil on the hob. Pots that have hot oil in them may cause self-ignition. |
| *Installation applied by unauthorized people may cause the product to operate at low performance, damage of the product and accidents. | *Pay attention to curtains and covers during cooking of meals like frying because oil may flare up. |
| *Power supply cable should not be exposed to press or smash during montage. Network cordon should not be placed near the cookers; it may cause fire if it melts. | *Make sure that filters are changed in convenience. Filters that are not changed at appropriate time has risk of causing fire due to oil that will be gathered on them. |
| *Do not plug into the socket before installation of the product is completed. | *Do not use filter materials that are not flame resistant instead of filter. |
| *Keep the plug at a reachable place so that you can unplug it in case of any danger. | *Do not operate your product without aluminum filter; do not remove filters when the product is on. |
| *Do not touch the lamps when they are on for long time. Lamps may hurt your hand as they will be hot. | *In case of flame, cut power of the product and the cooking appliances. (Cut power of the product by plugging it off the socket). |
| *Kitchen cooker hoods are designed for usage during normal and home-style cooking. If it is used for other purposes, failure risk occurs and it will be out of warranty. | *Your product may cause fire risk if cleaning is not applied periodically. |
| *Follow applicable rules and directions for passing out outlet air. (This warning is not valid for usage without chimney.) | *Cut power of the product before maintenance process. (Cut power of the device by unplugging it) |
*When chimney hood and the appliances working with energy other than electricity are operated at the same time, negative pressure in the room should not be more than 4 Pa (4 x 10^5 bar)
*If there is an appliance working with fuel or gaseous fuel at the same place with your hood, this appliance's exhaust should be isolated from its volume totally and the appliance should be hermetic type.
*When chimney connection is applied to your product, use ducts of 150mm or 120mm diameter. Duct connection should be as short as possible and should include few bends.
*Keep package materials away from children as they may be dangerous for them.
*Be sure that your child does not play with the product. Do not allow kids to use your product.
*If power supply cable is damaged, this cable should be changed by its producer or its service agency or a personnel who is a specialist at the same level in order to prevent a dangerous situation.
*In case of flame, cut power of the cooker hood and the cooking appliances, cover the flame. Never use water in order to extinguish it.
Use "MAX 6 A" fuse at cooker hood installment for your security.
Warning about Transportation and Carriage
*All the materials used at package of your product are suitable for recycling.
*Please comply with the signs on the product's box during transportation.
*Hold the holders placed at sides of the box in order to carry your product.
If you need transportation;
*Keep the original box.
*Carry your product in its original box; comply with the carrying signs on the product's box.
If there is no original package;
*Do not put heavy material on the chimney hood.
*Keep the external surface from bash.
*Pack your product to avoid damages.
Installation, taking off your product from its package:
*Check if there is any deformation on your product.
*Transportation damages and failures should immediately be reported to the transportation responsible.
*If you notice any damage please report to the seller.
*Do not allow children to play with packing material!!!
Usage of 5 Speed Digital Control
Usage
Remove protective folio on the inox product after installation.
Speed Selection The product has 5 speeds of ventilation level. One of 1,2,3...9 speeds is selected in accordance with steam of cooking or fry. Motor is started pressing ✗ control button on the front panel. Speed is increased pressing ⊕ button, and decreased by pressing ⊖ button. Automatic timer (TIMER) is available at the models with electronic remote control.
Timer
When pressed to Ⓤ button more than 2 seconds, timer function will be activated for 15 minutes and timer sign will appear on screen. Motor will stop automatically after 15 minutes.

Illumination
The product has 2 lamps and one lamp button to operate illumination. Press lamp button in order to start illumination.
Cleaning Periods of the Aluminum Filters:
Filters should be cleaned when "C" signal appears on Display or (according to usage) each 2-3 weeks. In order to remove "C" signal, after the filters are cleaned and replaced to their place, press ✗ button more than 3 seconds (when the product is at off position). Letter "E" will appear on Display and the product will operate as normal. If you would like to continue using the product without deleting "C" signal, when you press the ✗ button active speed will appear for 1 second, then "C" signal will appear once more and the motor will continue operating. NOTE: "C" signal will appear after usage of the product for 60 hours.
NOTE: If your product has dimmer function please pay attention to the explanation stated below.
Changing Brightness of the Lamp (Dimmer):
When the lamp is on, lamp's brightness starts to change continuously if you keep lamp button pressed. When you get the brightness level that you wish and stop pressing the button, brightness that is set will be recorded, and the product will start with the same brightness during next usage. When you press the lamp button 2 times consecutively, the lamp will be on at the highest brightness level. The lamp will always start at the brightness level that is set during last usage.

Picture 16
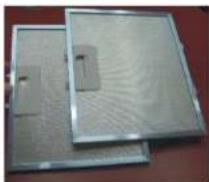
Dishwasher safe aluminum cassette filter.
Picture 17
MAINTENANCE
*Disconnect electricity connection before maintenance and cleaning process.
*Aluminum cassette filter holds the dust and the oil in the air.
*Metal filter should be washed once in a month with hot and soaped water or, if possible, at dishwasher (60C).
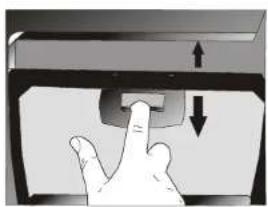
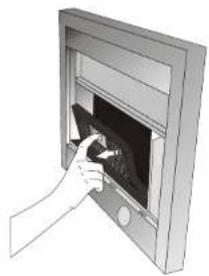
*Take off aluminum cassette filter pressing on springy latches on end point. After cleaning, do not replace before it dries.
*Outer surface of the cooker hood should be wiped with a wet cloth that is wetted with water or alcohol.
*Please avoid contact of electronic parts with water or similar materials.
*Using Inox cleaning and maintenance products available in the market will help your product to perform longer.
Warning: Aluminum filters may be washed in the dishwasher. Color of aluminum filters may change after several washings. This is normal and it is not necessary to change the filters.
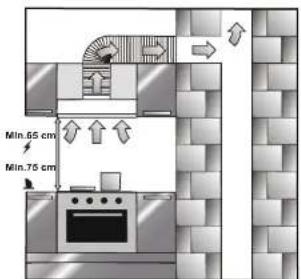
Figure 2
Place of the Product:
After installation of your product, distance between range hood and electrical hob should be at least 65 cm and gas hobs at least 75cm.(Figure 2)
Installation: Taking off the product from its box
* Please check if there is any damage or not on product.
* Transport damages should be reported to transporter immediately.
* Damages and defects should be reported also seller.
* Do not allow children to play with packing material.
Efficient Ventilation
In order to ensure correct ventilation, keep your kitchen windows closed.
IMPORTANT NOTE
Please pay attention when the product is operated at the same time with a product which operates using air and fuel (for instance; heater, water heater etc. which operates using gas, diesel fuel, coal or wood), since cooker hood may affect burning negatively as it directs the air out.
This warning is not valid for usage without chimney.
MOUNTING ISLAND CHIMNEY HOOD
Please follow below instructions.
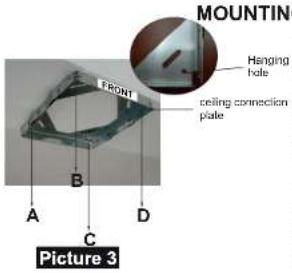
Installation of ceiling connection plate : Front sticker (figure 3) on ceiling connection plate and control panel of chimney hood should have the same direction.
1) Drill 10mm holes from A,B,C,D points. 2) Drive 10mm wall plugs in to A,B,C,D holes. 3) Fix ceiling connection plate to ceiling by using 4 screws (5,5 x 45). Wall plugs, screws and ceiling connection plate are given with chimney hood. Picture 3

Installation of cornerpieces:
Front sticker(picture 4) shows where front side of chimney hood should be installed. Front cornerpieces should be left and right directions. Back cornerpieces should be extroverted. Screw 4 cornerpieces to motor block. Hanging bar should have same directions with ceiling connection plate. Regulating the legth of chimney hood with these cornerpieces. Picture 4

natural_image
Three-panel photo showing a hand holding a paper over a metallic object, with no visible text or symbols.Installation of chimneys to motor cabinet:
Please put internal chimney in external chimney. For temporary connection between chimneys please use a screw on motor cabinet. (So chimneys won't drop while you install motor cabinet to ceiling connection plate.) Mount the chimneys on this screw. (Screw holes of internal chimney should befit the side of motor cabinet.) Picture 5
Changing Aluminum Casette Carbon Filter.
To remove, pull carbon fitler towards yourself from the ratchets on top. Figure 4a
natural_image
Hand pressing a button with directional arrows (no text or symbols)Figure 4a
natural_image
Hand inserting a small object into an open door (no text or symbols visible)Replacing Lamps
Unplug power cord of your cooker hood.
1W LED LAMBA Figure 5
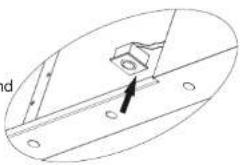
*Open the split extraction plate/glass.
*Take off the aluminium cassette filter. (There are on the left and right back edges covers which you can use for changing the lamps on the edges. Take this covers off)
*Disconnect cables of LED lights.
*Push onto light to remove them.
*Remove tape between lamp and product body.
*Remove protective tape of new lamp before placing
natural_image
Technical diagram of a mechanical assembly with a central component and mounting holes (no text or symbols)Figure 5
Functions of the Product
Your hood is compatible for use with our without chimney.
Usage with chimney
The product should be connected to a chimney that will direct the air out during usage with chimney. In order to achieve best performance, pay attention that the duct system follows the shortest way for connection to the chimney. Your product is produced as it will be appropriate for usage with chimney.
Attention!!!
Outlet of the product should not be connected to air canals that have other smoke as well.
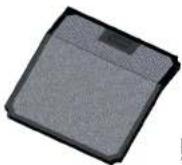
Figure 15
Active Carbon Filter
Carbon filters are used for filtering air and making air recycle where no wall air outlet is available. You may purchase carbon filters via authorized dealers and after sales services. (Picture 15)
Replacing Carbon Filters
Unplug product's power cord before changing carbon filter.
Carbon filters should be replaced in every 3-5 months as product is operated in kitchens with no air outlet.
You should use oil (aluminum cassette) filter all the times with our without carbon filter.


Picture 6
Placing Motor Cabin to Hanging Bar
Place fixed hanging sticks on hanging bar through the channels. Fix parts together via 3,5x9,5 screws Picture 6

natural_image
Hand holding a metal frame with a textured cylindrical object inside (no visible text or symbols)Picture 7
Installation bracket channels on ceiling mounting plate
Installing Aluminum Flexible Pipe
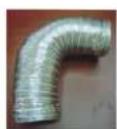
Connect aluminum flexible pipe to outlets on the product and kitchen wall. Ensure connection will not lose while your product is operated on maximum airflow level (Picture 7).
Avoid multiple folds and angles as they may negatively affect air suction capacity. Picture 8
Correct

False

Fixing Internal Chimney
Pull internal chimney up, align holes and fix by 3.5x9.5 nickel coated screws as shown in Picture 9.
natural_image
Close-up of a stainless steel kitchen fan with a hand holding a clip, showing metal blades and a downward arrow (no text or symbols visible)Picture 10
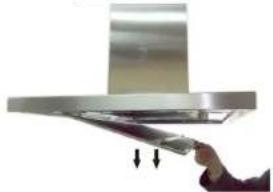
Removing split extraction plate
To remove split extraction plate, pull it down holding left and right upper points. Picture 10

Fixing Motor Cabin on Product Body
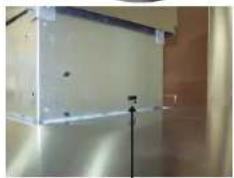
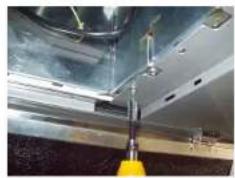
Place hanging hooks on product body onto channels on motor cabin. Fix them together with 3,5x9,5 screws (Picture 11-12)
natural_image
Exterior view of a modern office building (no signage)Hanging hook channel on motor cabin
natural_image
Close-up of a metallic industrial component with a yellow tool inserted, no visible text or symbolsPicture 11
Picture 12
- If the product does not work:
- In order to use the cooker hood efficiently;
- Warning about Transportation and Carriage
- Installation, taking off your product from its package:
- Usage of 5 Speed Digital Control
- Usage
- Timer
- Illumination
- Cleaning Periods of the Aluminum Filters:
- NOTE: If your product has dimmer function please pay attention to the explanation stated below.
- MAINTENANCE
- Place of the Product:
- Installation: Taking off the product from its box
- Efficient Ventilation
- IMPORTANT NOTE
- MOUNTING ISLAND CHIMNEY HOOD
- Replacing Lamps
- 1W LED LAMBA Figure 5
- Functions of the Product
- Active Carbon Filter
- Replacing Carbon Filters
- Placing Motor Cabin to Hanging Bar
- Installing Aluminum Flexible Pipe
- Fixing Internal Chimney
- Removing split extraction plate
- Fixing Motor Cabin on Product Body
Brand : SILVERLINE
Model : SM4204
Category : Range hood