
DFR7NZ - Gps UNIDEN - Free user manual and instructions
Find the device manual for free DFR7NZ UNIDEN in PDF.


| Product Type | GPS-enabled Radar Detector |
| Brand | Uniden |
| Model | DFR7NZ |
| Dimensions | 2.7 x 1.0 x 3.0 inches (approx.) |
| Weight | 6 oz (approx.) |
| Power Supply | 12V DC (cigarette lighter adapter) |
| Main Functions | Radar detection (X, K, Ka, Ku, Laser), GPS alerts, red light camera alerts, speed camera alerts, voice alerts, mute memory |
| Detection Range | Extended range with advanced filtering |
| GPS Capabilities | Built-in GPS for location-based alerts and speed monitoring |
| Display | OLED display with multi-color alerts |
| Maintenance | Clean lens with soft cloth; keep firmware updated via USB |
| Safety Features | Over-voltage protection, low power consumption, automatic dimming |
| Spare Parts | Mounting bracket, USB cable, power cord included; replaceable suction cups |
| Repairability | Limited user-serviceable parts; professional repair recommended |
| General Information | Designed for use in New Zealand (specific frequency coverage); compatible with Uniden's database updates |
Frequently Asked Questions - DFR7NZ UNIDEN
User questions about DFR7NZ UNIDEN
0 question about this device. Answer the ones you know or ask your own.
Ask a new question about this device
Download the instructions for your Gps in PDF format for free! Find your manual DFR7NZ - UNIDEN and take your electronic device back in hand. On this page are published all the documents necessary for the use of your device. DFR7NZ by UNIDEN.
USER MANUAL DFR7NZ UNIDEN
Detailed User's Manual
CUSTOMER CARE
At Uniden ^® , we care about you!
If you need assistance, please do NOT return this product to your place of purchase.
Save your receipt/proof of purchase for warranty.
Quickly find answers to your questions by:
- Reading your owner's manual, included with this product.
- Visiting our customer support website at www.uniden.com.
Images in this manual may differ slightly from your actual product.
DISCLAIMER: Radar detectors are illegal in some states. Some states prohibit mounting any object on your windshield. Check applicable law in your state and any state in which you use the product to verify that using and mounting a radar detector is legal. Uniden radar detectors are not manufactured and/or sold with the intent to be used for illegal purposes. Drive safely and exercise caution while using this product. Do not change settings of the product while driving. Uniden expects consumer's use of these products to be in compliance with all local, state, and federal law. Uniden expressly disclaims any liability arising out of or related to your use of this product.
CONTENTS
CUSTOMER CARE....2
DFR7 OVERVIEW ....5
FEATURES....5
INSTALL AND TURN ON DFR7....6
INSTALL/POWER ON....6
Windshield 6
Dashboard....6
WHAT'S IN THE BOX 6
PARTS OF THE DFR7....7
NON-KEY ELEMENTS 8
CHARGER 8
MENU SYSTEM....9
BASIC OPERATIONS....11
FEATURE DETAILS ....11
USER MARKS (LASER AND RADAR SITES)....11
HIGHWAY VS CITY MODE ....11
POP MODE....12
SCAN DISPLAY 12
ALARM PRIORITIES....12
MUTE MEMORY 12
MAINTENANCE....12
MAINTAINING THE EQUIPMENT ....12
UPDATING THE FIRMWARE/DATABASE ....12
TROUBLESHOOTING....12
SPECIFICATIONS ....13
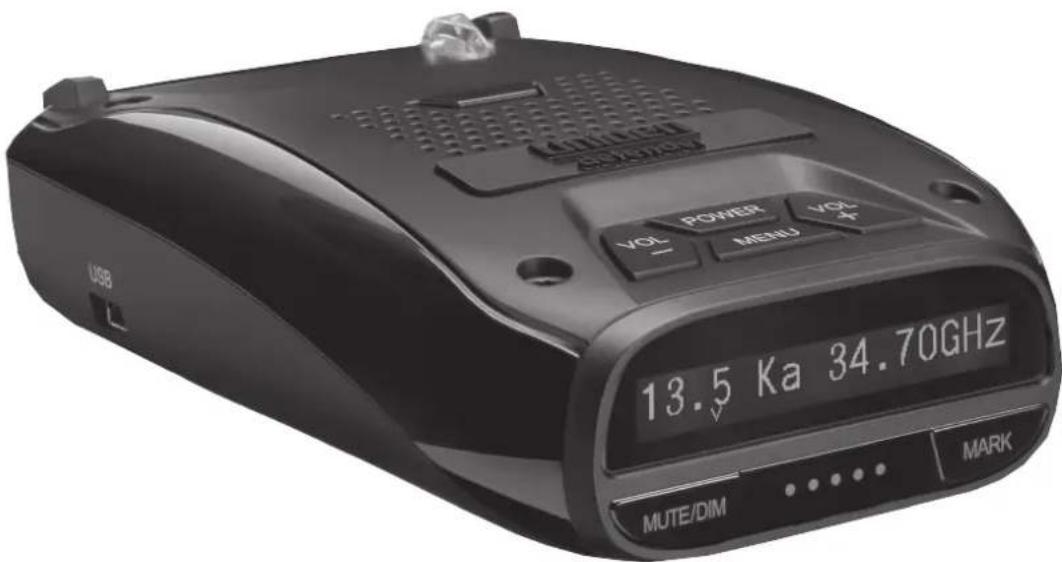
The DFR7 is a top of the line Radar Detector with a built-in GPS feature. With the DFR7, you can mark geographical points where you commonly encounter radar transmissions. These can be school zones, red-light cameras, and places where police frequently monitor traffic. You can mark these points so the detector will announce “User mark ahead” when you approach them. Among other announcements, the Voice Notification feature lets you know when you are approaching a radar and what type of radar it is (red light, speed, etc).
FEATURES
• Super Long Range Laser Radar Detection
- Voice Notifications
- Radar band frequency displays
• GPS for Red Light and Speed camera locations
- Easy to read OLED display
- User Mark set and voice notification
- Advanced K band filter
- Spectre I and IV undetectable
- Displays Signal Strength and Vehicle Battery Voltage
• Max. Speed Warning System
INSTALL AND TURN ON DFR7
You can mount the DFR7 on the windshield (bracket included) or on the dashboard (hook and loop tape included).
INSTALL/POWER ON
Windshield
When you mount the DFR7 on the windshield, mount it in the middle of the windshield between the driver and passenger. Be sure there are no obstructions and that there is a clear view through the back window.
- Attach the rubber suction cups to the bracket and push the cups firmly onto the windshield.
- Slide the unit onto the bracket until it clicks into place.
- Plug the power cord RJ45 connector into the DFR7 and plug the cigarette lighter adapter into the vehicle's cigarette lighter.
- The DFR7 automatically turns on and runs through a self test cycle.
Release the DFR7 from the bracket by pressing the Eject key on top of the detector.
Dashboard
The same types of mounting requirements for the windshield apply for mounting the unit on the dashboard.
- Attach the unit to the dashboard using the hook and loop fastener tape.
- Plug the power cord RJ45 connector into the DFR7 and plug the cigarette lighter adapter into the vehicle's cigarette lighter.
- The DFR7 automatically turns on and runs through a self test cycle.
Pull the bracket from the dashboard, separating the hook and loop tape.
WHAT'S IN THE BOX
 | 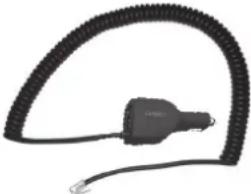 |
| DFR7 Radar Detector 12V DC Power Cord with RJ45 Connector | |
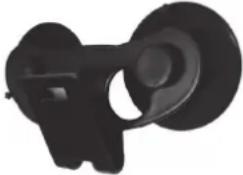 | Not Shown:Hook and Loop Fastener TapeSpare Fuse for DC Power CordOwner's Manual |
| Windshield Mounting Bracket | |
PARTS OF THE DFR7
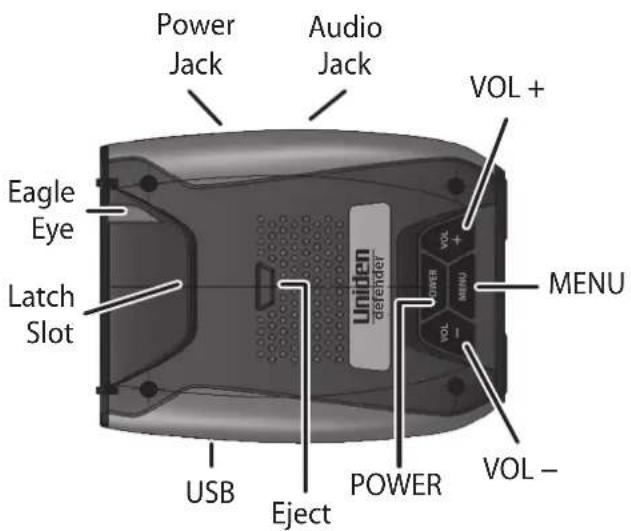
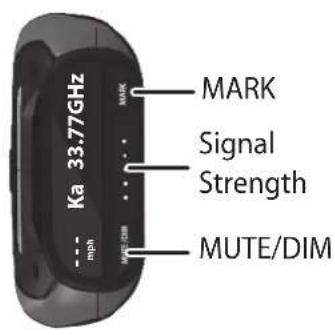
| KEY PRESS TO... PRESS AND HOLD TO... | ||
| POWER | Turn DFR7 on and off. NA | |
| VOL + | Turn volume up (7 levels: 0 - 6).In Menus, go to next item. | Press and hold both VOL + and VOL - to change modes between HIGHWAY and CITY. |
| VOL - | Turn volume down (7 levels: 0 - 6).In Menus, go to previous item. | |
| MENU | Access the Menu system.In the Menu system, press to cycle through options for the current menu item. | Exit the Menu system. |
| MUTE/DIM | MUTEMUTE on - Press MUTE/DIM to mute an alarm. Returns to normal operation 10 seconds after the alert ends or if a different band is detected during Mute mode. Mute On displays for a few seconds.MUTE off - Press MUTE/DIM to restore audible alarms before the 10 second automatic mute time-out.MUTE MEMORYSave a Mute location (Mute Memory) - press MUTE/DIM again while Mute On displays to save that GPS location and frequency to memory. Mute Memory displays on the screen.DFR7 stores up to 100 Mute Memory points.Delete Mute Memory - Press MUTE/DIM while Mute Memory displays; the DFR7 displays a delete confirmation message. Press MUTE/DIM again to confirm. | DIM - Changes the display backlight intensity:BrightDimDarkOff |
| MARK | User Mark. A User Mark is a manually tagged geographic location where an alarm is usually found. The DFR7 alerts when close to these User Marks.Add - Press MARKwhen you are at the alarm location.DeleteAn error message displays/sounds if memory is full or there is a GPS error. | Delete all User Marks. |
NON-KEY ELEMENTS
| ELEMENT WHAT IT DOES | |
| Eagle Eye Provides a 360° monitoring radius. | |
| Latch Slot | Insert the bracket latch into this slot. |
| Mini USB Provides PC connection for data updates. | |
| Audio Jack Plug in headset. | |
| Eject Press to release the bracket latch. | |
| Power Jack Plug the 12V Power Cord here. | |
| Signal Strength Displays received signal strength (5 levels). | |
CHARGER
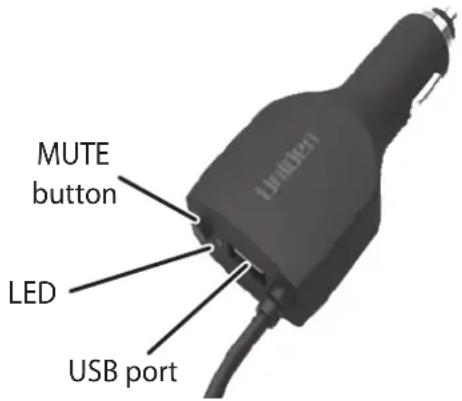
| ELEMENT WHAT IT DOES | |
| MUTE button • Press the mute | mute button to mute an alarm. Returns to normal operation 10 seconds after the alert ends or if a different band is detected during Mute mode. Mute On displays on the DFR7 for a few seconds.Save a Mute location (Mute Memory) - press the mute button again while Mute On displays on the DFR7 to save that GPS location and frequency to memory. Mute Memory displays on the screen.DFR7 stores up to 100 Mute Memory points.Delete Mute Memory - Press the mute button while Mute Memory displays on the DFR7; the DFR7 displays a delete confirmation message. Press the mute button again to confirm. |
| LED (Red) Off: Power is off. | Steady on: Power is on.Flashing: Receiving an alert. The faster it flashes, the stronger the signal. |
| USB Port Use this USB port to charge mobile devices. | |
MENU SYSTEM
Menus let you set up the system to your own requirements. You can turn different bands on and off and set specific items such as speed or auto mute.
Press MENU to access the Menu system. The screen displays the selection's current status. For example, if you press MENU and the screen displays Voice: ON, you have the option of turning Voice to OFF.
Use the following keys to navigate the menus:
- MENU: Change a menu item setting (press and hold to exit the Menu system).
• VOL + : Go to the next Menu item.
• VOL – : Go to the previous Menu item.
| MENU ITEM WHAT IT DOES SETTINGS | ||
| GPS Determines your geographic location. On | Off | |
| Speed Camera Alarm | Notifies you if any speed cameras are nearby.Only displays if GPS setting = ON | OnOff |
| Red Light Camera Alarm | Notifies you if any red light cameras are nearby.Only displays if GPS setting = ON. | OnOff |
| Voice Turns voice alert on or off under the following conditions:Type of radar/laserBand alarmsIf Voice is turned off, a chime sounds during alerts. | OnOff | |
| X Band Turn off to have the detector ignore X Band frequencies (Highway only). | OnOff | |
| K Band Turn off to have the detector ignore K Band frequencies. On | Off | |
| Ka Band Turn off to have the detector ignore Ka Band frequencies. | OnOff | |
| Laser Turn off to have the detector ignore lasers. On | Off | |
| POP Mode Detects POP transmissions (very brief transmissions, too fast for some detectors to hear). | OnOff | |
| K Filter | Filters noise from the K band to prevent false detections. | OnOff |
| TSF | Traffic Sensor Filter. Prevents false alarms caused by traffic monitoring radar systems. | OnOff |
| Ka Filter | Filters noise from the Ka band to prevent false detections. | OnOff |
| Scan | If Scan is turned on, a dot displays and moves back and forth on the screen to indicate scanning status. | OnOff |
| Display Lets you | set the following:• Speed | mph, km/h |
| • Compass (8 points) NW, W, etc | ||
| • Voltage V | ||
| • Altitude m (if Speed Unit set to km/h) | ft. (if Speed Unit set to mph) | |
| • Off | ||
| Speed Unit Sets | the speed measurement type. Miles per Hour (mph) | Kilometers per hour (km/h) |
| Auto Mute Auto | Mute reduces alarm level to 1 after 3 seconds and returns to normal operation (Auto Mute = OFF) 10 seconds after the alert ends. If the same alarm sounds within the 10 second period, Auto Mute remains at level 1. The unit returns to normal operation (Auto Mute = OFF) if a different band is detected during Auto Mute = ON mode. | OnOff |
| Backlight Turns | the front key backlight on and off On | Off |
| Quiet Ride Mutes | laser and radar alarms when you drive under the speed limit you set here. | 5 to 50 in 5 mph (10 to 80 in 10 km/h) intervalsOnOff |
| Limit Speed Sounds | ands an alarm when the vehicle reaches a specific speed. | 50 to 100 in 5 mph (80 to 160 in 10 km/h) intervalsOnOff |
| GMT Sets time zone according to Greenwich Mean Time (GMT). | Most common time zone settings for North America are:• GMT-05:00 - Eastern Standard• GMT-06:00 - Central Standard• GMT-07:00 - Mountain Standard• GMT-08:00 - Pacific Standard• GMT-09:00 - Yukon Standard• GMT-10:00 - Alaska-Hawaii Standard | |
| DST | Daylight Saving Time | OnOff |
| BAT Warning | Issues a warning if the vehicle battery voltage drops below 11V. | OnOff |
| BAT Saver | Turns off power to the DFR7 if the speed stays at 0 or if the GPS is not connected for more than an hour. | OnOff |
| Self Test | Runs a self diagnostic test at power up to check for faults. | OnOff |
| Factory Reset | Resets all settings except GMT to the factory defaults.There is no confirmation request for reset. | NA |
| Delete All Mute | Delete all saved Mute Memory pointsThere is no confirmation request for reset. | NA |
| FW Ver | Displays the latest firmware version. | NA |
| DB Ver | Displays the latest database version | NA |
| EXIT | Closes the Menu system. | NA |
| HOW DO I ...? TRY THIS... | |
| Turn on the DFR7 Press | POWER. The unit turns on and runs through an initial self-check if Self Test is turned on. It displays the different bands and their settings.The DFR7 turns on automatically when you start the vehicle. |
| Adjust the volume • Press | VOL + to increase volume. The unit beeps and displays a number increase.• Press VOL – to decrease volume. The unit beeps and displays a number decrease. |
| Mute alarm audio during the alert | Press MUTE/DIM during an audio alarm to mute it. (This is especially useful in situations where the alert may be prolonged, such as at red lights.) You can also press the MUTE button on the charger (see page 8). |
| Change the screen's brightness Press and hold MUTE/DIM. The DFR7 announces the brightness level (Bright, Dim, Dark, or Off) as it changes to that level. Press and hold the key again to cycle between the brightness levels. | |
| Turn bands on and off Press | MENU and cycle through the menu options until the band you want to turn off displays. Press MENU again to change that band's status. |
| Change Highway to City and back | Press and hold both VOL + and VOL – for at least 1 second to alternate between HIGHWAY and CITY setting. |
| Set a user mark Press | MARK to create a user mark when you are at a location where there is normally some type of radar. The DFR7 announces “User mark logged.” The DFR7 will announce when you approach user marks.The DFR7 can save up to 200 user marks. |
| Delete a user mark Press | MARK again at that location to delete the user mark.The DFR7 does NOT ask for confirmation before deleting user marks. |
| Delete ALL user marks Press and hold MARK to delete all user marks.The DFR7 DOES ask for confirmation before deleting all user marks. Press MARK again to confirm. | |
| Update the firmware and database | Refer to www.unidensupport.com for details. |
FEATURE DETAILS
USER MARKS (LASER AND RADAR SITES)
With the DFR7, you can mark geographical points where you commonly encounter radar transmissions, These can be school zones, red-light cameras, and places where police frequently monitor traffic.
When you are at the location, press MARK. The DFR7 announces "User mark logged." Now, when you approach these points, the DFR7 announces "User mark ahead."
Press and hold MARK at that location to delete that user mark.
The DFR7 holds up to 200 user marks.
HIGHWAY VS CITY MODE
Radar detectors operate with two sensitivity levels. These levels determine the types of signals and signal ranges (bands) detected. Highway mode is the most sensitive level while City mode is the least sensitive. If the X band is left on in City mode, a radar detector can pick up many X band signals (such as garage door openers) that generate false alerts. The DFR7 turns off the X band for City mode. When you are on the highway, there is less chance of picking up X band false alerts, so the DFR7 keeps the X band on in Highway mode.
Press and hold both VOL + and VOL - for at least 1 second to alternate between HIGHWAY and CITY mode.
POP MODE
In POP mode, the DFR7 can detect short burst from radars that are too fast for many other detectors to catch. You can turn POP mode on and off in the Menu system.
SCAN DISPLAY
A small dot on the screen indicates that the unit is scanning for signals. This dot travels back and forth in the middle of the screen. You can turn this display on and off in the Menu system.
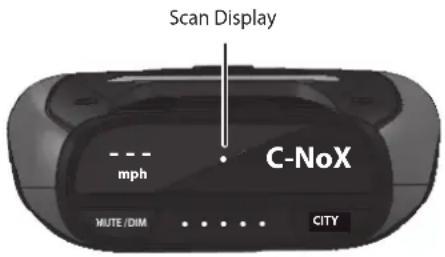
Elements on the screen vary according to what you turn on and off in the Menu system
ALARM PRIORITIES
• Speed Camera / Red Light Camera / User Mark Alarm/POI Limit Speed Alarm
- Laser signal
• X, K, Ka Band signal
• User Limit Speed Alarm
• Vehicle Low Battery Voltage Warning, Vehicle Battery Saver Alarm
MUTE MEMORY
Use Mute Memory to mute known areas of false alarms (such as department store automatic doors). The DFR7 remembers where you muted the audio (GPS location) and the frequency you muted. It will automatically mute when you travel to that location and the saved frequency is detected; however, if a different frequency is detected, the DFR7 alerts to that different frequency.
When you press MUTE/DIM or the MUTE button on the charger to mute audio for a specific location, Mute On displays. While Mute On displays, press MUTE/DIM or the MUTE button on the charger again to save that GPS location to memory. Mute Memory displays on the screen.
DFR7 stores up to 100 Mute Memory points.
To delete Mute Memory points, press MUTE/DIM or the MUTE button on the charger while Mute Memory displays. The DFR7 displays a delete confirmation message; press MUTE/DIM or the MUTE button on the charger again to confirm. You can also delete Mute Memory points from Menus/Delete All Mute?
MAINTENANCE
MAINTAINING THE EQUIPMENT
The DFR7 requires very little physical maintenance. Wipe it with a soft cloth to keep dust from accumulating. Check the power cord connections to keep them clean and free of corrosion.
UPDATING THE FIRMWARE/DATABASE
Uniden recommends that you update your DFR7's firmware and database periodically. Go to www.unidensupport.com, find your model, and check if you have the latest firmware:
TROUBLESHOOTING
| IF... TRY THIS... | |
| The unit won’t turn on Check the connections. Be sure they are all secure. | |
| No display or audio. | · If no display, check the connections. Be sure they are all secure.· If no audio, check if Voice is turned off. |
| The unit alarms when the vehicle hits bumps. Check the connections. Be sure they are all secure. | |
| The unit alarms briefly in the same location but no radar source was in view. | There may be a motion sensor or house alarm in use within range. |
| The DFR7 did not alert when a police car was in view. | · The officer may not have radar/laser units turned on.· Check that the band is turned on. PressMENUand cycle through the options to get to the bands. If the band is turned off, the OLED will show OFF. Turn the band on. |
| The vehicle starts but the DFR7 does not turn on. | · Verify that the power cord is securely connected to the unit and inserted into the cigarette lighter jack.· Change the fuse in the power cord. Unscrew the cigarette lighter plug to access the fuse. |
SPECIFICATIONS
| Receiver Type: Antenna Type: | |||
| Radar Double Conversion Superheterodyne Self-Contained Antenna | Radar Linear Polarized E-vector Vertical | ||
| Laser Pulsed Laser Signal Receiver Laser | Front | Convex Condenser Lens | |
| Frequency: Laser | Back | Concave Condenser Lens | |
| X 10.525 GHz Dimensions 110.00 mm (D) x 69.00 mm | (W) x 29.50 mm (H) | ||
| K 24.150 GHz Weight 6 oz (170g) | |||
| Ka | 33.400 - 36.000 GHz | Operating Temp. | -4° to +185° F (Radar/Laser)-20° to +85° C (Radar/Laser) |
| Laser | 800 nm - 1100 nm | Storage Temp. | -22° to +203° F (Radar/Laser)-30° to +95° C (Radar/Laser) |
| Detector Type: | Operating Power Source | DC 11.0 to 16.0 V | |
| Radar | Scanning Frequency Discriminator | USB Interface | USB Specification 2.0/1.1 |
| Laser Pulse Width Discriminator | |||
| Alarm Type | Beep (Detected Band and Signal strength) | ||
FCC/IC COMPLIANCE
FCC: AMWUA1602
ICC: 513C-UA1602
FCC Compliance
This device complies with Part 15 of the FCC rules. Operation is subjected to the following two conditions: (1) this device may not cause harmful interference, and (2) this device must accept any interference received, including interference that may cause undesired operation.
Changes or modifications not expressly approved by the party responsible for compliance could void your authority to operate the equipment.
This device complies with Industry Canada license-exempt RSS standard(s).Operation is subject to the following two conditions: (1) this device may not cause interference, and (2) this device must accept any interference, including interference that may cause
undesired operation of the device.
Changes or modifications not expressly approved by the party responsible for compliance could void your authority to operate the equipment.
Keep your receipt! Proof of purchase is required for warranty service.
WARRANTOR: UNIDEN AMERICA CORP. ("Uniden")
ELEMENTS OF WARRANTY: Uniden warrants, for one year, to the original retail owner, this Uniden Product to be free from defects in materials and craftsmanship with only the limitations or exclusions set out below.
WARRANTY DURATION: This warranty to the original user shall terminate and be of no further effect 12 months after the date of original retail sale. The warranty is invalid if the Product is (A) damaged or not maintained as reasonable or necessary, (B) modified, altered, or used as part of any conversion kits, subassemblies, or any configurations not sold by Uniden, (C) improperly installed, (D) serviced or repaired by someone other than an authorized Uniden service center for a defect or malfunction covered by this warranty, (E) used in any conjunction with equipment or parts or as part of any system not manufactured by Uniden, or (F) installed or programmed by anyone other than as detailed by the Operating Guide for this product.
STATEMENT OF REMEDY: In the event that the product does not conform to this warranty at any time while this warranty is in effect, warrantor will repair the defect and return it to you without charge for parts, service, or any other cost (except shipping and handling) incurred by warrantor or its representatives in connection with the performance of this warranty. THE LIMITED WARRANTY SET FORTH ABOVE IS THE SOLE AND ENTIRE WARRANTY PERTAINING TO THE PRODUCT AND IS IN LIEU OF AND EXCLUDES ALL OTHER WARRANTIES OF ANY NATURE WHATSOEVER, WHETHER EXPRESS, IMPLIED OR ARISING BY OPERATION OF LAW, INCLUDING, BUT NOT LIMITED TO ANY IMPLIED WARRANTIES OF MERCHANTABILITY OR FITNESS FOR A PARTICULAR PURPOSE. THIS WARRANTY DOES NOT COVER OR PROVIDE FOR THE REIMBURSEMENT OR PAYMENT OF INCIDENTAL OR CONSEQUENTIAL DAMAGES. Some states do not allow this exclusion or limitation of incidental or consequential damages so the above limitation or exclusion may not apply to you.
LEGAL REMEDIES: This warranty gives you specific legal rights, and you may also have other rights which vary from state to state. This warranty is void outside the United States of America.
PROCEDURE FOR OBTAINING PERFORMANCE OF WARRANTY: If, after following the instructions in this Operating Guide, you are certain that the Product is defective, pack the Product carefully (preferably in its original packaging). Include evidence of original purchase and a note describing the defect that has caused you to return it. The Product should be shipped freight prepaid, by traceable means, or delivered, to warrantor at:
Uniden America Corporation
C/O Saddle Creek
743 Henrietta Creek Rd., Suite 100
Roanoke, TX 76262
POP Mode is a trademark of MPH Industries, Inc.
- Detailed User's Manual
- CUSTOMER CARE
- Save your receipt/proof of purchase for warranty.
- CONTENTS
- DFR7 OVERVIEW ....5
- INSTALL AND TURN ON DFR7....6
- WHAT'S IN THE BOX 6
- PARTS OF THE DFR7....7
- MENU SYSTEM....9
- BASIC OPERATIONS....11
- FEATURE DETAILS ....11
- MAINTENANCE....12
- TROUBLESHOOTING....12
- SPECIFICATIONS ....13
- FEATURES
- INSTALL AND TURN ON DFR7
- INSTALL/POWER ON
- Windshield
- Dashboard
- MENU SYSTEM
- FEATURE DETAILS
- USER MARKS (LASER AND RADAR SITES)
- HIGHWAY VS CITY MODE
- POP MODE
- SCAN DISPLAY
- ALARM PRIORITIES
- MUTE MEMORY
- DFR7 stores up to 100 Mute Memory points.
- MAINTENANCE
- MAINTAINING THE EQUIPMENT
- UPDATING THE FIRMWARE/DATABASE
- TROUBLESHOOTING
- FCC/IC COMPLIANCE
- FCC Compliance
- Keep your receipt! Proof of purchase is required for warranty service.
- WARRANTOR: UNIDEN AMERICA CORP. ("Uniden")
Brand : UNIDEN
Model : DFR7NZ
Category : Gps