
AmphiSoundX MT100-5-SB20 - Soundbar MOTOROLA - Free user manual and instructions
Find the device manual for free AmphiSoundX MT100-5-SB20 MOTOROLA in PDF.


| Product Type | Soundbar |
| Brand | Motorola |
| Model | AmphiSoundX MT100-5-SB20 |
| Dimensions (W x H x D) | 96 x 6 x 8 cm |
| Weight | 2.5 kg |
| Power Supply | 100-240V AC, 50/60Hz |
| Power Consumption | 40W |
| Audio Output Channels | 2.1 |
| Total Speaker Output | 120W RMS |
| Subwoofer | Built-in (20W) |
| Connectivity | Bluetooth 5.0, USB, Optical, AUX |
| Bluetooth Range | 10 meters |
| Supported Audio Formats | MP3, WMA, WAV, FLAC |
| Remote Control | Included |
| Mounting Options | Tabletop or wall mount |
| Water Resistance | IPX4 (splash-proof) |
| Material | Plastic with mesh grill |
| Color | Black |
| Operating Temperature | 0°C to 40°C |
| What's in the Box | Soundbar, remote control, power adapter, user manual |
| Warranty | 1 year |
| Compatibility | TV, smartphone, tablet, PC |
| Sound Modes | Movie, Music, Dialogue, Night |
| Control Buttons | Volume +/-, Source, Power on top panel |
Frequently Asked Questions - AmphiSoundX MT100-5-SB20 MOTOROLA
User questions about AmphiSoundX MT100-5-SB20 MOTOROLA
0 question about this device. Answer the ones you know or ask your own.
Ask a new question about this device
Download the instructions for your Soundbar in PDF format for free! Find your manual AmphiSoundX MT100-5-SB20 - MOTOROLA and take your electronic device back in hand. On this page are published all the documents necessary for the use of your device. AmphiSoundX MT100-5-SB20 by MOTOROLA.
USER MANUAL AmphiSoundX MT100-5-SB20 MOTOROLA
MT250-ASB31
User Manual
Before using the soundbar, please read this manual thoroughly and retain it for future reference.
Contents
1. Important Safety Instructions....3
1.1 Safety....3
1.2 Caution....4
1.3 Warning 4
1.4 Marking....4
2. What's in the Box....5
3. Identifying the Parts....6
3.1 Main Unit 6
3.2 Wireless Subwoofer 6
3.3 Remote Control 7
4. Preparations....7
4.1 Prepare the Remote Control 7
4.2 Replace the Remote Control Battery....7
5. Placement and Mounting....8
5.1 Placement 8
5.2 Wall Mounting 8
6. Connections....9
6.1 Dolby Atmos ® 9
6.2 HDMI Connection....9
6.3 Use the OPTICAL Socket....10
6.4 Use the COAXIAL Socket 10
6.5 Use the AUX Socket....10
6.6 Connect Power 10
7. Pair up with the subwoofer 11
7.1 Automatic pairing....11
7.2 Manual pairing....11
8. Basic Operation....11
8.1 Standby/ON....11
8.2 Automatic Power Off Function 11
8.3 Select Modes....11
8.4 Adjust the Bass/Treble Level....12
8.5 Turn the Surround Sound ON/OFF....12
8.6 Select Equalizer (EQ) Effect....12
8.7 Adjust the Volume....12
8.8 Adjust the Brightness....12
9. AUX / OPTICAL / COAXIAL / HDMI Operation....12
10. Bluetooth Operation....13
10.1 Pair Bluetooth-enabled Devices....13
10.2 Listen to Music from Bluetooth Device....13
11. USB Operation....14
12. Troubleshooting.... 14
13. Specifications....15
1. Important Safety Instructions

CAUTION
RISK OF ELECTRIC SHOCK DO NOT OPEN

CAUTION: TO REDUCE THE RISK OF ELECTRIC SHOCK, DO NOT REMOVE COVER (OR BACK). NO USER-SERVICEABLE PARTS INSIDE. REFER SERVICING TO QUALIFIED SERVICE PERSONNEL.

The lightning flash with arrowhead symbol, within an equilateral triangle, is intended to alert the user to the presence of uninsulated “dangerous voltage” within the product’s enclosure that may be of sufficient magnitude as to constitute a risk of electric shock to persons.

The exclamation point within an equilateral triangle is intended to alert the user to the presence of important operating and maintenance (servicing) instructions in the literature accompanying the appliance.
1.1 Safety
1 Read these instructions - All the safety and operating instructions should be read before this product is operated.
2 Keep these instructions - The safety and operating instructions should be retained for future reference.
3 Heed all warnings - All warnings on the appliance and in the operating instructions should be adhered to.
4 Follow all instructions - All operating and usage instructions should be followed.
5 Do not use this apparatus near water - The appliance should not be used near water or moisture - for example, in a wet basement or near a swimming pool and the like.
6 Clean only with a dry cloth.
7 Do not block any ventilation openings. Install in accordance with the manufacturer's instructions.
8 Do not install near any heat sources such as radiators, heaters, stoves, or other apparatus (including amplifiers) that produce heat.
9 Do not defeat the safety purpose of the polarized or grounding plug. A polarized plug has two blades with one
wider than the other. A grounding plug has two blades and a third grounding prong. The wide blade or the third prong is provided for your safety. If the provided plug does not fit into your outlet, consult an electrician for replacement of the obsolete outlet.
10 Protect the power cord from being walked on or pinched particularly at plugs, convenience receptacles, and the point where they exit from the apparatus.
11 Only use attachments/accessories specified by the manufacturer.
12 Use only with the cart, stand, tripod, bracket or table specified by the manufacturer, or sold with the apparatus. When a cart or rack is used, use caution when moving the cart/ apparatus combination to avoid injury from tip-over.
13 Unplug the apparatus during lightning storms or when unused for long periods of time.
14 Refer all servicing to qualified personnel. Servicing is required when the apparatus has been damaged in any way, such as power supply cord or plug is damaged, liquid has been spilled or objects have fallen into the apparatus, the unit has been exposed to rain or moisture, does not operate normally, or has been dropped.
15 ☐ This equipment is a Class II or double insulated electrical appliance. It has been designed in such a way that it does not require a safety connection to electrical earth.
16 The apparatus shall not be exposed to dripping or splashing. No objects filled with liquids, such as vases, shall be placed on the apparatus.
17 Minimum distance around the apparatus for sufficient ventilation is 5cm.
18 The ventilation should not be impeded by covering the ventilation openings with items, such as newspapers, tablecloths, curtains, etc...
19 No naked flame sources, such as lighted candles, should be placed on the apparatus.
20 Batteries should be recycled or disposed of as per state and local guidelines.
21 The use of apparatus in moderate climates.
1.2 Caution
- Use of controls or adjustments or performance of procedures other than those described herein, may result in hazardous radiation exposure or other unsafe operation.
- To reduce the risk of fire or electric shock, do not expose this apparatus to rain or moisture. The apparatus must not be exposed to dripping or splashing and objects filled with liquids, such as vases, must not be placed on apparatus.
- The mains plug/appliance coupler is used as the disconnect device, the disconnect device must remain readily operable.
- Danger of explosion if battery is incorrectly replaced. Replace only with the same or equivalent type.
1.3 Warning
- The battery (batteries or battery pack) shall not be exposed to excessive heat such as sunshine, fire or the like.
- Before operating this system, check the voltage of this system to see if it is identical to the voltage of your local power supply.
- Do not place this unit close to strong magnetic fields.
- Do not place this unit on the amplifier or receiver.
- Do not place this unit close to damp areas as the moisture will affect the life of the laser head.
- If any solid object or liquid falls into the system, unplug the system and have it checked by qualified personnel before operating it any further.
- Do not attempt to clean the unit with chemical solvents as this may damage the finish. Use a clean, dry or slightly damp cloth.
- When removing the power plug from the wall outlet, always pull directly on the plug, never yank on the cord.
- Changes or modifications to this unit not expressly approved by the party responsible for compliance will void the user's authority to operate the equipment.
- The rating label is pasted on the bottom or back of the equipment.

Battery usage CAUTION
To prevent battery leakage which may result in bodily injury, property damage, or damage to the apparatus:
- Install all batteries correctly, + and - as marked on the apparatus.
- Do not mix old and new batteries.
- Do not mix alkaline, standard (Carbon-Zinc) or rechargeable (Ni-Cd, Ni-MH, etc.) batteries.
- Remove batteries when the unit is not used for a long time.
1.4 Marking
Correct Disposal of this product. This marking indicates that this product should not be disposed with other household wastes throughout the EU. To prevent possible harm to the environment or human health from uncontrolled waste disposal, recycle it responsibly to promote the sustainable reuse of material resources. To return your used device, please use the return and collection systems or contact the retailer where the product was purchased. They can take this product for environmental safe recycling.

Dolby Atmos
Dolby, Dolby Atmos, and the double-D symbol are registered trademarks of Dolby Laboratories Licensing Corporation. Manufactured under license from Dolby Laboratories. Confidential unpublished works. Copyright © 2012-2020 Dolby Laboratories. All rights reserved.
2. What's in the Box

Soundbar
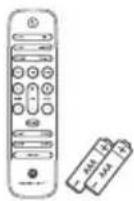
Remote Control / AAA Batteries x 2

Wireless Subwoofer

AC Power Cord × 2
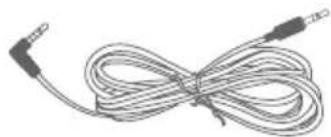

HDMI CableAUX Cable

Wall Bracket

Wall Mounting Screw
- Design and specifications are subject to change without notice.
- Images, illustrations and drawings shown on this User Manual are for reference only, actual product may vary in appearance.
3. Identifying the Parts
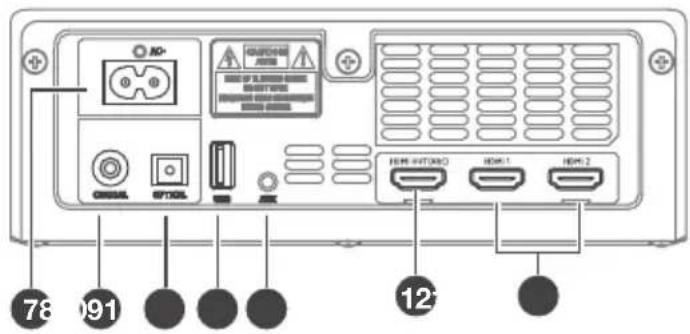
3.1 Main Unit

1 Remote Control Sensor
Receive signal from the remote control.
2 LED Display
Show the current status.
3 Wall bracket screws
4 ⏻ (ON/OFF) button
Switch the unit between ON and Standby mode.
5 (SOURCE) button
Select the play function.
6 VOL+/VOL- buttons
Increase/decrease the volume level.
7 AC\~ Socket
8 COAXIAL Socket
9 OPTICAL Socket
10 USB Socket
Insert the USB device to play music.
11 AUX Socket
Connect to an external audio device.
12 HDMI OUT (ARC) Socket
Connect to a TV via HDMI cable.
13 HDMI IN (1/2) Sockets
Connect to a TV via HDMI cable.

3.2 Wireless Subwoofer
1 AC\~Socket Connect to power.
2 PAIR button
Press activate the pairing function between the main unit and the subwoofer.
3 PAIR Indicator
Light up solidly when the pairing succeed.

3.3 Remote Control
1 ⏻Switch the unit between ON and STANDBY mode.
2 SOURCE buttons Select the play function.
3 |◀/▶Skip to previous/next track in Bluetooth/USB mode.
• ▶ Play/pause/resume playback in Bluetooth/USB mode.
Press and hold to activate the pairing function in Bluetooth mode or disconnect the existing paired Bluetooth device.
4 BASS+/- Adjust bass level.
5 TREBLE +/- Adjust treble level.
6 (MUTE) Mute or resume the sound.
• +/- (vol) Increase/decrease the volume level.
7 VERTICAL/SURROUND Adjust the surround ON/OFF.
8 EQ buttons Select Equalizer (EQ) Effect.
9 DIMMER Adjust display brightness.

4. Preparations
4.1 Prepare the Remote Control
The provided Remote Control allows the unit to be operated from a distance.
• Even if the Remote Control is operated within the effective range 19.7 feet (6m), remote control operation may be impossible if there are any obstacles between the unit and the remote control.
• If the Remote Control is operated near other products which generate infrared rays, or if other remote control devices using infra-red rays are used near the unit, it may operate incorrectly. Conversely, the other products may operate incorrectly.
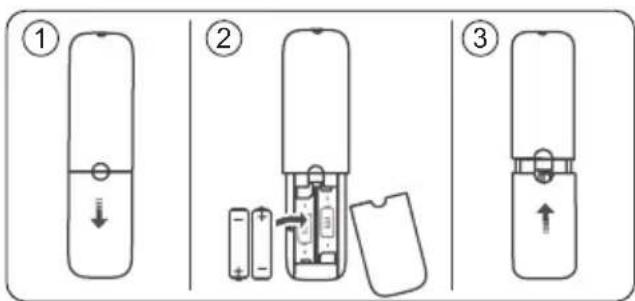
4.2 Replace the Remote Control Battery
1 Press and slide the back cover to open the battery compartment of the remote control.
2 Insert two AAA size batteries. Make sure the (+) and (-) ends of the batteries match the (+) and (-) ends indicated in the battery compartment.
3 Close the battery compartment cover.
Precautions Concerning Batteries
- Be sure to insert the batteries with correct positive “⊕” and negative “⊖” polarities.
- Use batteries of the same type. Never use different types of batteries together.
• Either rechargeable or non-rechargeable batteries can be used. Refer to the precautions on their labels.
- Be aware of your fingernails when removing the battery cover and the battery.
- Do not drop the remote control.
• Do not allow anything to impact the remote control.
- Do not spill water or any liquid on the remote control.
- Do not place the remote control on a wet object.
- Do not place the remote control under direct sunlight or near sources of excessive heat.
- Remove the battery from the remote control when not in use for a long period of time, as corrosion or battery leakage may occur and result in physical injury, and/or property damage, and/or fire.
- Do not use any batteries other than those specified.
- Do not mix new batteries with old ones.
- Never recharge a battery unless it is confirmed to be a rechargeable type.
5. Placement and Mounting
5.1 Placement

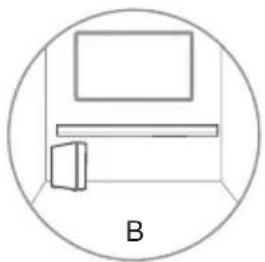
A If your TV is placed on a table, you can place the unit on the table directly in front of the TV stand, centered with the TV screen.
B If your TV is attached to a wall, you can mount the unit on the wall directly below the TV screen.
5.2 Wall Mounting
- Drill 4 parallel holes (∅ 5.5-6 mm each according to wall type) in the wall. The distance between the holes should be 870 mm.
- Firmly fix 1 dowel into each hole in the wall if necessary. Tighten the wall mount brackets on the wall with screws and screwdriver (not included). Make sure that they are securely installed.
- Remove the screws at the back of the unit. Install the wall mounting screws into the back of the unit.
- Lift the unit onto the wall mount brackets and slot into place.
- Installation must be carried out by qualified personnel only. Incorrect assembly can result in severe personal injury and property damage (if you intend to install this product yourself, you must check for installations such as electrical wiring and plumbing that may be buried inside the wall). It is the installer's responsibility to verify that the wall will safely support the total load of the unit and wall brackets.

- Additional tools (not included) are required for the installation.
- Do not overtighten screws.
- Keep this instruction manual for future reference.
- Use an electronic stud finder to check the wall type before drilling and mounting.
6. Connections
6.1 Dolby Atmos®
Dolby Atmos gives you amazing experience you have never before by overhead sound, and all the richness, clarity, and power of Dolby sound.
For using Dolby Atmos®
Dolby Atmos ® is available only in HDMI mode. For the details of the connection, please refer to “HDMI Connection”.
- To use Dolby Atmos ® in HDMI 1 / HDMI 2 / HDMI ARC mode, your TV has to support Dolby Atmos ® .
- Make sure that "No Encoding" is selected for bitstream in the audio output of the connected external device (e.g. Blu-ray DVD player, TV etc.).
- While entering Dolby Atmos / Dolby Digital / PCM format, the soundbar will show DOLBY ATMOS / DOLBY AUDIO / PCM AUDIO once, and if you want to check current format, pls stop playing and resume again. And this is only applicable for HDMI mode.
6.2 HDMI Connection
Some 4K HDR TVs require the HDMI input or picture settings to be set for HDR content reception. For further setup details on HDR display, please refer to the instruction manual of your TV.
Method 1: ARC (Audio Return Channel)
The ARC (Audio Return Channel) function allows you to send audio from your ARC-compliant TV to your sound bar through a single HDMI connection. To enjoy the ARC function, please ensure your TV is both HDMI-CEC and ARC compliant and set up accordingly. When correctly set up, you can use your TV remote control to adjust the volume output (VOL +/- and MUTE) of the sound bar.

- Connect the HDMI cable from unit's HDMI OUT (ARC) socket to the HDMI (ARC) socket on your ARC compliant TV. Then press the remote control to select HDMI ARC.
Tips:
- Your TV must support the HDMI-CEC and ARC function. HDMI-CEC and ARC must be set to On.
- The setting method of HDMI-CEC and ARC may differ depending on the TV. For details about ARC function, please refer to the owner's manual.
Method 2: Standard HDMI
- If your TV is not HDMI ARC-compliant, connect your soundbar to the TV through a standard HDMI connection.
![graph TD A["HDMI IN"] --> B["HDMI OUT (ARC)"] B --> C["TV Screen"] D["HDMI 1"] --> E["or HDMI 2"] F["HDMI OUT"] --> G["or HDMI 2"]](/content/2026/05/886563/images/4cdbdb69f09c3c9a25f2084dbb7c9237bd8d2d9c810eaed6108ac416d384a92e.jpg)
- Use an HDMI cable to connect the soundbar's HDMI OUT (ARC) socket to the TV's HDMI IN socket.
- Use an HDMI cable to connect the soundbar's HDMI IN (1 or 2) socket to your external devices (e.g. games consoles, DVD players and blu ray).
6.3 Use the OPTICAL Socket
- Remove the protective cap of the OPTICAL socket, then connect an OPTICAL cable (not included) to the TV's OPTICAL OUT socket and the OPTICAL socket on the unit.

6.4 Use the COAXIAL Socket
- You also can use the COAXIAL cable (not included) to connect the TV's COAXIAL OUT socket and COAXIAL socket on the unit.
Tip: The unit may not be able to decode all digital audio formats from the input source. In this case, the unit will mute. This is NOT a defect. Ensure that the audio setting of the input source (e.g. TV, game console, DVD player, etc.) is set to PCM or Dolby Digital (Refer to the user manual of the input source device for its audio setting details) with HDMI / OPTICAL / COAXIAL input.
6.5 Use the AUX Socket
A. Use a RCA to 3.5mm audio cable (not included) to connect the TV's audio output sockets to the AUX socket on the unit.

B. Use a 3.5mm to 3.5mm audio cable (included) to connect the TV's or external audio device headphone socket to the AUX socket on the unit.
6.6 Connect Power
- Risk of product damage! Ensure that the power supply voltage corresponds to the voltage printed on the back or the underside of the unit.
- Before connecting the AC power cord, ensure you have completed all other connections.
Connect the mains cable to the AC-Socket of the main unit and then into a mains socket.
Connect the mains cable to the AC-Socket of the Subwoofer and then into a mains socket.
- Soundbar
- Subwoofer

7. Pair up with the subwoofer
7.1 Automatic pairing
Plug the soundbar and the subwoofer into the mains sockets and then press ⏻ on the unit or remote control to switch the unit to ON mode. The subwoofer and soundbar will automatically pair.
- When the subwoofer is pairing with the main unit, the Pair Indicator will flash fast.
- When the subwoofer is paired with the main unit, the Pair Indicator will light up.
NOTE:
- Do not press the Pair button on the subwoofer, except for manual pairing.
- If the automatic pairing fails, pair the subwoofer with the main unit manually.
7.2 Manual pairing
If no audio from the wireless subwoofer can be heard, manually pair up the subwoofer.
1 Unplug both units from the mains sockets again, then plug them in again after 3 minutes.
- Press and hold the PAIR button on the subwoofer for a few seconds.
- The Pair indicator on the subwoofer will rapidly blink.
2 Then press the ⏻ on the unit or remote control to switch the unit ON.
3 Light stops blinking once the Subwoofer is paired with the Soundbar.
4 If the Pair indicator still keeps blinking, repeat step 1-3.
NOTE:
- The subwoofer should be within 6m of the soundbar in an open area (the closer the better).
-
Remove any objects between the subwoofer and the soundbar.
-
If the wireless connection fails again, check if there is a conflict or strong interference (e.g. interference from an electronic device) around the location. Remove these conflicts or strong interferences and repeat the above procedures.
- If the main unit is not connected with the subwoofer and it is in ON mode, the unit's POWER indicator will flash.
8. Basic Operation
8.1 Standby/ON
When you first connect the main unit to the mains socket, the main unit will be in Standby mode.
- Press the ⏻ button on the unit or on the remote control to switch the unit ON.
- Press the ⏻ button again to switch the unit back to STANDBY mode.
- Disconnect the mains plug from the mains socket if you want to switch the unit OFF completely.
- If a TV or an external device is connected, the unit will switch on automatically when the TV or the external device is switched on.
8.2 Automatic Power Off Function
The unit automatically turns to Standby mode after about 15 minutes if the TV or the external unit is disconnected, switched off or the volume is too close to mute.
- To switch the unit off completely, remove the mains plug from the mains socket.
- Please turn the unit off completely to save energy when not in use.
8.3 Select Modes
Press the ☐ (SOURCE) button on the unit or the AUX, BT, OPT/COA, HDMI 1/2, HDMI ARC and USB and buttons on the remote control to select the desired mode. The selected mode will show on the display.
8.4 Adjust the Bass/Treble Level
- Press the BASS +/- buttons on the remote control to adjust bass level.
- Press the TREBLE +/- buttons on the remote control to adjust bass level.
8.5 Turn the Surround Sound ON/OFF
- Press the VERTICAL/SURROUND button on the remote control to turn on the surround sound. Press this button again to turn off the surround sound.
Press the VOICE / SPORT / MOVIE / MUSIC buttons on the remote control to select your desired preset equalizer effects.
8.7 Adjust the Volume
- Press the + / - (VOL) buttons on the unit or on the remote control to adjust the volume.
- If you wish to turn the sound off, press the ⏻ (MUTE) button on the remote control. Press the ⏻ (MUTE) button again or press the + / - (VOL) buttons on the unit or on the remote control to resume normal listening.
8.8 Adjust the Brightness
- Press the DIMMER button on the remote control to select brightness level.
9. AUX / OPTICAL / COAXIAL / HDMI Operation
1 Ensure that the unit is connected to the TV or audio device.
2 Press the 📋 button repeatedly on the unit or the AUX, OPT/COA, HDMI 1/2, HDMI ARC buttons on the remote control to select the desired mode. The selected mode will show on the display.
3 Operate your audio device directly for playback features.
4 Press the VOL +/- button to adjust the volume to your desired level.
Tip:
- The unit may not be able to decode all digital audio formats from the input source. In this case, the unit will mute. This is NOT a defect. Ensure that the audio setting of the input source (e.g. TV, game console, DVD player, etc.) is set to PCM or Dolby Digital (Refer to the user manual of the input source device for its audio setting details) with HDMI 1/ HDMI 2/ HDMI ARC / OPTICAL / COAXIAL input.
- When the DOLBY DIGITAL audio format is entered, the Soundbar display shows DOLBY AUDIO. This is only applicable on HDMI / ARC mode
- When the PCM audio format is entered, the Soundbar display shows PCM AUDIO.
- When entering non-PCM or DOLBY DIGITAL audio formats, if there's no sound output from the unit and the display show NO SUPPORT.
- The full Dolby Atmos experience is only available when the Soundbar is connected to the source via a HDMI 2.0 cable.
- The Soundbar will still function when connected via other methods (such as a Digital Optical cable) but these are unable to support all of the Dolby features. Given this, our recommendation is to connect via HDMI, in order to ensure full Dolby support.
10. Bluetooth Operation
10.1 Pair Bluetooth-enabled Devices
The first time you connect your bluetooth device to this player, you need to pair your device to this player.
Note:
- The operational range between this player and a Bluetooth device is approximately 8 meters (without any object between the Bluetooth device and the unit).
- Before you connect a Bluetooth device to this unit, ensure you know the device's capabilities.
- Compatibility with all Bluetooth devices is not guaranteed.
- Any obstacle between this unit and a Bluetooth device can reduce the operational range.
- If the signal strength is weak, your Bluetooth receiver may disconnect, but it will re-enter pairing mode automatically.
1 During ON mode, press the 📄 button repeatedly on the unit or SOURCE button on the remote control to select Bluetooth mode. "NO BT" will show on the display if the unit is not paired to any Bluetooth device.
2 Activate your Bluetooth device and select the search mode. "MOTO 250 ASB" will appear on your Bluetooth device list.
- If you cannot find the unit, press and hold the ▶ll or BT button on the remote control to be searchable. The display will show "PAIR" and you will hear "Pairing" from the unit.
3 Select "MOTO 250 ASB" in the pairing list. After successful pairing, you will hear "Paired" from the unit, and the display panel shows "BT".
4 Play music from the connected Bluetooth device.
To disconnect the Bluetooth function, you can :
- Switch to another function on the unit.
- Disable the function from your Bluetooth device. The Bluetooth device will be disconnected from the unit after the “Disconnected” voice prompt.
- Press and hold the ▶|| or BT button on the remote control.
Tips:
- Enter "0000" for the password if necessary.
- If no other Bluetooth device pairs with this player within two minutes, the player will recover its previous connection.
- The player will also be disconnected when your device is moved beyond the operational range.
- If you want to reconnect your device to this player, place it within the operational range.
- If the device is moved beyond the operational range, when it is brought back, please check if the device is still connected to the player.
- If the connection is lost, follow the instructions above to pair your device to the player again.
10.2 Listen to Music from Bluetooth Device
- If the connected Bluetooth device supports Advanced Audio Distribution Profile (A2DP), you can listen to the music stored on the device through the player. - If the device also supports Audio Video Remote Control Profile (AVRCP), you can use the player's remote control to play music stored on the device.
-
Pair your device with the player.
-
Play music via your device (if it supports A2DP).
-
Use supplied remote control to control play (if it supports AVRCP).
| ▶II | Start, pause or resume play |
| |◀◀/▶▶| | Skip to the previous or next track |
11. USB Operation
1 Insert the USB device.
2 Press the 📋 button repeatedly on the unit or press the SOURCE button on the remote control to select USB mode.
3 During playback:
| ▶|| | Start, pause or resume play |
| |◀◀/▶▶| | Skip to the previous or next track |

Tips:
• The unit can support USB devices with up to 32 GB of memory.
• This unit can play MP3 only.
12. Troubleshooting
To keep the warranty valid, never try to repair the system yourself. If you encounter problems when using this unit, check the following points before requesting service.
| No power • Ensure | that the AC cord of the apparatus is properly connected. • Ensure that there is power at the AC outlet. • Press ⏻ (standby) button to turn the unit on. |
| Remote control does not work | • Before you press any playback control button, first select the correct source. • Reduce the distance between the remote control and the unit. • Insert the battery with its polarities (+/-) aligned as indicated. • Replace the battery. • Aim the remote control directly at the sensor on the front of the unit. |
| No sound • Make sure | sure that the unit is not muted. Press MUTE or VOL+/VOL-button to resume normal listening. • Press ⏻ button on the unit or on the remote control to switch the soundbar to standby mode. Then press the ⏻ button again to switch the soundbar on. • Unplug both the soundbar and the subwoofer from the mains socket, then plug them again. Switch on the soundbar. • Ensure the audio setting of the input source (e.g. TV, game console, DVD player, etc.) is set to PCM or Dolby Digital mode while using digital (e.g. HDMI, OPTICAL, COAXIAL) connection. • The subwoofer is out of range, please move the subwoofer closer to the soundbar. Make sure the subwoofer is within 5 m of the soundbar (the closer the better). • The soundbar may have lost connection with the subwoofer. Repair the units by following the steps on the section “Pairing the Wireless Subwoofer with the Soundbar”. • The unit may not be able to decode all digital audio formats from the input source. In this case, the unit will mute. This is NOT a defect.device is not muted. |
| TV has display problem while viewing HDR content from HDMI source. | Some 4K HDR TVs require the HDMI input or picture settings to be set for HDR content reception. For further setup details on HDR display, please refer to the instruction manual of your TV. |
| I can’t find the Bluetooth name of this unit on my Bluetooth device for Bluetooth pairing | Ensure the Bluetooth function is activated on your Bluetooth device.Ensure you have paired the unit with your Bluetooth device. |
| This is a 15 mins power off function, one of the ERPII standard requirement for saving power | When the unit’s external input signal level is too low, the unit will be turned off automatically in 15 minutes. Please increase the volume level of your external device. |
| The subwoofer is idle or the indicator of subwoofer do not light up. | Please unplug power cord from the mains socket, and plug it in again after 4 minutes to reset the subwoofer. |
13. Specifications
13.1 Soundbar
| Power Supply AC100-240V~ 50/60Hz | |
| Power Consumption 30 W / < 1 W (Standby) | |
| Speakers Impedance 8 ff + 8 ff | + 4ff |
| USB | 5V = 0.5AHi-Speed USB (2.0)32G (max), MP3 |
| Audio input sensitivity 500mV | |
| Frequency Response 120Hz - 20KHz | |
| Dimension (WxHxD) 950 x 71 x 112 | |
| Net weight 2.85 kg | |
13.2 Bluetooth / Wireless specification
| Bluetooth Version /profiles V 4.2 (A2DP, AVRCP) | |
| Bluetooth Maximum power transmitted | 5 dBm |
| Bluetooth Frequency bands 2402 MHz ~ 2480 MHz | |
| 2.4G wireless frequency range | 2400 MHz ~ 2483 MHz |
| 2.4G wireless maximum power | 6 dBm |
13.3 Subwoofer
| Power Supply AC100-240V~ 50/60Hz | |
| Power Consumption 25 W / < 0.5 W (Standby) | |
| Impedance 3 ff | |
| Frequency Response 40Hz - 120Hz | |
| Dimension (WxHxD) 240 x 420 x 240 mm | |
| Net weight 5.5 kg | |
13.4 Amplifier (RMS Output Power)
| Total 240 W | |
| Main Unit 30W + 30W + 60W | |
| Subwoofer 120W |
13.5 Remote Control
| Distance/Angle 6m / 30° | |
| Battery type AAA (1.5V x 2) |
* Specification subject to change without prior notice. Measured under specific conditions.
This product is ROHS Compliant!
Disposal of used Electrical & Electronics Equipment
Packaging and electrical goods should be recycled appropriately, and not treated as household waste. Please dispose of this equipment at your applicable collection point for the recycling of electrical & electronicequipment waste. By ensuring the correct disposal of this product, you will help prevent potentially hazardous to the environment and to human health, which could otherwise caused by unsuitable wastehandling of this product. The recycling of materials will help conserve Natural resource. Please do not therefore dispose of your old electrical and electronic equipment with your household waste. For more detailed Information about recycling of this product, Please contact your local city office, your household waste service or the shop where you purchased the product.
Flipkart India Private Limited ("Company") warranties the product to be free from manufacturing defects or any other specific defect as may be specified in the Specific Terms and Conditions below. The warranty is for a period mentioned in the Specific Terms and Conditions below, the invoice (if not specified in the Specific Terms and Conditions below), as well as the product listing page, and such period shall commence from the date of purchase of the product by the first end user. This is a non-transferable warranty, valid only in the territory of India and extended only to the first end user customer ("Customer") basis the following terms and conditions, which the Customer is deemed to have accepted upon purchase of the product:
- The warranty period of the product is 1 year, commencing from the date of purchase, Warranty service which includes replacement or repairs, will be carried out through the Authorised Service Centers ("ASC/s") only.
- Warranty will be valid only when the original purchase invoice is presented at the time of service. Company reserves the right to decline warranty service, if the purchase invoice is not presented.
- In case of commercial usage of the product, warranty period would be limited to 90 days only.
-
Warranty will cover only functional parts, issues having manufacturing defects and does not cover damages to the product resulting from unauthorised adaptations/ adjustments/ tampering/ repair, improper installation or placement, mishandling, improper use, deviation from the instructions set out in the user manual (if applicable) normal wear and tear caused due to use of the product.
-
Warranty does not cover any external accessories and fittings to the product.
-
All plastic, rubber, glass, or aesthetic parts and consumable replacements will be on a chargeable basis.
-
Warranty shall not apply to damages caused to the product by accident, voltage fluctuations, lightening, ingress of water (beyond certified limits, if any), fire or any other natural calamity, improper ventilation, dropping or excessive shock, or any external cause beyond Company's control.
-
Company shall retain all products or spare parts which are replaced and the ownership of the same shall vest with the Company.
-
Company is not liable to provide repair services or spare parts after the period of warranty expires and the same if provided will be on a chargeable basis.
-
Whilst the Company, through its ASC, shall make every effort to carry out the service at the earliest, it is expressly clarified that the Company is under no obligation to do so within a certain time period.
-
Whilst Company would take all necessary steps to repair the product under warranty and maintain sufficient stock of the spare parts of the products, in certain cases, at its sole discretion, Company may due to non-availability of spare parts of the product or product being in a state which is beyond economic repair, offer a replacement scheme to the Customer. The terms of such replacement offer is subject to change from year to year and shall also be applicable on the maximum retail price of the product.
-
All transportation & handling expenses incurred while replacing or repairing will be payable by the Customer.
-
For any warranty claim requested by the Customer from the region beyond municipal limits of the jurisdiction of the ASC, a visit by an authorised service personnel may be arranged by the Company through its ASC, on a case to case basis, at its sole discretion and the charges towards such visit will be borne by the Customer.
-
Warranty shall be void if:
-
The type or serial no. on the product has been altered, removed or defaced.
-
The product is not operated as per the instructions given in the User Guide, if any.
-
The defects are caused by household pets, rats, cockroaches or any other animals or insects.
-
The warranty automatically expires after the period of time stated in the product invoice even if the product may not be in use for any time for whatever reasons.
-
This Warranty shall not affect Customer's statutory rights under any applicable law
-
Customer agrees to indemnify and keep Company harmless against all damages, liabilities, costs, expenses, claims, suits and proceedings (including reasonable attorney's fee) that may be suffered by the Company as a consequence of: (i) violation of these terms and condition by the Customer; (ii) violation of applicable laws by the Customer; (iii) any action or inaction resulting in willful misconduct or negligence on the Customer's part.
-
In the event of repairs of any part (s) of the product, the Warranty will thereafter continue and remain in force only for the unexpired period of the Warranty. Moreover, the time taken for repair and in transit whether under the Warranty or otherwise shall not be excluded from the Warranty period.
-
None of the employees, sellers, dealers or ASCs of the Company have the authority to vary these terms and conditions.
-
Customer agrees that the courts at Bangalore shall have the exclusive jurisdiction to settle any dispute that may arise in relation to this Warranty or these terms and conditions.
-
COMPANY SHALL NOT BE LIABLE FOR ANY INDIRECT, SPECIAL, PUNITIVE, EXEMPLARY, SPECULATIVE OR CONSEQUENTIAL DAMAGES, INCLUDING, BUT NOT LIMITED TO, ANY LOSS OF USE, BUSINESS INTERRUPTION, AND LOSS OF INCOME OR PROFITS, IRRESPECTIVE OF WHETHER IT HAD AN ADVANCE NOTICE OF THE POSSIBILITY OF ANY SUCH DAMAGES.
-
For any further information / assistance please contact our customer Redressal cell at:
Flipkart India Private Limited
Buildings Alyssa, Begonia & Clover,
Embassy Tech Village, Outer Ring Road, Devarabeesanahalli Village, Bengaluru - 560103, Karnataka, India.
Tel.: 080-46331090
E-mail: support.moto@flipkart.com
KEEP OUT OF REACH OF CHILDREN
Children should be supervised to ensure that they do not play with the appliance.

motorola
- USER MANUAL
- CONTENTS
- IMPORTANT SAFETY INSTRUCTIONS....3
- WHAT'S IN THE BOX....5
- IDENTIFYING THE PARTS....6
- PREPARATIONS....7
- PLACEMENT AND MOUNTING....8
- CONNECTIONS....9
- PAIR UP WITH THE SUBWOOFER 11
- BASIC OPERATION....11
- AUX / OPTICAL / COAXIAL / HDMI OPERATION....12
- BLUETOOTH OPERATION....13
- USB OPERATION....14
- TROUBLESHOOTING.... 14
- SPECIFICATIONS....15
- IMPORTANT SAFETY INSTRUCTIONS
- CAUTION
- 1.1 SAFETY
- 1.2 CAUTION
- 1.3 WARNING
- BATTERY USAGE CAUTION
- 1.4 MARKING
- DOLBY ATMOS
- WHAT'S IN THE BOX
- IDENTIFYING THE PARTS
- 3.1 MAIN UNIT
- 1 REMOTE CONTROL SENSOR
- 2 LED DISPLAY
- 3 WALL BRACKET SCREWS
- 3.2 WIRELESS SUBWOOFER
- 2 PAIR BUTTON
- 3 PAIR INDICATOR
- 3.3 REMOTE CONTROL
- PREPARATIONS
- 4.1 PREPARE THE REMOTE CONTROL
- 4.2 REPLACE THE REMOTE CONTROL BATTERY
- PRECAUTIONS CONCERNING BATTERIES
- PLACEMENT AND MOUNTING
- 5.1 PLACEMENT
- 5.2 WALL MOUNTING
- CONNECTIONS
- 6.1 DOLBY ATMOS®
- FOR USING DOLBY ATMOS®
- 6.2 HDMI CONNECTION
- METHOD 1: ARC (AUDIO RETURN CHANNEL)
- TIPS
- METHOD 2: STANDARD HDMI
- 6.3 USE THE OPTICAL SOCKET
- 6.4 USE THE COAXIAL SOCKET
- 6.5 USE THE AUX SOCKET
- 6.6 CONNECT POWER
- SOUNDBAR
- SUBWOOFER
- PAIR UP WITH THE SUBWOOFER
- 7.1 AUTOMATIC PAIRING
- NOTE
- 7.2 MANUAL PAIRING
- BASIC OPERATION
- 8.1 STANDBY/ON
- 8.2 AUTOMATIC POWER OFF FUNCTION
- 8.3 SELECT MODES
- 8.4 ADJUST THE BASS/TREBLE LEVEL
- 8.5 TURN THE SURROUND SOUND ON/OFF
- 8.7 ADJUST THE VOLUME
- 8.8 ADJUST THE BRIGHTNESS
- AUX / OPTICAL / COAXIAL / HDMI OPERATION
- TIP
- BLUETOOTH OPERATION
- 10.1 PAIR BLUETOOTH-ENABLED DEVICES
- TO DISCONNECT THE BLUETOOTH FUNCTION, YOU CAN
- 10.2 LISTEN TO MUSIC FROM BLUETOOTH DEVICE
- USB OPERATION
- TROUBLESHOOTING
- SPECIFICATIONS
- THIS PRODUCT IS ROHS COMPLIANT
- DISPOSAL OF USED ELECTRICAL & ELECTRONICS EQUIPMENT
- MOTOROLA
Brand : MOTOROLA
Model : AmphiSoundX MT100-5-SB20
Category : Soundbar