
E300 - Gps ACER - Free user manual and instructions
Find the device manual for free E300 ACER in PDF.


| Product Type | Portable GPS Navigation |
| Brand | Acer |
| Model | E300 |
| Screen Size | 4.3 inches |
| Display Type | Color TFT LCD |
| Resolution | 480 x 272 pixels |
| Dimensions (HxWxD) | 120 x 75 x 18 mm |
| Weight | 150 g |
| Battery Type | Lithium-ion rechargeable |
| Battery Life | Up to 4 hours |
| Power Source | USB (5V) or car charger |
| Charging Time | Approximately 2 hours |
| Internal Memory | 4 GB (expandable via microSD) |
| Preloaded Maps | North America / Europe (depending on region) |
| Voice Guidance | Text-to-speech with street names |
| Traffic Support | FM traffic receiver (optional) |
| Bluetooth | No |
| Waterproof Rating | Not waterproof (IPX0) |
| Operating Temperature | 0°C to 45°C |
| Languages Supported | English, French, Spanish, German, Italian, Dutch, etc. |
| Warranty | 1 year limited |
| Maintenance | Clean with a soft dry cloth; avoid liquids |
| Safety Features | Safe driving mode, speed limit warnings |
| Spare Parts Availability | Battery and mount available online |
| Repairability | User-replaceable battery, otherwise not serviceable |
Frequently Asked Questions - E300 ACER
User questions about E300 ACER
0 question about this device. Answer the ones you know or ask your own.
Ask a new question about this device
Download the instructions for your Gps in PDF format for free! Find your manual E300 - ACER and take your electronic device back in hand. On this page are published all the documents necessary for the use of your device. E300 by ACER.
USER MANUAL E300 ACER
Acer e300 Series Travel Companion
User's Guide
acer
Legal Notices
COPYRIGHT
Acer e300 Series Travel Companion User's Guide Original issue: May 2006
Acer and the Acer logo are registered trademarks of Acer Inc. Other products or system names appearing in this document are trademarks or registered trademarks of their respective owners. Further, the ^© or ^™ symbols are not used in the text.
Changes may be made periodically to the information in this publication without obligation to notify any person of such revision or changes. Such changes will be incorporated in new editions of this User's Guide or supplementary documents and publications.
No part of this publication may be reproduced, stored in a retrieval system, or transmitted, in any form or by any means, electronic, mechanical, photocopy, recording, or otherwise, without the prior written permission of Acer Inc.
DISCLAIMER AND LIMITATION OF LIABILITY
Acer and its subsidiaries makes no representations or warranties, either expressed or implied, with respect to the contents hereof and specifically disclaims the implied warranties of merchantability or fitness for a particular purpose. Acer and its subsidiaries assume no responsibility for any damage or loss resulting from the use of this Acer e300 Series Travel Companion User's Guide.
NOTES
Record the device ID, serial number, purchase date, and place of purchase information in the space provided below. The serial number is indicated on the label affixed to your Acer device. All correspondence concerning your unit should include the serial number, device ID, and purchase information.
Acer e300 Series Travel Companion
Device ID: ____
Device serial number:
Date of purchase: ____
Place of purchase: ____
Table of Contents
Acer e300 Series Travel Companion feature highlights ....1
Powerful system 1
Wide and accurate GPS coverage....1
Mobile design....1
Battery life 1
Ergonomic features....2
Multimedia programs 2
Contacts management programs 2
Unpack the Acer e300 Series Travel Companion 3
First things first....6
System tour....6
Front and Rear panels 6
Top and bottom views....8
Right and left panels 9
Peripherals tour....9
Car mount kit....9
Car mount and car cradle 10
Chargers 11
USB cable.... 11
Acer e300 Series Travel Companion setup....12
Set up the Acer e300 Series Travel Companion on your vehicle 13
Start up the Acer e300 Series Travel Companion.... 16
Acer e300 Series Travel Companion fundamentals....20
Hardware interface....20
Using the touch screen backlight 20
Using the SD/MMC slot 20
Establishing device-PC connection 22
Recharging the Acer e300 Series Travel Companion 24
Command interface....26
Using the hot keys 26
Table of contents
Using the Acer e300 Series Travel Companion touch screen 27
Using the Main menu panel....27
Contacts management....29
Contacts 29
Multimedia mode....30
Multimedia mode overview 30
MP3.... 30
Using MP3.... 31
Photo....33
Using Photo 33
Viewing files in Full Screen mode 33
Viewing files in Slide Show mode.... 34
System configuration....35
System settings overview 35
Customizing user preferences.... 36
Volume 36
Power 36
Language....37
Date Time 37
System Info 37
Misc....37
System maintenance and user support 38
Using your Acer e300 Series Travel Companion safely.... 38
Driving precautions....38
Operating precautions....39
Storage precautions....42
Accessories and repair precautions 42
Cleaning your Acer e300 Series Travel Companion.... 42
Troubleshooting your Acer e300 Series Travel Companion 42
Recalibrating the screen 42
Resetting the Acer e300 Series Travel Companion.... 43
Loading the factory default settings.... 44
FAQs....45
Customer support....47
System specifications 48
Hardware features....48
Software specifications....48
Design and ergonomics....49
Environmental specifications....50
Regulatory and safety notices....50
FCC notice 51
Notice: Shielded cables....51
Notice: Peripheral devices 51
Caution....51
Operation conditions.... 51
Notice: Canadian users 52
Declaration of Conformity for EU countries 52
Important safety instructions.... 52
LCD pixel statement.... 54
Radio device regulatory notice 54
General 54
European Union (EU) 54
List of applicable countries 55
The FCC RF safety requirement.... 55
Canada — Low-power license-exempt radio communication devices (RSS-210) ..... 55
Exposure of humans to RF fields (RSS-102) 56
Acer e300 Series Travel Companion
Acer e300 Series Travel Companion feature highlights
No more fumbling with wieldy, outdated paper maps. No more sheepish "I think I'm lost" expression. And most definitely, no more going in circles finding that particular spot. Get to your destination the fast and easy way with your new Acer e300 Series Travel Companion.
Powerful system
- Microsoft Windows CE .NET 5.0 operating system
- Samsung S3C2442XL with internal clock speed 300 MHz processor
- SiRF Star III LP chipset and firmware solution
- Rechargeable 1100 mAh Lithium Ion battery
Wide and accurate GPS coverage
- Intuitive and Intelligent Navigation software
- Integrated patch antenna for optimum satellite pick up at Landscape and Portrait
Mobile design
- Compact and lightweight body makes it easy for users to carry it anywhere while driving or hiking
- Car mount kit for multi-vehicle usage (windshield or dashboard mounting)
- On-the-road recharging options via the car charger and USB cable
Battery life
• Normal usage: 6 hours
- MP3 usage: with speaker: 6 hours, with earphone: 8 hours
- Navigation software usage: 4 hours
Ergonomic features
• 2.8-inch QVGA LCD touch-sensitive screen
- Accessible control hot keys with backlight illumination
- Simple, easy-to-use user interface with large icons and command buttons
- Multi-language support for user interface
• Advanced power-saving options
Multimedia programs
• MP3 for your musical entertainment
• Photo for your favourite digital pictures
Contacts management programs
- Contacts for managing contact information on your device
- Microsoft ActiveSync for file transfer.
Unpack the Acer e300 Series Travel Companion
Thank you for purchasing the Acer e300 Series Travel Companion. The Acer e300 Series Travel Companion box contains all of the items listed below.
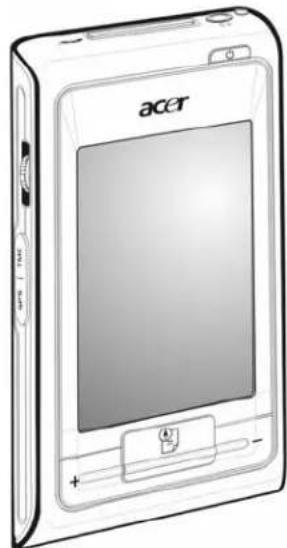
- Acer e300 Series Travel Companion unit
natural_image
Line drawing of a compact electronic device labeled 'acet' with no visible text or symbols on its body- Car mount kit


natural_image
Technical line drawing of a mechanical or electrical component with no visible text or symbols- Car charger

natural_image
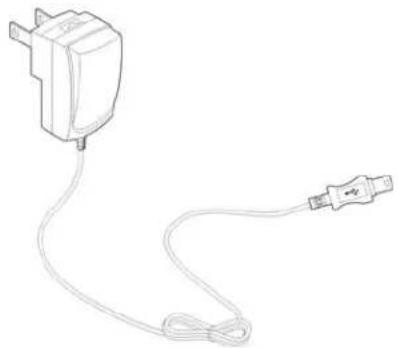
Line drawing of a coiled cable with connectors and a USB connector (no text or symbols)- AC adaptor
natural_image
Line drawing of a plug with a cable, no text or symbols present- Mini USB Sync and charge cable

natural_image
Line drawing of a flexible network cable with connectors (no text or symbols)- Navigation software SD card

- User documentation
Acer e300 Series Travel Companion CD
Acer e300 Series Travel Companion Starter Guide
Acer e300 Series Travel Companion Warranty Booklet
Navigation software Quick Starter Guide
Navigation software CD
Optional accessories:
GPS antenna

natural_image
Simple line drawing of a cable and connector with a rectangular base (no text or symbols)TMSC module and antenna

natural_image
Line drawing of a cable and connector assembly with connectors and wires (no text or symbols)
Report any product defects or missing items to the place of purchase immediately. Save the boxes and packing materials for future use.
Some models may include optional accessories that might not be shown in the above illustrations. Please check with your dealer for more details.
CHAPTER 1
First things first
This chapter describes the hardware interface of the Acer e300 Series Travel Companion and its peripherals. Instructions for setting up the device and some basic system operations are also discussed.
System tour
This section gives you a tour of the device hardware interface.
Front and Rear panels
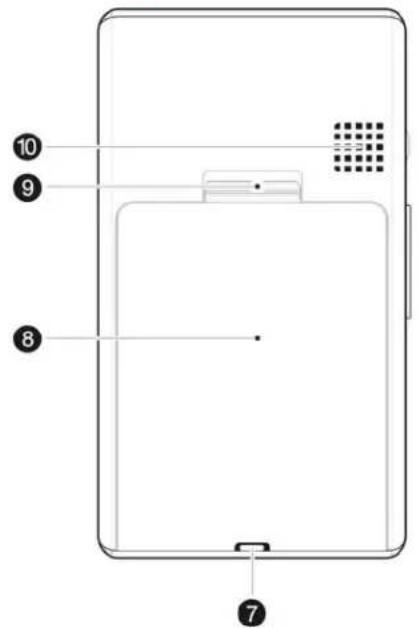

| No. | Icon | Component | Description |
| 1 | Power button/ Battery charging status LED indicator | Turn the device on or off.Indicates the battery charging status.Green – Battery is fully charged; the device is running on battery power.Orange – Battery chargingRed – Battery nearly depleted, should recharge the battery immediately. | |
| 2 | Touch screen | Displays the applications, data, and map images available on your device. It is touch-sensitive and responds to finger taps. | |
| 3 | Home/Navigation button | Pressing this button while in the Main Menu panel will bring you to the Navigation panel. Pressing this button while in other panel other than the Main Menu, will bring you to the Main Menu. | |
| 4 | + | Volume up button Turn up the volume of the speaker. | |
| 5 | Microphone | Inputs sounds and voices into your device. | |
| 6 | - | Volume down button Turn down the volume of the speaker. | |
| 7 | Strap holder | Eyelet for holding strap. | |
| 8 | Battery compartment | Houses the rechargeable battery | |
| 9 | Battery cover latch | Slide up to release the battery cover. | |
| 10 | Speaker | Emits system sounds. | |
| Note: For more information on how to use your Acer e300 Series Travel Companion in navigation mode, refer to the Navigation software Quick Starter Guide or the Navigation software User's Guide (located in the Navigation software CD). | |||
Top and bottom views

natural_image
Simple line drawing of a container with a small icon inside, no text or symbols present| No. | Icon | Component | Description |
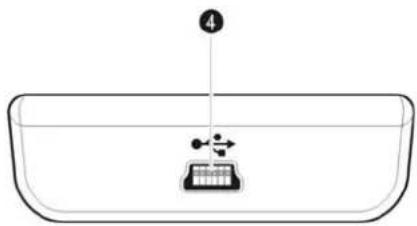
| 1 | SD/MMC slot Accepts SD and MMC storage cards, allowing you to use audio, image, and map files stored in it for use with internal applications.You can also use it to back up data from your device. | ||
| 2 | Earphone jack Connects to audio lineout devices (earphones/headphones). | ||
| 3 | Stylus Used as an input device for the e300. | ||
| 4 | USB port Connects the device to computer running on the MicrosoftWindows platform. Also serve as the power connector for charging the device. | ||
Right and left panels

| No. | Icon | Component | Description |
| 1 | Jog dial | Turn up or down to select option and application on the screen. Press to confirm the selection. | |
| 2 | GPS antenna jack | Connects to an external GPS antenna. | |
| 3 | Soft reset button | Press to perform a soft reset if the device freezes (i.e., device no longer responds to the buttons on the screen). | |
Peripherals tour
This section gives you a tour of the peripherals bundled with your Acer e300 Series Travel Companion.
Car mount kit
The car mount kit consists of the car mount and the car cradle.
Car mount and car cradle

| No. | Component | Description |
| 1 Cradle plate Connects the car mount to the car cradle. | ||
| 2 Adjustment joint Can be adjusted in eight directions. | ||
| 3 Flexible rod | Can be adjusted to further enhance the viewing comfort of the Acer e300 Series Travel Companion. | |
| 4 Suction cup release tab | Pull to release the vacuum seal of the suction cup. | |
| 5 Suction cup Fixes the car mount on the selected mounting area. | ||
| 6 Suction cup locking lever | Secures the vacuum seal of the car mount. | |
If you need to attach the cradle to a surface that is uneven you should use the non-slip pad that is provided with the car cradle.
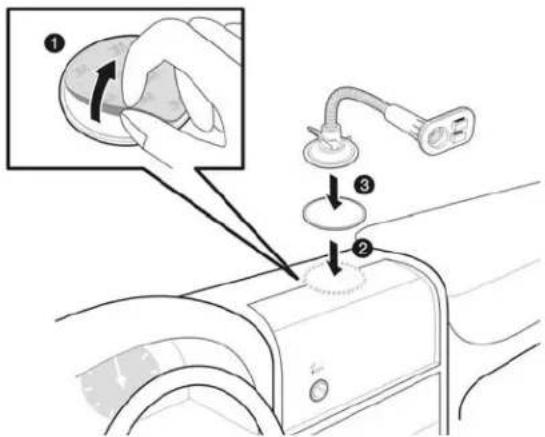
Peel off the sticker back to expose the adhesive side (1); stick the non-slip pad to a clean surface (2); attach the car mount on the non-slip pad (3).

If you remove the non-slip pad after placing it on a surface, the non-slip pad might leave an adhesive residue.
Chargers

USB cable

natural_image
Line drawing of a USB cable with two connectors and a connector terminal (no text or symbols)The included USB cable is used to transfer files from your computer to your device as well as used for charging your device.
Acer e300 Series Travel Companion setup
Using your new Acer e300 Series Travel Companion is a snap. Unpack, mount, turn on, and you're ready to go. Perform the following easy installation tasks to start using the device straight out of the box:
- Unpack the device
- Install the battery

- Turn on and configure the device.

- Set up the device on your vehicle. See your quick guide for more info.

If you remove your battery, you have to recalibrate your device, set your time and languages again.
Set up the Acer e300 Series Travel Companion on your vehicle
The Acer e300 Series Travel Companion comes with a car mount kit and a car charger with which you can set up your device on your vehicle. You can choose to position the car mount kit on the windshield using the suction cup, or on the dashboard using the self-adhesive power disc connector.

Some countries prohibit the mounting of any electronic device in any location on the vehicle dashboard. Be sure to check your local laws for acceptable mounting areas before installing the car mount bracket.

Some newer vehicle models may have a heat reflective shield embedded in the windshield. This may in some cases obstruct the GPS signal reception. If you encounter this problem in your vehicle, you need to purchase an external GPS antenna. For more information, contact your local Acer dealer.
Car mount installation reminders
Install the car mount on the surface of your vehicle:
- That is smooth, flat and free of dirt and oil
- Where the driver can easily view/reach it without taking his/her eyes off too far from the road
- Where the device will not obscure car controls nor restrict the driver's view of the road
• Far from the air bag deployment area
To set up the device on your vehicle:
This section shows how to install the car mount kit in your vehicle's windshield using the suction cup. For dashboard installation procedures using the self-adhesive power disc connector refer to the Acer e300 Series Travel Companion Starter Guide.
- Clean the mounting surface with a glass cleaner and a clean cotton cloth.
-
If the ambient temperature is below 15^ C ( 60^ F) warm the mounting area and the suction cup (e.g. with a hair dryer) to ensure a strong suction bond.
-
Install the car mount on the selected area.
-
Fix the suction cup to the selected area with the locking lever facing up.
- Flip the locking lever away from you to create a vacuum between the suction cup and the mounting surface.
- Make sure that the suction bond is strong enough before proceeding to the next step.
- Insert the pegs on the car mount's cradle plate to the holes on the back of the car cradle, then move the car cradle in the directions shown, until both parts are engaged.

- Insert the Navigation software SD card into the device.

natural_image
Line drawing of a hand inserting a card into a device (no text or symbols present)- Dock the device on the car cradle.

natural_image
Illustration of a hand holding an ACGT smartphone with a device inside, showing internal components (no text or symbols)- The internal antenna of your device is located as shown, for the best GPS reception, make sure to mount your device in the correct position as shown in the illustrations.
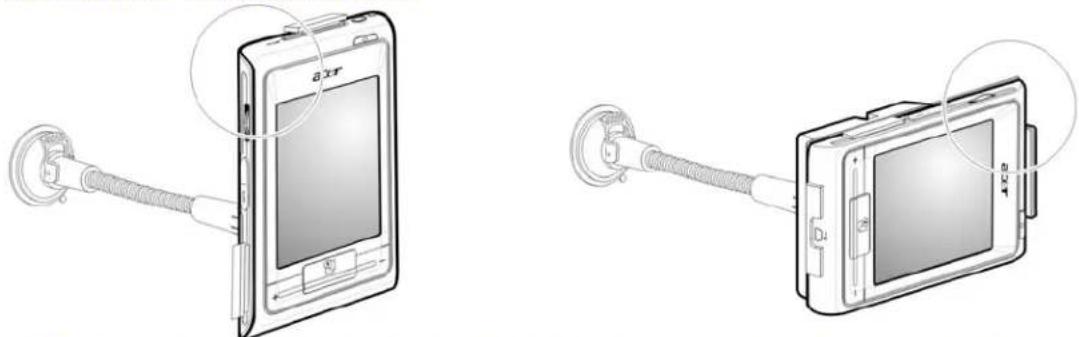
natural_image
Two diagrams showing a smartphone with cable connectors, one with a screen and the other with a device (no text or symbols present)
If you planned on using the device while hiking, for best reception, be sure to hold it at a 45^ angle.

- After setting up the device on the car mount, connect the car charger.

If the car engine is turned off, you may be required to switch the vehicle ignition back into the Accessories position. Consult your vehicle owner's manual.
The power LED indicator lights up orange during charging.

The device comes with the battery pre-charged to at least 30% capacity. You can start using it once it is mounted in your vehicle and connected to the cigarette lighter. However, for maximum usage time you need to charge your device to full capacity. Go to the "Recharging the device" section for instructions.
Start up the Acer e300 Series Travel Companion
Before mounting the Acer e300 Series Travel Companion on your vehicle, you should first calibrate the screen. After screen calibration, proceed to system settings configuration.
To turn on and calibrate the device:
- Turn on your device by pressing the power button ⏻ on the front right panel of the device.
When you first turn on your device, you will be asked to calibrate the screen. This process ensures that when you tap the screen the item tapped is activated.
- Follow the instructions on the screen.
After calibrating the screen, the Main Menu panel displays. This is also referred to as the Home panel.

To configure system settings:
If you intend to start using your Acer e300 Series Travel Companion at once, we recommend that you configure the language and date/time settings first. The rest of the user preferences can be set up later.
-
Tap "Settings" on the Main Menu panel.
-
To set the system language settings, tap "Language".
i. Tap the up or down arrow under the Text and Voice settings until the language of your choice is displayed.
-
To set the system date and time, tap "Date/Time".
-
Tap "Date".
i. Tap the up or down arrow under the Year, Month, and Day settings to set the date values.
- Tap "Time".
i. Tap the up or down arrow under the Hour and Minute settings to set the time values.
- Tap "Time Zone".
i. Tap the radio button for the time zone of your choice.
- Tap twice to return to the Main Menu panel.
For more information on the rest of the system configuration options, go to "Chapter 5 – System configuration".
Congratulations! Your new Acer e300 Series Travel Companion is now ready for use. Proceed to “Chapter 2 – Acer e300 Series Travel Companion fundamentals” for more information on the device’s user interface or you can refer to the Navigation software Quick Starter Guide to start using the device in navigation mode.
CHAPTER 2
Acer e300 Series Travel Companion fundamentals
This chapter describes basic hardware procedures in using your Acer e300 Series Travel Companion. Information on the device's command interface is also discussed.
Hardware interface
Using the touch screen backlight
Under some lighting conditions, viewing the information on your device may be difficult. If this is the case, activate the backlight by tapping on the screen to illuminate the touch screen.
Using the SD/MMC slot
Your Acer e300 Series Travel Companion has an SD/MMC slot 57 compatible with a range of SD and MMC storage cards that you can use to back up or transfer files and data.
Also, the Acer e300's GPS navigation system has its core on the Navigation software program. Using this program requires that users load the digital maps available in the Navigation software SD card included with the device.
To insert a storage card:
- Hold the device securely; then push the card into the slot until you hear an audible system sound; this will signal that the card is already properly seated within the slot. The card is secure when it is not protruding from the slot.

natural_image
Hand inserting a card into a device (no text or symbols visible)To remove a storage card:
-
Hold the device securely; then push against the top of the card, as if you were pushing it further into the slot, letting the card spring out. An audible system sound will signal that the card has been released.
-
Gently remove the card from the slot.

Establishing device-PC connection
The USB cable that comes with your device enables you to connect the device to your computer. File Explorer displays the Acer e300 Series Travel Companion as a USB mass storage device, with the SD/MMC card shown as a sub-folder. Once connected, you can:
- Use File Explorer to copy digital music and image files into your device's SD/MMC card and access them when in Multimedia mode.
It is advisable to organize files into subfolders. This will served as play lists and albums when you access the files from your device.

To enable access of multimedia files from your device, it should be located on the SD/MMC card, not on the device's memory.
Go to "Chapter 4 – Multimedia mode" for more information on how to work in Multimedia mode.
- Recharge the device via the USB connection

natural_image
Diagram showing connection between a laptop and an Apple OX3 device via USB cable (no text or symbols present)Installing Microsoft ActiveSync
Use Microsoft ActiveSync to exchange information between your Acer e300 Series Travel Companion and a computer running on the Microsoft Windows platform.

If you have a previous version of the Microsoft ActiveSync installed in your computer, uninstall it first before installing the latest version of Microsoft ActiveSync from the Acer e300 Series Travel Companion CD.
Microsoft ActiveSync does not support sync function on this device, it only supports file transfer.
Minimum installation requirements:
• Microsoft Windows XP, 2000, ME, and 98 SE
• Microsoft Internet Explorer 5.0 or later
- Hard disk drive with 12 to 65 MB of available hard disk space
• Available USB port
- CD-ROM drive
- VGA graphics card or compatible video graphics adapter at 256 color or higher
To install Microsoft ActiveSync on your computer:
- Close any open programs, including those that run at startup, and disable any virus-scanning software.
- Insert the Acer e300 Series Travel Companion CD into your computer's CD-ROM drive. The CD's welcome page will be displayed.
- Click the installation language of your choice.
- Click "Install ActiveSync" on the Please select your task screen.
The installation wizard will automatically begin.
- Follow the on-screen instructions.
After installation, the ActiveSync icon will appear on your computer's system tray (on the lower right-hand corner of the screen).

For detailed information on how to use ActiveSync on your computer, start "ActiveSync"; then click "Help", "Microsoft ActiveSync Help".
Recharging the Acer e300 Series Travel Companion
Your Acer e300 Series Travel Companion uses a rechargeable 1100 mAh Lithium Ion battery. The status icon located on the top right corner of the Main Menu panel indicates the level of the device's battery power.
If the battery level becomes low in the course of normal use, recharge the device. Normally, you can use the wall charger to recharge your device.

Additionally, you can also use the Mini USB Sync and charge cable to recharge your Acer e300 Series Travel Companion. However, this may be difficult when there's no available computer on hand. When your device battery is drained while on the road, you can still recharge your device by using either the car charger cable bundled with your device. Recharging time from empty to full capacity is about 2.5 hours in all cases.

If the battery level reaches very low status, the device will automatically turn off. In this case, you have about 12 hours to recharge your device after which you risk losing all data on the device's internal memory. In case all data is lost, the next time you power on the device you will be prompted to restore the data.
The Acer e300 Series Travel Companion can be turned on without battery, it should be connected to an AC power (car charger, AC adapter) and the battery cover covered.
The Acer e300 Series Travel Companion will not go into suspend mode automatically, if you don't plan to use it for a long period of time, you should turn off the power to save battery.
To recharge the device using the car charger:
Use the car charger to recharge your device while it is mounted on your vehicle.

To recharge the device using the USB cable:
The Mini USB Sync and charge cable that comes with your device enables you to connect your device to a computer running on the Microsoft Windows platform. When connected, the device battery is also recharged via the USB connection.
Go to the "Establishing device-PC connection" section for instructions on how to connect your Acer e300 Series Travel Companion to a computer.

You cannot simultaneously charge the device while transferring files thru the USB cable. The device will recharge the battery only after the finishing the file transfer function.
Command interface
Using the hot keys
The hot keys on your Acer e300 Series Travel Companion allow users to:
- +/- - Control the volume level of sound from the speaker
- Return to the Main Menu Panel/Launch the Navigation panel
Using the Acer e300 Series Travel Companion touch screen
The Acer e300 Series Travel Companion touch sensitive screen allows for a more natural way of entering information into the device using fingers instead of a stylus—no more wasted time finding a lost stylus or fumbling with an awkwardly shaped one! In this Guide, the tap and hold-and-drag actions are done by:
- Tap - Touch the screen once with your stylus to open items and select options.
- Hold and drag – Tap a slider icon and drag it across the screen. In Photo's Full Screen mode, hold and drag the image to pan it in different directions.
- Return – Tap to return to the previous screen.
Using the Main menu panel
When you turn on your device for the first time each day, you'll see the Main Menu panel, also called the Home panel. From any other screen, you can revert to it by pressing the Main Menu hot key
The Main Menu title bar displays the current time (with 12-hour notation), the panel name, and the battery power level status icon. Go to the “Recharging the device” section for more information on this status icon.

There are five program icons on the Main Menu panel.

- Tap on Navigation to display the Navigation panel. Refer to the Navigation software Quick Starter Guide or the Navigation software User's Guide for more information on how to use the device in navigation mode.

- Tap on MP3 to launch MP3 for music mode operation. Go to "Chapter 4 – Multimedia mode" for more information.

- Tap on Photo to launch Photo for picture mode operation. Go to "Chapter 4 – Multimedia mode" for more information.

- Tap on Contacts to launch the Contacts program to access your contacts list.

- Tap on Settings to open the Settings panel to configure the device's user preferences. Go to "Chapter 5 – System configuration" for more information.
CHAPTER 3
Contacts management

Contact files imported/exported to and from your device and computer is saved in .fs format.
Contacts
Contacts maintain a list of your friends' and colleagues' contact information. These include their email address, street address, multiple phone numbers, and other related information, such as birthday or anniversary date. You can enter multiple address entries for each contact. This program is integrated with your Navigation software enabling users to treat all address entries as possible destination points in navigation mode.
CHAPTER 4
Multimedia mode
This chapter describes the multimedia programs bundled with your Acer e300 Series Travel Companion.
Multimedia mode overview
In addition to its navigating function, your Acer e300 Series Travel Companion is also a mobile entertainment tool that lets you enjoy your digital music and image collection on the road. MP3 and Photo extend your device's function to the multimedia scene.
To enable access of multimedia files from your device, it should be located on the SD/MMC card, not on the device's memory. Do this either by:
- Using the USB cable to connect the device, with the SD/MMC card inside, to your computer, then use File Explorer to copy digital music and image files into the device's SD/MMC card folder.
- Using a compatible card reader to directly copy digital music and image files to the SD/MMC card.

It is advisable to organize files into subfolders. This will serve as play lists and albums when you access the files from your device.
MP3
Enjoy your favorite music on the road. The program features:
• Support for MP3, WAV and WMA files
- Auto-scanning of supported files in the device's built-in memory and SD/MMC card
- Separate volume control enabling you to adjust the playback sound level while retaining the volume level set for system sounds
• Hot key function for volume control
- Play list support based on sub-directory contents
Each sub-directory containing compatible music files is treated as an individual play list. For a more organized file search, it is advisable to named sub-directories based on genre or listening preferences. To illustrate, a sub-directory containing music you listen to when traveling can be named "Journey favorites"; or "Top alternative" for a sub-directory consisting of your favorite alternative songs.
- Shuffle and repeat playback functions
Using MP3
To open MP3:
- Tap "MP3" on the Main Menu panel.
To open files for playback:
-
The program will automatically scan the device SD/MMC card for supported digital files. Only sub-directories containing compatible music files will be displayed.
-
Search for the file you want to play.
Tap up/down arrow or use the jog dial to scroll through all available files.
-
Tap a file or press the jog dial to start playback of the selected file.
-
When the file is located in the root directory, tap the file for playback.
- When the file is located inside a sub-directory, tap the sub-directory icon; then tap a file for playback.
The selected file will automatically be played. Files in the same directory will also be played provided the Repeat function is disabled.
To rearrange the playback sequence:
Each directory containing supported music files is considered a play list. You can choose to shuffle the playback sequence to play files in random order.
- To enable the "Random" mode, tap.

A fade-out shuffle icon indicates enabled "Random" mode.
- To disable the Random mode, tap the fade-out Random button.

Tapping will automatically disable the Random mode.
To enable/disable the Repeat mode:
The Repeat mode lets you play the current track in a loop. The same track will be played over and over again until you disable the Repeat mode.
• To enable the Repeat mode, tap

A fade-out "Repeat" icon indicates enabled Repeat mode.
- To disable the Shuffle mode, tap the fade-out "Repeat" button.

Tapping will automatically disable the Repeat mode.
To control the playback volume:
To adjust the playback volume, you can use either the MP3 volume control slider or the volume control hot keys.
- Hold and drag the slider of the volume progress bar. This will only affect the volume of the track playback.
- Press the volume hot keys +/- . This will also adjust the sound level for the device's system sounds.
Photo
These days every mobile gadget seems to be equipped with a digital camera, better for capturing that spontaneous moment. With Acer e300 Series Travel Companion you can keep these images of your favorite moments as mobile as you are by using Photo. The program features:
- Support for JPEG, BMP (1-, 4-, 8-, and 24-bit) and GIF (still images) files
- Auto scanning of supported files in the device's built-in memory and SD/MMC card.
- Three viewing modes: Thumbnail, Full Screen, and Slide Show
- Album support based on sub-directory contents
Each sub-directory containing compatible image files is treated as an individual album. For a more organized file search, it is advisable to sort image files into sub-directories based on something, such as a particular event or a certain period. To illustrate, a sub-directory containing pictures from your daughter's birthday can be named "Cassie's 10^th birthday"; or "May 11 to June 24 log" for a sub-directory consisting of pictures taken during that period.
Using Photo
To open Photo:
- Tap "Photo" on the Main Menu panel.
The program will automatically scan the device's SD/MMC card for supported image files. Image files will be displayed as thumbnails; only sub-directories containing compatible files will be displayed.
Tap up/down arrow or use the jog dial to scroll through all available files. When a thumbnail is selected, a red border appears around it.
Viewing files in Full Screen mode
You can view image files in full screen.
To view image files in Full Screen mode:
- Search for the file you want to view.
Tap or use the jog dial to scroll through all available files.
Tap to return to the device's root directory.
-
Open the file in full screen mode.
-
When the file is located in the root directory, tap the file.
- When the file is located inside a sub-directory, tap the sub-directory icon; then tap the file you want to view.
3. Then tap

To change the image magnification level:
- Tap the magnifying glass with a "+" sign or press the "+" to zoom into the center of the image.
When in a Zoom In state, you can hold and drag the image to pan it in any direction you want. - Tap the magnifying glass with a "-" sign or press the "-" to zoom out the image display.
To change the image orientation:
- Tap to rotate the images 90^ clockwise.
To return to Thumbnail mode:
- Tap

Viewing files in Slide Show mode
You have the option to view images in a slide show much like viewing a PowerPoint presentation in your computer. Images are adjusted to fit the entire display area and are shown in a 3-second interval.
To enable the Slide Show mode:
- In Thumbnail or Full Screen mode, tap

Tap the touch screen to stop the slide show and return to the previous viewing mode.
CHAPTER 5
System configuration
This chapter describes the ways you can customize your Acer e300 Series Travel Companion by setting user preferences.
System settings overview
You can adjust the settings of your device to suit the way you work. Adjusting certain settings, such as those for system volume, power LED, and hot keys/ touch screen backlight may increase your standby time.
To access the Settings panel:
- Tap "Settings" on the Main Menu panel.

There are six preferences icon on this panel:

- Tap Volume to set the volume level for system sounds and enable tapping sound.

- Tap Power to view the battery power level and enable the hot keys backlight.

- Tap Language to set the language option for the system menus and voice prompts.
- Tap Date/Time to change the system date, time, and time zone settings.
- Tap to displays your device's model name and related technical specifications.
- Tap Misc. to displays option for Back to Factory Default, toggle for landscape and portrait mode, screen recalibration and Send Emergency Info.



Customizing user preferences
Volume
To set the system sounds volume level:
- Tap "+/-" to adjust the volume level.
To enable tap sounds:
- Tap the "Enable sound for TAP" check box.
Power
To set backlight brightness:
- Tap the +/- to the right of the "Backlight" to set the brightness of the backlight.
To set backlight auto-off function when running on Battery power:
- Tap the +/- to the right of "Battery" to set the screen backlight auto-off function.
Options include Never, backlight off after 30 seconds, 1, 2, or 3 minutes.
To set backlight auto-off function when running on AC power:
- Tap the +/- to the right of "AC Power" to set the screen backlight auto-off function.
Options include Never, backlight off after 1, 5, 10 or 30 minutes.
Language
The Acer e300 Series Travel Companion's user interface supports multiple pre-loaded languages.
Go to step 2 of the "To configure system settings" section for instructions on how to set the system language.
To load additional language options, refer to your Navigation software User's Guide.
Date Time
Go to step 3 of the "To configure system settings" section for instructions on how to set the system date and time.
System Info
Go to the "Troubleshooting your Acer e300 Series Travel Companion" section for instructions on how to use the three command buttons on the System Info screen.
Misc.
Go to the "Troubleshooting your Acer e300 Series Travel Companion" section for instructions on how to use the command buttons on the Misc. screen.
CHAPTER 6
System maintenance and user support
This chapter contains information regarding system usage, maintenance, and troubleshooting. Lists of frequently asked questions (FAQs) and user support contact information are also provided for reference.
Using your Acer e300 Series Travel Companion safely

The precautions and instructions stated in this Guide shall be executed in the English language. In the event of any discrepancy between the English language original hereof and any translation hereof into any other language, the English language original shall govern.
Driving precautions
When using the device in a vehicle, the vehicle operator is solely responsible for operating the vehicle in a safe manner. It is your responsibility to comply with all traffic laws. Failure to follow the directions below could result in death or catastrophic bodily injury to you or to others.
- Do not attempt to enter information or configure the device while driving. If you need to do so, pull out of traffic and come to a stop in a legally permissible and safe location before using your device.
- Vehicle operators must maintain full surveillance of pertinent driving conditions at all times. Minimize the need to view the device screen while driving and use voice prompts to guide you.
- Never place the device on the passenger seat or any place else in the car where it can become a projectile during a collision or stop.
- An air bag inflates with great force. DO NOT mount the device in the area over the air bag or in the air bag deployment area.
- Although reasonable attempt has been made to ensure that the database in your Acer e300 Series Travel Companion is accurate, such information may change from time to time. The Acer e300 Series Travel Companion database does not include any of the following:
- Legal restrictions (such as vehicular type, weight, height, width, load and speed restrictions)
- Road slope, bridge height, weight or other limits
- Construction work zones or hazards; road closures, traffic conditions
- Weather conditions
- Emergency events
It is your responsibility to disregard any unsafe, hazardous or illegal route suggestions. Your judgment and common sense shall take precedence over any information that may be received through the use of your device.
Operating precautions
Device usage precautions
- Do not use your device anywhere it may be exposed to water or in conditions of high humidity.
- Do not expose the device to extreme temperatures, which could occur in a vehicle under direct sunlight. Such exposure can shorten the life of the device, damage the plastic housing and/or battery, and increase the risk of explosion. The operating temperature for the device is 0^ to 40^ Celsius.
- Do not subject your device to sudden and severe temperature changes. This could result in moisture condensation in the device that could cause damage to your device. In the event of moisture condensation, allow your device to dry out completely.
-
Do not leave the device unattended on an automobile dashboard. When your vehicle is parked and the device is not in use, protect it from theft and extreme heat by storing it in an unobtrusive location, away from direct sunlight.
-
Your device is not a toy. Never allow children to play with your device.
- Never touch the liquid that might leak from a broken liquid crystal display. Contact with this liquid could cause a skin rash. If the crystal display liquid should come into contact with the skin or clothing, wash it immediately with clean water.
- Never raise the sound volume level too high when using the device with earphones. An excessive sound volume level could cause damage to your hearing.
- Never use the device's GPS inside an airplane.
Car mount precautions
- Some countries prohibit the mounting of any electronic device in any location on the vehicle dashboard. Be sure to check your local laws for applicable mounting before installing the car mount.
- Some newer vehicle models may have a heat reflective shield embedded in the windshield. This may in some cases obstruct the GPS signal reception. If you encounter this problem in your vehicle, you need to purchase an external GPS antenna. For more information, contact your local Acer dealer.

natural_image
Diagram of a car interior with a mounted device and cable, showing signal waves and wiring connections (no text or symbols)- The heating and cooling cycle of a vehicle's interior will in some cases loosen the adhesion of the suction cup. Check the vacuum seal of the car mount for adequate adhesion each time you use the unit, and reinstall it if necessary.
-
If the car mount has problems staying on, clean the plastic suction cup with alcohol, then reinstall. Moistening the suction cup may help adhesion in some cases.
-
To avoid extreme temperature from damaging the car mount, remove the unit if the temperature inside your vehicle exceeds 60°C.
- The dip in humidity and temperature at night may loosen the adhesion of the suction cup. For this reason, as well as for security, it is recommended that you remove both the car mount kit and the Acer e300 Series Travel Companion when leaving your vehicle overnight.
Storage precautions
- Do not store your device anywhere it may be exposed to water or in conditions of high humidity.
- When the device is not in use for an extended period of time, bring it indoors and store it in some location with a temperature range of -20^ to 60^ .
Accessories and repair precautions
- Only Acer authorized accessories should be use with the device. The use of incompatible accessories could result in bodily injury and/or damage to the device. The use of unauthorized accessories will also void your warranty.
- Never attempt to disassemble, repair or make any modification to your device. Refer all repair needs to your local Acer dealer.
Cleaning your Acer e300 Series Travel Companion
- Use a damp soft dry cloth to wipe the device's casing (not the display screen). Never use organic solvents such as benzene or paint thinner to clean your device. Use of these solvents can cause deformation or discoloration.
- Use a soft, clean, lint-free cloth to clean the display screen. Moistened LCD screen wipes could also be used as required.
Troubleshooting your Acer e300 Series Travel Companion
Recalibrating the screen
If while using your device, you discover tapping an item doesn't bring up the appropriate response, it means your device has lost its calibration. Recalibrate the screen.
To recalibrate the screen:
- Tap "Settings" on the Main Menu panel.
- Tap "Misc." on the System panel.
- Tap "Calibration" on the Misc. screen.
- Follow the onscreen instructions.
Resetting the Acer e300 Series Travel Companion
You may have to perform a reset if the device freezes (i.e., device no longer responds to the buttons on the screen). A soft reset allows your device to get a fresh start, similar to rebooting a computer. This will restart your device and adjust memory allocation. All records and entries are retained after a soft reset. GPS settings are also retained.
To perform a soft reset:
Hold the device securely; then press the soft reset button on the right side of your device.

Performing a soft reset will not clear the RAM in the unit.
To perform a hard reset:
Hold the device securely; press and hold the power button and then press the soft reset button on the right side of your device.
Performing a hard reset will clear the RAM in the unit and reset the GPS of the unit.
Loading the factory default settings
If you still encounter system errors even after soft and hard resetting the device, load the factory default settings to correct the error. These default settings have been selected to optimize your device's performance.
To load the factory default settings:
- Tap "Settings" on the Main Menu panel.
- Tap "Misc." on the Settings panel.
- Tap "Back to Factory Default" on the Misc. screen.
-
Tap "OK" on the dialog box.
-
After the factory reset, reconfigure your device's user preferences.

Performing a factory default will erase the RAM, reset the GPS and erase all the user/application data on the unit's Flash disc. The data on the SD card will not be erased.
FAQs
This section lists down frequently asked questions that may arise during the use of your Acer e300 Series Travel Companion, and gives easy answers and solutions to these questions.
| Aspect | Question | Answer |
| Audio Why is there no sound coming from the device? | ·If the earphone is plugged into the device, the speaker is automatically shut off.Disconnect the earphone.·Check that the device's volume settings is not muted. In the System panel, tap "Volume". | |
| Touch screen Why is the touch screen not responding to my finger taps? | The screen may have lost its calibration.Recalibrate the screen. Go to the "Recalibrating the screen" section for instructions. | |
| Language setting When I switched the language setting to Dutch, why do I still get an English Main Menu? | If a user selects a language that is not one of the multiple pre-loaded options, the new setting will only affect the Navigation software user interface. System menus and non-navigation screens will default to English. | |
| Aspect | Question | Answer |
| Multimedia mode | Why can’t I view my picture files? You may be trying to view an image that is not supported by Photo. Go to the “Photo” section for a list of supported image formats. | |
| Why can’t I play my music files or view my pictures while navigating? | The device’s multimedia programs—MP3 and Photo—are not available in navigation mode. This is for safety reasons so as not to distract the driver’s attention from the road. | |
| Navigation mode | Why is it that sometimes my device takes longer than 5 minutes to get a GPS fix? | If the previous GPS fix position was more than 500 km or 12 hours apart from your current position and time, it will take significantly longer than the standard TTFF time to get a GPS fix. This is due to the nature of the GPS algorithm and rotational velocity between the satellites and planet Earth, and deemed normal and is not the fault of your Acer e300 Series Travel Companion device. |
| System information and performance | How do I check the OS version of my device?How do I restore the system back to its default factory settings? | Perform a soft reset on the device. Go to the “Resetting the Acer e300 Series Travel Companion” section for instructions. The device’s OS version appears on the bottom left corner of the screen.View the device’s OS version and other technical specifications. In the Settings panel, tap Misc.Users can perform this task by using the Factory Reset button on the Misc. screen. Go to the “Loading the factory default settings” section for instructions. |
| Does performing a factory reset means a GPS reset as well? | Yes. The Factory Reset function reset the OS settings to their default factory values and cause the GPS settings to reset. | |
| What should I do if the system stops functioning normally? | Perform a soft reset on the device. Go to the “Resetting the Acer e300 Series Travel Companion” section for instructions. | |
| Power | I couldn’t turn on the device. | The battery power may be depleted. Recharge the device. Go to the “Recharging the device” section for instructions. |
Customer support
Technical assistance
If you encounter a problem with your Acer e300 Series Travel Companion, review the following first:
- "Troubleshooting your Acer e300 Series Travel Companion" section
- "FAQs" section
- Latest Acer e300 Series Travel Companion User's Guide on your regional Acer web site. Go to http://global.acer.com/support/.
If the problem still persists, you will need technical assistance. Refer to the http://global.acer.com/about/webmaster.htm/web site for information on how and where to contact the Acer Service Centers available in your area.
Product warranty
Refer to the Acer e300 Series Travel Companion Warranty Booklet for details on the warranty coverage of your Acer e300 Series Travel Companion.
CHAPTER 7
System specifications
This chapter lists the features and operating specifications of the Acer e300 Series Travel Companion.
Hardware features
| Aspect | Description |
| Processor Samsung S3C2442XL 300 MHz application processor | |
| GPS chipset SiRF Star III LP chipset and firmware solution | |
| Memory | 64 MB SDRAM for system memory64 MB onboard Flash memory (for operating system and embedded applications); Model with 2 GB Flash memory is also available |
| Power | High-density rechargeable 1100 mAh Lithium Ion battery2.5 hours charging time from empty to full capacityRecharging optionsIndoors using the AC adapterOn-the-road using either the car charger or the USB cablePower status LED indicator |
| Display | 2.8-inch screen for a wider viewing angle |
| Audio | 2W built-in speaker3.5 mm stereo earphone jack |
| Connectivity | USB portSD/MMC slot |
| Hardware command interface | Volume control hot keysMain Menu/ Navigation hot key |
Software specifications
| Aspect | Description |
| Operating system | Microsoft Windows CE .NET 5.0 |
| Navigation software | Vehicle and pedestrian navigationSimple operation, intuitive menus and touch screen buttons |
| Aspect | Description |
| Address book ContactsMaximum capacity of 500 contact entriesIntegrated with your Navigation software for faster navigation using address entries as destination points | |
| Multimedia applications | MP3– supports MP3, WMA, and WAV formatsPhoto– supports JPEG, BMP and GIF (still images) formats |
Design and ergonomics
| Aspect | Description |
| Compact and lightweight | Dimensions (L x W x H): 58.4 x 103 x 17.5 mmWeight: 110~130g |
| User-friendly interface | Acer e300 Series Travel CompanionQuick launch hot keys for Main Menu and Navigation panelsControl hot keys for volume and image magnification levelsTouch sensitive screenCar mountWindshield MountFirm grip suction cup provides a steady vibration-free supportSwiveling mechanism and axial rod allows for multi-angle adjustment for optimum viewing positionSoftwareMulti-language user interface optionsContacts-integration with navigation functionSystem configuration based on individual user preferences |
| Power-saving options | Auto-off function for touch screen backlight |
| Mobile design | Suction-based car mount facilitates multi-vehicle usageCompact and lightweight body makes it easy for users to carry it anywhereOn-the-road recharging options via the car charger and USB cableSimple, out-of-the-box operation: Mount, dock, and you're on the go. No fussing with screws and cables. |
| Entertainment function | Pre-loaded software for accessing digital music (MP3) and image files (Photo) |
| Bundled peripherals | Car mountCar CradleCar chargerAC adaptorUSB cable |
| Accessory options | External GPS antennaExternal TMC antenna |
Environmental specifications
| Aspect | Description | |
| Temperature | ||
| Operating | 0° to 40°C | |
| Storage | -20° to 60°C | |
| Relative humidity (non-condensing) | ||
| Operating | 20% to 90% RH | |
| Non-operating | 20% to 90% RH | |
Regulatory and safety notices
This device fully satisfies the requirements for CE marking when used in a residential, commercial or light industrial environment.
Underwriters Laboratories Inc. ("UL") has not tested the performance or reliability of the Global Positioning System ("GPS") hardware, operating software or other aspects of this product. UL has only tested for fire, shock or casualty hazards as outlined in UL's Standard(s) for Safety. UL Certification does not cover the performance or reliability of the GPS hardware and GPS operating software. UL MAKES NO REPRESENTATIONS, WARRANTIES OR CERTIFICATIONS WHATSOEVER REGARDING THE PERFORMANCE OR RELIABILITY OF ANY GPS RELATED FUNCTIONS OF THIS PRODUCT.
This appendix lists the general notices of your portable navigation device.
FCC notice
This device has been tested and found to comply with the limits for a Class B digital device pursuant to Part 15 of the FCC rules. These limits are designed to provide reasonable protection against harmful interference in a residential installation. This device generates, uses, and can radiate radio frequency energy and, if not installed and used in accordance with the instructions, may cause harmful interference to radio communications.
However, there is no guarantee that interference will not occur in a particular installation. If this device does cause harmful interference to radio or television reception, which can be determined by turning the device off and on, the user is encouraged to try to correct the interference by one or more of the following measures:
Reorient or relocate the receiving antenna.
Increase the separation between the device and receiver.
Connect the device into an outlet on a circuit different from that to which the receiver is connected.
Consult the dealer or an experienced radio/television technician for help.
Notice: Shielded cables
All connections to other computing devices must be made using shielded cables to maintain compliance with FCC regulations.
Notice: Peripheral devices
Only peripherals (input/output devices, terminals, printers, etc.) certified to comply with the Class B limits may be attached to this equipment. Operation with non-certified peripherals is likely to result in interference to radio and TV reception.
Caution
Changes or modifications not expressly approved by the manufacturer could void the user's authority, which is granted by the Federal Communications Commission, to operate this computer.
Operation conditions
This device complies with Part 15 of the FCC Rules. Operation is subject to the following two conditions: (1) this device may not cause harmful interference, and (2) this device must accept any interference received, including interference that may cause undesired operation.
Notice: Canadian users
This Class B digital apparatus complies with Canadian ICES-003.
Declaration of Conformity for EU countries
Hereby, Acer, declares that this Acer e300 Series Travel Companion is in compliance with the essential requirements and other relevant provisions of Directive 1999/5/EC. (Please visit
http://global.acer.com/products/pda/reg-pda/index.htm for complete documents.)
Compliant with Russian regulatory certification.

ME61
Important safety instructions
Read these instructions carefully. Save them for future reference.
Follow all warnings and instructions marked on the product.
Unplug this product from the wall outlet before cleaning. Do not use liquid cleaners or aerosol cleaners. Use a water-moistened cloth for cleaning.
Do not use this product near water.
Do not place this product on an unstable cart, stand or table. If the product falls, it could be seriously damaged.
This product should be operated from the type of power indicated on the marking label. If you are not sure of the type of power available, consult your dealer or local power company.
Do not allow anything to rest on the power cord. Do not locate this product where people will walk on the cord.
If an extension cord is used with this product, make sure that the total ampere rating of the equipment plugged into the extension cord does not exceed the extension cord ampere rating. Also, make sure that the total rating of all products plugged into the wall outlet does not exceed the fuse rating.
Never push objects of any kind into this product through cabinet slots as they may touch dangerous voltage points or short-out parts that could result in a fire or electric shock. Never spill liquid of any kind onto or into the product.
Do not attempt to service this product yourself, as opening or removing covers may expose you to dangerous voltage points or other risks. Refer all servicing to qualified service personnel.
Unplug this product from the wall outlet and refer servicing to qualified service personnel under the following conditions:
When the power cord or plug is damaged or frayed.
If liquid has been spilled into the product.
If the product has been exposed to rain or water.
If the product does not operate normally when the operating instructions are followed. Adjust only those controls that are covered by the operating instructions, since improper adjustment of other controls may result in damage and will often require extensive work by a qualified technician to restore the product to normal condition.
If the product has been dropped or the case has been damaged.
If the product exhibits a distinct change in performance, indicating a need for service.
The Acer e300 Series Travel Companion uses a lithium battery.
Replace the battery with the same type as the product's battery we recommend in the product specification list. Use of another battery may present a risk of fire or explosion.
Warning! Batteries may explode if not handled properly. Do not disassemble or dispose of them in fire. Keep them away from children and dispose of used batteries promptly.
To avoid hazard of unexpected electrical shock, use the AC adapter only when the wall socket is properly grounded.
Do not use your device while exercising.
LCD pixel statement
The LCD unit is produced with high-precision manufacturing techniques. Nevertheless, some pixels may occasionally misfire or appear as black or red dots. This has no effect on the recorded image and does not constitute a malfunction.
Radio device regulatory notice
Note: Below regulatory information is for models with wireless LAN and/or Bluetooth only.
General
This product complies with the radio frequency and safety standards of any country or region in which it has been approved for wireless use. Depending on configurations, this product may or may not contain wireless radio devices (such as wireless LAN and/or Bluetooth modules). Below information is for products with such devices.
European Union (EU)
This device complies with the essential requirements of the European Council Directives listed below:
73/23/EEC Low Voltage Directive
EN 60950
89/336/EEC Electromagnetic Compatibility (EMC) Directive
EN 55022
EN 55024
EN 61000-3-2/-3
99/5/EC Radio & Telecommunications Terminal Equipment (R&TTE) Directive
Art.3.1a) EN 60950
Art.3.1b) EN 301 489 -1/-17
List of applicable countries
EU member states as of May 2004 are: Belgium, Denmark, Germany, Greece, Spain, France, Ireland, Italy, Luxembourg, the Netherlands, Austria, Portugal, Finland, Sweden, United Kingdom Estonia, Latvia, Lithuania, Poland, Hungary, Czech Republic, Slovak Republic, Slovenia, Cyprus and Malta. Usage allowed in the countries of European Union, as well as Norway, Switzerland, Iceland and Liechtenstein. This device must be used in strict accordance with the regulations and constraints in the country of use. For further information, please contact local office in the country of use.
The FCC RF safety requirement
The radiated output power of the wireless LAN Mini PCI Card and Bluetooth card is far below the FCC radio frequency exposure limits. Nevertheless, the Acer e300 Series Travel Companion shall be used in such a manner that the potential for human contact during normal operation is minimized as follows:
An improper installation or unauthorized use may cause harmful interference to radio communications. Also any tampering of the internal antenna will void the FCC certification and your warranty.
To comply with FCC RF exposure compliance requirements, a separation distance of at least 20 cm (8 inches) must be maintained between this device and any other antennas or transmitters.
Canada — Low-power license-exempt radio communication devices (RSS-210)
Common information
Operation is subject to the following two conditions:
- This device may not cause interference, and
- This device must accept any interference, including interference that may cause undesired operation of the device.
Operation in 2.4 GHz band
To prevent radio interference to the licensed service, this device is intended to be operated indoors and installed outdoors is subject to licensing.
Exposure of humans to RF fields (RSS-102)
The Acer e300 Series Travel Companion employs low gain integral antennas that do not emit RF field in excess of Health Canada limits for the general population; consult Safety Code 6, obtainable from Health Canada's website at www.hc-sc.gc.ca/rpb.
CHAPTER 7
Acer e3XX
accessories, 49
cleaning, 41
design and ergonomics, 48
driving precautions, 39
environmental specifications, 49
factory default settings, 43
FAQs, 44
feature highlights, 1
fundamentals, 20
hardware specifications, 47
initial setup, 12
multimedia mode, 30
package contents, 3
peripherals, 49
product warranty, 46
regulatory information, 49
safety information, 38
serial number, 37
software specifications, 47
system configuration, 35
system information, 37
system tour, 6
technical assistance, 46
troubleshooting, 41
user preferences, 35
ActiveSync
installation requirements, 23
installing, 23
audio
earphone jack, device, 8
speaker, 7
specifications, 47
system settings, 36
backlight
hot keys, 36
touch screen, 20
basic operations
command interface, 26
hardware interface, 20
battery
lost data warning, 24
specifications, 47
status icons, 24
viewing status, 36
bottom view, 8
Calibration, 37
car charger
usage, 15
car cradle
docking the device, 15
car mount
ergonomics, 48
GPS signal obstruction, 13, 23
parts, 10
troubleshooting, 40
usage precautions, 40
car mount bracket
legal prohibition, 13
car mount kit
installation reminders, 13
installing, 13
parts, 9
command interface
hot keys, 26
Main Menu panel, 27
touch screen, 27
Contacts
overview, 29
hardware specifications, 47
driving precautions, 38
earphone jack
device, 8
environmental specifications
humidity, 49
temperature, 49
ergonomics
Acer e3XX, 48
car mount, 48
dimensions, 48
entertainment function, 48
mobile options, 48
power-saving options, 48
software command interface, 48
weight, 48
FAQs
audio, 44
language setting, 44
multimedia mode, 44
navigation mode, 44
power, 45
system information, 44
system performance, 44
touch screen, 44
front panel, 6
Full Screen mode, 33
hard reset
performing, 42
hardware procedures
battery recharging, 24
SD/MMC slot, 20
touch screen backlight, 20
hardware specifications
audio, 47
battery, 47
command interface, 47
connectivity options, 47
flash memory, 47
GPS chipset, 47
processor, 47
hot keys
enabling backlight, 36
enabling backlight auto-off timer, 36
Navigation panel, 7
usage, 26
Zoom in, 7
Zoom out, 7
humidity
non-operating, 49
operating, 49
image files
supported formats, 33
viewing, 33
joystick
limitation, 29, 43
left panel, 9
Main Menu
icons, 27
memory
flash memory, 47
system memory, 47
MP3 program
features, 30
opening files, 31
opening program, 31
playback volume, 32
Repeat mode, 32
Shuffle mode, 31
supported formats, 30
multimedia mode
FAQ, 44
overview, 30
using MP3, 30
using Photo, 33
music files
playing, 30
supported formats, 30
navigation mode
driving precautions, 38
FAQ, 44
GPS database limitations, 39
operating precautions
Acer e3XX, 39
car mount, 40
peripherals tour
car mount, 10
chargers, 11
USB cable, 11
Photo program
changing image orientation, 34
changing magnification level, 34
features, 33
Full Screen mode, 33
opening program, 33
panning images, 34
Slide Show mode, 34
Thumbnail mode, 33
power
battery level status icons, 24
recharging via car charger, 15
recharging via USB cable charger, 25
status LED indicator, 6
viewing battery status, 36
power-saving options
hot keys backlight, 36
processor, 47
rear panel, 6
recharging
time, empty to full capacity, 24
via car charger, 15
via USB cable, 25
Repeat mode, 32
right panel, 9
safety information
cleaning instructions, 41
compatible accessories, 41
driving precautions, 38
operating precautions, 39
repair, 41
storage precautions, 41
SD/MMC slot
location, 8
usage, 20
setup procedures
calibrating the device, 16
configuring preferences, 17
installing the car mount kit, 13
overview, 12
turning on the device, 16
unpacking, 3
Shuffle mode, 31
Slide Show mode, 34
soft reset
button, 9
performing, 42
software specifications
address book, 48
multimedia, 48
navigation, 48
operating system, 47
speaker, 7
storage card
inserting into device, 21
removing from device, 21
system configuration
battery status, 36
date and time, 37
language, 37
miscelaneous, 37
overview, 35
power backlight, 36
preference icons, 35
system information, 37
System panel, 35
volume, 36
system date
preference icon, 36
setting, 17
system information
Misc. screen, 37
preference icon, 36
System Info screen, 37
technical specifications, 47
system language
additional languages, 37
loading additional language support, 37
preference icon, 36
pre-loaded languages, 37
setting system default, 17
System panel
Date Time, 37
icons, 35
Language, 37
Misc., 37
Power, 36
System Info, 37
Volume, 36
system reset
factory reset, 43
soft reset, 42
system specifications
environmental, 49
ergonomics, 48
hardware, 47
physical dimensions, 48
regulatory information, 49
software, 47
system time
preference icon, 36
setting, 17
system time zone
preference icon, 36
setting, 17
system tour
bottom view, 8
front panel, 6
left panel, 9
rear panel, 6
right panel, 9
top view, 8
temperature
storage, 49
Thumbnail mode, 33
top view, 8
touch screen
location, 7
specifications, 47
usage, 27
touch screen backlight
usage, 20
troubleshooting
factory reset, 43
screen recalibration, 41
soft reset, 42
USB cable
parts, 11
recharging, 25
USB port
location, 8
user preferences
date and time, 37
language options, 37
power, 36
power backlight, 36
System panel, 35
volume, 36
volume
enabling tap sound, 36
setting volume level, 36
Zoom in hot key
location, 7
use in Photo, 34
Zoom out hot key
location, 7
use in Photo, 34
- Acer e300 Series Travel Companion
- Legal Notices
- COPYRIGHT
- DISCLAIMER AND LIMITATION OF LIABILITY
- NOTES
- Table of Contents
- Acer e300 Series Travel Companion feature highlights ....1
- First things first....6
- System tour....6
- Peripherals tour....9
- Acer e300 Series Travel Companion setup....12
- Acer e300 Series Travel Companion fundamentals....20
- Hardware interface....20
- Command interface....26
- Contacts management....29
- Multimedia mode....30
- System configuration....35
- System maintenance and user support 38
- Cleaning your Acer e300 Series Travel Companion.... 42
- Acer e300 Series Travel Companion feature highlights
- Powerful system
- Wide and accurate GPS coverage
- Mobile design
- Battery life
- Ergonomic features
- Multimedia programs
- Contacts management programs
- Unpack the Acer e300 Series Travel Companion
- CHAPTER 1
- First things first
- System tour
- Top and bottom views
- Right and left panels
- Peripherals tour
- Car mount kit
- Car mount and car cradle
- Chargers
- USB cable
- Acer e300 Series Travel Companion setup
- Set up the Acer e300 Series Travel Companion on your vehicle
- Car mount installation reminders
- To set up the device on your vehicle:
- Start up the Acer e300 Series Travel Companion
- To turn on and calibrate the device:
- To configure system settings:
- CHAPTER 2
- Acer e300 Series Travel Companion fundamentals
- Hardware interface
- Using the touch screen backlight
- Using the SD/MMC slot
- To insert a storage card:
- To remove a storage card:
- Establishing device-PC connection
- Installing Microsoft ActiveSync
- Minimum installation requirements:
- To install Microsoft ActiveSync on your computer:
- Recharging the Acer e300 Series Travel Companion
- Command interface
- Using the hot keys
- Using the Acer e300 Series Travel Companion touch screen
- Using the Main menu panel
- CHAPTER 3
- Contacts management
- Contacts
- CHAPTER 4
- Multimedia mode
- Multimedia mode overview
- MP3
- Using MP3
- To open MP3:
- To open files for playback:
- To rearrange the playback sequence:
- To enable/disable the Repeat mode:
- To control the playback volume:
- Photo
- Using Photo
- To open Photo:
- Viewing files in Full Screen mode
- To view image files in Full Screen mode:
- Then tap
- To change the image magnification level:
- To change the image orientation:
- To return to Thumbnail mode:
- Viewing files in Slide Show mode
- To enable the Slide Show mode:
- CHAPTER 5
- System configuration
- System settings overview
- Customizing user preferences
- Volume
- Power
- Language
- Date Time
- System Info
- Misc.
- CHAPTER 6
- System maintenance and user support
- Using your Acer e300 Series Travel Companion safely
- Driving precautions
- Operating precautions
- Device usage precautions
- Car mount precautions
- Storage precautions
- Accessories and repair precautions
- Cleaning your Acer e300 Series Travel Companion
- Troubleshooting your Acer e300 Series Travel Companion
- Recalibrating the screen
- To recalibrate the screen:
- Resetting the Acer e300 Series Travel Companion
- To perform a soft reset:
- To perform a hard reset:
- Loading the factory default settings
- To load the factory default settings:
- FAQs
- Customer support
- Technical assistance
- Product warranty
- CHAPTER 7
- System specifications
- Environmental specifications
- Regulatory and safety notices
- FCC notice
- Notice: Shielded cables
- Notice: Peripheral devices
- Caution
- Operation conditions
- Notice: Canadian users
- Declaration of Conformity for EU countries
- ME61
- Important safety instructions
- LCD pixel statement
- Radio device regulatory notice
- General
- European Union (EU)
- List of applicable countries
- The FCC RF safety requirement
- Canada — Low-power license-exempt radio communication devices (RSS-210)
- Exposure of humans to RF fields (RSS-102)
- Acer e3XX
- ActiveSync
- audio
- backlight
- battery
- car mount
- earphone jack
- ergonomics
- front panel, 6
- Full Screen mode, 33
- hard reset
- hardware procedures
- hardware specifications
- hot keys
- humidity
- image files
- joystick
- left panel, 9
- Main Menu
- memory
- MP3 program
- music files
- navigation mode
- Photo program
Brand : ACER
Model : E300
Category : Gps