
AK-CA-73 - Laptop bag Akyga - Free user manual and instructions
Find the device manual for free AK-CA-73 Akyga in PDF.


| Product Type | Fan and LED Controller |
| Supply Voltage | Molex 12 V / 5 V DC |
| Maximum Current | 10 A |
| Fan Output Voltage | 12 V |
| LED Output Voltage | 5 V |
| Maximum Load per Channel | 0.4 A (fan or LED strip) |
| Maximum Total Load | 4.8 A |
| Operating Temperature | 5–60 °C |
| Fan Control | Yes (10 fans supported) |
| LED Strip Support | Yes, addressable RGB (JST 4-pin) |
| Connector Types | JST 6-pin (fans) and JST 4-pin (LED strips) |
| Controller Cable Length | 28 cm |
| Power Cable Plug 1 | Molex (to PSU) |
| Power Cable Plug 2 | JST-PH 4-pin (to controller) |
| Remote Control Frequency | RF 433.92 MHz |
| Remote Control Battery | CR2025 |
| Compliance | CE, RoHS |
| EAN Code | 5901720136084 |
| Manufacturer | Ropla Computers sp. z o.o. |
| Included Accessories | Controller, power cable, remote control |
Frequently Asked Questions - AK-CA-73 Akyga
User questions about AK-CA-73 Akyga
0 question about this device. Answer the ones you know or ask your own.
Ask a new question about this device
Download the instructions for your Laptop bag in PDF format for free! Find your manual AK-CA-73 - Akyga and take your electronic device back in hand. On this page are published all the documents necessary for the use of your device. AK-CA-73 by Akyga.
USER MANUAL AK-CA-73 Akyga
/ak-ca-73
www.akyga.com
Short description of the product
The Akyga AK-CA-73 controller is used to control up to ten fans and two LED strips. Control is carried out using the included remote control, which allows you to select visual effects and change the operating parameters of fans according to individual needs. In addition, the controller is compatible with JST 6-pin fans and addressable LED strips with JST 4-pin connectors.
The product is designed for a DC voltage of 5 V/12 V from the Molex socket of an ATX power supply. The current consumption of the supplied devices must not exceed the current indicated on the controller.
The product is compatible with the applicable national and European requirements.
What is in the box?
- AK-CA-73 Controller
- Molex / JST-PH 4-pin cord
- Remote control
Symbols explanation:

There is a particular danger connected with service.

There is a risk of losing health or life (e.g. by electric shock).

Important tips and information.

The CE standard description on the product is the manufacturer's declaration that the marked product meets the requirements of the directive so-called The "New Approach" of the European Union (EU). For security and certification (CE) reasons, the device can not be rebuild or change in any way. In the reason of using the power supply for other purposes than those described, the product may be demaged. The incorrect use may also cause hazard such as short-circuits, burns, electric shocks, etc. Read the users manual carefully and keep it for later use. The product could be share to third partie only with the user manual included.

Product accordance with the EU directive 2002/96/EC. The symbol of the crossed out basket placed on the product means that the marked product can not be disposed of with other household waste. After use, the product must be return to collection point for used electrical and electronic equipment or to the seller. Appropriate segregation of rubbish for subsequent processing, recovery or decrution contributes to avoiding negative effects on the environment and health, and also allows the recovery of raw materials from which the product is made.

The RoHS mark on the product is the manufacturer's declaration that the marked product meets the requirements of the EU Restriction of Hazardous Substances (2002/95/EC) directive, which aims to reduce the amount of hazardous substances penetrating into the environment from electrical and electronic waste.

The device is intended only for domestic use, indoors.
Safety Precautions

Connecting computer components whose demanded power is greater than power of the controller, can cause damage (burn) of controller.

The controller should work in internal conditions that do not cause contact with water and direc sunlight.

During operation, the controller should be located in a designated housing.

An electrostatic discharge occurs when two object touch each other, for example, an electric charge that occurs when user touch metal door handle after walking on a carpet. Discharging electrostatic charges from fingers or other electrostatic conductors can damage electronic components. To avoid damaging the controller or devices connected to it, abstain from touching contacts, wires and electronic circuits. The user's contact with electronic components should be kept to a minimum.

The manufacturer of the product is not responsible for damage or insults caused in effect of disobey the safety instructions and informations contained in these user manual.

- Keep the product and the packaging out of range of children and animals. The package includes a foil that child could choke while playing.
- It is forbidden to apply the mechanical load to the product - strong shocks, impacts, dropping or crushing may cause its damage.
- The product operation in adverse conditions is not allowed. Adverse conditions are primarily: exposure to direct sunlight, high or very low ambient temperatures, strong vibrations, high humidity, surrounds of gases, dusts or flammable and aggressive liquids.
- If the product has been damaged, does not work properly or has been stored for a long period of time in bad or unfavorable conditions, safe operation of the device is not possible. It is essential to stop using the product and to protect it against re-use for security purposes.
• Take account of the user manual for other devices connected to the adapter.
- Product and power cord should not be touched with moist or wet hands under no circumstances.
- Short-circuiting the current connection is prohibited.
- Make sure that the power cord is not crushed, bent, twisted, rubbed against sharp edges or mechanically loaded in any other way. Avoid thermal load of the cable - in particular keep away from heat sources (such as stoves, radiators, fireplaces).
- Before connecting the adapter to the power supply, make sure that the power of the adapter is sufficient for the components in the computer.
- It is not allowed to put any objects inside the controller.
- The controller is connected to the power by plugging it into the Molex connector of an ATX power supply unit providing 5 V/12 V DC.

- Before connecting or conservation of the adapter make sure that the power cords are not live.
- First connect controller to computer components then connect controller to AC/DC power adapter. Never the other way around.
- In case of any doubts regarding operation, safety or connection of the product, please contact the manufacturer or a qualified specialist for this purpose.
- All maintenance, adjustment and repair work on the product may only be carried out by a qualified person in a specialist facility.
Removing the most common problems
| Problem | Cause | Solution |
| Controller or components connected to it do not function correctly | No mains voltage | Check the correct connection of the power supply to the power networkCheck the mains fuses |
| LED backlight off | Activate the LED backlight in the fans/strips using the remote control | |
| Incorrect connection of the device | Make sure that the plugs are correctly connected to the controllerCheck that the wires are well embedded in the sockets | |
| There is a suspicion of a product defect | Stop using and contact the seller | |
| Fans do not react to changing settings | Offloaded battery in remote control | Replace the battery in remote control |
| Too much distance between the remote control and the controller | Bring the remote control closer to the controller | |
| There is a suspicion of a product defect | Stop using and contact the seller |
Connecting fans and LED strips to the controller
- Make sure that the current consumption of the fans and LED strips does not exceed the maximum allowable load for the controller.
- Make sure that the controller is not connected to a power source.
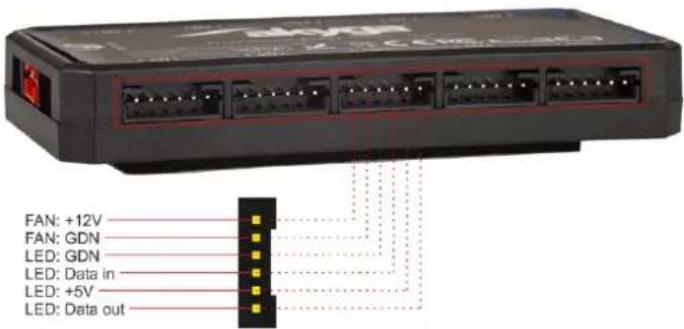
- Select and connect the appropriate 6-pin plug from the fan to the 6-pin socket on the controller.
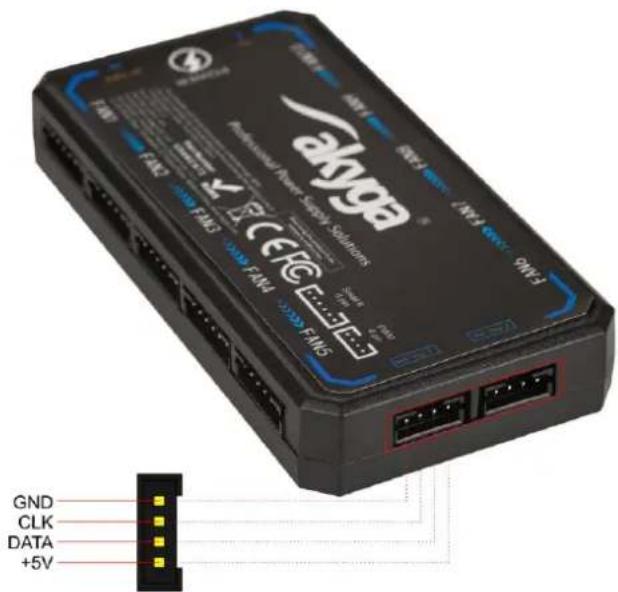
- Connect up to two addressable LED strips with the corresponding 4-pin connectors to the 4-pin sockets of LED STRIP 1 and/or LED STRIP 2.
Connecting fans
Connecting addressable LED strips
Connecting controller to power supply
- Make sure that the power supply is disconnected from power source.
- Connect cable included in the kit. The 4-pin connector should be plugged into the POWER socket in the controller. The Molex connector should be plugged into the corresponding socket on the ATX power supply.
- Optional: connect the 2-pin SW button connector from the case front panel to the 2-pin connector on the controller.
- Peel off the strip securing the double-sided tape on the back of the controller.
- Attach the controller to the chosen location in the case.
- The controller is ready to use.
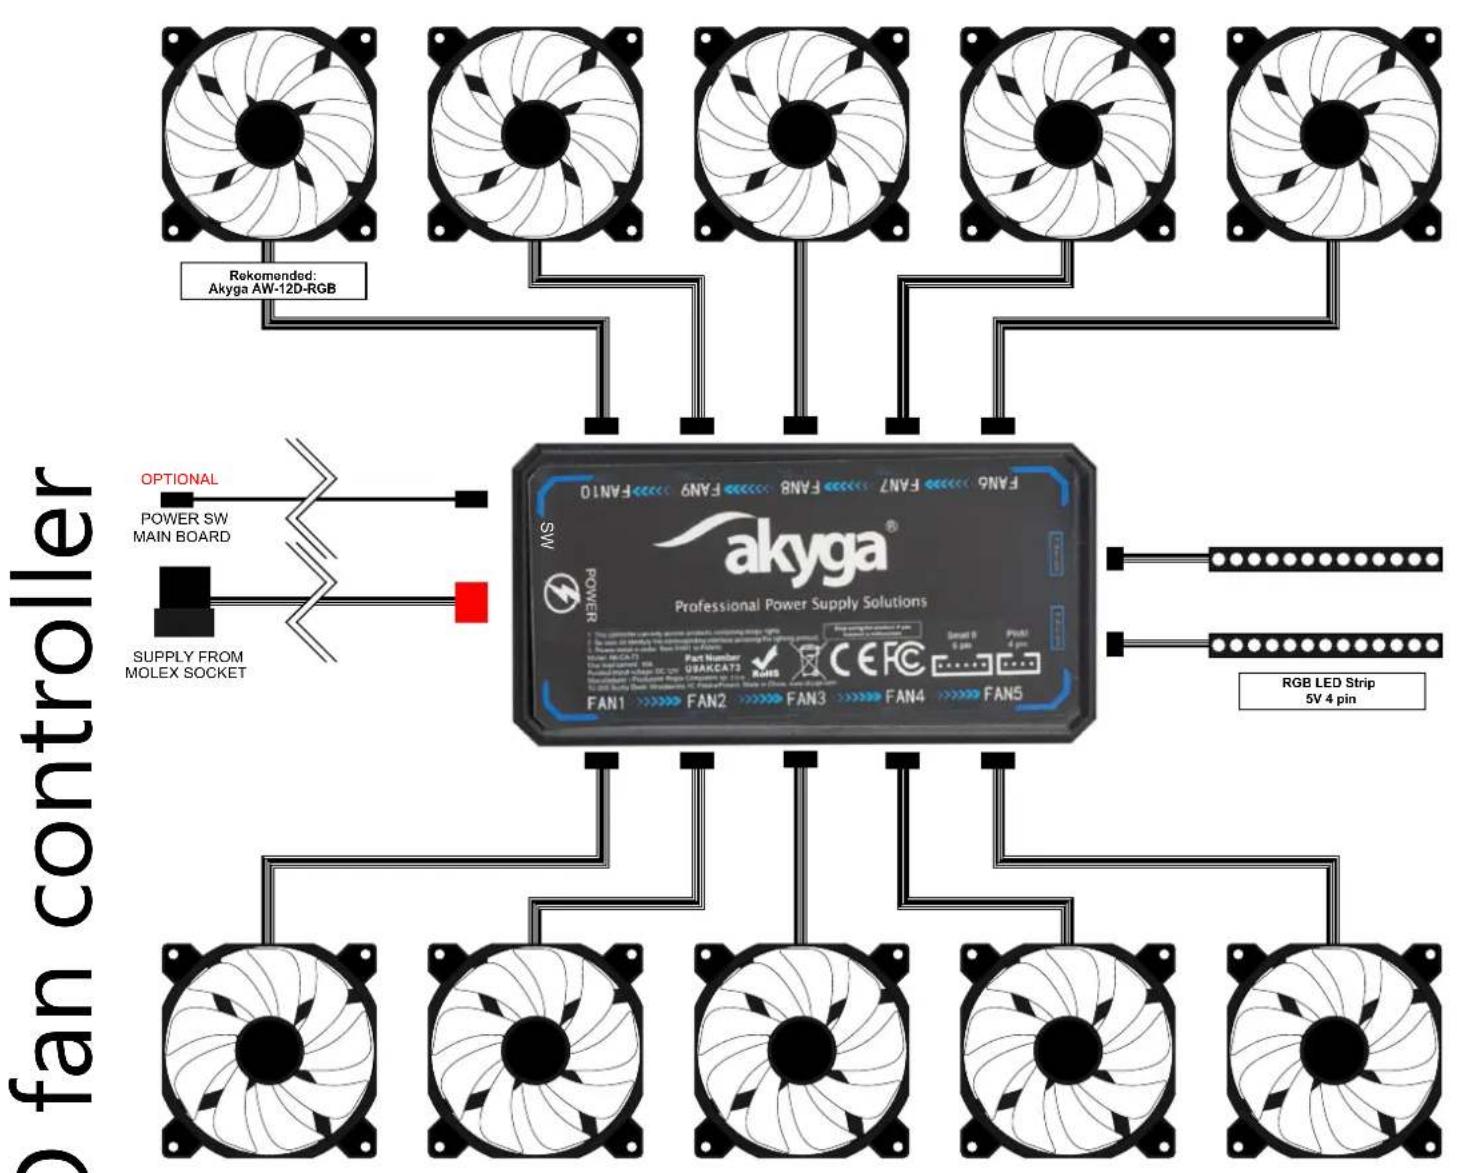
flowchart
graph TD
    A["Akyga® Professional Power Supply Solutions"] --> B["Rekomended: Akyga AW-12D-RGB"]
    A --> C["FAN1 FAN2 FAN3 FAN4 FAN5"]
    A --> D["FAN6 FAN7 FAN8 FAN9 FAN10"]
    A --> E["FAN10"]
    A --> F["FAN6"]
    G["OPTIONAL POWER SW MAIN BOARD"] --> H["Power Switch"]
    I["SUPPLY FROM MOLEX SOCKET"] --> J["Power Switch"]
    K["RGB LED Strip 5V 4 pin"] --> L["Pin 5V 4 pin"]
    M["Part Number U9AKCAT3"] --> N["Pin 5 Pin"]
    O["Standard B 0.2μs"] --> P["Pin 4 Pin"]
Remote control
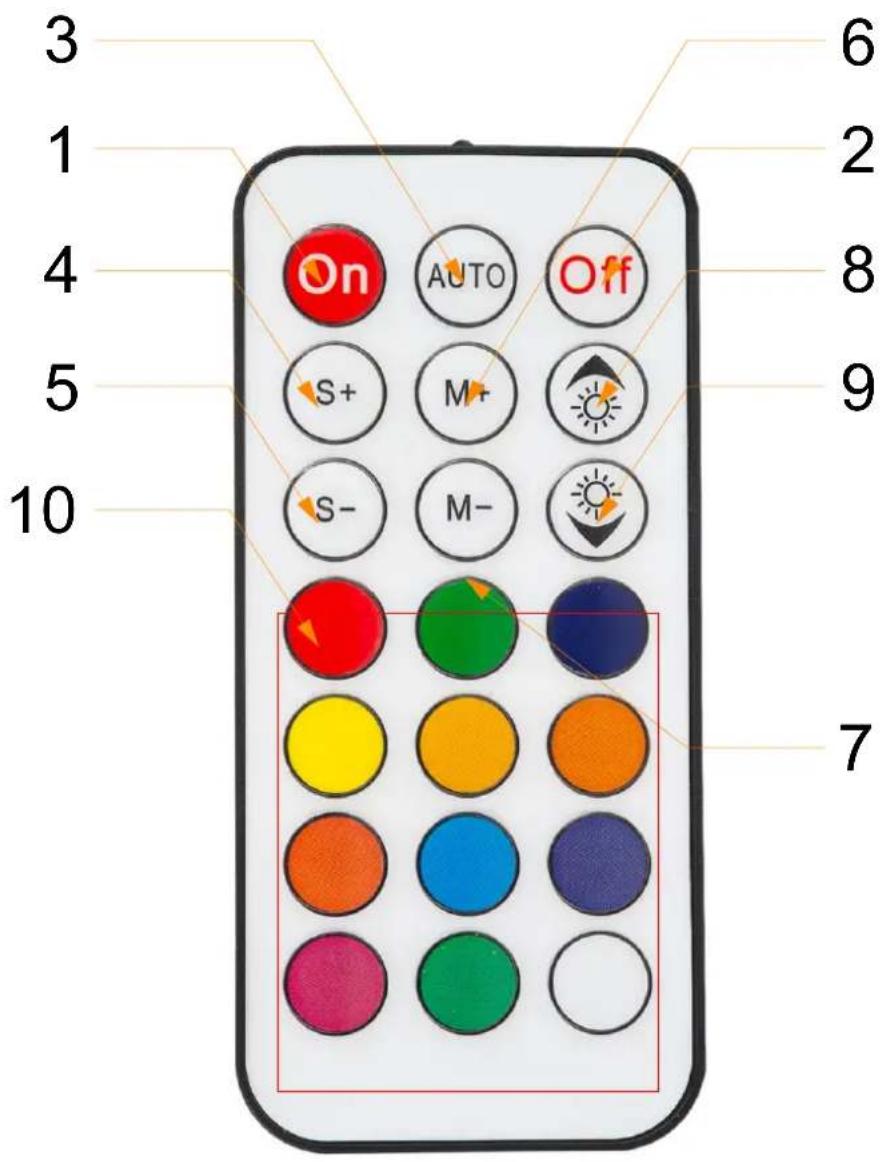
- On – Turn on the LED illumination.
- Off – Turn on the LED illumination.
- Auto mode – Switch automatic illumination program.
- S+ – increase the speed of the fans.
- S- - reduce the speed of the fans.
- M+ – Select next illumination program.
- M- - Go back to the previous illumination mode.
- Increase LED brightness.
- Reduce LED brightness.
- Select LED backlight colour.
The controller has a built-in memory. When the power is switched on again, the previous illumination will be displayed.
Cleaning the power supply:

Disconnect the controller from the electrical socket and connected devices before cleaning.

- Use soft and antistatic cloth for cleaning the controller.
- Do not use abrasive or chemical cleaners.
Technical specification

Product code:
Supply voltage:
Maximum power:
Output voltage:
Maximum energy load:
Temperature:
Fan adjustments:
Cable length:
The cable plug 1:
The cable plug 2:
Remote control power supply:
Frequency band of the remote control:
Included accessories:
Compliance with standards:
REACH compatibility:
EAN code :
AK-CA-73
Molex 12 V/5 V
Max. 10 A
12 V for Fan, 5 V for LED
4,8 A (max. 0,4 A for fan/LED strip)
5-60°C
Yes
28 cm
Molex
JST-PH 4-pin
CR2025 Battery
RF 433.92 MHz
LED Remote control
CE, RoHS
YES
5901720136084
Product manufacturer:
Ropla Computers sp. z o.o.
ul. Wrocławska 1c
52-200 Suchy Dwór


Brand : Akyga
Model : AK-CA-73
Category : Laptop bag