Two 6.3mm microphone jacks, adjustable volume and echo
Remote Control
Full function, infrared, requires 2 AAA batteries
Speaker Configuration
5.1 channel: 4 satellite, 1 center, 1 subwoofer
Frequently Asked Questions - DVD938 COBY
What should I do if there is no power?
Check that the AC power cord is securely connected to the unit and the wall outlet. Also ensure the Main Power switch on the rear panel is set to ON. If still no power, try a different outlet.
Why is there no picture or a distorted picture?
Make sure the TV is set to the correct video input (e.g., AV, Component). Verify that the video cable is securely connected. Press the V-MODE button on the remote repeatedly until the picture becomes normal.
There is no sound or the sound is distorted. What can I do?
Check that the audio cables are connected securely. Increase the volume level and ensure MUTE is not active. If the disc is in fast forward/rewind, press PLAY to resume normal playback.
The remote control does not work. How can I fix it?
First, check that two AAA/1.5V batteries are installed with correct polarity. Replace batteries if they are drained. Aim the remote directly at the sensor within 15 feet and remove any obstacles between them.
Why won't the player play a disc?
Ensure the disc is loaded label-side up and is compatible (DVD, CD, CD+G, JPEG). If the disc is dirty, clean it with a soft cloth. Also check that the disc's parental rating does not exceed the set level in the System Setup.
What should I do if the player freezes when I insert a USB drive or memory card?
The USB drive or memory card may be incompatible. Turn off the unit and unplug it from the AC outlet. Remove the device, then reconnect power and turn on again. Use only certified USB drives/memory cards.
How can I improve poor FM radio reception?
Extend the FM wire antenna fully and reposition it for best reception. You can also press the MO/ST button on the remote to switch to Mono mode for weak stations.
How do I reset the system to factory defaults?
Press SETUP on the remote, go to the Preference Page, select Default, and press ENTER. Note that Parental settings and Password will not be reset.
How do I set the parental control?
Press SETUP, navigate to the Preference Page, and select Parental. Enter the default password 136900, then choose a rating level. Movies above that level will require the password to play.
How can I use the karaoke function?
Connect one or two microphones to the Microphone Input Jacks on the front panel. Press SETUP, go to Karaoke Setup, set MIC to ON, and adjust MIC VOL and Echo Level as desired. Load a CD+G disc and press PLAY.
User questions about DVD938 COBY
0 question about this device. Answer the ones you know or ask your own.
Ask a new question about this device
No questions yet. Be the first to ask one.
Download the instructions for your Home Theater in PDF format for free! Find your manual DVD938 -
COBY and take your electronic device back in hand. On this page are published all the documents necessary for the use of your device. DVD938 by COBY.
USER MANUAL DVD938 COBY
natural_image
Black electronic TV set with multiple speakers and a monitor, displayed against a white background (no text or symbols visible)
DVD938
EN
5.1-Channel Home Theater DVD System
Instruction Manual Page 2
Please read carefully before use
Table of Contents
PaCkagE CoNTENTS 5
FEaTurES 6
abouT oPTiCal DiSCS 7
Disc Requirements 7
DVD Features....7
DVD Region Codes 8
Disc Care and Maintenance 8
Handling a Disc 9
Cleaning a Disc 9
DVD938 aT a glaNCE 10
Front Panel....10
Rear Panel.... 11
Remote Control 12
Battery Installation 12
Remote Key Functions 13
CoNNECTioNS 17
Video System....17
Composite Video Out (Standard) 18
Component Video Out (Best) 18
Audio System 19
Speakers 19
RCA Stereo Audio Out (Optional, Standard)......20
Coaxial Digital Audio Out (Optional, Best) 21
Stereo Line Input 21
Power Supply & Installation 22
Power Supply 22
Power Management 22
Installation 23
Table of Contents
gETTiNg STarTED 24
Turning the Unit On 24
Select the Video Line ....24
Select the Source Mode ....24
Load a Disc (or other media) 25
Basic Playback Instructions ....25
Play/Pause/Stop 26
Previous/Next (Skip) 26
Forward/Reverse (Search) 26
Step 26
Repeat Playback 27
Adjusting the Sound 27
oPEraTioN MoDES 28
DVD/CD Discs....28
Additional DVD Controls 28
MP3 Discs....29
Menu Operation 29
Karaoke Discs (CD+G) 30
JPEG Picture Discs.... 31
Thumbnail Mode Operation 31
USB Drives & Memory Cards ....32
Menu Operation 33
Tuner (AM/FM Radio) 33
SySTEM SETuP 35
General Setup Page 35
TV Display 35
Angle Mark 36
OSD Language (On-Screen Display Language) 36
Closed Captions ....36
Screen Saver 37
Last Memory 37
Table of Contents
Audio Setup Page 37
Analog Audio Setup 37
Digital Audio Setup ....39
Dolby Digital Setup ....40
Channel Delay 40
Equalizer 41
3D Processing 41
Karaoke Setup 44
Video Setup Page 44
Video Output 44
Color Setting 45
Preference Page 45
TV Type 45
PBC (Play Back Control) 46
Audio, Subtitle and Disc Menu 46
Parental....46
Default 47
Password Setup Page 47
Password Mode....47
Password 47
SPECiFiCaTioNS 48
TroubIESHooTiNg 49
SaFETy NoTiCES 53
Package Contents
Please make sure that the items shown below are included in the package. Should an item be missing, please contact the local retailer from which you purchased this product.
Coby DVD938 Main Unit1.
Satellite Speakers (x4)2.
Center Speaker (x1)3.
Subwoofer Speaker (x1)4.
Remote Control5.
AM Loop Antenna6.
FM Wire Antenna7.
AV Cable8.
Speaker Cables9.
Features
Thank you for purchasing a Coby Home Theater System! Please read this manual carefully before connection and operation and keep it for future reference.
This DVD player is a new generation home player that can produce high-quality video and audio for your continued enjoyment.
Built in digital audio decoders (Dolby Digital, LPCM, MPEG, etc.) ✦
High-fidelity 96kHz/24bit audio digital signal processor ★
Coaxial digital audio output ★
Playback support from USB drives and SD/MMC/MS memory cards ✦
Compatible with DVD, CD, CD+G, and JPEG discs ★
Full function remote control ★
AM/FM stereo tuning system ★
High-quality integrated amplifier ★
About Optical Discs
Disc Requirements
This DVD player supports playback of the following media types and discs.
Type Disc Mark Content Type
DVD Audio
+ Video :
CD Audio
CD + G Audio
+ Graphics
This unit can play back optical discs or memory cards that contain MP3, MPEG-4, or JPEG files. Discs and media types not listed above are not supported by this unit (e.g., PC CD-ROM, CD-Extra, CD-I, etc.)
DVD Features
Each DVD disc contains features that may vary depending upon the production of the disc. Some of the icons you may see that represent these features are shown below.
[HYSY]
Number of Audio Tracks
Number of Subtitles
Angle Indicator
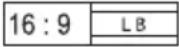
Screen Format (Aspect Ratio)
Zoom
About Optical Discs
Some of the DVD features enabled by this player depend on how the DVD was produced. Some features may not be enabled if the disc does not support the feature, or it may require special settings. Check the features printed on the DVD package or follow the instructions found on the disc's on-screen menu.
DVD Region Codes
DVD discs and DVD players are manufactured under a compulsory worldwide agreement, the DVD Regional Code System. DVD players will only operate with DVD discs encoded with the same corresponding Regional Code.
Region Code
Region
1 Canada, USA
2 Europe (including Poland, Romania, Czech Republic), Japan, Middle East (including Saudi Arabia, Egypt, Iran, South Africa)
3 East Asia (including Hong Kong, Taiwan, South Korea), Southeast Asia
4 Australia, Caribbean, Central America, South America, Mexico, New Zealand
5 Africa, the former Soviet Union, India, North Korea, Pakistan, Turkmenistan
6 China
Disc Care and Maintenance
Optical discs (DVDs, CDs) contain high-density compressed data and need proper handling.
About Optical Discs
Handling a Disc
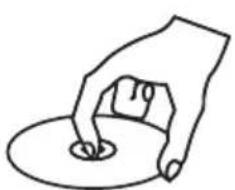
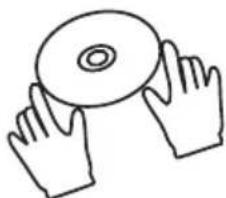
Hold a DVD/CD by its edges. Avoid touching the recorded side of the disc. To remove a DVD/CD from its storage case, press down on the center retention mechanism of the case and lift the disc out.
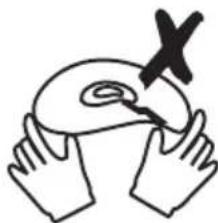
Do not bend or press discs. ✦
Do not subject discs to prolonged exposure to direct sunlight, high ✦ humidity, or high temperatures.
To reduce the risk of scratches, always put discs back in their case ★ after use. Store discs vertically in a cabinet.
Do not place stickers or labels on either side of a disc.
natural_image
Simple line drawing of a hand holding a circular object (no text or symbols)
natural_image
Simple line drawing of two hands holding a CD (no text or symbols)
natural_image
Illustration of two hands holding a circular object with a cross mark and a small mark, no text or symbols present.
Cleaning a Disc
Use a dry, soft cloth to wipe off any fingerprints and dusts from the playing surface of the disc. Wipe in a straight line radially from the center to the outside edge of the disc. Small dust particles and light stains will not affect playback quality.
Never use chemicals such as record sprays, anti-static sprays, benzene, or thinners to clean a disc. Doing so will damage the surface of the disc permanently.
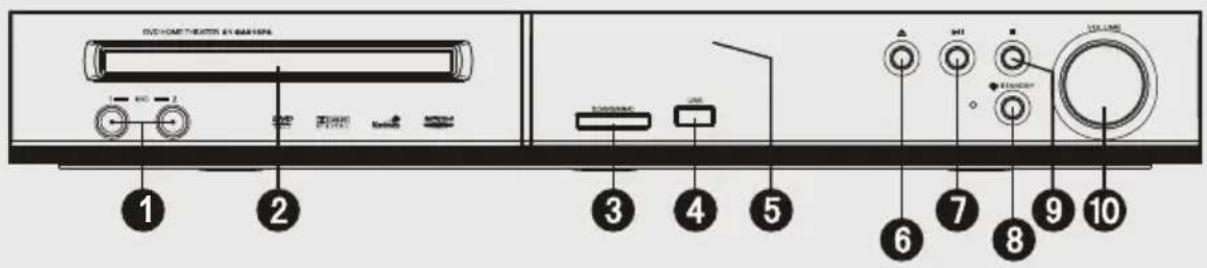
Front Panel
Name Description
1 Microphone Input Jacks (1 and 2)
Connect external microphones (6.3mm plug) to enjoy Karaoke CD+G discs.
2 Disc Tray Load optical discs in this compartment for playback (CD, DVD)
3 Card Slot Load memory cards here for playback (SD, Memory Stick, MMC)
4 USB Port Load USB flash memory drives here for playback
5 Display Screen Displays convenient playback/status information
6 Open/Close Open or close the Disc Tray
7 Play/Pause Play, pause, or resume playback
8 Stop Stop playback
9
Power/Standby
Turn the unit on or off (standby). The Main Power switch on the rear panel must be set to the ON position.
10 Volume Knob Turn to adjust the volume level
Rear Panel
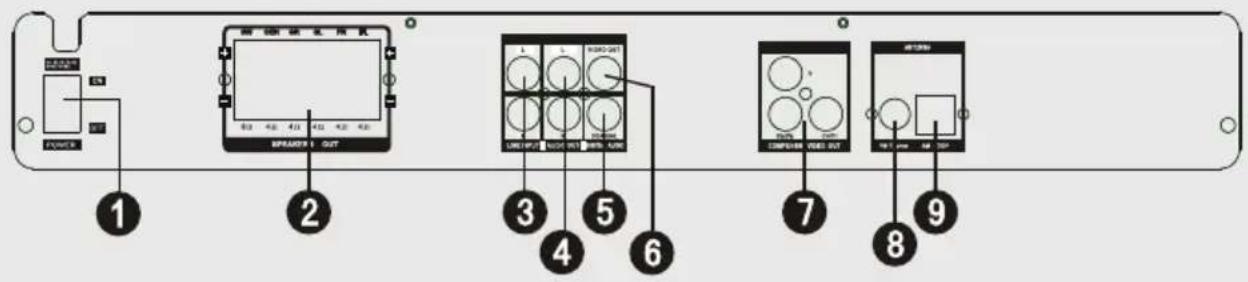
Name Description
1 Main Power Switch Turn the main power on or off.
2 Speaker Output Terminals
Connection terminals for the five satellite speakers (2 front, 1 center, 2 rear) and the subwoofer.
3 Stereo Line Input Optional connection to play stereo audio from an external audio source. An optional RCA stereo patch cable is required.
4 Stereo Audio Output Optional connection to output stereo audio to an external receiver/player. The AV cable may be used for this connection.
5 Coaxial Digital Audio Output
Optional connection to output digital audio to an external digital decoding audio receiver. An optional digital audio cable is required.
6 Composite Video Output
Standard connection to output composite video (480i) to a TV. The AV cable may be used for this connection.
7 Component Video Output
Optional connection to output component video (480p) to a TV. An optional component video cable is required.
8 FM Antenna Port Connection for the FM wire antenna.
9 AM Antenna Port Connection for the AM loop antenna.
Remote Control
The remote control transmits a directional infrared beam. Be sure to aim the remote control directly at the infrared remote sensor during operation. The sensor may not be able to receive signals properly if the sensor is covered, if there is a large object between the remote control and the sensor, or if it is exposed to direct sunlight or a strong artificial light (e.g., fluorescent or strobe lights). If possible, change the position of the light source or reposition the unit to avoid direct lighting.
To use the remote, point it at the remote sensor of the player. Operate the remote within 15 feet of the sensor and at an angle of ± 60 degrees.
Battery Installation
Remove the battery compartment cover located on the rear of the 1. remote control.
Insert batteries, making sure to match their polarities (+/-) to the 2. markings on the inside of the compartment.
Replace the cover.3.
Batteries in the remote will last for approximately 1 year. Replace the batteries if the remote control does not work. Always dispose of batteries according to your local municipal regulations.
The batteries used in the remote control may present a fire or chemical burn if mistreated. Do not recharge, disassemble, incinerate, or heat the battery ( 212°F). Do not mix old with new batteries, or different types of batteries. Remove the batteries from the remote if it will not be used for a long period of time. Keep batteries away from children.
Remote Key Functions
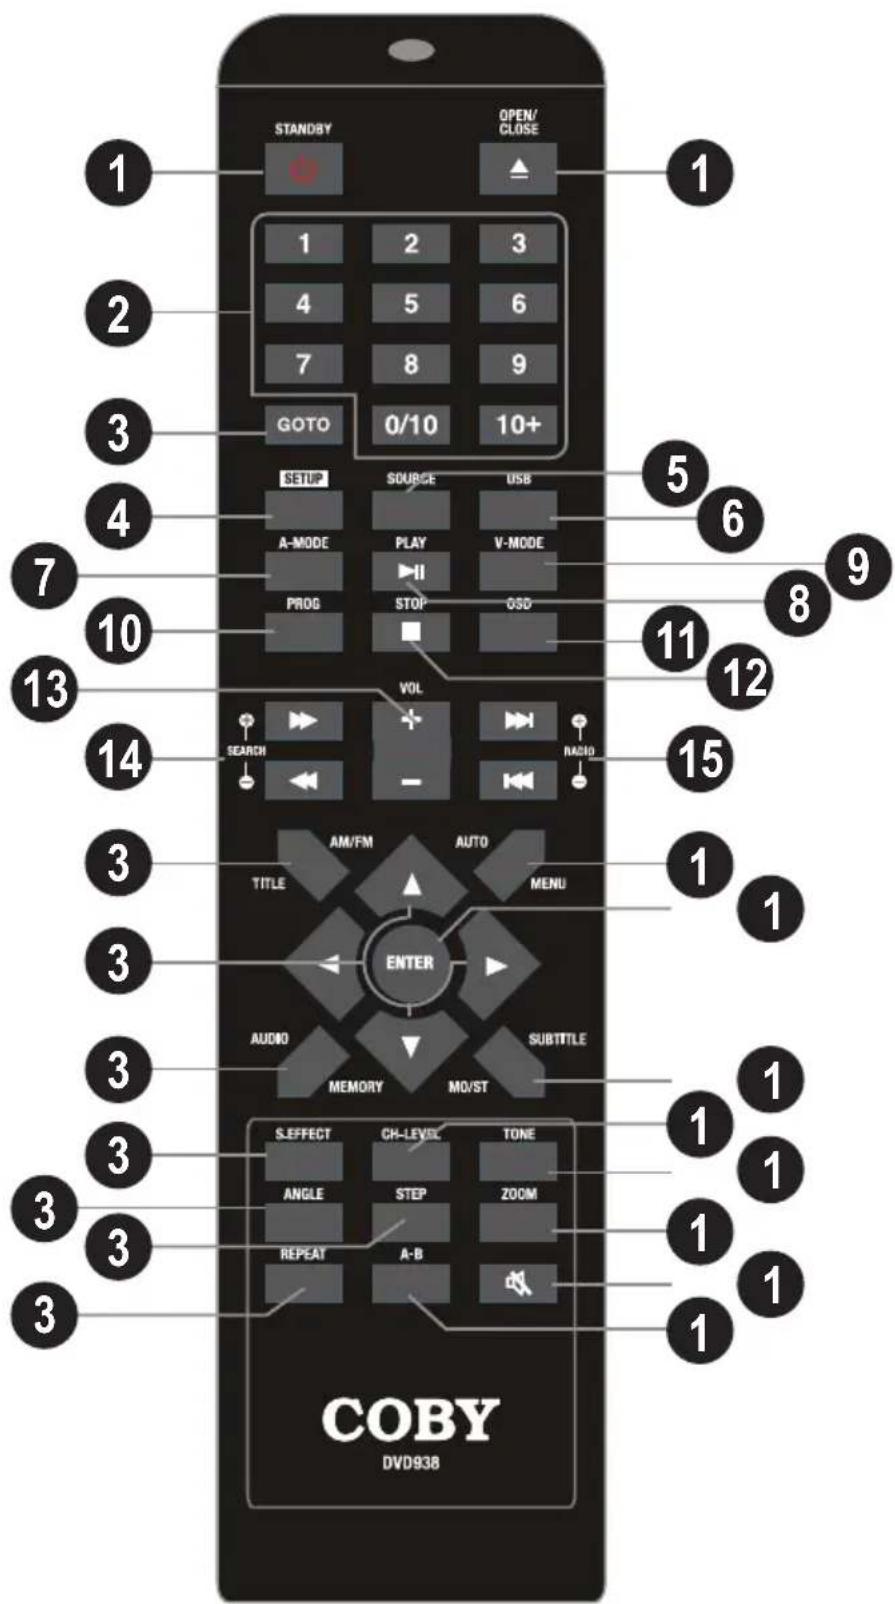
Name Description
1
Power/Standby
Turn the unit on or off (standby). The Main Power switch on the rear panel must be set to the ON position.
2 Open/Close Open or close
the disc compartment tray.
3 Numeric Keypad <0-9, 10>: Use the numeric keypad to input numbers where appropriate.<+10>: Add 10 to input numbers higher than 10. For example, press <+10> twice and then press <5> to input the number “25”.
4 GOTO Enter Direct Access mode to go to a specific part of a movie.
5 SETUP Enter the main setup menu of the unit.
6 SOURCE Change the source input mode of the unit (e.g., DVD-VIDEO, LINE, TUNER).
7 USB Change the source input mode between DVD, USB, and CARD. Press<SOURCE> to place the unit in DVD mode first to access the USB and memory card source modes.
8 A-MODE Toggle the audio mode between STEREO OUTPUT and 5.1 CHANNEL OUTPUT.
9
PLAY/PAUSE
Play or pause the disc.
10
V-MODE
Change the video output mode of the unit to match the video connection used. Select CVBS for 480i composite video, YUV for 480i component video, or P-YUV for 480p component video.
11
PROG
Enter Program mode to create a custom playlist.
12
STOP
Press once to stop disc playback. The player will save and resume playback from the stop location.Press twice to stop disc playback completely. The player will resume playback from the beginning of the disc.
13
OSD
Toggle on-screen information display.
VOL+
Increase the volume level.
14 VOL—Decrease the volume level.
15 REVERSE SEARCH —
[Video & Music] Increase the rate of reverse playback (rewind). [Radio] Tune to a lower station frequency.
16 PREVIOUS RADIO —
[Video & Music] Skip to the next track. [Radio] Tune to a higher station preset.
17 TITLE AM/FM
[DVD] Enter the DVD Title menu. Radio: Change between the AM and FM bands.
18 MENU / AUTO
[DVD] Return to the DVD Root menu. [Radio] Automatically scan for and save stations within reception as preset stations. Using this function will over-ride and erase all previously saved presets.
20 ENTER Confirm an on-screen menu selection or input.
21 AUDIO / MEMORY
[DVD] Change the DVD audio channel (requires a DVD featuring multiple audio channels). [Radio] Manually save the current frequency as a preset station.
22 SUBTITLE / MO/ST
[DVD] Change the subtitle display (requires a DVD featuring multiple subtitles). [Radio] Change between mono and stereo reception modes. Use mono mode for stations with weak reception.
23 S.EFFECT Change the sound effect options.
24
CH-LEVEL
Adjust the audio channel levels (use in conjunction with.
25
TONE
Adjust the bass and treble tone levels (use in conjunction with and).
26
ANGLE
[DVD] Change the angle view (requires a DVD featuring multiple camera angles).
27
STEP [DVD] Play DVD video frame by frame.
28
ZOOM [DVD] Use the picture zoom feature.
29
REPEAT
Change the repeat playback options.
30
A-B
Use the Repeat A-B function.
31
MUTE
Temporarily disable or restore the sound.
Connections
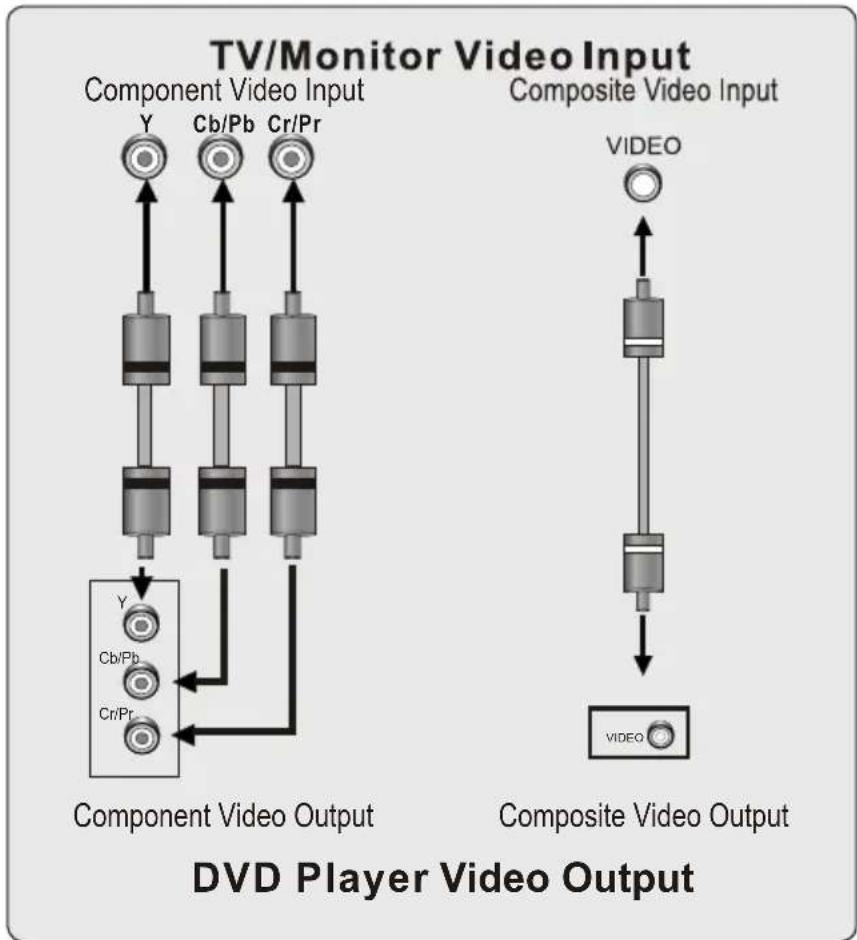
Video System
Choose the best available video connection. Avoid using more than one connection at the same time to prevent signal interference. The video settings of the unit must match the video connection used. Press V-MODE on the remote to change the video setting, or change the video settings in the System Setup menu (please refer to the System Setup section of this manual for more information).
flowchart
graph TD
    subgraph_TV_Monitor["TV/Monitor Video Input"]
        A1["Component Video Input Y"] --> B1["Component Video Output"]
        A2["Cb/Pb"] --> B2["Component Video Output"]
        A3["Cr/Pr"] --> B3["Component Video Output"]
        B1 --> C1["Component Video Output"]
        B2 --> C2["Component Video Output"]
        B3 --> C3["Component Video Output"]
        C1 --> D1["Video"]
        C2 --> D2["Video"]
        C3 --> D3["Video"]
    end
    subgraph_DVD["DVD Player Video Output"]
        E1["Component Video Input VIDEO"] --> F1["Composite Video Output"]
        F1 --> G1["Composite Video Output"]
    end
Composite Video Out (Standard)
Using the supplied AV cable:
Connect one end of the yellow cable to the yellow Video Out jack of 1. the unit.
Connect the other end of the yellow cable to the yellow Video In 2. jack of a TV.
Press on the remote until you see "CVBS" on the TV screen to set the unit to the composite video mode.
The maximum output resolution for the composite video connection is 480i.
Component Video Out (Best)
Using an optional component video cable:
Connect one end of the green, blue and red cables to the Y, Cb/Pb, 1. and Cr/Pr Component Video Out jacks of the unit, respectively.
Connect the other end of the green, blue and red cables to the Y, 2. Cb/Pb, and Cr/Pr Component Video In jacks of a TV, respectively.
You must set the unit's video output to either YUV or P-YUV when using the component video output. Use YUV for 480i output; use P-YUV for 480p output. See the Setup section of this manual for more information.
You may also press on the remote until you see "YUV" or "P-YUV" on the TV screen to set the unit to the component video mode.
The maximum output resolution for the component video connection is 480p.
Connections
Audio System
Choose the best available audio connection. Avoid using more than one connection at the same time to prevent signal interference. The audio settings of the unit must match the audio connection used. Change the audio settings in the System Setup menu (please refer to the System Setup section of this manual for more information).
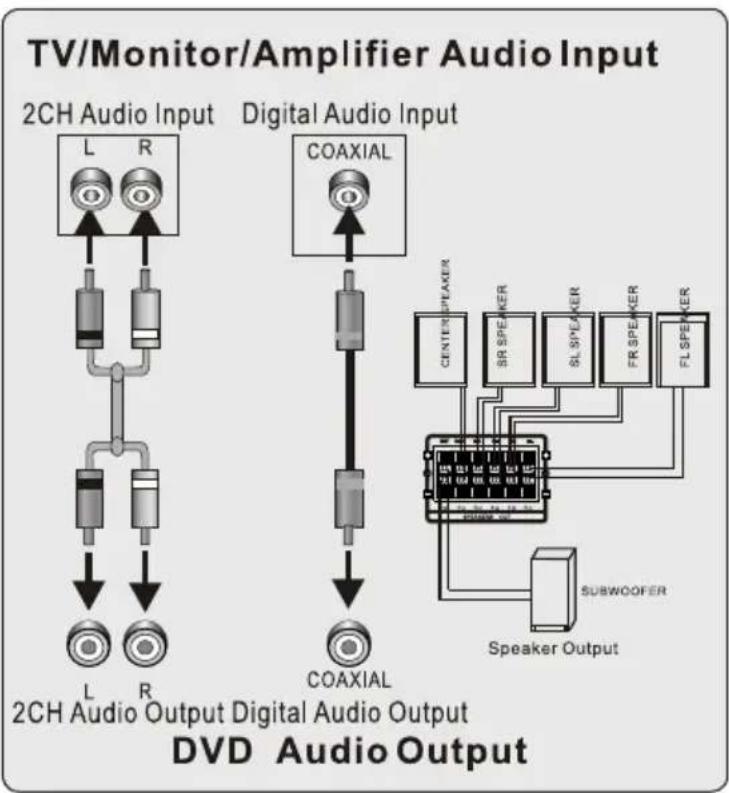
This unit has an integrated amplifier. Connect the supplied speakers to enjoy your movies with 5.1-channel surround sound!
If necessary, strip 3/8" (10 mm) of insulation from each end of the 1. speaker wire.
While pressing the terminal levers of each speaker, insert the bare 2. wire into the hole, then release the lever to secure the connection.
Connections
While pressing the speaker terminal levers of the unit, insert the bare 3. wire into the hole, then release the lever to secure the connection.
The speaker wire and terminal for each speaker is color-coded for 4. your convenience. The following table will help you match the speakers to their proper terminal:
Terminal Speaker Color
SW Subwoofer Green
CEN Center Red
SR Surround Right Blue
SL Surround Left Yellow
FR
Front Right
Gray
FL
Front Left
White
Make sure that the terminals are connected to the bare wires and not the insulation. Always match colored positive (+) terminals together; and match black negative (-) terminals together. If switched, the sound will be out of phase and will not be produced correctly. Do not connect more than one wire to each speaker terminal; do not connect one speaker to several terminals.
RCA Stereo Audio Out (Optional, Standard)
For use with an external amplifier/audio system. Using the supplied AV cable:
Connect one end of the white and red cables to the white and red Audio Out jacks of the unit (L, R).
Connect the other end of the white and red cables to the white and red Audio In jacks of an external audio system.
Please refer to the documentation included with your external audio system for further help using this connection.
Coaxial Digital Audio Out (Optional, Best)
For use with a digital decoding external amplifier/audio system. Using an optional coaxial digital audio cable:
Connect one end of the coaxial cable to the black Digital Audio Out 1. jack of the unit.
Connect the other end of the coaxial cable to the Digital Audio In 2. jack of an external audio system.
Please refer to the documentation included with your external audio system for further help using this connection.
Stereo Line Input
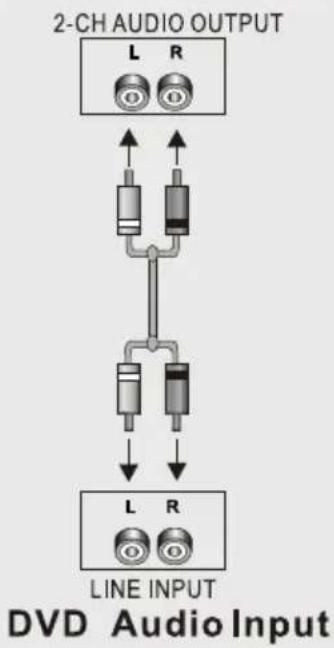
For use with an external playback device with stereo audio output (e.g., a VCR, MP3, or CD player). Using an optional RCA stereo audio patch cable:
Connect one end of the white 1. and red cables to the white and red Line Input jacks of the unit (L, R).
Connect the other end of the 2. cable to the output jack(s) of an external audio playback device.
Audio Output of Extra Devices
flowchart
graph TD
    A["2-CH AUDIO OUTPUT"] --> B["L R"]
    A --> C["Line INPUT"]
    B --> D["Diode 1"]
    B --> E["Diode 2"]
    C --> F["Diode 3"]
    C --> G["Diode 4"]
    D --> H["Line Input"]
    E --> H
    F --> H
    G --> H
    style A fill:#f9f,stroke:#333
    style B fill:#ccf,stroke:#333
    style C fill:#ccf,stroke:#333
    style D fill:#cfc,stroke:#333
    style E fill:#cfc,stroke:#333
    style F fill:#cfc,stroke:#333
    style G fill:#cfc,stroke:#333
Connections
After this connection has been made, press on the remote to switch to "LINE" mode to enjoy audio from the external device.
Depending on the type of patch cable used, you can use this connection with external devices with a 3.5mm stereo output jack or RCA stereo output jacks.
Please refer to the documentation included with your external audio system for further help using this connection.
Power Supply & Installation
Power Supply
Plug the power cord of this unit into an AC 100-240V 50/60Hz wall outlet, only. Make all video, speaker, and audio connections before connecting the power.
Do not connect the power plug to a power outlet other than that which is indicated here and on the rating label as this may result in the risk of fire or electric shock.
Do not handle the power plug with wet hands. Doing so may cause electric shock.
Power Management
If the unit will not be in use for a long period of time, turn the unit off and unplug it from the AC power supply, and remove the batteries from the remote control.
Connections
Installation
Install the unit on a level, flat and firm surface with good ventilation.
Never block the cabinet vents; blocked vents will cause the unit to overheat and malfunction.
Do not install the unit in a place exposed to heating sources or direct • sunlight.
Do not install the unit in a place exposed to moisture or rain.
Getting Started
Turning the Unit On
Locate the Main Power switch on the rear panel of the unit and set it 1. to the ON position.
Press to turn the player on. 2.
Select the Video Line
Press on the remote to set the video mode that corre-1. sponds to the video connection used (e.g., Component or Composite). See the Connections section for details.
Set your TV to display the video line connection that corresponds 2. to your DVD player (e.g., AV1, AV2, HDMI, Component, S-Video, DVD, etc.) The DVD output will be displayed on the TV screen when the proper line has been selected.
Select the Source Mode
For more information about each of the source modes, please refer to their respective sections in this manual.
Press on the remote to switch between DVD, TUNER, and ✦ LINE modes.
Select DVD mode to play optical discs (e.g., DVD, CD, or CD+G) ☆ from the disc tray.
Select TUNER to enjoy radio broadcasts. ☆
Select LINE mode to enjoy audio from an external device connected to the LINE IN jacks (optional).
Getting Started
Press to switch between Memory Card, USB, and DVD modes.
Select Memory Card to play media from memory cards loaded in ☆ the Card Slot (SD, Memory Stick, or MMC).
Select USB to play media from USB flash memory drives loaded ✦ in the USB Port.
Select DVD mode to play optical discs (e.g., DVD, CD, or CD+G) ☆ from the disc tray.
The unit must be placed in DVD mode before the Memory Card and USB modes can be accessed. Press to switch to DVD mode first, then press on the remote to change between Memory Card, USB, and DVD/Disc modes.
Load a Disc (or other media)
Press to open the disc tray. Insert a disc with the label-side up. Press again to close the disc tray.
If a single-sided disc is inserted upside-down, the unit will display “NO DISC” or “BAD DISC”.
To play from media other than a disc, insert a memory card or USB flash drive, then press on the remote to change between Memory Card, USB, and DVD/Disc modes.
Basic Playback Instructions
Press to start playback.
Some discs may start playing automatically or display a DVD menu specific to the disc. If a menu appears, use the to select a desired feature or option and then press to confirm.
Getting Started
Play/Pause/Stop
Press to play the disc for the first time. ✦
Press during playback to pause. Press again to ✦ resume playback.
Press during playback to stop the disc ("Pre-Stop"). Press ✦ to resume playback at the time-point at which the disc was stopped.
Press again when the disc is "Pre-Stopped" to stop playback ♦ completely. (When is pressed from this state, the disc will start playing from the beginning.)
Previous/Next (Skip)
Press to skip to the next track (DVD, CD, etc).
Press to return to the previous track (DVD, CD, etc).
Forward/Reverse (Search)
Press to fast forward through the current track. Each successive press of will change the rate of forward playback. Press to resume normal playback.
Press to reverse through the current track. Each successive press of will change the rate of reverse playback. Press to resume normal playback.
Step
Press for frame-by-frame playback. Each successive press of will advance the video one frame. Press to resume normal playback.
Audio will be muted during fast-forward, fast-reverse, and stepped playback.
Repeat Playback
Press to change the repeat playback mode.
Adjusting the Sound
Press to increase the volume level. ✦
Press to decrease the volume level. ★
Press to turn the volume off completely. Press again to restore the volume to the previous level.
Press to change toggle between audio output modes ★ (5.1-channel surround and 2-channel stereo).
Press to select an audio channel to adjust (e.g., front, rear, center) and then use the / keys to adjust the selected level.
Press to select BASS or TREBLE and then use the / ★ keys to adjust the selected tone.
Press to change the sound effects mode. Set the sound effects mode to off when playing a Dolby 5.1-channel disc to avoid interference with Dolby Digital decoding.
Operation Modes
DVD/CD Discs
Press to place the unit in DVD source mode (LOADING/1. DVD-VIDEO will appear on screen).
Load a compatible DVD-video or CD-audio disc into the disc tray. A 2. content menu will appear on screen.
Press to start playback.3.
Some discs may start playing automatically or display a DVD ☆ menu specific to the disc. If a menu appears, use the to select a desired feature or option and then press to confirm.
Additional DVD Controls
See the Getting Started section for basic playback controls (Play/Pause, Next/Forward, etc.)
On the remote... Function
PressAccess the title menu of the DVD.
PressReturn to the root menu of the DVD.
PressChange the on screen display of information.
PressChange the subtitle display (requires a DVD encoded with multiple subtitles).
Press
Change the audio track (requires a DVD encoded with multiple audio channels).
Press
Change the angle display (requires a DVD encoded with multiple camera angles).
PressChange the magnification level of the image. When the magnification level is greater than “1” (Zoom), use the Navigation Keypad to pan across the image (up, down, left, right).
Operation Modes
MP3 Discs
Press to place the unit in DVD source mode (LOADING/1. DVD-VIDEO will appear on screen).
Load a disc with compatible MP3 files into the disc tray. A content 2. menu will appear on screen.
Menu Operation
Press the or arrows of the navigation keypad to select a folder or a file, then press [ENTER] to enter the selected folder or play the selected file. (You can also use the numeric keypad to select and confirm folders and files.)
Press the arrow to return to the previous menu.
Press or to skip to the previous or next menu ✦ page, respectively.
Press to toggle between FOLDER and FILELIST playback ♦ modes.
Press
Other manuals COBY
Discover other manuals and user guides for the brand COBY
💬 Hi! I'm your manual assistant.I know your COBY DVD938.
How can I help you? (use, settings, error codes, maintenance, explaining a step from the manual, etc.)💡 Examples :
• How do I use it ?
• Error code E3 ?
• How do I clean it ?