
ICD-UX502 - Dictaphone SONY - Free user manual and instructions
Find the device manual for free ICD-UX502 SONY in PDF.


| Product Type | Digital Voice Recorder (Dictaphone) |
| Brand | Sony |
| Model | ICD-UX502 |
| Recording Media | Built-in memory (approx. 4 GB, actual usable capacity varies) |
| Recording Formats | MP3 (8 kbps, 48 kbps, 128 kbps, 192 kbps) |
| Playback Formats | MP3, WMA, AAC-LC |
| Microphone | Built-in stereo microphones |
| Speaker | Built-in mono speaker |
| Power Source | 1 x LR03 (size AAA) alkaline battery or NH-AAA rechargeable battery (not supplied) |
| Battery Life (Recording) | Approx. 29 hours (MP3 192 kbps) with alkaline battery |
| Battery Life (Playback via speaker) | Approx. 22 hours with alkaline battery |
| Battery Life (Playback via headphones) | Approx. 61 hours with alkaline battery |
| Dimensions (approx.) | 36.5 x 102.0 x 15.2 mm (1 7/16 x 4 1/8 x 5/8 in.) |
| Weight (approx.) | 58 g (2.1 oz) including battery |
| Key Features | Scene Select (Meeting, Voice Notes, Interview, Lecture, Audio IN), VOR (Voice Operated Recording), Noise Cut, DPC (Variable Playback Speed), Easy Search, Alarm playback, Track Marks, File dividing, Folder management, USB direct connection |
| Safety Warnings | Do not expose battery to excessive heat; risk of explosion if battery replaced incorrectly; use only specified batteries; do not listen at high volume for long periods to prevent hearing damage. |
| Maintenance | Clean exterior with a soft dry cloth; avoid solvents; keep away from moisture and extreme temperatures. |
| Spare Parts / Repairability | User-replaceable battery; external microphone (not supplied) can be connected; no other user-serviceable parts. |
Frequently Asked Questions - ICD-UX502 SONY
User questions about ICD-UX502 SONY
0 question about this device. Answer the ones you know or ask your own.
Ask a new question about this device
Download the instructions for your Dictaphone in PDF format for free! Find your manual ICD-UX502 - SONY and take your electronic device back in hand. On this page are published all the documents necessary for the use of your device. ICD-UX502 by SONY.
USER MANUAL ICD-UX502 SONY
Operating Instructions
Click! You can direct jump
Table of contents
Recording files
Utilizing your computer
Troubleshooting
Index
GB
4-421-477-11(1)
Table of Contents
WARNING 5
Notice for users 6
Preparing the recorder
Checking the Parts and Controls .....7
Using the Display Window ......9
Preventing Unintentional Operations (HOLD)....14
Maintaining the Moderate Volume Level (AVLS) (For European models only)....15
Turning the IC Recorder On ....16
Inserting a battery ....16
Turning the power on 17
Turning the power off ....17
Setting the Clock ....18
Setting the clock after preparing a power source ....18
Setting the clock using the menu .....19
Setting the Language to Be Used in the Display Window ....21
Selecting a Folder, File, and Tab ......22
Selecting a folder and a file .....22
Selecting a tab 23
Recording Files
Basic Recording 24
Monitoring the recording 25
Stopping the recording 26
Other operations ....26
Changing the Recording Settings .....27
Selecting a recording scene for each situation ....27
Tips for better recording 28
Changing the Scene Select settings .....29
Changing the Scene Select setting to the default values ....30
Starting to Record Automatically in Response to Sound - the VOR Function ....31
Recording via Other Devices ....32
Recording with an external microphone ....32
Recording from other equipment ....33
Playing Files
Basic Playback ....35
Stopping playback 35
Other operations ....36
Display when playing back a file ....37
Changing the Playback Settings ......38
Reducing noise in the playback sound and making the human voice clearer – the noise cut function ....38
Adjusting the playback speed - the DPC (Digital Pitch Control) function ....39
Selecting the sound effect ....40
Selecting the play mode ....42
Convenient Playback Methods ....44
Listening with better sound quality .....44
Searching forward/backward during playback - Cue/Review ....44
Quickly locating the point you wish to start playback - Easy search function .....45
Selecting a Recording Date from the Calendar and Playing Back ....47
Playing Back a File at a Desired Time with an Alarm ....49
Playback via Other Devices ....51
Recording with other equipment ....51
Erasing Files
Erasing a File ....52
Erasing All Files in a Folder ....53
Editing Files
Arranging Files in a Folder ....54
Moving a file to a different folder .....54
Using a Track Mark ....55
Adding a track mark ....55
Erasing a track mark 56
Erasing all the track marks in the selected file at one time ....57
Dividing a File ....58
Dividing a file at the current position .....58
Dividing a file at all the track mark positions ....59
Renaming a Folder and a File......60
Changing a folder name ......60
Changing a file name ....61
Protecting a File 62
About the Menu Function
Making Settings for the Menu ......63
Menu Settings ......64
Utilizing Your Computer
Using the IC Recorder with Your
Computer 77
Connecting the IC recorder to your computer ....78
Structure of folders and files ....79
Disconnecting the IC recorder from your computer ....81
Copying Files from the IC Recorder to
Your Computer 82
Copying Music Files from Your
Computer to the IC Recorder and
Playing Them Back 83
Copying a music file from your computer to the IC recorder (drag and drop) ......83
Playing back music files copied from your computer using the IC recorder .....84
Using the IC Recorder as
USB Memory 85
Additional Information
Using a USB AC Adaptor....86
Disconnecting the IC recorder from the AC outlet ....86
Precautions 87
Specifications......89
System requirements 89
Design and specifications ....90
Battery life 93
Troubleshooting
Troubleshooting 94
On the IC recorder operations .....94
Messages List ....100
System Limitations ......103
Trademarks ....104
Index 105
Browsing the Operation Guide
To use the buttons in the Operation Guide
Click the buttons located in the upper right of the pages of this manual to jump to “Table of Contents,” or “Index.”
flowchart
graph TD
    A["Table of Contents"] --> B["Jumps to the table of contents"]
    B --> C["Find what you are looking for from a list of topics in the manual."]
    D["Index"] --> E["Jumps to the index"]
    E --> F["Find what you are looking for from a list of key words mentioned in the manual."]

Hints
- You can jump to the indicated page by clicking a page number in the table of contents or in the index.
- You can jump to the indicated page by clicking a page reference indication (e.g., p. 6) on each page.
- To search for a reference page by keyword, enter the keyword into the find text field on the Adobe Reader window.
- Operation procedures may differ, depending on your Adobe Reader version.
To change the page layout
The buttons on the Adobe Reader window enable you to select how pages are displayed.


Continuous
Pages are displayed as a continuous roll of pages, fitting the page width inside the window. When you scroll, the previous or next pages scroll up or down continuously.

Single Page
Pages are displayed one at a time, fitting the page into the window. When you scroll, the display changes to the previous or next page.
WARNING
Do not expose the batteries (battery pack or batteries installed) to excessive heat such as sunshine, fire or the like for a long time.
CAUTION
Risk of explosion if battery is replaced by an incorrect type.
Dispose of used batteries according to the instructions.
- The recorded music is limited to private use only. Use of the music beyond this limit requires permission of the copyright holders.
- Sony is not responsible for incomplete recording/ downloading or damaged data due to problems of the IC recorder or computer.
- Depending on the types of the text and characters, the text shown on the IC recorder may not be displayed properly on device. This is due to:
— The capacity of the connected IC recorder.
— The IC recorder is not functioning normally.
— Content information is written in the language or the character that is not supported by the IC recorder.
Notice for the customers: the following information is only applicable to equipment sold in the countries applying EU directives
The manufacturer of this product is Sony Corporation, 1-7-1 Konan Minato-ku Tokyo, 108-0075 Japan. The Authorized Representative for EMC and product safety is Sony Deutschland GmbH, Hedelfinger Strasse 61, 70327 Stuttgart, Germany. For any service or guarantee matters please refer to the addresses given in separate service or guarantee documents.
To prevent possible hearing damage, do not listen at high volume levels for long periods.
Notice for users
All rights reserved. This manual or the software described herein, in whole or in part, may not be reproduced, translated or reduced to any machine readable form without prior written approval from Sony Corporation.
IN NO EVENT SHALL SONY CORPORATION BE LIABLE FOR ANY INCIDENTAL, CONSEQUENTIAL OR SPECIAL DAMAGES, WHETHER BASED ON TORT, CONTRACT, OR OTHERWISE, ARISING OUT OF OR IN CONNECTION WITH THIS MANUAL, THE SOFTWARE OR OTHER INFORMATION CONTAINED HEREIN OR THE USE THEREOF.
Sony Corporation reserves the right to make any modification to this manual or the information contained herein at any time without notice.
- The software described herein may also be governed by the terms of a separate user license agreement.
- The supplied connection support cable is for the IC recorder ICD-UX502. You cannot connect other IC recorders.
- Display windows in this manual may differ from what are actually displayed on your IC recorder depending on the area you purchased the IC recorder and the settings you have made.
What you record is for personal enjoyment and use only. Copyright laws prohibit other forms of use without the permission of the copyright holders.
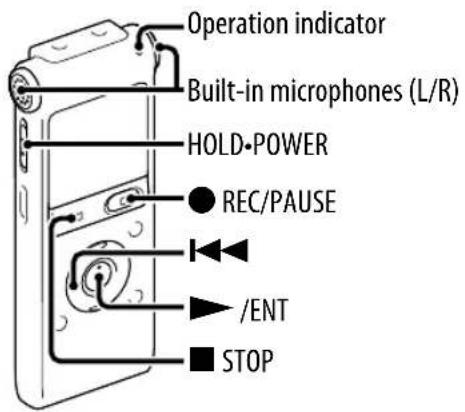
Checking the Parts and Controls
Front
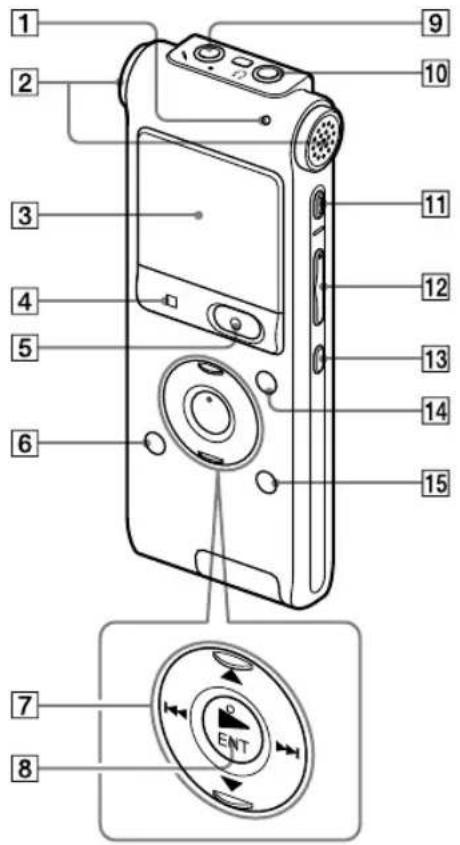
1 Operation indicator
2 Built-in microphones (st ereo) (L/R)
3 D isplay window
4 STOP button
5 ● REC (record)/PAUSE button
6 (folder) button
7 Control butt on (▲, ▼ / I ◀◀◀ (review/fast backward), ▶▶▶I (cue/fast forward))
8 ▶ (play)/ENT (enter) button*
9 (microphone) jack*
10 (headphone)jack
11 ERASE butt on
12 VOL (v olume) -/+* button
13 (repeat) A-B button
14 T-MARK (Track mark) button
15 MENU/NOISE CUT butt on
Rear
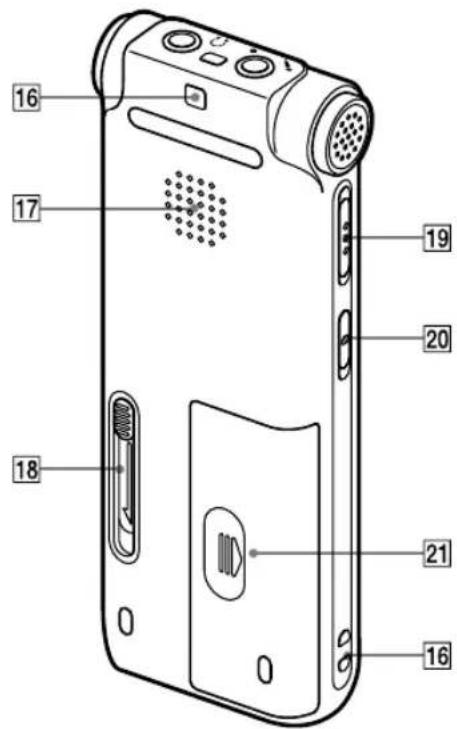
16 Strap hole
(A strap is not supplied.)
17 Speaker
18 USB DIRECT T slide lever
19 HOLD·PO WER switch
20 DPC(SPEED C TRL) switch
21 Battery compartment
Using the Display Window
Display when stopped
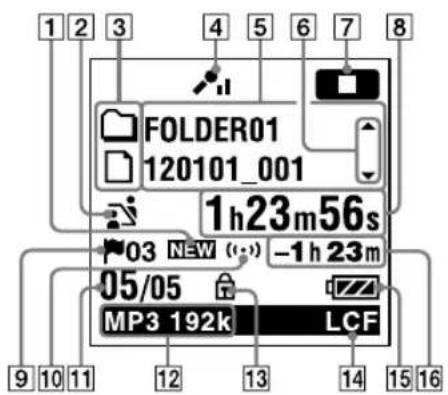
Note
The above window and the other windows in this section display indications, numbers, or items for explanatory purposes. The actual windows may differ from those displayed here.
1 Newly arriving podcast indication
2 S cene select indication
Displays the currently selected scene used for recording. Appears when a scene is set.
☐: A folder where you can record a file
☐: A folder for playback only
: A folder for podcast files
♪: Title name
: Artist name
☐: File name
4 Microphone sensitivity indicator
Displays the currently selected microphone sensitivity used for recording:
High
: Medium
: Low
5 File information
Displays the information for each file according to the file information type (folder name, title name, artist name, file name).
6 Operating guide for switching file information
You can switch the file information display in sequence by pressing ▲ or ▼.
7 Operation mode indicator
Displays the following, depending on the current operation of the IC recorder.
□: stop
: playback
REC: recording
●: recording pause (flashing)
VORREC : recording with the VOR function
VOR : recording pause with the VOR function (flashing) If you press ● REC/PAUSE to pause recording when “VOR” is set to “ON” in the menu, only “☐” flashes.
SYNC REC : synchronized recording
SYNC: synchronized recording pause (flashing)
<< >> : review/fast backward, cue/fast forward
: going backward/forward continuously
8 Elapsed time/Remaining time/Recording date and time indication
9 Track mark indicator
Displays the track mark number just before the current position. Appears when a track mark is set for a file.
10 Alarm indicator
Appears when the alarm is set in a file.
11 File location indication
The selected file number is displayed in the numerator and the total number of files in the folder is displayed in the denominator.
12 Recording mode indicator
Displays the recording mode set using the menu when the IC recorder is in the stop mode or recording mode, and displays the recording mode of the current file when the IC recorder is in the playback mode.
MP3 8k, MP3 48k, MP3 128k, MP3 192k
MP3 file recorded or transferred with the IC recorder When the files are transferred from your computer, file formats only (MP3) are displayed.
WMA : WMA files transferred
AAC : AAC-LC files transferred
Displays as follows when the IC recorder cannot get the recording mode.
: Unknown
13 Protect indicator
Appears when the protection is set for a file.
14 LCF (Low Cut Filter) indicator
Appears when "LCF(Low Cut)" is set to "ON" in the menu.
15 Battery indicator
16 R emaining recording time
Displays the remaining recording time in hours, minutes, and seconds. If there is 10 hours or more time remaining, the time is displayed in hours.
If there is 10 minutes or more and less than 10 hours time remaining, the time is displayed in hours and minutes.
If there is less than 10 minutes time remaining, the time is displayed in minutes and seconds.
Display when recording
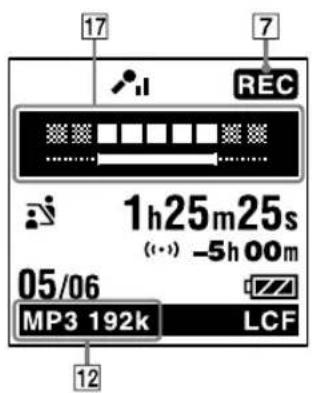
17 Recording level guide display
Displays the recording level and the optimum level for recording.
Display during playback
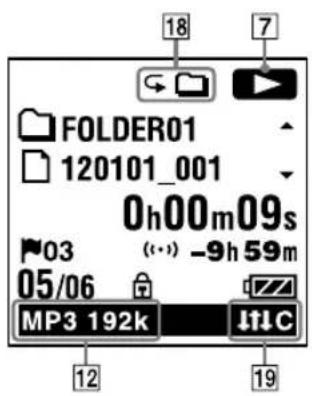
18 Play mode indicator
1: Appears when a file is played back.
☐: Appears when files in one folder are played back continuously.
ALL: A ppears when all the files are played back continuously.
1: Appears when one file is played back repeatedly.
Appears when files in one folder are played back repeatedly.
→ALL: Appears when all the files are played back repeatedly.
19 Noise cut/Effect indicator
Appears when the noise cut function is effective, or "Effect" is set in the menu.
N-CUT : Noise cut
P:Pop
HR : Rock
Jazz
BA1 : Bass1
BA2 : Bass2
HIC : Custom
Display in the HOLD status
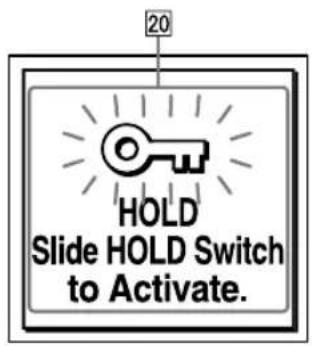
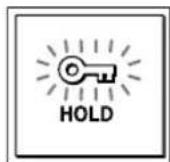
20 HOLD indicator
Appears when the IC recorder is in the HOLD status to prevent unintentional operations. To release the HOLD status, slide the HOLD•POWER switch towards the center (p. 14).
Display of the current date and time
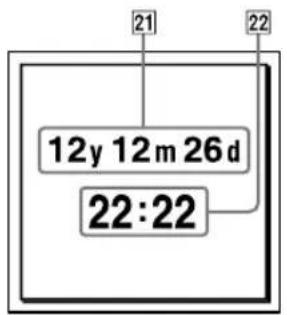
21 Current date display
Displays the current date (year, month, and day) for 3 seconds when you press ■ STOP in the stop mode. e.g.: 12y12m26d (December 26, 2012)
22 Current time display
Displays the current time (hour and minutes) for 3 seconds when you press ■ STOP in the stop mode. e.g.: 22:22 (24-Hour time display)/10:22 PM (12-Hour time display)
Display during folder selection
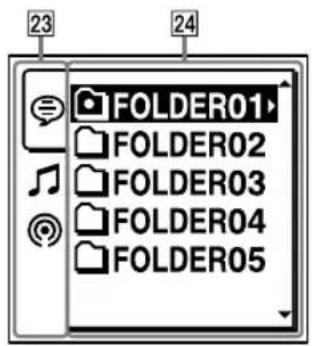
23 Tabs
Displays the types (recordable or playback-only) of areas available:
(Voice): Recordable area used to manage files recorded with the IC recorder.
(Music): Playback-only area used to manage music files transferred from your computer.
(Podcast): Playback-only area used to manage podcast files transferred from your computer.
24 Folders
Displays the folders contained in the selected tab.
Display during menu operation
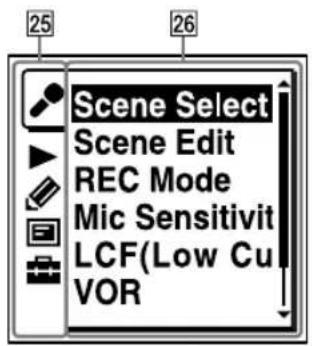
25 Menu tabs
Displays the menu tabs:
: Recording
▶ : Playback
: Edit
: Display
: IC recorder settings
26 Menu items
Displays the menu items of the selected menu tab.
Preventing Unintentional Operations (HOLD)
You can disable all the buttons (HOLD) in order to prevent unintentional operations when you carry the IC recorder, etc.
To disable the button operations (HOLD status)
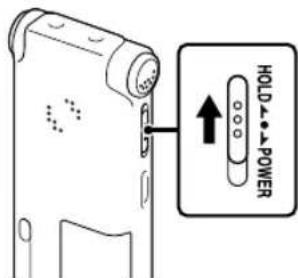
Slide the HOLD•POWER switch in the direction of “HOLD” to disable the buttons while the power is on.
"HOLD" will appear for approximately 3 seconds, indicating that all the button operations are disabled.
To enable the button operations
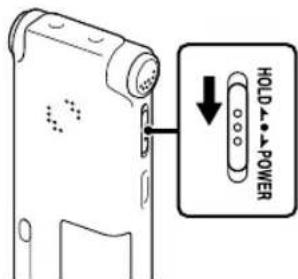
Slide the HOLD•POWER switch towards the center.
Note
When the HOLD function is activated during recording, all the button operations are disabled. To stop recording, cancel the HOLD function first.

Hint
Even if the HOLD function is activated, you can stop the alarm playback by pressing any button. (You cannot stop normal playback.)
Maintaining the Moderate Volume Level (AVLS) (For European models only)
The AVLS (Automatic Volume Limiter System) function allows you to listen to the sound at a moderate volume level when using the headphones. The AVLS function limits the maximum volume to prevent auditory issues or distraction and also to maintain a moderate volume level.
When "AVLS" is set to "ON"
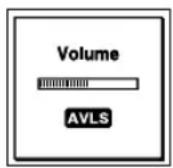
When you try to adjust the volume to a level that exceeds the AVLS-specified level, the “AVLS” indicator lights. You cannot adjust the volume to a level that exceeds the limit.
Note
“AVLS” is set to “ON” when you purchase the IC recorder. If you want to turn off the function and play back files at the original volume, use the menu to set “AVLS” to “OFF.”
When "AVLS" is set to "OFF"
To disable the AVLS function, do the following:
In the stop or playback mode, select MENU → the ▶tab → "AVLS," and then press ▶/ENT.
2 Press ▲ or ▼ to select "OFF," and then press ▶/ENT. The "AVLS OFF?" message is displayed with a beeping sound.
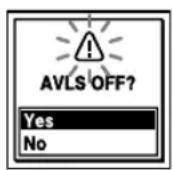
3 Press ▲ or ▼ to select "Yes," and then press ▶/ENT.
4 Press ■ STOP to exit the menu mode.
To enable the AVLS function:
Select “ON” in the step ②, or select “No” in the step ③.
If you play back files at a volume that exceeds the AVLS-specified level for specified period of time, the following animation will be displayed and “AVLS” in the menu is automatically set to “ON.”
Turning the IC Recorder On
Inserting a battery
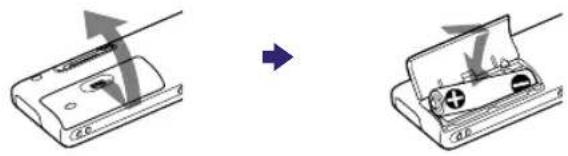
Slide and lift the battery compartment lid, and then insert an LR03 (size AAA) alkaline battery (supplied) or an NH-AAA rechargeable battery (not supplied) with correct polarity, and close the lid.
Note
You cannot charge a battery with the IC recorder.
When to replace the battery
The battery indicator on the display shows the battery condition in an animation.
Battery remain indication
: “Low Battery Level” appears.
Replace the current battery with a new alkaline battery or fully charged rechargeable battery.

: “Low Battery” appears and the IC recorder will stop operation.
Turning the power on
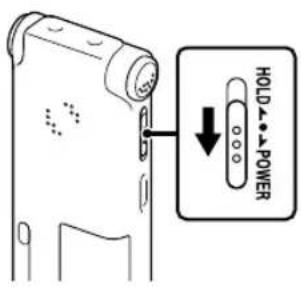
Slide and hold the HOLD•POWER switch in the direction of “POWER” until the window display appears. The “Accessing...” animation is displayed, and the IC recorder is turned on.
Turning the power off
Slide and hold the HOLD•POWER switch in the direction of the “POWER” until “Power Off” animation is displayed. The IC recorder is turned off.

Hint
When the IC recorder is in the stop mode, and you leave the IC recorder without attempting an operation for a certain length of time, the auto power off function will take effect. (The length of time before auto power off is set to “10min” when you purchase the IC recorder.)
Setting the Clock
You need to set the clock to use the alarm function or record the date and time.
Setting the clock after preparing a power source
When you insert a battery for the first time, or when you insert a battery after the IC recorder has been without a battery for more than 1 minute, the “Set Date&Time” animation appears, and then the year section begins to flash in the clock setting display window.
1 Set year, month, day, hour and minute.
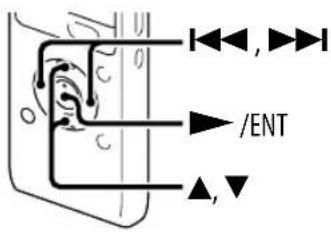
Press ▲ or ▼ to set the year (the last two digits of the year), and then press ▶ /ENT. Repeat this procedure to set month, day, hour, and minute in sequence.
You can move the cursor to the year, month, day, hour and minute by pressing ◀◀◀ and ▶▶◀.
When you set the minute and press ▶ /ENT, the clock reflects the setting.
The stop mode window will be displayed.
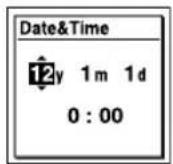
Setting the clock using the menu
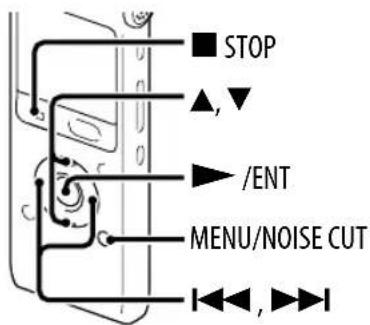
While the IC recorder is in the stop mode, you can set the clock using the menu.
1 Select "Date&Time" in the menu.
① Press MENU/NOISE CUT to enter the menu mode.
The menu mode window will be displayed.
② Press ◀◀◀, and then press ▲ or ▼ to select the □ tab, and then press ▶ /ENT.
③ Press ▲ or ▼ to select "Date&Time," and then press ▶ /ENT.
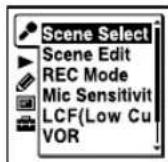
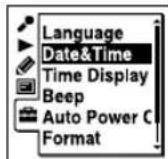
2 Press ▲ or ▼ to select "Auto(Synchronizing)" or "Manual," and then press ▶ /ENT.
When you select “Auto(Synchronizing),” the clock is automatically adjusted using the clock in the computer connected to the IC recorder and on which the Sound Organizer software is started. For the Sound Organizer software, refer to the supplied Quick Sart Guide.
When you select "Manual," proceed to the next steps.
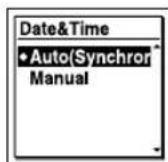
3 Press ▲ or ▼ to select "12y1m1d," and then press ▶ /ENT.
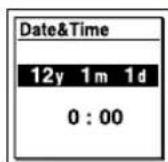
4 Set year, month, day, hour and minute.
Press ▲ or ▼ to set the year (the last two digits of the year), and then press ▶ /ENT. Repeat this procedure to set month, day, hour, and minute in sequence.
You can move the cursor to the year, month, day, hour and minute by pressing ◀◀◀ and ▶▶◀.
When you set the minute and press ▶ /ENT, the clock reflects the setting.
5 Press ■ STOP to exit the menu mode.
Notes
- If there is no operation for 1 minute or longer between steps, the clock setting is canceled and the window will return to the display of the stop mode.
- The time is displayed either in 12-Hour with “AM” or “PM,” or in 24-Hour, depending on the “Time Display” setting in the menu. The default setting differs depending on the country or region you purchased the IC recorder.
To display the current date and time
While the IC recorder is in the stop mode, press ■ STOP to display the current date and time for about 3 seconds.
12y 12m 26d
22:22
Setting the Language to Be Used in the Display Window
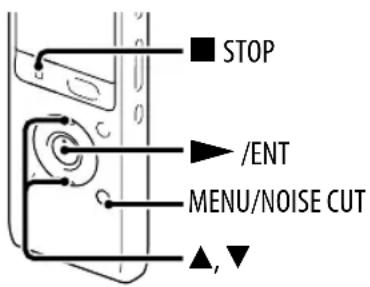
You can select the language to be used for messages, menus, folder names, file names, etc.
1 Press MENU/NOISE CUT. Select the tab "Language," and then press ▶ /ENT
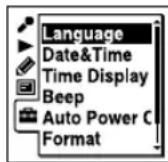
2 Press ▲ or ▼ to select the language that you want to use, and then press ▶ /ENT.
3 Press ■ STOP to exit the menu mode.
Selecting a Folder, File, and Tab
Selecting a folder and a file
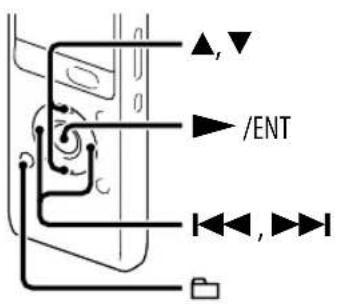
You can select a folder and a file for recording, playing or editing as follows:
1 Press
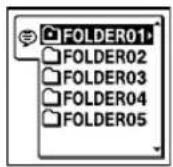
The folder selection window is displayed.
2 Select a folder.
Press ▲ or ▼ to select the desired folder, and then press ▶ /ENT.
Hint
To display the files contained in the selected folder, press ▲ or ▼ to select the desired folder, and then press ▶▶.
When you purchase the IC recorder, there are 5 folders already available (FOLDER01-05).
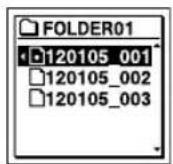
3 Select a file.
When the file selection window is displayed, press ▲ or ▼ to select the desired file, and then press ▶ /ENT.
When the stop mode window is displayed, you can switch files by pressing ◀◀◀ and ▶▶◀.
Selecting a tab
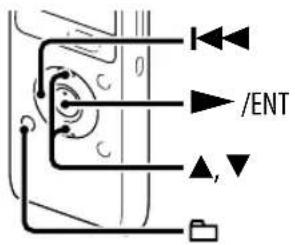
The recordable area and the playback-only area of folders stored on the IC recorder are managed separately, and are displayed with tabs. To select a folder, you can move to the desired area by selecting a tab as follows:
1 Press
The folder selection window is displayed.
2 Press ◀◀◀, and then press ▲ or ▼ to select the ☎, ♪, or Ⓤ tab.
Only the 📋 tab will be displayed when you purchase the IC recorder. The 🎥 tab and the 🔊tab will be displayed when you transfer files from your computer (☎ p. 83).
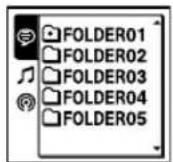
3 Press the ▶ /ENT.
The folders contained in the selected tab are displayed.
4 Select a folder and a file (p. 22).
Basic Recording
The following are the basic recording procedures using the specified microphone sensitivity and recording mode.
Note
Noise may be recorded if an object, such as your finger, etc., accidentally rubs or scratches the IC recorder during recording.

Hint
Before you start recording, we recommend you make a trial recording first, or monitor the recording (p. 25).
1 Slide the HOLD·POWER switch in the direction of "POWER" to turn on the IC recorder (p. 17), or towards the center to release the IC recorder from the HOLD status (p. 14).
The stop mode window appears.
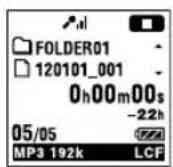
2 Select the desired folder (p.22).
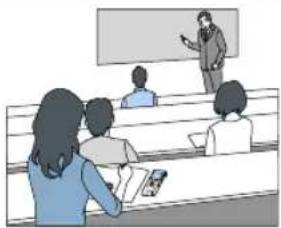
3 Place the IC recorder so that the built-in microphones face the direction of the source to be recorded.
natural_image
Illustration of a classroom lecture with a presenter at the front and students seated at desks (no text or symbols visible)4 Press ● REC/PAUSE in the stop mode.
The operation indicator lights in red.
You do not need to press and hold ● REC/PAUSE while recording.
The new file will be automatically recorded as the last file in the current folder.
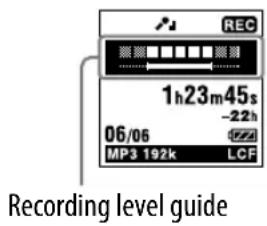
About the recording level guide
During recording, the recording level guide is displayed.
The upper meter shows the current input level during recording. The white bar in the lower meter shows the optimum input level for recording.
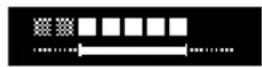
Please adjust the orientation of the built-in microphones, the distance from the sound source, the microphone sensitivity, or the scene select setting so that the upper input level fits within the lower optimum range, as illustrated above.

Hint
If the white portion of the input level meter is short, we recommend that you place the IC recorder nearer to the sound source or set the microphone sensitivity higher.
Monitoring the recording
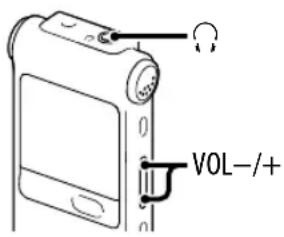
If you connect the supplied stereo headphones to the Ⓞ (headphone) jack, you can monitor the recording. You can adjust the monitoring volume by pressing VOL -/+ , but the recording level is fixed.
Stopping the recording
1 Press ■ STOP.
The “Accessing...” animation appears and the IC recorder stops at the beginning of the current recording file.
Note while accessing
The IC recorder is recording data and storing it on the memory when the “Accessing...” animation appears on the display. While the IC recorder is accessing data, do not remove the battery or connect or disconnect the USB AC adaptor (not supplied). Doing so may damage the data.
Other operations
| To Do this | |
| pause recording* | Press ● REC/PAUSE.During recording pause, the operation indicator flashes in red and “○” begins to flash in the display window. |
| release pause and resume recording | Press ● REC/PAUSE again. Recording resumes from that point. (To stop recording after pausing recording, press ■ STOP.) |
| review the current recording instantly | Press ▶/ENT. Recording stops and playback starts from the beginning of the file just recorded. |
| review during recording | Press and hold ◀◀ during recording or recording pause. Recording stops and you can search backwards while listening to fast playback sound. After you release ◀◀, playback starts from that point. |
* 1 hour after you pause recording, recording pause is automatically released and the IC recorder enters the stop mode.
Changing the Recording Settings
Selecting a recording scene for each situation
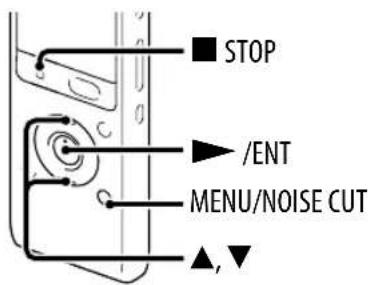
According to various recording scene, you can change the items for recording, such as REC Mode (p. 67), Mic Sensitivity (p. 67), etc., to the recommended settings in bulk. You can change the settings for each item.
1 In the stop mode, press MENU/NOISE CUT. Select the tab "Scene Select," and then press /ENT.
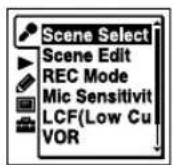
2 Press ▲ or ▼ to select a scene you want, and then press ▶/ENT.
3 Press ■ STOP to exit the menu mode.
| Scenes | Descriptions |
| (Meeting) | To record in a variety of situations, such as recording in a spacious conference room. |
| (Voice Notes) | To record dictation with a microphone in front of your mouth. |
| (Interview) | To record human voice at a distance of 1 to 2 meters (40 to 80 in.). |
| (Lecture) | To record a wide range of sound, such as a lecture in a classroom or a chorus lesson. |
| (Audio IN) | To record from external equipment, such as a television, portable CD/MD player or a tape recorder, connected to the IC recorder via an audio output connector (stereo mini-jack) with an audio connecting cable for dubbing. |
| (My Scene) | Use to keep your favorite settings. |
Tips for better recording
There are ways of making better recordings other than using scene selection.
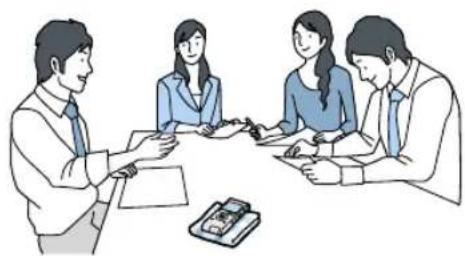
Recording at a meeting
By placing the IC recorder on a handkerchief, etc. substituting for a stand, you can record with clear, low-noise sound, without vibration noise from the desk.
natural_image
Illustration of four business professionals in a meeting around a table, no text or symbols visibleRecording a voice note
By placing the IC recorder close to one side of your mouth, you can prevent breathing on the built-in microphones, and record with clear sound.

natural_image
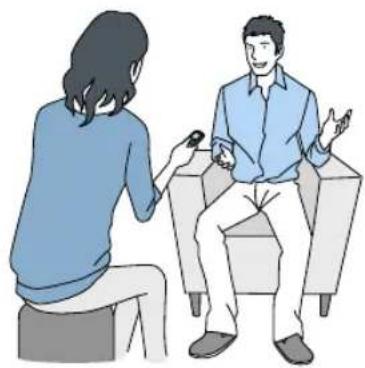
Illustration of a woman holding her hand, no text or symbols presentRecording an interview
Place the IC recorder so that the built-in microphones face the interviewee.
natural_image
Illustration of two people sitting and conversing, one holding a device (no text or symbols visible)Recording a music performance
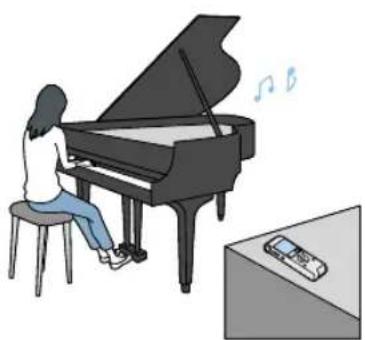
By attaching a tripod (not supplied) or placing the recorder on a stand or table, you can adjust the angle of the IC recorder and the built-in microphones more precisely.
When recording a chorus or piano performance, for example, place the IC recorder on a table approximately 2 to 3 meters (80 to 120 in.) from the performer(s). Set up the IC recorder with the display window facing up, and with the built-in microphones pointing towards the sound source.
natural_image
Illustration of a person playing grand piano with musical notes, next to a small telephone on a desk (no text or symbols present)Changing the Scene Select settings
In the stop mode, press MENU/NOISE CUT. Select the ▶ tab → “Scene Edit,” and then press ▶ /ENT.
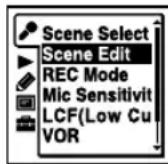
2 Press ▲ or ▼ to select the scene you want to change the settings, and then press ▶/ENT.
3 Press ▲ or ▼ to select "Edit from Current Setting" or "Edit," and then press ▶/ENT.
4 Press ▲ or ▼ to select the item you want to change, and then press ▶/ENT.
5 Press ▲ or ▼ to select a setting item, and then press ▶/ENT.
For details on the menu items and settings, see “Making Settings for the Menu.” (p. 67 – 68)
6 Press ▲ or ▼ to select "Edit Complete," and then press ▶/ENT.
7 Press ■ STOP to exit the menu mode.
Changing the Scene Select setting to the default values
In the stop mode, press MENU/NOISE CUT. Select the ▶tab "Scene Edit," and then press ▶/ENT.
2 Press ▲ or ▼ to select the scene you want to change the settings to the default values, and then press ▶/ENT.
3 Select "Set Default Value," and then press ▶/ENT.
“Default Value?” will be displayed.
4 Press ▲ or ▼ to select "Execute," and then press ▶/ENT.
The menu item settings of the selected scene will be set to the default values.
5 Press ■ STOP to exit the menu mode.
Default settings
For details on the menu items and settings, see pages 67 through 68.
| (Meeting) | (Voice Notes) | (Interview) | (Lecture) (Audio IN) | My(In My Scene) | |
| REC Mode | MP3192kbps | MP3128kbps | MP3192kbps | MP3192kbps | MP3192kbps |
| Mic Sensitivity | Medium Low | Medium Medium | Medium Low | Medium | Medium |
| LCF(Low Cut) | ON ON ON | OFF OFF OFF | |||
| VOR | OFF OFF OFF | OFF OFF | OFF | ||
| SYNC REC | OFF OFF OFF | OFF ON OFF | |||
| Select Input | MIC IN MIC | IN MIC IN | MIC IN | Audio IN | MIC IN |
Starting to Record Automatically in Response to Sound – the VOR Function
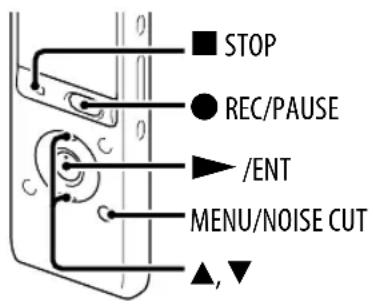
You can set the VOR (Voice Operated Recording) function to “ON,” to make the IC recorder start recording when the IC recorder detects sound that exceeds a specified level, and pause when sound falls to a level lower than a specified level.
In the stop or recording mode, press MENU/NOISE CUT. Select the ▶ tab → "VOR," and then press ▶ / ENT.
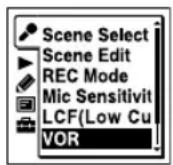
2 Press ▲ or ▼ to select "ON," and then press ▶/ENT. "VOR" is set to "OFF" when you purchase the IC recorder.
3 Press ■ STOP to exit the menu mode.
4 Press ● REC/PAUSE. “VORREC” appears in the display window. When the IC recorder detects sound that falls below a specified level, the “VORON” flashes, and the VOR recording pauses. When the IC recorder detects sound that exceeds a specified level during the VOR recording pause, the VOR recording starts again.
To cancel the VOR function
Set "VOR" to "OFF" in step ②.
Notes
- The VOR function is affected by the sound around you. Set “Mic Sensitivity” in the menu according to the recording conditions. If recording is not satisfactory after you have changed the “Mic Sensitivity” setting, or for an important recording, set “VOR” to “OFF” in the menu.
- During synchronized recording (p. 33), the VOR function does not work.
Recording via Other Devices
Recording with an external microphone
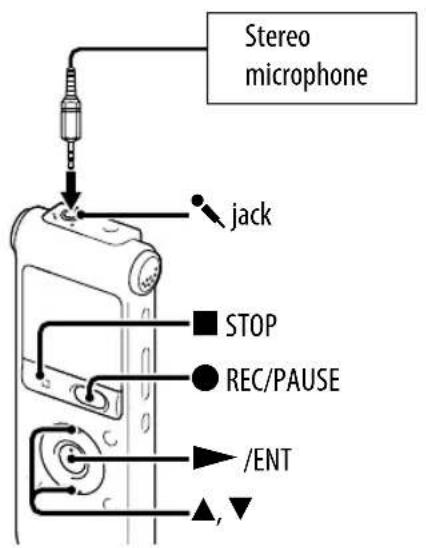
1 In the stop mode, connect an external microphone to the ♦ jack.
"Select Input" appears in the display window.
If "Select Input" is not displayed, set it in the menu (p. 68).
2 Press ▲ or ▼ to select "MIC IN," and then press ▶/ENT.
3 Press ■ STOP to exit the menu mode.
4 Press ● REC/PAUSE to start recording.
The built-in microphones are automatically cut off.
If the input level is not strong enough, adjust the “Mic Sensitivity” setting on the IC recorder.
When a plug in power type microphone is connected, power is automatically supplied to the microphone from the IC recorder.
To record sound from a telephone or a cell phone
You can use a headphone-type electret condenser microphone to record sound from a telephone or a cell phone.
For details on how to make the connection, refer to the operating instructions supplied with the microphone.
Recording from other equipment
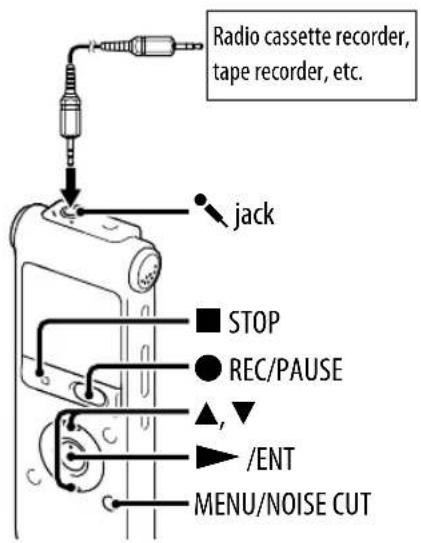
You can make music files without using the computer by recording sound/music from other equipment such as a radio cassette recorder, a tape recorder, etc. connected to the IC recorder.
When you select "Audio IN" from the "Scene Select" menu, the settings suitable for recording from other equipment are already selected (p. 27).

Hint
If the input level is not strong enough, connect the headphone jack (minijack, stereo) of other equipment to the ♦ jack of the IC recorder and adjust the volume level on the piece of equipment connected to the IC recorder while checking the recording level guide.
To record using the synchronized recording function
The IC recorder pauses when no sound is detected for more than 2 seconds. The IC recorder starts recording again as a new file when sound is detected.
1 Press MENU/NOISE CUT. Select the ▶ tab → "SYNC REC," and then press ▶ /ENT.
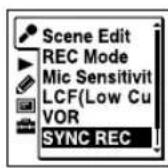
2 Press ▲ or ▼ to select "ON," and then press ▶/ENT.
3 Press ■ STOP to exit the menu mode.
4 In the stop mode, connect other equipment to the IC recorder.
Connect the audio output connector (stereo mini-jack) of other equipment to the ♦ jack of the IC recorder using an audio connecting cable.
"Select Input" appears in the display window.
If "Select Input" is not displayed, set it in the menu (p. 68).
5 Press ▲ or ▼ to select "Audio IN," and then press ▶/ENT.
6 Press ● REC/PAUSE to start recording.
“SYNC” flashes and the IC recorder enters the recording pause mode.
7 Start playback on the piece of equipment connected to the IC recorder.
“syn appears on the display and synchronized recording starts.
When no sound is detected for more than 2 seconds, “Dividing...” appears and then “SYNC” begins to flash. The synchronized recording pauses.
The IC recorder starts recording again as a new file when sound is detected.
To record without using the synchronized recording function
Select “OFF” in step ② of “To record using the synchronized recording function” (p. 33), and then proceed with steps ③ through ⑦. When you press ● REC/PAUSE in step ⑥, the built-in microphones are automatically cut off and the sound from the connected piece of equipment is recorded.
Basic Playback
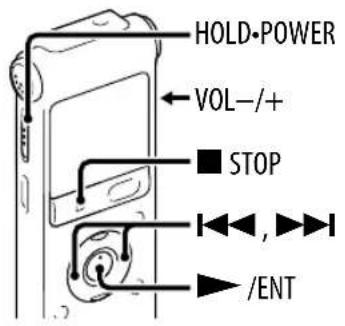
1 Slide the HOLD•POWER switch in the direction of “POWER” to turn on the IC recorder (p. 17), or towards the center to release the IC recorder from the HOLD status (p. 14).
The stop mode window appears.
2 Select the desired file to be played back (p.22).
If you do not select a file, the file just recorded will be played back.
3 Press ▶/ENT.
Playback starts, and the operation indicator will light in green.
4 Press VOL -/+ to adjust the volume.
Note for the customers in Europe
When “AVLS” is set to “ON” in the menu and the “AVLS” indicator is displayed, you cannot adjust the volume to a level that exceeds the AVLS-specified level. If you want to turn off the function and play back files at the original volume, use the menu to set “AVLS” to “OFF.”
Stopping playback
1 Press ■ STOP.
Other operations
| To Do this | |
| stop at the current position(Playback Pause function) | Press ▶/ENT. To resume playback from that point, press ▶/ENT again. |
| go back to the beginning of the current file | Press ◀◀ once.*1*2 |
| go back to previous files | Press ◀◀ repeatedly. (During the stop mode, keep the button pressed to go back the files continuously.*3) |
| skip to the next file | Press ▶▶| once.*1*2 |
| skip to the succeeding files | Press ▶▶| repeatedly. (During the stop mode, keep the button pressed to skip the files continuously.*3) |
* When a track mark is set, the IC recorder goes backward or forward to the track mark before or after the current point (p. 55).
*2 These operations are for when "Easy Search" is set to "OFF" (p. 45).
^*3 In the continuous searching mode, the IC recorder does not locate track marks.
Display when playing back a file
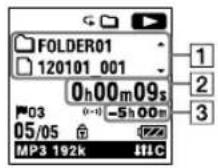
1 File information
Press ▲ or ▼ to check the file information during playback. A file recorded using the IC recorder is displayed as follows.
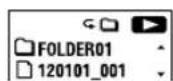
☐: Folder name: FOLDER01-FOLDER05
☐ : File name: Date_file number (e.g., 120101_001)
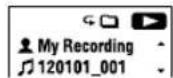
: Artist name (e.g., My Recording)
♪ : Title name: Date_file number (e.g., 120101_001)
2 Counter information
You can select the display mode in the menu (p. 73). Elapsed time: The elapsed playback time of one file Remaining time: The remaining playback time of one file Recording date: Date recorded Recording time: Time recorded
3 Remaining recording time
Displays the remaining recording time in hours, minutes, and seconds. If there is 10 hours or more time remaining, the time is displayed in hours. If there is 10 minutes or more and less than 10 hours time remaining, the time is displayed in hours and minutes. If there is less than 10 minutes time remaining, the time is displayed in minutes and seconds.
Changing the Playback Settings
Reducing noise in the playback sound and making the human voice clearer – the noise cut function
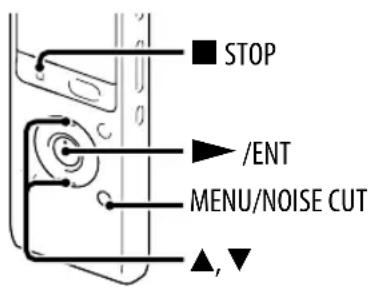
When the noise cut function is effective in the playback mode, ambient noise other than the human voice is reduced. A file is played back with clear sound quality because the noise of all frequency bands including a human voice is reduced.
To set the noise cut level
1 In the stop or playback mode, press and hold MENU/NOISE CUT for approximately 2 seconds or longer.
The “Noise Cut” setting window will be displayed.
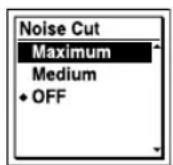
2 Press ▲ or ▼ to select "Maximum" or "Medium," and then press ▶/ENT.
3 Press ■ STOP to exit the menu mode.
To cancel the noise cut function
Set "Noise Cut" to "OFF" in step ②.
To set the noise cut function in the menu
Select and set "Noise Cut" from the ▶tab of the menu.
Note
When playing back a music file in good sound quality, make sure to set “Noise Cut” to “OFF.”
Adjusting the playback speed – the DPC (Digital Pitch Control) function
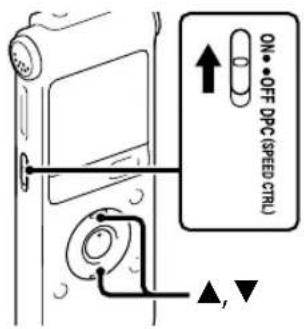
You can adjust the playback speed in a range from 0.50 times to 2.00 times. The file is played back in natural tones by means of a digital processing function.
1 Slide the DPC(SPEED CTRL) switch to "ON."
2 During playback, press ▲ or ▼ to adjust the playback speed.
The speed decreases by 0.05 times (from ×0.50 to ×1.00).
The speed increases by 0.10 times (from ×1.00 to ×2.00).
When you press and hold each button, you can change the speed continuously.
The playback speed is set to “×0.70” when you purchase the IC recorder.
To resume normal playback speed
Slide the DPC(SPEED CTRL) switch to "OFF."
Selecting the sound effect
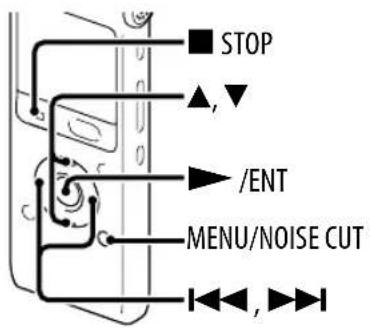
You can set the effect you want for the playback in the menu.
In the stop or playback mode, press MENU/NOISE CUT. Select the ▶ tab → "Effect," and then press ▶/ENT.
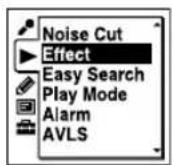
2 Press ▲ or ▼ to select effect you want for the playback, and then press ▶/ENT.
3 Press ■ STOP to exit the menu mode.
| Option items Description | |
| Pop Stresses middle ranges, ideal for vocals. | |
| Rock Emphasizes high and low ranges for a powerful sound. | |
| Jazz Emphasizes high ranges for lively sound. | |
| Bass1 Emphasizes the bass sound. | |
| Bass2 Emphasizes the bass sound even more. | |
| Custom You can design your own custom sound level for 5 bands. | |
| OFF Disables the effect function. | |
To set your favorite sound level
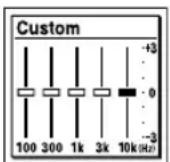
1 Set "Effect" to "Custom" in step ② on page 40, and then press ▶/ENT.
The custom setting window will be displayed.
2 When you adjust the sound level for the 100 Hz, 300 Hz, 1 kHz, 3 kHz, and 10 kHz bands, press I◀◀ or ▶▶▶ to move to the band to the left or right, and then press ▲ or ▼.
The setting can be adjusted in 7 steps from -3 to +3.
3 Press ▶/ENT.
4 Press ■ STOP to exit the menu mode.
Selecting the play mode
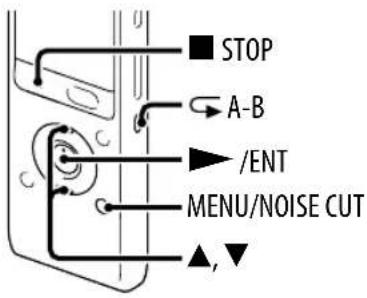
You can select the play mode in the menu.
In the stop or playback mode, press MENU/NOISE CUT. Select the ▶ tab ➔ "Play Mode," and then press ▶/ENT.
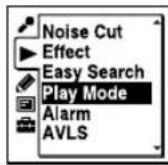
2 Press ▲ or ▼ to select "1," "□," "ALL," "→ 1," "←,□or " ALL," and then press ▶/ENT.
3 Press ■ STOP to exit the menu mode.
| Option items | Description/reference page |
| 1 A file is played back. | |
| Files in one folder are played back continuously. | |
| ALL All the files are played back continuously. | |
| 1 One file is played back repeatedly. | |
| Files in one folder are played back repeatedly. | |
| ALL All the files are played back repeatedly. | |
To play back a specified section repeatedly - A-B repeat
1 During playback, press A-B to specify the starting point A.
"A-B B?" is displayed.
2 Press A-B again to specify the finishing point B.
“A-B” is displayed and the specified section is played back repeatedly.
To resume normal playback:
Press ▶/ENT.
To stop A-B repeat playback:
Press ■ STOP.
To change the segment specified for A-B repeat playback:
During A-B repeat playback, press A-B again to specify a new starting point
A. Then specify a new finishing point B, as in step ②.
Convenient Playback Methods
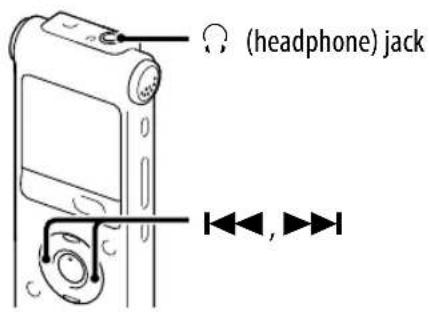
Listening with better sound quality
• To listen with the headphones:
Connect the supplied stereo headphones to the Ⓞ (headphone) jack. The built-in speaker will be automatically disconnected.
• To listen from an external speaker:
Connect an active or passive speaker to the (headphone) jack.
Searching forward/backward during playback – Cue/Review
• To search forward (Cue):
Press and hold ▶▶ during playback and release it at the point you wish to resume playback.
• To search backward (Review):
Press and hold ◀◀ during playback and release it at the point you wish to resume playback.
The IC recorder searches at slow speed with playback sound. This is useful to check one word forward or back. Then, if you press and hold the button, the IC recorder starts to search at higher speed.

When files are played back or searched to the end of the last file
- When you play back or fast play back to the end of the last file, "FILE END" lights up for approx. 5 seconds.
- When “FILE END” and the operation indicator go off, the IC recorder will stop at the beginning of the last file.
- If you press and hold ◀◀◀ while “FILE END” is lit, the files are played back rapidly, and normal playback will start at the point you release the button.
Quickly locating the point you wish to start playback – Easy search function
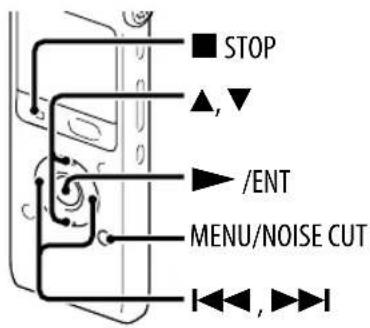
When “Easy Search” is set to “ON” in the menu, you can go back for the specified reverse skip time by pressing ◀◀◀ once, and can go forward for the specified forward skip time by pressing ▶▶▶ once during playback. This function is useful for locating a specific point in a long recording such as one made at a meeting.
In the stop or playback mode, press MENU/NOISE CUT. Select the ▶ tab → "Easy Search," and then press ▶/ENT.
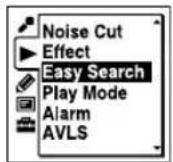
2 To go forward or backward for the specified skip time, press ▲ or ▼ to select "ON," and then press ▶/ENT. Skip to step 5.
To change the time to go forward or backward when searching, press ▲ or ▼ to select “Set Skip Time,” and then press ▶/ENT.
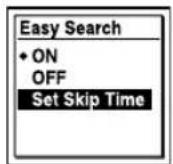
3 Press ▲ or ▼ to select "Forward Skip Time" or "Reverse Skip Time," and then press ▶/ENT.
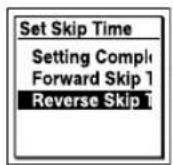
4 Press ▲ or ▼ to select the skip time, and then press ▶/ENT.

To adjust both the forward and backward skip times, repeat steps ③ and ④.
| Forward Skip Time 5sec, 10sec, 30sec, 1min, 5min, or 10min |
| Reverse Skip Time 1sec, 3sec, 5sec, 10sec, 30sec, 1min, 5min, or 10min |
5 Press ■ STOP to exit the menu mode.
Selecting a Recording Date from the Calendar and Playing Back
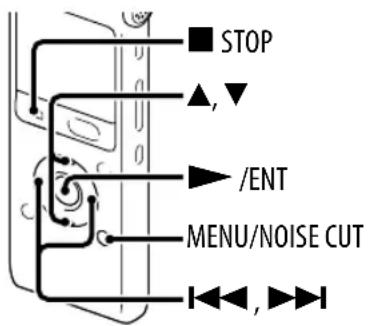
You can play back a file recorded using the IC recorder by searching for it from the calendar.
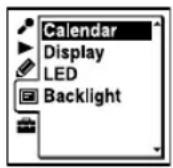
In the stop mode, press MENU/NOISE CUT. Select the □ tab ➤ "Calendar," and then press ▶/ENT.
The calendar appears after the “Accessing...” animation, and the current date will be selected.
2 Press ◀◀◀ or ▶▶◀I to select a date, and then press ▶/ENT.
The underline is displayed at the date where a recorded file exists.
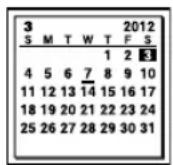
You can move to the previous week or the following week of the date by pressing ▲ or ▼. When you press and hold each button, you can move continuously through the dates or the weeks.
3 Press ▲ or ▼ to select a file, and then press ▶/ENT.
A confirmation message appears, and the file you selected will be played back for confirmation.
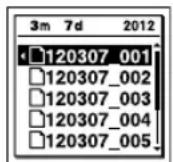
4 Press ▲ or ▼ to select "Enter," and then press ▶/ENT.
The file will be played back.
5 Press ■ STOP to stop playback.
To cancel the selection of a recording date from the calendar and the accompanying playback
Press ■ STOP before step ④.
Notes
- You need to set the clock in advance to select a recording date from the calendar and play back a file (p. 18).
- If you specify a date where a recorded file does not exist, "No File" will be displayed. Select a date where a recorded file exists.
- You can search for and play back only the files in the recordable folder that contains files recorded with the IC recorder. For details, see “Structure of folders and files” (p. 79).
Playing Back a File at a Desired Time with an Alarm
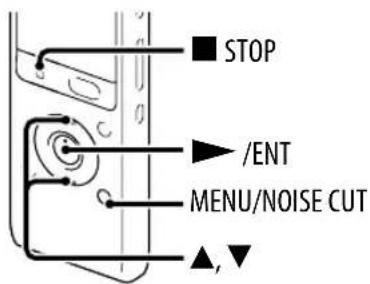
You can sound an alarm and start playback of a selected file at a desired time. You can have a file played back on a specified date, once every week, or at the same time every day. You can set an alarm for a file.
1 Select the file you want to play back with an alarm.
2 Enter the alarm setting mode.
① In the stop mode, press MENU/NOISE CUT. Select the ▶ tab → "Alarm," and then press ▶ /ENT.
② Press ▲ or ▼ to select "ON," and then press ▶/ENT.
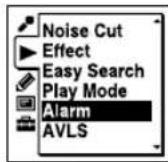
3 Set the alarm date and time.
① Press ▲ or ▼ to select "Date," a day of the week, or "Daily," and then press ▶/ENT.
② When you select "Date":
Set the year, month, day, hour, and minute in sequence, as described in "Setting the Clock" (p. 18).
When you select a day of the week or "Daily":
Press ▲ or ▼ to set the hour, and then press ▶/ENT.
Press ▲ or ▼ to set the minute, and then press ▶/ENT.
4 Press ▲ or ▼ to select a favorite alarm pattern, and then press ▶/ENT.
"Executing..., " is displayed.
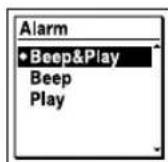
5 Press ■ STOP to exit the menu mode.
The setting process is finished and “(●)” (alarm indicator) appears in the display window.
To change the alarm setting
Select the file you want to change its alarm setting, and then follow steps ② through ⑤.
To cancel the alarm setting
Follow steps ① and ②. In step ②-② select “OFF” and press ▶/ENT. The alarm will be canceled and the alarm indicator will disappear from the display window.
When the set date and time comes
At the set time, the IC recorder is automatically turned on and “ALARM” is displayed in the display window. Then the alarm and the selected file will be played back using the selected alarm pattern.
When the playback ends, the IC recorder will stop automatically. (When the alarm pattern is set to “Beep&Play” or “Play,” the IC recorder will stop at the beginning of the selected file.)
To stop the alarm playback
Press any button other than VOL -/+ while the alarm sound is heard. If the HOLD function is activated, you can stop the alarm playback by pressing any button.
Playback via Other Devices
Recording with other equipment
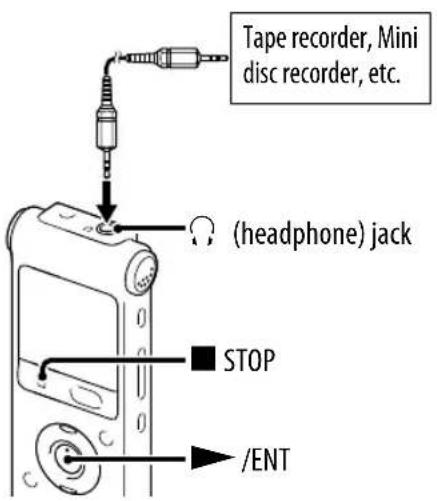
You can record the sound of the IC recorder with other equipment. Before you start recording, we recommend you make a trial recording first.
1 Connect the ⏻ (headphone) jack of the IC recorder to the external input terminal of other equipment using an audio connecting cable.
2 Press ▶/ENT to start playback and at the same time set the connected equipment to the recording mode.
A file from the IC recorder will be recorded on the equipment connected.
3 Press ■ STOP on the IC recorder and the connected equipment at the same time to stop recording.
Erasing a File
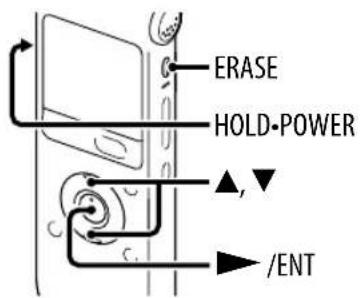
You can select a file and erase it as follows.
Note
Once a file has been erased, you cannot retrieve it.
1 Slide the HOLD•POWER switch in the direction of “POWER” to turn on the IC recorder (p. 17), or towards the center to release the IC recorder from the HOLD status (p. 14).
The stop mode window appears.
2 In the stop or playback mode, select the file you want to erase (p.22).
3 Press ERASE.
"Erase?" is displayed and the specified file is played back for confirmation.
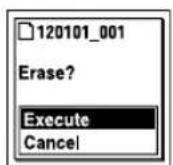
4 Press ▲ or ▼ to select "Execute."
5 Press ▶/ENT.
The “Erasing...” animation appears in the display window and the selected file will be erased.
When a file is erased, the remaining files will advance so that there will be no space between files.
To cancel erasing
Select "Cancel" in step ④, and then press ▶/ENT.
To erase a part of a file
Divide the file into two files first (p. 58), and then proceed with steps ② through ⑤.
Erasing All Files in a Folder
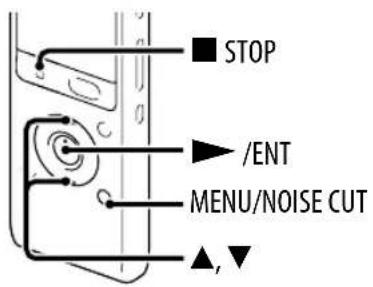
In the stop mode, select the folder containing the files you want to erase (p.22).
2 Press MENU/NOISE CUT. Select the ▲tab → "Erase All," and then press ▶/ENT.
"Erase All Files in the Folder?" will be displayed.
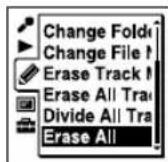
3 Press ▲ or ▼ to select "Execute," and then press ▶/ENT.
The “Erasing...” animation appears in the display window and all files in the selected folder will be erased.
4 Press ■ STOP to exit the menu mode.
To cancel erasing
Select "Cancel" in step ③, and then press ▶/ENT.
Arranging Files in a Folder
Moving a file to a different folder
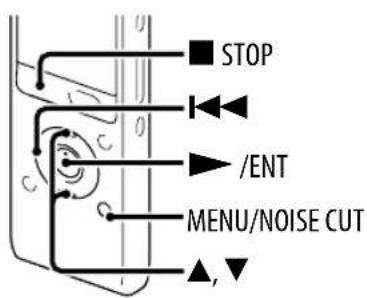
1 Select the file you want to move.
2 In the stop mode, press MENU/NOISE CUT. Select the 🔔 tab → "Move File," and then press ▶/ENT.
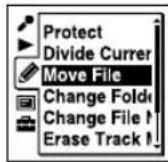
3 Press ◀◀◀, press ▲ or ▼ to select the ⏻ tab or the ♪ tab, and then press ▶/ENT.
4 Press ▲ or ▼ to select the folder that you want to move the file into, and then press ▶/ENT.
"Moving File..." animation is displayed and the file is moved to the last position in the destination folder.
When you move a file to another folder, the original file in the previous folder will be erased.
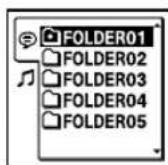
5 Press ■ STOP to exit the menu mode.
To cancel moving the file
Press ■ STOP before step ④.
Using a Track Mark
Adding a track mark
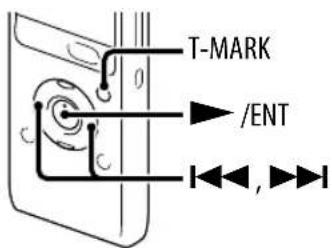
You can add a track mark at a point at which you would like to divide a file later or locate during playback. You can add a maximum of 98 track marks to each file.
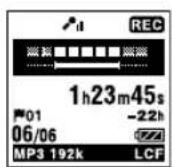
During recording, playing back, or recording pausing, press T-MARK at the position you want to add a track mark. The ▶ (Track mark) indicator flashes three times, and a track mark is added.
Locating a track mark and starting playback at the track mark
Press ◀◀◀ or ▶▶◀ in the stop mode. When the ⚫(Track mark) indicator flashes once, press ▶/ENT.
Erasing a track mark
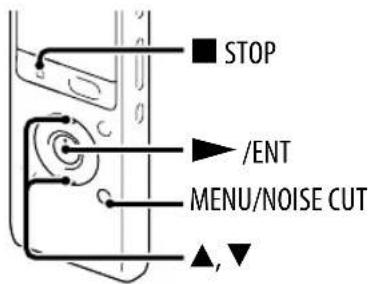
1 Stop at a position after the track mark you would like to erase.
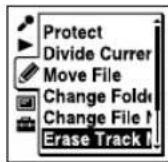
2 Press MENU/NOISE CUT. Select the tab → "Erase Track Mark," and then press ▶/ENT.
"Erase Track Mark?" will be displayed.
3 Press ▲ or ▼ to select "Execute," and then press ▶/ENT.
The “Erasing...” animation appears in the display window and the selected track mark will be erased.
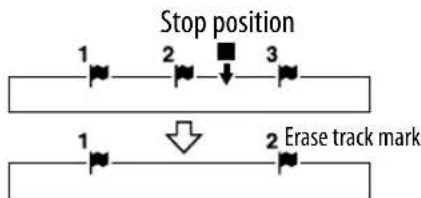
flowchart
graph TD
    A["Stop position"] --> B["1"]
    B --> C["2"]
    C --> D["3"]
    D --> E["Erase track mark"]
    F["1"] --> G["↓"]
    H["2"] --> I["End"]
The track mark just before the stop position will be erased.
4 Press ■ STOP to exit the menu mode.
To cancel erasing
Select "Cancel" in step ③, and then press ▶/ENT.
Erasing all the track marks in the selected file at one time
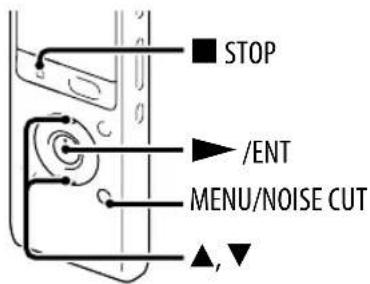
1 Select a file from which you want to erase the track marks.
2 Press MENU/NOISE CUT. Select the tab → "Erase All Track Marks," and then press ▶/ENT.
"Erase All Track Marks?" will be displayed.
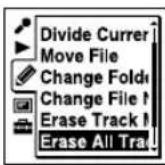
3 Press ▲ or ▼ to select "Execute," and then press ▶/ENT.
The “Erasing...” animation appears in the display window and all the track marks will be erased at one time.
4 Press ■ STOP to exit the menu mode.
To cancel erasing
Select "Cancel" in step ③, and then press ▶/ENT.
Dividing a File
Dividing a file at the current position
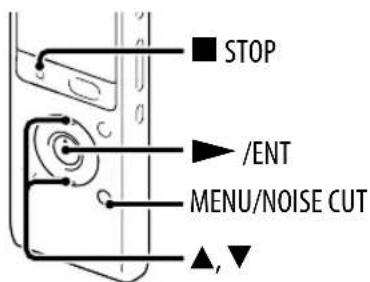
You can divide a file in the stop mode, so that the file is divided into two parts and new file numbers are added to the divided file names. By dividing a file, you can easily find the point from which you want to play back when you make a long recording such as at a meeting. You can divide a file until the total number of files in the folder reaches the maximum number allowed.
1 Stop the file at the position where you want to divide a file.
2 Press MENU/NOISE CUT. Select the ▶tab ➤ "Divide Current Position," and then press ▶/ENT.
"Divide?" will be displayed.
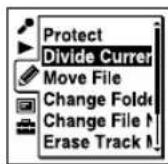
3 Press ▲ or ▼ to select "Execute," and then press ▶/ENT.
The “Dividing...” animation appears, and the divided files will be suffixed with a sequential number (“_1” for the original file, and “_2” for the new file).
| File 1 | File 2 | File 3 | ||
| A file is divided. | ||||
| File 1 | File 2_1 | File 2_2 | File 3 | |
A suffix made up of a sequential number is added to a file name of the divided files.
4 Press ■ STOP to exit the menu mode.
To cancel dividing
Select "Cancel" in step ③, and then press ▶/ENT.
Dividing a file at all the track mark positions
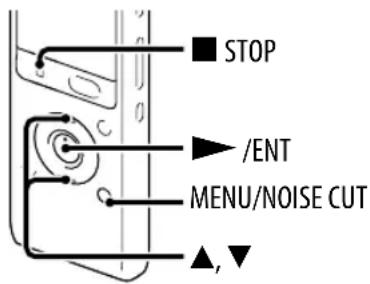
1 Select the file you want to divide.
2 In the stop mode, press MENU/NOISE CUT. Select the ▶ tab → "Divide All Track Marks," and then press ▶/ENT.
“Divide All Track Marks?” will be displayed.
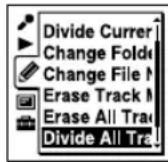
3 Press ▲ or ▼ to select "Execute," and then press ▶/ENT.
The “Dividing...” animation appears, and the file is divided at all the track mark positions. All the existing track marks in the files will be erased. A suffix made up of a sequential number is added each of the divided files.
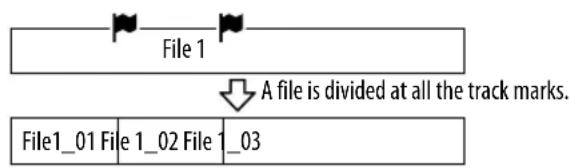
4 Press ■ STOP to exit the menu mode.
To cancel dividing
Select "Cancel" in step ③, and then press ▶/ENT.
Renaming a Folder and a File
Changing a folder name
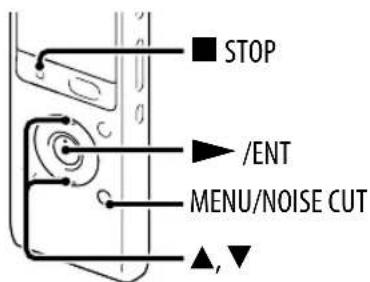
You can change a name of a folder used to store files recorded with the IC recorder.
You can choose a new folder name from the templates.
1 Select the folder which you want to rename from the Tab of the folder list.
2 In the stop mode, press MENU/NOISE CUT. Select the tab "Change Folder Name," and then press ▶/ENT.
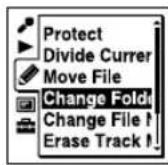
3 Press ▲ or ▼ to select a favorite folder name, and then press ▶/ENT.
You can choose a new folder name from the templates. "Executing..." appears in the display window and the folder name will be changed.
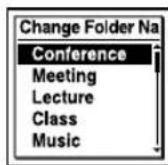
4 Press ■ STOP to exit the menu mode.
Hints
- When you specify a folder name that already exists, a suffix made up of a sequential number (2 to 10) is added to the name of the new folder.
- When you choose "FOLDER" from the templates, a suffix made up of a sequential number (01 to 10) is added to each of the folder names.
Changing a file name
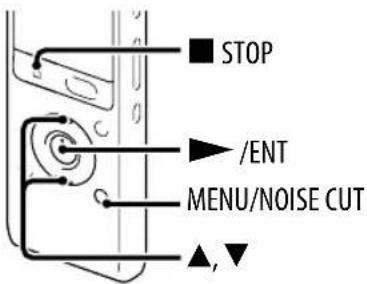
You can rename a file by prefixing characters from a desired template to the file name. A file in the recordable area, or in a folder on the ☺ tab, can be renamed. You can choose characters to be added from the templates.
1 Select the file which you want to rename from the tab of the folder list.
2 In the stop mode, press MENU/NOISE CUT. Select the ☑ tab → "Change File Name," and then press ▶/ENT.
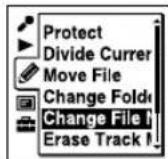
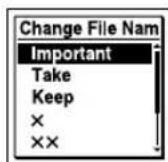
3 Press ▲ or ▼ to select the desired characters to be prefixed to the file name, and then press ▶/ENT.
You can choose characters from the templates. "Executing..." appears in the display window and the selected characters are added to the file name separated from it by an underbar (_). (e.g., If "A" is added to the file 12215_001.mp3: A_12215_001.mp3)
4 Press ■ STOP to exit the menu mode.
Protecting a File
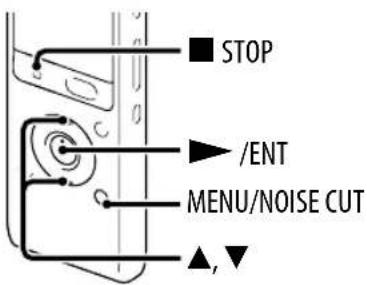
To prevent a file from being accidentally erased or edited, you can protect an important file. A protected file is marked with the Ⓗ (protect) indicator and is regarded as a read-only file you cannot erase or edit.
1 Display the file which you want to protect from the ☑tab or the ☑tab.
2 In the stop mode, press MENU/NOISE CUT. Select the ▶ tab → "Protect," and then press ▶/ENT.
"Set Protection?" will be displayed.
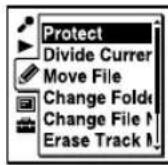
3 Press ▲ or ▼ to select "Execute," and then press ▶/ENT.
The file is protected. A protected file is marked with the Ⓞ (protect) indicator.
4 Press ■ STOP to exit the menu mode.
To release protection
Select the protected file, and then proceed with steps ② through ④. In this case, “Erase Protection?” will be displayed in step ②.
Making Settings for the Menu
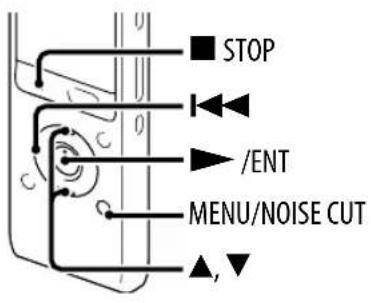
1 Press MENU/NOISE CUT to enter the menu mode.
The menu mode window will be displayed.
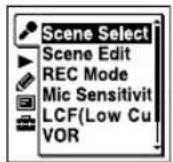
2 Press ◀◀◀, press ▲ or ▼ to select the ⚙, ▶, ⏰, □, or ☒ tab, and then press ▶▶/ENT.
3 Press ▲ or ▼ to select the menu item for which you want to make setting, and then press ▶/ENT.
4 Press ▲ or ▼ to select the setting that you want to set, and then press ▶/ENT.
5 Press ■ STOP to exit the menu mode.
Note
If you do not press any button for 60 seconds, the menu mode is automatically canceled and the window will return to the normal display.
To return to the previous window
Press ◀◀ during menu mode.
To exit the menu mode
Press ■ STOP or MENU/NOISE CUT.
Menu Settings
| Tabs Menu items | Operation mode (○: the setting can be made/—: the setting cannot be made) | |||
| Stop mode Playback mode | Recording mode | |||
| (Recording) | Scene Select | ○ | - | - |
| Scene Edit | ○ | - | - | |
| REC Mode | ○ | - | - | |
| Mic Sensitivity | ○ | - | ○ | |
| LCF(Low Cut) | ○ | - | ○ | |
| VOR | ○ | - | ○ | |
| SYNC REC | ○ | - | - | |
| Select Input | ○ | - | - | |
| (Playback) | Noise Cut | ○ | ○ | - |
| Effect | ○ | ○ | - | |
| Easy Search | ○ | ○ | - | |
| Play Mode | ○ | ○ | - | |
| Alarm | ○ | - | - | |
| AVLS* | ○ | ○ | - | |
| (Edit) | Protect | ○ | - | - |
| Divide Current Position | ○ | - | - | |
| Move File | ○ | - | - | |
| Change Folder Name | ○ | - | - | |
| Change File Name | ○ | - | - | |
| Erase Track Mark | ○ | - | - | |
| Erase All Track Marks | ○ | - | - | |
| Divide All Track Marks | ○ | - | - | |
| Erase All | ○ | - | - | |
* for the European models only
| Tabs Menu items | Operation mode (○: the setting can be made/—: the setting cannot be made) | |||
| Stop mode Playback mode | Recording mode | |||
| (Display) | Calendar | ○ | — | — |
| Display | ○ ○ | ○ | ||
| LED | ○ | — | — | |
| Backlight | ○ | — | — | |
| (IC recorder setting) | Language | ○ | — | — |
| Date&Time | ○ | — | — | |
| Time Display | ○ | — | — | |
| Beep | ○ | — | — | |
| Auto Power Off | ○ | — | — | |
| Format | ○ | — | — | |
| System Information | ○ | — | — | |
| Tabs Menu items Settings (*: Initial setting) | ||
| (Recording) | Scene Select( p. 27) | Allows you to choose a recording scene according to each recording situation as follows: (Meeting), Voice Notes), (Interview), Lecture), Audio IN), (My Scene).You can change the items for recording to the recommended settings in bulk. |
| Scene Edit( p. 29) | Edits the settings of the various recording menu items which are pre-set in the “Scene Select” menu.Edit: Changes the settings from the settings in the selected scene item.Edit from Current Setting:Changes the settings that is pre-set in the menu.Set Default Value:Changes the settings to the default settings.Execute:Changes the settings to the default settings and completes the process.Cancel:Completes the process without changing the settings.HintYou can edit the following menu items: “REC Mode” (p. 67), “Mic Sensitivity” (p. 67), “LCF(Low Cut)” (p. 67), “VOR” (p. 31) “SYNC REC” (p. 33), “Select Input” (p. 32, 33). When you select “Edit Complete,” the process will be completed. | |
| (Recording) | REC Mode | Sets the recording mode.MP3 192kbps*:MP3 (compressed) in stereo standard-quality recording modeMP3 128kbps:MP3 (compressed) in long play stereo recording modeMP3 48kbps(MONO):MP3 (compressed) in monaural standard recording modeMP3 8kbps(MONO):MP3 (compressed) in long play monaural recording mode |
| Mic Sensitivity | Sets the microphone sensitivity.High :To record a sound far away from the IC recorder or a low sound, such as recording in a spacious room.Medium *:To record the sound of a normal conversation or meeting, such as recording in a meeting space or during interview.Low :To record dictation with a microphone in front of your mouth, a sound near the IC recorder, or a loud sound. | |
| LCF(Low Cut) | Sets the LCF (Low Cut Filter) function to cut a low frequency to reduce the roaring noise from wind; therefore you can record a file more clearly.ON: The LCF function is activated.OFF*: The LCF function is canceled. | |
| (Recording) | VOR(12 p. 31) | Sets the VOR (Voice Operated Recording) function.ON: Recording starts when the IC recorder detects sound that exceeds a specified level, and pause when sound falls below a specified level. The VOR function is activated when ● REC/PAUSE is pressed.OFF*: The VOR function does not work. |
| SYNC REC(12 p. 33) | When set to “ON,” the IC recorder enters the recording pause mode when no sound is detected for more than 2 seconds, and the IC recorder starts recording again as a new file when any sound is detected.ON: The synchronized recording function is activated.OFF*: The synchronized recording function is canceled. | |
| Select Input(12 p. 32, 33) | Selects the external input to be recorded that is connected to the ◀ (microphone) jack.MIC IN*: Select when you record files using an external microphone.Audio IN: Select when you record using other equipment. | |
| ► (Playback) | Noise Cut(⇨ p. 38) | Sets the noise cut function and its levels.Maximum:The noise cut levels will be more intense.Medium:The noise cut level will be weakened.Select when you cannot catch the sound easily by setting “Noise Cut Level” to “Maximum.”OFF*: The noise cut function is canceled.NoteWhen playing back files using the built-in speaker, the noise cut function does not work. |
| Effect(⇨ p. 40) | Sets the effect you want for the playback.Pop:Stresses middle ranges, ideal for vocals.Rock:Emphasizes high and low ranges for a powerful sound.Jazz:Emphasizes high ranges for lively sound.Bass1:The bass sound is emphasized.Bass2:The bass sound is emphasized even more.Custom:You can design your own custom sound level for 5 bands of EQ (100 Hz, 300 Hz, 1 kHz, 3 kHz and 10 kHz) in 7 steps (-3 to +3).OFF*:The effect function does not work.NoteWhen playing back files using the built-in speaker, or when the noise cut function is effective (⇨ p. 38), the effect function does not work. | |
| ► (Playback) | Easy Search(☎ p. 45)Sets the easy search function.ON: You can go forward or backwards for the specified skip time by pressing ►►I or ◀◀ during playback. This function is useful when attempting to locate desired point in a long recording.OFF*: The easy search function does not work. When you press ►►I or ◀◀, a file will be moved forward or backward.Set Skip Time:Sets the time to go forward or backward when searching.Setting Complete:Changes the settings and completes the process.Forward Skip Time:Sets the time to skip forward when you press ►►I. (5sec, 10sec*, 30sec, 1min, 5min, or 10min)Reverse Skip Time:Sets the time to skip backwards when you press ◀◀. (1sec, 3sec*, 5sec, 10sec, 30sec, 1min, 5min, or 10min) | |
| Play Mode(☎ p. 42) | Sets the play mode.1: A f ile is played back.☐*: Files in one folder are played back continuously.ALL: A ll the files are played back continuously.⇨ 1: One file is played back repeatedly.⇨ ☐Files in one folder are played back repeatedly.⇨ ALL:All the files are played back repeatedly. | |
| Tabs Menu items Settings (*: Initial setting) | ||
| ► (Playback) | Alarm(☎ p. 49) | Sets the alarm.ON: The alarm function is effective.Set the date, time or day of the week or choose daily for playback, and set the following alarm pattern.Beep&Play: The selected file is played back after the alarm sounds.Beep: Only the alarm sounds.Play: Only the selected file is played back.OFF*: The alarm function is canceled. |
| AVLS*1(☎ p. 15) | Sets the AVLS (Automatic Volume Limiter System) function.ON*: The AVLS function that maintains a moderate volume level is effective when listening with the headphones.OFF: The AVLS function does not work and the sound is played back at the original volume.NotesWhen you turn off the function, please be careful not to listen to an excessive volume of the sound.When you listen to the sound using the headphones for the specific period of time, the AVLS function is automatically turned on even if you set “AVLS” to “OFF” in the menu.If you adjust the volume to a level that exceeds the AVLS-specified level, the volume will be set to a moderate volume level when you turn off the IC recorder. | |
^*1 for the European models only
| Tabs Menu items Settings (*: Initial setting) | ||
| (Edit) | Protect( p. 62) | Protects the selected file to prevent the file from being erased, divided, or being moved.Execute:The selected file will be protected. If you specify a file that has already been protected, the protection will be canceled.Cancel:Protection or cancel protection is not executed. |
| Divide Current Position ( p. 58) | Divides a file into two.Execute:A file will be divided into two.Cancel:File division is not executed. | |
| Move File ( p. 54) | Moves the selected file to the selected folder. Before attempting to move a file, select the file to be moved, and then go to the menu window. | |
| Change Folder Name ( p. 60) | Renames a folder by selecting a template. | |
| Change File Name ( p. 61) | Renames a file by selecting a template and prefixing the characters of the selected template to the file name. | |
| Erase Track Mark ( p. 56) | Erases the track mark just before the current position.Execute:The track mark will be erased.Cancel:The track mark will not be erased. | |
| Erase All Track Marks ( p. 57) | Erases all the track marks of the selected file.Execute:All the track marks will be erased.Cancel:All the track marks will not be erased. | |
| (Edit) | Divide All Track Marks (p. 59) | Divides a file at all the track mark positions.Execute:The track mark division is executed.Cancel:The track mark division is not executed. |
| Erase All (p. 53) | Erases all files in the selected folder.Press to return to the folder window before erasing the files and select a folder from which all files are to be erased, and then go to the menu window.Execute:All files in the selected folder will be erased.Cancel:All files will not be erased. | |
| (Display) | Calendar (p. 47) | Switches the display window to a calendar, and plays back a file recorded with the IC recorder by selecting a date from the calendar.Enter:The selected file is played back.Back:The IC recorder does not play the selected file and returns to the previous window. |
| Display Changes the display mode.Elapsed Time*: Elapsed playback time of one file Remain Time:During stop or playback, the remaining time of one file During recording, the available recording timeREC Date:Date recordedREC Time:Time recorded | ||
| (Display) | LED | Turns the operation indicator on or off during operation.ON*: During recording or playback, the operation indicator lights or flashes.OFF: The operation indicator does not light or flash, even during operation.NoteWhen the IC recorder is connected to a computer, the operation indicator lights or flashes even if “LED” is set to “OFF.” |
| Backlight Turns the backlight in the display window on or off.ON*: The backlight in the display window lights up for approx. 10 seconds.OFF: The backlight in the display window does not light, even during operation. | ||
| (IC recorder setting) | Language (p. 21) | Sets the language to be used for messages, menus, folder names, file names, etc.Deutsch (German), English, Español (Spanish), Français (French), Italiano (Italian), Русский (Russian)NoteNumber of language options you can select and the default setting differ depending on the country or region you purchased your IC recorder. |
| Date&Time (p. 19) | Auto(Synchronizing)*:When the IC recorder is connected to a computer that is running the Sound Organizer, the clock will be automatically adjusted according to that computer.Manual:Set the clock by setting year, month, day, hour, and minute in sequence. | |
| (IC recorder setting) | Time Display | Sets the clock display.12-Hour:12:00AM = midnight, 12:00PM = noon24-Hour:0:00 = midnight, 12:00 = noonNoteThe default setting differs depending on the area you purchased your IC recorder. |
| Beep | Sets whether a beep will be heard or not.ON*: A beep will sound to indicate that an operation has been accepted or an error has occurred.OFF: No beep sound will be heard.NoteThe alarm sounds even if you set “Beep” to “OFF” in the menu. | |
| Auto Power Off If there is | no operation attempted for the period you have set, the IC recorder turns off automatically.5min:The IC recorder will be turned off after approx. 5 minutes.10min*:The IC recorder will be turned off after approx. 10 minutes.30min:The IC recorder will be turned off after approx. 30 minutes.60min:The IC recorder will be turned off after approx. 60 minutes.OFF:The IC recorder will not be turned off automatically. | |
| (IC recorder setting) | Format | Formats the built-in memory, erasing all the data in the memory and resetting the folder structure to its default status.Execute:The “Formatting...” animation appears and the built-in memory will be formatted.Cancel:The built-in memory will not be formatted. |
| NotesWhen you format the built-in memory, all the data which you have stored on the memory will be erased. Once the memory has been erased, you cannot retrieve the data that was erased.When you format the built-in memory, the operating instructions stored in the built-in memory will also be erased. To get another copy of the operating instructions, please visit the Sony support home page depending on your area (p. 94). | ||
| System Information Dis | ays the IC recorder model name and the version number of the software. | |
Using the IC Recorder with Your Computer
When the IC recorder is connected to your computer, you can transfer data between them.
Copying files from the IC recorder to your computer to store them (p. 82)
Copying music files from your computer to the IC recorder to play them back (p. 83)
Using the IC recorder as USB memory (p. 85)
You can store image data or text data stored on the computer temporarily in the IC recorder.
System requirements for your computer
For details on the system requirements for your computer, see page 89.
Connecting the IC recorder to your computer
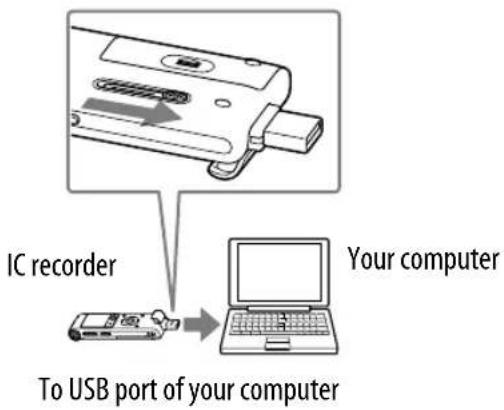
To exchange files between the IC recorder and your computer, connect the IC recorder to your computer.
1 Slide the USB DIRECT slide lever on the back of the IC recorder, and insert the USB connector into the USB port of a running computer.
2 Make sure the IC recorder has been recognized properly.
On the Windows screen; open “My Computer” or “Computer,” and make sure that “IC RECORDER” has been recognized.
On the Macintosh screen; make sure that an "IC RECORDER" drive is displayed on the Finder.
The IC recorder is recognized by the computer as soon as the connection is made. While the IC recorder is connected to the computer, “Connecting” is displayed in the display window of the IC recorder.
If the IC recorder cannot be connected to a computer directly, use the supplied USB connection support cable.
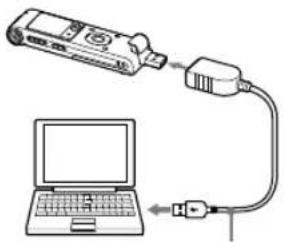
USB connection support cable (supplied)
Structure of folders and files
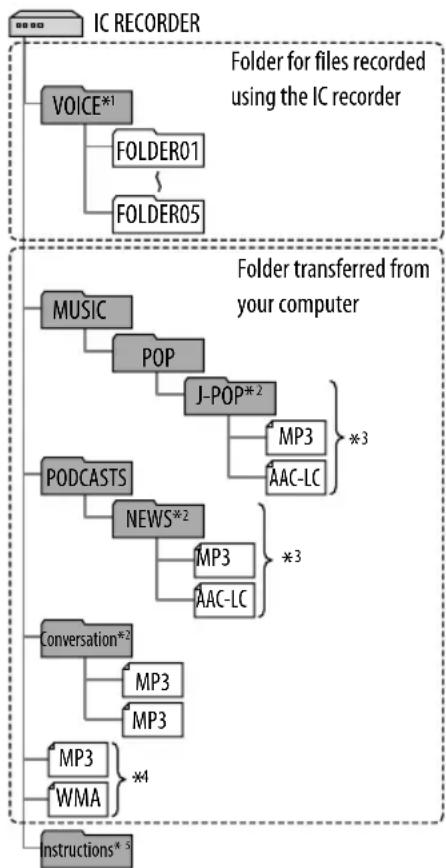
The folders and files are displayed on the computer screen as shown.
On a Windows screen using Explorer, and on a Macintosh screen using Finder, folders and files can be displayed by opening “IC RECORDER.”
Built-in memory
flowchart
graph TD
    A["IC RECORDER"] --> B["VOICE*1"]
    B --> C["FOLDER01"]
    C --> D["FOLDER05"]
    D --> E["MUSIC"]
    E --> F["POP"]
    F --> G["J-POP*2"]
    G --> H["MP3"]
    G --> I["AAC-LC"]
    H --> J["*3"]
    I --> K["*3"]
    L["PODCASTS"] --> M["NEWS*2"]
    M --> N["MP3"]
    M --> O["AAC-LC"]
    P["conversation*2"] --> Q["MP3"]
    P --> R["MP3"]
    S["MP3"] --> T["*4"]
    U["WMA"] --> V["*4"]
    W["Instructions*3"] --> X["..."]
*1 Even if a file is transferred directly under the VOICE folder, it will not be displayed on the ☑ tab of the IC recorder. When you transfer a file from your computer to the IC recorder, put the file in the folders under the VOICE folder.
*2 The name of a folder in which music files are stored will be displayed on the IC recorder as it is, so it is convenient if you put an easy-to-remember name on the folder in advance.
Folders shown in the illustration are examples of folder names.
*3 The IC recorder can recognize up to 8 levels of folders transferred to the IC recorder.
*4 If you transfer music files separately, they are classified as being in “No Folder.”
*5 The operating instructions of the IC recorder are stored in the “Instructions” folder directly under the “IC RECORDER” folder.

Hints
- The title or artist name, etc., registered in the music files, can be displayed on the IC recorder. It is useful if you input the ID3 tag information using the software you use to make the music files on your computer.
- If no title, or artist name has been registered “No Data” will be displayed in the display window of the IC recorder.
Structure of folders displayed in the display window of the IC recorder
The display of the structure of the folders seen in the display window of the IC recorder is different from that seen on the display of a computer.
The folder indicators in the display window of the IC recorder are as follows:
☐ : Folder for files recorded using the IC recorder
☐ : Folder transferred from a computer (They are displayed when music files have been transferred from a computer.)
: Folder for podcast files transferred from a computer (These folders are displayed when podcast files have been transferred from a computer.)
Note
If folders have no files that can be played back using the IC recorder, those folders will not be displayed in the display window of the IC recorder.
Folders displayed on the ☑ tab of the IC recorder
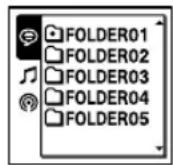
Folders for files recorded using the IC recorder (folders under the VOICE folder) will be displayed.
Note
Even if a file is transferred directly under the VOICE folder, it will not be displayed on the ☺ tab of the IC recorder.
Folders displayed on the Tab of the IC recorder
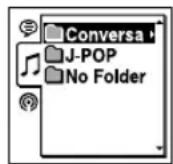
The following folders will be displayed among the folders forwarded from a computer.
- Folders under the MUSIC folder which contains a file (when some folders have multiple levels, all folders will be displayed in parallel.)
- Folders transferred to places other than under the MUSIC folder or the PODCASTS folder
- A folder called “No Folder” (If you transfer music files separately, those files will be displayed under this folder.)
Folders displayed on the @tab of the IC recorder
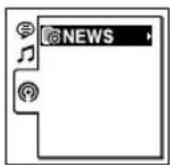
Folders for podcast files transferred from a computer will be displayed.
Disconnecting the IC recorder from your computer
Follow the procedures below; otherwise, data may be damaged.
1 Make sure that the operation indicator of the IC recorder does not light.
2 Perform the following operation on your computer.*
On the Windows taskbar at the bottom right of the desktop, left-click the following icon:

▶ Left-click “Eject IC RECORDER” (Windows 7), or “Safely remove USB Mass Storage Device” (Windows XP, Windows Vista).
The icon and menu displayed can be different on different operating systems. The icon may not be always displayed on the taskbar depending on your computer settings.
On a Macintosh screen, click the "IC RECORDER" ejection icon on the Finder.
3 Disconnect the IC recorder from the USB port of the computer, and slide the USB DIRECT slide lever in the direction of the arrow to retract the USB connector.
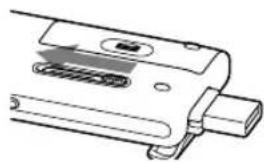
natural_image
Technical line drawing of a mechanical component with no visible text or symbolsCopying Files from the IC Recorder to Your Computer
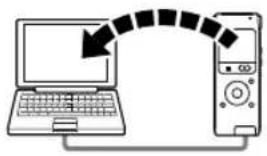
flowchart
graph TD
    A["Laptop"] -->|Video Stream| B["Desktop Computer"]
    B --> C["Video Stream"]
    C --> D["Video Stream"]
    D --> E["Video Stream"]
    E --> F["Video Stream"]
You can copy the files and folders from the IC recorder to your computer to store them.
1 Connect the IC recorder to your computer (p. 78).
2 Copy files or folders you want to transfer to your computer.
Drag and drop the files or folders you want to copy from "IC RECORDER" to the local disk on your computer.

To copy a file or folder (Drag and drop)
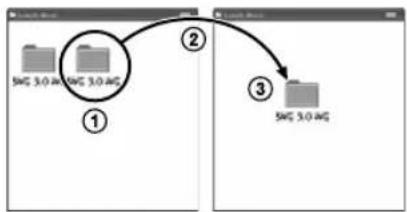
flowchart
graph TD
    A["①"] --> B["②"]
    B --> C["③"]
    style A fill:#f9f,stroke:#333
    style B fill:#ccf,stroke:#333
    style C fill:#cfc,stroke:#333
IC RECORDER
Your computer
① Click and hold,
② drag,
③ and then drop.
3 Disconnect the IC recorder from your computer (p. 81).
Copying Music Files from Your Computer to the IC Recorder and Playing Them Back
You can copy music or the other audio files (MP3(.mp3)/WMA(.wma)/AAC-LC(.m4a)*) from your computer to the IC recorder by dragging and dropping them, and you can play them back using the IC recorder.
* For the file formats that can be played back using the IC recorder, see "Specifications" (p. 89).
1 Connect the IC recorder to your computer (p. 78).
2 Copy the folder in which the music files are stored to the IC recorder.
On a Windows screen using Explorer, or on a Macintosh screen using Finder, drag and drop the folder containing the music files onto "IC RECORDER."
The IC recorder can recognize up to 400 folders. You can copy up to 199 files to one folder. Moreover, the IC recorder can recognize up to a total of 4,095 folders and files for one memory media.
3 Disconnect the IC recorder from your computer (p. 81).
Playing back music files copied from your computer using the IC recorder
1 Press
2 Press ◀◀◀, press ▲ or ▼ to select the ♪ tab, and then press ▶/ENT.
3 Press ▲ or ▼ to select the folder (☐) in which music files are stored, and then press ▶/ENT.
To display the files contained in the selected folder, press ▶▶▶.
4 Select the music file you want to play.
When the file selection window is displayed, press ▲ or ▼ to select the desired file, and then press ▶ /ENT.
When the stop mode window is displayed, you can switch files by pressing ◀◀◀ and ▶▶◀.
5 Press ▶/ENT to start playback.
6 Press ■ STOP to stop playback.
Display when playing back a music file
Press ▲ or ▼ to check the music file information during playback.
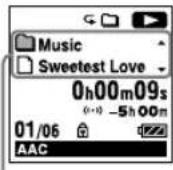
: Folder name
□: File name
: Artist name
♪ : Title name
Using the IC Recorder as USB Memory
When the IC recorder is connected to your computer, image data or text data on the computer, as well as files recorded using the IC recorder can be temporarily stored on the IC recorder.
Your computer must meet the specified system requirements to use the IC recorder as USB memory.
For details on the system requirements, see page 89.
Using a USB AC Adaptor
USB connector of the IC recorder
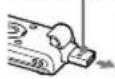
USB AC adaptor (not supplied)
You can use the IC recorder by connecting the IC recorder to an AC outlet using a USB AC adaptor (not supplied). It is useful when you want to record for a long time.
1 Connect a USB AC adaptor to an AC outlet.
2 Slide the USB DIRECT slide lever on the back of the IC recorder and connect the USB connector to the USB AC adaptor.
Disconnecting the IC recorder from the AC outlet
Follow the procedures below; otherwise, when the IC recorder contains data files, the files may be damaged or become unplayable.
1 If you are recording or playing back a file, press ■ STOP to put the IC recorder into the stop mode.
2 Make sure that the operation indicator of the IC recorder does not light.
3 Disconnect the IC recorder from the USB AC adaptor, and then disconnect the USB AC adaptor from the AC outlet.
Precautions
On power
Operate the unit only on 1.5 V or 1.2 V DC. Use one LR03 (size AAA) alkaline battery or one NH-AAA rechargeable battery.
On safety
Do not operate the unit while driving, cycling or operating any motorized vehicle.
On handling
- Do not leave the unit in a location near heat sources, or in a place subject to direct sunlight, excessive dust or mechanical shock.
- Should any solid object or liquid fall into the unit, remove the battery and have the unit checked by qualified personnel before operating it any further.
- Be careful not to allow water to splash on the unit. The unit is not waterproof. In particular, be careful in the following situations.
— When you have the unit in your pocket and go to the bathroom, etc.
When you bend down, the unit may drop into the water and may get wet.
- When you use the unit in an environment where the unit is exposed to rain, snow, or humidity.
— In circumstances where you get sweaty. If you touch the unit with wet hands or if you put the unit in the pocket of sweaty clothes, the unit may get wet.
- You may feel pain in your ears if you use the headphones when the ambient air is very dry. This is not because of a malfunction of the headphones, but because of static electricity accumulated in your body. You can reduce static electricity by wearing non-synthetic clothes that prevent the emergence of static electricity.
On noise
- Noise may be heard when the unit is placed near an AC power source, a fluorescent lamp or a mobile phone during recording or playback.
- Noise may be recorded when an object, such as your finger, etc., rubs or scratches the unit during recording.
On maintenance
To clean the exterior, use a soft cloth slightly moistened in water. Then use a soft dry cloth to wipe the exterior. Do not use alcohol, benzine or thinner.
If you have any questions or problems concerning your unit, please consult your nearest Sony dealer.
Backup recommendations
To avoid potential risk of data loss caused by accidental operation or malfunction of the IC recorder, we recommend that you save a backup copy of your recorded files to a computer, etc.
Specifications
System requirements
To use your computer with the IC recorder, or to use the IC recorder as a USB mass storage device, your computer must meet the operating system requirements and port environment described below.
Operating systems
- Windows 7 Ultimate
- Windows 7 Professional
- Windows 7 Home Premium
- Windows 7 Home Basic
- Windows 7 Starter
- Windows Vista Ultimate Service Pack 2 or higher
- Windows Vista Business Service Pack 2 or higher
- Windows Vista Home Premium Service Pack 2 or higher
- Windows Vista Home Basic Service Pack 2 or higher
- Windows XP Media Center Edition 2005 Service Pack 3 or higher
- Windows XP Media Center Edition 2004 Service Pack 3 or higher*
- Windows XP Media Center Edition Service Pack 3 or higher*
- Windows XP Professional Service Pack 3 or higher
- Windows XP Home Edition Service Pack 3 or higher
• Mac OS X (v10.3.9-v10.7)
Pre-installed.
*Excluding China
Notes
- One of the above operating systems should be by default pre-installed. Any operating system other than those indicated above (Windows 98, Windows 2000 or Linux, etc.), upgraded operating systems or multi-boot environment are not supported.
- 64 bit versions of Windows XP are not supported.
- For the latest version information and compatibility with your operating system, please access the support home page for the IC recorder (p. 94).
Hardware environment:
- Sound board: Sound boards compatible with any of the supported operating systems
- Port: USB port
Notes
The following systems are not supported:
- Operating systems other than the ones indicated on page 89
- Personally constructed computers or operating systems
- Upgraded operating systems
- Multi-boot environment
- Multi-monitor environment
Design and specifications
| IC Recorder section | |
| Capacity (User available capacity) | |
| 2 GB (approx. 1.80 GB = 1,932,735,283 Byte) | |
| A part of the memory capacity is used as a management area. | |
| Maximum number of folders (for a drive) | |
| 400 folders | |
| Maximum number of files (for a folder) | |
| 199 files | |
| Maximum number of files (for a drive) | |
| 4,074 files (When 21 folders are contained in a drive.) | |
| Frequency range | |
| MP3 192kbps | 50 Hz - 20,000 Hz |
| MP3 128kbps | 50 Hz - 16,000 Hz |
| MP3 48kbps(MONO) | 50 Hz - 14,000 Hz |
| MP3 8kbps(MONO) | 60 Hz - 3,400 Hz |
| Compatible file formats | |
| MP3*1 | Bit rate: 32 kbps - 320 kbps (Supports variable bit rate (VBR))Sampling frequencies: 16/22.05/24/32/44.1/48 kHzFile extension: .mp3*1 The playback of MP3 files recorded using the IC recorder is also supported. Not all encoders are supported. |
| WMA*2 | Bit rate: 32 kbps - 192 kbps, (Supports variable bit rate (VBR))Sampling frequencies: 44.1 kHzFile extension: .wma*2 WMA Ver. 9 is compatible, however, MBR (Multi Bit Rate), Lossless, Professional, and Voice are not supported. Copyright-protected file cannot be played back. Not all encoders are supported. |
| AAC-LC*3 | Bit rate: 16 kbps - 320 kbps, (Supports variable bit rate (VBR))Sampling frequencies:11.025/12/16/22.05/24/32/44.1/48 kHzFile extension: .m4a*3 Copyright-protected file cannot be played back. Not all AAC encoders are supported. |
| General section | |
| Speaker | |
| Approx. 16 mm (21/32 in.) dia. | |
| Input/Output | |
| Microphone jack (minijack, stereo) | input for plug in power, minimum input level 0.9 mV |
| Headphone jack (minijack, stereo) | recommended load impedance: 16 ohms |
| USB connector (Type-A) | High-Speed USB compatible |
| Playback speed control (DPC) | |
| 2.00 times - 0.50 times MP3/WMA/AAC-LC | |
| Power output | |
| 90 mW | |
| Power requirements | |
| One LR03 (size AAA) alkaline battery (supplied) | 1.5 V DC |
| One NH-AAA rechargeable battery (not supplied) | 1.2 V DC |
| Operating temperature | |
| 5 °C - 35 °C (41 °F to 95 °F) | |
| Dimensions (w/h/d) (not incl. projecting parts and controls) (JEITA)*4 | |
| Approx. 36.6 mm × 102.0 mm × 14.6 mm (1 1/2 × 4 1/8 × 19/32 inches) | |
| Mass (JEITA)*4 | |
| Approx. 56 g (2 oz) including one LR03 (size AAA) alkaline battery*4 The standard of JEITA (Japan Electronics and Information Technology Industries Association) | |
| Supplied accessories | |
| See supplied Quick Start Guide | |
Design and specifications are subject to change without notice.
Maximum recording time ^*5*6
The maximum recording time of all the folders is as follows.
| REC mode Recording scene | *7 | Built-in memory | |
| MP3 192kbps Stereo st | standard-quality recording mode | 22h. 20m. | |
| MP3 128kbps Long play | stereo recording mode | 33h. 30m. | |
| MP3 48kbps (MONO) | Monaural standard recording mode | 89h. 25m. | |
| MP3 8kbps (MONO) L | long play monaural recording mode 536h. | ||
h.: hours/m.: minutes
*5 When you are going to record continuously for a long time, you may have to replace the battery with new one in the midst of recording. For details on the battery life, see the table on page 93.
*6 The maximum recording time in the above table is for your reference only.
*7 Default settings
The maximum playback time of a music file /number of files*8
| Bit rate Playback time Number of files | ||
| 48 kbps 89h. 25m. 1341 files | ||
| 128 kbps 33h. 30m. 502 files | ||
| 256 kbps | 16h. 45m. 251 files |
h.: hours/m.: minutes
*8 In the case where MP3 files of 4 minutes each are transferred to the IC recorder.
Battery life
When using a Sony LR03 (SG) (size AAA) alkaline battery ^*1
| REC Mode Recording Playback through | speaker*2 | Playback using the headphones |
| MP3 192kbps Approx. 29h. Approx. 22h. Approx. 61h. | ||
| MP3 128kbps Approx. 31h. Approx. 22h. Approx. 61h. | ||
| MP3 48kbps (MONO) Approx. 33h. Approx. 22h. Approx. 61h. | ||
| MP3 8kbps (MONO) Approx. 42h. Approx. 22h. Approx. 61h. | ||
| Music file (128 kbps/44.1kHz) — Approx. 22h. Approx. 61h. |
h.: hours
When using a Sony NH-AAA rechargeable battery ^4
| REC Mode Recording Playback through | speaker*2 | Playback using the headphones |
| MP3 192kbps Approx. 24h. Approx. 15h. Approx. 39h. | ||
| MP3 128kbps Approx. 24h. Approx. 15h. Approx. 39h. | ||
| MP3 48kbps (MONO) Approx. 25h. Approx. 15h. Approx. 39h. | ||
| MP3 8kbps (MONO) Approx. 30h. Approx. 15h. Approx. 39h. | ||
| Music file (128 kbps/44.1kHz) — Approx. 15h. Approx. 39h. |
h.: hours
*1 Measured value by the standard of JEITA (Japan Electronics and Information Technology Industries Association). The battery life may shorten depending on how you operate the IC recorder.
*2 When playing back music through the internal speaker with the volume level set to 13
Troubleshooting
Before taking the IC recorder for repair, check the following sections. Should any problem persist after you have made these checks, consult your nearest Sony dealer.
Please access the following support home page to get the support information about your IC recorder:
For customers in Europe: http://support.sony-europe.com/DNA For customers in Latin America: http://www.sony-latin.com/index.crp For customers in the U.S.A.: http://www.sony.com/recordersupport For customers in Canada: http://www.sony.ca/ElectronicsSupport http://fr.sony.ca/ElectronicsSupport For customers in other countries/regions: http://www.sony-asia.com/support
Note that recorded files may be deleted during service or repair work.
On the IC recorder operations
Noise
Noise is heard.
- An object, such as your finger, etc., accidentally rubbed or scratched the IC recorder during recording so that noise was recorded.
- The IC recorder was placed near an AC power source, a fluorescent lamp or a mobile phone during recording or playback.
- The plug of the connected external microphone (not supplied) is dirty.
→ Clean the plug. - The plug of the connected headphones is dirty.
→ Clean the plug.
Power source
The IC recorder cannot be turned on. The IC recorder does not operate, even if you press any button.
- The battery is weak.
- The battery has been inserted with incorrect polarity (p. 16).
- The power of the IC recorder is off.
→ Slide and hold the HOLD•POWER switch in the direction of “POWER” until the window display appears. The power is turned on (p. 17).
- The HOLD function is activated.
→ Slide the HOLD•POWER switch in the center direction (p. 14).
The IC recorder cannot be turned off.
- Slide and hold the HOLD•POWER switch in the direction of “POWER” until “Power Off” animation is displayed when the IC recorder is stopped. The power is turned off (p. 17).
The IC recorder is powered off automatically.
- When the IC recorder is in the stop mode and you leave the IC recorder without attempting an operation for a certain length of time, the auto power off function will take effect. (The length of time before auto power off is set to “10min” when you purchase the IC recorder.) You can select the length of time before auto power off takes effect in the menu (p. 75).
The battery life is short.
- The battery life on page 93 is based on playback with the volume level set to 13. The battery life may shorten depending on the operation of the IC recorder.
- Even if you do not use the IC recorder, the battery is consumed slightly. If you do not intend to use the IC recorder for an extended period of time, it is recommended that you turn the power off (p. 17) or remove the battery. Moreover, if you set “Auto Power Off” to a short span in the menu (p. 75), you can prevent the battery from being consumed due to forgetting to turn the IC recorder off.
- You are using a battery in an environment with a temperature of under 5 °C (41 °F). Battery life becomes shorter as a result of the battery characteristics. This is not a malfunction.
- You are using a manganese battery for this IC recorder. You cannot use the IC recorder with a manganese battery.
Operating
The IC recorder does not operate correctly.
• Take out the battery and insert it again.
- You may have formatted the memory of the IC recorder using the computer.
→ Use the IC recorder formatting function to format the memory (p. 76).
The operation indicator does not light.
- “LED” is set to “OFF.”
→ Display the menu and set "LED" to "ON" (p. 74).
Recording
You cannot record a file.
- The remaining memory capacity is insufficient.
- You cannot record a file when you select a folder in the playback-only area (the 📌 tab and the 🔒 tab).
Recording is interrupted.
- The VOR function is activated. When you are not using the VOR function, set "VOR" to "OFF" in the menu (p. 31).
The VOR function does not work.
- During synchronized recording, the VOR function does not work.
When recording from other equipment, the input level is too strong or not strong enough.
- Connect the headphone jack of other equipment to the ⚪ (microphone) jack of the IC recorder and adjust the volume level on the piece of equipment connected to the IC recorder.
Playback
The playback volume is low.
- The built-in speaker is mainly for monitoring, and the playback volume is low.
→ Use the supplied headphones.
No sound comes from the speaker.
• Headphones are plugged in (p. 44).
Sound comes from the speaker even when the headphones are plugged in.
- If you plug in the headphones not securely during playback, the sound may come from the speaker.
→ Unplug the headphones, and then insert them securely.
Sound effect does not change even when the "Effect" setting is changed.
- When you are using the built-in speaker, the effect function is invalid.
- When the noise cut function is effective, the effect function does not work.
Playback speed is too fast or too slow.
- The DPC(SPEED CTRL) switch to "ON," and the playback speed is adjusted with ▲ or ▼.
→ Slide the DPC(SPEED CTRL) switch to "OFF" or press ▲ or ▼ to adjust the speed in DPC again (p. 39).
Playback sound is not good when a music file is played back.
- The noise cut function is effective.
→ When you play back a music file, set "Noise Cut" to "OFF" (p. 38).
Editing
You cannot divide a file.
- You need a certain amount of free space in the memory to divide a file.
- 199 files have been recorded in the selected folder (☐).
→ Erase some of the files (p. 52) or erase all the files after you store them on your computer or other device. - Because of the system limitations, you may not be able to divide a file at the very beginning or at the very end of the file.
- You cannot divide files other than those recorded using the IC recorder (e.g., a file transferred from a computer).
You cannot move a file.
- You cannot move a Ⓞ (Podcast) file.
- You cannot move a protected file.
Clock
“--:--” is displayed.
- You have not set the clock (p. 18).
"--y--m--d" or "--:--" is displayed on the REC Date display.
- The date of recording will not be displayed if you recorded the file when the clock was not set.
Display
There are fewer menu items displayed in the menu mode.
- During playback or recording modes, there are menu items that are not displayed (p. 64).
The remaining time displayed in the display window is shorter than that displayed in the computer.
- The IC recorder requires a certain amount of memory for system operation. That amount is subtracted from the remaining time, which is the reason for the difference.
Files
The "Memory Full" animation is displayed and you cannot start recording.
- The memory is full.
→ Erase some of the files (p. 52) or erase all the files after you store them on the your computer or other device.
The "File Full" animation is displayed and you cannot operate the IC recorder.
- 199 files have been recorded in the selected folder (☐) or 4,074 files (when there are 21 folders) in total have been recorded. Therefore you cannot record another file, or move a file.
→ Erase some of the files (p. 52) or erase all the files after you store them on your computer or other device.
Computers
Menu does not reflect the change in settings.
- If the battery is removed just after the menu setting is changed, the menu setting may not function.
A character in a folder or file name is displayed in unreadable characters.
- The IC recorder cannot support or display some special characters and symbols that are entered on a computer using Windows Explorer or the Macintosh Finder.
It takes a long time to copy a file.
- If the file size of a file is large, it takes a considerable time to finish copying. Wait until the copying is finished.
The IC recorder is not recognized by your computer. A folder/file cannot be transferred from your computer.
- Disconnect the IC recorder from your computer and reconnect it.
- Do not use a USB hub or USB extension cable other than supplied USB connection support cable. Connect the IC recorder directly to your computer or use the supplied USB connection support cable.
- Operation is not guaranteed if you use any system requirements other than those described on page 89.
- Depending on the USB port position, the IC recorder may not be recognized. If this happens, try another port.
The file transferred from your computer cannot be played back.
- The IC recorder can recognize up to 8 levels of folders transferred to the IC recorder.
- The file format may differ from those that can be played back using the IC recorder (MP3(.mp3)/WMA(.wma)/AAC-LC(.m4a)). Check the compatible file formats (p. 90).
The computer cannot start.
- If you reboot the computer with the IC recorder connected to the computer, the computer may freeze or may not start properly.
→ Disconnect the IC recorder from the computer and reboot the computer again.
Messages List
Follow the instructions below if a message appears in the display.
| Message Cause/Remedy | |
| HOLDSlide HOLD Switch to Activate. | All the button operations are disabled because the IC recorder is in the HOLD status to prevent unintentional operations. Slide the HOLD•POWER switch towards the center to release the IC recorder from the HOLD status (p. 14). |
| Low Battery Level | You cannot format the memory or erase all the files in a folder because of insufficient battery power. Replace the exhausted battery with a new LR03 (size AAA) alkaline battery or a fully-charged NH-AAA rechargeable battery (not supplied). |
| Low Battery | The battery is exhausted. Replace the exhausted battery with a new LR03 (size AAA) alkaline battery or a fully-charged NH-AAA rechargeable battery (not supplied). |
| Memory Full | The remaining memory capacity of the IC recorder is insufficient. Erase some files before recording. |
| File Full | When there are already the maximum number of files in the selected folder or the total number of files stored on the IC recorder has exceeded the maximum, you cannot record a new file. Erase some files before recording. |
| Settings are Full | When you rename a folder, there are already 10 folders with the same folder name as the folder you selected. Please select a different folder name from the templates. |
| Track Marks are Full | You can set up to 98 track marks for a file. Cancel unwanted track marks (p. 56). |
| File Damaged | You cannot play back or edit files, because the data of the selected file is damaged. |
| Built-In Memory Needs to be Formatted | The IC recorder cannot be turned on using the computer because there is no copy of the control file required for operation. Format the IC recorder using the formatting function in the menu (p. 76). Do not use your computer to format the IC recorder. |
| Process Error | Remove and then re-insert the battery.Save a backup copy of your data and format the IC recorder using the menu (p. 76). |
| Set Date&Time | ● Set the clock; otherwise, you cannot set the alarm. |
| No File | ● The selected folder does not have any files. You cannot move a file or set the alarm, etc., because of this. |
| No Track Marks | ● There are no track marks when you attempt to erase a track mark or track marks, or divide a file at all the track mark positions. |
| File Protected | ● The selected file is protected or is a “Read only” file. You cannot erase it. Cancel the protection on the IC recorder or cancel “Read only” on your computer to edit the file using the IC recorder. |
| Already Set | ● You set the alarm to play back a file at a date and time previously set on another file. Change the alarm setting. |
| Past Date/Time | ● You set the alarm when the time has already passed. Check it and set the appropriate date and time (⇨ p. 49). |
| Unknown Data | ● This data is not in a file format that is supported by the IC recorder. The IC recorder supports MP3(.mp3)/WMA(.wma)/AAC-LC(.m4a) files. For details, see “Design and specifications” (⇨ p. 90).● You cannot play back copyright protected files. |
| Invalid Operation | ● You cannot divide or set a track mark in files in the folder in the playback-only area (the ➔ tab and the ➔ab).● The file name has reached the maximum number of characters; you cannot divide the file. Shorten the file name.● The “Divide All Track Marks” function cannot be used because there is a track mark within 0.5 seconds from the dividing position.● The “Divide All Track Marks” function cannot be used because there is a track mark within 0.5 seconds from the beginning of a file or the end of a file.● The file length is less than 1 second; you cannot divide such a short file.● The “Divide Current Position” function cannot be used at a position within 0.5 seconds from the beginning of a file or the end of a file. |
| New File | ● The file being recorded has reached the maximum size limit (1 GB). The file will be divided automatically and recording will continue as a new file. |
| Invalid when Noise Cut is ON | When the noise cut function is effective, the effect function does not work. Set “Noise Cut” to “OFF” (p. 38). |
| Change Folder | If there are no files in the or folder, no folders are displayed in the display window. A folder containing a file will be displayed. |
| Cannot Divide - Exceeds Max 199 Files in Folder | When there are already 199 files in the selected folder or the total number of files stored on the IC recorder exceeds the maximum, you cannot divide a file. Erase some files before dividing a file. |
| Same File Name Exists | A file of the same file name already exists in the folder, so a file cannot be created or renamed. |
| Erased Track Marks too near Divide Point | When there is a track mark set within 0.5 seconds from the dividing position, the track mark is automatically erased. |
| AVLS* | The volume of the playback sound exceeds the AVLS-specified level. Adjust the volume to a moderate level. |
| System Error | A system error other than the above has occurred. Remove the battery and re-insert it. |
*: for the European models only
System Limitations
There are some system limitations of the IC recorder. Troubles as mentioned below are not malfunctions of the IC recorder.
| Symptom Cause/Remedy | |
| You cannot display or play back music files in order. | ·If you have transferred music files using your computer, those files may not be transferred in order of transfer because of system limitations. If you transfer music files from your computer to the IC recorder one by one, you can display and play back the music files in transferred order. |
| A file is divided automatically. | ·The file being recorded has reached the maximum size limit (1 GB). Therefore it is automatically divided. |
| You cannot enter lower-case characters. | ·Depending on the combination of the characters used for the folder name that was made on your computer, those characters may change to all capitals. |
| “□” is displayed in place of a folder name, title, artist name, or file name. | ·A character which cannot be displayed on the IC recorder has been used. Using your computer, replace it with one which can be displayed on the IC recorder. |
| When you set A-B repeat playback, the set positions move a little. | ·Depending on the files, the set positions may move. |
| The remaining recording time becomes shorter when you divide a file. | ·You need a certain amount of free space for a file management area to divide a file, therefore the remaining recording time will be shortened. |
Trademarks
- Microsoft, Windows, Windows Vista and Windows Media are registered trademarks or trademarks of Microsoft Corporation in the United States and/or other countries.
• Macintosh and Mac OS are trademarks of Apple Inc., registered in the USA and other countries. - MPEG Layer-3 audio coding technology and patents licensed from Fraunhofer IIS and Thomson.
All other trademarks and registered trademarks are trademarks or registered trademarks of their respective holders. Furthermore, “™” and “®” are not mentioned in each case in this manual.
This product contains technology subject to certain intellectual property rights of Microsoft.
Use or distribution of this technology outside of this product is prohibited without the appropriate license(s) from Microsoft.
Index
A
A-B repeat 43
AAC-LC files 90
Adjusting the volume .....25, 35
Alarm 49,64,71
Alkaline battery 93
AVLS (Automatic Volume Limiter System) 15, 64, 71
B
Battery life 93
Built-in memory 79
Built-in microphones 24
C
Calendar 47,65,73
Changing a file name .....61, 64, 72
Changing a folder name ...60, 64, 72
Changing the Scene Select settings ....29, 64, 66
Connecting the IC recorder to your computer 78
Copying files to your computer 82
Copying music files to the IC recorder .... 83
Cue 44
D
Displaying the current date and time 20
Display window 9
Dividing a file at all the track mark positions ....59, 64, 73
Dividing a file at the current position ....58, 64, 72
DPC (Digital Pitch Control) ..... 39
E
Easy search 45,64,70
Editing files 54
Effect 40,64,69
Erasing 52
Erasing all files in a folder ....53, 64, 73
Erasing all the track marks ....57, 64, 72
Erasing a track mark .....56, 64, 72
External microphone 32
F
Folder 22,60,79
H
HOLD 14
HOLD•POWER switch .....14, 17
1
Index to parts and controls Display window ....9
Front 7
Rear 8
Input selection ......32, 34, 64, 68
M
Maintenance 88
Menu
Alarm 64,71
Auto Power Off 65,75
AVLS 64,71
Backlight 65,74
Beep 65,75
Calendar 65,73
Change File Name ......64, 72
Change Folder Name ......64, 72
Date&Time 65,74
Display 65,73
Divide All Track Marks ......64, 73
Divide Current Position .....64, 72
Easy Search 64,70
Effect 64, 69
Erase All 64,73
Erase All Track Marks ......64, 72
Erase Track Mark 64,72
Format 65,76
Language 65,74
LCF(Low Cut) ......64, 67
LED 65,74
Making settings 63
Menu Settings 64
Mic Sensitivity 64, 67
Move File 64,72
Noise Cut 64, 69
Play Mode 64,70
Protect 64,72
REC Mode 64, 67
Scene Edit 64, 66
Scene Select 64, 66
Select Input 64, 68
SYNC REC 64, 68
System Information 65,76
Time Display 65,75
VOR 64,68
Messages list 100
Monitoring the recording 25
Moving a file ....54, 64, 72
MP3 files 90
N
Noise 87
Noise cut 38,64,69
P
Pause recording 26
Playback 35
Playback speed 39
Playback time 92
Play modes 42,64,70
Precautions 87
Protecting a file ......62, 64, 72
R
Rechargeable battery .....16, 93
Recording 24
Recording from a telephone ..... 32
Recording from other equipment 33
Recording level guide 25
Recording time 92
Recording with an external microphone 32
Recording with other equipment 51
Remaining recording time 37
Review 26,44
S
Scene selection 27, 64, 66
Selecting a folder and a file ..... 22
Selecting a tab 23
Setting the clock .....18, 65, 74
Setting the language .....21, 65, 74
Specifications 89
Synchronized recording ....33, 64, 68
System limitations 103
System requirements 89
T
Tab view 13
Track mark 55
Troubleshooting 94
U
USB AC adaptor 86
USB Memory 85
Using the IC recorder with your computer 77
V
VOR (Voice Operated Recording) 31, 64, 68
W
WMA files 90
- Operating Instructions
- Table of Contents
- Preparing the recorder
- Recording Files
- Playing Files
- Erasing Files
- Editing Files
- About the Menu Function
- Utilizing Your Computer
- Using the IC Recorder with Your
- Copying Files from the IC Recorder to
- Copying Music Files from Your
- Using the IC Recorder as
- Additional Information
- Using a USB AC Adaptor....86
- Precautions 87
- Specifications......89
- Troubleshooting
- Troubleshooting 94
- Messages List ....100
- System Limitations ......103
- Trademarks ....104
- Index 105
- Browsing the Operation Guide
- To use the buttons in the Operation Guide
- Hints
- To change the page layout
- Continuous
- Single Page
- WARNING
- CAUTION
- Notice for the customers: the following information is only applicable to equipment sold in the countries applying EU directives
- Notice for users
- Checking the Parts and Controls
- Using the Display Window
- Note
- Recording level guide display
- Play mode indicator
- Noise cut/Effect indicator
- HOLD indicator
- Current date display
- Current time display
- Tabs
- Folders
- Menu tabs
- Menu items
- Preventing Unintentional Operations (HOLD)
- To disable the button operations (HOLD status)
- To enable the button operations
- Hint
- Maintaining the Moderate Volume Level (AVLS) (For European models only)
- When "AVLS" is set to "ON"
- When "AVLS" is set to "OFF"
- Turning the IC Recorder On
- Inserting a battery
- When to replace the battery
- Battery remain indication
- Turning the power on
- Turning the power off
- Setting the Clock
- Setting the clock after preparing a power source
- Set year, month, day, hour and minute.
- Setting the clock using the menu
- Select "Date&Time" in the menu.
- Press ▲ or ▼ to select "Auto(Synchronizing)" or "Manual," and then press ▶ /ENT.
- Press ▲ or ▼ to select "12y1m1d," and then press ▶ /ENT.
- Set year, month, day, hour and minute.
- Press ■ STOP to exit the menu mode.
- Notes
- To display the current date and time
- Setting the Language to Be Used in the Display Window
- Selecting a Folder, File, and Tab
- Selecting a folder and a file
- Press
- Select a folder.
- Select a file.
- Selecting a tab
- Press ◀◀◀, and then press ▲ or ▼ to select the ☎, ♪, or Ⓤ tab.
- Press the ▶ /ENT.
- Select a folder and a file (p. 22).
- Basic Recording
- Press ● REC/PAUSE in the stop mode.
- About the recording level guide
- Monitoring the recording
- Stopping the recording
- Press ■ STOP.
- Note while accessing
- Changing the Recording Settings
- Selecting a recording scene for each situation
- Tips for better recording
- Recording at a meeting
- Recording a voice note
- Recording an interview
- Recording a music performance
- Changing the Scene Select settings
- Changing the Scene Select setting to the default values
- Default settings
- Starting to Record Automatically in Response to Sound – the VOR Function
- To cancel the VOR function
- Recording via Other Devices
- Recording with an external microphone
- To record sound from a telephone or a cell phone
- Recording from other equipment
- To record using the synchronized recording function
- In the stop mode, connect other equipment to the IC recorder.
- Press ▲ or ▼ to select "Audio IN," and then press ▶/ENT.
- Press ● REC/PAUSE to start recording.
- Start playback on the piece of equipment connected to the IC recorder.
- To record without using the synchronized recording function
- Basic Playback
- Note for the customers in Europe
- Stopping playback
- Other operations
- Display when playing back a file
- File information
- Counter information
- Remaining recording time
- Changing the Playback Settings
- To set the noise cut level
- To cancel the noise cut function
- To set the noise cut function in the menu
- Adjusting the playback speed – the DPC (Digital Pitch Control) function
- To resume normal playback speed
- Selecting the sound effect
- To set your favorite sound level
- Selecting the play mode
- To play back a specified section repeatedly - A-B repeat
- During playback, press A-B to specify the starting point A.
- Press A-B again to specify the finishing point B.
- Convenient Playback Methods
- Listening with better sound quality
- Searching forward/backward during playback – Cue/Review
- When files are played back or searched to the end of the last file
- Quickly locating the point you wish to start playback – Easy search function
- Selecting a Recording Date from the Calendar and Playing Back
- In the stop mode, press MENU/NOISE CUT. Select the □ tab ➤ "Calendar," and then press ▶/ENT.
- Press ◀◀◀ or ▶▶◀I to select a date, and then press ▶/ENT.
- Press ▲ or ▼ to select a file, and then press ▶/ENT.
- Press ▲ or ▼ to select "Enter," and then press ▶/ENT.
- Press ■ STOP to stop playback.
- To cancel the selection of a recording date from the calendar and the accompanying playback
- Playing Back a File at a Desired Time with an Alarm
- To change the alarm setting
- To cancel the alarm setting
- When the set date and time comes
- To stop the alarm playback
- Playback via Other Devices
- Recording with other equipment
- Erasing a File
- To cancel erasing
- To erase a part of a file
- Erasing All Files in a Folder
- Arranging Files in a Folder
- Moving a file to a different folder
- To cancel moving the file
- Using a Track Mark
- Adding a track mark
- Locating a track mark and starting playback at the track mark
- Erasing a track mark
- Erasing all the track marks in the selected file at one time
- Dividing a File
- Dividing a file at the current position
- To cancel dividing
- Dividing a file at all the track mark positions
- Renaming a Folder and a File
- Changing a folder name
- Changing a file name
- Protecting a File
- To release protection
- Making Settings for the Menu
- Press MENU/NOISE CUT to enter the menu mode.
- To return to the previous window
- To exit the menu mode
- Using the IC Recorder with Your Computer
- Connecting the IC recorder to your computer
- Structure of folders and files
- Built-in memory
- Structure of folders displayed in the display window of the IC recorder
- Folders displayed on the ☑ tab of the IC recorder
- Folders displayed on the Tab of the IC recorder
- Disconnecting the IC recorder from your computer
- Copying Files from the IC Recorder to Your Computer
- Copying Music Files from Your Computer to the IC Recorder and Playing Them Back
- Playing back music files copied from your computer using the IC recorder
- Display when playing back a music file
- Using the IC Recorder as USB Memory
- Using a USB AC Adaptor
- Disconnecting the IC recorder from the AC outlet
- Precautions
- On power
- On safety
- On handling
- On noise
- On maintenance
- Backup recommendations
- Specifications
- System requirements
- Operating systems
- Hardware environment:
- Maximum recording time *5*6
- Battery life
- On the IC recorder operations
- Noise
- Noise is heard.
- Power source
- The IC recorder cannot be turned on. The IC recorder does not operate, even if you press any button.
- The IC recorder cannot be turned off.
- The IC recorder is powered off automatically.
- The battery life is short.
- Operating
- The IC recorder does not operate correctly.
- The operation indicator does not light.
- Recording
- You cannot record a file.
- Recording is interrupted.
- The VOR function does not work.
- When recording from other equipment, the input level is too strong or not strong enough.
- Playback
- The playback volume is low.
- No sound comes from the speaker.
- Sound comes from the speaker even when the headphones are plugged in.
- Sound effect does not change even when the "Effect" setting is changed.
- Playback speed is too fast or too slow.
- Playback sound is not good when a music file is played back.
- Editing
- You cannot divide a file.
- You cannot move a file.
- Clock
- “--:--” is displayed.
- "--y--m--d" or "--:--" is displayed on the REC Date display.
- Display
- There are fewer menu items displayed in the menu mode.
- The remaining time displayed in the display window is shorter than that displayed in the computer.
- Files
- The "Memory Full" animation is displayed and you cannot start recording.
- The "File Full" animation is displayed and you cannot operate the IC recorder.
- Computers
- Menu does not reflect the change in settings.
- A character in a folder or file name is displayed in unreadable characters.
- It takes a long time to copy a file.
- The IC recorder is not recognized by your computer. A folder/file cannot be transferred from your computer.
- The file transferred from your computer cannot be played back.
- The computer cannot start.
- Messages List
- System Limitations
- Trademarks
- Index
- A
- B
- C
- D
- E
- F
- H
- 1
- M
- N
- P
- R
- S
- T
- U
- V
- W
Brand : SONY
Model : ICD-UX502
Category : Dictaphone