
MHC-GZR5D - Hi-Fi System SONY - Free user manual and instructions
Find the device manual for free MHC-GZR5D SONY in PDF.


| Product Type | Mini HI-FI Component System |
| Brand | Sony |
| Model | MHC-GZR5D |
| Dimensions (Main Unit) | Approx. 200 × 306 × 415 mm (w/h/d) |
| Weight (Main Unit) | Approx. 7.9 kg |
| Speaker Dimensions | Approx. 220 × 306 × 235 mm (each) |
| Speaker Weight | Approx. 3.0 kg (each) |
| Power Output | 72 W + 72 W (rated at 6 Ω, 1 kHz, 1% THD); 120 W + 120 W (RMS at 6 Ω, 1 kHz, 10% THD) |
| Power Consumption | 190 W |
| Standby Power Consumption | 0.5 W |
| Power Requirements | AC 120-240 V, 50/60 Hz (adjustable with voltage selector; varies by region) |
| Disc Playback | DVD VIDEO, VIDEO CD, CD, DATA CD, DATA DVD (MP3, JPEG) |
| Supported Audio Formats | MP3, WMA, AAC (USB); Dolby Digital, DTS (DVD) |
| Tuner | FM/AM, 20 FM + 10 AM presets |
| Tape Deck | Type I (normal) cassette, 4-track 2-channel stereo |
| USB Functionality | Music transfer from disc to USB, playback of MP3/WMA/AAC and JPEG |
| Karaoke | Microphone input with echo, key control, score mode, Karaoke Pon |
| Remote Control | Included, can operate Sony TV |
| Accessories Included | Remote Commander, AM loop antenna, FM lead antenna, video cord, speaker pads, batteries |
| Safety Features | Auto standby, parental control, multi-disc resume, screen saver |
| Cleaning Instructions | Clean with soft cloth slightly moistened with mild detergent; avoid abrasive pads or solvents |
Frequently Asked Questions - MHC-GZR5D SONY
User questions about MHC-GZR5D SONY
0 question about this device. Answer the ones you know or ask your own.
Ask a new question about this device
Download the instructions for your Hi-Fi System in PDF format for free! Find your manual MHC-GZR5D - SONY and take your electronic device back in hand. On this page are published all the documents necessary for the use of your device. MHC-GZR5D by SONY.
USER MANUAL MHC-GZR5D SONY
Synchronized transfer 63
Synchro recording 60
SYSTEM SETUP 55
T
THEATRE SYNC 27
TIME: 41, 114
Timer 85
TITLE 37,114
Title 39,121
TRACK 36,76,114
Track 7.8
TRACK SELECTION 54
Transferring 62
Troubleshooting 94
TV Hookup 22
TV TYPE 53
SONY®
3-296-435-11(1)
Mini HI-FI Component System
Operating Instructions MHC-GZR5D


WARNING
To reduce the risk of fire, do not cover the ventilation opening of the apparatus with newspapers, tablecloths, curtains, etc. Do not place the naked flame sources such as lighted candles on the apparatus.
To reduce the risk of fire or electric shock, do not expose this apparatus to dripping or splashing, and do not place objects filled with liquids, such as vases, on the apparatus.
As the main plug is used to disconnect the unit from the mains, connect the unit to an easily accessible AC outlet. Should you notice an abnormality in the unit, disconnect the main plug from the AC outlet immediately.
Do not install the appliance in a confined space, such as a bookcase or built-in cabinet.
Do not expose batteries or apparatus with battery-installed to excessive heat such as sunshine, fire or the like.
The unit is not disconnected from the mains as long as it is connected to the AC outlet, even if the unit itself has been turned off.
Excessive sound pressure from earphones and headphones can cause hearing loss.
CAUTION
The use of optical instruments with this product will increase eye hazard.

This appliance is classified as a CLASS 1 LASER product. This marking is located on the rear exterior.
Notice for the customer in the countries applying EU Directives
The manufacturer of this product is Sony Corporation, 1-7-1 Konan, Minato-ku, Tokyo, 108-0075 Japan.
The Authorized Representative for EMC and product safety is Sony Deutschland GmbH, Hedelfinger Strasse 61, 70327 Stuttgart, Germany.
For any service or guarantee matters please refer to the addresses given in separate service or guarantee documents.

Disposal of Old Electrical & Electronic Equipment (Applicable in the European Union and other European countries with separate collection systems)
This symbol on the product or on its packaging indicates that this product shall not be treated as household waste. Instead it shall be handed over to the applicable collection point for the recycling of electrical and electronic equipment. By ensuring this product is disposed of correctly, you will help prevent potential negative consequences for the environment and human health, which could otherwise be caused by inappropriate waste handling of this product. The recycling of materials will help to conserve natural resources. For more detailed information about recycling of this product, please contact your local Civic Office, your household waste disposal service or the shop where you purchased the product.
Applicable accessories: Remote commander

Disposal of waste batteries (applicable in the European Union and other European countries with separate collection systems)
This symbol on the battery or on the packaging indicates that the battery provided with this product shall not be treated as household waste. By ensuring these batteries are disposed of correctly, you will help prevent potentially negative consequences for the environment and human health which could otherwise be caused by inappropriate waste handling of the battery. The recycling of the materials will help to conserve natural resources. In case of products that for safety, performance or data integrity reasons require a permanent connection with an incorporated battery, this battery should be replaced by qualified service staff only. To ensure that the battery will be treated properly, hand over the product at end-of-life to the applicable collection point for the recycling of electrical and electronic equipment.
For all other batteries, please view the section on how to remove the battery from the product safely. Hand the battery over to the applicable collection point for the recycling of waste batteries.
For more detailed information about recycling of this product or battery, please contact your local Civic Office, your household waste disposal service or the shop where you purchased the product.
Note on power cord plug shapes (Saudi Arabian model only)
For AC 220 V wall sockets
1 Make the appropriate voltage setting on the system (only for models with a voltage selector).
2 Make sure that the 13 A 3-pin plug (Type BF) is securely attached to the power cord. (The 13 A 3-pin plug is attached when shipped from the factory.)

natural_image
Line drawing of a 3-pin electrical plug with cable (no text or symbols)For AC 127 V wall sockets
1 Make the appropriate voltage setting on the system (only for models with a voltage selector).
2 Remove the 13 A 3-pin plug using a screwdriver.

natural_image
Illustration of hands using a screwdriver to adjust or install a mechanical component (no text or symbols visible)3 Attach the supplied parallel blade plug (Type A).

natural_image
Illustration of hands connecting a plug into a socket (no text or symbols)About this manual
- Icons, such as CD at the top of each explanation indicate what kind of media can be used with the function being explained.
- The Control Menu items may be different depending on the disc.
- The Control Menu items may vary depending on the area.
- The Setup Menu items may be different depending on the area.
- The order of the displayed items may be different from the actual display.
Table of Contents
About this manual 4
playable discs 7
Guide to parts and controls ......12
Getting Started
Hooking up the system......20
Hooking up the TV....22
Setting the clock 24
Performing "QUICK" setup ......25
Using the "THEATRE SYNC"
function 27
Disc
Playing a disc 28
— Normal Play
Using play mode ....34
Searching/selecting a disc ....39
Playing MP3/JPEG discs ....42
Adjusting the delay between the picture and sound ....47
— "A/V SYNC"
Restricting playback of the disc ....48
— PARENTAL CONTROL
Using the Setup Menu ....51
Tuner
Listening to the radio ....57
Tape
Playing a tape 60
Recording onto a tape ......60
USB Device
Transferring music from a disc to an USB device 62
Recording analog audio to an USB device 67
Listening to music of an USB device 69
Sound Adjustment
Adjusting the sound .....78
Singing along: Karaoke ....80
Other Operations
Using the timer 85
Changing the display ....87
Viewing information about the disc ....88
Hooking up optional components 92
Additional Information
Troubleshooting 94
Precautions 108
Specifications 110
Guide to the Control Menu display 113
Language code list 117
Glossary 119
Index 123
playable discs
| Type Characteristics | Icon used in this manual | Logo | ||
| DVD VIDEO | • DVD VIDEO• DVD-R*/-RW*/+R/+RWin DVD VIDEO format* also in video mode |  |  | |
| VR mode | • DVD-R/-RWin VR (Video Recording) mode(except for DVD-R DL) |  | ||
| VIDEO CD | • VIDEO CD (Ver.1.1 and Ver. 2.0)• Super VCD• CD-R*/-RW** in VIDEO CD or Super VCD format |  |  | |
| CD | • AUDIO CD• CD-R*/-RW** in AUDIO CD format |  |  |  |
| DATA CD | • CD-ROM/-R/-RWin DATA CD format, containing MP3 audio tracks ^1) or JPEG image files ^2) , and conforming to ISO 9660 ^3) Level 1 or Level 2, or Joliet(expansion format) |  |  |  |
 |  | |||
| Type Characteristics | Icon used in this manual | Logo | |
| DATA DVD | • DVD-ROM/-R/-RW/+R/+RW in DATA DVD format containing MP3 audio tracks ^1) or JPEG image files ^2) , and conforming to UDF (Universal Disk Format) |  | |
This system can also play back discs with the following disc logos:

1) MP3 (MPEG 1 Audio Layer 3) is a standard format defined by ISO/MPEG which compresses audio data. MP3 audio tracks must be in MPEG 1 Audio Layer 3 format.
2) JPEG image files must conform to the DCF image file format (DCF “Design rule for Camera File System”: Image standards for digital cameras regulated by “Japan Electronics and Information Technology Industries Association” (JEITA)).
^3) A logical format of files and folders on CD-ROMs, defined by ISO (International Organization for Standardization)
“DVD+RW,” “DVD-RW,” “DVD+R,” “DVD VIDEO,” and the “CD” logos are trademarks.
Discs that cannot be played
- CD-ROMs recorded in PHOTO CD format
• DATA CDs recorded in MP3 PRO format
• Data part of CD-Extras ^1)
• Data part of Mixed CDs ^2)
• Super Audio CDs
• DVD Audio discs - DVD-RAMs
- CPRM compatible DVD-R/RW recorded in Copy-once programs ^3)
• Discs of non-standard shape (for example, heart, square, star)
• Discs that have adhesive tape, paper, or sticker attached to them - Rental or used discs with attached seals where the glue extends beyond the seal
• Discs that have labels printed using ink that feels tacky when touched
^1) CD-Extra: This format records audio (AUDIO CD data) on the tracks in session 1 and data on the tracks in session 2.
2) Mixed CD: This format records data on the first track and audio (AUDIO CD data) on the second and subsequent tracks of a session.
3) CPRM: “Content Protection for Recordable Media” is a coding technology that protects copyright for Copy-Once programs.
Region code of DVD VIDEOS you can play back on this system
Your system has a region code printed on the back of the unit and will only play back DVD VIDEOS labeled with identical region code.
DVD VIDEOs labeled will also be played back on this system. If you try to play back any other region code DVD VIDEO, the message "Playback prohibited by area limitations." will appear on the TV screen. Depending on the DVD VIDEO, no region code indication may be labeled even though playing the DVD VIDEO is prohibited by area restrictions.
Note on DualDiscs
A DualDisc is a two sided disc product which mates DVD recorded material on one side with digital audio material on the other side. However, since the audio material side does not conform to the Compact Disc (CD) standard, playback on this product is not guaranteed.
Notes on CD-R/-RW and DVD-R/-RW/+R/+RW
- In some cases, CD-Rs/-RWs and DVD-Rs/-RWs/+Rs/+RWs cannot be played back on this system due to the recording quality or physical condition of the disc, or the characteristics of the recording device and authoring software. The disc will not be played back if it has not been correctly finalized. For more information, see the operating instructions for the recording device.
- Note that some playback functions may not work with some DVD+Rs/+RWs, even if they have been correctly finalized. In this case, view the disc by normal playback.
- A disc created in Packet Write format cannot be played back.
Note on playback operations of DVD VIDEOS and VIDEO CDs
Some playback operations of DVD VIDEOs and VIDEO CDs may be intentionally set by software producers. Since this system play back DVD VIDEOs and VIDEO CDs according to the disc contents the software producers designed, some playback features may not be available. Also, refer to the instructions supplied with the DVD VIDEOs or VIDEO CDs.
Music discs encoded with copyright protection technologies
This product is designed to play back discs that conform to the Compact Disc (CD) standard. Recently, various music discs encoded with copyright protection technologies are marketed by some record companies. Please be aware that among those discs, there are some that do not conform to the CD standard and may not be playable by this product.
Notes on Multi Session disc
- If the first session is recorded in AUDIO CD or VIDEO CD format, only the first session will be played back.
- The system will recognize a Multi Session disc as an AUDIO CD if there is a session recorded in AUDIO CD format on the disc. However, the system will only play back the disc if the first session is recorded in AUDIO CD format.
- This system can play back Multi Session discs when an MP3 audio track or a JPEG image file is contained in the first session. Any subsequent MP3 audio tracks or JPEG image files recorded in later sessions can also be played back.
Copyrights
This product incorporates copyright protection technology that is protected by U.S. patents and other intellectual property rights. Use of this copyright protection technology must be authorized by Macrovision, and is intended for home and other limited viewing uses only unless otherwise authorized by Macrovision. Reverse engineering or disassembly is prohibited.
This system incorporates Dolby ^1) Digital and DTS ^2) Digital Surround System.
^1) Manufactured under license from Dolby Laboratories.
"Dolby" and the double-D symbol are trademarks of Dolby Laboratories.
2) Manufactured under license under U.S. Patent #'s: 5,451,942; 5,956,674; 5,974,380; 5,978,762; 6,487,535 & other U.S. and worldwide patents issued & pending. DTS and DTS 2.0 + Digital Out are registered trademarks and the DTS logos and Symbol are trademarks of DTS, Inc.©1996-2007 DTS, Inc. All Rights Reserved.
- MPEG Layer-3 audio coding technology and patents licensed from Fraunhofer IIS and Thomson.
- Windows Media is a registered trademark of Microsoft Corporation in the United States and/or other countries.
Guide to parts and controls
This manual mainly explains operations using the remote, but the same operations can also be performed using the buttons on the unit having the same or similar names.
Unit
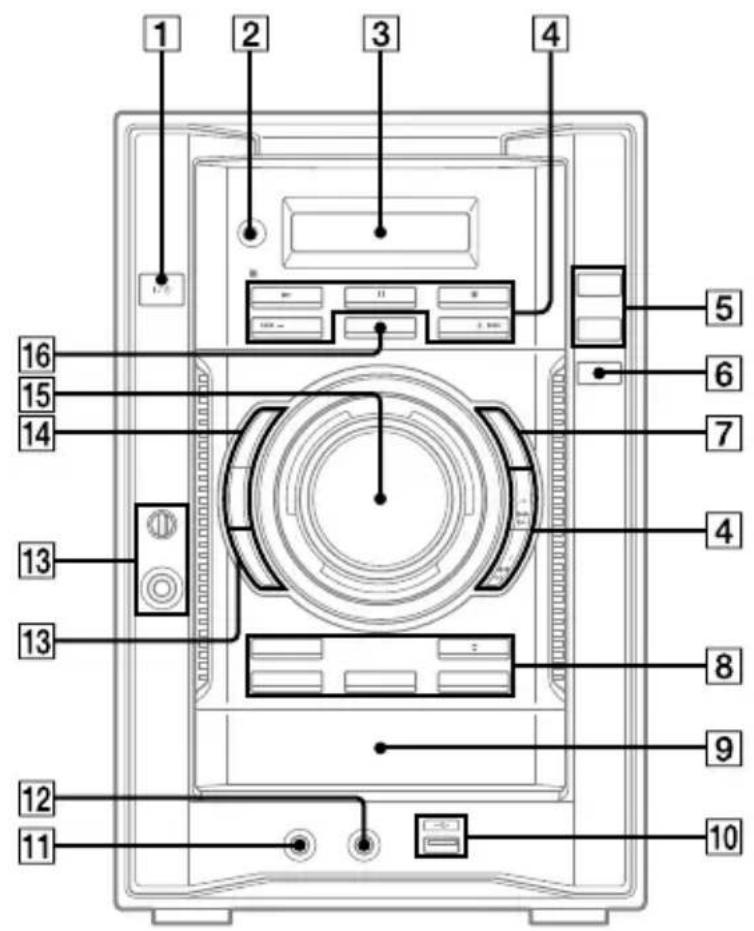
Top panel

Remote


I/⏻ (on/standby) (63, 86, 105)
Press to turn on or off the system.
Remote: TV I/ ^1) (on/standby) (24)
Press to turn on or off the TV.

Remote sensor

Display

Unit: ▶ (play) (22, 28, 71)
Remote: ▷ ^2) (play) (28, 71)
Press to start playback.
II (pause) (23, 29)
Press to pause playback.
■ (stop) (29, 58, 61, 63)
Press to stop playback.
|◀◀/▶▶| (go backward/forward) (26, 27, 29, 72)
Press to select a track or chapter.
◀◀/▶▶ (rewind/fast forward) (29)
Press to find a point in a track or chapter.
Remote: ☐/— (27, 29)
Press to select a folder.
Unit: ↗(29)
Remote: SLOW/SLOW (29)
Press to watch the slow-motion play.
TUNING +/- (57, 58, 59)
Press to tune in the desired station.
PRESET +/− (58)
Press to select the preset station.
Remote: TV CH +/— ^1) (24)
Press to change the TV channels.
5
USB (65, 69)
Press to select the "USB" function.
REC TO USB (63, 67)
Press to transfer music from a disc or record the sound from an analog audio source to the connected optional USB device.
Press to mark track numbers during recording.
6
ENTER (24, 26, 29, 34, 39, 43, 47, 48, 51, 57, 63, 67, 71, 82, 85)
Press to enter the settings.
7
DISPLAY (23, 25, 59, 87, 88)
Press to display the disc information or clock in the front panel display.
8
Unit: ▲ (open/close) (28)
Press to load or eject a disc.
Unit: EX-CHANGE/DISC SKIP (30)
Press to select a disc.
Press to exchange a disc while playing.
Remote: DISC SKIP (30, 63)
Press to select a disc.
Unit: DISC 1 — DISC 3 (30, 61, 63, 105)
Press to select a disc.
Press to switch to the “DVD” function from other function.
9
Disc tray
10
← (USB) port (62, 67, 69, 86)
Connect an optional USB device.
← (USB) indicator (74)
Lights up in red when transferring or recording to the connected optional USB device or when erasing audio tracks or folders.
11
PHONES jack
Connect the headphones.
12
AUDIO IN jack (93)
Connect an optional audio component.
13
ECHO (80)
Press to adjust the echo level.
MIC jack (61, 80)
Connect a microphone.
MIC LEVEL (80)
Turn to adjust the microphone volume.
14
Unit: DSGX (78, 105)
Press to reinforce the bass.
Unit: EQ (78)
Press to select the sound effect.
Remote: SOUND FIELD (78)
Press to select the sound field for the surround sound.
15
Unit: VOLUME (28, 81, 85)
Turn to adjust the volume.
Remote: VOLUME +/— ^2) (28, 81, 85)
Press to adjust the volume.
Remote: TV VOL +/— ^1)2) (24)
Press to adjust the TV volume.
16
Unit: FUNCTION (22, 23, 25, 28, 57, 60, 61, 63, 67, 69, 80)
Remote: FUNCTION +/- (23, 25, 28, 57, 60, 63, 67, 69, 80)
Press to select the function.
17
● (record) (61)
Press to record on a tape.
▶ (play) (60)
Press to start playback of a tape.
◀◀/▶▶ (rewind/fast forward) (60)
Press to rewind or fast forward a tape.
■(stop/eject) (60)
Press to stop playback of a tape.
Press to insert or eject a tape.
II (pause) (60)
Press to pause playback of a tape.
18
PICTURE NAVI (44, 73)
Press to display the thumbnail pictures.
19
REPEAT/FM MODE (38, 59, 77)
Press to listen to a disc, an USB device, a single track or file repeatedly.
Press to select FM reception mode (monaural or stereo).
20
AUDIO (31, 80)
Press to display the current audio signal on the TV screen.
21
SUBTITLE (30)
Press to switch the language of the subtitle (DVD VIDEO only).
D. TUNING (58)
Press to switch to the direct tuning mode.
22
ANGLE (30)
Press to change the angle (DVD VIDEO with multi-angles only).
23
DVD/TUNER MENU (39, 42, 57, 71)
Press to display the menu items on the TV screen.
Press to preset the radio station.
24
DISPLAY (26, 34, 39, 47, 48, 51, 64, 71, 82, 92, 113)
Press to display the Control Menu on the TV screen.
The Control Menu is displayed only when the “DVD” function or “USB” function is selected.
25
TV ^1) (24)
Press to operate the TV functions.
26
◀II STEP II▶ (29)
Press to play one frame at a time when playback is paused.
Press to advance the current scene during playback.
←• REPLAY (29, 43, 71)
Press to replay the previous scene during playback.
27
RETURN (33, 43, 65, 72)
Press to return to the previous menu on the TV screen.
28
/// (24, 34, 35, 39, 57, 64, 78, 85)
Press to select the menu items.
29
DVD TOP MENU (39)
Press to display the DVD title on the TV screen.
30
CLEAR (25, 27, 35, 41, 44, 65, 73)
Press to delete a pre-programmed track or file.
Press to erase audio tracks or folders from the connected optional USB device.
-/--1) (24)
Press to enter a single digit or double digit number.
31
Numeric buttons ^2) (24, 29, 39, 48, 53, 58)
Press to select a track or chapter. Press to enter a password.
10/0^1)
Press to enter a double digit number.
32
KEY CONTROL b/# (81)
Press to change the key to suit your vocal range.
SCORE (84)
Press to start or stop calculating your vocal score.
KARAOKE MODE (80)
Press to select the Karaoke mode.
KARAOKE PON (82)
Press to activate the “Karaoke Pon” function.
33
TIME/TEXT (88, 90)
Press to change the information appearing in the front panel display or on-screen display.
34
SLEEP (27, 85)
Press to set the Sleep Timer.
TV INPUT ^1) (24)
Press to switch the input sources.
35
TIMER MENU (24, 85)
Press to set the clock and the timers.
36
THEATRE SYNC (27)
Press to activate the “THEATRE SYNC” function.
^1) This button is used to operate a Sony TV. For details, see “Operating a Sony TV” (page 24).
^2) The numeric button 5 31, TV VOL + 15, VOLUME + 15 and ▷ 4 buttons on the remote have a tactile dot. Use the tactile dot as a reference when operating the system.
Display


1 Lights up when the timer is set. (85)
2 Indicates the current surround format.
③ Lights up when “DSGX” is turned on.
(78)
4 Lights up during transfer or recording. (60, 62, 67)
5 Lights up when the "USB" function is selected. (69)
6 Indicates the file format.
7 Indicates the type of disc being played back. (28)
8 Indicates the disc presence. (28)
9 Indicates the playback status of the disc or USB device.
10 Lights up when playing VIDEO CD with PBC function. (32)
11 Lights up in "TUNER" function. (57)
12 Indicates the selected play mode. (34)
13 Lights up when the USB device is recognized. (69)
14 Lights up when the microphone echo is turned on.
15 Lights up when the Karaoke Mode is turned on. (80)
16 Lights up when the title or chapter number is displayed.
17 Lights up when the output video signal is NTSC. (23)
18 Displays the text information.
Getting Started
Hooking up the system
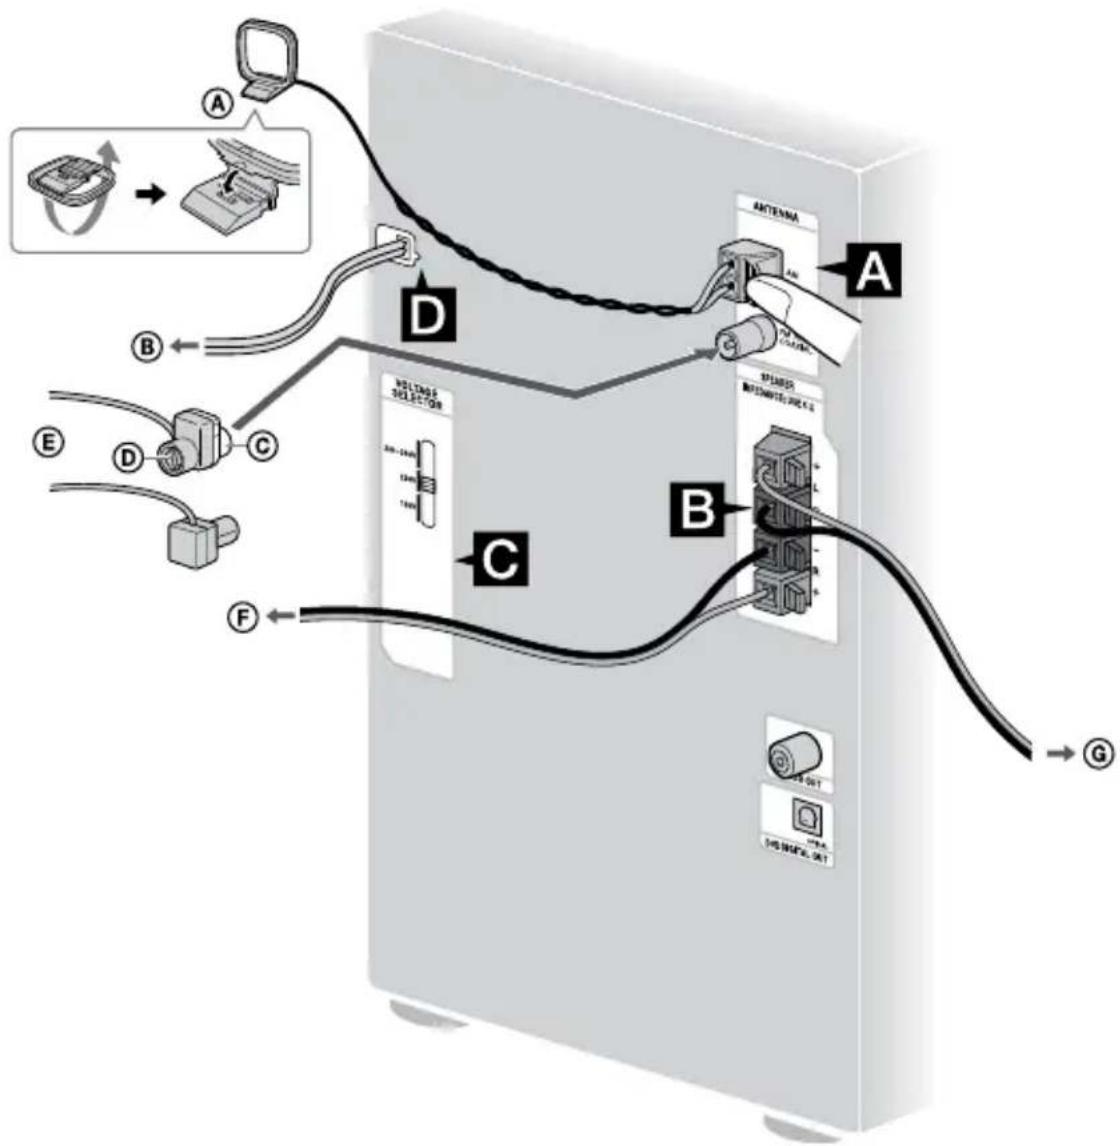
Ⓐ AM loop antenna
⑧ Wall socket
© White side for North American model
(D) Brown side for other regions
⑤ FM lead antenna (Extend it horizontally.)
⑤ Right speaker
© Left speaker
A FM/AM antennas
Find a location and an orientation that provide good reception, and then set up the antenna.
Keep the antennas away from the speaker cords, the power cord and the USB cable to avoid picking up noise.
B Speakers
Insert only the stripped portion of the speaker cords.
The speaker cords are color-coded with their respective speaker terminals.
Notes
- Be sure to connect the speakers securely and correctly.
- Be sure to match the speaker cord to the appropriate terminal on the components: to and to . If the cords are reversed, the sound will be distorted and will lack bass.
C Voltage selector
For models with a voltage selector, set VOLTAGE SELECTOR to the local power line voltage.
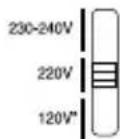
* Saudi Arabian model:
120 - 127 V/220 - 240 V/NO OPERATION
D Power
Connect the power cord to a wall socket. If the supplied adaptor on the plug does not fit your wall socket, detach it from the plug (only for models equipped with an adaptor).
Inserting two R6 (size AA) batteries into the remote
Slide and remove the battery compartment lid, and insert the two supplied R6 (size AA) batteries, ● side first, matching the polarities shown below.
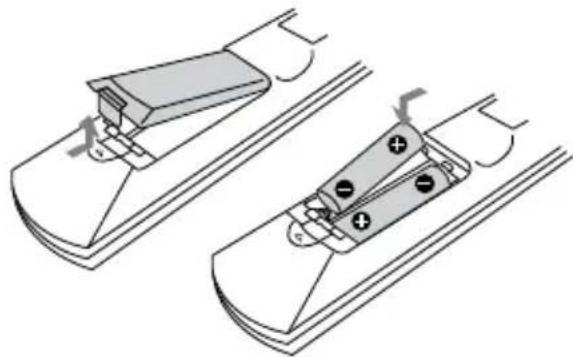
natural_image
Technical line drawing of two mechanical components with mounting holes and a battery, no text or symbols presentNote
If you do not use the remote for a long period of time, remove the batteries to avoid possible damage from battery leakage and corrosion.
Tip
With normal use, the batteries should last for about six months. When the remote no longer operates the system, replace both batteries with new ones.
Attaching the speaker pads
Attach the supplied speaker pads at each corner on the bottom of the speakers to prevent them from slipping.
Left speaker (4)/Right speaker (4)

natural_image
Simple line drawing of a roof structure with four vertical supports and a curved top panel (no text or symbols)When carrying this system
Perform the following procedure to protect the DVD mechanism. Use buttons on the unit for the operation.
1 Press I/① to turn on the system, then press FUNCTION 16 repeatedly to select "DVD."
2 Make sure that no disc is loaded in the system and check that "NO DISC" appears.
3 Hold down ▶ ④ and then press I/⏻ ① until "STANDBY" appears in the display. Then, "LOCK" appears in the display.
4 Unplug the power cord.
Hooking up the TV
Connect the video input jack of your TV to the VIDEO OUT jack with the supplied video cord.

When connecting a video deck
Connect the video deck to the TV using a video cord (not supplied). However, do not connect this unit to the TV through the video deck. Otherwise, you may experience video leakage when watching video images from this system. Connect this unit directly to the TV as shown below.
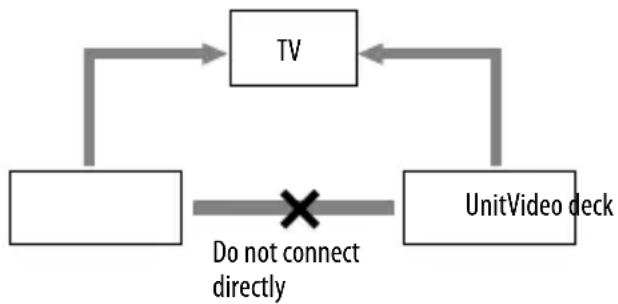
flowchart
graph TD
    TV["TV"] --> UnitVideoDeck["UnitVideo deck"]
    UnitVideoDeck --> TV
    UnitVideoDeck --> TV
    TV -->|Do not connect directly| UnitVideoDeck
Changing the color system
(Except for European and Russian models)
Set the color system to PAL or NTSC depending on the color system of your TV.
The default setting for color system is different depending on the area.
Each time you perform the procedure below, the color system changes as follows:
NTSC ↔ PAL
1 Press I/① to turn on the system.
2 Press FUNCTION +/- (or FUNCTION on the unit) 16 repeatedly to select "DVD."
3 Press I/① to turn off the system.
4 Press DISPLAY 7 to display the clock.
5 While the clock is displayed, hold down 14 on the unit, then press 1/1 on the unit.
The system turns on automatically and the color system is changed.
“COLOR NTSC” or “COLOR PAL” appears in the display.
When using a TV
Turn on the TV and select the video input so that you can view the pictures from this system.
Operating a Sony TV
You can use the following buttons to operate a Sony TV. These buttons have been marked in orange.
To Press
| Turn the TV on or off | TV 1/1 1 while holding down TV 25 |
| Switch the TV's input source between the TV and other input sources | TV INPUT 34 while holding down TV 25 |
| Select the TV channels | TV CH +/- 4 or numeric buttons 31* while holding down TV 25 |
| Adjust the volume of the TV speaker(s) | TV VOL +/- 15 while holding down TV 25 |
* For double digit number, hold down TV ^25 and press -/-- 30, then press the number. (For example, hold down TV 25, press -/-- 30, then 2 and 5 for entering 25.)
Setting the clock
Use buttons on the remote to set the clock.
1 Press I/① to turn on the system.
2 Press TIMER MENU 35.
The hour indication flashes in the display. If “PLAY SET?” flashes in the display, press ↑ or ↓ 28 repeatedly to select “CLOCK SET?,” then press ENTER 6.
3 Press ↑ or ↓ 28 repeatedly to set the hour.
4 Press ENTER 6.
The minute indication flashes in the display.
5 Press ↑ or ↓ 28 repeatedly to set the minutes.
6 Press ENTER 6.
The clock starts functioning.
Note
The clock settings are canceled when you disconnect the power cord or if a power failure occurs.
To display the clock when the system is off
Press DISPLAY 7.
The clock is displayed for about 8 seconds.
Performing "QUICK" setup
Before using the system, you can make the minimum basic adjustments in "QUICK" setup. If you do not want to perform "QUICK" setup, press CLEAR 30 in step 3. The guide message will disappear from the TV screen.
1 Turn on your TV and select the video input.
2 Press I/① to turn on the system.
Note
Make sure there is no disc in the unit. Otherwise, the guide message does not appear.
3 Press FUNCTION +/- (or FUNCTION on the unit) 16 repeatedly to select "DVD."
The guide message appears at the bottom of the TV screen.
4 Press ENTER 6 without loading a disc.
"LANGUAGE SETUP" appears on the TV screen.
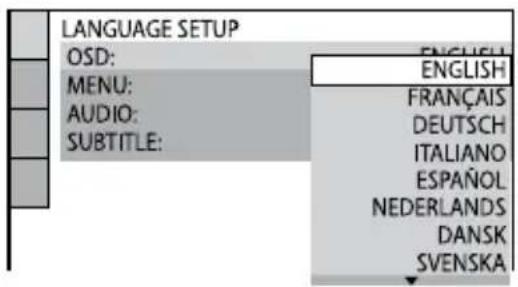
5 Press ↑ or ↓ 28 repeatedly to select a language, then press ENTER 6.
The setting is selected and "VIDEO SETUP" appears on the TV screen.
Tips
- The selected language is for "OSD," "MENU" and "SUBTITLE."
• The selectable language is different depending on the area.
6 Press ↑ or ↓ 28 repeatedly to select the setting that matches your TV type.
If you have a 4:3 standard TV:
Select "4:3 LETTER BOX" or "4:3 PAN SCAN" (page 53, 54)
If you have a wide-screen TV or a 4:3 standard TV with wide-screen mode:
Select "16:9" (page 53)
7 Press ENTER 6.
The setting is selected and "QUICK SETUP is complete." appears on the TV screen.
The system is ready for playback. If you want to change each setting individually, see "Using the Setup Menu" (page 51).
If you make a mistake
Press ◀◀◀ 4, then select the item again.
To quit "QUICK" setup
Press DISPLAY 24.
To recall "QUICK" setup settings
1 Press DISPLAY 24 when playback is stopped.
The Control Menu appears on the TV screen.
2 Press ↑ or ↓ 28 repeatedly to select (SETUP), then press ENTER 6.
3 Press ↑ or ↓ 28 repeatedly to select "QUICK," then press ENTER 6.
Note
The guide message appears at the bottom of the TV screen when you turn on the system for the first time or after performing "RESET" (page 105).
Using the "THEATRE SYNC" function
THEATRE SYNC 36 allows you to turn on your Sony TV and this system, changes the system's function to "DVD" and then switches the TV's input source you have set with just one button.
Preparing to use the "THEATRE SYNC" function
Register the TV's input source connected to this system.
To select the TV's input
Press the following buttons while holding down SLEEP 34.
| Press TV's input source | |
| 0 No input source(Default) | |
| 1 to 8 VIDEO 1 to VIDEO 8 | |
| 9 COMPONENT 1 | |
| CLEAR 30 | COMPONENT 2 |
| - 4 | COMPONENT 3 |
| + 4 | COMPONENT 4 |
The selected TV's input source is memorized into the remote.
Operating the "THEATRE SYNC" function
Keep the remote pointed in the direction of the TV until the TV is turned on and the input source is changed correctly, then press THEATRE SYNC 36.
If this function does not work, change the transmission time. The transmission time varies depending on the TV.
To change the transmission time
Press the following buttons while holding down ▶▶▶1 4.
| Press Transmission time | |
| 1 0.5 (Default) | |
| 2 | 1 |
| 3 1.5 | |
| 4 | 2 |
| 5 2.5 | |
| 6 | 3 |
| 7 3.5 | |
| 8 | 4 |
Note
This function is only for Sony TV series, however, some TV products may also not work.
Disc
Playing a disc
— Normal Play

Depending on the DVD VIDEO or VIDEO CD, some operations may be different or restricted. Refer to the operating instructions supplied with the disc.
Note on the maximum number of tracks, files and folders on a DATA CD/DVD
This system cannot play a DATA CD/DVD in the following cases.
- When the number of tracks or files on a folder exceeds 150.
- When the number of folders on a disc exceeds 200.
These numbers may vary depending on the track structure, the file structure and the folder structure.
Example: When playing a DVD VIDEO

1 Press FUNCTION +/- (or FUNCTION on the unit) 16 repeatedly to select "DVD."
2 Press ▲ 8 on the unit.
3 Load a disc with the label side facing up on the disc tray 9. To load additional discs, slide the disc tray with your finger as show below.

natural_image
Illustration of a hand inserting a CD into a CD inside a computer case (no text or symbols)When you play back an 8 cm disc such as a CD single, place it on the inner circle of the tray
4 Press ▲ 8 on the unit to close the disc tray 9.
Do not forcibly push the disc tray to close it as this may cause a malfunction.
If the playback does not start automatically, press ▷ (or ▶ on the unit) 4.
5 Press VOLUME +/- (or turn VOLUME on the unit) 15 to adjust the volume.
Note
Depending on the system status, the volume level may not appear on the TV screen.
Other operations
| To Do this | |
| Stop playback Press ■ 4. | |
| Pause playback Press || 41). Press || 4 again or press ▷ (or ▶ on the unit) 4 to resume playback. | |
| Select a track or chapter2) | Press ◀◀ or ▶▶◆ 4 repeatedly.Or, press the numeric buttons 31 when the Control Menu is turned off, then press ENTER 63). |
| Select a folder4) | Press +7- 4 repeatedly during playback or when playback is paused. |
| Locate a point quickly in fast forward or fast reverse (Lock Search)5) | Press ◀◀ or ▶▶◆ 4 during playback. Each time you press ◀◀ or ▶▶◆ 4, the playback speed changes cyclically6).To return to normal playback, press ▷ (or ▶ on the unit) 4. |
| To Do this | |
| Watch frame by frame (Slow-motion Play) ^7) | Press SLOW or SLOW ▶ 4 when playback is paused. Each time you press SLOW ^8) or SLOW ▶ 4, the playback speed changes. To return to normal playback, press ▷ (or ▶ on the unit) 4. |
| Play one frame at a time (Freeze Frame) ^7) | Press STEP II▶ 26 to go to the next frame when playback is paused. Press ◀II STEP 26 ^8) to go to the preceding frame when playback is paused. To return to normal playback, press ▷ (or ▶ on the unit) 4. |
| Replay the previous scene | Press REPLAY 26 during playback. (Instant Replay) ^9) |
| Briefly fast forward the current scene | Press ADVANCE●→ 26 during playback. (Instant Advance) ^9) |
To Do this
| Select a disc Press DISC SKIP 8 on the remote (or one of DISC 1 - DISC 3 8 on the unit). | |
| Switch to DVD function from another source | Press one of DISC 1 - DISC 3 8 on the unit (Automatic Source Selection). |
| Exchange other discs while playing | Press EX-CHANGE/ DISC SKIP 8 on the unit. |
^1) There may be some disturbance in the video image.
^2) Except for JPEG image files. You cannot select an audio track during Lock Search operation of MP3 audio tracks.
^3) DVD VIDEO, DVD-R/-RW in VR mode, VIDEO CD and AUDIO CD only.
^4) MP3 audio tracks and JPEG image files only.
^5) Except for JPEG image files.
^6) Depending on the disc, the actual speed may differ.
^7) DVD VIDEO, DVD-R/-RW in VR mode and VIDEO CD only.
^8) Except for VIDEO CD.
^9) DVD VIDEO and DVD-R/-RW in VR mode only.
Notes
- You cannot search for a still picture on a DVD-R/-RW in VR mode.
- You may not be able to use the Instant Replay or Instant Advance function in Repeat Play mode or with some scenes.
Displaying multi-angles and subtitles
Changing the angles
(DVD VIDEO only)
You can change the viewing angle while playing a DVD VIDEO on which various angles (multi-angles) for a scene are recorded.
Press ANGLE 22 repeatedly during playback. Each time you press ANGLE 22, the angle changes.
Note
Depending on the DVD VIDEO, you may not be able to change the angle, even if multi-angles are recorded on the DVD VIDEO.
Displaying the subtitles
(DVD VIDEO and DVD-R/-RW in VR mode only)
You can turn the subtitles on or off while playing a DVD VIDEO or DVD-R/-RW in VR mode on which subtitles are recorded. You can also change the language of the subtitles with DVD VIDEO or DVD-R/-RW in VR mode on which multilingual subtitles are recorded.
Press SUBTITLE ^21 repeatedly during playback. Each time you press SUBTITLE ^21 , the subtitle language changes or turns off.
Note
Depending on the DVD VIDEO, you may not be able to change the subtitles even if multilingual subtitles are recorded on the DVD VIDEO. You also may not be able to turn the subtitles off.
Other useful functions
Changing the sound
When playing a DVD VIDEO recorded in multiple audio formats, you can select the audio format you want. If the DVD VIDEO is recorded with multilingual tracks, you can also change the language.
When playing a VIDEO CD, AUDIO CD or MP3 audio tracks, you can select the sound from the right or left channel and listen to the sound of the selected channel through both the right and left speakers. For example, when playing a track with the vocals on the right channel and the instruments on the left channel, you can hear the instruments from both speakers by selecting the left channel.
Press AUDIO 20 repeatedly during playback to select the audio signal you want.
The default setting is underlined.
When playing a DVD VIDEO:
Depending on the DVD VIDEO, the option of language and audio format varies.
When a 4-digit number is displayed, the digits represent a language code (see “Language code list” (page 117)). When the same language is displayed two or more times, the DVD VIDEO is recorded in multiple audio formats. Note that the sound changes automatically depending on the disc.
When playing a DVD-R/-RW in VR mode:
The number of audio tracks recorded on a disc are displayed.
Example:
• 1: MAIN: the main sound of the audio track 1.
• 1: SUB: the sub sound of the audio track 1.
• 1: MAIN+SUB: the main and sub sound of the audio track 1.
- 2: MAIN*: the main sound of the audio track 2.
- 2: SUB*: the sub sound of the audio track 2.
- 2: MAIN+SUB*: the main and sub sound of the audio track 2.
* These items do not appear if only one audio stream is recorded on the disc being played back.
When playing a VIDEO CD, AUDIO CD, or MP3 audio track:
• STEREO: the standard stereo sound.
• 1/L: the sound of the left channel (monaural).
- 2/R: the sound of the right channel (monaural).
When playing a Super VCD:
• 1: STEREO: the stereo sound of the audio track 1.
- 1: 1/L: the sound of the left channel of the audio track 1 (monaural).
- 1: 2/R: the sound of the right channel of the audio track 1 (monaural).
• 2: STEREO: the stereo sound of the audio track 2.
- 2: 1/L: the sound of the left channel of the audio track 2 (monaural).
- 2: 2/R: the sound of the right channel of the audio track 2 (monaural).
Note
While the system is playing a Super VCD on which the audio track 2 is not recorded, no sound will come out when you select "2: STEREO," "2: 1/L" or "2: 2/R."
Playing VIDEO CDs with PBC functions (Version 2.0) — PBC Playback
(VIDEO CD only)
You can use the PBC (Playback Control) menus on your TV screen to enjoy the disc's interactive software. The menu format and structure may differ depending on each disc.
1 Press ▷ (or ▶ on the unit) 4 to start playing a VIDEO CD with PBC functions (Version 2.0).
The PBC menu appears on the TV screen. Depending on the VIDEO CD, the menu may not appear.
2 Press the numeric buttons 31 to select the item number you want.
3 Press ENTER 6.
Depending on the VIDEO CD, "Press ENTER" may appear as "Press SELECT" in the operating instructions supplied with the disc. In this case, press ▷ (or ▶ on the unit) 4.
4 Continue playback according to the instructions on the menus.
Refer to the operating instructions supplied with the VIDEO CD, as the operating procedure may differ depending on the VIDEO CD.
To return to the previous menu
Press 📌 RETURN 27.
Note
PBC playback is canceled when Shuffle Play, Program Play or Repeat Play is activated.
To cancel playback with PBC functions
1 Press ◀◀◀ or ▶▶▶I 4 repeatedly or press the numeric buttons 31 to select a track when playback is stopped.
2 Press ▷ (or ▶ on the unit) 4 or ENTER 6.
Playback starts from the selected track. Still images, such as the menu screens, will not be shown.
To return to PBC playback, press ■ 4 twice, then press ▷ (or ▶ on the unit) 4.
Resuming playback from the point you stopped the disc — Resume Play
This system memorizes the point where you stopped the disc so you can resume playback from that point. Resume Play is not canceled when you turn off the system except for MP3 audio tracks and JPEG image files.
1 While playing a disc, press ■ 4 to stop playback.
“RESUME” appears in the display. If “RESUME” does not appear, Resume Play is not available.
2 Press ▷ (or ▶ on the unit) 4.
The system starts playback from the point you stopped the disc in step 1.
Notes
- You cannot perform Resume Play during Shuffle Play or Program Play.
- This function may not work properly with some discs.
- Resume Play is canceled when
- you press ■4 when playback is stopped.
- you open the disc tray.
- you change the function.
- you change the settings in the Setup Menu.
- you changed the “PARENTAL CONTROL” level.
Tip
To play back from the beginning of the disc, press ■ 4 twice, then press ▷ (or ▶ on the unit) 4.
Resuming playback of a disc that was stopped — Multi-disc Resume
(DVD VIDEO and VIDEO CD only) This system can store the point where you stopped the playback of the disc for up to 10 discs and resumes playback when you insert the same disc again. If you store a playback resume point for the 11th disc, the playback resume point for the first disc will be deleted. To activate this function, set “MULTI-DISC RESUME” in “SYSTEM SETUP” to “ON” (page 55).
Notes
- If "MULTI-DISC RESUME" in "SYSTEM SETUP" is set to "ON" and you play back a recorded disc such as DVD-R, the system may play back other recorded discs from the same playback resume point. To start playback from the beginning of the disc, press ■ 4 twice and then press ▷ (or ▶ on the unit) 4.
- The playback resume point is deleted when the power cord is disconnected.
Using play mode
Creating your own program
— Program Play
VIDEO CD
CD
You can make a program of up to 99 steps in the order you want them to be played back.
You can only program the tracks from the current disc.
1 Press 📄 DISPLAY 24 when playback is stopped.
The Control Menu appears on the TV screen.
2 Press ↑ or ↓ 28 repeatedly to select (PROGRAM), then press ENTER 6.
The options for "PROGRAM" appear on the TV screen.
3 Press ↑ or ↓ 28 repeatedly to select "SET →," then press ENTER 6.
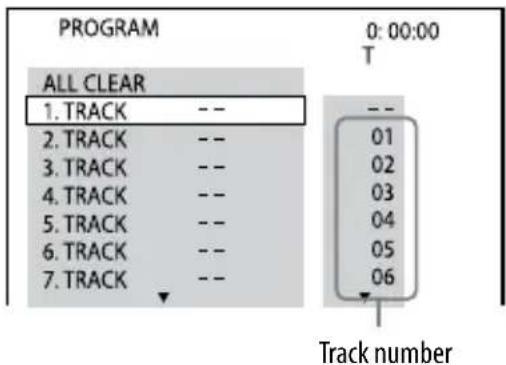
4 Press → 28.
The cursor moves to the track list "T" (in this case, "01").

5 Select the track you want to program.
For example, select track "02."
Press ↑ or ↓ 28 repeatedly to select "02" under "T," then press ENTER6.

6 To program other tracks, repeat steps 4 to 5.
7 Press ▷ (or ▶ on the unit) 4. Program Play starts.
When the Program Play ends, you can restart the same program by pressing ▷ (or ▶ on the unit) 4.
To change a programmed step:
Press or 28 repeatedly to select the programmed step number you want to change. Then, press 28 and select the desired track number.
To delete a programmed step:
Press or 28 repeatedly to select the programmed step number you want to delete. Then, press CLEAR 30.
To delete all of the programmed steps in the program list:
Press ↑ 28 to select "ALL CLEAR." Then, press ENTER 6.
To cancel Program Play
Press CLEAR 30 or select "OFF" in step 3. To play back the same program again, select "ON" in step 3 and press ENTER 6.
To turn off the Control Menu
Press ⓂDISPLAY 24 repeatedly until the Control Menu disappears from the TV screen.
Notes
- When Program Play is activated, the “REPEAT” setting is automatically changed to “ON” if the current setting is “ALL DISCS,” “ONE DISC” or “TRACK.”
- You cannot perform Program Play with VIDEO CDs during PBC playback.
Tip
The Program Play is canceled and the program list is cleared when
— you open the disc tray.
- you change the disc.
— you turn off the system.
- you change the function.
Playing in random order
— Shuffle Play
VIDEO CD
CD
DATA CD
DATA DVD
You can play back the tracks on the current disc in random order. Each time you perform Shuffle Play, the playing order may differ.
Shuffle Play is only available for the tracks on the current disc.
1 Press DISPLAY 24.
The Control Menu appears on the TV screen.
2 Press ↑ or ↓ 28 repeatedly to select •(SHUFFLE), then press ENTER 6.
The options for “SHUFFLE” appear on the TV screen.
3 Press ↑ or ↓ 28 repeatedly to select the setting you want.
When playing a VIDEO CD or AUDIO CD:
- TRACK: all tracks on the current disc is played back randomly.
When Program Play is activated:
- ON: all tracks in the program list is played back randomly.
When playing a DATA CD/DVD:
- ON (MUSIC): all MP3 audio tracks in the selected folder on the current disc are played back randomly. When no folder is selected, the first folder is played back randomly.
4 Press ENTER 6.
5 Press ▷ (or ▶ on the unit) 4. Shuffle Play starts. To cancel Shuffle Play, press CLEAR 30 or select "OFF" in step 3.
To turn off the Control Menu
Press ⒹDISPLAY 24 repeatedly until the Control Menu disappears from the TV screen.
Notes
- Shuffle Play is canceled when
— you open the disc tray.
— you change the disc. - you turn off the system.
— you change the function. - you perform Track/Index Search.
- you set "MODE (MUSIC, IMAGE)" to "IMAGE" when playback is stopped.
— you perform CD Synchro Recording. - you transfer music from a disc to an USB device.
- You cannot perform Shuffle Play with VIDEO CDs during PBC playback.
- The same song may be played back repeatedly for MP3 audio tracks.
Playing repeatedly
— Repeat Play

You can play the contents on a disc repeatedly.
You can select Shuffle Play and Program Play at the same time.
1 Press DISPLAY 24.
The Control Menu appears on the TV screen.
2 Press ↑ or ↓ 28 repeatedly to select •(REPEAT), then press ENTER 6.
The options for “REPEAT” appear on the TV screen.
3 Press ↑ or ↓ 28 repeatedly to select the setting you want.
The default setting is underlined.
When playing a DVD VIDEO or DVD-R/DVD-RW in VR mode:
• OFF: does not play back repeatedly.
- ALL DISCS: repeats all discs.
- ONE DISC: repeats all the titles on the current disc.
• TITLE: repeats the current title.
- CHAPTER: repeats the current chapter.
When playing a VIDEO CD or AUDIO CD:
• OFF: does not play back repeatedly.
- ALL DISCS: repeats all discs.
- ONE DISC: repeats all the tracks on the current disc.
- TRACK: repeats the current track.
When playing a DATA CD or DATA DVD:
• OFF: does not play back repeatedly.
- ALL DISCS: repeats all discs.
- ONE DISC: repeats all the folders on the current disc.
- FOLDER: repeats the current folder.
- TRACK*: repeats the current track.
* MP3 audio tracks only.
When Program Play or Shuffle Play is activated:
• OFF: does not play back repeatedly.
- ON: repeats the Program Play or Shuffle Play.
4 Press ENTER 6.
5 Press ▷ (or ▶ on the unit) 4.
Repeat Play starts. To cancel Repeat Play, press CLEAR 30 or select “OFF” in step 3.
To turn off the Control Menu
Press DISPLAY 24 repeatedly until the Control Menu disappears from the TV screen.
Notes
- You can also change the Repeat Play setting by pressing REPEAT/FM MODE 19 repeatedly.
- “REP” lights up in the display when Repeat Play is set to “ALL DISCS,” “ONE DISC,” “FOLDER” or “ON.”
- “REP1” lights up in the display when Repeat Play is set to “TITLE,” “CHAPTER” or “TRACK.”
- Depending on the DVD VIDEO, you cannot perform Repeat Play.
- You cannot perform Repeat Play with VIDEO CDs during PBC playback.
- When playing a DATA CD/DVD which contains MP3 audio tracks and JPEG image files, the audio sound will not match the image if their playing time are different.
- You cannot select “TRACK” when “MODE (MUSIC, IMAGE)” is set to “IMAGE” (page 45).
- Repeat Play is canceled when
- you open the disc tray.
- you change the disc (except when “ALL DISCS” is selected).
- you turn off the system.
- you change the function (except when "ALL DISCS" is selected).
— you perform CD Synchro Recording.
— you transfer music from a disc to an USB device.
Searching/selecting a disc
Playing DVD VIDEOS using the menu
DVD-V
Some DVD VIDEOS have menus to help you enjoy the DVD VIDEOS. You can play back DVD VIDEOS using these menus on the TV screen.
Using DVD TOP MENU
A DVD VIDEO contains a lot of sections of picture or music feature called “title.” When you play back a DVD VIDEO which contains several titles, you can select the title you want using DVD TOP MENU 29.
Using DVD MENU
Some DVD VIDEOs allow you to select the disc contents using a menu. When you play back these DVD VIDEOs, you can select items such as the language for the subtitles and the language for the sound using DVD/TUNER MENU 23.
1 Press DVD TOP MENU 29 or DVD/TUNER MENU 23.
The menu appears on the TV screen. The contents of the menu vary depending on the disc.
2 Press ↑/↓/←/→ 28 or the numeric buttons 31 to select the title or item you want to play back.
3 Press ENTER 6.
Selecting "ORIGINAL" or "PLAY LIST" on a DVD-R/-RW in VR mode
DVD-VR
This function is only available for DVD-Rs/-RWs in VR mode with a playlist created.
1 Press DISPLAY 24 when playback is stopped.
The Control Menu appears on the TV screen.
2 Press ↑ or ↓ 28 repeatedly to select •(ORIGINAL/PLAY LIST), then press ENTER 6.
The options for “ORIGINAL/PLAY LIST” appear on the TV screen.
3 Press ↑ or ↓ 28 repeatedly to select the setting you want.
- PLAY LIST: play back according to the playlist created on the disc.
• ORIGINAL: play back according to the originally recorded sequence.
4 Press ENTER 6.
Using the on-screen display to search for a title/chapter/scene/track/index/folder/file

You can search by different information recorded on a disc, such as title, track, and folder. Each item is assigned a unique number on the disc, and you can select the numbered item you want from the Control Menu. You can also search for a particular point using the time code (Time Search) (DVD VIDEO and DVD-R/-RW in VR mode only).
1 Press DISPLAY 24. When playing a DATA CD/DVD with JPEG image files, press DISPLAY twice.
The Control Menu appears on the TV screen.
2 Press ↑ or ↓ 28 repeatedly to select the search item.
Example: when you select (CHAPTER)
“** (**)” is selected (** refers to a number). The number in parentheses indicates the total number of titles, chapters, tracks, indexes, scenes, folders or files.
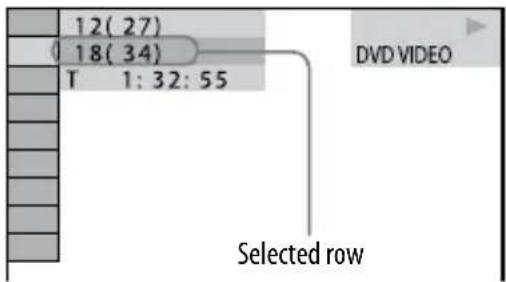
3 Press ENTER 6. “** (**)” change to “- - (**)”.
4 Press ↑ or ↓ 28 repeatedly or the numeric buttons 31 to select the title, track, folder or file, etc.
If you make a mistake, press CLEAR 30 to cancel the number.
5 Press ENTER6.
The system starts playback from the selected title, track, folder or file, etc.
To turn off the Control Menu
Press ⒶDISPLAY 24 repeatedly until the Control Menu disappears.
Tip
When the Control Menu display is turned off, you can search for a chapter (DVD VIDEO and DVD-R/-RW in VR mode) or track (AUDIO CD and VIDEO CD) by pressing the numeric buttons 31 and ENTER 6.
To search for a particular point using the time code — Time Search
(DVD VIDEO and DVD-R/-RW in VR mode only)
1 Press DISPLAY 24.
2 Press ↑ or ↓ 28 repeatedly to select (TIME).
“T **:**:**” (elapsed playing time of the current title) is selected.
3 Press ENTER 6.
“T **:**:*” changes to “T--:--:-”.
4 Input the time code using the numeric buttons 31, then press ENTER 6.
For example, to find the scene at 2 hours, 10 minutes, and 20 seconds after the beginning, enter "21020". If you make a mistake, press CLEAR 30 to cancel the number.
Note
Depending on the disc, you cannot perform Time Search.
Playing MP3/JPEG discs
DATA CD DATA DVD
Notes
- The system can recognize up to 200 folders, and will not play any folders beyond the 200th. (Depending on the folder configuration, the number of folders that can be recognized by the system may decrease.)
- The maximum number of MP3 audio tracks or JPEG image files on a folder which this system can recognize is 150.
- The system can play back MP3 audio tracks and JPEG image files. The system will play back any data with the extension “.mp3”, “.jpg” or “.jpeg” even if they are not in MP3 or JPEG format. Playing this data may generate a loud noise which could damage your speaker system.
- Depending on the encoding/writing software, recording device, or the recording media used to record an MP3 audio track, you may encounter problems such as cannot play back, sound interruptions and noise.
• The following discs/situations can increase the time it takes to start playback:
— a disc recorded with a complicated tree structure.
— a disc recorded in Multi Session.
— a disc to which data can be added (non-finalized disc).
— when the tracks or files in another folder have just been played back.
- Some CD-Rs/-RWs or DVD-Rs/-RWs/+Rs/+RWs cannot be played back on the system depending on the file format.
- The system can play back to a depth of 8 folders only.
- The system may not play certain types of JPEG image files (ex. a JPEG image file that is less than 8 (width) × 8 (height)).
Selecting an MP3 audio track or folder
1 Load a disc on the disc tray ⑨.
"FOLDER LIST" appears on the TV screen.
If "FOLDER LIST" does not appear, press DVD/TUNER MENU 23.

2 Press ↑ or ↓ 28 repeatedly to select a folder.
Playing a folder:
Press ▷ (or ▶ on the unit) 4.
The system starts playback from the first track of the selected folder.
To stop playback, press ■ 4.
Playing a track:
1 Press ENTER 6. "TRACK LIST" appears.
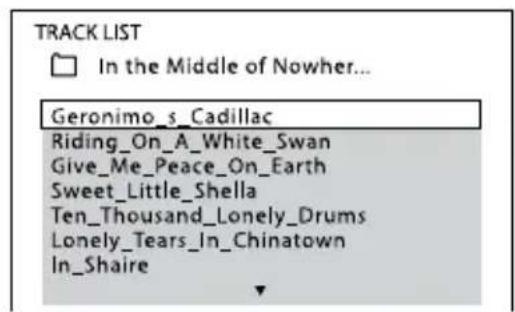
2 Press ↑ or ↓ 28 repeatedly to select the MP3 audio track you want, then press ENTER 6. The system starts playing the selected MP3 audio track. To stop playback, press ■ 4.
To display the next or previous page of "TRACK LIST" or "FOLDER LIST"
Press ← or • → 26 repeatedly when "TRACK LIST" or "FOLDER LIST" is displayed.
To play back the next folder of MP3 audio tracks
You can select the next folder by pressing ▶▶▶▶ 4 repeatedly until the last track of the current folder, then press ▶▶▶▶ 4 once. The first track of the next folder is selected. However, you cannot select the previous folder by pressing ◀◀◀ 4 repeatedly. To select the previous folder, select the folder from “FOLDER LIST.”
To return to "FOLDER LIST" when "TRACK LIST" is displayed Press ⬆ RETURN 27.
To turn on or off "FOLDER LIST" or "TRACK LIST"
Press DVD/TUNER MENU 23 repeatedly.
Selecting a JPEG image file or folder
1 Load a disc on the disc tray 9. "FOLDER LIST" appears on the TV screen.
If "FOLDER LIST" does not appear, press DVD/TUNER MENU 23.
2 Press or 28 repeatedly to select a folder.
Playing a folder:
Press ▷ (or ▶ on the unit) 4. The system starts a slide show from the first image file of the selected folder.
Playing an image file:
1 Press PICTURE NAVI 18. Thumbnail picture for the first 16 JPEG image files in the selected folder is displayed.
| 1 | 2 | 3 | 4 |
| 5 | 6 | 7 | 8 |
| 9 | 10 | 11 | 12 |
| 13 | 14 | 15 | 16 |
If there are more than 16 image files in the selected folder, the scroll bar appears at the right.
2 Press ↑/↓/←/→ 28 to select the image you want to view, then press ▷ (or ▶ on the unit) 4. The slide show starts from the selected image file. To stop playback, press ■ 4.

natural_image
Illustration of a mountain range with pine trees at the base (no text or symbols)To display the next or previous page of "FOLDER LIST"
Press ← or • → 26 repeatedly when "FOLDER LIST" is displayed.
To display the next or previous JPEG image file
Press or 28 repeatedly during the slide show.
To play back the next folder of JPEG image files
You can select the next folder by pressing ➤ 28 repeatedly until the last file of the current folder, then press ➤ 28 once. The first file of the next folder is selected. However, you cannot select the previous folder by pressing ➤ 28 repeatedly. To select the previous folder, select the folder from “FOLDER LIST.”
To turn on or off "FOLDER LIST"
Press DVD/TUNER MENU 23 repeatedly.
To rotate a JPEG image file
When a JPEG image file is displayed on the TV screen, you can rotate the image by 90 degrees.
Press ↑ or ↓ 28 repeatedly while viewing an image.
Press CLEAR 30 to return to the original view.
Notes
- The PICTURE NAVI ^18 button does not work when “MODE (MUSIC, IMAGE)” is set to “MUSIC.”
- When you press or 28 to select the next or previous image, the image will return to its original view even if you have rotated the image previously.
• The slide show stops when you press ↑ or ↓ 28.
Playing MP3 audio tracks and JPEG image files as a slide show with sound
DATA CD DATA DVD
You can play back a slide show with sound by first placing both JPEG image files and MP3 audio tracks in the same folder on a DATA CD/DVD.
1 Load a disc on the disc tray 9.
2 Press 🎨 DISPLAY 24 when playback is stopped.
The Control Menu appears on the TV screen.
3 Press ↑ or ↓ 28 repeatedly to select 🎨 (MODE (MUSIC, IMAGE)), then press ENTER 6. The options for “MODE (MUSIC, IMAGE)” appear on the TV screen. The default setting is underlined.
- AUTO: Plays back both JPEG image files and MP3 audio tracks in the same folder as a slide show with sound.
• MUSIC: Plays back MP3 audio tracks continuously. - IMAGE: Plays back JPEG image files as a slide show.
4 Press ↑ or ↓ 28 repeatedly to select "AUTO," then press ENTER 6.
5 Press DVD/TUNER MENU 23.
"FOLDER LIST" appears on the TV screen.
6 Press ↑ or ↓ 28 repeatedly to select the folder you want, then press ▷ (or ▶ on the unit) 4. The slide show with sound starts from the selected folder. To stop playback, press ■ 4.
To turn on or off "FOLDER LIST"
Press DVD/TUNER MENU 23 repeatedly.
To cancel slide show with sound
Select "MUSIC" or "IMAGE" in step 4.
Notes
- If there are no MP3 audio tracks in the disc and “MODE (MUSIC, IMAGE)” is set to “MUSIC,” “No audio data” appears on the TV screen and the disc cannot be played back.
- If there are no JPEG image files in the disc and “MODE (MUSIC, IMAGE)” is set to “IMAGE,” “No image data” appears on the TV screen and the disc cannot be played back.
- If you play back a large data size of MP3 audio tracks and JPEG image files at the same time, the sound may skip.
Specifying the slide show speed
(JPEG image files only)
1 Press DISPLAY 24 repeatedly until the Control Menu for JPEG image files appears on the TV screen.
2 Press ↑ or ↓ 28 repeatedly to select (INTERVAL), then press ENTER 6.
The options for “INTERVAL” appear on the TV screen.
3 Press ↑ or ↓ 28 repeatedly to select the transition interval you want. The default setting is underlined.
• NORMAL: Sets to the standard duration.
- FAST: Sets the duration shorter than “NORMAL.”
- SLOW 1: Sets the duration longer than “NORMAL.”
- SLOW 2: Sets the duration longer than “SLOW 1.”
4 Press ENTER 6.
The selected setting takes effect.
Note
Some JPEG image files (especially progressive JPEG image files or JPEG image files with 3,000,000 pixels or more) may take a longer time to display than others, which may make the transitions seem longer than that of the option you selected.
Selecting a transition effect for image files in the slide show
(JPEG image files only)
1 Press DISPLAY 24 repeatedly until the Control Menu for JPEG image files appears on the TV screen.
2 Press ↑ or ↓ 28 repeatedly to select (EFFECT), then press ENTER 6.
The options for “EFFECT” appear on the TV screen.
3 Press ↑ or ↓ 28 repeatedly to select the setting you want.
The default setting is underlined.
- MODE 1: The image sweeps in from top to bottom of the screen.
- MODE 2: The image sweeps in from left to right of the screen.
- MODE 3: The image stretches out from the center of the screen.
- MODE 4: The image randomly cycles through the effects.
- MODE 5: The next image slides over the current image.
• OFF: Turns off this function.
4 Press ENTER6.
The selected setting takes effect.
Adjusting the delay between the picture and sound
- "A/V SYNC"
DVD-V
DVD-VR
VIDEO CD
When the sound does not synchronize with the pictures on the screen, you can adjust the delay between the picture and sound.
1 Press DISPLAY 24.
The Control Menu appears on the TV screen.
2 Press ↑ or ↓ 28 repeatedly to select •(A/V SYNC), then press ENTER 6.
The options for “A/V SYNC” appear on the TV screen.
3 Press ↑ or ↓ 28 repeatedly to select the setting you want.
The default setting is underlined.
- OFF: Does not adjust.
- ON: Adjusts the difference between picture and sound.
4 Press ENTER 6.
Note
Depending on the input stream, this function may not be effective.
Restricting playback of the disc
— PARENTAL CONTROL
DVD-V
You can limit the playback of some DVD VIDEOS according to a predetermined level such as the age of the users. When a limited scene is played back, that scene may be skipped or replaced with different scenes.
1 Press DISPLAY 24 when playback is stopped.
The Control Menu appears on the TV screen.
2 Press ↑ or ↓ 28 repeatedly to select UP), then press ENTER 6.
The options for "SETUP" appear on the TV screen.
3 Press ↑ or ↓ 28 repeatedly to select "CUSTOM," then press ENTER 6.
The Setup Menu appears on the TV screen.
4 Press ↑ or ↓ 28 repeatedly to select "SYSTEM SETUP," then press ENTER 6.
5 Press ↑ or ↓ 28 repeatedly to select "PARENTAL CONTROL," then press ENTER 6.
If you have not registered a password:
The display for registering a new password appears on the TV screen.
![PARENTAL CONTROL Enter a new 4-digit password, then press[ENTER].](/content/2026/05/884927/images/090d1b7d3a4e70f49b71de4625286139721f8607a1d96de2485d96b6e1484f29.jpg)
Enter a 4-digit password using the numeric buttons 31, then press ENTER 6.
The display for confirming the password appears on the TV screen.
When you have already registered a password:
The display for entering the password appears on the TV screen.
6 Enter or re-enter your 4-digit password using the numeric buttons 31, then press ENTER 6.
The display for setting the playback limitation level appears on the TV screen.

7 Press ↑ or ↓ 28 repeatedly to select "STANDARD," then press ENTER 6.
The options for "STANDARD" appear on the TV screen.
8 Press ↑ or ↓ 28 repeatedly to select a geographic area as the playback limitation level, then press ENTER 6.
The area is selected. When you select “OTHERS→,” enter the area code for the geographic area you want by using the numeric buttons 31 (see “Parental Control area code list” (page 118)).
9 Press ↑ or ↓ 28 repeatedly to select "LEVEL," then press ENTER 6.
The options for "LEVEL" appear on the TV screen.
10 Press ↑ or ↓ 28 repeatedly to select the level you want, then press ENTER 6.
"PARENTAL CONTROL" setting is completed.
The lower the value, the stricter the limitation.
If you make a mistake when entering your password
Press ← 28 repeatedly to delete the number you have entered, then re-enter your password again.
To turn off the "PARENTAL CONTROL" function
Set "LEVEL" to "OFF" in step 10.
To play back a disc for which "PARENTAL CONTROL" is set
1 Load the disc and press ▷ (or ▶ on the unit) 4.
The display for entering your password appears on the TV screen.
2 Enter your 4-digit password using the numeric buttons 31, then press ENTER 6.
The system starts playback.
Notes
- When you play back DVD VIDEOS which do not have the “PARENTAL CONTROL” function, playback cannot be limited on this system.
- Depending on the DVD VIDEO, you may be asked to change the “PARENTAL CONTROL” level while playing the disc. In this case, enter your password, then change the level. If Resume Play is canceled, the level returns to the original level.
Tip
If you forget your password, remove the disc and repeat steps 1 to 5 of “Restricting playback of the disc” (page 48). When you are asked to enter your password, enter “199703” using the numeric buttons 31, then press ENTER 6. The display will ask you to enter a new 4-digit password. After you enter a new 4-digit password, reload the disc and press ▷ (or ▶ on the unit) 4. When the display for entering your password appears, enter your new password.
Changing the password
1 Press DISPLAY 24 when playback is stopped.
The Control Menu appears on the TV screen.
2 Press ↑ or ↓ 28 repeatedly to select UP), then press ENTER 6.
The options for “SETUP” appear on the TV screen.
3 Press ↑ or ↓ 28 repeatedly to select "CUSTOM," then press ENTER 6.
The Setup Menu appears on the TV screen.
4 Press ↑ or ↓ 28 repeatedly to select "SYSTEM SETUP," then press ENTER 6.
5 Press ↑ or ↓ 28 repeatedly to select "PARENTAL CONTROL," then press ENTER 6. The display for entering the password appears on the TV screen.
6 Enter your 4-digit password using the numeric buttons 31, then press ENTER 6.
7 Press ↑ or ↓ 28 repeatedly to select "CHANGE PASSWORD," then press ENTER 6.
8 Enter your 4-digit password using the numeric buttons 31, then press ENTER 6.
9 Enter a new 4-digit password using the numeric buttons 31, then press ENTER 6.
10 To confirm your password, re-enter it using the numeric buttons 31, then press ENTER 6.
If you make a mistake when entering your password
Press ← 28 repeatedly to delete the number you have entered, then re-enter your password again.
Using the Setup Menu
By using the Setup Menu, you can make various adjustments to items such as picture and sound.
Displayed items vary depending on the country or region.
Note
Playback settings stored in the disc take priority over the Setup Menu settings.
Therefore, some of the Setup Menu settings may not be performed.
1 Press DISPLAY 24 when playback is stopped.
The Control Menu appears on the TV screen.
2 Press ↑ or ↓ 28 repeatedly to select UP), then press ENTER 6.
The options for "SETUP" appear on the TV screen.
3 Press ↑ or ↓ 28 repeatedly to select "CUSTOM," then press ENTER 6.
The Setup Menu appears on the TV screen.
4 Press ↑ or ↓ 28 repeatedly to select the setup item from the displayed list: "LANGUAGE SETUP," "VIDEO SETUP," "AUDIO SETUP" or "SYSTEM SETUP." Then press ENTER 6.
The setup item is selected.
Example: "VIDEO SETUP"
Selected item

5 Press ↑ or ↓ 28 repeatedly to select the item you want, then press ENTER 6.
The options for the selected item appear on the TV screen.
Example: "TV TYPE"
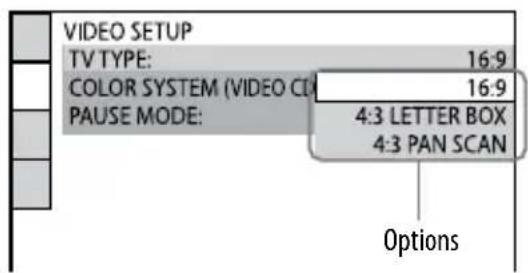
6 Press ↑ or ↓ 28 repeatedly to select the setting you want, then press ENTER 6.
The setting is selected and setup is completed.

Setup Menu item list
Setting the language — "LANGUAGE SETUP"
Set various languages for the on-screen display or sound track.

OSD
(On-Screen Display)
Switches the language of the on-screen display.
MENU\*
(DVD VIDEO only)
Select the language for the DVD menu.
AUDIO\*
(DVD VIDEO only)
Switches the language of the sound track. When you select “ORIGINAL,” the language given priority in the disc is selected.
SUBTITLE\*
(DVD VIDEO only)
Switches the language of the subtitle. When you select “AUDIO FOLLOW,” the language for the subtitles changes according to the language you selected for the sound track.
* When you select a language in “MENU,” “AUDIO,” or “SUBTITLE” that is not recorded on the DVD VIDEO, one of the recorded language is automatically selected. However, depending on the disc, the language may not be selected automatically. If you select “OTHERS →” in “MENU,” “AUDIO,” and “SUBTITLE” enter a language code using the numeric buttons 31 (see “Language code list” (page 117)).
Setting the TV screen — "VIDEO SETUP"
Choose the settings according to the TV you connected.
The default setting is underlined.

TV TYPE
(DVD VIDEO only)
16:9: Select this when you connect a wide-screen TV or a TV with a wide mode function.

natural_image
Simple line drawing of a mountain landscape with trees and water (no text or symbols)4:3 LETTER BOX: Select this when you connect a 4:3 screen TV. This setting displays a wide picture with bands on the upper and lower portions of the screen.

natural_image
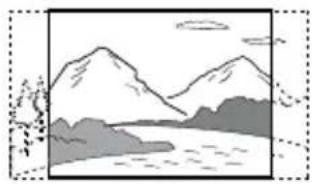
Simple line drawing of a mountain landscape with trees and water (no text or symbols)4:3 PAN SCAN*: Select this when you connect a 4:3 screen TV. This setting displays the wide picture on the entire screen and cuts off the portions that do not fit.
natural_image
Simple line drawing of a mountain landscape with a river and trees (no text or symbols)(Except for European and Russian models)
Select the output video signal when you play back a VIDEO CD.
AUTO: Outputs the video signal according to the color system of the disc, either PAL or NTSC.
PAL: Changes the video signal of an NTSC disc and output it in PAL system.
NTSC: Changes the video signal of a PAL disc and output it in NTSC system.
PAUSE MODE
(DVD VIDEO and DVD-R/-RW in VR mode only)
AUTO: The picture, including subjects that move dynamically, is output with no jitter. Normally select this position.
FRAME: The picture, including subjects that do not move dynamically, is output in high resolution.
* Depending on the DVD VIDEO, "4:3 LETTER BOX" may be selected automatically instead of "4:3 PAN SCAN" or vice versa.
Setting the audio options — "AUDIO SETUP"
Configure audio related settings. The default setting is underlined.
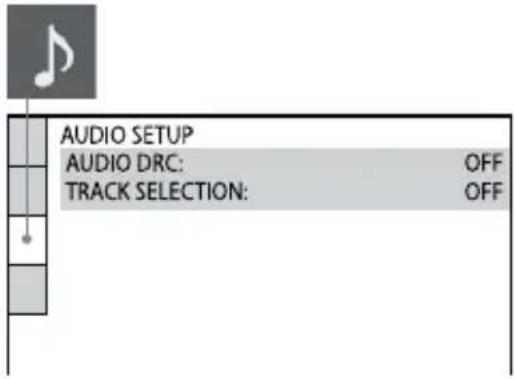
AUDIO DRC ^1) (Dynamic Range Compression)
(DVD VIDEO only)
OFF: No compression of dynamic range.
STANDARD: Reproduces the sound track with the kind of dynamic range that the recording engineer intended. Useful for watching movies at low volume late at night.
MAX: Narrows the dynamic range fully.
TRACK SELECTION
(DVD VIDEO only)
Gives priority to the sound track which contains the highest number of channels when you play back a DVD VIDEO on which multiple audio (PCM, DTS, MPEG audio, or Dolby Digital) formats ^2) are recorded.
OFF: No priority given.
AUTO ^3) : Priority given.
1) "AUDIO DRC" can only be performed with Dolby Digital sources.
2) If each audio sound track has the same number of channels, the system selects the audio sound tracks in the order from PCM, DTS, Dolby Digital, to MPEG.
3) When you set "TRACK SELECTION" to "AUTO," the language may change. The "TRACK SELECTION" setting has higher priority than the "AUDIO" settings in "LANGUAGE SETUP" (page 52). However, depending on the disc, this function may not be performed.
Setting the system — "SYSTEM SETUP"

SCREEN SAVER
The screen saver will help prevent your display device from becoming damaged (ghosting). Press any button (e.g., ▷④) to cancel the screen saver.
ON: The screen saver image appears if you do not operate the system for about 15 minutes.
OFF: The screen saver does not appear.
BACKGROUND
Selects the background color or picture to be displayed on the TV screen. The background color or picture is displayed when playback is stopped or while playing an AUDIO CD and MP3 audio tracks.
JACKET PICTURE: The jacket picture (still picture) appears in the background, but only when the jacket picture is already recorded on the disc (DVD VIDEO, CD-Extra, etc.). If the disc does not contain a jacket picture, the "GRAPHICS" picture appears.
GRAPHICS: A preset picture stored in the system appears in the background. BLUE: The background color is blue. BLACK: The background color is black.
PARENTAL CONTROL
Sets the playback restrictions. For details, see “Restricting playback of the disc” (page 48).
MULTI-DISC RESUME
(DVD VIDEO and VIDEO CD only)
ON: Stores the resume playback point in the memory for up to 10 discs.
OFF: Does not store the resume playback point in the memory. Playback starts at the resume playback point only for the current disc in the system.
RESET\*
Returns “SETUP” settings to the default settings. For details, see “To return the “SETUP” settings to the default settings*, perform reset as follows:” (page 105).
* Except for "PARENTAL CONTROL" settings
Tuner
Listening to the radio
You can listen to a radio station either by selecting a preset station, or by manually tuning in the station.
Listening to a preset radio station
1 Press FUNCTION +/- (or FUNCTION on the unit) 16 repeatedly to select "TUNER FM" or "TUNER AM".
2 Press and hold TUNING +/- 4 until the frequency indication changes and then release.
Scanning stops automatically when a station is tuned in and “TUNED” lights up in the display. When a FM stereo program is tuned in, “ST” lights up in the display.

If “TUNED” does not appear and the scanning does not stop, press TUNING +/- 4 repeatedly to tune in the station you want.
3 Press DVD/TUNER MENU 23. "MEMORY?" flashes in the display.
4 Press ENTER 6 or → 28.
A preset number flashes in the display.
The stations are stored from preset number 1.

5 Press ↑ or ↓ 28 repeatedly to select the preset number you want.
6 Press ENTER 6.
"COMPLETE" appears in the display.
The station is stored.
7 Repeat steps 1 to 6 to store other stations.
You can preset up to 20 FM stations and 10 AM stations.
The preset stations are retained for half a day even if you unplug the power cord or if a power failure occurs.
8 To listen to a preset station, press PRESET +/— 4 repeatedly to select the preset station you want.
You can also press the numeric buttons 31, then press ENTER 6 to select a preset station.
To stop automatic scanning
Press ■ 4.
To cancel presetting
Press DVD/TUNER MENU 23.
Listening to a non-preset radio station/station with a weak signal
1 Press FUNCTION +/- (or FUNCTION on the unit) 16 repeatedly to select "TUNER FM" or "TUNER AM."
2 Tune in the station you want.
For manual tuning:
Press TUNING +/- 4 repeatedly.
For direct tuning:
Press D.TUNING 21, then use the numeric buttons 31 to enter the frequency of the station you want. For example, press 1, 0, 2, 5 and 0 to enter the frequency of FM 102.50 MHz, then press ENTER 6. If you cannot tune in the station, make sure you have entered the right frequency. If you still cannot tune in the station, the frequency is not used in your area.
To cancel direct tuning
Press D.TUNING ^21 .
To change the AM tuning interval
(Except for European, Russian and Saudi Arabian models)
The AM tuning interval is factory-preset to 9 kHz or 10 kHz (for some areas).
1 Press FUNCTION +/- (or FUNCTION on the unit) 16 repeatedly to select "TUNER AM".
2 Press I/① to turn off the system.
3 Press DISPLAY 7 to display the clock.
4 While the clock is displayed, hold down TUNING + 4 on the unit, then press I/①① on the unit.
“AM 9K STEP” or “AM 10K STEP” appears in the display.
When you change the interval, all the AM preset stations are erased.
Tips
- To improve broadcast reception, adjust the supplied antennas, or connect an external antenna.
- When an FM stereo program has static noise, press REPEAT/FM MODE ^19 repeatedly until “MONO” appears in the display. There will be no stereo effect, but the reception will improve.
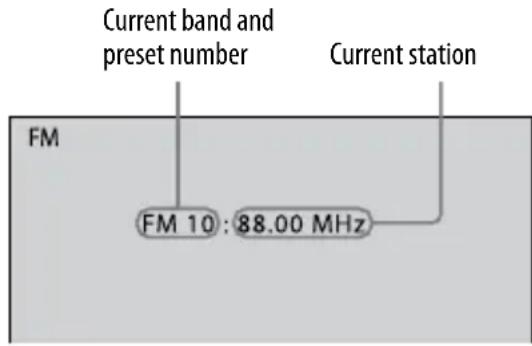
- You can also set the frequency by viewing the tuner information on the TV screen.
Tape
Playing a tape
You can use TYPE I (normal) tape.
1 Press FUNCTION +/- (or FUNCTION on the unit) 16 repeatedly to select "TAPE."
2 Insert a tape.
Press ■▲17 on the unit to insert a tape into the cassette holder with the side you want to play back facing up. Make sure there is no slack in the tape to avoid damaging the tape or the cassette holder.
3 Press ▶ 17 on the unit. The tape starts playing.
Other operations
| To Do this | |
| Stop playback Press ▲▲ 17. | |
| Pause playback Press ▪ □17. Press ▪17 again to resume playback. | |
| Fast-forward or rewind | Press ◀◀ or ▶▶17. |
Note
Be sure to press ■▲ 17 on the unit after the tape has been wound or rewound to the end.
Recording onto a tape
There are three ways to record on a TYPE I (normal) tape.
Use the buttons on the unit for the operation.
The recording level is adjusted automatically.
CD Synchro Recording
You can record an entire VIDEO CD or AUDIO CD onto a tape.
Manual Recording
You can record just the portion you want from a sound source, including connected audio components.
Sound Mixing
You can “mix” sound from any one of the sound sources and singing or speaking into a microphone. The mixed sound can be recorded onto a tape.
1 Insert a recordable tape into the cassette holder with the side you want to record facing up.
2 Prepare the recording source.
For CD Synchro Recording:
Press FUNCTION 16 repeatedly to select "DVD," then load the disc you want to record. If you have already loaded the disc, press DISC 1 — DISC 3 8 to select the disc. When the system automatically starts playback, press ■ 4 twice to cancel resume play.
For Manual Recording and Sound Mixing:
Select the desired source to record or mix.
To record only your favorite CD tracks in your desired order, perform steps 1 to 6 of “Creating your own program” (page 34).
To record only sound from a microphone, press FUNCTION 16 repeatedly to select “AUDIO IN,” and do not connect any component to the AUDIO IN jack 12.
3 Start recording.
For CD Synchro Recording:
Press ● 17.
The CD starts playing automatically after 10 seconds have passed.
For Manual Recording:
Start playing the desired recording source, then press ●17.
If there is noise while recording from the tuner, reposition the appropriate antenna to reduce the noise.
For Sound Mixing:
Press ● 17, and then start playing the desired source and start singing or speaking into the microphone. If acoustic feedback (howling) occurs, reduce the volume, move the microphone away from the speakers, or change the direction of the microphone.
To stop recording
Press ■▲ 17.
Notes
- CD Synchro Recording is not available with DVDs, DATA CD/DVDs.
- You cannot listen to other sources while recording.
- If you connect or disconnect a microphone or headphones during recording, the sound may cut off for a moment.
- When “DVD” function or “USB” function is selected, Karaoke Mode is automatically turned on when you connect a microphone to MIC jack 13.
- The system may continue playback of other discs even after the Synchro Recording is completed.
USB Device
Transferring music from a disc to an USB device
You can connect an optional USB device to the (USB) port 10 on the unit and transfer music from a disc to the USB device.
You can transfer music from an AUDIO CD or DATA CD/DVD (MP3 audio tracks only) only.
The audio format of files transferred by this system is MP3.
The amount of free space required on the USB device is about 1 MB per minute when transferring music from an AUDIO CD.
Required free space may be larger when transferring music from a DATA CD/DVD (MP3 audio tracks only).
Refer to "Compatible USB devices" (supplement) for a list of USB devices that can be connected to this system.
The transferred music is limited to private use only. Use of the music beyond this limit requires permission of the copyright holders.
Note on the maximum number of tracks, files and folders on an USB device
This system cannot transfer music from a disc in the following cases.
- When the number of tracks or files on a folder exceeds 150.
- When the number of folders on an USB device exceeds 200.
These numbers may vary depending on the track structure, the file structure and the folder structure.
1 Connect an USB device to the (USB) port 10 as shown below.
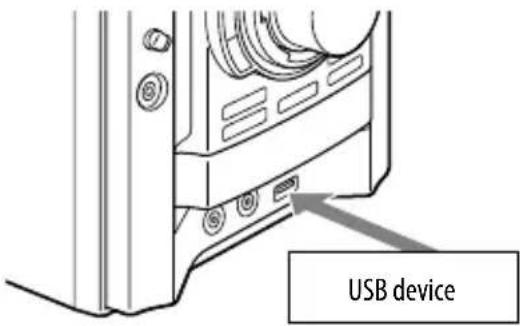
When USB cable connection is necessary, connect the USB cable supplied with the USB device to be connected.
See the operating instructions supplied with the USB device to be connected for details on the operation method.
When the USB device is connected, "READING" appears and "USB MEM" lights up in the display.
Notes
- Do not use the USB devices other than those listed in “Compatible USB devices” (supplement). Operation of models not listed is not guaranteed.
- Operation is not guaranteed, even when using these USB devices.
- When inserting the USB device, make sure of the direction and insert it all the way to the (USB) port 10 on the unit.
- Do not forcibly insert the USB device, as this may cause the device to be damaged.
- Do not insert other device or objects besides the USB device.
- It may take about 10 seconds before “READING” appears in the display depending on the type of USB device connected.
2 Press FUNCTION +/- (or FUNCTION on the unit) 16 repeatedly to select "DVD".
3 Load the disc you want to transfer.
If you have loaded the disc, press DISC SKIP repeatedly (or DISC 1 — DISC 3 on the unit) 8 to select the disc. When the system automatically starts playback, press ■4 twice to cancel resume play.
To remove the USB device
1 Press ■ 4 to stop playback.
2 Press I/① to turn off the system.
3 Remove the USB device.
Using the front panel display
You can easily transfer all the music on a disc to an USB device (Synchronized transfer).
You can also transfer a single audio track during playback (REC 1).
1 Set the USB device to stand by for transferring.
Synchronized transfer:
Press ■ 4 twice to cancel resume play, then press REC TO USB 5 on the unit.
REC 1:
Start playing the track you want to transfer, then press REC TO USB ^5 on the unit.
"READING" appears, and the display cycles between "FREE xxxMB" (remaining space on the USB device) and "PUSH ENTER."
The USB device stands by for transferring.
2 Press ENTER 6.
“USB,” “REC” and “SYNC” light up and transferring starts. No sound is output during transfer.
When the transfer is completed, the system stops automatically.
Using the on-screen display
1 Press DISPLAY 24 when playback is stopped.
The Control Menu appears on the TV screen.
2 Press ↑ or ↓ 28 repeatedly to select (USB RECORDING), then press ENTER 6.
The options for "USB RECORDING" appear on the TV screen.
3 Press ↑ or ↓ 28 repeatedly to select the desired option, then press ENTER 6.
For AUDIO CD:
- TRACK: The tracks on the AUDIO CD appear. You can transfer the desired track.
For DATA CD/DVD:
- TRACK: The folders on the DATA CD/DVD appear. You can transfer the desired MP3 audio track.
- FOLDER: The folders on the DATA CD/DVD appear. You can transfer all MP3 audio tracks in the folder.
“Reading.” appears, and the tracks or folders appear on the TV screen.
Note
It may take some time to display the tracks or folders depending on the number of tracks or folders.
4 Select the tracks that you want to transfer.
For AUDIO CD:
Press ↑ or ↓ 28 repeatedly to select the track, then press ENTER 6. The tracks are marked in the order that you select. To cancel the selection, press ENTER 6 again.
Remaining space of the USB device

Tracks to be transferred
To select all tracks on the AUDIO CD
Press ↑/↓/←/▶ 28 repeatedly to select “■ ALL,” then press ENTER 6. To cancel the selection, select “□ALL,” then press ENTER 6.
For DATA CD/DVD:
Press ↑ or ↓ 28 repeatedly to select the MP3 audio tracks or folders, then press ENTER 6.
The MP3 audio tracks or folders are marked. To cancel the selection, press ENTER 6 again.
Remaining space of the USB device
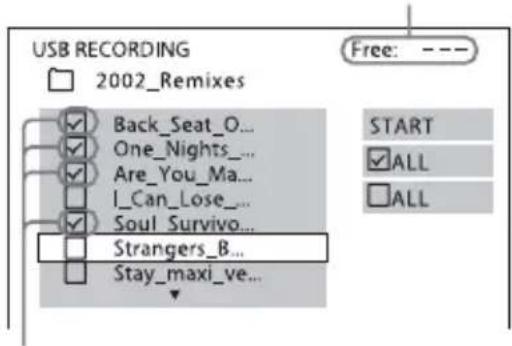
MP3 audio tracks or folders to be transferred
To select all tracks or folders on the DATA CD/DVD
Press ↑/↓/↔ 28 repeatedly to select “√ALL,” then press ENTER 6. To cancel the selection, select “□ALL,” then press ENTER 6.
5 Press // 28 repeatedly to select "START," then press ENTER 6.
The system starts transferring and the transfer status appears. No sound is output during transfer.
To stop transferring, press ■4.
To return to the previous display
Press 📌 RETURN 27.
To erase audio tracks or folders from the USB device
You can erase audio tracks or folders on the USB device.
1 Press FUNCTION +/ — (or FUNCTION on the unit) 16 repeatedly to select "USB" (or press USB 5 on the unit). "FOLDER LIST" appears.
2 Press ↑ or ↓ 28 repeatedly to select a folder.
To erase all audio tracks in a folder, press CLEAR 30.
To erase an audio track, press ENTER 6. "TRACK LIST" appears.
Press ↑ or ↓ 28 repeatedly to select the desired audio track, then press CLEAR 30.
3 Press ← or → 28 repeatedly to select "YES," then press ENTER 6.
To cancel, select "NO," then press ENTER 6.
Folder and track generation rules
When first transferring music to an USB device, a “MUSIC” folder is created directly below the “ROOT.” Folders and tracks are generated within this “MUSIC” folder as follows:
■ When transferring music from an AUDIO CD
In stop mode ^1) :
Folder name: "FLDR001"2)
Track name: "TRACK001"2)
During playback:
Folder name: "REC1-CD" ^4
Track name: "TRACK001"2)
■ When transferring music from a DATA CD/DVD (MP3 audio tracks only)
In stop mode ^1) :
Folder name: Same as the transferred folder ^4)
Track name: Same as the transferred track ^4
During playback:
Folder name: "REC1-MP3" ^3
Track name: Same as the transferred track ^4
^1) Except when resuming playback.
^2) Folder and tracks numbers are assigned serially thereafter.
^3) A new track is created in the “REC1-CD” or “REC1-MP3” folder each time a transfer is performed.
^4) Up to 64 characters of the name are assigned.
^5) Up to 60 characters of the name are assigned.
Notes
- Do not remove the USB device during transfer or erase operations. Doing so may corrupt the data on the USB device or damage the USB device itself.
- Do not connect the system and the USB device through an USB hub.
- When transferring music from an AUDIO CD, the tracks are transferred as 128 kbps MP3 audio tracks. When transferring music from a DATA CD/DVD, MP3 audio tracks are transferred with the same bit rate as the original MP3 audio tracks.
- CD text information is not transferred in the created MP3 audio tracks.
• Transferring stops automatically if:
— the USB device runs out of space during the transfer process.
— the number of folders on the USB device reaches the limit for the number that the system can recognize.
- Up to 150 audio tracks can be contained on a single folder and up to 200 folders can be contained on a single USB device.
The maximum number of audio tracks and folders may vary depending on the audio tracks and folder structure.
- If the folder to be erased contains non-MP3/WMA (Windows Media Audio)/AAC format audio tracks or sub folders, these are not erased.
- If a folder or audio track that you are trying to transfer already exists on the USB device with the same name, a sequential number is added after the name without overwriting the original folder or track.
Recording analog audio to an USB device
You can record the sound from analog audio sources.
1 Connect an USB device to the (USB) port 10.
2 Press FUNCTION +/- (or FUNCTION on the unit) 16 repeatedly to select the desired source.
- TAPE: To record from this system's tape deck.*
- TUNER FM/AM: To record from this system's tuner.
- AUDIO IN: To record from the optional component connected to the AUDIO IN jack 12.
* Recording continues even though tape playback has ended.
3 Press REC TO USB 5 on the unit.
“PLEASE WAIT” appears and the display cycles between “FREE xxxMB” (remaining space on the USB device) and “PUSH ENTER.” The USB device stands by for recording.
4 Start playing the desired source to record, then press ENTER 6. "USB" and "REC" light up and recording starts. To stop recording, press ■4.
To remove the USB device
1 Press ■ 4 to stop playback.
2 Press I/① to turn off the system.
3 Remove the USB device.
To mark track numbers
You can mark the track numbers during recording of any source. Press REC TO USB 5 on the unit during recording at the point you want to add a track mark. "NEW TRACK" appears and a track mark is added.
Folder and track generation rules
When first recording the analog audio to an USB device, a “MUSIC” folder is created directly below the “ROOT.” Folders and tracks are generated within this “MUSIC” folder as follows:
■ When recording from the tape deck
Folder name: "TAPE001"* Track name: "TRACK001"*
■ When recording from the tuner
Folder name: "FM001"* or "AM001"* Track name: "TRACK001"*
■ When recording from the AUDIO IN jack
Folder name: "AUDIO001"* Track name: "TRACK001"*
* Folder and track numbers are assigned serially thereafter.
Notes
- Do not remove the USB device during recording operation. Doing so may corrupt the data on the USB device or damage the USB device itself.
- Do not connect the system and the USB device through an USB hub.
- Each time you press REC TO USB 5 on the unit during recording, the system pauses recording for a few seconds to add a new track mark. No sound is recorded during this time.
- The track numbers are automatically marked when you record more than 60 minutes.
• Recording stops automatically when: - you change the function.
— you turn off the system.
— the USB device runs out of space during the recording.
— the number of audio tracks on the USB device reaches the limit for the number that the system can recognize. - The sound is recorded as 128 kbps MP3 audio track.
- Up to 150 audio tracks can be contained on a single folder and up to 200 folders can be contained on a single USB device.
The maximum number of audio tracks and folders may vary depending on the audio tracks and folder structure.
Listening to music of an USB device
You can listen to music stored in the USB device. The audio formats that can be played back by this system are as follows: MP3*/WMA*/AAC*
Refer to “Compatible USB devices” (supplement) for a list of USB devices that can be connected to this system.
* Files with copyright protection (Digital Rights Management) cannot be played by this system.
Note on the maximum number of tracks, files and folders on an USB device
This system cannot play an USB device in the following cases.
- When the number of tracks or files on a folder exceeds 150.
- When the number of folders on an USB device exceeds 200.
These numbers may vary depending on the track structure, the file structure and the folder structure.
1 Press FUNCTION +/- (or FUNCTION on the unit) 16 repeatedly to select "USB" (or press USB 5 on the unit).
2 Connect an USB device to the (USB) port 10.
When USB cable connection is necessary, connect the USB cable supplied with the USB device to be connected.
See the operating instructions supplied with the USB device to be connected for details on the operation method.
When the USB device is connected, "READING" appears and "USB MEM" lights up in the display.
Notes
- Do not use the USB devices other than those listed in “Compatible USB devices” (supplement). Operation of models not listed is not guaranteed.
- Operation is not guaranteed, even when using these USB devices.
- When inserting the USB device, make sure of the direction and insert it all the way to the (USB) port 10 on the unit.
- Do not forcibly insert the USB device, as this may cause the device to be damaged.
- Do not insert other device or objects besides the USB device.
- It may take about 10 seconds before “READING” appears in the display depending on the type of USB device connected.
To remove the USB device
1 Press ■ 4 to stop playback.
2 Press I/① to turn off the system.
3 Remove the USB device.
Notes on the USB device
- The system can play back up to 200 folders, including folders that do not contain MP3 audio tracks and JPEG image files.
- The file formats that this system can play are as follows:
— MP3: file extension “.mp3”
- WMA: file extension ".wma"
- AAC: file extension ".m4a"
- JPEG: file extension “.jpg” or “.jpeg”
The system will play back any data with the extension above even if they are not in MP3/WMA/AAC/JPEG format. Playing this data may generate a loud noise which could damage your speaker system.
- The following USB devices/situations can increase the time it takes to start playback:
— an USB device recorded with a complicated tree structure.
— when the tracks or files in another folder have just been played back.
- Some USB devices cannot be played back on the system depending on the file format.
- The system can play back to a depth of 8 folders only.
- When the USB device is inserted, the system reads all the files on the USB device. If there are many folders or files on the USB device, it may take a long time to finish reading the USB device.
- Do not connect the system and the USB device through an USB hub.
- With some connected USB devices, after an operation is performed, there may be a delay before it is performed by this system.
- Resume Play is canceled when you turn off the system.
- This system does not necessarily support all the functions provided in a connected USB device.
- Tracks transferred by a device such as a computer may not be played back in the order in which they were recorded.
- The playback order for the system may differ from the playback order of the connected USB device.
- Always turn off the system before removing the USB device. Removing the USB device while the system is on may corrupt the data on the USB device.
- Do not save other types of files or unnecessary folders on an USB device that has audio tracks or JPEG image files.
- Folders that have no audio tracks or JPEG image files are skipped.
- The maximum number of audio tracks and folders that can be contained on a single USB device is 200 (including the “ROOT” and “MUSIC” folders).
The maximum number of audio tracks and folders may vary depending on the file and folder structure.
- Compatibility with all encoding/writing softwares, recording devices, and recording media cannot be guaranteed. Incompatible USB device may produce noise or interrupted audio or may not play at all.
Selecting an audio track or folder
1 Press ⒸDISPLAY 24 when playback is stopped.
The Control Menu appears on the TV screen.
2 Press ↑ or ↓ 28 repeatedly to select (MODE (MUSIC, IMAGE)), then press ENTER 6. The options for “MODE (MUSIC, IMAGE)” appear on the TV screen.
3 Press ↑ or ↓ 28 repeatedly to select "MUSIC," then press ENTER 6.
4 Press DVD/TUNER MENU 23. "FOLDER LIST" appears on the TV screen.
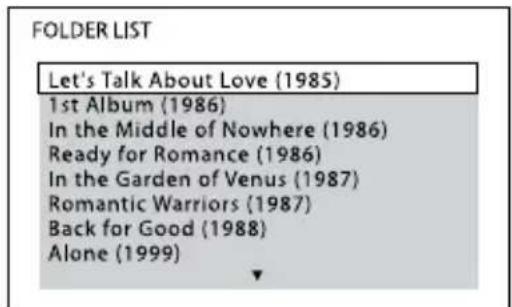
5 Press ↑ or ↓ 28 repeatedly to select a folder.
Playing a folder:
Press ▷ (or ▶ on the unit) 4. The system starts playback from the first track of the selected folder. To stop playback, press ■ 4.
Playing a track:
1 Press ENTER 6. "TRACK LIST" appears.

2 Press ↑ or ↓ 28 repeatedly to select the audio track you want, then press ENTER 6. The system starts playing the selected audio track. To stop playback, press ■ 4.
To display the next or previous page of "TRACK LIST" or "FOLDER LIST"
Press ←→ 26 repeatedly when "TRACK LIST" or "FOLDER LIST" is displayed.
To play back the next folder of audio tracks
You can select the next folder by pressing ▶▶▶4 repeatedly until the last track of the current folder, then press ▶▶▶4 once. The first track of the next folder is selected. However, you cannot select the previous folder by pressing ◀◀◀4 repeatedly. To select the previous folder, select the folder from “FOLDER LIST.”
To return to "FOLDER LIST" when "TRACK LIST" is displayed
Press 📞 RETURN 27.
To turn on or off "FOLDER LIST" or "TRACK LIST"
Press DVD/TUNER MENU 23 repeatedly.
Selecting a JPEG image file or folder
1 Press DISPLAY 24 when playback is stopped. The Control Menu appears on the TV screen.
2 Press ↑ or ↓ 28 repeatedly to select (MODE (MUSIC, IMAGE)), then press ENTER 6. The options for “MODE (MUSIC, IMAGE)” appear.
3 Press ↑ or ↓ 28 repeatedly to select "IMAGE," then press ENTER 6.
4 Press DVD/TUNER MENU 23. "FOLDER LIST" appears on the TV screen.
5 Press ↑ or ↓ 28 repeatedly to select a folder.
Playing a folder: Press ▷ (or ▶ on the unit) 4. The system starts a slide show from the first image file of the selected folder.
Playing an image file:
1 Press PICTURE NAVI 18. Thumbnail picture for the first 16 JPEG image files in the selected folder is displayed.
| 1 | 2 | 3 | 4 |
| 5 | 6 | 7 | 8 |
| 9 | 10 | 11 | 12 |
| 13 | 14 | 15 | 16 |
If there are more than 16 image files in the selected folder, the scroll bar appears at the right.
2 Press ↑/↓/←/→ 28 to select the image you want to view, then press ▷ (or ▶ on the unit) 4. The slide show starts from the selected image file. To stop playback, press ■ 4.

natural_image
Illustration of a mountain range with pine trees at the base (no text or symbols)To display the next or previous page of "FOLDER LIST"
Press ← or • → 26 repeatedly when "FOLDER LIST" is displayed.
To display the next or previous JPEG image file
Press or 28 repeatedly during the slide show.
To play back the next folder of JPEG image files
You can select the next folder by pressing ➔ 28 repeatedly until the last file of the current folder, then press ➔ 28 once. The first file of the next folder is selected. However, you cannot select the previous folder by pressing ➔ 28 repeatedly. To select the previous folder, select the folder from “FOLDER LIST.”
To turn on or off "FOLDER LIST"
Press DVD/TUNER MENU 23 repeatedly.
To rotate a JPEG image file
When a JPEG image file is displayed on the TV screen, you can rotate the image by 90 degrees.
Press ↑ or ↓ 28 repeatedly while viewing an image.
Press CLEAR 30 to return to the original view.
Notes
- The PICTURE NAVI ^18 button does not work when “MODE (MUSIC, IMAGE)” is set to “MUSIC.”
- When you press or 28 to select the next or previous image, the image will return to its original view even if you have rotated the image previously.
- The slide show stops when you press or 28.
- The maximum number of audio tracks or JPEG image files on a folder which this system can recognize is 150.
- If there are no audio tracks in the USB device and “MODE (MUSIC, IMAGE)” is set to “MUSIC,” “No audio data” appears on the TV screen and the USB device cannot be played back.
- If there are no JPEG image files in the USB device and “MODE (MUSIC, IMAGE)” is set to “IMAGE,” “No image data” appears on the TV screen and the USB device cannot be played back.
Tip
You can change the brightness of the (USB) indicator 10 on the unit when the indicator is lit in blue.
Press ■ 4 and USB 5 on the unit at the same time.
Each time you repeat the procedure above, the indicator brightness changes accordingly.
Specifying the slide show speed
(JPEG image files only)
1 Press DISPLAY 24 repeatedly until the Control Menu for JPEG image files appears on the TV screen.
2 Press ↑ or ↓ 28 repeatedly to select (INTERVAL), then press ENTER 6.
The options for "INTERVAL" appear on the TV screen.
3 Press ↑ or ↓ 28 repeatedly to select the transition interval you want.
The default setting is underlined.
• NORMAL: Sets to the standard duration.
- FAST: Sets the duration shorter than “NORMAL.”
- SLOW 1: Sets the duration longer than “NORMAL.”
- SLOW 2: Sets the duration longer than “SLOW 1.”
4 Press ENTER 6.
The selected setting takes effect.
Note
Some JPEG image files (especially progressive JPEG image files or JPEG image files with 3,000,000 pixels or more) may take a longer time to display than others, which may make the transitions seem longer than that of the option you selected.
Selecting a transition effect for image files in the slide show
(JPEG image files only)
1 Press DISPLAY 24 repeatedly until the Control Menu for JPEG image files appears on the TV screen.
2 Press ↑ or ↓ 28 repeatedly to select (EFFECT), then press ENTER 6.
The options for “EFFECT” appear on the TV screen.
3 Press ↑ or ↓ 28 repeatedly to select the setting you want.
The default setting is underlined.
- MODE 1: The image sweeps in from top to bottom of the screen.
- MODE 2: The image sweeps in from left to right of the screen.
- MODE 3: The image stretches out from the center of the screen.
- MODE 4: The image randomly cycles through the effects.
- MODE 5: The next image slides over the current image.
• OFF: Turns off this function.
4 Press ENTER 6.
The selected setting takes effect.
Playing in random order
— Shuffle Play
You can play back the tracks on the USB device in random order. Each time you perform Shuffle Play, the playing order may differ.
1 Press DISPLAY 24.
The Control Menu appears on the TV screen.
2 Press ↑ or ↓ 28 repeatedly to select •(SHUFFLE), then press ENTER 6.
The options for "SHUFFLE" appear on the TV screen.
3 Press ↑ or ↓ 28 repeatedly to select the setting you want.
- ON (MUSIC): all audio tracks in the selected folder on the USB device is played back randomly. When no folder is selected, the first folder is played back randomly.
4 Press ENTER6.
Shuffle Play starts. To cancel Shuffle Play, press CLEAR 30 or select "OFF" in step 3.
To turn off the Control Menu
Press ⓂDISPLAY 24 repeatedly until the Control Menu disappears from the TV screen.
Notes
- Shuffle Play is canceled when:
— you remove the USB device.
— you turn off the system.
— you change the function.
- you set "MODE (MUSIC, IMAGE)" to "IMAGE" when playback is stopped.
- The same song may be played back repeatedly for audio tracks.
Playing repeatedly
— Repeat Play
You can play the audio tracks and JPEG image files on the USB device repeatedly. You can select Shuffle Play at the same time.
1 Press DISPLAY 24.
The Control Menu appears on the TV screen.
2 Press ↑ or ↓ 28 repeatedly to select •(REPEAT), then press ENTER 6.
The options for “REPEAT” appear on the TV screen.
3 Press ↑ or ↓ 28 repeatedly to select the setting you want.
- MEMORY: repeats all the folders on the USB device.
- FOLDER: repeats the current folder.
- TRACK*: repeats the current track.
* Audio tracks only.
When Shuffle Play is activated:
• ON: repeats the Shuffle Play.
4 Press ENTER 6.
5 Press ▷ (or ▶ on the unit) 4.
Repeat Play starts.
To cancel Repeat Play, press CLEAR
30 or select "OFF" in step 3.
To turn off the Control Menu
Press ⒹDISPLAY 24 repeatedly until the Control Menu disappears from the TV screen.
Notes
- You can also change the Repeat Play setting by pressing REPEAT/FM MODE 19 repeatedly.
- “REP” lights up in the display when Repeat Play is set to “MEMORY,” “FOLDER” or “ON.”
- “REP1” lights up in the display when Repeat Play is set to “TRACK.”
- You cannot select “TRACK” when “MODE (MUSIC, IMAGE)” is set to “IMAGE” (page 72).
- Repeat Play is canceled when:
— you remove the USB device.
— you turn off the system.
— you change the function.
Sound Adjustment
Adjusting the sound
Generating a more dynamic sound (Dynamic Sound Generator X-tra)
You can reinforce the bass and create a more powerful sound.
The DSGX setting is ideal for music sources.
Press DSGX 14 on the unit repeatedly.
Each time you press the button, the display changes as follows:
DSGX ON ↔ DSGX OFF
Tip
The default setting is "DSGX ON."
Selecting the preset effect
1 Press EQ 14 on the unit.
The last selected preset effect appears in the display.
2 Press EQ 14 on the unit repeatedly to select the preset effect you want.
Each time you press the button, the display changes cyclically as follows: ROCK → MP3 SURR → HIP HOP → POP → TECHNO → JAZZ → FLAT...
Selecting the sound field
You can take advantage of the surround sound simply by selecting one of the sound fields. They bring the exciting and powerful sound of movie theaters into your home.
1 Press SOUND FIELD 14.
The last selected sound field appears in the display.
2 Press ↑/↓/↔/→ 28 (or SOUND FIELD 14) repeatedly when the last selected sound field appears in the display to select the sound field you want.
When the headphones are not connected:
2CH STEREO
Reproduces stereo output from multi channel sources such as DVD VIDEOs during “DVD” function. The system outputs the original sound during functions other than “DVD” and during playback of stereo sources such as AUDIO CD, VIDEO CD and MP3 audio tracks.
2CH SURR
Reproduces stereo output with surround effect from multi channel sources such as DVD VIDEO during DVD function. The system outputs the original sound with surround effect during functions other than DVD.
VIRTUAL A\*
Creates 3 sets of virtual surround speakers from the sound of the front speakers. This sound field is only effective when you play back multi channel sources.
VIRTUAL B\*
Creates 1 set of virtual surround speakers from the sound of the front speakers without using actual surround speakers. This mode is effective when the distance between the front speakers is short. This sound field is only effective when you play back multi channel sources.
When the headphones are connected:
HP 2CH
The normal sound field for headphones.
HP SURR
The sound field for headphones with surround effect.
HP VIRTUAL\*
The sound field for headphones with virtual surround effect. This sound field is only effective when you play back multi channel sources.
* These sound fields cannot be selected when:
— a microphone is connected.
— the Karaoke Mode is turned on.
- the function is set to other than "DVD" or "USB."
Notes
- Depending on the disc, the surround effect may not be as much as expected.
- You cannot change the sound field when transferring or recording to the USB device.
Singing along: Karaoke

You can enjoy Karaoke by setting the system to Karaoke Mode.
Preparing for karaoke
(DVD VIDEO, DVD-R/-RW in VR mode, VIDEO CD and MP3 audio tracks (including those on an USB device))
1 Press FUNCTION +/- (or FUNCTION on the unit) 16 repeatedly to select "DVD" or "USB."
2 Turn MIC LEVEL 13 on the unit to "MIN" to reduce the microphone volume.
3 Connect a microphone to MIC jack 13 on the unit.
The Karaoke Mode is turned on.
"KARAOKE MODE: ON" appears on
the TV screen and " ", appears in
the display.
4 Start playing the music and adjust the volume.
DVD VIDEO, DVD-R/-RW in VR mode:
The system outputs the audio format that you have selected.
AUDIO CD, VIDEO CD, MP3 audio tracks:
The audio setting automatically changes to "1/L" and the system outputs the left channel audio.
If you want to hear vocal:
Press AUDIO ^20 repeatedly to select another audio channel.
5 Start singing along with the music and adjust the microphone volume by turning MIC LEVEL 13.
To turn off the Karaoke Mode
Disconnect the microphone or press KARAOKE MODE ^32 . “KARAOKE MODE: OFF” appears on the TV screen.
Other operations
| To Do this | |
| Adjust the microphone volume | Turn MIC LEVEL 13 on the unit. |
| Adjust the microphone echo | Press ECHO 13 on the unit repeatedly. |
| Cancel the echo effect | Press ECHO 13 on the unit repeatedly until “ECHO OFF” appears. |
Notes
- The sound input from the microphone is not output from the DVD DIGITAL OUT jack.
- Karaoke Mode is automatically turned off when you:
— turn off the system.
- change the function (except for the "DVD" function or "USB" function).
— connect the headphones.
- If howling occurs:
— move the microphone away from the speakers.
— change the direction of the microphone.
— lower the MIC LEVEL 13 or ECHO 13.
- press VOLUME - repeatedly (or turn VOLUME on the unit counterclockwise) 15.
Changing the key
- Key Control
You can change the key to suit your vocal range, except when the system is in stop mode.
Press KEY CONTROL b/# 32 to suit your vocal range in Karaoke mode.
You can adjust the key higher or lower in 13 steps (b6 - #6).
Notes
- Depending on the disc, you may not be able to change the key.
- The key automatically returns to the original key when:
— you turn off the system.
— you change the function.
— you change the disc.
— the disc tray is opened.
— you stop playback.
— the title or track changes.
— you change the folder.
— the play item is changed during PBC playback.
— you perform Lock Search.
— you cancel Karaoke mode.
- DVD layer is changed.
Playing karaoke with any stereo disc
— "Karaoke Pon"
You can enjoy karaoke with a stereo-recorded disc, even if it is a non-karaoke disc, by reducing the sound of the vocals.
Press KARAOKE PON 32 in Karaoke mode.
To cancel "Karaoke Pon" mode
Press KARAOKE PON ^32 again.
Notes
• This function may not work well when:
— only a few instruments are playing.
- a duet is playing.
— the vocals on the disc deviate from the center.
- playing monaural-recorded discs (the accompaniment is also reduced).
- playing multiplex discs.
- During “Karaoke Pon” mode, the stereo effect is reduced.
- “Karaoke Pon” mode is automatically canceled when:
— you turn off the system.
— you change the function.
— you change the disc.
— you open the disc tray.
- you press AUDIO20.
- you set "VOCAL SELECT" to other than "OFF."
— you cancel Karaoke mode.
Selecting the vocals
— Vocal Select (DVD VIDEO/VIDEO CD/CD only)
When playing a DVD with the “Dolby Digital Karaoke” format in Karaoke mode, you can turn on or off the guide vocal recorded in the karaoke track.
When playing a VIDEO CD or AUDIO CD in Karaoke mode, you can listen to the vocals.
You can also change the guide vocal channel. You can select different kinds of vocals.
1 Press DISPLAY 24 in Karaoke mode.
The Control Menu appears on the TV screen.
2 Press ↑ or ↓ 28 repeatedly to select •(VOCAL SELECT), then press ENTER 6.
The options for “VOCAL SELECT” appear on the TV screen.
3 Press ↑ or ↓ 28 repeatedly to select the desired vocal channel.
The output channel changes as follows.
The default settings are underlined.
When playing a DVD VIDEO
• OFF: Turns off the guide vocal.
• 1+2: Guide vocal 1+2
• 1: Guide vocal 1
• 2: Guide vocal 2
When playing a VIDEO CD or AUDIO CD
• OFF: Turns off the guide vocal.
- L+R: The same sound is output from both speakers.
• STEREO: The standard stereo sound
When playing a Super VCD
• OFF: Turns off the guide vocal.
- 1:L+R: The same sound of the audio track 1 is output from both speakers.
• 1:STEREO: The stereo sound of the audio track 1
- 2:L+R: The same sound of the audio track 2 is output from both speakers.
- 2:STEREO: The stereo sound of the audio track 2
4 Press ENTER 6.
Notes
- When playing a DVD VIDEO, the function works only with the “Dolby Digital Karaoke” format.
- Depending on the disc, you may not be able to change the guide vocal channel.
- The channel returns to the default setting when:
— you turn off the system.
— you change the function.
— you change the disc.
— you open the disc tray. - you press AUDIO20.
— you cancel Karaoke mode. - you set "Karaoke Pon" mode to on.
- When playing a DVD VIDEO recorded only with one kind of guide vocal, select "1."
Selecting the scoring mode
— Score Mode
When karaoke mode is turned on, you can use the scoring mode. Your score is calculated by comparing your voice with the music source.
1 Press DISPLAY 24 in Karaoke mode.
The Control Menu appears on the TV screen.
2 Press ↑ or ↓ 28 repeatedly to select (SCORE MODE), then press ENTER 6.
The options for “SCORE MODE” appear on the TV screen.
3 Press ↑ or ↓ 28 repeatedly to select a setting.
The default setting is underlined.
- BEGINNER 1: Beginner level. The score updates every 3 seconds.
- BEGINNER 2: Beginner level.
- EXPERT 1: Advance level. The score updates every 3 seconds.
• EXPERT 2: Advance level. - DEMO: Demonstration mode. The score is displayed regardless of singing.
4 Press ENTER 6.
5 Start playing the music.
6 Press SCORE 32 before singing a song in Karaoke mode.
The previous highest score appears on the TV screen and the display changes as follows according to the level selected for “SCORE MODE” level.
★OC: When you select “BEGINNER 1” or “EXPERT 1.”
★--: When you select "BEGINNER 2" or "EXPERT 2."
★DEMO: When you select "DEMO."
7 After singing for more than a minute, press SCORE 32 again to view your score.
Your score is calculated from a scale of 0 to 99.
Your score is displayed for 5 seconds, during which time the system enters pause mode.
After your score, the ranking is displayed as follows:
- The ranking is displayed as a list with top 3 scores.
- Your score and ranking for the last song flash.
- If you are in the top 10, your ranking is displayed. If not, “10+” is displayed.
- If your score is “0,” your score is not displayed in the ranking list.
Notes
- The highest score is reset when the system is turned off.
- The “SCORE MODE” function may be canceled when certain remote buttons are pressed.
- In some cases, you may not be able to use the scoring mode.
Tip
The “SCORE MODE” setting is automatically changed to “BEGINNER 1” when the system is turned off.
Other Operations
Using the timer
Falling asleep to music
— Sleep Timer
You can set the system to turn off after a certain time, so that you can fall asleep to music.
Press SLEEP 34 repeatedly to select the time you want.
Setting the timer
— Play Timer/Rec Timer
You cannot activate both the Play Timer and the Rec Timer at the same time. Make sure you have set the clock (see "Setting the clock" (page 24)).
Play Timer
You can wake up to music at a preset time.
Rec Timer
You can record from a preset radio station at a specified time.
1 Prepare the sound source.
For Play Timer:
You can select one of the following music sources.
Disc: Load a disc.
USB: Connect an USB device.
Tuner: Tune in the preset station you want.
Then press VOLUME +/- (or turn VOLUME on the unit) 15 to adjust the volume.
For Rec Timer:
Tune in the preset radio station you want.
2 Press TIMER MENU 35.
3 Press ↑ or ↓ 28 repeatedly to select "PLAY SET?" or "REC SET?," then press ENTER 6.
“ON” appears and the hour indication flashes in the display.
4 Set the time to start playback or recording.
Press ↑ or ↓ 28 repeatedly to set the hour, then press ENTER 6. The minute indication flashes in the display. Use the procedure above to set the minute. “OFF” appears and the hour indication flashes in the display.
5 Set the time to stop playback or recording using the same procedure as step 4.
6 Select the sound source or prepare the USB device.
For Play Timer:
Press ↑ or ↓ 28 repeatedly until the music source (DVD, USB or tuner) you want appears in the display, then press ENTER 6. The display will show the timer settings.
For Rec Timer:
The display will show the timer settings. Connect an USB device to the (USB) port 10 on the unit and check that "USB MEM" lights up in the display.
7 Press I/① to turn off the system.
Be sure to turn off the system at least 120 seconds before the preset time.
Other operations
| To Do this | |
| Check the setting | 1 Press TIMER MENU35.“TIMER SEL?”flashes in the display.2 Press ENTER6.3 Press ↑ or ↓28repeatedly to select “PLAY SEL?” or “REC SEL?,” then press ENTER6. |
| Change the setting | Start from step 1. |
| Cancel the Play Timer or Rec Timer | 1 Press TIMER MENU35.“TIMER SEL?”flashes in the display.2 Press ENTER6.3 Press ↑ or ↓28repeatedly to select “TIMER OFF?,” then press ENTER6. |
Notes
- If you use the Play Timer or Rec Timer and the Sleep Timer at the same time, the Sleep Timer has priority.
- The Play Timer and Rec Timer will not be activated if the system is turned on or if "STANDBY" flashes in the display.
- The volume is reduced to minimum during Rec Timer.
- When you set the Rec Timer, the system turns on 90 seconds before the preset time. When you set the Play Timer, the system turns on 30 seconds before the preset time. Do not operate the system from the time the system turns on until the play or recording starts.
Changing the display
Turning off the display
- Power Saving Mode
The clock display can be turned off to minimize the amount of power consumed during standby mode (Power Saving Mode).
Press DISPLAY 7 repeatedly while the system is turned off.
Clock ^* →
No display (Power Saving Mode) →
Clock ...
* The clock display automatically turns to Power Saving Mode after 8 seconds.
Viewing information about the disc
Viewing information about the disc in the front panel display
Press DISPLAY 7.
Each time you press DISPLAY ^7 , the display changes from ① → ② → ① → ...
① Disc information
② Clock display (for 8 seconds)
Checking the elapsed playing time, remaining time and titles
Press TIME/TEXT 33 during playback. Each time you press TIME/TEXT 33, the display changes from ① → ② → ... → ① → ...
When playing a DVD VIDEO or DVD-R/-RW in VR mode:
- When the menu or the title without a chapter is played back
① Elapsed playing time of the menu or the current title
② Disc title
- When a chapter other than above condition is played back
① Elapsed playing time of the current title
② Remaining time of the current title
③ Elapsed playing time of the current chapter
④ Remaining time of the current chapter
⑤ Disc title ^2)
When playing an AUDIO CD or VIDEO CD without PBC function:
① Elapsed playing time of the current track
② Remaining time of the current track
③ Elapsed playing time of the disc ^3)
④ Remaining time of the disc ^3)
⑤ Track name ^1)4)
When playing a VIDEO CD with PBC function:
① Elapsed playing time of the current scene
② Disc title ^1)4)
When playing MP3 audio tracks on a DATA CD/DVD:
① Elapsed playing time of the current track/file
② Track name ^4)5)
Checking the total playing time and titles
Press TIME/TEXT 33 repeatedly when playback is stopped.
Each time you press TIME/TEXT 33, the display changes from ① → ② → ① → ...
DVD VIDEO or DVD-R/-RW in VR mode:
① Total number of titles on the disc
② Disc title ^1)
AUDIO CD or VIDEO CD without PBC playback:
① Total number of the tracks on the disc and the total playing time of the disc ② Disc title ^1)
VIDEO CD with PBC playback:
① Total number of scenes on the disc
1) “NO TEXT” appears in the display if the DVD VIDEO is not a DVD-TEXT disc, the AUDIO CD is not a CD-TEXT disc or the VIDEO CD does not have text information.
^2) The current chapter number and the current title number are displayed for 2 seconds before the display returns to the elapsed playing time.
^3) When Program Play or Shuffle Play is turned on, the elapsed playing time and the remaining time of the disc would be skipped.
^4) The current track number and the current index number (for a disc without PBC) or the current scene number (for a disc with PBC) are displayed for 2 seconds before the display returns to the elapsed playing time.
5) If an MP3 audio track has the ID3 tag, the system will display an album name or title name from the ID3 tag information. The system supports ID3 ver 1.0/1.1/2.2/2.3. ID3 ver 2.2/2.3 tag information display has priority when both ID3 ver 1.0/1.1 and ver 2.2/2.3 tags are used for a single MP3 audio track.
Notes
- If you play back a disc containing JPEG image files only, “JPEG” or “NO AUDIO” appears in the display.
- You cannot use TIME/TEXT 33 to change the display of disc information when:
— a JPEG image file is played back.
- playback is stopped for DATA CD/DVD with MP3 audio tracks and/or JPEG image files.
- If the MP3 audio track title contains characters which cannot be displayed, these characters will be displayed as “_”.
- The elapsed playing time of MP3 audio tracks may not be displayed correctly.
Viewing information about the disc in the on-screen display
Press TIME/TEXT 33.
Each time you press TIME/TEXT 33 while playing the disc, the display changes from ① → ② → ... → ① → ...
The time display that you can view on the TV screen depends on the disc you are playing.

* If an MP3 audio track has the ID3 tag, the system will display an album name or title name from the ID3 tag information. The system supports ID3 ver 1.0/1.1/2.2/2.3. ID3 ver 2.2/2.3 tag information display has priority when both ID3 ver 1.0/1.1 and ver 2.2/2.3 tags are used for a single MP3 audio track.
Note
The Control Menu display will show different items depending on the disc type.
When playing a DVD VIDEO or DVD-R/-RW in VR mode:
① Elapsed playing time of the current title
② Remaining time of the current title
③ Elapsed playing time of the current chapter
④ Remaining time of the current chapter
⑤ Elapsed playing time of the current title and disc title
When playing a VIDEO CD with PBC function:
① Elapsed playing time of the current scene
② Disc title
When playing an AUDIO CD or VIDEO CD without PBC function:
① Elapsed playing time of the current track
② Remaining time of the current track
③ Elapsed playing time of the disc
④ Remaining time of the disc
⑤ Elapsed playing time of the current track and track name
When playing MP3 audio tracks on a DATA CD/DVD:
Elapsed playing time of the current track and folder/track name*
* If an MP3 audio track has the ID3 tag, the system will display an album name or title name from the ID3 tag information. The system supports ID3 ver 1.0/1.1/2.2/2.3. ID3 ver 2.2/2.3 tag information display has priority when both ID3 ver 1.0/1.1 and ver 2.2/2.3 tags are used for a single MP3 audio track.
Notes
- Only alphabet letters, numbers and some symbols can be displayed.
- Depending on the disc, the system can only display a limited number of characters.
- For MP3 audio tracks with format other than ISO 9660 Level 1 and Level 2, folder name and track name may not be displayed.
Displaying the audio information of the disc
(DVD VIDEO only)
When you press AUDIO ^20 repeatedly during playback, the format of the current audio signal is displayed on the TV screen.
When playing a DVD VIDEO:
For example, in Dolby Digital format, multiple signals ranging from monaural to 5.1 channel signals can be recorded on a DVD VIDEO.
Example:
For Dolby Digital 5.1 channel:
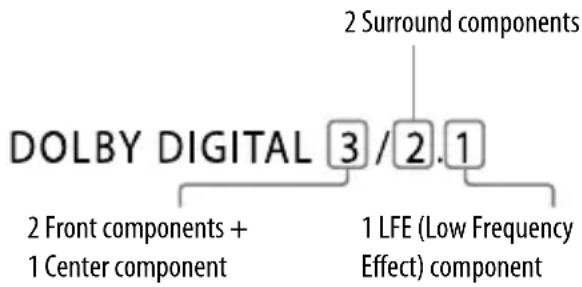
Checking the date information of JPEG image files
You can check the date information during playback when "Exif"* tag is recorded in the JPEG image files.
Press DISPLAY 24 repeatedly during playback.
The Control Menu appears.

* "Exchangeable Image File Format" is a digital camera image format defined by the "Japan Electronics & Information Technology Industries Association" (JEITA).
Note
The date information format varies depending on the area.
Hooking up optional components
To enhance your system, you can connect optional components. Refer to the operating instructions provided with each component.
Front panel
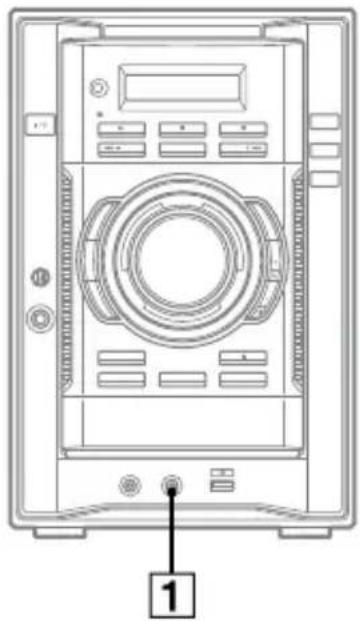
natural_image
Front view of a computer control panel with buttons and ports (no text or symbols visible)Rear panel

1 AUDIO IN jack
Connect the audio output jacks of an optional component (portable audio player, etc.).
2 VIDEO OUT jack
Connect the video input jack of the TV or projector.
3 DVD DIGITAL OUT jack
Connect the digital optical input jack of an optional digital component (such as amplifier). You can enjoy 5.1 channel sound, if the connected amplifier equipped with Dolby Digital or DTS decoder.
Notes
- Sound is output only when the system function is set to "DVD" or "USB."
- If you press AUDIO 20, SOUND FIELD 14 or the buttons related to Karaoke Mode, or if you connect or disconnect microphones or headphones, the sound cuts off for a moment.
Enjoying the multi channel sound with the optional amplifier
1 Connect the digital optical cord. See “Hooking up optional components” (page 92).
2 Connect the speakers (not supplied) to an optional amplifier equipped with a decoder.
For the speakers placement, refer to the operating instructions supplied with the connected amplifier.
3 Start playing a multi channel source, such as a DVD VIDEO.
4 Select the audio format you want.
See “Changing the sound” (page 31).
Additional Information
Troubleshooting
Should you encounter a problem with your system, do the following:
1 Make sure the power cord and speaker cords are connected correctly and firmly.
2 Find your problem in the troubleshooting checklist below and take the indicated corrective action.
If the problem persists after doing all of the above, consult your nearest Sony dealer.
If "PROTECT" appears on the display
Immediately unplug the power cord, and check the following items.
- If your system has a voltage selector, is the voltage selector set to the correct voltage?
- Are the + and — speaker cords short-circuited?
- Are you using only the supplied speakers?
- Is anything blocking the ventilation holes on the top or back of the system?
After you have checked these above items and found to be all right, wait for 60 seconds and reconnect the power cord, and then turn on the system. If the issue persists, contact your nearest Sony dealer.
General
The system does not turn on.
• Is the power cord plugged in?
- Is the voltage selector set correctly to match the local power line voltage? (For models with a voltage selector only)
The clock or timer setting is canceled.
- The power cord is disconnected or a power failure occurred. Redo “Setting the clock” (page 24). If you have set the timer, redo “Using the timer” (page 85).
There is no sound.
- Press VOLUME + repeatedly (or turn VOLUME on the unit clockwise) 15.
- The headphones are connected to the PHONES jack 11.
- Check the speaker connections (page 20).
- There is no audio output during Rec Timer.
- The system is in pause mode, in Slow-motion Play or in Lock Search. Press ▷ (or ▶ on the unit) 4 to start the playback.
- No sound is output when transferring music to the USB device.
There is no microphone sound.
- Press VOLUME + repeatedly (or turn VOLUME on the unit clockwise) 15 or turn MIC LEVEL 13 on the unit clockwise to adjust the microphone volume.
- Make sure the microphone is connected to the MIC jack 13 correctly.
- Make sure the microphone is turned on.
There is severe hum or noise.
- A TV or VCR is placed too close to the unit. Move the unit away from the TV or VCR.
- Move the unit away from the source of noise.
- Connect the unit to a different wall outlet.
• Install a noise filter (commercially available) to the power cord.
The timer does not function.
- Check the timer setting and set the correct time (page 85).
- Cancel the Sleep Timer function.
The remote does not function.
- Remove the obstacles between the remote and the unit.
- Move the remote closer to the unit.
- Point the remote at the unit's sensor.
- Replace the batteries (R6/size AA).
- Locate the unit away from the fluorescent light.
There is acoustic feedback.
- Reduce the volume.
- Move the microphone away from the speakers or change the direction of the microphone.
The color irregularity on a TV screen persists.
- Turn off the TV set once, then turn it on after 15 to 30 minutes. If the color irregularity still persists, place the speakers farther away from the TV set.
"THEATRE SYNC" function does not work.
- If distance between the TV and this unit is too far, this function may not work. Install the unit near the TV.
Speakers
Sound comes from one channel or unbalanced left and right volume.
- Place the speakers as symmetrically as possible.
- Check that the speakers are connected securely and correctly.
- The source being played back is monaural.
Sound lacks bass.
- Check that the speaker's + and — terminals are connected correctly.
Disc Player
The disc does not eject and "LOCKED" appears in the display.
- Consult your nearest Sony dealer or local authorized Sony service facility.
The disc tray 9 does not close.
- Load the disc correctly.
- Always close the disc tray 9 by pressing ▲8 on the unit. Do not forcibly push the disc tray to close it as this may cause a malfunction.
The disc does not eject.
- You cannot eject the disc when performing CD Synchro Recording or when transferring music from a disc. Press ■ 4 to cancel the operation, then press ▲ 8 on the unit to eject the disc. - Consult your nearest Sony dealer.
Playback does not start.
- Check whether a disc is loaded.
- Wipe the disc clean (page 108).
- Reload the disc.
- Load the disc that this system can play back (page 7).
- Load the disc on the disc tray 9 with the label side facing up.
-
Remove the disc and wipe away the moisture on the disc, then leave the system turned on for a few hours until the moisture evaporates.
-
Press ▷ (or ▶ on the unit) 4 to start playback.
- The region code on the DVD VIDEO does not match the system.
The sound skips.
- Wipe the disc clean (page 108).
- Reload the disc.
- Move the unit to a place without vibration (e.g., on top of a stable stand).
- Move the speakers away from the unit, or place them on separate stands. When you listen to a track with bass sounds at high volume, the speaker vibration may cause the sound to skip.
Playback does not start from the first track.
- Shuffle Play mode, Program Play mode or Repeat Play mode is selected.
- Resume Play has been selected. Press ■ 4 twice. Then, press ▷ (or ▶ on the unit) 4 to start playback (page 33).
- The title of DVD VIDEO or PBC menu automatically appears on the TV screen.
Playback starts automatically.
- The DVD VIDEO features an auto playback function.
Playback stops automatically.
- Some discs may contain an auto pause signal. While playing such a disc, the playback stops at auto pause signal.
You cannot perform some functions such as Stop, Lock Search, Slow-motion Play, Repeat Play, Shuffle Play or Program Play.
- Depending on the disc, you may not be able to do some of the operations above. Refer to the operating instructions supplied with the disc.
The DATA CD/DVD (MP3 audio track/JPEG image file) cannot be played back.
- The DATA CD is not recorded in a format that conforms to ISO 9660 Level 1, Level 2, or Joliet (expansion format).
- The DATA DVD is not recorded in a format that conforms to UDF (Universal Disk Format).
- The MP3 audio track does not have the extension “.mp3”.
- The data is not stored in the desired format.
- The MP3 audio tracks in format other than MPEG 1 Audio Layer 3 cannot be played back.
-
The system can play back to a depth of 8 folders only.
-
For MP3 audio tracks and JPEG image files, check the “MODE (MUSIC, IMAGE)” setting (page 45).
- The disc contains more than 200 folders.
- The folder contains more than 150 tracks/files.
- The JPEG image file does not have the extension “.jpg” or “.jpeg”.
- The JPEG image file is larger than 3,072 (width) × 2,048 (height) in normal mode, or more than 2,000,000 pixels in Progressive JPEG mode which is mainly used on the Internet website.
- JPEG image files with a high width to length ratio cannot be played back.
The MP3 audio tracks take longer time to play back than others.
• After the system reads all the tracks on the disc, playback may take more time than usual if:
– the number of folders or tracks on the disc is very large.
– the folder and track organization structure is very complex.
"Data error" appears on the TV screen when playing a DATA CD/DVD.
- The MP3 audio track/JPEG image file you want to play is broken.
-
The data is not MPEG 1 Audio Layer 3 data.
-
The JPEG image file format does not conform to DCF.
- The JPEG image file has the extension “.jpg” or “.jpeg”, but is not in JPEG format.
The disc title, CD-TEXT and DVD-TEXT characters do not appear properly.
- Use a disc that conforms to the ISO 9660 Level 1, Level 2, or Joliet (expansion).
- The character code that can be displayed by this system are as follows:
- Upper cases (A to Z)
- Numbers (0 to 9)
- Symbols (< > * +, ? / [ ] _)
Other characters appear as “_”.
The surround effect is difficult to hear when you are playing a Dolby Digital or MPEG audio sound track.
- Make sure the sound field is set properly (page 78).
- Check the speaker connection (page 20).
- Depending on the DVD VIDEO, the output signal may not be the entire 5.1 channel. It may be monaural or stereo, even if the sound track is recorded in Dolby Digital or MPEG audio format.
The sound loses stereo effect when you play back a DVD VIDEO, VIDEO CD, AUDIO CD or MP3 audio track.
- Unplug the microphone or press KARAOKE MODE 32 repeatedly until “” disappears from the display.
- Make sure the system is connected properly.
- Check the speaker connection (page 20).
USB device
You cannot start transferring or recording to an USB device.
- The following problems may have occurred.
— The USB device is full.
— The number of tracks and folders on the USB device has reached the upper limit.
— The USB device is write-protected.
Transferring or recording is stopped before it is finished.
- You are using an unsupported USB device. Refer to “Compatible USB devices” (supplement) for the supported device types.
- The USB device is not formatted correctly. Refer to the operating instructions supplied with the USB device for how to format.
- Turn off the system and remove the USB device. If the USB device has a power switch, turn the USB device off and then on again after removing it from the system. Then perform transferring again.
- If the transfer, recording and erase operations are repeated multiple times, the file structure within the USB device becomes fragmented. Refer to the operating instructions supplied with the USB device for how to deal with this problem. If the problem persists, contact your nearest Sony dealer.
Transferring or recording results in an error.
- You are using an unsupported USB device. Refer to “Compatible USB devices” (supplement) for the supported device types.
- Turn off the system and remove the USB device. If the USB device has a power switch, turn the USB device off and then on again after removing it from the system. Then perform transferring again.
- The USB device was disconnected or the power was turned off during the transfer process. Delete the partially-transferred track or partially-recorded track, and perform transferring or recording again. If this does not fix the problem, the USB device may be broken. Refer to the operating instructions supplied with the USB device for how to deal with this problem. If the problem persists, contact your nearest Sony dealer.
Tracks or folders on the USB device cannot be erased.
- Check if the USB device is writeprotected.
- The USB device was disconnected or the power was turned off during the erase operation. Delete the partially-erased track. If this does not fix the problem, the USB device may be broken. Refer to the operating instructions supplied with the USB device for how to deal with this problem. If the problem persists, contact your nearest Sony dealer.
Are you using a supported USB device?
- If you connect an unsupported USB device, the following problems may occur. Refer to “Compatible USB devices” (supplement) for the supported device types.
— The USB device is not recognized. - Track, file or folder names are not displayed on this system.
— Playback is not possible.
— The sound skips. - There is noise.
— A distorted sound is output.
— Transferring or recording stops before it is finished.
"OVER CURRENT" appears.
- A problem has been detected with the level of electrical current from the (USB) port 10. Turn off the system and remove the USB device from the (USB) port 10. Make sure there is no problem with the USB device. If this display pattern persists, contact your nearest Sony dealer.
There is no sound.
- The USB device is not connected correctly. Turn off the system and reconnect the USB device, then turn on the system and check if “USB MEM” lights up.
There is noise, skipping, or distorted sound.
- Turn off the system, then reconnect the USB device.
- The music data itself contains noise, or the sound is distorted. Noise may have entered during the transfer process or recording. Delete the track, and try transferring or recording again.
- The bit rate used when encoding audio files was low. Send audio files with higher bit rate to the USB device.
The USB device cannot be connected into the (USB) port 10.
- The USB device is being connected backwards. Connect the USB device in the correct orientation.
"READING" is displayed for an extended time, or it takes a long time before playback starts.
- The reading process can take a long time in the following cases.
— There are many folders, tracks or files on the USB device.
— The file structure is extremely complex.
— The memory capacity is excessive.
— The file size is extremely large.
— The internal memory is fragmented.
Thus, we recommend following these guidelines.
— Total folders on USB device: 200 or less
— Total tracks or files per folder: 150 or less
Erroneous display
- Send the music data to the USB device again, as the data stored in the USB device may have been corrupted.
- The character code that can be displayed by this system are as follows:
- Upper cases (A to Z)
- Numbers (0 to 9)
- Symbols (< > * +, ? / [ ] _)
Other characters appear as “_”.
The USB device is not recognized.
- Turn off the system and reconnect the USB device, then turn on the system.
- Connect the supported USB device (Refer to “Compatible USB devices” (supplement)).
- The USB device does not work properly. Refer to the operating instructions supplied with the USB device for how to deal with this problem. If the problem persists, contact your nearest Sony dealer.
"Data error" appears on the display when playing an USB device.
- The audio track/JPEG image file you want to play is broken.
- The JPEG image file format does not conform to DCF.
- The JPEG image file has the extension “.jpg” or “.jpeg”, but is not in JPEG format.
Play does not start.
- Turn off the system and reconnect the USB device, then turn on the system.
- Connect the supported USB device (Refer to “Compatible USB devices” (supplement)).
- Press ▷ (or ▶ on the unit) 4 to start play.
Play does not start from the first track.
- Set the play mode to Normal Play mode.
Tracks or files cannot be played back.
- The MP3 audio track does not have the extension “.mp3”.
- The WMA audio track does not have the extension “.wma”.
- The AAC audio track does not have the extension “.m4a”.
- The audio track is not stored in MP3/WMA/AAC format.
- The JPEG image file does not have the extension “.jpg” or “.jpeg”.
- The JPEG image file is larger than 3,072 (width) × 2,048 (height) in normal mode, or more than 2,000,000 pixels in Progressive JPEG mode which is mainly used on the Internet website.
- JPEG image files with a high width to length ratio cannot be played back.
- Check the “MODE (MUSIC, IMAGE)” setting (page 71, 72).
- USB device formatted with file systems other than FAT12, FAT16 or FAT32 are unsupported.*
- The MP3 audio tracks in format other than MPEG 1 Audio Layer 3 cannot be played back.
- A WMA audio track that is the WMA DRM, WMA Lossless, or WMA PRO format cannot be played back.
- An AAC audio track that is the AAC DRM or AAC Lossless format cannot be played back.
-
AAC audio tracks encoded at 96 kHz cannot be played back.
-
If you use a partitioned USB device, only tracks or files on the first partition can be played.
- The system can play back to a depth of 8 folders only.
- The number of folders has exceeded 200.
- The number of tracks or files has exceeded 150.
- Tracks or files that are encrypted or protected by passwords, etc. cannot be played back.
* This system supports FAT12, FAT16 and FAT32, but some USB devices may not support all of these FAT. For details, see the operating instructions of each USB device or contact the manufacturer.
Picture
There is no picture.
- Check that the system is connected securely.
- The video cord is damaged. Replace it with a new one.
• Make sure you connect the unit to the video input jack of your TV (page 22). -
Make sure you turn on the TV and operate the TV correctly.
-
Make sure you select the video input on the TV so that you can view the pictures from the system.
- Make sure you set the color system correctly, according to your TV's color system (Except for European and Russian models).
- Make sure you connect the unit and your TV using only the supplied video cord.
Picture noise appears.
- Wipe the disc clean (page 108).
- If video signal from your system has to go through your VCR to your TV, the copy-protection applied to some DVD VIDEO programs could affect the picture quality.
- Keep the speaker cords away from the antennas.
- When you play back a VIDEO CD recorded in a different color system from the one you set to the system, the picture image may be distorted (Except for European and Russian models) (page 23, 54).
- Set the color system to match your TV (Except for European and Russian models) (page 23, 54).
The aspect ratio of the TV screen cannot be changed even though you can set "TV TYPE" under "VIDEO SETUP" in the Setup Menu when you play back a wide picture.
- The aspect ratio is fixed on your DVD VIDEO.
- Depending on the TV, you may not change the aspect ratio.
Messages do not appear on the TV screen in the language you want.
- Select the language you want for the on-screen display in “OSD” under “LANGUAGE SETUP” in the Setup Menu (page 52).
The language for the sound track cannot be changed.
- Multilingual tracks are not recorded on the DVD VIDEO being played back.
- The DVD VIDEO prohibits changing the language for the sound track.
The subtitles language cannot be changed.
- Multilingual subtitles are not recorded on the DVD VIDEO being played back.
- The DVD VIDEO prohibits changing the subtitles.
The subtitles cannot be turned off.
- The DVD VIDEO prohibits turning off subtitles.
The angles cannot be changed.
- Multi-angles are not recorded on the DVD VIDEO being played back.
- The DVD VIDEO prohibits changing the angles.
Tuner
The radio presetting is canceled.
- The power cord is disconnected or a power failure occurred for longer than a day. Redo “Listening to a preset radio station” (page 57).
There is severe hum or noise. ("TUNED" or "ST" flashes in the display)
- Set the proper band and frequency (page 57).
- Connect the antenna properly (page 20).
- Find a place and an orientation that provide good reception, then set up the antenna again. If you cannot obtain good reception, we recommend that you connect a commercially available external antenna.
- The supplied FM lead antenna receives signals along its entire length, so make sure you extend it fully.
- Locate the antennas as far away from the speaker cords and the power cord as possible, to avoid picking up noise.
- Try turning off the surrounding electrical equipment.
A stereo FM program cannot be received in stereo.
- Press REPEAT/FM MODE 19 repeatedly until “STEREO” appears in the display.
Tape deck
The tape does not record or playback, or there is a decrease in sound level.
- The tape heads are dirty (see “Cleaning the tape heads” (page 110)).
- The record/playback heads are magnetized (see “Demagnetizing the tape heads” (page 110)).
The tape does not erase completely.
- The record/playback heads are magnetized (see “Demagnetizing the tape heads” (page 110)).
There is excessive wow or flutter, or the sound drops out.
- The capstans or pinch rollers are dirty (see “Cleaning the tape heads” (page 110)).
Noise increases or the high frequencies are erased.
- The record/playback heads are magnetized (see “Demagnetizing the tape heads” (page 110)).
The tape does not record.
- No tape is loaded. Load a tape.
- The tab has been removed from the tape. Cover the broken tab with adhesive tape (page 110).
• The tape has reeled to the end.
Optional components
There is no sound.
- Refer to General item “There is no sound.” (page 94) and check the condition of the system.
- Connect the component properly (page 92) while checking:
- if the cords are connected properly.
- if the cord plugs are firmly inserted all the way.
- Turn on the connected component.
- Refer to the operating instructions supplied with the connected component and start playing.
If the system still does not operate properly after performing the above measures or other troubles not described above occur, reset the system as follows:
Use buttons on the unit to reset the system to its factory default settings.
1 Unplug the power cord.
2 Plug the power cord back in.
3 Press I/① to turn on the system.
4 While holding down DSGX 14, press DISC 1 8 and press I/① 1 at the same time.
“RESET” appears in the display. The system is reset to the factory settings except for the “SETUP” settings. You should set the settings you made, such as the preset stations, clock and timer.
To return the "SETUP" settings to the default settings\*, perform reset as follows:
1 Press DISPLAY 24 when playback is stopped.
The Control Menu appears on the TV screen.
2 Press ↑ or ↓ 28 repeatedly to select (SETUP), then press ENTER 6.
3 Press ↑ or ↓ 28 repeatedly to select "CUSTOM," then press ENTER 6. The Setup Menu appears.
4 Press ↑ or ↓ 28 repeatedly to select "SYSTEM SETUP," then press ENTER 6.
5 Press ↑ or ↓ 28 repeatedly to select "RESET," then press ENTER6.
6 Press or 28 repeatedly to select "YES," then press ENTER6. It takes a few seconds to complete. Do not press I/1 when resetting the system.
* Except for "PARENTAL CONTROL" settings
Self-diagnosis Function
(When letters/numbers appear in the display)
When the self-diagnosis function is activated to prevent the system from malfunctioning, a 5-character service number (e.g. C 13 50) with a combination of a letter and 4 digits appears on the TV screen or the front panel display. In this case, check the following table.
First 3 Cause and corrective characters of action the service number
| C 13 This disc is dirty. | |
| Clean the disc with a soft cloth (page 108). | |
| C 31 The disc is not inserted correctly. | |
| Restart the system, then re-insert the disc correctly. | |
| E XX(XX is a number) | To prevent a malfunction, the system has performed the self-diagnosis function. |
| Contact your nearest Sony dealer or local authorized Sony service facility and give the 5-character service number.Example: E 61 10 | |
When displaying the version number on the TV screen
When you turn on the system, the version number [VER.X.XX] (X is a number) may appear on the TV screen. Although this is not a malfunction and for Sony service use only, normal system operation will not be possible. Turn off the system, and then turn on the system again to operate.

Messages
One of the following messages may appear or flash in the front panel display during operation.
CANNOT PLAY
- A disc that cannot be played back was inserted.
- A DVD VIDEO with unsupported region code was inserted.
DATA ERROR (for USB devices)
You tried to play a track that is not playable.
DATA ERROR (for DATA CD/DVDs)
- The MP3 audio track and JPEG image file you want to play back is damaged.
- The MP3 audio track does not conform to MPEG 1 Audio Layer 3 format.
- The JPEG image file does not conform to DCF format.
- The MP3 audio track has the extension “.mp3” but it is not in MP3 format.
- The JPEG image file has the extension “.jpg” or “.jpeg” but it is not in JPEG format.
DEVICE ERROR
The USB device could not be recognized or an unknown device is connected.
DEVICE FULL
The USB device is full.
ERASE ERROR
Erase of audio tracks or folders on the USB device failed.
FATAL ERROR
The USB device has been disconnected while transferring to the USB device.
FOLDER FULL
The number of folders on the USB device has reached the maximum.
INVALID
You have pressed an invalid button.
JPEG
The playback mode is “IMAGE” and a JPEG image file is being played back.
NO AUDIO
The connected USB device or the loaded DATA CD/DVD does not contain audio tracks.
NO DEVICE
No USB device is connected.
NO DISC
There is no disc on the disc tray 9.
NO IMAGE
The connected USB device or the loaded DATA CD/DVD does not contain image files.
NOT IN USE
You have pressed a button whose operation is not allowed or invalid at that time.
NOT SUPPORTED
- An unsupported USB device is connected.
- The USB device is connected to this system through a hub.
OVER CURRENT
An over current from the (USB) port 10 was detected.
PASSWORD
"PARENTAL CONTROL" is set.
PLEASE WAIT
- The system is doing initialization process.
- The system is readying for usage of an USB device.
PROTECTED
The USB device is write-protected.
PUSH STOP
You have pressed the buttons whose operation is only possible when playback is stopped.
READING
- The system is reading information of the disc. Some buttons are not available.
- The system is recognizing the USB device.
REC ERROR
Transferring did not start, stopped partway, or otherwise could not be performed.
TIME NG
The on time and off time of Play Timer or Rec Timer is the same.
TRACK FULL
The number of audio tracks on the USB device has reached the maximum.
Precautions
Notes on discs
- Before playing, wipe the disc with a cleaning cloth from the center out to the edge.
- Do not clean discs with solvents, such as benzine, thinner, or commercially available cleaners or anti-static spray intended for vinyl LPs.
- Do not expose discs to direct sunlight or heat sources such as hot air ducts, nor leave it in a car parked in direct sunlight.
On cleaning discs, disc/lens cleaner
Do not use a commercially available cleaning disc or disc/lens cleaner (wet or spray type). These may cause apparatus to malfunction.
On operating voltage
Before operating the system, check that the operating voltage of the unit is identical with the voltage of your local power supply.
On safety
- Completely disconnect the power cord (mains lead) from the wall socket (mains) if it is not going to be used for an extended period of time. When unplugging the unit, always grip the plug. Never pull the cord itself.
- Should any solid object or liquid get into the system, unplug the system, and have it checked by qualified personnel before operating it again.
On placement
- Do not place the system in an inclined position or in locations that are extremely hot, cold, dusty, dirty, or humid or lacking adequate ventilation, or subject to vibration, direct sunlight or a bright light.
- Be careful when placing the unit or speakers on surfaces that have been specially treated (for example, with wax, oil, polish) as staining or discoloration of the surface may result.
- If the system is brought directly from a cold to a warm location or is placed in a very damp room, moisture may condense on the lens inside the DVD player, and cause the system to malfunction. In this situation, remove the disc, and leave the system turned on for about an hour until the moisture evaporates.
On heat buildup
- Heat buildup on the unit during operation is normal and is not cause for alarm.
- Do not touch the cabinet if it has been used continuously at a high volume because the cabinet may have become hot.
- Do not obstruct the ventilation holes.
In case color irregularity is observed on a nearby TV screen
With the magnetically shielded type of speakers, the speakers can be installed near a TV set. However, color irregularity may still be observed on the TV screen depending on the type of your TV set. In this situation, turn off the TV, wait 15 to 30 minutes, and turn it back on. If there is no improvement, move the speakers far away from the TV.
IMPORTANT NOTICE
Caution: If you leave a still video image or on-screen display image displayed on your TV for an extended period of time via this system, you risk permanent damage to your TV screen. Projection TVs are especially susceptible to this.
Cleaning the cabinet
Clean this system with a soft cloth slightly moistened with a mild detergent solution. Do not use any type of abrasive pad, scouring powder, or solvent, such as thinner, benzine, or alcohol.
To prevent a tape from being accidentally recorded over
Break off the cassette's overwrite protection tab from side A or B as illustrated.

To later reuse the tape for recording, cover the broken tab with adhesive tape.
About a tape longer than 90 minutes
The use of the tape with more than 90 minutes of play time is not recommended except for long, continuous recording or playback.
Cleaning the tape heads
Use dry- or wet-type cleaning cassette (available separately) after every 10 hours of use, before you start an important recording, or after playing an old tape. Failure to clean the tape heads can cause degraded sound quality or an inability of the unit to record or play tapes. For details, refer to the instructions of the cleaning cassette.
Demagnetizing the tape heads
Use a demagnetizing cassette (available separately) after every 20 to 30 hours of use. Failure to demagnetize the tape heads can cause an increase in noise, a loss of high frequency sound, and an inability to completely erase tapes. For details, refer to the instructions of the demagnetizing cassette.
Specifications
Main unit
Amplifier section
The following measured at AC 230 V, 50/60 Hz (European and Russian models) The following measured at AC 127, 240 V, 50/60 Hz (Saudi Arabian model) The following measured at AC 120, 220, 240 V, 50/60 Hz (Other models)
Power output (rated): 72 W + 72 W (6 Ω at 1 kHz, 1% THD)
RMS output power (reference): 120 W + 120 W (per channel at 6 Ω, 1 kHz, 10% THD)
Inputs
AUDIO IN (stereo mini jack): voltage 700 mV, impedance 47 kilohms MIC (phone jack): sensitivity 2 mV, impedance 10 kilohms
Outputs
VIDEO OUT (phono jack): max. output level 1 Vp-p, unbalanced, Sync negative, load impedance 75 ohms
DVD DIGITAL OUT (Square optical connector jack, rear panel): Wavelength 650 nm
PHONES (stereo mini jack): accepts headphones of 8 ohms or more
USB section
Supported bit rate
MP3 (MPEG 1 Audio Layer-3):
32 - 320 kbps
WMA: 48 - 192 kbps
AAC: 48 - 320 kbps
Sampling frequencies
MP3 (MPEG 1 Audio Layer-3):
32/44.1/48 kHz
WMA: 44.1 kHz
AAC: 44.1 kHz
← (USB) port:
Maximum current:
500 mA
Disc player section
System:
Compact disc and digital audio and video system
Laser Diode Properties
Emission duration: Continuous
Laser Output*: Less than 44.6μW
* This output is the value measurement at a distance of 200mm from the objective lens surface on the Optical Pick-up Block with 7mm aperture.
Frequency response
DVD (PCM 48 kHz): 2 Hz - 22 kHz (±1 dB)
CD: 2 Hz - 20 kHz (±0.5 dB)
Video color system format
European and Russian models: PAL
Other models: NTSC and PAL
Tape deck section
Recording system:
4-track 2-channel, stereo
Tuner section
FM stereo, FM/AM superheterodyne tuner
FM tuner section
Tuning range:
87.5 - 108.0 MHz (50 kHz step)
Antenna:
FM lead antenna
Antenna terminals:
75 Ω unbalanced
Intermediate frequency:
10.7 MHz
AM tuner section
Tuning range:
European, Russian and Saudi Arabian models:
531 - 1,602 kHz (9 kHz step)
Other models:
531 - 1,602 kHz (with 9 kHz tuning interval)
530 - 1,610 kHz (with 10 kHz tuning interval)
Antenna:
AM loop antenna
Antenna terminals:
External antenna terminal
Intermediate frequency:
450 kHz
Speaker
Front speaker (SS-GZR5D)
Speaker system:
2-way 2-Driver speaker system, Bass reflex, Magnetically shielded
Speaker unit
Woofer: 160 mm, cone type
Tweeter: 40 mm, cone type
Rated impedance: 6 ohms
Dimensions (w/h/d):
Approx. 220 × 306 × 235 mm
Mass:
Approx. 3.0 kg
General
Power requirements
European and Russian models:
AC 230 V, 50/60 Hz
Saudi Arabian model:
AC 120 - 127, 220 - 240 V,
50/60 Hz, adjustable with voltage
selector
Thai model:
AC 220 V, 50/60 Hz
Other models:
AC 120, 220, 230 - 240 V, 50/60 Hz,
adjustable with voltage selector
Power consumption: 190 W
Dimensions (w/h/d) (excl. speakers):
Approx. 200 × 306 × 415 mm
Mass (excl. speakers):
Approx. 7.9 kg
Supplied accessories:
Remote Commander (1)
AM loop antenna (1)
FM lead antenna (1)
Video cord (1)
Speaker pads (8)
KARAOKE DVD disc (2) (Russian
model only)
Microphone (1) (Russian and
Philippine models only)
R6 (Size AA) batteries (2)
Design and specifications are subject to change without notice.

- Standby power consumption: 0.5 W
- Halogenated flame retardants are not used in the printed wiring boards.
Guide to the Control Menu display
Use the Control Menu to select a function and to view related information. Press DISPLAY 24 repeatedly to turn on, turn off or change the Control Menu display as follows:
Control Menu display 1 → Control Menu display 2 (appears for certain discs and USB devices only) → Control Menu display off → Control Menu display 1 → ...
Control Menu display
The Control Menu display 1 and 2 will show different items depending on the disc type. Example: Control Menu display 1 when playing a DVD VIDEO
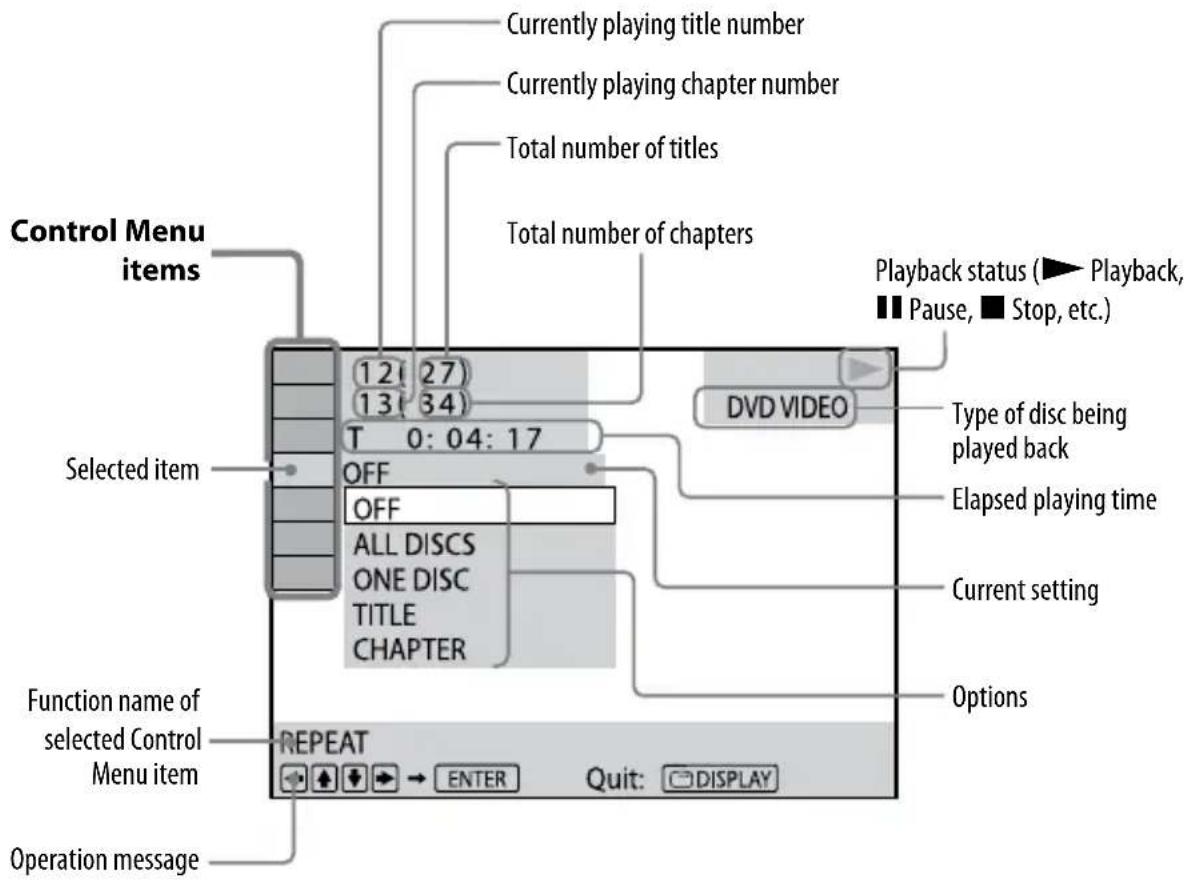
To turn off the Control Menu
Press ⒹDISPLAY 24 repeatedly until the Control Menu disappears from the TV screen.
List of Control Menu items
| Item Item Name, Function, Relevant Disc Type | |
 | [TITLE] (page 40)/[SCENE]/[TRACK] (page 40)Selects the title, scene, or track to be played back.DVD.V DVD.VR VIDEO CD |
 | [CHAPTER]/[INDEX] (page 40)Selects the chapter or index to be played back.DVD.V DVD.VR VIDEO CD |
 | [TRACK] ^1) (page 40)Selects the track to be played back.C D DATA CD DATA DVD |
 | [ORIGINAL/PLAY LIST] (page 39)Selects the playback sequence either to the originally recorded sequence or to the playlist created on the disc.DVD.VR |
 | [TIME] ^1) (page 41)Checks the elapsed playing time and the remaining time.Inputs the time code for picture and music searching.DVD.V DVD.VR VIDEO CD C D DATA CD DATA DVD |
 | [PROGRAM] (page 34)Plays back the tracks in the order you want.VIDEO CD C D |
 | [SHUFFLE] ^1) (page 36, 75)Plays back the tracks in random order.VIDEO CD C D DATA CD DATA DVD |
 | [REPEAT] ^1) (page 37, 76)Plays back all discs repeatedly, the entire disc (all titles/all tracks/all folders) repeatedly or one title/chapter/track/folder repeatedly.DVD-V DVD-VR VIDEO CD C D DATA CD DATA DVD |
 | [A/V SYNC] (page 47)You can adjust the delay between the picture and sound.DVD-V DVD-VR VIDEO CD |
 | [SETUP] ^1) (page 26, 51)QUICKUse “QUICK” Setup to choose the language of the on-screen display and the aspect ratio of the TV.CUSTOMIn addition to the “QUICK” setup setting, you can adjust other settings.DVD-V DVD-VR VIDEO CD C D DATA CD DATA DVD |
 | [FOLDER] ^1) (page 40)Selects the folder to be played back.DATA CD DATA DVD |
 | [FILE] ^1) (page 40)Selects the JPEG image file to be played back.DATA CD DATA DVD |
 | [DATE] ^1) (page 92)Displays the date when the picture was taken by a digital camera.DATA CD DATA DVD |
 | [INTERVAL] ^1) (page 46, 74)Specifies the duration for which the slides are displayed on the TV screen.DATA CD DATA DVD |
| [EFFECT]1) (page 47, 75)Selects the transition effects to be used for changing slides during a slide show.DATA CD DATA DVD | |
| [MODE (MUSIC, IMAGE)]1) (page 45, 71, 72)For DATA CD/DVD, selects the data type: MP3 audio track (MUSIC), JPEG image file (IMAGE) or both (AUTO) to be played back.For USB device, selects the data type: audio track (MUSIC) or JPEG image file (IMAGE) to be played back.DATA CD DATA DVD | |
| [USB RECORDING] (page 64)Transfers tracks on an AUDIO CD or DATA CD/DVD to an USB device.C D DATA CD DATA DVD | |
| [KARAOKE MODE]1) (page 80)Sets Karaoke mode to on or off.DVD-V DVD-VR VIDEO CD C D DATA CD DATA DVD | |
| [SCORE MODE]1)2) (page 84)Calculates your vocal score by comparing your voice with the music source.DVD-V DVD-VR VIDEO CD C D DATA CD DATA DVD | |
| [VOCAL SELECT]2) (page 82)Selects the guide vocal recorded on the “Dolby Digital Karaoke” Format disc (DVD VIDEO only).Selects the vocal type recorded on the disc (VIDEO CD, AUDIO CD only).Turns off the vocal.DVD-V VIDEO CD C D | |
^1) These functions are the same when using an USB device. However, some menu items may not be available.
2) This function is only available during Karaoke mode.
Language code list
The language spellings conform to the ISO 639:1988 (E/F) standard.
Code Language Code Language Code Language Code Language
| 1027 Afar 1186 Scots Gaelic 1350 Malayalam 1513 Siswati | |||||||
| 1028 Abkhazian 1194 Galician 1352 Mongolian 1514 Sesotho | |||||||
| 1032 Afrikaans 1196 Guarani 1353 Moldavian 1515 Sundanese | |||||||
| 1039 Amharic 1203 Gujarati 1356 Marathi 1516 Swedish | |||||||
| 1044 Arabic 1209 Hausa | 1357 Malay | 1517 Swahili | |||||
| 1045 Assamese 1217 Hindi | 1358 Maltese | 1521 Tamil | |||||
| 1051 Aymara 1226 Croatian 1363 Burmese | 1525 Telugu | ||||||
| 1052 | Azerbaijani | 1229 | Hungarian | 1365 | Nauru | 1527 | Tajik |
| 1053 | Bashkir | 1233 | Armenian | 1369 | Nepali | 1528 | Thai |
| 1057 Byelorussian 1235 Interlingua 1376 Dutch | 1529 Tigrinya | ||||||
| 1059 Bulgarian 1239 Interlingue 1379 Norwegian 1531 Turkmen | |||||||
| 1060 | Bihari | 1245 | Inupiak | 1393 | Occitan | 1532 | Tagalog |
| 1061 | Bislama 1248 Indonesian | 1403 (Afan) Oromo | 1534 Setswana | ||||
| 1066 | Bengali; Bangla | 1253 | Icelandic | 1408 | Oriya | 1535 | Tonga |
| 1067 | Tibetan | 1254 | Italian | 1417 | Punjabi | 1538 | Turkish |
| 1070 | Breton | 1257 | Hebrew | 1428 | Polish | 1539 | Tsonga |
| 1079 | Catalan | 1261 | Japanese | 1435 | Pashto; Pushto | 1540 | Tatar |
| 1093 | Corsican | 1269 | Yiddish | 1436 | Portuguese | 1543 | Twi |
| 1097 Czech | 1283 Javanese 1463 Quechua | 1557 Ukrainian | |||||
| 1103 | Welsh | 1287 | Georgian | 1481 | Rhaeto-Romance | 1564 | Urdu |
| 1105 Danish | 1297 Kazakh | 1482 Kirundi | 1572 Uzbek | ||||
| 1109 German 1298 Greenlandic | 1483 Romanian | 1581 Vietnamese | |||||
| 1130 | Bhutani | 1299 | Cambodian | 1489 | Russian | 1587 | Volapük |
| 1142 | Greek | 1300 | Kannada | 1491 | Kinyarwanda | 1613 | Wolof |
| 1144 | English | 1301 | Korean | 1495 | Sanskrit | 1632 | Xhosa |
| 1145 | Esperanto | 1305 | Kashmiri | 1498 | Sindhi | 1665 | Yoruba |
| 1149 Spanish 1307 Kurdish 1501 Sangho | 1684 Chinese | ||||||
| 1150 Estonian 1311 Kirghiz | 1502 Serbo-Croatian | 1697 Zulu | |||||
| 1151 | Basque | 1313 | Latin | 1503 | Singhalese | 1703 | Not specified |
| 1157 Persian | 1326 Lingala | 1505 Slovak | |||||
| 1165 Finnish | 1327 Laothian | 1506 Slovenian | |||||
| 1166 Fiji | 1332 Lithuanian 1507 Samoan | ||||||
| 1171 Faroese | 1334 Latvian; Lettish | 1508 Shona | |||||
| 1174 French | 1345 Malagasy | 1509 Somali | |||||
| 1181 Frisian | 1347 Maori | 1511 Albanian | |||||
| 1183 Irish | 1349 Macedonian | 1512 Serbian | |||||
Parental Control area code list
Code Area Code Area Code Area Code Area
| 2044 Argentina 2165 Finland 2362 Mexico 2149 Spain | ||||||
| 2047 Australia 2174 France 2376 Netherlands 2499 Sweden | ||||||
| 2046 Austria 2109 Germany 2390 New Zealand 2086 Switzerland | ||||||
| 2057 Belgium 2248 India 2379 Norway 2528 Thailand | ||||||
| 2070 Brazil | 2238 | Indonesia | 2427 | Pakistan | 2184 | United Kingdom |
| 2079 Canada | 2254 | Italy | 2424 | Philippines | ||
| 2090 Chile 2276 Japan | 2436 | Portugal | ||||
| 2092 China | 2304 | Korea 2489 Russia | ||||
| 2115 Denmark | 2363 | Malaysia | 2501 | Singapore | ||
Glossary
Auto Pause
An automatic pause according to the signal encoded on the disc while playing a VIDEO CD. If the CD/DVD player does not resume play for a long time, press ▷ (or press ▶ on the unit) ④ to resume play manually.
Chapter
Subdivision of a title on a DVD VIDEO. A title is composed of several chapters.
Dolby Digital
This movie theater sound format is more advanced than Dolby Surround Pro Logic. In this format, the surround speakers output stereo sound with an expanded frequency range and a subwoofer channel for deep bass is independently provided. This format is also called “5.1” because the subwoofer channel is counted as 0.1 channel (since it functions only when a deep bass effect is needed). All six channels in this format are recorded separately for superior channel separation. Furthermore, since all the signals are processed digitally, less signal degradation occurs.
DTS
Digital audio compression technology developed by DTS, Inc. This technology conforms to 5.1-channel surround. The surround channel is stereo and there is discrete subwoofer channel in this format. DTS provides the same 5.1 discrete channels of high quality digital audio. The good channel separation is realized because the all channel data is recorded discrete and processed in digital.
DVD VIDEO
A disc that contains up to 8 hours of moving pictures even though its diameter is the same as an AUDIO CD. The data capacity of a single-layer and single-sided DVD VIDEO, at 4.7 GB (Giga Byte), is 7 times that of an AUDIO CD. Furthermore, the data capacity of a dual-layer and single-sided DVD VIDEO is 8.5 GB, a single-layer and double-sided DVD VIDEO 9.4 GB, and a dual-layer and double-sided DVD VIDEO 17 GB. The picture data uses the MPEG 2 format, one of the worldwide standards for digital compression technology. The picture data is compressed to about 1/40 of its original size. The DVD VIDEO also uses variable rate coding technology that changes the data to be allocated according to the status of the picture. The audio data is recorded in Dolby Digital as well as in PCM, allowing you to enjoy more realistic audio presence. Furthermore, various advanced functions such as the multi-angle, multilingual, and Parental Control functions are provided with the DVD VIDEO.
DVD-RW
A DVD-RW is a recordable and rewritable disc that is the same size as a DVD VIDEO. The DVD-RW has two different modes: VR mode and Video mode. DVD-RWs created in Video mode have the same format as a DVD VIDEO, while discs created in VR (Video Recording) mode allow the contents to be programmed or edited.
DVD+RW
A DVD+RW (plus RW) is a recordable and rewritable disc. DVD+RWs use a recording format that is comparable to the DVD VIDEO format.
File
A JPEG image file recorded on a DATA CD, DATA DVD or USB device. ("File" is an exclusive definition for this system.) A single file consists of a single image.
Film based software, Video based software
DVD VIDEOs can be classified as Film based or Video based software. Film based DVD VIDEOs contain the same images (24 frames per second) that are shown at movie theaters. Video based DVD VIDEOs, such as television dramas or sitcoms, displays images at 30 frames (or 60 fields) per second.
Folder
Section of a music or picture piece on a DATA CD, DATA DVD or USB device containing MP3 audio tracks, JPEG image files.
Interlace format (Interlaced scanning)
The Interlace format is the NTSC standard method for displaying TV images at 30 frames per second. Each frame is scanned twice-alternately between the even numbered scanning lines and then odd numbered scanning lines, at 60 times per second.
Menu Playback
Playback using the menu screens recorded on VIDEO CDs with PBC functions. You can enjoy simple interactive software using the menu playback function.
Multi-angle function
Various angles, or viewpoints of the video camera, for a scene are recorded on some DVD VIDEOS.
Multilingual function
Several languages for the sound or subtitles in a picture are recorded on some DVD VIDEOS.
Multi Session
This is a recording method that enables adding of data using the Track-At-Once method. Conventional CDs begin at a CD control area called the Lead-in and end at an area called Lead-out. A Multi Session disc is a disc having multiple sessions, with each segment from Lead-in to Lead-out regarded as a single session.
Parental Control
A function of the DVD VIDEO to limit playback of the disc by the age of the users according to the limitation level in each country. The limitation varies from disc to disc; when it is activated, playback is completely prohibited, violent scenes are skipped or replaced with other scenes and so on.
Playback Control (PBC)
Signals encoded on VIDEO CDs (Version 2.0) to control playback. By using menu screens recorded on VIDEO CDs with PBC functions, you can enjoy playing simple interactive programs, programs with search functions, and so on.
Region Code
This system is used to protect copyrights. A region code is allocated on each DVD system or DVD VIDEO according to the sales region. Each region code is shown on the unit as well as on the disc packaging. The system can play back the discs that match its region code. The system can also play back discs with the “” mark. Even when the region code is not shown on the DVD VIDEO, the region limit may still be activated.
Scene
On a VIDEO CD with PBC functions, the menu screens, moving pictures and still pictures are divided into sections called “scenes.”
Title
The longest section of a picture or a music piece on a DVD VIDEO; a movie, etc., for a picture piece on video software, or the entire album in audio software.
Track
Section of a picture or a music piece on a VIDEO CD, CD, or MP3. A folder is composed of several tracks (MP3 only).
VIDEO CD
A compact disc that contains moving pictures.
The picture data uses the MPEG 1 format, one of the worldwide standards for digital compression technology. The picture data is compressed to about 1/140 of its original size. Consequently, a 12 cm VIDEO CD can contain up to 74 minutes of moving pictures.
VIDEO CDs also contain compact audio data.
Sounds outside the range of human hearing are compressed while the sounds we can hear are not compressed. VIDEO CDs can hold 6 times the audio information of conventional AUDIO CDs.
There are 2 versions of VIDEO CDs.
- Version 1.1: You can play back only moving pictures and sounds.
- Version 2.0: You can play back high-resolution still pictures and enjoy PBC functions.
This system conforms to both versions.
Index
Numerics
16:9 53
4:3 LETTER BOX 53
4:3 PAN SCAN 54
5.1 Channel Surround 91, 93
A
A/V SYNC 47,115
AAC 69
ANGLE 30
AUDIO 53
AUDIO DRC 54
AUDIO SETUP 54
Auto Pause 119
B
BACKGROUND 55
Batteries 21
C
CHAPTER 37, 114
Chapter 29, 119
COLD RESET 105
Controlling the TV 24
Control Menu Display 113
CUSTOM 48, 51
D
DATA CD 7
DATA DVD 8
DATE 115
Dolby Digital 119
DTS 119
DVD 7,8
DVD+RW 7,120
DVD-RW 7,120
DVD VIDEO 119
E
EFFECT 47, 75, 116
F
Fast forward 29
Fast reverse 29
FILE 115
File 120
Film based software 120
FOLDER 38, 76, 115
Folder 120
Freeze Frame 29
Front panel display 19
|
INDEX 40,114
Instant Advance 29
Instant Replay 29
Interlace format 120
INTERVAL 46, 74, 115
J
JPEG 42, 43, 45, 72
K
Karaoke 80
ECHO 80
KARAOKE MODE 80,116
Karaoke Pon 82
Key Control 81
SCORE MODE 84,116
VOCAL SELECT 82, 116
L
Language code list 117
LANGUAGE SETUP 26, 52
M
Manual recording 60
MENU 53
Menu Playback 120
Microphones 80
Microphone volume 80
MODE (MUSIC, IMAGE) 45, 116
MP3 7,69
Multi-angle 30, 120
MULTI-DISC RESUME 34, 55
Multilingual 120
Multi Session Disc 10, 121


- T
- SONY®
- Mini HI-FI Component System
- WARNING
- CAUTION
- Notice for the customer in the countries applying EU Directives
- Disposal of waste batteries (applicable in the European Union and other European countries with separate collection systems)
- Note on power cord plug shapes (Saudi Arabian model only)
- For AC 220 V wall sockets
- For AC 127 V wall sockets
- About this manual
- Table of Contents
- Getting Started
- Disc
- Tuner
- Tape
- USB Device
- Sound Adjustment
- Other Operations
- Additional Information
- Discs that cannot be played
- Region code of DVD VIDEOS you can play back on this system
- Note on DualDiscs
- Notes on CD-R/-RW and DVD-R/-RW/+R/+RW
- Note on playback operations of DVD VIDEOS and VIDEO CDs
- Music discs encoded with copyright protection technologies
- Notes on Multi Session disc
- Copyrights
- Guide to parts and controls
- Unit
- Top panel
- TIMER MENU (24, 85)
- THEATRE SYNC (27)
- Display
- Hooking up the system
- A FM/AM antennas
- B Speakers
- Notes
- C Voltage selector
- D Power
- Inserting two R6 (size AA) batteries into the remote
- Note
- Tip
- Attaching the speaker pads
- When carrying this system
- Hooking up the TV
- When connecting a video deck
- Changing the color system
- When using a TV
- Operating a Sony TV
- Setting the clock
- To display the clock when the system is off
- Performing "QUICK" setup
- Press ENTER 6 without loading a disc.
- Press ↑ or ↓ 28 repeatedly to select a language, then press ENTER 6.
- Tips
- Press ↑ or ↓ 28 repeatedly to select the setting that matches your TV type.
- If you have a 4:3 standard TV:
- If you have a wide-screen TV or a 4:3 standard TV with wide-screen mode:
- Press ENTER 6.
- If you make a mistake
- To quit "QUICK" setup
- To recall "QUICK" setup settings
- Using the "THEATRE SYNC" function
- Preparing to use the "THEATRE SYNC" function
- To select the TV's input
- Operating the "THEATRE SYNC" function
- To change the transmission time
- Playing a disc
- Note on the maximum number of tracks, files and folders on a DATA CD/DVD
- Displaying multi-angles and subtitles
- Changing the angles
- Displaying the subtitles
- Other useful functions
- Changing the sound
- When playing a DVD VIDEO:
- When playing a DVD-R/-RW in VR mode:
- When playing a VIDEO CD, AUDIO CD, or MP3 audio track:
- When playing a Super VCD:
- Playing VIDEO CDs with PBC functions (Version 2.0) — PBC Playback
- To return to the previous menu
- To cancel playback with PBC functions
- Resuming playback from the point you stopped the disc — Resume Play
- Resuming playback of a disc that was stopped — Multi-disc Resume
- Using play mode
- Creating your own program
- Press → 28.
- Select the track you want to program.
- To program other tracks, repeat steps 4 to 5.
- Press ▷ (or ▶ on the unit) 4. Program Play starts.
- To change a programmed step:
- To delete a programmed step:
- To delete all of the programmed steps in the program list:
- To cancel Program Play
- To turn off the Control Menu
- Playing in random order
- When playing a VIDEO CD or AUDIO CD:
- When Program Play is activated:
- When playing a DATA CD/DVD:
- Press ENTER 6.
- Playing repeatedly
- When playing a DVD VIDEO or DVD-R/DVD-RW in VR mode:
- When playing a DATA CD or DATA DVD:
- When Program Play or Shuffle Play is activated:
- Press ▷ (or ▶ on the unit) 4.
- Searching/selecting a disc
- Playing DVD VIDEOS using the menu
- DVD-V
- Using DVD TOP MENU
- Using DVD MENU
- Selecting "ORIGINAL" or "PLAY LIST" on a DVD-R/-RW in VR mode
- DVD-VR
- Using the on-screen display to search for a title/chapter/scene/track/index/folder/file
- To search for a particular point using the time code — Time Search
- Playing MP3/JPEG discs
- DATA CD DATA DVD
- Selecting an MP3 audio track or folder
- Load a disc on the disc tray ⑨.
- Press ↑ or ↓ 28 repeatedly to select a folder.
- Playing a folder:
- Playing a track:
- To display the next or previous page of "TRACK LIST" or "FOLDER LIST"
- To play back the next folder of MP3 audio tracks
- To turn on or off "FOLDER LIST" or "TRACK LIST"
- Selecting a JPEG image file or folder
- Playing an image file:
- To display the next or previous page of "FOLDER LIST"
- To display the next or previous JPEG image file
- To play back the next folder of JPEG image files
- To turn on or off "FOLDER LIST"
- To rotate a JPEG image file
- Playing MP3 audio tracks and JPEG image files as a slide show with sound
- To cancel slide show with sound
- Specifying the slide show speed
- Selecting a transition effect for image files in the slide show
- Adjusting the delay between the picture and sound
- Restricting playback of the disc
- If you have not registered a password:
- When you have already registered a password:
- If you make a mistake when entering your password
- To turn off the "PARENTAL CONTROL" function
- To play back a disc for which "PARENTAL CONTROL" is set
- Changing the password
- Using the Setup Menu
- Setup Menu item list
- Setting the language — "LANGUAGE SETUP"
- OSD
- MENU\*
- AUDIO\*
- SUBTITLE\*
- Setting the TV screen — "VIDEO SETUP"
- TV TYPE
- PAUSE MODE
- Setting the audio options — "AUDIO SETUP"
- AUDIO DRC 1) (Dynamic Range Compression)
- TRACK SELECTION
- Setting the system — "SYSTEM SETUP"
- SCREEN SAVER
- BACKGROUND
- PARENTAL CONTROL
- MULTI-DISC RESUME
- RESET\*
- Listening to the radio
- Listening to a preset radio station
- To stop automatic scanning
- To cancel presetting
- Listening to a non-preset radio station/station with a weak signal
- For manual tuning:
- For direct tuning:
- To cancel direct tuning
- To change the AM tuning interval
- Playing a tape
- Recording onto a tape
- CD Synchro Recording
- Manual Recording
- Sound Mixing
- Prepare the recording source.
- For CD Synchro Recording:
- For Manual Recording and Sound Mixing:
- Start recording.
- For Manual Recording:
- For Sound Mixing:
- To stop recording
- Transferring music from a disc to an USB device
- Note on the maximum number of tracks, files and folders on an USB device
- To remove the USB device
- Using the front panel display
- Synchronized transfer:
- REC 1:
- Using the on-screen display
- For AUDIO CD:
- For DATA CD/DVD:
- To select all tracks on the AUDIO CD
- To select all tracks or folders on the DATA CD/DVD
- To return to the previous display
- To erase audio tracks or folders from the USB device
- Folder and track generation rules
- ■ When transferring music from an AUDIO CD
- ■ When transferring music from a DATA CD/DVD (MP3 audio tracks only)
- Recording analog audio to an USB device
- To mark track numbers
- ■ When recording from the tape deck
- ■ When recording from the tuner
- ■ When recording from the AUDIO IN jack
- Listening to music of an USB device
- Notes on the USB device
- Selecting an audio track or folder
- To play back the next folder of audio tracks
- To return to "FOLDER LIST" when "TRACK LIST" is displayed
- — Repeat Play
- When Shuffle Play is activated:
- Adjusting the sound
- Generating a more dynamic sound (Dynamic Sound Generator X-tra)
- Selecting the preset effect
- Selecting the sound field
- When the headphones are not connected:
- 2CH STEREO
- 2CH SURR
- VIRTUAL A\*
- VIRTUAL B\*
- When the headphones are connected:
- HP 2CH
- HP SURR
- HP VIRTUAL\*
- Singing along: Karaoke
- Preparing for karaoke
- DVD VIDEO, DVD-R/-RW in VR mode:
- AUDIO CD, VIDEO CD, MP3 audio tracks:
- If you want to hear vocal:
- To turn off the Karaoke Mode
- Changing the key
- - Key Control
- Press KEY CONTROL b/# 32 to suit your vocal range in Karaoke mode.
- Playing karaoke with any stereo disc
- To cancel "Karaoke Pon" mode
- Selecting the vocals
- Press ↑ or ↓ 28 repeatedly to select the desired vocal channel.
- When playing a DVD VIDEO
- When playing a VIDEO CD or AUDIO CD
- When playing a Super VCD
- Selecting the scoring mode
- — Score Mode
- Press DISPLAY 24 in Karaoke mode.
- Using the timer
- Falling asleep to music
- Setting the timer
- Play Timer
- Rec Timer
- Prepare the sound source.
- For Play Timer:
- For Rec Timer:
- Press TIMER MENU 35.
- Press ↑ or ↓ 28 repeatedly to select "PLAY SET?" or "REC SET?," then press ENTER 6.
- Changing the display
- Turning off the display
- - Power Saving Mode
- Viewing information about the disc
- Viewing information about the disc in the front panel display
- Checking the elapsed playing time, remaining time and titles
- When playing a DVD VIDEO or DVD-R/-RW in VR mode:
- When playing an AUDIO CD or VIDEO CD without PBC function:
- When playing a VIDEO CD with PBC function:
- When playing MP3 audio tracks on a DATA CD/DVD:
- Checking the total playing time and titles
- DVD VIDEO or DVD-R/-RW in VR mode:
- AUDIO CD or VIDEO CD without PBC playback:
- VIDEO CD with PBC playback:
- Viewing information about the disc in the on-screen display
- Press TIME/TEXT 33.
- Displaying the audio information of the disc
- Checking the date information of JPEG image files
- Hooking up optional components
- Front panel
- Rear panel
- AUDIO IN jack
- VIDEO OUT jack
- DVD DIGITAL OUT jack
- Enjoying the multi channel sound with the optional amplifier
- Troubleshooting
- If "PROTECT" appears on the display
- General
- The system does not turn on.
- The clock or timer setting is canceled.
- There is no sound.
- There is no microphone sound.
- There is severe hum or noise.
- The timer does not function.
- The remote does not function.
- There is acoustic feedback.
- The color irregularity on a TV screen persists.
- "THEATRE SYNC" function does not work.
- Speakers
- Sound comes from one channel or unbalanced left and right volume.
- Sound lacks bass.
- Disc Player
- The disc does not eject and "LOCKED" appears in the display.
- The disc tray 9 does not close.
- The disc does not eject.
- Playback does not start.
- The sound skips.
- Playback does not start from the first track.
- Playback starts automatically.
- Playback stops automatically.
- You cannot perform some functions such as Stop, Lock Search, Slow-motion Play, Repeat Play, Shuffle Play or Program Play.
- The DATA CD/DVD (MP3 audio track/JPEG image file) cannot be played back.
- The MP3 audio tracks take longer time to play back than others.
- "Data error" appears on the TV screen when playing a DATA CD/DVD.
- The disc title, CD-TEXT and DVD-TEXT characters do not appear properly.
- The surround effect is difficult to hear when you are playing a Dolby Digital or MPEG audio sound track.
- The sound loses stereo effect when you play back a DVD VIDEO, VIDEO CD, AUDIO CD or MP3 audio track.
- You cannot start transferring or recording to an USB device.
- Transferring or recording is stopped before it is finished.
- Transferring or recording results in an error.
- Tracks or folders on the USB device cannot be erased.
- Are you using a supported USB device?
- "OVER CURRENT" appears.
- There is noise, skipping, or distorted sound.
- The USB device cannot be connected into the (USB) port 10.
- "READING" is displayed for an extended time, or it takes a long time before playback starts.
- Erroneous display
- The USB device is not recognized.
- "Data error" appears on the display when playing an USB device.
- Play does not start.
- Play does not start from the first track.
- Tracks or files cannot be played back.
- Picture
- There is no picture.
- Picture noise appears.
- A stereo FM program cannot be received in stereo.
- Tape deck
- The tape does not record or playback, or there is a decrease in sound level.
- The tape does not erase completely.
- There is excessive wow or flutter, or the sound drops out.
- Noise increases or the high frequencies are erased.
- The tape does not record.
- Optional components
- If the system still does not operate properly after performing the above measures or other troubles not described above occur, reset the system as follows:
- To return the "SETUP" settings to the default settings\*, perform reset as follows:
- Self-diagnosis Function
- When displaying the version number on the TV screen
- Messages
- CANNOT PLAY
- DATA ERROR (for USB devices)
- DATA ERROR (for DATA CD/DVDs)
- DEVICE ERROR
- DEVICE FULL
- ERASE ERROR
- FATAL ERROR
- FOLDER FULL
- INVALID
- JPEG
- NO AUDIO
- NO DEVICE
- NO DISC
- NO IMAGE
- NOT IN USE
- NOT SUPPORTED
- OVER CURRENT
- PASSWORD
- PLEASE WAIT
- PROTECTED
- PUSH STOP
- READING
- REC ERROR
- TIME NG
- TRACK FULL
- Precautions
- Notes on discs
- On cleaning discs, disc/lens cleaner
- On operating voltage
- On safety
- On placement
- On heat buildup
- In case color irregularity is observed on a nearby TV screen
- IMPORTANT NOTICE
- Cleaning the cabinet
- To prevent a tape from being accidentally recorded over
- About a tape longer than 90 minutes
- Cleaning the tape heads
- Demagnetizing the tape heads
- Specifications
- Main unit
- Amplifier section
- Inputs
- Outputs
- USB section
- Disc player section
- Tape deck section
- Tuner section
- Speaker
- Front speaker (SS-GZR5D)
- Guide to the Control Menu display
- Control Menu display
- List of Control Menu items
- Language code list
- Parental Control area code list
- Glossary
- Auto Pause
- Chapter
- Dolby Digital
- DTS
- DVD VIDEO
- DVD-RW
- DVD+RW
- File
- Film based software, Video based software
- Folder
- Interlace format (Interlaced scanning)
- Menu Playback
- Multi-angle function
- Multilingual function
- Multi Session
- Playback Control (PBC)
- Region Code
- Scene
- Title
- Track
- VIDEO CD
- Index
- Numerics
- A
- B
- C
- D
- E
- F
- |
- J
- K
- L
- M
Brand : SONY
Model : MHC-GZR5D
Category : Hi-Fi System