
RF-BS-1000 - Scanner Renkforce - Free user manual and instructions
Find the device manual for free RF-BS-1000 Renkforce in PDF.


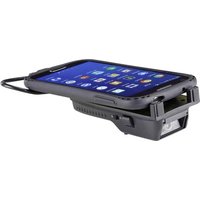
| Product Type | Barcode Scanner |
| Brand | Renkforce |
| Model | RF-BS-1000 |
| Dimensions (L x W x H) | 16.5 x 7.0 x 9.5 cm |
| Weight | 145 g |
| Power Supply | USB bus-powered (5V DC) |
| Cable Length | 1.5 m |
| Scan Technology | Laser, 650 nm |
| Scan Rate | 100 scans/sec |
| Readable Barcodes | 1D: UPC/EAN, Code 39, Code 128, Interleaved 2 of 5, Codabar, etc. |
| Supported Interfaces | USB HID, USB Virtual COM |
| Operating Range | Up to 30 cm (depending on barcode density) |
| Optical Resolution | 0.1 mm (4 mil) |
| Indicator | LED (red/green) and beeper |
| Operating Temperature | 0°C to 40°C |
| Storage Temperature | -20°C to 60°C |
| Humidity | 5% to 95% non-condensing |
| Drop Resistance | 1.5 m onto concrete |
| Cleaning | Wipe with a soft, dry cloth. Use isopropyl alcohol for stubborn dirt. |
| Safety | Laser Class 2, FDA CDRH compliant. Do not stare into the beam. |
| Spare Parts / Repairability | Replacement cables and scanning windows available. Device not user-serviceable internally. |
| General Information | Plug-and-play, no driver needed for most systems. Compatible with Windows, macOS, Linux, Android, iOS (via OTG). |
Frequently Asked Questions - RF-BS-1000 Renkforce
User questions about RF-BS-1000 Renkforce
0 question about this device. Answer the ones you know or ask your own.
Ask a new question about this device
Download the instructions for your Scanner in PDF format for free! Find your manual RF-BS-1000 - Renkforce and take your electronic device back in hand. On this page are published all the documents necessary for the use of your device. RF-BS-1000 by Renkforce.
USER MANUAL RF-BS-1000 Renkforce
VisualTable QuickStartGuide
- Starting VisualTable 2
- Operating the hardware .... 4
- Program tools .... 5
- Creating ebook......8
- Precautions to take before reformatting PC .....12

1. Starting VisualTable
(1) Connect VisualTable and run VisualTable program.

natural_image
Computer setup with tower, cables, and monitor (no visible text or symbols)

natural_image
Close-up of a hand placing a paper over a triangular device with control buttons (no visible text or symbols)
natural_image
Hand interacting with a touchscreen device inside a transparent cube (no visible text or symbols)① Turn on your PC power and check all the connections of the USB cable, power cable and power adaptor of the VisualTable to the PC. Start the program 30 seconds after connecting the USB cable.
② Double click the "VisualTable" icon on the PC screen or in the start menu in the PC screen corner.
③ Put your book, binding or paper, on the top of VisualTable with its visible side facing down.
④ Turn on power by pressing the power button on the button panel at the front of VisualTable.
⑤ Push the LEFT or RIGHT button to capture pages.
⑥ If the projected image does not appear, check "Camera options" in "Custom Setting" in the
(2) Custom Setting: Camera options

below.
Choose the right driver in the "Video Device" selection window.
- Windows 7 and above: Choose "TAMTUS-CAM500."
- Windows XP: Choose "USB 2.0 Camera Device."
2 Once you see "2592x1944" in the "Camera Resolution" selection window the setting is complete.
3 Click the "OK" button at the bottom and exit "Custom Setting". If there is no image on the screen, choose a different video device again or choose a lower camera resolution step by step and check whether the projected image appears on the screen.
* Note: See III. 3. "1) Camera setting" in User Guide inside CD for more details about the settings.

1 Path for Captured: to select a folder where captured images are saved
2 Path for OCR: to select a folder where OCR-formatted documents are saved
3 Image Edit Program: to select an Image Edit program; otherwise, Windows' Mspaint.exe has been set at default. (Open the folder of the requested edit program and click its exe file.)
4 Web Drive: to register the site for cloud service drive (e.g. google drive). The registered site will pop up by click of "U" button in "App" of the Main menu panel. App → U
5 Registered Site: the registered search engine to be used in VisualTable, moving up and down by using the Up/Down arrow on the right in order to select preferred one.
6 Path for E-Book Image: to determine a folder for saving scanned images for creating an eBook in the eBook mode.
7 Documents Folder: to determine a folder for saving the image by double click of the inside of the scan area in creating eBook. (Refer to III. "5. Creating eBook".)
8 Menu Window Size: to select the size of the Main menu panel and make it small or large.


Custom Setting >OCR options
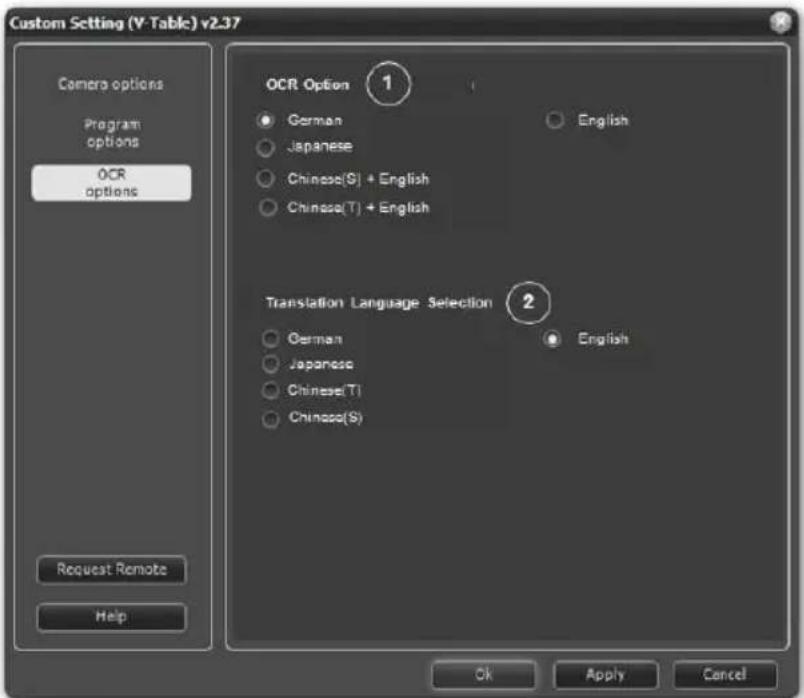
OCR Option: to select a targeted language for OCR converting characters on documents. In the event of converting a document written only in English, selecting "English" will improve the recognition rate.
2 Translation Language Selection: to select a language after translation. (The related function in the Main menu panel: Area selection→ Translation)
2. Operating the hardware
Both the hardware and the software program menu can be used for image capture. In the event of successive scanning of the book, use the software menu panel "Main menu panel". (Refer to III. "5. Creating an eBook" for more detail.)
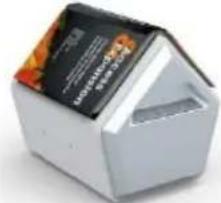
(1) Hardware key pad
* Direction of the Book matching the initial setting

natural_image
Exterior view of a modern office building (no signage)(2) Buttons on the software menu panel
- POWER : Power on & off (Equipment beep: No execution of program or no proper connection of the cables)
- AUTO : captures and saves pages on both sides alternately.
- LEFT : shows the left page of the book on the screen
- RIGHT R : shows the right page of the book on the screen
-
CAPTURE: captures the current image and save it.
-
Program tools (Demo Video: Click https://youtu.be/8VO61AngFR4)
 | Left view | To show the left side of a book | |
 | Right view | To show the right side of a book | |
| [AST8] | Real-time image view | To show images of the book on the screen in real time. A click on the button displays Freeze-screen. | |
 | Freeze-screen | To freeze a captured image on the screen.A click on the button displays Real-time image view.Click on either R or L to bring up a new page. | |
 | Negative view | To show the color of an image in reverse form1 I couldn't find Sue because she 2 Kate was very late for the meeting be 3 Peter didn't come to school on time b | |
| → | |||
 | Capture | To scan the current page and save it in a file. The destination can be set in "Path for Captured" of 1. (2) Custom Setting/ Program options. The basic folder name is "Capture Image"/ "YYYY-MM-DD"(Year-Month-Date) and basic file name is "HH_MM_SS"(Hour_Minute_Second). In writing mode, the objects that are drawn or written on the image are saved together. | |
 | Series-Capture | To save left and right sides in image file format. The currently viewing page is saved first and then the opposing side follows. The path is assigned to Captured Image Save folder. | |
 | Rotation | To display an image turning at 90 degrees clockwise. The rotation value is saved and later applied in the same form when uploading the image. | |
 | Open folder | To open Captured Image Save folder to verify the image saved in the scan mode. | |
 | Area selection | To drag a specific area with a mouse to make selection | |
 | Save | To save the selected area into an image | |
 | Copy | To copy the selected image onto the clipboard or on other application programs running on the Windows environment. | |
 | Cut | To cut the selected area for use in a teaching materialTo move, adjust the size of, rotate, or delete the cut imageTo double click on the cut image to fix and write on | |
| [kxzc] | Internet search | To convert the selected area into characters, for which a search is possible on the Internet. | |
 | OCR | To extract the selected area of an image into a text that can be saved in a file. | |
| [y862] | Translation | To translate the language selected in OCR option (The related setting: III. 3. Custom setting/ OCR option) | |
| [0YX6] | Comparative screen | To divide the monitor into two, where one screen shows a captured image while the other displays a real-time video. The screen ratio can be adjusted by moving the central bar. | |
 | Refresh | To refresh the left and light sides on the screen | |
| [2277]Enlarge/Reduce | To enlarge/reduce the viewing screen by the mouse wheel or the icon. To drag the mouse to move the screen | ||
 | OCR:Optical Character Reader | To convert the contents of the book on the screen into a text and save it This function is possible only on a computer on which the OCR license has been installed. | |
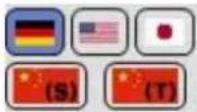 | To select a language to convert before conversionGerman/ English/ Japanese/Chinese (Simplified)/ Chinese (Traditional) | ||
| [WXZY] | To select a format among PDF, WORD or TXT | ||
| [7KW8] | Text copy | To copy characters onto the clipboard for later use on another application software such as WORD or PPT | |
 | Open Doc | To open “OCR Documents” folder and confirm converted documents | |
 | TTS Learning | TTS is not provided. | |
| Application program | To execute an application program linked to VisualTable. | ||
 | e-Book | To scan books and create e-Books | |
 | TTS | TTS is not provided. | |
 | Web drive | To use cloud service drive (e.g. google drive). The registered site will pop up by click of “U” button. | |
 | Image Edit | To edit the currently viewing page in an Image Edit program. The use of a specific edit program requires a separate registration; otherwise, Mspaint will be executed at default. (The related setting: Custom setting/ Program options/ Image Edit Program) | |
 | Exit | To escape from the Area Select tool | |
 | Writing mode | To change modes to allow writing on the currently viewing page.When the mode is changed, attribute bars (brightness/contrast and line width/color) appear. Click on either L / R to exit the writing mode and get a new page. | |
 | Move | To drag the mouse to move the viewing page | |
 | Figures | To draw figures including lines, rectangular, circles and planes | |
 | Normal eraser | To erase areas on the line where the eraser comes in contact. | |
| Complete eraser | To erase all the contents written on the page. | ||
 | Image Open | To get a new image in the writing mode. It is possible to write on the new image or convert a specific area into text by using “Area selection” and then “OCR” button. | |
4. Creating eBook
The VisualTable scanner enables user to scan texts or reference books conveniently and produce eBooks in the PDF file format.
Main menu panel: App → Go to the Creating eBook program.
(1) Browse Creating eBook program
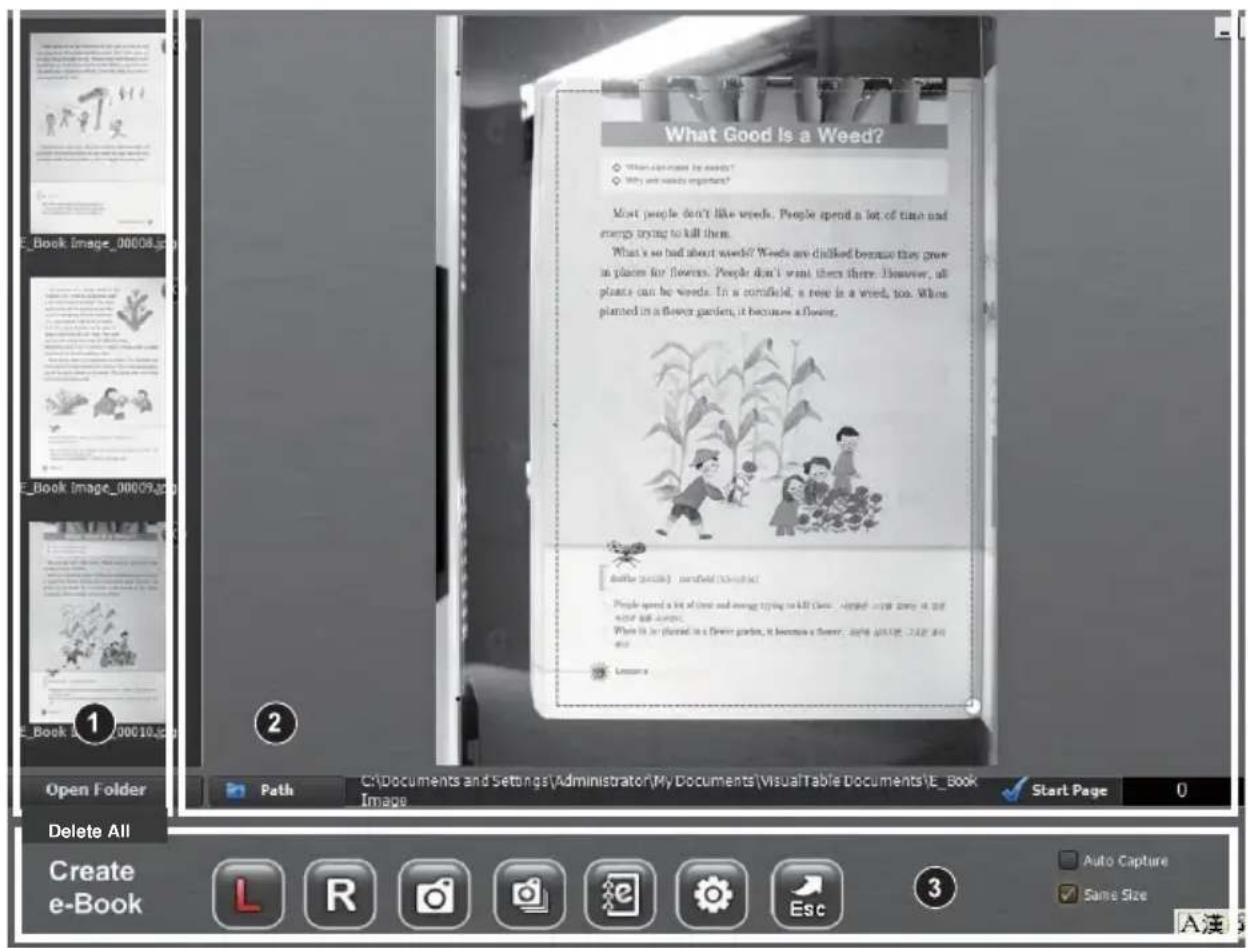
< Creating eBook program >
1 Saved image lineup window
2 Real-time image/ Scan area specifying window
3 Function button window

Saved image lineup window
 | To display the list of scanned imagesX To delete the saved imageFile name: the folder name + sequential number |
 | To get the folder of saved images and check them |
 | To delete all the files in the folder. In the event of sharing VisualTable, make sure to back up all the necessary scanned images for successive scanning in the next time before other users delete all the images by “Delete All” button. |

Real-time image/ Scan area specifying window
 | To show the page of a book to be scanned and specify scan areas for saving.- Drag the mouse to move about the Area Select window (the dotted box).- Click on a circle at a corner of the Area Select window to drag and adjust its size.- Scanning is executed only on the marked area, which can be saved for later use.- Saving the image by double click of the inside of the scan area in creating eBook (Folder setting: Custom setting/ Program options/ Documents Folder) |
 | To select the folder to save scanned images for creating an eBook file.Scanned image files are automatically numbered.File name: the folder name + sequential number |
 | To input a beginning number; this will increase by one at each scanning.File name: the folder name + sequential number counting from the beginning number (It is helpful to creating pdf file by having the successive numbers for the previous scanned files.) |

Function button window
 | Left | To go to page on the left side and show it |
 | Right | To go to page on the right side and show it |
 | Capture | To scan and save the currently viewing page |
  | Automatic captureCreating eBook | To save left and right pages in image file format. The currently viewing page is saved first and then the opposite page follows. The path is assigned to “E_Book Image” save folder.The opposite page will be saved after the first pages is completed, waiting for an interval set in “Delay Time” (Custom Setting/ Camera options). In the event that scanned images are dim and blurry or their brightness is not uniform, you need to extend the scan delay time 5 seconds at default.To convert saved images and create eBook in a text type PDF file.- Text type PDF file: Possible to copy and paste in a general pdf software (Image type PDF file: Not possible to copy)- Maximum pages possible to be converted into one PDF file: 300 pages. (In the event of scanning a book with over 300 pages, create a pdf file per 300 pages and then combine all the related pdf files.) |
 | Custom Setting | User can select Camera options, Program options or OCR options and have a necessary setting. |
 | Exit | To close “Creating eBook” program |
 | When the check mark is displayed in the box, press either L / R to move to the left or Right side and save the image. The saving is carried out according to a preset Scan Delay Time established under Configuration. (Custom Setting/ Camera options/ Delay Time) | |
 | To make the left and right Area Select boxes equal in size based on the left side when the check mark is displayed in the box. Adjustment of a size is possible only in the left side. | |
(2) Scan order for the Creating eBook program
① Click on 'Save Folder' and assign the path of a folder where images for eBook are saved
② Click on g 'View Right Side' and on d , giving the book an area (in green dotted line)
③ Click on f 'View Left Side' and on d, giving the book an area (in red dotted line)
④ Click on e 'Beginning Page' to enter the beginning number.
⑤ Click on i to save the left and right sides automatically; click on h to save the current page. Turn pages to repeat the function.
⑥ Click on j to convert saved images and create eBook in a PDF file.
![What Good Is a Weed? What can miss to weed? Why are weak important? Most people don't like weeds. People spend a lot of time and wrong trying to kill them. What's so bad about weeds? Weeds are disliked because they grow in place for flowers. People don't want them there. However, all plants can be weeds. In a couldled, a rose is a weed, too. When planted in a flower garden, it becomes a flower. doble [book] worked [book]# People spend a lot of time and wrong trying to kill them. 2018-2019 3:30 [the A#l save] When it is planted in a flower garden, it becomes a flower. 2018-2019 3:30 d b Open Folder C:\Documents and Settings\Administrator\My Documents\Visual Table Documents\E_Book Image Start Page e 0 Delete All Create e-Book L R h i j k l Auto Capture Same Size A 漢](/content/2026/05/884769/images/2727325e1cdabce2468bff96b9b9506f9b318daa370bec21b9fcea034f8c15b1.jpg)
a Saved image lineup window
b Folder open
c Save folder
d Area select window
e Beginning page
f View left side
g View right side
h Save current image
i Save left/right images
j Create eBook in a PDF file
k Configuration
Exit
5. Precautions to take before reformatting PC
Only one validation attempt is allowed per license of OCR. If you need to reformat your PC, please refer to following instructions to back up the license information of your OCR. In the event of your negligence of this instruction, supplier has no responsibility for the related OCR issue.
(1) If you want to reinstall on the same PC after reformatting the PC.
- Steps to back up the OCR license key

- Step 1: Find the file of "idrs_software_keys_14.inf" in the OCR folder
(C Drive→ Program Files→ TAMTUS→ OCR)
- Step 2: Back up the file of "idrs_software_keys_14.inf"
- Step 3: Reformat the PC → Reinstall your OCR → Paste the file inside the same folder.
(2) If you want to install OCR on a different PC
Refer to the link "http://blog.naver.com/smartbookscanner".
* Make sure you keep OCR license serial number on the case cover of Set-up CD in order to handle all the reinstallation issue with supplier. In the event of your negligence of this instruction, supplier has no responsibility for the related OCR issue.


Brand : Renkforce
Model : RF-BS-1000
Category : Scanner