
ViewPad 7x - Tablet VIEWSONIC - Free user manual and instructions
Find the device manual for free ViewPad 7x VIEWSONIC in PDF.


| Product Type | 7-inch Tablet |
| Model Number | VS14109 |
| Operating System | Android (Linux-based) |
| Display | 7-inch Capacitive Touchscreen |
| Processor | 1 GHz Cortex-A8 (estimated) |
| Memory (RAM) | 512 MB (typical) |
| Internal Storage | 512 MB ROM (typical) |
| Expandable Storage | microSD card slot |
| Rear Camera | 5 MP with LED flash (estimated) |
| Front Camera | VGA (estimated) |
| Battery | 2-cell 1600 mAh, non-removable |
| Charging Time | Approximately 2 hours |
| Power Adapter | Input: 100-240V AC, 50/60Hz; Output: 12V DC, 1A |
| Connectivity | Wi-Fi 802.11 b/g/n, Bluetooth 2.1+EDR, GPS/AGPS, USB 2.0 (micro-B), HDMI, 3.5mm headset jack |
| Sensors | Light sensor, G-sensor |
| Included Accessories | AC adapter, micro USB cable, headset, Quick Start Guide |
| Warranty | 1 year labor (limited) |
| Safety Certifications | FCC, CE, RoHS, WEEE |
| Cleaning | Use a soft, slightly damp cloth; no abrasives |
| Operating Temperature | 0°C to 50°C |
Frequently Asked Questions - ViewPad 7x VIEWSONIC
User questions about ViewPad 7x VIEWSONIC
0 question about this device. Answer the ones you know or ask your own.
Ask a new question about this device
Download the instructions for your Tablet in PDF format for free! Find your manual ViewPad 7x - VIEWSONIC and take your electronic device back in hand. On this page are published all the documents necessary for the use of your device. ViewPad 7x by VIEWSONIC.
USER MANUAL ViewPad 7x VIEWSONIC
The following statement applies to all products that have received FCC approval. Applicable products bear the FCC logo, and/or an FCC ID in the format FCC ID: GSS-VS14109 on the product label. This device complies with part 15 of the FCC Rules. Operation is subject to the following two conditions: (1) This device may not cause harmful interference, and (2) This device must accept any interference received, including interference that may cause undesired operation. This mobiledevice has been tested and found to comply with the limits for a Class B digital device, pursuant to Part 15 of the FCC Rules. These limits are designed to provide reasonable protection against harmful interference in a residential installation. This equipment generates, uses and can radiate radio frequencyenergy and, if not installed and used in accordance with the instructions, may cause harmful interferenceto radio communications.
However, there is no guarantee that interference will not occur in a particular installation. If this equipment does cause harmful interference to radio or television reception, which can be determined by turning the equipment off and on, the user is encouraged to try to correct the interference by one or more of the following measures
- Reorient or relocate the receiving antenna.
- Increase the separation between the equipment and receiver.
- consult the dealer or an experienced radio/TV technician for help.
- Connect the equipment into an outlet on a circuit different from that to which the receiver is connected.
Changes or modifications not expressly approved by the party responsible for compliance could void theuser's authority to operate the equipment. The antenna(s) used for this transmitter must not be colocated or operating in conjunction with any otherantenna or transmitter.
FCC SAR information
FCC Radiation Exposure Statement
This equipment complies with FCC RF radiation exposure limits set forth an uncontrolled environment. This transmitter must not be co-located or operating in conjunction with any other antenna or transmitter.
The device was tested and complies to measurement standards and procedures specified in FCC OET Bulletin 65, Supplement C
Canada Statement
This device complies with Industry Canada licence-exempt RSS standard(s).
Operation is subject to the following two conditions: (1) this device may not cause interference, and (2) this device must accept any interference, including interference that may cause undesired operation of the device.
CE Conformity for European Countries

The device complies with the EMC Directive 2004/108/EC and Low Voltage Directive 2006/95/EC.
CE SAR Information
THIS MOBILE DEVICE MEETS GUIDELINES FOR EXPOSURE TO RADIO WAVES. Your mobile device is a radio transmitter and receiver. It is designed not to exceed the limits for exposure to radio waves recommended by international guidelines. These guidelines were developed by the independent scientific organization ICNIRP and include safety margins designed to assure the protection of all persons, regardless of age and health.
The exposure guidelines for mobile devices employ a unit of measurement known as the Specific Absorption Rate or SAR. The SAR limit stated in the ICNIRP guidelines is 2.0 W/kg averaged over 10 grams of tissue. Test for body worn SAR, the positions of the device are at a minimum of 1.5 cm from the body with the device transmitting at its highest certified power level in all tested frequency bands. The actual SAR level of an operating device can be below the maximum value because the device is designed to use only the power required to reach the network. That amount changes depending on a number of factors such as how close you are to a network base station. The highest SAR value under the ICNIRP guidelines for use of the device at the body is 0.792 W/kg. Use of device accessories and enhancements may result in different SAR values. SAR values may vary depending on national reporting and testing requirements and the network band.
Following information is only for EU-member states:
The mark shown to the right is in compliance with the Waste Electrical and Electronic Equipment Directive 2002/96/EC (WEEE).
The mark indicates the requirement NOT to dispose the equipment as unsorted municipal waste, but use the return and collection systems according to local law.
If the batteries, accumulators and button cells included with this equipment, display the chemical symbol Hg, Cd, or Pb, then it means that the battery has a heavy metal content of more than 0.0005% Mercury, or more than 0.002% Cadmium, or more than 0.004% Lead.


European Union Regulatory Conformance
The equipment complies with the RF Exposure Requirement 1999/519/EC, Council Recommendation of 12 July 1999 on the limitation of exposure of the general public to electromagnetic fields (0–300 GHz). This equipment meets the following conformance standards: EN50332-1/2, EN301489-1, EN301489-3, EN301489-17, EN55022/24, EN62209-2, EN60950-1, EN300328, EN300440-1/2
The device has been tested to comply with the Sound Pressure Level requirement laid down in the applicable EN 50332-1 and EN 50332-2 standards. Permanent hearing loss may occur if earphones or headphones are used at high volume for prolonged periods of time.

The conformity assessment procedure has been followed with the involvement of the following Notified Body:
PHOENIX TESTLAB
Identification mark: CE0700 (Notified Body) CE
CE0700
| This equipment may be operated in: | |||||
| AT BE BG CH CY CZ DE DK | |||||
| EE ES FI FR GB GR HU IE | |||||
| IT IS LI LT LU LV MT NL | |||||
| NO PL PT RO SE SI SK TR | |||||
We, hereby, declare that this cellular, Wi-Fi, & Bluetooth radio is in compliance with the essential requirements and other relevant provisions of Directive 1999/5/EC.
Products with 2.4-GHz Wireless LAN Devices France
For 2.4-GHz wireless LAN operation of this product, certain restrictions apply. This equipment may use the entire-2400-MHz to 2483.5-MHz frequency band (channels 1 through 13) for indoor applications. For outdoor use, only 2400-2454 MHz frequency band (channels 1-9) may be used. For the latest requirements, see http://www.art-telecom.fr.
Caution:
Risk of explosion if battery replaced aced by an incorrect type.
Dispose of used batteries according to the instructions.
RISK GROUP 1
CAUTION
Possibly hazardous optical radiation emitted from this product.
Do not stare at operating lamp. May be harmful to the eyes.
IEC 62471: 2006
Declaration of RoHS Compliance
This product has been designed and manufactured in compliance with Directive 2002/95/EC of the European Parliament and the Council on restriction of the use of certain hazardous substances in electrical and electronic equipment (RoHS Directive) and is deemed to comply with the maximum concentration values issued by the European Technical Adaptation Committee (TAC) as shown below:
| Substance Proposed Maximum Concentration | Actual Concentration | |
| Lead (Pb) 0.1% < 0.1% | ||
| Mercury (Hg) 0.1% < 0.1% | ||
| Cadmium (Cd) 0.01% < 0.01% | ||
| Hexavalent Chromium ( Cr^6+ ) | 0.1% < 0.1% | |
| Polybrominated biphenyls (PBB) 0.1% < 0.1% | ||
| Polybrominated diphenyl ethers (PBDE) 0.1% | < 0.1% |
Certain components of products as stated above are exempted under the Annex of the RoHS Directives as noted below:
Examples of exempted components are:
- Mercury in compact fluorescent lamps not exceeding 5 mg per lamp and in other lamps not specifically mentioned in the Annex of RoHS Directive.
- Lead in glass of cathode ray tubes, electronic components, fluorescent tubes, and electronic ceramic parts (e.g. piezoelectronic devices).
- Lead in high temperature type solders (i.e. lead-based alloys containing 85% by weight or more lead).
- Lead as an allotting element in steel containing up to 0.35% lead by weight, aluminium containing up to 0.4% lead by weight and as a cooper alloy containing up to 4% lead by weight.
Important Safety Instructions
- DO NOT place objects on top of the ViewPad, as objects may scratch the screen.
- DO NOT expose the ViewPad to dirty or dusty environments.
- DO NOT place the ViewPad on an uneven or unstable surface.
- DO NOT insert any foreign objects into the ViewPad.
- DO NOT expose the ViewPad to strong magnetic or electrical field.
- DO NOT expose the ViewPad to direct sunlight as it can damage the LCD Screen. Keep it away from heat sources.
- Do not store your device in temperatures higher than 50^ C ( 122^ F). The operating temperature for this device is from 0^ C ( 32^ F) to 50^ C ( 122^ F).
- DO NOT use the ViewPad in the rain.
- Please check with your Local Authority or retailer for proper disposal of electronic products.
- The ViewPad and the adapter may produce some heat during normal operation or charging. DO NOT leave the ViewPad on your lap to prevent discomfort or injury from heat exposure.
- POWER INPUT RATING: Refer to the rating label on the ViewPad and be sure that the power adapter complies with the rating. Only use accessories specified by the manufacturer.
- DO NOT use a pen or any sharp object to tap the screen.
- Clean the touch screen with a soft cloth. If needed, dampen the cloth slightly before cleaning. Never use abrasives or cleaning solutions.
- Always power off the ViewPad to install or remove external devices that do not support hot-plug.
- Disconnect the ViewPad from an electrical outlet and power off before cleaning the ViewPad.
- DO NOT disassemble the ViewPad, only a certified service technician should perform repair.
- The ViewPad has apertures to disperse heat. DO NOT block the ViewPad ventilation, the ViewPad may become hot and malfunction as a result.
- Risk of explosion if battery replaced aced by an incorrect type. Dispose of used batteries according to the instructions.
- Users have to use the connection to USB interfaces with USB 2.0 version or higher.
- PLUGGABLE EQUIPMENT, the socket-outlet shell be installed near the equipment and shall be easily accessible.
Copyright Information
Copyright © ViewSonic® Corporation, 2011. All rights reserved.
Android is a trademark of Google Inc. Use of this trademark is subject to Google Permissions.
This product has an Android ^™ platform based on Linux, which can be expanded by a variety of JME-based application SW.
All products used in this device and trademarks mentioned herein are trademarks or registered trademarks of their respective owners.
Google ^™ , the Google logo, Android ^™ , the Android logo and Gmail ^™ are trademarks of Google Inc. Use of this trademark is subject to Google Permissions.
Wi-Fi and the Wi-Fi CERTIFIED logo are registered trademarks of the Wireless Fidelity Alliance.
microSD ^TM is a trademark of SD Card Association.
Bluetooth and the Bluetooth logo are trademarks owned by Bluetooth SIG, Inc.
Java, JME and all other Java-based marks are trademarks or registered trademarks of Sun Microsystems, Inc. in the United States and other countries.
The prediction engine of the input method is TOUCHPAL, provided by COOTEK.
DataViz and RoadSync are registered trademarks of DataViz, Inc. All rights reserved.
DataViz and Documents To Go are trademarks or registered trademarks of DataViz, Inc. All rights reserved.
Word To Go™, Sheet To Go®, Slideshow To Go®, PDF To Go® and icons are trademarks or registered trademarks of DataViz, Inc. All rights reserved.
Disclaimer: ViewSonic Corporation shall not be liable for technical or editorial errors or omissions contained herein; nor for incidental or consequential damages resulting from furnishing this material, or the performance or use of this product.
In the interest of continuing product improvement, ViewSonic Corporation reserves the right to change product specifications without notice. Information in this document may change without notice.
No part of this document may be copied, reproduced, or transmitted by any means, for any purpose without prior written permission from ViewSonic Corporation.
Intellectual Property Right Information
Right to all technologies and products that comprise this device are the property of their respective owners:
This product has an Android platform based on Linux, which can be expanded by a variety of Java-Script-based application SW.
Google, the Google logo, Android, the Android logo, Gmail, and YouTube are trademarks of Google Inc.
Bluetooth and the Bluetooth logo are trademarks owned by Bluetooth SIG, Inc.
Java, JME and all other Java-based marks are trademarks or registered trademarks of Sun Microsystems, Inc. in the United States and other countries.
microSD is a trademark of SD Card Association.
The prediction engine of the input method is TOUCHPAL, provided by COOTEK.
Product Registration
To meet your future needs, and to receive any additional product information as it becomes available, please register your product on the Internet at:
www.viewsonic.com.
For Your Records
Product Name: ViewPad 7x
Model Number: VS14109
Document Number: ViewPad 7x_UG_ENG Rev. 1a 05-06-11
Serial Number: ____
Purchase Date: ____
Product disposal at end of product life
ViewSonic respects the environment and is committed to working and living green.
Thank you for being part of Smarter, Greener Computing. Please visit ViewSonic website to learn more.
USA & Canada: http://www.viewsonic.com/company/green/recycle-program/
Europe: http://www.viewsoniceurope.com/uk/support/recycling-information/
Taiwan: http://recycle.epa.gov.tw/recycle/index2.aspx
Chapter 1: Getting Started.... 1
1.1 Your Device.... 1
Front....1
Back 1
Top 2
Down 2
1.2 Accessories 2
1.3 Installing Memory Card.... 3
1.4 Charging Battery 3
1.5 Using Headsets 4
1.6 Turning the Device On or Off 4
1.7 Unlocking the Screen.... 5
Chapter 2: The Basics.... 6
2.1 Home Screen 6
Extended Home screen.... 6
Status Bar Icons 7
Shortcut menu 8
Using widgets....9
Application drawer....9
Setting wallpaper.... 10
2.2 Adjusting Volume.... 11
2.3 Setting up Wi-Fi 12
2.4 Contacts 14
Adding contacts.... 14
Importing contacts.... 15
Backing up contacts 15
Favorite contacts.... 16
Chapter 3: Entering Information 17
3.1 On-Screen Keyboard.... 17
Using the on-screen keyboard 17
Setting input method 18
3.2 Configuring Keyboard Settings 18
3.3 Using User Dictionary.... 19
Adding Words in the Dictionary 19
Editing Words in the Dictionary 19
Chapter 4: Email.... 20
4.1 Email Accounts 20
Setting up an Internet email account 20
Viewing email accounts.... 20
4.2 Using Email.... 21
Composing and sending emails 21
Receiving emails 22
Reading and replying to emails 22
Managing email folders 23
Customizing email settings 23
Chapter 5: Using Internet 25
5.1 Browsing Web Pages...... 25
Managing web pages 26
Chapter 6: Google Apps ...... 27
6.1 Gmail 27
Signing in to Gmail 27
Refreshing Gmail 27
Creating and sending emails.... 27
Reading and replying to emails 28
Forwarding emails 28
Managing emails 28
Viewing folder labels 29
Searching for emails 29
Configuring Gmail settings 29
6.2 Talk 30
Signing in to Google Talk 30
Google Talk options 30
Starting chat 30
Configuring Google Talk settings 31
6.3 Maps 32
Viewing Map.... 32
Finding places 33
6.4 Navigation.... 33
Getting directions 34
Finding your current location.... 34
6.5 Latitude 35
Starting Latitude 35
Configuring privacy settings 35
6.6 Market.... 36
Searching for applications.... 36
Downloading applications 36
Removing applications 36
6.7 Places 37
6.8 Google Search 37
Searching information by entering text 37
6.9 Voice Search.... 38
6.10 YouTube 38
Watching videos.... 38
Uploading videos.... 38
Searching videos.... 38
Chapter 7: Using Bluetooth.... 39
7.1 Connecting to Bluetooth Devices.... 39
Chapter 8: Multimedia Applications ...... 40
8.1 Videos and Photos 40
Recording a video 40
Taking a photo 41
Reviewing a video 41
Reviewing a photo.... 42
Configuring camera settings 42
8.2 Viewing Videos & Photos 44
Playing videos 44
Viewing photos 44
8.3 Using Music Player 45
Music screen 45
Playing music 47
Changing playback options 47
Managing playlists.... 48
Chapter 9: Programs.... 49
9.1 Books 51
Browsing an ebook.... 51
Downloading an ebook.... 51
9.2 Browser 51
9.3 Calculator.... 51
9.4 Calendar 52
9.5 Camera 52
9.6 Clock....52
9.7 Contacts....52
9.8 Downloads 53
Managing files 53
9.9 Email....53
Managing files and folders 53
9.11 FM Radio 54
9.12 Gallery 55
9.13 Gmail 55
9.14 Google Search 55
9.15 Latitude 55
9.16 Maps 55
9.17 Market.... 55
9.18 Music 56
9.19 Navigation 56
9.20 Places 56
9.21 Settings 56
9.22 Spare Parts 56
9.23 Talk 56
9.24 Voice Search.... 56
9.25 YouTube 56
Chapter 10: Managing Your Device.... 57
10.1 Device Settings.... 57
Wireless & networks 57
Sound 57
Screen 58
Location & security 58
Applications 58
Accounts & sync.... 59
Privacy 59
Storage....59
Language & input 59
Accessibility....60
Date & time 60
About tablet 60
10.2 Changing Basic Settings.... 61
Date and time settings 61
Alarms settings.... 61
Display settings 62
Ringtone settings 62
10.3 Using Wireless & networks 62
10.4 Protecting Your Device.... 63
Screen lock protection settings 63
10.5 Resetting the Device 63
Safety Information 64
Specifications 68
Chapter 1: Getting Started
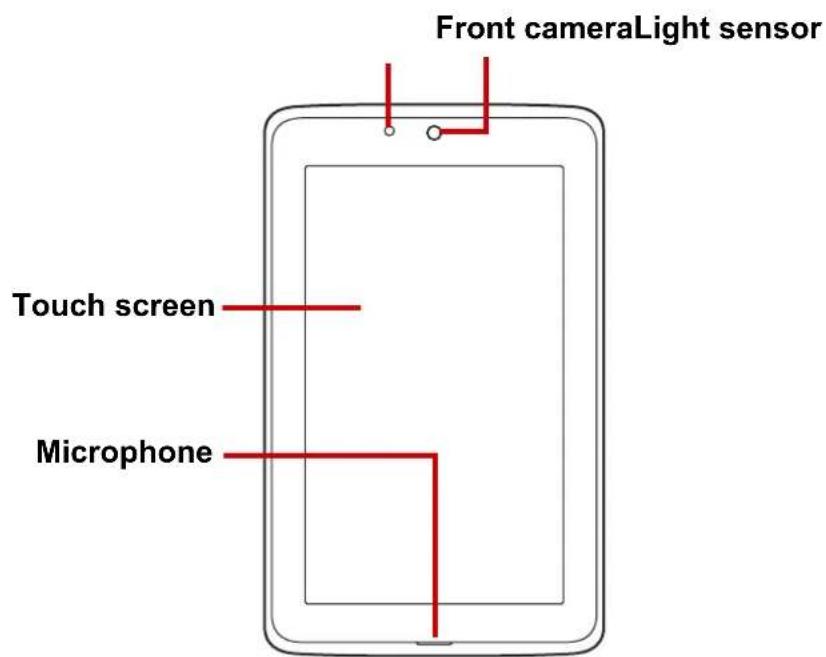
1.1 Your Device
Front
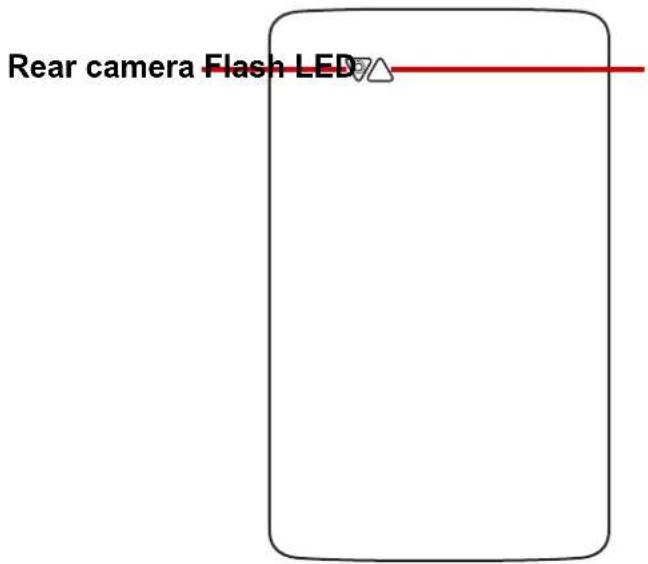
Back
Top

Headset jack:
- Use a headset for hands-free conversation or listening to music.
Power:
- Press and hold for 5 seconds to turn the device on or off. - To save battery, press to temporarily turn the screen on or off.
Down
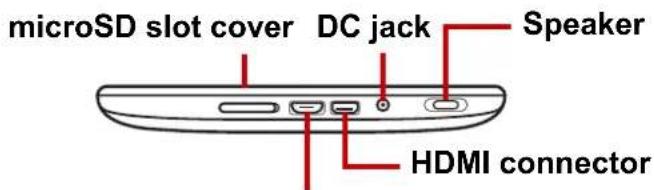
Micro USB connector:
- Connect USB cable to PC as a USB mass storage.
1.2 Accessories
Your package comes with the following items. If any of them is missing, please contact your retailer.
- ViewPad 7x
• AC adapter and plugs - Micro USB cable
- Headset
- Quick Start Guide
• Compliance information
1.3 Installing Memory Card
You need a microSD ^® card to store photos, music, videos, and other data.
To install the memory card
- Open the card cover.
- Insert the microSD card as shown. Make sure the gold contacts are facing down.
To remove the memory card
-
For safe removal, tap > Storage > Unmount SD card.
-
Open the card cover.
- Push to eject the microSD card from the slot.
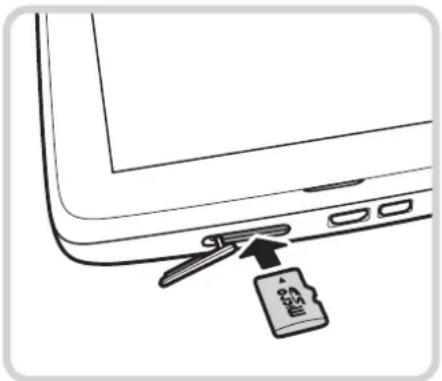
natural_image
Diagram of a laptop with a card inserted into the front panel, showing a small card icon and an arrow pointing to the pad (no text or symbols present)NOTE: Do not remove the memory card while the device is turned on. Sudden removal of the memory card may cause data loss or unpredictable system hang up.
1.4 Charging Battery
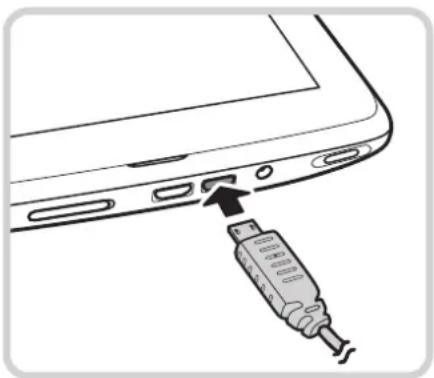
The battery is only partially charged. To fully charge the battery, charge it for 2 hours.
Charge the battery
- Connect one end of the AC adaptor to the DC jack of the device.
- Plug the other end of the AC adaptor to the wall outlet to start charging.
When the battery is charging and the device is turned on, the icon is displayed on the status bar. When the battery is fully charged, the icon is displayed on the status bar.
natural_image
Diagram of a device being inserted into a laptop (no text or symbols present)1.5 Using Headsets
For hands-free conversation or listening to music, plug a headset to the headset jack.
NOTE:
- When using a headset, your ability to hear outside sounds may be limited. Do not use headset if it will endanger you.
- When using a headset, do not set the volume to its maximum as it may damage your hearing.
1.6 Turning the Device On or Off
After installing the memory card and charging the battery, the device is ready to be turned on.
To turn on your device
Press and hold the Power button until the device vibrates.
To turn off your device
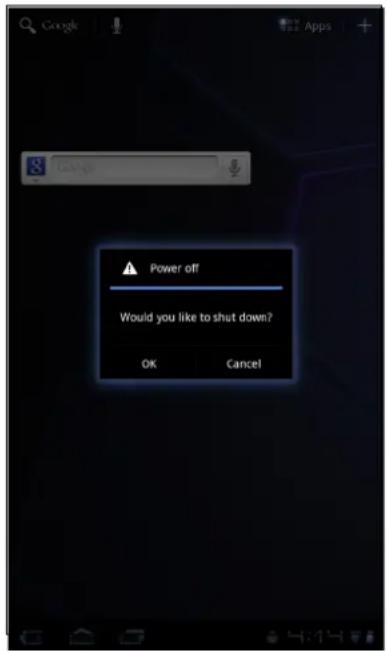
- Press and hold the Power button for 5 seconds.
- A pop-up window appears, tap OK to confirm.
To set your device to Sleep mode
To set the device to sleep mode, press the Power button. This will turn the display off.
To turn the display on, press the Power button again.
1.7 Unlocking the Screen
By default, the screen automatically locks after a period of inactivity. You can set the length of time until the screen locks, see "Screen" on page 59.
To unlock the screen
-
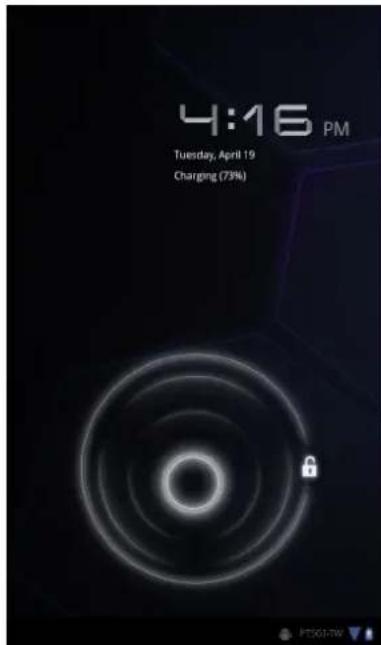
Press the Power button to turn on the display from Sleep mode.
-
Tap and drag the middle circle ( ) to unlock the screen.
Chapter 2: The Basics
2.1 Home Screen
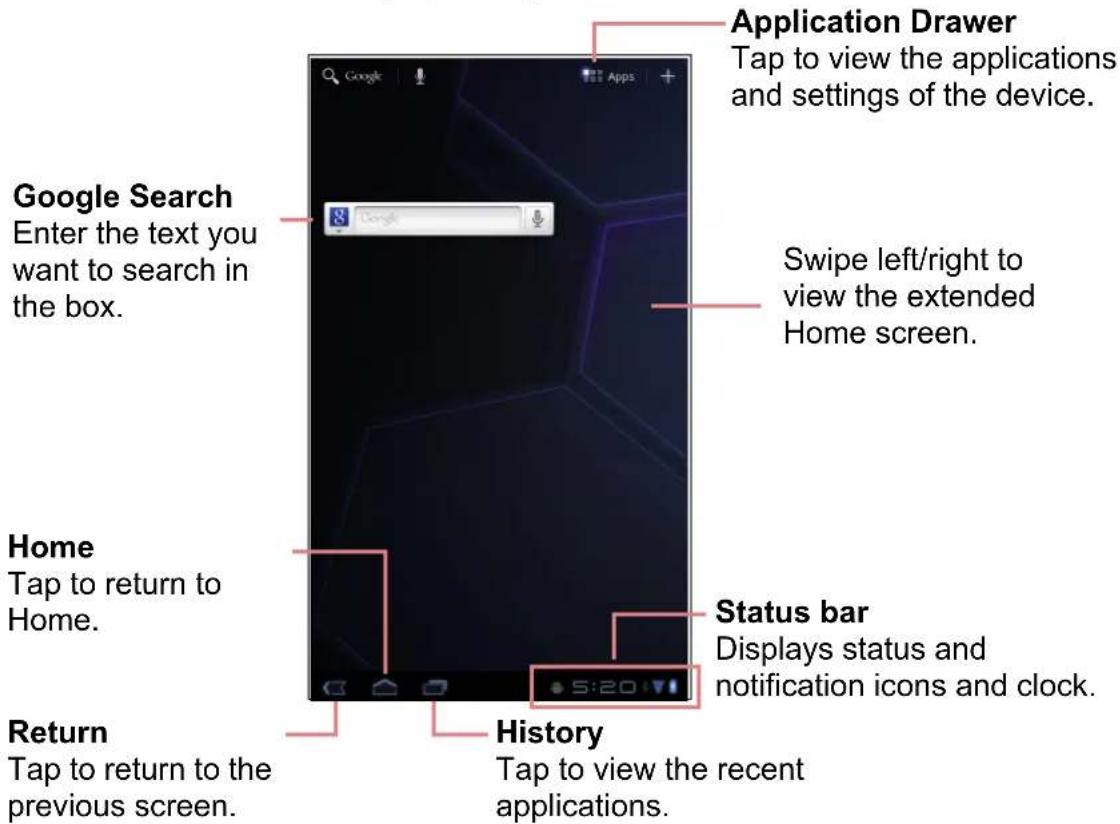
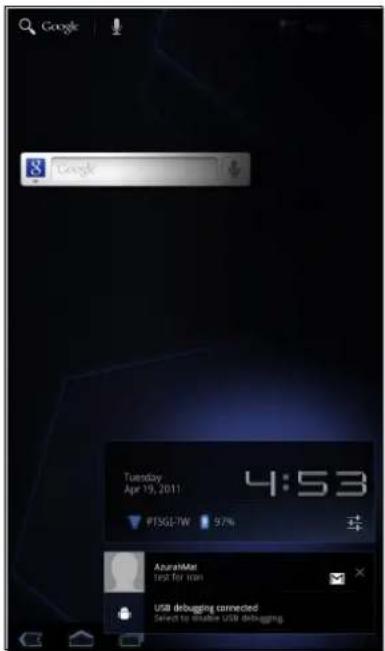
From the Home screen, you can quickly access common features and view notifications of received messages, battery and connection status.
Extended Home screen
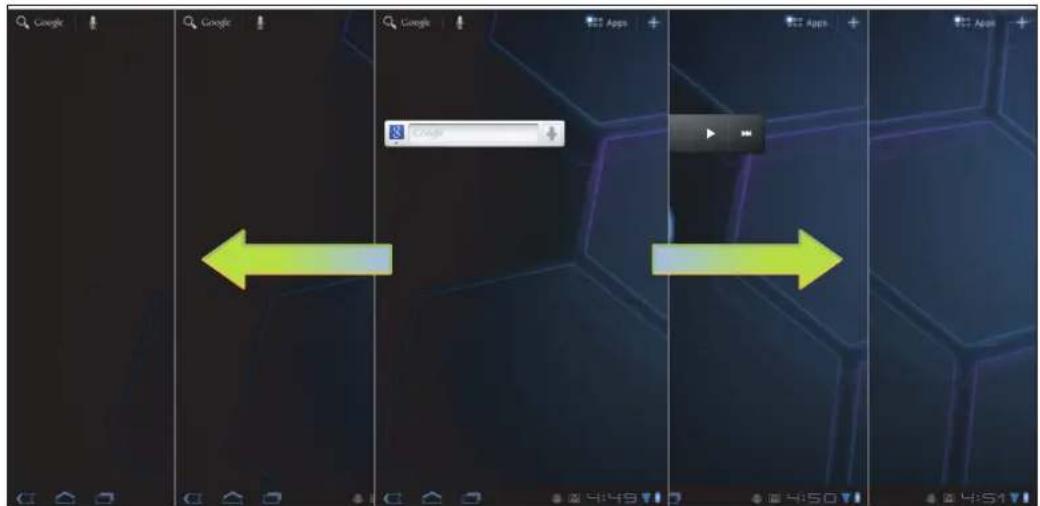
Swipe your finger to the left or right across the Home screen.
The two extensions to the left and to the right of the Home screen provide more space for icons, widgets, shortcuts, and other items.
Status Bar Icons
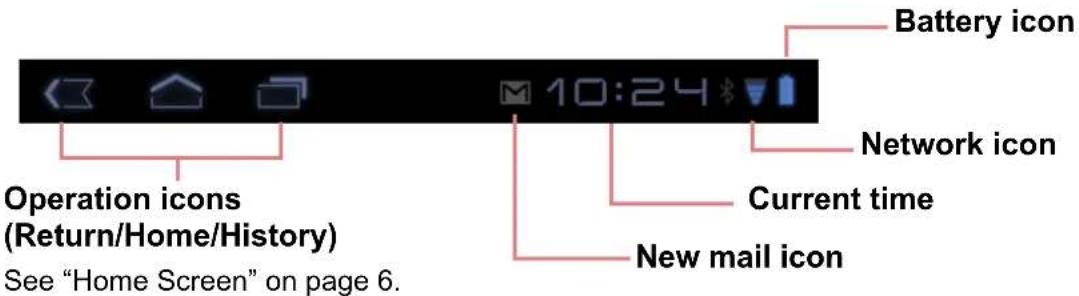
Status bar icons indicate different types of information.
The icons on the status bar indicate the following information:
| Icon Description Icon Description | |||
 | Battery is full. Wi-Fi is connected. | ||
| [5320] | Battery is low. Bluetooth connection is active. | ||
| [7260] | Battery is completely discharged. | File downloading in progress. | |
| [2X20] | Battery is charging. New email notification. | ||
Tap the status bar and scroll up to view notifications or view system information easily. To close the window, tap 📄.
Shortcut menu
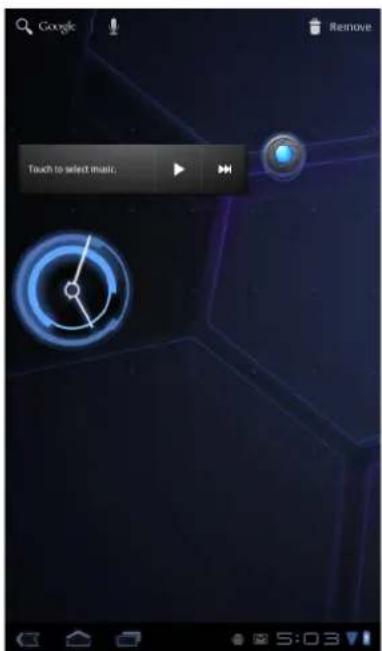
The shortcut menu allows you to easily access an application from the Home screen. To open an application, tap an icon.
Customizing shortcut menu
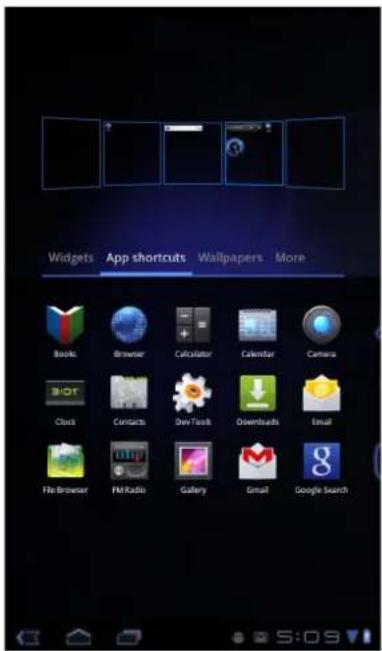
To add a shortcut:
1.

- Tap App shortcuts to display the applications.
- To add an item, drag the application icon to the specific Home screen.
To remove shortcut:
- Tap and hold an application icon.
The Remove pears on the top right of the Home screen.
- Drag the application icon to delete. The application icon is removed from the Home screen.
Using widgets
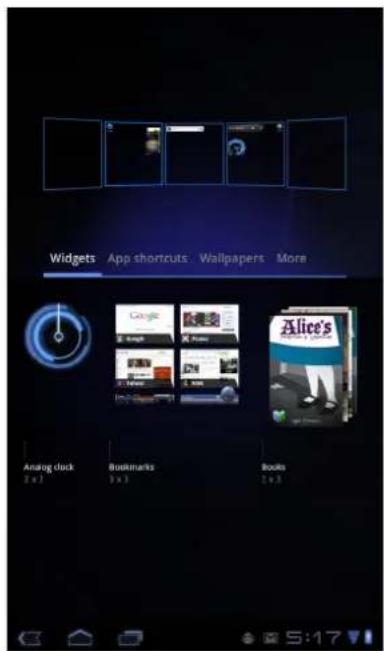
Save time with live updates right on the Home screen and get all your personalized updates in one place.
You may add and customize the Widgets on the Home screen as you like.
-
From the Home screen, tap + All available widgets is displayed
-
To add widget, drag the widget icon to the specific Home screen.
To remove widgets:
-
From the Home screen, tap and hold the desired widget. The 📄️ isears on the top right of the Home screen.
-
Drag the widget to the Home screen.
Application drawer
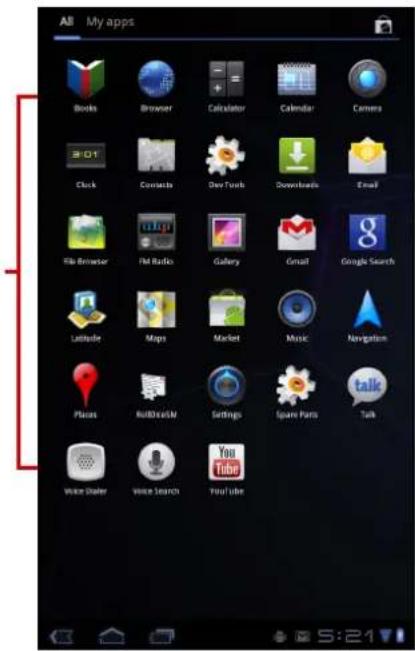
The Application Drawer contains all applications and settings. Tap 📄 Appwen the menu.
- Tap an icon to access the application.
Setting wallpaper
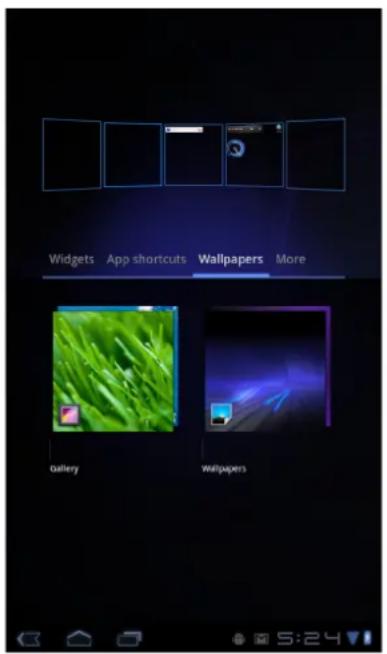
You can customize the wallpaper of your Home screen with a default wallpaper or with pictures taken with your device.
Set wallpaper from Wallpaper gallery
- From the Home screen, tap +Wallpapers.
- Tap Wallpapers.
All default wallpapers are displayed.
- Tap the desired wallpaper to set as Home screen wallpaper.
Set wallpaper from My Gallery
- From the Home screen, tap +Wallpapers.
- Tap Gallery.
- Browse the files. Tap to select the picture you want to use as wallpaper.
- Drag your finger to select the crop area.
- Tap √ Get the cropped photo as wallpaper.
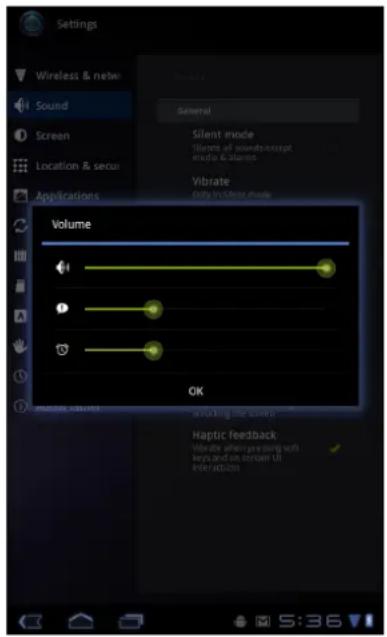
2.2 Adjusting Volume
This device features three types of volume which can be adjusted separately:
• Ringer volume: Set the volume for notifications.
• Media volume: Set the volume for music and videos.
• Alarm volume: Set the volume for alarms.
To adjust the volume
- From the Home screen, tap Sound.
- Tap Volume.
- To adjust the volume, do either of the following:
a. Drag the respective volume slider to adjust the volume.
b. Press the volume button to adjust the volume.
NOTE: When the device is set to silent mode, all sounds are turned off except media and alarm.
- Tap OK to save your settings.
2.3 Setting up Wi-Fi
This device only uses Wi-Fi connection. You need to connect to a wireless network before surfing the Internet or using the related applications that require internet connection.
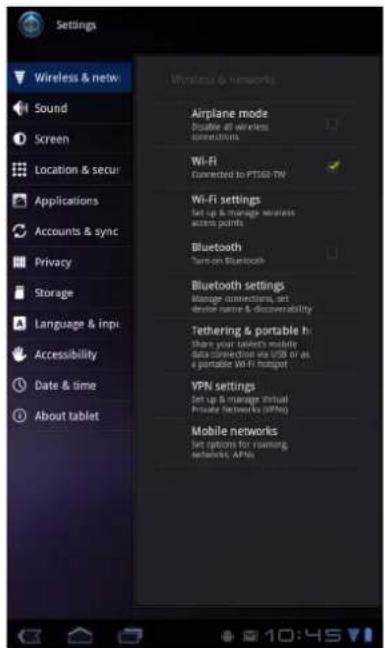
To turn Wi-Fi on or off
- From the Home screen, tap > Wireless & networks.
- Tap Wi-Fi check box to turn Wi-Fi function on or off.
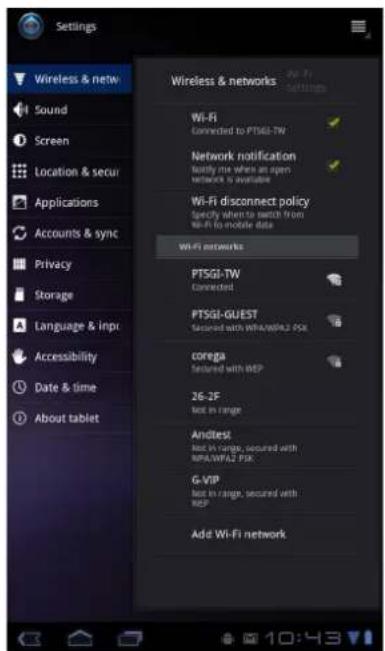
To connect to a Wi-Fi network
- Turn Wi-Fi on.
- Tap Wi-Fi settings > Network notification to start detecting networks.
- The available networks are listed. Tap a network to connect to or tap Add Wi-fi network to manually add a connection.
- If you select an unsecured network, the connection is automatically established. Otherwise, proceed to the next step.
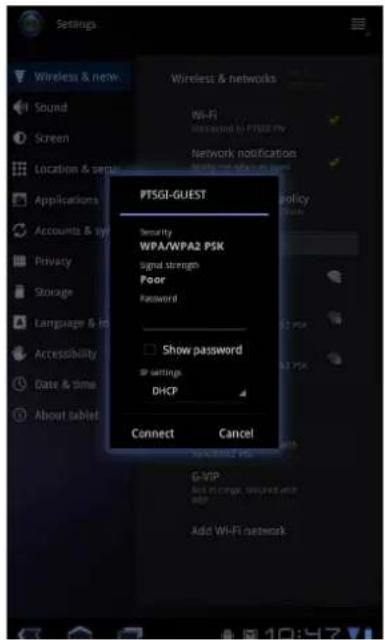
- When connecting to a secured network, you will be prompted for the password. Enter the password, then tap Connect.
When Wi-Fi is connected, the connection icon is displayed on the status bar.
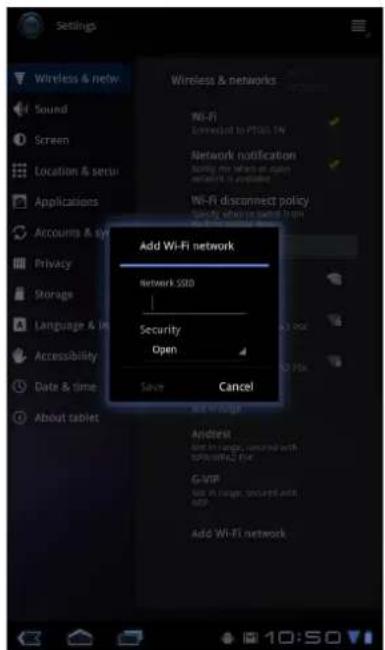
To add Wi-Fi network
- From the Home screen, tap Apps > Settings > Wireless & networks.
- Tap Wi-Fi settings.
- In Wi-Fi networks, tap Add Wi-Fi network. A new window is displayed.
- Follow the on-screen instructions and enter the necessary information, then tap Save to save the settings.
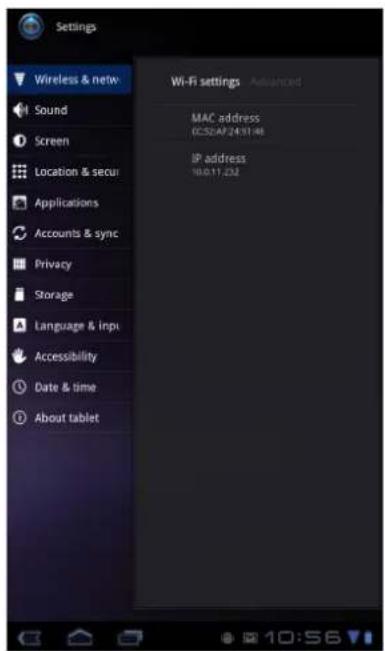
To view Wi-Fi settings
- From the Home screen, tap Apps > Settings > Wireless & networks.
- Tap Wi-Fi settings > □ > Advanced.
The details on MAC address and IP address appear on the screen.
2.4 Contacts
Contacts lets you store names, phone numbers, email, and other information. Contacts are stored in the phone memory. You can also add the frequently used contacts to the Starred list. See “Favorite contacts” on page 16.
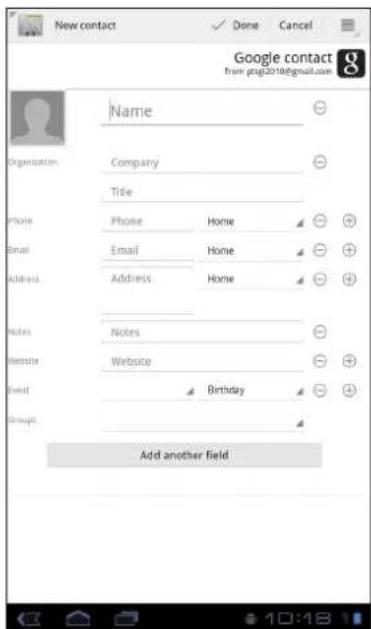
Adding contacts
- From the Home screen, tap ≧ 40:5 tacts.
- Tap
- Enter contact information such as name, phone number, email address, etc.
- When finished, tap to save the contact or tap Cancel to exit without saving any changes.
Importing contacts
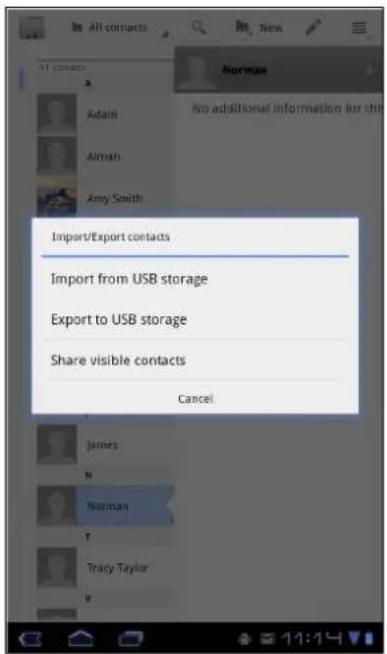
You can import contacts from the memory card to your device.
- From the Home screen, tap >40's tacts.
- Tap > Import/Export.
- Select Import from USB storage.
- Select vCard files to import and tap OK.
Backing up contacts
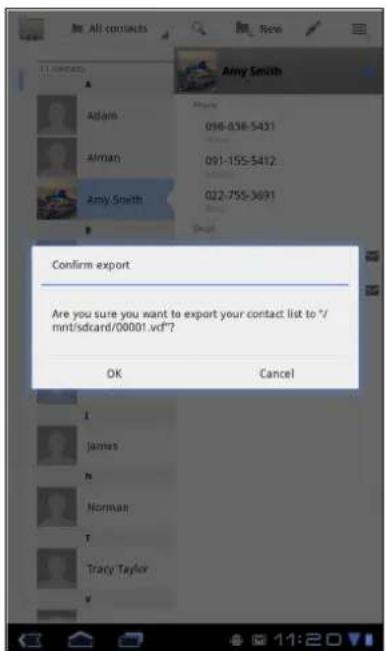
You can copy contacts to the memory card to back up your contacts information.
Export contacts to the memory card
- From the Home screen, tap △ Contacts.
- Tap ≡ > Import/Export > Export to USB storage.
NOTE: Copying contacts to the memory card will overwrite the old backup file.
- A warning message pops up, tap OK to proceed. All contacts are copied to the memory card.
Favorite contacts
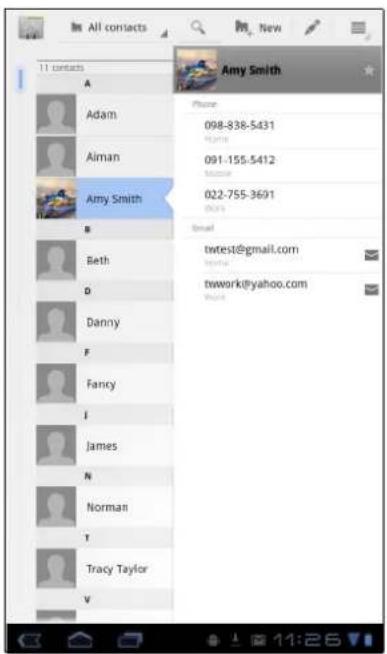
Add the most frequently called contacts to the Starred contact list to help you access contacts quickly and easily.
Add to Starred List
- From the Home screen, tap ≧4075 tacts.
- From All contacts list, tap a contact.
- Tap and the icon turns blue.
The contact is now displayed in the Starred list.
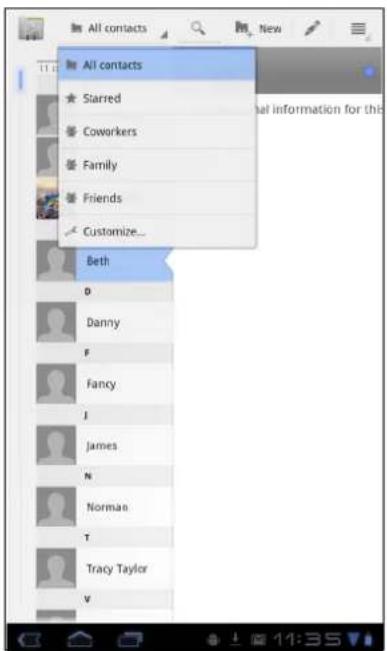
Remove from Starred List
- From the Home screen, tap 40:3 tacts.
- Tap the group list, tap Starred.
The Starred list is displayed. - Tap a contact and tap
The contact is removed from the Starred list.

Chapter 3: Entering Information
3.1 On-Screen Keyboard
The on-screen keyboard appears when an application requires text input, such as messaging and writing emails. The keyboard input method is activated by default.
Using the on-screen keyboard
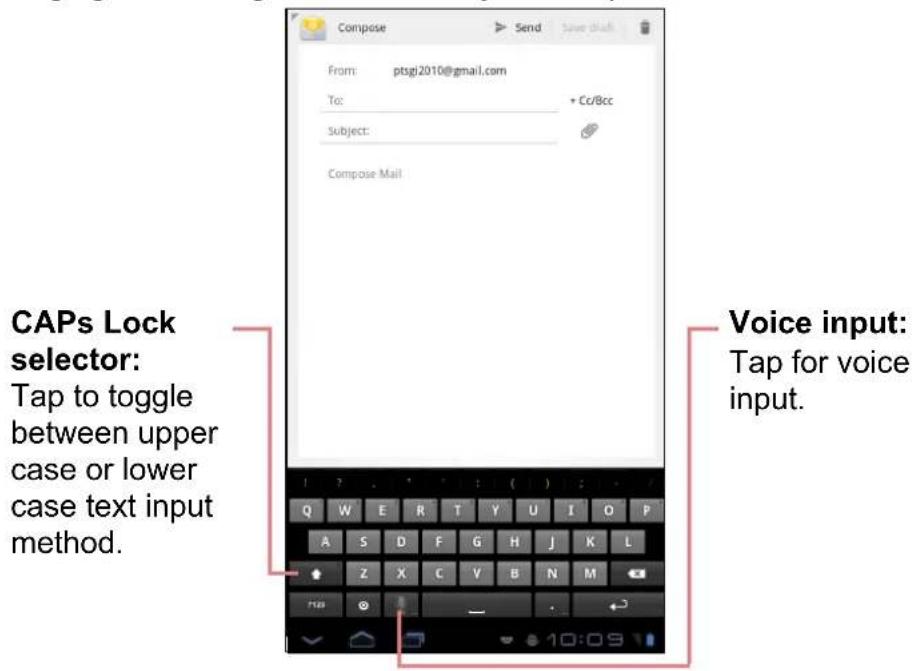
Tap the screen to display the on-screen keyboard.
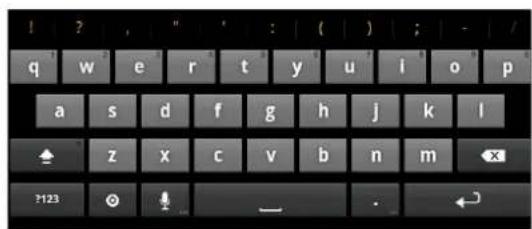
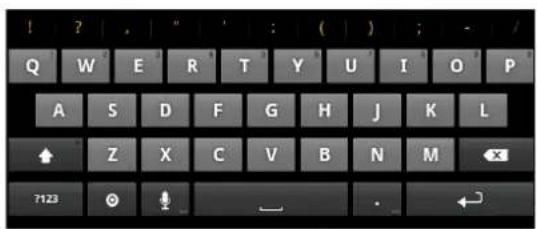
Lowercase keyboard Uppercase keyboard
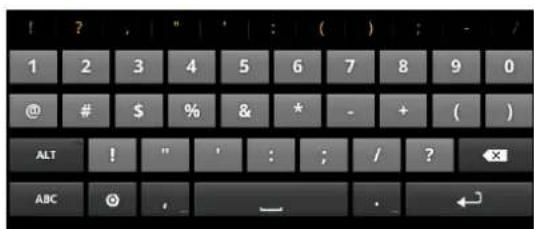
Numbers and symbols
- Tap the keys to enter the characters.
• To toggle between upper and lower case letter display, tap - To display the numeric and symbols keyboard, tap . To switch back to lower case letter display, tap ABC .
Setting input method
- On the on-screen keyboard, tap
- Tap Select input method.
- Change the keyboard settings.

3.2 Configuring Keyboard Settings
Use keyboard aids to set up various input settings.
- From the Home screen, tap Apps > Settings > Language & input.
- Tap Configure input methods > Settings.
-
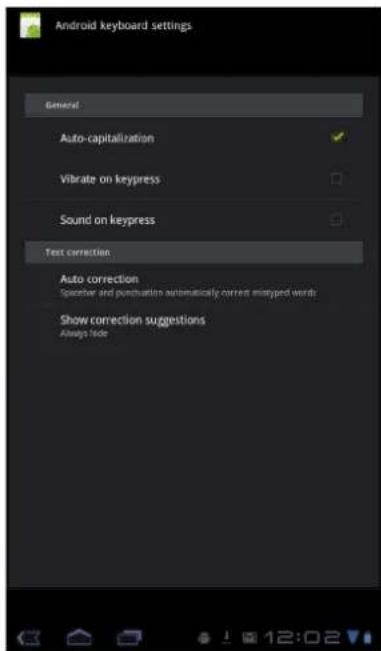
Select the applicable options from the following Android keyboard settings:
-
Auto-capitalization: Select to automatically capitalize the first letter of a sentence.
• Vibrate on keypress: Select to activate vibration when a key is touched. - Sound on keypress: Select to activate a clicking sound when a key is touched.
- Auto correction: Select to enter a highlighted word automatically if a space or punctuation symbol is typed.
• Show correction suggestions: Select to display suggested words as you type.
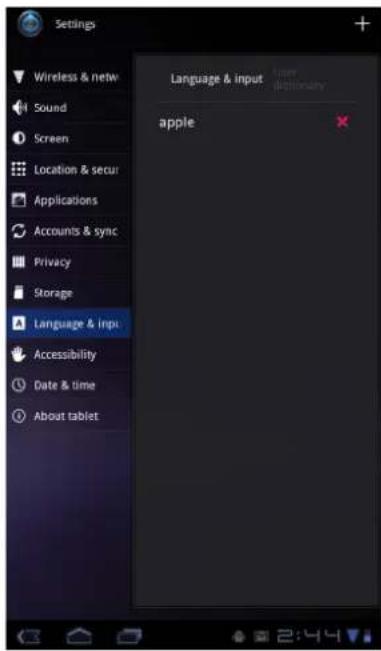
3.3 Using User Dictionary
Select to add user preset words to the dictionary.
Adding Words in the Dictionary
- From the Home screen, tap > Language & input.
- Tap User dictionary.
- To add a new word, tap +Add.
- Enter the word you want to add, and touch OK.
Editing Words in the Dictionary
- From the Home screen, tap > Language & input.
- Tap User dictionary.
-
Do one of the following:
-
To edit the word, tap a word. Revise the selected word and tap OK.
• To delete the word from the dictionary, tap
Chapter 4: Email
Use Email to send and receive email messages via your internet email accounts.
4.1 Email Accounts
Your device can send and receive emails just as you do with a computer. Your device supports email accounts provided by an Internet Service Provider (ISP) or web-based email, such as Hotmail, Yahoo! Mail, etc.
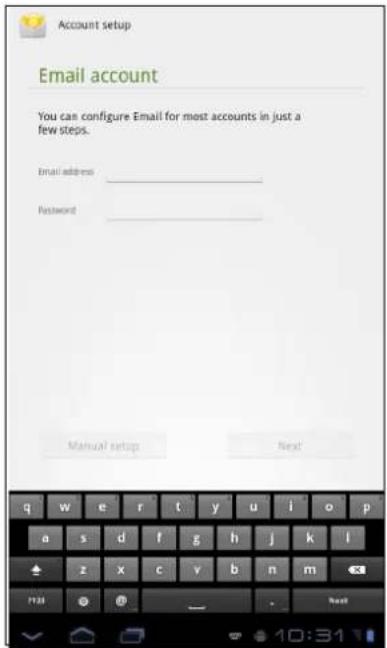
Setting up an Internet email account
- From the Home screen, tap >1 April il.
- Enter your Email address and Password.
- Tap Next. The device will automatically retrieve the email settings.
- To add another email account, tap ≡ > Account settings > Add account
- Enter Your Name and Account display name.
NOTE: The Account display name is the name shown to the recipients of your emails.
- Tap Next.
Once the account set up is completed, the device will automatically retrieve your emails.
Viewing email accounts
- From the Home screen, tap 4118il.
- Tap the account picker box at the top left of the screen.
- Tap the account you want to access from the available email accounts.
![Office Office 1 pvg2316@gmail.com AzurahMat test for icon — Warmest regards - Azurah Mat Techni... AzurahMat attachment for testing Download — Warmest regar... You/Tube Congratulations on your first YouTube upload! — Congrat... noreply@google.com You are using Google Latitude and reporting your location... Gmail Team Import your contacts and old email — You can import you... Load more messages [Gmail]/Sent Mail [Gmail]/Spam [Gmail]/Starred [Gmail]/Trash](/content/2026/05/884681/images/c08a04a58b3bd8c5d535aae579c0a72a46ea9d136b46e57eb53eb7fa770541c2.jpg)
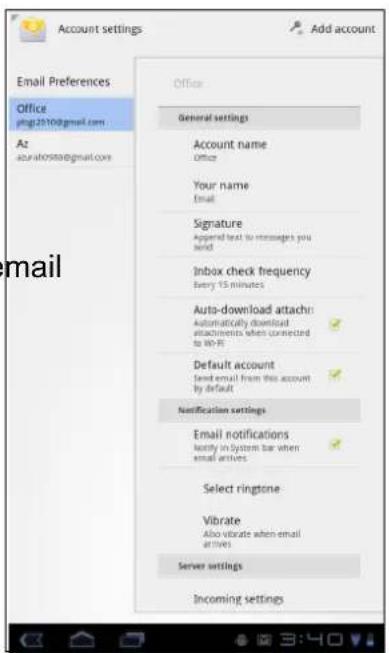
Customizing email settings
Configure message settings using the Account settings menu.
- From the Home screen, tap 📋 Appril.
- Tap the account you want to access.
- Tap > Account settings to open the email setting menu.
4.2 Using Email
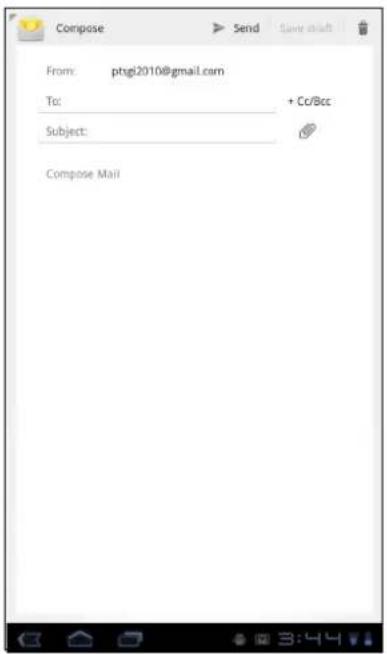
Composing and sending emails
- From the Home screen, tap 📋 Appril.
- Tap an email account.
- Tap
- In the To field, enter the recipient's email address.
- Enter a Subject.
- Compose your email.
- Tap
Sending an email from Contacts
You can send an email to a contact with an email address stored in Contacts.
- From the Home screen, tap ≧ 40% tacts.
- Tap a name to open contact.
- Tap Email Home or Email Work.
- Enter a Subject.
- Compose your email.
- Tap
Adding attachments to an email message
- On the Compose screen, tap . ⓤ
- Select the file that you want to attach.
Receiving emails
Emails are automatically received in your Inbox when the device connects to a wireless network.
To manually receive emails
- From the Home screen, tap
- Tap an email account.
- Tap.

Reading and replying to emails
Inbox displays email headers. Download the email to view the complete content.
To download attachments
- With POP3 email accounts, attachments are downloaded when you download the complete message.
- With IMAP4 email accounts, tap the attachment to mark it for download. The attachment is downloaded the next time you connect to your email server.
NOTE: Only supported file types can be opened on the device.
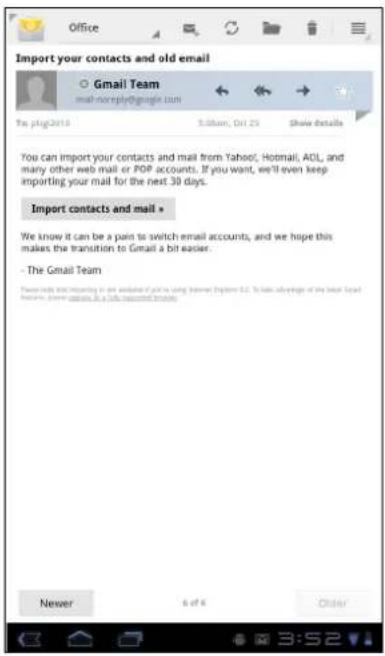
To reply or forward an email
- From the Home screen, tap
- Tap an email account.
- Tap a message to open.
- Do any of the following:
- Tap (Reply) or (Reply all) to reply the email.
- Tap (Forward). Then enter the recipient in the To field.

-
Compose your message.
-
Tap
Managing email folders
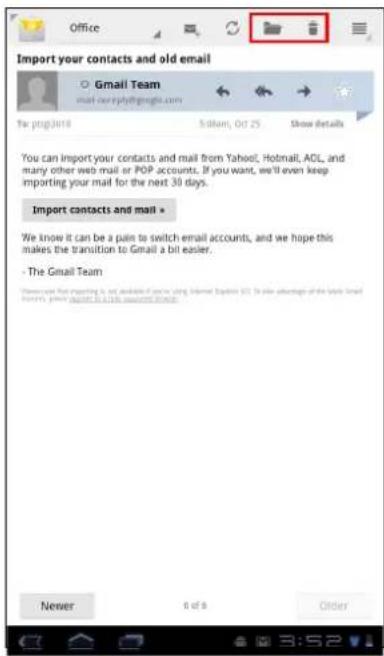
To delete an email
- From the Home screen, tap
- Tap an email account.
- Tap a message to open.
- Tap to delete an email.
To move an email to a folder
- From the Home screen, tap ▷ Affil.
- Tap an email account.
- Tap a message to open.
- Tap and tap the desired folder to move the current email to the selected folder.
Customizing email settings
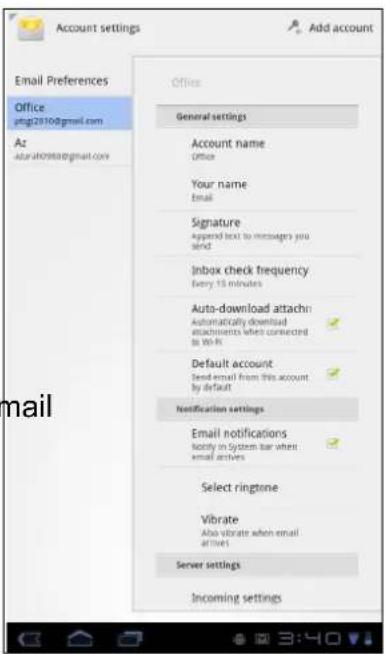
You can configure the general settings of your email account such as account name, email checking frequency, default account, notifications, and server settings.
To set up your account name
- From the Home screen, tap 📋 Appail.
- Tap an email account.
- Tap > Account settings to view the email account settings.
- Tap Account name to change the account name.
- Tap OK to confirm.
To set up email checking frequency
-
From the Home screen, tap > Affil.
-
Tap an email account.
-
Tap ≡ > Account settings to view the email account settings.
-
Tap Inbox check frequency.
You can set the device to automatically check for new email every 5 minutes, every 10 minutes, every 15 minutes, every 30 minutes, every hour, or never.
To set up default account
- From the Home screen, tap 📋 Appril.
- Tap an email account.
- Tap ≡ > Account settings to view the email account settings.
- Tap Default account to send email from this account by default.
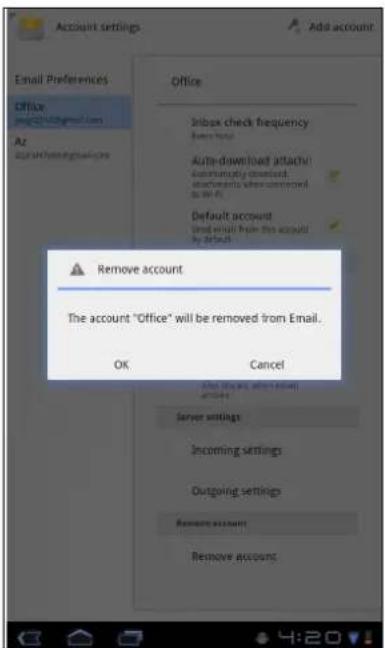
To delete an email account
- From the Home screen, tap 📄 Appril.
- Tap the email account to delete.
- Tap ≡ > Account settings > Remove account.
- Tap OK to confirm.
Chapter 5: Using Internet
5.1 Browsing Web Pages
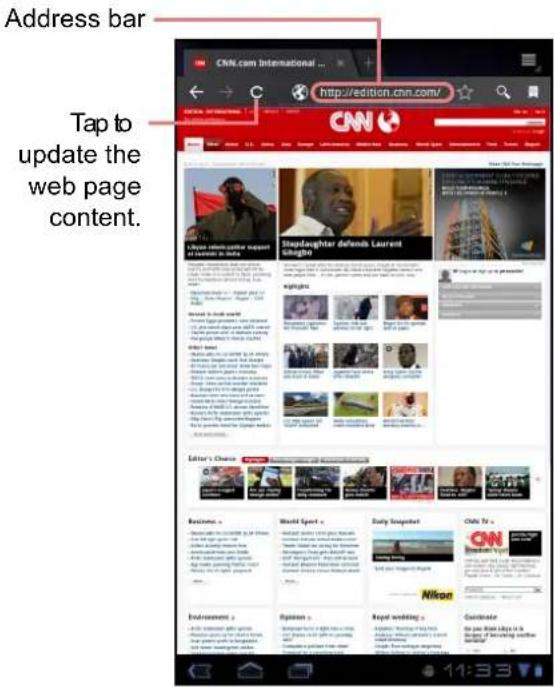
- From the Home screen, tap > App browser.
- Tap the address bar.
- Type the URL. As you type, a list of URL suggestions appears on the screen.
- Tap a match item in the list.
To scroll the page
To scroll up or down, swipe your finger down or up. To scroll left or right, tap and swipe your finger to the right or left.
To set Home page
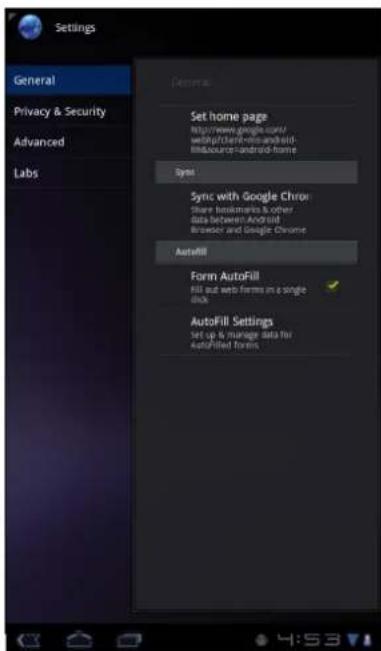
- While viewing a web page, tap > Settings > Set home page.
- Enter the URL of the page that you want to set as home page.
- Select Current page or Default page.
- Tap OK to save your settings.
Managing web pages
While viewing a web page, tap → configure the browser settings:
- General: Select to set home page, and configure sync data and autofill settings.
- Privacy & Security: Select to configure privacy and security settings including cache, history, cookies, form data, location, and etc.
- Advanced: Select to set search engine, open in background, enable JavaScript, enable plug-ins, advanced settings for individual website, page content settings, and reset all settings to the factory default.
• Labs: Select to set quick control access and show the most visited pages.
Chapter 6: Google Apps
The following sections cover Android and Google applications that come pre-installed on your device.
6.1 Gmail
Gmail is the email service provided by Google.
Signing in to Gmail
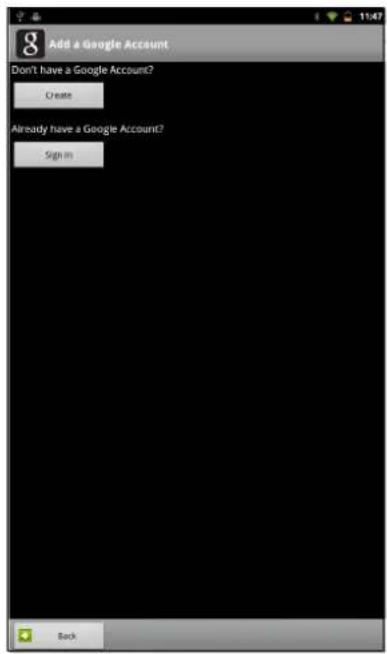
- From the Home screen, tap 📄
- Tap Create or Sign in your Google account.
- Follow the on-screen instructions to login or create your Gmail account.
- Once logged in, you can begin reading and sending emails from your Gmail account.
Refreshing Gmail
- From the Home screen, tap >K app til.
- Tap Menu > Refresh.
Creating and sending emails
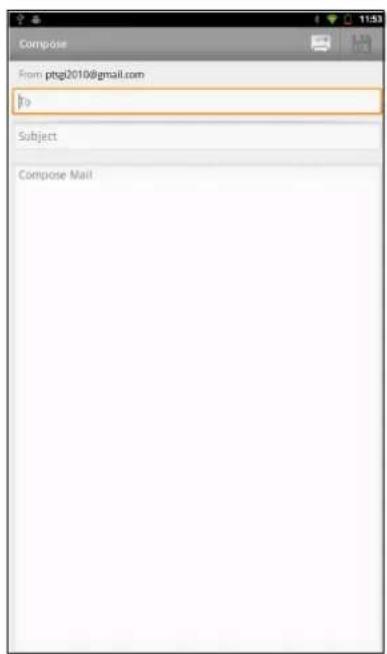
- From the Home screen, tap 📄 Add-inil.
- Tap Menu > Compose.
- Enter the recipient.
- Enter the subject and compose your message.
- If necessary, do any of the following:
• To add Cc/Bcc, tap Menu > Add Cc/Bcc.
• To attach files, tap Menu > Attach. -
To save as draft, tap or tap Menu > Save draft.
-
Tap to send the email.
Reading and replying to emails
- From the Home screen, tap 🎨 Aosnil.
- Tap an email to read.
- To reply, tap (Reply) or (Reply all).
- Compose your message.
- Tap to send the email.
To preview and download attachments
- From the Home screen, tap 📄 Appsil.
- Tap an email to read.
- Scroll to the end of the email and do any of the following:
• To preview an attachment, tap Preview.
• To download an attachment, tap Download.
Forwarding emails
- From the Home screen, tap
- Tap an email to open.
- To forward, tap .→
- Enter the recipient.
- Tap to send the email.
Managing emails
To delete emails
- From the Home screen, tap >Hosil.
- Tap and hold an email, then tap Delete.
To add a star to emails
- From the Home screen, tap >Hopsil.
- Tap the star icon.
To select emails
- From the Home screen, tap > [GPS]
- Tap the check icon.
To mark emails as read or unread
- From the Home screen, tap >H AOSil.
- Tap and hold an email, then tap Mark read or Mark unread.
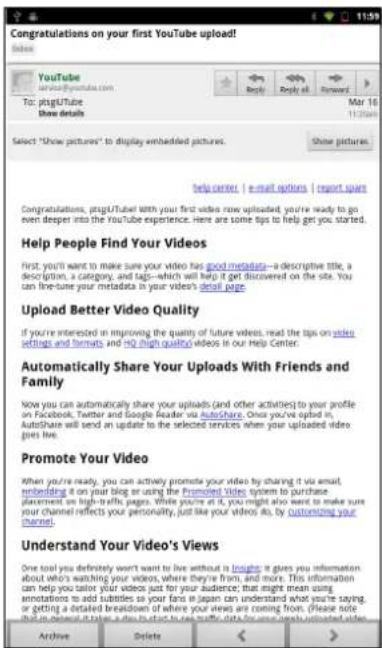
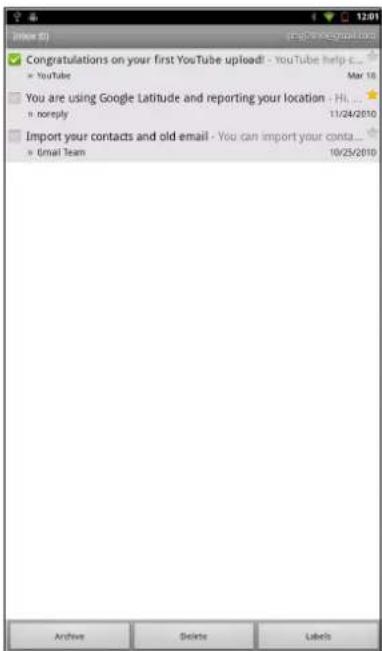
To place emails in archive
- From the Home screen, tap >AOSnil.
- Tap and hold an email, then tap Archive.
To mute emails
- From the Home screen, tap >K appnil.
- Tap and hold an email, then tap Mute.
To change labels of emails
- From the Home screen, tap >K appril.
- Tap and hold an email, then tap Change labels.
- Tap a label, then tap OK.
Viewing folder labels
- From the Home screen, tap >Hoolil.
- Tap Menu > Go to labels.
Searching for emails
- From the Home screen, tap
- Tap Menu > Search.
- Type the text to search, then tap

Configuring Gmail settings
- From the Home screen, tap >H 2005 til.
- Tap Menu > More > Settings.
- Tap one of the following settings:
![Inbox Sync 4 days Starred ★ Chats Sent Sync 4 days Outbox Drafts Sync all All Mail Spam Trash [Imap]/Trash Personal Receipts Travel Work](/content/2026/05/884681/images/bd84243d44ecaa12f73ee559a3078c55ab738531662a5834aa2fa98e82365252.jpg)
• Signature: Add a text signature to your outgoing emails.
- Confirm actions: Prompt for confirmation before archieving, deleting, or sending emails.
- Reply all: Make "Reply all" as the default when replying emails.
- Auto-advance: Select which screen to show after you delete or achieve a conversation.
- Message text size: Set the font size used in emails.
- Batch operations: Allow label operations on more than one conversation.
- Clear search history: Remove all the searches you have performed.
- Labels: Select which labels are synchronized.
- Email notifications: Displays a notification icon on the status bar when an email is received.
- Select ringtone: Select email notification ringtone.
• Vibrate: Enable the device to vibrate when an email is received.
- Notify once: Notify once for new email, not for every new email.
6.2 Talk
Use Google Talk to chat with your friends who also have Google accounts.
Signing in to Google Talk
-
From the Home screen, tap
-
Select an account and tap Sign in.
If you log in for the first time, enter your username and password, then tap Sign in.
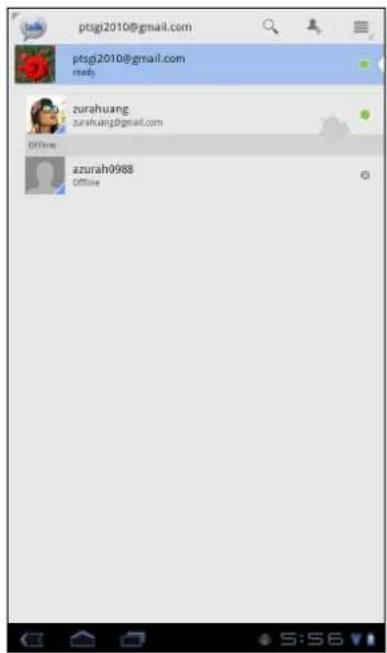
Google Talk options
Once logged in, you can begin using Google Talk and do any of the following:
• To view friends list, tap >All friends.
• To add friends to friend's list, tap .
• To search a person, tap .
• To sign out, tap > Sign out.
- To configure Google Talk settings, tap >Settings.
• To block a person, tap and hold an account and tap Block friend.
• To close all chats, tap ≡ > Close all chats.
Starting chat
- From the Home screen, tap
- Tap a friend on your friends list.
- Type your message, then tap .
Chatting Options
The following options can be accessed when a chat window is opened:
• To start video chat, tap >Chat off record.
• To chat off record, tap >Chat off record.
- To switch chats, tap >Switch chats.
• To view the Friends list window, tap □ > Friends list.
• To invite another friend to join the chat, tap ■ > Add to chat.
• To close the chat, tap >End chat.
• To clear previous chat history, tap □ > Clear chat history.
• To insert smileys, tap >Insert smiley.
• To view your friend's profile, tap □ > View in contacts.
Configuring Google Talk settings
- From the Home screen, tap

-
Tap > Settings.
-
Tap one of the following settings:
-
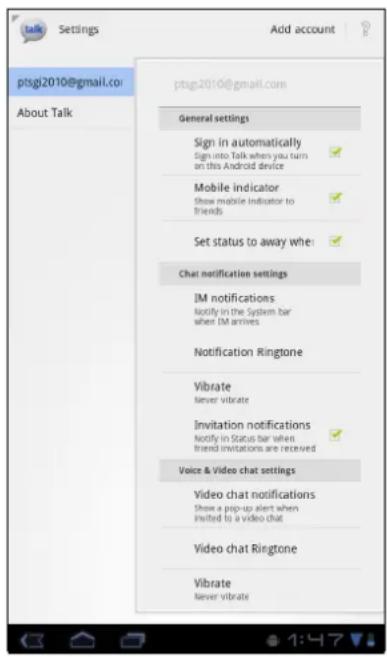
Sign in automatically: Enable to automatically sign in when Google Talk is opened.
- Mobile indicator: Enable to show mobile indicator to your friends.
- Set status to away when screen is turned off: Enable to set status to away when the screen is turned off.
- IM notifications: Enable to display a notification icon when an instant message is received.
- Notification Ringtone: Select the ringtone to use when an instant message is received.
- Vibrate: Enable to vibrate when an instant message is received.
-
Invitation notifications: Enable to display a notification icon when friends invitations are received.
-
Video chat notifications: Enable to display a notification icon when a video chat invitation is received.
- Video chat Ringtone: Select the ringtone to use when a video chat invitation is received.
• Vibrate: Enable to vibrate when a video chat invitation is received. - Blocked friends: View the blocked friends list.
- Clear search history: Clear previous Google Talk chat searches from showing up in the Search box.
- Manage account: Set the general sync settings and manage accounts.
6.3 Maps
Use Google Maps™ to find places, view traffic and direction information, and find your friends' location.
Before starting Maps ^TM , do the following:
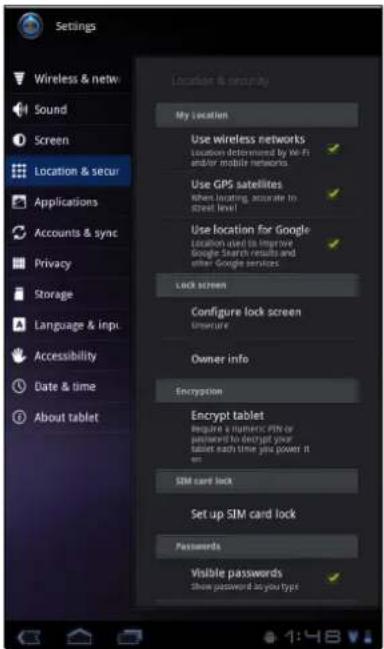
- From the Home screen, tap > Location & security.
- Tap to enable Use wireless networks.
- Tap to enable Use GPS satellites.
Viewing Map
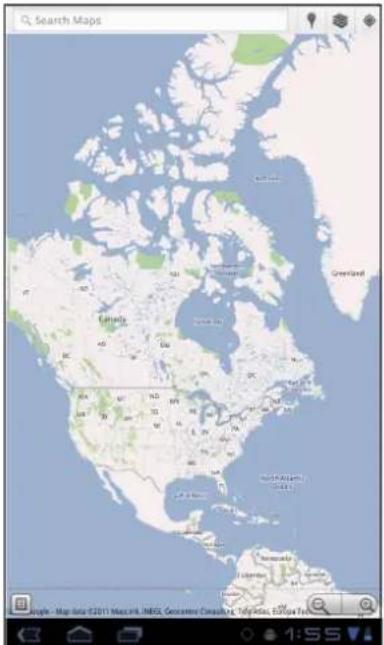
- From the Home screen, tap >Haps.
-
Do any of the following:
-
Tap and hold an area on the map to view the address.
- Slide your finger on the screen to scroll the map.
- Tap the zoom controls to zoom in or out.
- To select nearby attractions, tap then tap the desired category.
• To select Map mode, tap then tap Traffic, Satellite, Terrain, Buzz, Latitude, My Maps, Wikipedia, Transit Lines, or Favorite Places.
• To find your location, tap
- To search for a place of interest, tap the Search Maps box then type in a keyword to begin search.
• To get direction, tap the address box and tap

Finding places
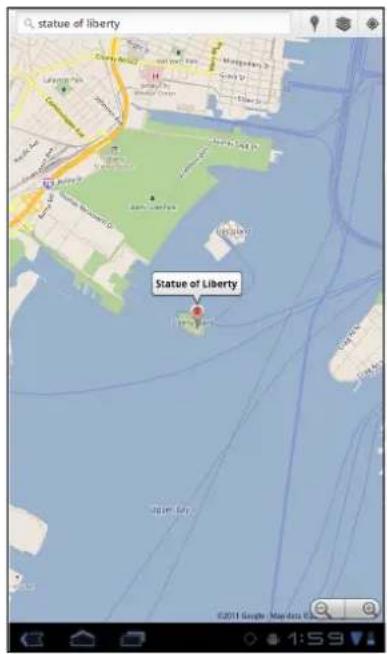
- From the Home screen, tap >Hans.
- Tap the Search Maps box.
- Type the place to search on the text field.
- Tap .
A callout appears to indicate the location of the searched place.
6.4 Navigation
Google Maps Navigation allows you to say the destination and get voice directions.
NOTE: Not available in all locations.
Before starting Navigation, do the following:
- From the Home screen, tap Apps > Settings > Location & security.
- Tap to enable Use wireless networks.
- Tap to enable Use GPS satellites.
Getting directions
- From the Home screen, tap navigation.
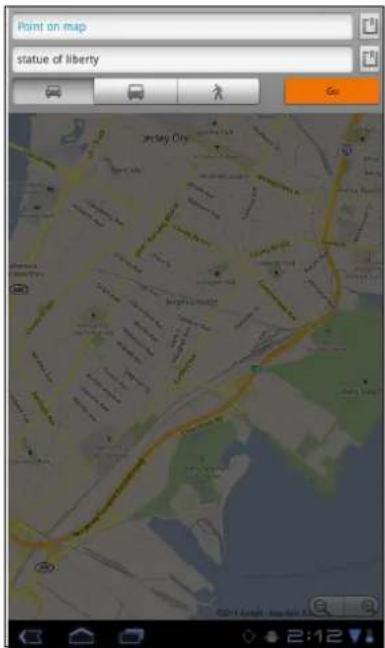
- Enter the starting point and the ending point, or tap the corresponding □ and select an option.
- Select a direction icon.
• : Driving directions
• : Transit directions
• : Walking directions
- Tap to view the directions.
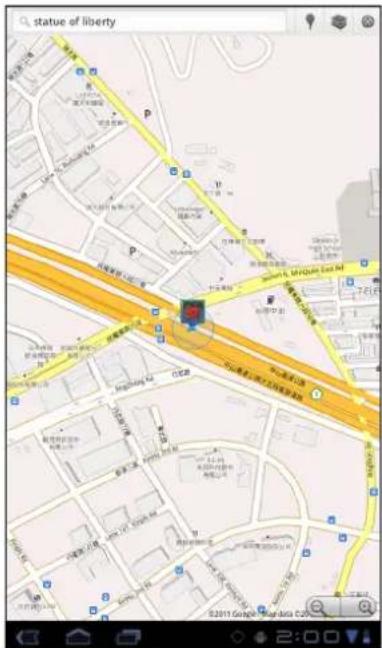
Finding your current location
-
From the Home screen, tap >1 tap gation.
-
Tap to view your location on the map.
A blue blinking arrow indicates your current location on the map.
6.5 Latitude
With Latitude, you can view your friends' location and share your location to them on Google Maps™.
Starting Latitude
-
From the Home screen, tap >Lapitude.
-
Do any of the following:
• To add friends, tap .
• To refresh your friends list, tap .
• To share your current location with your friends, tap and select a place from the available list.
• To view the map, tap your account > .
- To change your privacy settings, tap your account > Edit privacy settings.
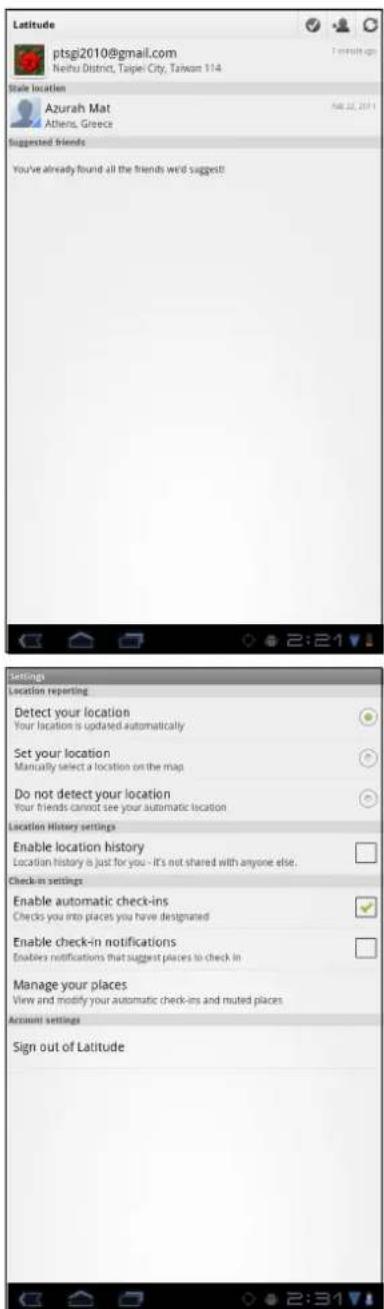
Configuring privacy settings
- From the Home screen, tap ▷batitude.
- Tap your account > Edit privacy settings.
-
Tap one of the following:
-
Detect your location: Select to automatically update your location.
- Set your location: Select to manually set your location on the map.
- Do not detect your location: Select to hide your location from your friends.
- Enable location history: Select to store your previous locations and visualize them on the Latitude website.
- Enable automatic check-ins: Select to enable you to check in at places that you chose.
- Enable check-in notifications: Select to enable notifications that suggest places to check in.
- Manage your places: Select to manage and modify your automatic check-ins and muted places.
• Sign out of Latitude: Tap to sign out from Latitude.
6.6 Market
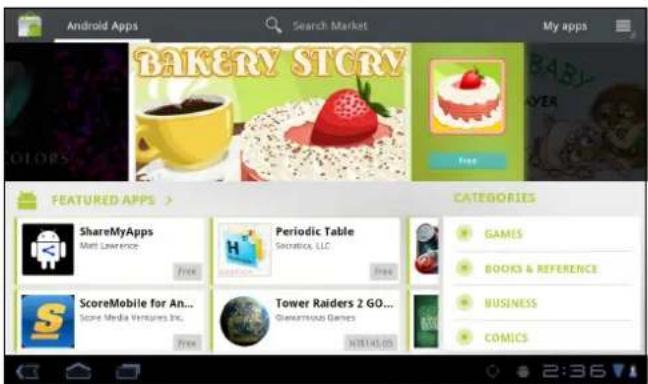
Android Market™ allows you to purchase and download games and other applications to your device.
When opening Android Market for the first time, the Terms of Service is displayed on screen. Tap Accept to accept the terms and continue.
NOTE: Android Market may not be supported in some countries.
Searching for applications
- From the Home screen, tap >Market.
-
To browse for an application, tap a category to view available applications.
-
To search, tap Search Market box.
-
Type the application name, then tap

Downloading applications
- From the Home screen, tap > Market.
- Search for desired application.
- Tap the application that you want to download.
- Tap DOWNLOAD > OK.
Removing applications
- From the Home screen, tap > Market.
- Tap My areist of downloaded applications are displayed on screen.
- Tap the application that you want to remove.
- Tap Uninstall.
6.7 Places
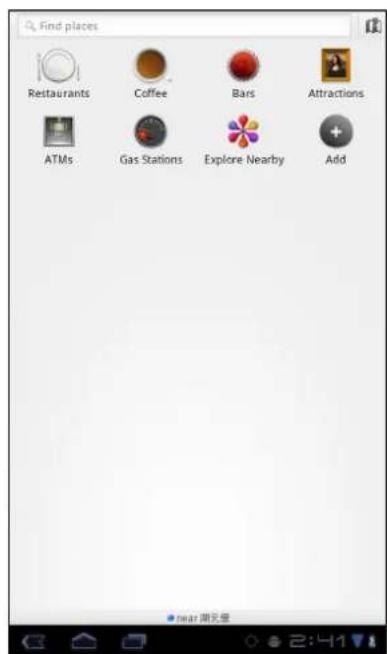
Places is a location-based application that helps you find the places and things around you. Local information available includes restaurants, coffee shops, bars, hotels, attractions, ATMs, gas stations, and more. This application also helps you get where you are going with maps and directions.
From the Home screen, tap
6.8 Google Search
From the Home Screen, you can search information on your device and on the web with Google Search right away.
Searching information by entering text
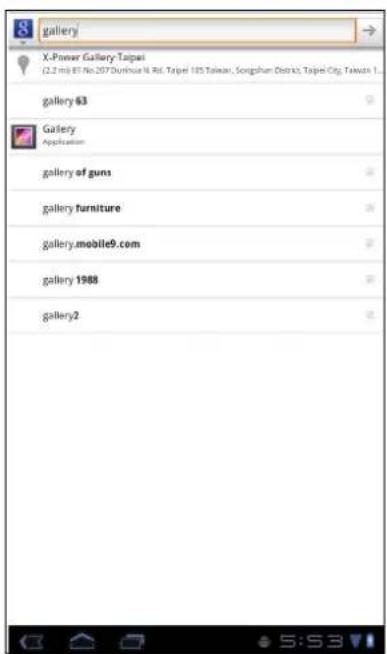
- From the Home screen, tap Google Search or tap Google Search widget.
- Enter the text you are searching in the Quick Search box.
- As you type, matching items on your device and suggestions from Google web search are added to the list of previously chosen search results. Tap a match item in the list.
- If what you are searching is not in the list, tap in the Quick Search box. The Browser opens, displaying results of a Google search on the web.
6.9 Voice Search
Speak your query to search item on Google, or for applications or contacts on your device.
-
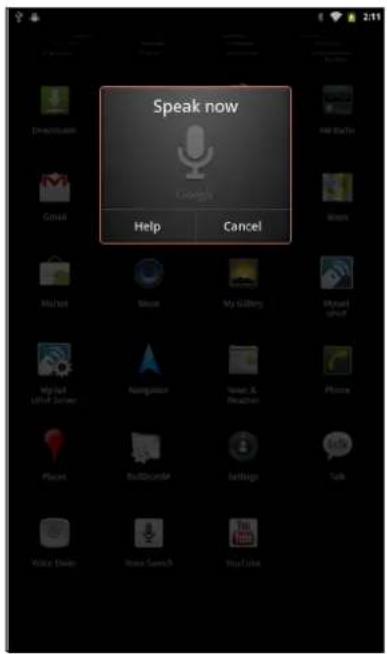
From the Home screen, tap 📄 from the Search or tap in the Quick Search box.
-
A dialog opens, prompting you to speak the words that you want to search for.
- When you are finished speaking, Voice Search analyzes your speech and displays the results of your search.
If Voice Search misunderstands you, Quick Search Box presents a list of similar-sounding search terms.
6.10 YouTube
YouTube allows you to watch, upload, and download videos to your device.
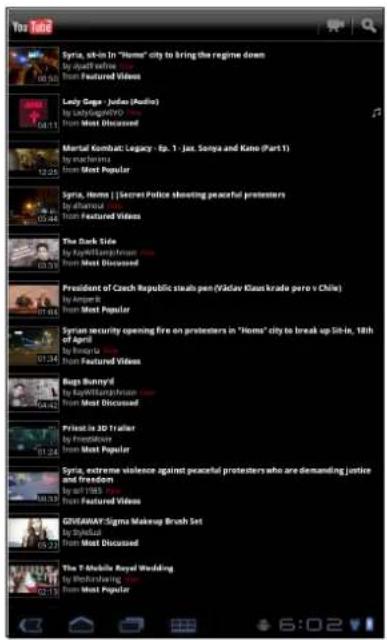
Watching videos
- From the Home screen, tap 🎨 Acts Tube.
- Tap a video to start playback.
Uploading videos
- From the Home screen, tap 🎨AopsTube.
- Tap to record your video.
- Sign in to your YouTube account.
- Follow the on-screen instructions to upload your video.
Searching videos
- From the Home screen, tap 🎨AcidsTube.
- To search for videos, tap
- Type the keyword to search.
- Tap .
Chapter 7: Using Bluetooth
Bluetooth modes
- On: Bluetooth is turned on. Your device detects other Bluetooth devices, but your device is not visible to others.
• Discoverable: Bluetooth is turned on and your device is visible to other Bluetooth devices. - Off: Bluetooth is turned off.
To turn Bluetooth on or off
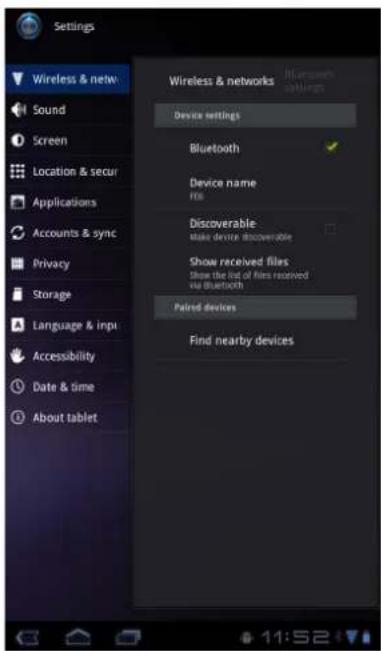
- From the Home screen, tap Apps > Settings > Wireless & networks.
- Tap Bluetooth check box to activate the Bluetooth function.
- To make your device visible to others, tap Bluetooth settings > Discoverable check box to make this device visible to other devices.
7.1 Connecting to Bluetooth Devices
A connection to a Bluetooth device is called a partnership. You need to pair and create a partnership with a Bluetooth device to exchange information.
-
From the Home screen, tap > Wireless & networks.
-
Tap Bluetooth settings to view the menu options.
- To search for a new device, tap Scan for devices.
- Tap a detected device.
- To start pairing, enter the PIN and tap OK.
NOTE:
- The PIN of the device must be the same PIN on the other bluetooth device.
-
On some devices, tap Pair to start pairing.
-
The paired bluetooth device name is displayed.
NOTE: Once a partnership has been created, connecting to that device again will no longer require entering the PIN.
Chapter 8: Multimedia Applications
8.1 Videos and Photos
This device is equipped with rear and front cameras to take photos and videos. By default, your device uses the rear camera to take photos or record videos. To switch to front camera, tap > Front or tap Menu > Switch Camera.
Recording a video
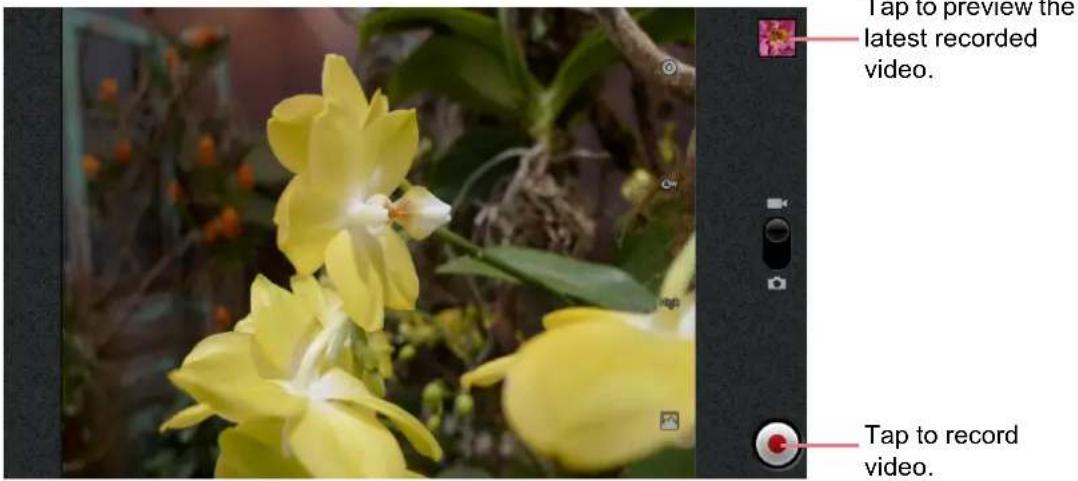
-
From the Home screen, tap 📄 scpcorder.
-
Aim the device at the subject.
-
To start recording, tap
To stop recording, tap


Taking a photo
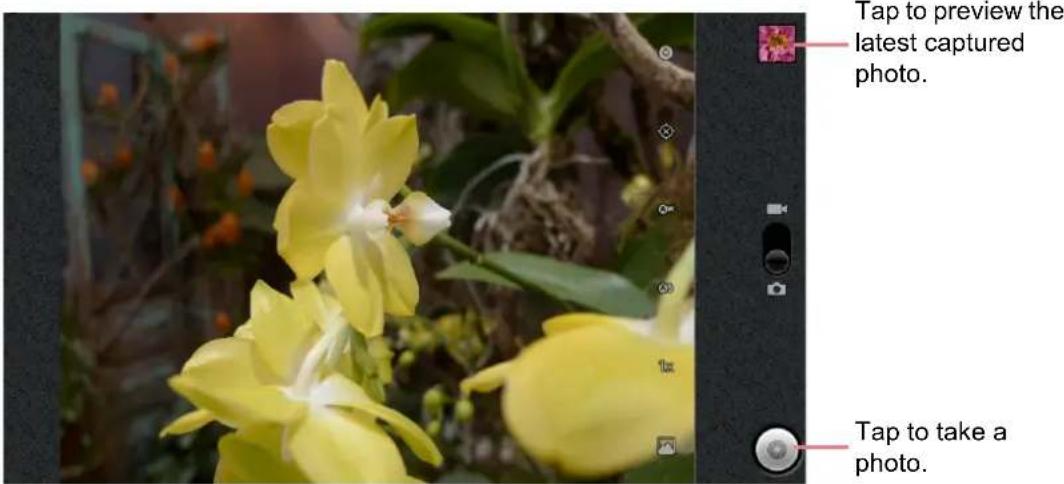
- From the Home screen, tap 📄 camera.
- Aim the device at the subject.
- Tap to take the shot.
To focus on the image before taking the shot, tap and hold 🔒. The focus frame turns green to indicate that the focus is set.
Reviewing a video
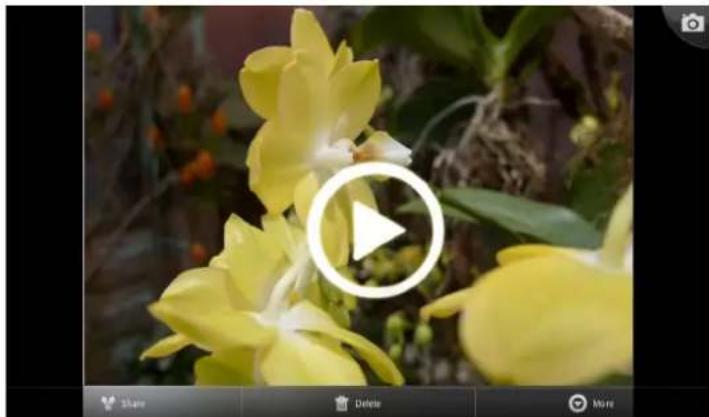
After recording a video, tap the window located at top right corner to preview the latest recorded video on the screen.
- Tap to play the video.
- Tap Share to share the video via Bluetooth, YouTube, Messaging, Email, or Gmail.
- Tap Delete to delete the video.
- Tap More to view the video details or set the slideshow settings.
- Tap to return to Camera mode.
natural_image
Close-up of yellow flowers with a white play button overlay (no text or symbols on the flower image)Reviewing a photo
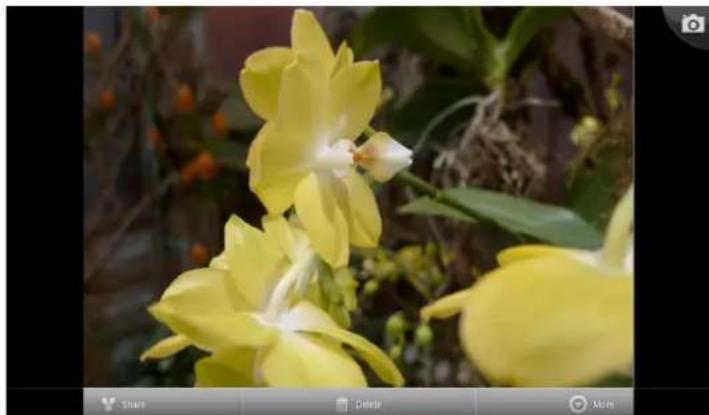
After taking a photo, tap the window located at top right corner to preview the latest captured photo on the screen.
- Tap Share to share the photo via Bluetooth, Picasa, Messaging, Email, or Gmail.
- Tap Delete to delete the photo.
- Tap More to view photo details, set the photo as Contact icon/Wallpaper, crop the photo, rotate the photo to the left/right, or set the slideshow settings.
- Tap to return to Camera mode.
natural_image
Close-up of yellow flowers with green foliage in the background (no text or symbols visible)Configuring camera settings
Tap the icon (on the right side of the screen) to access the respective camera/camcorder menu. Swipe your finger up and down to scroll the page for more options.
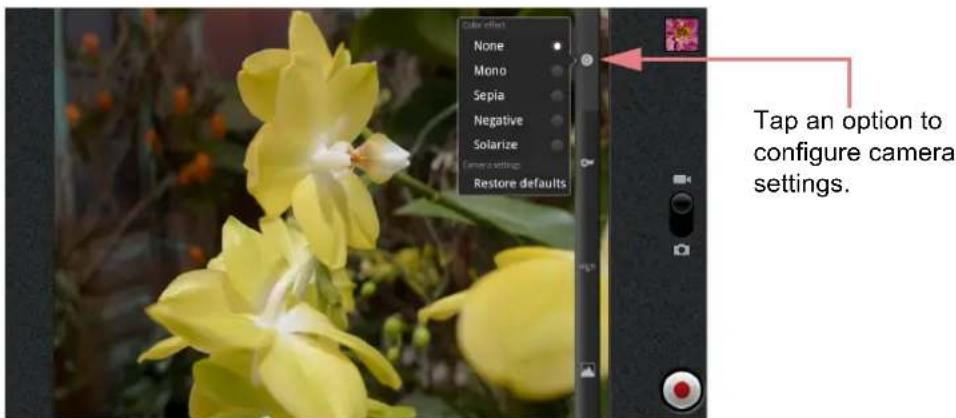
Tap to view and adjust the general settings of your camera:
| Mode Setting Available options | |
| Video mode | Color effect None, Mono, Sepia, Negative, Solarize |
| Restore defaults OK, Cancel | |
| White balance Auto, Incandescent, Daylight, Fluorescent, Cloudy | |
| Video quality High (30m), Low (30m), YouTube (High, 10m) | |
| White balance Auto, Sunny, Cloudy, Incandescent, Fluorescent | |
| Select camera Back, Front | |
| Photo mode | Focus mode Auto, Infinity, Macro |
| Exposure +2, +1, 0, -1, -2 | |
| Picture quality Super fine, Fine, Normal | |
| Color effect None, Mono, Sepia, Negative, Solarize | |
| Grid Off, On | |
| Shutter sound Off, On | |
| Restore defaults OK, Cancel | |
| Store location Off, On | |
| White balance Auto, Incandescent, Daylight, Fluorescent, Cloudy | |
| Flash mode Auto, On, Off | |
| Zoom 1x ~ 6x | |
| Select camera Back, Front | |
8.2 Viewing Videos & Photos
Playing videos
- From the Home screen, tap > Gallery.
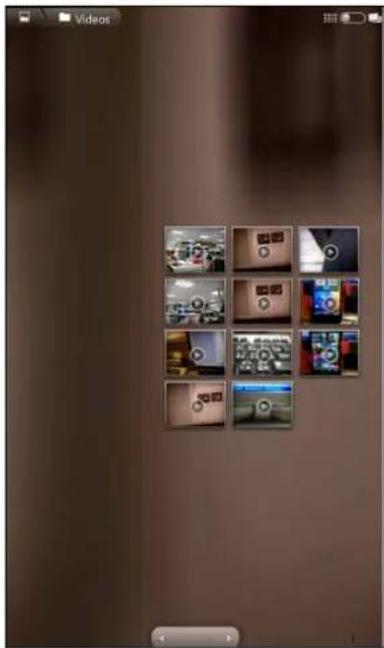
- Tap Videos folder to view the videos in thumbnails.
- Tap the video to playback.
natural_image
Grid of nine small video thumbnails on a plain background, no text or symbols visibleViewing photos
- From the Home screen, tap 📄 Honeyery.
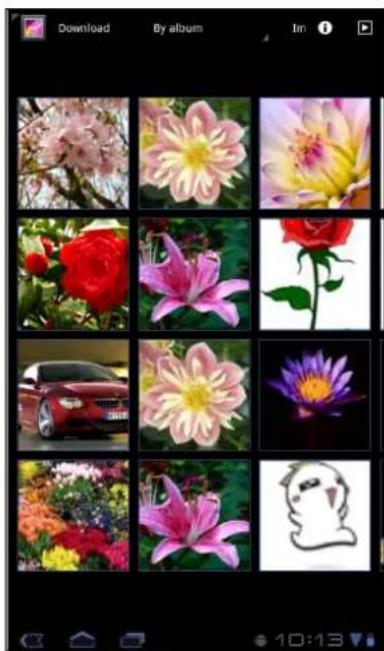
- Tap the desired folder to view the images in thumbnails.
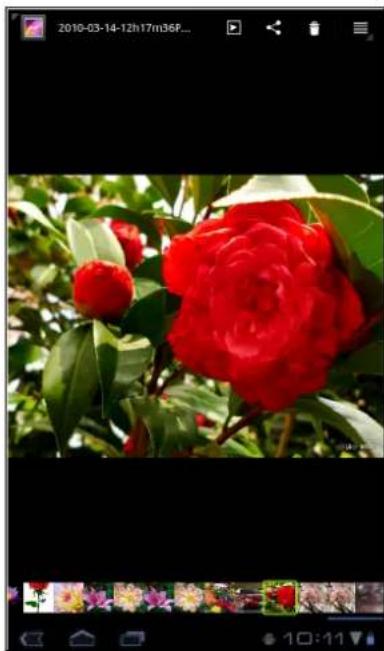
- Tap an image to view.
natural_image
Grid of 12 flower and rose images including pink, yellow, red, pink, purple, and pink lilies, displayed in a mobile photo editing app interface (no text or symbols on the images themselves)- Swipe your finger to the left/right to view the previous/next image.
• To play the slideshow, tap .
• To share the photo via Picasa, Bluetooth, Gmail, or Email, tap
- To delete the photo, tap . 📁 en, tap Confirm Delete to confirm file deletion.
- To edit the photo, tap show more options.
natural_image
Close-up of a vibrant red rose with green leaves in the background, captured in a photo editing interface (no text or symbols on the rose itself)8.3 Using Music Player
You can transfer music to the device from the computer. From the Home screen, tap Apps > Music.
Music screen
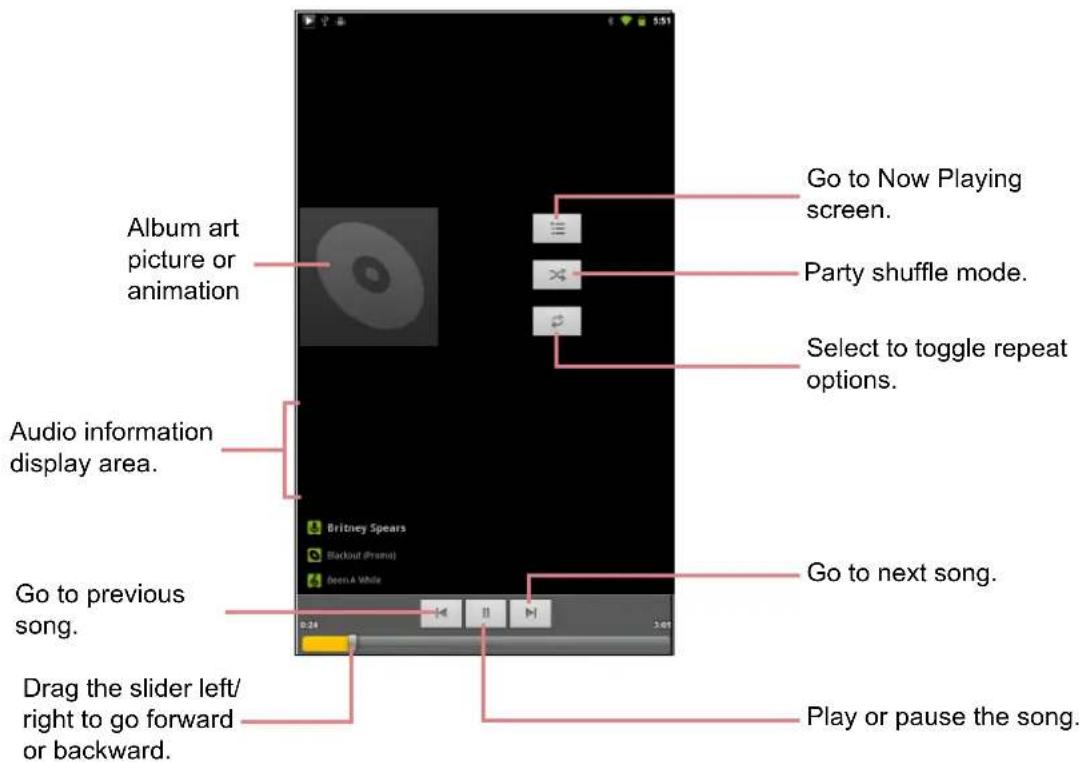
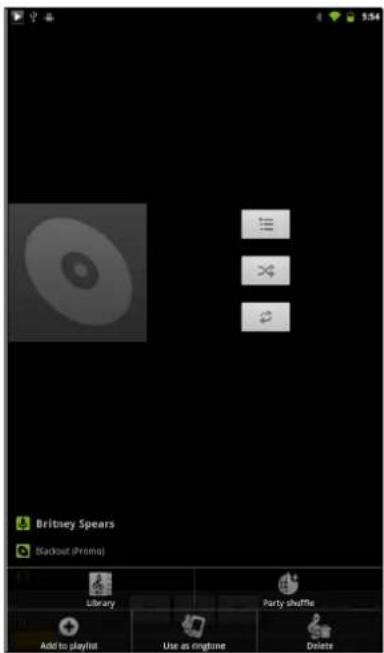
- Playback screen: Displays the playback area with the playback controls.
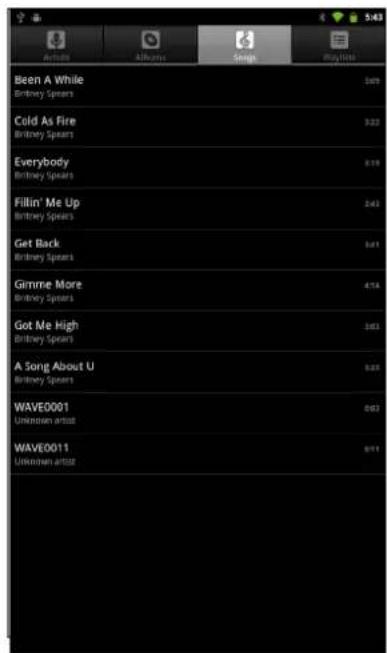
- Library screen: Displays folder categories to search for media files. It contains the following categories: Artists, Albums, Songs, and Playlists.
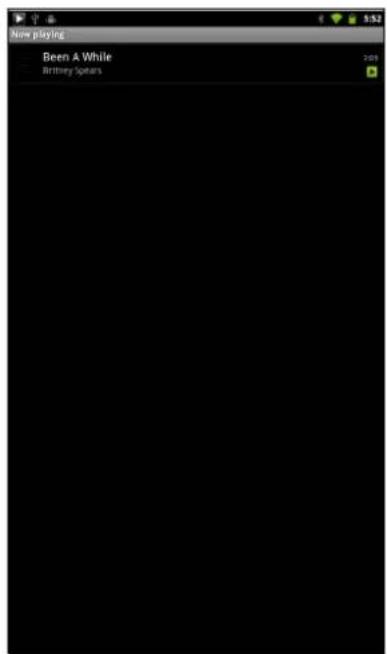
- Now Playing screen: Displays the song currently playing. Drag the media files to arrange the sequence for playback.
Playing music
To play music
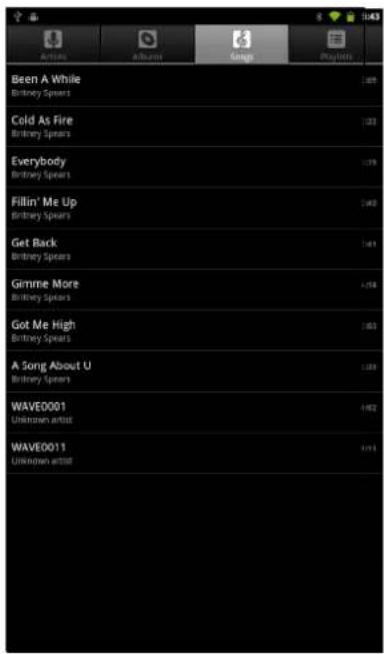
- From the Home screen, tap ▶ 4000c. The Library screen is displayed.
- Tap Songs to view the list of songs.
- Tap a song to play.
Changing playback options
While in Playback screen, tap Menu.
• To go to the Music Library screen, tap Library.
• To play songs in shuffle order, tap Party shuffle.
- To add a song to a preferred playlist, tap Add to playlist.
- To set a song as your ringtone, tap Use as ringtone.
• To delete a song, tap Delete.
Managing playlists
To add a music file to playlist
Add songs to a specific playlist or create a playlist.
- From the Home screen, tap >Music.
The Library screen is displayed. - Browse for the song that you want to add in a playlist.
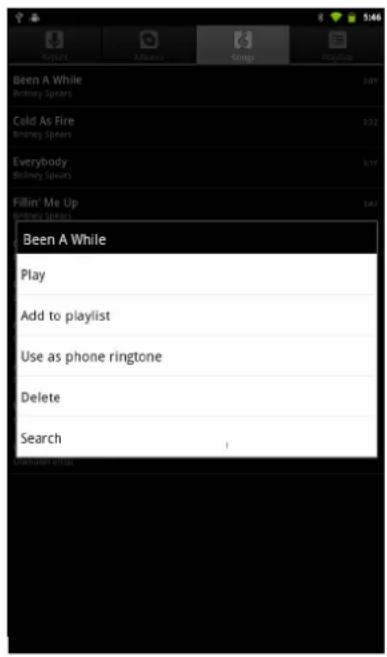
- Tap and hold the song.
- Tap Add to playlist.
- Select from the current playlist or tap New to create a new playlist. The song is added to the playlist.
NOTE: If you create a new playlist, enter the playlist name, then tap Save.
To remove a music file from playlist
- From the Home screen, tap >Music.
The Library screen is displayed. - Tap Playlists and browse for the playlist.
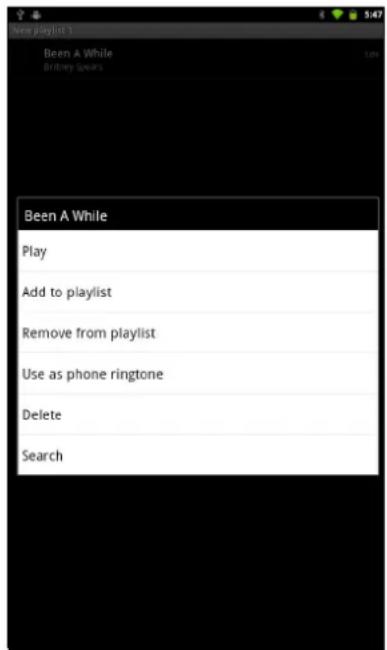
- Tap and hold the song that you want to remove from the playlist.
- Tap Remove from playlist.
The song is removed from the playlist.
Chapter 9: Programs
Your device comes with the following pre-installed programs.
| Programs Description | ||
 | Books Download ebooks from online catalog for viewing on your device. See page 51. | |
 | Browser Browse the web and download files from the Internet. See page 25. | |
 | Calculator Perform basic arithmetic functions, such as addition, subtraction, multiplication, and division. See page 51. | |
 | Calendar Create and track schedule or appointments. See page 52. | |
 | Camera Capture photos. See page 41. | |
 | Clock Set up alarms. See page 62. | |
 | Contacts Store names, numbers, email, and other information. See page 14. | |
 | Downloads View or delete the files that you have downloaded in Browser, Gmail, or Email. See page 53. | |
 | Email Send and receive email messages. See page 21. | |
 | File Browser Manage audio, video, photo, and other files. See page 53. | |
 | FM Radio Tune and listen to the radio. See page 54. | |
 | Gallery View and edit photos and videos. See page 44. | |
 | Gmail Access your Gmail account on your device. See page 27. | |
 | Google Search Search applications and contacts on your device, and the Internet using Google Search. See page 37. | |
 | Latitude See your friends' locations and share yours with them. You need to sign in with your Google account to use this feature. See page 35. | |
| Programs Description | ||
 | Maps View the map and get directions to your destination. See page 32. | |
 | Market Purchase games and other applications from Android Market and download them to your device. See page 36. | |
 | Music Play and manage music and audio files on your device. See page 45. | |
 | Navigation | Use to track your location, find places, and get driving directions to your destination. See page 33. |
| [0000] | Places Help you to find the places around you. Local information available includes restaurants, coffee shops, bars, hotels, attractions, ATMs, gas stations, and more. See page 37. | |
| [000] | Settings | Configure wireless settings and other general settings of your device. See page 58. |
| [007] | Spare Parts View device information and configure animations, font size, end button behaviour, haptic feedback, and compatibility mode settings. See page 56. | |
| [001] | Talk | Log in and chat with friends using Google Talk. See page 30. |
 | Voice Search Use Google Search by saying the word instead of typing them. See page 38. | |
 | YouTube Watch videos from YouTube on your device. See page 38. | |
9.1 Books
The Books program allows you to download ebooks from online catalog for viewing on your device.
Browsing an ebook
- From the Home screen, tap
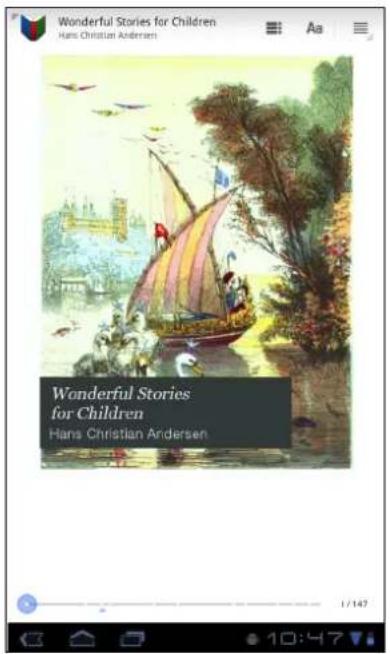
- Select an ebook and tap the book cover to start reading.
- Swipe your fingers right and left to flip to the previous and the next page.
• To view the table of contents, tap .
• To change the reader settings, tap . Aa - To view the book information or access on-line help, tap to show more options.
Downloading an ebook
- From the Home screen, tap >107ks.
- To add more ebooks to your library, tap toop browse on Google eBookstore or tap to search by book title or author name.
9.2 Browser
Open the Browser to view web pages. See "Browsing Web Pages" on page 25.
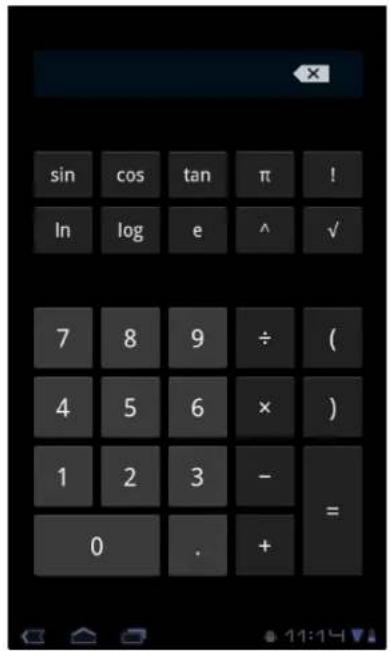
9.3 Calculator
With Calculator, you can perform basic arithmetic functions on your device.
- From the Home screen, tap 📄 Ap: culator.
- Use the on-screen calculator keypads to perform arithmetic calculation.
9.4 Calendar
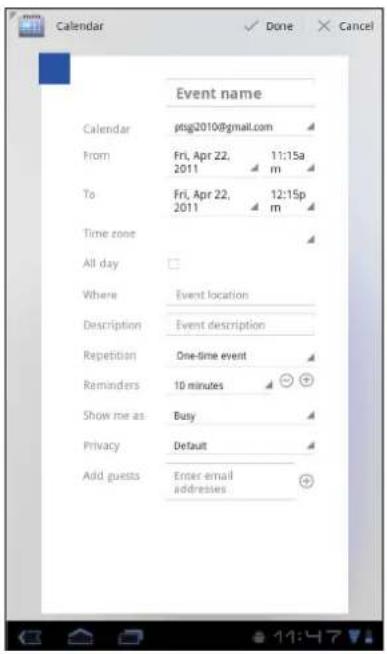
The Calendar lets you schedule and sound alarms for appointments, meetings and other events. Scheduled appointments for the day can be displayed on the Home screen.
To schedule an event
- From the Home screen, tap 📄️ 🐃 🐃 🐃 🐃 🐃 🐃 🐃 🐃 🐃 🐃 🐃 🐃 🐃 🐃 🐃 🐃 🐃 🐃 🐃 🐃 🐃 🐃 🐃 🐃 🐃 🐃 🐃 🐃 🐃 🐃 🐃 🐃 🐃 🐃
- Tap
- Enter the event details.
- Select the date and time for From and To fields.
NOTE: For an all-day event, check All day.
- To set repetition, select the repetition from the list.
- To set a reminder, select the time from the list.
- When finished, tap . √ Done
TIP: From the Calendar screen, tap and hold a day or a time slot then set a new appointment on the tapped date or time.
9.5 Camera
Capture photos with this device. See "Videos and Photos" on page 40.
9.6 Clock
Set alarms with this device. See "Alarms settings" on page 62.
9.7 Contacts
View or manage your contact list. See "Contacts" on page 14.
9.8 Downloads
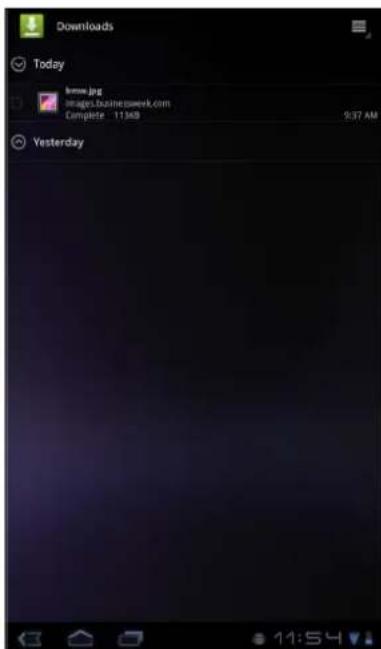
Use Downloads to view or delete what you have downloaded in Browser, Gmail, or Email.
NOTE: The downloaded files are stored in the "Download" folder in your memory card.
- From the Home screen, tap Download.
- Tap an image to view it.
Managing files
- To delete a file, tap the check box on the left side of the image. A green tick appears, tap Delete.
• To sort the file by size, tap ≡ > Sort by size. - To sort the file by time, tap >ort by time.
• To view files that have been downloaded earlier, tap the headings.
9.9 Email
Use Email to connect to your remote mailbox and retrieve your email messages from your device. See "Using Email" on page 21.
9.10 File Browser
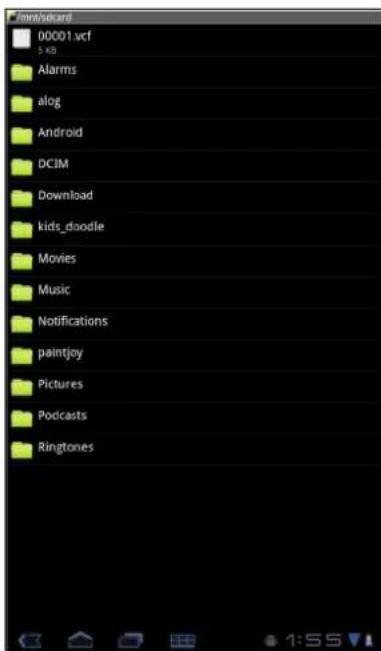
File Browser lets you browse the contents of your device and the memory card.
- From the Home screen, tap >> A13 Browser.
- Tap the folder list and tap the folder you want to explore.
Managing files and folders
- To open a folder or file, tap the file or folder.
• To move, delete, rename or view file or folder details, tap and hold to view the options. Then tap a desired option. - To copy, tap and hold a file or folder, then tap Copy. To paste a file or folder, tap ▶ Paste.
- To create a new folder, tap >New folder.
• To sort items, tap > Sort, then tap a sorting option.
- To mark a file or folder, tap >Mark.
• To copy all files and folders, tap 📄 > Copy all.
• To delete all files and folders, tap > More > Delete all.
• To search for a file, tap > More > Search.
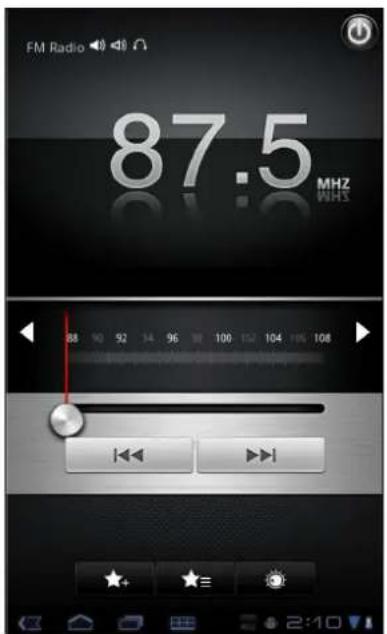
9.11 FM Radio
FM Radio lets you listen to the FM radio.
NOTE: You must connect a headset or an earphone to use this function.
-
From the Home screen, tap 🎨 Apps Radio.
-
Do any of the following:
• To manually tune to a frequency, tap on a desired frequency.
• To tune to another radio station, tap or ▶▶.

• To view the Favorite List, tap .
• To add the current radio station into the Favorite list, tap and then enter the station name and tap OK.
- To set the desired radio station frequency, tap 📷. Enter the radio frequency and tap OK.
- To turn on the speaker, tap ☐Speaker. - To mute the sound, tap ☐Mute.
• To change other radio settings, tap Settings.
9.12 Gallery
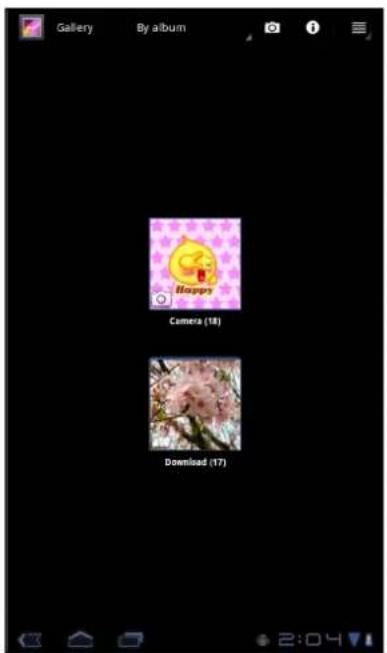
You can view your captured images, recorded video clips, and downloaded images in Gallery.
- From the Home screen, tap 🎨 Ametry.
- Tap the desired folder to view the camera pictures or camera videos.
The images or videos are displayed in thumbnails. - To view photos or videos, see "Viewing Videos & Photos" on page 44.
9.13 Gmail
Use Gmail to send and receive emails using your Google email account. See “Gmail” on page 27.
9.14 Google Search
Search information on your device and on the web with Google Search. See “Google Search” on page 37.
9.15 Latitude
Latitude allows you to keep track of your friends' location and share your location to them. See "Latitude" on page 35.
9.16 Maps
Use Maps to view the map and get directions to your destination. See "Maps" on page 32.
9.17 Market
Use Market to purchase and download games and other applications to your device. See "Market" on page 36.
9.18 Music
Use Music to play music files or recorded voice files. See "Using Music Player" on page 45.
9.19 Navigation
Use Navigation to locate your location and provide a real time turn by turn direction to your chosen destination. See "Navigation" on page 33.
9.20 Places
Places is a location-based application that helps you find the places and things around you. See "Places" on page 37.
9.21 Settings
In the Settings menu, you can view and make adjustments for wireless & network settings, device general settings and security settings. See “Device Settings” on page 58.
9.22 Spare Parts
With Spare Parts, you can view device information and configure animations, font size, end button behaviour, haptic feedback, and compatibility mode settings.
From the Home screen, tap ▶ Square Parts.
9.23 Talk
Use Talk to chat with your friends. See "Talk" on page 30.
9.24 Voice Search
Use Voice Search to say the words to search in the Internet using Google search engine. See “Voice Search” on page 38.
9.25 YouTube
Use YouTube to watch, upload, and view videos from YouTube using your device.
See "YouTube" on page 38.
Chapter 10: Managing Your Device
10.1 Device Settings
From the Home screen, tap Apps > Settings to view and adjust the settings of your device. Settings menu is categorized into: Wireless & networks, Sound, Screen, Location & security, Applications, Accounts & sync, Privacy, Storage, Language & input, Accessibility, Date & time, and About tablet.
Wireless & networks
| Application Description | |
| Airplane mode Disable all wireless connections. | |
| Wi-Fi settings | Manage Wi-Fi connections, scan and connect to available Wi-Fi networks. |
| Bluetooth settings | Manage connections, set device name, and discoverability of the device. |
| Tethering & portable hotspot | Share your device data connection via USB or as a portable Wi-Fi hotspot. |
| VPN settings Set up and manage Virtual Private Networks (VPNs). | |
| Mobile networks Set options for roaming, networks, and Access Point Names. | |
Sound
| Application Description | |
| Silent mode Turn silent mode on/off. All sounds except media and alarms are turned off. | |
| Vibrate | Device vibrates for incoming calls (only during Silent mode). |
| Volume Adjust the volume for media, notification, and alarms. | |
| Notification ringtone | Set your default notification ringtone. |
| Audible selection | Enable/disable sound when making screen selection. |
| Screen lock sounds | Play sounds when locking or unlocking the screen. |
| Haptic feedback | Play sound when pressing soft keys and on certain UI interactions. |
Screen
Application Description
Brightness Adjust the brightness of the screen.
Auto-rotate screen Switch orientation automatically when rotating the device.
Animation Show animation when opening and closing windows.
Timeout Adjust delay before the screen automatically goes off.
Location & security
Application Description
Use wireless networks Allow location to be determined by Wi-Fi and/or mobile networks
Use GPS satellites Enable GPS satellites.
Use location for Google Use location to improve Google Search results and other Google services.
Configure lock screen Set the lock screen with a pattern, PIN, or password.
Owner info Show owner info on the lock screen.
Encrypt tablet Set user to enter a PIN or password to decrypt your device each time you turn it on.
Visible passwords Show passwords as you type.
Device administrators Add or remove device administrators.
Use secure credential Allow applications to access secure certificates and other credentials.
Install from USD storage Install encrypted certificates from USB storage.
Set password Set or change the credential storage password.
Clear credentials Clear credential storage of all contents and reset its password.
Applications
Application Description
Manage and remove installed applications. applications
Running services View and control currently running services.
Storage use View storage used by applications.
Battery use View the battery usage on the currently running applications.
Application Description
Unknown sources Allow to install non-market applications.
Development Set options for application development.
Accounts & sync
Application Description
Background data Enable background data usage.
Auto-sync Automatically sync data.
Manage accounts Tap Add account to add an account to configure synchronization settings for Calendar, Contacts, and Gmail.
Privacy
Applications Description
Back up my data Back up the current settings and other application data.
Back up account Back up the account data for debugging purpose.
Automatic restore Automatically restore backed up settings and other data after application reinstallation.
Factory data reset Delete all data on the device and restore to factory default settings.
Storage
Application Description
Internal storage Show available device storage.
Language & input
Application Description
Select language Set the on-screen display language for your device.
User dictionary Add or edit user preset words to the dictionary.
Voice recognizer settings Set the voice recognizer settings.
Text-to-speech settings Set the text-to-speech settings.
Current input method Set on-screen keyboard input method.
Input method selector Set the input method selector setting.
Application Description
Configure input method Configure on-screen keyboard settings.
Accessibility
Application Description
Download accessibility Configure the settings for the downloaded application with an accessibility feature.
Date & time
Application Description
Automatic date & time Check to use network provided time.
Automatic time zone Check to use network provided time zone.
Set date Set the date.
Set time Set the time.
Select time zone Select the time zone of your current location.
Use 24-hour format Set the clock to 24-hour format.
Select date format Set the preferred date format.
About tablet
Check the system update and view device status, battery usage, legal information, model number, and software version.
10.2 Changing Basic Settings
Date and time settings
To automatically set date and time
- From the Home screen, tap Apps > Settings > Date & time.
- Tap Automatic date & time and Automatic time zone to automatically set the date and time according to the network.
To manually set date and time
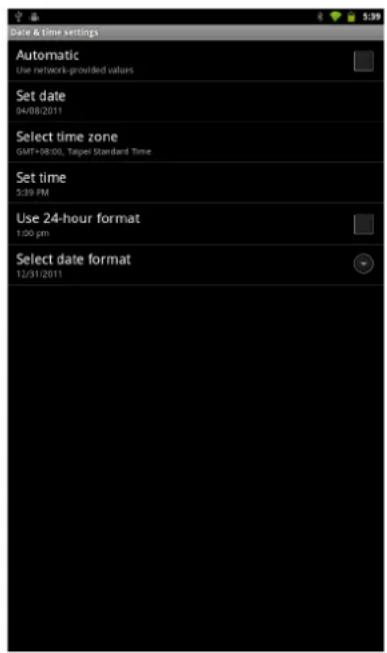
- From the Home screen, tap > Date & time.
-
Tap Set date to set the date.
-
To adjust the date, tap the month, day, or year field, and tap p or q to increase or decrease the value. Tap Set to apply the values.
-
To change the date format, tap Select date format, and select the date format from the list.
-
Tap Select time zone to select the time zone from the list.
-
Tap Set time to set the time.
-
To adjust the time, tap the hour, minute, second or AM/PM field, and tap + or - to increase or decrease the value. Tap Set to apply the values.
- To use 24-hour format, tap Use 24-hour format.
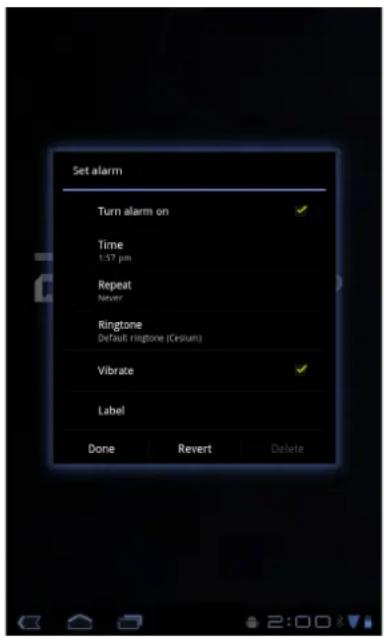
Alarms settings
You can set up alarms on this device.
To set the alarm
- From the Home screen, tap >Clock.
2.
- To add an alarm, tap Add alarm.
- Tap the p or q to set the alarm time, and tap Set.
- To set repeat mode, tap Repeat. Tap one or more options, then tap OK.
- To set the ringtone, tap Ringtone. Tap an option, then tap OK.
- To vibrate when alarm sounds, check Vibrate.
- To enter an alarm label, tap Label.
- After all settings are completed, tap Done.
Display settings
The display settings of this device affect the battery and external power level.
To turn off backlight when the device is idle
- From the Home screen, tap Apps > Settings > Screen.
- Tap Timeout.
- Select from the screen timeout list. Your setting is automatically saved.
To adjust brightness
- From the Home screen, tap Apps > Settings > Screen.
- Tap Brightness.
- Drag the Brightness slider to adjust brightness settings.
- Tap OK when finished.
To change the screen orientation
- From the Home screen, tap Apps > Settings > Screen.
- Tap Auto-rotate screen to automatically switch the screen orientation when rotating the device.
Ringtone settings
You can assign a default ringtone whenever a new notification is received.
To change the notification ringtone
- From the Home screen, tap Apps > Settings > Sound.
- Tap Notification ringtone.
- Tap the preferred ringtone from the list.
- Tap OK to confirm.
10.3 Using Wireless & networks
Wireless & networks allows you to manage Wi-Fi and Bluetooth, Tethering, and Virtual Private Networks (VPNs).
- From the Home screen, tap Apps > Settings > Wireless & networks.
- If necessary, do any of the following:
• To enable or disable Wi-Fi or Bluetooth, tap their corresponding boxes.
- To configure Wi-Fi or Bluetooth settings, tap Wi-Fi settings or Bluetooth settings.
- To share your device mobile data connection via USB or as a portable Wi-Fi hotspot, tap Tethering & portable hotspot.
• To set up and manage Virtual Private Networks (VPNs), tap VPN settings.
10.4 Protecting Your Device
You can protect your device from unauthorized users by requiring the PIN code or entering a password.
Screen lock protection settings
You can increase your device security by creating a screen unlock pattern (disabled by default). When enabled, you must draw the correct unlock pattern on the screen to unlock and regain access to the device.
- From the Home screen, tap Apps > Settings > Location & security.
- Tap Configure lock screen.
- Tap Pattern to draw pattern to unlock screen.
- Follow on-screen instructions to draw your own personal unlock pattern and tap Continue.
- Redraw your unlock pattern again and tap Confirm.
10.5 Resetting the Device
You can reset your device to its factory defaults.
- From the Home screen, tap Apps > Settings > Privacy.
- Tap Factory data reset.
- Tap Reset tablet to reset.
Specifications
Connectivity
GPS GPS / AGPS
Wi-Fi 802.11 b/g/n
Bluetooth 2.1 with EDR
USB USB 2.0 High-Speed client (micro-B type)
Power
Battery 2 cell battery pack (1600mAh, in series), unremovable
AC Adapter AC input voltage: 100-240Vac, 50/60Hz
AC input current: 200mAac max.
DC output voltage: 12Vdc (typical)
DC output current: 1A (typical)
Temperature
Operating -15°C to 55°C
Non-operating / Storage -20°C to 70°C
Charging 0°C to 40°C
Humidity
Operating 10% to 90% non-condensing
Non-operating / Storage 5% to 95% non-condensing
Customer Support
For technical support or product service, see the table below or contact your reseller.
NOTE: You will need the product serial number.
| Country/Region Website | T = TelephoneF = FAX | ||
| Australia/New Zealand | www.viewsonic.com.au | AUS= 1800 880 818NZ= 0800 008 822 | service@au.viewsonic.com |
| Canada www.viewsonic.com | T (Toll-Free)= 1-866-463-4775T (Toll)= 1-424-233-2533F= 1-909-468-3757 | service.ca@viewsonic.com | |
| Europe www.viewsoniceurope.com www.viewsoniceurope.com/uk/support/call-desk/ | |||
| Hong Kong www.hk.viewsonic.com T= 852 3102 2900 service@hk.viewsonic.com | |||
| India www.in.viewsonic.com T= 1800 266 0101 service@in.viewsonic.com | |||
| Ireland (Eire) | www.viewsoniceurope.com /uk/ | www.viewsoniceurope.com/uk/support/call-desk/ | service_ie@viewsoniceurope.com |
| Korea www.kr.viewsonic.com T= 080 333 2131 service@kr.viewsonic.com | |||
| Latin America (Argentina) | www.viewsonic.com/la/ T= 0800-4441185 soporte@viewsonic.com | ||
| Latin America (Chile) | www.viewsonic.com/la/ | T= 1230-020-7975 | soporte@viewsonic.com |
| Latin America (Columbia) | www.viewsonic.com/la/ T= 01800-9-157235 soporte@viewsonic.com | ||
| Latin America (Mexico) | www.viewsonic.com/la/ | T= 001-8882328722 | soporte@viewsonic.com |
| Renta y Datos, 29 SUR 721, COL. LA PAZ, 72160 PUEBLA, PUE. Tel: 01.222.891.55.77 CON 10 LINEASElectroser, Av Reforma No. 403Gx39 y 41, 97000 Mérida, Yucatán. Tel: 01.999.925.19.16Other places please refer to http://www.viewsonic.com/la/soporte/index.htm#Mexico | |||
| Latin America (Peru) | www.viewsonic.com/la/ | T= 0800-54565 | soporte@viewsonic.com |
| Macau | www.hk.viewsonic.com T= 853 2870 0303 service@hk.viewsonic.com | ||
| Middle East | ap.viewsonic.com/me/ | Contact your reseller | service@ap.viewsonic.com |
| Puerto Rico & Virgin Islands | www.viewsonic.com | T= 1-800-688-6688 (English)T= 1-866-379-1304 (Spanish)F= 1-909-468-3757 | service.us@viewsonic.comsoporte@viewsonic.com |
| Singapore/Malaysia/Thailand | www.viewsonic.com.sg T= 65 6461 6044 service@sg.viewsonic.com | ||
| South Africa | ap.viewsonic.com/za/ | Contact your reseller | service@ap.viewsonic.com |
| United Kingdom | www.viewsoniceurope.com /uk/ | www.viewsoniceurope.com/uk/support/call-desk/ | service_gb@viewsoniceurope.com |
| United States | www.viewsonic.com | T (Toll-Free)= 1-800-688-6688T (Toll)= 1-424-233-2530F= 1-909-468-3757 | service.us@viewsonic.com |
Limited Warranty
ViewSonic® ViewPad
What the warranty covers:
ViewSonic warrants its products to be free from defects in material and workmanship, under normal use, during the warranty period. If a product proves to be defective in material or workmanship during the warranty period, ViewSonic will, at its sole option, repair or replace the product with a like product. Replacement product or parts may include remanufactured or refurbished parts or components.
How long the warranty is effective:
ViewSonic ViewPad are warranted for at least 1 year for labor from the date of the first customer purchase.
Who the warranty protects:
This warranty is valid only for the first consumer purchaser.
What the warranty does not cover:
- Any product on which the serial number has been defaced, modified or removed.
- Damage, deterioration or malfunction resulting from:
a. Accident, misuse, neglect, fire, water, lightning, or other acts of nature, unauthorized product modification, or failure to follow instructions supplied with the product.
b. Any damage of the product due to shipment.
c. Removal or installation of the product.
d. Causes external to the product, such as electric power fluctuations or failure.
e. Use of supplies or parts not meeting ViewSonic's specifications.
f. Normal wear and tear.
g. Any other cause which does not relate to a product defect.
-
Any product exhibiting a condition commonly known as "image burn-in" which results when a static image is displayed on the product for an extended period of time.
-
Removal, installation, one way transportation, insurance, and set-up service charges.
How to get service:
- For information about receiving service under warranty, contact ViewSonic Customer Support (Please refer to Customer Support page). You will need to provide your product's serial number.
- To obtain warranty service, you will be required to provide (a) the original dated sales slip, (b) your name, (c) your address, (d) a description of the problem, and (e) the serial number of the product.
- Take the original container to an authorised ViewSonic Service Centre or use the prepaid product freight option to ship to ViewSonic directly.
- For additional information or the name of the nearest ViewSonic service center, contact ViewSonic.
Limitation of implied warranties:
There are no warranties, express or implied, which extend beyond the description contained herein including the implied warranty of merchantability and fitness for a particular purpose.
Exclusion of damages:
ViewSonic's liability is limited to the cost of repair or replacement of the product.
ViewSonic shall not be liable for:
- Damage to other property caused by any defects in the product, damages based upon inconvenience, loss of use of the product, loss of time, loss of profits, loss of business opportunity, loss of goodwill, interference with business relationships, or other commercial loss, even if advised of the possibility of such damages.
- Any other damages, whether incidental, consequential or otherwise.
- Any claim against the customer by any other party.
- Repair or attempted repair by anyone not authorized by ViewSonic.
4.3: ViewSonic TPC Warranty TPC_LW01 Rev. 1e 08-06-10
A
Address bar 25
Adjust brightness 62 date and time 61
Assign notification ringtone 62
B
Battery Charge 3
Bluetooth 39 connecting 39
Books 51
Browser 51
C
Camcorder 51, 52, 53, 54, 55
Camera settings 42
D
Device protect 63 reset 63 settings menu 56
device settings menu 56
Device settings 57
Display backlight 62 brightness 62 orientation 62
E
Email 20
F
File managing 53
File Browser 53, 54
FM 54
FM Radio 54
Folders managing 53
G
Gallery 55 Google Talk 56
H
Headset 4 Home screen 6
|
Icons Status Bar 7 Internet 25 connecting 25
K
Keyboard on-screen 17
L
Latitude 55
M
Maps 55 Market 55 Micro USB port 2 Music 56 Music Player 45, 56
N
Navigation 56
P
Photo taking photos 41
Places 56
Power button 2 turn on and off 4
Programs 49
s
Screen orientation 62
Settings 56 alarms 61 basic 61 date and time 61 display 62 keyboard 18 ringtone 62
T
Text entering 17
U
Unlock screen 5
Using 21
V
Video
recording 40
viewing 41, 42
Voice Dialer 56
Voice Search 56
Volume
adjusting 11
slider 2
W
Wireless & networks 62
Y
YouTube 56

natural_image
Three colorful bird figurines perched on a green branch against a red background (no text or symbols)ViewSonic®
- FCC SAR information
- Canada Statement
- CE Conformity for European Countries
- CE SAR Information
- Following information is only for EU-member states:
- European Union Regulatory Conformance
- Products with 2.4-GHz Wireless LAN Devices France
- Caution:
- Declaration of RoHS Compliance
- Important Safety Instructions
- Copyright Information
- Intellectual Property Right Information
- Product Registration
- For Your Records
- Product disposal at end of product life
- Chapter 1: Getting Started.... 1
- Your Device.... 1
- Accessories 2
- Installing Memory Card.... 3
- Charging Battery 3
- Using Headsets 4
- Turning the Device On or Off 4
- Unlocking the Screen.... 5
- Chapter 2: The Basics.... 6
- Home Screen 6
- Adjusting Volume.... 11
- Setting up Wi-Fi 12
- Contacts 14
- Chapter 3: Entering Information 17
- On-Screen Keyboard.... 17
- Configuring Keyboard Settings 18
- Using User Dictionary.... 19
- Chapter 4: Email.... 20
- Email Accounts 20
- Using Email.... 21
- Chapter 5: Using Internet 25
- Browsing Web Pages...... 25
- Chapter 6: Google Apps ...... 27
- Gmail 27
- Talk 30
- Maps 32
- Navigation.... 33
- Latitude 35
- Market.... 36
- Places 37
- Google Search 37
- Voice Search.... 38
- YouTube 38
- Chapter 7: Using Bluetooth.... 39
- Connecting to Bluetooth Devices.... 39
- Chapter 8: Multimedia Applications ...... 40
- Videos and Photos 40
- Viewing Videos & Photos 44
- Using Music Player 45
- Chapter 9: Programs.... 49
- Books 51
- Browser 51
- Calculator.... 51
- Calendar 52
- Camera 52
- Clock....52
- Contacts....52
- Downloads 53
- Email....53
- FM Radio 54
- Gallery 55
- Gmail 55
- Google Search 55
- Latitude 55
- Maps 55
- Market.... 55
- Music 56
- Navigation 56
- Places 56
- Settings 56
- Spare Parts 56
- Talk 56
- Voice Search.... 56
- YouTube 56
- Chapter 10: Managing Your Device.... 57
- Device Settings.... 57
- Chapter 1: Getting Started
- Your Device
- Top
- Headset jack:
- Power:
- Down
- Micro USB connector:
- Accessories
- Installing Memory Card
- To install the memory card
- To remove the memory card
- Charging Battery
- Charge the battery
- Using Headsets
- NOTE:
- Turning the Device On or Off
- To turn on your device
- To turn off your device
- To set your device to Sleep mode
- Unlocking the Screen
- To unlock the screen
- Chapter 2: The Basics
- Home Screen
- Extended Home screen
- Status Bar Icons
- Shortcut menu
- Customizing shortcut menu
- Using widgets
- Application drawer
- Setting wallpaper
- Set wallpaper from Wallpaper gallery
- Set wallpaper from My Gallery
- Adjusting Volume
- To adjust the volume
- Setting up Wi-Fi
- To turn Wi-Fi on or off
- To connect to a Wi-Fi network
- To add Wi-Fi network
- To view Wi-Fi settings
- Contacts
- Adding contacts
- Importing contacts
- Backing up contacts
- Export contacts to the memory card
- Favorite contacts
- Add to Starred List
- Remove from Starred List
- Chapter 3: Entering Information
- On-Screen Keyboard
- Using the on-screen keyboard
- Setting input method
- Configuring Keyboard Settings
- Using User Dictionary
- Adding Words in the Dictionary
- Editing Words in the Dictionary
- Chapter 4: Email
- Email Accounts
- Setting up an Internet email account
- Viewing email accounts
- Customizing email settings
- Using Email
- Composing and sending emails
- Sending an email from Contacts
- Adding attachments to an email message
- Receiving emails
- To manually receive emails
- Reading and replying to emails
- To download attachments
- To reply or forward an email
- Managing email folders
- To delete an email
- To move an email to a folder
- To set up your account name
- To set up email checking frequency
- To set up default account
- To delete an email account
- Chapter 5: Using Internet
- Browsing Web Pages
- To scroll the page
- To set Home page
- Managing web pages
- Chapter 6: Google Apps
- Gmail
- Signing in to Gmail
- Refreshing Gmail
- Creating and sending emails
- To preview and download attachments
- Forwarding emails
- Managing emails
- To delete emails
- To add a star to emails
- To select emails
- To mark emails as read or unread
- To place emails in archive
- To mute emails
- To change labels of emails
- Viewing folder labels
- Searching for emails
- Configuring Gmail settings
- Talk
- Signing in to Google Talk
- Google Talk options
- Starting chat
- Chatting Options
- Configuring Google Talk settings
- Maps
- Viewing Map
- Finding places
- Navigation
- Getting directions
- Finding your current location
- Latitude
- Starting Latitude
- Configuring privacy settings
- Market
- Searching for applications
- Downloading applications
- Removing applications
- Places
- Google Search
- Searching information by entering text
- Voice Search
- YouTube
- Watching videos
- Uploading videos
- Searching videos
- Chapter 7: Using Bluetooth
- Bluetooth modes
- To turn Bluetooth on or off
- Connecting to Bluetooth Devices
- Chapter 8: Multimedia Applications
- Videos and Photos
- Recording a video
- Taking a photo
- Reviewing a video
- Reviewing a photo
- Configuring camera settings
- Viewing Videos & Photos
- Playing videos
- Viewing photos
- Using Music Player
- Music screen
- Playing music
- To play music
- Changing playback options
- Managing playlists
- To add a music file to playlist
- To remove a music file from playlist
- Chapter 9: Programs
- Books
- Browsing an ebook
- Downloading an ebook
- Browser
- Calculator
- Calendar
- To schedule an event
- Camera
- Clock
- Contacts
- Downloads
- Managing files
- File Browser
- Managing files and folders
- FM Radio
- Gallery
- Gmail
- Google Search
- Latitude
- Maps
- Market
- Music
- Navigation
- Places
- Settings
- Spare Parts
- Talk
- Voice Search
- YouTube
- Chapter 10: Managing Your Device
- Device Settings
- Screen
- Application Description
- Location & security
- Applications
- Accounts & sync
- Privacy
- Applications Description
- Storage
- Language & input
- Accessibility
- Date & time
- About tablet
- Changing Basic Settings
- Date and time settings
- To automatically set date and time
- To manually set date and time
- Alarms settings
- To set the alarm
- Display settings
- To turn off backlight when the device is idle
- To adjust brightness
- To change the screen orientation
- Ringtone settings
- To change the notification ringtone
- Using Wireless & networks
- Protecting Your Device
- Screen lock protection settings
- Resetting the Device
- Specifications
- Connectivity
- Power
- Temperature
- Humidity
- Customer Support
- Limited Warranty
- ViewSonic® ViewPad
- What the warranty covers:
- How long the warranty is effective:
- Who the warranty protects:
- What the warranty does not cover:
- How to get service:
- Limitation of implied warranties:
- Exclusion of damages:
- A
- B
- C
- D
- E
- F
- G
- H
- |
- K
- L
- M
- N
- P
- s
- T
- U
- V
- W
- Y
Brand : VIEWSONIC
Model : ViewPad 7x
Category : Tablet