
EA7900P45E - Chainsaw MAKITA - Free user manual and instructions
Find the device manual for free EA7900P45E MAKITA in PDF.


| Product Type | Chainsaw (gasoline-powered) |
| Brand | Makita |
| Model | EA7900P45E |
| Engine Displacement | 78.5 cm³ |
| Max. Power | 4.3 kW / 10,000 min⁻¹ |
| Max. Torque | 4.7 Nm / 7,000 min⁻¹ |
| Idle Speed | 2,500 min⁻¹ |
| Max. Engine Speed (with bar/chain) | 12,800 min⁻¹ |
| Clutch Engagement Speed | 3,200 min⁻¹ |
| Fuel Tank Capacity | 0.75 L |
| Chain Oil Tank Capacity | 0.42 L |
| Chain Speed (at top speed) | 28.1 m/s |
| Guide Bar Length (cutting length) | 38, 45, 50, 60, 70 cm |
| Chain Pitch | 3/8" |
| Chain Gauge | .058" |
| Sprocket Teeth | 7 |
| Weight (without bar/chain, empty tank) | 6.6 kg |
| Sound Pressure Level (at operator) | 105.1 dB(A) (K=2.5) |
| Sound Power Level (guaranteed) | 117 dB(A) |
| Vibration (front handle) | 6.6 m/s² (K=2) |
| Vibration (rear handle) | 4.5 m/s² (K=2) |
| Ignition System | Electronic (maintenance-free) |
| Spark Plug | NGK BPMR 7A or Bosch WSR 6F (gap 0.5 mm) |
| Fuel/Oil Mixture Ratio | 50:1 (gasoline:two-stroke oil, JASO FC or ISO EGD) |
| Chain Brake | Inertia-activated + manual |
| Safety Features | Hand guards, chain catch, anti-vibration system, throttle lock |
| Carburetor | ZAMA diaphragm (adjustable idle only) |
| Class | Professional (intended for felling, limbing, bucking) |
Frequently Asked Questions - EA7900P45E MAKITA
User questions about EA7900P45E MAKITA
0 question about this device. Answer the ones you know or ask your own.
Ask a new question about this device
Download the instructions for your Chainsaw in PDF format for free! Find your manual EA7900P45E - MAKITA and take your electronic device back in hand. On this page are published all the documents necessary for the use of your device. EA7900P45E by MAKITA.
USER MANUAL EA7900P45E MAKITA
Original Instruction Manual
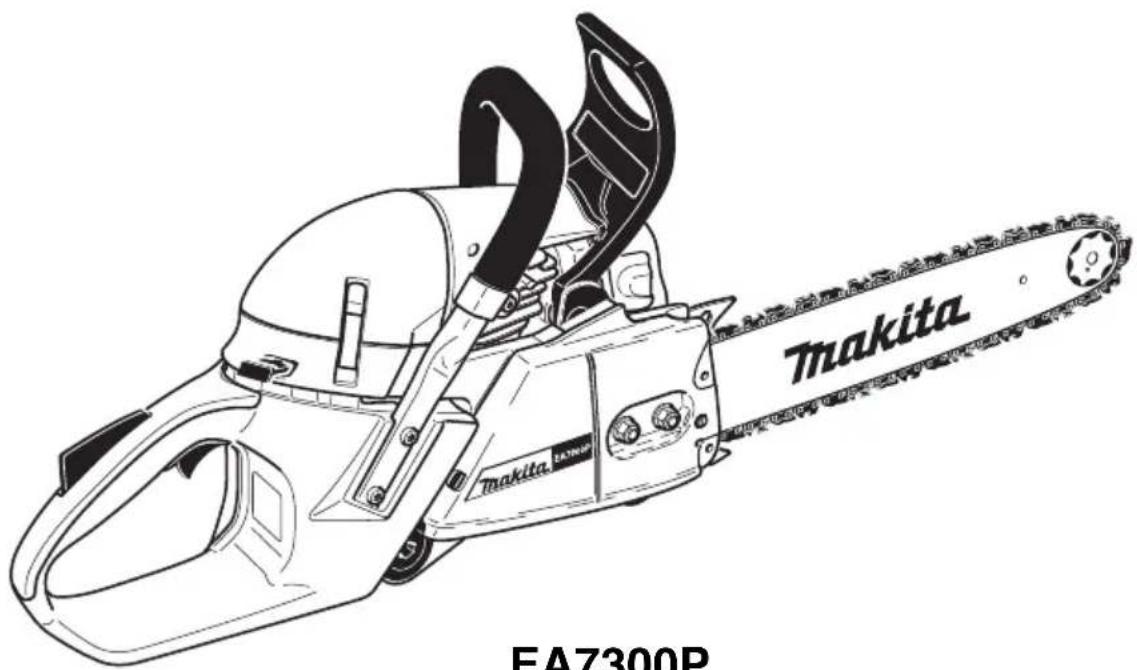
EA7300P
EA7900P
CE
Important:
Read this instruction manual carefully before putting the chain saw into operation and strictly observe the safety regulations!
Keep this instruction manual!
Thank you for purchasing a MAKITA product!
Congratulations on choosing a MAKITA chain saw! We are confident that you will be satisfied with this modern piece of equipment.
The EA7300P and EA7900P are very handy and robust chain saws with a new Design.
The automatic chain lubrication with variable-fl ow oil pump and maintenance-free electronic ignition ensure trouble-free operation, while the hand-saving anti-vibration system and ergonomic grips and controls make work easier, safer, and less tiring for the user.
MAKITA chain saws EA7300P and EA7900P are equipped with the latest safety features and meet all national and international standards. These features include: hand guards on both handles, grip throttle lever lock, chain catch, safety saw chain, and chain brake. The chain brake can be actuated manually, and is also inertia-actuated automatically in case of kickback.
The following industrial property rights apply: GBM 29616652, EP 0560201B1.

In order to ensure the proper functioning and performance of your new chain saw, and to safeguard your own personal safety, it is imperative that you read this instruction manual thoroughly before operation. Be especially careful to observe all safety precautions! Failure to observe these precautions can lead to severe injury or death!
Packing
Your MAKITA chain saw comes delivered in a protective cardboard box to protect against shipping damage.
Cardboard is a basic raw material and is consequently reusable or suitable for recycling (waste paper recycling).

Table of contents Page
Packing 2
Delivery inventory 3
Symbols 3
SAFETY PRECAUTIONS
General precautions ....4
Protective equipment 4
Fuels / Refuelling 5
Putting into operation ....5 Kickback ....6
Working behavior/Method of working 6-7
Transport and storage ....8 Maintenance ....8
First aid 8
Technical data 9
Denomination of components 9
Mounting the guide bar and saw chain 10-11
Tightening the saw chain 11-12
Chain brake 12
Fuels 13-14
Refuelling 14
Checking the chain lubrication ....15
Adjusting the chain lubrication 15
Starting the engine ....16 Cold start ....16
Warm start 16
Stopping the engine 16
Checking the chain brake 16
Adjusting the carburetor 17
Working in summer / winter 18
MAINTENANCE
Sharpening the saw chain 19-20
Cleaning the brake band and sprocket interior 21
Cleaning the guide bar 22
Replacing the saw chain ....22
Replacing the suction head 22
Cleaning the air filter and the filter hood 23
Replacing the spark plug 24
Checking the ignition spark ....24 Checking the muffler screws ....24
Replacing the starter cable / Replacing the return spring 25
Mounting the fan housing 26
Cleaning the cylinder area 26
Replacing/cleaning the spark arrester screen .....26
Instructions for periodic maintenance 27
Service, spare parts and guarantee ....27-28
Trouble shooting 28
Extract from spare parts list 29
Accessories 29
EU conformity declaration 30
Delivery inventory

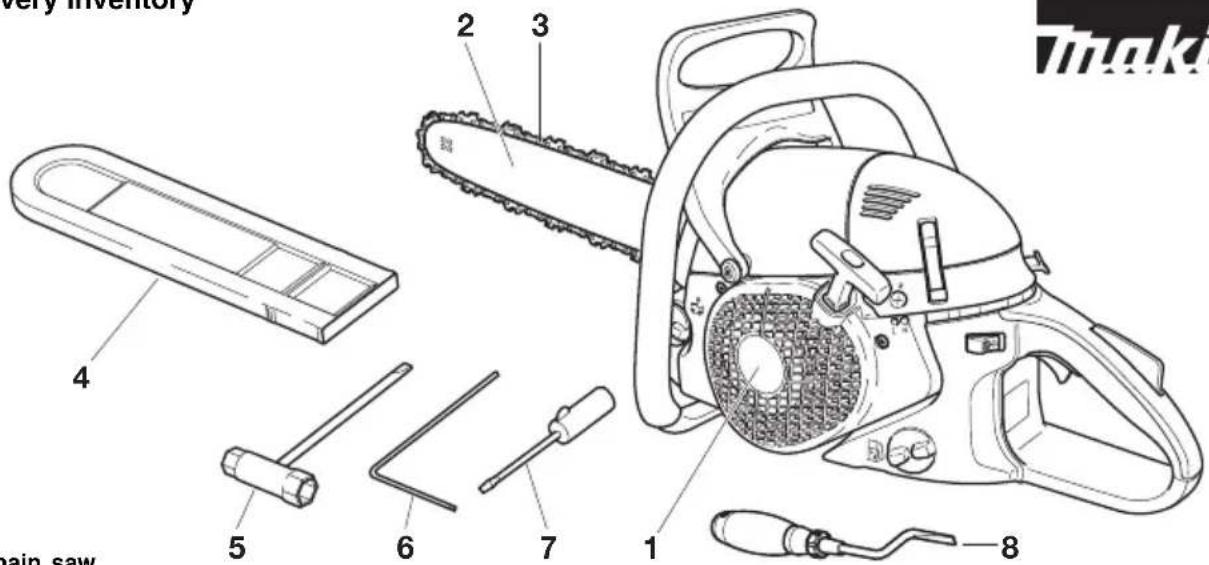
- Chain saw
- Guide bar
- Saw chain
- Chain protection cover
- Universal wrench
- Offset screwdriver
- Screwdriver for carburetor adjustment
- Cylinder fi n cleaner
- Instruction manual (not shown)
In case one of the parts listed should not be included in the delivery inventory, please consult your sales agent.
Symbols
You will notice the following symbols on the saw and in the Instruction Manual:
 | Read instruction manual and follow the warning- and safety precautions! | 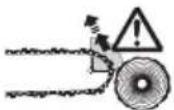 | Caution, kickback! |
 | Particular care and caution! | 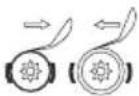 | Chain brake |
 | Forbidden! | ||
 | Wear protective helmet, eye and ear protection! |  | Fuel and oil mixture |
 | Wear protective gloves! |  | Working in summer / winter |
 | No smoking! | ||
 | No open fi re! |  | Carburetor adjustment |
 | Stop engine! |  | Chain oil fi ll/oil pump |
 | Push the starting valve |  | Saw chain oil adjustment screw |
 | Start engine |  | First aid |
 | Off switch |  | Recycling |
 |  | CE - Marking |
SAFETY PRECAUTIONS
Intended use
Power chain saws
This power chain saw may be used only for sawing wood out of doors. It is intended for the following uses depending on its class:
- Professional and mid-class: Use on small, medium and large trees: felling, limb removal, cutting to length, thinning.
- Hobbyklasse: Occasional use on small trees, fruit-tree care, felling, limb removal, cutting to length.
Unauthorised users:
Persons who are not familiar with the Instruction Manual, children, young people, and persons under the influence of drugs, alcohol or medication must not use this saw.
National regulations may restrict the use of the unit!
General precautions
- To ensure correct operation the user has to read this instruction manual to make himself familiar with the charac teristics of the chain saw. Users insufficiently informed will endanger themselves as well as others due to improper handling.
- It is recommended to lend the chain saw only to people who are experienced in working with chain saws. Always hand over the instruction manual.
- First users should ask the dealer for basic instructions to become familiarized with the characteristics of engine powered sawing or even attend a recognized course of instruction.
- Children and young persons aged under 18 years must not be allowed to operate the chain saw. Persons over the age of 16 years may, however, use the chain saw for the purpose of being trained as long as they are under the supervision of a qualified trainer.
- Use chain saws always with the utmost care and attention.
- Operate the chain saw only if you are in good physical condition. If you are tired, your attention will be reduced. Be especially careful at the end of a working day. Perform all work calmly and carefully. The user has to accept liability for others.
- Never use the chain saw after having consumed alcohol, drugs or medication.
- A fire extinguisher must be available in the immediate vicinity when working in easily inflammable vegetation or when it has not rained for a long time (danger of fire).
Protective equipment
- In order to avoid head, eye, hand or foot injuries as well as to protect your hearing the following protective equipment must be used during operation of the chain saw:
- The kind of clothing should be appropriate, i. e. it should be tight-fitting but not be a hindrance. Do not wear jewellery or clothing which could become entangled with bushes or shrubs. If you have long hair, always wear a hairnet!
- It is necessary to wear a protective helmet whenever working with the chain saw. The protective helmet (1) is to be checked in regular intervals for damage and is to be replaced after 5 years at the latest. Use only approved protective helmets.
- The face shield (2) of the protective helmet (or the goggles) protects against sawdust and wood chips. During operation of the chain saw always wear a goggle or a face shield to prevent eye injuries.
- Wear adequate noise protection equipment (ear muffs (3), ear plugs, etc.). Octave brand analysis upon request.
- The safety jacket (4) is provided with special signal-coloured shoulder straps and is comfortable and easy to care for.
-
The protective brace and bib overall (5) is made of a nylon fabric with 22 layers and protects against cuts. We strongly recommend its use.
-
Protective gloves (6) made of thick leather are part of the prescribed equipment and must always be worn during operation of the chain saw.
- During operation of the chain saw safety shoes or safety boots (7) fitted with anti-skid sole, steel toe caps and protection for the leg must always to be worn. Safety shoes equipped with a protective layer provide protection against cuts and ensure a secure footing.


1
natural_image
Illustration of two bottles with scattered beans, no text or symbols present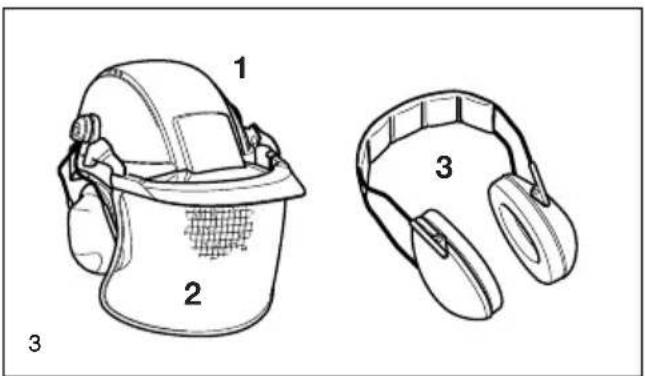
natural_image
Technical line drawings of two helmet components labeled 1 and 2, and a separate view of the head with three numbered parts (no text or symbols on the devices themselves)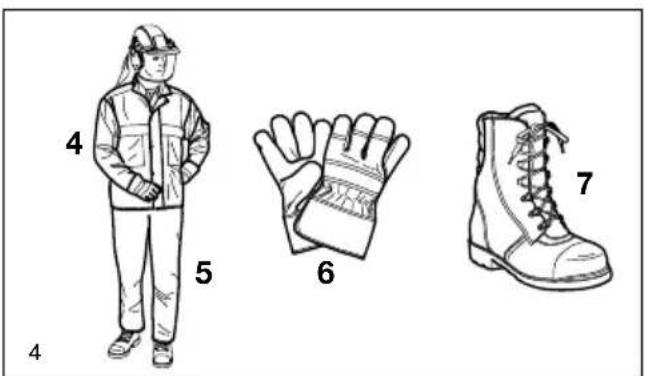
Fuels / Refuelling
- Stop the engine before refuelling the chain saw.
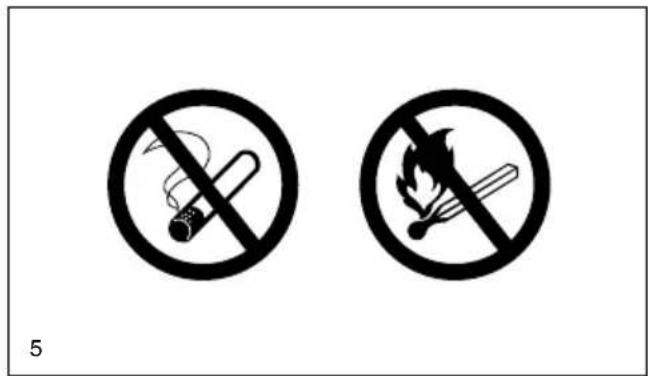
- Do not smoke or work near open fi res (5).
- Let the engine cool down before refuelling.
- Fuels can contain substances similar to solvents. Eyes and skin should not come in contact with mineral oil products. Always wear protective gloves when refuelling. Frequently clean and change protective clothes. Do not breathe in fuel vapors. Inhalation of fuel vapours can be hazardous to your health.
- Do not spill fuel or chain oil. When you have spilt fuel or oil immediately clean the chain saw. Fuel should not come in contact with clothes. If your clothes have come in contact with fuel, change them ot once.
- Ensure that no fuel or chain oil oozes into the soil (environmental protection). Use an appropriate base.
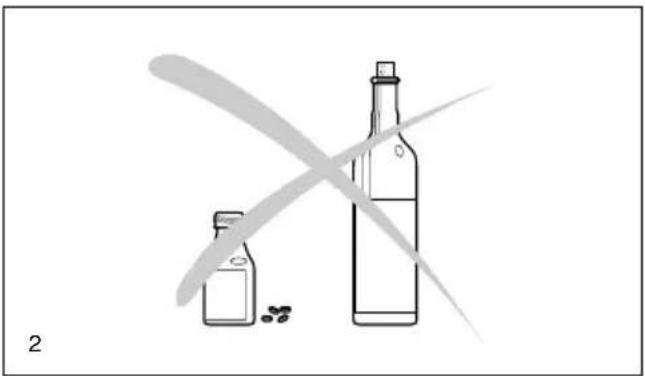
- Refuelling is not allowed in closed rooms. Fuel vapors will accumulate near the floor (explosion hazard).
- Ensure to firmly tighten the screw plugs of the fuel and oil tanks.
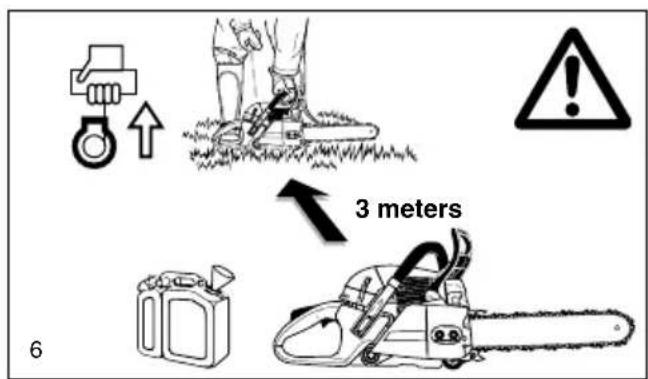
- Change the place before starting the engine (at least 3 m from the place of refuelling) (6).
- Fuel cannot be stored for an unlimited period of time. Buy only as much as will be consumed in the near future.
- Use only approved and marked containers for the transport and storage of fuel and chain oil. Ensure children have no access to fuel or chain oil.
Putting into operation
- Do not work on your own. Another person must be nearby in case of emergencies (within shouting distance).
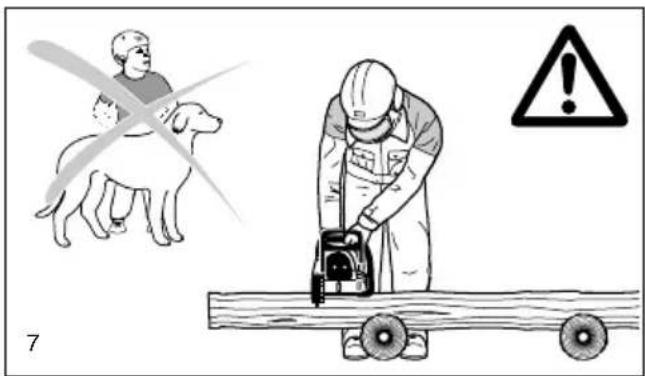
- Ensure that there are no children or other people within the working area. Pay attention to any animals in the working area, as well (7).
- Before starting work the chain saw must be checked for perfect function and operating safety according to the prescriptions.
Check especially the function of the chain brake, the correct mounting of the guide bar, the correct sharpening and tightening of the chain, the firm mounting of the sprocket guard, the easy motion of the throttle lever and the function of the throttle lever lock, the cleanliness and dryness of the handles, and the function of the ON/OFF switch.
- Put the chain saw only into operation if it is completely assembled. Never use the chain saw when it is not completely assembled.
- Before starting the chain saw ensure that you have a safe footing.
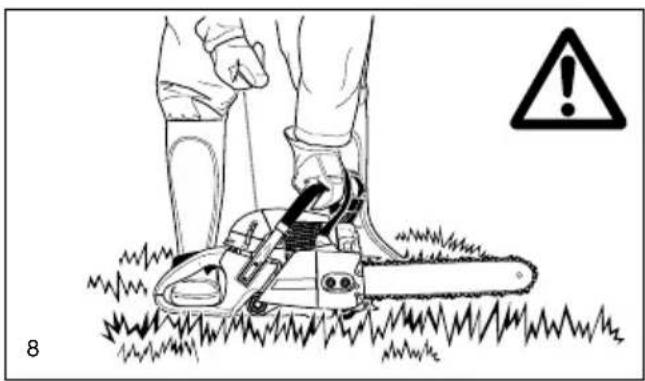
- Put the chain saw into operation only as described in this instruction manual (8). Other starting methods are not allowed.
- When starting the chain saw it must be well supported and securely held. The guide bar and chain must not be in contact with any object.
- When working with the chain saw always hold it with both hands. Take the back handle with the right hand and the tubular handle with the left hand. Hold the handles tightly with your thumbs facing your fingers.
- CAUTION: When releasing the throttle lever the chain will keep on running for a short period of time (free-wheeling).
- Continuously ensure that you have a safe footing.
- Hold the chain saw such that you will not breathe in the exhaust gas. Do not work in closed rooms (danger of poisoning).
- Switch off the chain saw immediately if you observe any changes in its operating behavior.
- The engine must be switched off before checking the chain tension, tightening the chain, replacing it or clearing malfunctions (9).
- When the sawing device is hit by stones, nails or other hard objects, switch off the engine immediately and check the sawing device.
- When stopping work or leaving the working place switch off the chain saw (9) and put it down such that nobody is endangered.
- Do not put the overheated power chain saw in dry grass or on any inflammable objects. The muffler is very hot (danger of fire).
- CAUTION: Oil dropping from the chain or guide bar after having stopped the saw chain will pollute the soil. Always use an appropriate base.
natural_image
Illustration of a person using a chainsaw on grass, with an exclamation mark and warning symbol (no text or labels)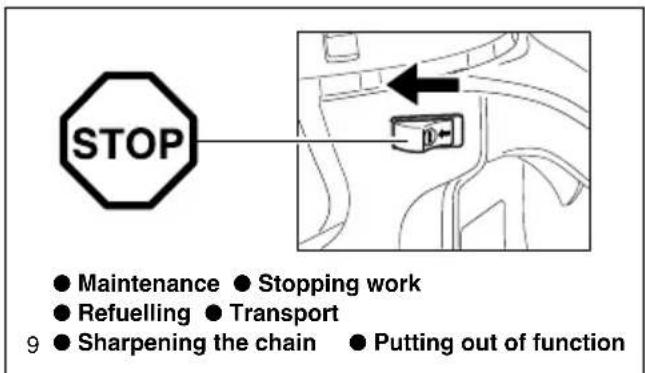
Kickback
- When working with the chain saw dangerous kickbacks may occur.
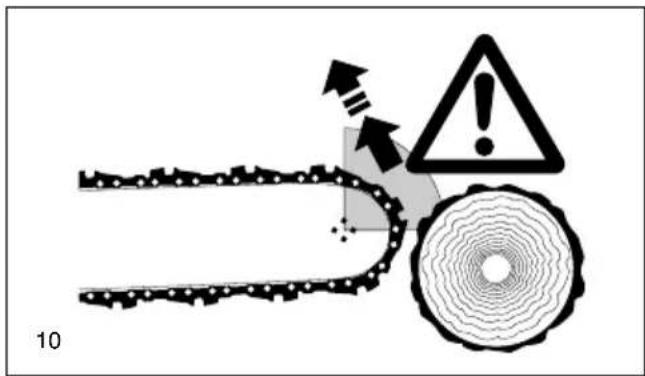
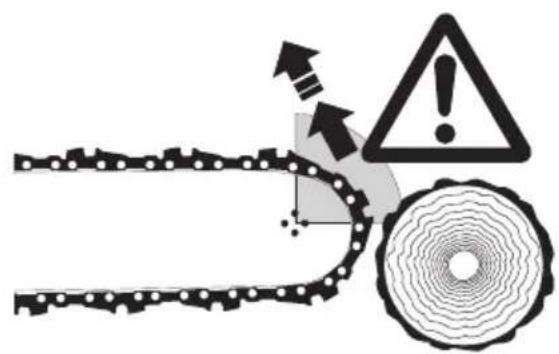
- Kickback occurs when the upper part of the end of the guide bar inadvertently touches wood or other hard objects (10).
- This causes the saw to be thrown back toward the user with great force and out of control. Risk of injury!
In order to prevent kickback, follow these rules:
- Only specially-trained persons should perform plunge cuts, i.e., piercing timber or wood with the tip of the saw!
- Never apply the end of the bar when starting to make a cut.
- Always observe the end of the guide bar. Be careful when continuing an already started cut.
- When starting to cut the chain must be running.
- Ensure that the chain is always sharpened correctly. Pay special attention to the height of the depth limiter.
- Never cut several branches at the same time. When cutting a branch ensure that no other branch is touched.
- When crosscutting a trunk be aware of the trunks next to it.
Working behavior/Method of working
- Only use the chain saw during good light and visibility periods. Be aware of slippery or wet areas, and of ice and snow (risk of slipping). The risk of slipping is extremely high when working on recently peeled wood (bark).
- Never work on unstable surfaces. Make sure that there are no obstacles in the working area, risk of stumbling. Always ensure that you have a safe footing.
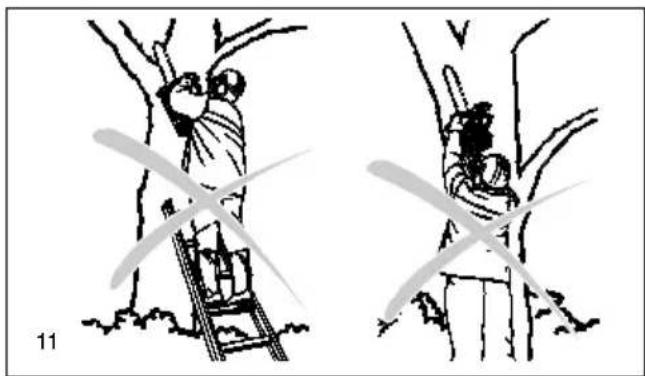
- Never saw above your shoulder height (11).
- Never saw while standing on a ladder (11).
- Never climb up into trees to perform sawing with the chain saw.
- Do not work leaning too far over.
-
Guide the chain saw in such a way that no part of your body is within the elongated swivelling range of the saw (12).
-
Use the chain saw for sawing wood only.
- Avoid touching the ground with the chain saw while it is still running.
- Never use the chain saw for lifting up or removing pieces of wood or other objects.
- Remove foreign objects such as sand, stones and nails found within the working area. Foreign objects may damage the sawing device and can cause dangerous kickback.
- When sawing precut timber use a safe support (sawing jack, 13). Do not steady the workpiece with your foot, and do not allow anyone else to hold or steady it.
- Secure round pieces against rotation.
- For cutting down trees or performing crosscuts the spike bar (13, Z) must be applied to the wood to be cut.
Before performing a crosscut firmly apply the spike bar to the timber, only then can the timber be cut with the chain running. For this the chain saw is lifted at the back handle and guided with the tubular handle. The spike bar serves as a centre of rotation. Continue by slightly pressing down the tubular handle and simultaneously pulling back the chain saw. Apply the spike bar a little bit deeper and once again lift the back handle.
- When the timber must be pierced for cutting or longitudinal cuts are to be performed it is urgently recommended to have this carried out by specially trained persons only (high risk of kickback).
- Do longitudinal - lengthwise - cuts at the lowest possible angle (14). Be very careful when doing this type of cut, as the spike bar cannot grip.
- The saw must be running whenever you remove the chain saw from the wood.
- When performing several cuts the throttle lever must be released in between.
natural_image
Illustration of two figures climbing a tree, one using a ladder to lift the tree (no text or symbols)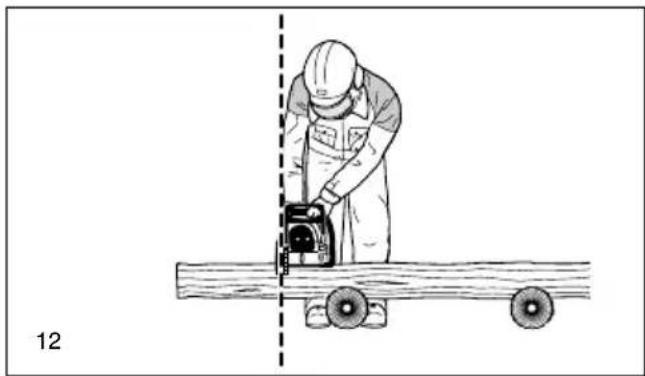
natural_image
Illustration of a person using a power tool on a wooden beam, with a dashed vertical line and number 12 label (no text or symbols on the diagram itself)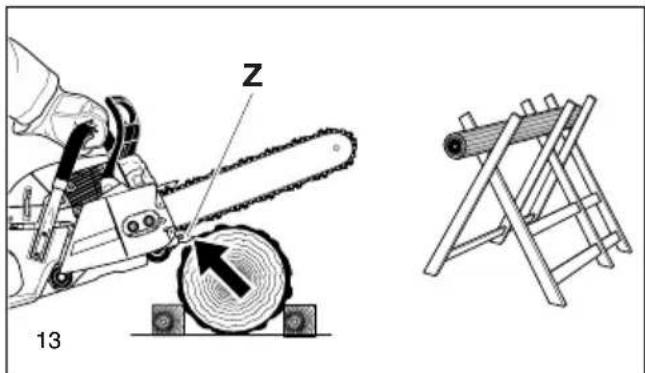
natural_image
Technical illustration of a chain cutter with a gear and a wooden ladder setup (no text or symbols)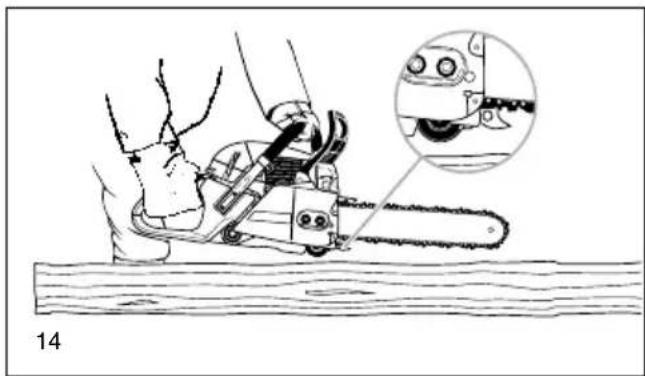
natural_image
Illustration of a chain-linking machine on a wooden surface, with an inset showing the gear mechanism (no text or symbols present)- Be careful when cutting splintery wood. Cut pieces of wood may be pulled along (risk of injuries).
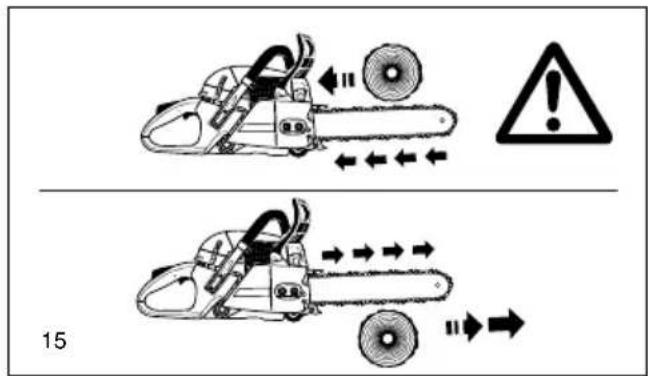
- When cutting with the upper edge of the guide bar, the chain saw may be pushed in the direction of the user if the chain gets clamped. For this reason use the lower edge of the bar whenever possible. The chain saw will then be pushed away from you (15).
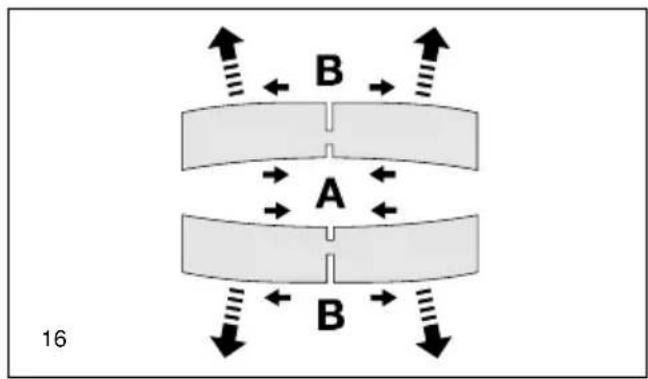
- If the timber is under tension (16), first cut the pressure side (A). Then the crosscut can be performed on the tension side (B). Thus clamping of the guide bar can be avoided.
CAUTION:
People felling trees or cutting of branches must be specially trained. High risk of injuries!
- When cutting of branches, the chain saw should be supported on the trunk. Do not use the end of the bar for cutting (risk of kickback).
- Be aware of branches under tension. Do not cut free branches from below.
- Never perform detensioning cuts while standing on the trunk.
- Before cutting down a tree ensure that
a) only those people are within the working area which are actually involved in cutting down the tree.
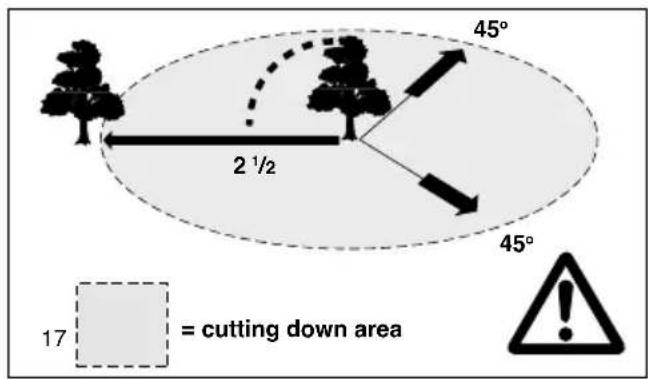
b) every worker involved can withdraw without stumbling (the people should withdraw backwards in a diagonal line, i. e. at a degree of 45°).
c) the bottom part of the trunk is free from foreign objects, underbrush and branches. Make sure to have a safe footing (risk of stumbling).
d) the next working place is at least 2 1/2 tree lengths away (17). Before cutting down the tree check the direction of fall and make sure that there are neither people nor objects within a distance of 2 1/2 tree lengths.
- Judging the tree:
Direction of hanging - loose or dry branches - height of the tree - natural overhang - is the tree rotten?
- Take into account the direction and speed of the wind. If strong gusts are occurring, do not do any felling.
- Cutting the roots:
Start with the strongest root. First do the vertical and then the horizontal cut.
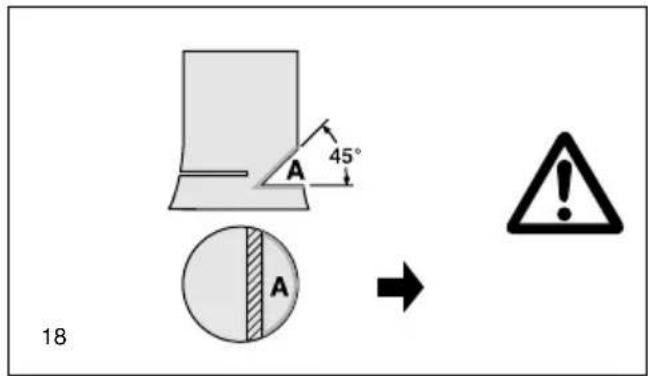
- Notching the trunk (18, A):
The notch determines the direction of fall and guides the tree. The trunk is notched perpendicular to the direction of fall and penetrates 1/3 -1/5 of the trunk diameter. Perform the cut near the ground.
- When correcting the cut, always do so over the whole width of the notch.
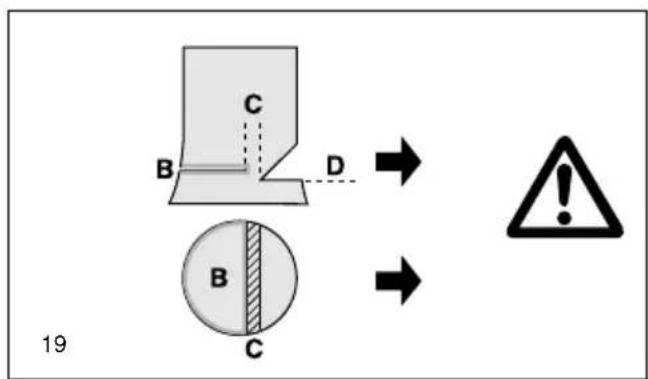
- Cut down the tree (19, B) above the bottom edge of the notch (D). The cut must be exactly horizontal. The distance between both cuts must be approx. 1/10 of the trunk diameter.
- The material between both cuts (C) serves as a hinge. Never cut it through, otherwise the tree will fall without any control. Insert felling wedges in time.
- Secure the cut only with wedges made of plastic or aluminium. Do not use iron wedges. If the saw hits an iron wedge the chain can be seriously damaged or torn.
- When cutting down a tree always stays sideways of the falling tree.
- When withdrawing after having performed the cut, be alert for falling branches.
- When working on sloping ground the user of the chain saw must stay above or sidewards of the trunk to be cut or the tree already cut down.
- Be alert for trunks which may roll towards you.
Transport and storage
- When changing your location during work switch off the chain saw and actuate the chain brake in order to prevent an inadvertent start of the chain.
- Never carry or transport the chain saw with the chain running.
- When transporting the chain saw over long distances the guide bar protection cover (delivered with the chain saw) must be applied.
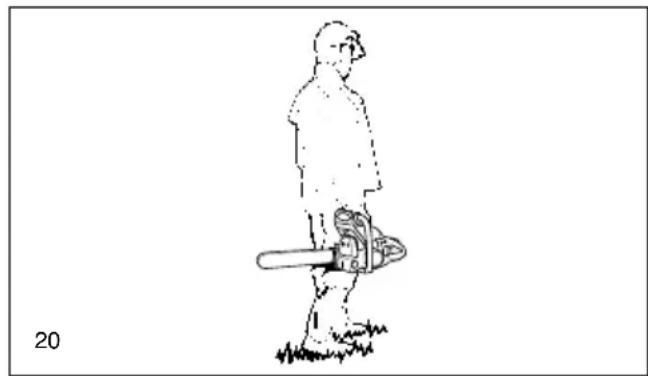
- Carry the chain saw with the tubular handle. The guide bar points backwards (20). Avoid coming in contact with the muffler (danger of burns).
- Ensure safe positioning of the chain saw during car transportation to avoid fuel or chain oil leakage.
- Store the chain saw safely in a dry place. It must not be stored outdoors. Keep the chain saw away from children.
- Before storing the chain saw over a long period of time or shipping it the fuel and oil tanks must be completely emptied.
Maintenance
- Before performing maintenance work switch off the chain saw (21) and pull out the plug cap.
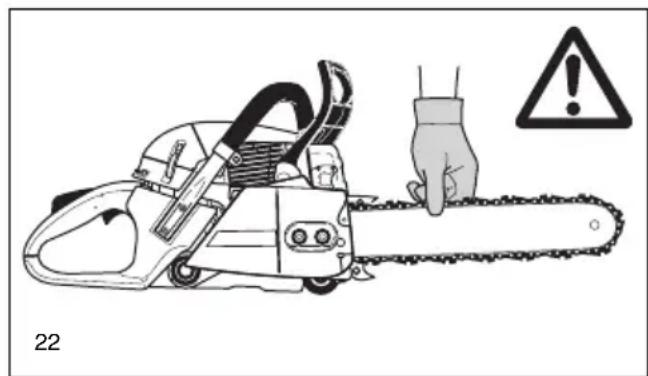
- Before starting work always check the operating safety of the chain saw, in particular the function of the chain brake. Make sure that the chain is always sharpened and tightened correctly (22).
- Operate the chain saw only at a low noise and emission level. For this ensure the carburetor is adjusted correctly.
- Regularly clean the chain saw.
- Regularly check the tank cap for tightness.
Observe the accident prevention instructions issued by trade associations and insurance companies. Do not perform any modifications on the chain saw. You will put your safety at risk.
Perform only the maintenance and repair works described in the instruction manual. All other work must be carried out by MAKITA Service.
Use only original MAKITA spare parts and accessories.
Using spare parts other than original MAKITA parts or accessories and guide bar/chain combinations or lengths which are not approved bring a high risk of accidents. We cannot accept any responsibility for accidents and damage resulting from using sawing devices or accessories which have not been approved.
First aid
For the event of a possible accident, please make sure that a first aid kit is always immediately available close by. Immediately replace any items used from the first aid box.
When calling for help, give the following information:
- Place of the accident
- What happened
- Number of injured people
- Kind of injuries
- Your name!
NOTE
Individuals with poor circulation who are exposed to excessive vibration may experience injury to blood vessels or the nervous system.
Vibration may cause the following symptoms to occur in the fingers, hands or wrists: "Falling asleep" (numbness), tingling, pain, stabbing sensation, alteration of skin colour or of the skin. If any of these symptoms occur, see a physician!
To reduce the risk of vibration white finger, keep your hands warm, wear gloves, and make sure the saw chain is sharp.
natural_image
Simple line drawing of a person standing next to a chain-linking device (no text or symbols)
natural_image
Illustration of a chain-linking gear with a hand holding a chainsaw and warning symbol (no text or labels)

natural_image
Black and white medical cross symbol inside a square frame, labeled '24' at bottom left (no text or numbers on the cross itself)Technical data
| Technical data | EA7300P | EA7900P | |
| Stroke volume cm | ^3 | 72.6 | 78.5 |
| Bore | mm | 5 | |
| Stroke | mm | 37 | |
| Max. power at speed | kW / 1/min | 4,1 / 10.000 | 4,3 / 10.000 |
| Max. torque at speed | Nm / 1/min | 4,5 / 7.000 | 4,7 / 7.000 |
| Idling speed / max. engine speed with bar and chain | 1/min | 2,500 / 12,800 | 2,500 / 12,800 |
| Clutch engagement speed | 1/min | 3,200 | 3,200 |
| Sound pressure level at the workplace L_pA, eq per ISO 22868 ^1) 4) | dB(A) | 105.1 / K_pA = 2.5 | 105.1 / K_pA = 2.5 |
| Sound power level L_WA, FI+Ra per ISO 22868 ^2) 4) | dB(A) | 115.3 / K_WA = 2.5 | 115.3 / K_WA = 2.5 |
| Vibration acceleration a_hv, eq per ISO 22867 ^1) 4) | |||
| - Tubular handle | m/s ^2 | 6.2 / K=2 | 6.6 / K=2 |
| - Rear handle | m/s ^2 | 4.1 / K=2 | 4.5 / K=2 |
| Carburetor (diaphragm carburetor) | Type | ZAMA | |
| Ignition system | Type | electronic | |
| Spark plug | Type | NGK BPMR 7A | |
| Electrode gap | mm | 0.5 | |
| or spark plug | Type | BOSCH WSR 6F | |
| Fuel consumption at max. load per ISO 7293 | kg/h | 1.9 | 2.0 |
| Specific consumption at max. load per ISO 7293 | g/kWh | 460 | 460 |
| Fuel tank capacity | I | 0.75 | |
| Chain oil tank capacity | I | 0.42 | |
| Mixture ratio (fuel/two-stroke oil) | |||
| - when using MAKITA oil | 50 : 1 | ||
| - when using Aspen Alkylat (two-stroke fuel) | 50 : 1 (2%) | ||
| - when using other oils | 50 : 1 (quality grade: JASO FC or ISO EGD) | ||
| Chain brake | engages manually or in case of kickback | ||
| Chain speed ^3) | m/s | 28.1 | |
| Sprocket pitch | inch | 3/8 | |
| Number of teeth | Z | 7 | |
| Chain type see the Extract from the spare-parts list | 099 | ||
| Pitch / gauge | inch | 3/8 / .058 | |
| Guide bar, length of a cut | cm | 38 / 45 / 50 / 60 / 70 | |
| Guide-bar type see the Extract from the spare-parts list | |||
| Weight (fuel tank empty, without chain and guide bar) | kg | 6.6 | 6.6 |
1) Figures derived in equal part from idling, full-load and top-speed.
2) Figures derived in equal part from full-load and top-speed.
^3) At top-speed. ^4) Uncertainty (K=).
Denomination of components
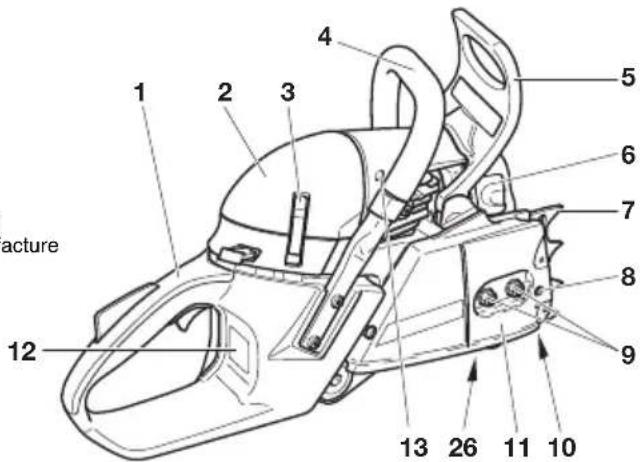
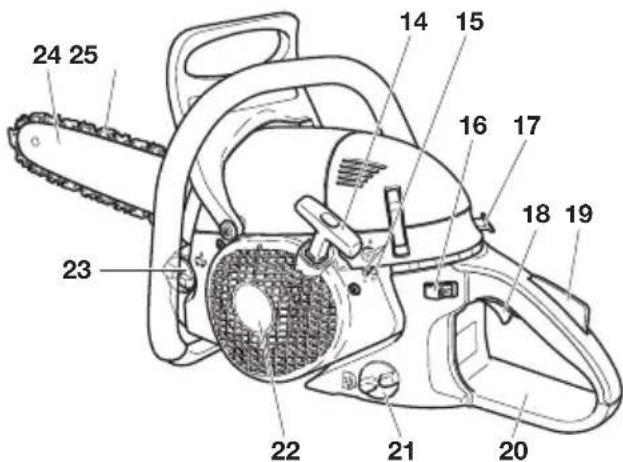
1 Handle
2 Filter hood
3 Filter hood clip
4 Tubular handle
5 Hand guard (release for chain brake)
6 Muffler
7 Spike bar
8 Chain tensioning screw
9 Retaining nuts
10 Chain catch
11 Sprocket guard
12 Identifi cation plate
13 Starting valve
14 Starter grip
15 Adjusting screws for carburetor
16 I/STOP-switch
17 Choke switch and half-throttle lock
18 Throttle lever
19 Safety locking button
20 Rear hand guard
21 Fuel tank cap
22 Fan housing with starting assembly
23 Oil tank cap
24 Guide bar
25 Chain
26 Adjusting screw for oil pump (bottom side)
Identifi cation plate (12)
Indicate when ordering spare parts


A
Before doing any work on the guide bar or chain, always switch off the engine and pull the plug cap off the spark plug (see „Replacing the spark plug“). Always wear protective gloves!
CAUTION:
Start the chain saw only after having assembled it completely and inspected.
Mounting the guide bar and saw chain
Use the universal wrench delivered with the chain saw for the following work.
Put the chain saw on a stable surface and carry out the following steps for mounting the guide bar and saw chain:
Release the chain brake by pulling the hand guard (1) in direction of arrow.
Unscrew retaining nuts (2).
Pull off the sprocket guard (3).
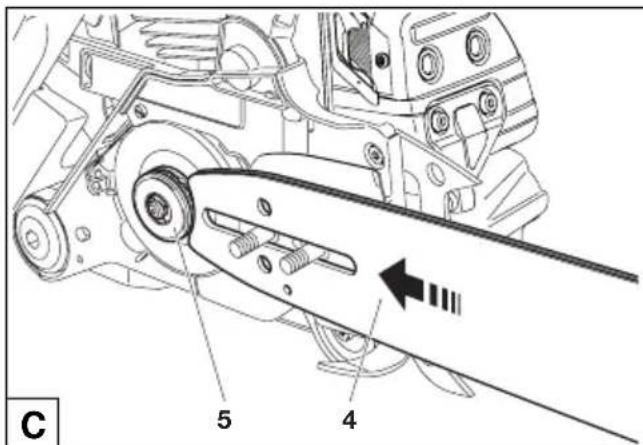
Position the guide bar (4) and push against the sprocket (5) as shown by the arrow.
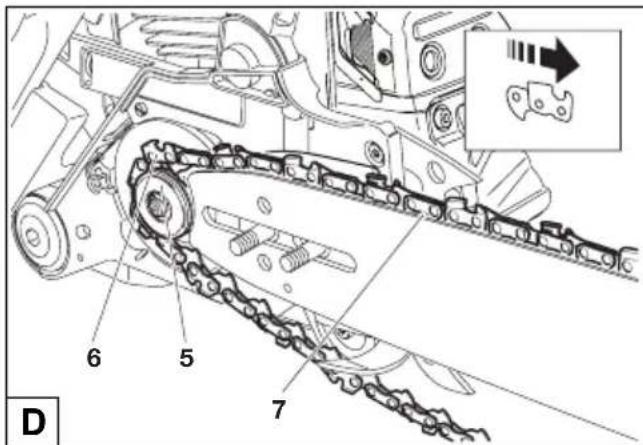
Lift the chain (6) over the sprocket (5). Using your right hand, guide the chain into the top guide groove on the guide bar (7).
CAUTION:
Note that the cutting edges along the top of the chain must point in the direction of the arrow!
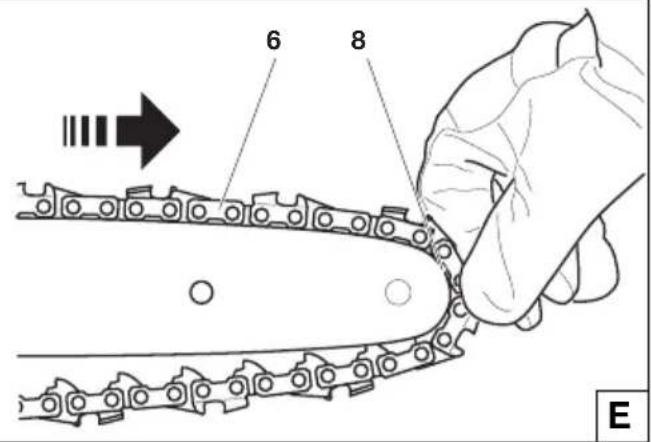
Pull the chain (6) around the sprocket nose (8) of the guide bar in the direction of the arrow.
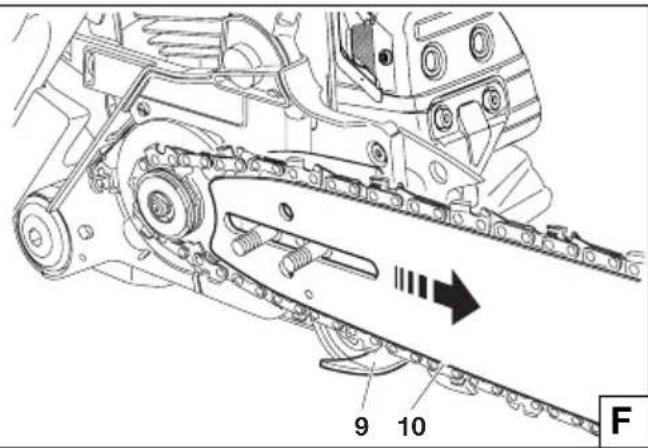
Guide the chain over the chain catch (9).
Pull the guide bar as shown by the arrow to take the slack out of the chain, so that it comes up to the bottom edge of the guide bar (10).
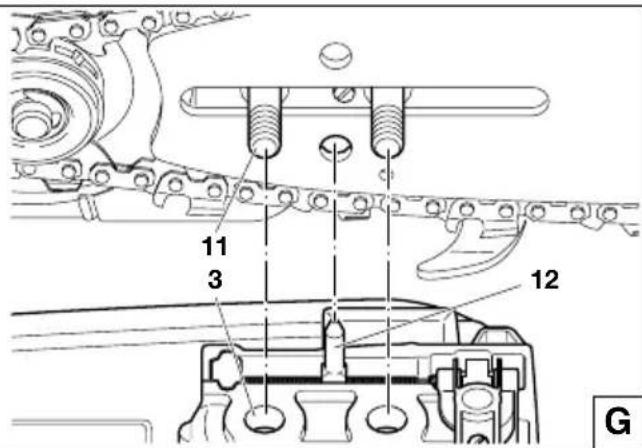
Line up the holes in the sprocket guard (3) with the bolts (11).
Turn the chain tensioning screw (H/13) until the chain tensioning bolt (12) is aligned with the hole in the guide bar.
Replace the sprocket guard.
Manually tighten the retaining nuts (H/2).
Tightening the saw chain
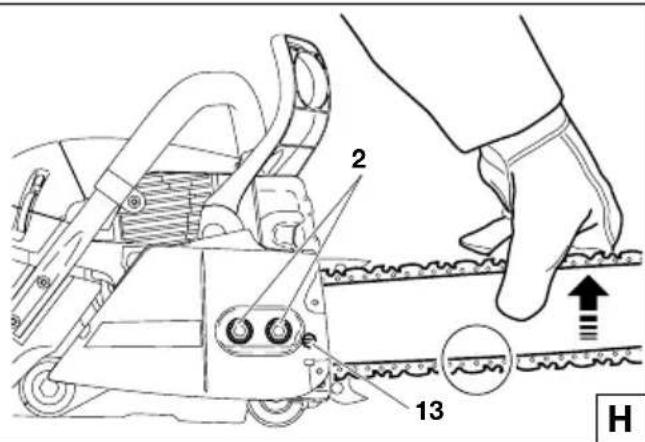
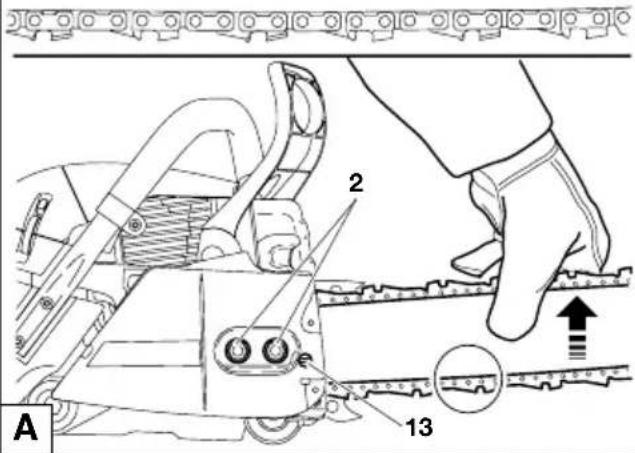
Slightly lift the end of the guide bar and turn the chain adjusting screw (13) to the right (clockwise) until the chain rests against the bottom side of the guide bar.
While still holding up the tip of the guide bar, tighten the retaining nuts (2) with the universal wrench.
Checking the chain tension
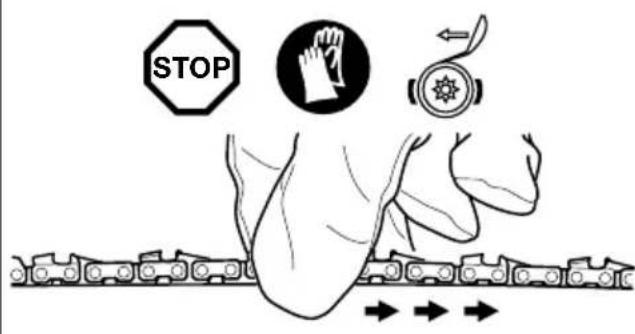
The tension of the chain is correct if the chain rests against the bottom side of the guide bar and can still be easily turned by hand.
While doing so the chain brake must be released.
Check the chain tension frequently - new chains tend to get longer during use!
When checking the chain tension the engine must be switched off.
NOTE:
It is recommended to use 2-3 chains alternatively.
In order to guarantee uniform wear of the guide bar the bar should be turned over whenever replacing the chain.
Retightening the saw chain
Loosen the nuts (2) about one turn with the universal wrench.
Raise the tip of the guide bar a little and turn the chain tensioning screw (13) to the right (clockwise) until the saw chain is again up against the bottom edge of the guide bar (see circle).
While keeping the tip of the guide bar raised, tighten the nuts (2) again with the universal wrench.
Chain brake
The EA comes with an inertia chain brake as standard equipment. If kickback occurs due to contact of the guide-bar tip with wood (see SAFETY PRECAUTIONS, page 6), the chain brake will stop the chain through inertia if the kickback is sufficiently strong.
The chain will stop within a fraction of a second.
The chain brake is installed to block the saw chain before starting it and to stop it immediately in case of an emergency.
IMPORTANT: NEVER run the saw with the chain brake activated (except for testing, see "Testing chain brake")! Doing so can very quickly cause extensive engine damage!
ALWAYS release the chain brake before starting the work!
B
Engaging the chain brake (braking)
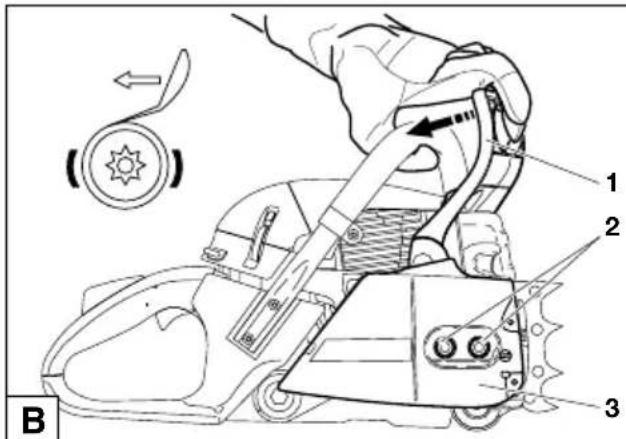
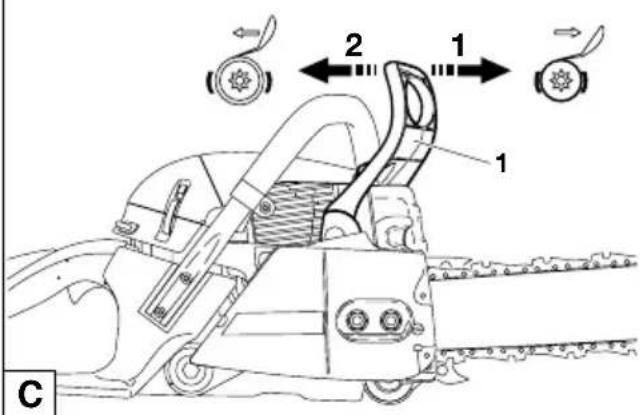
If the kickback is strong enough the sudden acceleration of the guide bar combined with the inertia of the hand guard (1) will automatically actuate the chain brake.
To engage the chain brake manually, simply push the hand guard (1) forward (towards the tip of the saw) with your left hand (arrow 1).
Releasing the chain brake
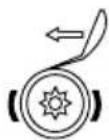
Pull the hand guard (1) towards you (arrow 2) until you feel it catch. The brake is now released.
Fuel
CAUTION:
This saw is powered by mineral-oil products (gasoline and oil).
Be especially careful when handling gasoline.
Do not smoke. Keep tool well away from open flames, spark, or fi re (explosion hazard).
Fuel mixture
This tool is powered by a high-performance air-cooled two-stroke engine. It runs on a mixture of gasoline and two-stroke engine oil.
The engine is designed for unleaded regular gasoline with a min. octane value of 91 ROZ. In case no such fuel is available, you can use fuel with a higher octane value. This will not affect the engine.
In order to obtain an optimum engine output and to protect your health and the environment use unleaded fuel only.
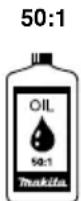
To lubricate the engine, use a synthetic oil for two-stroke air-cooled engines (quality grade JASO FC or ISO EGD), which has to be added to the fuel. The engine has been designed for use of MAKITA high-performance two-stroke engine oil and a mixture ratio of only 50:1 to protect the environment. In addition, a long service life and reliable operation with a minimum emission of exhaust gases are ensured.
MAKITA high-performance two-stroke engine oil is available in the following sizes to suit your individual requirements:
1 I order number 980 008 607
100 ml order number 980 008 606
In case MAKITA high-performance two-stroke engine oil is not available, it is urgently recommended to use a mixture ratio of 50:1 with other two-stroke engine oils, as otherwise optimum operation of the engine cannot be guaranteed.

ution: Do not use ready-mixed fuel from petrol stations.
The correct mixture ratio:
50:1 when using MAKITA high-performance two-stroke engine oil, i. e. mix 50 parts gasoline with 1 part oil.
50:1 when using other synthetic two-stroke engine oils (quality grade JASO FC or ISO EGD), i. e. mix 50 parts gasoline with 1 part oil.
NOTE:
For preparing the fuel-oil mixture first mix the entire oil quantity with half of the fuel required, then add the remaining fuel.




| 1000 cm^3 | (1 litre) | 20 cm | ^3 |
| 5000 cm^3 | (5 litres) | 100 cm | ^3 |
| 10000 cm^3 | (10 litres) | 200 cm | ^3 |
20 3
100 cm ^3
200 cm ^3
Thoroughly shake the mixture before filling it into the chain saw tank.
It is not wise to add more engine oil than specified to ensure safe operation. This will only result in a higher production of combustion residues which will pollute the environment and clog the exhaust channel in the cylinder as well as the muffler. In addition, fuel consumption will rise and performance will decrease.
The Storage of Fuel
Fuels have a limited storage life. Fuel and fuel mixtures age through evaporation, especially at high temperatures. Aged fuel and fuel mixtures can cause starting problems and damage the engine. Purchase only that amount of fuel, which will be consumed over the next few months. At high temperatures, once fuel has been mixed it should be used up in 6-8 weeks.
Store fuel only in proper containers, in dry, cool, secure locations!
AVOID SKIN AND EYE CONTACT
Mineral oil products degrease your skin. If your skin comes in contact with these substances repeatedly and for an extended period of time, it will desiccate. Various skin deseases may result. In addition, allergic reactions are known to occur.
Eyes can be irritated by contact with oil. If oil comes into your eyes, immediately wash them with clear water.
If your eyes are still irritated, see a doctor immediately!
D
Chain oil

Use an oil with adhesive additive for lubricating the chain and guide bar. The adhesive additive prevents the oil from being fl ung off the chain too quickly.
We recommend the use of chain oil which is bio-degradable in order to protect the environment. The use of bio-degradable oil may even be required by local regulations.
The chain oil BIOTOP sold by MAKITA is made of special vegetable oils and is 100% bio-degradable. BIOTOP has been granted the „blue angel“ (Blauer Umweltschutz-Engel) for being particularly environment-friendly (RAL UZ 48).

BIOTOP chain oil is available in the following sizes:
1 I order number 980 008 610
5 I order number 980 008 611
Bio-degradable oil is stable only for a limited period of time. It should be used within 2 years from the date of manufacture (printed on the container).
E
Important note on bio-degradable chain oils
If you are not planning to use the saw again for an extended period of time, empty the oil tank and put in a small amount of regular engine oil (SAE 30), and then run the saw for a time. This is necessary to flush out all remaining bio-degradable oil from the oil tank, oil-feed system, chain and guide bar, as many such oils tend to leave sticky residues over time, which can cause dam-
age to the oil pump or other parts.
The next time you use the saw, fi ll the tank with BIOTOP chain oil again. In case of damage caused by using waste oil or unappropriate chain oil the product guarantee will be null and void.
Your salesman will inform you about the use of chain oil.
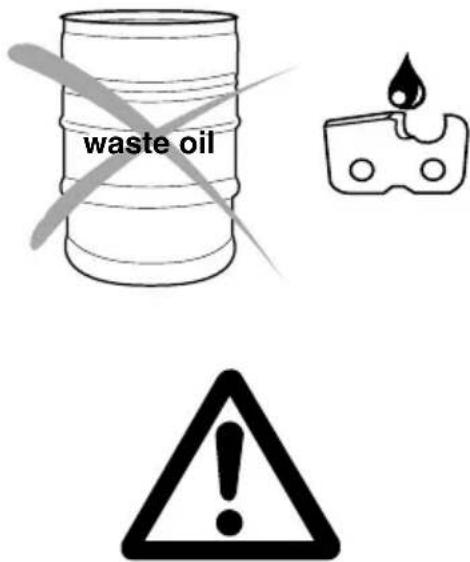
NEVER USE WASTE OIL
Waste oil is very dangerous for the environment.
Waste oil contains high amounts of carcinogenic substances.
Residues in waste oil result in a high degree of wear and tear at the oil pump and the sawing device.
In case of damage caused by using waste oil or unappropriate chain oil the product guarantee will be null and void.
Your salesman will inform you about the use of chain oil.
AVOID SKIN AND EYE CONTACT
Mineral oil products degrease your skin. If your skin comes in contact with these substances repeatedly and for an extended period of time, it will desiccate. Various skin deseases may result. In addition, allergic reactions are known to occur.
Eyes can be irritated by contact with oil. If oil comes into your eyes, immediately wash them with clear water.
If your eyes are still irritated, see a doctor immediately!
A

natural_image
Technical line drawing of a mechanical chain saw assembly with labeled components (no text or symbols)chain oil fuel/oil mixture
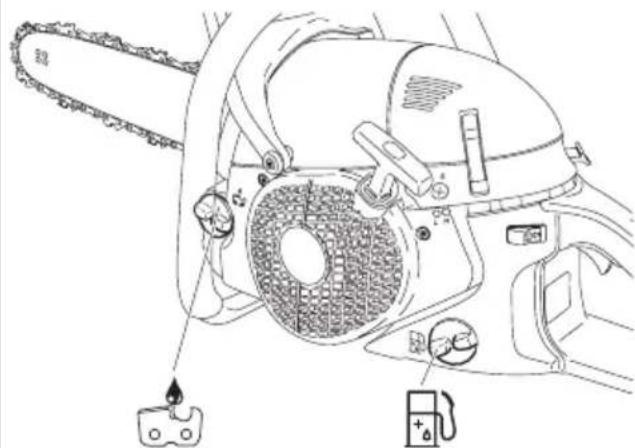
Refuelling

FOLLOW THE SAFETY PRECAUTIONS!
Be careful and cautious when handling fuels.
The engine must be switched off!
Thoroughly clean the area around the caps, to prevent dirt from getting into the fuel or oil tank.
Unscrew the cap and fill the tank with fuel (fuel/oil mixture) or chain oil as the case may be. Fill up to the bottom edge of the filler neck. Be careful not to spill fuel or chain oil!
Tightly screw on the cap.
Clean screw cap and tank after refuelling.
Lubricating the chain

During operation there must always be sufficient chain oil in the chain-oil tank to provide good chain lubrication. One filling is sufficient for about one half-hour of continuous operation. While working make sure there is enough chain oil in the tank. If necessary, add oil. The engine must be switched off!
B
Checking the chain lubrication
Never work with the chain saw without sufficient chain lubrication. Otherwise the service life of the chain and guide bar will be reduced. Before starting work check the oil level in the tank and the oil feed.
Check the oil feed rate as described below:
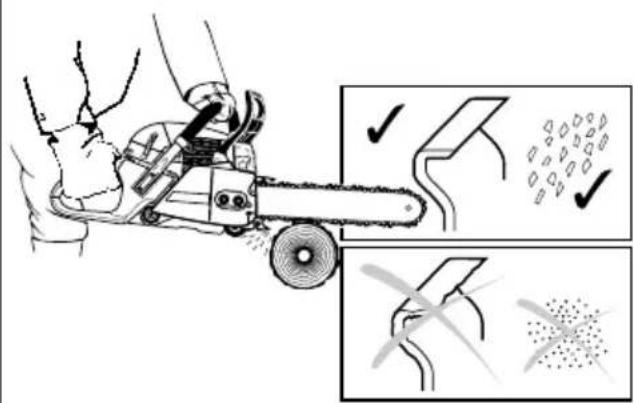
Start the chain saw (see „Starting the engine“).
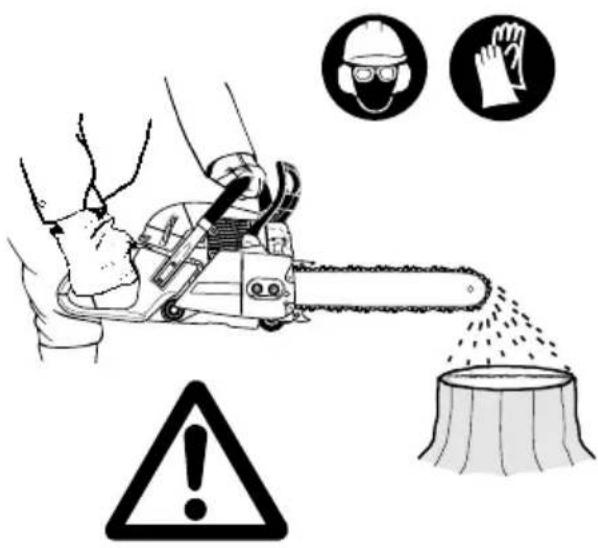
Hold the running chain saw approx. 15 cm above a trunk or the ground (use an appropriate base).
If the lubrication is sufficient, you will see a light oil trace because oil will be flung off the sawing device. Pay attention to the direction the wind is blowing and avoid unnecessary exposure to the oil spray!
Note:
After the saw has been turned off it is normal for residual chain oil to drip from the oil feed system, the guide bar and the chain for a time. This does not constitute a defect!
Place the saw on a suitable surface.
C
Adjusting the chain lubrication
The engine must be switched off.

You can adjust the oil pump feed rate with the adjusting screw (1). The adjusting screw is on the bottom side of the housing.
The oil pump comes factory-set to a medium feed rate.
To change the feed quantity use the screwdriver and adjust the adjusting screw in the following way:
- Turn to the right to reduce the feed rate.
- Turn to the left to increase the feed rate.
Even very small adjustments to the adjusting screw (1) can influence the oil flow rate. While working make sure there is enough chain oil in the tank. If necessary, add oil.
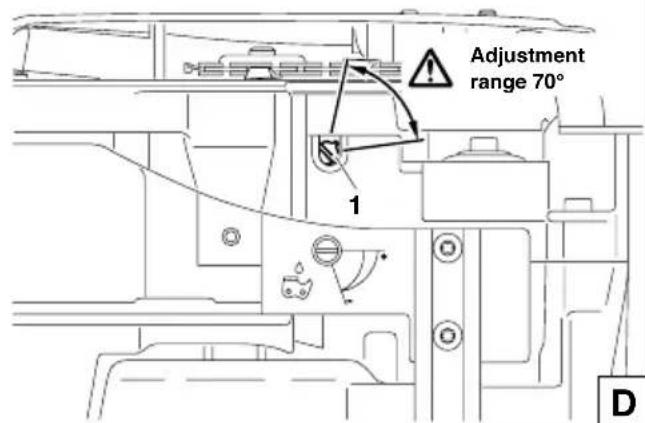
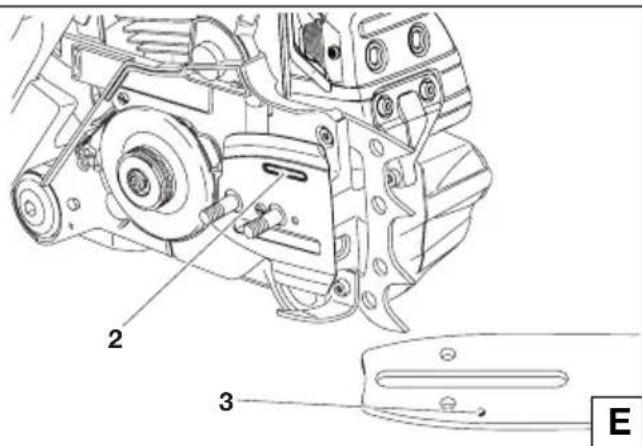
To ensure troublefree operation of the oil pump the oil guide groove at the crank case (2) and the oil inlet bore in the guide bar (3) must be cleaned regularly.
Note:
After the saw has been turned off it is normal for residual chain oil to drip from the oil feed system, the guide bar and the chain for a time. This does not constitute a defect!
Place the saw on a suitable surface.
Starting the engine
Start the chain saw only after having assembled it completely and inspected.
Move at least 3m away from the place where you fuelled the saw.
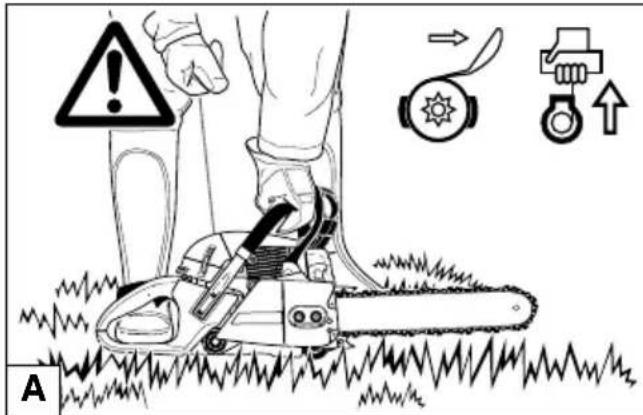
Make sure you have a good footing, and place the saw on the ground in such a way that the chain is not touching anything.
Engage the chain brake (lock).
Hold the tubular handle tightly with one hand and press the chain saw to the ground.
Steady the right foot by standing in the rear handle.
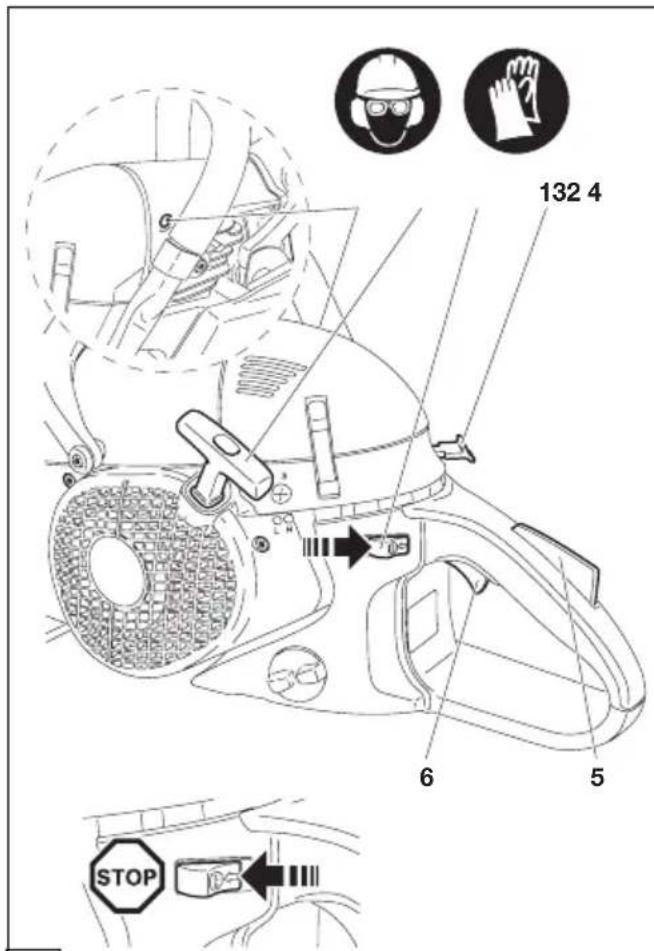
Cold-starting:
Pull the choke (1) out until it audibly clicks. This simultaneously actuates the half-throttle lock.
Move the I/STOP ignition switch (3) as shown by the arrow.
Slowly pull out the starter cable until you notice resistance (the piston is positioned before the top dead centre).
Push the starting valve (2).
Now pull the starter cable with a fast and forceful movement until you hear the first ignition.
CAUTION: Do not pull out the starter cable more than approx. 50 cm, and lead it back by hand.
Push the starting valve (2).
Depress the choke (1) and pull the starter cable again. As soon as the engine is running, grasp the rear handle (this actuates the grip safety (5)) and tap the throttle (6). This will release the half-throttle lock and the engine will run in idle.
CAUTION: As soon as the engine is started it must be put in idle to prevent the chain brake from being damaged.
Now release the chain brake.

Warm starting:
As described for cold starting, except before starting pull the choke (1) all the way out and back in one time, in order to activate the half-throttle lock.
Stopping the engine
Move the I/STOP ignition switch to the "STOP" position.
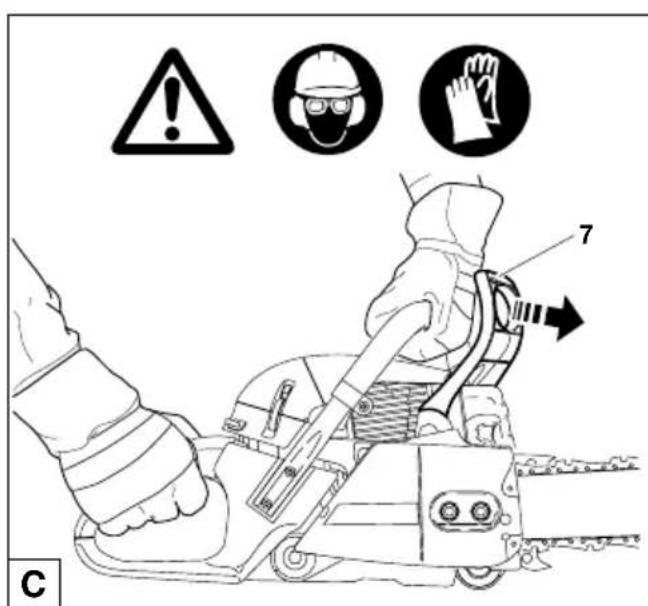
Checking the chain brake
Do not work with the chain saw without first checking the chain brake!
Start the engine as described (make sure you have a good footing, and place the chain saw on the ground in such a way that the guide bar is free of contact).
Grasp the tubular handle firmly with one hand and hold the grip with the other.
With the engine running at moderate speed, press the hand guard (7) in the direction of the arrow with the back of your hand until the chain brake engages. The chain should stop immediately.
Immediately release the throttle and release the chain brake.
IMPORTANT: If the chain does not stop immediately when you test the chain brake, do NOT use the chain saw. Take the chain saw to a MAKITA service center.
Adjusting the carburetor
CAUTION: Carburetor adjustment may only be done by a specialist MAKITA service centre!

SERVICE
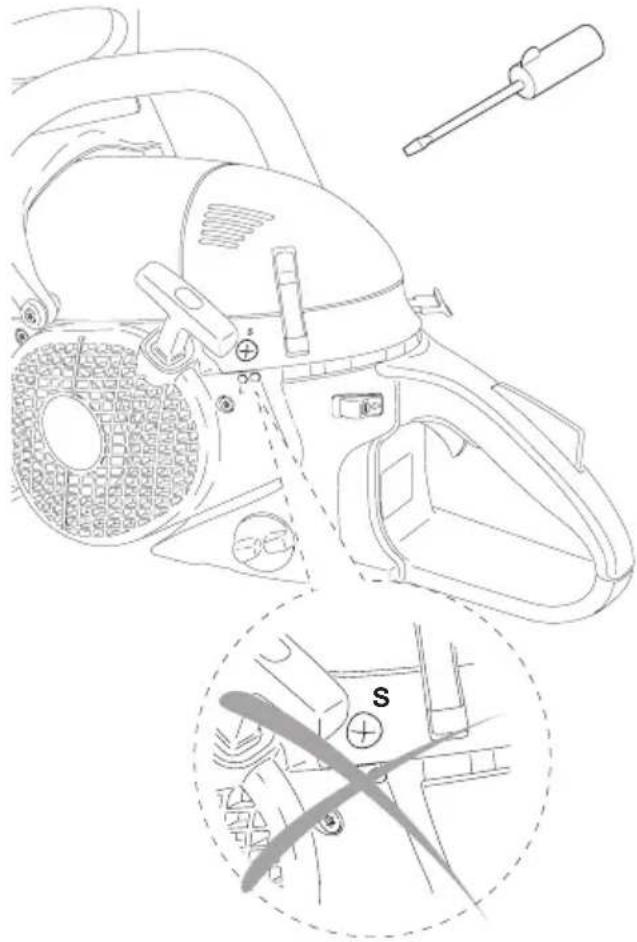
Only adjusting screw (S) can be manipulated by the user. If the saw chain moves in idle (i.e. without the throttle being pressed), it is imperative to correct the idle speed!
Do not adjust the idle speed until after complete assembly and testing of the saw!
Idle speed adjustment must only be undertaken when the engine is warm, with a clean air filter and properly installed guide bar and chain.
Use a screwdriver (4 mm blade) for idle adjustments.
Adjusting the idle speed
Turn adjusting screw (S) counter-clockwise (unscrew): Idle speed decreases.
Turn adjusting screw (S) clockwise (screw in): Idle speed increases.
Important: If the saw chain still moves during idle even after you have adjusted the idle speed, do NOT use the saw. Take it to a MAKITA service centre!


natural_image
Technical line drawing of a manual lawn saw with labeled components and a close-up inset showing a screwdriver (no text or symbols present)Working in winter
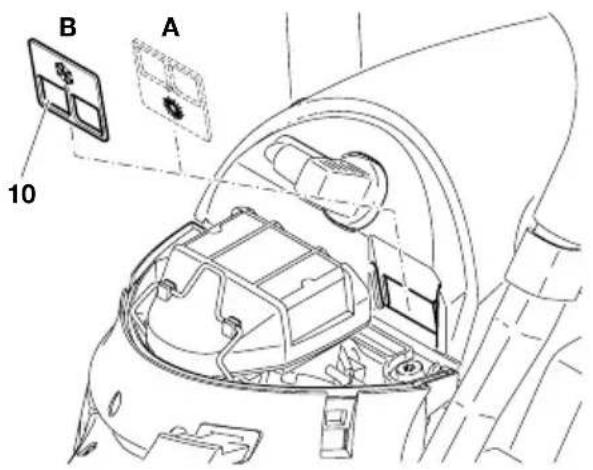
In order to prevent carburetor icing in conditions of low temperature combined with high humidity, and below +5°C in order to get up to operating temperature faster, heated air can be taken from the cylinder.
Remove the filter hood (see „Cleaning air filter“)
Remove the insert (10) and insert it as shown in position B for cold-weather operation.
At temperatures above + 5°C the carburetor must NOT be fed heated air. Failure to follow these instructions can lead to damage to the cylinder and piston!
At temperatures over +5°C place the insert in position A for normal operation.
Position A

- Normal operation
Position B

- Cold-weather operation
Reinstall the filter hood.
B
A
MAINTENANCE
Sharpening the saw chain


CAUTION: Before doing any work on the guide bar or chain, always switch off the engine and pull the plug cap off the spark plug (see „Replacing the spark plug“). Always wear protective gloves!
The chain needs sharpening when:
The sawdust produced when sawing damp wood looks like wood fl our.
The chain penetrates the wood only under great pressure.
The cutting edge is visibly damaged.
The saw is pulled to the left or right when sawing. This is caused by uneven sharpening of the chain.
Important: Sharpen frequently, but without removing too much metal!
Generally, 2 or 3 strokes of the fi le will be enough.
Have the chain resharpened at a service centre when you have already sharpened it yourself several times.
B
Proper sharpening:
CAUTION: Use only chains and guide bars designed for this saw (see the Extract from the spare-parts list)!
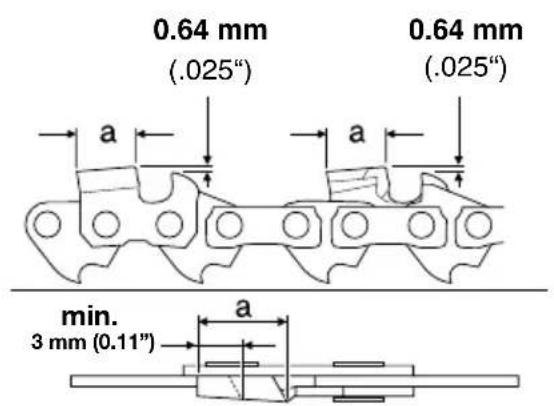
All cutters must be of the same length (dimension a). Cutters with different lengths result in rough running of the chain and can cause cracks in the chain.
The minimum cutter length: 3 mm. Do not resharpen the chain when the minimum cutter length has been reached; at this point, the chain must be replaced (see the Extract from the spare-parts list and „Replacing the saw chain“).
The depth of the cut is determined by the difference in height between the depth limiter (round nose) and the cutting edge.
The best results are obtained with a depth-limiter depth of 0.64 mm (.025").
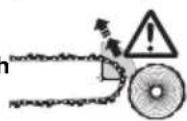
CAUTION: Excessive
depth
increases the risk of kickback!
C
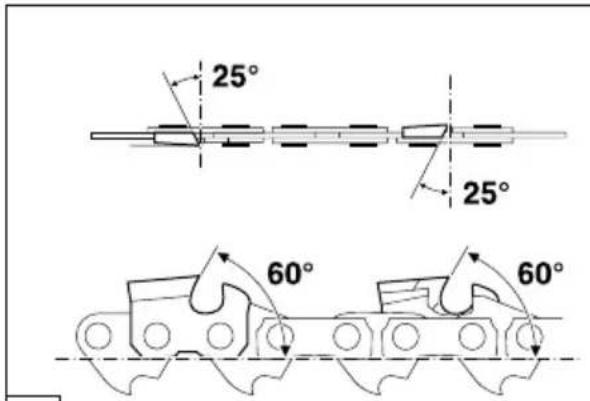
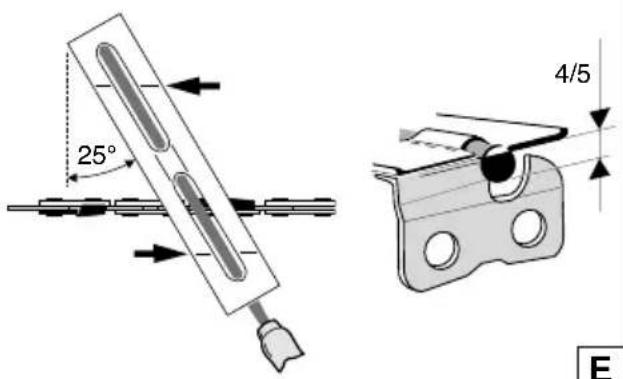
The sharpening angle of 25^ must be identical for all cutters! Different angles result in a roughly, irregularly running chain, increase wear and tear and cause chain breakage.
The front rake 60° of the cutter results from the cut depth of the round file. If the proper file is used in the right manner, the correct front rake will be obtained automatically.
Files and how to work with them
Sharpen using a special file holder with a saw chain round file. Normal round fi les are not appropriate for this work. See „Accessories“ for the order number.
File the first cutter half with a 5.5 mm dia. round saw-chain file, then switch to a 4.8 mm dia. file.
The file should cut only when pushed forwards (arrow). Lift the file when leading it backwards.
First sharpen the shortest cutter. The length of this cutter is then the standard for all other cutters of the chain.
New saw teeth must be fi led to the exact same shape as the used teeth, including on their running surfaces.
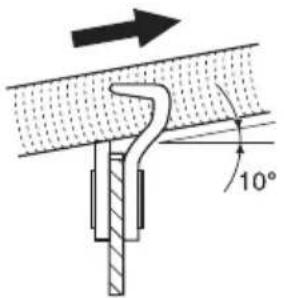
Always guide the file horizontally (10 to the guide bar).
D
The file holder makes file guidance easier. It is marked for the correct sharpening angle of 25^ (keep the marks parallel with the chain when filing, see illustration) and limits the cut depth to the correct 4/5 of the file diameter. See „Accessories“ for the order number.
E
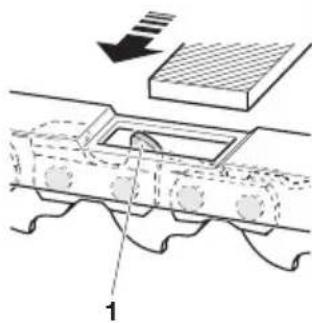
After having sharpened the chain, the height of the depth limiter must be checked by means of a chain gauge. See „Accessories“ for the order number.
Correct even the smallest excess height with a special flat file (1). See „Accessories“ for the order number.
Round off the front of the depth limiter (2).
natural_image
Diagram of a car under load with a component, showing structural components and motion direction (no text or symbols)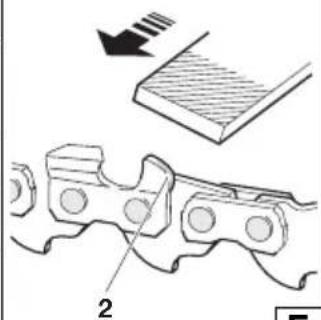
natural_image
Technical illustration of a chain link mechanism with labeled component '2' and directional arrow (no text or symbols beyond label)F
Cleaning the brake band and sprocket interior
CAUTION: Before doing any work on the guide bar or chain, always switch off the engine and pull the plug cap off the spark plug (see „Replacing the spark plug“). Always wear protective gloves!
CAUTION: Start the chain saw only after having assembled it completely and inspected.
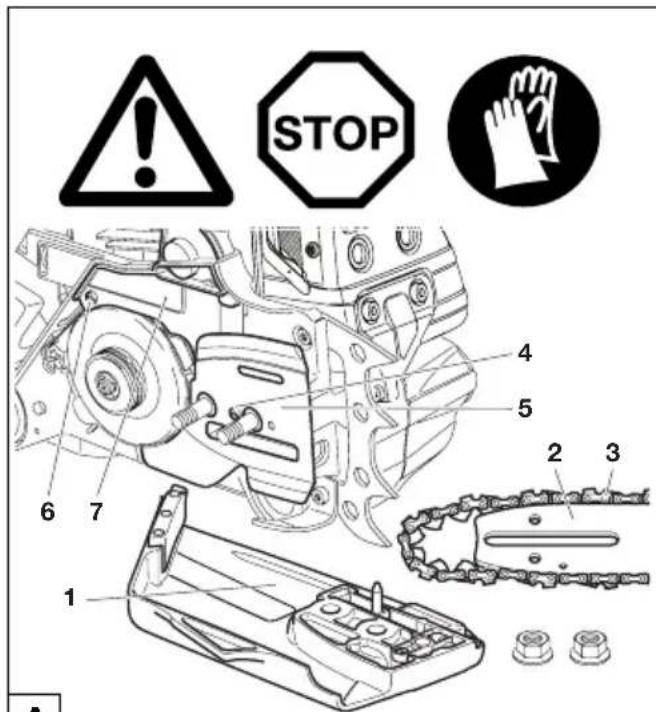
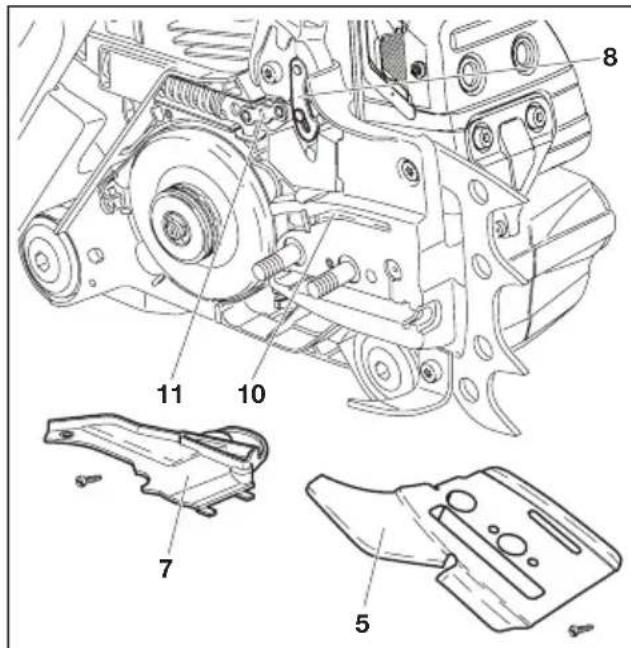
Remove the sprocket guard (1) (See „PUTTING INTO OPERATION“ figs. B) and clean the interior with a brush
Remove the chain (3) and guide bar (2).
Unscrew screw (4) and remove the guide plate (5).
Unscrew screw (6) and remove the brake mechanism cover (7).

SERVICE
Clean the guide plate (5) and brake mechanism cover (7).
Use a brush to clean the interior, especially the brake band (11).
Make sure to leave no residue in the oil guide groove (10)
NOTE:
The brake mechanism cover (7) holds the lever (8) in place. Before putting the cover back on, check the lever and pin for proper positioning.
First put on the brake mechanism cover (7) and then the guide plate (5).
For replacing the guide bar, chain, and sprocket see „PUTTING INTO OPERATION A-H“.
After assembly, always check the functioning of the chain brake (see "Checking the chain brake")
NOTE:
The chain brake is a very important safety device and like any other component subject to normal wear and tear.
Regular inspection and maintenance are important for your own safety and must be done by a MAKITA service centre.
B
Cleaning the guide bar
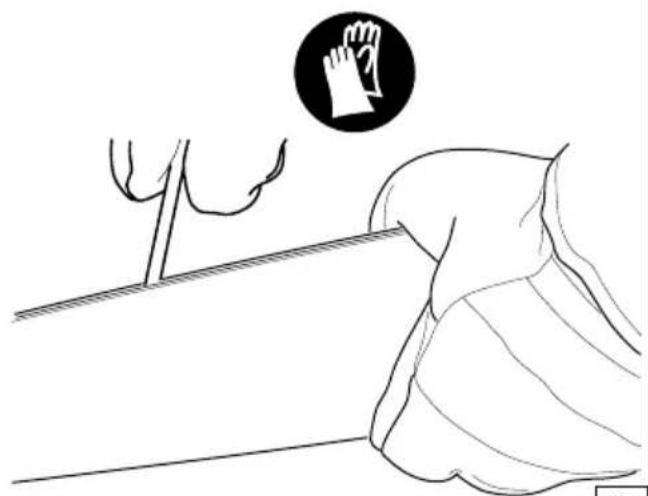
CAUTION: Protective gloves must be worn.
Regularly inspect the bearing surfaces of the guide bar for damage, and clean them with a suitable tool.
natural_image
Line drawing of a person's arm and hand holding a glove, with no text or symbols presentC
Replacing the saw chain
CAUTION: Use only chains and guide bars designed for this saw (see the Extract from the spare-parts list)!
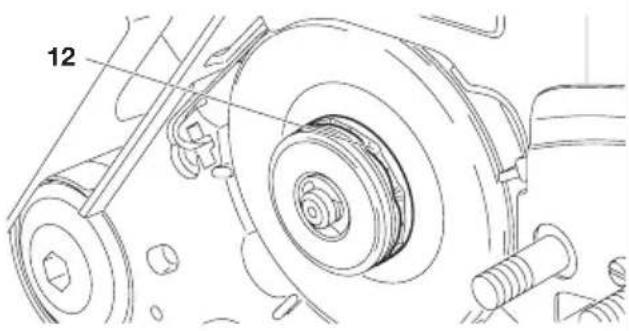
Check the sprocket before mounting a new chain.
Worn out sprockets (12) may damage the new chain and must therefore be replaced.
Remove the sprocket guard (1) (See „PUTTING INTO OPERATION“ figs. B).
Remove the chain and guide bar.
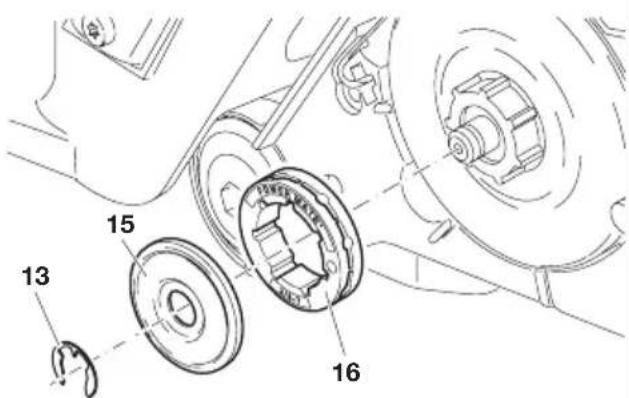
Remove circlip (13).
CAREFUL: The circlip will jump out of the groove unless you hold it down with your thumb while removing it.
Remove cup-disc (15).
Replace the old sprocket (12) with a new one (16). For the part number consult the "Extract from the spare parts list".
Assemble the new sprocket, cup-disc and circlip.
For replacing the guide bar, chain, and sprocket see „PUTTING INTO OPERATION A-H“.
NOTE:
New chains stretch, so check the chain tension frequently (see "Checking the chain tension").
D
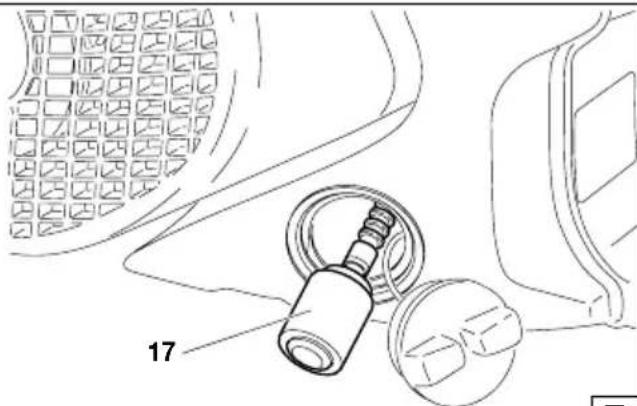
Replacing the suction head
The felt filter (17) of the suction head can become clogged. It is recommended to replace the suction head once every three months in order to ensure unimpeded fuel flow to the carburetor.
To remove the suction head for replacement, pull it out through the tank fi ller neck using a piece of wire bent at one end to form a hook.
natural_image
Technical line drawing of a car interior showing a valve and seat assembly (no text or symbols)E
natural_image
Line drawing of hands using a tool to adjust or install a mechanical component (no text or symbols present)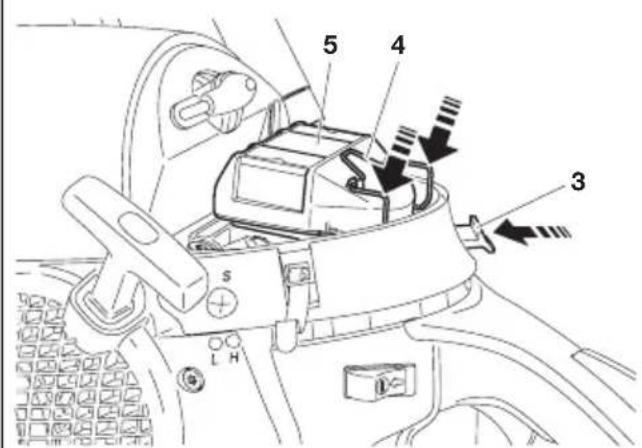
A
Cleaning the air fi Iter

CAUTION: To prevent eye injury, always wear eye protection when cleaning the filter with compressed air!
Do not use fuel to clean the air filter.
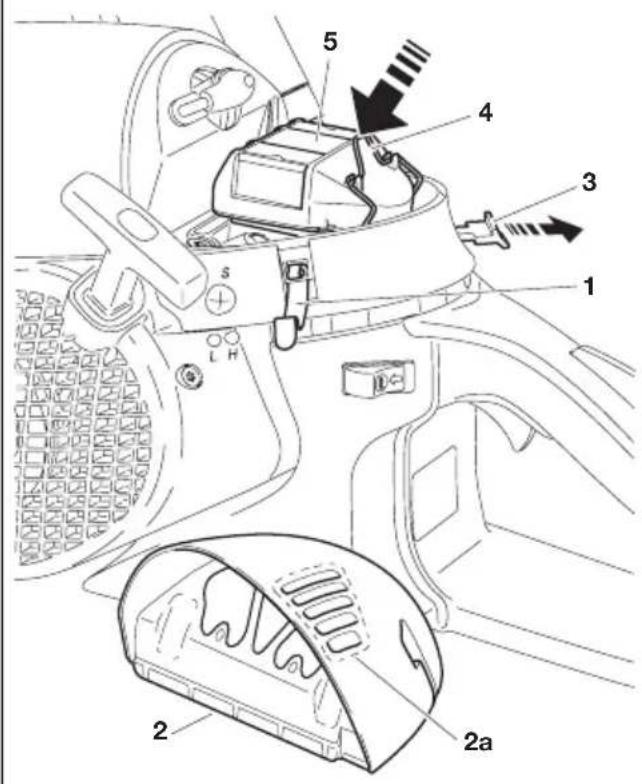
Unhook the filter hood clips (1) with the combination tool and remove the filter hood (2).
Pull out the choke (3) to prevent dirt particles from getting into the carburetor.
Unhook the air filter retainer (4) by pressing in the direction shown by the arrow.
Pull the air filter (5) up and out.
IMPORTANT: Cover the intake opening with a clean cloth to prevent dirt particles from getting into the carburetor.
Choosing the right filter: The fleece filter is for use in dry or dusty conditions. The nylon fi lter is for use in damp conditions.
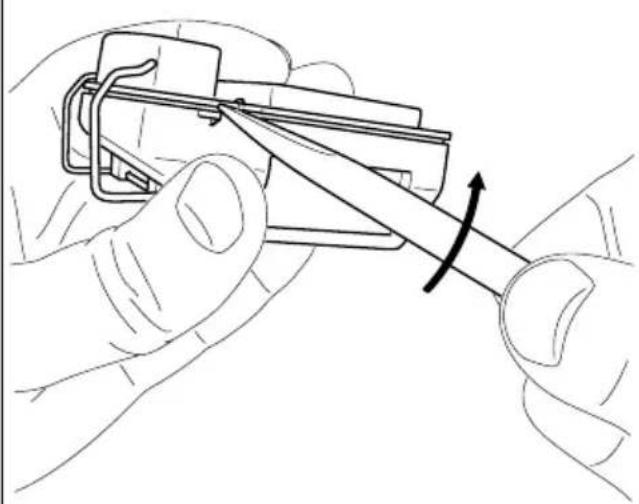
Pry apart the top and bottom of the air filter as shown in Figure.
Cleaning the fleece filter: Carefully tap out dust or carefully blow out dust from the inside with compressed air. Do not brush the fleece, as this will force dirt particles into the fabric. If the filter is very dirty, it can be washed in lukewarm water with regular dishwashing detergent. Note that the fleece filter does not need to be cleaned until there is a noticeable loss of power. If cleaning the filter does not bring an improvement in performance, it is time to replace it.
Cleaning the nylon filter, the nylon filter in the filter hood and pre-fi iter: Use a soft brush or blow out dirt from the inside with compressed air. If the filter is very dirty, it can be washed in lukewarm water with regular dishwashing detergent. Clean frequently (several times a day) when working in very dusty or dirty conditions. Full engine power is possible only with a clean air fi iter!
Note on the pre-filter: The ventilation slots (2a) can be covered by an additional self-adhesive nylon pre-filter. Before putting on this filter, clean the area where it will go. This pre-filter is available as an accessory part.
Let the air filter dry completely.
Put the top and bottom sections back together.
Before assembling the air filter, check the choke flap for any dirt particles. If there are any, remove them with a brush.
CAUTION: If the air filter becomes damaged, replace immediately! Pieces of cloth or large dirt particles can destroy the engine!
Put in the air filter (5) and press down the air filter retainer (4) evenly with thumb and forefinger until it clicks.
Push in the choke (3) and push the throttle all the way in to deactivate the half-throttle lock.
Put on the filter hood (2) and hook in the clips (1).
Replacing the spark plug


CAUTION:
Do not touch the spark plug or plug cap if the engine is running (high voltage).
Switch off the engine before starting any maintenance work. A hot engine can cause burns. Wear protective gloves!
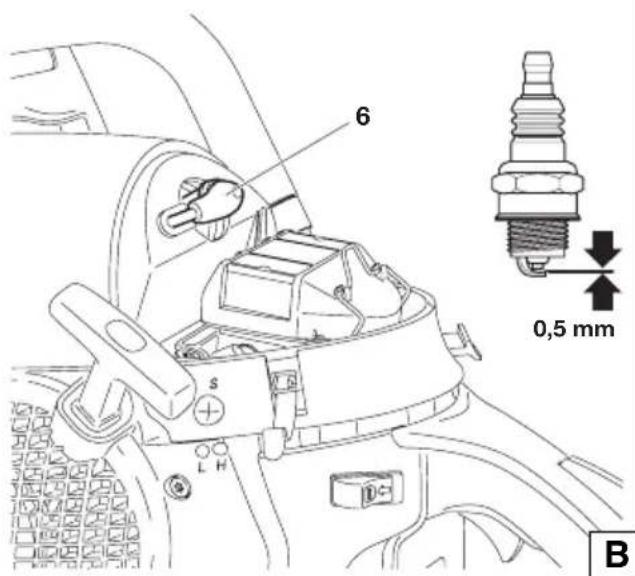
The spark plug must be replaced in case of damage to the insulator, electrode erosion (burn) or if the electrodes are very dirty or oily.
Remove the filter cover (see "Cleaning the air filter").
Pull the plug cap (6) off the spark plug. Use only the combination wrench supplied with the saw to remove the spark plug.
Electrode gap
The electrode gap must be 0.5 mm.
CAUTION: Use only the following spark plugs: NGK BPMR 7A or BOSCH WSR 6F.
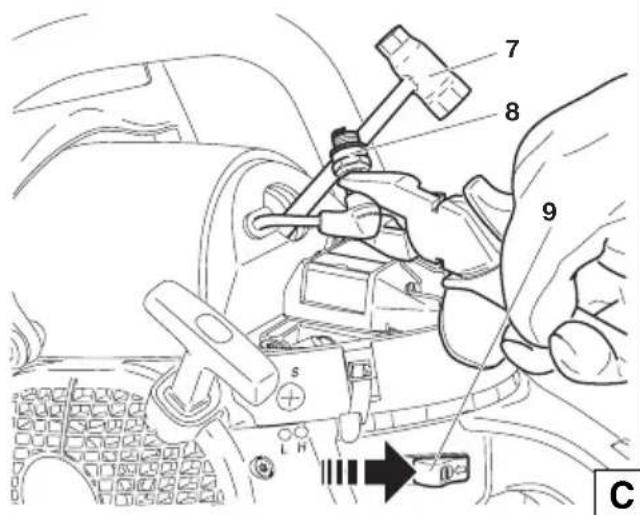
Checking the ignition spark
Stick the combination tool (7) between the hood and cylinder exactly as shown.
IMPORTANT! Do not stick the tool in the spark plug hole. It should touch only the cylinder (otherwise the engine will be damaged!).
With the spark-plug cap firmly attached to the unscrewed spark plug (8), use insulated pliers to hold the plug against the tool (away from the spark-plug hole!).
Switch the I/STOP ignition switch (9) as shown by the arrow. Pull the starter cable hard.
If the function is correct, an ignition spark must be visible near the electrodes.
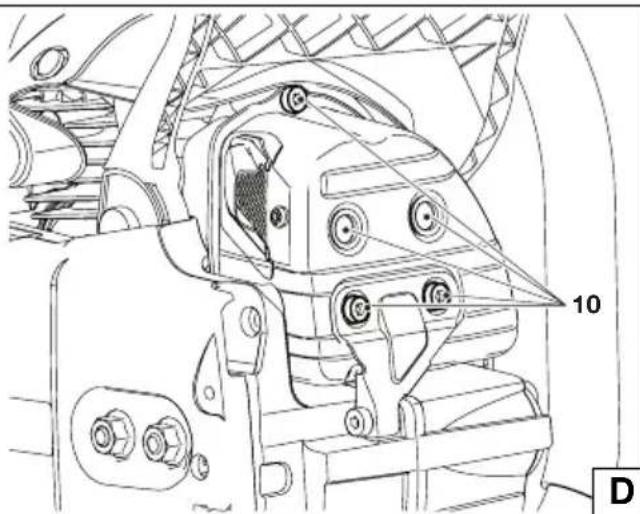
Checking the muffler screws



Careful!
Do not tighten the muffl er screws when the engine is hot!
Check the muffler screws (10) for tightness. If they are loose, hand-tighten them. Important - do not overtighten!
natural_image
Technical line drawing of a mechanical assembly with numbered components (no readable text or symbols)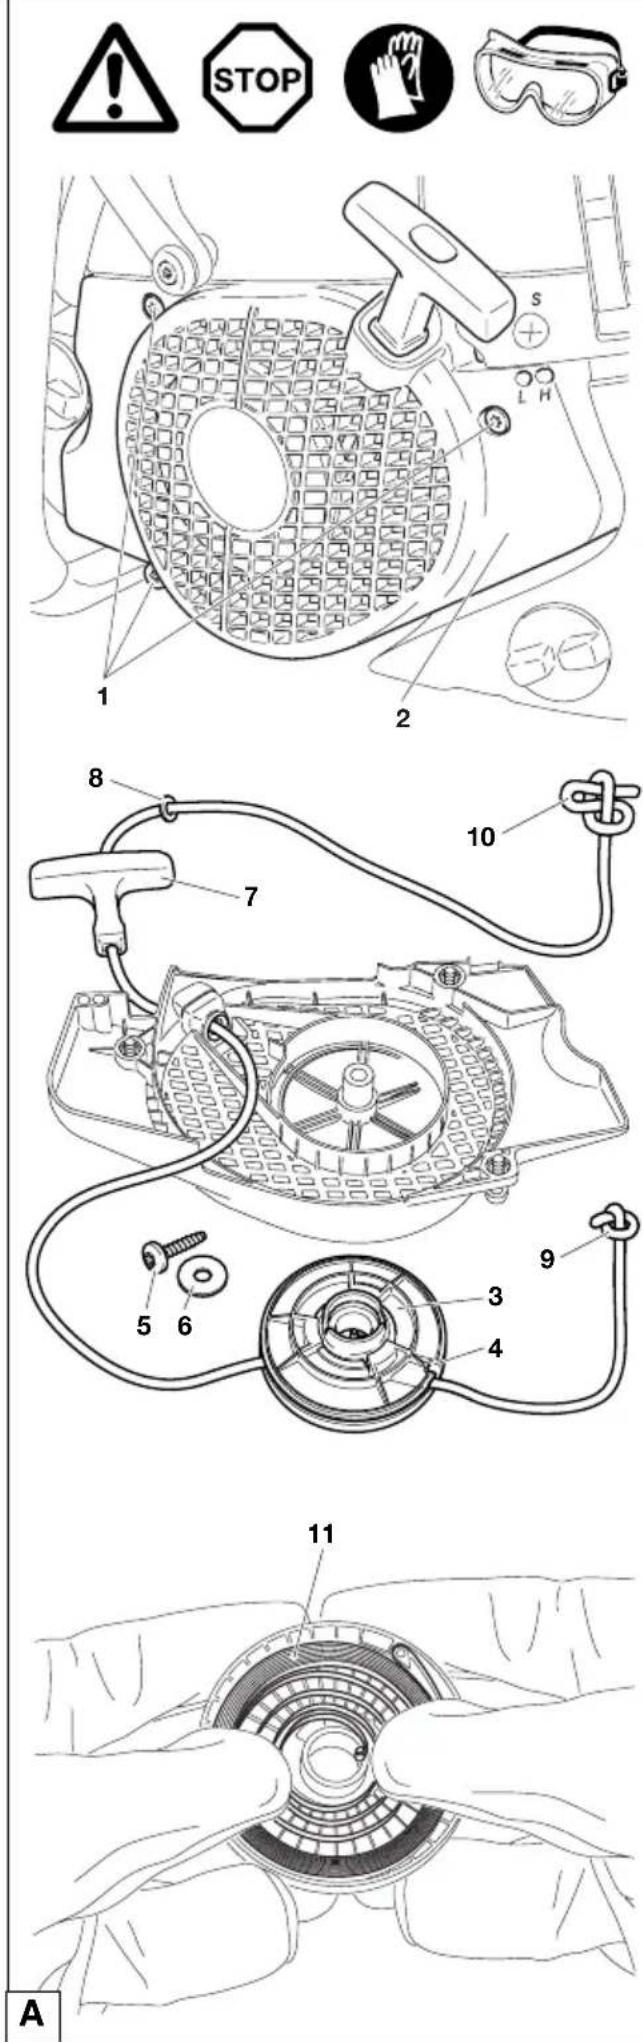
Replacing the starter cable / Replacing the return spring
Unscrew three screws (1).
Remove fan housing (2).
NOTE: The screws (1) are secured against falling out of the housing.
CAREFUL! Injury hazard! Do not unscrew screw (5) if the return spring is under tension.
If the starter cable is to be replaced although it is not broken, it will be necessary to first de-tension the cable drum return spring (3).
To do this, use the grip to pull the cable all the way out of the fan housing.
Hold the cable drum with one hand, and with the other push the cable into the space (4).
Carefully let the drum turn until the return spring is no longer under tension.
Unscrew screw (5) and remove washer (6). Carefully remove the cable drum.
CAREFUL! Injury hazard! The return spring can pop out!
Remove any cable pieces.
Thread a new cable (dia. 3.5 mm, length 980 mm) as shown in the illustration (don't forget the washer (8)) and knot both ends as shown.
Pull knot (9) into the cable drum (3).
Pull knot (10) into the starter grip (7).
Put the drum on its spindle and turn it slightly until the return spring engages.
Screw in and tighten screw (5) and washer (6).
Guide the cable into the space (4) on the drum and use the cable to turn the drum two turns clockwise.
Hold the cable drum with your left hand and with your right hand untwist the cable, pull it tight and hold it.
Carefully release the cable drum. The spring will wind the cable around the drum.
Repeat three or four times. The starter grip should now be held upright on the fan housing.
NOTE: With the cable pulled all the way out, it must still be possible to turn the pulley another 1/4 turn against the return spring.
CAUTION: Danger of injury! Secure the cable grip when pulled out! It will whip back if the cable pulley is released by accident.
Replacing the return spring
Disassemble the fan housing and cable drum (see above).
CAUTION: Danger of injury! If the spring is broken it may pop out!
Replacement return springs are supplied pretensioned in the cable drum. CAUTION – the spring can pop out. If it does, it can be put back in as shown in the drawing.
Before installation in the fan housing, lightly grease the new return spring (11) with multipurpose grease (order no. 944 360 000).
Install the cable drum and fan housing (see above).
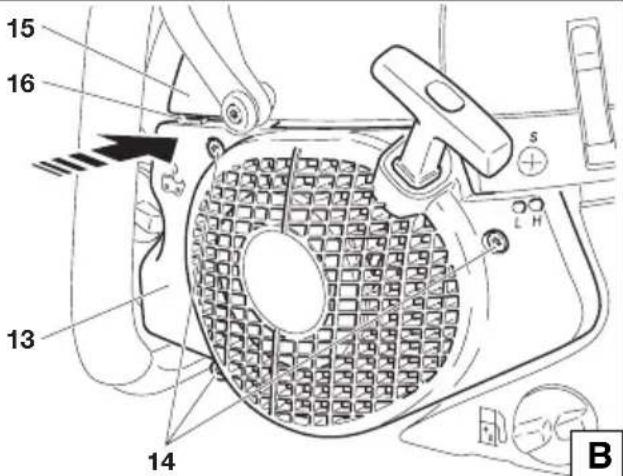
Mounting the fan housing
Put the fan housing (13) on.
Press the screws (14) into their holes.
Lift the engine hood (15) slightly and use your thumb to hook in the tab (16) on the fan housing.
Straighten out the fan housing, push lightly against the saw and pull the starter grip until the starting mechanism catches.
Tighten screws (14).
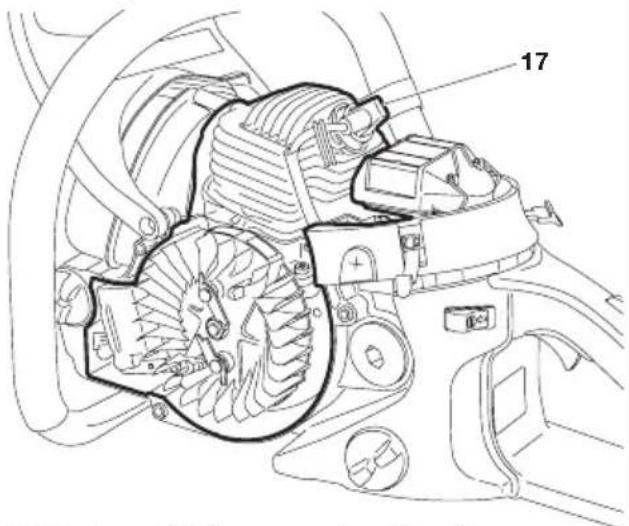
Cleaning the cylinder area



Remove the filter hood and air filter.
Remove the spark plug cap and unscrew the spark plug.
Press in the starting valve and activate the chain brake.
Push the cable cutout and ignition cable out sideways.
Unscrew the two rearmost screws on the cover.
Unscrew the screws on the handguard pivot and remove the bushing.
Lift the cover out of the air intake guide and remove.
IMPORTANT: Put the air fi iter back on and fasten it. Insert the spark plug and hand-tighten.
Put the spark plug cap on the plug and pull out the starting valve.
Remove the fan housing and remove the air guide.
CAUTION: To prevent eye injury, always wear eye protection when cleaning the filter with compressed air!
The entire area (17) can now be brushed clean or cleaned with compressed air.
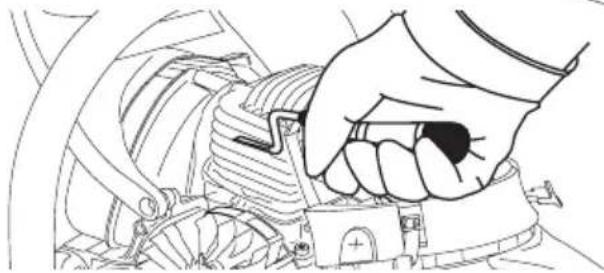
A bottle brush can come in handy for cleaning out the cylinder ribs.
With the cylinder fi n cleaner, clean out the area between the cylinder fi ns and between the cylinder and the mounting plate.
Do not use force. Be careful not to damage the short-circuit wire and the ignition wire.
natural_image
Line drawing of a hand gripping a mechanical component (no text or symbols)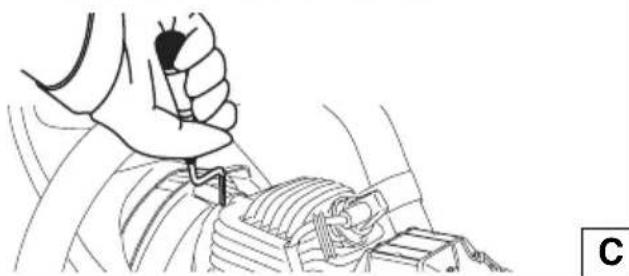
natural_image
Line drawing of a hand using a tool to adjust or install a mechanical component (no text or symbols present)Replacing/cleaning the spark arrester screen
The spark arrester screen should be checked and cleaned regularly. Let cool the engine down for sure!
Loosen the screw (18) and remove the spark arrester screen (19).
Caution: Do not use sharp or pointed objects for screen cleaning. Damaged or misformed screen wires may result.
Reassembly the spark arrester screen and tighten the screw.
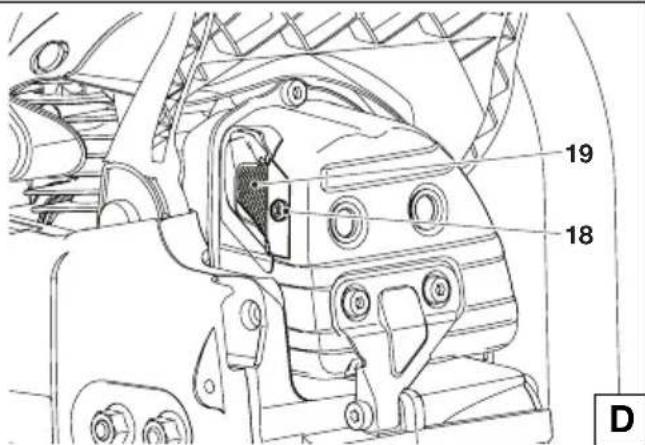
Instructions for periodic maintenance
To ensure long life, prevent damage and ensure the full functioning of the safety features the following maintenance must be performed regularly. Guarantee claims can be recognized only if this work is performed regularly and properly. Failure to perform the prescribed maintenance work can lead to accidents!
The user of the chain saw must not perform maintenance work which is not described in the instruction manual. All such work must be carried out by a MAKITA service centre.
Page
| General Chain saw Clean exterior, check for damage. In case of damage, have repaired by a qualified service centre immediately Saw chain Sharpen regulatory, replace in good time 19-20 Chain brake Have inspected regularly at an authorized service centre Guide bar Turn over to ensure even wear of bearing surfaces Replace in good time 12, 22 Starter cable Check for damage. Replace if damaged. 25 | |||
| Before each startCheck chain tensionGuide bar Check for damageChain lubricationFunctional checkChain brake Functional checkOFF switch, Safety locking button, Throttle leverFunctional checkFuel/oil tank capCheck for tightness | Inspect for damage and sharpness12151616 | 19-20 | |
| Every dayGuide bar Check for damage, clean oil intake boreGuide bar support Idle speed Check (chain must not run) | Clean22Clean, in particular the oil guide groove17 | 2315, 21 | |
| Every weekSpark plug | Fan housingCylinder areaCheck and replace if necessaryMufflerChain guide Screws and nuts | Clean to maintain good cooling air flow.Clean to maintain good cooling air flow.24Check tightness of mounting, Clean spark arrester screenCheckCheck their condition and that they are firmly secured. | 9269, 2611 |
| Every 3 monthsFuel, oil tanks | Suction headClean | Replace | 22 |
| Annually | Chain saw Check at an authorized service centre | ||
| Storage Chain saw Clean exterior, check for damage. In case of damage, have repaired by a qualified service centre immediately Guide bar/chain Demount, clean and oil slightly Clean the guide groove of the guide bar Fuel, oil tanksEmpty and clean CarburetorRun empty | 22 | ||
Service, spare parts and guarantee
Maintenance and repair
The maintenance and repair of modern engines as well as all safety devices require qualified technical training and a special workshop equipped with special tools and testing devices.
We therefore recommend that you consult a MAKITA service centre for all work not described in this instruction manual.
The MAKITA service centres have all the necessary equipment and skilled and experienced personnel, who can work out cost-effective solutions and advise you in all matters.
To find your local distributor, please visit www.makita-outdoor.com
Spare parts
Reliable long-term operation, as well as the safety of your chain saw, depend among other things on the quality of the spare parts
used. Use only original MAKITA parts, marked

Only original spare parts and accessories guarantee the highest quality in material, dimensions, function and safety.
Original spare parts and accessories can be obtained from your local dealer. He will also have the spare part lists to determine the required spare part numbers, and will be constantly informed about the latest improvements and spare part innovations.
Please bear in mind that if parts other than original MAKITA spare parts are used, this will automatically invalidate the MAKITA product guarantee.
Guarantee
MAKITA guarantees the highest quality and will therefore reimburse all costs for repair by replacement of damaged parts resulting from material or production faults occurring within the guarantee period after purchase. Please note that in some countries particular guarantee conditions may exist. If you have any questions, please contact your salesman, who is responsible for the guarantee of the product.
Please note that we cannot accept any responsibility for damage caused by:
- Disregard of the instruction manual.
• Non-performance of the required maintenance and cleaning.
• Incorrect carburetor adjustment.
• Normal wear and tear. - Obvious overloading due to permanent exceeding of the upper performance limits.
- Use of guide bars and chains which have not been approved.
- Use of guide bar and chain lengths which have not been approved.
- Use of force, improper use, misuse or accidents.
- Damage from overheating due to dirt on the fan housing.
• Work on the chain saw by unskilled persons or inappropriate repairs. - Use of unsuitable spare parts or parts which are not original MAKITA parts, insofar as they have caused the damage.
- Use of unsuitable or old oil.
- Damage related to conditions arising from lease or rent contracts.
- Damages caused by disregarding loose outer bolted connections.
Cleaning, servicing and adjustment work is not covered by the guarantee. All repairs covered by the guarantee must be performed by a MAKITA service centre.
Trouble shooting
| Malfunction | System Observation | Cause | |
| Chain does not run Chain | brake Engine runs | Chain brake actuated. | |
| Engine does not start or only with diffi culty pression system, mechanical malfunction.No ignition spark Switch on STOP, fault or short-circuit in the wiring, plug cap or spark plug defective.suction head dirty, fuel fuel supply line bent or interruptedВыde | Ignition system | Ignition spark | Malfunction in fuel supply system, com- |
| Compression | Fuel tank is filled | Choke in wrong position, carburetor defective, | |
| shaft packings defective, cylinder or piston rings | Inside | Cylinder base packing ring defective, radial defective | |
| Outside | Spark plug does not seal. | Starter does not engage | Spring in starter broken, broken parts |
| malfunction inside the engine. | |||
| Warm start difficulties | Carburetor | Fuel tank is filledIgnition spark | Wrong carburetor adjustment. |
| Engine starts, but dies immediately carburetor dirty. Tank venting defective, fuel line interrupted, cable defective, STOP switch defective. Starting valve dirty | Fuel tank is filled | Wrong idling adjustment, suction head or | |
| Insufficient power simultaneously | Several systems may be involved der clogged, spark | Engine is idling | Air filter dirty, wrong carburetor adjustment, muffler clogged, exhaust channel in cylin- |
| No chain lubricationOil guide groove dirty.Oil-pump adjusting screw incorrectly adjusted. | No oil on the chain | Oil tank empty. | |
Extract from the spare parts list
Use only original MAKITA parts. For repairs and replacement of other parts, see your MAKITA service centre.
EA7300P
EA7900P

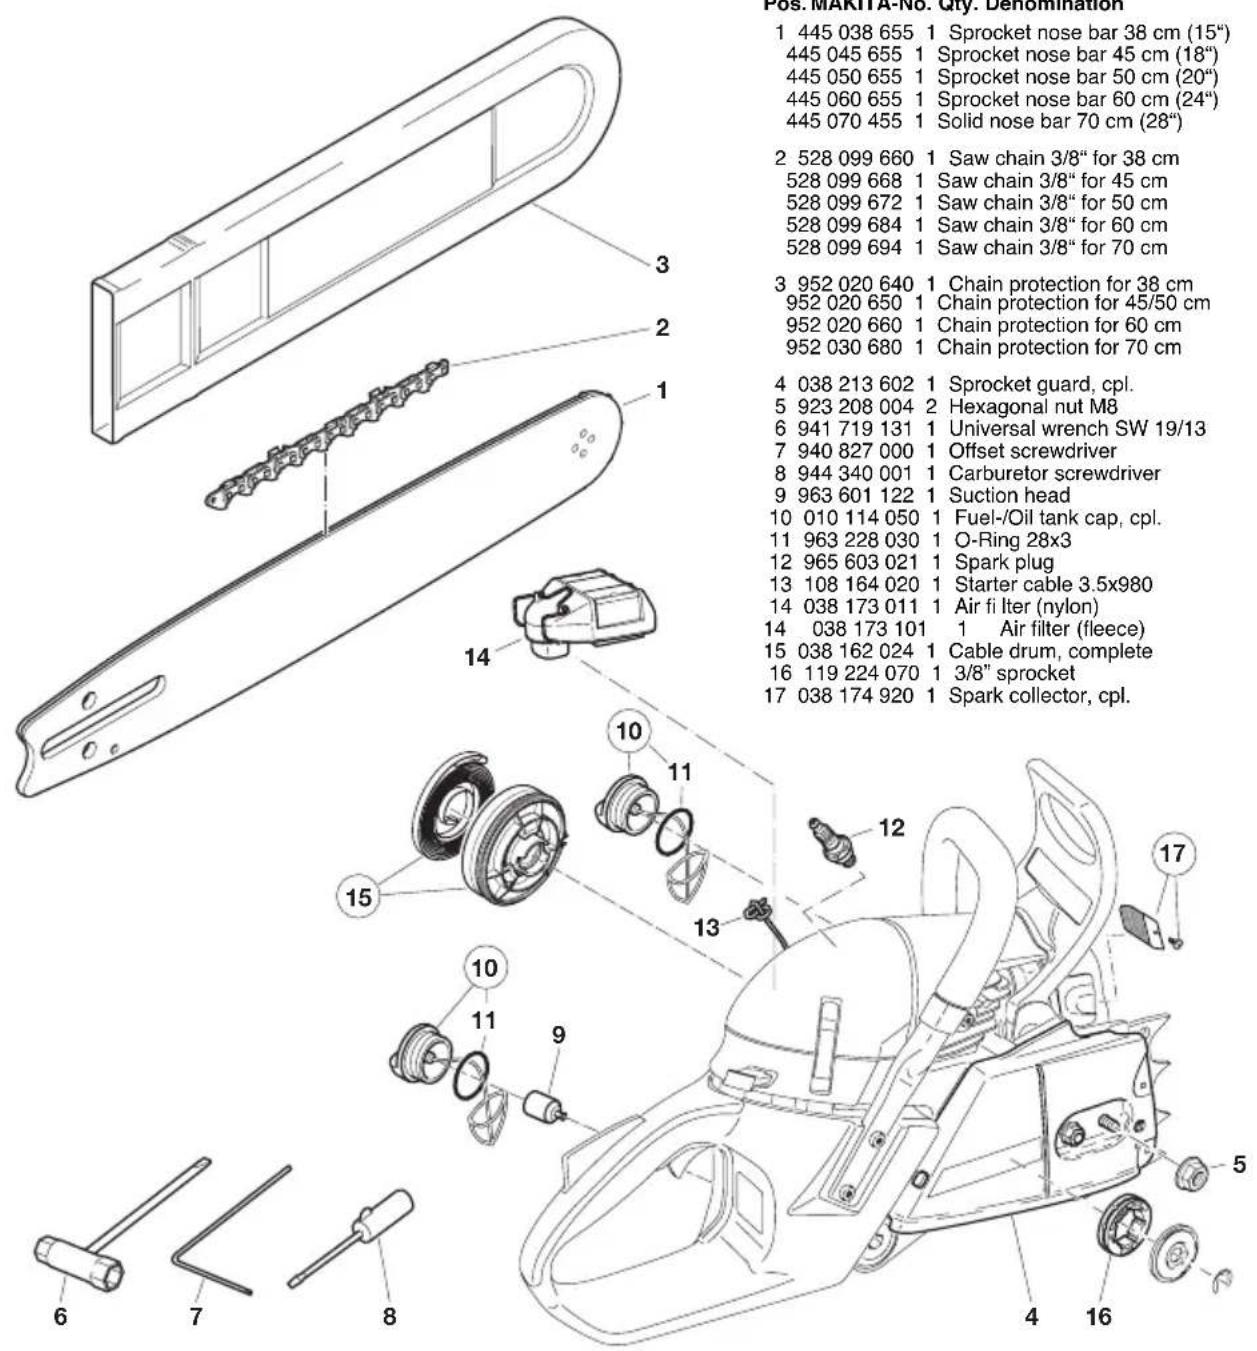
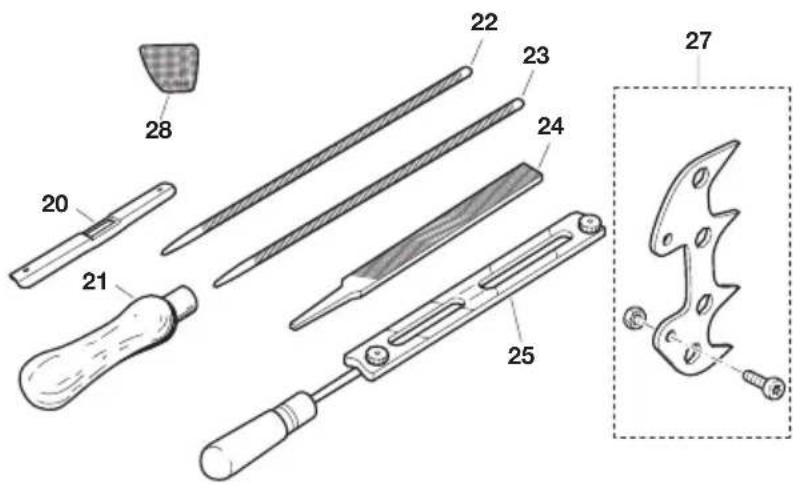
Accessories (not delivered with the chain saw)
20 953 100 090 1 Chain gauge
21 953 004 010 1 File handle
22 953 003 040 1 Round fi le, dia. 5,5 mm
23 953 003 070 1 Round fi le, dia. 4,8 mm
24 953 003 060 1 Flat file
25 953 030 030 1 File holder 3/8"
27 957 250 060 1 Spike bar, cpl.
28 038 173 200 1 Pre-fi iter (nylon)
- 949 000 035 1 Combined can
(for 5l fuel, 2.5l chain oil)
EU Conformity Declaration
The undersigned, Tomoyasu Kato, as authorized by MAKITA Corporation, declare that the MAKITA machines,
Typ: 038, 039
Chain saw EU prototype test certifi cate No.
EA7300P (039) 4811004.11013
EA7900P (038) 4811004.11013
manufactured by MAKITA Corporation, 3-11-8 Sumiyoshi-Cho, Anjo, Aichi, 446-8502 Japan, conforms to the basic safety and health requirements of the applicable EU Directives:
EU Machinery Directive 2006/42/EG.
EU EMC Directive 2004/108/EG.
Outdoor Noise Directive 2000/14/EG.
The most important standards applied to properly meet the requirements of the above EU Directive were: EN 11681-1, CISPR 12, EN 50082-1.
The conformity assessment procedure 2000/14/EG was performed per Annex V. The measured sound power level ( L_wa ) is 115,6 dB(A). The guaranteed sound power level ( L_d ) is 117 dB(A).
The EU-Type-Examination Certificate was performed by: DEKRA Testing and Certification GmbH (2140), Enderstraße 92 b, D-01277 Dresden.
The technical documentation is on file at MAKITA International Europe Ltd., Michigan Drive, Tongwell, Milton Keynes, Bucks, MK15 8JD, England.
Anjo, 16.12.2011
For MAKITA Corporation
Tomoyasu Kato
Managing Director
Tofi nd your local distributor, please visit
www.makita-outdoor.com
- Important:
- Thank you for purchasing a MAKITA product!
- Packing
- Table of contents Page
- SAFETY PRECAUTIONS
- MAINTENANCE
- Symbols
- Intended use
- Power chain saws
- Unauthorised users:
- General precautions
- Protective equipment
- Fuels / Refuelling
- Putting into operation
- Kickback
- In order to prevent kickback, follow these rules:
- Working behavior/Method of working
- CAUTION:
- People felling trees or cutting of branches must be specially trained. High risk of injuries!
- - Before cutting down a tree ensure that
- - Judging the tree:
- - Cutting the roots:
- - Notching the trunk (18, A):
- Transport and storage
- First aid
- NOTE
- Denomination of components
- Mounting the guide bar and saw chain
- Tightening the saw chain
- Checking the chain tension
- NOTE:
- Retightening the saw chain
- Chain brake
- B
- Engaging the chain brake (braking)
- Releasing the chain brake
- Fuel
- Fuel mixture
- In order to obtain an optimum engine output and to protect your health and the environment use unleaded fuel only.
- The correct mixture ratio:
- The Storage of Fuel
- AVOID SKIN AND EYE CONTACT
- Chain oil
- Important note on bio-degradable chain oils
- NEVER USE WASTE OIL
- A
- Refuelling
- FOLLOW THE SAFETY PRECAUTIONS!
- Lubricating the chain
- Checking the chain lubrication
- Adjusting the chain lubrication
- The engine must be switched off.
- Starting the engine
- Cold-starting:
- Warm starting:
- Stopping the engine
- Checking the chain brake
- Adjusting the carburetor
- Adjusting the idle speed
- Working in winter
- Sharpening the saw chain
- The chain needs sharpening when:
- Important: Sharpen frequently, but without removing too much metal!
- Proper sharpening:
- CAUTION: Use only chains and guide bars designed for this saw (see the Extract from the spare-parts list)!
- C
- Files and how to work with them
- Cleaning the brake band and sprocket interior
- Cleaning the guide bar
- Replacing the saw chain
- Replacing the suction head
- Cleaning the air fi Iter
- Replacing the spark plug
- Electrode gap
- Checking the ignition spark
- Checking the muffler screws
- Careful!
- Replacing the starter cable / Replacing the return spring
- CAREFUL! Injury hazard! Do not unscrew screw (5) if the return spring is under tension.
- CAREFUL! Injury hazard! The return spring can pop out!
- Replacing the return spring
- CAUTION: Danger of injury! If the spring is broken it may pop out!
- Mounting the fan housing
- Cleaning the cylinder area
- CAUTION: To prevent eye injury, always wear eye protection when cleaning the filter with compressed air!
- Replacing/cleaning the spark arrester screen
- Instructions for periodic maintenance
- Service, spare parts and guarantee
- Maintenance and repair
- Spare parts
- Guarantee
- Extract from the spare parts list
- EA7300P
- EA7900P
- Accessories (not delivered with the chain saw)
- EU Conformity Declaration
Brand : MAKITA
Model : EA7900P45E
Category : Chainsaw