
GXM 52 - GPS antenna GARMIN - Free user manual and instructions
Find the device manual for free GXM 52 GARMIN in PDF.


| Product Type | SiriusXM Marine Weather and Radio Antenna |
| Brand | Garmin |
| Model | GXM 52 |
| Dimensions (Diameter x Height) | 3.61 x 1.95 in (91.6 x 49.5 mm) |
| Weight | 7.1 oz (201 g) |
| Temperature Range | -22° to 158°F (-30° to 70°C) |
| Case Material | Fully gasketed, high-impact plastic alloy |
| Waterproof Rating | IEC 60529 IPX7 |
| Power Input Voltage Range | 9 to 32 Vdc |
| Input Current (at 12 Vdc) | 280 mA |
| NMEA 2000 Load Equivalency Number (LEN) | 8 (400 mA) |
| Required Network | NMEA 2000 |
| Satellite Radio Support | SiriusXM (subscription required) |
| Weather Data Support | SiriusXM Marine Weather (subscription required) |
| Mounting Options | Surface, under fiberglass deck, or pole mount (1 in. OD pipe thread) |
| Software Update Method | Via memory card (SD card) |
| Audio Output | Audio adapter cable for stereo connection (for radio) |
| Primary Function | Provides SiriusXM weather and radio data to NMEA 2000 network |
| Safety Warnings | Use common sense; weather info may contain errors; wear safety gear during installation |
| Product Support | Go to www.garmin.com/support or call (913) 397.8200 (USA) |
Frequently Asked Questions - GXM 52 GARMIN
User questions about GXM 52 GARMIN
0 question about this device. Answer the ones you know or ask your own.
Ask a new question about this device
Download the instructions for your GPS antenna in PDF format for free! Find your manual GXM 52 - GARMIN and take your electronic device back in hand. On this page are published all the documents necessary for the use of your device. GXM 52 by GARMIN.
USER MANUAL GXM 52 GARMIN
GXM™ Installation Instructions
This antenna provides SiriusXM ® weather and radio to your existing NMEA 2000 ® network. If you do not have an existing NMEA 2000 network on your boat, you must install one. For more information about NMEA 2000, go to www.garmin.com.
Important Safety Information
WARNING
See the Important Safety and Product Information guide in the product box for product warnings and other important information.
The weather information provided through this product is subject to service interruptions and may contain errors, inaccuracies, or outdated information, and consequently should not be relied upon exclusively. Always use common sense while navigating, and check alternate weather information sources prior to making safety-related decisions. You acknowledge and agree that you shall be solely responsible for use of the weather information and all decisions taken with respect to navigating in weather. Garmin® will not be responsible for any consequences of using SiriusXM weather information.
CAUTION
Always wear safety goggles, ear protection, and a dust mask when drilling, cutting, or sanding.
NOTICE
When drilling or cutting, always check what is on the opposite side of the surface.
Registering Your Device
Help us better support you by completing our online registration today.
- Go to http://my.garmin.com.
- Keep the original sales receipt, or a photocopy, in a safe place.
Contacting Garmin Product Support
- Go to www.garmin.com/support and click Contact Support for in-country support information.
• In the USA, call (913) 397.8200 or (800) 800.1020.
• In the UK, call 0808 2380000.
• In Europe, call +44 (0) 870.8501241.
Loading the New Software on a Memory Card
The device may contain a software-update memory card. If so, follow the instructions provided with the card. If a software update memory card is not included, you must copy the software update to a memory card.
1 Insert a memory card into the card slot on the computer.
2 Go to www.garmin.com/support/software/marine.html.
3 Select Download next to "Chartplotters with SD card".
4 Read and agree to the terms.
5 Select Download.
6 Select Run.
7 Select the drive associated with the memory card, and select Next > Finish.
Updating the Device Software
Before you can update the software, you must obtain a software-update memory card or load the latest software onto a memory card.
1 Turn on the chartplotter.
2 Insert the memory card into the card slot.
3 Follow the on-screen instructions.
The software update process takes approximately 2–10 minutes to complete. The device returns to normal operation when the update process is complete.
NOTE: Do not remove the memory card until the device has returned to normal operation.
Antenna Mounting Considerations
You can mount the antenna on a flat surface, install it under fiberglass, or attach it to a standard 1 in. OD, 14 threads per inch, pipe-threaded pole (not included). You can route the cable outside of the pole or through the pole. For best performance, consider these guidelines when selecting the antenna mounting location.
- To ensure the best reception, the antenna should be mounted in a location that has a clear, unobstructed view of the sky in all directions ①.

- The antenna should not be mounted where it is shaded by the superstructure of the boat ②, a radome antenna, or the mast.
- The antenna should not be mounted near the engine or other sources of Electromagnetic Interference (EMI) ③.
- If a radar is present, the antenna should be mounted above the path of the radar ④. If necessary, the antenna may be mounted below the path of the radar ⑤.
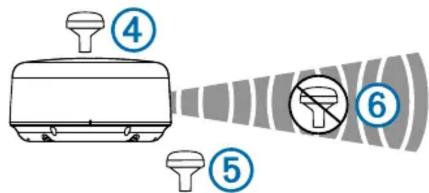
- The antenna should not be mounted directly in the path of the radar ⑥.
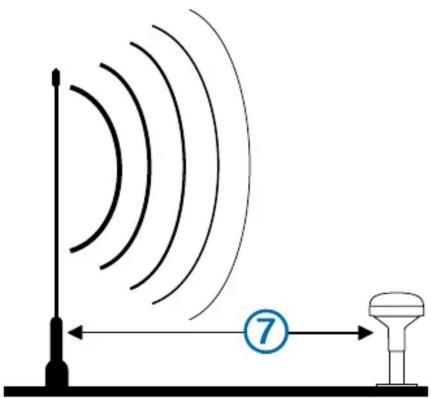
- The antenna should be mounted at least 3 ft. (1 m) away from (preferably above) the path of a radar beam or a VHF radio antenna ⑦.
Testing the Mounting Location
1 Temporarily secure the antenna in the preferred mounting location and test it for correct operation.
2 If you experience interference with other electronics, move the antenna to a different location, and test it again.
3 Repeat steps 1–2 until you observe full or acceptable signal strength.
4 Permanently mount the antenna.
Surface Mounting the Antenna
NOTICE
If you are mounting the bracket on fiberglass with screws, it is recommended to use a countersink bit to drill a clearance counterbore through only the top gel-coat layer. This will help to avoid any cracking in the gel-coat layer when the screws are tightened.
Stainless-steel screws may bind when screwed into fiberglass and overtightened. Garmin recommends applying an anti-seize lubricant to the screws before installing them.
Before you permanently mount the antenna, you must test the mounting location for correct operation (Antenna Mounting Considerations).
1 Using the surface-mount bracket ① as your mounting template, mark the three pilot-hole locations and trace the cable-hole in the center of the bracket.

2 Set the surface-mount bracket aside. Do not drill through the bracket.
3 Drill the three 1/8 in. (3.2 mm) pilot holes.
4 Use a 1 in. (25 mm) hole saw to cut the cable hole in the center.
5 Place the seal pad ② on the bottom of the surface-mount bracket, aligning the screw holes.
6 Use the included M4 screws to secure the surface-mount bracket to the mounting surface.
7 Route the cable ③ through the 1 in. (25 mm) hole and connect it to the antenna.
8 Verify that the large gasket ④ is in place on the bottom of the antenna, place the antenna on the surface-mount bracket, and twist it clockwise to lock it in place.
9 Secure the antenna to the mounting bracket with the included M3 set screw ⑤.
10 Route the cable away from sources of electronic interference.
Mounting the Antenna with the Cable Routed Through the Pole
Before you permanently mount the antenna, you must test the mounting location for correct operation (Antenna Mounting Considerations).
1 Position a standard 1 in. OD, 14 threads per inch, pipe-threaded pole (not included) in the selected location, and mark the approximate center of the pole.
2 Drill a hole using a 34 in. (19 mm) drill bit for the cable to pass through.
3 Fasten the pole to the boat.
4 Thread the pole-mount adapter onto the pole. Do not overtighten the adapter.
5 Route the cable through the pole and connect it to the antenna.
6 Place the antenna on the pole-mount adapter and twist it clockwise to lock it in place.
7 Secure the antenna to the adapter with the included M3 set screw ①.

8 With the antenna installed on the pole mount, fill the vertical cable slot ② with a marine sealant (optional).
9 Route the cable away from sources of electronic interference.
Mounting the Antenna with the Cable Routed Outside the Pole
Before you permanently mount the antenna, you must test the mounting location for correct operation (Antenna Mounting Considerations).
1 Route the cable through the pole-mount adapter ①, and place the cable in the vertical slot ② along the base of the pole-mount adapter.
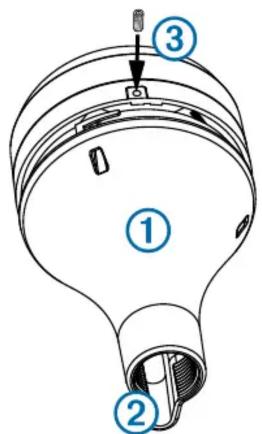
2 Screw the pole-mount adapter onto a standard 1 in. OD, 14 threads per inch, pipe-threaded pole (not included).
Do not overtighten the adapter on the pole.
3 Connect the cable to the antenna.
4 Place the antenna on the pole-mount adapter and twist it clockwise to lock it in place.
5 Secure the antenna to the adapter with the included M3 set screw ③.
6 With the antenna installed on the pole mount, fill the remaining gap in the vertical cable slot with a marine sealant (optional).
7 Attach the pole to the boat if it is not already attached.
8 Route the cable away from sources of electronic interference.
Mounting the Antenna Under the Deck
NOTICE
Before attaching the under-deck mounting bracket to the surface, verify the supplied screws will not penetrate the surface. If the supplied screws are too long, you must purchase surface-appropriate screws to complete the installation.
Before you permanently mount the antenna, you must test the mounting location for correct operation (Antenna Mounting Considerations).
Because the antenna cannot acquire signals through metal, it must be mounted under a fiberglass surface only.
Even when mounted under fiberglass, mounting this antenna below deck decreases SiriusXM signal reception. If you are operating off-shore, an above-deck mounting location free of obstructions is recommended.
1 Place the adhesive pads ① on the under-deck mounting bracket ②.

2 Place the antenna in the under-deck mounting bracket.
3 Adhere the under-deck mounting bracket to the mounting surface.
4 Secure the under-deck mounting bracket to the mounting surface with screws.
5 Connect the cable to the antenna ③.
6 Route the cable away from sources of electronic interference.
NMEA 2000 Connection Considerations
The antenna connects to a NMEA 2000 network on your boat. The NMEA 2000 network provides power to the antenna and shares data with other NMEA 2000-compatible devices on the network. The included NMEA 2000 cable and connector allow you to connect the device to your existing NMEA 2000 network. If you do not have an existing NMEA 2000 network on your boat, you must create one.
If you are unfamiliar with NMEA 2000, you should read the "NMEA 2000 Network Fundamentals" chapter of the Technical Reference for NMEA 2000 Products. To download this document, select Manuals on the product page for your device at www.garmin.com.

Item Description
| 1 | GXM antenna |
| 2 | Garmin device |
| 3 | Ignition or in-line switch |
| 4 | NMEA 2000 power cable |
| 5 | 12 Vdc power source |
| 6 | Audio cable connection |
| 7 | NMEA 2000 drop cable |
| 8 | NMEA 2000 terminator or backbone cable |
| 9 | NMEA 2000 T-connector |
| 10 | NMEA 2000 terminator or backbone cable |
Connecting the Audio Cable
If you have a subscription to SiriusXM radio, you must connect the audio adapter cable to the antenna and to the stereo on your boat. The adapter cable connects to the antenna using the included NMEA 2000/audio cable.
1 Connect the audio adapter cable to the included NMEA 2000/audio cable and route it away from sources of electrical interference.
2 Refer to the stereo owner's manual to identify the correct audio input connectors.
3 Connect the audio adapter cable to your stereo.
Activating a SiriusXM Subscription
SiriusXM offers several subscription options. Go to http://www.siriusxm.com/sxmmarine to determine which subscription package is best for your needs.
Before you can activate your SiriusXM subscription, you must have the radio ID of your antenna. The radio ID is available in the product box, and on the System Information page of a connected device. See the owner's manual provided with your device for more information.
1 Contact SiriusXM by phone at (866) 528-7474 or go to http://care.siriusxm.com to subscribe.
2 Provide the necessary information to the SiriusXM representative or on the web site to activate your antenna.
3 Verify the functionality of the activated services:
- For SiriusXM weather, on a connected device, view the Weather Subscription option from the System Information page, and confirm that your subscribed services are listed.
- For SiriusXM radio, on a connected device, go to the Media page and confirm that radio channels are available.
4 If the service is not activated within the hour, go to http://care.siriusxm.com/refresh or contact SiriusXM by phone at 1-855-MYREFRESH (697-3373).
NOTE: For the antenna to receive the SiriusXM signal, it must be powered on, facing skyward, and tuned to channel 1.
THE USER AGREES THAT THE SiriusXM WEATHER SERVICE OFFERING IS PROVIDED "AS IS", THAT YOUR Garmin HARDWARE EQUIPMENT ONLY ALLOWS THE DISPLAY OF SUCH SERVICE OFFERING, AND THAT ANY CHANGES BY THE SERVICE PROVIDER MAY INTERFERE WITH THE ABILITY OF YOUR Garmin HARDWARE EQUIPMENT TO RECEIVE OR DISPLAY SUCH SERVICE OFFERING. FURTHER, SUCH SERVICE OFFERING CONTAINS INFORMATION FURNISHED BY OTHERS WHO ARE NOT UNDER THE CONTROL OF Garmin, AND THEREFORE THE SERVICE OFFERING IS ACCORDINGLY FURNISHED WITHOUT ANY WARRANTY OF Garmin, EXPRESS OR IMPLIED, INCLUDING WITHOUT LIMITATION, IMPLIED WARRANTIES OF MERCHANTABILITY AND FITNESS FOR A PARTICULAR PURPOSE.
Specifications
| Measurement Specification | |
| Dimensions (diameter x height) | 3.61 × 1.95 in. (91.6 × 49.5 mm) |
| Weight 7.1 oz (201 g) | |
| Temperature range From -22° | to 158°F (from -30° to 70°C) |
| Case material Fully gasketed, | high-impact plastic alloy, waterproof to IEC 60529 IPX7 standards. |
| Power input source From 9 to | 32 Vdc |
| Input current 280 mA at 12 Vdc | |
| NMEA 2000 load equivalency number (LEN) | 8 (400 mA) |
Acknowledgment
Garmin SHALL HAVE NO LIABILITY IF CHANGES IN THE SERVICE PROVIDER'S SUBSCRIPTION OFFERING NEGATIVELY IMPACTS OR RENDERS IMPOSSIBLE THE USE OF PURCHASED Garmin HARDWARE EQUIPMENT WITH THE SERVICE PROVIDER'S OFFERING IN THE FUTURE.
Garmin ® and the Garmin logo are trademarks of Garmin Ltd. or its subsidiaries, registered in the USA and other countries. GXM ™ is a trademark of Garmin Ltd. or its subsidiaries. These trademarks may not be used without the express permission of Garmin.
NMEA 2000® and the NMEA 2000 logo are registered trademarks of the National Marine Electronics Association. SiriusXM® is a registered trademark of SiriusXM Radio Inc. All other trademarks and copyrights are the property of their respective owners.
This product may include open source software. The following software is licensed under versions of the GNU General Public License (GPL) (www.gnu.org/licenses/gpl.html): 1. linux-2.6.30 (www.kernel.org); 2. u-boot-1.1.5 (ftp.denx.de/pub/u-boot); 3. busybox-1.18.4 (www.busybox.net); 4. mtd-utils-1.1.0 (http://git.uclibc.org). Copies of this GPL-licensed source, and modifications thereto, may be freely found at http://developer.garmin.com . The following software is distributed under other licenses: 1. zlib (www.zlib.net , Copyright (C) 1995-2012 Jean-loup Gailly and Mark Adler); 2. Atmel bootloader (www.atmel.com /tools).
- GXM™ Installation Instructions
- Important Safety Information
- WARNING
- CAUTION
- NOTICE
- Registering Your Device
- Contacting Garmin Product Support
- Loading the New Software on a Memory Card
- Updating the Device Software
- Antenna Mounting Considerations
- Testing the Mounting Location
- Surface Mounting the Antenna
- Mounting the Antenna with the Cable Routed Through the Pole
- Mounting the Antenna with the Cable Routed Outside the Pole
- Mounting the Antenna Under the Deck
- NMEA 2000 Connection Considerations
- Connecting the Audio Cable
- Activating a SiriusXM Subscription
- Acknowledgment
Brand : GARMIN
Model : GXM 52
Category : GPS antenna