M-LYNX-702 V.3 - Loudspeaker Marshall Electronics - Free user manual and instructions
Find the device manual for free M-LYNX-702 V.3 Marshall Electronics in PDF.


| Product Type | Dual 7-inch LCD Monitor |
| Brand | Marshall Electronics |
| Model | M-LYNX-702 V.3 |
| Screen Size | 7 inches (each screen) |
| Screen Resolution | 1280 x 800 pixels |
| Aspect Ratio | 16:10 |
| Brightness | 400 cd/m² |
| Contrast Ratio | 800:1 |
| Response Time | 14 ms |
| Viewing Angle | 89°/89° (L/R/U/D) |
| Inputs | HDMI, 3G-SDI (per screen) |
| Outputs | HDMI loop out, 3G-SDI loop out (per screen) |
| Power Supply | 11-17 VDC, < 24W; includes 12V adapter and 4-pin XLR |
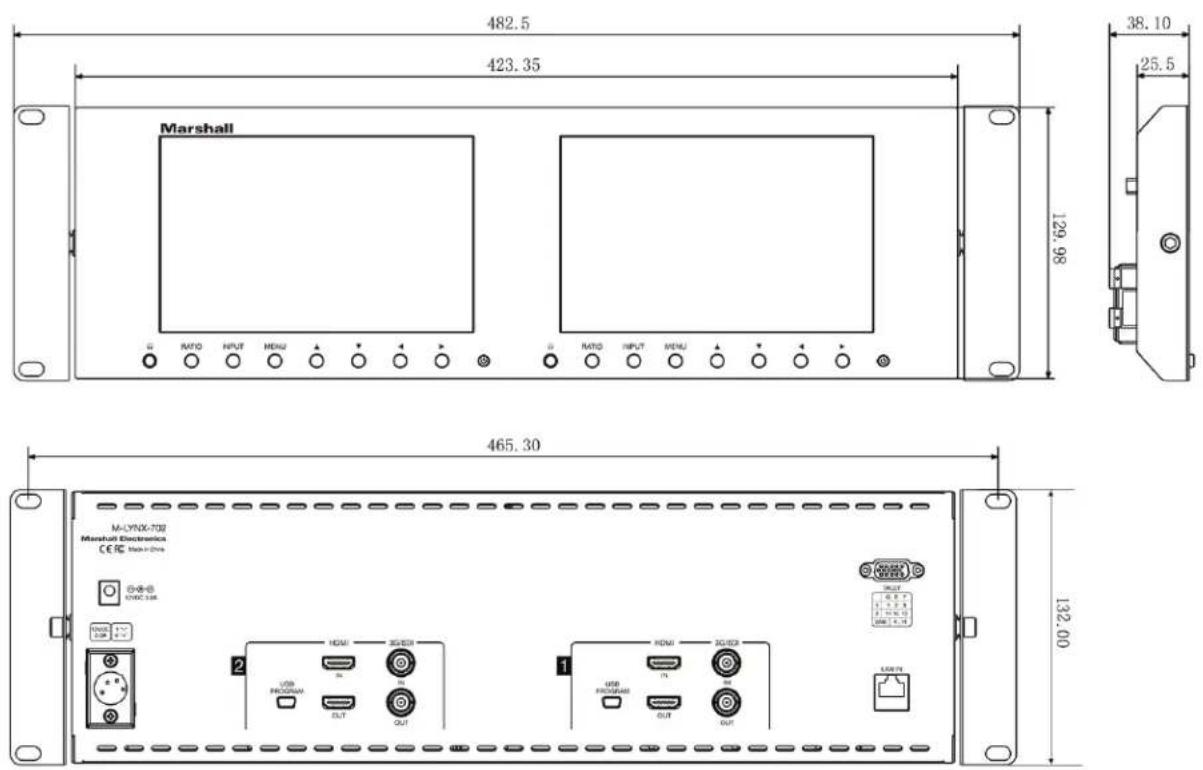
| Dimensions | 482.5 x 132 x 25.5 mm (19" x 5.2" x 1") |
| Weight | 1.85 kg (4 lbs) |
| Supported SDI Formats | SD: 480i, 576i; HD: 720p, 1080i, 1080p; 3G Level A: 1080p50/59.94/60 |
| Supported HDMI Formats | SD: 480i/p, 576i/p; HD: 720p, 1080i, 1080p (up to 60 Hz) |
| On-Screen Menu | Video, Audio, Setting, OSD controls |
| Network Control | Ethernet LAN (RJ-45) with Windows application |
| Tally | 15-pin D-Sub for red/green/yellow border indicators |
| Headphone Output | 3.5mm jack (per screen) |
| Warranty | 2 years (first consumer) |
Frequently Asked Questions - M-LYNX-702 V.3 Marshall Electronics
User questions about M-LYNX-702 V.3 Marshall Electronics
0 question about this device. Answer the ones you know or ask your own.
Ask a new question about this device
Download the instructions for your Loudspeaker in PDF format for free! Find your manual M-LYNX-702 V.3 - Marshall Electronics and take your electronic device back in hand. On this page are published all the documents necessary for the use of your device. M-LYNX-702 V.3 by Marshall Electronics.
USER MANUAL M-LYNX-702 V.3 Marshall Electronics
Table of Contents 01
- Package Includes 02
- Product Description 02
2.1 Front Panel 02
2.2 Rear Panel Connections 03
- On-Screen Menu 04
3.1 Main Menu Categories 04
3.2 Sub-Menu Descriptions 04
3.2.1 Video 06
3.2.2 Audio 07
3.2.3 Setting 07
3.2.4 OSD (On-Screen Display) 08
- Dimensions 09
- Parameters 10
- Network Controls 11
Warranty End
1. Package Includes
• One M-LYNX-702 Monitor
• One universal AC power adapter
- One AC power cord
• Information card
2. Product Description
2.1 Front Panel
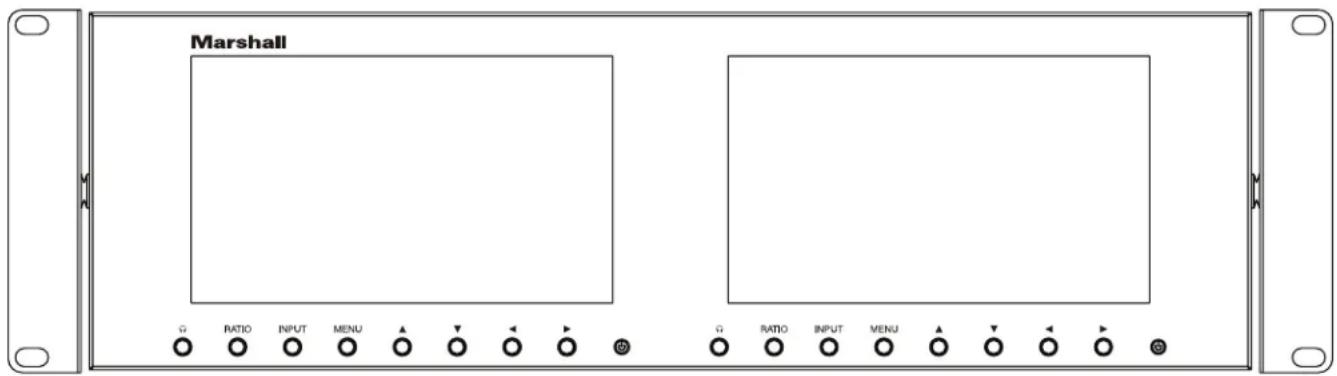
Headphone jack (one per screen). Monitor channels 1 and 2 of embedded audio from HDMI or SDI source.
RATIO: Aspect ratio button provides quick selection of Full Screen, 16:9, and 4:3.
INPUT: HDMI/SDI button switches between HDMI or SDI inputs.
MENU: Accesses the on-screen menus. Press the menu button a second time to clear the screen or wait 10 seconds and it will clear itself.
▲ : Short cut key to change Brightness. When menu is on screen, moves selection up.
▼ : Short cut key to change Contrast. When menu is on screen, moves selection down.
◀: Short cut key to decrease Volume. Use after ▲ or ▼ short cuts to decrease brightness or contrast.
When menu is on screen, use to change selected parameter.
▶ : Short cut key to increase the Volume. Use after ▲ or ▼ short cuts to increase brightness or contrast.
When menu is on screen, use to change selected parameter.
Power button. Press to turn screen on or off.
2.2 Rear Panel Connections
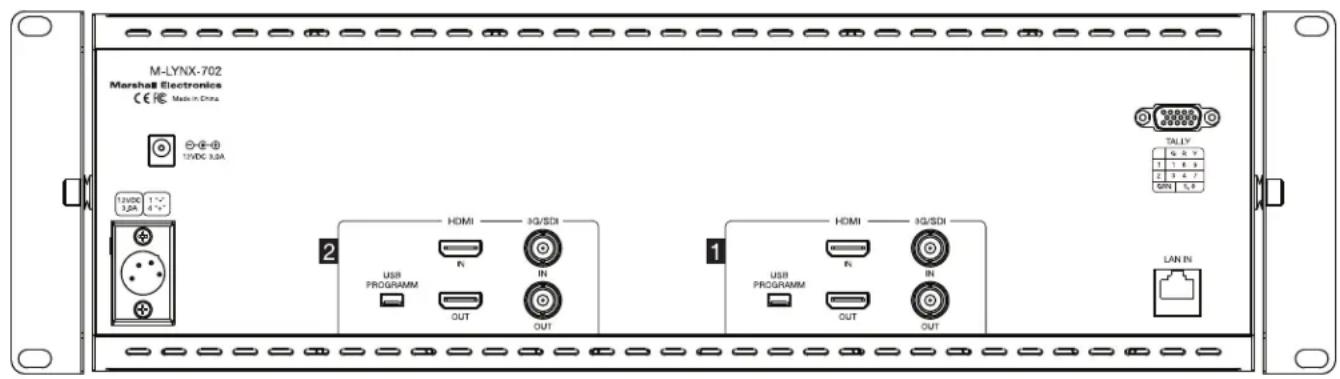
Power Input
The M-LYNX-702 V.3 monitor can be powered using either the included 12-Volt power supply plugged into the small coaxial connector or standard 12-Volt camera-type power supply connected to the 4-pin XLR connector. It is recommended to connect only one type of power supply at one time.
USB Port
The USB port is used for service functions only.
HDMI Input and Loop Out
Connect a standard HDMI source here. For details, see the Compatible Input Formats section below. Active loop out allows “daisy-chaining” to other devices. (Loop out continues to function when the screen is turned off.)
3G/SDI Input and Loop Out
Connect a serial digital source here. It is compatible with SDI, HD SDI, or 3G SDI sources. Active loop out allows “daisy-chaining” to other devices. (Loop out continues to function when the screen is turned off.)
TALLY
The 15-pin D-Sub connector on the back panel is used to control the on-screen colored tally indicators. The Red, Green, or Yellow border color can be turned on by connecting the appropriate pin on this connector to the ground pin via “dry contact” or “open collector” type source. Refer to the table printed next to the connector for wiring information. Note: External power should not be applied to this connector.
LAN Port
Ethernet LAN "RJ-45" Connector. The monitor can be operated from a PC using the application provided with the unit.
3. On Screen Menu
Access the main menu by pressing the Menu button on the front panel.
Use the ▲ / ▼ keys to move within the main menu.
Use the ▶ key to access a sub-menu.
Once in a sub-menu, use the ▲ / ▼ keys to select an item to adjust and use the ◀ /▶ keys to change values or choices within their range.
Use the "Menu" key to return to main menu from the sub-menus.
To exit from the on-screen menus, press the "Menu" key again.
3.1 Main Menu Categories
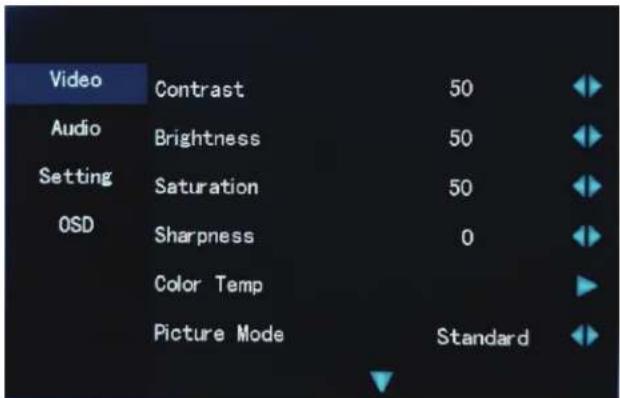
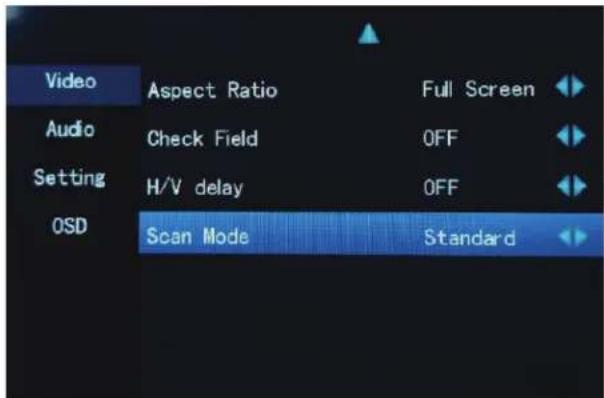
Video - Contrast, Brightness, Saturation, Sharpness, Color Temp., Picture Mode, Aspect Ratio, Check Field (selection of individual color), H/V delay (Only available on SDI signal), Scan Mode.
Continued on Next Page
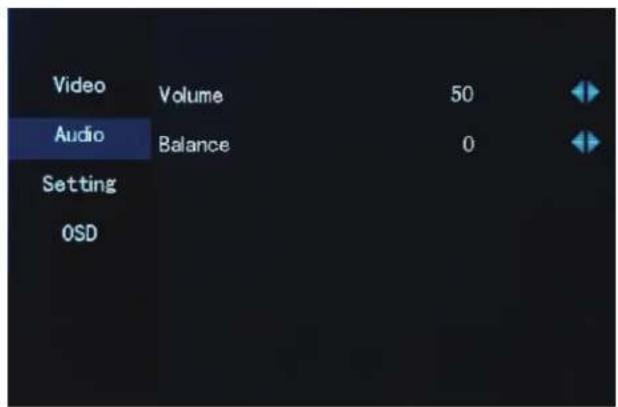
Audio – Volume, Balance.
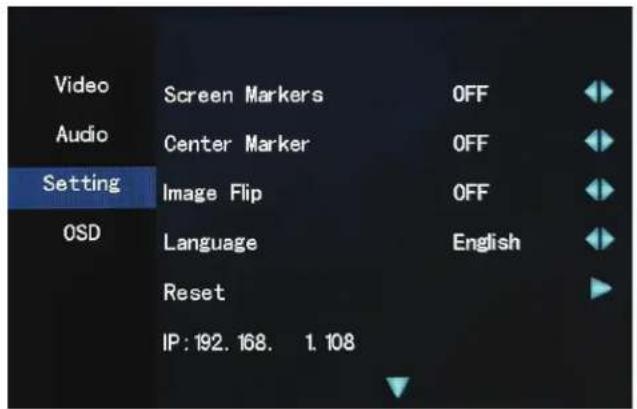
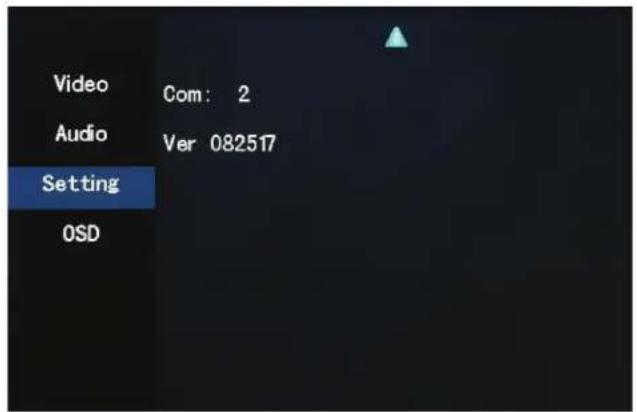
Setting – Screen Markers, Center Marker, Image Flip, Language, Reset, IP, Com, Ver.
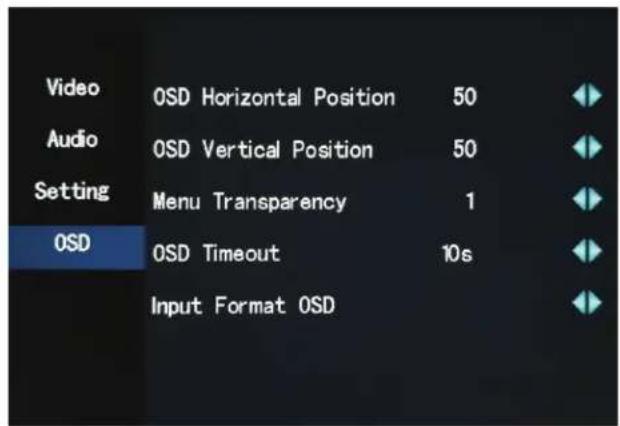
OSD – Setup On-Screen Menu Display. Has selections for Horizontal Position, Vertical Position, Menu Transparency, Menu Timeout, and display of Input Format.
3.2 Sub-Menu Descriptions
The default settings shown are the values the unit comes with “out-of-the-box.” In most cases, these are the mid-range settings for a given function and are not intended to be used as “ideal” values or choices. Best settings will depend on the application.
3.2.1 Video
| Contrast | (0 - 100, 50 = default) |
| Brightness | (0 - 100, 50 = default) |
| Saturation | (0 - 100, 50 = default) |
| Sharpness | (0 - 100, 0 = default) |
Color Temp (6500K=Default)
- 6500K (approximates REC 709 standards)
- 7300K
• 9300K
• User (0 - 255, 128 = default) - (Allows fine-tuning display white balance)
Picture Mode
| Standard | Contrast, Brightness and Saturation = 50 |
| Soft | Contrast = 40, Brightness and Saturation = 45 |
| User | Returns display to most recent User settings for Contrast, Brightness and Saturation |
| Vivid | Contrast = 60, Brightness = 55, Saturation = 75 |
Aspect Ratio (Full Screen = Default)
| Full Screen | Picture is sized to fit the 16:10 display area |
| 4:3 | Display is set to exact 4:3 aspect ratio |
| 16:9 | Display is set to exact 16:9 aspect ratio |
| 14:9 | Display is set to exact 14:9 aspect ratio |
| Zoom1 | The picture is expanded |
| Zoom2 | The picture is expanded twice as much as Zoom1 |
| Panorama | Display is set for 1.85 aspect ratio |
| Pixel to Pixel | Incoming video pixels are mapped 1:1 to display pixels. This may result in an apparent shrinking or expansion of the image depending on the incoming format. (In other words, the resulting image will appear in native resolution without scaling.) |
Check Field (Off = Default)
Off
- Default
Mono
- Picture will be displayed as black & white, all other color information is removed
Red
- Only red color information is displayed
Green
- Only green color information is displayed
Blue
- Only blue color information is displayed
H/V Delay (Only available on SDI signal. Off = Default)
- Off
- H/V delay
- V delay
- H delay
Scan Mode
Standard
- Normal picture size
Overscan
- Expands picture by 5%
Underscan
- Shrinks picture by 5%
3.2.2 Audio
Volume (0 - 100, 50 = default)
- Increase or decrease headphone volume
Balance (-10 - +10, 0 = default)
- Increase or decrease headphone volume
3.2.3 Setting
Screen Markers (OFF = Default)
Set size of reference frame mark to show area of interest.
- OFF
• 96%
• 93%
• 90%
• 85%
• 80%
Center Marker (OFF = Default)
Displays a red “+” mark on the screen to indicate the center position
- OFF
• ON
Image Flip (OFF = Default)
- OFF
• V - Flips the image vertically
• H - Flips the image horizontally
• V/H - Simultaneously flips the image vertically and horizontally
Language (English = Default)
Select language used for the on-screen menus
- English
- Español
Reset
Selecting Reset will produce this message: Reset function values?: Yes / No
Press ◀ /▶ keys to select "Yes" or "No" and press the front panel "MENU" key to confirm the selection. Selecting "Yes" will reset the monitor back to factory default values and choices.
IP: 0.0.0.0
Displays the monitor default IP address: 192. 168. 0. 8 when monitor is not connected to network. Displays IP address assigned by DHCP enabled server or router when monitor is connected to network.
Com: 1 or 2
"Com: 1" is screen 1, "Com: 2" is screen 2.
Ver: Firmware version.
3.2.4 OSD (On-Screen Display)
OSD Horizontal Position (0 - 100, 50 = default)
OSD Vertical Position (0 - 100, 50 = default)
Menu Transparency (0 - 10, 1 = default)
OSD Timeout (5s / 10s / 15s / 60s, 10s = default)
- Moves Menu Display Horizontally
- Moves Menu Display Vertically
- Darken or Lighten the background behind the menus
- The input video format will be displayed for the selected number of seconds whenever the input source is changed
4. Dimensions (mm)
Continued on Next Page
- Parameters
| Screen 7" screen x 2 | |
| Screen Resolution | 1280 x 800 |
| Dot pitch 0.117 (H) x 0.117 (V) | |
| Ratio 16:10 | |
| Brightness 400 cd/m2 | |
| Contrast 800:1 | |
| Response Time 14ms | |
| Back light | LED |
| View angle | 89°/89°, 89°/89° (L/R,U/D) |
| Input | HDMI-IN, SDI-IN per screen |
| Output | HDMI-OUT, SDI-OUT per screen |
| Control | Ethernet |
| SDI input formats | SD: 480i 59.94 / 576i 50 |
| HD: 720p 25, 29.97, 30, 50, 59.94, 60 / 1080p 23.98, 23.98sF, 24, 24sF, 25, 29.97, 30/ 1080i 50, 59.94, 60 | |
| 3G-Level A: 1080p 50, 59.94, 60 | |
| HDMI input formats | SD: 480i 59.94/480p 59.94/576i 50/576p 50 |
| HD: 720p 25, 29.97, 30, 50, 59.94, 60 | |
| 1080i 50, 59.94, 60 | |
| 1080p 23.98, 23.98sF, 24, 24sF, 25, 29.97, 30, 50, 59.94, 60 | |
| Power consumption | < 24W |
| Voltage | 11 - 17 VDC |
| Operating current | 1.61A |
| Work temperature | 0° ~ 35°C / 32°F ~ 95°F |
| Store temperature | ~10°C ~ 50°C/~14°F ~ 122°F |
| Size | 482.50 x 132.00 x 25.50 mm / 19" x 5.2" x 1" |
| Weight | 1.85 kg / 4 lbs |
Continued on Next Page
6. Network Control
Please download related Windows application from the Marshall website at: http://www.lcdracks.com/monitors/LYNX/M-LYNX-702.php
- On the monitor, select Menu/Setting and read the IP address.
Note: It is best to connect to the network first then connect power supply. In this way, the monitor will correctly display the IP information. (See Menu/Setting screen below.)
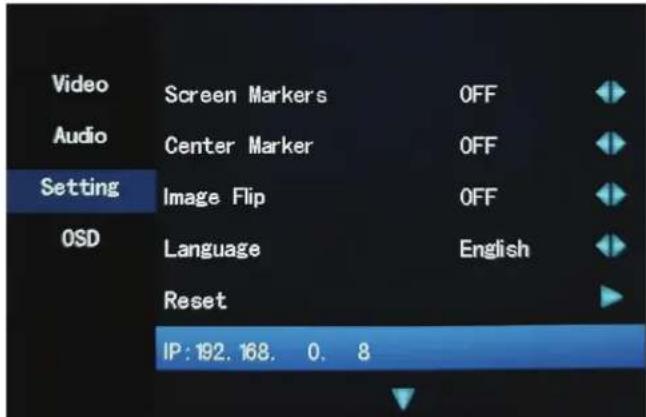
- Open the application you have downloaded, Then, Input: User / Password, Click Log In.
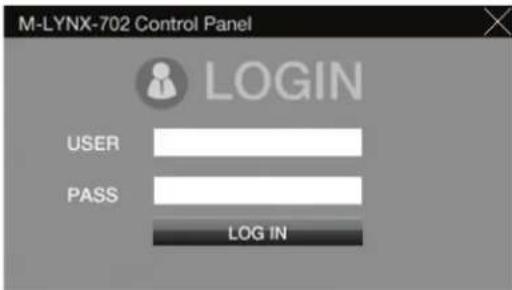
PLEASE NOTE:
The default username is: Marshall
The default password is: 1
• After login, Click: Add monitors.
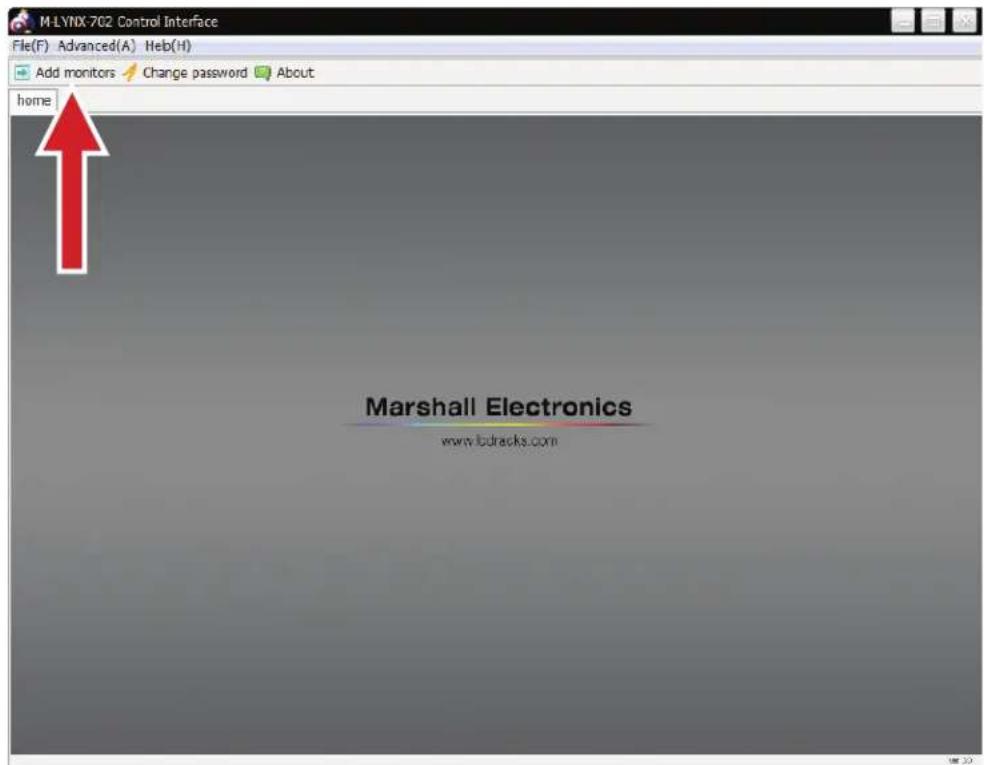
- Input IP address shown in the monitor Menu under "Setting" option, then click connect.
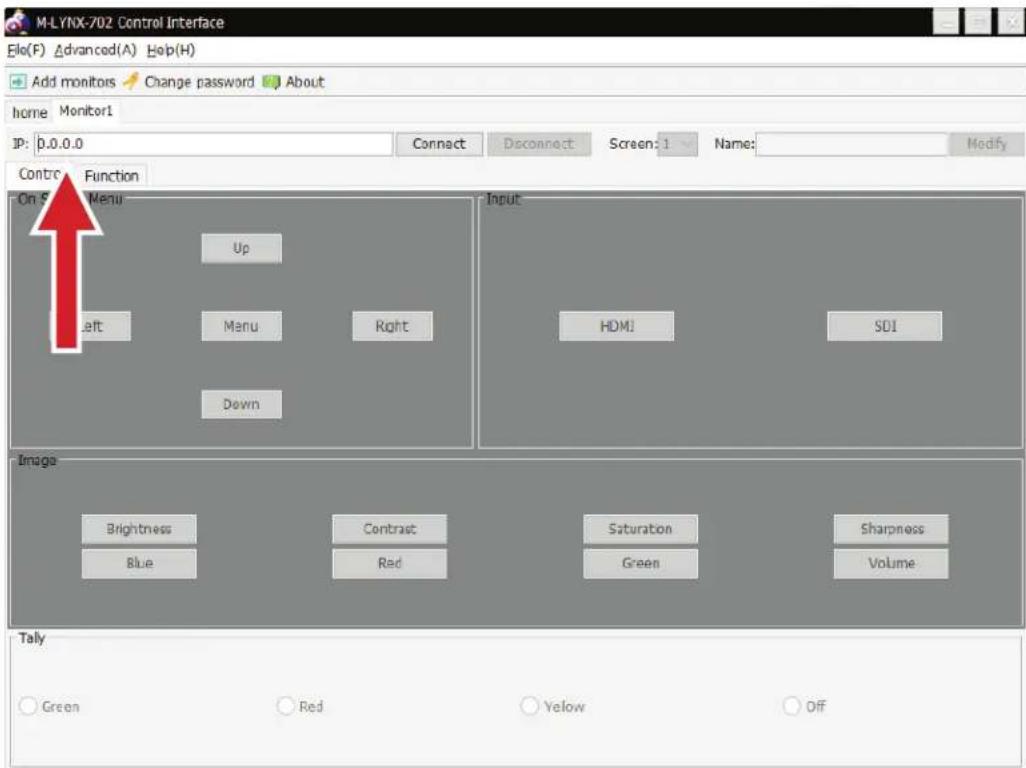
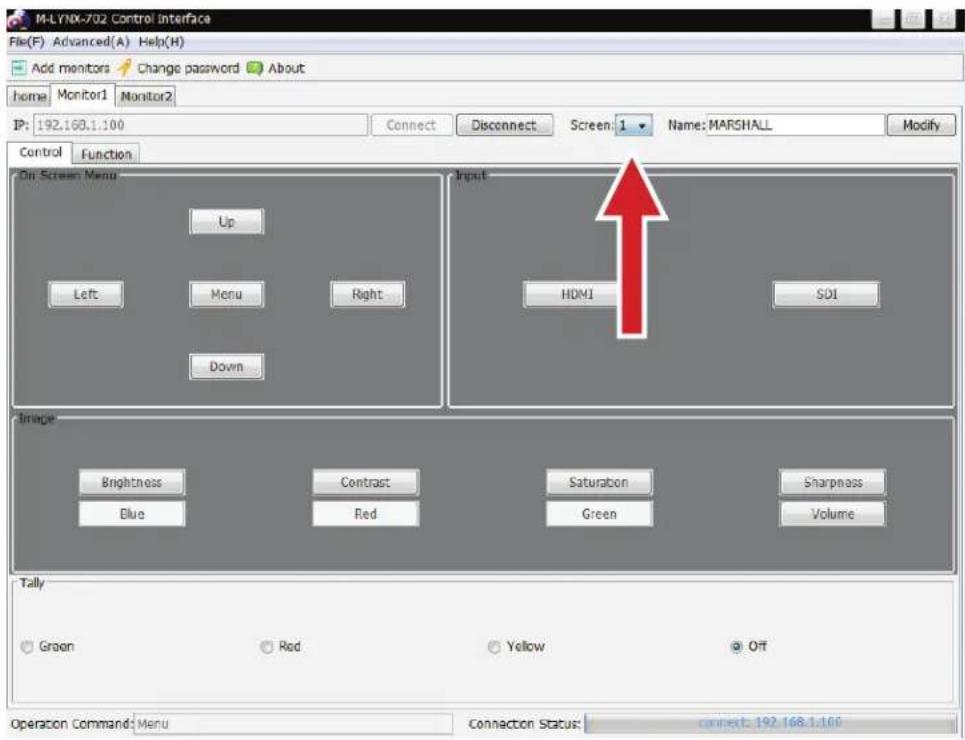
- Select Screen 1 (left) or Screen 2 (right).
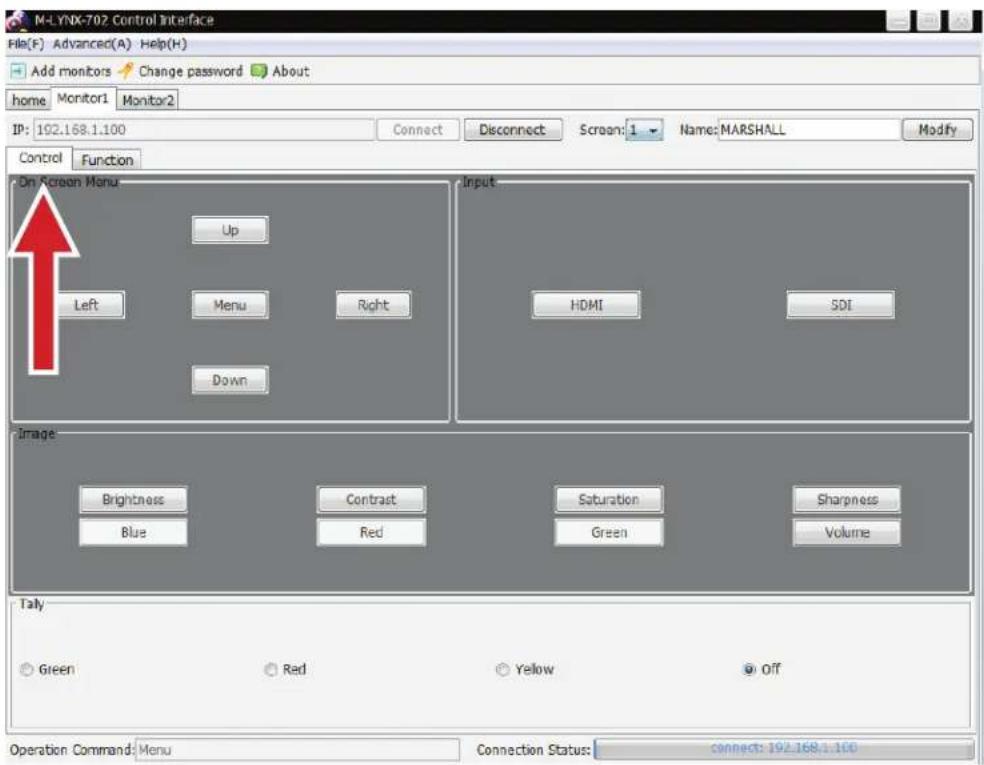
- Then, select Control to operate basic menu settings.
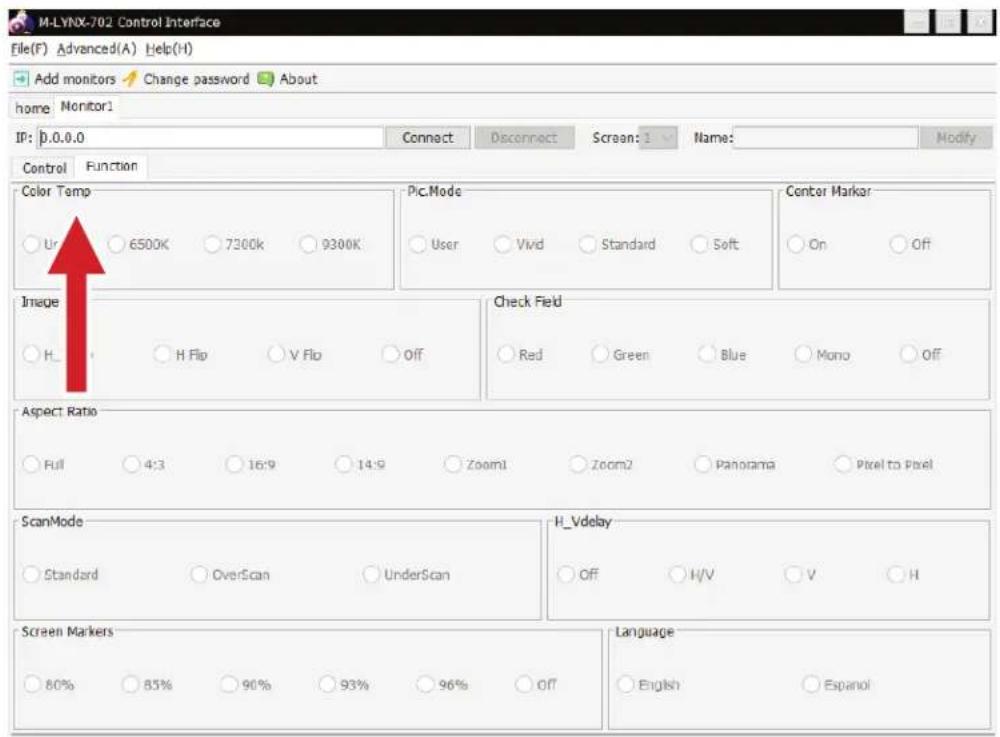
- Or, select Function then click on the desired choices. The monitor will immediately respond.
Warranty
Marshall Electronics warranties to the first consumer that this device will, under normal use, be free from defects in workmanship and materials, when received in its original container, for a period of two years from the purchase date. This warranty is extended to the first consumer only, and proof of purchase is necessary to honor the warranty. If there is no proof of purchase provided with a warranty claim, Marshall Electronics reserves the right not to honor the warranty set forth above. Therefore, labor and parts may be charged to the consumer. This warranty does not apply to the product exterior or cosmetics. Misuse, abnormal handling, alterations or modifications in design or construction void this warranty. No sales personnel of the seller or any other person is authorized to make any warranties other than those described above, or to extend the duration of any warranties on behalf of Marshall Electronics, beyond the time period described above.
Due to constant effort to improve products and product features, specifications may change without notice.
Marshall
20608 Madrona Avenue, Torrance, CA 90503
Tel: (800) 800-6608 / (310) 333-0606 • Fax: 310-333-0688
www.marshall-usa.com
support@marshall-usa.com
- Table of Contents 01
- Warranty End
- Package Includes
- Product Description
- Front Panel
- Rear Panel Connections
- Power Input
- USB Port
- HDMI Input and Loop Out
- 3G/SDI Input and Loop Out
- TALLY
- LAN Port
- On Screen Menu
- Main Menu Categories
- Sub-Menu Descriptions
- Video
- Color Temp (6500K=Default)
- Picture Mode
- Aspect Ratio (Full Screen = Default)
- Check Field (Off = Default)
- H/V Delay (Only available on SDI signal. Off = Default)
- Scan Mode
- Audio
- Setting
- Center Marker (OFF = Default)
- Image Flip (OFF = Default)
- Language (English = Default)
- Reset
- IP: 0.0.0.0
- Com: 1 or 2
- OSD (On-Screen Display)
- Dimensions (mm)
- Network Control
- Warranty
- Marshall
Brand : Marshall Electronics
Model : M-LYNX-702 V.3
Category : Loudspeaker