
Ronin RS 2 - Camera Tripod DJI - Free user manual and instructions
Find the device manual for free Ronin RS 2 DJI in PDF.


| Type | Professional 3-Axis Gimbal |
| Compatible Cameras | DSLR and Mirrorless Cameras |
| Max Payload | 4.5 kg (Handheld) |
| Weight (Gimbal Only) | Approx. 960 g (excl. quick-release plates and camera mounting plate) |
| Total Weight (with BG30 grip and extended grip/tripod) | Approx. 1.45 kg |
| Dimensions (Folded) | 260 × 265 × 70 mm (excl. grip) |
| Dimensions (Unfolded) | 410 × 260 × 195 mm (incl. grip, excl. extended grip/tripod) |
| Battery Type | BG30 LiPo 4S, 1950 mAh, 30.03 Wh |
| Max Runtime | Approx. 12 hours (properly balanced) |
| Charging Time | Approx. 1.5 hours (24 W USB charger) |
| Charging Temperature Range | 5° to 40°C (41° to 104°F) |
| Operating Temperature | -20° to 45°C (-4° to 113°F) |
| Titan Stabilization Algorithm | Yes |
| Touchscreen | Full-color, with intuitive interface |
| Intelligent Shooting Modes | ActiveTrack 3.0, Timelapse, Motionlapse, Track, Panorama, Time Tunnel, 3D Roll 360, Portrait Mode |
| Bluetooth | Bluetooth 5.0 |
| Mobile App | Ronin App (iOS 11.0+ / Android 7.0+) |
| Camera Control Ports | USB-C (RSS, Image Transmission/Focus Motor, Focus Motor) |
| Accessory Ports | RSA/NATO Ports, 1/4"-20 UNC Screw Holes, Cold Shoe |
| Water Resistance | Not waterproof; protect from dust and water |
| Maintenance | Wipe with soft dry cloth; do not spray cleaning liquids |
| Included Items | BG30 Grip, Extended Grip/Tripod, Upper & Lower Quick-Release Plates, Camera Mounting Plate, USB-C Cable |
| Safety Features | Axis locks, safety buttons, silent mode, push mode, selfie disable |
Frequently Asked Questions - Ronin RS 2 DJI
User questions about Ronin RS 2 DJI
0 question about this device. Answer the ones you know or ask your own.
Ask a new question about this device
Download the instructions for your Camera Tripod in PDF format for free! Find your manual Ronin RS 2 - DJI and take your electronic device back in hand. On this page are published all the documents necessary for the use of your device. Ronin RS 2 by DJI.
USER MANUAL Ronin RS 2 DJI
natural_image
Line drawing of a RONIN robotic device with three tripod legs (no text or symbols on the device itself)
Searching for Keywords
Search for keywords such as "battery" and "install" to find a topic. If you are using Adobe Acrobat Reader to read this document, press Ctrl+F on Windows or Command+F on Mac to begin a search.

Navigating to a Topic
View a complete list of topics in the table of contents. Click on a topic to navigate to that section.

Printing this Document
This document supports high resolution printing.
Using this Manual
Legend

Warning Important Hints and tips Reference

Before You Begin
The following documents have been produced to help you safely operate and make full use of your DJI RS 2.
DJI RS 2 Quick Start Guide
DJI RS 2 User Manual
DJI RS 2 Disclaimer and Safety Guidelines
Read the entire quick start guide and user manual and watch the informational and tutorial videos on the product page of the DJI official website (http:www.dji.com/rs-2). Read the disclaimer and safety guidelines to understand your legal rights and responsibilities. If you have any questions or problems during the installation, maintenance, or use of this product, contact DJI or a DJI authorized dealer.
Download the Ronin App
Search "Ronin" in the App Store or Google Play and follow the instructions for installation.


Android 7.0 or aboveiOS 11. RoniabApp
Contents
Using this Manual 2
Legend 2
Before You Begin 2
Download the Ronin App 2
Contents 3
Introduction 4
DJI RS 2 Diagram 5
Getting Started 6
Attaching the Extended Grip/Tripod 6
Mounting the Grip 6
Unlocking and Locking the Gimbal 7
Mounting the Camera 7
Balancing 9
BG30 Grip and Built-In Battery 12
Charging 12
Safety Guidelines 12
Operations 16
Activating DJI RS 2 16
Touchscreen 16
Ronin App Settings 20
Image Transmission 29
Operation Modes 30
Updating Firmware 31
Maintenance 31
Specifications 32
Introduction
DJI RS 2 is a professional single-handed 3-axis gimbal specifically designed for DSLR and mirrorless cameras. It is compatible with a wide range of camera setups and supports a tested payload of up to 4.5 kg.
DJI RS 2 boasts enhanced gimbal performance thanks to its updated Titan Stabilization Algorithm. With a full-color touchscreen, users can calibrate the gimbal, set parameters, and choose from intelligent shooting modes such as ActiveTrack 3.0, Timelapse, Track, Panorama, and Time Tunnel.
Locks on each axis arm enables faster and more convenient balancing as well as more secure storage. The onboard buttons allow users to control the gimbal and switch profiles and working modes. When used with the provided camera control cables, DJI RS 2 can also control camera focus, shutter, and recording. With the RSA/NATO ports, accessories such as the Focus Wheel and Twist Grip Dual Handle can be used. The detachable grip has a built-in battery with a capacity of 1950 mAh, providing a maximum runtime of up to 12 hours*.
After connecting to the Ronin app, it's easy to control gimbal movement and parameter settings with intelligent functions such as Panorama, Timelapse, and Track. With the DJI Ronin RavenEye Image Transmission System mounted, users can shoot smooth footage while automatically tracking a subject with ActiveTrack 3.0.
DJI RS 2 Diagram
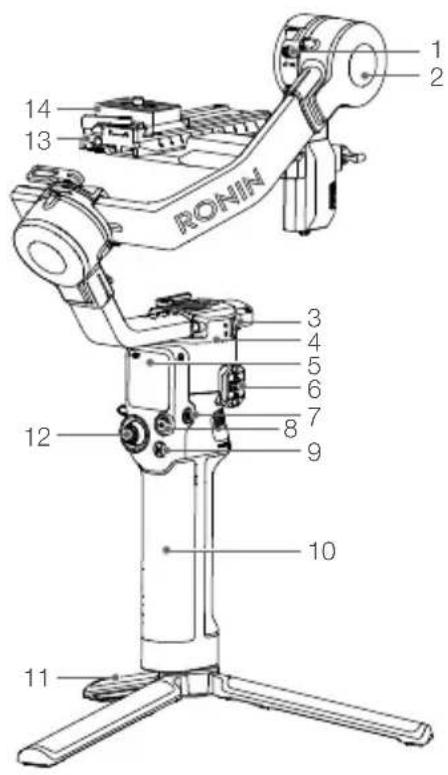
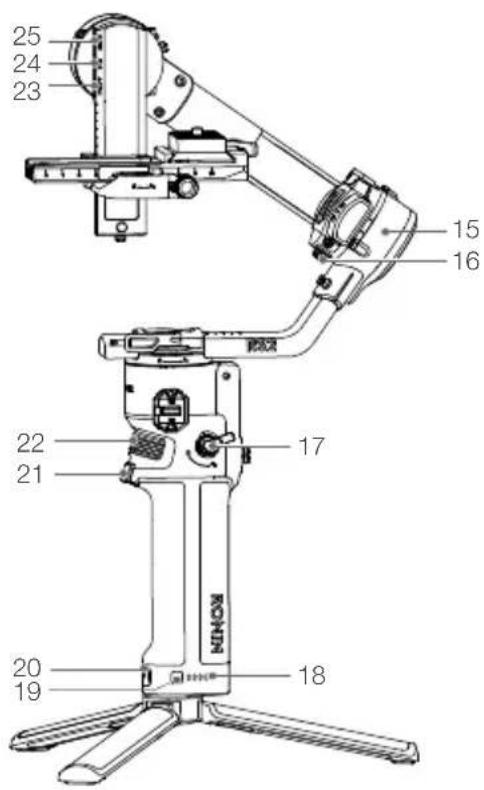
- Tilt Lock
- Tilt Motor
- Pan Lock
- Pan Motor
- Touchscreen
- Ronin Series Accessories (RSA)/NATO Ports
- Power Button
- Camera Control Button
- M Button
- BG30 Grip (Built-in battery with 14 "-20 screw hole)
- Extended Grip/Tripod
-
Joystick
-
Lower Quick-Release Plate
-
Upper Quick-Release Plate
-
Roll Motor
-
Roll Lock
-
Grip Lever/Safety Button
-
Battery Level Indicators
-
Battery Level Button
-
Power Port (USB-C)
-
Trigger
-
Front Dial
-
Image Transmission/Focus Motor Port (USB-C)
-
Focus Motor Port (USB-C)
-
RSS Camera Control Port (USB-C)
Getting Started
Attaching the Extended Grip/Tripod
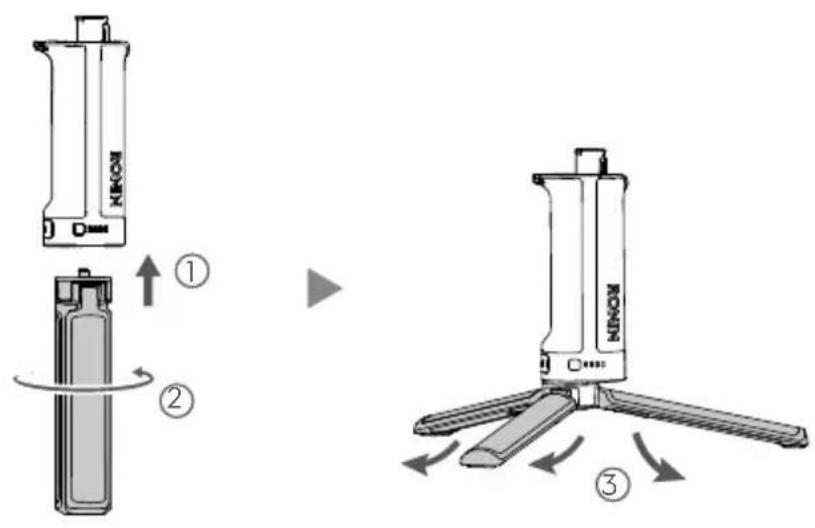
Mounting the Grip
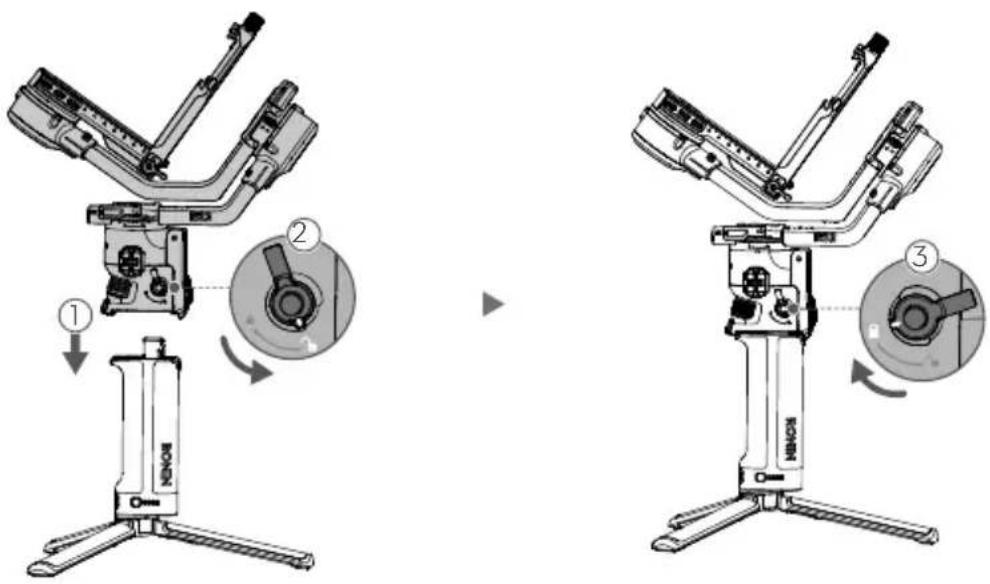
Insert the grip into the gimbal as shown ①. Make sure the grip lever is in the unlocked position ②, and then toggle to the locked position after attaching ③.
To remove the grip, toggle the lever to the unlocked position, hold down the safety button, and pull the grip away from the gimbal.
Unlocking and Locking the Gimbal
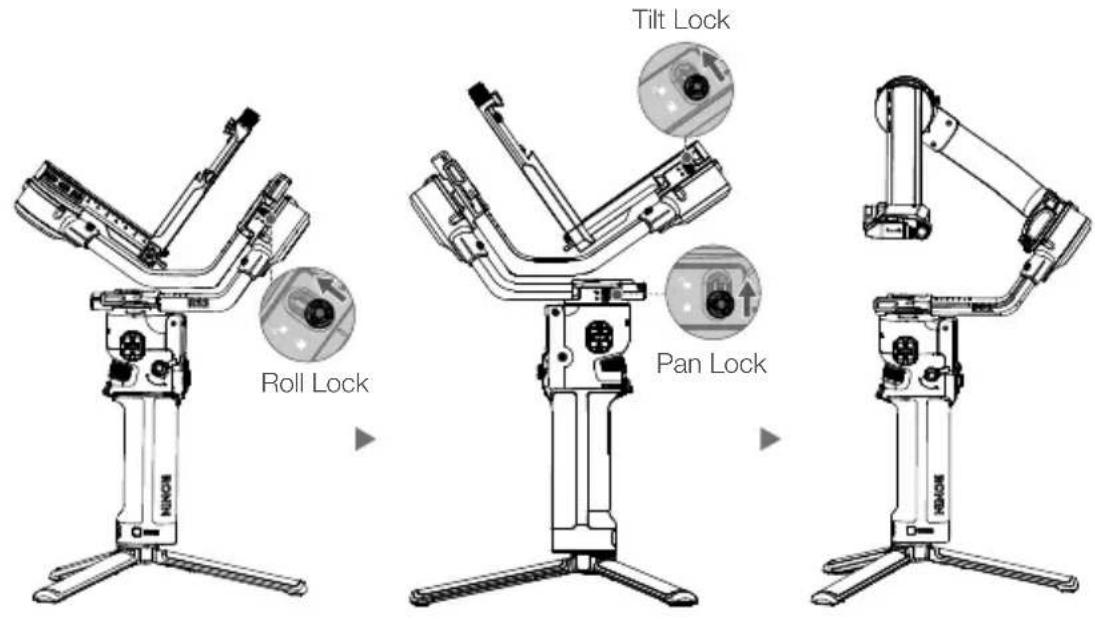
The gimbal is folded by default. To unfold the gimbal, toggle the tilt lock, roll lock, and pan lock levers to the unlocked position and adjust the gimbal position as shown, and then toggle the three locks to the locked position.
Mounting the Camera
Supported Cameras and Lenses
DJI RS 2 has been rigorously tested to support a payload of 4.5 kg. Make sure the combined weight of the camera, lens, and other accessories are within 4.5 kg. Refer to the official DJI website (https://www.dji.com/support/compatibility) for the most updated DJI RS 2 Camera Compatibility List.
Mounting a Camera
Make sure to prepare the camera before mounting it to DJI RS 2. Remove the lens cap and check that the battery and memory card are inserted in the camera. Make sure DJI RS 2 is powered off or in sleep mode before mounting the camera.
1. Attach the Upper Quick-Release Plate
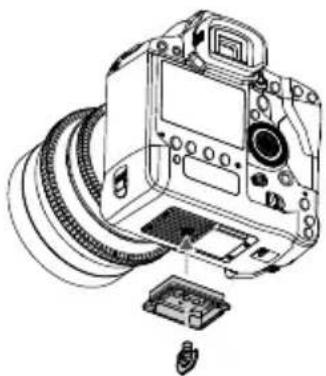
The camera lens and the arrow on the bottom of the upper quick-release plate must face the same direction. Attach the upper quick-release plate to the camera by tightening the screw.
natural_image
Technical line drawing of a camera module with attached electronic components (no text or symbols)
A camera riser is required when using a focus motor or a small camera with a large lens, such as a Sony A6400 with the Sony FE 24-70 f2.8 GM lens.
2. Attach the Lower Quick-Release Plate and Lens-Fastening Strap
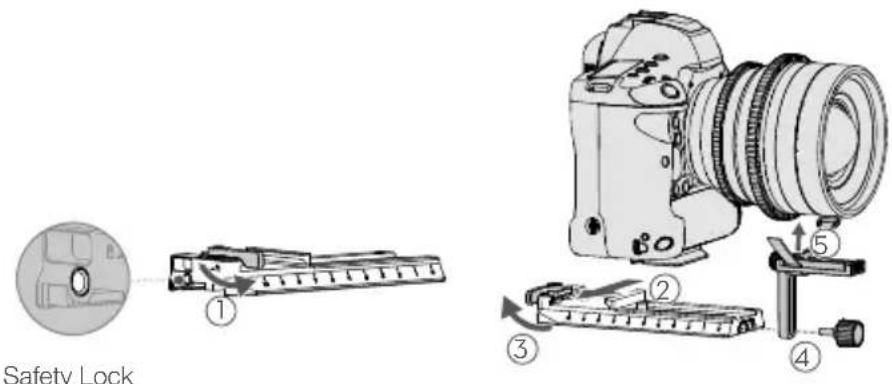
Toggle the lever on the lower quick-release plate to the unlocked position ①, then insert the camera ② and toggle the lever to the locked position ③ after it is engaged. Attach the lens-fastening strap to the lower quick-release plate ④, and bind the strap to the camera lens ⑤. Note that the rubber of the lens-fastening strap must be directly under the lens.
It is recommended to use the lens-fastening strap when using a long or heavy lens, and always use the lens-fastening strap before enabling SuperSmooth mode.
To remove the camera from the lower quick-release plate, toggle the lever to the unlocked position and remove the camera while pressing the safety lock beside the lever.
3. Attach the Camera to the Gimbal
Toggle the lever on the camera mounting plate to the unlocked position ① and insert the lower quick-release plate ②. Toggle the lever to the locked position once the camera is roughly balanced ③.
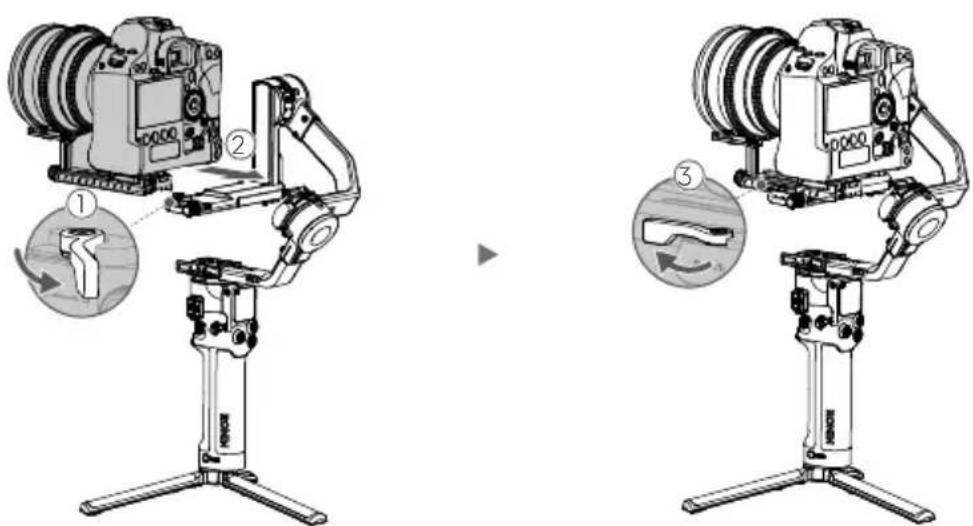
To remove the lower quick-release plate, toggle the lever on the camera mounting plate to the unlocked position and remove the lower quick-release plate while pressing the safety lock on the mounting plate.
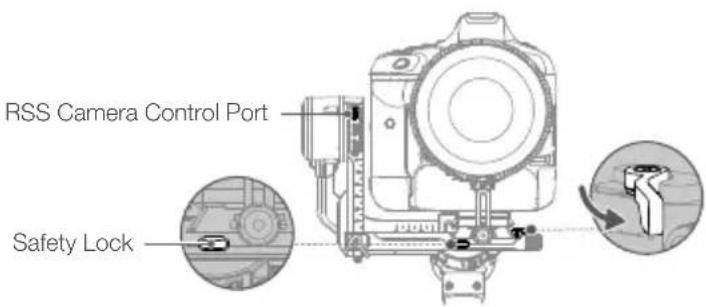
4. Connect the Camera Control Cable
Choose the proper camera control cable according to the camera type. Plug one end of the cable into the camera and plug the other end into the RSS camera control port of the gimbal as shown above.
Balancing
To obtain the best performance from DJI RS 2, proper balancing is essential. Proper balance is critical for shots with DJI RS 2 where fast motion or acceleration is required and also offers longer battery runtimes. There are three axes that need to be properly balanced before powering on DJI RS 2 and setting up the software.
Before Balancing
-
The camera needs to be fully configured, with all accessories and cables connected, before installing and balancing the camera on the gimbal. If the camera has a lens cap, make sure to remove it before balancing.
-
Before balancing, make sure to power on the camera if using an optical zoom lens and to select the focal length if using a varifocal lens. Make sure DJI RS 2 is powered off or in sleep mode before balancing.
Balancing Steps
1. Balancing the Vertical Tilt
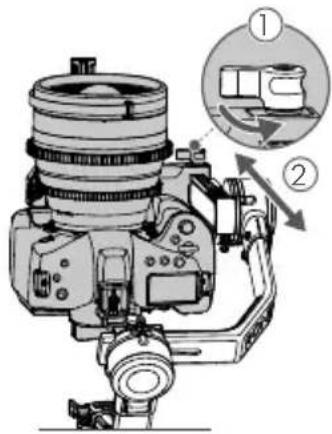
a. Unlock the tilt axis and loosen the mounting plate knob ①.
b. Rotate the tilt axis so that the camera lens is pointing upward. Check to make sure the camera is not top or bottom-heavy. If top-heavy, move the camera backward ②. If bottom-heavy, move the camera forward ②.
c. Tighten the mounting plate knob while holding the camera upward. The vertical tilt is balanced when the camera is steady while pointing upward.
2. Balancing Depth for the Tilt Axis
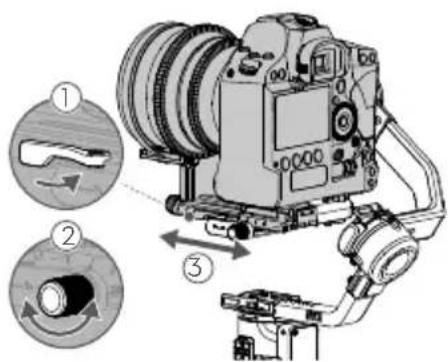
a. Rotate the tilt axis so that the camera lens is pointing forward. Toggle the lever to the unlocked position ①.
b. Check to make sure the camera is not front or back-heavy. If front-heavy, move the camera backward by turning the knob ②. If back-heavy, move the camera forward.
c. Toggle the lever to the locked position. The tilt axis is balanced when the camera is steady while tilted up or down by 45^ .
d. Lock the tilt axis.
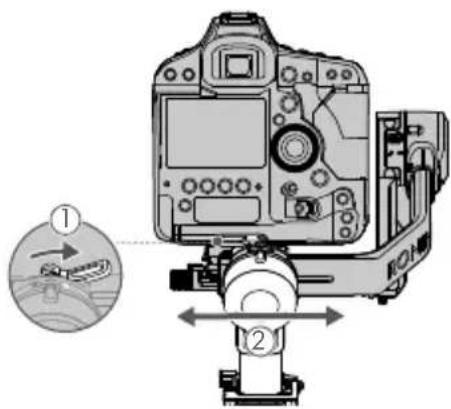
3. Balancing the Roll Axis
a. Unlock the roll axis. Toggle the lever on the roll arm to the unlocked position ①.
b. Check the direction in which the roll motor swings. If the camera rotates to the left, move the camera to the right ②. If the camera rotates to the right, move the camera to the left ②.
c. Toggle the lever on the roll arm to the locked position. The roll axis is balanced when the camera is steady.
d. Lock the roll axis.
4. Balancing the Pan Axis
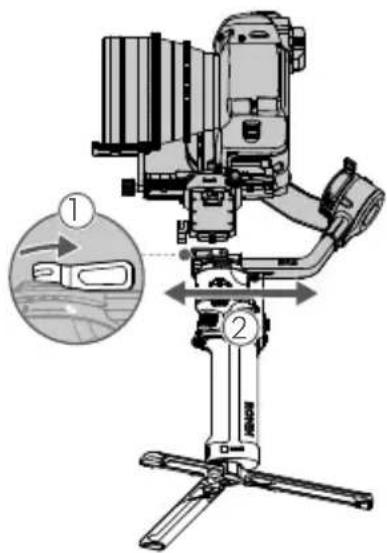
a. Unlock the pan axis. Toggle the lever on the pan arm to the unlocked position ①.
b. While holding the grip, tilt DJI RS 2 forward, and rotate the pan arm until parallel with you.
c. Check the movement of the pan axis. If the camera lens rotates to the left, push the pan axis to the right ②. If the camera lens rotates to the right, push the pan axis to the left ②.
d. Toggle the lever on the pan arm to the locked position. The pan axis is balanced when the camera is steady when rotating the pan while tilting the grip.

If mounting a longer camera system, it is necessary to use counterweights. Visit the official DJI store to purchase the counterweights.
BG30 Grip and Built-In Battery
The BG30 grip is for handheld use. The built-in battery within the grip has a capacity of 1950 mAh and the maximum runtime is 12 hours (when the DJI RS 2 is properly balanced).
Charging
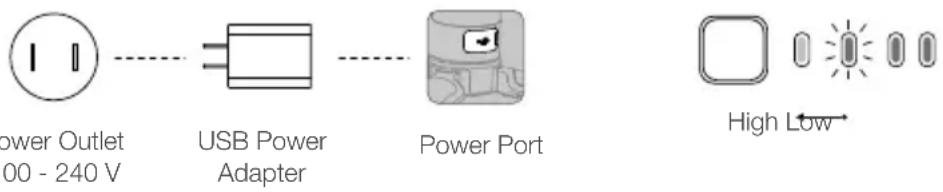
Before using for the first time, charge the battery grip through the power port using a charging cable (included) and a USB adapter (not included). It is recommended to use a USB adapter with QC 2.0 and PD protocol (max. 24 W).
During charging and usage, the battery level indicators indicate the battery level. When not in use, press the battery level button to check the battery level.
Power Outlet
100 - 240 V
Safety Guidelines
The following terms are used throughout the product literature to indicate various levels of potential harm when operating this product:
NOTICE Procedures, which if not properly followed, create a possibility of physical property damage AND a little or no possibility of injury.
WARNING Procedures, which if not properly followed, create the probability of property damage, collateral damage, and serious injury OR create a high probability of superficial injury.

WARNING
Read the user manual to become familiar with the features of this product before operating. Failure to operate the product correctly can result in damage to the product, personal property, and cause serious injury. This is a sophisticated product. It must be operated with caution and common sense and requires some basic mechanical ability. Failure to operate this product in a safe and responsible manner could result in injury or damage to the product or other property.
This product is not intended for use by children without direct adult supervision. Do not use with incompatible components or alter this product in any way outside of the documents provided by SZ DJI OSMO TECHNOLOGY CO., LTD. These Safety Guidelines contain instructions for safety, operation and maintenance. It is essential to read and follow all of the instructions and warnings in the user manual, prior to assembly, setup or use, in order to operate the product correctly and avoid damage or serious injury.
WARNING
To avoid fire, serious injury, and property damage, observe the following safety guidelines when using, charging, or storing the grip.
Grip Use
- DO NOT allow the grip to come into contact with any kind of liquid. DO NOT leave the grip out in the rain or near a source of moisture. DO NOT drop the grip into water. If the inside of the battery comes into contact with water, chemical decomposition may occur, potentially resulting in the battery catching on fire, and may even lead to an explosion.
- If the grip falls into water by accident, put it in a safe and open area immediately. Maintain a safe distance from the grip until it is completely dry. DO NOT use the grip again, and dispose of the grip properly as described in the Grip Disposal section.
- Put out any fire using water, sand, fire blanket, or a dry powder fire extinguisher.
- DO NOT use non-DJI batteries. Go to www.dji.com to purchase new batteries. DJI takes no responsibility for any damage caused by non-DJI batteries.
- DO NOT use or charge a swollen, leaky, or damaged grip. If the grip is abnormal, contact DJI or a DJI authorized dealer for further assistance.
- The grip should be used in temperatures from -20^ to 45^ C ( -4^ to 113^ F). Use of the grip in environments above 50^ C ( 122^ F) can lead to a fire or explosion. Use of grip below -10^ C ( 14^ F) can lead to permanent damage.
- DO NOT use the grip in strong electrostatic or electromagnetic environments. Otherwise, the battery control board may malfunction.
- DO NOT disassemble or pierce the grip in any way or the battery may leak, ignite, or explode.
- DO NOT drop or strike batteries. DO NOT place heavy objects on the grip or charger.
- Electrolytes in the battery are highly corrosive. If any electrolytes make contact with your skin or eyes, immediately wash the affected area with fresh running water for at least 15 minutes, and then see a doctor immediately.
- DO NOT use the grip if dropped.
- DO NOT heat batteries. DO NOT put the grip in a microwave oven or in a pressurized container.
- DO NOT manually short-circuit the grip.
- Clean grip terminals with a clean, dry cloth.
Grip Charging
-
DO NOT leave the grip unattended during charging. DO NOT charge the grip near flammable materials or on flammable surfaces such as carpet or wood.
-
Charging the grip outside of the temperature range of 5^ to 40^ C ( 41^ to 104^ F) may lead to leakage, overheating, or battery damage. The ideal charging temperature is 22^ to 28^ C ( 72^ to 82^ F).
Grip Storage
- Keep the grip out of the reach of children and animals.
- If the grip will be stored for an extended period, charge the grip until the battery level reaches between 30% and 50%.
- DO NOT leave the grip near heat sources such as a furnace or heater. DO NOT leave the grip inside of a vehicle on hot days. The ideal storage temperature is 22^ to 28^ C ( 72^ to 82^ F).
- Keep the grip dry.
Grip Maintenance
- DO NOT use the grip when the temperature is too high or too low.
- DO NOT store the battery in environments with a temperature higher than 45^ C ( 113^ F) or lower than 0^ C ( 32^ F).
Travel Notice
- Before carrying the grip on an airline flight, it must first be discharged until the battery level is lower than 30%. Only discharge the grip in a fireproof location and store the grip in a ventilated location.
- Keep the grip away from metal objects such as glasses, watches, jewelry, and hairpins.
- DO NOT transport a damaged grip or a grip with battery level higher than 30%.
Grip Disposal
Dispose of the grip in specific recycling boxes only after a complete discharge. DO NOT place the grip in regular trash containers. Strictly follow your local regulations regarding the disposal and recycling of batteries.
NOTICE
Grip Use
- Make sure the grip is fully charged before use.
- If a low-battery warning appears, charge the grip as soon as possible.
Grip Charging
- The grip is designed to stop charging when it is full. It is good practice, however, to monitor the charging progress and disconnect the gimbal when fully charged.
Grip Storage
-
Discharge the grip to 40%-65% if it will not be used for 10 days or more. This can greatly extend the battery life.
-
If the grip is stored for an extended period and the battery is depleted, the grip will enter sleep mode. Recharge the grip to exit sleep mode.
- Remove the grip from the gimbal when stored for an extended period.
Grip Maintenance
- Battery life may be reduced if not used for an extended period.
- Discharge and charge the grip completely once every three months to keep it in good condition.
Grip Disposal
- If the grip is disabled and the battery cannot be fully discharged, contact a professional battery disposal or recycling agent for further assistance.
- Dispose of the grip immediately if it cannot be powered on after over-discharging.
Operations
Activating DJI RS 2
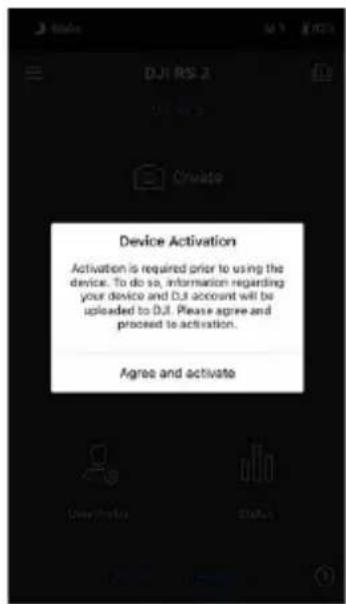
DJI RS 2 needs to be activated through the Ronin app before using for the first time.
- Press and hold the power button to power on the gimbal.
- Enable Bluetooth on your mobile device and launch the Ronin app. Once detected in the list of Bluetooth devices, select DJI RS 2 and input the default Bluetooth password: 12345678. Make sure you are connected to the internet and follow the on-screen instructions to activate DJI RS 2. Note that a DJI account is required during activation.
Touchscreen
Home
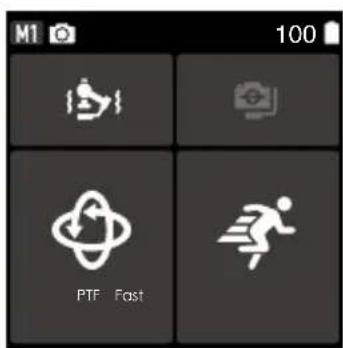
M1 User Profile: indicates the current user profile. Users can set and save three user profiles: M1, M2, and M3.
Camera Status: indicates a camera control cable is connected.
100 Battery Level: displays the current battery level of the gimbal. 🚙 indicates the battery is charged with a normal charger. 🚙 indicates the battery is charged
with a quick charger.
Auto Tune: tap to enter the auto tune screen after balancing the gimbal. If the lens-fastening strap is installed, users can enable SuperSmooth prior to auto tune for optimal performance. SuperSmooth will take effect after auto tune completed. The stiffness can be adjusted on the auto tune screen.
Balance Status: tap to check the balance status.
Follow Mode: tap to select follow mode. The tilt motor controls the tilt axis to follow, pan motor controls the pan axis to follow, and roll motor controls the roll axis to follow.
PF: pan follow, where only the pan axis follows the movement of the grip.
PTF: pan and tilt follow, where both the pan and tilt axes follow the movement of the grip.
FPV: pan, tilt and roll follow, where all three axes follow the movement of the grip.
3D Roll 360: enable to shoot footage while rotating the camera 360°.
Portrait: enable to shoot in portrait mode.
Custom: enable or disable any axis follow as required.
Follow Speed: tap to select follow speed. Users can choose fast, medium, slow, and custom.
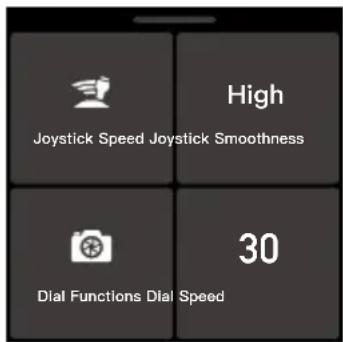
Slide Up: Joystick and Front Dial Settings Screen
Slide up from the bottom of the screen to enter the joystick and front dial settings screen.
Joystick Speed: allows users to control the speed of the joystick for the gimbal. Users can choose fast, medium, slow, and custom.
Joystick Smoothness: allows users to control the sensitivity of the gimbal. The lower the smoothing value, the more sensitive the movement of the gimbal.
Dial Functions: allows users to set the function of the front dial. Users can choose to control the focus motor, focus, ISO, aperture, and roll axis.
Dial Speed: allows users to set the response speed of the function set for the front dial.
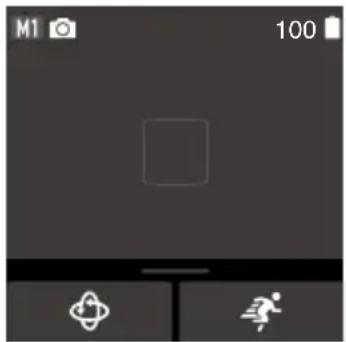
Slide Down: Image Transmission Screen
Slide down from the top of the screen to enter the image transmission screen after mounting the DJI Ronin RavenEye Image Transmission System. After the subject is selected, ActiveTrack can be enabled by pressing the trigger once. ActiveTrack allows users to track the subject automatically and maintain the subject in the middle of the frame.
The appropriate speed should be set by adjusting the speed bar on the bottom of the screen when using ActiveTrack. Subjects may be lost if the speed is set too high and the stabilization may be affected if the speed is set too low.
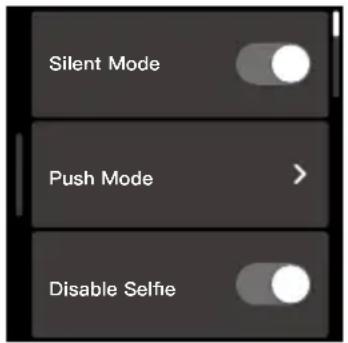
Slide Left: System Settings Screen
Slide left from the right edge of the screen to enter the system settings screen.
Silent Mode: enable to turn off sounds including the warning tone.
Push Mode: enable to manually control the tilt and pan axis.
Disable Selfie: prevents accidentally entering selfie mode and interrupting recording. If disabled, Selfie mode will not be entered if the trigger is pressed three times.
More Settings
Horiz Calibration: use if the gimbal is unlevel when the gimbal is steady. If the issue persists, use Tune Manually.
Gimbal Auto Check: tap to analyze and output the status information of the gimbal.
Restore Parameters: tap to restore the gimbal parameters and Bluetooth password to default settings.
Language: choose the onscreen language from English, Chinese (Simplified), Chinese (Traditional), German, French, Korean, Japanese, Spanish, Brazilian Portuguese, Russian, and Thai.
Device Info: displays the IMU, GCU, and more Bluetooth information.
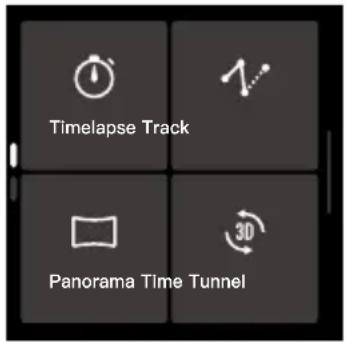
Slide Right: Create Screen
Slide right from the left edge of the screen to enter the Create screen.
Timelapse
In Timelapse, DJI RS 2 triggers the camera to capture still images at the set interval time and will automatically stop when completed. The duration for the Timelapse and the interval time can be set so that DJI RS 2 can calculate the exact number of images required, and the duration of the video can be calculated after the frame rate is set.
Motionlapse allows users to set up to five waypoints so that the camera moves and shoots during the Timelapse.
Track
Track is designed to capture video with up to 10 waypoints. The waypoint needs to be selected by manually moving the gimbal or using the joystick. Tap + to add a waypoint.
The duration and stay time can be set on the waypoint settings screen after a waypoint is added and the position of the waypoint also can be reset. The duration indicates how much time it will take for the gimbal to travel from one waypoint to the next. The stay time indicates how long the gimbal will remain steady at the waypoint before moving to the next waypoint.
Panorama
Panorama allows users to capture a series of interconnecting still images with precise control based on the settings. Users can then generate a panorama using image processing software. The camera captures interconnecting still images based on the setting range when selecting 3x3 or 180° panorama. When creating a custom panorama, users need to set the shooting range, sensor type, lens focal length, overlap, and interval.
Time Tunnel
Allows users to capture a Timelapse while the gimbal is in 3D Roll 360 mode. The number of photos and the duration of the video can be calculated after setting the interval, duration, and the frame rate. The starting angle and the number of rotations will determine the way that the gimbal will move. Tap Start to begin shooting and check progress by tapping Preview.

Make sure the camera and gimbal are connected using the corresponding camera control cable before using Timelapse, Panorama, or Time Tunnel. The interval time between shooting photos should be set to one second more than the shutter time to avoid blurred footage when using a long exposure.
Button Functions
Power Button
Press and hold to power on or off. Tap to lock or unlock the touchscreen. Press twice to enter or exit sleep mode.
Battery Level Button
Press once to check battery level.
Trigger
Tap once to start ActiveTrack (requires the Image Transmission System to be enabled). Press and hold to enter Lock mode. Tap twice to re-center the gimbal. Tap three times to turn the gimbal 180^ so that the camera faces you (selfie mode).
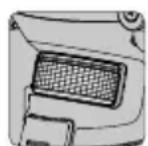
Front Dial\*
Turn to control focus (default setting).
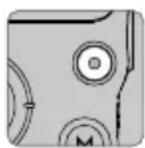
Camera Control Button\*
Press halfway for autofocus. Press once to start or stop recording. Press and hold to take a photo.
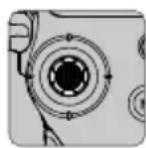
Joystick
Push up or down to control the movement of the tilt axis (default setting). Push left or right to control the movement of the pan axis (default setting).
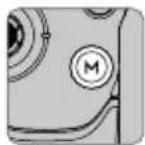
M Button
Tap to select a user profile.
Press and hold to enter Sport mode.
Press and hold and press the trigger twice to remain in Sport mode. Repeat to exit Sport mode.
Quickly tap twice to enter portrait mode.
Press three times to enter or exit 3D Roll 360. When in 3D Roll 360, move the joystick left or right twice to automatically rotate the camera. Tap the trigger twice to stop continuous auto rotation.
Press and hold the M button together with the trigger to begin auto tune.
Ronin App Settings
The Ronin App contains all the features of the touchscreen as well as more features of the gimbal and the DJI Ronin RavenEye Image Transmission System. The screenshots below are based on the iOS version of the app.
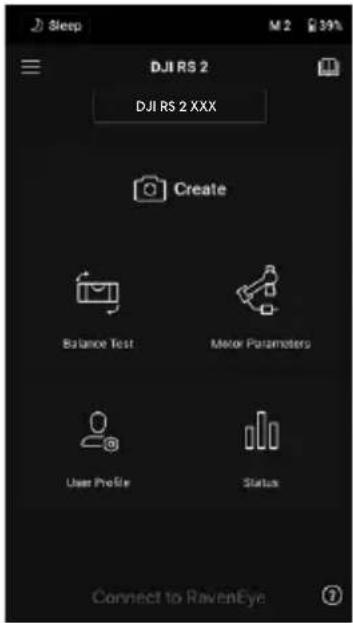
Top Bar
Sleep/Wake: tap to enter or exit sleep mode. When DJI RS 2 is in sleep mode, the motor will be powered off, but the gimbal remains powered on.
M1: displays the current user profile.
Battery Level: displays the battery level of the gimbal.
三 About
Settings: view your account and the quick start guide.
Device List: displays the device name and password.
Firmware: displays the firmware version.
Academy
Watch the tutorials and read the manual documents.
Create
Virtual Joystick
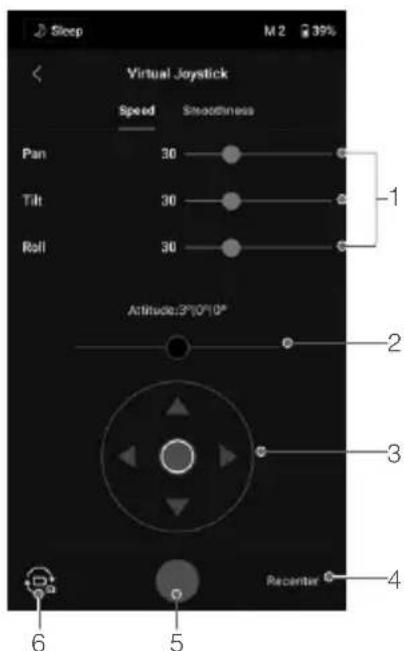
Use the virtual joystick in the app to control the movement of the gimbal and to shoot.
-
Control Bar: control the speed and smoothness of the gimbal by adjusting the control bar. Speed allows users to adjust the remote-controlled rotational speed. Smoothness allows users to adjust the sensitivity of the gimbal. The lower the smoothing value, the more sensitive the movement of the gimbal.
-
Roll Stick: control the roll axis movement of the gimbal using the virtual joystick.
-
Pan/Tilt Stick: control the pan and tilt axis movement of the gimbal using the virtual joystick.
-
Recenter: tap to recenter the gimbal.
-
Shoot/Record Button: tap to take photos or record videos.
-
Photo/Video Toggle: tap to switch between photo and video modes. Make sure the mode is the same as the settings on the camera.
Force Mobile
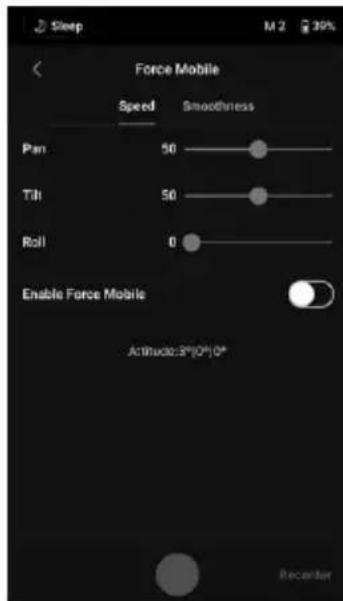
Force Mobile requires the phone holder and a mobile phone mounted on a tripod or handlebar vertically. After enabling this feature in the Ronin app, the gimbal movement can be controlled by tilting and rotating your mobile phone.
Speed determines the relationship between the rotational speed and angle. When the speed is set to 50, the angle of rotation for the gimbal and mobile phone is 1-to-1. The gimbal will move at an identical angle to the mobile phone. When the speed is set to less than 50, the gimbal will rotate slower than the movement of the phone. When the max speed is set higher to a higher value than 50, the rotation of the gimbal is faster than the mobile phone.
Smoothing allows users to control the sensitivity of the gimbal. The lower the smoothing value, the more sensitive the movement of the gimbal.
Recenter: tap to recenter the gimbal.
Shutter/Record Button: tap to take photos or record videos.
Panorama
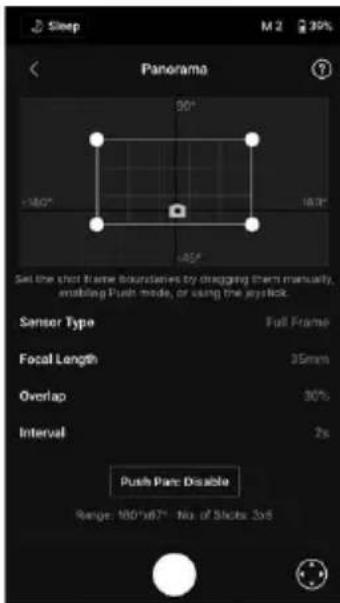
Panorama allows users to capture a series of interconnecting still images with precise control based on the sensor type, lens focal length, overlap, and interval.
Make sure you have connected the camera and gimbal using the corresponding camera control cable before using Panorama.
Overlap: determines the overlap ratio of every photo when generating a panorama.
The interval time between shooting photos should be set to one second more than the shutter time to avoid blurred footage when using a long exposure.
After confirming the camera settings, the panorama range can be set by dragging the white dots on the grid map, pushing the gimbal manually, or using the virtual joystick. The total range covered by the endpoints and the shots required to compose the panorama is displayed above the grid map. The tilt axis range in Panorama is -45^ to +90^ in order to avoid capturing the gimbal in the shot, while the pan axis allows you to capture a full 360^ rotation.
Tap the shutter/record button to begin.
Timelapse
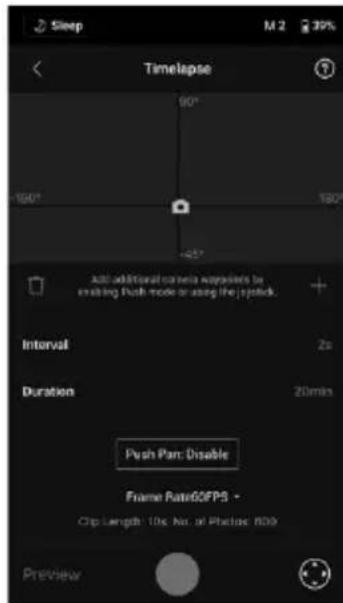
In Timelapse, DJI RS 2 triggers the camera to capture still images with the set interval time and will automatically stop when completed. The duration for the Timelapse and the frame rate can be set so that DJI RS 2 can calculate the exact number of images required.
By enabling Push mode, users can manually adjust the pan and tilt axes before starting the Timelapse. Users can push DJI RS 2 to alter the camera orientation and adjust the framing. Tap the virtual joystick icon to use the virtual joystick to adjust the camera orientation.
Motionlapse allows users to set up to five waypoints so that the camera moves during the Timelapse.
To adjust the position of a waypoint, adjust the camera to the desired position, and tap the + icon to confirm the waypoint. You can also use the virtual joystick to control the pan, tilt, and roll axis as well.
To add another waypoint, move the gimbal to the next waypoint, and tap the + icon above the grid map. Afterwards, to delete a waypoint, select the waypoint and tap the trash icon.
After setting up the waypoints, you can either tap Preview to make sure the Motionlapse includes everything or tap the shutter/record button to start shooting. Make sure the camera and gimbal have been connected using the corresponding camera control cable.
Track
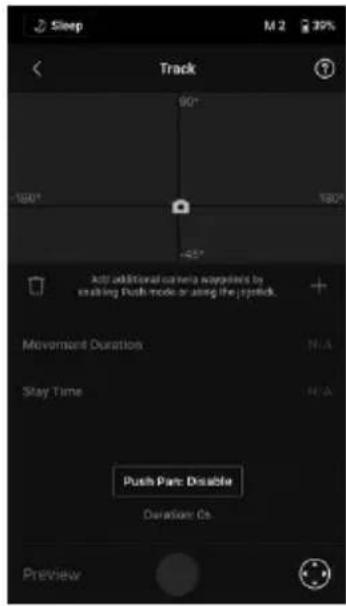
Track is designed to capture video with up to 10 waypoints. Users need to select the waypoint manually by moving the gimbal or using the virtual joystick. The duration parameter below the grid map indicates how much time it will take for the gimbal to travel from one waypoint to the next. The stay time indicates how long the gimbal will remain steady at the waypoint before moving to the next waypoint.

DO NOT press the shutter button of the camera while using Track.
Gaming Controller
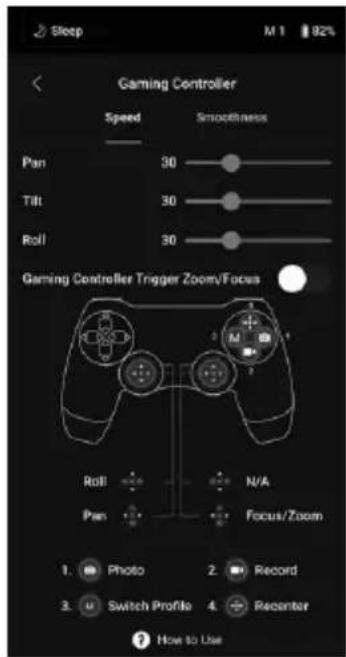
PS4 DualShock and Xbox controllers can be used to control the gimbal and camera. After connecting the controller to the mobile device and gimbal, users can control gimbal movements, focus, and zoom, and can record videos, recenter gimbal, capture photos, and switch profiles.
The speed and smoothness of the control sticks can be adjusted. Set the focus value within 10 on the camera settings for optimal performance. iOS 13 or higher, Android 9.0 or higher, and Ronin app v1.4.0 or higher are required.
Tap How to Use to learn more about the gaming controller.
Balance Adjustment
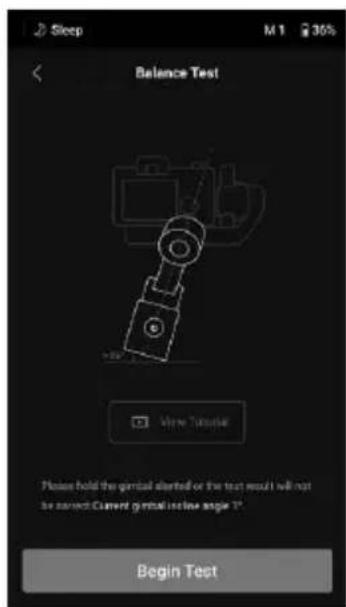
Tap Begin Test and DJI RS 2 will check the balance status and provide a score for each axis. Make sure the gimbal is not obstructed in any way before performing the balance test and follow the onscreen instructions.
Motor Parameters
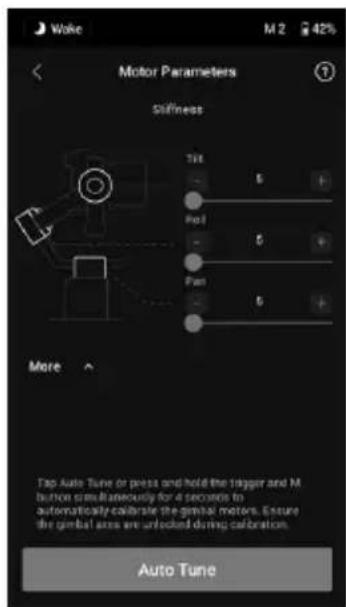
Auto Tune: the stiffness value is determined by the payload of the gimbal. Use Auto Tune to obtain the stiffness value automatically after balancing.
Tap Auto Tune and DJI RS 2 automatically calculates the result based on the weight of the gimbal setup. Alternatively, press and hold the M button and trigger simultaneously for four seconds to start auto tune without using the app.
The auto tune process takes approximately 15 to 30 seconds. After auto tune, you can see detailed motor diagnostics at the bottom of the screen. If the gimbal is properly balanced, the power value of the motors should be in the range of ±5 . If power consumption on a particular axis constantly goes beyond that range, check the mechanical balance of DJI RS 2.
Stiffness: the motor stiffness adjustment allows you to fine-tune the power that is applied by the motors as they react and balance the weight on each axis. Make sure you leave an extra margin to ensure stability at all times. If the stiffness value is too high the gimbal may shake and if the value is too low the gimbal performance will be affected.

- When using auto tune, make sure the three axes are unlocked and that DJI RS 2 is placed on a steady surface in Upright or Underslung mode.
- Make sure the gimbal is balanced and the stiffness values are tuned properly every time you change the camera or lens.
User Profile
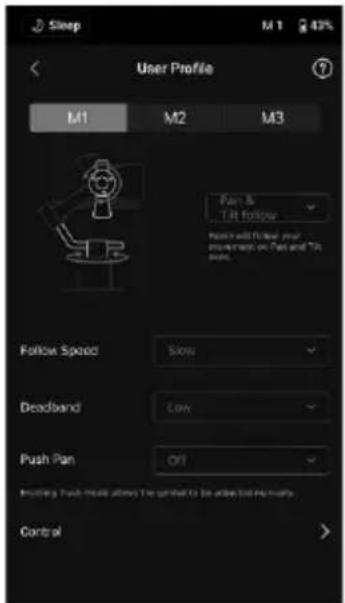
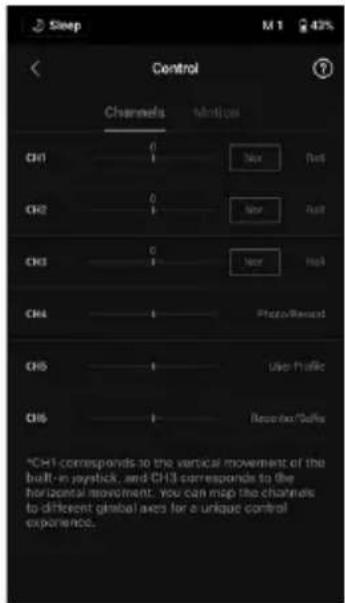
Three user profiles can be set and save.
Follow Mode: choose from Pan and Tilt Follow, FPV, Customized, and 3D Roll 360.
Speed: determines how fast the camera travels while translating a pan, tilt, or roll movement.
Deadband: determines how much movement the gimbal tolerates prior to translating the pan, tilt, and roll movement of the camera.
Push: After enabling Push, the gimbal axis can be manually pushed to the desired position.
Control Settings
Channels
The channel indicator provides feedback when configuring remote operation. Pan, tilt, and roll channels can be reassigned and each axis can also be inverted. Normal means the direction of movement is the same as the joystick. Inverted means the direction of movement is the opposite of the joystick.
When using the joystick, you can only control CH1 and CH3, which is mapped to tilt and pan axes by default. You can customize channel mapping by tapping on the name of the axis on the right of the screen.
Motion
You can set the joystick control by adjusting deadband, max speed, smoothing, and endpoints for each axis. There are three default profiles for each settings.
Deadband: when the deadband value increases, more stick movement will be required to translate into the actual movement of the gimbal.
Max Speed: allows the remote-controlled rotational speed to be adjusted.
Smoothing: allows you to control the sensitivity of the gimbal. The lower the smoothing value, the more sensitive the movement of the gimbal.
Endpoint: limits the rotational range of the gimbal by setting the endpoints. The pan axis has a slip-ring, enabling DJI RS 2 to rotate continuously when the endpoints are set to 180^ . On the tilt axis, you can set up the endpoints according to your requirements. Some longer lenses may hit the gimbal frame. Set the endpoint angle to prevent such cases.
Status
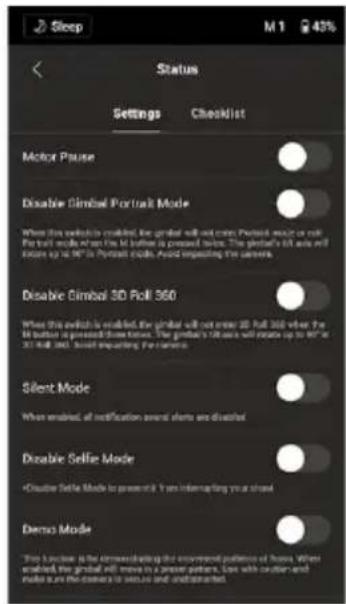
Settings
Use more features such as Motor Pause, Disable Gimbal Portrait Mode, Silent Mode, System Calibration, Advanced Calibration, and Restore Gimbal Setup.
Checklist
When the gimbal status is abnormal, the status information is displayed here.
Image Transmission
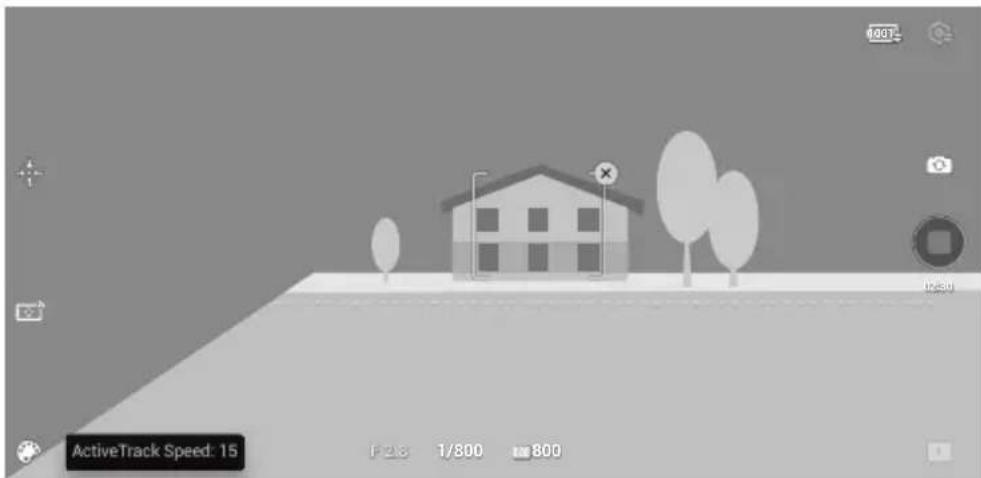
With the DJI Ronin RavenEye Image Transmission System mounted, tap Connect to RavenEye on the home screen of the Ronin app to use the image transmission feature.
natural_image
3D-rendered grayscale scene of a house with trees and a road, no visible text or symbolsUsing ActiveTrack 3.0
When tracking a person, it is recommended to select and confirm the person in the center of the camera view by pressing the trigger once. When tracking an object, it is recommended to select and confirm the object by dragging a box around it in order to recognize the object better. The gimbal begins to track after recognizing the object successfully.
The appropriate speed should be set when using ActiveTrack. Subjects may be lost if the speed is set too high and the stabilization may be affected if the speed is set too low.
For optimal performance, it is recommended to set the ActiveTrack speed to 20 when using a lens with a 24 mm equivalent focal length (tested with Sony α7 III). Increase the ActiveTrack speed when using a lens with an equivalent focal length less than 24 mm. Decrease the ActiveTrack speed when using a lens with an equivalent focal length more than 24 mm.
Tap 📋 to use Virtual Joystick and Force Mobile.

Refer to the DJI Ronin RavenEye Image Transmission System User Guide for more information.
Operation Modes
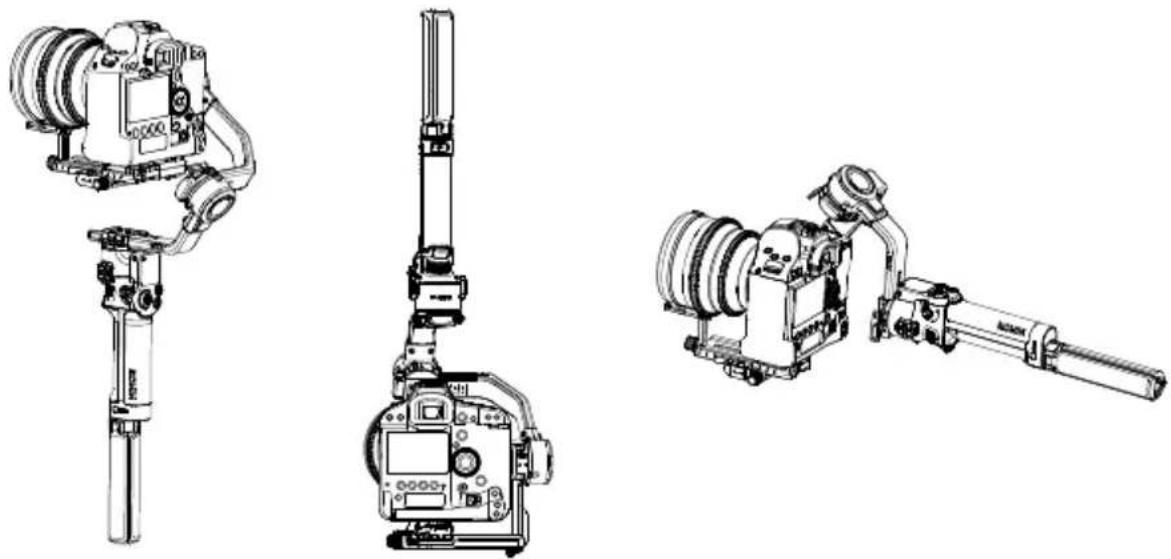
There are four operation modes for the DJI RS 2: Upright, Underslung, Flashlight, and Briefcase.
natural_image
Technical line drawings of three different camera modules (no text or symbols present)Flashlight ModeUnderslung ModeUpright Mo
3D Roll 360 is available when using DJI RS 2 in Flashlight mode. The slip-ring on the pan axis enables DJI RS 2 to perform a continuous roll rotation. 3D Roll 360 can be used with the grip at any orientation.
Press the M button three times to enter or exit 3D Roll 360 or go to User Profile in the
Ronin app to enable or disable 3D Roll 360. Push the joystick to the left or right to begin 3D Roll 360. Push the joystick to the left or right twice in quick succession to trigger auto rotation.
During auto rotation: when the grip is horizontal, press the trigger twice and the camera will stop in an upright position. Press the trigger three times and the camera will stop in an upside-down position. When the grip is vertical, press the trigger twice and the camera will stop at a pan axis angle of 0^ with the lens pointing upward. Press the trigger three times and the camera will stop at a pan axis angle of 180^ degree with lens pointing upward.
Set the Max Speed and Smoothing for the 3D Roll 360 in the Control settings under the User Profile of the Ronin app. Note that Speed and Deadband are unavailable when using 3D Roll 360.
You can use DJI RS 2 in Briefcase mode with the briefcase handle and extended grip/tripod mounted. The briefcase handle can be mounted to either RSA/NATO port. Attach the briefcase handle as shown. Make sure the knob is tightened.
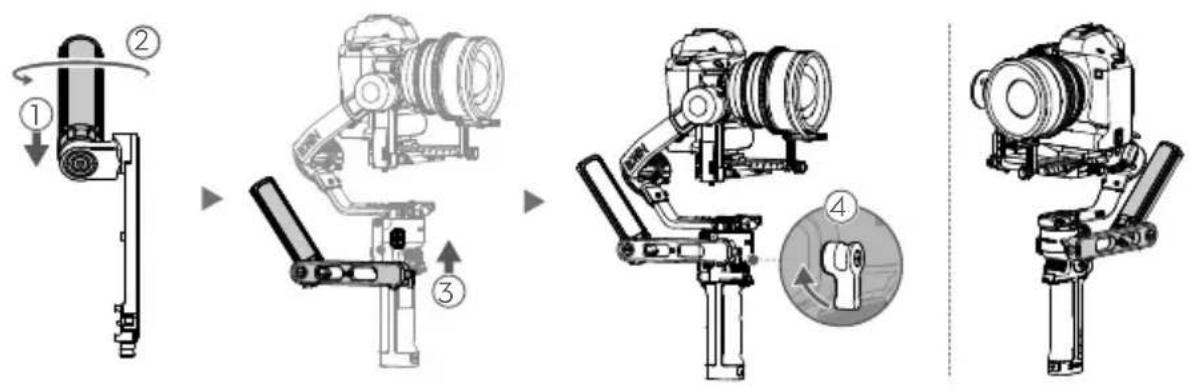

When attaching the briefcase handle to the other side, the extended grip/tripod angle must be adjusted by loosening the screw on the briefcase handle.
Updating Firmware
Update the firmware using the Ronin app. An on-screen alert will be received when new firmware is available. Follow the on-screen instructions to update the firmware.
Maintenance
DJI RS 2 is not waterproof. Make sure to protect it from dust and water during use. After use, it is recommended to wipe DJI RS 2 with a soft dry cloth. DO NOT spray any cleaning liquids onto DJI RS 2.
Specifications
| External Device | Accessory Port | RSA/NATO Ports1/4"-20 UNC Screw HolesCold ShoeImage Transmission/Focus Motor Port (USB-C)Focus Motor Port (USB-C)RSS Camera Control Port (USB-C) |
| Input Power | Model: BG30-1950mAh-15.4VType: LiPo 4SCapacity: 1950 mAhEnergy: 30.03 WhVoltage: 12-17.6 VMax. Runtime: Approx. 12 hCharging Time: Approx. 1.5 h (when using 24 W USB Charger)Charging Temperature Range: 5° to 40°C (41° to 104°F)USB Input: 5V/2A, 9V/2A, 12V/2A, 15V/1.6A | |
| Connections Bluetooth | 5.0, Power Port (USB-C) | |
| Ronin App Requirements | iOS 11.0 or aboveAndroid 7.0 or above | |
| On Screen Supported languages | Chinese (Simplified), English, Chinese (Traditional), German, French, Korean, Japanese, Spanish, Brazilian Portuguese, Russian, Thai. | |
| Working Performance | Load Weight(Reference Value) | 4.5 kg (Handheld) |
| Maximum Controlled Rotation | Pan axis: 360°/s | |
| Tilt axis: 360°/s | ||
| Roll axis: 360°/s | ||
| Pan axis: 360° continuous rotation | ||
| Roll axis: -95° to +240° | ||
| Tilt axis: -112° to +214° | ||
| Mechanical and Electrical Characteristics | Bluetooth Operating Frequency | 2.40 - 2.4835 GHz |
| Bluetooth Transmitter Power | <8 dBm | |
| Operating Temperature | -20° to 45°C (-4° to 113°F) | |
| Weight | Gimbal: Approx. 960 g (2.12 lbs) (excl. the Quick-Release Plates and Camera Mounting Plate)Camera Mounting Plate: Approx. 150 g (0.33 lbs)BG30 Grip: Approx. 265 g (0.58 lbs)Extended Grip/Tripod: Approx. 226 g (0.50 lbs)Upper and Lower Quick-Release Plates: Approx. 105 g (0.23 lbs) | |
| Dimensions | Gimbal (folded): 260×265×70 mm (excl. grip)Gimbal (unfolded): 410×260×195 mm (incl. grip, excl. Extended Grip/Tripod) |
This content is subject to change.
Download the latest version from
http://www.dji.com/rs-2
If you have any questions about this document, please contact DJI by sending a message to DocSupport@dji.com.
RONIN is a trademark of DJI OSMO.
Copyright © 2020 DJI OSMO All Rights Reserved.
- Searching for Keywords
- Navigating to a Topic
- Printing this Document
- Using this Manual
- Before You Begin
- Download the Ronin App
- Contents
- Using this Manual 2
- Contents 3
- Introduction 4
- Getting Started 6
- BG30 Grip and Built-In Battery 12
- Operations 16
- Operation Modes 30
- Updating Firmware 31
- Maintenance 31
- Specifications 32
- Introduction
- DJI RS 2 Diagram
- Getting Started
- Mounting the Grip
- Unlocking and Locking the Gimbal
- Mounting the Camera
- Supported Cameras and Lenses
- Mounting a Camera
- Attach the Upper Quick-Release Plate
- Attach the Lower Quick-Release Plate and Lens-Fastening Strap
- Attach the Camera to the Gimbal
- Connect the Camera Control Cable
- Balancing
- Before Balancing
- Balancing Steps
- Balancing the Vertical Tilt
- Balancing Depth for the Tilt Axis
- Balancing the Roll Axis
- Balancing the Pan Axis
- BG30 Grip and Built-In Battery
- Charging
- Safety Guidelines
- WARNING
- Grip Use
- Grip Charging
- Grip Storage
- Grip Maintenance
- Travel Notice
- Grip Disposal
- NOTICE
- Operations
- Activating DJI RS 2
- Touchscreen
- Home
- Slide Up: Joystick and Front Dial Settings Screen
- Slide Down: Image Transmission Screen
- Slide Left: System Settings Screen
- More Settings
- Slide Right: Create Screen
- Timelapse
- Track
- Panorama
- Time Tunnel
- Button Functions
- Power Button
- Battery Level Button
- Trigger
- Front Dial\*
- Camera Control Button\*
- Joystick
- M Button
- Ronin App Settings
- Top Bar
- 三 About
- Academy
- Create
- Force Mobile
- Gaming Controller
- Balance Adjustment
- Motor Parameters
- User Profile
- Control Settings
- Channels
- Motion
- Status
- Settings
- Checklist
- Image Transmission
- Operation Modes
- Updating Firmware
- Maintenance
Brand : DJI
Model : Ronin RS 2
Category : Camera Tripod