
Blink 500 TX - Microphone Saramonic - Free user manual and instructions
Find the device manual for free Blink 500 TX Saramonic in PDF.


| Product Type | Wireless Microphone Transmitter |
| Brand | Saramonic |
| Model | Blink 500 TX |
| Connectivity | 2.4 GHz wireless |
| Frequency Band | 2.4 GHz ISM |
| Battery Type | Internal rechargeable lithium-ion |
| Battery Life | Approximately 6 hours |
| Charging | USB-C, 2 hours for full charge |
| Weight | 36 g (1.27 oz) |
| Dimensions | 58 x 40 x 17 mm (2.28 x 1.57 x 0.67 in) |
| Color | Black |
| Material | ABS plastic |
| Microphone Type | Built-in omnidirectional condenser microphone |
| Range | Up to 100 meters (line of sight) |
| Operating Temperature | 0°C to 50°C (32°F to 122°F) |
| Main Functions | Wireless audio transmission, mute button, gain control |
| Maintenance & Cleaning | Wipe with a dry soft cloth; avoid liquids and solvents |
| Safety Warnings | Keep away from water and extreme heat; do not disassemble |
| Spare Parts & Repairability | Non-user-serviceable; contact Saramonic support for repairs |
| General Information | Designed for vlogging, content creation, and mobile journalism |
Frequently Asked Questions - Blink 500 TX Saramonic
User questions about Blink 500 TX Saramonic
0 question about this device. Answer the ones you know or ask your own.
Ask a new question about this device
Download the instructions for your Microphone in PDF format for free! Find your manual Blink 500 TX - Saramonic and take your electronic device back in hand. On this page are published all the documents necessary for the use of your device. Blink 500 TX by Saramonic.
USER MANUAL Blink 500 TX Saramonic
Ultracompact 2.4GHz Dual-Channel Wireless Microphone System Blink500
User Manual
General Introduction
The Saramonic Blink500 is an incredibly lightweight, ultracompact and easy-to-use 2-person wireless microphone system for DSLR, Mirrorless and Video cameras, or mobile devices that delivers detailed, broadcast-quality sound.
The system series is comprised of three different receivers. The RX receiver has a 3.5mm output and includes TRS and TRRS output cables, allowing it to work with any device with a 3.5mm audio input. The RXDi receiver has a MFi Certified Lightning output and is designed for Apple iOS devices. And the RXUC receiver has a USB-C output and is designed for devices with a USB-C port, including Android smartphones and tablets.
The clip-on transmitter has a great sounding built-in mic and it is small and light enough to clip to shirts and clothing, or you can use it as a traditional beltpack transmitter with the included SR-M1 professional lavalier microphone.
No technical knowledge of audio is required to operate. The Blink500 system operates on the interference-free 2.4GHz spectrum and automatically hops to free channels to avoid static noise and audio dropouts.
There are six kits available in the Blink500 series:
| Model | In the box |
| Blink500 B1(TX+RX) | 1 × Blink500 RX 1 × Blink500 TX |
| Blink500 B2(TX+TX+RX) | 1 × Blink500 RX 2 × Blink500 TX |
| Blink500 B3(TX+RXDi) | 1 × Blink500 RXDi 1 × Blink500 TX |
| Blink500 B4(TX+TX+RXDi) | 1 × Blink500 RXDi 2 × Blink500 TX |
| Blink500 B5(TX+RXUC) | 1 × Blink500 RXUC 1 × Blink500 TX |
| Blink500 B6(TX+TX+RXUC) | 1 × Blink500 RXUC 2 × Blink500 TX |
Product Structure
1. Blink500 RX: Clip-On and Shoe-Mountable Receiver

① Power Key
Long press to turn on or off the receiver.
② Power and Pairing Indicator
Power Functions:
Solid Red Light = Low Battery
Pairing Functions:
Flashing Blue Light (every one second) = Unpaired
Quick Flashing Blue Light (every 0.5 second) = Waiting for Pairing
Solid Blue Light = Paired Successfully
Once the receiver and transmitter are paired, they will be connected with each other automatically, even when powered off and on.
③ USB Type-C Charging Port
④ Charge Indicator
Solid Green Light = Charging Battery
Light turns off when fully charged.
⑤ Line Out
Connect the receiver to a DSLR or Mirrorless camera, camcorder, smartphone, tablet, mixer or amplifier with the supplied output cables.
⑥ Pairing Pin-Hole
⑦ Belt Clip and Standard Cold Shoe Mount
2. Blink500 RXDi: Lightning Receiver

① Lightning Connector
② Pairing Indicator
Flashing Blue Light (every one second) = Unpaired
Quick Flashing Blue Light (every 0.5 second) = Waiting for Pairing
Solid Blue Light = Paired Successfully
Once the receiver and transmitter are paired, they will be connected with each other automatically, even when powered off and on.
③ Pairing Pin-Hole
④ Antenna
- Blink500 RXUC: USB-C Receiver

① USB Type-C Connector
② Pairing Indicator
Flashing Blue Light (every one second) = Unpaired
Quick Flashing Blue Light (every 0.5 second) = Waiting for Pairing
Solid Blue Light = Paired Successfully
Once the receiver and transmitter are paired, they will be connected with each other automatically, even when powered off and on.
③ Pairing Pin-Hole
④ Antenna
- Blink500 TX: Body-pack Transmitter with Microphone
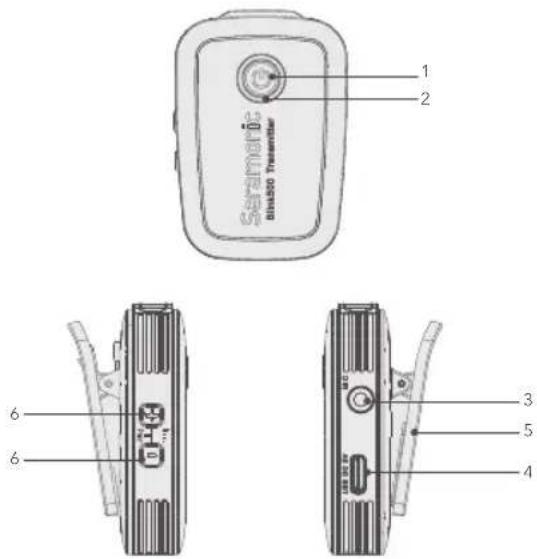
① Power Key
Long press to turn on or off the transmitter.
② Power Indicator, Volume Indicator and Pairing Indicator
Power Functions:
Solid Red Light = Low Battery
When charging:
Solid Green Light = Charging Battery
Light turns off when fully charged.
Volume Functions:
Indicates the volume setting in three stages.
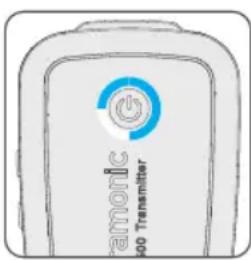
Adjust the audio level by the "+" and "-" buttons.
Default is in the third stage.
The transmitter mic will be muted if you turn down the volume till all the lights are turned off.
Pairing Functions:

Flashing Blue Light (every one second) = Unpaired
Slow Flashing Blue Light (every three seconds) = Paired
Successfully
③ 3.5mm Audio Input
Connect to the supplied lavalier microphone.
④ USB Typc-C Charging Port
⑤ Belt Clip and Standard Cold Shoe Mount
⑥ Volume Control Buttons & Pair Buttons
Operation Guide
For the Blink500 B1/B2 kit
- Turn on the transmitter TX by long pressing the power key.
- Turn on the receiver RX by long pressing the power key.
- Insert the pairing pin into the pairing pin-hole of RX, press hard and the pair indicator should be quick flashing at every 0.5s. Press both the "+" and "-" button of transmitter TX simultaneously within 10 seconds.
- The kit will be paired when the RX pair indicator is solid blue and the TX pair indicator is flashing slowly.
Note: To pair the second transmitter TX, just repeat the step 3 and 4.
- Connect the receiver RX to the mic jack of a camera, camcorder, recorder or mixer with the supplied 3.5mm TRS audio cable. Or connect the RX to a smartphone or tablet with the supplied 3.5mm TRS to TRRS audio cable.
- You are ready to record.
Note: The output of receiver RX is line out. You can connect it to speaker system. To avoid noise during connection, before connecting the receiver to a speaker system, please mute the speaker system and do not use the headphones.
For the Blink500 B3/B4/B5/B6 kit
- Turn on the transmitter by long pressing the power key.
-
Plug the RXDi into an iOS device or the RXUC into an USB Type-C device. Please make sure the antenna (yellow side) is oriented on the top of the device, when in landscape mode, to get the best signal.
-
Insert the pairing pin into the pairing pin-hole of RXDi or RXUC, press hard and the pair indicator should be quick flashing at every 0.5s. Press both the "+" and "-" button of transmitter TX simultaneously within 10 seconds.
- The kit will be paired when the RX pair indicator is solid blue and the TX pair indicator is flash slowly.
Note: To pair the second transmitter TX, just repeat the step 3 and 4.
- You are ready to record.
Specification
| Blink500 RXUC | |
| Transmission Type | 2.4GHz Digital Frequency |
| Modulation | GFSK |
| Operating Range | Up to 164' (50m) |
| Audio Output Connector | USB-C Connector |
| Power Requirements | Supplied by USB-C Devices |
| Built-in Battery Life | Approx. 6 hours |
| Antenna | PIFA Antenna |
| Weight | Approx. 10.5g (0.37oz) |
| Dimensions | 76×16.5×11mm |
| Operating Temperature | 0°C to 50°C |
| Storage Temperature | -20°C to +55°C |
| Blink500 RXDi | |
| Transmission Type | 2.4GHz Digital Frequency |
| Modulation | GFSK |
| Operating Range | Up to 164' (50m) |
| Audio Output Connector | MFi Certified Lightning Connector |
| Power Requirement | Supplied by iOS Device |
| Built-in Battery Life | Approx. 6 hours |
| Antenna | PIFA Antenna |
| Weight | Approx. 11g (0.38oz) |
| Dimensions | 76×16.5×11mm |
| Operating Temperature | 0°C to 50°C |
| Storage Temperature | -20°C to +55°C |
| Blink500 RX | |
| Transmission Type | 2.4GHz Digital Frequency |
| Modulation | GFSK |
| Operating Range | Up to 164' (50m) |
| Audio Output Connector | 3.5 mm Jack |
| Audio Output level | -60 dBV |
| Power Requirements | Built-in Li-ion Battery or USB-C DC 5V |
| Built-In Battery Life | Approx. 6 hours |
| Antenna | PIFA Antenna |
| Weight | Approx. 26.5g (0.93oz) |
| Dimensions | 62×33×15.5mm |
| Operating Temperature | 0°C to 50°C |
| Storage Temperature | -20°C to +55°C |
| Blink500 TX | |
| Transmission Type | 2.4GHz Digital Frequency |
| Modulation | GFSK |
| Operating Range | Up to 164' (50m) |
| RF Output Power | 10mW |
| Polar Pattern | Omnidirectional |
| Frequency Response | 50Hz-18KHz |
| Maximum SPL | Built-in Microphone:120dB SPLLavalier Microphone: 110dB SPL |
| Sensitivity | Built-in Microphone: -42dBLavalier Microphone: -30dB |
| SNR | >78dB |
| Power Requirements | Built-in Li-ion Battery or USB-C DC 5V |
| Built-in Battery Life | Approx. 6 hours |
| Antenna | PIFA Antenna |
| Audio Inputs | 3.5mm TRS Lavalier Microphone Inputor Built-in Microphone |
| Weight | Approx. 34g (1.2oz) |
| Dimensions | 63×43×16.5mm |
| Operating Temperature | 0°C to 50°C |
| Storage Temperature | -20°C to +55°C |
Packing List
Blink500 RX
1× Blink500 RX Receiver with Built-In Clip and Camera Shoe-Mount
1× 1' (30.5 cm) Gold-Plated 3.5mm TRS to TRS Output Cable for Cameras
1× 1' (30.5 cm) Gold-Plated 3.5mm TRS to TRRS Output Cable for Smartphones and Tablets
1× 1' (30.5 cm) Gold-Plated USB-C to USB-A Charging Cables
1× Pairing Pin
1× Warranty Card
1× User Manual
Blink500 TX
1× Blink500 TX Transmitter with Built-In Microphone and Clip
1× SR-M1 Omnidirectional Lavalier Microphone
1× Alligator-Style Lavalier Microphone Clip
1× Foam Lavalier Windscreen
1× 1' (30.5 cm) Gold-Plated USB-C to USB-A Charging Cable
1× Pairing Pin
1× Warranty Card
1× User Manual
Blink500 RXDi
1× Blink 500 RXDi Receiver with MFi Certified Apple Lightning Connector
1× Pairing Pin
1× Warranty Card
1× User Manual
Blink500 RXUC
1× Blink 500 RXUC Receiver with USB-C Connector
1× Pairing Pin
1× Warranty Card
1× User Manual
Blink500 B1(TX+RX)
1× Blink500 RX Receiver with Built-In Clip and Camera Shoe-Mount
1× Blink500 TX Transmitter with Built-In Microphone and Clip
1× 1' (30.5 cm) Gold-Plated 3.5mm TRS to TRS Output Cable for Cameras
1× 1' (30.5 cm) Gold-Plated 3.5mm TRS to TRRS Output Cable for Smartphones and Tablets
2× 1' (30.5 cm) Gold-Plated USB-C to USB-A Charging Cables
1× SR-M1 Omnidirectional Lavalier Microphone
1× Alligator-Style Lavalier Microphone Clip
1× Foam Lavalier Windscreen
1× Pairing Pin
1× Warranty Card
1× User Manual
Blink500 B2(TX+TX+RX)
1× Blink500 RX Receiver with Built-In Clip and Camera Shoe-Mount
2 × Blink500 TX Transmitters with Built-In Microphone and Clip
1× 1' (30.5 cm) Gold-Plated 3.5mm TRS to TRS Output Cable for Cameras
1× 1' (30.5 cm) Gold-Plated 3.5mm TRS to TRRS Output Cable for Smartphones and Tablets
3× 1' (30.5 cm) Gold-Plated USB-C to USB-A Charging Cables
2× SR-M1 Omnidirectional Lavalier Microphones
2× Alligator-Style Lavalier Microphone Clips
2× Foam Lavalier Windscreens
1× Pairing Pin
1× Warranty Card
1× User Manual
Blink500 B3(TX+RXDi)
1× Blink500 RXDi Receiver with MFi Certified Apple Lightning Connector
1× Blink500 TX Transmitter with Built-In Microphone and Clip
1× SR-M1 Omnidirectional Lavalier Microphone
1× Alligator-Style Lavalier Microphone Clip
1× Foam Lavalier Windscreen
1× 1' (30.5 cm) Gold-Plated USB-C to USB-A Charging Cable
1× Pairing Pin
1× Warranty Card
1× User Manual
Blink500 B4(TX+TX+RXDi)
1× Blink500 RXDi Receiver with MFi Certified Apple Lightning Connector
2× Blink500 TX Transmitters with Built-In Microphone and Clip
2× SR-M1 Omnidirectional Lavalier Microphones
2× Alligator-Style Lavalier Microphone Clips
2× Foam Lavalier Windscreens
2× 1' (30.5 cm) Gold-Plated USB-C to USB-A Charging Cables
1× Pairing Pin
1× Warranty Card
1× User Manual
Blink500 B5(TX+RXUC)
1× Blink500 RXUC Receiver with USB-C Connector
1× Blink500 TX Transmitter with Built-In Microphone and Clip
1× SR-M1 Omnidirectional Lavalier Microphones
1× Alligator-Style Lavalier Microphone Clip
1× Foam Lavalier Windscreen
1 × 1' (30.5 cm) Gold-Plated USB-C to USB-A Charging Cable
1× Pairing Pin
1× Warranty Card
1× User Manual
Blink500 B6(TX+TX+RXUC)
1× Blink500 RXUC Receiver with USB-C Connector
2× Blink500 TX Transmitters with Built-In Microphone and Clip
2× SR-M1 Omnidirectional Lavalier Microphones
2× Alligator-Style Lavalier Microphone Clips
2× Foam Lavalier Windscreens
2× 1' (30.5 cm) Gold-Plated USB-C to USB-A Charging Cables
1× Pairing Pin
1× Warranty Card
1× User Manual
Common Technical Issues and Solutions
If you encounter problems when using the Blink500 system, please refer to the follow checklist before contacting technical support. If the problem cannot be solved, please contact the dealer's after-sales service department.
| Problems Causes Solutions | ||
| The RX/TX cannot be turned on | The battery is very low. | Charge the RX/TX with the supplied charging cable. |
| The battery become drained quickly | The device is being used under cold or hot conditions. | Recharge or move to less cold or hot environment. |
| There is no sound | The transmitter TX is muted. | Adjust the sound by the "+" and "-" buttons. |
| The transmitter and receiver is not paired. | Pair the system. Refer to the "Operation Guide." | |
| The audio cable is not fully plugged in. | Re-plug the audio cable. | |
| The sound is weak | The transmitter volume setting is too low. | Adjust the volume, the goal is to transmit the highest level in the entire signal path without distortion to get the highest signal to noise ratio. |
| The sound is distorted | Transmitter/receiver volume setting is not suitable. | Adjust the volume, the goal is to transmit the highest level in the entire signal path without distortion to get the highest signal to noise ratio. |
| Using a mono plug headphone. | Please use the headphone with stereo plug | |
| Problems Causes Solutions | ||
| There is too much ambient noise is picked up | The Blink500 TX built-in microphone is omnidirectional.The microphone may pick up more ambient sounds. | Please make sure the microphone is as close as possible to the subject being shot. |
| Signal is interfered. | 1. Adjust the angel of transmitter/receiver.2. There is more radio frequency interference outdoors. Try to move the recording indoors.3. Be away from conductive objects such as metal and water.4. Overhead telephone lines, fluorescent lights, and metal fences may interfere with wireless microphones.5. Turn off all nearby computers and phones. | |
| There is sound interruption or noise | The RF signal is weak. | 1. Make sure that the line of sight between the transmitter and receiver antennas is unobstructed.2. Your body, clothes, and stage set may be a hindrance.3. If there are obstacles, you need to shorten the distance between the transmitter and the receiver. |
| The input level of the camera, recorder or mixer is too high. | Turn down the audio input level of the camera or recording device. Turn down the gain of mixer. | |
| The volume of the transmitter is too high. | Lower the volume to the second stage. | |
www.saramonic.com
Saramonic is a trademark registered and owned by Shenzhen DSQN Investment CO., LTD.
COPYRIGHT 2011-2021 SARAMONIC INTERNATIONAL (A brand of DSQN)
Room 2009, Shenzhou Bairuida Bldg, Banxuegang Road, Bantian Street, Longgang District,
Shenzhen, China 518129 Email: info@saramonic.com
Made in China


- General Introduction
- Product Structure
- Blink500 RX: Clip-On and Shoe-Mountable Receiver
- Power Functions:
- Pairing Functions:
- Blink500 RXDi: Lightning Receiver
- When charging:
- Volume Functions:
- Operation Guide
- For the Blink500 B1/B2 kit
- For the Blink500 B3/B4/B5/B6 kit
- Packing List
- Blink500 RX
- Blink500 TX
- Blink500 RXDi
- Blink500 RXUC
- Blink500 B1(TX+RX)
- Blink500 B2(TX+TX+RX)
- Blink500 B3(TX+RXDi)
- Blink500 B4(TX+TX+RXDi)
- Blink500 B5(TX+RXUC)
- Blink500 B6(TX+TX+RXUC)
- Common Technical Issues and Solutions
Brand : Saramonic
Model : Blink 500 TX
Category : Microphone