
BD-MP1 - Blu-ray player TASCAM - Free user manual and instructions
Find the device manual for free BD-MP1 TASCAM in PDF.


| Product Type | Professional Blu-ray Player |
| Dimensions (W x H x D) | 483 x 44 x 250 mm (19" rackmount, 1U) |
| Weight | 4.5 kg |
| Power Supply | AC 120V/230V, 50/60Hz, 25W |
| Playback Formats | Blu-ray, DVD, CD, CD-R/RW, DVD±R/RW |
| Video Outputs | HDMI (v1.4), Composite (RCA) |
| Audio Outputs | Analog stereo RCA, Digital optical (TOSLINK), Digital coaxial |
| Control Interface | RS-232C, IR remote input |
| USB Port | Front USB 2.0 for firmware updates and media playback |
| Supported Audio Codecs | Dolby Digital, DTS, MP3, WAV, FLAC |
| Region Code | Region A (Blu-ray), Region 1 (DVD) or as specified |
| Rackmount Kit | Included (rack ears) |
| Maintenance | Clean with a soft dry cloth; do not use liquids or solvents |
| Safety | Read manual before use; do not expose to rain or moisture; use only specified power source |
| Spare Parts & Repairability | Contact Tascam authorized service center for genuine parts |
| Operating Temperature | 5°C to 35°C |
| Storage Temperature | -20°C to 60°C |
Frequently Asked Questions - BD-MP1 TASCAM
User questions about BD-MP1 TASCAM
0 question about this device. Answer the ones you know or ask your own.
Ask a new question about this device
Download the instructions for your Blu-ray player in PDF format for free! Find your manual BD-MP1 - TASCAM and take your electronic device back in hand. On this page are published all the documents necessary for the use of your device. BD-MP1 by TASCAM.
USER MANUAL BD-MP1 TASCAM
IMPORTANT SAFETY INSTRUCTIONS
 | CAUTION: TO REDUCE THE RISK OF ELECTRIC SHOCK, DO NOT REMOVE COVER (OR BACK). NO USER-SERVICEABLE PARTS INSIDE. REFER SERVICING TO QUALIFIED SERVICE PERSONNEL. |
 | The lightning flash with arrowhead symbol, within equilateral triangle, is intended to alert the user to the presence of uninsulated “dangerous voltage” within the product’s enclosure that may be of sufficient magnitude to constitute a risk of electric shock to persons. |
 | The exclamation point within an equilateral triangle is intended to alert the user to the presence of important operating and maintenance (servicing) instructions in the literature accompanying the appliance. |
WARNING: TO PREVENT FIRE OR SHOCK HAZARD, DO NOT EXPOSE THIS APPLIANCE TO RAIN OR MOISTURE.
- Read these instructions.
- Keep these instructions.
- Heed all warnings.
- Follow all instructions.
- Do not use this apparatus near water.
- Clean only with dry cloth.
- Do not block any ventilation openings. Install in accordance with the manufacturer's instructions.
- Do not install near any heat sources such as radiators, heat registers, stoves, or other apparatus (including amplifiers) that produce heat.
- Do not defeat the safety purpose of the polarized or grounding-type plug. A polarized plug has two blades with one wider than the other. A grounding type plug has two blades and a third grounding prong. The wide blade or the third prong are provided for your safety. If the provided plug does not fit into your outlet, consult an electrician for replacement of the obsolete outlet.
- Protect the power cord from being walked on or pinched particularly at plugs, convenience receptacles, and the point where they exit from the apparatus.
- Only use attachments/accessories specified by the manufacturer.
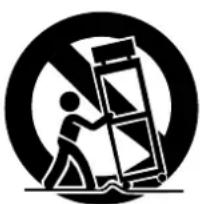
- Use only with the cart, stand, tripod, bracket, or table specified by the manufacturer, or sold with the apparatus. When a cart is used, use caution when moving the cart/ apparatus combination to avoid injury from tip-over.
natural_image
Symbolic icon of a person lifting a large object, enclosed in a circle with no text or symbols- Unplug this apparatus during lightning storms or when unused for long periods of time.
- Refer all servicing to qualified service personnel. Servicing is required when the apparatus has been damaged in any way, such as power-supply cord or plug is damaged, liquid has been spilled or objects have fallen into the apparatus, the apparatus has been exposed to rain or moisture, does not operate normally, or has been dropped.
-
The apparatus draws nominal non-operating power from the AC outlet with its POWER or STANDBY/ON switch not in the ON position.
-
The mains plug is used as the disconnect device, the disconnect device shall remain readily operable.
- Caution should be taken when using earphones or headphones with the product because excessive sound pressure (volume) from earphones or headphones can cause hearing loss.
- If you are experiencing problems with this product, contact TEAC for a service referral. Do not use the product until it has been repaired.
CAUTION
• Do not expose this apparatus to drips or splashes.
- Do not place any objects filled with liquids, such as vases, on the apparatus.
- Do not install this apparatus in a confined space such as a book case or similar unit.
- The apparatus should be located close enough to the AC outlet so that you can easily grasp the power cord plug at any time.
- If the product uses batteries (including a battery pack or installed batteries), they should not be exposed to sunshine, fire or excessive heat.
- CAUTION for products that use replaceable lithium batteries: there is danger of explosion if a battery is replaced with an incorrect type of battery. Replace only with the same or equivalent type.
WARNING
- Products with Class I construction are equipped with a power supply cord that has a grounding plug. The cord of such a product must be plugged into an AC outlet that has a protective grounding connection.
WARNING
• To prevent possible hearing damage, do not listen at high volume levels for long periods.

WARNING
- This equipment is not suitable for use in locations where children are likely to be present.
RACK-MOUNTING THE UNIT
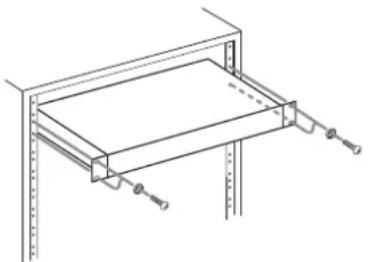
Use the supplied rackmount kit to mount the unit in a standard 19-inch rack, as shown below.
natural_image
Technical line drawing of a mechanical assembly with mounting brackets and fasteners (no text or symbols)ATTENTION
- Leave 1U of space above the unit for ventilation.
- Allow at least 10 cm (4 in) at the rear of the unit for ventilation.
Model for USA
Declaration of Conformity
Model Number: BD-MP1
Trade Name: TASCAM
Responsible party: TEAC AMERICA, INC.
Address: 10410 Pioneer Blvd. Suite #1, Santa Fe Springs, California 90670, U.S.A.
Telephone number: 1-323-726-0303

This device complies with Part 15 of the FCC Rules. Operation is subject to the following two conditions: (1) this device may not cause harmful interference, and (2) this device must accept any interference received, including interference that may cause undesired operation.
INFORMATION TO THE USER
This equipment has been tested and found to comply with the limits for a Class B digital device, pursuant to Part 15 of the FCC Rules. These limits are designed to provide reasonable protection against harmful interference in a residential installation. This equipment generates, uses, and can radiate radio frequency energy and, if not installed and used in accordance with the instruction manual, may cause harmful interference to radio communications. However, there is no guarantee that interference will not occur in a particular installation. If this equipment does cause harmful interference to radio or television reception, which can be determined by turning the equipment off and on, the user is encouraged to try to correct the interference by one or more of the following measures.
a) Reorient or relocate the receiving antenna.
b) Increase the separation between the equipment and receiver.
c) Connect the equipment into an outlet on a circuit different from that to which the receiver is connected.
d) Consult the dealer or an experienced radio/TV technician for help.
CAUTION
Changes or modifications to this equipment not expressly approved by TEAC CORPORATION for compliance could void the user's authority to operate this equipment.
Laser information
This product contains a semiconductor laser system inside the cabinet and is classified as a "CLASS 1 LASER PRODUCT".
To prevent being exposed to the laser beam, do not try to open the enclosure.
Notes on Laser Product
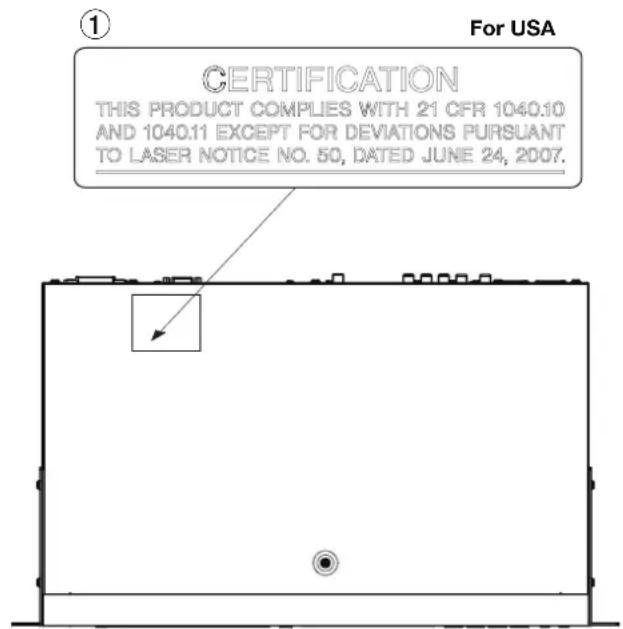
This product has been designed and manufactured according to FDA regulations "title 21, CFR, chapter 1, subchapter J, based on the Radiation Control for Health and Safety Act of 1968", and is classified as a class 1 laser product. There is no hazardous invisible laser radiation during operation because invisible laser radiation emitted inside of this product is completely confined in the protective housings.
The label required in this regulation is shown at ①.
CAUTION
- DO NOT REMOVE THE PROTECTIVE HOUSING USING A SCREWDRIVER.
- USE OF CONTROLS OR ADJUSTMENTS OR PERFORMANCE OF PROCEDURES OTHER THAN THOSE SPECIFIED HEREIN MAY RESULT IN HAZARDOUS RADIATION EXPOSURE.
Optical pickup
Type: SL6167
Manufacturer: Sony Corporation
Laser output: Less than 100 mW on the objective lens (CD) Less than 100 mW on the objective lens (DVD)
Wavelength: 770 - 800 nm (CD) typ. 650 - 664 nm (DVD) typ.
Optical pickup
Type: SLD3134VL
Manufacturer: Sony Corporation
Laser output: Less than 700 mW on the objective lens (BD)
Wavelength: 400 - 410 nm (BD) typ.
Optical pickup
Type: SL6169
Manufacturer: Sony Corporation
Laser output: Less than 150 mW on the objective lens (CD)
Less than 150 mW on the objective lens (DVD)
Wavelength: 770 - 800 nm (CD) typ.
650 - 664 nm (DVD) typ.
Optical pickup
Type: SLD3135VL
Manufacturer: Sony Corporation
Laser output: Less than 700 mW on the objective lens (BD)
Wavelength: 400 - 410 nm (BD) typ.
IN USA/CANADA, USE ONLY ON 120 V SUPPLY.
Model for Canada
THIS CLASS B DIGITAL APPARATUS COMPLIES WITH CANADIAN ICES-003.
Labeling of authorization
CAN ICES-3(B)/NMB-3(B)
Compliance of interference
This equipment complies with FCC/IC radiation exposure limits set forth for an uncontrolled environment and meets the FCC radio frequency (RF) Exposure Guidelines and RSS-102 of the IC radio frequency (RF) Exposure rules. This equipment has very low levels of RF energy that it deemed to comply without maximum permissive exposure evaluation (MPE). But it is desirable that it should be installed and operated keeping the radiator at least 20 cm or more away from person's body (excluding extremities: hands, wrists, feet and ankles).
CAUTIONS ABOUT BATTERIES
This product uses batteries. Misuse of batteries could cause a leak, rupture or other trouble. Always abide by the following precautions when using batteries.
- Never recharge non-rechargeable batteries. The batteries could rupture or leak, causing fire or injury.
- When installing batteries, pay attention to the polarity indications (plus/minus (+/-) orientation), and install them correctly in the battery compartment as indicated. Putting them in backward could make the batteries rupture or leak, causing fire, injury or stains around them.
- When you store or dispose batteries, isolate their terminals with insulation tape or something like that to prevent them from contacting other batteries or metallic objects.
- When throwing used batteries away, follow the disposal instructions indicated on the batteries and the local disposal laws.
- Do not use batteries other than those specified. Do not mix and use new and old batteries or different types of batteries together. The batteries could rupture or leak, causing fire, injury or stains around them.
- Do not carry or store batteries together with small metal objects. The batteries could short, causing leak, rupture or other trouble.
- Do not heat or disassemble batteries. Do not put them in fire or water. Batteries could rupture or leak, causing fire, injury or stains around them.
- If the battery fluid leaks, wipe away any fluid on the battery case before inserting new batteries. If the battery fluid gets in an eye, it could cause loss of eyesight. If fluid does enter an eye, wash it out thoroughly with clean water without rubbing the eye and then consult a doctor immediately. If the fluid gets on a person's body or clothing, it could cause skin injuries or burns. If this should happen, wash it off with clean water and then consult a doctor immediately.
- The unit power should be off when you install and replace batteries.
- Remove the batteries if you do not plan to use the unit for a long time. Batteries could rupture or leak, causing fire, injury or stains around them. If the battery fluid leaks, wipe away any fluid on the battery compartment before inserting new batteries.
- Do not disassemble a battery. The acid inside the battery could harm skin or clothing.
- Do not expose batteries to extremely low air pressure as it could result in an explosion or leakage of flammable liquids or gases.
For European Customers
Disposal of electrical and electronic equipment and batteries and/or accumulators
(a) All electrical/electronic equipment and waste batteries/accumulators should be disposed of separately from the municipal waste stream via collection facilities designated by the government or local authorities.
(b) By disposing of electrical/electronic equipment and waste batteries/accumulators correctly, you will help save valuable resources and prevent any potential negative effects on human health and the environment.
(c) Improper disposal of waste electrical/electronic equipment and batteries/accumulators can have serious effects on the environment and human health because of the presence of hazardous substances in the equipment.
(d) The Waste Electrical and Electronic Equipment (WEEE) symbols, which show wheeled bins that have been crossed out, indicate that electrical/electronic equipment and batteries/accumulators must be collected and disposed of separately from household waste.
If a battery or accumulator contains more than the specified values of lead (Pb), mercury (Hg), and/or cadmium (Cd) as defined in the Battery Directive (2006/66/EC), then the chemical symbols for those elements will be indicated beneath the WEEE symbol.
(e) Return and collection systems are available to end users. For more detailed information about the disposal of old electrical/electronic equipment and waste batteries/accumulators, please contact your city office, waste disposal service or the shop where you purchased the equipment.
Contents
Introduction....7
Included items 7
Conventions used in this manual 7
Features....7
Trademarks and copyrights....8
Precautions for placement and use....9
Using the TEAC Global Site 9
Product registration....9
Beware of condensation 9
Cleaning the unit 9
Notes about power supplies....10
About TASCAM customer support service....10
SD cards and USB flash drives 10
Precautions for use....10
Handling discs.... 10
Names and functions of parts 11
Front panel 11
Rear panel....12
Wireless remote control (TASCAM RC-BDMP1)....13
HOME screen....15
Disc 15
Media 15
Playing files on SD cards and USB flash drives....16
Adding files to and removing them from a playlist ..... 16
Settings 18
General Settings....18
Display Settings....21
Audio Settings 23
System Information....23
Making connections....24
Installing rackmount years 24
Display 25
Preparing the remote control....25
Installing batteries....25
When to replace batteries 25
Battery precautions....25
Using the wireless remote control....25
Turning the unit on and off....26
Loading and removing discs....26
Loading discs....26
Ejecting discs....26
Inserting and removing SD cards....26
Inserting SD cards....26
Removing SD cards....26
SD card write protection switches....26
Connecting and disconnecting USB flash drives 26
Connecting USB flash drives....26
Disconnecting USB flash drives....26
Panel lock function....27
When locked 27
Remote control overview 27
BD-Live overview....27
Types of media that can be played....28
Playable file formats (video, audio and image)....28
Playing media 28
Loading discs....28
Automatic playback overview....28
Playing video discs....29
Pausing playback 29
Stopping playback 29
Searching backward/forward....29
Skipping to the previous or next chapter/track 29
Repeating playback of part of a scene or track....29
Repeating playback of a chapter, title or track....29
Jumping to a specific playback time, scene or track....30
Playing USB flash drives and SD cards ....30
Playing USB flash drive/SD cards playlists....31
Using program playback....33
Setting bookmarks....34
Adjusting the volume from the unit 34
Muting with this unit....34
Overview of ON SCREEN information bar....35
Network connection overview 36
Option menus 37
General Settings....37
Troubleshooting 41
Specifications....43
General 43
Outputs 43
Control input/output....43
Audio performance....43
Dimensional drawings 44
Other 44
Notice regarding software that uses the GNU GPL....45
About the licensing of software used in this product....45
GNU GENERAL PUBLIC LICENSE 45
GNU LESSER GENERAL PUBLIC LICENSE....48
Introduction
Thank you very much for purchasing the TASCAM BD-MP1 BLU-RAY DISC PLAYER.
Before using this unit, read this Owner's Manual carefully so that you will be able to use it correctly and enjoy working with it for many years. After you have finished reading this manual, please keep it in a safe place for future reference.
You can also download this Owner's Manual from the TEAC Global Site (http://teac-global.com/).
Included items
This product includes the following items.
Take care when opening the package to avoid damaging the items. Keep the box and packing materials for transportation in the future.
Please contact the store where you purchased this unit if any of these items are missing or have been damaged during transportation.
● Main unit....×1
● Power cord set....×1
● Wireless remote control (TASCAM RC-BDMP1)....× 1
● AAA batteries....×2
- Rackmount screw kit....x 1 Items included in kit
- Rackmount ears (left and right)....×2
- Screws for ear attachment ....x 6
- Screws for attachment to rack....×4
- Washers (for rack) .......× 4
- Owner's Manual (this document) including warranty....×1
Conventions used in this manual
In this manual, we use the following conventions:
- SD/SDHC memory cards are called "SD cards".
- "USB flash drives" are sometimes called "USB drives".
- The CD-DA format is sometimes called the "audio CD" format. In addition, CDs with tracks recorded in the audio CD format are sometimes called "audio CDs".
- CDs with MP3 or WMA files are called "data CDs".
- The input source that is currently selected is called the "current source".
● The folder that is currently selected is called the "current folder".
● As necessary, additional information is provided under TIP, NOTE and CAUTION headings.
TIP
These are tips about how to use the unit.
NOTE
These provide additional explanations and describe special cases.
ATTENTION
Failure to follow these instructions could result in damage to equipment or lost data, for example.
CAUTION
Failure to follow these instructions could result in injury.
Features
● A wide range of formats is supported for discs and for video, image and audio files.
Supported disc formats
- Blu-ray: BD25, BD50, BD-ROM, BD-R, BD-RE
● DVD: DVD-ROM, DVD-R, DVD-RW, DVD+R, DVD+RW - CD:CD-DA,CD-R
Supported file formats
● Video: ASF, MPG, AVI, 3GP, DAT, MKV, MOV, M2TS, OGM, TP, TS, MP4, WMV
- Image: JPEG, GIF, PNG
● Audio: WAV, MP3, WMA, AAC, FLAC, APE
● Along with numerous types of Blu-ray discs, DVDs and CDs, SD cards and USB flash drives are also supported.
● Power on play and repeat modes
The power on play function enables automatic playback of content when the unit is turned on. Moreover, by setting a repeat mode, the same video can be automatically played repeatedly after the power is turned on.
- Seamless repetition of individual chapters, titles and A-B repeat intervals is possible.
● Extensive lock functions to prevent accidents caused by misoperation
The panel lock, IR lock and tray lock functions prevent misoperation by users and changes after setup in commercial facilities.
- HIDE MENU function
Using the HIDE MENU function, the HOME screen can be set to be shown or hidden (blacked out).
This is useful for smooth content playback in public venues.
● Dual USB flash drive ports
Ports for USB flash drives are available on both the front and back of the unit.
This enables flexible support for USB flash drives that are used constantly as well as temporarily.
● The HDMI output connector on the back of the unit is a standard inclusion. This enables output to monitors and TVs that support HDMI.
● Balanced and unbalanced output jacks
For audio output, in addition to unbalanced RCA outputs, balanced XLR output jacks with high reliability are included. Enables working flexibly with a variety of professional equipment.
● Coaxial digital audio output
The coaxial digital audio output on the back of the unit supports Dolby Audio, DTS-HD and other professional grade digital audio output formats. Moreover, two-channel linear PCM playback is also possible.
● 7.1 analog output (8 RCA jacks)
Front left and right, center, side left and right, surround back left and right and subwoofer output jacks are included for 7.1 surround systems. These enable realization of rich three-dimensional audio experiences.
● Support for external control using Ethernet/RS-232C
This unit has Ethernet and RS-232C ports for external control. These enable seamless integration in audiovisual installations that require seamless remote control with high reliability.
- Even without a remote control, buttons on the front of the unit enable playback, stopping, pausing, and searching forward and backward, as well as easy operations to make menu settings, for example, using the shift mode.
In addition, the panel lock function can prevent misuse of the operation buttons.
● Compact 1U rackmount size
Constructed with a tough metal body that has outstanding durability, the compact 1U size contributes to saving space in professional racks and fixed installations.
Trademarks and copyrights
- It is forbidden by law to copy, broadcast, show, broadcast on cable, play in public, or rent copyrighted material without permission. Commercial BD-video/DVD-video discs are copy-protected, and any recordings made from these discs will be distorted. This item incorporates copy protection technology that is protected by U.S. patents and other intellectual property rights of Rovi Corporation. Reverse engineering and disassembly are prohibited.
- This product incorporates copy protection technology that is protected by U.S. patents and other intellectual property rights of Rovi Corporation. The use of Rovi Corporation's copy protection technology in the product must be authorized by Rovi Corporation. Reverse engineering and disassembly are prohibited.
- THIS PRODUCT IS LICENSED UNDER THE AVC PATENT PORTFOLIO LICENSE FOR THE PERSONAL USE OF A CONSUMER OR OTHER USES IN WHICH IT DOES NOT RECEIVE REMUNERATION TO (i) ENCODE VIDEO IN COMPLIANCE WITH THE AVC STANDARD ("AVC VIDEO") AND/OR (ii) DECODE AVC VIDEO THAT WAS ENCODED BY A CONSUMER ENGAGED IN A PERSONAL ACTIVITY AND/OR WAS OBTAINED FROM A VIDEO PROVIDER LICENSED TO PROVIDE AVC VIDEO. NO LICENSE IS GRANTED OR SHALL BE IMPLIED FOR ANY OTHER USE. ADDITIONAL INFORMATION MAY BE OBTAINED FROM MPEG LA, L.L.C. SEE HTTP://WWW.MPEGLA.COM
● THIS PRODUCT IS LICENSED UNDER THE VC-1 PATENT PORTFOLIO LICENSE FOR THE PERSONAL AND NON-COMMERCIAL USE OF A CONSUMER TO (i) ENCODE VIDEO IN COMPLIANCE WITH THE VC-1 STANDARD ("VC-1 VIDEO") AND/OR (ii) DECODE VC-1 VIDEO THAT WAS ENCODED BY A CONSUMER ENGAGED IN A PERSONAL AND NON-COMMERCIAL ACTIVITY AND/OR WAS OBTAINED FROM A VIDEO PROVIDER LICENSED TO PROVIDE VC-1 VIDEO. NO LICENSE IS GRANTED OR SHALL BE IMPLIED FOR ANY OTHER USE. ADDITIONAL INFORMATION MAY BE OBTAINED FROM MPEG LA, L.L.C. SEE HTTP://WWW.MPEGLA.COM
Cinavia™
Cinavia Notice
This product uses Cinavia technology to limit the use of unauthorized copies of some commercially-produced film and videos and their soundtracks. When a prohibited use of an unauthorized copy is detected, a message will be displayed and playback or copying will be interrupted. More information about Cinavia technology is provided at the Cinavia Online Consumer Information Center at http://www.cinavia.com
To request additional information about Cinavia by mail, send a postcard with your mailing address to: Cinavia Consumer Information Center, P.O. Box 86851, San Diego, CA, 92138, USA. This product incorporates proprietary technology under license from Verance Corporation and is protected by U.S. Patent 7,369,677 and other U.S. and worldwide patents issued and pending as well as copyright and trade secret protection for certain aspects of such technology. Cinavia is a trademark of Verance Corporation. Copyright 2004-2016 Verance Corporation. All rights reserved by Verance. Reverse engineering or disassembly is prohibited.
● Manufactured under license from Dolby Laboratories. Dolby, Dolby Audio, and the double-D symbol are trademarks of Dolby Laboratories.
DOLBY AUDIO™
● For DTS patents, see http://patents.dts.com.
Manufactured under license from DTS Licensing Limited. DTS, DTS-HD, the Symbol, & DTS and the Symbol together are registered trademarks, and DTS-HD Master Audio | Essential is a trademark of DTS, Inc. © DTS, Inc. All Rights Reserved.

dts-HD™
Master Audio | Essential
- Blu-ray Disc™, Blu-ray™, BD-Live™, BONUSVIEW™ and related logos are trademarks of the Blu-ray Disc Association.

BONUS VIEW™
● "DVD Logo" is a trademark of DVD Format/Logo Licensing Corporation.

- HDMI, the HDMI logo and High-Definition Multimedia Interface are trademarks or registered trademarks of HDMI LLC in the USA and other countries.

- Oracle and Java are registered trademarks of Oracle Corporation and its subsidiary and affiliated companies in the USA and other countries. Names, including those of companies and products, in this document might be trademarks or registered trademarks.

● AVCHD and the AVCHD logo are trademarks of Panasonic Corporation and Sony Corporation.
AVCHD™
- "x.v.Color" and "x.v.Color" logo are trademarks of Sony Corporation.
x.v.Color
● Supply of this product does not convey a license nor imply any right to distribute MPEG Layer-3 compliant content created with this product in revenue-generating broadcast systems (terrestrial, satellite, cable and/or other distribution channels), streaming applications (via Internet, intranets and/or other networks), other content distribution systems (pay-audio or audio-on-demand applications and the like) or on physical media (compact discs, digital versatile discs, semiconductor chips, hard drives, memory cards and the like). An independent license for such use is required. For details, please visit http://mp3licensing.com.
● TASCAM is a registered trademark of TEAC Corporation.
● Other company names, product names and logos in this document are the trademarks or registered trademarks of their respective owners.
Information is given about products in this manual only for the purpose of example and does not indicate any guarantees against infringements of third-party intellectual property rights and other rights related to them. TEAC Corporation will bear no responsibility for infringements on third-party intellectual property rights or their occurrence because of the use of these products.
With the exception of personal enjoyment and similar uses, copyrighted materials belonging to third parties cannot be used without permission from the rights holders in accordance with copyright law. Please use the equipment appropriately.
TEAC Corporation will bear no responsibility for rights infringements committed by users of this product.
Precautions for placement and use
● The operating temperature range of this unit is 5–35 °C.
- Do not install this unit in the following types of locations. Doing so could make the sound quality worse or cause malfunction.
Locations with frequent vibrations
Near windows or other places exposed to direct sunlight
Near heaters or other extremely hot places
Extremely cold places
Very humid or poorly ventilated places
Very dusty places
● Install the unit so that it is level.
● To enable good heat dissipation, do not place anything on top of the unit.
- Do not place the unit on top of a power amplifier or other device that generates heat.
Using the TEAC Global Site
You can download updates for this unit from the TEAC Global Site:
http://teac-global.com/
In the TASCAM Downloads section, select the desired language to open the Downloads website page for that language.
Product registration
Customers in the USA, please visit the following TASCAM website to register your TASCAM product online.
https://tascam.com/us/
Beware of condensation
Condensation could occur if the unit is moved from a cold place to a warm place, it is used immediately after a cold room has been heated or it is otherwise exposed to a sudden temperature change. To prevent this, or if this occurs, let the unit sit for one or two hours at the new room temperature before using it.
Cleaning the unit
Use a dry soft cloth to wipe the unit clean. Do not wipe with chemical cleaning cloths, thinner, alcohol or other chemical agents. Doing so could damage the surface or cause discoloration.
Notes about power supplies
- Insert the included power cord all the way into the AC IN connector.
- Do not connect a power supply other than one that is 100V AC (50/60Hz).
- Hold the power cord by its plug when connecting or disconnecting it.
About TASCAM customer support service
TASCAM products are supported and warranted only in their country/region of purchase.
To receive support after purchase, on the TASCAM Distributors list page of the TEAC Global Site (http://teac-global.com/), search for the local company or representative for the region where you purchased the product and contact that organization.
When making inquiries, the address (URL) of the shop or web shop where it was purchased and the purchase date are required.
Moreover, the warranty card and proof of purchase might also be necessary.
SD cards and USB flash drives
This unit can use SD cards and USB flash drives for playback. A list of SD cards and USB flash drives that have been confirmed for use with this unit can be found on the TEAC Global Site (http://teac-global.com). Check the page for this product. You can also contact TASCAM customer support service.
Precautions for use
SD cards and USB flash drives are delicate media. In order to avoid damaging SD cards and USB flash drives, please take the following precautions when handling them.
- Do not leave them in extremely hot or cold places.
- Do not leave them in extremely humid places.
- Do not let them get wet.
- Do not put things on top of them or twist them.
- Do not hit them.
- Do not remove or insert them during playback, data transmission or other access.
- When transporting them, put them into cases, for example.
Handling discs
● Load discs with their recorded sides down.
- Load discs when the disc tray is completely open.
- Align discs with the tray guide and place them so they are level.
- Do not touch the recorded (unlabeled) side. Fingerprints, oils and other substances can cause errors during playback.
- If fingerprints or dust adhere to the recorded side of a disc, wipe it gently with a soft dry cloth from the center towards the outside edge.
- Dirt on discs can lower video and sound quality, so clean them and always store them in a clean state.
- Do not use any record spray, anti-static solutions, benzene, paint thinner or other chemical agents to clean discs as they could damage the delicate playing surface. It may cause discs to become unplayable.
- Do not apply labels or other materials to discs. Do not use discs that have glue or sticky residue from having had tape, stickers or other materials applied to their surface. Such discs could become stuck in the unit or cause it to malfunction.
- Never use commercially-available disc stabilizers. Using stabilizers with this player could prevent playback or damage the unit.
- Do not use cracked discs.
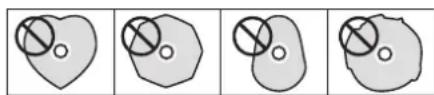
- Do not use discs that are irregularly shaped, including discs shaped like hearts, business cards and octagons because using such discs could cause the unit to malfunction.
natural_image
Four abstract diagrams showing overlapping circles within heart-shaped shapes, no text or symbols present● Copy Control CDs have been sold by several record companies in an attempt to protect their copyrights. Since some of these discs do not comply with the CD specifications, they may not be playable on the unit.
NOTE
If a disc that cannot be played back or a disc that is upside down is loaded in the unit, "NO DISC" will appear on the display.
ATTENTION
- Only load one disc at a time. Loading two or more discs at the same time could cause malfunction and damage the discs.
- Do not push the disc tray in when the power is in standby. Doing so could cause malfunction.
Front panel

① button and indicator
Use to turn the unit on and off (put it into standby). The indicator lights red when the power is off (in standby) and green when on.
CAUTION
Before turning the unit on, lower the volumes of connected equipment to their minimum levels. Failure to do so could result in a sudden loud noise that could harm hearing, for example.
ATTENTION
Do not turn the power on/off when the unit is playing any media or reading data from an SD card or USB flash drive. Doing so could make the unit stop operating properly and cause data on the SD card or USB flash drive to be damaged.
② Disc tray
Press the OPEN/CLOSE [LOCK] button to open the disc tray and load/remove a disc. To close the disc tray, press the OPEN/CLOSE [LOCK] button.
③ OPEN/CLOSE [LOCK](▲) button
Use to open and close the disc tray usually. Press while pressing the HIDE MENU [SHIFT] button to enable the front panel lock function. Do this again to disable the lock function.
④ Remote control signal receiver
Signals from remote controls are received here. When operating the remote control, point it toward this receiver.
⑤ Display
This shows various types of information.
⑥ HIDE MENU [SHIFT] button
When the HOME screen is open, press this to hide it. Moreover, this button can be pressed at the same time as another button to enable the shift mode and use the shift function of that button (shown as light lettering on a black background).
⑦ STOP [ENTER] (HOME) (■) button
When a video file is being played, paused or searched, press to stop that operation and return to the HOME screen. When an audio file is being played, paused or searched, press to stop playback or searching.
When the HOME screen or Default Settings Screen is open, press at the same time as the HIDE MENU [SHIFT] button to enable shift mode and use this as the ENTER button.
⑧ PLAY [▽] (▶) button/indicator
Press when stopped or in playback standby to start playback. The indicator lights green during playback and is unlit at all other times.
When the HOME screen or Default Settings Screen is open, press at the same time as the HIDE MENU [SHIFT] button to enable shift mode and use this as the move cursor down (√) button.
⑨ PAUSE [^] (II) (TOP MENU) button
Press when playing back to pause playback. When the HOME screen or Default Settings Screen is open, press at the same time as the HIDE MENU [SHIFT] button to enable shift mode and use this as the move cursor up (^) button.
⑩ SKIP |◀◀/▶▶| [<]/[>] (◀◀/▶▶) (REPEAT/A-B) buttons
Press when playing back or paused to skip to the previous or next chapter or file.
(Playback will start after skipping.)
Press and hold when playing back or paused to search backward/forward. The search speed changes (among 5 speeds) each time the button is pressed and held.
(To resume playing back or to pause when searching backward/forward, press the PLAY [√] (▶) or PAUSE [^] (■) button.
When the HOME screen or Default Settings Screen is open, press at the same time as the HIDE MENU [SHIFT] button to enable shift mode and use as the move cursor left/right () buttons.
⑪ USB port
Connect/disconnect USB flash drives here.
Audio, video and other files can be played back from a connected USB flash drive. Moreover, this can be used to load update files for firmware updates.
⑫ SD card slot
Insert an SD card in this slot.
Audio, video and other files can be played back from a connected SD card.
Button combinations and the unit's behavior
| Button combination Button | press Behavior | ||
| SHIFT | ▲ | Simultaneous press Changes the LOCK setting. | |
| SHIFT | ■ | Simultaneous press Confirms or selects menu items. | |
| SHIFT | ▶ | Simultaneous press | √ (down) |
| SHIFT | || | Simultaneous press | ^ (up) |
| SHIFT | ◀◀ | Simultaneous press | < (left) |
| SHIFT | ▶▶ | Simultaneous press | > (right) |
| ▶ | ■ | Simultaneous press Displays the HOME screen. | |
| ▶ | || | Simultaneous press Displays the top menu/title menu of the disc. | |
| ▶ | ◀◀ | Simultaneous press Selects repeat modes. | |
| ▶ | ▶▶ | Simultaneous press Plays back a defined section between point A and B repeatedly. | |
Rear panel

⑬ ANALOG OUT (BALANCED) L/R jacks
These are balanced XLR analog output jacks. These transmit audio signals to external speakers and amplifiers, for example. Use XLR cables for connection.
⑭ ANALOG OUT (UNBALANCED) L/R jacks
These are unbalanced RCA analog output jacks. These transmit audio signals to external speakers and amplifiers, for example. Use RCA cables for connection.
⑮ 7.1 audio out (unbalanced) jacks
These are 7.1 unbalanced RCA analog output jacks. These transmit 8 channels of audio signals to a 7.1 surround system. Use RCA cables for connection.
⑯ DIGITAL OUT (COAXIAL) connector
This is a coaxial digital audio output connector. This transmits digital audio signals to a television. Use a coaxial cable (75Ω) for connection.
⑰ HDMI OUT port
Audio/video signals are transmitted from the HDMI port. Use an HDMI cable for connection.
⑱ USB port
Connect/disconnect USB flash drives here. Audio, video and other files can be played back from a connected USB flash drive. Moreover, this can be used to load update files for firmware updates.
⑲ ETHERNET connector
This is an Ethernet port. Use to connect this unit to a network and to control it from a computer. Moreover, BD-Live contents can also be accessed with an Internet connection. Use an STP cable that is category 5e or higher for connection.
⑳ RS-232C connector
This is a 9-pin D-sub RS-232C control input/output connector. A computer can be used to control this unit by connecting to it with an RS-232C cable.
②1 AC IN connector
Connect the included power cord here.
CAUTION
Always use the included cord to supply power to this unit. Use of a different one could cause malfunction, fire or electric shock.
Wireless remote control (TASCAM RC-BDMP1)
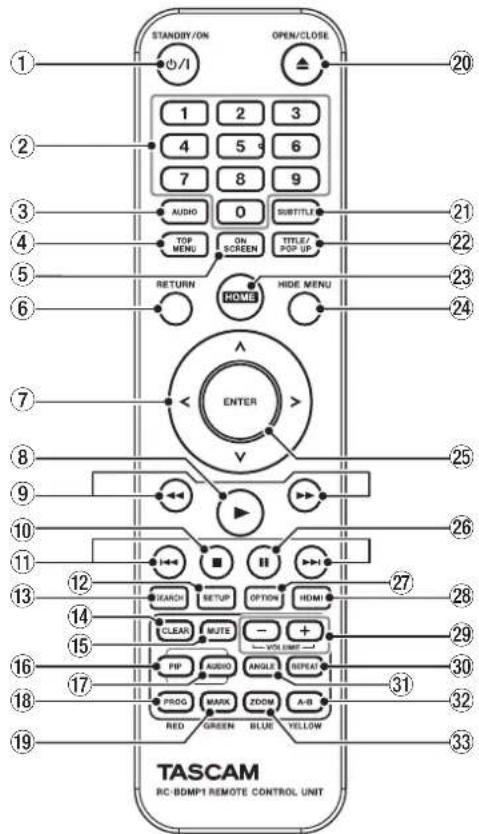
① ⏻/l (STANDBY/ON) button
This has the same function as the button on the main unit.
CAUTION
Before turning the unit on, lower the volumes of connected equipment to their minimum levels.
Failure to do so could result in a sudden loud noise that could harm hearing, for example.
② Number (0–9) buttons
The number buttons can be used during media playback to designate and select chapter and audio track numbers (except when options or submenus are shown on the screen). (see "Jumping to a specific playback time, scene or track" on page 30)
③ AUDIO button
Press during video disc playback to show the current audio settings at the top left of the monitor screen.
Press this button repeatedly to show the audio settings that can be used and to switch sound sources.
The audio settings shown depend on the settings supported by the video disc.
For example, stereo, mono, left channel and right channel can be selected for DVDs, and DTS-HD MA (master audio) or Dolby Digital can be selected in various languages for Blu-ray discs.
④ TOP MENU button
Press during playback of a video disc to show the top menu screen.
Use the I/I I cursor buttons to move in menus, and use the ENTER button to confirm selection.
⑤ ON SCREEN button
Press during video disc playback to show an information bar that can be used to check the current status at the top of the monitor screen.
⑥ RETURN button
Press when using the HOME screen to return to the previous menu. Press repeatedly to return to the top menu.
⑦ Cursor buttons /^/
Press when the HOME screen is open to move between setting items.
Moving in menus is also possible on video file top menu and title menu screens as well as option menu screens during playback.
⑧ ▶ button
This has the same function as the PLAY [∨] (▶) button on the main unit.
⑨ ◀◀/▶▶ buttons
Press when playing back or paused to search backward/forward.
- When searching backward/forward in a video file, press the PAUSE (II) button to pause playback. In this state, press the ▶▶ button to resume playback, or press the ◀◀ button to resume backward searching.
- When searching backward/forward in an audio file, press the PAUSE (II) button to pause playback. Press it again to resume searching backward/forward.
⑩ ■ button
This has the same function as the STOP (■) button on the main unit.
⑪ ◀◀/▶▶| buttons
Press when playing back or paused to skip to the previous or next chapter or file. (Playback will start after skipping.)
- In video files, this will move to the previous or next chapter. - In audio files, this will move to the previous or next file.
⑫ SETUP button
Press when using the HOME screen, playing back, paused or searching backward/forward to open the Setup Menu. Press again to return to the original screen.
⑬ SEARCH button
Press when playing back or paused to designate a specific playback time within the current medium. Press this button to open an information bar at top of the monitor screen. The cursor will appear for 20 seconds in the time display area (upper right) of the information bar. Press the ENTER button while the cursor appears and use the number buttons to input any playback time. To move among hours, minutes and seconds, use the </> cursor buttons while the cursor appears.
⑭ CLEAR button
This clears the value in the field being input. In the bookmark list, this deletes the selected bookmark.
⑮ MUTE button
This mutes the volume of the main unit. (An icon appears at the top of the monitor.)
⑯ PIP button
This turns the picture-in-picture function on/off. This function can only be used with discs that support it.
⑰ AUDIO button (2nd)\*
This selects the audio language used with the picture-in-picture function. This function can only be used with discs that support it. (Unclear.)
* This does not have the same function as the ③ AUDIO button.
⑱ PROG/RED button
This opens the program page where tracks can be selected for playback in a specific order.
⑲ MARK/GREEN button
During video file playback, press this button to add a bookmark at any point. (Up to 12 can be added.)
20 ▲ OPEN/CLOSE button
This has the same function as the OPEN/ CLOSE [LOCK] button on the main unit.
⑳ SUBTITLE button
Press during video file playback to change the subtitle display style.
The settings that can be used depend on the subtitle languages supported by the video.
⑳ TITLE/POP UP button
When a media file is playing or paused, press to show the title menu.
Use the I/I I cursor buttons to move in menus, and use the ENTER button to confirm selection.
②3 HOME button
Press this button to stop the current operation and return to the HOME screen.
⑳ HIDE MENU button
This has the same function as the HIDE/MENU [SHIFT] button on the main unit.
⑲ ENTER button
This functions as the execute button on the HOME screen and every menu screen.
②6 II button
This has the same function as the PAUSE [^] (II) (TOP MENU) button on the main unit.
⑳ OPTION button
When playing back or paused, press to open the Option Menu screen.
Use the I I I cursor buttons to move in menus, and use the ENTER button to confirm selection.
⑳ HDMI button
Press this button repeatedly to cycle through the following screen resolutions.
● 480I/576I, 480P/576P, 720P, 1080I, 1080P
⑲ -/+ (VOLUME) buttons
Press when playing back or paused to adjust the audio volume.
③0 REPEAT button
Press when playing back or paused to enable repeat playback mode for the selected chapter, title or track. An icon will appear at the top of the monitor. Press this button repeatedly to enable selection of repeat playback conditions. (see "Jumping to a specific playback time, scene or track" on page 30)
③1 ANGLE button
Press when a video file that has been recorded with multiple angles is playing or paused to show the currently selected angle. An icon will appear at the top of the monitor. Press this button repeatedly to enable selection of recorded angles.
③2 A-B/YELLOW button
Press the A-B button during disc playback to repeat playback of part of a scene or track.
③3 ZOOM/BLUE button
Press when a selected image is shown to zoom in/out. (The size being displayed currently is shown at the top of the monitor.)
Press this button repeatedly to change the zoom to the following sizes.
(No zoom when no indicator is shown on the monitor.)
- Zoom size shown on monitor: 2×, 3×, 4×, 1/2, 1/3, 1/4
HOME screen
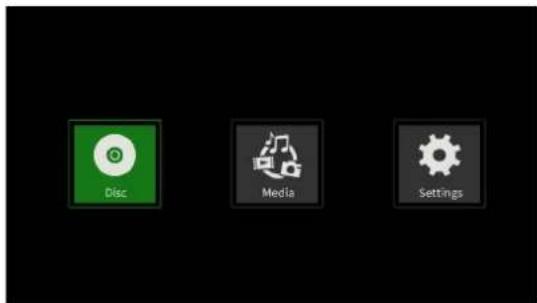
Select, play and check media files, set up the unit and conduct other functions on the HOME screen.
To move between menus, confirm settings and execute items, use the shift* functions of buttons on the unit or use the cursor and ENTER buttons on the remote control.
(These explanations will primarily use remote control operations.)
* To move the cursor and confirm/execute using the unit, press the HIDE/MENU [SHIFT] button with the desired shift function (shown below the button with light characters on a dark background) at the same time.
Disc
This plays the disc loaded in the disc tray of the unit.
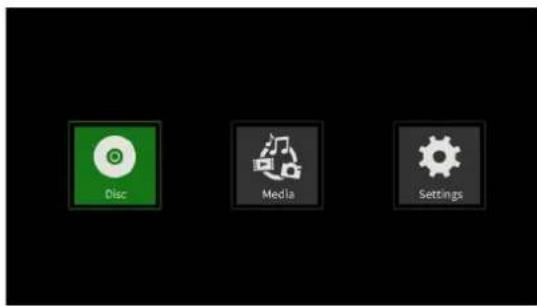
To play a disc, while the Disc icon is selected, press the ▶ button.
Media
This enables selection of media (items) loaded in the unit.
Basic remote control functions
● To exit a folder or subfolder, press the cursor button repeatedly to return to the starting screen.
- Press the HOME button to return to the HOME screen.
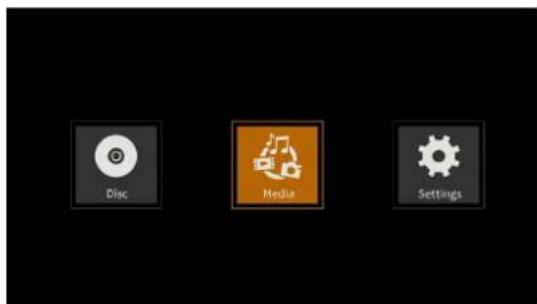
While the Media icon is selected, press the ENTER button to show the various media loaded in the unit.
NOTE
• Usually the icons are shown in the order that the media were loaded.
- After the power is turned on, the various icons are shown in the order that the unit recognized the media. (The images shown on these pages are examples after the power was turned on.)
● BDMV icon: Blu-ray disc
The disc loaded in the disc tray is shown as follows.
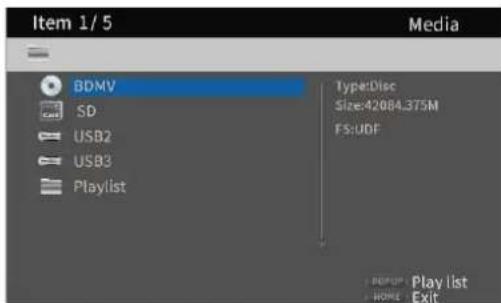
● DVD Video icon: DVD disc
The disc loaded in the disc tray is shown as follows.
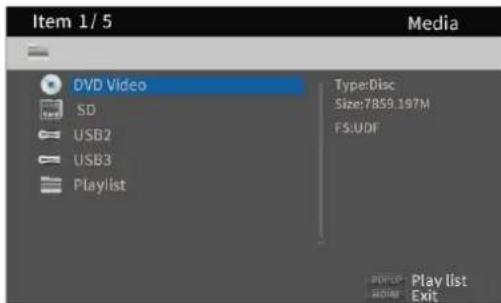
● CDDA icon: Compact disc (CD)
The disc loaded in the disc tray is shown as follows.
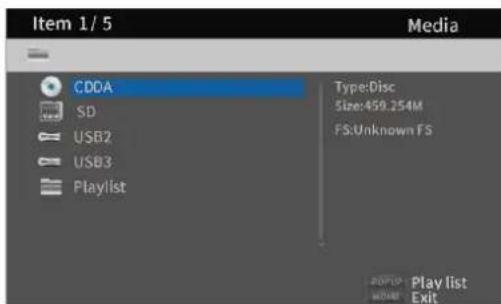
Select the BDMV or CDDA icon and press the ENTER button to start playback of the media.
- SD icon: SD card
- USB2/3* icon: USB flash drive
* The USB number is shown in the order that the USB flash drives were connected. If an SD card is not loaded, "USB1" will be shown as the first. Flash drives loaded in the unit are shown as follows.
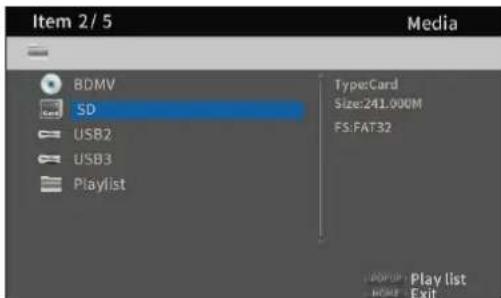
Playing files on SD cards and USB flash drives
- Use the ∨/∧ cursor buttons to select an SD card or USB flash drive and press the ENTER button to show individual folders as below. (The same method is used to show the content of folders on both SD cards and USB flash drives.)
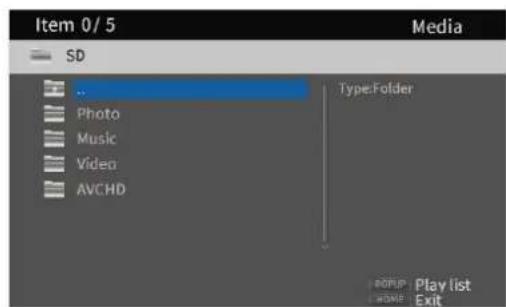
□...: Top folder
Photo: Photo folder
Music: Audio folder
Video: Video folder
AVCHD: High-quality video folder
- Use the / cursor buttons to select a folder and press the ENTER button to show the files inside the folder.
(Example: Music folder open)
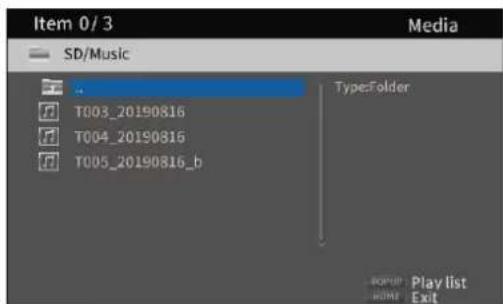
- Use the √/^ cursor buttons to select a file and press the ▶ button to start playback.
When a file is selected, the following information appears on the right side of the monitor.
- Thumbnails of image files
• Various information for audio and video files
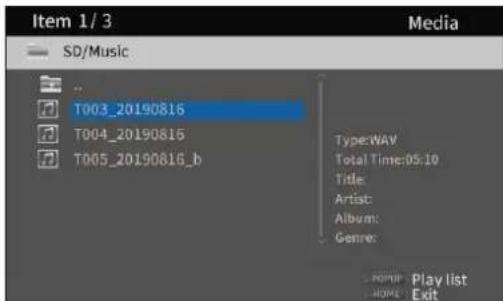
When a file is selected, press the > cursor button to add a check mark before the file name, selecting it.
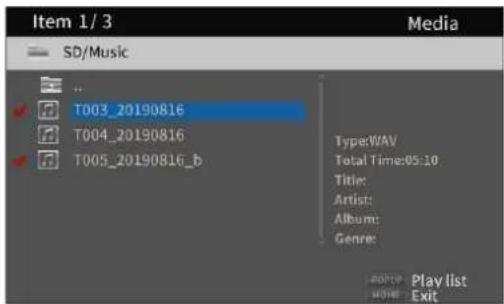
- In this state, press the ENTER button to play the selected files in order. After playback completes, the screen above will reopen.
- To remove a check mark from a file, select it again and press the > cursor button.
- Playlist icon
By using a playlist, files can be played back in the order selected from the media (items).
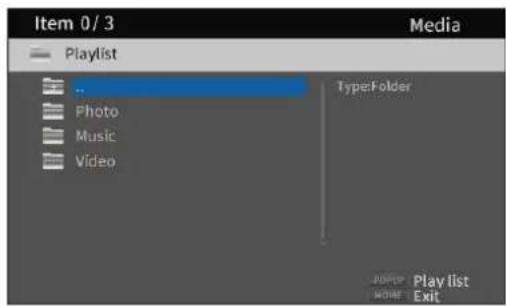
... Top folder
Photo: Photo folder
Music: Audio folder
Video: Video folder
Adding files to and removing them from a playlist
Adding files to a playlist
- Use the ∨/∧ cursor buttons to select an SD card or USB flash drive and press the ENTER button to select the desired folder.
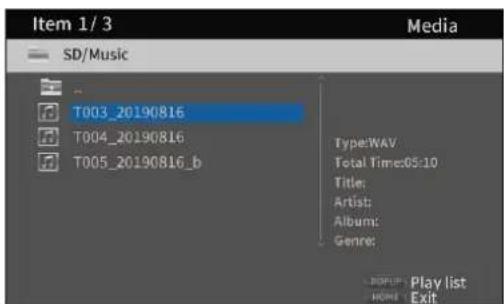
- Select the file to add to the playlist, and press the TITLE/POP UP button to open a pop-up message.
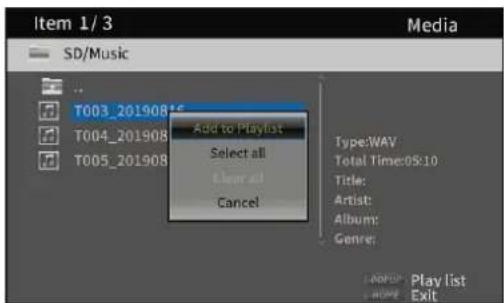
- Use the ∨/∧ cursor buttons to select "Add to playlist", and press the ENTER button to add the selected file to the playlist.
- When a file is selected, press the > cursor button to add a check mark before the file name, selecting it.
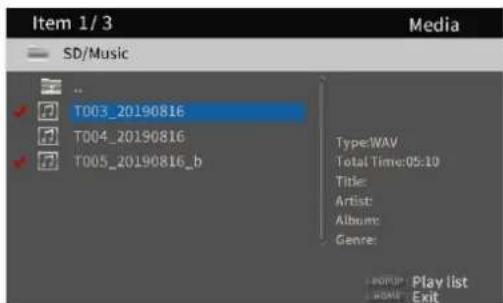
Select a file again and press the > cursor button to remove its check mark.
- Add check marks to the necessary files, and press the TITLE/POP UP button to open a pop-up message. Use the / cursor buttons to select "Add to playlist", and press the ENTER button to add the selected file to the playlist.
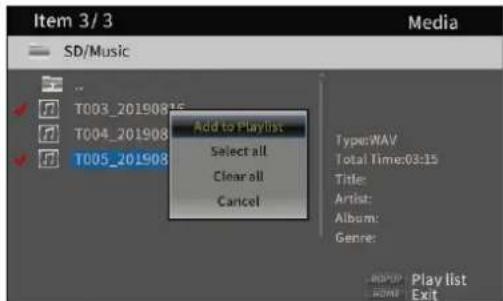
- In addition, check marks can be added to all files in the folder by selecting "Select all" in the pop-up and pressing the ENTER button in step 2.
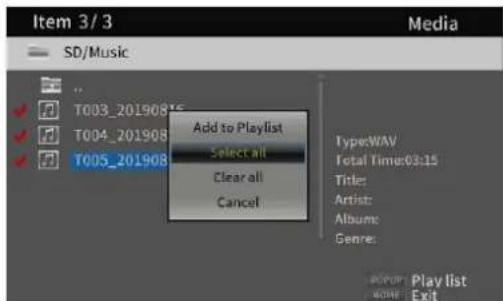
- With check marks added to files, press the TITLE/POP UP button to open a pop-up message.
Use the ∨/∧ cursor buttons to select "Add to playlist", and press the ENTER button to add the selected file to the playlist.
- Select "Clear all" in the pop-up message and press the ENTER button to remove check marks from all files. Exiting the folder will also remove the check marks from all files.
To do nothing, select "Cancel" and press the ENTER button, or press the RETURN button to return to the original screen.
Removing files from a playlist
- To remove a file from a playlist, select the playlist icon and open the folder that contains the file.
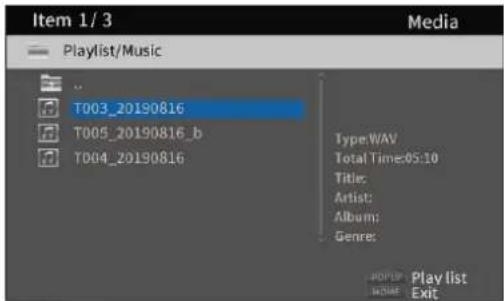
- To remove a specific file from the playlist, select it and press the > cursor button to add a check mark before its name.
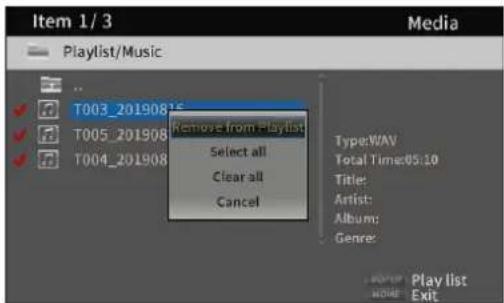
- At this point, press the TITLE/POP UP button to open a pop-up message. Then, use the / cursor buttons to select "Remove from playlist" and press the ENTER button to remove files with check marks from the playlist.
- To remove all files from the playlist, press the TITLE/POP UP button to open a pop-up message. Then, select "Select all" and the press the ENTER button to add check marks to all files in the folder.
Press the TITLE/POP UP button again to open a pop-up message. Then, use the ∨/∧ cursor buttons to select "Remove from playlist" and press the ENTER button to remove files with check marks from the playlist.
Settings
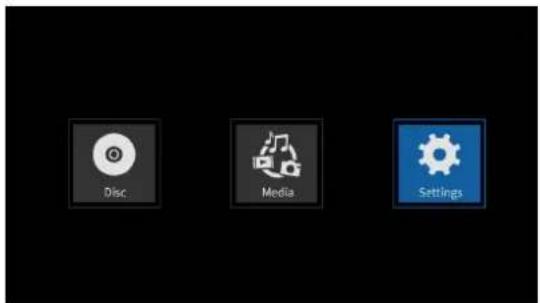
On the Settings screens, which include the General Settings, Display Settings, Audio Settings and System Information screens, settings can be made and information checked, for example.
While the Settings icon is selected, press the ENTER button to show icons for the various settings.
To move between menus, confirm settings and execute items, use the shift* functions of buttons on the unit or use the cursor and ENTER buttons on the remote control. (These explanations will primarily use remote control operations.)
* To move the cursor and confirm/execute using the unit, press the HIDE/MENU [SHIFT] button with the desired shift function (shown below the button with light characters on a dark background) at the same time.
Basic remote control functions
● To exit a folder or subfolder, press the cursor button repeatedly to return to the starting screen.
● Press the HOME button to return to the HOME screen.
- Press the RETURN button even during an operation to return to the previous screen.
● In the list of settings below, the underlined setting items are the defaults.
General Settings
System
| Function Options Explanation | ||
| Screen Saver On/Off | — | Turn the screen saver on/off.If “On” is selected, the following functions become enabled when nothing is playing back or when playback is stopped or paused.● A screensaver will appear after about 3 minutes without operation.● The unit will automatically turn off after about 10 minutes without operation. |
| HDMI CEC On/Off | — | When an HDMI cable is used to connect a device such as this unit that supports HDMI CEC to a TV that supports HDMI CEC, this function allows the remote control to link operation of both of them.(When off, only the unit will respond to the remote control.) |
| Disc Auto Upgrade | On/Off | If an upgrade disc is loaded into this unit, upgrading will occur automatically. |
| Load Default More... | This function restores the various settings stored in the backup memory of the unit to their factory default values. | |
| Upgrade Disc/USB Storage | Use to upgrade the unit firmware.(Selection of upgrade media is possible.) | |
| Easy Setup More... | The following settings can be made easily using a setup wizard:● Use the General Settings items to make more detailed settings, including language, monitor resolution and monitor aspect ratio. |
Language
| Function Options Explanation | ||
| OSD English/Japanese | Set the language used for unit function and information screens to English or Japanese. | |
| Disc menus Various languages/More Set the language used for option menus during playback. | ||
| Audio Various languages/More Set the language used to show during playback. | ||
| Subtitles Various languages/More/Off | Set the language used to show subtitles during playback or turn subtitles off. | |
* These functions only work with content that support them.
Playback
| Function Options Explanation | ||
| Disc Auto Playback On (Repeat On)/On (Repeat Off)/Off | Automatic playback and repeat playback functions can be set.When the repeat function is used, playback will start automatically if the disc to be played is loaded in the disc tray and the power is turned on, as well as if a disc is changed and the disc tray is closed.With the repeat function, after a disc is played completely, playback will repeat continuously from the beginning.On (Repeat On): Both automatic and repeat playback functions are enabled.On (Repeat Off): The repeat playback function is off, but the automatic playback function is enabled.Off: Both automatic and repeat playback functions are disabled.NOTEThis function only work with discs that support it.When the repeat function is enabled, playback will start automatically when a disc is loaded. For this reason, be careful during the following operations.Making settings on the HOME screenPlaying files on an SD card/USB flash driveAutomatic playback is not supported for SD cards or USB flash drives. | |
| Closed Captions | On/Off | Set whether or not the function to subtitle video disc audio is enabled. |
| Angle Icon | On/Off | Set whether or not an icon is shown when angle operations are available during video disc playback. |
| PIP Icon | On/Off | Set whether or not an icon is shown when picture-in-picture functions are available during video disc playback. |
| Secondary Audio Icon | On/Off | Set whether or not the secondary audio icon is shown or not. |
| Last Memory | On/Off | Set whether or not the unit stores the last playback positions of discs in its internal memory. When this function is on, playback will start from the stored position when a disc is played again.NOTEThese functions only work with content that support them.Pressing the HOME button during playback will not save the playback position.This unit can save positions for five discs maximum. When the total number of discs would exceed five, the record for the disc played least recently will be replaced by a record for the most recent disc. |
Security
| Function Options Explanation | ||
| Change Password More... | A password can be set for the unit.● The password is a 4-digit number.* The default password is “0000”. | |
| Parental Control More... | Set the age rating restriction for discs.A password must be input to change this.* The default setting is “Off”. | |
| Country Code More... | Set the country to use for Parental Control.A password must be input to change this. |
Network
| Function Options Explanation | ||
| Internet Connection Enable/Disable Enable or disable Internet connection for the unit. | ||
| Interface Ethernet/Wireless | —— | Set the method of Internet access for the unit to “Ethernet” or “Wireless”.*When using "Wireless", after responding "Yes", select from the following connection methods.• Scan: The unit will search for access points, allowing selection of a network.• Manual: An SSID can be set manually to connect.• Auto: Connection is possible using Wi-Fi Protected Setup (WPS) standards. |
| Information | More... | The following information related to the Internet connection is shown:• interface, address type, IP address, subnet mask, gateway, DNS and DNS 2.(When DHCP is set to “0”, this information can be input manually using the remote control.) |
| Connection Test | More... | This tests the network connection. |
| IP Setting | Auto/Manual | Select how the unit's IP address is set.• Auto: Automatically acquire the IP address from a DHCP server.• Manual: Manually input the interface, address type, IP address, subnet mask, gateway, DNS1 and DNS2 numbers. |
| Wireless Setting | More... | Use this to make wireless connection settings.*• Scan: The unit will search for access points, allowing selection of a network.• Manual: An SSID can be set manually to connect.• Auto: Connection is possible using Wi-Fi Protected Setup (WPS) standards. |
| BD-Live BUDA | ● BUDA Information● BUDA Setup | Set the storage location used to save BD-Live contents.• BUDA Information• This shows the amount of open space in the storage location used to save content.• Press the ENTER button to show the Fmt buda button, and press the ENTER button again.This creates a BUDA folder in the selected storage location.• BUDA SetupThe storage location used by BUDA can be set to an external device or the internal storage.• External: A USB flash drive connected to the unit will be used.**• Onboard: The internal storage of the device will be used. |
| BD-LIVE Connection | Permitted/Partially Permitted/Prohibited | Select the access level for BD-Live contents on the Internet.● Permitted: All contents can be accessed.● Partially Permitted: Specific contents can be accessed.● Prohibited: BD-Live contents will be blocked. |
| Proxy Settings Disable/Enable | ____ | Set whether or not to connect this unit to the Internet through a proxy server.● Disable: Do not use a proxy server.● Enable: A proxy host and proxy port can be set. |
* "Wireless" connection can only be used if a USB-wireless LAN adapters has been connected to the unit.
A USB-wireless LAN adapter is not included with this unit. (see "Network connection overview" on page 36)
** If USB flash drives have been connected to both the front and back USB ports, the one first recognized by the unit will be used for external memory
Do not disconnect the USB flash drive when the BD-Live function is in use. The USB flash drive should use the FAT32 file format.
Display Settings
TV
| Function Options Explanation | ||
| TV Screen | ● 16:9 Full● 16:9 Normal● 4:3 Pan & Scan● 4:3 Letterbox | Use to set the display aspect ratio. |
| Resolution | ● Auto● 480I/576I● 480P/576P● 720P● 1080I● 1080P | Use to set the image resolution.● If Auto is selected, this unit will detect the optimal resolution for the monitor or TV. In this case, a message confirming the saving of the selection will appear. Select "OK" as necessary. |
| TV System NTSC/PAL/Multi Select the broadcast format* of the device connected to the unit. | ||
| Color Space | ● RGB● YCbCr● YCbCr422● Full RGB | Select the HDMI output color space. |
| HDMI Deep Color 30 bits/36 bits/48 bits/Off Select the HDMI output deep color mode.** | ||
| HDMI 1080P 24Hz On/Off | — | Turn frame rate conversion on/off for 1080P Blu-ray discs that play back at 24 Hz. |
| HDMI 3D | Auto/Off | ● When Auto is selected, the 3D signal will automatically be output when 3D video is played.● When Off is selected, 3D signals will not be output. |
* When in a region that supports both NTSC and PAL, select "Multi".
** For this function to work properly, the TV or monitor must support HDMI version 1.3 or later.
Video Process
| Function Options Explanation | ||
| Video Adjustments | More... | Adjust the brightness, contrast, hue and saturation output from this unit to the TV or monitor.● Brightness/Contrast/Hue/Saturation |
| Sharpness | High/Normal/Low | Set the sharpness to High/Normal/Low for images output from this unit to the TV or monitor. |
Closed Captions
| Function Options Explanation | ||
| CC Attributes Auto/Custom | Auto: Use default attributes for subtitle fonts and windows, including their size, color and opacity.Custom: Enable adjustment of subtitle fonts and windows, including their size, color and opacity. | |
| Font color Default/White/Black/Red/Green/Blue/Yellow/Magenta/Cyan The color of font size Default/Standard/Small/Large The size of subtitle fonts can be adjusted. | subtitle fonts can be adjusted. | |
| Font style | DefaultMonospaced with serifsProportionally spaced with serifsMonospaced without serifsProportionally spaced without serifs | The style of subtitle fonts can be adjusted. |
| Font opacity Solid/Translucent/Transparent | The opacity of subtitle fonts can be adjusted.SolidTranslucentTransparent | |
| Font edge | DefaultNoneRaisedDepressed UniformLeft drop shadowLeft drop shadow | An edge effect can be added to subtitle fonts.RaisedDepressedUniformLeft drop shadowRight drop shadow |
| Font edge color White/Black/Red/Green/Blue/Yellow/Magenta/Cyan | The edges of subtitle fonts can have a color added. | |
| Background color Default/White/Black/Red/Green/Blue/Yellow/Magenta/Cyan | The background color of subtitle fonts can be changed. | |
| Background opacity | Solid/Translucent/Transparent | The opacity of the background of subtitle fonts can be changed.SolidTranslucentTransparent |
| Window color | Default/White/Black/Red/Green/Blue/Yellow/Magenta/Cyan | The color of the subtitle window can be changed. |
| Window opacity | Solid/Translucent/Transparent | The opacity of the subtitle window can be changed.SolidTranslucentTransparent |
Audio Settings
Audio Output
| Function Options Explanation | ||
| S/PDIF Bitstream/PCM/Off This | selects the digital audio signal format. | |
| HDMI Bitstream/PCM/Off This | selects the HDMI audio format. | |
| FS Setting 48 kHz/96 kHz/192 | kHz This selects the sampling frequency.* | |
| Volume Control Enable/Disable | Volume up/down operations can be enabled or disabled. | |
| Dolby DRC | Off/On/Auto | Set the dynamic range to Off, On or Auto. |
* The downsampling frequency used during audio playback for signal processing inside the unit can be set. If an audio signal is played that has a sampling frequency higher than the selected value, it will be converted to the set sampling frequency. PCM signals output by HDMI and S/PDIF connectors will also be downsampled to the set value.
Speaker Settings
| Function Options Explanation | ||
| Configuration 2.x/3.x/4.x/5.x/6.x/7.x | Select the channel configuration.● 2.x: Lt/Rt*, Stereo● 3.x: LCR● 4.x: LRLsRs● 5.x:● 6.x:● 7.x: C+LR+LsRs+LsrRsr | |
| Test Tone | More... | Select to play a test tone from the speakers. **● Subwoofer selection: None, Single● Speakers: C, L, R, SW1, Ls, Rs, Lsr, Rsr |
* Lt/Rt is a two-channel downmix output that supports Dolby surround. When played on an ordinary stereo system, the L and R channel balance could be degraded. If this occurs, select Stereo.
** Trim adjustment overview
Digital full scale (-10dB) is shown as "0" to make adjustment of surround channel speaker volume differences easier. If trim adjustment is unnecessary, use the default setting (+10).
S/PDIF Output Configuration
| Function Options Explanation | ||
| Configuration | FL/FRSL/SRC/SWSBL/SBRL/R (-10dBF) | The selection items are the same signals that are output from the analog outputs on the back of the unit.The selected analog outputs are output from the digital audio output (COAXIAL) connector. |
* The maximum audio level will become -10 dBF only for L/R
System Information
Use to check the revision and the MAC address used by this unit.
- Model: BD-MP1
- MAC: xx-xx-xx-xx-xx-xx
- Revision: xxx.xxx
Making connections
This is an example of connections with the unit.
Precautions before making connections
● Carefully read the operation manuals of the devices to be connected and then connect them correctly.
● Before making connections, turn this unit and all equipment to be connected off (standby).
● Install all connected devices, including this unit, so that they are powered from the same line. When using a power strip or similar device, be sure to use one that has high current capacity (thick cable) in order to minimize fluctuations in power voltage. Moreover, do not bundle or wrap power cords.
- Connect cable types correctly. (Be careful not to insert cables into the wrong connectors or with the wrong orientation.)
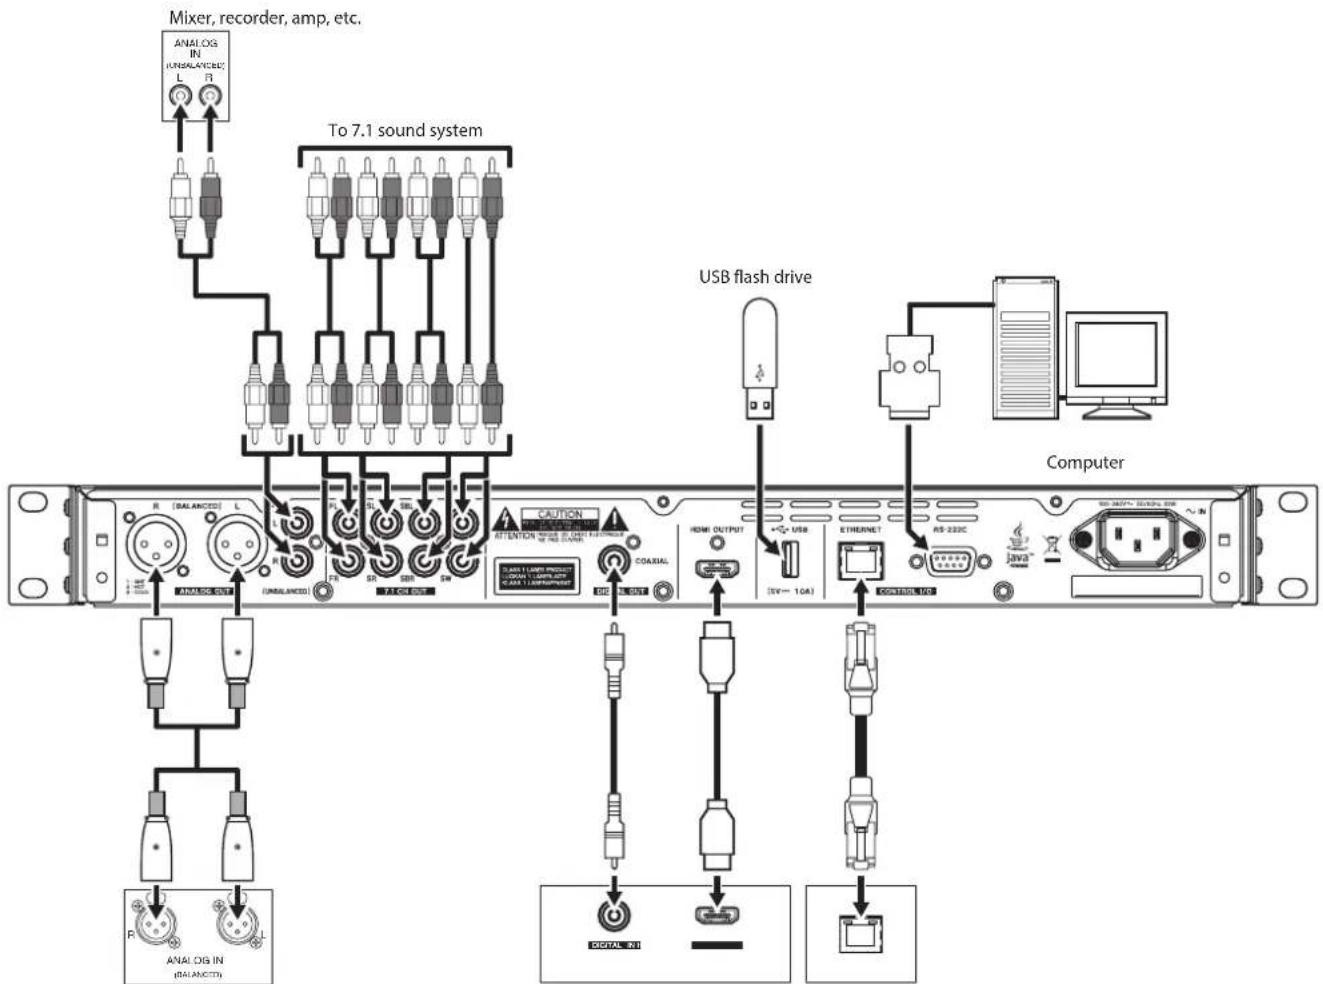
flowchart
graph TD
    A["Mixer, recorder, amp, etc."] --> B["Analog IN (UNBALANCED)"]
    B --> C["L"]
    B --> D["R"]
    E["To 7.1 sound system"] --> F["USB flash drive"]
    F --> G["Computer"]
    H["ANAL OG IN (BALANCED)"] --> I["P"]
    H --> J["ANAL OG IN (BALANCED)"]
    K["CAUTION"] --> L["INTENTION WITH LIGHT EXPIRATION OF US LAYER"]
    M["COAUXAL"] --> N["USB OUTPUT"]
    O["HDMI OUTPUT"] --> P["USB"]
    Q["USB flash drive"] --> R["USB"]
    S["CONTROL IN"] --> T["AS-232C"]
    U["Digital IN"] --> V["Digital"]
    W["Computer"] --> X["Java"]
Mixer, recorder, amp, etc. TV, display, etc. Network router, etc.
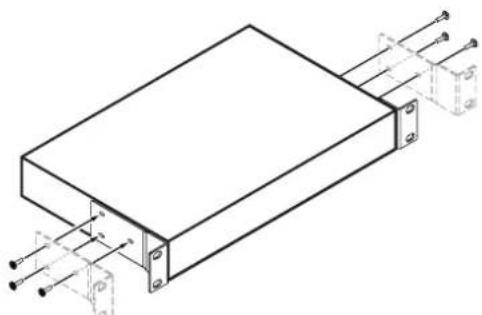
Installing rackmount years
The included rackmount ears must first be attached before mounting this unit in a rack.
● Refer to the illustration below when attaching them.
natural_image
Technical line drawing of a rectangular electronic component with mounting brackets and connectors (no text or symbols)NOTE
• A Phillips screwdriver is necessary for attachment.
- The attachment holes in the included rackmount ears are elongated, allowing adjustment so that the unit does not stick out of the rack when attached.
Display
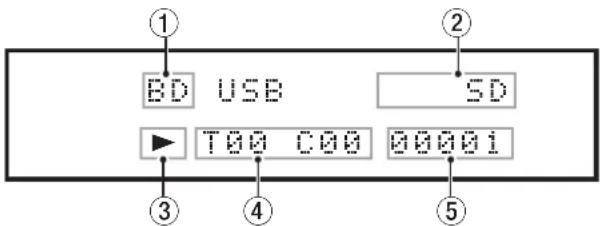
① Type of disc in tray
This shows the type of disc loaded in the tray of the unit.
- Blu-ray disc: BDMU, BDAU
- DVD disc: DVD
- Audio CD:CD
- No disc loaded: NO DISC
② Connected media
These appear when a USB flash drive or SD card is connected to the USB port or the SD card slot on the unit.
③ Media operation status
When the unit is playing or paused, an icon appears here.
- During playback: ▶
- When paused:
④ Title/chapter/track
When the unit is playing or paused, title/chapter/track information appears here.
- Title/track: T00
- Chapte: C ☐ ☐
⑤ Various information
- This shows the position in the media item order shown on the Media page of the HOME screen.
- SETUP appears when on the Settings page of the HOME screen.
- Various information is shown in response to different operations.
- When a USB flash drive is connected: USB IN
- When a USB flash drive is disconnected: USB OUT
- When the STOP button is pressed: STOP
- When the TITLE/POP UP button is pressed: POP
- When the disc tray is open: OPEN
- When the disc tray is closed: CLOSE
- When a medium is recognized: LOAD
- When playing back: ☐☐: ☐☐: ☐☐
- Other information shown
- When the title menu of a disc that contains multiple titles is open: ROOT
- When the title menu of a purchased or rental video disc is open: TOP
- During a firmware update: UPGRADE
• Volume adjustment: VOL 0 Adjustment range (-41 min. - 0 max.)
Preparing the remote control
Installing batteries
- Open the cover on the back.
- Insert two AAA batteries, being certain to use the correct and orientations.
- Close the cover.
When to replace batteries
Replace both batteries with new ones if the distance from the main unit that the remote can be used decreases or if the unit stops responding to the remote buttons.
Battery precautions
Misuse of batteries could cause them to leak or rupture, for example. Carefully read and follow the battery caution labels. (see "CAUTIONS ABOUT BATTERIES" on page 5)
Using the wireless remote control
See "Wireless remote control (TASCAM RC-BDMP1)" on page 13 for the button functions.
When using the remote control, point it toward the receiver on the unit and use it within the range shown below.
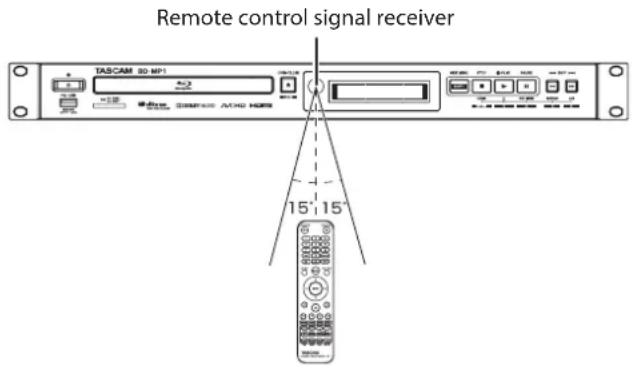
Remote control operation range From any angle within 15° of front: 5 m
ATTENTION
- Operation might not be possible if there are obstacles.
- Remove the battery if not using the remote control for a long time (a month or more).
- It battery fluid should leak, wipe away any fluid inside the case thoroughly and install a new battery.
- When using other devices that can be controlled by infrared rays, operation of this remote control could cause those devices to function improperly.
Turning the unit on and off
NOTE
When this unit is connected by a power cord and electricity is supplied from an outlet, it will automatically start up. (This will also occur when power is restored after a power outage or other interruption to the power supply.)
If the STANDBY/ON indicator on the front of the unit lights red, press the Button or the remote control STANDBY/ON button.
HELLO
Startup screen
BDUSB
BDMV
Operation screen
After the unit starts and the startup screen is shown, the operation screen will appear on the display.
Turning the unit off
Press the ⏻ button or the remote control STANDBY/ON button to turn the unit off.
ATTENTION
Do not turn the power off or disconnect the power cord when the unit is operating (including playing back or writing data to a USB flash drive). Doing so could damage the unit.
Loading and removing discs
Loading discs
Press the OPEN/CLOSE (▲) button on the main unit or remote control.
Open the disc tray and place the disc on it with the label side up. Press the OPEN/CLOSE (▲) button again to close the disc tray. After loading a disc, the unit will read its information and show the media type on the display.
NOTE
- When the disc tray is open, "OPEN" will appear on the display. When the disc tray is open, "CLOSE" will appear on the display.
- If a disc other than a playable CD is inserted or a disc is inserted upside down, the unit will automatically eject it.
Ejecting discs
Press the OPEN/CLOSE (▲) button on the main unit or remote control.
After the disc tray opens, pick the disc up by its center and remove it.
NOTE
The OPEN/CLOSE button functions when the unit is turned on.
Inserting and removing SD cards
Inserting SD cards
Insert an SD card into the SD card slot on the front of the unit to enable playback.
TIP
SD cards can be inserted whether or not the unit is on or off.
- Inserted SD cards with the correct orientation.
- The label should be up and the connector should be inserted toward the back.
Removing SD cards
Turn the unit off or stop operation before removing an SD card.
ATTENTION
Do not remove an SD card when the unit is operating (playing back an SD card). Doing so could cause proper dubbing to fail, data to be lost, and sudden loud noises from monitoring equipment, which might damage the equipment, harm hearing or cause other trouble.
- Press the SD card in gently to make it to come forward.
- Pull the SD card out by hand.
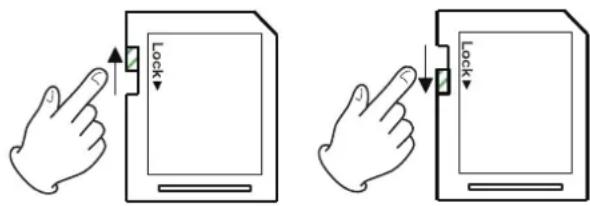
SD card write protection switches
SD cards have write-protection switches that prevent writing new data to them.
Connecting and disconnecting USB flash drives
Connecting USB flash drives
Connect a USB flash drive to the USB port on the front or back of the unit to enable playback.
TIP
You can connect a USB flash drive when the unit is on or off.
Disconnecting USB flash drives
Turn the unit off or stop operation before disconnecting a USB flash drive.
ATTENTION
Never disconnect a USB flash drive when the unit is operating (including playing back or writing data to the USB flash drive). Doing so could cause the loss of data or damage the unit.
Panel lock function
By using the lock functions, opening and closing the disc tray, and operations using the remote control and main unit buttons can be locked.
-
Press the HIDE MENU [SHIFT] and OPEN/CLOSE [LOCK] buttons on the front of the unit at the same time. The current lock status will appear on the unit display.
-
While pressing and holding the HIDE MENU [SHIFT] button on the unit, press the OPEN/CLOSE [LOCK] button again.
- Pressing these buttons changes the status every time.
- Press the OPEN/CLOSE [LOCK] button while continuing to press and hold the HIDE MENU [SHIFT] button until the desired lock function appears.
| Unit display indication Lock status | |
| LOCK: T LOCK | Disc tray locked |
| LOCK: P LOCK | Main unit buttons locked* |
| LOCK: R LOCK | Remote control locked |
| LOCK: R+P LOCK | Remote control and main unit buttons locked* |
| LOCK: R+T LOCK | Remote control and disc tray locked |
| LOCK: OFF | Unlocked |
* Even when the main unit buttons are locked, pressing the HIDE MENU [SHIFT] and OPEN/CLOSE [LOCK] buttons at the same time still works.
When locked
If operation of the front panel is attempted when the front panel is locked, "LOCKED" will appear on the display and that operation will not be executed.
NOTE
- If the disc tray is locked using LOCK: T LOCK or LOCK: R+T LOCK while the tray is still open, closing it once will be possible. After that, the disc tray will be locked.
- Turning the power on again will be possible even if the power is turned off while the unit is locked. The unit will remain locked after it starts up.
Remote control overview
This unit can be controlled remotely by connecting it to a computer, either by connecting their RS-232C ports with an RS-232C cable or by connecting the unit's ETHERNET to a LAN port on the computer with a LAN cable.
- For details about this unit's communication and command protocols for ETHERNET and RS-232C, refer to the BD-MP1 download page of the TASCAM website (http://teac-global.com/).
BD-Live overview
This unit supports BD-Video (BD-ROM Profile 2.0) with BD-Live functions.
By connecting this unit to the Internet, this function can be used to enable additional content, including special videos and subtitles.
● The various functions that can be used with BD-Live depend on the disc. Refer to the screen display and explanations of the disc for details about those functions and operations.
- To use BD-Live functions, connect this unit to the Internet and make the necessary settings. See "Network connection overview" on page 36 for connection procedures, and "See "Network" on page 20 for setting procedures.
- Depending on the disc, changing the settings described in "Network" on page 20 might be necessary.
- If the BD-LIVE Connection setting is "Prohibited" in "Network" on page 20, BD-Live content will not be able to access the Internet.
- Depending on the network setup being used, network connection might take some time or might not even be possible.
- During playback of discs that support BD-Live, identification data for the unit or disc might be transmitted to the content provider.
To limit Internet connection, change the "Network" on page 20 settings described on page 17.
Types of media that can be played
This unit can play the following media formats.
Disc media
● Supported Blu-ray
BD25, BD50, BD-ROM, BD-R, BD-RE
● Supported DVD
DVD-ROM, DVD+R, DVD-R, DVD+RW, DVD-RW
● Supported CD
CD-DA, CD-R, CD-RW
Disc formats
● Supported Blu-ray BDMV, BDAV
● Supported DVD
DVD-Video, DVD-VR, AVCHD
NOTE
- BD-R/DVD-RW/DVD-R media that have not been finalized (closed) might not play properly.
- BD-RE version 1.0 (cartridge type) and DVD-RAM media cannot be played.
- Additional recorded parts cannot be played from BD-RE/BD-R/DVD-RW/DVD-R media with multi-session (multi-border) recordings.
- Some BD-Video/DVD-Video media might not operate as explained in this manual due to the intentions of their producers. For details, refer to the manuals of such discs.
- Use music CDs that conform to ISO standards.
- Playback is not guaranteed for all discs that conform to the standards.
playable file formats (video, audio and image)
This unit can play the following file formats.
Video formats
- .asf, .mpg, .avi, .3gp, .dat, .mkv, .mov, .m2ts, .ogm, .tp, .ts, .mp4, .wmv
Audio formats
- .wav, .mp3, .wma, .aac, .flac, .ape
Still image formats
- .jpeg, .gif, .png
NOTE
USB flash drives and SD cards must use FAT16, FAT32 or NTFS file systems.
Playing media
This section explains basic operations, including playback, pausing and stopping.
The following explanations assume that necessary connections have been completed, the unit is on, a disc or other media that contains video or audio files has been loaded, the current source has been selected, and "BDMV", "BDAV", "DVD", "CD", "USB" or "SD", for example, appears on the display.
Loading discs
Conduct the following operations with the buttons on the front of the unit or with the remote control.
(These explanations will primarily use remote control operations.)
-
Press the OPEN/CLOSE (▲) button to open the disc tray.
-
Load a disc in the disc tray, and press the OPEN/CLOSE (▲) button again to close it.
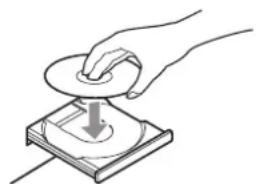
natural_image
Hand pressing down on a square electronic device with a circular button (no text or symbols visible)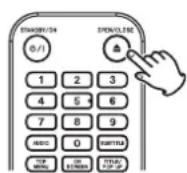
While the disc is being read, "L O A D" appears on the display, followed by one of the items below when reading completes.
- Blu-ray disc: BDMV, BDAV
- DVD disc: DVD
- Audio CD:CD
Automatic playback overview
- When Disc Auto Playback (HOME screen > Settings > System) is set to On (Repeat On) (the default is Off), discs will start playing automatically after they are loaded.
- When Disc Auto Playback is Off or playback does not start, select Disc on the HOME screen, and press the ENTER or ▶ button.
NOTE
- When the repeat function is enabled, playback will start automatically when a disc is loaded. For this reason, be careful during the following operations.
- Making settings on the HOME screen
- Playing files on an SD card/USB flash drive
● Automatic playback is not supported for SD cards or USB flash drives.
Playing video discs
- If a disc that has never been played before is loaded, it will start playing from the beginning.
- If Last Memory (HOME screen > Settings > System) is set to On (the default is On), when discs that have been played before are loaded, they will resume playing* from the position where they were last stopped.
* This only works with purchased or rental video discs. Moreover, the unit can save positions for five discs maximum with this function. When the total number of discs would exceed five, the record for the disc played least recently will be replaced by a record for the most recent disc.
Operating from disc top menus and pop-up menus
When video discs have menus or pop-up menus, they can be shown and a variety of operations are possible.
(The contents of menus and pop-up menus depend on the programming of the discs.)
- To show the title menu, press the TOP MENU button. If this is done when playing or paused, playback will stop. To show the title menu without stopping playback when playing or paused, press the TITLE/POP UP button. To move between items in the title menu use the cursor buttons, and press the ENTER button to confirm.
Pausing playback
To pause playback, press the Ⅱ button.
Press the ▪ button again or press the ▶ button to resume playback from the stopped position.
Stopping playback
To stop playback, press the ■ button.
Press the ▶ or ENTER button to start playback from the stopped position.
* This is different from pausing.
- Whatever is shown on the monitor will disappear.
- During repeat playback, the repeat mode will clear.
Searching backward/forward
Use the ◀◀/▶▶ buttons to search backward/forward
Pressing the ◀◀/▶▶ button again will change the search speed up to five levels.
Pressing it again will return to ordinary playback.
When searching backward/forward in a disc, press the Ⅱ button to pause playback.
Pressing the Ⅱ button again will resume playback.
Skipping to the previous or next chapter/track
Press the I◄◄/►►I button to skip to the previous/next chapter/track.
- When playing, paused or searching backward/forward, press the ◀◀◀/▶▶I button to skip to the previous/next chapter/track and resume playback.
● To return to the beginning of the currently playing chapter/track, press the ◀◀◀ button once.
(However, if the current chapter/track is playing back or paused within a few seconds of its beginning, this will move to the previous chapter/track and resume playback.)
Repeating playback of part of a scene or track
* This repeat playback function is different from the automatic playback repeat function. The playback position will not be retained when the unit is turned off. During media playback, press the A-B button to set a desired interval (between A and B points) and play it back repeatedly. (In this explanation, “scene” is used, but it also applies to “tracks” when using audio files.)
- Press the A-B button at the point in the scene were repeat playback will start. The starting point "A-" will appear at the top of the monitor.
- Next, press the A-B button at the point in the scene were repeat playback will end. The starting and ending points "A-B" will appear at the top of the monitor, and repeat playback will continue between these points.
- During repeat playback, press the A-B button again to end repeat playback and continue ordinary playback (Not all video discs support this function.)
Repeating playback of a chapter, title or track
* This repeat playback function is different from the automatic playback repeat function. The playback position will not be retained when the unit is turned off.
Press the REPEAT button to enable repeat playback mode. The currently playing chapter, title or track will play repeatedly. Press this button repeatedly to change the repeat playback mode.
Video discs
- During chapter repeat playback, playback starts at the beginning of the current chapter. (The Icon appears at the top of the monitor.)
- During title repeat playback, playback starts at the beginning of the current title. (The tech appears at the top of the monitor.)
- During all repeat playback, playback starts at the beginning of the video file. (The icon appears at the top of the monitor.)
CDs and video/audio files
- During single repeat playback, playback starts at the beginning of the current track. (The icon appears at the top of the monitor.)
- During all repeat playback, playback repeats for all tracks on a CD and for all video/audio files in the same folder. (The icon appears at the top of the monitor.)
Jumping to a specific playback time, scene or track
(This also applies to "chapters" when using audio discs.)
During disc playback, press the SEARCH button to show an information bar at the top of the monitor. A cursor will appear in the time display area.

At this time, press a cursor button to move the selection between the time and chapter display areas.

NOTE
Only playback times and chapter numbers that exist on the playing disc can be specified. Values that exceed these ranges cannot be specified.
Jumping to a specific playback time
- In this state, press the ENTER button to select the time display area, enabling the value to be changed.

- Use the number buttons to input values.
Use the I cursor buttons to move between the hours, minutes and seconds.
(In the illustration below, values have been entered for minutes and seconds.)

- After inputting values, press the ENTER button to start playback from the specified time.
(The chapter display will also change to the chapter at the specified time.)
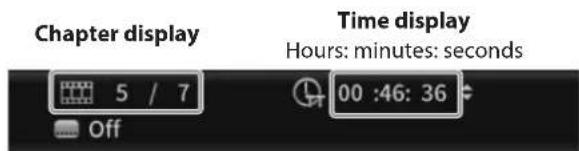
Press the ON SCREEN button to close the information bar.
Jumping to a specific chapter or track
- Use a I cursor button in the time display area to move the cursor to the chapter display area. In this state, press the ENTER button to show up and down triangle icons in the chapter display area, enabling the value to be changed.

-
Use the number buttons to input values.
-
After inputting values, press the ENTER button to start playback from the specified chapter.
(The time display will also change to the time at the specified chapter.)
Press the ON SCREEN button to close the information bar.
Playing USB flash drives and SD cards
To play these media, connect them to the USB port* or SD card slot on the front of the unit.
* Another USB port is on the back of the unit.
While the medium is being read, "L.ORD" appears on the display, followed by one of the items below when reading completes.
- USB flash drive: USB
- SD card: SD
- Select Media on the HOME screen and press the ENTER button.
Media icons will appear. Use the ∨/∧ cursor buttons to select an SD/USB icon and press the ENTER button.
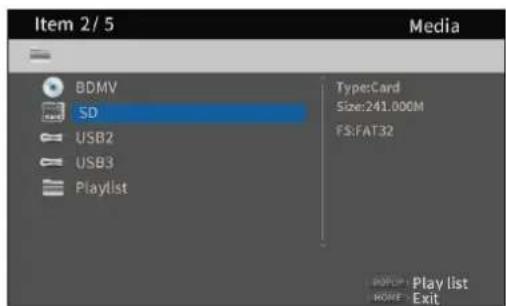
- Opening the selected icon will show the following folders.
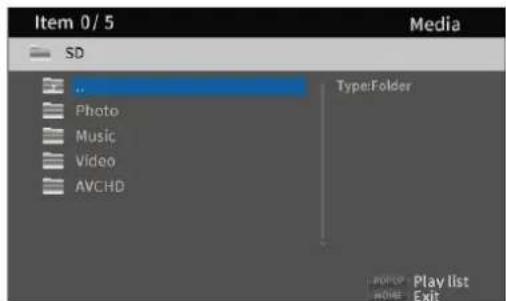
...: Top folder
Photo: Photo folder
Music: Audio folder
Video: Video folder
AVCHD: High-quality video folder
- Select the target folder, and press the ENTER button.
Files inside the folder will be shown.
(Example: Music folder open)
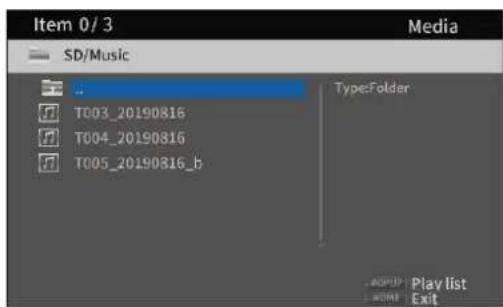
- Use the √/∧ cursor buttons to select a file and press the ▶ button to start playback.
When a file is selected, the following information appears on the right side of the monitor.
- Thumbnails of image files
- Various information for audio and video files
Playing USB flash drive/SD cards playlists
To play playlists with these media, connect them to the USB port* or SD card slot on the front of the unit.
* Another USB port is on the back of the unit.
While the medium is being read, "LOAD" appears on the display, followed by one of the items below when reading completes.
- USB flash drive: USB
- SD card: SD
NOTE
Media files in playlists will be played back in the order that they were selected.
Adding files to a playlist
- Select Media on the HOME screen and press the ENTER button.
Media icons will appear. Use the ∨/∧ cursor buttons to select an SD/USB icon and press the ENTER button.
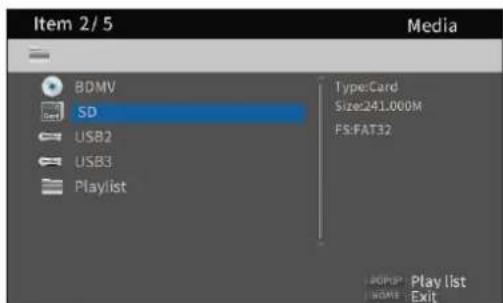
- Opening the selected icon will show the following folders.
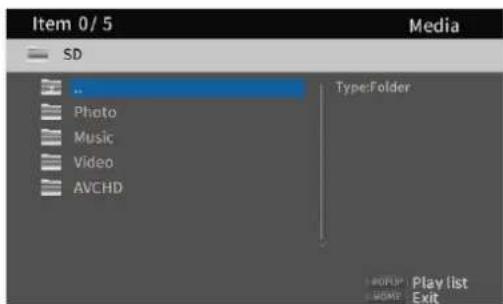
...: Top folder
Photo: Photo folder
Music: Audio folder
Video: Video folder
AVCHD: High-quality video folder
NOTE
Playlists can only include image, audio or video files.
A playlist cannot contain different types of files. (For example, it cannot contain both image and video files.)
- Select the file to add to the playlist, and press the TITLE/POP UP button to open a pop-up message.
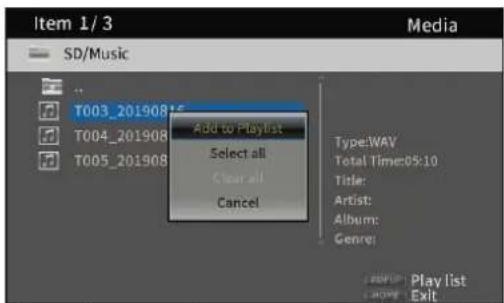
- Use the √/^ cursor buttons to select "Add to playlist", and press the ENTER button to add the selected file to the playlist.
- When a file is selected, press the cursor button to add a check mark before the file name, selecting it.
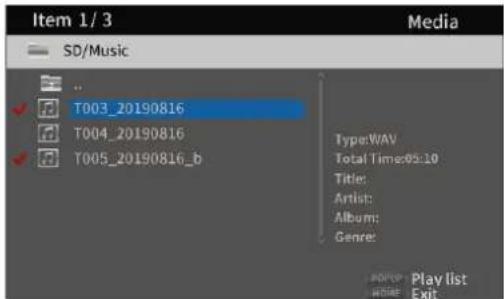
Select a file again and press the > cursor button to remove its check mark.
- Add check marks to the necessary files, and press the TITLE/POP UP button to open a pop-up message.
Use the ∨/∧ cursor buttons to select "Add to playlist", and press the ENTER button to add the selected file to the playlist.
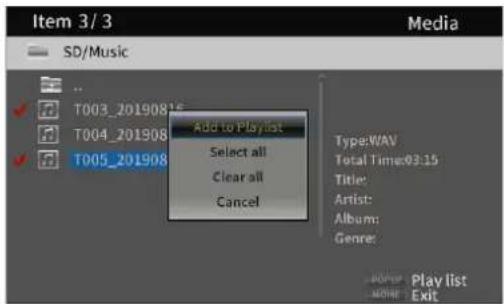
- In addition, check marks can be added to all files in the folder by selecting "Select all" in the pop-up and pressing the ENTER button in step 3.
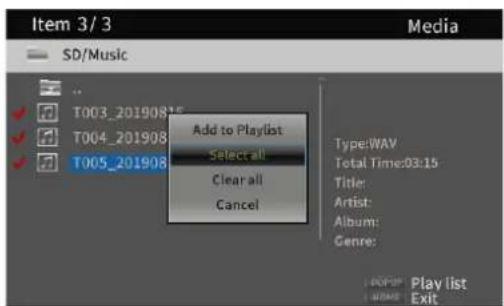
- With check marks added to files, press the TITLE/POP UP button to open a pop-up message. Use the ∨/∧ cursor buttons to select "Add to playlist", and press the ENTER button to add the selected file to the playlist.
- Select "Clear all" in the pop-up message and press the ENTER button to remove check marks from all files. Exiting the folder will also remove the check marks from all files.
To do nothing, select "Cancel" and press the ENTER button, or press the RETURN button to return to the original screen.
Playing files in a playlist
- Select Media on the HOME screen and press the ENTER button.
Media icons will appear. Use the ∨/∧ cursor buttons to select the Playlist folder and press the ENTER button.
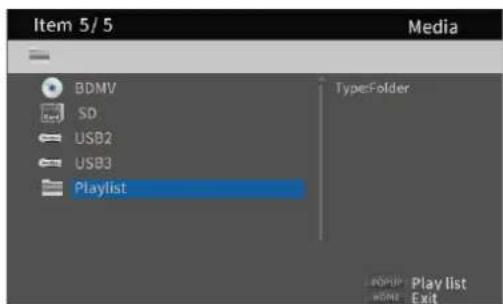
- Opening the playlist folder will show the following folders.
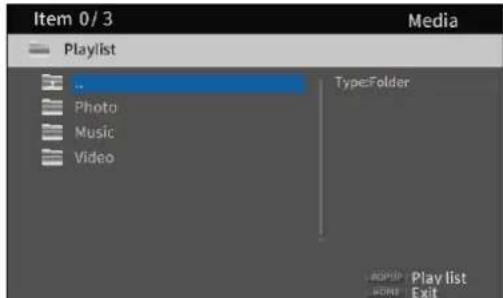
... Top folder
Photo: Photo folder
Music: Audio folder
Video: Video folder
- Select a file for playback, and press the ENTER or ▶ button to start playing the playlist
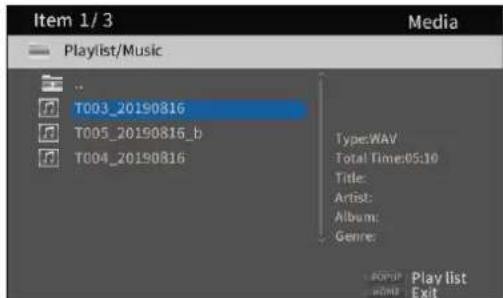
Removing files from a playlist
- To remove a file from a playlist, select the playlist icon and open the folder that contains the file.
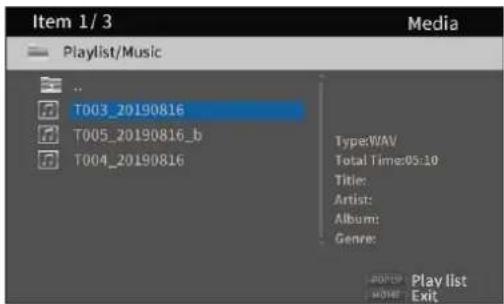
- To remove a specific file from the playlist, select it and press the > cursor button to add a check mark before its name.
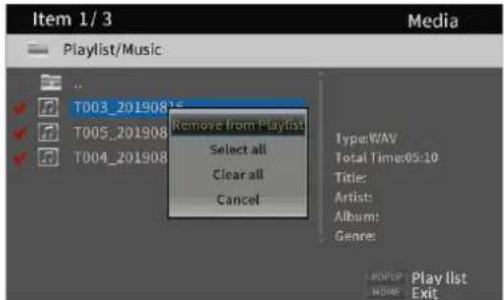
- At this point, press the TITLE/POP UP button to open a pop-up message. Then, use the ∨/∧ cursor buttons to select "Remove from playlist" and press the ENTER button to remove files with check marks from the playlist.
- To remove all files from the playlist, press the TITLE/POP UP button to open a pop-up message. Then, select "Select all" and the press the ENTER button to add check marks to all files in the folder.
Press the TITLE/POP UP button again to open a pop-up message. Then, use the ∨/∧ cursor buttons to select "Remove from playlist" and press the ENTER button to remove files with check marks from the playlist.
Using program playback
This unit can play the content (titles/chapters or tracks) of video and audio discs in specified order.
- First, press the PROG/RED button. The following Program page appears on the monitor.
NOTE
Pressing the PROG/RED button again during this operation will clear the set content, restoring the default state.
DVD Screen
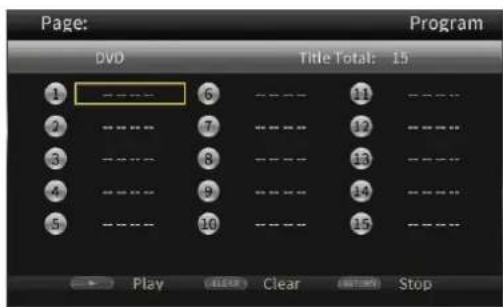
CD Screen
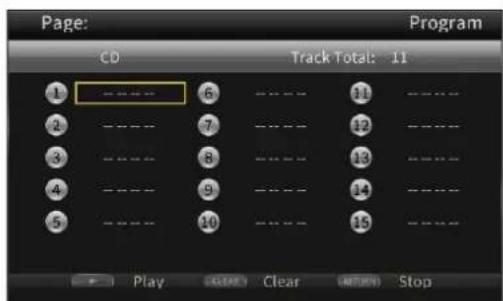
The Program screen shows the type of media that can have its playback order set (title/chapter or track), the total number of programmed items (15 maximum) and the names of the operation buttons (Play/Clear/Stop).
* Remote control button assignments
- Play button
- Clear: CLEAR button
-
Stop: RETURN button
-
On the Program screen, input the content to play in order from field ① using the procedures below.
-
First, in field ①, press the ENTER button. Then use the √/^ cursor buttons to select titles/chapters or tracks.
DVD Screen
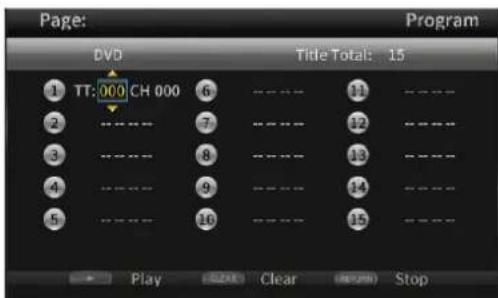
- For video discs, first use the / cursor buttons to select the number* of the title to be played in the title input
field. Then, use the > cursor button to move to the chapter input field, and use the √/∧ cursor buttons to select the number* of the chapter to be played.
- Use the CLEAR button to reset the input number to 0.
- Press the RETURN button to cancel the program and close the Program page.
* Only values that exist in the disc content can be selected.
CD Screen
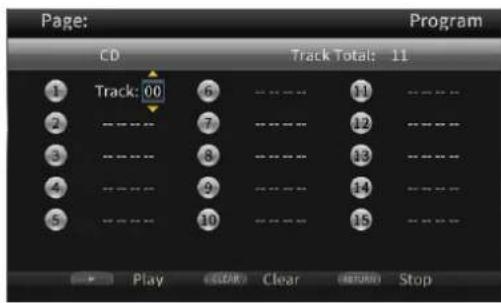
- For audio discs, use the /^ cursor buttons to select the number* of the track to be played in the track input field.
- Use the CLEAR button to reset the input number to 0.
- Press the RETURN button to cancel the program and close the Program page.
* Only values that exist in the disc content can be selected.
2. After inputting all the desired playback items, press the
▶ button to start program playback.
NOTE
When the Program page is open, only the following buttons can be used.
▶, CLEAR, RETURN, cursor and number buttons
Setting bookmarks
This unit can be used to set bookmarks to remember specific places on video discs. The internal memory can store a maximum of 12 bookmarks.
● To create a bookmark, press the MARK/GREEN button at the desired place during video playback.
● The bookmark number, current title, chapter and time are shown on the monitor.
Jumping to bookmarks
- Press and hold the MARK/GREEN button for 6 seconds.
Playback will pause, and available bookmarks will be shown on the monitor. - Use the I cursor buttons to move between bookmarks.
When a bookmark is selected, its number and the current title, chapter and time are shown on the monitor.
Available bookmarks appear white, while unused bookmarks appear gray. - Press the ENTER button to jump to the target bookmark.
Playback from that bookmark is possible.
To cancel this operation and return to ordinary playback, press the MARK/GREEN button.
Deleting bookmarks
- Press and hold the MARK/GREEN button for 6 seconds.
Playback will pause, and available bookmarks will be shown on the monitor. - To delete the last created bookmark, press the CLEAR/GREEN button.
- Press the MARK/GREEN button to close the bookmarks and return to ordinary playback.
Adjusting the volume from the unit
To adjust the volume during playback, use the -/+ (VOLUME) buttons.
If the playback sound still cannot be heard after raising the volume some, adjust the volume on the monitor, TV, amplifier or other sound output equipment.
NOTE
If the remote control -/+ (VOLUME) buttons do not function, on the HOME screen, select Settings > Audio Settings > Audio Output > Volume Control and set it to Enable.
Muting with this unit
By pressing the MUTE button, playing sounds can be muted by this unit.
When muted, the don appears on the monitor.
Press the MUTE button again to stop muting. The Icon appears on the monitor. (This icon will disappear from the monitor after a little while.)
Overview of ON SCREEN information bar
Press the ON SCREEN button to open an information bar at top of the monitor screen.
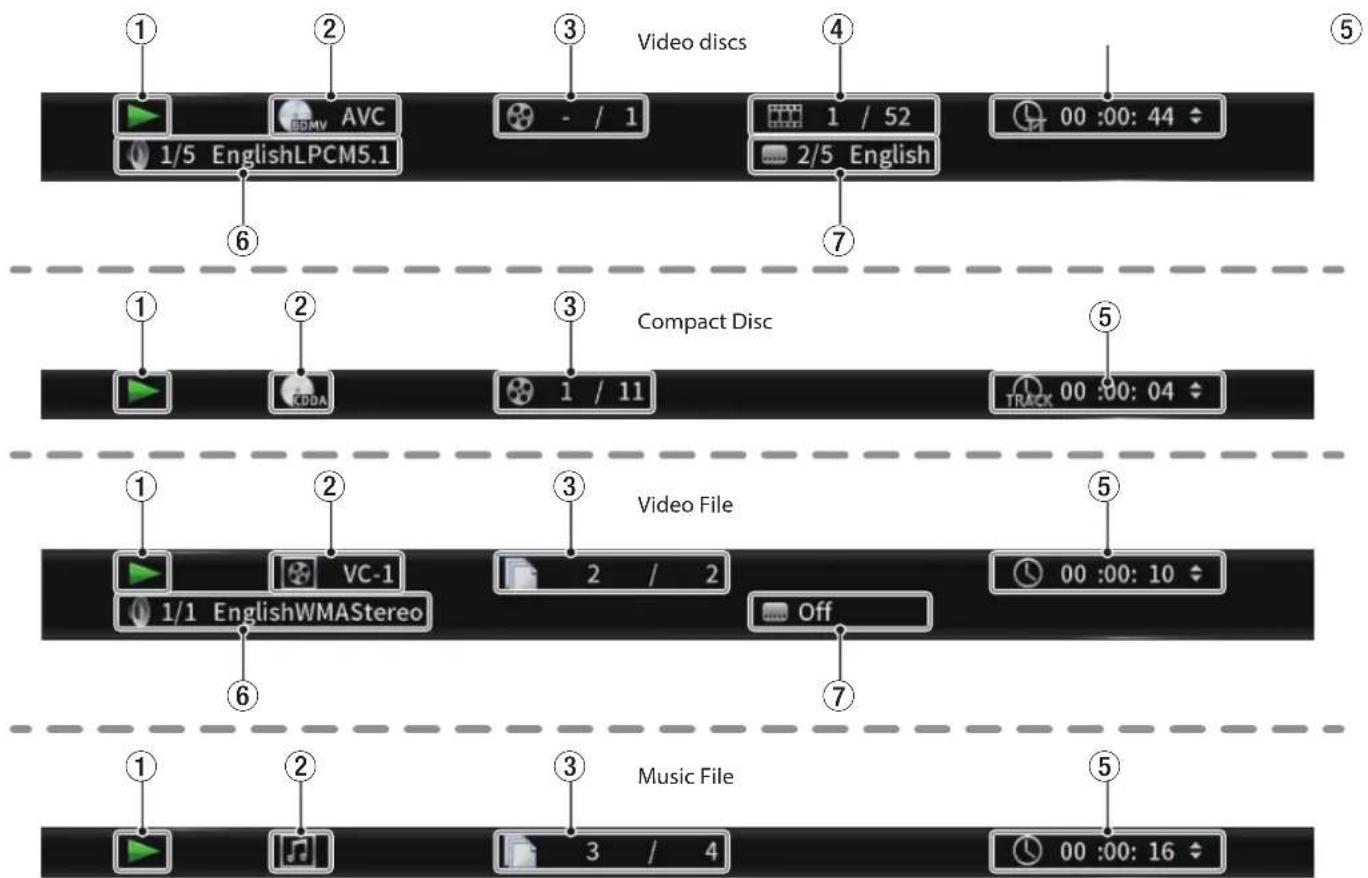
flowchart
graph TD
    A["1/5 EnglishLPCM5.1"] --> B["AVC"]
    B --> C["- / 1"]
    C --> D["1 / 52"]
    D --> E["2/5 English"]
    E --> F["00:00:44"]
    G["Compact Disc"] --> H["1 / 11"]
    H --> I["TRACK 00:00:04"]
    J["1/1 EnglishWMAStereo"] --> K["VC-1"]
    K --> L["2 / 2"]
    L --> M["Off"]
    M --> N["00:00:10"]
    O["Music File"] --> P["3 / 4"]
    P --> Q["00:00:16"]
1 Operation status
This shows the current operation status.
Playing
■ Playback paused
◀◀ X Search backward X (1–5)
▶▶ X Search forward X (1–5)
Skip backward
▶▶I Skip forward
Operation not possible
2 Media/file
This shows the type of the playing media/file.
3 Title/track
This shows the number of the current title/track.
4 Chapter
This shows the current chapter.
5 Playback time
This shows the current playback time.
6 Audio settings
This shows the current audio settings.
Press the AUDIO button to change the available audio settings.
7 Subtitle language
This shows the current subtitle setting.
Press the SUBTITLE button to change the selectable subtitle language.
Network connection overview
From the HOME screen, use Settings > General Settings > Network to set the network connection.
- In the submenu, set "Internet Connection" to "Enable".
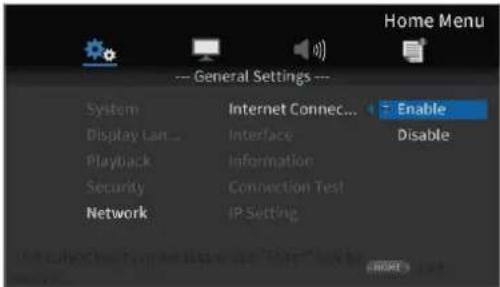
Use the > cursor or ENTER button to move to the function setting. Use the ∨/∧ cursor buttons to select "Enable" or "Disable" and press the ENTER button to confirm.
To exit a folder or subfolder, press the< cursor button repeatedly to return to the starting screen.
- Set the method of Internet access for the unit to "Ethernet" or "Wireless"* in the submenu.
* "Wireless" connection can only be used if a USB-wireless LAN adapter* has been connected to the unit.
(A USB-wireless LAN adapter is not included with this unit. Prepare one for use as necessary. For recommended USB-wireless LAN adapters, see the TASCAM web site (https://tascam.com/us/).)
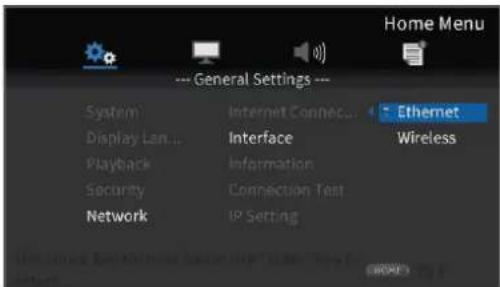
Use the > cursor or ENTER button to move to the function setting. Use the ∨/∧ cursor buttons to select "Ethernet" or "Wireless" and press the ENTER button to confirm.
The following message will appear when the current setting is changed.
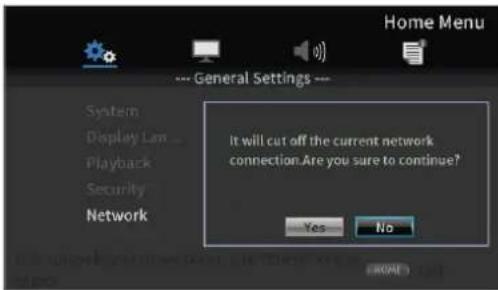
To connect, select "Yes" and press the ENTER button.
• Using a wireless connection
The following connection methods can be selected.
- Scan: The unit will search for access points, allowing selection of a network.
- Manual: An SSID can be set manually to connect.
- Auto: Connection is possible using Wi-Fi Protected Setup (WPS) standards.
- From the Information submenu, Network Information, the following screen can be checked.
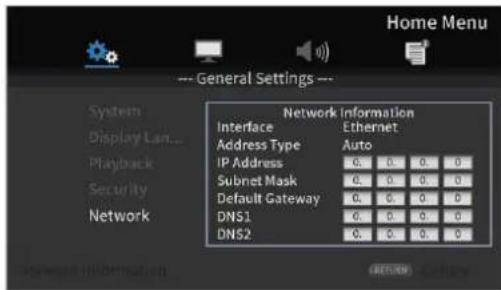
Press the RETURN Button to return to the previous screen.
• Information shown
interface, address type, IP address, subnet mask, gateway, DNS1 and DNS 2.
( When DHCP is set to "0", this information can be input manually using the remote control.)
- The network can be tested with "Connection Test" in the submenu.
The following messages appear if there is a problem with the network connection.
• "Network is FAILD": Problem with network
- "Proxy is FAILD": Problem with proxy
- Select how the unit's IP address is set in the IP Setting submenu.
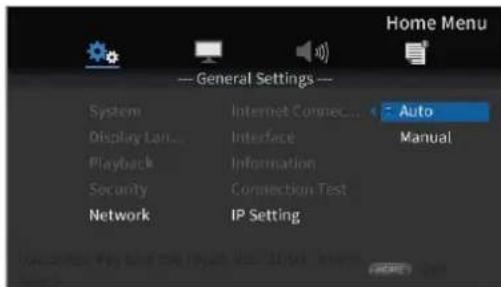
• Auto: Automatically acquire the IP address from a DHCP server.
- Manual: (see settings screen below)
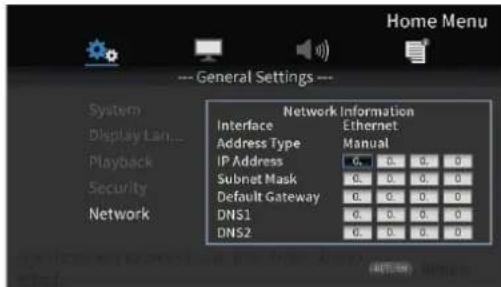
The cursor buttons can be used to select the IP address, subnet mask, default gateway, DNS 1 and DNS 2, and the number buttons can be used to input values.
Press the RETURN button even during an operation to return to the previous screen.
- If "Wireless" is selected in the submenu Interface setting, select "Wireless Setting" in the submenu to set the wireless connection. (The setting procedures are the same for the Interface settings.)
Option menus
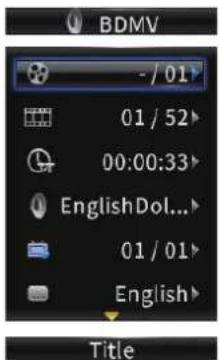
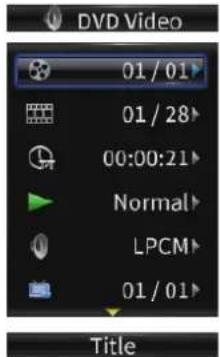
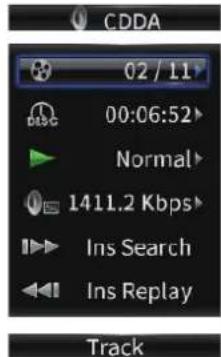
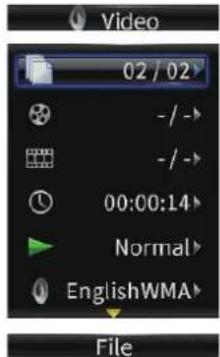
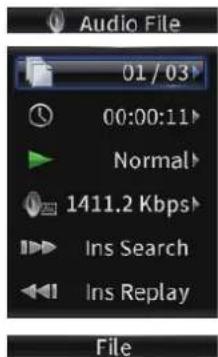
Using the option menus, specific settings can be made during playback without opening the Settings menu. Option menus appear on the left side of the monitor.
The available options depend on the type of media currently used.
Refer to the appropriate section according to the media type: BDMV options for Blu-ray discs, DVD Video options for DVDs, Video options for video files, Audio CD options for audio CDs, Audio File options for audio files and Image File options for image files.
To show and hide option menus, press the remote control OPTION button during playback.
Basic option menu operations
● To move in a menu, use the/^ cursor buttons. The current item is shown in a blue frame.
- If an arrow (▶) appears to the right of a menu item, press the ENTER or > cursor button to open a submenu that contains additional options.
- In a submenu, if up/down arrows (▲▼) appear, the ∨/∧ cursor buttons can be used to select the previous or next option. Press the ENTER or <cursor button to confirm a selection and close the submenu.
- If no arrow appears to the right of an item, press the ENTER button to execute that function.
General Settings
BDMV options
| Option menu name Options Explanation | |||
 | Title |  | The playing title can be changed.The number on the left is the currently playing title. The number on the right is the total number of titles. |
 | Chapter |  | The playing chapter can be changed.The number on the left is the currently playing chapter. The number on the right is the total number of chapters. |
| Time | Hours: minutes: seconds | The elapsed time of the title or chapter.The time shown can be switched from title elapsed time (TT) to title remaining time (-TT), chapter elapsed time (CH) or chapter remaining time (-CH). | |
| 00: 00: 00 | |||
 | Audio (Depends on disc) | Audio settings can be changed.The audio settings that can be used depend on which are supported by the video. For example, DTS-HD MA (master audio) or Dolby Digital can be selected in various languages for Blu-ray discs. | |
 | Angle |  | The camera angle can be changed.The number on the left is the current angle. The number on the right is the total number of available angles. This function can only be used with discs that have data for multiple angles. |
 | Subtitles (Depends on disc) | Subtitle display can be changed.The settings that can be used depend on the subtitle languages supported by the video. | |
  | Subtitle style (Depends on disc)Secondary video On/Off | The display style of subtitles can be changed.The settings that can be used depend on the subtitle languages supported by the video.The picture-in-picture function can be turned on/off.Using this function, additional content can be shown in a small window during playback in the main window.This function can only be used with discs that support it. | |
 | Secondary audio On/Off | The audio used by the picture-in-picture function can be turned on/off.This function can only be used with discs that support it. | |
  | Bit rate – | This is the current bit rate.The shown bit rate can be switched between video and audio. | |
 | Image off – | Press the ENTER button to turn the video image off, and continue playing only the audio.This function can only be used with discs that support it. | |
 | Quick search – Press the | ENTER button to search forward 30 seconds. | |
 | Instant replay – Press the | ENTER button to jump backward | 10 seconds. |
 | CC Select | ● Analog CC 1 - 4● Off | Closed caption settings can be changed. This is set to Off when shipped new from the factory. |
* The content shown depends on the disc playing.
DVD Video options
| Option menu name Options Explanation | |||
 | Title | - / 01 | The playing title can be changed.The number on the left is the currently playing title. The number on the right is the total number of titles. |
 | Chapter | 03 / 52 | The playing chapter can be changed.The number on the left is the currently playing chapter. The number on the right is the total number of chapters. |
 | Time | Hours: minutes: seconds | The elapsed time of the title or chapter.The time shown can be switched from title elapsed time (TT) to title remaining time (-TT), chapter elapsed time (CH) or chapter remaining time (-CH). |
| 00: 00: 00 | |||
 | Mode | NormalShuffle CHShuffle TTh Shuffle ALLRandom CHRandom TTRandom ALL | The file playback mode can be changed. |
 | Audio | (Depends on disc) | Audio settings can be changed.The audio settings that can be used depend on which are supported by the video. For example, DTS-HD MA (master audio) or Dolby Digital can be selected in various languages for Blu-ray discs. |
 | Angle | - | The camera angle can be changed.The number on the left is the current angle. The number on the right is the total number of available angles. This function can only be used with discs that have data for multiple angles. |
 | Subtitles | (Depends on disc) | Subtitle display can be changed.The settings that can be used depend on the subtitle languages supported by the video. |
 | Subtitle style (Depends on disc) | The display style of subtitles can be changed.The settings that can be used depend on the subtitle languages supported by the video. |
 | Secondary video On*/Off | The picture-in-picture function can be turned on/off.Using this function, additional content can be shown in a small window during playback in the main window.This function can only be used with discs that support it. |
 | Secondary audio On*/Off | The audio used by the picture-in-picture function can be turned on/off.This function can only be used with discs that support it. |
  | Bit rate – | This is the current bit rate.The shown bit rate can be switched between video and audio. |
 | Image off – | Press the ENTER button to turn the video image off, and continue playing only the audio.This function can only be used with discs that support it. |
 | Quick search – Press the ENTER button to search forward 30 seconds. | |
 | Instant replay – Press the ENTER button to jump backward | 10 seconds. |
 | CC Select | ● Analog CC 1 - 4● OffClosed caption settings can be changed. This is set to Off when shipped new from the factory. |
* The content shown depends on the disc playing.
Video options
| Option menu name Options | Explanation | ||
 | File | - | The playing file can be changed.The number on the left is the currently playing file. The number on the right is the total number of video files in the folder. |
 | Title | - | The playing title can be changed.The number on the left is the currently playing title. The number on the right is the total number of titles. |
 | Chapter | - | The playing chapter can be changed.The number on the left is the currently playing chapter. The number on the right is the total number of chapters. |
 | Time | Hours: minutes: seconds | The elapsed time of the title or chapter.The time shown can be switched from title elapsed time (TT) to title remaining time (-TT), chapter elapsed time (CH) or chapter remaining time (-CH). |
| 00: 00: 00 | |||
 | Mode | Normally/Random/Shuffle | The file playback mode can be changed. |
 | Audio | (Depends on file) | Audio settings can be changed.The audio settings that can be used depend on which are supported by the video. For example, Stereo, Mono, Left and Right can be selected with video files. |
 | Subtitles | (Depends on file) | Subtitle display can be changed.The settings that can be used depend on the subtitle languages supported by the video. |
 | Code | - | The external subtitle code can be changed. |
 | Bit rate – | This is the current bit rate.The shown bit rate can be switched between video and audio. | |
 | Quick search – Press the ENTER button to search forward 30 seconds. | ||
 | Instant replay – Press the ENTER button to jump backward | 10 seconds. | |
 | CC Select | ● Analog CC1 - 4● Digital CS1 - 6● Off | Closed caption settings can be changed. This is set to Off when shipped new from the factory. |
Audio CD options
| Option menu name Options Explanation | |||
 | Track – | The playing track can be changed.The number on the left is the currently playing track. The number on the right is the total number of tracks on the disc or in the program. | |
 | Time | Hours: minutes: seconds | Track or disc elapsed timeThe time shown can be switched from track elapsed time (Track) to track remaining time (-Track), disc elapsed time (Disc) or disc remaining time (-Disc). |
| 00: 00: 00 | |||
 | Mode Normally/Random/Shuffle The file playback mode can be changed. | ||
 | Bit rate – This is the current audio bit rate. | ||
 | Quick search – Press the ENTER button to search forward 30 seconds. | ||
 | Instant replay – Press the ENTER button to jump backward 10 seconds. | ||
Audio file options
| Option menu name Options Explanation | |||
 | File – | The playing file can be changed.The number on the left is the currently playing file. The number on the right is the total number of audio files in the folder or playlist. | |
 | Time | Hours: minutes: seconds | This is the file elapsed time.The time shown can be switched from the file elapsed time to the file remaining time. |
| 00: 00: 00 | |||
 | Mode Normally/Random/Shuffle The file playback mode can be changed. | ||
 | Bit rate – This is the current audio bit rate. | ||
 | Quick search – Press the ENTER button to search forward 30 seconds. | ||
 | Instant replay – Press the ENTER button to jump backward | 10 seconds. | |
Image File options
| Option menu name Options Explanation | |||
 | File – | The file being shown can be changed.The number on the left is the currently shown file. The number on the right is the total number of image files in the folder. | |
 | Mode Normally/Random/Shuffle The file display mode can be changed. | ||
 | Slideshow speed Slow/Middle/First | The slideshow speed can be changed. This is set toMiddlewhen shipped new from the factory. | |
 | Transitions | None/Wipe Left/Wipe Right/Wipe Up/Wipe Down/Box In/Box Out/Blending/Dissolve/Interlace H/Interlace V/Split In H/Split In V/Split Out H/Split Out V | The transition used between slideshow images can be changed.This is set toNonewhen shipped new from the factory. |
Troubleshooting
If you are having trouble with the operation of this unit, please try the following before seeking repair.
If these measures do not solve the problem, please contact the store where you bought the unit or TASCAM customer support service.
The unit will not turn on.
- Confirm that the power plug and other connectors are inserted completely.
Turning the TV off causes this unit to automatically turn off.
(Turning this unit on also causes the TV to automatically turn on.)
- When used with a TV that supports CEC link functions, if CEC link control is set to ON for this unit, the power for the TV and this unit will be linked, causing one to turn on/off automatically. (Depending on the TV being used, it might not automatically turn on.)
The unit does not function.
- Confirm that the lock function is not on.
- When operation is prohibited, " ⊗" or a message will appear.
The Settings screen or its submenus cannot be selected or opened.
● Sometimes settings and items cannot be selected or shown.
The disc tray cannot be opened or closed.
● The disc tray cannot be opened or closed during software (firmware) updates.
- If a disc that cannot be used by this unit is loaded in it, the tray might stop opening and closing.
- Confirm that the tray lock function is not on.
Operations are not possible for a while after the disc is loaded.
- Some time is necessary for the unit to recognize the disc and read its information before the disc can be used.
SD card/USB flash drive is not recognized.
- Confirm that the SD card/USB flash drive is inserted securely.
- Is the connected SD card/USB flash drive supported by the unit?
- Check the format (file system) of the SD card/USB flash drive.
- Stop playback or recording once.
Sometime after connecting a SD card/USB device, the unit stopped responding to operations.
● A problem has occurred during playback from the SD card/USB device, making operation of the unit impossible. Disconnect and reconnect the SD card/USB device.
The remote control (RC-BDMP1) does not function.
- Confirm that a battery is installed and has not died.
- Confirm that the IR lock function is not on.
The playback screen does not appear.
- Is the TV input set to the input connected to this unit?
- Display at the selected resolution might not be possible. Press the HDMI button on the remote control to change the resolution setting.
A disc cannot be played.
- Confirm that the disc format is supported by this unit.
- Confirm that the disc is not scratched or dirty.
A file on a disc cannot be played.
- Confirm that the disc is recorded in UDF, ISO9660 or JOLIET format.
- Confirm that the file format is supported by this unit.
A file desired for playback cannot be found.
- Confirm that the maximum file number has not been exceeded.
- Check the file extension.
No sound is output.
- Check connections with the monitoring system again. Check the volume of the amplifier as well.
There is noise.
- Confirm that the connection cables do not have contact issues.
Video or audio stops momentarily.
● During playback of a dual layer disc, video or audio might stop temporarily when switching from the first layer to the second.
- If a disc has scratches or fingerprints on its surface, for example, it might not play properly.
Something is wrong with the screen size.
● Has "TV Screen" been set according to the TV format?
- If the screen size is specified by the disc, a size other than the set screen size might be used.
“ ⊗ ” appears.
● The operation is prohibited by the content during playback.
Operations are not possible during playback.
● Some discs prohibit operations.
- With some discs, the unit cannot be used to change the playback speed, for example.
Playback will not start when a title is selected.
- Playback might be prohibited by parental controls. Check the "Parental Control" setting.
The HOME screen will not open.
- If the HIDE MENU function is on, the HOME screen will not open and the screen will remain black even if the HOME button is pushed.
To open the HOME screen, press the HIDE MENU button on the unit remote control to turn the HIDE MENU function off.
During playback, video is disrupted, does not appear or has a strange color.
- When searching forward or backward, for example, the video might appear a little irregular.
● Is a mobile phone or other device that emits radio waves being used nearby? - Has a disc that is not supported by the unit or that has a different region code been loaded in it.
- Does the TV support HDCP?
● With the power on, try disconnecting the HDMI cable from the TV and this unit and then reconnecting it. - Use a different HDMI cable and reconnect them.
- Check the "Video" setting.
Subtitles do not appear.
- Subtitles cannot be turned on for titles without subtitle data.
No audio is output from the AV amplifier.
- Confirm that the AV amplifier is turned on.
- Confirm that the AV amplifier output is correct.
- Confirm that the AV amplifier supports bitstream or LPCM.
- Check the volume of the AV amplifier.
The camera angle cannot be changed.
● Angles cannot be changed for BD-Video or DVD-Video that does not have multiple angles recorded.
● Camera angles can only be changed for scenes that have it enabled.
High definition resolution cannot be viewed.
- Confirmed that the title recorded in high definition.
- Does the TV connected to the unit support high definition?
HDMI device control does not work.
● HDM device control only works when the necessary settings have been made for this unit and the other supported device.
- When HDMI device control is enabled, it will be disabled if the power plug of this device or the HDMI cable is disconnected.
Cannot connect to a network.
- Confirm that the modem and router are turned on.
- Confirm that the modem and router Internet indicators are lit.
- Check the unit's Network settings.
- Confirm that this unit and router are connected correctly.
- Confirm that the router DHCP function is enabled.
A password was forgotten.
- If it has been forgotten, contact TASCAM customer support service.
Specifications
General
Supported media
Disc media
Blu-ray: BD25, BD50, BD-ROM, BD-R, BD-RE
DVD: DVD-ROM, DVD-R, DVD-RW, DVD+R, DVD+RW
CD: CD-DA, CD-R, CD-RW
Disc formats
Blu-ray: BDMV, BDAV
DVD: DVD-Video, DVD-VR, AVCHD
Supported file formats
Video: ASF, MPG, AVI, 3GP, DAT, MKV, MOV, M2TS, OGM, TP, TS, MP4, WMV
Audio: WAV, MP3, WMA, AAC, FLAC, APE
Picture: JPEG, GIF, PNG
* USB flash drive and SD card formats must use FAT16, FAT32 or NTFS file systems.
Audio
BD/DVD/USB/SD
Sampling frequency: 44.1 kHz/48 kHz/64 kHz/88.2 kHz/96 kHz/176.4 kHz/192 kHz
Bit length: 16/24 bit
CD
Sampling frequency: 44.1 kHz/48 kHz
Bit length: 16/24 bit
MP3/WMA
Sampling frequency: 32 kHz/44.1 kHz/48 kHz
Bitrate MP3: 112 kbps - 320 kbps
WMA: 48 kbps - 192 kbps
Outputs
HDMI output
Connector: HDMI 19pin Type A
Resolution: 480i/576i, 480p/576p, 720p, 1080i, 1080p
Aspect ratio: 16:9 Full, 16:9 Normal,
4:3 Pan & Scan, 4:3 Letterbox
Video format: NTSC, PAL, Multi
HDMI signal system: RGB PC level, RGB Video level,
YCbCr(4:4:4), YCbCr (4:2:2)
Digital Audio output
COAXIAL
Connectors: RCA pin jacks
Format: IEC60958-3(S/P DIF)
Output impedance: 75 Ω or lower
Analog audio outputs
Balanced
Connectors: XLR-3-32 (1: GND, 2: HOT, 3: COLD) x2 (Stereo)
Nominal output level: +4 dBV (1.23 Vrms)
Maximum output level: +20 dBV (7.75 Vrms)
Output impedance: 200 Ω or lower
Unbalanced
Connectors: RCA pin jack × 1 pair
Nominal outputlevel: -10 dBV (0.316 Vrms)
Maximum output level: +6 dBV (2.0 Vrms)
Output impedance: 200 Ω or lower
7.1ch Audio outputs
Connector: RCA x8 (FL/FR/SL/SR/SBL/SBR/C/SW)
Connector Color: FL, SL, SBL-White
FR, SR, SBR-Red
C, SW-Black
Nominal output level: -10 dBV (0.316 Vrms)
Maximum output level: +6 dBV (2.0 Vrms)
Output impedance: 200 Ω or lower
Control input/output
RS-232C connector
Connector: D-sub 9 pin
Format: RS-232C
Ethernet connector
Connector: RJ-45
Protocol: 10 BASE-T/100 BASE-TX
USB port
Connector: USB type-A x2 (Front x1, Rear x1)
Protocol: USB 2.0 compliant
Rated supply voltage: DC 5 V, 1 A
Mass storage class: 2TB (MAX)
Supported file formats: FAT16/FAT32/NTFS
SD slot
Supported media: SD (512 MB-2 GB), SDHC (4 GB-32 GB),
Storage class: Max 32GB
Supported file formats: FAT16/FAT32/NTFS
Audio performance
Frequency response: 20 Hz - 20 kHz +/-0.5 dB
(Fs=44.1 kHz/48 kHz, JEITA)
S/N ratio: > 96 dB (When playback, JEITA)
THD (Total Harmonic Distortion): < 0.03% 1 kHz(JEITA)
Dynamic range: > 96 dB (JEITA)
Channel separation: > 89 dB (JEITA)
Other
Power
AC100 - 240 V, 50/60 Hz
Power consumption
30 W
Dimensions (W x H x D, Including protrusions)
482.8×44×280.7 mm
Weight
2.64 kg
Operating temperature range
5^ - 35^ (41°F - 95°F)
Dimensional drawings
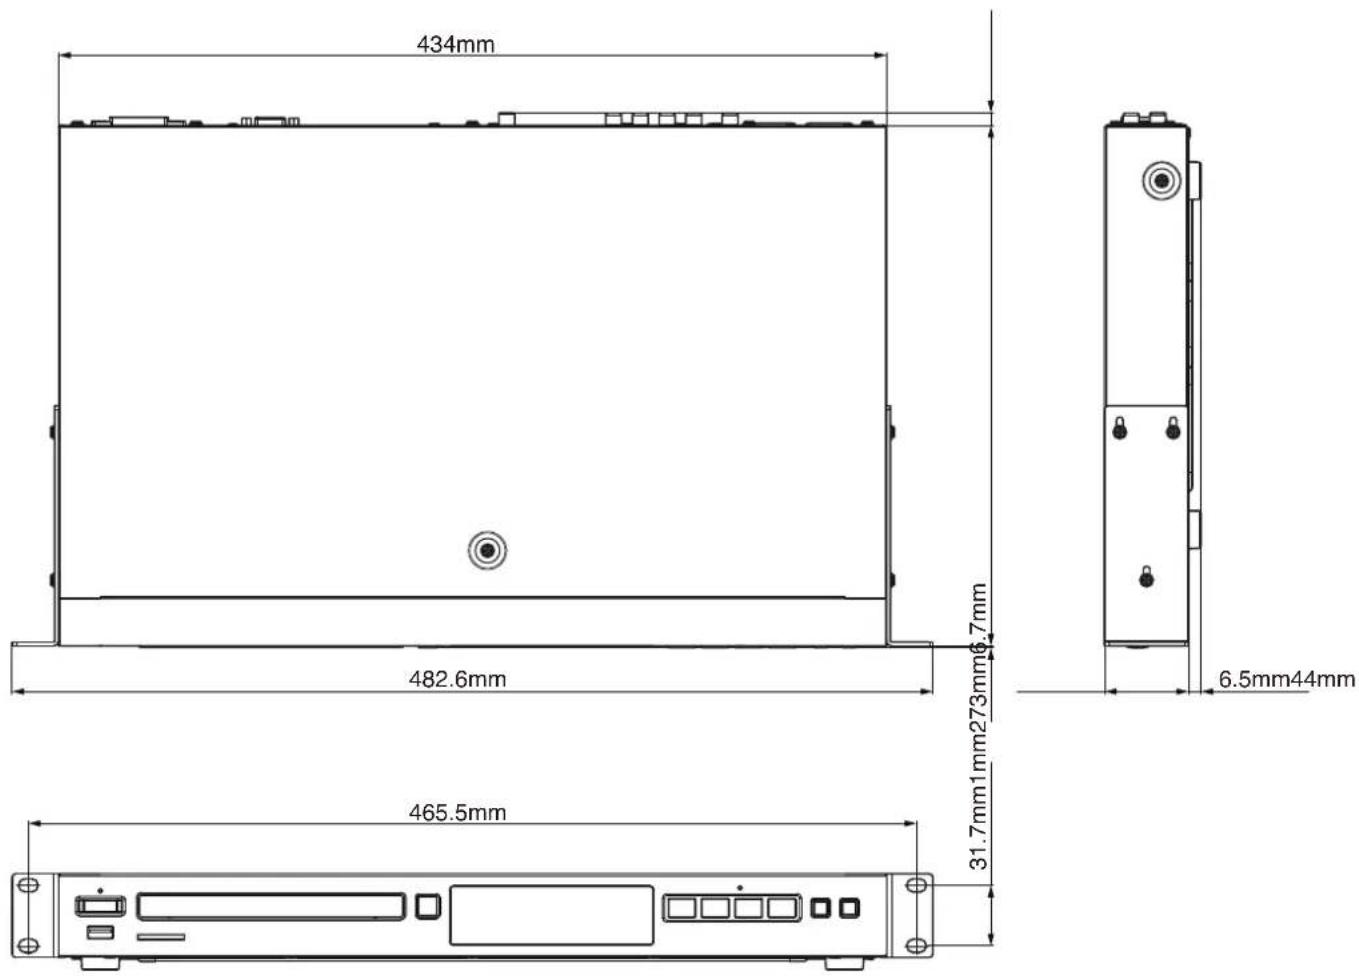
● Illustrations in this manual might differ in part from the actual product.
- Specifications and external appearance might be changed without notification to improve the product.
Notice regarding software that uses the GNU GPL
List of packages
(GNU GPLv2)
linux kernel
(GNU LGPLv2.1)
DirectFB
About the licensing of software used in this product
The software included in this product is comprised of multiple discrete software applications, and the copyrights of each of these belong to various third parties.
This product includes software covered by end-user license agreements (hereafter, "EULA") stipulated by third parties.
Among these is the GNU General Public License (hereafter, "GPL") for free executable software applications. As a condition for the distribution of software covered by the GPL, the source code for such software must be made available. If you wish to obtain the source code for such software, you may do so by accessing the following URL and filling out a registration form.
http://www.teac.co.jp/support/opensource/index.html Please understand that we are unable to respond to questions about the source code contents and similar matters.
Source code will not be provided for software covered by EULAs other than the GPL.
Software distributed in accordance with the GPL allows customers to use it without charge, but, to the extent of applicable laws, no explicit or implicit guarantees are provided for such software.
With the exceptions of provisions of applicable laws and written agreements, the copyright holders and those who change and redistribute such software with the permission described above will bear no responsibility for any loss caused by the use of or the inability to use such software. Please read the GPL for details about, for example, conditions for use and provisions that must be followed regarding such software.
Before using software or software components that are included in this product and subject to the GPL, please read the following GNU GENERAL PUBLIC LICENSE carefully. Moreover, since the provisions of this license are set by a third party, we provide it in its original language (English).
GNU GENERAL PUBLIC LICENSE
Version 2, June 1991 Copyright (C) 1989, 1991 Free Software Foundation, Inc.
51 Franklin Street, Fifth Floor, Boston, MA 02110-1301, USA
Everyone is permitted to copy and distribute verbatim copies of this license document, but changing it is not allowed.
Preamble
The licenses for most software are designed to take away your freedom to share and change it. By contrast, the GNU General Public License is intended to guarantee your freedom to share and change free software--to make sure the software is free for all its users. This General Public License applies to most of the Free Software Foundation's software and to any other program whose authors commit to using it. (Some other Free Software Foundation software is covered by the GNU Lesser General Public License instead.) You can apply it to your programs, too.
When we speak of free software, we are referring to freedom, not price. Our General Public Licenses are designed to make sure that you have the freedom to distribute copies of free software (and charge for this service if you wish), that you receive source code or can get it if you want it, that you can change the software or use pieces of it in new free programs; and that you know you can do these things.
To protect your rights, we need to make restrictions that forbid anyone to deny you these rights or to ask you to surrender the rights. These restrictions translate to certain responsibilities for you if you distribute copies of the software, or if you modify it.
For example, if you distribute copies of such a program, whether gratis or for a fee, you must give the recipients all the rights that you have. You must make sure that they, too, receive or can get the source code. And you must show them these terms so they know their rights.
We protect your rights with two steps: (1) copyright the software, and (2) offer you this license which gives you legal permission to copy, distribute and/or modify the software.
Also, for each author's protection and ours, we want to make certain that everyone understands that there is no warranty for this free software. If the software is modified by someone else and passed on, we want its recipients to know that what they have is not the original, so that any problems introduced by others will not reflect on the original authors' reputations.
Finally, any free program is threatened constantly by software patents. We wish to avoid the danger that redistributors of a free program will individually obtain patent licenses, in effect making the program proprietary. To prevent this, we have made it clear that any patent must be licensed for everyone's free use or not licensed at all.
The precise terms and conditions for copying, distribution and modification follow.
TERMS AND CONDITIONS FOR COPYING, DISTRIBUTION AND MODIFICATION
- This License applies to any program or other work which contains a notice placed by the copyright holder saying it may be distributed under the terms of this General Public License. The "Program", below, refers to any such program or work, and a "work based on the Program" means either the Program or any derivative work under copyright law: that is to say, a work containing the Program or a portion of it, either verbatim or with modifications and/or translated into another language. (Hereinafter, translation is included without limitation in the term "modification".) Each licensee is addressed as "you".
Activities other than copying, distribution and modification are not covered by this License; they are outside its scope. The act of running the Program is not restricted, and the output from the Program is covered only if its contents constitute a work based on the Program (independent of having been made by running the Program). Whether that is true depends on what the Program does.
- You may copy and distribute verbatim copies of the Program's source code as you receive it, in any medium, provided that you conspicuously and appropriately publish on each copy an appro-
priate copyright notice and disclaimer of warranty; keep intact all the notices that refer to this License and to the absence of any warranty; and give any other recipients of the Program a copy of this License along with the Program.
You may charge a fee for the physical act of transferring a copy, and you may at your option offer warranty protection in exchange for a fee.
- You may modify your copy or copies of the Program or any portion of it, thus forming a work based on the Program, and copy and distribute such modifications or work under the terms of Section 1 above, provided that you also meet all of these conditions:
a) You must cause the modified files to carry prominent notices stating that you changed the files and the date of any change.
b) You must cause any work that you distribute or publish, that in whole or in part contains or is derived from the Program or any part thereof, to be licensed as a whole at no charge to all third parties under the terms of this License.
c) If the modified program normally reads commands interactively when run, you must cause it, when started running for such interactive use in the most ordinary way, to print or display an announcement including an appropriate copyright notice and a notice that there is no warranty (or else, saying that you provide a warranty) and that users may redistribute the program under these conditions, and telling the user how to view a copy of this License. (Exception: if the Program itself is interactive but does not normally print such an announcement, your work based on the Program is not required to print an announcement.)
These requirements apply to the modified work as a whole. If identifiable sections of that work are not derived from the Program, and can be reasonably considered independent and separate works in themselves, then this License, and its terms, do not apply to those sections when you distribute them as separate works. But when you distribute the same sections as part of a whole which is a work based on the Program, the distribution of the whole must be on the terms of this License, whose permissions for other licensees extend to the entire whole, and thus to each and every part regardless of who wrote it.
Thus, it is not the intent of this section to claim rights or contest your rights to work written entirely by you; rather, the intent is to exercise the right to control the distribution of derivative or collective works based on the Program.
In addition, mere aggregation of another work not based on the Program with the Program (or with a work based on the Program) on a volume of a storage or distribution medium does not bring the other work under the scope of this License.
- You may copy and distribute the Program (or a work based on it, under Section 2) in object code or executable form under the terms of Sections 1 and 2 above provided that you also do one of the following:
a) Accompany it with the complete corresponding machine-readable source code, which must be distributed under the terms of Sections 1 and 2 above on a medium customarily used for software interchange; or,
b) Accompany it with a written offer, valid for at least three years, to give any third party, for a charge no more than your cost of physically performing source distribution, a complete machine-readable copy of the corresponding source code, to be distributed under the terms of Sections 1 and 2 above on a medium customarily used for software interchange; or,
c) Accompany it with the information you received as to the offer to distribute corresponding source code. (This alternative is allowed only for noncommercial distribution and only if you received the program in object code or executable
form with such an offer, in accord with Subsection b above.)
The source code for a work means the preferred form of the work for making modifications to it. For an executable work, complete source code means all the source code for all modules it contains, plus any associated interface definition files, plus the scripts used to control compilation and installation of the executable. However, as a special exception, the source code distributed need not include anything that is normally distributed (in either source or binary form) with the major components (compiler, kernel, and so on) of the operating system on which the executable runs, unless that component itself accompanies the executable.
If distribution of executable or object code is made by offering access to copy from a designated place, then offering equivalent access to copy the source code from the same place counts as distribution of the source code, even though third parties are not compelled to copy the source along with the object code.
-
You may not copy, modify, sublicense, or distribute the Program except as expressly provided under this License. Any attempt otherwise to copy, modify, sublicense or distribute the Program is void, and will automatically terminate your rights under this License. However, parties who have received copies, or rights, from you under this License will not have their licenses terminated so long as such parties remain in full compliance.
-
You are not required to accept this License, since you have not signed it. However, nothing else grants you permission to modify or distribute the Program or its derivative works. These actions are prohibited by law if you do not accept this License. Therefore, by modifying or distributing the Program (or any work based on the Program), you indicate your acceptance of this License to do so, and all its terms and conditions for copying, distributing or modifying the Program or works based on it.
-
Each time you redistribute the Program (or any work based on the Program), the recipient automatically receives a license from the original licensor to copy, distribute or modify the Program subject to these terms and conditions. You may not impose any further restrictions on the recipients' exercise of the rights granted herein. You are not responsible for enforcing compliance by third parties to this License.
-
If, as a consequence of a court judgment or allegation of patent infringement or for any other reason (not limited to patent issues), conditions are imposed on you (whether by court order, agreement or otherwise) that contradict the conditions of this License, they do not excuse you from the conditions of this License. If you cannot distribute so as to satisfy simultaneously your obligations under this License and any other pertinent obligations, then as a consequence you may not distribute the Program at all. For example, if a patent license would not permit royalty-free redistribution of the Program by all those who receive copies directly or indirectly through you, then the only way you could satisfy both it and this License would be to refrain entirely from distribution of the Program.
If any portion of this section is held invalid or unenforceable under any particular circumstance, the balance of the section is intended to apply and the section as a whole is intended to apply in other circumstances.
It is not the purpose of this section to induce you to infringe any patents or other property right claims or to contest validity of any such claims; this section has the sole purpose of protecting the integrity of the free software distribution system, which is implemented by public license practices. Many people have made generous contributions to the wide range of software distributed through that system in reliance on consistent application of that system; it is up to the author/donor to decide if he or she is willing to distribute software through any other system and a
licensee cannot impose that choice.
This section is intended to make thoroughly clear what is believed to be a consequence of the rest of this License.
-
If the distribution and/or use of the Program is restricted in certain countries either by patents or by copyrighted interfaces, the original copyright holder who places the Program under this License may add an explicit geographical distribution limitation excluding those countries, so that distribution is permitted only in or among countries not thus excluded. In such case, this License incorporates the limitation as if written in the body of this License.
-
The Free Software Foundation may publish revised and/or new versions of the General Public License from time to time. Such new versions will be similar in spirit to the present version, but may differ in detail to address new problems or concerns.
Each version is given a distinguishing version number. If the Program specifies a version number of this License which applies to it and "any later version", you have the option of following the terms and conditions either of that version or of any later version published by the Free Software Foundation. If the Program does not specify a version number of this License, you may choose any version ever published by the Free Software Foundation.
- If you wish to incorporate parts of the Program into other free programs whose distribution conditions are different, write to the author to ask for permission. For software which is copyrighted by the Free Software Foundation, write to the Free Software Foundation; we sometimes make exceptions for this. Our decision will be guided by the two goals of preserving the free status of all derivatives of our free software and of promoting the sharing and reuse of software generally.
NO WARRANTY
-
BECAUSE THE PROGRAM IS LICENSED FREE OF CHARGE, THERE IS NO WARRANTY FOR THE PROGRAM, TO THE EXTENT PERMITTED BY APPLICABLE LAW. EXCEPT WHEN OTHERWISE STATED IN WRITING THE COPYRIGHT HOLDERS AND/OR OTHER PARTIES PROVIDE THE PROGRAM "AS IS" WITHOUT WARRANTY OF ANY KIND, EITHER EXPRESSED OR IMPLIED, INCLUDING, BUT NOT LIMITED TO, THE IMPLIED WARRANTIES OF MERCHANTABILITY AND FITNESS FOR A PARTICULAR PURPOSE. THE ENTIRE RISK AS TO THE QUALITY AND PERFORMANCE OF THE PROGRAM IS WITH YOU. SHOULD THE PROGRAM PROVE DEFECTIVE, YOU ASSUME THE COST OF ALL NECESSARY SERVICING, REPAIR OR CORRECTION.
-
IN NO EVENT UNLESS REQUIRED BY APPLICABLE LAW OR AGREED TO IN WRITING WILL ANY COPYRIGHT HOLDER, OR ANY OTHER PARTY WHO MAY MODIFY AND/OR REDISTRIBUTE THE PROGRAM AS PERMITTED ABOVE, BE LIABLE TO YOU FOR DAMAGES, INCLUDING ANY GENERAL, SPECIAL, INCIDENTAL OR CONSEQUENTIAL DAMAGES ARISING OUT OF THE USE OR INABILITY TO USE THE PROGRAM (INCLUDING BUT NOT LIMITED TO LOSS OF DATA OR DATA BEING RENDERED INACCURATE OR LOSSES SUSTAINED BY YOU OR THIRD PARTIES OR A FAILURE OF THE PROGRAM TO OPERATE WITH ANY OTHER PROGRAMS), EVEN IF SUCH HOLDER OR OTHER PARTY HAS BEEN ADVISED OF THE POSSIBILITY OF SUCH DAMAGES.
END OF TERMS AND CONDITIONS
How to Apply These Terms to Your New Programs
If you develop a new program, and you want it to be of the greatest possible use to the public, the best way to achieve this is to make it free software which everyone can redistribute and change under these terms.
To do so, attach the following notices to the program. It is safest to attach them to the start of each source file to most effectively convey the exclusion of warranty; and each file should have at least the "copyright" line and a pointer to where the full notice is found.
one line to give the program's name and an idea of what it does.
Copyright (C) yyyy name of author
This program is free software; you can redistribute it and/or modify it under the terms of the GNU General Public License as published by the Free Software Foundation; either version 2 of the License, or (at your option) any later version.
This program is distributed in the hope that it will be useful, but WITHOUT ANY WARRANTY; without even the implied warranty of MERCHANTABILITY or FITNESS FOR A PARTICULAR PURPOSE. See the GNU General Public License for more details.
You should have received a copy of the GNU General Public License along with this program; if not, write to the Free Software Foundation, Inc., 51 Franklin Street, Fifth Floor, Boston, MA 02110-1301, USA.
Also add information on how to contact you by electronic and paper mail.
If the program is interactive, make it output a short notice like this when it starts in an interactive mode:
Gnomovision version 69, Copyright (C) year name of author Gnomovision comes with ABSOLUTELY NO WARRANTY; for details type 'show w'. This is free software, and you are welcome to redistribute it under certain conditions; type 'show c' for details.
The hypothetical commands `show w' and `show c' should show the appropriate parts of the General Public License. Of course, the commands you use may be called something other than `show w' and `show c'; they could even be mouse-clicks or menu items--whatever suits your program.
You should also get your employer (if you work as a programmer) or your school, if any, to sign a "copyright disclaimer" for the program, if necessary. Here is a sample; alter the names:
Yoyodyne, Inc., hereby disclaims all copyright interest in the program 'Gnomovision' (which makes passes at compilers) written by James Hacker.
signature of Ty Coon, 1 April 1989
Ty Coon, President of Vice
This General Public License does not permit incorporating your program into proprietary programs. If your program is a subroutine library, you may consider it more useful to permit linking proprietary applications with the library. If this is what you want to do, use the GNU Lesser General Public License instead of this License.
GNU LESSER GENERAL PUBLIC LICENSE
Version 2.1, February 1999 Copyright (C) 1991, 1999 Free Software Foundation, Inc. 51 Franklin Street, Fifth Floor, Boston, MA 02110-1301 USA Everyone is permitted to copy and distribute verbatim copies of this license document, but changing it is not allowed.
[This is the first released version of the Lesser GPL. It also counts as the successor of the GNU Library Public License, version 2, hence the version number 2.1.]
Preamble
The licenses for most software are designed to take away your freedom to share and change it. By contrast, the GNU General Public Licenses are intended to guarantee your freedom to share and change free software--to make sure the software is free for all its users.
This license, the Lesser General Public License, applies to some specially designated software packages--typically libraries--of the Free Software Foundation and other authors who decide to use it. You can use it too, but we suggest you first think carefully about whether this license or the ordinary General Public License is the better strategy to use in any particular case, based on the explanations below.
When we speak of free software, we are referring to freedom of use, not price. Our General Public Licenses are designed to make sure that you have the freedom to distribute copies of free software (and charge for this service if you wish); that you receive source code or can get it if you want it; that you can change the software and use pieces of it in new free programs; and that you are informed that you can do these things.
To protect your rights, we need to make restrictions that forbid distributors to deny you these rights or to ask you to surrender these rights. These restrictions translate to certain responsibilities for you if you distribute copies of the library or if you modify it.
For example, if you distribute copies of the library, whether gratis or for a fee, you must give the recipients all the rights that we gave you. You must make sure that they, too, receive or can get the source code. If you link other code with the library, you must provide complete object files to the recipients, so that they can relink them with the library after making changes to the library and recompiling it. And you must show them these terms so they know their rights.
We protect your rights with a two-step method: (1) we copyright the library, and (2) we offer you this license, which gives you legal permission to copy, distribute and/or modify the library.
To protect each distributor, we want to make it very clear that there is no warranty for the free library. Also, if the library is modified by someone else and passed on, the recipients should know that what they have is not the original version, so that the original author's reputation will not be affected by problems that might be introduced by others.
Finally, software patents pose a constant threat to the existence of any free program. We wish to make sure that a company cannot effectively restrict the users of a free program by obtaining a restrictive license from a patent holder. Therefore, we insist that any patent license obtained for a version of the library must be consistent with the full freedom of use specified in this license.
Most GNU software, including some libraries, is covered by the ordinary GNU General Public License. This license, the GNU Lesser General Public License, applies to certain designated libraries, and is quite different from the ordinary General Public License. We use this license for certain libraries in order to permit linking those libraries into non-free programs.
When a program is linked with a library, whether statically or using a shared library, the combination of the two is legally speaking a combined work, a derivative of the original library. The ordinary General Public License therefore permits such linking only if the entire combination fits its criteria of freedom. The Lesser General Public License permits more lax criteria for linking other code with the library.
We call this license the "Lesser" General Public License because it does Less to protect the user's freedom than the ordinary General Public License. It also provides other free software developers Less of an advantage over competing non-free programs. These disadvantages are the reason we use the ordinary General Public License for many libraries. However, the Lesser license provides advantages in certain special circumstances.
For example, on rare occasions, there may be a special need to encourage the widest possible use of a certain library, so that it becomes a de-facto standard. To achieve this, non-free programs must be allowed to use the library. A more frequent case is that a free library does the same job as widely used non-free libraries. In this case, there is little to gain by limiting the free library to free software only, so we use the Lesser General Public License.
In other cases, permission to use a particular library in non-free programs enables a greater number of people to use a large body of free software. For example, permission to use the GNU C Library in non-free programs enables many more people to use the whole GNU operating system, as well as its variant, the GNU/Linux operating system.
Although the Lesser General Public License is Less protective of the users' freedom, it does ensure that the user of a program that is linked with the Library has the freedom and the wherewithal to run that program using a modified version of the Library.
The precise terms and conditions for copying, distribution and modification follow. Pay close attention to the difference between a "work based on the library" and a "work that uses the library". The former contains code derived from the library, whereas the latter must be combined with the library in order to run.
TERMS AND CONDITIONS FOR COPYING, DISTRIBUTION AND MODIFICATION
- This License Agreement applies to any software library or other program which contains a notice placed by the copyright holder or other authorized party saying it may be distributed under the terms of this Lesser General Public License (also called "this License"). Each licensee is addressed as "you".
A "library" means a collection of software functions and/or data prepared so as to be conveniently linked with application programs (which use some of those functions and data) to form executables.
The "Library", below, refers to any such software library or work which has been distributed under these terms. A "work based on the Library" means either the Library or any derivative work under copyright law: that is to say, a work containing the Library or a portion of it, either verbatim or with modifications and/or translated straightforwardly into another language. (Hereinafter, translation is included without limitation in the term "modification".)
"Source code" for a work means the preferred form of the work for making modifications to it. For a library, complete source code means all the source code for all modules it contains, plus any associated interface definition files, plus the scripts used to control compilation and installation of the library.
Activities other than copying, distribution and modification are not covered by this License; they are outside its scope. The act
of running a program using the Library is not restricted, and output from such a program is covered only if its contents constitute a work based on the Library (independent of the use of the Library in a tool for writing it). Whether that is true depends on what the Library does and what the program that uses the Library does.
- You may copy and distribute verbatim copies of the Library's complete source code as you receive it, in any medium, provided that you conspicuously and appropriately publish on each copy an appropriate copyright notice and disclaimer of warranty; keep intact all the notices that refer to this License and to the absence of any warranty; and distribute a copy of this License along with the Library.
You may charge a fee for the physical act of transferring a copy, and you may at your option offer warranty protection in exchange for a fee.
- You may modify your copy or copies of the Library or any portion of it, thus forming a work based on the Library, and copy and distribute such modifications or work under the terms of Section 1 above, provided that you also meet all of these conditions:
- a) The modified work must itself be a software library.
- b) You must cause the files modified to carry prominent notices stating that you changed the files and the date of any change.
- c) You must cause the whole of the work to be licensed at no charge to all third parties under the terms of this License.
- d) If a facility in the modified Library refers to a function or a table of data to be supplied by an application program that uses the facility, other than as an argument passed when the facility is invoked, then you must make a good faith effort to ensure that, in the event an application does not supply such function or table, the facility still operates, and performs whatever part of its purpose remains meaningful. (For example, a function in a library to compute square roots has a purpose that is entirely well-defined independent of the application. Therefore, Subsection 2d requires that any application-supplied function or table used by this function must be optional: if the application does not supply it, the square root function must still compute square roots.)
These requirements apply to the modified work as a whole. If identifiable sections of that work are not derived from the Library, and can be reasonably considered independent and separate works in themselves, then this License, and its terms, do
not apply to those sections when you distribute them as separate works. But when you distribute the same sections as part of a whole which is a work based on the Library, the distribution of the whole must be on the terms of this License, whose permissions for other licensees extend to the entire whole, and thus to each and every part regardless of who wrote it.
Thus, it is not the intent of this section to claim rights or contest your rights to work written entirely by you; rather, the intent is to exercise the right to control the distribution of derivative or collective works based on the Library.
In addition, mere aggregation of another work not based on the Library with the Library (or with a work based on the Library) on a volume of a storage or distribution medium does not bring the other work under the scope of this License.
- You may opt to apply the terms of the ordinary GNU General Public License instead of this License to a given copy of the Library. To do this, you must alter all the notices that refer to this License, so that they refer to the ordinary GNU General Public License, version 2, instead of to this License. (If a newer version than version 2 of the ordinary GNU General Public License has appeared, then you can specify that version instead if you wish.) Do not make any other change in these notices.
Once this change is made in a given copy, it is irreversible for that copy, so the ordinary GNU General Public License applies to all subsequent copies and derivative works made from that copy.
This option is useful when you wish to copy part of the code of the Library into a program that is not a library.
- You may copy and distribute the Library (or a portion or derivative of it, under Section 2) in object code or executable form under the terms of Sections 1 and 2 above provided that you accompany it with the complete corresponding machine-readable source code, which must be distributed under the terms of Sections 1 and 2 above on a medium customarily used for software interchange.
If distribution of object code is made by offering access to copy from a designated place, then offering equivalent access to copy the source code from the same place satisfies the requirement to distribute the source code, even though third parties are not compelled to copy the source along with the object code.
- A program that contains no derivative of any portion of the Library, but is designed to work with the Library by being compiled or linked with it, is called a "work that uses the Library". Such a work,
in isolation, is not a derivative work of the Library, and therefore falls outside the scope of this License.
However, linking a "work that uses the Library" with the Library creates an executable that is a derivative of the Library (because it contains portions of the Library), rather than a "work that uses the library". The executable is therefore covered by this License. Section 6 states terms for distribution of such executables.
When a "work that uses the Library" uses material from a header file that is part of the Library, the object code for the work may be a derivative work of the Library even though the source code is not. Whether this is true is especially significant if the work can be linked without the Library, or if the work is itself a library. The threshold for this to be true is not precisely defined by law.
If such an object file uses only numerical parameters, data structure layouts and accessors, and small macros and small inline functions (ten lines or less in length), then the use of the object file is unrestricted, regardless of whether it is legally a derivative work. (Executables containing this object code plus portions of the Library will still fall under Section 6.)
Otherwise, if the work is a derivative of the Library, you may distribute the object code for the work under the terms of Section 6. Any executables containing that work also fall under Section 6, whether or not they are linked directly with the Library itself.
- As an exception to the Sections above, you may also combine or link a "work that uses the Library" with the Library to produce a work containing portions of the Library, and distribute that work under terms of your choice, provided that the terms permit modification of the work for the customer's own use and reverse engineering for debugging such modifications.
You must give prominent notice with each copy of the work that the Library is used in it and that the Library and its use are covered by this License. You must supply a copy of this License. If the work during execution displays copyright notices, you must include the copyright notice for the Library among them, as well as a reference directing the user to the copy of this License. Also, you must do one of these things:
- a) Accompany the work with the complete corresponding machine-readable source code for the Library including whatever changes were used in the work (which must be distributed under Sections 1 and 2 above); and, if the work is an executable linked
with the Library, with the complete machine-readable "work that uses the Library", as object code and/or source code, so that the user can modify the Library and then relink to produce a modified executable containing the modified Library. (It is understood that the user who changes the contents of definitions files in the Library will not necessarily be able to recompile the application to use the modified definitions.)
- b) Use a suitable shared library mechanism for linking with the Library. A suitable mechanism is one that (1) uses at run time a copy of the library already present on the user's computer system, rather than copying library functions into the executable, and (2) will operate properly with a modified version of the library, if the user installs one, as long as the modified version is interface-compatible with the version that the work was made with.
- c) Accompany the work with a written offer, valid for at least three years, to give the same user the materials specified in Subsection 6a, above, for a charge no more than the cost of performing this distribution.
- d) If distribution of the work is made by offering access to copy from a designated place, offer equivalent access to copy the above specified materials from the same place.
- e) Verify that the user has already received a copy of these materials or that you have already sent this user a copy.
For an executable, the required form of the "work that uses the Library" must include any data and utility programs needed for reproducing the executable from it. However, as a special exception, the materials to be distributed need not include anything that is normally distributed (in either source or binary form) with the major components (compiler, kernel, and so on) of the operating system on which the executable runs, unless that component itself accompanies the executable.
It may happen that this requirement contradicts the license restrictions of other proprietary libraries that do not normally accompany the operating system. Such a contradiction means you cannot use both them and the Library together in an executable that you distribute.
- You may place library facilities that are a work based on the Library side-by-side in a single library together with other library facilities not covered by this License, and distribute such a combined library, provided that the separate distribution of
the work based on the Library and of the other library facilities is otherwise permitted, and provided that you do these two things:
- a) Accompany the combined library with a copy of the same work based on the Library, uncombined with any other library facilities. This must be distributed under the terms of the Sections above.
-
b) Give prominent notice with the combined library of the fact that part of it is a work based on the Library, and explaining where to find the accompanying uncombined form of the same work.
-
You may not copy, modify, sublicense, link with, or distribute the Library except as expressly provided under this License. Any attempt otherwise to copy, modify, sublicense, link with, or distribute the Library is void, and will automatically terminate your rights under this License. However, parties who have received copies, or rights, from you under this License will not have their licenses terminated so long as such parties remain in full compliance.
- You are not required to accept this License, since you have not signed it. However, nothing else grants you permission to modify or distribute the Library or its derivative works. These actions are prohibited by law if you do not accept this License. Therefore, by modifying or distributing the Library (or any work based on the Library), you indicate your acceptance of this License to do so, and all its terms and conditions for copying, distributing or modifying the Library or works based on it.
- Each time you redistribute the Library (or any work based on the Library), the recipient automatically receives a license from the original licensor to copy, distribute, link with or modify the Library subject to these terms and conditions. You may not impose any further restrictions on the recipients' exercise of the rights granted herein. You are not responsible for enforcing compliance by third parties with this License.
- If, as a consequence of a court judgment or allegation of patent infringement or for any other reason (not limited to patent issues), conditions are imposed on you (whether by court order, agreement or otherwise) that contradict the conditions of this License, they do not excuse you from the conditions of this License. If you cannot distribute so as to satisfy simultaneously your obligations under this License and any other pertinent obligations, then as a consequence you may not distribute the Library at all. For example, if a patent license would not permit royalty-free redistribution of the Library by all those who receive copies directly or indirectly through you, then the only way
you could satisfy both it and this License would be to refrain entirely from distribution of the Library.
If any portion of this section is held invalid or unenforceable under any particular circumstance, the balance of the section is intended to apply, and the section as a whole is intended to apply in other circumstances.
It is not the purpose of this section to induce you to infringe any patents or other property right claims or to contest validity of any such claims; this section has the sole purpose of protecting the integrity of the free software distribution system which is implemented by public license practices. Many people have made generous contributions to the wide range of software distributed through that system in reliance on consistent application of that system; it is up to the author/donor to decide if he or she is willing to distribute software through any other system and a licensee cannot impose that choice.
This section is intended to make thoroughly clear what is believed to be a consequence of the rest of this License.
- If the distribution and/or use of the Library is restricted in certain countries either by patents or by copyrighted interfaces, the original copyright holder who places the Library under this License may add an explicit geographical distribution limitation excluding those countries, so that distribution is permitted only in or among countries not thus excluded. In such case, this License incorporates the limitation as if written in the body of this License.
- The Free Software Foundation may publish revised and/or new versions of the Lesser General Public License from time to time. Such new versions will be similar in spirit to the present version, but may differ in detail to address new problems or concerns.
Each version is given a distinguishing version number. If the Library specifies a version number of this License which applies to it and "any later version", you have the option of following the terms and conditions either of that version or of any later version published by the Free Software Foundation. If the Library does not specify a license version number, you may choose any version ever published by the Free Software Foundation. - If you wish to incorporate parts of the Library into other free programs whose distribution conditions are incompatible with these, write to the author to ask for permission. For software which is copyrighted by the Free Software Foundation, write to the Free Software Foundation; we sometimes make exceptions for this. Our decision will be guided by the two goals
of preserving the free status of all derivatives of our free software and of promoting the sharing and reuse of software generally.
NO WARRANTY
-
BECAUSE THE LIBRARY IS LICENSED FREE OF CHARGE, THERE IS NO WARRANTY FOR THE LIBRARY, TO THE EXTENT PERMITTED BY APPLICABLE LAW. EXCEPT WHEN OTHERWISE STATED IN WRITING THE COPYRIGHT HOLDERS AND/OR OTHER PARTIES PROVIDE THE LIBRARY "AS IS" WITHOUT WARRANTY OF ANY KIND, EITHER EXPRESSED OR IMPLIED, INCLUDING, BUT NOT LIMITED TO, THE IMPLIED WARRANTIES OF MERCHANTABILITY AND FITNESS FOR A PARTICULAR PURPOSE. THE ENTIRE RISK AS TO THE QUALITY AND PERFORMANCE OF THE LIBRARY IS WITH YOU. SHOULD THE LIBRARY PROVE DEFECTIVE, YOU ASSUME THE COST OF ALL NECESSARY SERVICING, REPAIR OR CORRECTION.
-
IN NO EVENT UNLESS REQUIRED BY APPLICABLE LAW OR AGREED TO IN WRITING WILL ANY COPYRIGHT HOLDER, OR ANY OTHER PARTY WHO MAY MODIFY AND/OR REDISTRIBUTE THE LIBRARY AS PERMITTED ABOVE, BE LIABLE TO YOU FOR DAMAGES, INCLUDING ANY GENERAL, SPECIAL, INCIDENTAL OR CONSEQUENTIAL DAMAGES ARISING OUT OF THE USE OR INABILITY TO USE THE LIBRARY (INCLUDING BUT NOT LIMITED TO LOSS OF DATA OR DATA BEING RENDERED INAC-CURATE OR LOSSES SUSTAINED BY YOU OR THIRD PARTIES OR A FAILURE OF THE LIBRARY TO OPERATE WITH ANY OTHER SOFTWARE), EVEN IF SUCH HOLDER OR OTHER PARTY HAS BEEN ADVISED OF THE POSSIBILITY OF SUCH DAMAGES.
END OF TERMS AND CONDITIONS
How to Apply These Terms to Your New Libraries
If you develop a new library, and you want it to be of the greatest possible use to the public, we recommend making it free software that everyone can redistribute and change. You can do so by permitting redistribution under these terms (or, alternatively, under the terms of the ordinary General Public License).
To apply these terms, attach the following notices to the library. It is safest to attach them to the start of each source file to most effectively convey the exclusion of warranty; and each file should have at least the "copyright" line and a pointer to where the full notice is found.
one line to give the library's name and an idea of what it does.
Copyright (C) year name of author
This library is free software; you can redistribute it and/or modify it under the terms of the GNU Lesser General Public License as published by the Free Software Foundation; either version 2.1 of the License, or (at your option) any later version.
This library is distributed in the hope that it will be useful, but WITHOUT ANY WARRANTY; without even the implied warranty of MERCHANTABILITY or FITNESS FOR A PARTICULAR PURPOSE. See the GNU Lesser General Public License for more details.
You should have received a copy of the GNU Lesser General Public License along with this library; if not, write to the Free Software Foundation, Inc., 51 Franklin Street, Fifth Floor, Boston, MA 02110-1301 USA
Also add information on how to contact you by electronic and paper mail.
You should also get your employer (if you work as a programmer) or your school, if any, to sign a "copyright disclaimer" for the library, if necessary. Here is a sample; alter the names:
Yoyodyne, Inc., hereby disclaims all copyright interest in the library 'Frob' (a library for tweaking knobs) written by James Random Hacker.
signature of Ty Coon, 1 April 1990
Ty Coon, President of Vice
WARRANTY
< In the United States >
This warranty gives you specific legal rights and you may also have other rights which vary from state to state. This warranty is only valid within the country the unit was originally purchased.
WHAT IS COVERED AND WHAT IS NOT COVERED
Except as specified below, this warranty covers all defects in materials and workmanship in this product. The following are not covered by the warranty:
- Damage to or deterioration of the external cabinet.
- Damage resulting from accident, misuse, abuse or neglect.
- Damage resulting from failure to perform basic daily maintenance and/or calibration or otherwise resulting from failure to follow instructions contained in your owner's manual.
- Damage occurring during shipment of the product. (Claims must be presented to the carrier)
- Damage resulting from repair or attempted repair by anyone other than TEAC or an authorized TASCAM service station.
- Damage resulting from causes other than product defects, including lack of technical skill, competence, or experience of the user.
- Damage to any unit which has been altered or on which the serial number has been defaced, modified or is missing.
WHO IS COVERED UNDER THE WARRANTY
This warranty may be enforced only by the original purchaser. This warranty is not valid if the product was purchased through an unauthorized dealer.
LENGTH OF WARRANTY
All parts except heads and disk drives are warranted for one (1) year from the date of original purchase. Heads and disk drives are warranted for ninety (90) days from date of original purchase. Labor is warranted for ninety (90) days from date of original purchase.
WHAT WE WILL PAY FOR
We will pay all labor and material expenses for items covered by the warranty. Payment of shipping charges is discussed in the next section of this warranty.
HOW YOU CAN GET WARRANTY SERVICE
Your unit must be serviced by an authorized TASCAM service station in the United States. (This warranty is not enforceable outside the U.S.) If you are unable to locate an authorized TASCAM service station in your area, please contact us. We either will refer you to an authorized service station or instruct you to return the unit to the factory. Whenever warranty service is required, you must present a copy of the original dated sales receipt from an Authorized TASCAM Dealer. You must pay any shipping charges if it is necessary to ship the product to service. However, if the necessary repairs are covered by the warranty, we will pay return surface shipping charges to any destination within the United States.
LIMITATION OF IMPLIED WARRANTIES
Any implied warranties, INCLUDING WARRANTIES OF MERCHANTABILITY AND FITNESS FOR A PARTICULAR PURPOSE, are limited in duration to the length of this warranty.
EXCLUSION OF DAMAGES
TEAC's liability for any defective product is limited to repair or replacement of the product, at TEAC's option. TEAC shall not be liable for:
-
Damages based upon inconvenience, loss of use of the product, loss of time interrupted operation or commercial loss; or
-
Any other damages, whether incidental, consequential or otherwise.
Some states do not allow limitations on how long an implied warranty lasts and/or do not allow the exclusion or limitation of incidental or consequential damages, so the above limitations and exclusions may not apply to you.
To locate an Authorized Service Center in Your Area CALL 1-323-726-0303
This product is subject to the legal warranty regulations of the country of purchase. In case of a defect or a problem, please contact the dealer where you bought the product.
< In other countries/areas >
This warranty gives you specific legal rights, and you may also have other rights that vary by country, state or province.
If you have a warranty claim or request, please contact the dealer where you bought the product.
If you require repair services for your TASCAM equipment, please contact the dealer where the product was purchased from or the TASCAMDistributor in your country. A list of TASCAM Distributors can be found on our website at: http://teac-global.com/
TASCAM
TEAC CORPORATION
Phone: +81-42-356-9143
1-47 Ochiai, Tama-shi, Tokyo 206-8530 Japan
TEAC AMERICA, INC.
Phone: +1-323-726-0303
10410 Pioneer Blvd. Suite #1, Santa Fe Springs, California 90670, U.S.A.
TEAC UK Ltd.
Phone: +44-1923-797205
Meridien House, 69-71 Clarendon Road, Watford, Herts, WD17 1DS, United Kingdom
TEAC EUROPE GmbH
Phone: +49-611-71580
Room 817, Xinian Center A, Tairan Nine Road West, Shennan Road, Futian District, Shenzhen, Guangdong Province 518040, China
0120.MA-3069B
https://tascam.com/us/
https://www.tascam.eu/en/
https://www.tascam.en/de/
- IMPORTANT SAFETY INSTRUCTIONS
- WARNING: TO PREVENT FIRE OR SHOCK HAZARD, DO NOT EXPOSE THIS APPLIANCE TO RAIN OR MOISTURE.
- CAUTION
- WARNING
- RACK-MOUNTING THE UNIT
- ATTENTION
- Model for USA
- Declaration of Conformity
- INFORMATION TO THE USER
- Laser information
- Notes on Laser Product
- Optical pickup
- Model for Canada
- Compliance of interference
- CAUTIONS ABOUT BATTERIES
- For European Customers
- Disposal of electrical and electronic equipment and batteries and/or accumulators
- Contents
- Introduction
- Included items
- Conventions used in this manual
- TIP
- NOTE
- Features
- Trademarks and copyrights
- DOLBY AUDIO™
- BONUS VIEW™
- AVCHD™
- x.v.Color
- Precautions for placement and use
- Using the TEAC Global Site
- Product registration
- Beware of condensation
- Cleaning the unit
- Notes about power supplies
- About TASCAM customer support service
- SD cards and USB flash drives
- Precautions for use
- Handling discs
- Front panel
- ① button and indicator
- ② Disc tray
- ③ OPEN/CLOSE [LOCK](▲) button
- ④ Remote control signal receiver
- ⑤ Display
- ⑥ HIDE MENU [SHIFT] button
- ⑦ STOP [ENTER] (HOME) (■) button
- ⑧ PLAY [▽] (▶) button/indicator
- ⑨ PAUSE [^] (II) (TOP MENU) button
- ⑩ SKIP |◀◀/▶▶| [<]/[>] (◀◀/▶▶) (REPEAT/A-B) buttons
- ⑪ USB port
- ⑫ SD card slot
- Rear panel
- ⑬ ANALOG OUT (BALANCED) L/R jacks
- ⑭ ANALOG OUT (UNBALANCED) L/R jacks
- ⑮ 7.1 audio out (unbalanced) jacks
- ⑯ DIGITAL OUT (COAXIAL) connector
- ⑰ HDMI OUT port
- ⑱ USB port
- ⑲ ETHERNET connector
- ⑳ RS-232C connector
- ②1 AC IN connector
- Wireless remote control (TASCAM RC-BDMP1)
- ① ⏻/l (STANDBY/ON) button
- ② Number (0–9) buttons
- ③ AUDIO button
- ④ TOP MENU button
- ⑤ ON SCREEN button
- ⑥ RETURN button
- ⑦ Cursor buttons /^/
- ⑧ ▶ button
- ⑨ ◀◀/▶▶ buttons
- ⑩ ■ button
- ⑪ ◀◀/▶▶| buttons
- ⑫ SETUP button
- ⑬ SEARCH button
- ⑭ CLEAR button
- ⑮ MUTE button
- ⑯ PIP button
- ⑰ AUDIO button (2nd)\*
- ⑱ PROG/RED button
- ⑲ MARK/GREEN button
- ▲ OPEN/CLOSE button
- ⑳ SUBTITLE button
- ⑳ TITLE/POP UP button
- ②3 HOME button
- ⑳ HIDE MENU button
- ⑲ ENTER button
- ②6 II button
- ⑳ OPTION button
- ⑳ HDMI button
- ⑲ -/+ (VOLUME) buttons
- ③0 REPEAT button
- ③1 ANGLE button
- ③2 A-B/YELLOW button
- ③3 ZOOM/BLUE button
- HOME screen
- Disc
- Media
- Basic remote control functions
- Playing files on SD cards and USB flash drives
- - Playlist icon
- Adding files to and removing them from a playlist
- Adding files to a playlist
- Removing files from a playlist
- Settings
- General Settings
- Display Settings
- Audio Settings
- Audio Output
- Speaker Settings
- S/PDIF Output Configuration
- System Information
- Making connections
- Precautions before making connections
- Installing rackmount years
- Display
- ① Type of disc in tray
- ② Connected media
- ③ Media operation status
- ④ Title/chapter/track
- ⑤ Various information
- Preparing the remote control
- Installing batteries
- When to replace batteries
- Battery precautions
- Using the wireless remote control
- Turning the unit on and off
- Turning the unit off
- Loading and removing discs
- Loading discs
- Ejecting discs
- Inserting and removing SD cards
- Inserting SD cards
- Removing SD cards
- SD card write protection switches
- Connecting and disconnecting USB flash drives
- Connecting USB flash drives
- Disconnecting USB flash drives
- Panel lock function
- When locked
- Remote control overview
- BD-Live overview
- Types of media that can be played
- Disc media
- Disc formats
- playable file formats (video, audio and image)
- Video formats
- Audio formats
- Still image formats
- Playing media
- Automatic playback overview
- Playing video discs
- Operating from disc top menus and pop-up menus
- Pausing playback
- Stopping playback
- Searching backward/forward
- Skipping to the previous or next chapter/track
- Repeating playback of part of a scene or track
- Repeating playback of a chapter, title or track
- Video discs
- CDs and video/audio files
- Jumping to a specific playback time, scene or track
- Jumping to a specific playback time
- Jumping to a specific chapter or track
- Playing USB flash drives and SD cards
- Playing USB flash drive/SD cards playlists
- Playing files in a playlist
- Using program playback
- Setting bookmarks
- Jumping to bookmarks
- Deleting bookmarks
- Adjusting the volume from the unit
- Muting with this unit
- Overview of ON SCREEN information bar
- Operation status
- Media/file
- Title/track
- Chapter
- Playback time
- Audio settings
- Subtitle language
- Network connection overview
- Option menus
- Basic option menu operations
- Troubleshooting
- The unit will not turn on.
- Turning the TV off causes this unit to automatically turn off.
- (Turning this unit on also causes the TV to automatically turn on.)
- The unit does not function.
- The Settings screen or its submenus cannot be selected or opened.
- The disc tray cannot be opened or closed.
- Operations are not possible for a while after the disc is loaded.
- SD card/USB flash drive is not recognized.
- Sometime after connecting a SD card/USB device, the unit stopped responding to operations.
- The remote control (RC-BDMP1) does not function.
- The playback screen does not appear.
- A disc cannot be played.
- A file on a disc cannot be played.
- A file desired for playback cannot be found.
- No sound is output.
- There is noise.
- Video or audio stops momentarily.
- Something is wrong with the screen size.
- “ ⊗ ” appears.
- Operations are not possible during playback.
- Playback will not start when a title is selected.
- The HOME screen will not open.
- During playback, video is disrupted, does not appear or has a strange color.
- Subtitles do not appear.
- No audio is output from the AV amplifier.
- The camera angle cannot be changed.
- High definition resolution cannot be viewed.
- HDMI device control does not work.
- Cannot connect to a network.
- A password was forgotten.
- Specifications
- General
- Supported media
- Supported file formats
- Audio
- BD/DVD/USB/SD
- CD
- MP3/WMA
- Outputs
- HDMI output
- Digital Audio output
- COAXIAL
- Analog audio outputs
- Balanced
- Unbalanced
- 7.1ch Audio outputs
- Control input/output
- RS-232C connector
- Ethernet connector
- USB port
- SD slot
- Audio performance
- Other
- Dimensional drawings
- Notice regarding software that uses the GNU GPL
- List of packages
- About the licensing of software used in this product
- GNU GENERAL PUBLIC LICENSE
- Preamble
- TERMS AND CONDITIONS FOR COPYING, DISTRIBUTION AND MODIFICATION
- NO WARRANTY
- END OF TERMS AND CONDITIONS
- How to Apply These Terms to Your New Programs
- GNU LESSER GENERAL PUBLIC LICENSE
- How to Apply These Terms to Your New Libraries
- WARRANTY
- < In the United States >
- WHAT IS COVERED AND WHAT IS NOT COVERED
- WHO IS COVERED UNDER THE WARRANTY
- LENGTH OF WARRANTY
- WHAT WE WILL PAY FOR
- HOW YOU CAN GET WARRANTY SERVICE
- LIMITATION OF IMPLIED WARRANTIES
- EXCLUSION OF DAMAGES
- < In other countries/areas >
- TASCAM
Brand : TASCAM
Model : BD-MP1
Category : Blu-ray player