
Osmo Pocket 2 - Action Camera DJI - Free user manual and instructions
Find the device manual for free Osmo Pocket 2 DJI in PDF.


| Product Type | Handheld Gimbal Camera |
| Brand | DJI |
| Model | Osmo Pocket 2 |
| Dimensions | 124.7 x 38.1 x 30 mm |
| Weight | 117 g |
| Sensor | 1/1.7" CMOS, 64 MP effective pixels |
| Lens | FOV 93°, F1.8 (20 mm equivalent) |
| Video Resolution | 4K up to 60fps, 2.7K, 1080p up to 60fps |
| Max Photo Resolution | 9216 x 6912 (64 MP) |
| Battery Capacity | 875 mAh LiPo |
| Operating Time | Approx. 2 hours 20 minutes (1080p@24fps) |
| Charging Time | Approx. 1 hour 13 minutes (5V/2A adapter) |
| Stabilization | 3-axis gimbal |
| Max Video Bitrate | 100 Mbps |
| Supported microSD Cards | Up to 256 GB, UHS-I Speed Grade 3 recommended |
| App | DJI Mimo (iOS 11.0+, Android 7.0+) |
| Audio | 4 microphones with wind noise reduction |
| Operating Temperature | 0° to 40°C (32° to 104°F) |
| Storage Temperature | -10° to 45°C (14° to 113°F) |
| Interface | USB-C, Universal Port |
| Cleaning | Use a soft, dry cloth; avoid liquids |
| Safety | Not water resistant; keep away from sand and dust; do not cover heat dissipation area |
| Spare Parts / Repair | Detachable base, Mini Control Stick, Do-It-All Handle, Tripod Mount, Wide-Angle Lens; visit www.dji.com/support for service |
| General Information | Activation required via DJI Mimo; firmware updates via app; includes story modes, ActiveTrack, FaceTrack, panoramas, timelapse, HDR video |
Frequently Asked Questions - Osmo Pocket 2 DJI
User questions about Osmo Pocket 2 DJI
0 question about this device. Answer the ones you know or ask your own.
Ask a new question about this device
Download the instructions for your Action Camera in PDF format for free! Find your manual Osmo Pocket 2 - DJI and take your electronic device back in hand. On this page are published all the documents necessary for the use of your device. Osmo Pocket 2 by DJI.
USER MANUAL Osmo Pocket 2 DJI
natural_image
Line drawing of a handheld device with a screen and control panel (no text or symbols)
Searching for Keywords
Search for keywords such as "battery" and "install" to find a topic. If you are using Adobe Acrobat Reader to read this document, press Ctrl+F on Windows or Command+F on Mac to begin a search.

Navigating to a Topic
View a complete list of topics in the table of contents. Click on a topic to navigate to that section.

Printing this Document
This document supports high resolution printing.
Using this Manual
Legend

Important Hints and Tips
Read Before First Use
Read the following documents before using DJI Pocket 2
- User Manual
- Quick Start Guide
- Disclaimer and Safety Guidelines
It is recommended to watch all tutorial videos on the DJI Mimo app or official DJI™ website (www.dji.com/pocket-2), and read the disclaimer and safety guidelines before using for the first time. Make sure to review the quick start guide before using for the first time and refer to this user manual for more information.
Downloading the DJI Mimo App
Scan the QR code to the right or search for "DJI Mimo" on the App Store or Google Play.
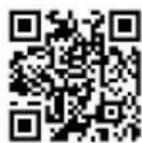

The Android version of DJI Mimo is compatible with Android v7.0 and later. The iOS version of DJI Mimo is compatible with iOS v11.0 and later.
Contents
Using this Manual 2
Legend 2
Read Before First Use 2
Downloading the DJI Mimo App 2
Introduction 4
Overview 4
Activating DJI Pocket 2 5
Operation 5
Button Feature 5
Adjusting the Gimbal Manually 6
Operating the Touchscreen 6
Storing Photos and Videos 8
Status LED Descriptions 9
DJI Mimo App 9
Charging DJI Pocket 2 11
Updating Firmware 12
Maintenance 12
Storing DJI Pocket 2 12
Usage Notices 12
Appendix 13
Specifications 13
Replacing the Detachable Base 14
Using the DJI Pocket 2 Mini Control Stick 15
Using Other Accessories 15
After-Sales Information 16
Introduction
DJI Pocket 2 is a handheld gimbal camera that combines mobility and stability in one device. It shoots sharp 64 MP photos and stable video at up to 4K 60fps. The onboard touchscreen displays a live view from the camera and can control camera and gimbal movements. Create the perfect shot with intelligent modes such as ActiceTrack, Zoom, Panorama, Timelapse, and HDR Video and enjoy high quality sound recording with four microphones that boast wind noise reduction. Connect DJI Pocket 2 to DJI Mimo using a mobile device either wirelessly* or by adapter. The app can be used to create professional-quality videos and to share to social media instantly in Story mode.
Accessories such as the Mini Control Stick, Do-It-All Handle, Wireless Microphone Transmitter, Micro Tripod, Tripod Mount (1/4"), and Wide-Angle Lens can be used to enjoy more DJI Pocket 2 features.
* The Do-It-All Handle is required in order to connect with DJI Mimo wirelessly.
Overview
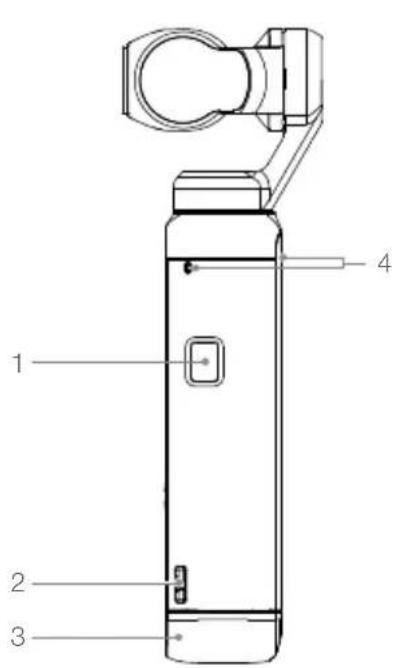
-
Power Button
-
Lanyard Hole
-
Detachable Base
-
Microphone*
-
Touchscreen
-
Universal Port (with Cover)
-
Status LED
-
Shutter/Record Button
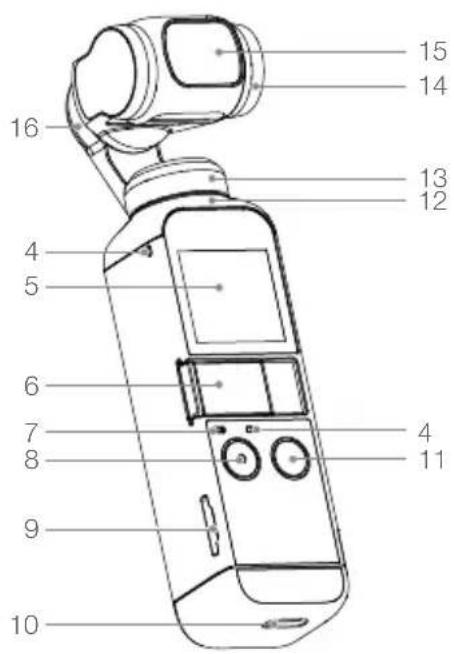
-
microSD Card Slot
-
USB-C Port
-
Function Button
-
Heat Dissipation Area
-
Pan Motor
-
Tilt Motor
-
Camera
-
Roll Motor
Activating DJI Pocket 2
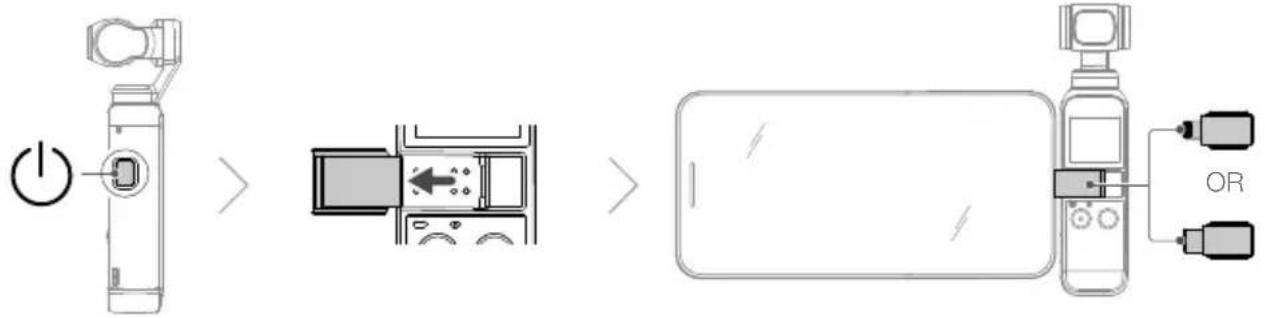
When using DJI Pocket 2 for the first time, activation is required through DJI Mimo. Follow the steps below to activate.
- Press and hold the Power button to power on.
- Remove the cover on the universal port.
- Choose a Lightning or USB-C smartphone adapter to connect to DJI Pocket 2.
- Launch DJI Mimo and follow the on-screen instructions to activate DJI Pocket 2.
flowchart
graph LR
    A["Power Input"] --> B["Device Shift"]
    B --> C["Output"]
    style A fill:#f9f,stroke:#333
    style B fill:#ccf,stroke:#333
    style C fill:#cfc,stroke:#333

DO NOT touch the gimbal when it is powering on. Otherwise, the performance may be affected.
Operation
Button Feature
Power Button
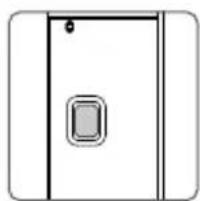
natural_image
Simple line drawing of a door with a handle and square opening (no text or symbols)Press and hold the Power button for one second to power on or off.
Function Button
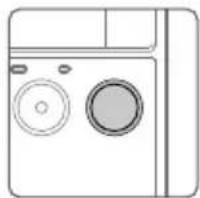
natural_image
Line drawing of a washing machine with two circular gauges (no text or symbols)In camera view, press once to switch between Video and Photo mode. Press twice to recenter the gimbal. Press three times to switch the camera between facing forward and backward. Press and hold to completely lock the gimbal, during which time the orientation of the camera will not follow the rotation of the handle. This mode is recommended for scenarios where the subject is moving in a straight line and without abrupt movements.
When DJI Pocket 2 is powered off, press the Function button once to quickly power.
In the settings of the touchscreen, press the Function button once to return to the previous screen.
Shutter/Record Button
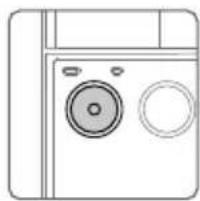
natural_image
Line drawing of a front-loading washing machine with two circular gauges (no text or symbols)In camera view, press the Shutter/Record button once to take a photo or to start or stop recording a video. In settings, press once to return to the camera view. During recording, press and hold to pause recording.
Adjusting the Gimbal Manually
The tilt angle of DJI Pocket 2 can be adjusted manually.
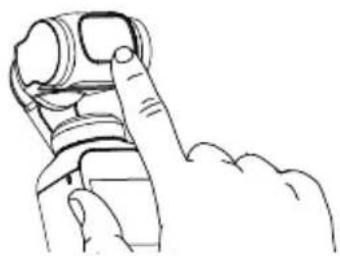
natural_image
Line drawing of a hand holding a mechanical device with a finger pointing to it (no text or symbols)
- In Motionlapse, the pan angle can also be adjusted manually.

- DO NOT touch the camera lens. Otherwise, the quality of the image may be affected by fingerprints or dirt.
Operating the Touchscreen
The touchscreen displays the camera view after DJI Pocket 2 is powered on, as well as the shooting mode, battery level, and microSD card information.
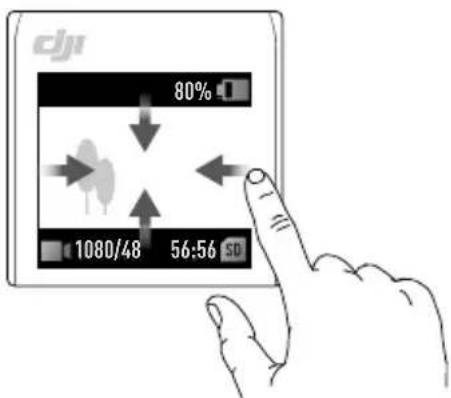
Swipe Up
Swipe up on the touchscreen to enter gimbal settings.
- Re-center: tap to re-center the gimbal.
- 📄p: tap to switch the camera between facing forward and backward.
- Slow Follow / Fast Follow: tap to switch between Slow Follow and Fast Follow.
a. In Fast Follow, the gimbal responds faster, but moves more abruptly. It is recommended for scenarios that require fast transitions.
b. In Slow Follow, the gimbal responds slower, but the movement is smoother.
- Follow/Tilt Locked/FPV:
a. Follow: the pan and tilt axes follow the handle while the roll axis remains level. This mode is suitable for most scenarios.
b. Tilt Locked: Only the pan axis follows. The tilt axis is locked and the roll axis remains level. This mode is suitable for scenarios such as where the camera position switches between high and low.
c. FPV: pan, tilt, and roll axes follow. This mode is suitable for scenarios where the camera position is continuously rotating and there is less stability.
Swipe Down
Swipe down on the touchscreen to enter settings. Swipe left or right to select System Settings, Glamour Effects, Pro Settings, 16MP/64MP Settings, and Gimbal Pitch Control/Zoom Control.
- Gimbal Pitch Control/Zoom Control: tap for Gimbal Pitch Control and for Zoom Control.
- System Settings
a. Screen Settings: tap the icon to switch between full-screen display and letterbox display.
b. Storage: displays the remaining capacity of the microSD card. Tap to enter and tap Format to format the microSD card.
c. FT (Selfie): tap to turn FT (Selfie) on and off. With FT (Selfie) turned on, FaceTrack will be automatically enabled when the camera is turned towards the user and a face is detected.
d. Accessories: displays information of connected DJI Pocket 2 accessories.
e. ● Calibration: tap to calibrate the gimbal. Calibration is used to reduce drift caused by human error or nearby magnetic interference. Place DJI Pocket 2 on a stable and flat surface and do not touch during calibration.
f. Anti-Flicker: tap to select an anti-flicker frequency according to local regulations.
g. ▶ Key Tone: tap to turn the key tone on and off.
h. More: reset to default settings, change language, and view device information such as firmware version, serial number, and battery information.
- 😊 🎨 Glamour Effects: tap to turn Glamour Effects on and off. Turn on Glamour Effects to beautify your photos or videos.
- 64MP / 16MP Pixel Settings: Tap to switch between High-Pixel (16 MP) and Ultra High-Pixel (64 MP). The selection will take effect once the shooting mode is entered.
- PRO PRO Pro Settings: tap to enable Pro mode. In camera view, tap Pro in the top left corner to adjust settings such as the format, white balance, and exposure parameters.
Swipe Left
Swipe left on the touchscreen to enter the settings of the shooting mode and swipe up or down to select a shooting mode.
- Panorama: swipe left to switch between 180^ , 3 × 3 , and Sphere Panorama (coming soon).
- 📷 photo: swipe left to set the photo ratio and the countdown timer.
- ■ideo: swipe left to set the video resolution and frame rate.
- HDR Video: tap to select HDR Video mode (firmware version v1.01 or later is required.)
- Slow Motion: swipe left to check the speed.
- Ⓧ Timelapse: swipe left and then up and down to choose between Timelapse, Motionlapse, and Hyperlapse. Tap the icon in the camera view to set the duration and interval time for Timelapse and Motionlapse, and the resolution and speed for Hyperlapse. Once set, tap OK to confirm. To begin a Motionlapse, point the camera at the start point and tap the icon. Next, point the camera at the end point and tap the icon again.
Swipe Right
Swipe up or down to scroll through photos and videos. Tap to playback videos and tap to select multiple photos and videos. Swipe right to add favorites (♥ or delete ( ) photos and videos.
Double Tap
When in Photo, Video, or Slow Motion mode, double-tap the touchscreen to enable ActiveTrack. FaceTrack will be enabled if a face is detected and will enable automatically if the camera is facing toward the user. Press the Function button or tap on the touchscreen to exit ActiveTrack.

• ActiveTrack is disabled in the following scenarios: in FPV mode or Video mode at 4K/60fps, when wirelessly connected to DJI Mimo and in Video mode at 4K 48/50/60fps, in Video mode set to High Quality video mode at 4K 30fps, and in 8x Slow Motion mode.
- When connected to DJI Mimo, the touchscreen turns off and cannot be used.
Storing Photos and Videos
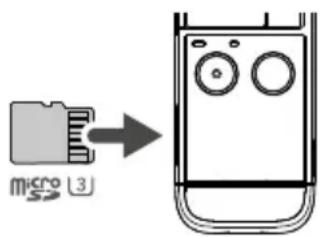
Footage shot on DJI Pocket 2 can be stored on a microSD card (not provided). A UHS-I Speed Grade 3 rating microSD card is required due to the fast read and write speeds necessary for high-resolution video data. Insert the microSD card into the microSD card slot as shown.
Status LED Descriptions
Blinking Pattern Description
Blinks red three times quickly Battery level is low and device is about to power off
Blinds red and green alternatively Updating firmware
Solid red Temperature is too high
Blinks red slowly Recording video
Blinks yellow No serial number
Solid yellow Device not activated
Solid green Working normally with microSD card inserted
Blinks green "X" times ("X" is the time of the countdown) Interval countdown
DJI Mimo App
Home Page
AI Editor
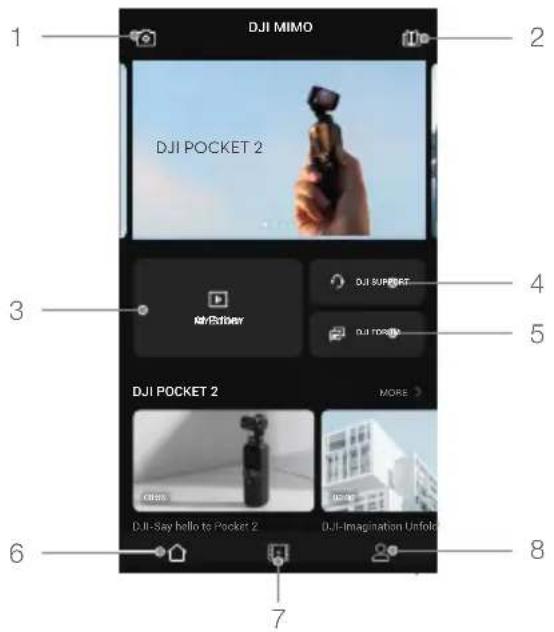
- Camera View: tap to enter the camera view.
- Academy: tap to watch tutorial videos and view manual documents.
- AI Editor: tap to select videos to edit. AI Editor will automatically edit videos with music and transitions that can be shared directly.
- DJI Support: tap to enter the official DJI product support page.
- Forum: tap to enter the official DJI forum page.
- Home: tap to return to the home screen.
- Edit: tap to edit footage from DJI Pocket 2 or import and edit footage from a mobile device.
- Profile: register or log in to a DJI account. View works and settings and connect to the DJI Store.
Camera View
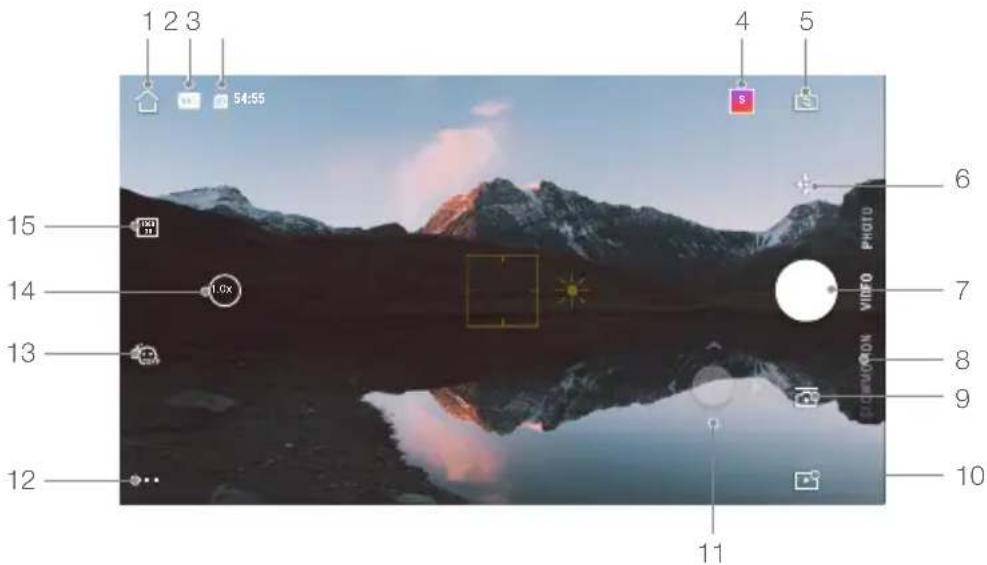
The camera view display may differ depending on the shooting mode. This display is for reference only.
Tap on the touchscreen for focusing and metering. For ActiveTrack, drag a box on the screen and DJI Pocket 2 will track the subject. For FaceTrack, DJI Pocket 2 automatically detects faces and will track the subject.
- Home
:tap to return to the home screen.
- Battery Level
99% displays current battery level of DJI Pocket 2.
- microSD Card Information
SD : displays either the remaining number of photos that can be taken or the duration of video that can be recorded according to the current shooting mode.
- Story
s : tap to select Story template.
- Flip
: tap to switch the gimbal from facing forward or backward.
- Re-Center
: tap to re-center the gimbal.
- Shutter Button
tap to take a photo or to start or stop recording video.
- Shooting Mode
Scroll to select the shooting mode. Choose between Story, Panorama, Photo, Video, HDR Video, Slow Motion, Timelapse, and Motionlapse (enabled in Timelapse settings.)
- Gimbal Settings
: select Slow Follow or Fast Follow and choose between Tilt Locked, Follow, and FPV mode.
- Playback
▶: tap to preview photos and videos as soon as they are captured.
- Virtual Joystick
move the virtual joystick left and right to control the pan axis, and up and down to control the tilt axis.
- Settings
- : choose Basic or Pro mode for the selected shooting mode. Various parameters can be set when in different shooting modes. Video mode is used as an example below:
a. Video Settings
Normal: Grid, FT (Selfie), and Anti-Flicker are available.
Pro: More settings are available once Pro is enabled including Focus Mode, White Balance, Overexposure Alert, Histogram, and sound settings (e.g. volume amplification level).
b. Gimbal and Handle Settings
Calibrate the gimbal and turn Gimbal Easy Control on and off. Turn on Gimbal Easy Control to control tilt and pan axes with one virtual joystick. Turn off to control tilt and pan axes on two separate virtual joysticks.
c. General Settings
View device name, device serial number, and version info, and format the microSD card.
13. Glamour Effects
OFF: tap to turn Glamour Effects on and off. Turn on Glamour Effects to beautify your photos or videos.
14. Zoom
1.0x : tap and drag to set the zoom ratio.
15. Quality
1080: tap to set the resolution, frame rate, and image quality.
Charging DJI Pocket 2
natural_image
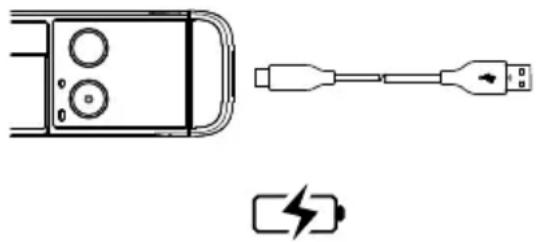
Diagram showing a device with two circular ports and a connected USB cable, alongside a battery symbol (no text or labels)To charge DJI Pocket 2, connect a USB adapter (not provided) to the USB-C port using the provided power cable. The battery is fully charged when the status LED turns off. The battery level is displayed on the touchscreen after powering on DJI Pocket 2.
Charging time: approx. 1 hour 13 minutes (when using a 5V/2A USB adapter).
The status LED indicates the battery level during charging. Refer to the table below for more information.
Blinking Pattern Battery Level
| Blinks green 0-24% |
| Blinks green twice 25%-49% |
| Blinks green three times 50%-74% |
| Blinks green four times 75%-99% |
| Glows solid green for six seconds a |

- It is recommended to use a 5V/2A USB adapter for optimal charging.
• Make sure to charge DJI Pocket 2 in an environment where the temperature is between 5^ and 60^ C ( 41^ and 140^ F). For safety reasons, DJI Pocket 2 limits the charge current when its temperature is between 45^ and 60^ C ( 113^ and 140^ F). In such scenarios, DJI Pocket 2 cannot be fully charged.
Updating Firmware
The firmware of DJI Pocket 2 must be updated through DJI Mimo. A prompt will appear when new firmware is available. Follow the on-screen instructions to update the firmware.

- A microSD card is required to update firmware.
• Make sure that the battery level of DJI Pocket 2 is at least 15% before updating firmware.
Maintenance
Storing DJI Pocket 2
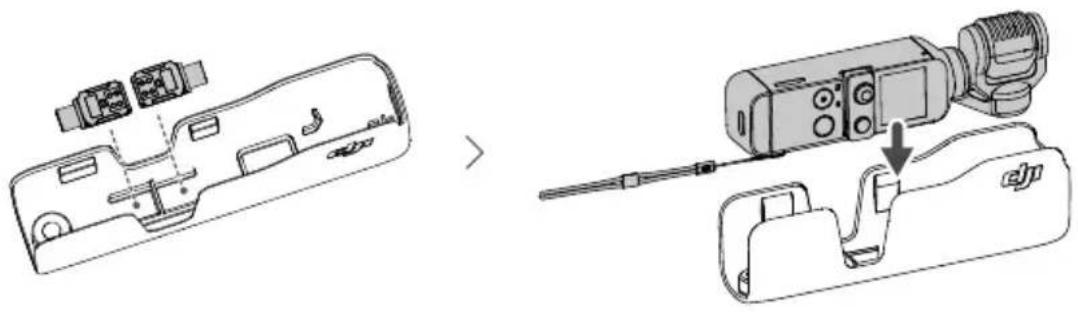
Store the smartphone adapters in the cover. With DJI Pocket 2 powered off and in storage mode and the microSD card slot facing upward, place DJI Pocket 2 into the cover as shown for safer transportation and storage.
natural_image
Technical line drawing showing a device assembly before and after disassembly (no text or symbols present)
• To prevent unnecessary gimbal damage, make sure to place DJI Pocket 2 into the cover correctly.
Usage Notices
- DJI Pocket 2 contains delicate components that may be damaged upon impact, which may cause the gimbal to malfunction.
- Make sure there is nothing obstructing the gimbal when DJI Pocket 2 is powered on.
- DJI Pocket 2 is not water resistant. DO NOT use any liquid cleansers. Only use a soft, dry cloth to clean DJI Pocket 2.
- Keep DJI Pocket 2 away from sand and dust to safeguard the sensors and the motors.
- When DJI Pocket 2 is not in use, it is recommended to use the cover to protect the universal port. Avoid touching the universal port during use as it may become hot.
- DO NOT cover or touch the heat dissipation area of DJI Pocket 2 as it may become hot during use. DJI Pocket 2 will stop shooting if it starts to overheat.
- Make sure to hold DJI Pocket 2 and your smartphone firmly when using the smartphone adapter to mount your smartphone to DJI Pocket 2.
Appendix
Specifications
| General | |
| Name DJI POCKET 2 | |
| Model OT-211 | |
| Dimensions 124.7×38.1×30 mm | |
| Weight 117 g | |
| Input Voltage/Current 5V/2A or 5V/1A | |
| Gimbal | |
| Angular Vibration Range ±0.005° | |
| Controllable Range Pan: -230° to +70°, Roll: ±45°, Tilt: -100° to +50° | |
| Mechanical Range Pan: -250° to +90°, Roll: ±90°, Tilt: -180° to +70° | |
| Max Controllable Speed 120° /s | |
| Stabilization 3 axis | |
| Camera | |
| Sensor 1/1.7" CMOS, Effective pixels: 64 MP | |
| Lens FOV 93°, F1.8 (Format Equivalent: 20 mm) | |
| ISO | Photo: 100-6400 (16 MP), 100-3200 (64 MP)Video: 100-6400Slow Motion: 100-3200 |
| Electronic Shutter Speed 1/8000 - 8 s | |
| Max Image Size 9216×6912 | |
| Still Photography Modes | Single Shot, Countdown, Panorama |
| Video Resolution | 4K Ultra HD: 3840×2160 24/25/30/48/50/60p2.7K: 2720×1530 24/25/30/48/50/60pFHD: 1920×1080 24/25/30/48/50/60p |
| Video Recording Modes | Video/HDR Video/Timelapse/Slow Motion (video resolution: 1080 120/240p) |
| Max Video Bitrate | 100 Mbps |
| Supported File Formats | FAT32 (≤32 GB)/exFAT (>32 GB) |
| Photo Formats | JPEG/DNG |
| Video Formats | MP4 (MPEG-4 AVC/H.264) |
| Supported SD Cards | Max. 256 GB SDHC/SDXC UHS-I Speed Grade 1 or UHS-I Speed Grade 3 microSDThe following microSD cards are recommended:Samsung EVO Plus 32GB UHS-I Speed Grade 1 microSDHC,Samsung Pro 64GB UHS-I Speed Grade 3 microSDXC,Samsung Pro Endurance 64GB UHS-I Speed Grade 1 microSDXC,Samsung Evo Plus 64GB UHS-I Speed Grade 3 microSDXC,SanDisk Extreme 16/32GB UHS-I Speed Grade 3 microSDHC,SanDisk Extreme Plus 128GB V30 A1 UHS-I Speed Grade 3 microSDXC,SanDisk Extreme Pro 64GB V30 A1 UHS-I Speed Grade 3 microSDXC,Lexar 633X 32GB UHS-I Speed Grade 1 microSDHC,Lexar 633X 32GB UHS-I Speed Grade 1 microSDHC. |
| Operating Temperature 0° to 40°C (32° to 104°F) | |
| Audio Output 48 kHz, AAC | |
| Battery | |
| Type LiPo | |
| Capacity 875 mAh | |
| Energy 6.738 Wh | |
| Voltage 7.7 V | |
| Charging Voltage Limit 8.8 V | |
| Charging Environment Temperature | 5° to 60°C (41° to 140°F) |
| Operating Temperature 0° to 40°C (32° to 104°F) | |
| Operating Time | 2 hours 20 minutes (this value is tested in a laboratory environment when recording 1080 24fps video and should be used for reference only) |
| Charging Time 1 hour 13 minutes (when using a 5V/2A USB adapter) | |
| App | |
| App DJI Mimo | |
Replacing the Detachable Base
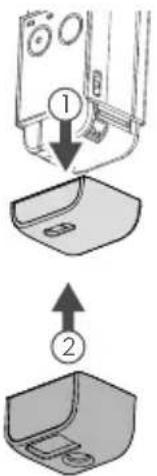
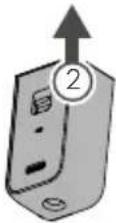
The detachable base can be removed by pulling down as shown and can be replaced with the provided DJI Pocket 2 Tripod Mount (1/4").
Using the DJI Pocket 2 Mini Control Stick
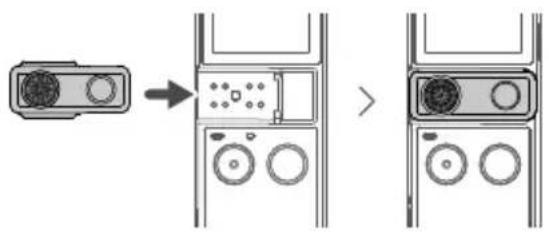
The provided DJI Pocket 2 Mini Control Stick can be used for gimbal movements and zoom control. Scan the QR code or read the user guide on the official DJI website (www.dji.com/pocket-2).

Using Other Accessories
| Accessory list Diagram | |
| DJI Pocket 2 Do-It-All Handle | 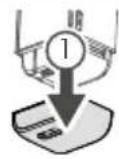 |
 | |
| DJI Wireless Microphone Transmitter | 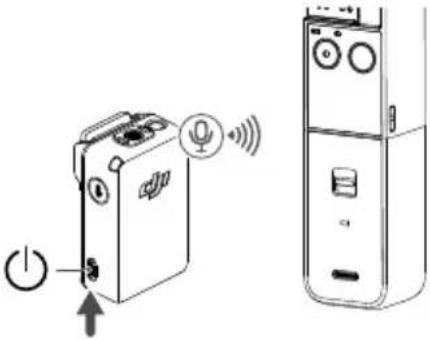 |
| DJI Pocket 2 Micro Tripod | 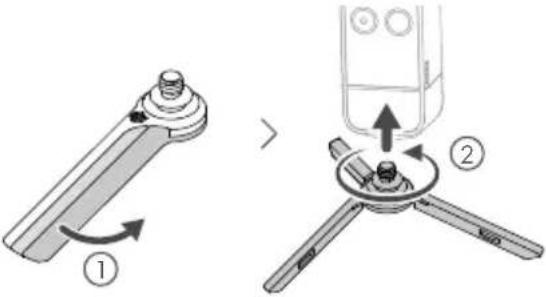 |
| DJI Pocket 2 Wide-Angle Lens | 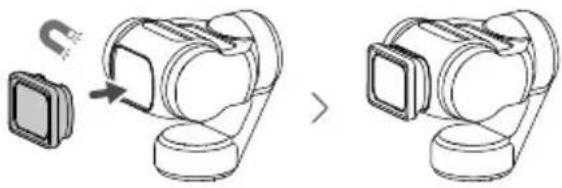 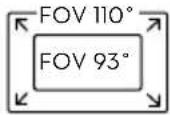 |
| Storing DJI Pocket 2 and other accessories | 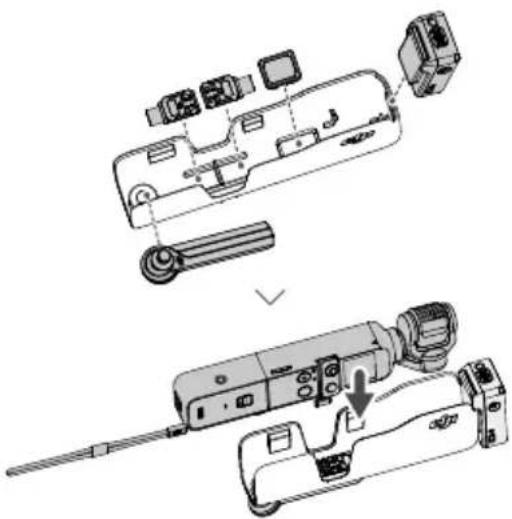 |
| Scan the QR code or read the corresponding user guide on the official DJI website (www.dji.com/pocket-2). |  |
After-Sales Information
Visit https://www.dji.com/support to learn more about after-sales service policies, repair services, and support.
This content is subject to change.
Download the latest version from
www.dji.com/pocket-2
OSMO is a trademark of DJI OSMO.
Copyright © 2020 DJI OSMO All Rights Reserved.
- Searching for Keywords
- Navigating to a Topic
- Printing this Document
- Using this Manual
- Legend
- Read Before First Use
- Downloading the DJI Mimo App
- Contents
- Using this Manual 2
- Introduction 4
- Operation 5
- Updating Firmware 12
- Maintenance 12
- Appendix 13
- After-Sales Information 16
- Introduction
- Overview
- Activating DJI Pocket 2
- Operation
- Button Feature
- Shutter/Record Button
- Adjusting the Gimbal Manually
- Operating the Touchscreen
- Swipe Up
- Swipe Down
- Swipe Left
- Swipe Right
- Double Tap
- Storing Photos and Videos
- Status LED Descriptions
- DJI Mimo App
- Home Page
- Camera View
- a. Video Settings
- b. Gimbal and Handle Settings
- c. General Settings
- Glamour Effects
- Zoom
- Quality
- Charging DJI Pocket 2
- Updating Firmware
- Maintenance
- Storing DJI Pocket 2
- Usage Notices
- Appendix
- Replacing the Detachable Base
- Using the DJI Pocket 2 Mini Control Stick
- After-Sales Information
Brand : DJI
Model : Osmo Pocket 2
Category : Action Camera