
Cadence Sensor 2 - Sensor GARMIN - Free user manual and instructions
Find the device manual for free Cadence Sensor 2 GARMIN in PDF.


| Product Type | Cadence Sensor |
| Model | Cadence Sensor 2 |
| Brand | Garmin |
| Battery Type | User-replaceable CR2032, 3 V |
| Battery Life | Approximately 12 months at 1 hour/day |
| Operating Temperature Range | -20° to 60°C (-4° to 140°F) |
| Water Rating | IEC 60529 IPX7 |
| Wireless Frequency/Protocol | 2.4 GHz @ 4 dBm nominal |
| Compatible Technologies | ANT+ and Bluetooth |
| Maximum Bluetooth Connections | 2 devices |
| LED Indicators | Green for activity, red for low battery |
| Installation Location | Non-drive side crank arm |
| Strap Included | Yes, multiple sizes |
| Pairing Requirement | Rotate crank arm 2 revolutions to wake |
| Standalone Use with App | No, requires compatible Garmin device or speed sensor (cadence sensor cannot pair alone with Garmin Connect) |
| Warranty | Garmin standard limited warranty |
| Manual Availability | Free PDF download on notice-facile.com |
Frequently Asked Questions - Cadence Sensor 2 GARMIN
User questions about Cadence Sensor 2 GARMIN
0 question about this device. Answer the ones you know or ask your own.
Ask a new question about this device
Download the instructions for your Sensor in PDF format for free! Find your manual Cadence Sensor 2 - GARMIN and take your electronic device back in hand. On this page are published all the documents necessary for the use of your device. Cadence Sensor 2 by GARMIN.
USER MANUAL Cadence Sensor 2 GARMIN
SPEED SENSOR 2 AND CADENCE SENSOR 2
Owner's Manual
© 2019 Garmin Ltd. or its subsidiaries
All rights reserved. Under the copyright laws, this manual may not be copied, in whole or in part, without the written consent of Garmin. Garmin reserves the right to change or improve its products and to make changes in the content of this manual without obligation to notify any person or organization of such changes or improvements. Go to www.garmin.com for current updates and supplemental information concerning the use of this product.
Garmin ^® , the Garmin logo, and ANT+ ^® are trademarks of Garmin Ltd. or its subsidiaries, registered in the USA and other countries. Garmin Connect ^™ is a trademark of Garmin Ltd. or its subsidiaries. These trademarks may not be used without the express permission of Garmin.
Apple ^* is a trademark of Apple Inc., registered in the U.S. and other countries. The BLUETOOTH ^ word mark and logos are owned by the Bluetooth SIG, Inc. and any use of such marks by Garmin is under license. Other trademarks and trade names are those of their respective owners.
This product is ANT+ ^® certified. Visit www.thisisant.com/directory for a list of compatible products and apps.
M/N: A03610, A03650
Table of Contents
Introduction...... 1
Installing the Speed Sensor.... 1
Installing the Cadence Sensor.... 2
Pairing the Sensors with Your Device.... 2
Garmin Connect™ 3
Device Information...... 4
User Replaceable Batteries.... 4
Speed Sensor 2 and Cadence Sensor 2
Specifications.... 5
Troubleshooting......6
My device will not connect to the sensors.... 6
Limited Warranty....6
Index......7
Introduction
WARNING
See the Important Safety and Product Information guide in the product box for product warnings and other important information.
Always consult your physician before you begin or modify any exercise program.
Installing the Speed Sensor
NOTE: If you do not have this sensor, you can skip this task.
TIP: Garmin ^® recommends you secure your bike on a stand while installing the sensor.
1 Place and hold the speed sensor on top of the wheel hub.
2 Pull the strap around the wheel hub, and attach it to the hook on the sensor.
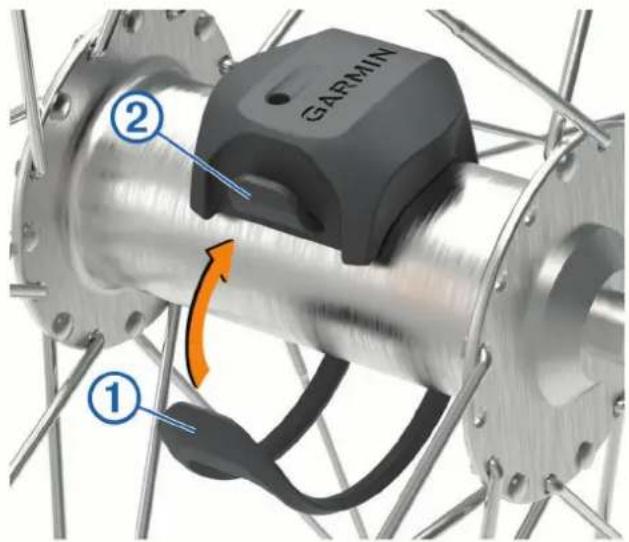
The sensor may be tilted when installed on an asymmetrical hub. This does not affect operation.
3 Rotate the wheel to check for clearance.
The sensor should not contact other parts of your bike.
NOTE: The LED flashes green for five seconds to indicate activity after two revolutions.
Installing the Cadence Sensor
NOTE: If you do not have this sensor, you can skip this task.
TIP: Garmin recommends you secure your bike on a stand while installing the sensor.
1 Select the band size that fits your crank arm securely.
The band you select should be the smallest one that stretches across the crank arm.
2 On the non-drive side, place and hold the flat side of the cadence sensor on the inside of the crank arm.
3 Pull the bands around the crank arm, and attach them to the hooks on the sensor.
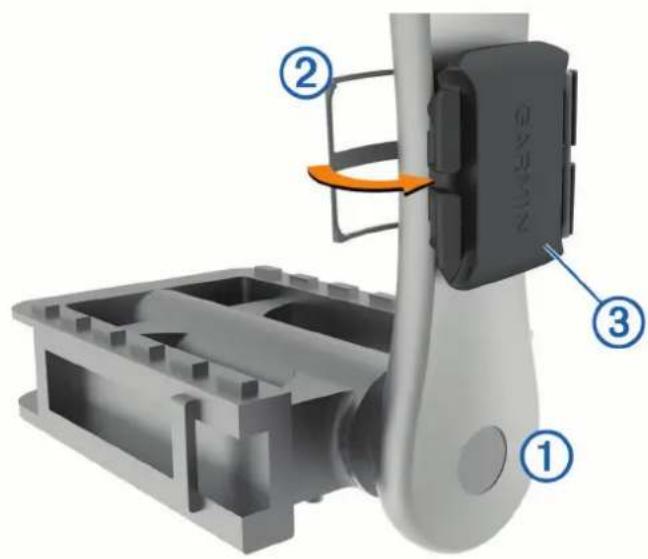
4 Rotate the crank arm to check for clearance.
The sensor and bands should not contact any part of your bike or shoe.
NOTE: The LED flashes green for five seconds to indicate activity after two revolutions.
5 Take a 15 minute test ride and inspect the sensor and bands to ensure there is no evidence of damage.
Pairing the Sensors with Your Device
The first time you connect a wireless sensor to your device using ANT+ or Bluetooth technology, you must pair the device and sensor. After they are paired, the device connects to the sensor automatically when you start an activity and the sensor is active and within range.
NOTE: The pairing instructions differ for each Garmin compatible device. See your owner's manual.
- Bring the Garmin compatible device within 3 m (10 ft.) of the sensor.
- Stay 10 m (33 ft.) away from other wireless sensors while pairing.
- Rotate the crank arm or wheel two revolutions to wake up the sensor.
The LED flashes green for five seconds to indicate activity. The LED flashes red to indicate a low battery level.
- If available, pair the sensor using ANT+ technology.
NOTE: The sensor can pair with up to two Bluetooth devices and any number of ANT+ devices.
After you pair the first time, your Garmin compatible device automatically recognizes the wireless sensor each time it is activated.
Garmin Connect™
Your Garmin Connect account allows you to track your performance and connect with your friends. It gives you the tools to track, analyze, share, and encourage each other. Record the events of your active lifestyle.
You can create your free Garmin Connect account when you pair your device with your phone using the Garmin Connect app.
Store your activities: After you complete a ride with your device, you can sync with the Garmin Connect app to upload that activity and keep it as long as you want.
Analyze your data: You can view more detailed information about your fitness and indoor activities, including time, distance, calories burned, speed charts, and customizable reports.
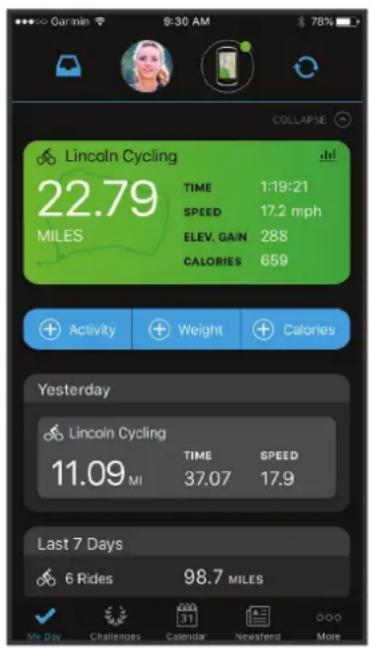
Share your activities: You can connect with friends to follow each other's activities or post links to your activities on your favorite social networking sites.
Manage your settings: You can customize your device and user settings on your Garmin Connect account.
Pairing the Speed Sensor With Your Smartphone
When you pair the speed sensor with the Garmin Connect app, you can record and upload cycling activities that include speed and distance data without using another Garmin device. The speed sensor must be paired directly through the Garmin Connect app, instead of from the Bluetooth settings on your smartphone.
NOTE: The cadence sensor cannot pair with the Garmin Connect app and be used as a standalone sensor.
1 From the app store on your smartphone, install and open the Garmin Connect app.
2 Bring your smartphone within 3 m (10 ft.) of the speed sensor.
NOTE: Stay 10 m (33 ft.) away from other wireless sensors while pairing.
3 Rotate the wheel two revolutions to wake up the speed sensor.
The LED flashes green for five seconds to indicate activity. The LED flashes red to indicate a low battery level.
4 Select an option to add the speed sensor to your Garmin Connect account:
- If this is the first device you have paired with the Garmin Connect app, follow the on-screen instructions.
- If you have already paired another device with the Garmin Connect app, from the menu, select Garmin Devices > Add Device, and follow the on-screen instructions.
Device Information
User Replaceable Batteries
WARNING
See the Important Safety and Product Information guide in the product box for product warnings and other important information.
Replacing the Speed Sensor Battery
The device uses one CR2032 battery. The LED flashes red to indicate a low battery level after two revolutions.
1 Locate the circular battery cover on the front of the sensor.
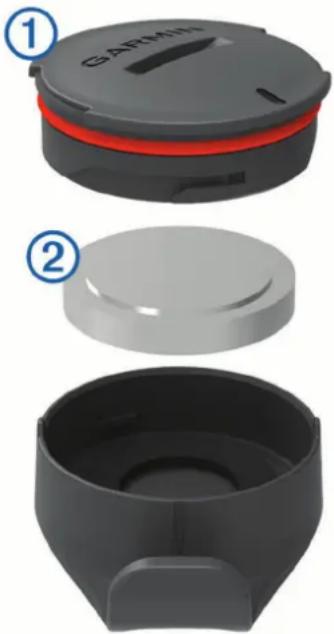
2 Twist the cover counter-clockwise until the cover is loose enough to remove.
3 Remove the cover and the battery .②
4 Wait 30 seconds.
5 Insert the new battery into the cover, observing polarity.
NOTE: Do not damage or lose the O-ring gasket.
6 Twist the cover clockwise so that the marker on the cover aligns with the marker on the case.
NOTE: The LED flashes red and green for a few seconds after battery replacement. When the LED flashes green and then stops flashing, the device is active and ready to send data.
Replacing the Cadence Sensor Battery
The device uses one CR2032 battery. The LED flashes red to indicate a low battery level after two revolutions.
1 Locate the circular battery cover on the back of the sensor.
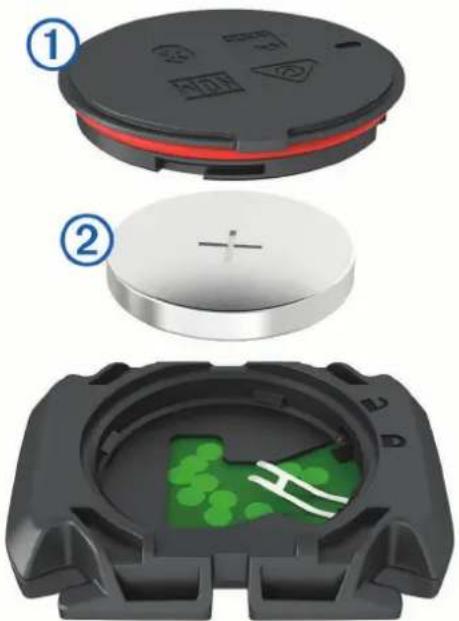
2 Twist the cover counter-clockwise until the marker points to unlocked and the cover is loose enough to remove.
3 Remove the cover and the battery.②
4 Wait 30 seconds.
5 Insert the new battery into the cover, observing polarity.
NOTE: Do not damage or lose the O-ring gasket.
6 Twist the cover clockwise until the marker points to locked.
NOTE: The LED flashes red and green for a few seconds after battery replacement. When the LED flashes green and then stops flashing, the device is active and ready to send data.
Speed Sensor 2 and Cadence Sensor 2 Specifications
Battery type User-replaceable CR2032, 3 V
Battery life Approximately 12 mo. at 1 hr./day
Speed sensor storage Up to 300 hr. of activity data
Operating temperature range From -20° to 60°C (from -4° to 140°F)
Wireless frequency/protocol 2.4 GHz @ 4 dBm nominal
Water rating IEC 60529 IPX7
1
Troubleshooting
My device will not connect to the sensors
If your device will not connect to the speed and cadence sensors, you can try these tips.
- Rotate the crank arm or wheel two revolutions to wake up the sensor.
The LED flashes green for five seconds to indicate activity. The LED flashes red to indicate a low battery level.
- Replace the battery if the LED does not flash after two revolutions.
- Enable Bluetooth technology on your smartphone or Garmin device.
- Pair the sensor with your device using ANT+ technology.
NOTE: If the sensor is already paired with two Bluetooth devices, you should pair using ANT+ technology or remove a Bluetooth device.
- Remove the sensor from your Garmin device to retry the pairing process.
- Remove the speed sensor from the Garmin Connect app and the Bluetooth settings on your smartphone to retry the pairing process.
Limited Warranty
The Garmin standard limited warranty applies to this accessory. For more information, go to www.garmin.com/support/warranty.
Index
A
ANT+ sensors 2
applications, smartphone 3
B
battery, replacing 4, 5
Bluetooth sensors 2
D
data
storing 3
transferring 3
G
Garmin Connect 3
1
installing 1,2
P
pairing
sensors 2
smartphone 3,6
S
smartphone, pairing 3, 6
specifications 5
speed and cadence sensors 1, 2, 4, 5
storing data 3
T
troubleshooting 6
support.garmin.com
- SPEED SENSOR 2 AND CADENCE SENSOR 2
- Table of Contents
- Introduction...... 1
- Device Information...... 4
- Troubleshooting......6
- Index......7
- Introduction
- WARNING
- Installing the Speed Sensor
- Installing the Cadence Sensor
- Pairing the Sensors with Your Device
- Garmin Connect™
- Pairing the Speed Sensor With Your Smartphone
- Device Information
- User Replaceable Batteries
- Replacing the Speed Sensor Battery
- Replacing the Cadence Sensor Battery
- Speed Sensor 2 and Cadence Sensor 2 Specifications
- Troubleshooting
- My device will not connect to the sensors
- Limited Warranty
- Index
- A
- B
- D
- G
- 1
- P
- S
- T
Brand : GARMIN
Model : Cadence Sensor 2
Category : Sensor