
Varia RVR315 - Accessoires vélo GARMIN - Free user manual and instructions
Find the device manual for free Varia RVR315 GARMIN in PDF.


| Product Type | Bicycle Rearview Radar and Taillight |
| Model | Varia RVR315 |
| Brand | Garmin |
| Dimensions (L x W x H) | 78 x 32 x 22.5 mm |
| Weight | 53.5 g |
| Battery Type | Rechargeable built-in lithium-ion |
| Battery Life (RTL515 variant) | Up to 16 hr (Day Flash), 8 hr (Peloton), 6 hr (Solid/Night Flash), 3 mo (Standby) |
| Battery Life (RTL516 variant) | Up to 9 hr (Solid), 3 mo (Standby) |
| Charging Time | ~3 hr with AC adapter, ~5 hr with computer |
| Radar Range | Up to 140 m |
| Radar Detection Speed Range | 10 to 160 km/h (6 to 99 mph) |
| Radar Beam Width | 40 degrees |
| Maximum Vehicles Detected | 8 |
| Light Modes (RTL515) | Solid, Peloton, Night Flash, Day Flash, Standby |
| Light Modes (RTL516) | Solid only |
| Water Rating | IPX7 |
| Operating Temperature | -20° to 50°C (-4° to 122°F) |
| Connectivity | ANT+, Bluetooth |
| Compatible Devices | Edge 1030, 830, 530, 130; Forerunner 945, fēnix 6, vivoactive 4; Smartphone with Varia app; Varia RDU |
| Mount | Universal seat post mount (included), rubber pads, O-rings |
| Maintenance | Clean with water, dry thoroughly; avoid abrasive cleaners |
| Safety | Enhances situational awareness, not a replacement for attentiveness |
| Replacement Parts | O-rings (EPDM) available at buy.garmin.com |
| In the Box | Varia RVR315, universal mount, rubber pads, O-rings, USB cable, manual |
Frequently Asked Questions - Varia RVR315 GARMIN
User questions about Varia RVR315 GARMIN
0 question about this device. Answer the ones you know or ask your own.
Ask a new question about this device
Download the instructions for your Accessoires vélo in PDF format for free! Find your manual Varia RVR315 - GARMIN and take your electronic device back in hand. On this page are published all the documents necessary for the use of your device. Varia RVR315 by GARMIN.
USER MANUAL Varia RVR315 GARMIN
natural_image
Line drawing of a handheld device with circular and rectangular buttons (no text or symbols)VARIATM REARVIEW RADAR RTL515/ RTL516
Owner's Manual
© 2020 Garmin Ltd. or its subsidiaries
All rights reserved. Under the copyright laws, this manual may not be copied, in whole or in part, without the written consent of Garmin. Garmin reserves the right to change or improve its products and to make changes in the content of this manual without obligation to notify any person or organization of such changes or improvements. Go to www.garmin.com for current updates and supplemental information concerning the use of this product.
Garmin ^7 , the Garmin logo, ANT ^+ , Edge ^6 , fēnix ^5 , Forerunner ^9 , and vivoactive ^8 are trademarks of Garmin Ltd. or its subsidiaries, registered in the USA and other countries. Garmin Connect ^™ , Garmin Express ^™ , and Varia ^™ are trademarks of Garmin Ltd. or its subsidiaries. These trademarks may not be used without the express permission of Garmin. The BLUETOOTH ^4 word mark and logos are owned by the Bluetooth SIG, Inc. and any use of such marks by Garmin is under license.
M/N: A04024
Country restrictions apply. 010-02377-00 is approved for operation in France and the United Kingdom. 010-02378-00 is approved for operation in Germany.
Table of Contents
Introduction....1
Getting Started....1
Tips for Installing the Device....1
Installing the Universal Mount....1
Device Overview.... 1
Varia RTL515/RTL516 Status LED.... 1
Taillight Modes....1
Turning Off the Taillight.... 2
The Varia RTL515/RTL516 and Your Edge 1030...... 2
Pairing the Varia Radar Device with Your Edge 1030....2
Viewing Radar on Your Edge Device.... 2
Tone Alerts for Approaching Vehicles.... 2
Viewing Widgets.... 2
Customizing the Varia Device Settings with Your Edge 1030.... 2
Customizing the Radar Alert Settings with Your Edge 1030..... 3
The Varia RTL515/RTL516 and the Varia App.... 3
Pairing the Varia Radar Device with Your Smartphone...... 3
Viewing Radar on the Varia App.... 3
Customizing the Varia App Alert Settings.... 3
The Varia RTL515/RTL516 and Your Radar Display
Unit 4
Varia RDU Device Overview....4
Installing the Varia RDU Device.... 4
Pairing the Radar Device with the RDU Device....4
Turning On the Varia RDU Device....4
Turning Off the Varia RDU Device and Radar Device.... 4
Other Compatible Devices.... 4
Pairing the Radar Device with a Compatible Edge Device...... 4
Pairing the Radar Device with a Compatible Garmin Watch..... 5
Device Information.... 5
Charging the Device.... 5
Device Care....5
Radar Detection....5
Specifications....6
Troubleshooting.... 6
Resetting the Device....6
Updating the Radar Software With Your Edge Device...... 6
Product Updates....6
The radar device is not responding.... 6
Radar detection does not work indoors.... 6
The radar device does not turn on.... 6
The status LED is flashing yellow.... 6
The status LED turns red while charging.... 6
The status LED turns red while updating the software.... 7
The radar device disconnects from the Edge device....7
The radar device disconnects from the Varia app.... 7
The radar device disconnects from the Varia RDU device...... 7
Replacement O-rings....7
Getting More Information....7
Index......8
Introduction
WARNING
See the Important Safety and Product Information guide in the product box for product warnings and other important information.
The device can improve situational awareness. It is not a replacement for cyclist attentiveness and good judgement. Always maintain awareness of your surroundings, and operate the bicycle in a safe manner. Failure to do so could result in serious injury or death.
Always consult your physician before you begin or modify any exercise program.
Getting Started
You can use the Varia Rearview Radar RTL515/RTL516 with your compatible Garmin® device, a smartphone, or the Varia RDU (radar display unit). This list provides an overview of the installation and setup tasks.
- Charge the device (Charging the Device, page 5).
• Install the universal mount (Installing the Universal Mount, page 1). - If you are using an Edge 1030 device, pair the devices (The Varia RTL515/RTL516 and Your Edge 1030, page 2).
- If you are using your smartphone, download the Garmin Varia app to your smartphone, and pair the devices (The Varia RTL515/RTL516 and the Varia App, page 3).
- If you are using the Varia RDU, pair the devices (The Varia RTL515/RTL516 and Your Radar Display Unit, page 4).
- If you are using another Garmin device, pair the devices (Other Compatible Devices, page 4).
Tips for Installing the Device
The Varia Rearview Radar RTL515/RTL516 device includes a taillight and micro radar that can detect approaching vehicles up to 140 meters away.
- Select a secure location to mount the device where it does not interfere with the safe operation of your bike.
- Mount the device as high on the seat post as possible for optimal light visibility and radar detection.
NOTE: The mount surface should be vertical. The mounts are designed to accommodate most seat post angles.
- Mount the Varia RTL515/RTL516 device on the seat post 250 mm to 1200 mm above the road.
• Install the device correctly.
The device faces backward and is perpendicular to the road.
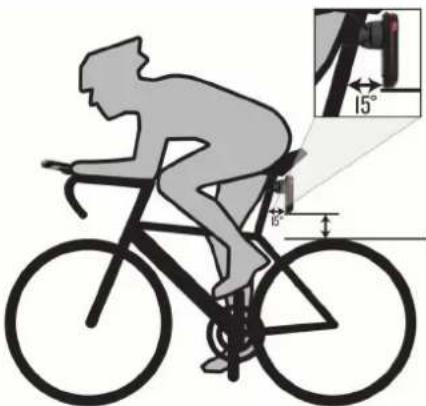
- Make sure there are no obstructions in front of the light.
- Go for a test ride during the day in a safe environment.
Installing the Universal Mount
1 Select a rubber pad ① based on your seat post shape, and place the rubber pad on the back of the universal mount.
2 Place the universal mount on the seat post.
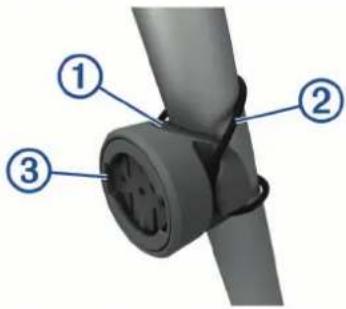
3 Attach the universal mount securely using one band ②
4 Align the tabs on the back of the device with the universal mount notches ③
5 Press down slightly and turn the device clockwise until it locks into place.
Device Overview
natural_image
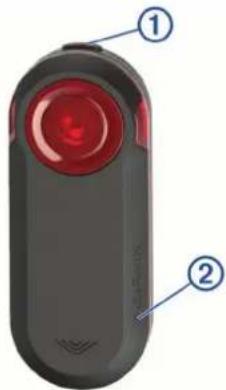
Close-up of a black handheld device with red circular lens and labeled parts (no text or symbols on body)| 1Device key | Press to change light modes.Hold for 1 second to turn the device on and enter active mode.Hold for 2 seconds to turn the device off.Hold for 8 seconds to reset the device. |
| 2Status LED | Changes color based on the battery level, pairing status, and charging status. (Varia RTL515/RTL516 Status LED, page 1) |
Varia RTL515/RTL516 Status LED
| LED State Status | |
| Flashing purple The device is in active pairing mode. | |
| Flashing blue The device is in smart mode and can be controlled by a paired Varia RDU or compatible Garmin device. | |
| Flashing green The device is charging. | |
| Solid green The device is fully charged. | |
| Flashing red The device has approximately 60 or fewer minutes of battery life remaining. | |
| Solid red An error occurred. You may need to restart the device. | |
Taillight Modes
You can switch the Varia RTL515 light modes by pressing the device key.
| Mode Light Intensity Default Flash | Behavior | Flash Behavior when Vehicle Approaches | |
| Solid (default) High None Light flashes | |||
| Peloton (group ride) | Moderate None Light flashes | softly | |
| Night Flash High Slow Light flashes | quickly | ||
| Day Flash Maximum Occasional Light flashes | quickly | ||
| Standby None None The device does | not detect vehicles. | ||
The Varia 516 has the solid mode only and the light does not flash when a vehicle approaches. You can switch the device to standby mode by pressing the device key.
Turning Off the Taillight
Hold the device key for 2 seconds.
The Varia RTL515/RTL516 and Your Edge 1030
You can remotely control your radar device and customize settings using your compatible Edge device. This section contains instructions for the Edge 1030 device. Other compatible Edge devices contain similar settings and controls (Other Compatible Devices, page 4).
Pairing the Varia Radar Device with Your Edge 1030
The first time you connect the Varia RTL515/RTL516 device to your Edge device, you must pair both devices. After the initial pairing, the Edge device automatically connects to the radar device when you start your activity and the radar device is active and within range.
NOTE: The radar device is compatible with other Garmin devices (Other Compatible Devices, page 4).
1 Bring the Edge device within range (3 m) of the sensor.
NOTE: Stay 10 m away from other ANT+° sensors while pairing.
2 Turn on the Edge device.
3 Select > Sensors > Add Sensor > Search All.
4 While the Varia RTL515/RTL516 device is turned off, hold the device key for 2 seconds to enter pairing mode.
The status LED flashes purple, and the taillight turns on. The device is in pairing mode for 5 minutes or until you press the device key.
5 Select your sensor, and select Add.
When the sensor is paired with your Edge device, the sensor status is Connected. The 📊radar) and 🌈like light) status icons appear solid on the top banner of the home screen.
Viewing Radar on Your Edge Device
Go for a ride.
The radar information appears on the active data screen.
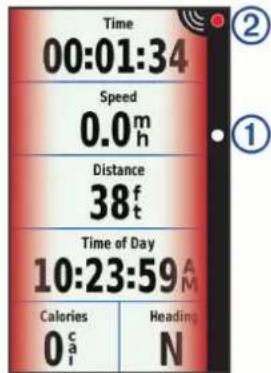
The vehicle position LED ① moves up the column as a vehicle gets closer to your bike. The threat level LED ② changes color based on the potential level of threat. Green indicates no vehicle is detected. Amber indicates a vehicle is approaching. Red indicates a vehicle is advancing at a high rate of speed.
Tone Alerts for Approaching Vehicles
The Edge device beeps if audible tones are turned on in the settings. Your device has alert tones for several features. The alert tone for approaching vehicles has a unique sound. The device beeps one time when the first vehicle is detected. After the threat is cleared, the device beeps again when another vehicle is detected.
Viewing Widgets
Your device is preloaded with several widgets, and more are available when you pair your device with a smartphone or other compatible device.
1 From the home screen, swipe down from the top of the screen.
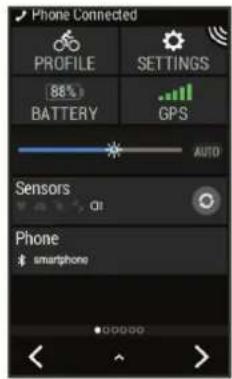
The settings widget appears. A flashing icon means the device is searching for a signal. A solid icon means the signal was found or the sensor is connected. You can select any icon to change the settings.
2 Swipe left or right to view more widgets.
The next time you swipe down to view the widgets, the last widget you viewed appears.
Customizing the Varia Device Settings with Your Edge 1030
Before you can customize Varia device settings with your Edge device, you must pair the devices.
1 Select ≡ Sensors > Lights.
2 Select an option:
- Select Enable to enable the light network.
- Select Network Options > Test Lights to verify that each light in your network is set up correctly (Testing the Light Network, page 3).
- Select a light to view device information and customize each light in your network (Light Network Settings, page 3).
Testing the Light Network
1 From the Sensors menu, select Lights > Network Options > Test Lights.
2 Select a light to test.
The light blinks when it is connected.
Light Network Settings
From the Sensors menu, select Lights, and select a paired light.
Enable: Turns on the light and allows you to control the light remotely with your Edge device. You can disable a light to disconnect it from the light network.
Light Mode: Sets the light intensity and pattern mode, or turns off the light.
NOTE: This setting is available when you select the Individual light mode setting (Light Mode Settings, page 3).
Software Update: Checks for software updates.
About: Displays device, software, and battery information.
Remove: Allows you to delete a paired light from the network.
Light Mode Settings
From the Sensors menu, select Lights > Network Options > Light Mode.
Auto: Automatically adjusts the light intensity and light mode based on the ambient light and time of day. This mode is recommended for commuting or road rides.
High Visibility: Sets the light intensity to flash mode or the brightest setting available.
Trail: Automatically adjusts the light intensity and light mode based on the ambient light and time of day. This mode is recommended for mountain biking.
Individual: Allows you to customize the light intensity and pattern mode for each light in your network (Light Network Settings, page 3).
Customizing the Radar Alert Settings with Your Edge 1030
Before you can customize the radar alert settings with your Edge device, you must pair the devices.
You can customize how the radar alerts sound and display on your Edge device.
1 From your Edge device, select ≡ Sensors.
2 Select your radar device.
3 Select Sensor Details > Alert Settings.
4 Select an option.
The Varia RTL515/RTL516 and the Varia App
The Varia app connects to your Varia radar device using Bluetooth ^® technology. The app displays radar information and enables you to view settings.
- After pairing, the app displays a colored banner indicating the threat level posed by approaching vehicles.
- You can enable smartphone vibration alerts so you can monitor those alerts while your smartphone is in your pocket, instead of mounted on the handlebar.
- You can view radar device battery details.
You can download the Varia app from the app store on your smartphone.
Pairing the Varia Radar Device with Your Smartphone
The first time you connect the Varia RTL515/RTL516 device to the Varia app, you must pair both devices. After the initial pairing, the Varia app automatically connects to the Varia RTL515/RTL516 when you open the app and the radar device is active and within range.
1 Bring your smartphone within range (3 m) of the radar device. NOTE: Stay 10 m away from other Bluetooth sensors while pairing.
2 On your compatible smartphone, enable Bluetooth technology.
3 From the app store on your smartphone, install and open the Varia app.
4 Select Pair Now.
5 While the Varia RTL515/RTL516 radar device is turned off, hold the device key for 2 seconds to enter pairing mode.
The status LED flashes purple, and the taillight turns on. The device is in pairing mode for 5 minutes or until you press the device key.
6 Select That's Mine.
When the radar device is paired with your smartphone, the app displays the current status, and . (●)
Viewing Radar on the Varia App
Go for a ride.
The radar information appears on the active data screen.
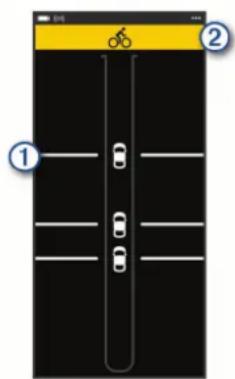
The vehicle position moves up the screen as a vehicle gets closer to your bike. The threat level banner changes color based on the potential level of threat. Green indicates no vehicle is detected. Amber indicates a vehicle is approaching. Red indicates a vehicle is advancing at a high rate of speed.
TIP: The line next to the vehicle also indicates the threat level. A straight line changes to jagged with a red threat level.
Customizing the Varia App Alert Settings
Before you can customize the radar alert settings with the Varia app, you must pair the devices.
1 From the Varia app, select •> Settings.
2 Select an option.
The Varia RTL515/RTL516 and Your Radar Display Unit
You can display radar data using the compatible rear display unit (RDU).
Varia RDU Device Overview
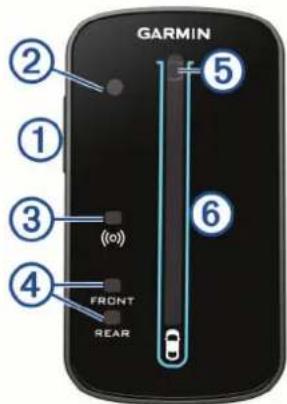
| 1 | Device key Turns the device on and off. |
| 2 | Ambient light sensor detects available light and automatically adjusts the brightness of the display. |
| 3 | Connection status LED Appears solid blue when the device is paired with the taillight. Flashes blue when the device is searching for the taillight. |
| 4 | FRONT and REAR device status LEDs Flashes red when the battery is low. Appears solid red when there is a device error. |
| 5 | Threat level LED Charging status LED (Charging the Device, page 5) Changes color based on the potential level of threat. Green indicates no vehicle is detected. Amber indicates a vehicle is approaching. Red indicates a vehicle is advancing at a high rate of speed. |
| 6 | Vehicle position LEDs Moves up the column as the vehicle gets closer to your bike. |
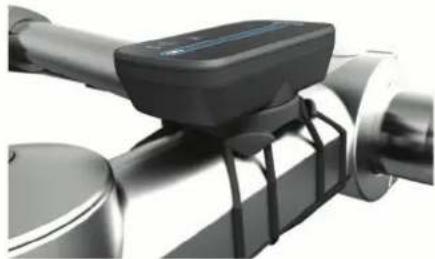
Installing the Varia RDU Device
NOTE: If you do not have a Varia RDU device, you can use a compatible Edge device.
You can install the device on the stem or the handlebars.
1 Select a secure location to mount the device where it does not interfere with the safe operation of your bike.
2 Place the rubber disk on the back of the bike mount. The rubber tabs align with the back of the bike mount so it stays in place.
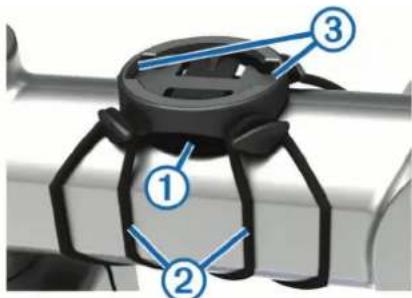
3 Place the bike mount on the bike stem.
4 Attach the bike mount securely using the two bands ②
5 Align the tabs on the back of the device with the bike mount notches ③
6 Press down slightly and turn the device clockwise until it locks into place.
natural_image
Close-up of a mechanical device with a black sensor or sensor mounted on a cylindrical shaft (no visible text or symbols)Pairing the Radar Device with the RDU Device
The Varia RDU device can be paired with one radar device at a time.
1 Hold the Varia RDU device key for 5 seconds.
The threat level LED flashes purple.
2 Turn on the radar unit.
3 Bring the devices within 1 cm of each other, and wait while the devices connect.
The Varia RDU LED turns solid blue and the threat level LED turns solid green.
The Varia RTL515/RTL516 status LED flashes purple.
Turning On the Varia RDU Device
Hold the device key for 1 second to turn on the device.
The LEDs fill the column to indicate the battery level.
The LED flashes blue while it is searching for the radar device.
Varia RDU Battery Status LED
When you turn on the device, the LED at the top of the column briefly indicates the battery status.
| LED Activity Status | |
| Flashing green The device is charging. | |
| Solid green Charging is complete. | |
| Flashing yellow The battery is low. | |
| Flashing red The battery is critically low. | |
Setting the Varia RDU Device Tones
- Press the device key to turn on tones.
- Press the device key again to turn off tones.
Turning Off the Varia RDU Device and Radar Device
If the Varia RDU device is paired with the radar device, you can turn off both devices at the same time.
Hold the device key on the Varia RDU device for 1 second.
Other Compatible Devices
Pairing the Radar Device with a Compatible Edge Device
This task is for the Edge 1030, 830, 530, and 130 devices. If your device is not listed, go to buy.garmin.com.
1 Bring the Edge device within range (3 m) of the sensor. NOTE: Stay 10 m away from other ANT+ sensors while pairing.
3 From the Sensors menu, select Add Sensor > Search All.
4 While the Varia RTL515/RTL516 device is turned off, hold the device key for 2 seconds to enter pairing mode.
The status LED flashes purple, and the taillight turns on. The device is in pairing mode for 5 minutes or until you press the device key.
5 Select your sensor.
When the sensor is paired with your Edge device, the radar and bike light status icons appear solid.
Pairing the Radar Device with a Compatible Garmin Watch
This task is for the Forerunner ^® 945, fēnix ^® 6 series, and vivoactive ^® 4 series watches. If your device is not listed, go to buy.garmin.com.
1 Bring the watch within range (3 m) of the sensor.
NOTE: Stay 10 m away from other ANT+ sensors while pairing.
2 Turn on the Garmin watch.
3 From the Settings menu, select Sensors > Add New > Search All.
4 While the Varia RTL515/RTL516 device is turned off, hold the device key for 2 seconds to enter pairing mode.
The status LED flashes purple, and the taillight turns on. The device is in pairing mode for 5 minutes or until you press the device key.
5 Select your sensor.
When the sensor is paired with your Garmin watch, the radar and bike light status icons appear solid.
Device Information
Charging the Device
NOTICE
To prevent corrosion, thoroughly dry the USB port, the weather cap, and the surrounding area before charging or connecting to a computer.
The device is powered by a built-in lithium-ion battery that you can charge using a standard wall outlet or a USB port on your computer.
NOTE: The device does not charge when outside the approved temperature range (Varia RTL515/RTL516 Specifications, page 6).
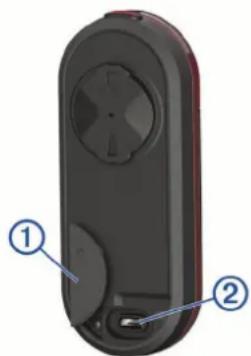
1 Pull up the weather cap from the USB port. ②
natural_image
3D model of a remote control device with labeled parts (no text or symbols on the device itself)2 Plug the small end of the USB cable into the USB port on the device.
3 Plug the large end of the USB cable into an AC adapter or a computer USB port.
4 Plug the AC adapter into a standard wall outlet.
5 Charge the device completely.
The status LED flashes green while charging. The status LED is solid green when charging is complete.
6 Remove the USB cable, and close the weather cap.
Tips for Charging the Device
- Connect the charger securely to the device.
You can charge the device by plugging the USB cable into a Garmin approved AC adapter with a standard wall outlet or a USB port on your computer. Charging a fully depleted battery takes about 5 hours using a computer and 3 hours using an AC power source.
- Remove the charger from the device when the status LED is solid green.
- View the remaining battery life ☑ your Edge 1030 settings widget (Viewing Widgets, page 2).
Device Care
NOTICE
Do not store the device where prolonged exposure to extreme temperatures can occur, because it can cause permanent damage.
Avoid chemical cleaners, solvents, and insect repellents that can damage plastic components and finishes.
Secure the weather cap tightly to prevent damage to the USB port.
Avoid extreme shock and harsh treatment, because it can degrade the life of the product.
Cleaning the Device
NOTICE
Do not use a cloth or any material that can scratch the optical lens on the front of the device. Scratching the optical lens may cause poor radar performance.
- Clear mud and dirt from the weather cap area.
- While the weather cap is closed, hold the device under running water.
After cleaning, allow the device to dry completely.
Radar Detection
WARNING
The device can improve situational awareness. It is not a replacement for cyclist attentiveness and good judgement. Always maintain awareness of your surroundings, and operate the bicycle in a safe manner. Failure to do so could result in serious injury or death.
- The radar detects approaching vehicles up to 140 m away.
- The radar detects approaching vehicle speed from 10 to 160km / h (from 6 to 99 mph).
NOTE: The radar does not detect vehicles traveling at the same speed as your bike.
- The radar beam width is 40 degrees. It provides radar coverage for typical bends in the road.
- The radar can detect up to eight approaching vehicles.
Specifications
Varia RTL515/RTL516 Specifications
| Battery type Rechargeable, built-in lithium-ion battery | |
| RTL515 battery life Up to 6 hr. in solid modeUp to 8 hr. in peloton modeUp to 6 hr. in night flash modeUp to 16 hr. in day flash modeUp to 3 mo. in standby mode | |
| RTL516 battery life Up to 9 hr. in solid modeUp to 3 mo. in standby mode | |
| Operating temperature range | From -20° to 50°C (from -4° to 122°F) |
| Charging temperature range | From 0° to 45°C (from 32° to 113°F) |
| Wireless frequencies | 2.4 GHz @ 0 dBm nominal; 24 GHz @ 13.6 dBm nominal |
| Water rating IEC 60529 IPX71 | |
| RTL515 LED luminous flux | 20 lm (solid mode)8 lm (peloton mode)29 lm (night flash mode)65 lm (day flash mode) |
| RTL516 LED luminous flux | 5 lm (solid mode only)Certified for use in Germany |
Varia RDU Specifications
| Battery type Rechargeable, built-in lithium-ion battery | |
| Battery life Up to 10 hr., typical usage | |
| Operating temperature range From -20° to 60°C (from -4° to 140°F) | |
| Charging temperature range From 0° to 45°C (from 32° to 113°F) | |
| Wireless frequency 2.4 GHz ANT+ @ 0 dBm nominal | |
| Water rating IEC 60529 IPX7 | ^1 |
Troubleshooting
Resetting the Device
You can reset the device if it stops responding.
Hold the device key for 8 seconds until all the LEDs turn off.
Resetting deletes the pairing connections from the device.
Updating the Radar Software With Your Edge Device
Before you can update the Varia radar software, you must pair the radar device with your Edge device, you must have a Garmin Connect™ account, and you must pair the Edge device with a compatible smartphone.
1 Bring the Edge device within 3 m (10 ft.) of the radar device.
2 Sync your Edge device with the Garmin Connect app.
When new software is available, your device alerts you to update the software.
3 Follow the on-screen instructions.
The taillight LED flashes blue and green to indicate the device is updating. When the update is complete, the LED flashes green 20 times.
Taillight Status LED for Software Updates
| LED Activity Status | |
| Flashing blue and green | The device is uploading software. |
| Flashing green The software update is complete and successful. | |
| Flashing red The software update failed. | |
Product Updates
On your computer, install Garmin Express™ (www.garmin.com /express).
This provides easy access to these services for Garmin devices:
- Software updates
- Product registration
Updating the Software Using the Garmin Express Application
Before you can update your device software, you must download the Garmin Express application.
1 Connect the radar device to your computer using the USB cable.
Garmin Express looks for software updates automatically and sends them to your device.
2 Follow the on-screen instructions.
3 Disconnect the device, and turn it on.
The radar LED flashes blue and green to indicate the device is updating. When the update is complete, the LED flashes green 20 times.
The radar device is not responding
During a ride, if the radar device status LED is solid red, the device is in an error state.
- Make sure the device is within the approved operating temperature range (Varia RTL515/RTL516 Specifications, page 6).
- Turn the device off, and turn it back on.
You can check the battery level on the Sensors menu of your Edge device or on the Varia app.
- Avoid multiple sources of radar interference.
Radar detection does not work indoors
The device is tuned to detect vehicles in an outdoor setting. If you turn on the device indoors, a saturation alert can occur. When you take the device outdoors, the device resumes normal operation.
The radar device does not turn on
- Make sure the device is within the approved operating or charging temperature range (Varia RTL515/RTL516 Specifications, page 6).
- Charge the device for 4 hours (Charging the Device, page 5). If the device does not turn on, disconnect the charger, and charge for another 4 hours.
The status LED is flashing yellow
If the radar device status LED flashes yellow, the device is in demo mode. When the radar device is in demo mode, artificial data is generated for demonstration only.
To exit demo mode, select an option:
- Turn the device off, and turn it back on.
- Hold the device key for 8 seconds to reset the device.
The status LED turns red while charging
- Check the USB cable, connectors, and ports for damage.
- Make sure the power source is generating power.
You can check this several ways. For example, you can check whether other devices powered by the source are functioning.
- Make sure the device is within the approved charging temperature range (Varia RTL515/RTL516 Specifications, page 6).
The status LED turns red while updating the software
- Check the USB cable, connectors, and ports for damage.
- Turn both devices off, and turn them back on.
- Make sure the device is within the approved operating temperature range (Varia RTL515/RTL516 Specifications, page 6).
The radar device disconnects from the Edge device
WARNING
If the radar device is not connected or sending radar data, Garmin recommends that you stop riding and check the devices in a safe location. Failure to do so could result in serious injury or death.
- Turn both devices off, and turn them back on.
- Pair the devices (Pairing the Varia Radar Device with Your Edge 1030, page 2).
The Varia RTL515/RTL516 device sends light and radar data to the Edge device. The Edge device displays G and when connected.
The radar device disconnects from the Varia app
WARNING
If the radar device is not connected or sending radar data, Garmin recommends that you stop riding and check the devices in a safe location. Failure to do so could result in serious injury or death.
- Turn off Bluetooth technology from your smartphone settings, and turn it back on.
- Turn both devices off, and turn them back on.
The Varia RTL515/RTL516 device sends light and radar data to the Varia app. The Varia app displays when connected.
The radar device disconnects from the Varia RDU device
WARNING
If the radar device is not connected or sending radar data, Garmin recommends that you stop riding and check the devices in a safe location. Failure to do so could result in serious injury or death.
If the threat level LED is solid red and the REAR LED is off, the radar device is not connected to the Varia RDU device.
- Turn both devices off, and turn them back on.
You can check the battery level when you turn the devices back on. - Pair the devices (Pairing the Radar Device with the RDU Device, page 4).
Replacement O-rings
Replacement bands (O-rings) are available for the mounts.
NOTE: Use Ethylene Propylene Diene Monomer (EPDM) replacement bands only. Go to http://buy.garmin.com, or contact your Garmin dealer.
Getting More Information
- Go to support.garmin.com for additional manuals, articles, and software updates.
- Go to buy.garmin.com, or contact your Garmin dealer for information about optional accessories and replacement parts.
Index
W
Wi-Fi 2
A
accessories 7
alerts 3
ANT+ sensors 2
apps 3
smartphone 3
B
bands 7
battery 1,4
charging 5,6
bike sensors 2, 3
Bluetooth sensors 2
brightness 3
C
charging 5
cleaning the device 5
customizing the device 2-4
D
data, screen 3
demo mode 6
device, care 5
E
Edge 2-4
F
fēnix 5
Forerunner 5
G
Garmin Express 6
updating software 6
GPS, signal 2
I
indoor training 6
installing 1,4
K
keys 1, 4
L
light modes 1
M
mounting the device 1, 4
0
O-rings. See bands
P
pairing 2–5, 7
power key 1
R
radar 3
resetting, device 6
S
satellite signals 2
screen 3
settings 2, 3
smartphone 2
software, updating 6, 7
specifications 5, 6
speed 3
status LED 1,4
T
tones 2,4
troubleshooting 4–7
U
updates, software 6
USB 6
V
vívoactive 5
support.garmin.com
- VARIATM REARVIEW RADAR RTL515/ RTL516
- Table of Contents
- Introduction....1
- The Varia RTL515/RTL516 and Your Edge 1030...... 2
- The Varia RTL515/RTL516 and the Varia App.... 3
- The Varia RTL515/RTL516 and Your Radar Display
- Other Compatible Devices.... 4
- Device Information.... 5
- Troubleshooting.... 6
- Introduction
- WARNING
- Getting Started
- Tips for Installing the Device
- Installing the Universal Mount
- Device Overview
- Varia RTL515/RTL516 Status LED
- Taillight Modes
- Turning Off the Taillight
- The Varia RTL515/RTL516 and Your Edge 1030
- Pairing the Varia Radar Device with Your Edge 1030
- Viewing Radar on Your Edge Device
- Tone Alerts for Approaching Vehicles
- Viewing Widgets
- Customizing the Varia Device Settings with Your Edge 1030
- Testing the Light Network
- Light Network Settings
- Light Mode Settings
- Customizing the Radar Alert Settings with Your Edge 1030
- The Varia RTL515/RTL516 and the Varia App
- Pairing the Varia Radar Device with Your Smartphone
- Viewing Radar on the Varia App
- Customizing the Varia App Alert Settings
- The Varia RTL515/RTL516 and Your Radar Display Unit
- Varia RDU Device Overview
- Installing the Varia RDU Device
- Pairing the Radar Device with the RDU Device
- Turning On the Varia RDU Device
- Varia RDU Battery Status LED
- Setting the Varia RDU Device Tones
- Turning Off the Varia RDU Device and Radar Device
- Other Compatible Devices
- Pairing the Radar Device with a Compatible Edge Device
- Pairing the Radar Device with a Compatible Garmin Watch
- Device Information
- Charging the Device
- NOTICE
- Tips for Charging the Device
- Device Care
- Cleaning the Device
- Radar Detection
- Specifications
- Troubleshooting
- Resetting the Device
- Updating the Radar Software With Your Edge Device
- Product Updates
- Updating the Software Using the Garmin Express Application
- The radar device is not responding
- Radar detection does not work indoors
- The radar device does not turn on
- The status LED is flashing yellow
- The status LED turns red while charging
- The status LED turns red while updating the software
- The radar device disconnects from the Edge device
- The radar device disconnects from the Varia app
- The radar device disconnects from the Varia RDU device
- Replacement O-rings
- Getting More Information
- Index
- W
- A
- B
- C
- D
- E
- F
- G
- I
- K
- L
- M
- 0
- P
- R
- S
- T
- U
- V
Brand : GARMIN
Model : Varia RVR315
Category : Accessoires vélo