
MiniJ Smart Washing Machine - Washing machine Xiaomi - Free user manual and instructions
Find the device manual for free MiniJ Smart Washing Machine Xiaomi in PDF.


| Type | Full automatic drum washing machine |
| Model | MiniJ |
| Rated Voltage and Frequency | 220V-240V / 50Hz |
| Rated Power Consumption | 1200 W |
| Rated Wash Capacity | 2.8 kg |
| Rated Spin Capacity | 2.8 kg |
| Wash Speed | 50 RPM |
| Spin Speed | 700 RPM |
| Water Pressure Range | 0.05 MPa – 0.8 MPa |
| Dimensions (W × D × H) | 500 × 415 × 630 mm |
| Net Weight | 34 kg |
| Programs | Standard, Baby Care, Quick Wash, Soft, Intensive, Rinse/Spin, Drum Clean, Boiling Wash |
| Special Features | Boiling wash (95°C sterilization), DD frequency conversion, super silent, intelligent control |
| Installation Requirements | Hard, level surface; avoid direct sunlight; room temperature above 0°C; dedicated 10A wall outlet |
| Safety Features | Child lock, grounding, automatic power-off after 10 minutes, door lock check |
| Maintenance | Clean water supply valve filter every 3-4 months; run Drum Clean program; wipe exterior with damp cloth |
| Accessories Included | Water inlet hose, drain hose, cover bottom, guide-leg, bolt spanner, warranty card, manual |
Frequently Asked Questions - MiniJ Smart Washing Machine Xiaomi
User questions about MiniJ Smart Washing Machine Xiaomi
0 question about this device. Answer the ones you know or ask your own.
Ask a new question about this device
Download the instructions for your Washing machine in PDF format for free! Find your manual MiniJ Smart Washing Machine - Xiaomi and take your electronic device back in hand. On this page are published all the documents necessary for the use of your device. MiniJ Smart Washing Machine by Xiaomi.
USER MANUAL MiniJ Smart Washing Machine Xiaomi
User Manual
MINIJ to Go
Contents
Display product color
Safety Precautions
A. Important safety symbols and precautions 3
B. Please read the following contents before using the washing machine 4
Installing the Washing Machine
A. Appearance of the washing machine 7
B.Accessories 7
C.Guide 8
Removing the shipping bolts 9
Adjusting the leveling leg 10
Fixing the cover bottom aLeveling feetnLeveling feetd guide-leg 11
Connecting the hose-water(in) 12
Connecting the hose drain 13
D.Installation requirements 14
Power supply 14
Water supply 14
Grounding 15
Ground location 16
Contents
How to operate the washing machine? 17
A. Control panel and program description 18
B.Boiling wash 20
Application method of boiling wash function 20
Inspection before carrying out boiling wash program 20
C.Boiling wash program Precautions 21
Precautions for using the detergent 22
How to clean and maintain the washing machine? 23
A.Drum clean 24
B.Cleaning the water supply valve filter 25
C.Cleaning the enclosure 26
D.Storing the washing machine 27
Troubleshooting 28
A.Troubleshooting 29
B.Product Specifications 32
C.PCB Control 33
Safety Precautions
Important Safety Symbols and Precautions. Please read this manual carefully before using the product and keep it properly.
Please read the instructions carefully and perform operation with caution and care when installing, maintaining and operating your washing machine to make the most of functions and extend the service life of the machine.we are't liable for damages resulting from improper use.
Meanings of icons and symbols in this manual:

CAUTION: Hazards or unsafe practices that may result in personal injury or property damage.

ATTENTION: To reduce the risk of fire, explosion or personal injury when using your washing machine, follow these basic safety precautions.

WARNING: Hazards or unsafe practices that may result in severepersonal injury, death or property damage.
Risk of fire
Do not wash the soaked clothing stained with gasoline or other flammable, explosive and toxic solvent, for the clothing aforesaid will release the substance that may cause fire or explosion. Wash the clothing aforesaid manually first, and ensure that all those liquid, solid and particle traces are removed before putting it into the washing machine. Hazardous substances include acetone, alcohol, gasoline, kerosene, certain liquid household cleanser and detergent, turpentine, wax and wax remover.
Risk of fire
◆ Do not use the strong acid cleanser.
◆ Do not put gasoline, alcohol, dry cleanser or other flammable and explosive substances into the washing machine as detergent.
◆ Do not overload the wall power socket or the extension cord. Otherwise, it may cause fire and electric shock.
◆ Never use this product together with other heating equipment at the same time.
Risk of placement
◆ keep the playing children (or pets) away from the washing machine; if they are trapped in it, serious injury may occur.
This appliance is not intended for use by children, persons with physical defect, sensory handicap or mental deficiency and persons with insufficient relevant experience and knowledge unless they have been adequately supervised or guided by a responsible person and understand the potential hazards to ensure that they can use the appliance safely.
◆ Install the washing machine in a dry and ventilated room rather than in a bathroom or a wet room.
◆ Position the washing machine on a hard, flat and clean surface without any water or oil.
◆ Never place the washing machine on the other washing machines.
Risk of electricity
◆ The water supply hose will degrade over time. Check the expansion, kink, breakage, wear and tear as well as the leak of the hoses periodically, and replace them promptly when there is something wrong.
◆ Owing to hot water will be used in boiling wash program, risk of electrical scalding may exist. Especially make children keep off the product;
◆ In case of gas leak, ventilate the room immediately and do not touch the power plug.
Safety Precautions
Important Safety Symbols and Precautions. Please read this manual carefully before using the product and keep it properly.
Risk of power supply
◆ Please unplug the washing machine before performing maintenance, cleaning or repair. Please unplug the washing machine before performing maintenance, cleaning or repair. Do not attempt to repair the washing machine by yourself. Repairs made by inexperienced or unqualified persons may make more serious damage to the washing machine and cause personal injury.
◆ Always unplug the washing machine and turn off the water supply faucet after use.
◆ Never bend the power cord by force or place heavy thing on the power cord;
◆ Never touch the power cord with wet hand;
◆ Never connect too many electrical apparatuses on the power outlet to avoid overloading;
◆ Never install the washing machine close to other electrical apparatuses; never place a candle or cigarette on the washing machine;
◆ Never approach the washing machine soaked in water, otherwise an electric shock may occur;
◆ Please use a dedicated wall type AC power outlet of 220V/50Hz and not less than 10A;
◆ The specification of the power plug shall comply with the requirements of electricity load current. Use the 220V AC power supply alone with reliable grounding.
How to install the washing machine?
Unpack your washing machine and inspect it for shipping damage. Also make sure that you have received all items shown below. If the washing machine was damaged during shipping or you do not have all items, contact we dealer immediately.
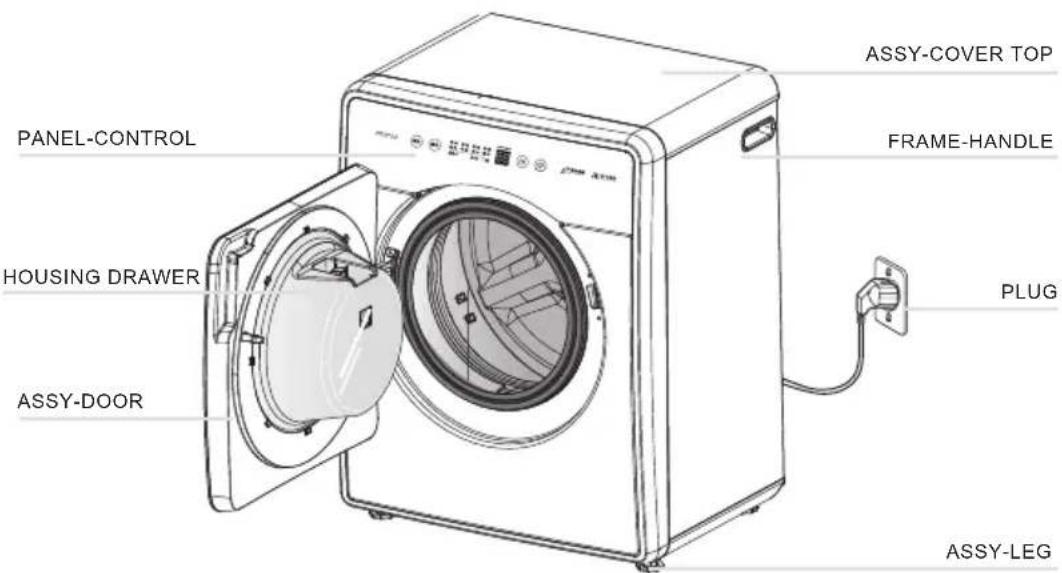
Washing machine appearance
Common part names and positions of the mini drum washing machine.
Accessories
Complete accessories and personalized design
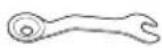
BOLT-SPANER (optional)

WARRANTY CARD
(1)
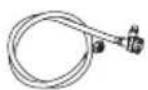
HOSE-WATER(IN)
(1)

CAP-FIXER
(3)
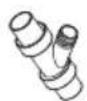
HOSE-DRAIN LINK
(1)

COVER BOTTOM
(1)
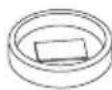
GUIDE-LEG
(4)
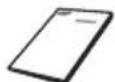
MANUAL-BOOK
(2)
GUIDE
INSTALLING THE WASHING MACHINE
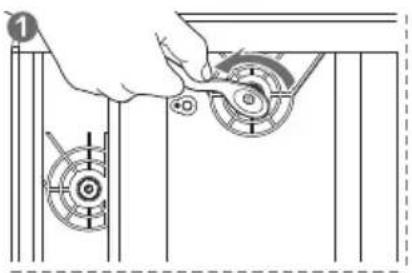
Removing the shipping bolts
natural_image
Diagram showing a hand adjusting a mechanical component with two circular parts, no text or symbols presentLoosen all bolts with the wrench.
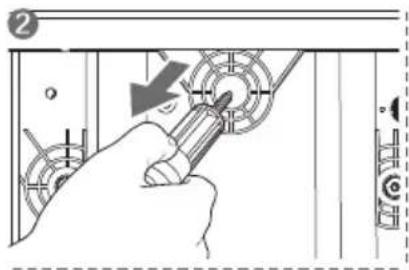
Take each bolt head and pull it out from the loose hole.
natural_image
Hand operating a mechanical component with a circular dial and arrow indicating direction (no text or symbols)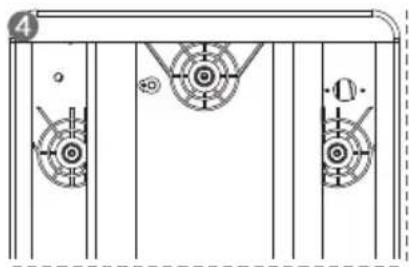
natural_image
Pure technical diagram of mechanical components without any text, numbers, or symbolsDismantle three shipping bolts in turn and keep them properly

- Three shipping bolts on the back of the machine must be dismantled before using the washing machine.
- Packing materials can be dangerous to children; keep all packing materials well out of the reach of children.
Adjusting the leveling leg
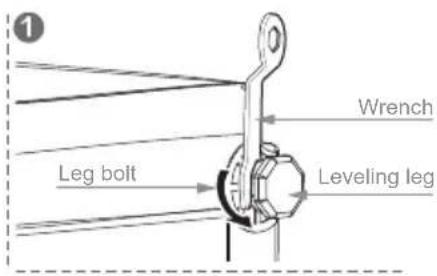
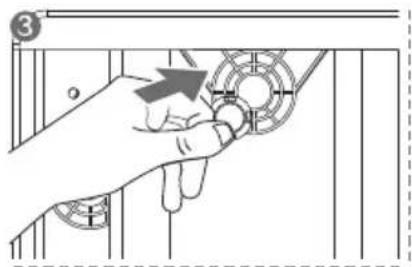
Turn left to loosen the leg bolt with the wrench.
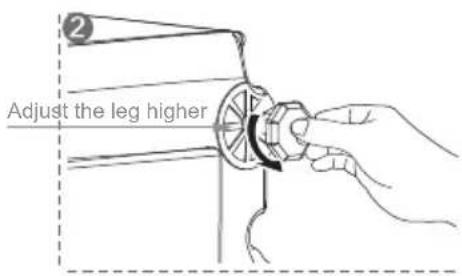
Adjust the leveling leg until it is at the desired height, turn left for higher, and turn right for lower.
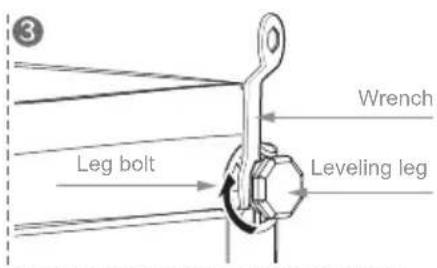
Tighten the feet with a wrench and adjust four feet
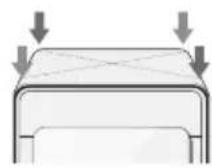
Check if the leveling leg is level
Press two top corners in diagonal direction of the washing machine with both hands to test whether the washing machine could shake.

If the floor is uneven, adjust the leveling leg of the washing machine (do not insert pieces of wood or any other objects under the leg)
When you tighten the leg bolt with the wrench for fixation and adjustment, avoid movement of the leg.
Fixing the cover bottom aLeveling feetnLeveling feetd guide-leg
1
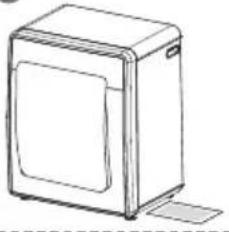
natural_image
Line drawing of a rectangular kitchen appliance with a lid and side panel (no text or symbols)a. Side lay the machine body and place the cover bottom to the bottom
②
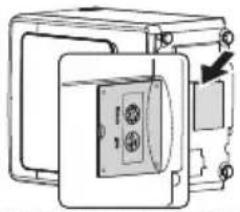
natural_image
Diagram of a device with an open lid and internal components, showing no text or symbols.b. Align one side of the cover bottom and insert it into the groove
③
natural_image
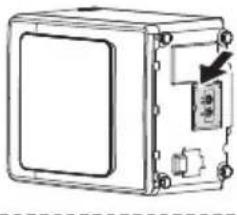
Technical line drawing of a mechanical device with internal components and mounting holes (no text or symbols)c.Clip four bayonets of the cover bottom into the groove, and press the whole bottom plate into the groove.
4
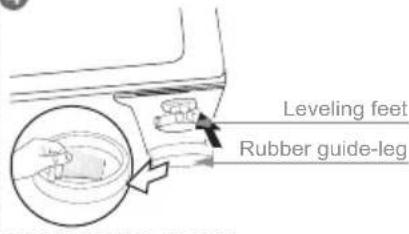
d. Tear off the internal adhesive paper of rubber guide-leg and stick it on the leveling feet of machine;
5
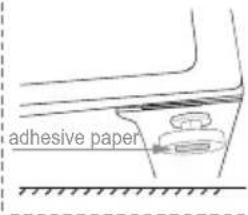
e. Tear off the external adhesive paper, and put down the machine slowly to make the guide-leg stick to the ground;
natural_image
Line drawing of a washing machine with a magnified inset showing the base and side view (no text or symbols)
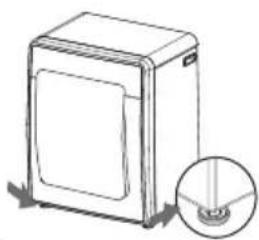
◆ After sticking the adhesive papers tightly, put down the machine body slowly to make four guide-legs fully stick to the ground.
Connecting the hose-water(in)
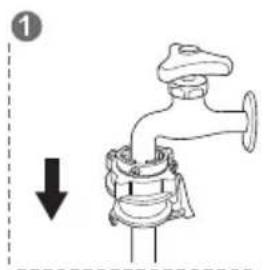
natural_image
Line drawing of a faucet with a downward arrow indicating force or movement (no text or symbols)a. Dismantle the existing hose-water(in);
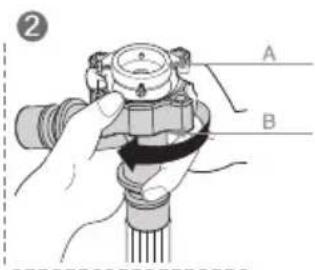
b. Loosen the screw B, turn it to a position with a distance of 5mm from A;
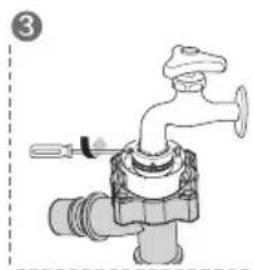
natural_image
Illustration of a faucet with a valve inserted, showing mechanical components (no text or symbols)c. Tighten the hose-water(in) and the water tap connector.
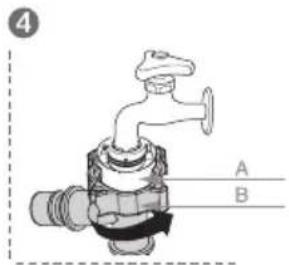
natural_image
Illustration of a faucet with labeled parts A and B (no text or symbols on the diagram itself)e. Turn part B in the direction as shown in the figure and combine it with part A;
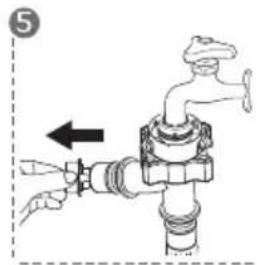
f. Take down the blank plug from the connector on the other end of T type hose-water(in);
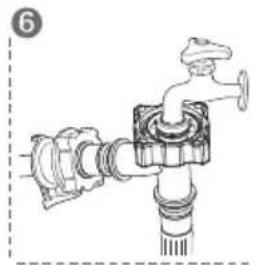
natural_image
Diagram of a faucet assembly with pipe fittings and valve (no text or labels)g. Connect the hose-water(in) connector with the joint to make a click sound, automatic combination is completed.

◆ After installation, turn on the water faucet to check for any leakage. Please use the hose-water(in) attached with the machine;
◆ Unplug the appliance and turn off the water faucet after use.
Connecting the hose drain
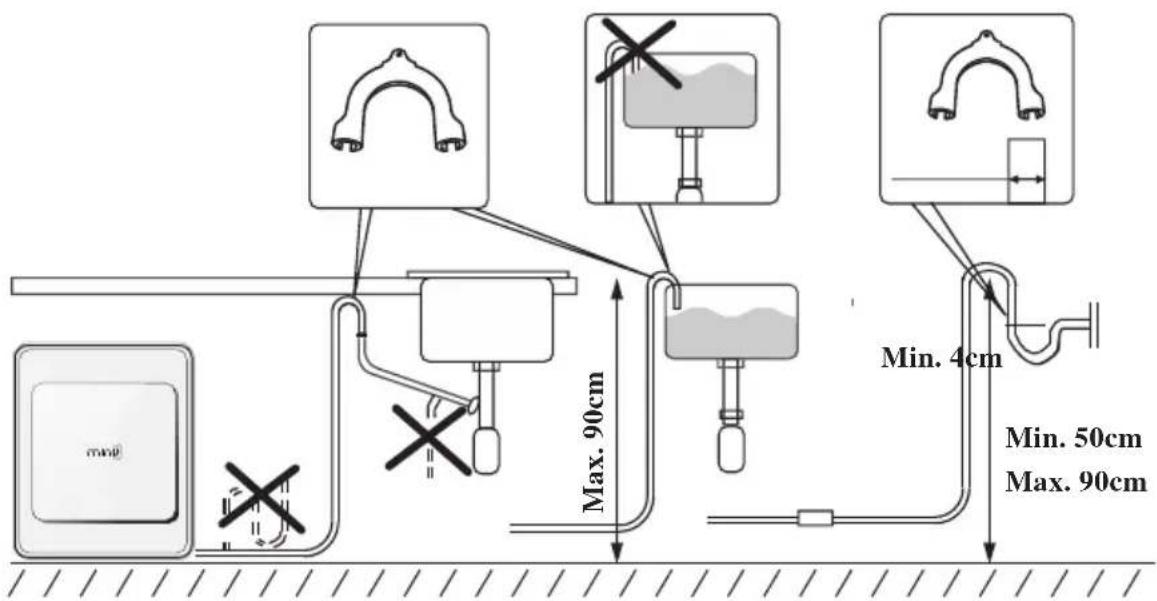
The end of the hose drain may be positioned in three ways:
- In a floor drain directly
We recommend that you shall use the hose drain attached to the appliance; it can be directly inserted into the floor drain with the width of the trough entry not less than 4 cm.
2.In a sink hose drain branch:
The end of the hose drain is connected to a sink hose drain branch. If the hose is too long, it cannot be forced into the washing machine, otherwise abnormal noise may occur. Note: the width of the sink entry shall not less than 4 cm.
- Over the edge of a wash basin:
The end of the hose drain must be placed at a height of between 50 and 90 cm from the ground. To avoid the influence of the hose drain bending on water flow, secure it over the edge of the wash basin with a hook or a piece of string to prevent the hose drain from moving.
Note: the end of the hose drain cannot be immersed in water.
Installation requirements
all electrical circuit and grounding must be set as per the national electrical standard.
Power supply

To avoid the unnecessary risk of fire, electric shock or personal injury, all electrical circuit and grounding must be set as per the national electrical standard. It is the owner's responsibility to provide proper maintenance on the electrical appliance.
◆ Do not overload the wall power socket or the extension cord. Otherwise, it may cause fire and electric shock.
◆ Only the power cord equipped with the washing machine can be used.
When ready for installation, ensure the power supply complies with the following items: Fuse or breaker of 220V, 50Hz, 10A. When the heating function is used, the maximum current of the washing machine may reach 10A. Ensure that your power supply unit (current, voltage and cable) can meet the normal load requirements of the appliance. Use the State Grid. If you are not sure about the voltage, contact with the manufacturer, product and service agent or qualified person.
◆ To guarantee your safety, use the three-core socket and check to ensure it is grounded accurately and reliably. (The washing machine has been equipped with a three-core socket.)
◆ Protect the power cord.
◆ The power cord has to be positioned so that it will not be stepped on, pressed or clamped by the article on or next to it. Pay special attention to the power cord of plug, socket and power cord contact of the appliance.
Water supply

◆ The working water pressure of the washing machine is 0.05MPa\~0.8MPa. When the water pressure is below 0.05MPa, the water supply valve may not work normally, or the time of water supply is longer than that of program control, and the display screen shows “SF”.
◆ The water supply faucet must be less than 122cm away from the rear of the washing machine so that the water supply hose can be easily connected to the washing machine and the water faucet.
◆ To prevent the risk of water leakage and waterway damage, consider the following ways:
Ensure water tap is at a reasonable position for easy connection.
Turn off the water faucet when the washing machine is not used.
Check water leakage conditions of the internal loop regularly.
Grounding

◆ The washing machine must be grounded. If the washing machine has a fault or cannot run normally, the current can be conducted to the ground, minimizing the risk of electric shock.
◆ The ground wire cannot be connected to the plastic pipe, gas conduit or hot-water pipeline. If the ground wire is connected to the improper ground conductor, electric shock may occur.
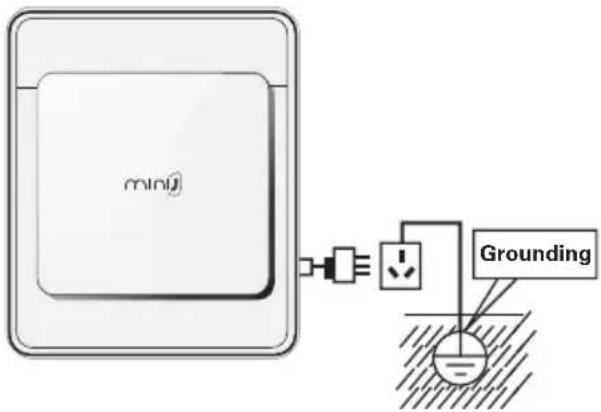
If you are not sure whether the washing machine is grounded accurately, check and verification should be performed by the manufacturer, product and service agent or qualified person.
If the power cord is damaged, replacement should be conducted by the manufacturer, product and service agent or qualified person to avoid risk. The plug attached to the washing machine cannot be transformed. If the plug cannot match the socket, a suited one should be installed by the manufacturer, product and service agent or qualified person.
Installation requirements
all electrical circuit and grounding must be set as per the national electrical standard.
Ground location

To minimize the vibration or unbalanced load, the wood floor has to be reinforced. The carpet and the soft floor tile surface may cause vibration and slight movement of the washing machine in operation.
Before you install the washing machine, select a location with the following characteristics:
◆ Do not position the washing machine on a platform or a structure with weak support.
◆ A hard, level surface (if the surface is uneven, see “Adjusting the leveling leg” on page 10).
◆ Avoid direct sunlight, with adequate ventilation. (The washing machine shall not be installed in a bathroom or a wet room.)
◆ Room temperature shall not fall below 0 °C.
◆ Away from sources of heat such as coal or gas stove.
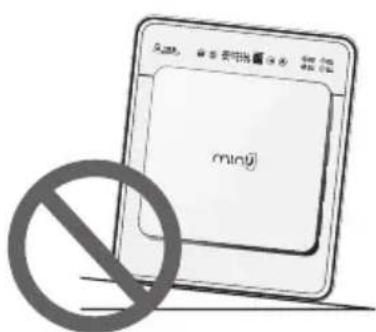
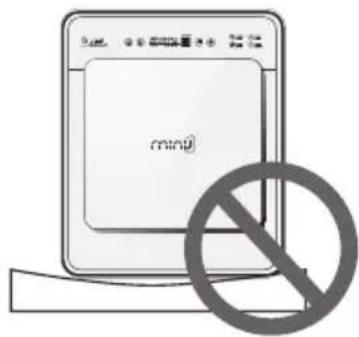
Make sure that the washing machine does not stand on its power cord. Ventilation openings must not be obstructed by carpeting when the washing machine is installed on a carpeted floor.
How to operate the washing machine?
Description of buttons and programsUsing methods 18
High temperature boiling wash, as well as precautions 20
Using methods of detergents and additives 22
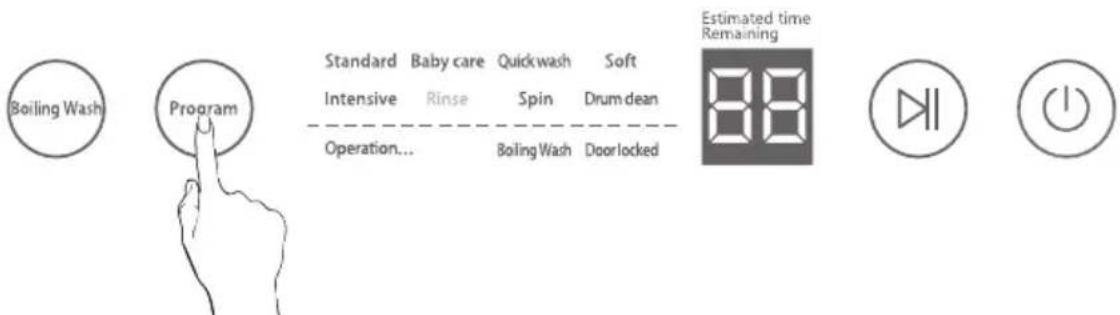
Control panel and program description
Control panel and program description facilitate easy operation of the drum washing machine
minu


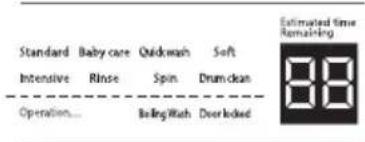
Standard Baby care Quickwash Soft Intensive Rinse Spin Drum dean Operation... BillingWash Doorlocked


煮洗
Boiling wash button Program button
This button is for washing routine clothing, such as children clothing and underclothes; the boiling wash function is applicable for standard wash and baby care program only.

Start/Pause
Press this button to start/pause the operation of the machine; if you want to change washing program, press this button for pause, then press the button of selected program to start.

Display button
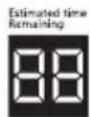
Display the remaining time for finishing washing; error message is displayed if the washing machine breaks down, in order to take appropriate countermeasures.
程序
Press this program button to select one from eight optional programs.

ON/OFF button
Turn on/off the washing machine by this button. If the washing machine is kept unused for 10 minutes after power on, the power supply will be shut off automatically.

Core selling points
DD frequency conversion and super silent washing of the washing machine; high temperature sterilization at 95°C and comprehensive protection of the clothing.
Intelligent control program, washing precisely
Multiprogramming, washing state is absolutely clear

Cotton
suitable for washing generally or slightly soiled cotton textiles, linen bed sheet, linen table cloth, underwear, towels, shirts, etc.

Soft
suitable for washing generally or slightly soiled cotton textiles, linen bed sheet, linen table cloth, underwear, towels, shirts, etc.

Baby care
detergents on baby's laundry can be dissolved completely at high temperature so that baby's soft skin can be protected.

Drum clean
This program is designed to clean the inner drum of washing machine to keep it sanitary (no clothing shall be added when this program is used)

Quick Wash

suitable for washing slightly soiled laundry that is worn only once or needs washing a little, has a special smell.

Intensive

suitable for washing moderately or heavily soiled cotton textiles, linen bed sheet and table cloth, underwear, towels, jeans, overalls, etc.

High temperature boiling wash

High temperature washing and additional rinse will be carried out to ensure children clothing or underclothes free of residual washing powder;

rinse/spin

MINU drum washing machine has single rinse/spin function, and single rinse is used to rinse and spin the clothing;
Boiling wash
Eradicating invisible residual bacteria, facilitating comprehensive protection for health
Application method of boiling wash function
a. Put clothing into the washing drum and add a proper amount of detergent, then close the door;
b. Press the power supply button ⏻ ;
c. Press the "program" button to select standard wash or baby care program;
d. Then press the "boiling wash" button;
e. Press the "start/pause" button ▶ to begin wash.

In order to enhance the washing effect, detergent and bleacher may be added into the washing drum before adding clothing
Inspection before carrying out boiling wash program
A. Check the classified washing of clothing
a. Carry out classification based on color and smudginess degree of clothing (for instance, more dirty clothing, unfaded clothing, white clothing, soft clothing etc.).
b.Fasten all attached articles of the clothing and empty the pockets; if there is damage of clothing, please repair it before washing.

- Never boiling wash the clothing which may fade;
- Never boiling wash soft clothing, such as wool product or ladies underwear etc;
B. Check the cover of machine door
a. Check if machine button is fastened;
b. If clothing is clamped by the cover of machine door during wash, the clothing may be torn or leakage may occur. Please ensure machine door is closed and clothing is not clamped.

Boiling wash program Precautions
◆ Please use a dedicated wall type AC power outlet of 220V-240V/50Hz and 10A;
◆ Never use power extension line;
- Adopting other supply voltage or current may result in fire, electric shock or power failure;
◆ Never use this product together with other heating equipment at the same time;
◆ The temperature of boiling wash program may be different due to environment;
◆ The internal temperature may be very high in the boiling wash program, so operate carefully to avoid scalding.
◆ Provide cold water to cool the hot water, ensure to reach the safe water temperature during drainage;
◆ Time required for sterilization by boiling wash program is based on water inlet temperature, the lower water inlet temperature is, the longer time is required;
◆ With specific design for the washing machine, only cold water will be supplied to cool the hot water after the boiling wash program;
◆ Boiling wash program can be kept on only after the machine door is closed;
Please ensure the cap-drawer is placed at the correct position, and it cannot be taken down during wash
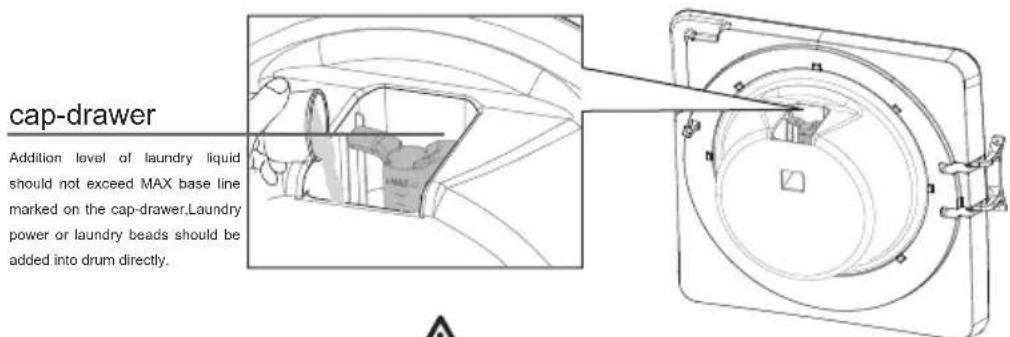
Precautions for using the detergent

A. Determining the amount of laundry liquid
The amount of detergent is based on the water hardness in your area and the detergent manufacturer's recommendations on the package as well as the weight of laundry, the type of fabric, the degree of soiling etc.
B.Selecting proper laundry liquid
The type of detergent you should use is based on the type of fabric (cotton, delicate items, chemical fiber and wool), color, wash temperature, degree and type of soiling. Always use "low foam" washing powder, which is designed for drum washing machine.
◆ Keep detergents and additives in a safe, dry place out of the reach of children.
◆ Please use appropriate amount of detergent according to the type of fabric and the degree of soiling for the sake of environmental protection.
◆ Appropriate amount of detergent shall be used according to the weight of laundry, the degree of soiling and product description.
How to clean and maintain the washing machine?
Keeping the washing machine clean can improve its performance, avoid unnecessary repairs and prolong its service life. When the washing machine has been in service under a wet environment for a long time, all sorts of bacteria in air may adhere to it, forming mould and bringing harm to human bodies thereby. Therefore, please keep the washing machine clean.
Drum clean
This is a drum auto clean program and can remove the possibly bred mould in the drum.
Precautions for using drum cleaning function
A. Turn on the water supply faucet.
B. Press the Power button ⏻ to start the washing machine.
C. Press the Program button to select the Drum clean program.
D. Press Start/Pause button ▶ to start the Drum clean program.
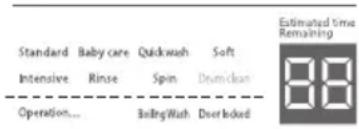

Never add clothing into the inner drum in drum cleaning program.
Application method of drum cleaning function

◆ Be sure to use the specialized cleansers to clean the inner drum.
◆ The drum can be cleaned without cleansers for the Drum clean program.
◆ The Drum clean program cannot be used when there are clothes in the washing machine, or the laundry or machine may be damaged.
Only one tenth of drum cleanser amount recommended by the manufacturer shall be used for the sake of environmental protection.
◆ Bleach containing chlorine may fade the laundry; be sure to use oxygen bleach only.
◆ There are powder and liquid cleansers to clean the drum.
◆ Powder cleanser: Please use powder bleach or the cleanser specialized for the inner drum of the washing machine.
◆ Liquid cleanser: Please use liquid oxygen bleach or the cleanser specialized for the inner drum of the washing machine.
◆ Never use foam type detergent.
Cleaning the water supply valve filter
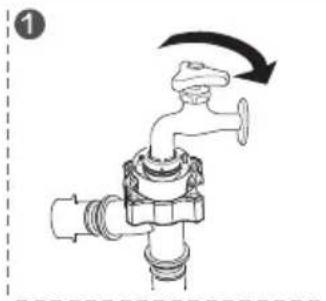
You should clean the supply valve filter at least 3 to 4 times per year, or when you see "SF" error message on the display:
natural_image
Diagram of a faucet with a valve and pipe fitting, showing a rotation arrow (no text or symbols)Pull out the power plug and turn off the water supply faucet of the washing machine.
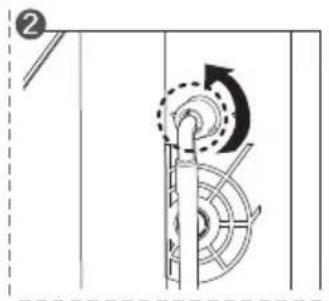
Unscrew the water supply hose from the back of the machine.
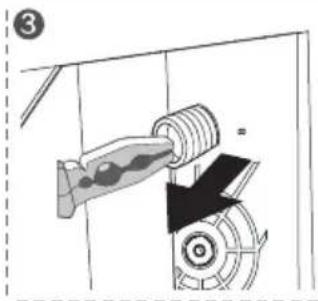
With a pair of pliers, gently pull out the water supply valve filter and rinse it under water until clean.
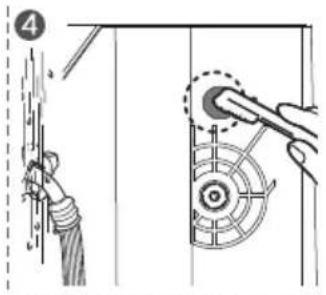
Clean the inside and outside of the threaded connector.
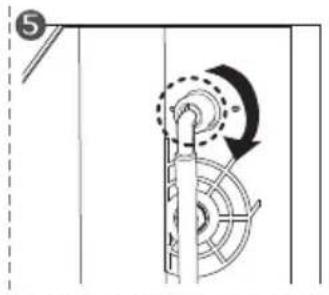
Push the filter back into the original place. Reconnect the water supply hose.
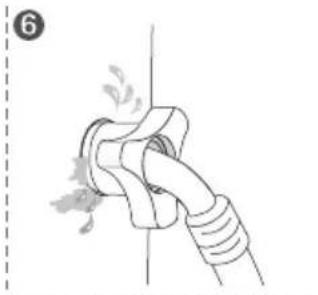
natural_image
Illustration of a rope knot with a handle and spring, no text or symbols presentTurn on the faucet and make sure the connections are watertight.
- Rust: Rusting may occur if water with rust or rusty article, such as hair pin, is put into the drum, or water has been remained in the drum for too long.
- Rust cleaning: Squeeze out the rust removing paste on a soft cloth or sponge, and then wipe the rusty parts.
※ Never use a steel brush, otherwise the drum will be damaged. - Residual detergent: (Dark color and stain) After long service of the washing machine, if excessive detergent is added, or cleaning program is repeated with detergent not dissolved completely, clothing may be contaminated by residual detergent.
Cleaning the enclosure
Clean the housing of washing machine regularly to keep it clean and sanitary
1
natural_image
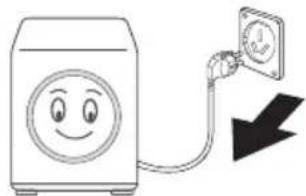
Simple line drawing of a smiling washing machine connected to a wall-mounted power outlet with a downward arrow (no text or symbols)a. Unplug the washing machine before cleaning, otherwise electric shock or personal injury may occur.
2
natural_image
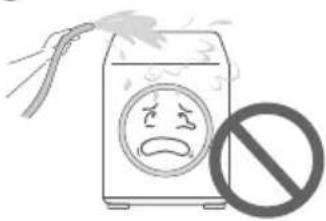
Illustration of a hand using a tool to clean a washing machine with a sad face and a no-smoking symbol (no text or labels)b. Never spill water on the washing machine, otherwise short circuit or electric shock may occur.
③
natural_image
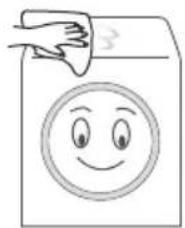
Simple line drawing of a hand holding a paper with a smiley face inside, no text or symbols present.c. Use a wet cloth to clean the washing machine.
4
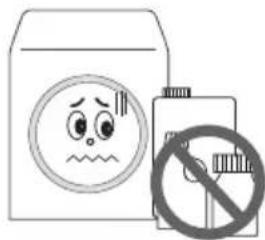
d. Never use synthetic detergent, benzene contained detergent or diluents.

Precautions for cleaning housing of the washing machine
◆ Wipe the washing machine enclosure, including the control panel, with a soft cloth and nonabrasive household detergents.
◆ Use a soft cloth to dry the enclosure.
Do not pour water on the enclosure in case parts of the machine would be damaged.
Storing the washing machine
Drain the residual water out of the machine; otherwise the washing machine may be damaged
1 Select the Spin program to drain the water out with the fastest speed.
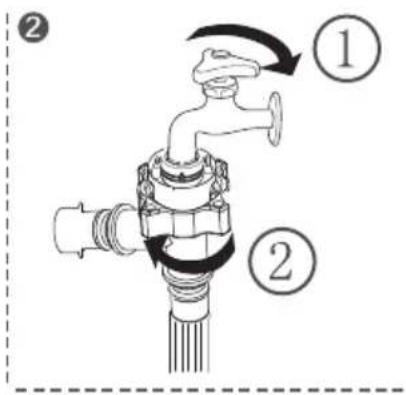
Turn off the water faucet and separate the water supply hose.
natural_image
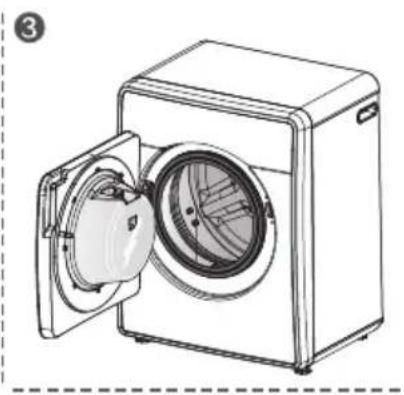
Line drawing of a washing machine with an open door opening the lid (no text or symbols)Unplug the washing machine and open the machine door to allow ventilation.
Troubleshooting
If the washing machine is in the following situations, sometimes it is not a failure;
Check according to the list below before consigning for repair;
If it is indeed a failure, contact with the after-sale service department of our company, and never handle it by yourself.
| Phenomenon | Solution |
| Detergent remains in the detergent drawer after the washing is complete | Check if the water pressure is sufficient when washing.Check if the washing powder are damp and caking. |
| Washing machine vibrates or is too noisy | Check if the washing machine is set on an uneven surface. If the surface is uneven, adjust the leveling leg to level the appliance.Check if the shipping bolts are removed.Check if the washing machine is touching any other objects.Check if the laundry load is balanced in the inner drum of the washing machine. |
| The displayed washing time deviates from the actual washing time | There is deviation in the weight of laundry, watery supply time and balancing time. |
| The drainage pump has abnormal noise | Check if the drainage pump filter is blocked by laundry flocks and clean the debris |
| Foam overflows from the air return hole on the back of washing machine | Too much washing powder, so reduce its amount;Pour the washing powder into the drum directly;Use low foam washing powder or liquid detergent dedicated for drum. |
Troubleshooting
Error messages description
| Error code | Code description | Solution |
 | Abnormal door lock | Check if the door is opened and make sure the door is closed firmly.Whether the wiring harness of the computer board falls off.Check if the plug wire of door switch is loose or has a poor contact. |
 | Abnormal water supply | Check if the water supply faucet is turned on.Clean the water supply valve filter.Check the water pressure.Check if the drain valve is plugged up. |
 | Abnormal draining | Clean the drain valve.Check if the drain hose is properly installed.Check if the hose drain is plugged up. |
 | Extreme low water level with standard watering times | Check if the drain valve is plugged up.Check if the water pressure is normal.Check if there is water leakage. |
 | Imbalance alarm | Excessive eccentricity or winding of clothing, so put the clothing again after tidying up.Increase the quantity of clothing to be washed.Check if the washing machine feet are level adjusted. |
 | Abnormal communication between computer board and frequency conversion board | Power off the machine to check if the wire connecting the motor and the electric reactor falls off.Check if the patch cord of the motor and cables fall off.Check if the computer board wirings fall off. |
 | Overtop water temperature for above 5 seconds | At this time, keep children off the washing machine and restart it.Unplug the power cord, and replug it after cooling down. |
Error code Code description Solution
| tf | Temperature sensor abnormality | Check if the NTC plug wire is in poor contact.Test the resistance of temperature sensor in cold state with the multimeter and check if it is above 1.5MΩ.Check if the wire and plug-in between the temperature sensor and the computer board are in poor contact. |
| -f | Too high water level | Disentangle flexible pipes of the pressure switch, then test-run the machine.Check if there is something wrong with the drainage pump.Check if the hose of pressure switch is clogged. |
| xu lu | Abnormal voltage | Power supply voltage is unstable.Program will run automatically after the voltage becomes stable.Purchase a device which can provide stabilized voltage. |
Problems and solutions
A. Your washing machine is installed with the fuzzy logic control system which can automatically detect the balance of laundry during spinning. When the laundry is detected unbalanced or with strong eccentricity by the washing machine, the machine will properly extend the spin time to adjust the balance of the laundry or run at a lower speed when spinning in order to avoid damage to the machine.
B. When there are excessive foams, the time on the display will cease for a spell, meanwhile the machine is eliminating the foams rather than fault, and the machine will automatically return to normal program if finished.
C. Before contacting After-sales Service Department:
- Try to solve the problem (see "Troubleshooting").
◆ Restart the program to see if the fault still exists.
If the fault persists, call after-sales service and describe the problem.
Product Specifications
Energy efficiency program: Power supply + strong wash + boiling wash for 5 times (pressed in five seconds)".
| ModelMINIJ | ||
| Type | Full automatic washing machine | |
| Rated voltage and frequency | 220V-240V/50Hz | |
| Wash mode Drum-type | ||
| Spin mode | Centrifugal type | |
| Rated wash and Spin capacity | Wash | 2.8kg |
| Spin | 2.8kg | |
| Rated consumed power | 1200W | |
| Tap water pressure(MPa) | 0.05MPa-0.8MPa | |
| External dimensions (mm) | 500×415×630 | |
| Net weight (kg) | 34kg | |
| Rotation rate of wash | 50RPM | |
| Rotation rate of spin | 700RPM | |
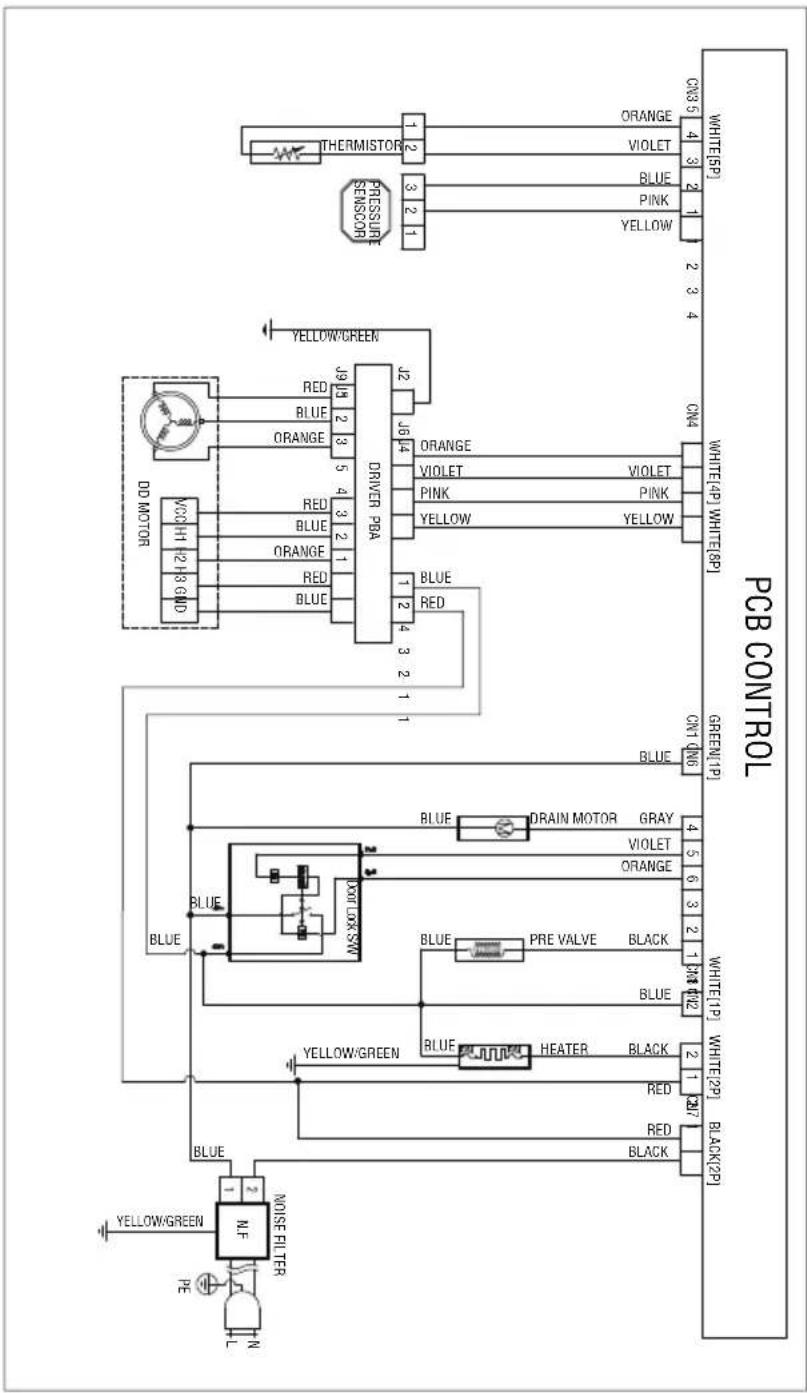
flowchart
graph TD
    A["White 5P"] --> B["PCB CONTROL"]
    C["White 4P"] --> B
    D["White 2P"] --> B
    E["Black 2P"] --> B
    F["Blue 1P"] --> B
    G["Blue 2P"] --> B
    H["Blue 3P"] --> B
    I["Blue 4P"] --> B
    J["Blue 5P"] --> B
    K["Yellow 5P"] --> B
    L["Green 1P"] --> B
    M["Orange 1P"] --> B
    N["Red 1P"] --> B
    O["Blue 2P"] --> P["Blue VOLT"]
    Q["Blue 3P"] --> R["PINK VOLT"]
    S["Blue 4P"] --> T["VOLT"]
    U["Blue 5P"] --> V["VOLT"]
    W["Blue 6P"] --> X["VOLT"]
    Y["Blue 7P"] --> Z["VOLT"]
    AA["Blue 8P"] --> AB["VOLT"]
    AC["Blue 9P"] --> AD["VOLT"]
    AE["Blue 10P"] --> AF["VOLT"]
    AG["Blue 11P"] --> AH["VOLT"]
    AI["Blue 12P"] --> AJ["VOLT"]
    AK["Blue 13P"] --> AL["VOLT"]
    AM["Blue 14P"] --> AN["VOLT"]
    AO["Blue 15P"] --> AP["VOLT"]
    AQ["Blue 16P"] --> AR["VOLT"]
    AS["Blue 17P"] --> AT["VOLT"]
    AU["Blue 18P"] --> AV["VOLT"]
    AW["Blue 19P"] --> AX["VOLT"]
    AY["Yellow 5P"] --> AZ["THERMISTOR"]
    BA["Green 2P"] --> BB["PRESSURE SENSOR"]
    BC["Red 2P"] --> BD["DRIVEER PBA"]
    BE["Blue 3P"] --> BF["ORANGE"]
    BG["Red 3P"] --> BH["ORANGE"]
    BI["Blue 4P"] --> BJ["ORANGE"]
    BK["Red 4P"] --> BL["ORANGE"]
    BM["Blue 5P"] --> BN["VOLT"]
    BO["Green 6P"] --> BP["VOLT"]
    BQ["Black 6P"] --> BR["VOLT"]
- User Manual
- Contents
- Safety Precautions
- Installing the Washing Machine
- How to operate the washing machine? 17
- How to clean and maintain the washing machine? 23
- Troubleshooting 28
- Risk of fire
- Risk of placement
- Risk of electricity
- Risk of power supply
- How to install the washing machine?
- Washing machine appearance
- Accessories
- Removing the shipping bolts
- Adjusting the leveling leg
- Fixing the cover bottom aLeveling feetnLeveling feetd guide-leg
- Connecting the hose-water(in)
- Connecting the hose drain
- Installation requirements
- Power supply
- Water supply
- Grounding
- Ground location
- How to operate the washing machine?
- Control panel and program description
- 煮洗
- Boiling wash button Program button
- Start/Pause
- Display button
- 程序
- ON/OFF button
- Core selling points
- Intelligent control program, washing precisely
- Cotton
- Soft
- Baby care
- Drum clean
- Quick Wash
- Intensive
- High temperature boiling wash
- rinse/spin
- Boiling wash
- Application method of boiling wash function
- Inspection before carrying out boiling wash program
- Check the classified washing of clothing
- Check the cover of machine door
- Boiling wash program Precautions
- Precautions for using the detergent
- Determining the amount of laundry liquid
- B.Selecting proper laundry liquid
- How to clean and maintain the washing machine?
- Precautions for using drum cleaning function
- Application method of drum cleaning function
- Cleaning the water supply valve filter
- Cleaning the enclosure
- Precautions for cleaning housing of the washing machine
- Storing the washing machine
- Troubleshooting
- Problems and solutions
- Product Specifications
Brand : Xiaomi
Model : MiniJ Smart Washing Machine
Category : Washing machine