
GoXtreme Enduro Black - Video camera EASYPIX - Free user manual and instructions
Find the device manual for free GoXtreme Enduro Black EASYPIX in PDF.


| Product Type | Action Video Camera |
| Brand | Easypix |
| Model | GoXtreme Enduro Black |
| Video Resolution | Up to 4K@30fps, 2.7K@30fps, 1080p@60fps/30fps, 720p@120fps/60fps |
| Photo Resolution | Up to 16MP (interpolated), 12M, 8M, 5M, 2M |
| Sensor | 8MP |
| Display | 2.0" LCD (5 cm) |
| Lens Angle | 170° wide angle |
| Waterproof Housing | Up to 30m depth (included) |
| WiFi | 2.4 GHz, range 5–10m (remote: up to 10m) |
| Remote Control | Included, splashproof only (not waterproof) |
| Battery | Exchangeable 900mAh Li-Ion, up to 90 min recording |
| Storage | MicroSD up to 64GB (U3 class 10 or higher, not included) |
| File Formats | MP4 (video), JPG (photo) |
| Interfaces | HDMI, USB, WiFi |
| Dimensions | 59 x 41 x 30 mm |
| Webcam Function | Windows only (video only, audio via headset) |
| App Compatibility | XDV app (iOS/Android) |
| Charging | USB, max 1000mAh |
| Box Contents | Camera, waterproof housing, second cover, remote control, various mounts, battery, USB cable, manual |
| Operating Temperature | Max 40°C |
| Maintenance | Rinse housing with fresh water after salt/chlorine use, dry with housing open |
| Safety | Not suitable for children under 3; not waterproof without housing; avoid high temperatures |
| Spare Parts & Repairability | Battery exchangeable; MicroSD card user-replaceable; accessories available |
Frequently Asked Questions - GoXtreme Enduro Black EASYPIX
User questions about GoXtreme Enduro Black EASYPIX
0 question about this device. Answer the ones you know or ask your own.
Ask a new question about this device
Download the instructions for your Video camera in PDF format for free! Find your manual GoXtreme Enduro Black - EASYPIX and take your electronic device back in hand. On this page are published all the documents necessary for the use of your device. GoXtreme Enduro Black by EASYPIX.
USER MANUAL GoXtreme Enduro Black EASYPIX
Table of contents
General information....3
Explanation of symbols ....3
Product description....4
Intended use ....4
Restrictions....4
Safety instructions....5
Operating environment....6
Camera description ....7
First use 8
Step 1: Insert and charge the battery....8
Step 2: Turn on/off the camera ....9
Step 3: Insert and format the MicroSD card....9
Step 4: Switching between modes .....10
Settings....12
Remote control....16
Connection to "XDV" App....17
Webcam function (Windows only)....19
Technical specifications ....20
Box contents....21
Disposal 21
Disclaimer
Easypix makes no representations or warranties with respect to this manual and, to the extent permitted by law, expressly limits its liability for breach of any warranty that may arise from replacement of this manual by another. Furthermore, Easypix reserves the right to revise this publication at any time without obligation to notify any person of the revision.
Easypix is not responsible or liable for the misuse of the information contained herein. If you have suggestions for improvement or changes or if you have found errors in this publication, please let us know.
All relevant state, regional and local safety regulations must be observed when installing and using this product. For safety reasons and to ensure compliance with the documented system data, only the manufacturer may carry out repairs on components.
Failure to observe this information may result in personal injury or equipment damage.
Copyright © Easypix GmbH
All rights reserved. No part of this publication may be reproduced, distributed or transmitted in any form or by any means, including photocopying, recording or other electronic or mechanical means, without the prior written permission of the publisher. For permission requests, please contact the publisher in writing.
Easypix GmbH, Em Parkveedel 11, 50733 Cologne, Germany support@easypix.com - www.easypix.com
General information
Please read this manual and its safety instructions before using this product. Follow all instructions. This will prevent hazards that could result in property damage and/or serious injury.
The product may only be used by persons who have fully read and understood the contents of this user manual.
Make sure that each person using the product has read and follows these warnings and instructions.
Keep all safety information and instructions for future reference and pass them on to subsequent users of the product.
The manufacturer is not liable for damage to property or personal injury resulting from incorrect handling or failure to observe the safety instructions.
Explanation of symbols

WARNING
"Warning" indicates a hazard with a risk which, if not avoided, may result in injury.
NOTE!
"Note" indicates information that is considered important but is not hazard-related.
Product description
GoXtreme Enduro Black is a compact and portable action video and still image camera with class leading features including video recording in stunning ultra high definition at up to 30 frames per second and still image capture at up to 16MP.
The 170° viewing angle, built in LCD screen and WiFi connectivity allow you to capture, view and share every detail ensuring nothing is left to chance.
With a wide selection of accessories and mounts including the 30M waterproof case available out of the box, the GoXtreme Enduro Black is ready for your next adventure.
Intended use
This product is suitable for use during various sports or activities. The supplied brackets allow the camera to be mounted in multiple positions: on a bicycle, helmet or on the body.
Restrictions

WARNING
The product is not suitable for children under 3 years of age. Contains small parts. Risk of suffocation.

WARNING
The product is not waterproof.
It should only be immersed under water when securely enclosed in the supplied housing.
- Before using the product in water, make sure that all covers and latches on the camera and underwater housing are securely closed and sealed.
- After use in salty or chlorinated water, clean the housing under tap water and allow it to dry.
- After use under water, the housing must be left open to dry in order to prevent condensation or rust formation.
Safety instructions

WARNING
This product is only suitable for the purpose described. The manufacturer is not liable for damage caused by improper use.

WARNING
Please read these operating instructions carefully before use.
• Always protect your camera from falls, bumps and shocks.
- Keep a sufficient distance from objects that generate strong magnetic fields or radio waves to prevent them from damaging the product or affecting the sound and picture quality.
- In the unlikely event of overheating, smoke or unpleasant odours coming from the unit, disconnect it immediately from the charging cable and remove the battery to avoid fire.
- Please do not disassemble the product. Doing so will void any warranty.
- Please dispose of the waste and residues at the end of the product's life in accordance with local laws and regulations.
Operating environment
- Please peel off the transparent protective film from the lens and screen before first use.
- It is normal for the case to become warm during use.
- To avoid condensation inside the housing or behind the lens, the product should not be exposed to large differences in temperature and humidity.
- Do not expose your camera to temperatures exceeding 40°
- Store the product in a cool place (at room temperature) in a dry and dust-free environment and never expose it to high temperatures or prolonged exposure to direct sunlight.
- Protect the product from falls, bumps and knocks.
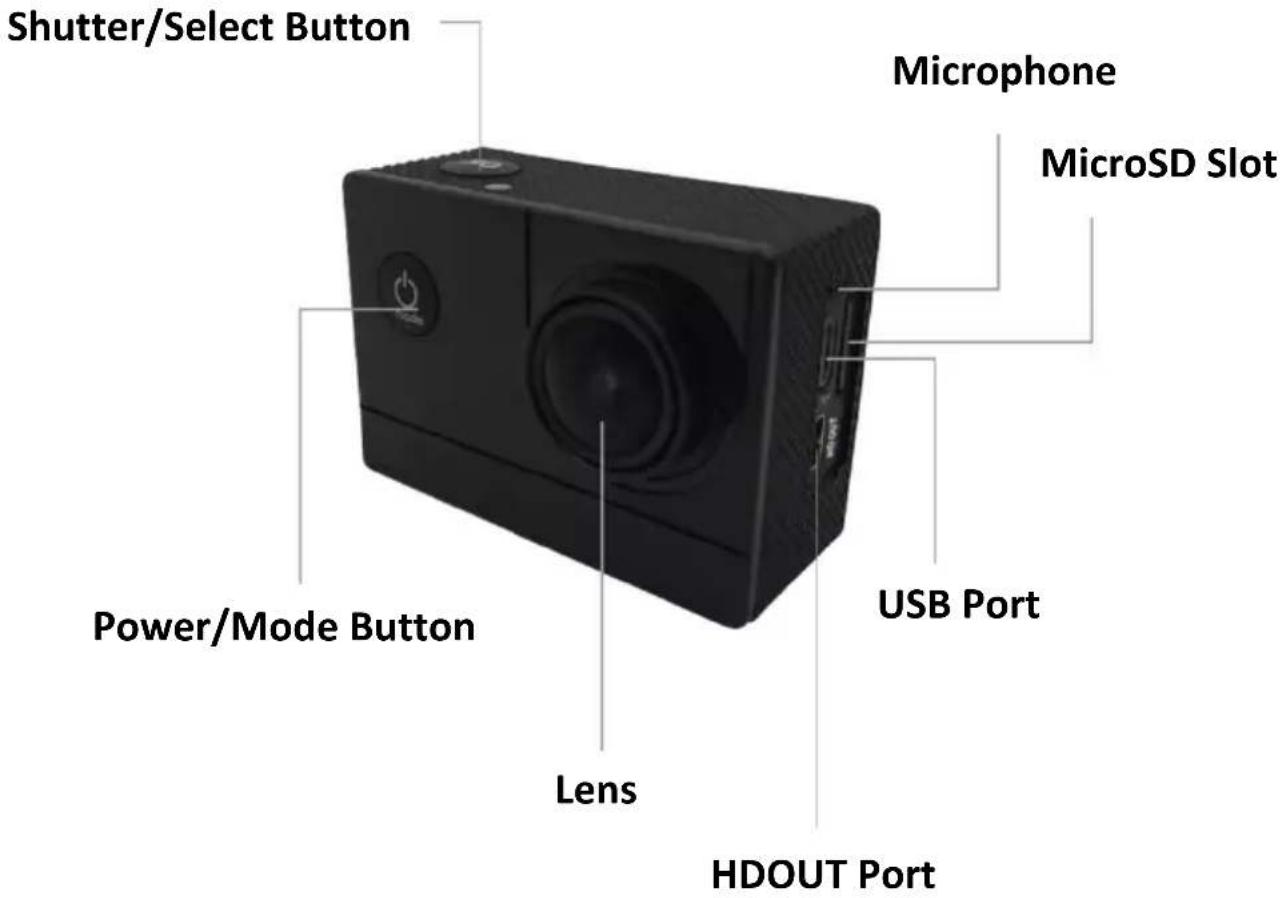
Camera description
First use
NOTE!
To ensure optimum performance from your camera, please follow the steps below when using the camera for the first time:
Step 1: Insert and charge the battery
Before using the product for the first time, make sure that it is fully charged.
- Open the battery compartment cover, insert the battery and charge it for a minimum of 4 hours.
- Keep the device away from children during charging.
- Ensure that the camera is turned off during charging.
- Product should only be charged via the USB port of a computer or USB power supply with a maximum output of 1000mAh.
- Disconnect the USB cable connected to the product before using it.
- The battery life is up to 90 minutes under optimal conditions and is dependent on the settings used and the outside temperature.
Step 2: Turn on/off the camera
- Press and hold the Power button for about 3 seconds to turn on the camera.
- To turn off the camera, press and hold the Power button again for about 3 seconds.
Step 3: Insert and format the MicroSD card
NOTE!
- Please make sure that your memory card is formatted in the camera before using the card for the first time.
- For best results, we recommend the use of high-quality Class 10 MicroSD cards with U3 High Speed or higher.
- Ensure a U3 speed memory card is always used when recording 4K video. Using a lower speed card may cause data transfer speed problems due to the large file size that a 4K video produces.
• Maximum micro SD card size is 64GB - The recording time depends on the selected resolution.
• A MicroSD card is not supplied with this product.
ATTENTION!
The formatting process deletes all files on the card.
Please ensure any important files already on the card are backed up.
Format the MicroSD card:
-
In the settings menu, scroll your finger to navigate to the "Format Card" sub-menu.
-
Tap the "Format Card" button and your card will be formatted immediately after confirming.
Step 4: Switching between modes
Switch between video recording / photo shooting / slow motion video / playback / settings by pressing the power button as mode function.
Video recording
Switch to recording mode and you will see the icon in the upper left corner
of the screen.
Press OK to start the recording.
Press "OK" again if you want to stop recording.
Photo shooting
Switch the camera on and press “Mode” to select “Photo shooting Mode”,
you will see the icon in the upper left corner of the screen display and
the camera is in photo shooting mode.
Press "OK" to take photos.
Slow motion
Switch through the modes until the slow motion video icon
„ “ appears.
Press the OK key to start video, at the same time the „red icon“ will be flashing.
The high frame rate video starts recording.
Playback
A. Verify the camera is in playback menu
B. Press „UP“ or „DOWN“ button to select file
C. Press „OK“ button to playback video
D. Press „OK“ button for 2s - the camera shows „Delete this file?“.
Here you can delete files.
Setting
Press the "Power / Mode" button and go to the settings:
When the symbol 📄 displayed on the camera screen,
press the "OK" button to enter the settings.
Press the "Power / Mode" button to switch between the
setting categories.
Use the "UP" and "DOWN" buttons to search.
Confirm your selection with the "OK" button.
To exit the setting mode, select "X" in the categories and confirm with "OK".
Settings
Video Resolution
4K 30fps, 2.7K 30fps, 1080P 60fps, 1080P 30fps, 720P 120fps, 720P
60fps
Selects your video resolution and frame rate setting.
Time Lapse Record (Off/0.5S/1S/2S/5S/10S/30S/60S)
Selects the interval at which a photo is taken to produce a time lapse video.
Record Audio (Off, On)
Option to record video with or without sound.
Slow Motion (1080P@60FPS/720P@120FPS)
Selects the resolution at which slow motion video will be recorded.
Date Stamp (Off, On)
Select 'On' to add a date and time display to your recordings.
Image Size
16M/12M/8M/5M/2M
Selects the still image resolution.
Burst Photo (Off, 3 Sequence, 5 Sequence, 10 Sequence)
When activated the camera takes a rapid burst of 3, 5 or 10 images.
Auto Shoot
(Off, 3S Timer, 10S Timer, 15S Timer, 20S Timer, 30S Timer)
When activated the camera automatically takes a photo every 3, 10, 15, 20 or 30 seconds.
Exposure (-3---+3)
Selects your chosen exposure levels.
White Balance
(Auto, Sunny, Cloudy, Incandescent Light, Fluorescent Light)
Selects your preferred White Balance setting from a number of pre-set options.
Date/Time
When connected to a smartphone the time and date synchronize automatically. However the Date/Time menu option allows you to manually set the time and date if required. Press the up / down buttons on the side of the camera to increase or decrease the selected field. Pressing the OK button allows you to progress to the next setting. After you have made all settings, press the on / off (Mode) button on the front of the camera to confirm the settings and exit.
Auto Power Off (1 Minute, 3 Minutes, 5 Minutes)
In order to prolong battery life the camera can be set to power off automatically after 1,3 or 5 minutes.
Language
Selects the language displayed for all menu items.
Frequency (50 Hz, 60 Hz)
Select to match the frequency of the electricity network in your country. An incorrect setting may cause a flickering effect in videos in artificial light.
Screensaver (Off, 10S, 20S, 30S)
To help prolong battery life the camera screen can be set to turn off after a preset period of time.
WiFi (Off, On)
Turns the cameras WiFi network on or off. WiFi must be activated for use with a smartphone or tablet.
Format
WARNING: Formatting your memory card will erase all files stored on the card.
Default Setting
Resets your camera and all settings to default factory settings.
Version
Displays the camera system settings.
NOTE!
- As the camera uses FAT32 formatting, the maximum file size possible per file is 4GB. As a result, the Micro SD card stops recording when the recording reaches 4GB, saves the file and automatically starts to record again on a new file.
- This camera automatically stops recording when the battery is out of power. Your video will save before the camera powers off.
Remote control
Using the supplied remote control:
You can start a video recording or take a photo using the remote control. To do this, press the relevant button for photo or video on the remote control to take a photo or to start recording.
Press the video button again to stop recording.
The remote control has an operating range of about 10 metres.

NOTE!
The remote control is splashproof only.
As it is not waterproof it is not suitable for use while completely submerged under water.
Connection to "XDV" App
- Before using the WiFi feature, please go to the App Store or GooglePlay and install the XDV app on your smartphone or tablet PC.

ANDROID

iOS
- Press the UP button to activate the built in WiFi (WLAN) function of the camera.
- Open the WiFi settings screen on your smartphone and select the camera from the list of available WiFi networks.
- The password required to complete the pairing is 12345678.
When the WiFi is connected, camera screen will be switched off after few seconds.
Turn off the WiFi function:
Press „UP“ button to exit the WiFi mode.
NOTE!
- Ensure that you have downloaded the correct app.
- Please note that wireless transmission of files via the app is not possible for videos with a resolution of more than 1080p. Files with a resolution greater than 1080p can only be transferred using a computer or card reader.
- The camera Wi-Fi bandwidth is relatively narrow, and its signal will be affected by distance, other signals, electromagnetic waves, obstacles and other factors. A latency or delay of between 2 to 5 seconds is normal in some circumstances. The operational distance of the Wi-Fi is about 5-10 meters.
- When you have finished using the app, please deactivate the WiFi function to conserve the battery.
- If using your camera and smartphone near a WiFi router regularly used by you, your smartphone will often connect automatically to the router network as a priority (as your smartphone will have saved the router password) rather than to the camera.
In this case please try to connect the camera to your smartphone while maintaining a distance further away from the router so that it does not connect to the router network.
Webcam function (Windows only)
Connect the camera to your PC using a USB cable, then select the "PC Camera" function shown in the display.
PLEASE NOTE:
Please note that the web cam function provides video only and does not include audio.
A headset or earphones with in-line mic as provided with many smartphones is required for audio.
Please note you may need to enter the settings of any app or program you use (e.g. Skype) so you can select your action cam as the preferred web cam option.
Technical specifications
| Video resolution | 4K@30fps*2.7K@30fps1080p @60fps/30fps720p@120fps/60fps |
| Photo resolution | 16M*, 12M*, 8M, 5M, 2M |
| Display | 2.0"/5cm |
| Sensor | 8MP |
| Waterproof housing | Waterproof up to 30m |
| Microphone/Loudspeaker | Integrated |
| Wide angle | 170° |
| WiFi frequency | 2.4 GHZ |
| File formats | MP4, JPG |
| Interface | HDMI, USB |
| Battery | Exchangeable 900mAh Li-Ion battery |
| Remote Control | Range up to 10M |
| Dimensions of the product | 59 x 41 x 30 mm |
| External memory | - Support of MicroSD cardsup to max. 64GB (not included)- Requirement: U3 class10 cards or higher |
*by interpolation
Box contents
- Camera
- Waterproof housing
• Second cover for the housing (not waterproof) - Remote control
- Orientation adaptors
-
Tripod adapter
-
Monopod adapter
- Bike mount
- Helmet mount
- Frame Mount
- Battery
- USB cable
- Manual EN/DE
Operating instructions in other languages are available for download at https://bit.ly/43w4LGe or
www.easypix.info/download-manuals/download/goxtreme-enduro-black/
Disposal

Disposal of packaging:
Dispose of the packaging according to its type.
Add cardboard and paperboard to the waste paper, foils and plastic wrapping to the recyclable waste collection.

natural_image
Abstract black-and-white icon depicting a person moving with arrows, enclosed in a circle (no text or symbols)
Waste electrical and electronic equipment and/or batteries disposed of by users in private households in the European Union:
This symbol on the product or on its packaging indicates that it cannot be disposed of with household waste. You must dispose of your old appliance and/or battery by handing it over to the applicable collection system for the recycling of electrical and electronic equipment and/or batteries. For more information on recycling this device and/or battery, contact your local council, the shop where you purchased the device or your household waste disposal service. Recycling materials helps to conserve natural resources and ensures that it is recycled in a way that protects human health and the environment.

WARNING
Warning regarding batteries:
- Do not disassemble or hit the battery. Be careful not to short-circuit the battery. Do not expose the battery to high temperatures. Do not continue using the battery if it leaks or expands.
- Keep the battery away from children.
- Batteries can explode if exposed to an open fire.
Never throw batteries into fire.
- Dispose of used batteries according to local regulations.
- Before disposing of the device, remove the battery and dispose of it separately.
Declaration of conformity
We hereby declare that the marking has been affixed to this product in accordance with the essential requirements and relevant provisions of the European directives.
The complete declaration of conformity can be downloaded here: www.easypix.info/download/pdf/doc_goxtreme_enduro_black.pdf


Made in China
EASYPIX®
LIFESTYLE ELECTRONICS


- Table of contents
- Disclaimer
- General information
- Explanation of symbols
- WARNING
- NOTE!
- Product description
- Intended use
- Restrictions
- Safety instructions
- Operating environment
- Camera description
- First use
- Step 1: Insert and charge the battery
- Step 2: Turn on/off the camera
- Step 3: Insert and format the MicroSD card
- ATTENTION!
- Format the MicroSD card:
- Step 4: Switching between modes
- Video recording
- Photo shooting
- Slow motion
- Playback
- Setting
- Settings
- Video Resolution
- Time Lapse Record (Off/0.5S/1S/2S/5S/10S/30S/60S)
- Record Audio (Off, On)
- Slow Motion (1080P@60FPS/720P@120FPS)
- Date Stamp (Off, On)
- Image Size
- Burst Photo (Off, 3 Sequence, 5 Sequence, 10 Sequence)
- Auto Shoot
- Exposure (-3---+3)
- White Balance
- Date/Time
- Auto Power Off (1 Minute, 3 Minutes, 5 Minutes)
- Language
- Frequency (50 Hz, 60 Hz)
- Screensaver (Off, 10S, 20S, 30S)
- WiFi (Off, On)
- Format
- Default Setting
- Version
- Remote control
- Using the supplied remote control:
- Connection to "XDV" App
- Turn off the WiFi function:
- Webcam function (Windows only)
- PLEASE NOTE:
- Technical specifications
- Box contents
- Disposal
- Disposal of packaging:
- Warning regarding batteries:
- Declaration of conformity
Brand : EASYPIX
Model : GoXtreme Enduro Black
Category : Video camera