
ESB150 - Home trainer Body-Solid - Free user manual and instructions
Find the device manual for free ESB150 Body-Solid in PDF.


| Product Type | Upright Home Exercise Bike |
| Model | ESB150 |
| Brand | Body-Solid |
| Dimensions (L x W x H) | 40 x 22 x 50 inches (101.6 x 55.9 x 127 cm) |
| Weight | 85 lbs (38.6 kg) |
| Max User Weight | 300 lbs (136 kg) |
| Resistance Type | Magnetic |
| Resistance Levels | 8 |
| Power Source | Self-powered (no AC required) |
| Display | LCD – Time, Distance, Calories, RPM, Speed |
| Pedals | Adjustable with toe straps |
| Seat Adjustment | Vertical and horizontal (sliding rail) |
| Handlebars | Multi-position with pulse sensors |
| Frame Warranty | Lifetime |
| Parts Warranty | 2 years |
| Maintenance | Keep clean, lubricate chain/tensioner as needed |
| Safety | Stable base, emergency stop (brake lever) |
| Spare Parts | Available via Body-Solid dealers; typical replaceable parts include pedals, seat, handle grips, console |
| Assembly Required | Yes (basic tools included) |
Frequently Asked Questions - ESB150 Body-Solid
User questions about ESB150 Body-Solid
0 question about this device. Answer the ones you know or ask your own.
Ask a new question about this device
Download the instructions for your Home trainer in PDF format for free! Find your manual ESB150 - Body-Solid and take your electronic device back in hand. On this page are published all the documents necessary for the use of your device. ESB150 by Body-Solid.
USER MANUAL ESB150 Body-Solid
natural_image
Line drawing of a stationary exercise bike with visible legs, arms, and seat (no text or symbols)Table of Contents
Dimensions.... p. 2
Reference Drawings.... p. 3
Important Safety Instructions.... p. 4
Before You Begin. p. 5
Preparations.... p. 6
Assembly Instructions.... p. 7-19
Features...... p. 20
Setup.... p 21-22
Warning, Safety & Maintenance.... p. 23
Mainframe Parts List.... p. 24
Parts List.... p. 25-26
Hardware (To Scale).... p. 27
Exploded View Diagram.... p. 28
Notes.... p. 29
Assembly
OWNER'S

Instructions
MANUAL
Dimensions

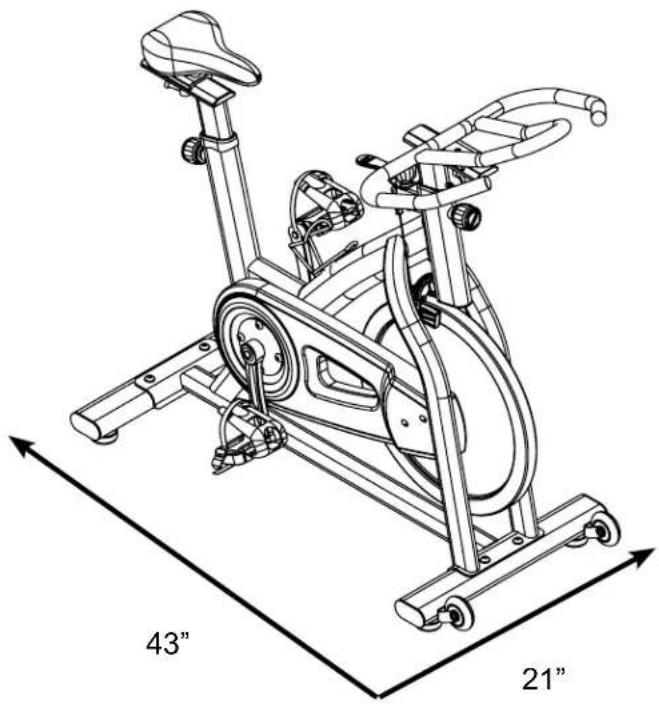
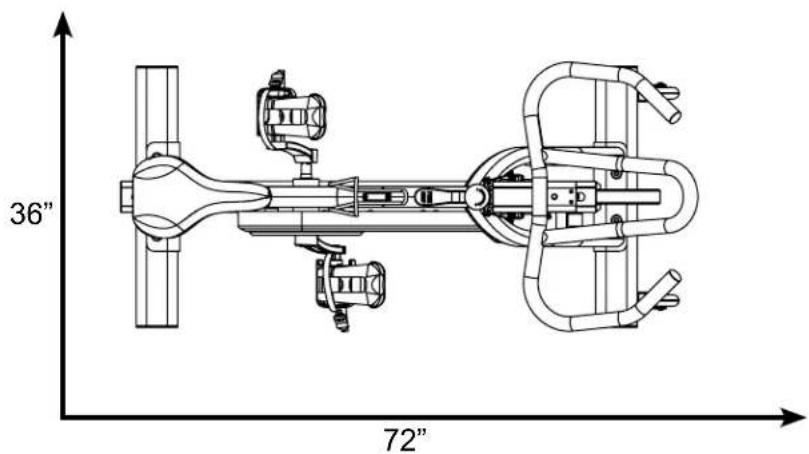
om layout diagram below will help you decide at placement for your ESB150.
The overall space needed for operation may be more depending on the user.
Minimum Usage Space - 43" L x 21" W
natural_image
Line drawing of an outdoor exercise bike with 43-inch and 21-inch angular measurement labels (no text or symbols on the diagram itself)Suggested Usage Space - 36" W x 72" L
Reference Diagrams

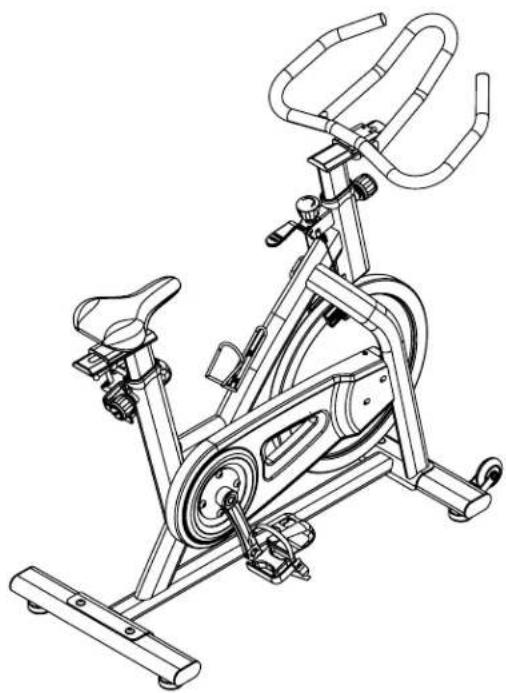
Use the following diagrams as a point of reference when pling your ESB150.
Becoming familiar with the unit and the orientation of its components will help ease installation. Please use the following diagrams to become more accustomed with your ESB150 and its applications.
natural_image
Line drawing of a stationary exercise bike with visible frame, legs, and side-mounted wheels (no text or symbols)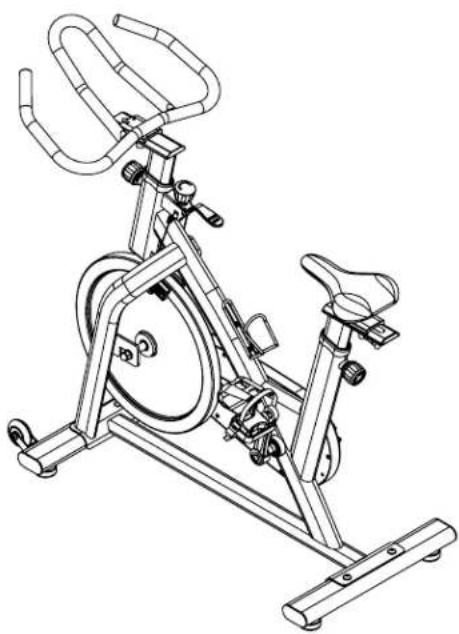
natural_image
Line drawing of a stationary exercise bike with adjustable arms and wheels (no text or symbols)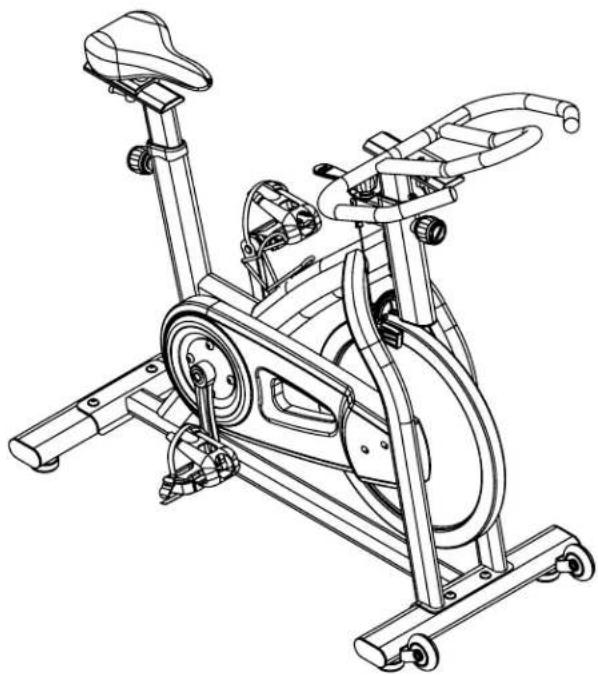
natural_image
Line drawing of an outdoor exercise bike with visible legs, arms, and wheels (no text or symbols)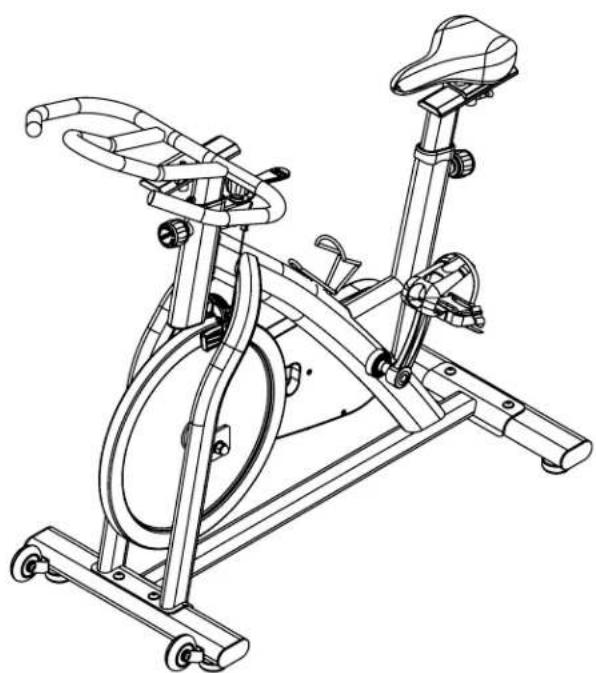
natural_image
Line drawing of an exercise bike with rotating legs and seat (no text or symbols)Important Safety Instructions

beginning any fitness program, you should obtain lete physical examination from your physician.
When using exercise equipment, you should always take basic precautions, including the following:
Read all instructions before using the ESB150. These instructions are written to ensure your safety and to protect the unit.
○ Do not allow children on or near the equipment.
Use the equipment only for its intended purpose as described in this guide. Do not use accessory attachments that are not recommended by the manufacturer. Such attachments might cause injuries.
○ Wearproperexerciseclothingandshoesforyour workout, no loose clothing.
○ Use care when getting on or off the unit.
Do not overexert yourself or work to exhaustion.
If you feel any pain or abnormal symptoms, stop your workout immediately and consult your physician.
Never operate the unit when it has been dropped or damaged. Return the equipment to a service center for examination and repair.
Never drop or insert objects into any opening in the equipment.
○ Always check the unit before each use. Make sure that all fasteners are secure and in good working condition.
○ Do not use the equipment outdoors or near water.
Personal Safety During Assembly
Itisstronglyrecommendedthataqualifieddealer assemble the equipment.
Before beginning assembly, please take the time to read the instructions thoroughly.
Read each step in the assembly instructions and follow the steps in sequence. Do not skip ahead. If you skip ahead, you may learn later that you have to disassemble components and that you may have damaged the equipment.
○ Assemble and operate the ESB150 on a solid, level surface. Locate the unit a few feet from the walls or furniture to provide easy access.
Assistance is required.
Before You Begin

Retain this Owner's Manual for future reference!
To maximize your use of the equipment please study this Owner's Manual thoroughly. Please retain this manual for future reference or parts information.
Thank you for purchasing the ESB150.
This Fitness Exercise Bike is part of the Endurance line of quality cardio machines, which let you target specific muscle groups to achieve better muscle tone and overall body conditioning.
Unpacking the Equipment
The ESB150 is carefully tested and inspected before shipment. We have shipped the unit in several pieces that require assembly. Ask for assistance during the assembly process. Carefully unpack the boxes and lay the pieces on the floor near the area where you plan to use the equipment.
The ESB150 is designed for your enjoyment. By following these precautions and using common sense, you will have many safe and pleasurable hours of healthful exercise with your Endurance ESB150.
After assembly, you should check all functions to ensure correct operation. If you experience problems, or if any items are missing, first recheck the assembly instructions to locate any possible errors made during assembly. If you are unable to correct the problem, call the dealer from whom you purchased the machine or call 1-800-556-3113 for the dealer nearest you.
Obtaining Service
Please use this Owner's Manual to make sure that all parts have been included in your shipment. When ordering parts, you must use the part number and description from this Owner's Manual. Use only Endurance replacement parts when servicing this unit. Failure to do so will void your warranty and could result in personal injury.
For information about product operation or service, check out the official Endurance website at www.bodysolid.com or contact an authorized Endurance dealer or an Endurance factory-authorized service company or contact Endurance customer service, M-F 8:30am-5:00pm CST, at one of the following:

TollFree(800)556-3113
Local: (708) 427-3555
Fax: (708) 427-3556

E-mailservice@bodysolid.com
or write to:

Endurance
Service
Department
1900 S. Des Plaines Ave.
Forest Park, IL 60130 USA
Endurance continually seeks ways to improve the performance, specifications and product manuals in order to ensure that only superior products are released from our factories. Please take the time to carefully read through this manual thoroughly. Instructions contained in this document are not intended to cover all details or variations possible with Endurance equipment, or to cover every contingency that may be met in conjunction with installation, operation, maintenance or troubleshooting of the equipment. Even though we have prepared this manual with extreme care, neither the publisher nor the author can accept responsibility for any errors in, or omission from, the information given. Should additional information be required, or should situations arise that are not covered by this manual, the matter should be directed to your local Endurance representative, or the Service Department at Endurance in Forest Park, Illinois.
Any Questions?
Call (800) 556-3113
Preparations

CAUTION: To set up this unit, you will need assistance.
Do not attempt assembly by yourself.
You must review and follow the instructions in this Owner's Manual. If you do not assemble and use the ESB150 according to these guidelines, you could void the Endurance warranty.
CAUTION!
Obtain assistance! Do not attempt to assemble the ESB150 by yourself. Review the Installation Requirements before proceeding with the following steps.
Required Tools
The basic tools that you must obtain before assembling the ESB150 include but are not limited to:
○ Standard Wrench Set
Metric Wrench Set
○ Adjustable Wrench
Allen Set
○ Rubber Mallet
Silicone Spray Oil
Installation Requirements
Follow these installation requirements when assembling the ESB150:
Set up the ESB150 on a solid, flat surface.
A smooth, flat surface under the machine helps keep it level. A level machine has fewer malfunctions.
Provide ample space around the machine.
Open space around the machine allows for easier access and a more comfortable workout.
Insert all bolts in the same direction.
For aesthetic purposes, insert all bolts in the same direction unless specified (in text or illustrations) to do otherwise.
Leave room for adjustments.
Tighten fasteners such as bolts, nuts, and screws so the unit is stable, but leave room for adjustments. Do not fully tighten fasteners until instructed in the assembly steps to do so.
Fill out and mail the warranty card.
To benefit from the best and most comprehensible warranty in the fitness industry, completely fill out and mail the warranty card enclosed with the unit.
Assembly Instructions
Assembly of the ESB150 takes professional installers about 1 hour to complete.
Professional installers are highly recommended!
If this is the first time you have assembled this type of equipment, plan on significantly more time. However, if you acquire the appropriate tools, obtain assistance, and follow the assembly steps sequentially, the process will take time, but is fairly easy.
Assembly Tips
Read all "Notes" on each page before beginning each step.
While you may be able to assemble the ESB150 using the illustrations only, important safety notes and other tips are included in the text.
Some pieces may have extra holes that you will not use. Use only those holes indicated in the instructions and illustrations.
IMPORTANT!
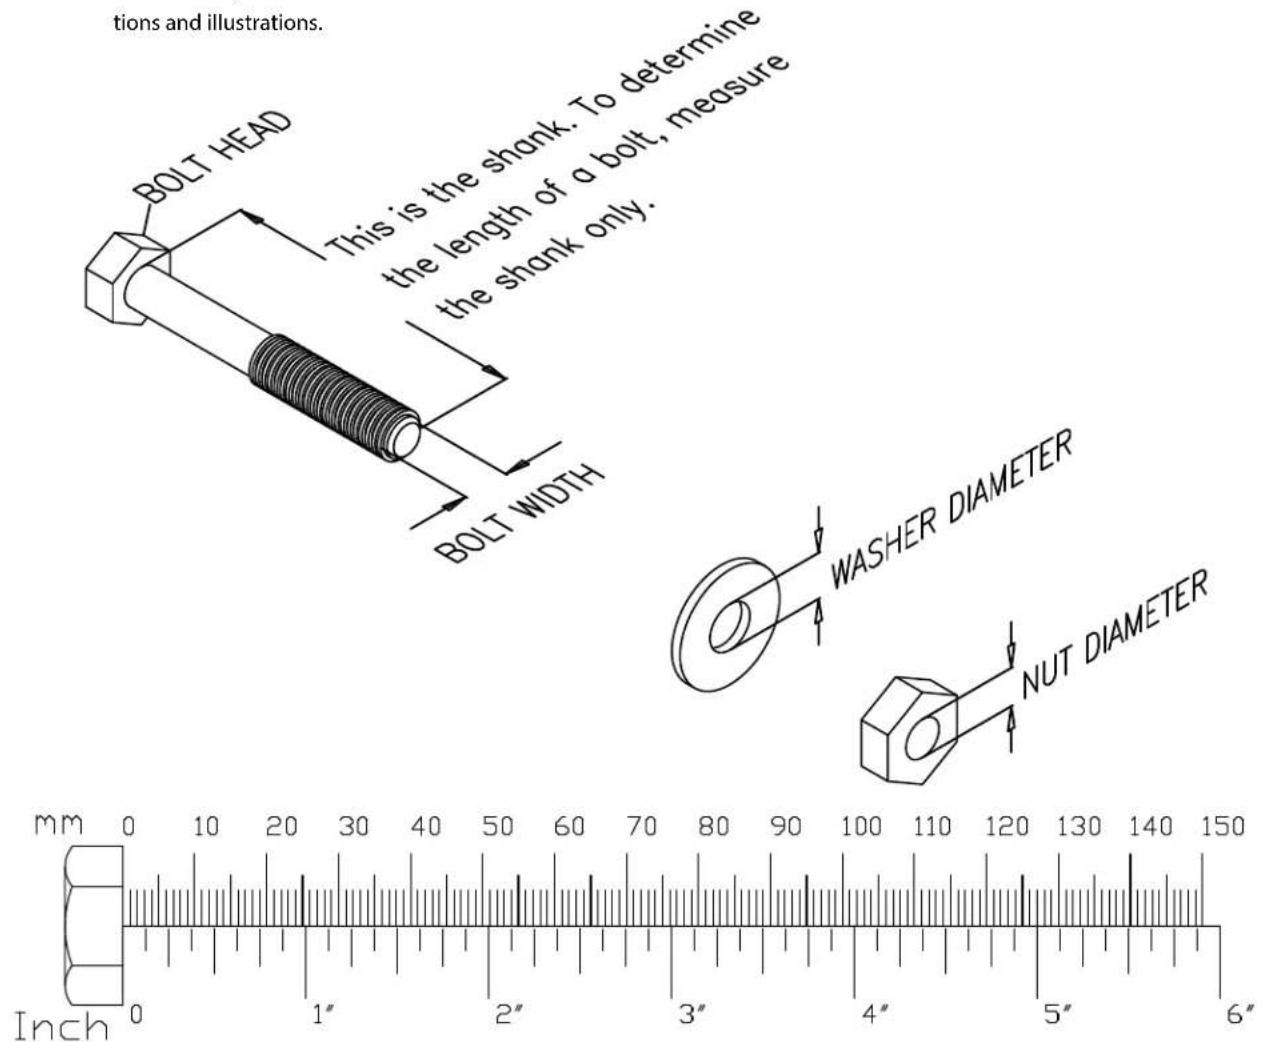
Before you begin you should look at the quick reference guide that shows all hardware parts (in actual size) along with the corresponding component numbers in the assembly instructions.
To find out the length of a particular bolt, measure its shank (the long, narrow part beneath the head) using the ruler below. Refer to the following diagram:
Be careful to assemble all components in the sequence they are presented.
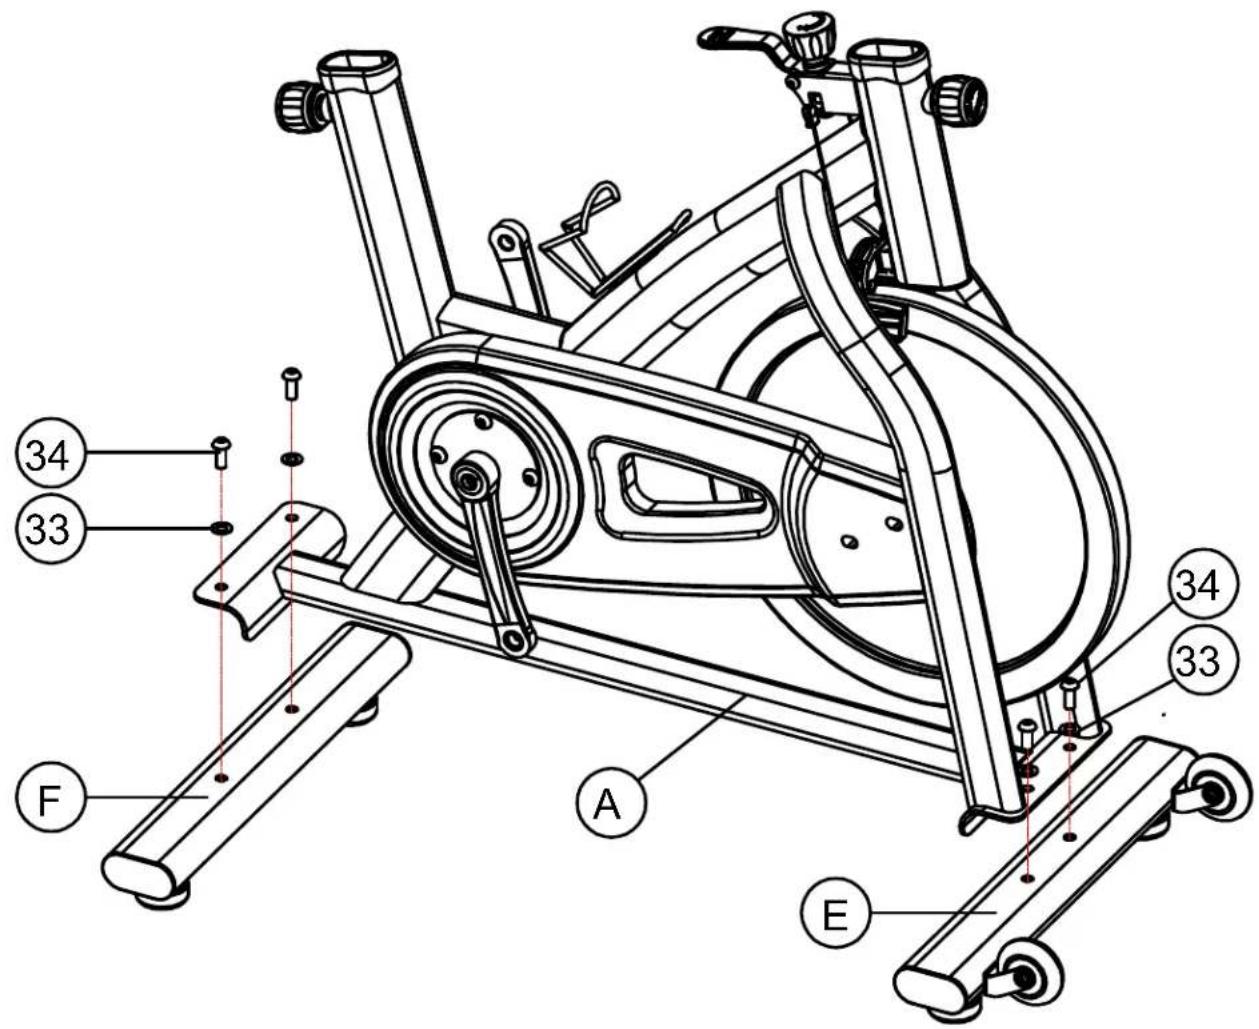
A. Connect Front Base (E) to Main Frame (A) using:
Two 34 (M10x25 Hex Flat Round Head Screw)
Two 33 (M10 washer)
B. Connect Rear Base (F) to Main Frame (A) using:
Two 34 (M10x25 Hex Flat Round Head Screw)
Two 33 (M10 washer)
C. Wrench tighten all hardware.

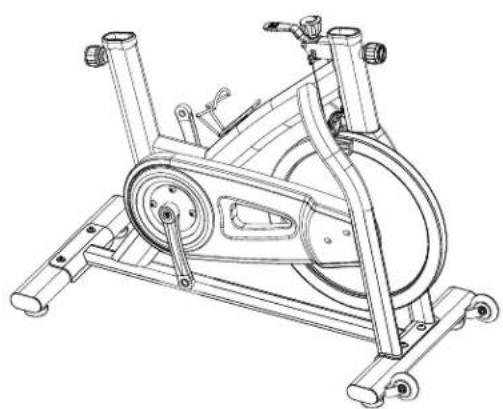
natural_image
Line drawing of an outdoor stationary bike with wheels and suspension components (no text or symbols)Above shows Step 1 assembled and completed.
STEP
1
STEP
2
Be careful to assemble all components in the sequence they are presented.
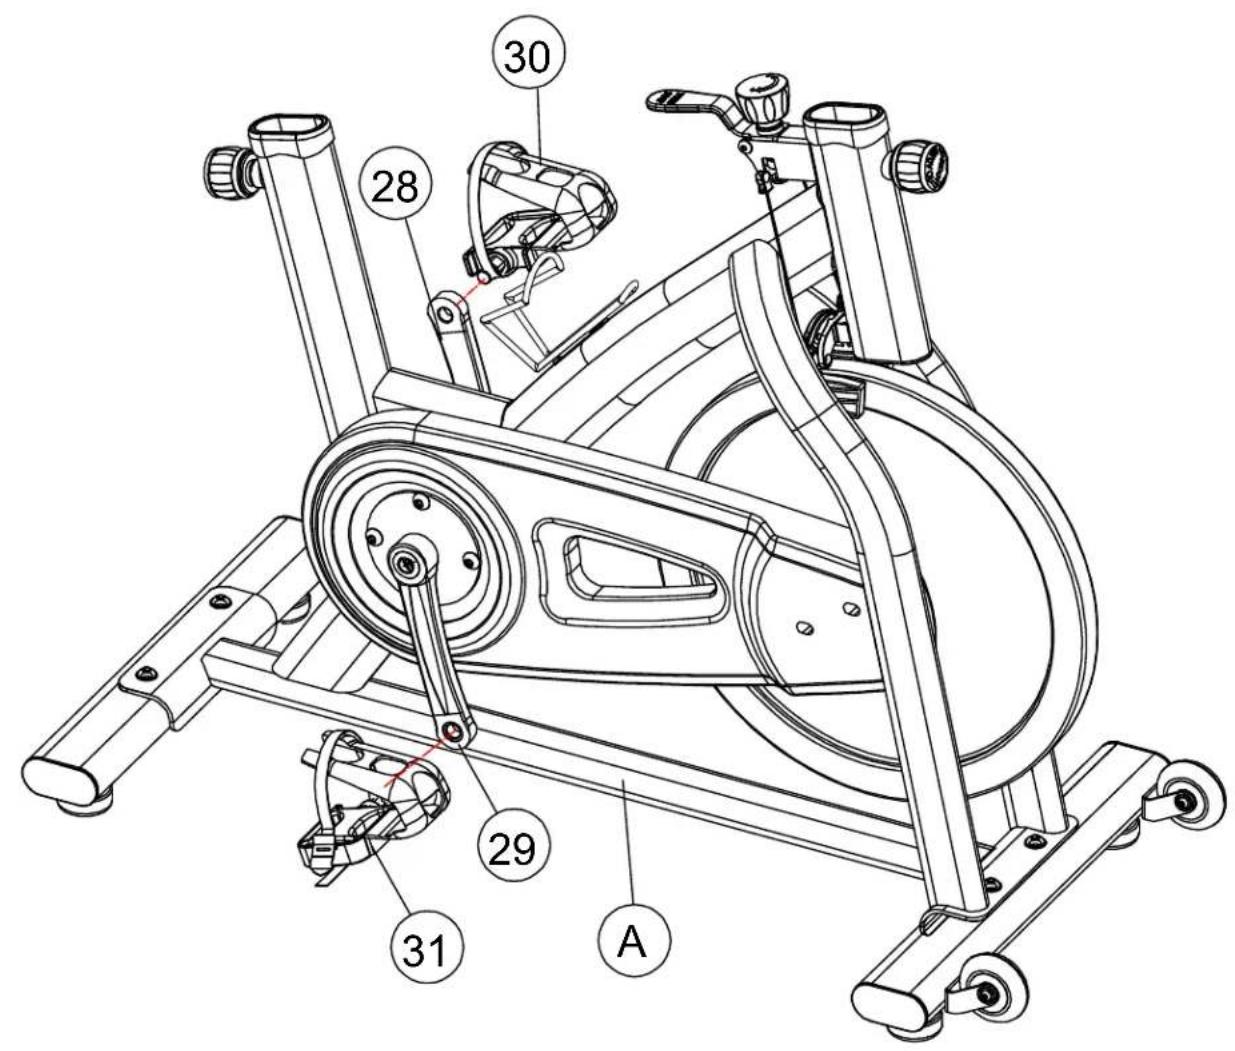
A. Screw (counterclockwise) Left Pedal (30) onto Left Crank (28).
NOTE: To install pedals, always screw on towards the handlebar direction.
B. Screw (clockwise) Right Pedal (31) onto Right Crank (29).
NOTE: To install pedals, always screw on towards the handlebar direction.
C. Wrench tighten all hardware.

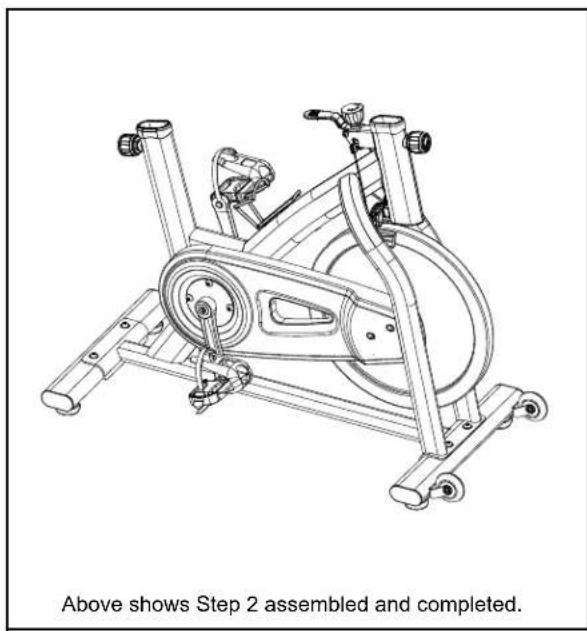
natural_image
Line drawing of an outdoor stationary bike with visible components and no text or symbols on the diagram itselfSTEP
2
STEP
3
Be careful to assemble all components in the sequence they are presented.
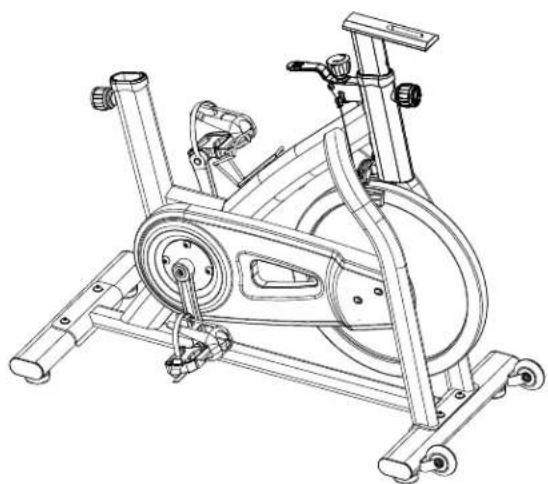
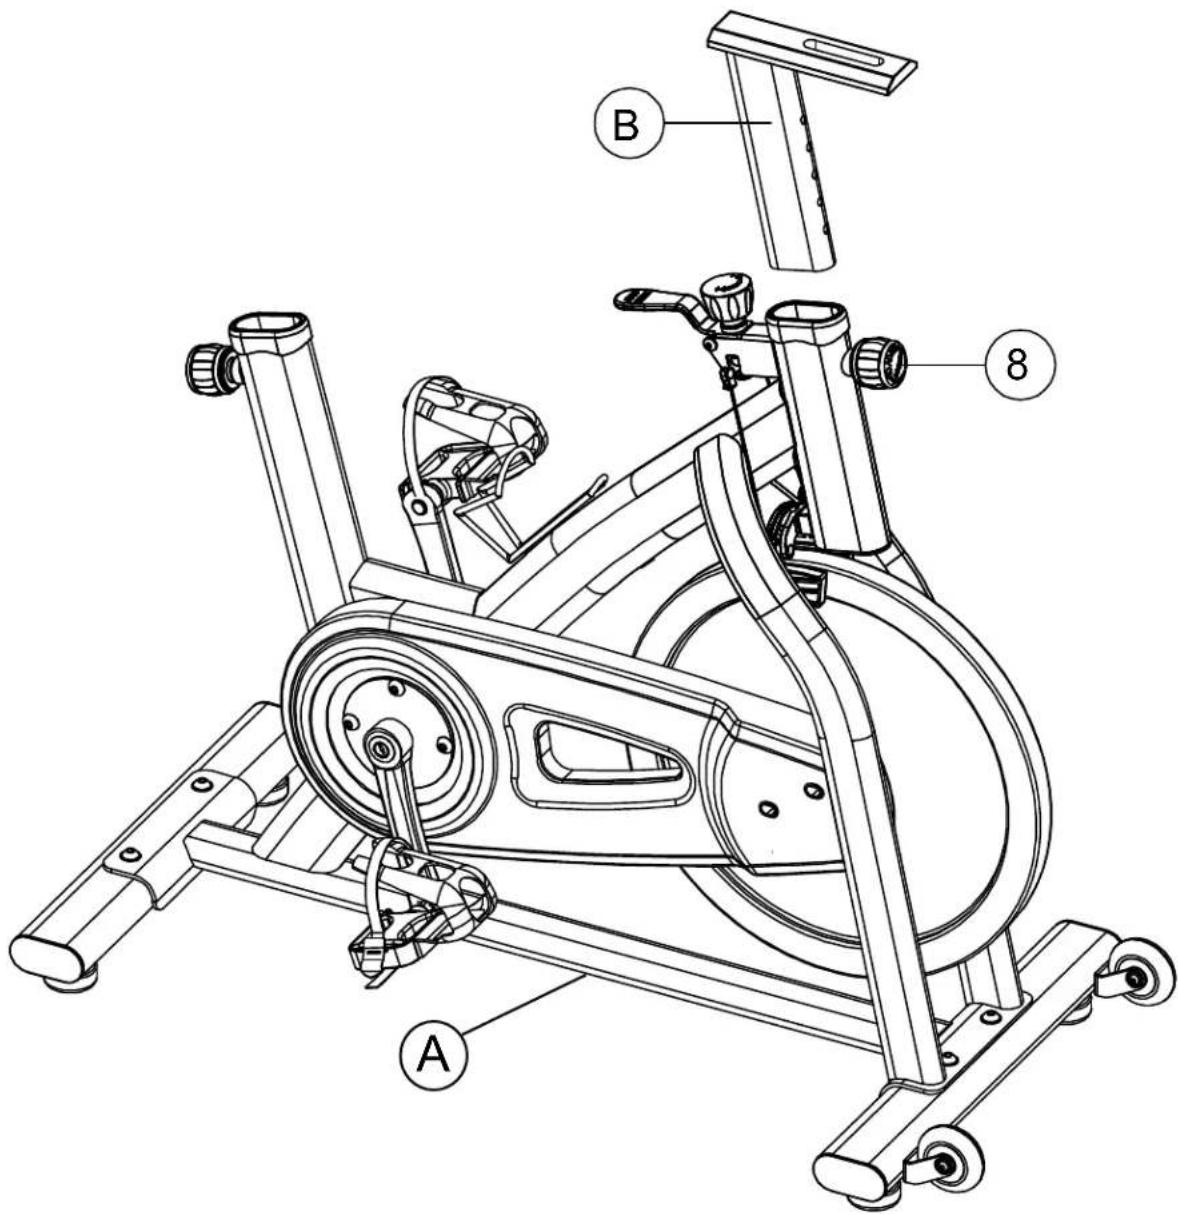
A. Loosen Pop Pin (8) and insert Handlebar (B) into the Handlebar Post Housing on Mainframe (A).
NOTE: Silicone oil may be used to ease gliding on Handlebar (B).
B. Retighten Pop Pin (8).

natural_image
Line drawing of an exercise bike with rotating wheel and side-mounted legs (no text or symbols)Above shows Step 3 assembled and completed.
STEP
3
STEP
4
Be careful to assemble all components in the sequence they are presented.
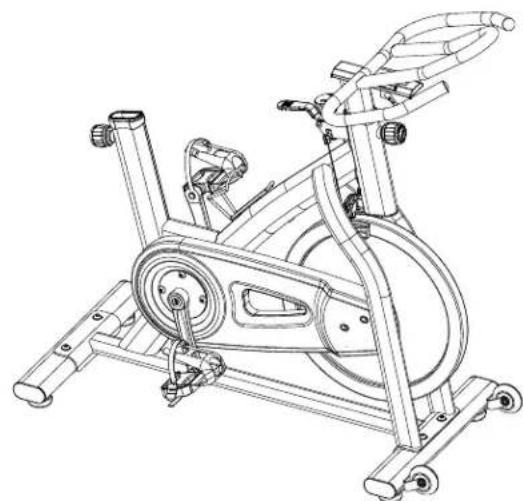
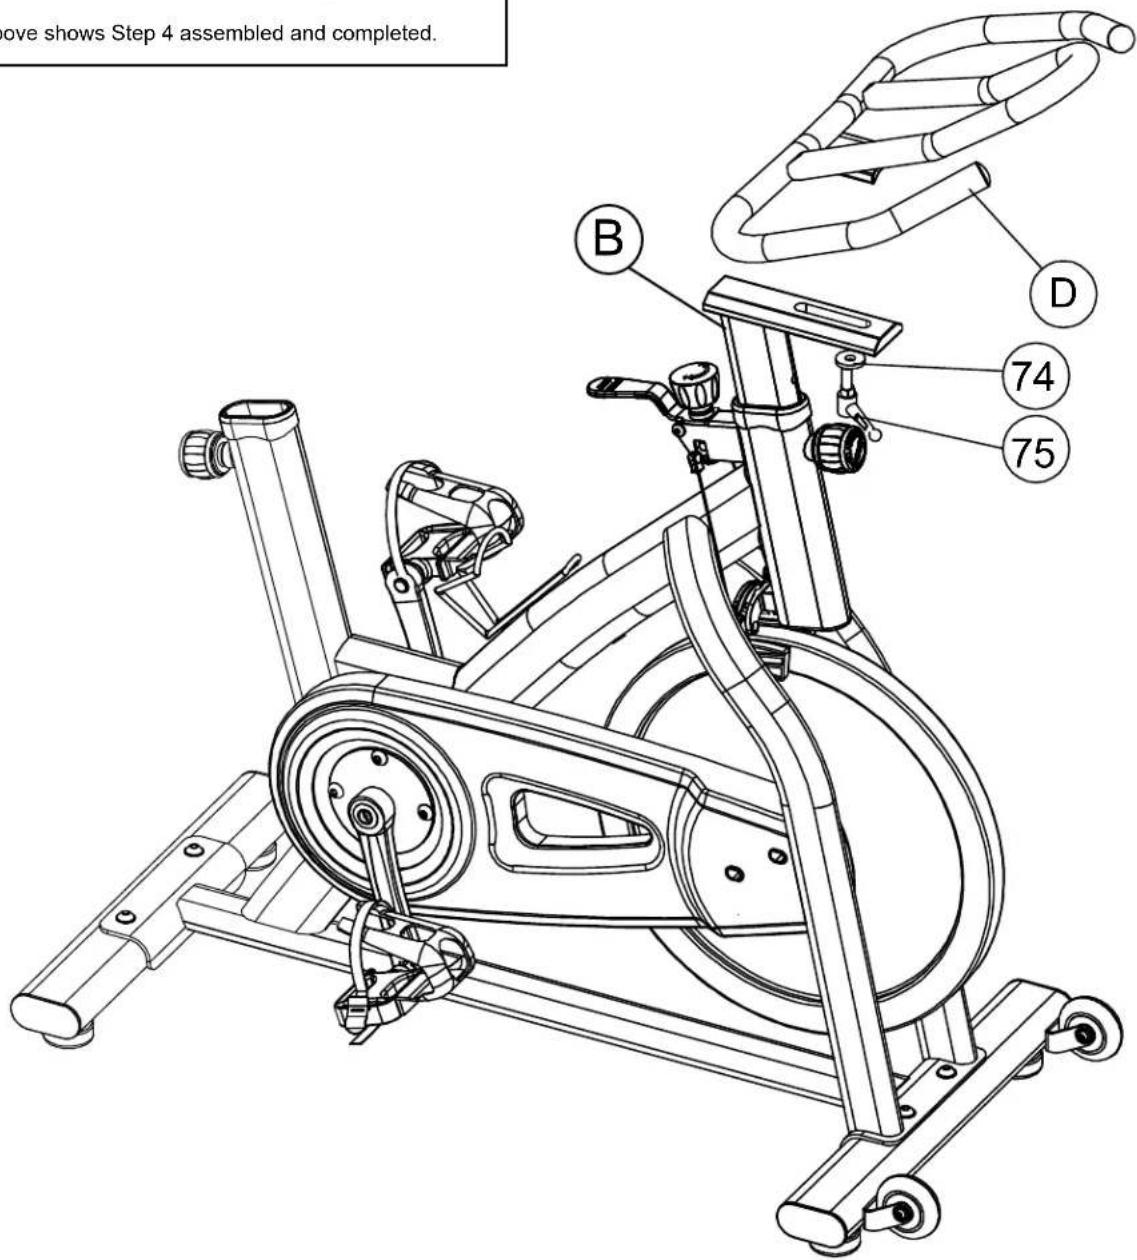
A. Connect Handlebar (D) to Handlebar Post (B) using:
One 75 (knob)
One 74 (M10 washer)

natural_image
Line drawing of an exercise bike with rotating body and side-mounted arms (no text or symbols)STEP
4
STEP
5
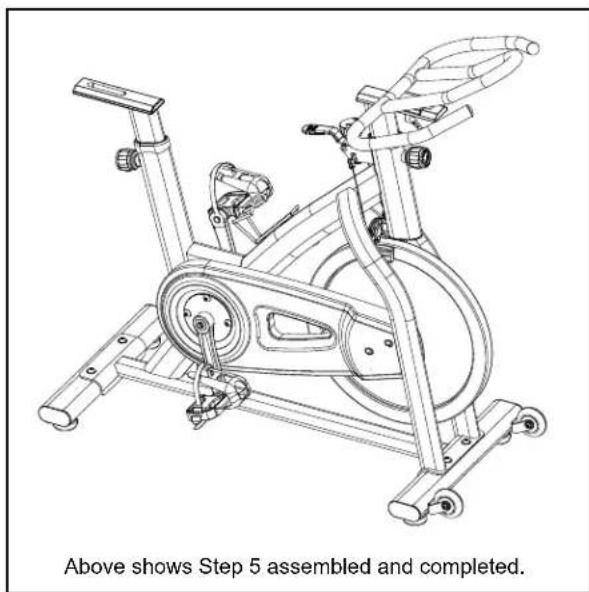
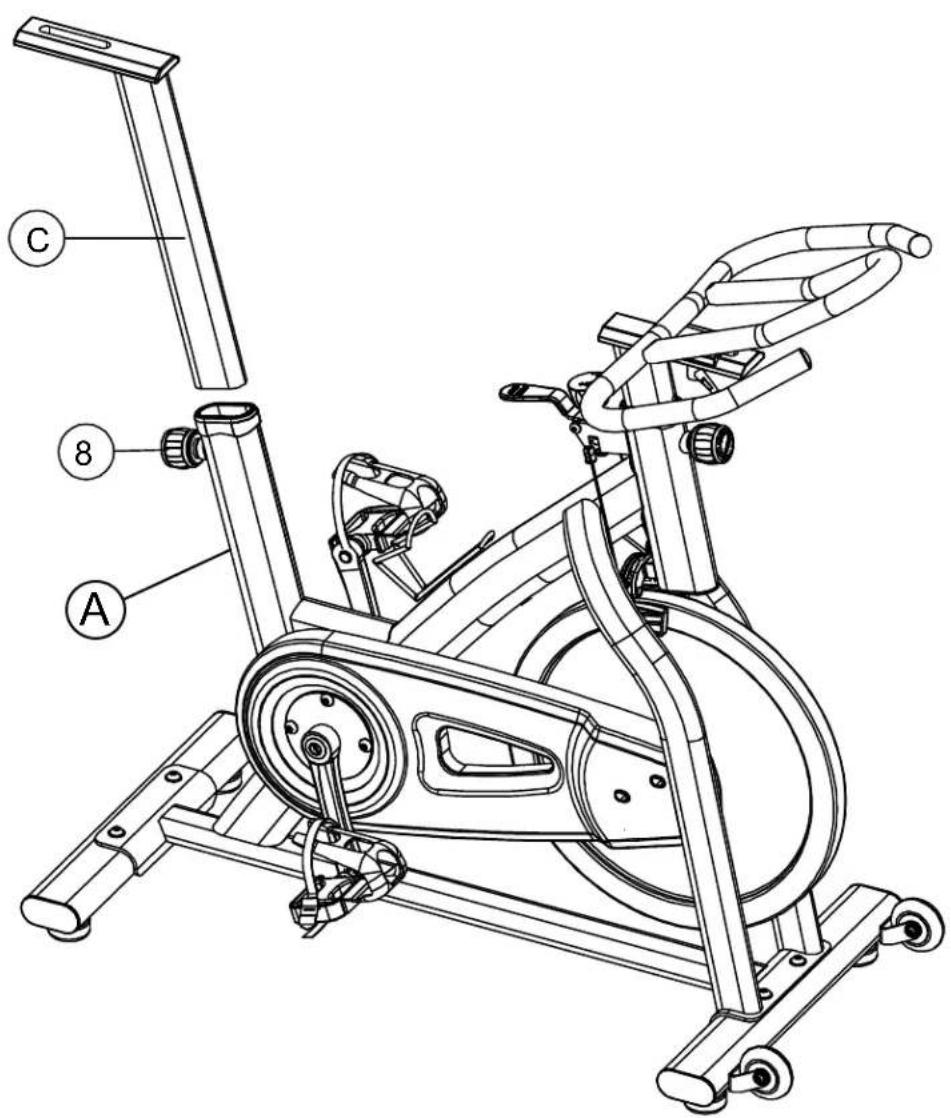
Be careful to assemble all components in the sequence they are presented.
A. Loosen Pop-Pin (8) and insert Seat Post (C) into the Seat Post Housing on Mainframe (A).
NOTE: Silicone oil may be used to ease gliding on Seat Post (C).
B. Retighten Pop-Pin (8)

natural_image
Line drawing of an outdoor exercise bike with labeled steps and completed body (no text or symbols on the diagram itself)STEP
5
Be careful to assemble all components in the sequence they are presented.
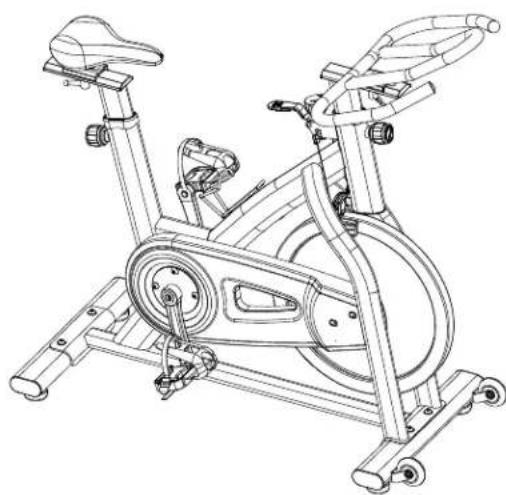
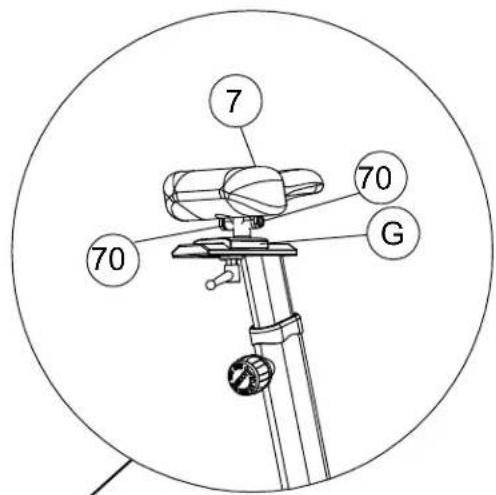
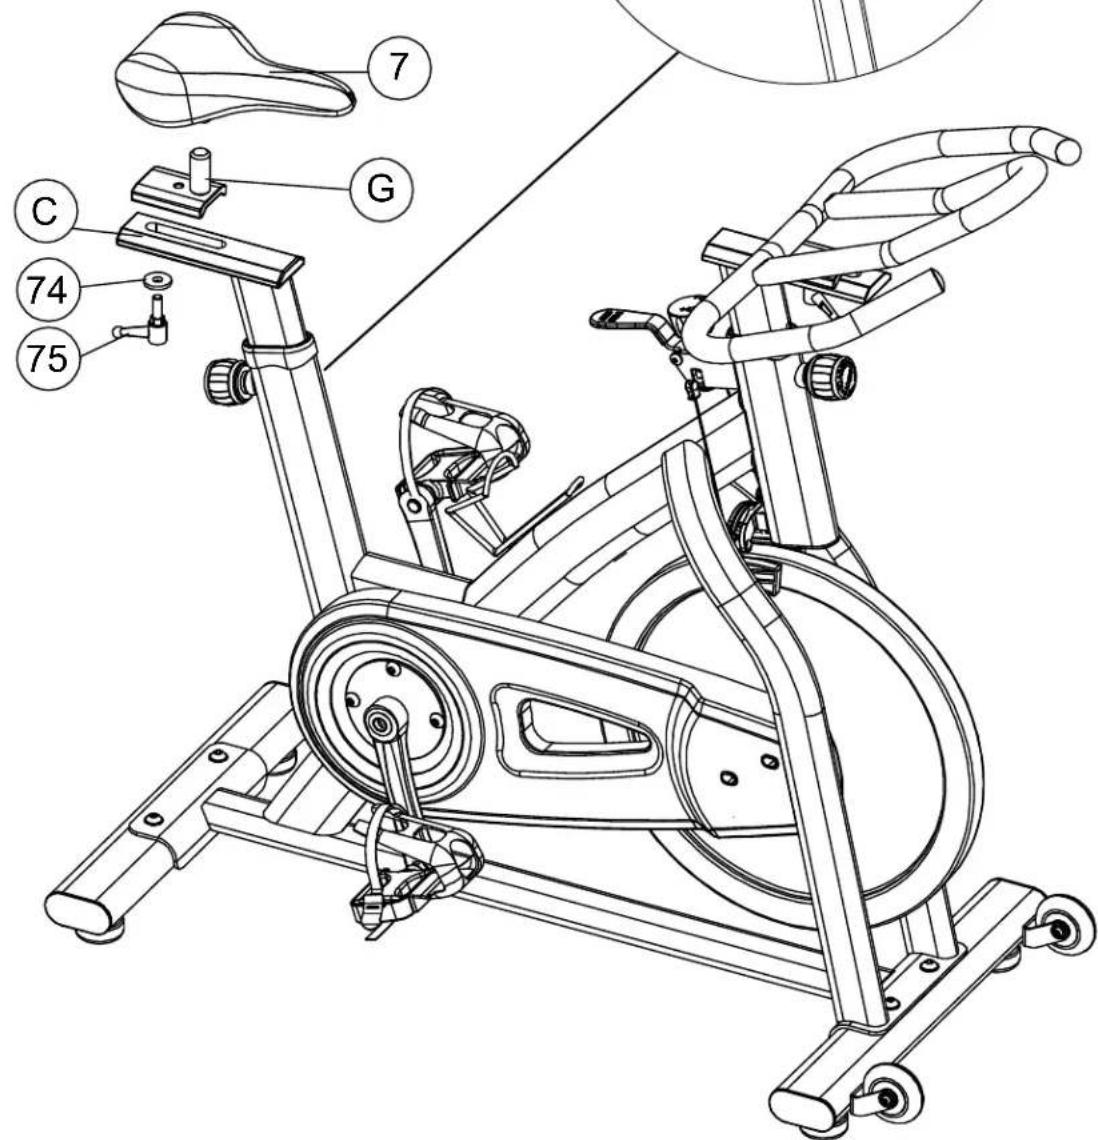
A. Secure Seat Slider (G) onto Seat Post (C) using:
One 75 (knob)
One 74 (M10 washer)
B. Slightly loosen both Hex Nuts (70).
C. Insert Seat (7) onto Seat Glider (G).
D. Tighten both Hex Nuts (70) to secure the seat assembly.
E. Wrench tighten all hardware.
Congratulations! You are done. After assembly, you should check all functions to ensure correct operation. If you experience problems, first recheck the assembly instructions to locate any possible errors made during assembly. If you are unable to correct the problem, call the dealer from whom you purchased the machine or call 1-800-556-3113 for the dealer nearest you.
NOTE: If any bolts seem to loosen periodically, use Loctite 242 for a long-term cure.

natural_image
Line drawing of a stationary exercise bike with two side legs and wheels (no text or symbols)Above shows Step 6 assembled and completed.
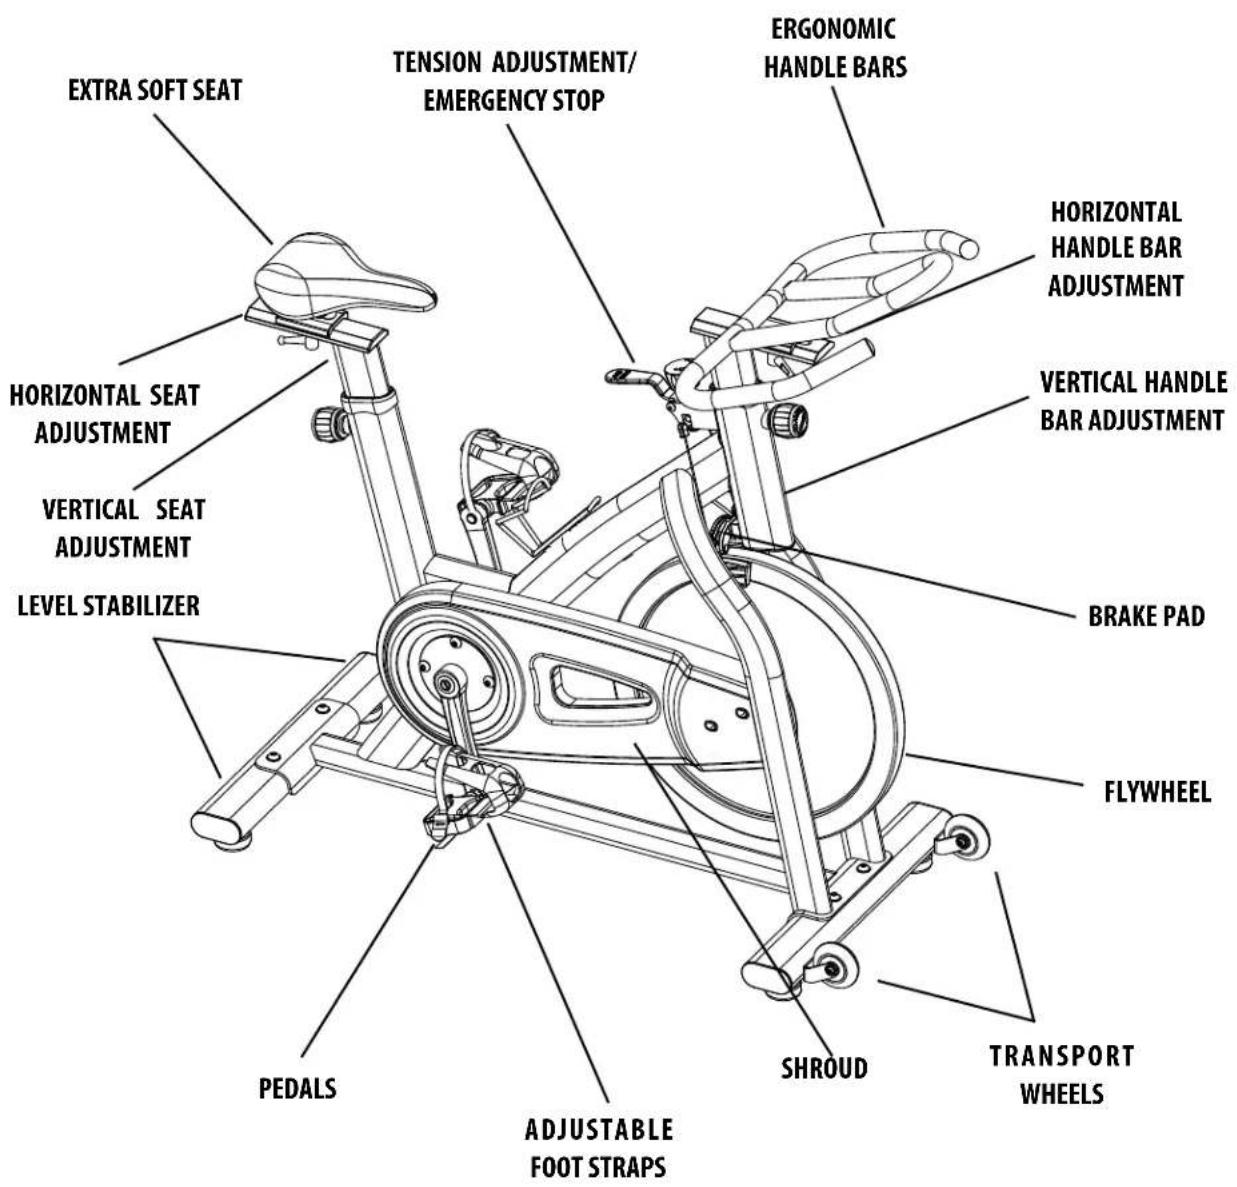
Features
The FSB150 is a very beneficial cardio machine yet easy and practical to use. Below are the features included with your ESB150 Spin Bike.
Understanding all the features on this unit will improve and benefit your workout.
Setup
The ESB150 is designed to use minimal floor space and in your home or office.
To make exercise a desirable daily activity for you, the ESB150 should be placed in a comfortable and attractive setting.
PLACEMENT IN YOUR HOME
To make exercise a desirable daily activity for you, the ESB150 should be placed in a comfortable and attractive setting. This Spin Bike is designed to use minimal floor space and to fit nicely in your home or office.
- Do not place or operate the ESB150 outdoors.
- Do not place the ESB150 near water or in a high moisture content environment.
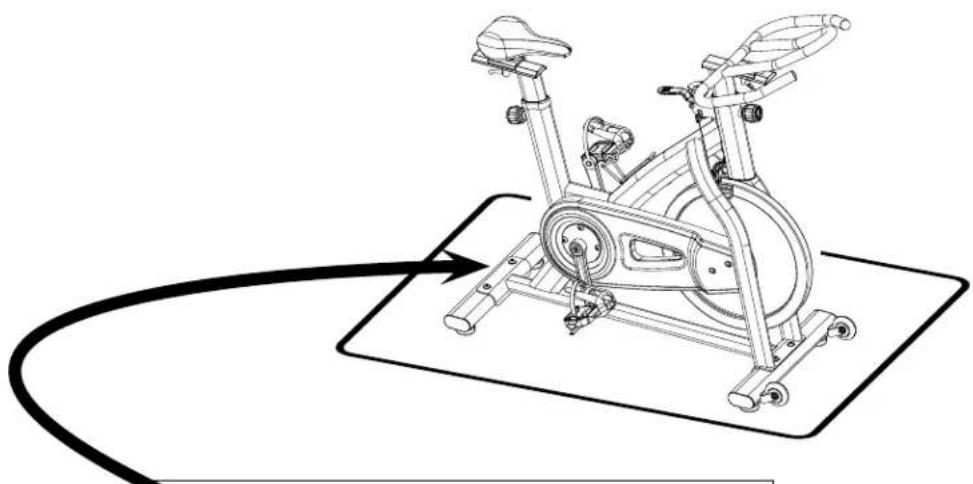
- It is highly recommended to place a dedicated equipment mat beneath your ESB150 A dedicated mat provides superior stability and firmness for a proper workout.
MOVING THE ESB150
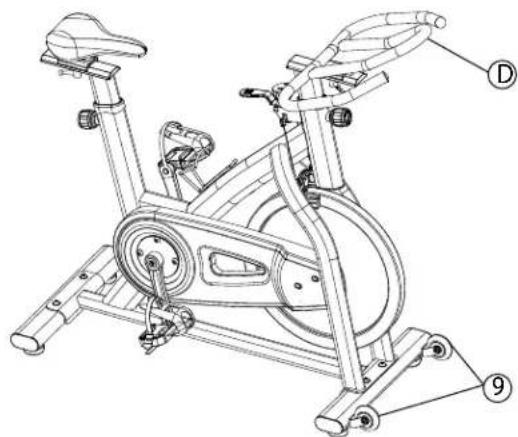
This Fitness Exercise Bike is easy to move around safely. To move the ESB150:
A. Grasp Handlebar (D).
B. Carefully pull Handlebar (D) towards you while pushing the front of the Spin Bike downward.
C. Simply roll the ESB150 on Wheels (9) to the desired location.
D. When the destination has been reached, gently lower the Spin Bike into position.
LEVELING THE ESB150
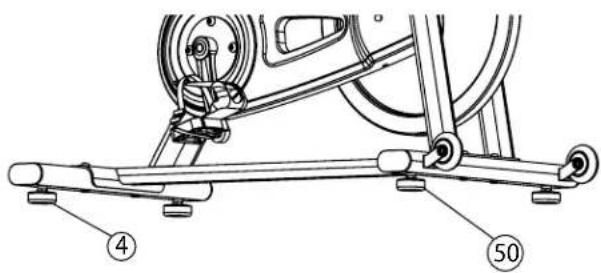
The Front and Rear Base Levelers (4) can be adjusted to balance the level the ESB150. To adjust the level of the ESB150, rotate Front or Rear Base Levelers (3) so they are at floor level.
Once the ESB150 has been balanced, secure Base Levelers (4) by locking Nut (50) located above each Leveler (4).
Setup

seat posture is important for a beneficial workout.
Good posture places less strain on your body's joints, and is beneficial for optimal health and fitness levels.
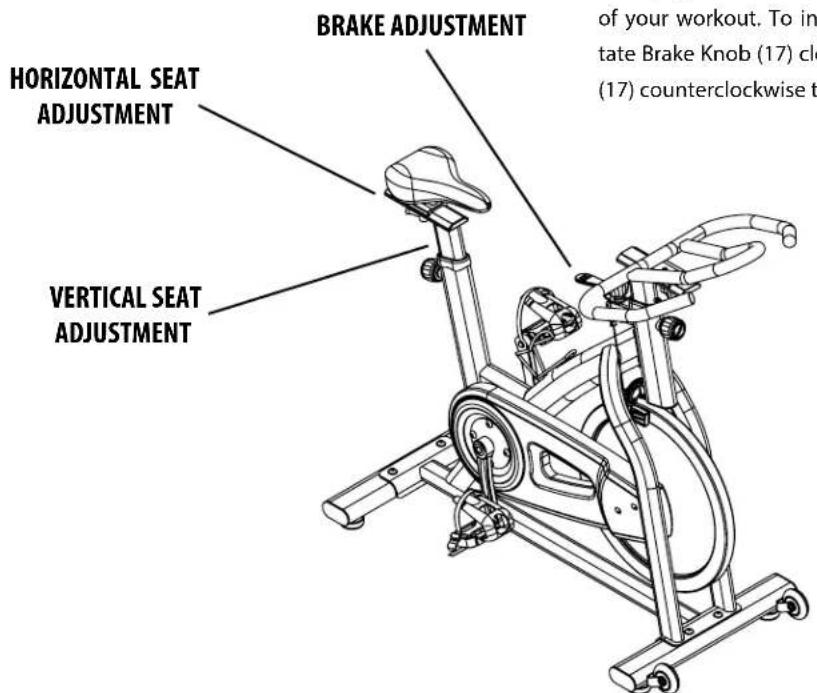
VERTICAL SEAT ADJUSTMENT
To adjust seat height:
A. Mount onto the ESB150 spin bike.
B. Step on one pedal after having brought it to the lowest position. Make sure your legs are stretched but do not lock your knees.
Also, seat height should be level with the user's hips while standing adjacent to the seat.
C. If height requires adjustment, loosen the Pop Pin by turning it counterclockwise then pull while adjusting the seat.
D. After adjustment, place the Pop Pin in the chosen position and lock the Pop Pin by turning it clockwise.
HORIZONTAL SEAT ADJUSTMENT
To adjust the seat horizontally:
A. Mount onto the ESB150 spin bike.
B. Position the pedals so that one pedal is towards the front of the bike and one pedal is towards the rear of the bike.
C. Look down on your forward knee, it should be directly above your front foot for correct posture otherwise adjustment is required.
Also, if the Handle Bar is too far to reach, the seat needs to be adjusted forward.
D. To adjust the seat horizontally, loosen the Pop Pin by turning it counterclockwise then adjust the seat as needed.
E. After adjustment, place the Pop Pin in the chosen position and lock the Pop Pin by turning the knob clockwise.
BRAKE ADJUSTMENT
Varying resistance will increase the effectiveness of your workout. To increase brake resistance, rotate Brake Knob (17) clockwise. Rotate Brake Knob (17) counterclockwise to decrease resistance.
Warning, Safety & Maintenance

operative that the user becomes familiar and stands all warnings posted on the unit.
To minimize the risk of injury, follow all safety guidelines provided with the unit and owner's manual.
Precision craftsmanship assures Endurance's ability to consistently deliver products of the highest standards. Our products have been carefully designed to ensure safe, efficient long term operation.
However, it must be realized that safe use of this equipment requires that owners carefully read and follow the Endurance use recommendations, warnings, and maintenance guidelines in this Owners Manual.
Routine inspection and maintenance is of critical importance to ensure maximum safety and performance. Endurance uses the highest quality materials available, but wear is inevitable. Therefore, you must carefully inspect your equipment as outlined in the Maintenance Schedule.
Be advised that dangerous conditions can arise even during a warranty period. A warranty does not negate the owner's responsibility to thoroughly, carefully and daily inspect the machine.
Including maintaining the equipment, the owner's responsibility is also to:
- Be sure to always provide adequate supervision to all end-users.
- Be sure to instruct all end-users of proper usage.
- Be sure all supervisors and personal trainers who instruct end-users on equipment use are properly trained and know the function and importance of every adjustment and setting.
Also, be sure these trainers provide proper instruction to end-users on the fundamentals of cardio training.
NUTS/BOLTS/FASTENERS:
Periodically inspect all nuts and bolts. Tighten if needed. If bolts seem to loosen periodically, use Loctite 242 for a long-term cure.
- Go through a re-tightening sequence periodically to ensure that all hardware is properly tensioned.
ADJUSTMENTS / LOCKING PINS / TIGHTENING KNOBS:
○ Check all pieces for signs of visible wear or damage.
○ Check springs in Pop Pins for proper tension and alignment.
○ If the spring sticks or has lost its rigidity, replace it immediately.
ANTI-SKID SURFACES:
○ Replace if they appear worn or become slippery.
WARNING INSTRUCTION LABELS:
○ Inspectandfamiliarizeyourselfwithallsafety warnings and other user information on decals.
WARNING
To minimize the risk of serious injury, read and follow all safety guidelines provided with the unit and owner's manual.
- Consult a physician before beginning any fitness program or using fitness equipment.
- Do not allow children on or near the equipment.
- Always ride and stop in a controlled and safe manner.
- Do not dismount or attempt to remove feet from pedals until the flywheel has stopped completely.
- Keep body and clothing clear of all moving parts.
- Properly secure all adjustments and locking features prior to using the spin bike.
- Maximum user capacity is 350 LB (158.8 KG).
Mainframe Parts List
Part# Qty Description
| A | 1 | MAIN | FRAME |
| B | 1 | HANDLEBAR | POST |
| C | 1 | SEAT | POST |
| D | 1 | HANDLEBAR | |
| E | 1 | FRONT | BASE |
| F | 1 | REAR | BASE |
| G | 1 | SEAT | SLIDER |
Part numbers are required when ordering parts.
Parts List
Part# Qty Description
| 1 | 1 | CHAIN | COVER | A | |
| 2 | 1 | CHAIN COVER B | |||
| 3 | 1 | CHAIN COVER C | |||
| 4 | 4 | BASE | LEVELER | ||
| 5 | 2 | BUSHING | 40 x 80 x 2T | (FLAT OVAL) | |
| 6 | 5 | END CAP | 40 x 80 x 2T (FLAT OVAL) | ||
| 7 | 1 | SEAT | |||
| 8 | 2 | POP | PIN | ||
| 9 | 2 | TRANSPORT | WHEEL | ||
| 10 | 2 | PLASTIC SPACER | 25 × 6.5 × 6 | ||
| 11 | 1 | STOPPER BAR | |||
| 12 | 1 | FELT WASHER | 25 × 10 × 3 | ||
| 13 | 2 | BRAKE PAD HOLDER | |||
| 14 | 1 | CLAMP BRAKE ASSEMBLY | |||
| 15 | 1 | TENSION KNOB | |||
| 16 | 2 | BRAKE PAD (FELT) | |||
| 17 | 1 | CLAMP BRAKE HOLDER | |||
| 18 | 2 | BRAKE STRING | 170L | ||
| 19 | 2 | RUBBER SPACER | 25 × 6.5 × 6 | ||
| 20 | 2 | CRANK COVER | |||
| 21 | 1 | TINNERMAN CLIP NUT | |||
| 22 | 1 | FLYWHEEL | |||
| 23 | 1 | FLYWHEEL SPINDLE | |||
| 24 | 1 | SLEEVE | 18 × 12 × 34 | ||
| 25 | 1 | AXLE | |||
| 26 | 1 | BELT WHEEL | |||
| 27 | 1 | BELT | 1360mm | ||
| 28 | 1 | LEFT CRANK | M18 | ||
| 29 | 1 | RIGHT CRANK | M18 | ||
| 30 | 1 | LEFT PEDAL | M18 | ||
| 31 | 1 | RIGHT PEDAL | M18 | ||
| 32 | 2 | PEDAL SHEATH | |||
| 33 | 4 | FLAT WASHER | M10 | ||
| 34 | 4 | HEX FLAT ROUND HEAD SCREW | M10x25 | ||
| 35 | 1 | RUBBER COVER | |||
| 36 | 1 | BOTTLE HOLDER | |||
| 37 | 2 | BEARING | 6001 ABEC-5 | ||
| 38 | 2 | BEARING | 6004 ABEC-5 | ||
| 39 | 4 | BEARING | 608 | ||
| 40 | 1 | FLAT WASHER | M12 | ||
| 41 | 1 | ACORN CAP NUT | M12 | ||
| 42 | 8 | PHILLIPS PAN HEAD SCREW | ST4.8 x 15 | ||
| 43 | 2 | PEDAL STRIP | |||
| 44 | 2 | COUNTER BALANCE WEIGHT | |||
| 45 | 1 | FLANGE NUT | M12 | ||
| 46 | 1 | FLANGE NUT | M6 | ||
Part numbers are required when ordering parts.
Parts List
Part# Qty Description
| 47 | 1 | FLAT WASHER | 25 × 10 × 1.5T | ||
| 48 | 2 | WASHER | WASHER | 27 × 20 × 0.3T | |
| 49 | 2 | RETAINER | RING | ||
| 50 | 4 | HEX | NUT | M10 | (BLACK) |
| 51 | 3 | BUTTON HEAD CAP BOLT | 8 × M6 × 30 | ||
| 52 | 1 | BUTTON HEAD CAP SCREW | M6 x 25 | ||
| 53 | 2 | FLAT | WASHER | M5 | |
| 54 | 2 | FLANGE | NUT | M10 | |
| 55 | 2 | PHILLIPS FLAT HEAD SCREW | M5x18 | ||
| 56 | 3 | HEX | NUT | M12 | x 6 |
| 57 | 4 | BUTTON HEAD CAP SCREW | M10 x 16 | ||
| 58 | 1 | NYLON LOCK NUT | M10 x P1.25 | ||
| 59 | 2 | PHILLIPS ROUND HEAD SCREW | M5 x 12 | ||
| 60 | 3 | BUTTON HEAD CAP SCREW | M6 x 12 | ||
| 61 | 1 | TENSION BRACKET | |||
| 62 | 1 | TENSION SPRING | |||
| 63 | 2 | ESB 150 LOGO DECAL | |||
| 64 | 1 | FLYWHEEL DECAL LEFT | |||
| 65 | 1 | TENSION PULLEY | |||
| 66 | 1 | RETAINER RING | |||
| 67 | 1 | NYLON | LOCK NUT | M10 | |
| 68 | 1 | BUTTON HEAD CAP SCREW | M10 x 25 | ||
| 69 | 1 | FLAT | WASHER | M10 | |
| 70 | 2 | NYLON | LOCK NUT | M8 | |
| 71 | 2 | PHILLIPS PAN HEAD SCREW | M5 x 12 | ||
| 72 | 2 | FLAT WASHER | 10 × 5.2 × 1T | ||
| 73 | 2 | ENDURANCE LOGO DECAL | |||
| 74 | 2 | FLAT | WASHER | M10 | x OD30 |
| 75 | 2 | KNOB | |||
| 76 | 1 | FLYWHEEL DECAL RIGHT |
Part numbers are required when ordering parts.
Hardware (To Scale)
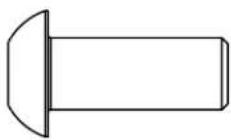
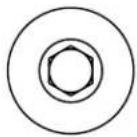
Part# 34 M10x25 Hex Flat Round Head Screw Qty. 4
Part#
33
M10
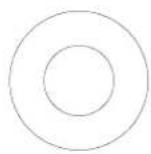
Washer
Qty.
Part#
74
M10x30OD
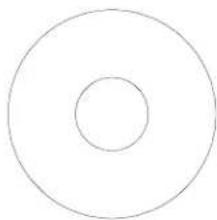
natural_image
Simple concentric circle diagram with no text or symbolsWasher
Qty.

Exploded View Diagram
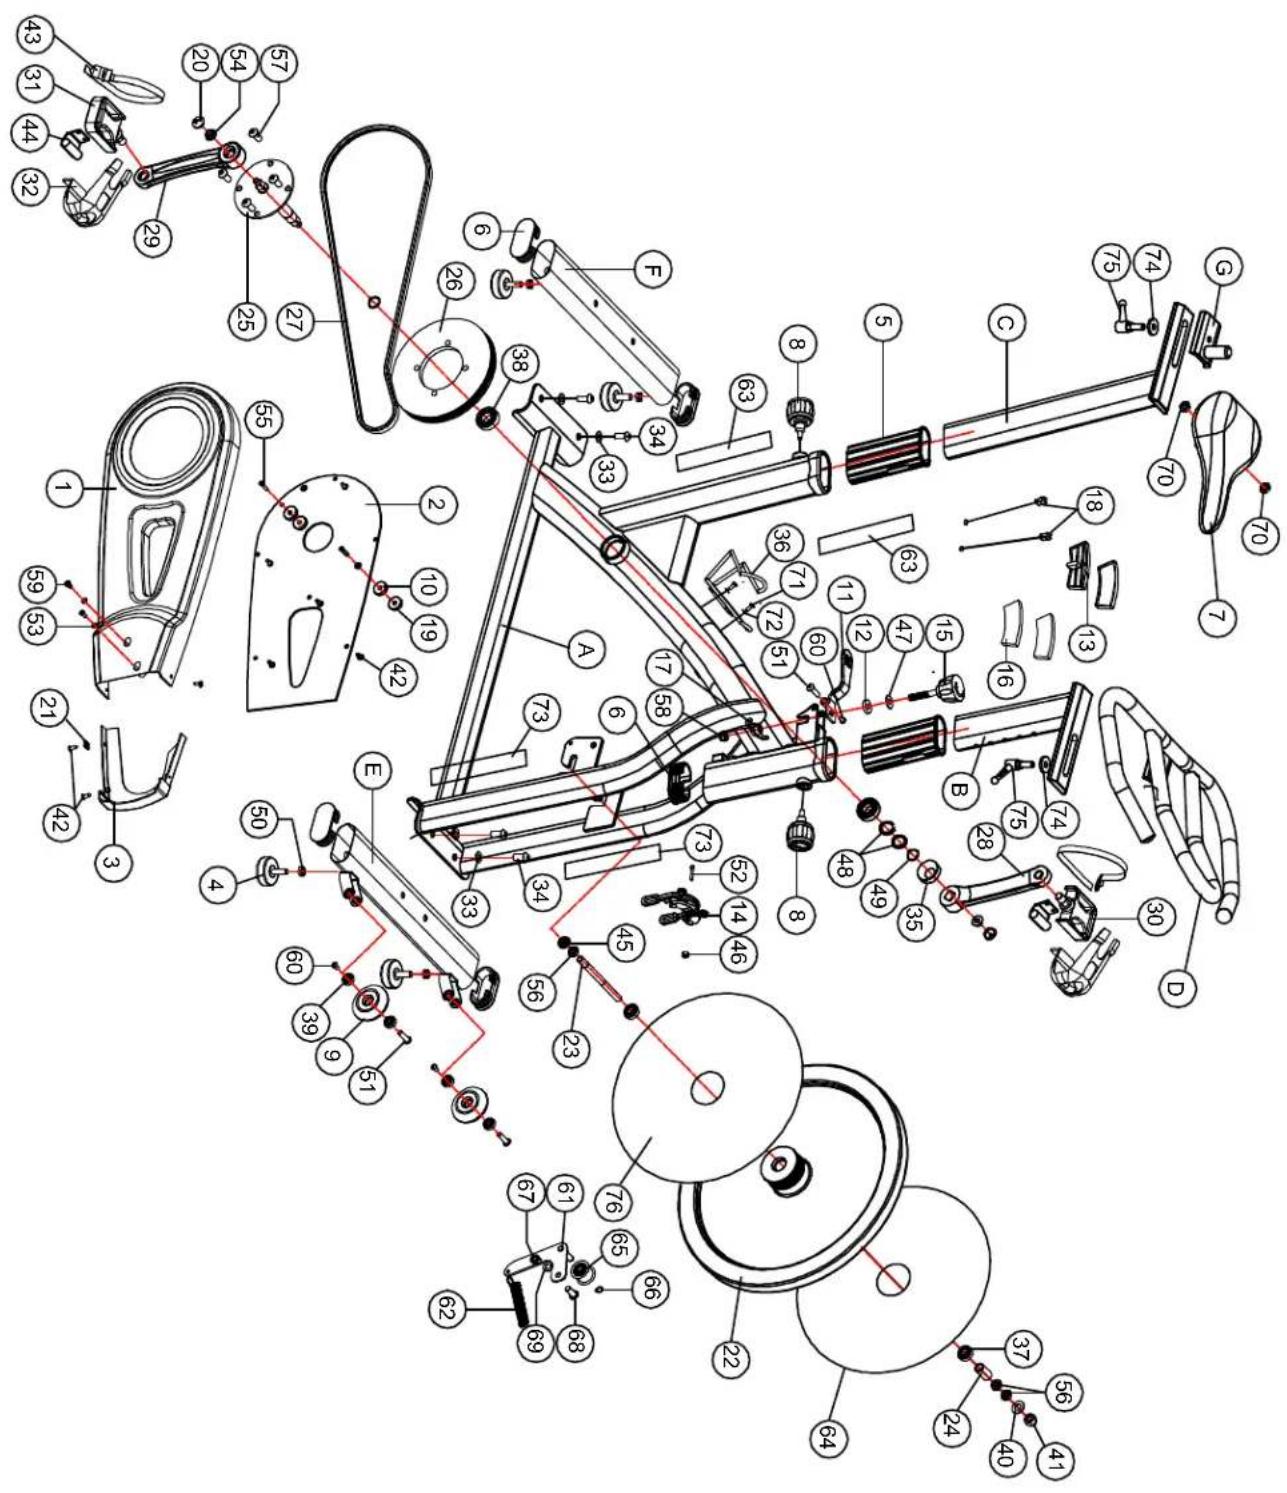
Notes
natural_image
Line drawing of an exercise bike on a mat with a cable, no text or symbols presentSerial Number is Located on the Frame
Model Name: ESB150
Purchase Date: ____
Serial Number: ____
1900 S. Des Plaines Ave.
Forest Park, Il 60130
(800) 556-3113
Hours: M-F 8:30 - 5:00
- Table of Contents
- Dimensions
- Reference Diagrams
- Important Safety Instructions
- Personal Safety During Assembly
- Assistance is required.
- Before You Begin
- Retain this Owner's Manual for future reference!
- Preparations
- CAUTION!
- Required Tools
- Installation Requirements
- Set up the ESB150 on a solid, flat surface.
- Provide ample space around the machine.
- Insert all bolts in the same direction.
- Leave room for adjustments.
- Fill out and mail the warranty card.
- Assembly Instructions
- Assembly Tips
- IMPORTANT!
- Be careful to assemble all components in the sequence they are presented.
- STEP
- 2
- 3
- 4
- 5
- Features
- Setup
- PLACEMENT IN YOUR HOME
- MOVING THE ESB150
- LEVELING THE ESB150
- VERTICAL SEAT ADJUSTMENT
- HORIZONTAL SEAT ADJUSTMENT
- BRAKE ADJUSTMENT
- Warning, Safety & Maintenance
- operative that the user becomes familiar and stands all warnings posted on the unit.
- NUTS/BOLTS/FASTENERS:
- ADJUSTMENTS / LOCKING PINS / TIGHTENING KNOBS:
- ANTI-SKID SURFACES:
- WARNING INSTRUCTION LABELS:
- WARNING
- Mainframe Parts List
- Parts List
- Hardware (To Scale)
- Exploded View Diagram
- Serial Number is Located on the Frame
Brand : Body-Solid
Model : ESB150
Category : Home trainer