
Charge Power Pack - Bike computer GARMIN - Free user manual and instructions
Find the device manual for free Charge Power Pack GARMIN in PDF.


| Product Type | External battery pack for Garmin Edge bike computers |
| Battery Type | Lithium-ion |
| Battery Capacity | 3100 mAh at 5 V (15.5 Wh) |
| Charging Time | Approximately 4 hours (using included USB cable and wall charger) |
| Input | 5-5.5 V, 2 A |
| Output (Electrical Contacts) | 5.07 V, up to 1 A |
| Output (USB-A Port) | 5.07 V, up to 2.4 A |
| Water Rating | IEC 60529 IPX7 (withstands incidental exposure to water up to 1 m for 30 min) |
| Operating Temperature Range | -20°C to 60°C (-4°F to 140°F) |
| Charging Temperature Range | 0°C to 45°C (32°F to 113°F) |
| Compatibility | Garmin Edge devices with electrical contacts or via USB cable (requires accessory cable for some models) |
| Mounting | Out-front mount with lever adapter and quarter-turn adapter (included) |
| Indicators | Status LEDs: flashing blue during charging, solid blue when full; battery level via device key (each solid LED = 25%) |
| Safety Features | Overcharge protection, temperature protection, short-circuit protection |
| Maintenance | Keep USB ports and weather cap dry; use only Garmin-approved cables |
| Warranty | Garmin standard limited warranty (see www.garmin.com/support/warranty.html) |
Frequently Asked Questions - Charge Power Pack GARMIN
User questions about Charge Power Pack GARMIN
0 question about this device. Answer the ones you know or ask your own.
Ask a new question about this device
Download the instructions for your Bike computer in PDF format for free! Find your manual Charge Power Pack - GARMIN and take your electronic device back in hand. On this page are published all the documents necessary for the use of your device. Charge Power Pack by GARMIN.
USER MANUAL Charge Power Pack GARMIN
natural_image
Line drawing of a Garmin VR headset with hexagonal connector and mounting slots (no text or symbols on body)EDGE® EXTERNAL BATTERY PACK
Installation Instructions 2
Garmin ^® , the Garmin logo, and Edge ^® are trademarks of Garmin Ltd. or its subsidiaries, registered in the USA and other countries. These trademarks may not be used without the express permission of Garmin.
Other trademarks and trade names are those of their respective owners.
EDGE® EXTERNAL BATTERY PACK Installation Instructions
Important Safety Information
WARNING
See the Important Safety and Product Information guide in the GPS device product box for product warnings and other important information.
A lithium-ion battery is used in this device.
If these guidelines are not followed, the battery may experience a shortened life span or may present a risk of damage to the device, fire, chemical burn, electrolyte leak, and/or injury.
- Do not disassemble, modify, remanufacture, puncture or damage the battery pack.
- Do not expose the battery pack to fire, explosion, or other hazard.
NOTICE
- Do not immerse the battery pack in water or other liquids.
- Do not leave the battery pack exposed to a heat source or in a high-temperature location, such as in the sun in an unattended vehicle. To prevent the possibility of damage, remove the battery pack from the vehicle or store it out of direct sunlight, such as in the glove box.
- Do not operate the battery pack outside of the temperature ranges specified in the printed manual in the product packaging.
- When storing the battery pack for an extended time period, store within the temperature ranges specified in the printed manual in the product packaging.
- Do not use a power and/or data cable that is not approved or supplied by Garmin®.
- Contact your local waste disposal department to dispose of the battery pack in accordance with applicable local laws and regulations.
Device Overview
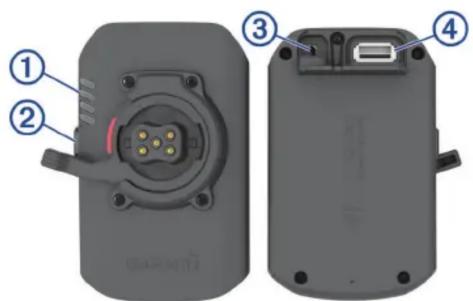
① Status LEDs
② Device key
③ Input power Micro-USB port (under weather cap)
④ Output power USB-A port (under weather cap)
Charging the Battery Pack
NOTICE
To prevent corrosion, thoroughly dry the USB port, the weather cap, and the surrounding area before charging or connecting to a computer.
NOTE: The device will not charge when outside the charging temperature range (Specifications, page 3).
1 Pull up the weather cap from the Micro-USB port.
2 Plug the small end of the USB cable into the Micro-USB port on the device.
3 Plug the large end of the USB cable into the USB wall charger.
4 Charge the battery pack completely.
The status LEDs flash blue while charging. The status LEDs are solid blue when charging is complete. Charging a fully depleted battery pack takes approximately four hours using the USB cable and wall charger included with the battery pack. The battery pack may charge slowly when using a third-party USB cable or power source.
Tips for Using the Battery Pack
- Select the device key to check the battery charge level. Each solid LED represents up to a 25% battery charge level. When one LED is flashing, the battery pack has less than a 5% charge remaining.
- Connect your Edge ^ device to the battery pack. Edge devices with electrical contacts start charging when connected to the charging pins on the battery pack. For Edge devices without electrical contacts, you must connect a USB cable to the USB-A port on the battery pack. Go to buy.garmin.com to purchase an accessory cable.
- Hold the device key for five seconds to stop charging a connected Edge device. You can select the device key to continue charging.
Installing the Lever Adapter
1 Use the 2 mm hex key to remove the two screws ① on the bottom of the mount.
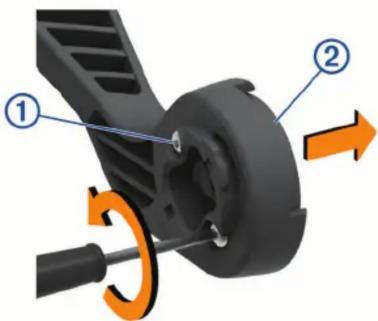
2 Remove the quarter-turn adapter ②.
3 Insert the lever adapter ③.
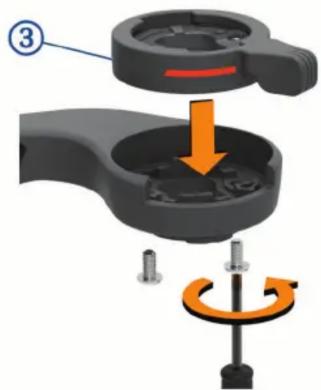
4 Replace the screws, and use the 2 mm hex key to tighten the screws.
Installing the Out-Front Mount
You can use the out-front mount to install the battery pack and your Edge device.
1 Select a secure location to mount the Edge device and battery pack where they do not interfere with the safe operation of your bike.
2 Use the 2.5 mm hex key to remove the screw ① from the handlebar connector ②.
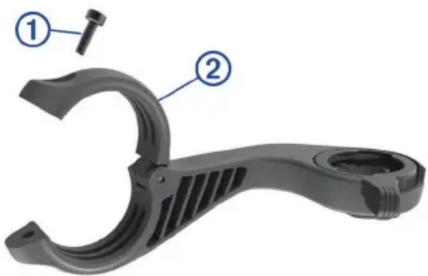
natural_image
Mechanical clamp component with labeled parts (1 and 2), no text or symbols present3 Place a rubber pad around the handlebar:
- If the handlebar diameter is 25.4 mm, use the thicker pad.
- If the handlebar diameter is 31.8 ~mm , use the thinner pad.
4 Place the handlebar connector around the rubber pad.
NOTE: You should align the contours on the rubber pad with the grooves on the inside of the handlebar connector.
5 Replace the screw, and use the 2.5 mm hex key to tighten the screw.
NOTE: Garmin recommends tightening the screw so the mount is secure, with a maximum torque specification of 7 lbf-in. (0.8 N-m). You should check the tightness of the screw periodically.
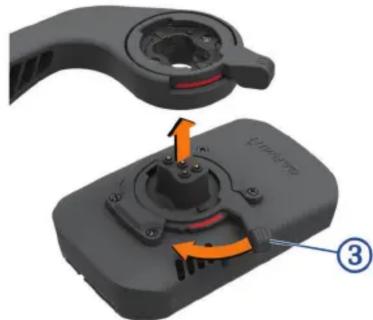
6 Insert the battery pack into the bottom of the mount.
The lever ③ must be in the open position. The red mark indicates the open position.
natural_image
Close-up of a mechanical device with orange arrows indicating a component, no visible text or symbols7 Snap the lever to the closed position to lock the battery pack into the mount.
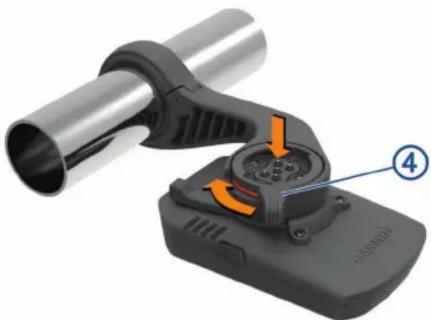
8 Insert the Edge device into the top of the mount.
The lever ④ must be in the open position. The red mark indicates the open position.
natural_image
Close-up of a mechanical device with orange arrows indicating a component, no visible text or symbols9 Snap the lever to the closed position to lock the Edge device into the mount.
10 If necessary, use a USB cable to connect the Edge device to the output power USB-A port on the battery pack (Tips for Using the Battery Pack, page 2).
Device Information
Specifications
| Battery type Lithium-ion battery | |
| Output capacity 3100 mAh | at 5 V (15.5 Wh) |
| Battery operation time Up to 24 hr. powering the Edge 1030 device | |
| Charging temperature range | From 0° to 45°C (from 32° to 113°F) |
| Operating and storage temperature range | From -20° to 60°C (from -4° to 140°F) |
| Input 5 to 5.5 V, 2 A | |
| Output Electrical contacts: | 5.07 V, up to 1 AUSB port: 5.07 V, up to 2.4 A |
| Water rating IEC 60529 IPX7* | |
*The device withstands incidental exposure to water of up to 1 m for up to 30 min. For more information, go to www.garmin.com /waterrating.
Limited Warranty
The Garmin standard limited warranty applies to this accessory. For more information, go to www.garmin.com/support/warranty.html.
Brand : GARMIN
Model : Charge Power Pack
Category : Bike computer