
CM470112 - Coffee maker GAGGENAU - Free user manual and instructions
Find the device manual for free CM470112 GAGGENAU in PDF.


| Product Type | Fully Automatic Built-In Coffee Machine |
| Model | CM470112 |
| Brand | Gaggenau |
| Dimensions (H x W x D) | 455 x 595 x 455 mm |
| Weight | 28 kg |
| Power Supply | 220-240 V, 50-60 Hz, 1600 W |
| Water Tank Capacity | 2.5 L |
| Bean Hopper Capacity | 250 g |
| Ground Coffee Bypass | Yes, for pre-ground coffee |
| Brewing System | Ceramic disc grinder, 15 bar pump, thermoblock heating |
| Milk System | Integrated steam wand with automatic milk frother |
| Programmable Beverages | Espresso, coffee, latte macchiato, cappuccino, hot water |
| User Interface | TFT color display with touch controls |
| Cleaning and Maintenance | Automatic rinsing and descaling program; removable brew unit |
| Safety Features | Child lock, auto shut-off, overheat protection |
| Energy Efficiency Class | A+ (EU energy label) |
| Spare Parts Availability | Brew unit, water filter, seals, gaskets, drip tray available via Gaggenau service |
| Repairability Index | 6.5 / 10 (based on ease of disassembly and parts availability) |
Frequently Asked Questions - CM470112 GAGGENAU
User questions about CM470112 GAGGENAU
0 question about this device. Answer the ones you know or ask your own.
Ask a new question about this device
Download the instructions for your Coffee maker in PDF format for free! Find your manual CM470112 - GAGGENAU and take your electronic device back in hand. On this page are published all the documents necessary for the use of your device. CM470112 by GAGGENAU.
USER MANUAL CM470112 GAGGENAU
Fully Automatic Espresso Machine
Table of contents
Intended use 3
Important safety information 3
Environmental protection 4
Saving energy 4
Environmentally-friendly disposal 4
Familiarising yourself with your appliance 5
Included in delivery 5
Assembly and components 6
Display and operating controls 7
Function selector positions 7
Symbols 7
Colours and display 8
Automatic door opening 8
Additional information i and i ^① 8
Accessories 9
Switching the appliance on and off 9
Main switch 9
Hibernate mode 10
Activating the appliance 10
Setting up the appliance 10
Initial settings 10
Setting the water hardness 11
Water filter 11
Operation with or without a water filter 11
Inserting the water filter 12
Fill bean container 12
Preparing beverages 13
Beverage selection 13
Preparing coffee using freshly ground beans 14
Preparing two cups at the same time 14
Preparing coffee using ground coffee 15
Preparing a coffee with milk 15
Preparing milk froth and warm milk 16
Preparing hot water 16
Setting the grinding level 17
Changing bean type 17
Individual beverages 17
Child lock 18
Activating the child lock 18
Deactivating the child lock 18
Basic settings 19
Setting the milk container weight 21
Messages 21
Daily care and cleaning 22
Daily maintenance 22
Cleaning the milk system 23
Cleaning the brewing unit 24
Service programmes 25
Cleaning 25
Descaling 26
Cleaning and descaling 26
Fill the water tank with fresh water. 27
Emptying programme 27
Simple troubleshooting 28
Technical data 30
AQUA-STOP guarantee 30
Additional information on products, accessories, replacement parts and services can be found at
www.gaggenau.com and in the online shop
www.gaggenau.com/zz/store
Intended use
Check the appliance for damage after unpacking it. Do not connect the appliance if it has been damaged in transport.
This appliance is intended for domestic use only.
Only use the appliance indoors at room temperature and up to 2000 m above sea level.
Protect the appliance from frost, otherwise it will become damaged.
⚠️ Important safety information
Please read carefully, follow and retain the operating instructions. When passing on the appliance, enclose these instructions.
This appliance can be used by children aged from 8 years and above and by persons with reduced physical, sensory or mental capabilities or lack of experience and knowledge if they have been given supervision or instruction concerning use of the appliance in a safe way and if they understand the hazards involved. Keep children under 8 years of age away from the appliance and connecting cable and do not allow them to use the appliance. Children shall not play with the appliance. Cleaning and user maintenance shall not be made by children unless they are older than 8 years and supervised.
⚠ Warning – Danger of electric shock!
- The appliance may only be connected to a power supply with alternating current via a correctly installed socket with earthing.
Ensure that the protective conductor system of the domestic electricity supply has been correctly installed. - Connect and operate the appliance only in accordance with the specifications on the rating plate. If the power cord of this appliance is damaged, it must be replaced by customer service.
- Do not use if the power cable or appliance is damaged. If a fault occurs, pull the mains plug or switch off the mains voltage immediately.
- If water is leaking from the inlet hose, turn off the tap at once. When connecting or working on the water pipe, disconnect the appliance from the mains power supply.
-
To prevent hazards, the appliance may be repaired by our customer service only.
-
Never immerse the appliance or mains cord in water.
- The plug and socket connection of the appliance must not come into contact with liquids.
⚠ Warning – Hazard due to magnetism!
The appliance contains permanent magnets which may affect electronic implants, e.g. heart pacemakers or insulin pumps. Persons wearing electronic implants must maintain a minimum distance of 10 cm from the appliance and from the following parts upon removal: milk container, milk system, water tank and brewing unit.
⚠ Warning – Risk of suffocation!
Do not let children play with packaging material. Store small parts safely as they can be easily swallowed.
⚠ Warning – Risk of burns!
- The milk system becomes very hot. After use, allow it to cool down first before touching it.
- Some parts of the appliance become very hot. Never touch hot appliance parts.
⚠ Warning – Risk of injury!
- Improper use of this appliance may result in injury.
- Do not reach into the grinding unit.
- Be careful not to jam your fingers when closing the door.
⚠ Warning – Risk of fire!
The appliance will become hot. Ventilate the appliance adequately. Never operate the appliance in a unit with the cabinet door closed.
⚠ Warning – Risk of harm to health!
Soiling on the appliance may be dangerous to health. Follow the cleaning instructions for the appliance.
Environmental protection
Saving energy
- If the appliance is not being used, switch it off.
- Set the interval for automatic switch-off to the smallest value.
- If possible, do not interrupt coffee or milk froth dispensing. Stopping a process prematurely results in higher energy consumption and the drip tray fills up more quickly.
- Descale the appliance regularly to avoid a build-up of limescale. Limescale residue results in higher energy consumption.
Environmentally-friendly disposal
Dispose of packaging in an environmentally-friendly manner.
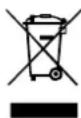
This appliance is labelled in accordance with European Directive 2012/19/EU concerning used electrical and electronic appliances (waste electrical and electronic equipment - WEEE). The guideline determines the framework for the return and recycling of used appliances as applicable throughout the EU.
Please ask your dealer about current disposal routes.
Familiarising yourself with your appliance
Use this section to familiarise yourself with your new appliance. The control panel and the individual operating controls are explained. You will also be informed about the accessories.
Further information about the appliance, such as how to change the opening angle of the door, can be found in the enclosed installation instructions.
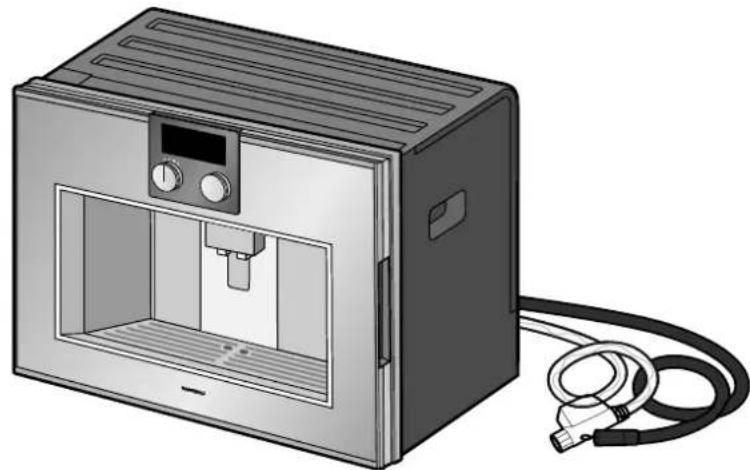
Included in delivery
(For use)
natural_image
Illustration of a 3D printer with control panel and cable, no text or symbols present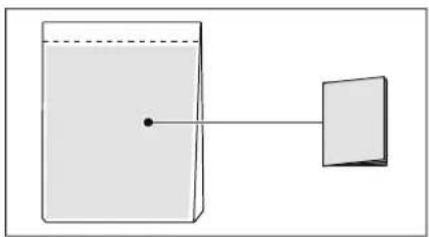
natural_image
Simple diagram showing a container with liquid and a separate rectangular block connected by an arrow (no text or symbols)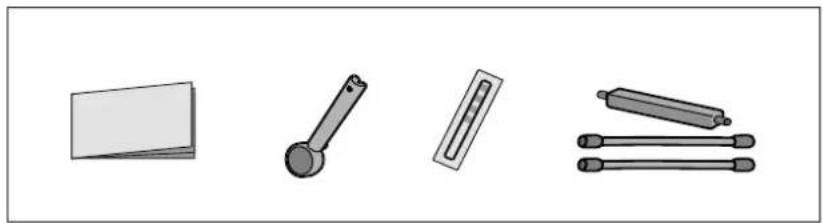
natural_image
Illustration of four common office supplies: a flatboard, a tool, a ruler, and three cylindrical objects (no text or symbols)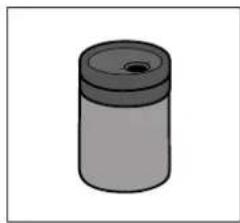
natural_image
Simple 3D illustration of a cylindrical object with a lid and central hole (no text or symbols)
natural_image
Simple vertical gray line on white background (no text or symbols)Assembly and components
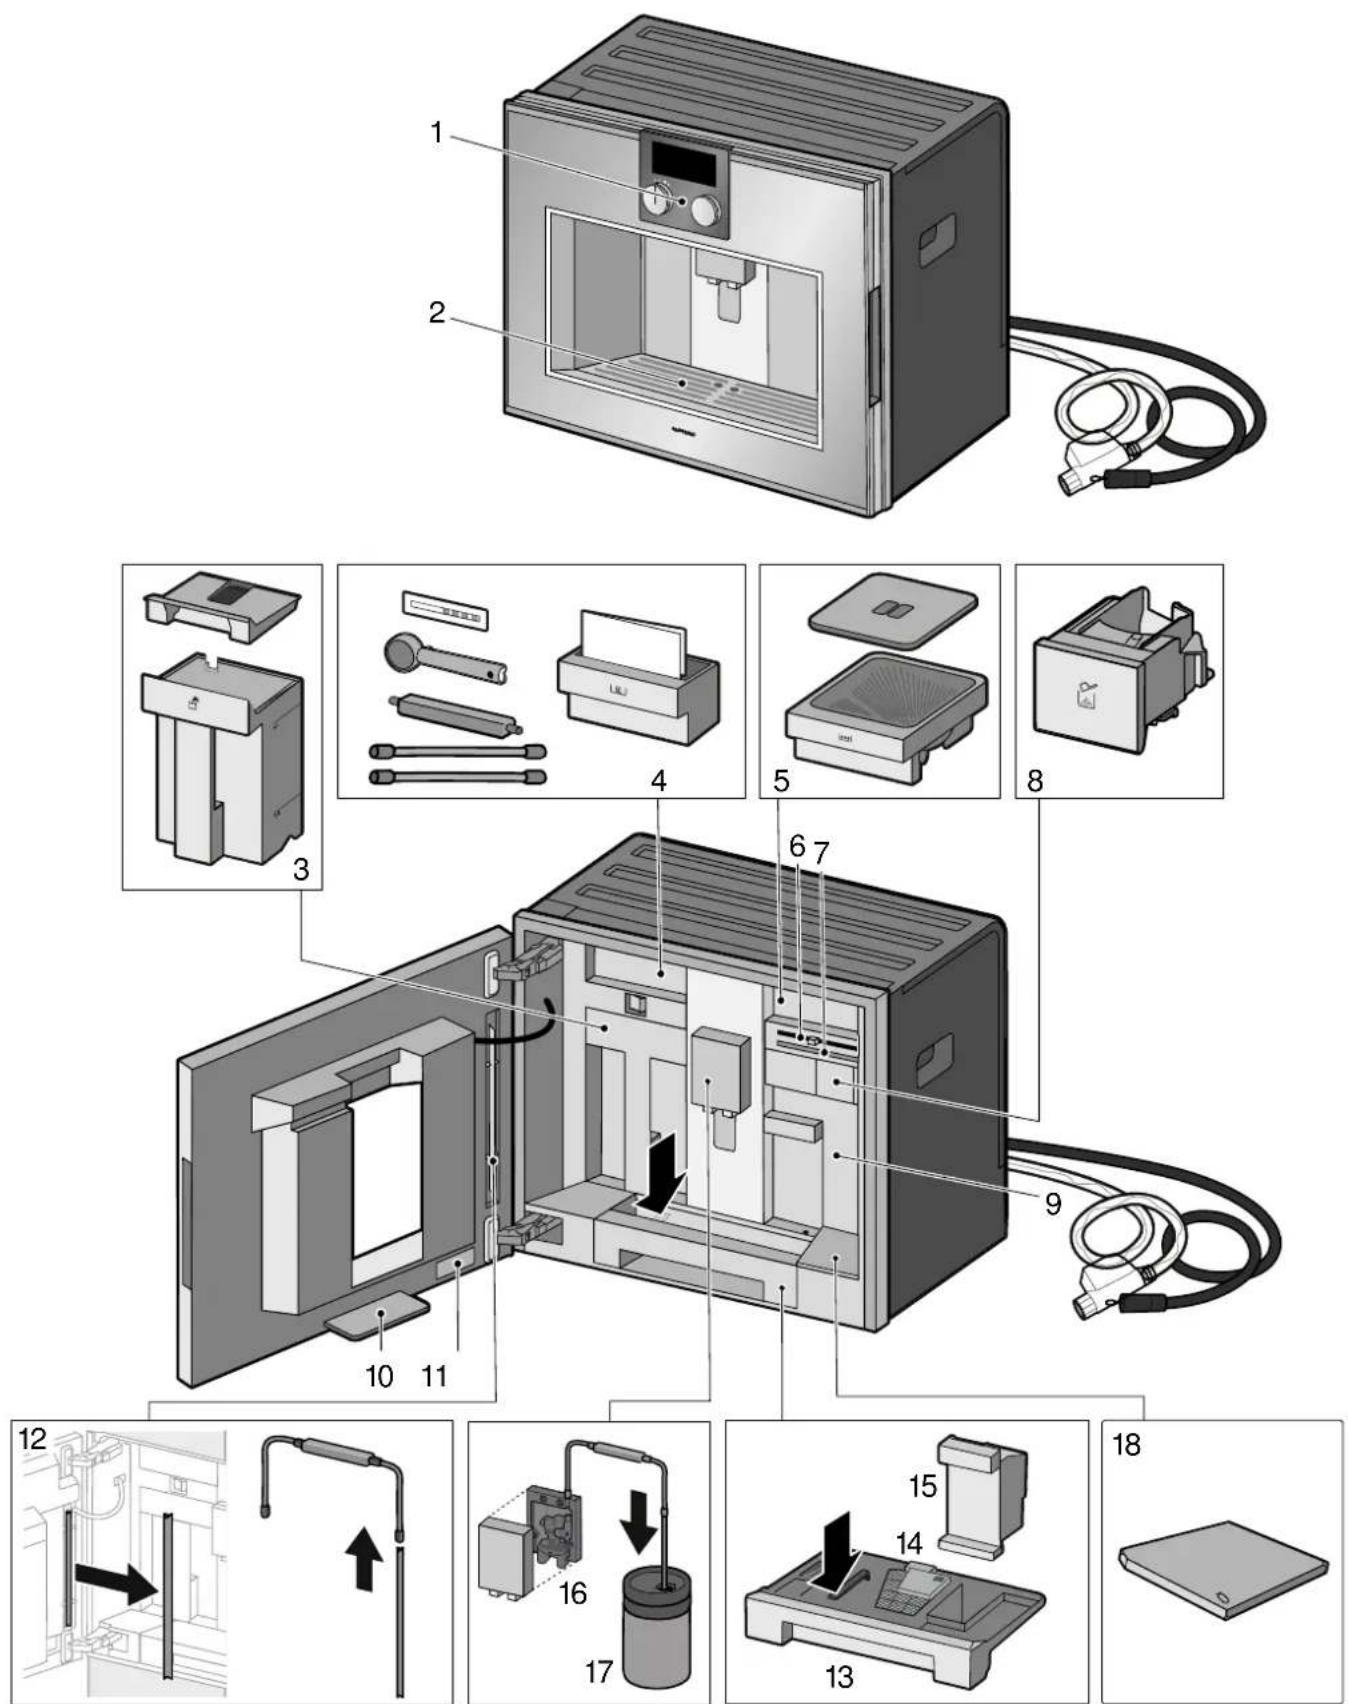
| 1 Display and controls |
| 2 Shelf, e.g. for a cup |
| 3 Water tank with cover |
| 4 Accessory drawer (for quick reference guide and accessories) |
| 5 Bean container |
| 6 Grinding level adjustment |
| 7 Magnetic holder (for milk hose connecting element) |
| 8 Ground coffee drawer |
| 9 Protective cover (for brewing unit) |
| 10 Collecting tray |
| 11 Rating plate |
| 12 Holder (for milk tube) |
| 13 Drip tray |
| 14 Drain filter |
| 15 Coffee residue container |
| 16 Beverage dispenser and milk system, height-adjustable |
| 17 Milk container |
| 18 Shelf (scales) for milk container, removable |
Display and operating controls
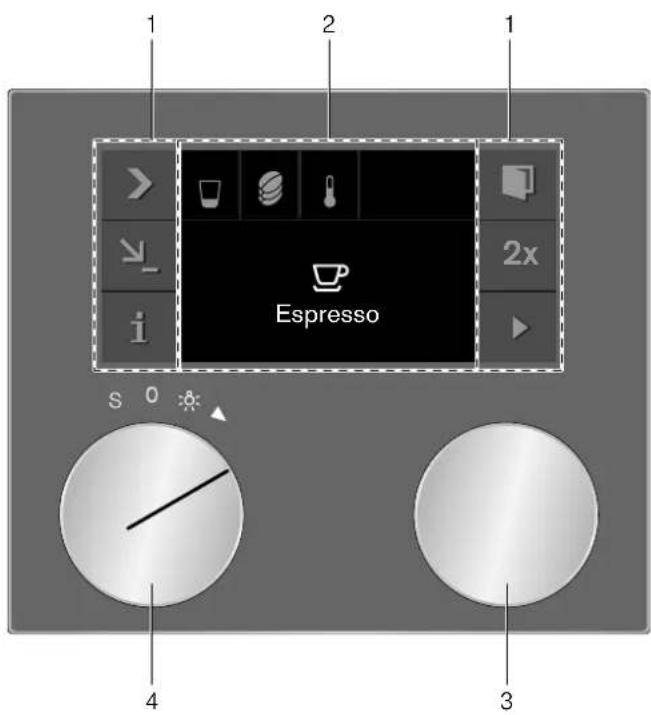
| 1 Control panel These areas are touch sensitive.Touch a symbol to select the corresponding function. |
| 2 Display The display shows, for example,current settings and options. |
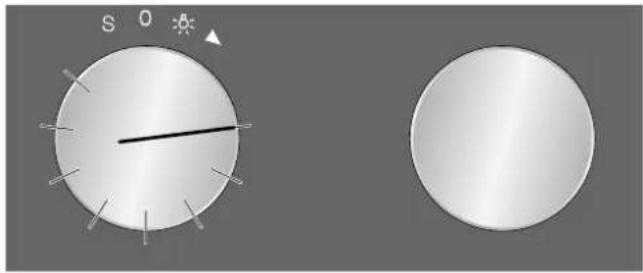
| 3 Rotary selector You can select the desired beverage and other settings using the rotary selector. |
| 4 Function selector You can use the function selector to call up beverages or the favourite drinks you have saved. |
Function selector positions
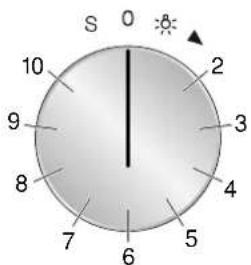
| Position Function |
| 0 Zero setting |
| Light |
| 2 Beverage selection |
| 3 - 10 Memory locations for individual beverages |
| S Service programmes/basic settings |
Symbols
The following overview details the symbols that are the most used when operating the appliance.
| Symbol Function | |
| ▶ Start | |
| ■ Stop | |
| × Cancel | |
| √ Confirm/save settings | |
| > Selection arrow | |
| Opening the door | |
| i Call up additional information | |
| Call up additional tips | |
| _ | Edit settings |
| ↘ | Save individual beverage |
| Quick capacity selection | |
| 2x | 2 beverages |
| ∅ Child lock | |
Colours and display
Colours
The different colours are used to guide the user in the relevant setting situations.
Orange Initial settings
Main functions, messages
Blue Basic settings
Cleaning
White Adjustable values
Appearance
The symbols, values and displays may change, depending on the situation.
| Standard Values and symbols which have just been selected will be displayed in a larger font. | |
| Reduced display screen | After a short while, the amount of information shown on the display will be reduced and only the most important information will remain. This function is activated in the basic settings ex works and can be deactivated. |
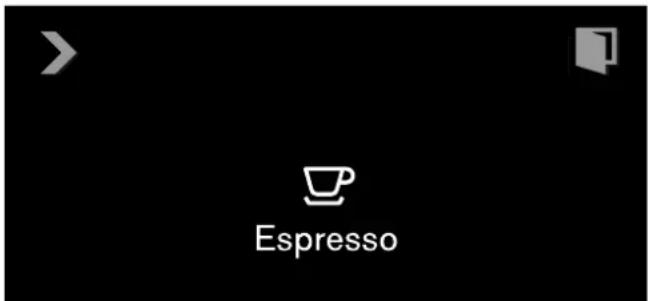
Automatic door opening
The appliance door springs open when you touch the symbol and you can open it fully by using the recessed handle on the side.
Automatic door opening does not work if the child lock is activated or there is a power cut. You can open the recessed handle on the side by hand.
Additional information i and i ^®
By touching the i symbol you can call up additional information.
During operation you will for example receive information about the number of beverages dispensed previously.
If the function selector is set to S, you will for example receive information about when the appliance needs to be descaled or cleaned, or when the water filter needs changing. You can use this information for example to start a service programme that is due soon.
The i ^1 symbol appears for important user prompts. New messages are also shown on the display for several seconds. These messages disappear automatically after a few seconds or must be confirmed with √. A list of messages can be displayed by touching the i ^1 symbol. The message disappears when the required action has been carried out.
Accessories
The fully automatic espresso machine has a drawer for storing accessories such as the quick reference guide or measuring spoon inside the appliance. After opening the door, you can use the magnetic holder and the clip for the individual parts, such as the milk hose set. The holder for the milk tube is situated on the inside of the door.
The appliance includes the following accessories as standard:
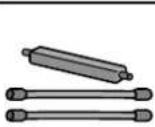 | Measuring spoonFor adding ground coffee. |
| Milk hose setFor connecting the milk container. | |
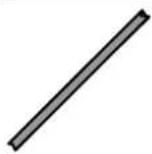 | Milk tubeFor inserting into the milk container,milk cartons and milk bottles or forrunning a service programme. |
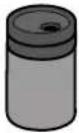 | Milk containerVolume capacity 0.5 litres.The milk container has beendesigned especially for use togetherwith this fully automatic coffeemachine. It is intended solely for usein the household and for storing milkin the refrigerator. |
The following accessories can be ordered by contacting the after-sales service:
Water filter (order no.: 17000705)
• Cleaning tablets (order no.: 00311769)
• Descaling tablets (order no.: 00311819)
• Stainless-steel milk container (order no.: 11019259)
- Limit stop for 92° opening angle (order no.: 00636455)
- Bean container with lid (order no.: 11015223)
• Water inlet hose extension (order no.: 11019575)
Switching the appliance on and off
Main switch
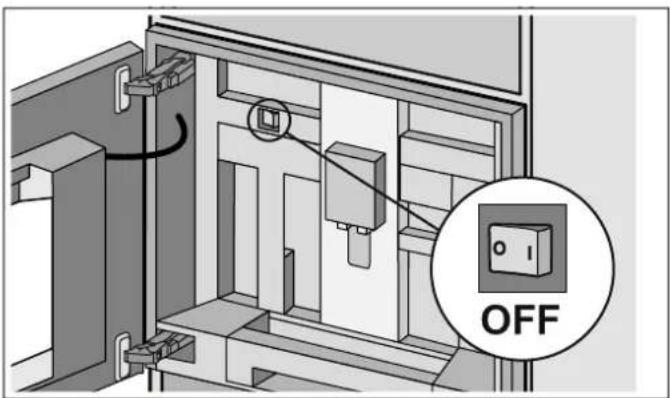
The main switch is used to switch the appliance on and off.
If the appliance is switched off at the main switch, the power supply is interrupted.
The appliance is programmed so that it switches to standby mode automatically after about 30 minutes. This timespan can be changed. → "Basic settings" on page 19
The appliance rinses automatically when it is switched on at the main switch. Exception: The appliance was only switched off a few minutes beforehand.
Notes
- Do not press the main switch during operation. If you want to manually switch off the appliance, you must first set the function selector to 0 so that it rinses automatically. Then switch off the appliance using the main switch.
- The appliance is equipped with a sensor. If a milk container is present, this will be shown on the display when switching to energy-saving mode (function selector set to 0). If there is milk in the container, please keep in the refrigerator.
Hibernate mode
The appliance goes into hibernate mode if the function selector is turned to 0 or if the child lock is activated.
The brightness of the display is dimmed in hibernate mode during the first few minutes.

The display then switches itself off.
Notes
- In Basic settings, you can select whether the Gaggenau logo is to be displayed during hibernate mode. "Basic settings" on page 19
- The brightness of the display depends on the vertical viewing angle. You can adjust the display using the "Brightness" setting in the basic settings.
Activating the appliance
To leave hibernate mode or to activate the display when it has been switched off, turn the function selector.
You can now set the desired function. You can read about how to set functions in the respective chapters.
Note: If no drip tray is inserted, the appliance cannot be switched on and no water will flow from the coffee dispenser.
The message "Insert trays" appears.
Setting up the appliance
Note: Only use the appliance in frost-free areas. If the appliance was transported or stored at temperatures below 0 ^ , you must wait for at least 3 hours before using it.
Before the appliance can be switched on and used, it must be assembled and connected according to the enclosed installation instructions.
Initial settings
Notes
- The query appears automatically when first switched on after connection to a power outlet.
- You can change the settings at any time. "Basic settings" on page 19
1 Switch on the appliance at the main switch. The preset language appears in the display.
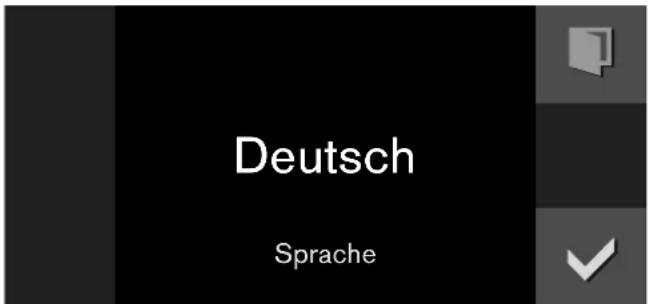
2 Turn the rotary selector to select the required display language.
3 Press √ to confirm.
The temperature unit appears in the display.
4 Use the rotary selector to select the required temperature unit.
5 Press √ to confirm.
The preset capacity unit appears in the display.
6 Use the rotary selector to select the required capacity unit.
7 Press √ to confirm.
The preset weight unit appears in the display.
8 Use the rotary selector to select the required weight unit.
9 Press √ to confirm.
The display shows "Initial set-up complete". Confirm with √. The appliance is now ready to use.
Note: If the language is changed, the system restarts. This takes a few seconds.
Setting the water hardness
It is important to set the water hardness correctly so that the appliance indicates in good time when the descaling programme should be run. The preset water hardness is level 4. If a water softening unit is installed in the household, select the "Softening device" setting. You can check the water hardness using the enclosed test strip or by asking your local water supplier.
1 Briefly immerse the enclosed test strip in fresh tap water, leave it to drip and read off the result after one minute.
2 Rotate the function selector to S.
3 Use the rotary selector to select "Basic settings" and touch the √ symbol.
4 Use the rotary selector to select "Water hardness".
5 Touch the _ symbol.
6 Using the rotary selector, set the measured water hardness.
7 Press √ to confirm.
The setting has been saved. Touch X to exit the basic settings.
Water filter
Operation with or without a water filter
You can use the appliance with or without a water filter. To ensure that the descaling display of the appliance functions correctly, you must specify in the basic settings whether a water filter is used.
1 Rotate the function selector to S.
2 Select "Basic settings" using the rotary selector.
3 Touch the √ symbol.
4 Select "Water filter" using the rotary selector.
5 Touch the _ symbol.
6 Use the rotary selector to select either "Available" (with water filter) or "Not available" (without water filter).
7 Press √ to confirm.
The rinse program starts with the "Available" setting. Proceed according to the information on the display.
8 Touch the X symbol to leave the Basic settings menu.
Inserting the water filter
New water filters must always be rinsed after being fitted.
1 Rotate function selector to S.
2 Select "Water filter change" using the rotary selector.
3 Touch the √ symbol.
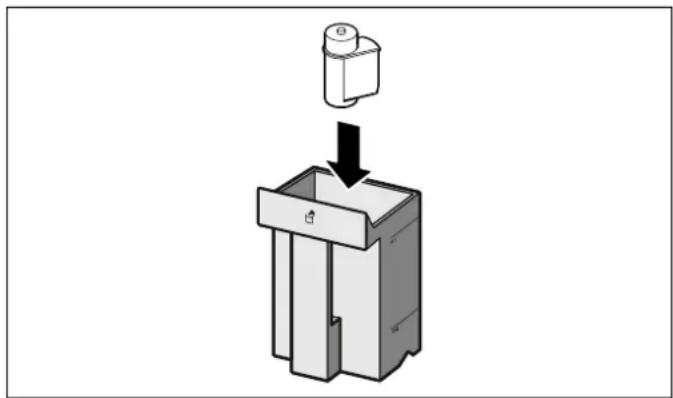
4 Insert the water filter in the water tank.
natural_image
Diagram of a mechanical device with a cylindrical component inserted into a housing, showing a downward arrow indicating process (no text or symbols present)5 Remove the milk hose from the milk container and close the door.
6 Touch the √ symbol.
Water will only now run through the filter to rinse it. After the rinsing process, confirm with √. The appliance is ready for use again.
Rinsing the filter also activates the setting for the display "Change water filter". When the display "Please change water filter" is shown or at the latest after two months, the filter is no longer effective. It needs to be replaced for reasons of hygiene and so that the appliance does not experience a build-up of limescale (which could damage the appliance).
Replacement filters can be obtained from the after-sales service. → "Accessories" on page 9
Note: If the appliance has not been used for a long period of time (due to holidays, for example), the filter that is fitted should be rinsed before using the appliance. To do this, simply dispense a cup of hot water.
Fill bean container
Using your appliance, you can prepare coffee using freshly ground coffee beans or ground coffee. Always only add ground coffee shortly before making a drink. → "Preparing coffee using ground coffee" on page 15
1 Open the door.
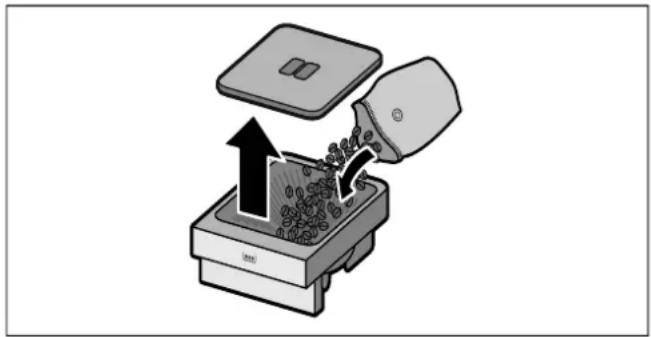
2 Pull the bean container out, remove the lid and fill the container with beans. Replace the lid and insert the bean container again.
natural_image
Diagram showing a device being inserted into a container with particles, no text or symbols presentNote: Coffee beans that have been glazed or caramelised or that contain other sugary additives block the brewing unit. Only use pure bean mixes that are suitable for use in fully automatic espresso or coffee machines.
3 Close the door.
Preparing beverages
Beverage selection
Notes
- The integrated fan switches on each time a drink is dispensed and switches off again after a few minutes.
- When first using the appliance or when it has not been used for a long time, the first cup of coffee does not have the full aroma.
- The appliance is programmed with the standard factory settings for optimal performance.
- After starting the appliance for the first time, you will only consistently achieve a suitably thick and stable crema after the first few cups have been dispensed.
| Ristretto Concentrated espresso. Best served in small, thick-walled cups. Preheat cups with hot water. | ||
| Espresso Concentrated coffee. Serve in small, thick-walled cups. Preheat cups with hot water. | ||
| Coffee Coffee | ||
| Americano 13 espresso, is topped up with 23 hot water. | ||
| Hot water For preparing hot drinks, e.g. tea, or to preheat cups. | ||
| Milk froth For preparing speciality white coffees. | ||
| Warm milk As a beverage or as an ingredient in special coffee beverages. | ||
| White coffee 12 coffee + 12 milk; best served in a wide-rimmed cup. | ||
| Latte Macchiato A specialty drink, served in a glass featuring three layers: at the bottom hot milk, in the middle espresso, and at the top milk froth. | ||
| Flat White | Espresso with frothed milk. | |
| Cappuccino | 13 espresso + 13 milk + 13 milk froth; best served in a cup. | |
| Espresso Mac-chiato | Espresso finished with milk froth. | |
You may be able to select further options depending on your choice of beverage:
| Size | Small - Medium - Large - Very large | |
| Strength | Very mild - Mild - Medium - Strong - Very strong - Extra strong etc., not available for milk froth, warm milk and hot water | |
| Temperature Hot - Very hot - Extra hot not available for milk froth and warm milk Different temperatures can be selected for hot water. | ||
| Mixing ratio | Setting for the proportion of milk, only available for coffee beverages with milk. | |
Aroma function "Extra strong"
The longer coffee is brewed, the more bitter substances and undesired aromas are released. This has a negative effect on the taste and makes the coffee less easily digestible. Your appliance therefore has a special Aroma function for very strong coffee. After half the requested volume has been prepared, coffee is ground and brewed once more, so that only the palatable and easily digestible flavours are released.
The Aroma function "Extra strong", e.g. "Extra strong 3 Ⓧ 2x" is only available for certain settings. The coffee is prepared in two stages with this setting. Wait until the process is fully completed.
Preparing coffee using freshly ground beans
The appliance must be switched on. The bean container must be filled.
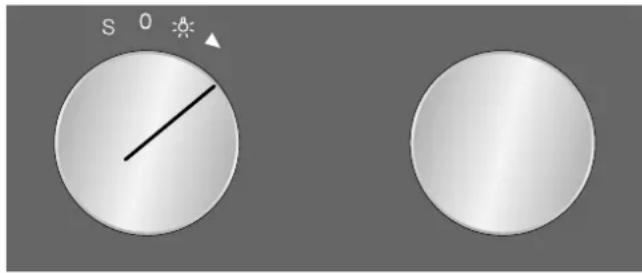
1 Rotate function selector to position 2.
natural_image
Two circular objects: a white circle with a diagonal line and a gray circle with a gradient fill, both on a gray background (no text or symbols)2 Use the rotary selector to select the desired beverage, e.g. coffee.
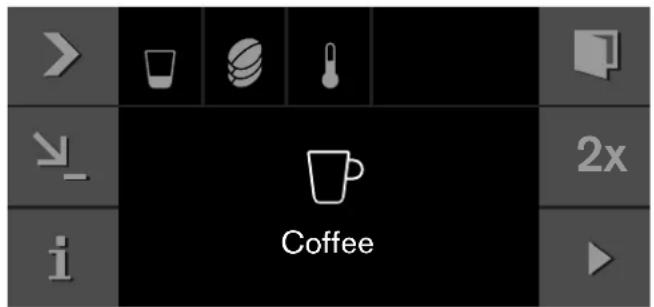
3 Place a cup under the coffee dispenser.
4 Touch the > symbol.
5 Set the size using the rotary selector.
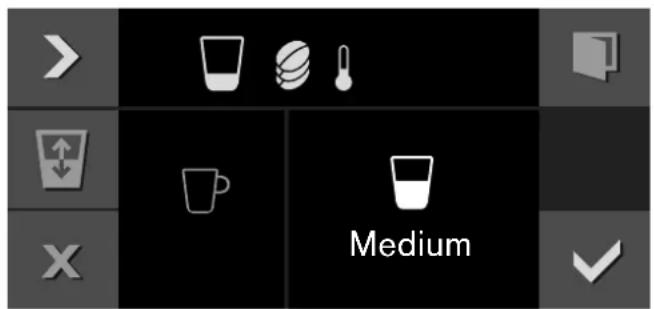
6 Touch the > symbol.
7 Set the strength using the rotary selector.
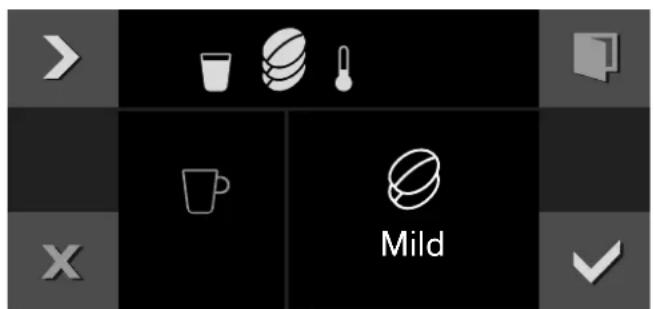
8 Touch the > symbol.
9 Set the temperature using the rotary selector.
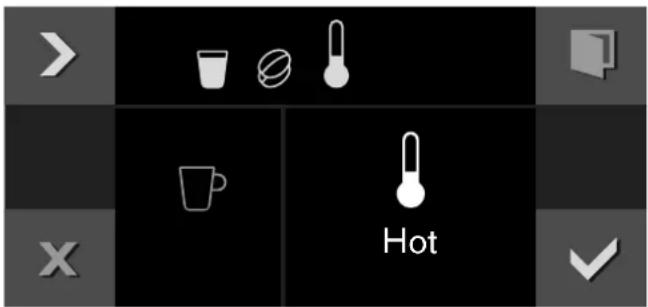
10 Press √ to confirm the settings.
11 Press ▶ to start.
The beverage is brewed and then runs into the cup.
Notes
- While the beverage is dispensed, the ■ symbol is displayed. Touch this symbol to stop the beverage being prepared.
- Using the symbol, you can save the current beverage: Touch the symbol, turn the function selector to a free memory location and save the entry. "Individual beverages" on page 17
Preparing two cups at the same time
You have the option of dispensing two beverages simultaneously:
1 Select the beverage and use the rotary selector to choose settings such as the temperature if desired.
2 Touch the 2xsymbol.
3 Place two cups, or similar, underneath the beverage dispenser.
4 Press ▶ to start.
The beverage selected is brewed and then dispensed into the cups.
Note: The coffee is prepared in two stages. Wait until the process is fully completed.
Preparing coffee using ground coffee
The appliance must be switched on.
Important: Remove cups or glasses before opening the door as they may otherwise fall off.
1 Turn the function selector to position 2.
2 Open the door.
3 Using the measuring spoon, fill a maximum of two level spoonfuls of ground coffee into the ground coffee drawer. Close the ground coffee drawer.
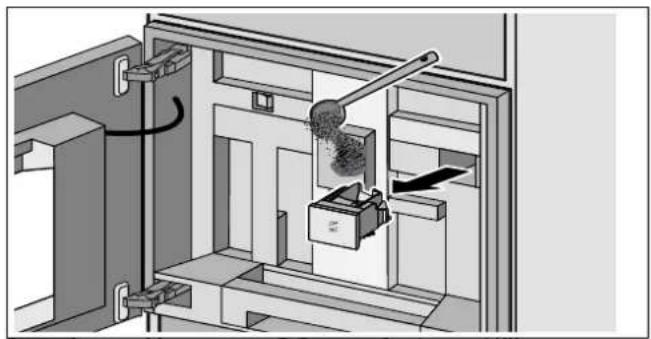
natural_image
Technical diagram of a mechanical device with internal components and motion arrows (no text or symbols)Note: Do not fill the drawer with beans or instant coffee.
4 Close the door.
5 Use the rotary selector to select the desired beverage (beverages made from ground coffee are identified with the ▼— symbol).
6 Place a cup under the coffee dispenser.
7 Touch the > symbol.
8 Set the quantity using the rotary selector.
9 Touch the > symbol.
10 Set the temperature using the rotary selector.
11 Confirm the settings using √.
12 Press ▶ to start.
The beverage is brewed and then runs into the cup. To prepare another cup, refill with ground coffee and repeat the process.
Notes
- While the beverage is dispensed, the ■ symbol is displayed. Touch this symbol to stop the beverage being prepared.
- If coffee is not dispensed within 90 seconds, the brewing chamber empties itself automatically to prevent an overflow.
- The Aroma function is unavailable when using ground coffee. Similarly, it is not possible to dispense two cups at once when using ground coffee.
Preparing a coffee with milk
⚠ Warning – Risk of burns!
The milk system becomes very hot. After use, allow it to cool down first before touching it.
You can decant the milk into the milk container supplied or fill e.g. into a milk jug or use the milk directly from the carton. → "Setting the milk container weight" on page 21
Important: Remove cups or glasses before opening the door as they may otherwise fall off.
Using the milk container:
Open the door.
- Push the beverage dispenser down completely.
- Remove the cover of the beverage dispenser towards the front.
- Attach a milk hose from the milk system to the beverage dispenser and feed it outwards through the opening at the top.
- Attach the connecting element of the milk system to the magnetic holder (on the inside of the appliance).
- Place the filled milk container on the right next to the coffee dispenser. Connect the milk tube to the milk hose and then guide the milk tube into the milk container. The end of the milk tube must be immersed in the milk.
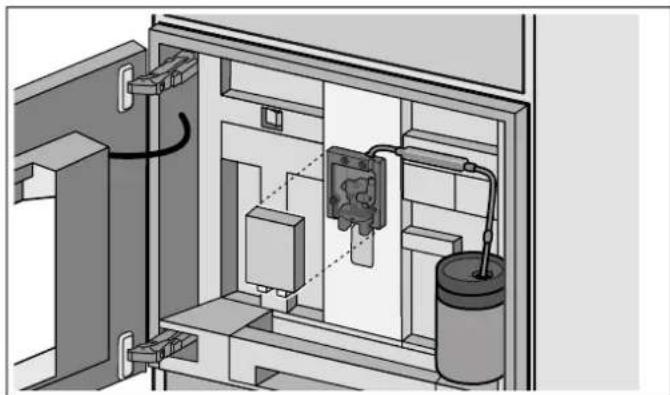
natural_image
Interior view of an electrical enclosure showing internal components and wiring (no text or symbols)- Close the door.
Using a milk carton or other container:
- Open the door.
- Push the beverage dispenser down completely.
- Remove the cover of the beverage dispenser towards the front.
- Feed the milk hose of the milk system outwards through the opening at the top.
- Attach the magnetic holder to the appliance.
- Place the filled milk carton on the right next to the coffee dispenser. Connect the milk tube to the milk hose and then guide the milk tube into the milk carton. The end of the milk tube must be immersed in the milk.
- Close the door.
To prepare a drink:
The appliance must be switched on. The bean container must be filled.
1 Rotate function selector to position 2.
2 Using the rotary selector, select a coffee beverage with milk. To select a beverage made with ground coffee, you must first fill the ground coffee drawer.
3 Place a cup or glass under the coffee dispenser.
4 Press ▶ to start.
- or -
Touch the > symbol first, then set the size or strength for example, using the rotary selector. Confirm with √.
The milk is drawn in and prepared and then the coffee is brewed.
Notes
- While the beverage is dispensed, the ■ symbol is displayed. Touch this symbol to stop the beverage being prepared.
- Using the symbol, you can save the current beverage: Touch the symbol, turn the function selector to a free memory location and save the entry. "Individual beverages" on page 17
- Dried-on milk residues are difficult to remove, so always clean the milk system after every use. "Cleaning the milk system" on page 23
Preparing milk froth and warm milk
⚠ Warning – Risk of burns!
The milk system becomes very hot. After use, allow it to cool down first before touching it.
To prepare a drink:
The appliance must be switched on.
1 Rotate the function selector to position 2.
2 Connect the milk hose. → "Preparing a coffee with milk" on page 15
3 Select "Milk froth" or "Warm milk" with the rotary selector.
4 Place a cup or glass under the coffee dispenser.
5 Touch the > symbol.
6 Set the size using the rotary selector.
7 Press √ to confirm the settings.
8 Press ▶ to start.
The milk is drawn in and then flows into the cup or glass.
Notes
- While the beverage is dispensed, the ■ symbol is displayed. Touch this symbol to stop the beverage being prepared.
- Using the symbol, you can save the current beverage: Touch the symbol, turn the function selector to a free memory location and save the entry. "Individual beverages" on page 17
- Dried-on milk residues are difficult to remove, so always clean the milk system after every use. "Cleaning the milk system" on page 23
Preparing hot water
⚠ Warning – Risk of burns!
The milk system becomes very hot. After use, allow it to cool down first before touching it.
The appliance must be switched on.
1 Remove the milk tube from the milk container.
2 Rotate function selector to position 2.
3 Select "Hot water" using the rotary selector.
4 Place a cup or glass under the coffee dispenser.
5 Touch the > symbol.
6 Set the size using the rotary selector.
7 Touch the > symbol.
8 Set the temperature using the rotary selector.
9 Confirm with √.
10 Press ▶ to start.
The water is heated and then flows into the cup or glass.
Notes
- While the beverage is dispensed, the ■ symbol is displayed. Touch this symbol to stop the beverage being prepared.
- Using the symbol, you can save the current beverage: Touch the symbol, turn the function selector to a free memory location and save the entry. "Individual beverages" on page 17
Setting the grinding level

Warning - Risk of injury!
Do not reach into the grinding unit.
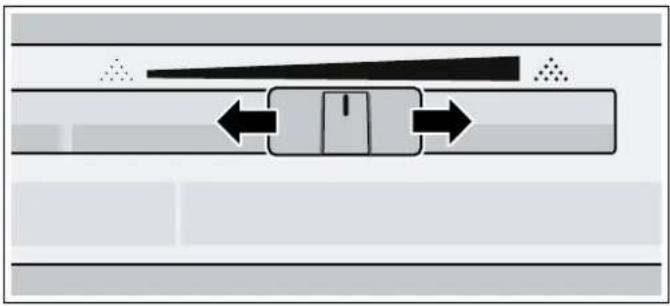
Using the slider for the grinding level, the desired fineness of the ground coffee can be set between a fine grinding level (left) and a coarser grinding level (right).
natural_image
Pure diagram of a mechanical or fluidic component with directional arrows, no text or symbols presentNotes
- The new setting only becomes noticeable after the second cup of coffee.
- Set a finer grinding level with dark-roasted beans and a coarser grinding level with lighter beans.
- If the display shows the message "Set coarser grinding level", the coffee beans are being ground too finely. Set a coarser grinding level. To do so, slide the slider to the right.
- Only make small changes to the grinding level setting.
Changing bean type
If you are using a new type of bean, the Empty grind function allows you to run the grinding unit until empty of your previous bean type.
The appliance must be switched on.
1 Remove the bean container and empty out the beans.
2 Add the new beans and reinsert the bean container. The message "New type of coffee beans in bean container?" appears.
3 Press √ to confirm.
The grinding unit is then emptied of your previous bean type in two grinding stages.
Note: This message always appears when the bean container is inserted. If you do not want to empty the grinding unit, e.g. when only refilling with beans, confirm with X.
Individual beverages
You can define and save instructions for up to 8 individual beverages.
1 Turn the function selector to one of the 8 memory locations.
natural_image
Two circular objects: a metallic dial with pointer and angle indicators, and a plain sphere (no text or symbols)2 Use the > symbol to successively select the desired beverage, size, strength, temperature and coffee-milk ratio and use the rotary selector to save the settings.
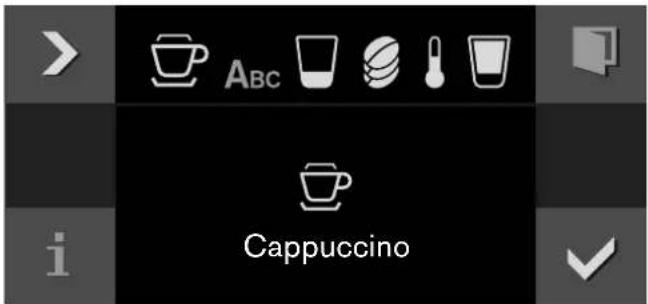
3 Enter the name of the beverage in "ABC".
| Rotary selec-tor | Selects lettersA new word always begins with a capital let-ter. |
| > Press briefly: moves the cursor to the rightPress and hold: shifts to umlauts and spe-cial charactersPress twice: adds a line break | |
| > Press briefly: moves the cursor to the rightPress and hold: shifts to normal charactersPress twice: adds a line break | |
Delete letters
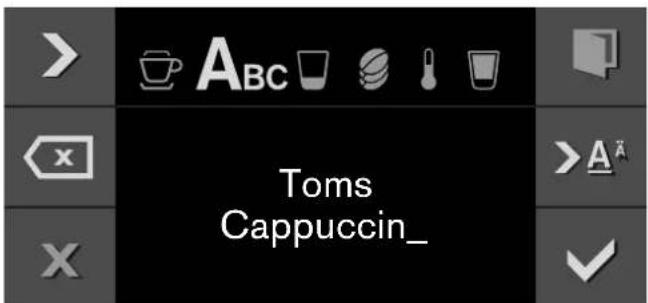
4 Save with √ or cancel with X and exit the menu.
5 Press ▶ to start.
Depending on the beverage selected, the beans will be ground first, then the milk prepared and finally the coffee brewed.
Notes
- While the beverage is dispensed, the ■ symbol is displayed. Touch this symbol to stop the beverage being prepared.
- For entering a name, Latin characters, certain special characters and numbers are available.
- To change an existing memory location, touch the _ symbol and save a new setting.
- If a memory location which is already occupied is selected, the settings will be overwritten.
Child lock
The appliance has a child lock to prevent children operating it accidentally.
Notes
- You must set the child lock to "Available" in Basic settings. → "Basic settings" on page 19
- If there is a power failure while the child lock is activated, it may be deactivated when power is restored.
Activating the child lock
Prerequisite:
The function selector is set to 0.
Touch the 🔒 symbol for at least 6 seconds.
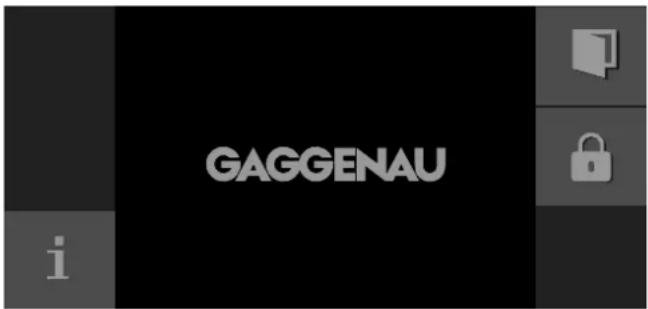
The child lock is now activated. The 🔒 symbol is shown at the top of the display.
Deactivating the child lock
Prerequisite:
The function selector is set to 0.
Touch and hold the ☑ symbol for at least 6 seconds.
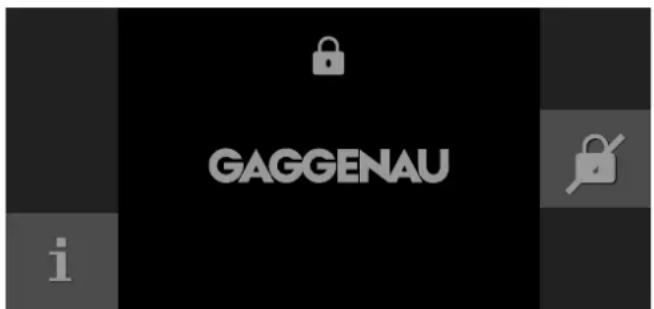
The child lock is deactivated. You can set the appliance as normal.
Basic settings
Your appliance can be individually adjusted in the basic settings.
1 Turn the function selector to S.
2 Select "Basic settings" using the rotary selector.
3 Touch the √ symbol.
4 Turn the rotary selector to select the required basic setting.
5 Touch the _ symbol.
6 Set the basic setting using the rotary selector.
7 Save with √ or cancel with X and exit the current basic setting.
8 Turn the function selector to 0 to exit the basic settings menu.
The changes are saved.
| Basic setting Permitted settings Explanation | |||
 | Brightness Level 1, 2, 3, 4, 5*, 6, 7, 8 Sets the display brightness | ||
 | Display Reduced*/Standard If the 'Reduced' setting has been selected, only the most important information will be shown on the display after a short time. | ||
 | Touch field colour Grey* / White Selects the colour of the symbols on the touch fields | ||
 | Touch field tone Tone 1* / Tone 2 / Off Selects an audible signal for when a touch field is touched | ||
 | Touch field tone vol-ume | Level 1, 2, 3, 4, 5*, 6, 7, 8 Sets the volume of the touch field tone | |
 | Signal volume Level 1, 2, 3, 4, 5*, 6, 7, 8 Sets the volume of the audible signal | ||
 | Light settings Lighting options 1*-7 O Light off | ||
| ● Light on ^ Light only on when a beverage is being dispensed Other setting options will appear if you touch the \_ symbol. | |||
 | Standby after | 5 minutes - 3 hours | Setting for the time after which the appli-ance automatically rinses and switches to standby mode. |
 | Water hardness | 1-4*, softening device | Briefly immerse the enclosed test strip in fresh tap water, leave it to drip and read off the result after one minute. Set the meas-ured water hardness. |
 | Water filter | Available/not available* | Available: Operating the appliance with a water filter. Not available: Operating the appliance with-out a water filter. |
 | Temperature unit | °C* / °F | Setting the temperature unit |
 | Capacity unit | ml/fl.oz.* | Set the capacity unit |
 | Capacity | +/- 5 ml to 60 ml (0.2 fl.oz to 2 fl.oz) | Adjust the capacity to individual cup sizes. First select the beverage and then set the capacity. |
 | Weight unit g*/oz. Set the weight unit | ||
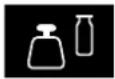 | Milk container weight | Standard*/Individual | Setting for weight detection. → "Setting the milk container weight" on page 21 |
 | Language German* / French / Italian / Spanish /Portuguese / Dutch / Danish / Swedish/ Norwegian / Finnish / Greek / Turkish/ Russian / Polish / Czech / Slovenian /Slovakian / Arabic / Hebrew / Japanese/ Korean / Thai / Chinese / English US/ English | Select language for text displayNote:If the language is changed, the system restarts. This takes a few seconds.The basic settings menu is also closed. | |
 | Factory settings Reset the appliance to the factory set-tings | Confirm the question "Delete all individual settings made and reset to factory set-tings?" by pressing √ or cancel by press-ing X.Note:Individual drinks will also be deleted if the appliance is reset to factory settings.After resetting the factory settings, the "Ini-tial settings" menu is displayed. | |
 | Demo mode On / Off* Only for demonstration purposes. The "Off" setting must be activated for normal opera-tion. The setting is only possible in the first 3 minutes after switching on the appliance. | ||
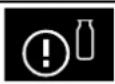 | Milk container reminder | 30* minutes - 6 hours Setting for the time after which the reminder appears. | |
 | Child lock Not available*/Available Available: The child lock can be activated.→ "Child lock" on page 18 | ||
| * Factory setting | |||
Setting the milk container weight
Using the weight, the appliance detects the quantity of milk in the milk container to ensure that there is always sufficient milk to dispense e.g. Latte Macchiato. If there is too little milk in the container, a corresponding message will be displayed.
The weight of the supplied empty milk container and that of an empty Tetra Pak carton (approx. 30 g) are already saved under "Standard". The appliance automatically detects whether the milk container or a Tetra Pak carton is being used. However, you can also save the weight of your own milk container or a Tetra Pak carton (if its weight deviates from the standard value) under the "Individual" setting.
Note: The container filled with milk must not exceed the maximum weight of 2 kg.
1 Rotate the function selector to S.
2 Select "Basic settings" using the rotary selector.
3 Touch the √ symbol.
4 Select "Milk container weight" with the rotary selector.
5 Touch the _ symbol.
6 Select "Standard" (preset milk container weight) or "Individual" (own weight input for the milk container) using the rotary selector.
7 Press √ to confirm.
8 With the "Standard" setting the appliance automatically reverts to the "Basic settings" selection level or With the "Individual" setting, your own milk container can now be weighed and the weight saved.
9 Check whether the area for the milk container behind the door is free. Confirm with √.
10 Place an empty container, e.g. a milk jug, in the area and confirm with √.
11 Close the door. The weight of the container is determined and then displayed.
12 Press √ to confirm. The changes are saved.
13 Touch the X symbol to leave the "Basic settings" menu.
Messages
Depending on the setting in "Basic settings" or when dispensing a beverage with milk, various reminders or messages may be shown on the display:
| "Reminder: Is the milk still fresh?" | Appears after a set time.→ "Basic settings" on page 19Please check whether the milk in the milk container is fresh. |
| "Reminder: Place milk in the refrigerator" | Appears when the appliance is switched off. |
| "Milk container connected?" | Message appears after selection of a beverage with milk. Please check and confirm. |
| "Not enough milk for the selected beverage" | Message appears when there is not enough milk in the milk container. |
Daily care and cleaning
Daily maintenance
Every time the appliance is switched on or switched to 0, it rinses automatically. Exception: the appliance was only switched off a few minutes beforehand or no coffee was dispensed before it was switched to 0.

Warning – Danger of electric shock!
Before cleaning the appliance, switch it off using the main switch. Never immerse the appliance in water. Do not use a steam cleaner.
Caution!
Surface damage!
- Do not use any cleaning agents containing alcohol or spirits.
- Do not use abrasive cloths or cleaning agents.
- Always remove any residue of lime, coffee, milk and descaling solution immediately. This residue may cause corrosion to form.
- New sponge cloths may contain salts. Salts can cause rust film on stainless steel and must therefore be washed out thoroughly before use.
Notes
- The coffee residue container should be emptied and cleaned every day in order to prevent deposits.
- Clean the drip tray with the filter regularly.
- Immediately remove residues from the shelf to avoid stains.
- If the appliance has not been used for a long time (e.g. while you are on holiday), clean the entire appliance thoroughly, including the milk system, ground coffee drawer and brewing unit before using.
1 Wipe the housing with a soft, damp cloth.
2 Remove the shelf and open the door.
3 Press down the lever in the drip tray and pull the drip tray out forwards.
4 Remove the filter from the drip tray.
5 Empty, clean and dry the individual parts.
6 Rinse out the water tank with clear, fresh water.
7 Remove the ground coffee drawer, clean under running water and dry it thoroughly.
8 Wipe out the inside of the appliance (drip tray holder and ground coffee drawer) and the collecting tray and dry them.
9 Insert the filter in the drip tray and snap into place.
10 Insert all dry parts, such as the ground coffee drawer.
Caution!
Not all of the appliance components can be cleaned in the dishwasher.
Not dishwasher-safe:
| Shelf | |
| Accessory drawer | |
| Water tank with cover | |
| Beverage dispenser cover | |
| Metal connecting element | |
| Bean container with lid | |
| Ground coffee drawer | |
| Protective cover for brewing unit | |
| Brewing unit | |
| Milk container |
Dishwasher-safe:
| max. 60 °C | Collecting tray |
| Drip tray | |
| Filter | |
| Coffee residue container | |
| Milk hoses | |
| Milk tube | |
| Individual parts of the beverage dispenser | |
| Measuring spoon | |
| Individual parts of the milk container lid | |
| Shelf for the milk container |
Cleaning the milk system
The milk system is automatically cleaned with a short jet of steam directly after preparing a milk drink.
Important: Clean the milk system manually on a weekly basis, or more frequently if required.

Warning – Risk of burns!
The beverage dispenser gets very hot. After use, let it cool down first before touching it.
Cleaning the milk system automatically
1 Turn the function selector to S.
2 Use the rotary selector to select "Clean milk system".
3 Touch the √ symbol.
The cleaning programme starts. The information in the display guides you through the programme.
4 Open the door.
5 Remove the milk tube from the milk container and wipe it down. Insert the end of the milk tube into the hole in the coffee residue container.
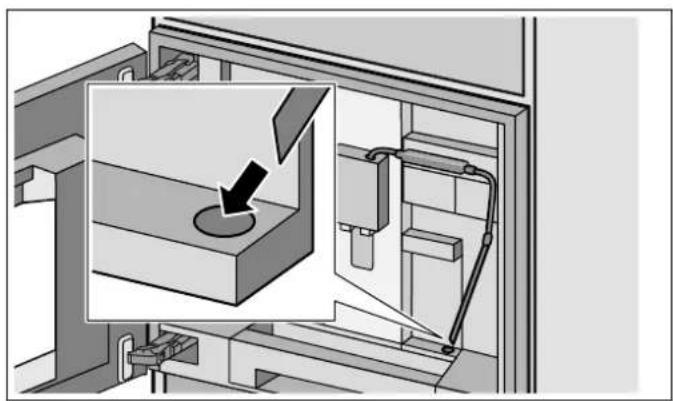
natural_image
Technical diagram showing a mechanical assembly with an inset view of a cylindrical component (no text or symbols present)6 Close the door.
7 Touch the ▶ symbol.
The programme runs for approx. 1 minute.
8 Touch the √ symbol.
The programme has finished.
Cleaning the milk system manually
Take the milk system apart to clean it:
1 Push the beverage dispenser down completely and pull the cover forwards to remove.
2 Press the snap lever to the left of the beverage dispenser downwards and pull the beverage dispenser straight forwards.
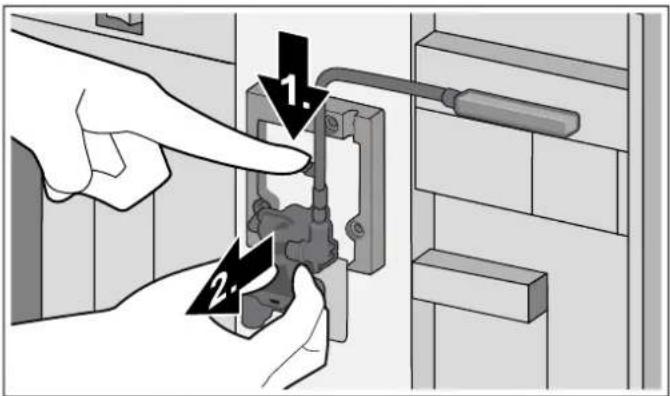
3 Detach the milk hose and dismantle the top and bottom sections of the beverage dispenser.
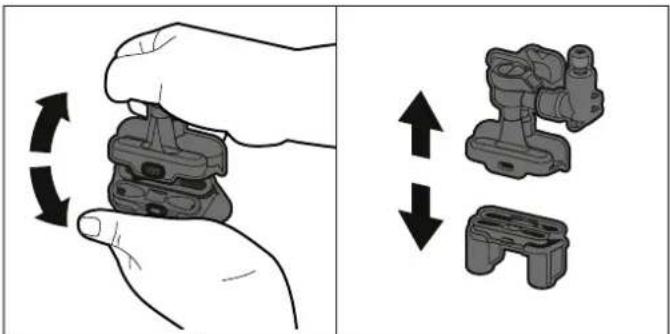
natural_image
Two-panel illustration showing hands holding a mechanical component with rotational arrows indicating motion (no text or symbols)4 Separate the milk hoses, connecting element and milk tube.
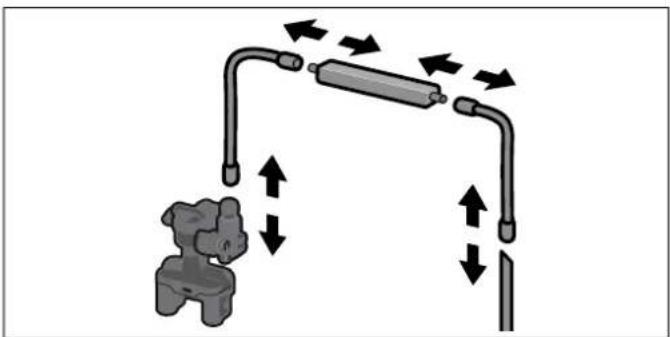
natural_image
Diagram showing mechanical components with directional arrows indicating movement or force (no text or symbols)5 Clean the individual parts with a detergent solution and a soft cloth.
6 Rinse all parts with clean water and dry.
7 Put the individual parts back together again (also see quick reference guide).
5 Clean the individual parts with a detergent solution and a soft cloth.
6 Rinse all parts with clean water and dry.
7 Put the individual parts back together again (also see quick reference guide).
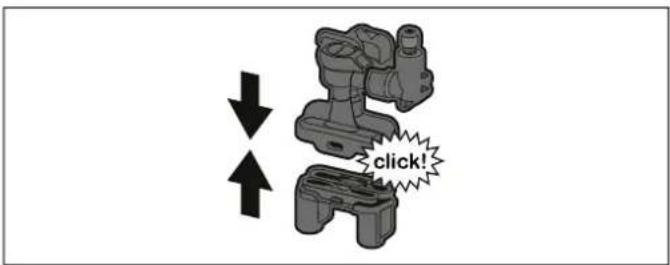
8 Firmly attach the beverage dispenser straight from the front onto the three connections.
9 Replace the cover.
8 Firmly attach the beverage dispenser straight from the front onto the three connections. 9 Replace the cover.
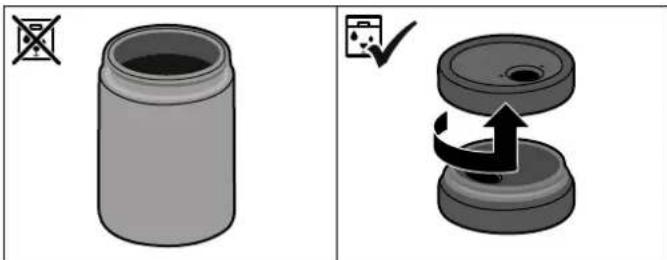
Cleaning the milk container
For reasons of hygiene the milk container must be cleaned regularly. Only the individual parts of the lid are dishwasher-safe. Clean the stainless steel milk container by hand using a mild cleaning agent.
natural_image
Two-panel illustration showing a cylindrical container and a mechanical component with an arrow indicating rotation (no text or symbols)Cleaning the brewing unit
(Also see the quick reference guide)
Notes
- Regularly clean the brewing unit by hand in addition to the automatic cleaning programme.
- Do not use washing-up liquid or other cleaning agents to clean the brewing unit and do not put the brewing unit in the dishwasher.
1 Turn the function selector to 0.
2 Open the door.
3 Switch off the appliance using the main switch.
4 Remove the protective cover of the brewing unit.
5 Remove the coffee residue container.
6 Slide the red latch on the brewing unit all the way to the left to 🔒.
7 Press the eject lever right down.
The brewing unit will be released.
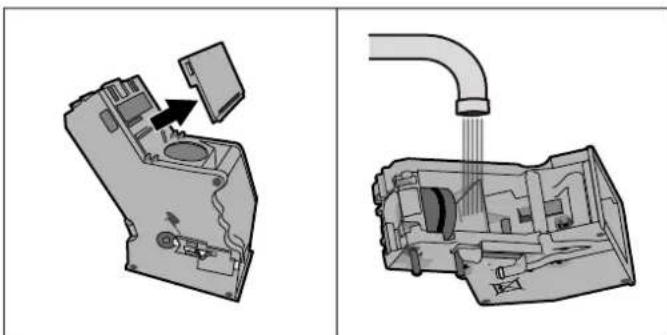
8 Take hold of the brewing unit by the recessed grips and carefully remove it.
9 Clean the brewing unit thoroughly under running water.
natural_image
Two technical diagrams showing internal components of a device, one with a handle and arrow indicating insertion or disassembly, the other with a pipe outlet (no text or symbols present)10 Remove the cover and clean the filter under running water.
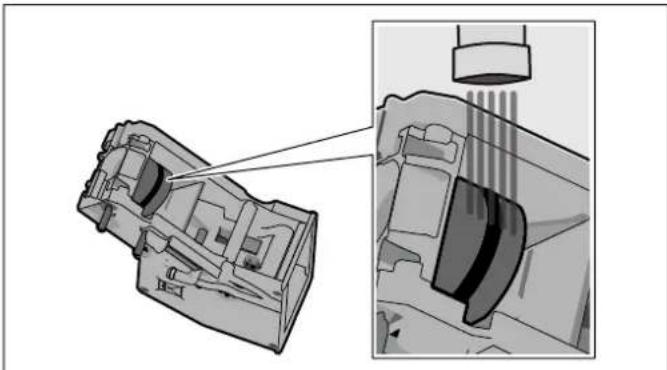
natural_image
Technical illustration of a mechanical component with cross-sectional view and internal structure (no text or symbols)11 Thoroughly clean the connecting taps on the brewing unit.
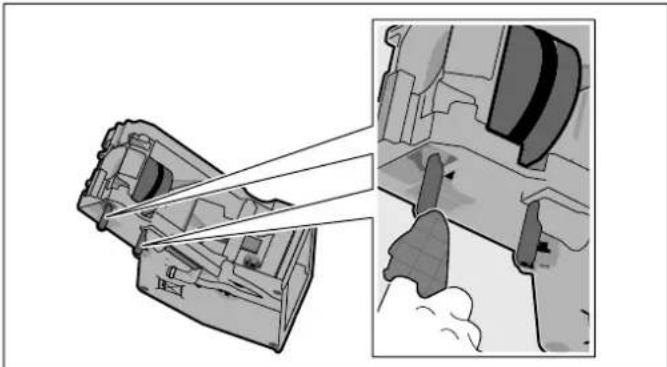
natural_image
Mechanical assembly diagram showing internal components and motion directions (no text or labels)12 Clean the interior of the appliance thoroughly, taking care to remove any coffee residues.
13 Allow the brewing unit and the interior of the appliance to dry.
14 Refit the cover.
15 Push the brewing unit all the way into the appliance, pressing on the middle until it audibly clicks into place.
Important: The red latch must be right over to the left to ☑ before inserting.
16 Press the eject lever all the way up and push the red latch right over to the right to 🔒.
17 Insert the coffee residue container.
18 Replace the protective cover.
19 Close the door.
Service programmes
(Also see the quick reference guide)
Every so often – the exact frequency depends on usage and water hardness – one of the following messages will appear in the display in place of the coffee selection:
- Please change water filter
- Please clean
- Please descale
- Please descale and clean
The i ^① warning symbol then lights up.
The water filter should be changed immediately at this point and the appliance cleaned or descaled using the appropriate programme. Otherwise the appliance may be damaged.
The service programmes can also be started at any time without any prompt from the display. Set the function selector to S and select and run the desired programme.
Notes
- Caution! Do not drink or come into contact with cleaning or descaling materials. Keep cleaning materials and descaling tablets out of the reach of children. They may be toxic.
- Important: If the appliance is not descaled in good time, the message "Appliance locked Descaling required urgently" will appear. Immediately perform the descaling process in accordance with the instructions. If the appliance is locked, it can only be operated again once descaling has been carried out.
- Caution! With each of the service programmes, use descaling and cleaning agents as described in the instructions and observe the (relevant) safety information.
- Do not drink the liquids.
- Never use vinegar, vinegar-based products, citric acid or citric acid-based products for descaling.
- For cleaning and descaling only use the tablets intended for such purpose. They have been specially developed for this appliance, and new stocks can be ordered through the after-sales service. → "Accessories" on page 9
- Never insert descaling tablets or other products into the grounds compartment.
- Never interrupt the service programme.
-
Prior to starting a service programme, remove, clean and reinsert the brewing unit. Rinse the milk system.
-
At the end of a service programme, wipe down the appliance using a soft, damp cloth to immediately remove any descaler residue. This residue may cause corrosion.
- New sponge cloths may contain salts. Salts can cause rust film on stainless steel, so cloths must always be washed out thoroughly before use.
- If one of the service programmes is interrupted, e.g. by a power failure, proceed as follows:
1 Touch the √ symbol.
2 Remove the milk tube from the milk container and wipe it down. Insert the end of the milk tube into the hole in the coffee residue container.
3 Touch the ▶ symbol.
The programme starts and rinses the appliance.Duration: approx. 2 minutes.
4 Touch the √ symbol.
- Caution! Do not drink the descale solution.
Cleaning
Duration: approx. 5 minutes
Prior to starting the service programme, clean the brewing unit. → "Cleaning the brewing unit" on page 24
1 Rotate function selector to S.
2 Select "Cleaning programme" using the rotary selector.
3 Touch the √ symbol.
The cleaning programme starts. The information in the display guides you through the programme.
4 Empty the drip tray with the filter and the coffee residue container. Clean and reinsert.
5 Place a cleaning tablet in the ground coffee drawer and close the drawer again.
6 Close the door.
7 Touch the ▶ symbol.
The programme will run for approx. 5 minutes.
8 Touch the √ symbol.
The programme has finished.
The appliance is ready for use.
Descaling
Duration: approx. 21 minutes
1 Turn the function selector to S.
2 Select "Descaling programme" using the rotary selector.
3 Touch the √ symbol.
The descaling programme starts. The notes in the display guide you through the programme.
4 Empty the drip tray with the filter and the coffee residue container. Clean and reinsert.
5 Remove the water filter (if there is one) and touch the √ symbol.
6 Pour lukewarm water into the empty water tank up to the "calc" mark (0.5 l) and then dissolve a descaling tablet in it.
7 Remove the milk tube from the milk container and wipe it down. Insert the end of the milk tube into the hole in the coffee residue container.
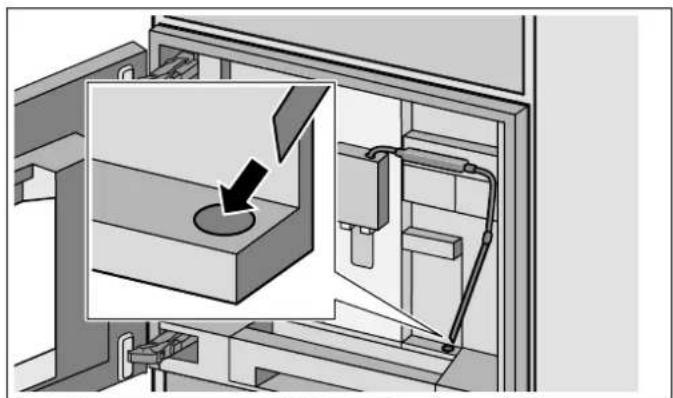
natural_image
Technical diagram showing a mechanical assembly with an inset view of a cylindrical component (no text or symbols present)8 Close the door.
9 Touch the ▶ symbol.
The programme will run for approx. 19 minutes.
Note: If there is too little descaling solution in the water tank, the message "Fill water tank with water and descaler" appears. Pour lukewarm water into the empty water tank up to the "calc" mark (0.5 l) and then dissolve a descaling tablet in it. Press √ to confirm. The programme will continue.
10 If a water filter is used, reinsert it now.
11 Touch the ▶ symbol.
The programme will run for approx. 2 minutes and rinse the appliance.
The programme has finished.
12 Touch the √ symbol.
The appliance is ready to use.
Cleaning and descaling
Duration: approx. 26 minutes
The cleaning and descaling programme combines the individual cleaning and descaling functions. If the two programmes are both due at around the same time, the fully automatic espresso machine automatically suggests this service programme.
Prior to starting the service programme, clean the brewing unit. → "Cleaning the brewing unit" on page 24
1 Turn the function selector to S.
2 Select "Cleaning and descaling programme" using the rotary selector.
3 Touch the √ symbol.
The cleaning and descaling programme starts. The notes on the display guide you through the programme.
4 Empty the drip tray with the filter and the coffee residue container. Clean and reinsert.
5 Place a cleaning tablet in the ground coffee drawer and close the drawer again.
6 Remove the water filter (if there is one) and touch the √ symbol.
7 Pour lukewarm water into the empty water tank up to the "calc" mark (0.5 l) and then dissolve a descaling tablet in it.
8 Remove the milk tube from the milk container and wipe it down. Insert the end of the milk tube into the hole in the coffee residue container.
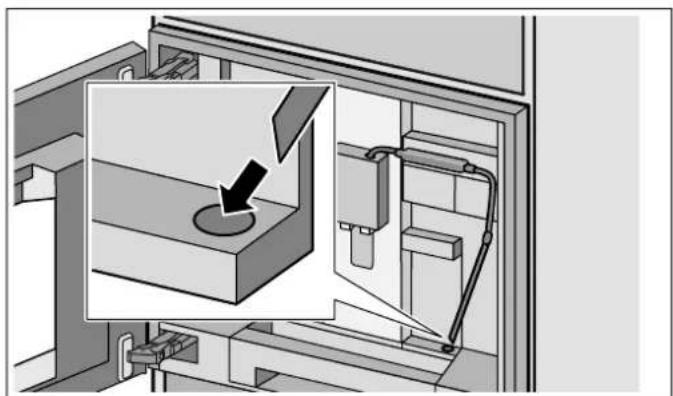
natural_image
Technical diagram showing a mechanical assembly with an inset close-up of a cylindrical component (no text or symbols visible)9 Close the door.
10 Touch the ▶ symbol.
The programme will run for approx. 19 minutes.
Note: If there is too little descaling solution in the water tank, the message "Fill water tank with water and descaler" appears. Pour lukewarm water into the empty water tank up to the "calc" mark (0.5 l) and then dissolve a descaling tablet in it. Press √ to confirm. The programme will continue.
11 If a water filter is used, reinsert it now.
12 Touch the ▶ symbol.
The programme will run for approx. 7 minutes and rinse the appliance.
The programme has finished.
13 Touch the √ symbol.
The appliance is ready to use.
Fill the water tank with fresh water.
If the appliance is not used for a few days, the water in the water tank should be replaced. The appliance must be ready for use.
1 Rotate function selector to S.
2 Select "Fresh water replenishment" using the rotary selector.
3 Touch the √ symbol.
4 Touch the ▶ symbol.
The tank is emptied and filled with fresh water. Fresh water replenishment has finished.
5 Touch the √ symbol.
The appliance is ready for use.
Emptying programme
The emptying programme is a service programme which is used to remove coffee bean residue and to prevent damage caused by frost during transportation and storage. The appliance must be ready for use.
1 Rotate function selector to S.
2 Select "Emptying programme" with the rotary selector.
3 Touch the √ symbol.
4 Empty the bean container and reinsert it.
5 If present, remove the milk container.
6 Close the door.
The emptying programme runs for approx. 2 minutes.
7 Remove the brewing unit and clean it thoroughly.
8 Touch the √ symbol.
9 Clean the drip tray with the filter, coffee residue container, milk system and milk hose set thoroughly and then reinsert them.
10 Close the door.
The emptying programme has finished.
Simple troubleshooting
Problem Cause Solution
| The personally selected capacity is not reached. Coffee dispensing slows to a trickle or stops completely. | Grinding level is too fine. The ground coffee is too fine. | Adjust the grinding level to a coarser setting.Use coarser ground coffee. | |
| Heavy build-up of limescale in the appliance. | Descale the appliance as described in the instructions. | ||
| The brewing unit is soiled. Clean the brewing unit. | |||
| The hot water is milky or tastes of milk or coffee. | The milk hose has not been removed. | Remove the milk hose from the milk container. | |
| Milk or coffee residue in the beverage dispenser. | Clean the beverage dispenser. | ||
| The coffee has no crema. Unsuitable type of coffee. Use a type of coffee with a higher proportion of robusta beans. | |||
| Problem Cause | Solution | ||
| Display screen "Milk container connected?" despite connected milk container. | Container is outside the range of the sensor. | Position the container at the right-hand edge. | |
| Material, e.g. milk carton, is not recognised. | Confirm the display query with "Yes" or use the supplied milk container. | ||
| No milk dispensed despite filled milk container. | The milk tube is not inserted deep enough in the milk container. | Insert the milk tube down to the bottom of the milk container. | |
| The milk container is empty but no message is displayed. | The shelf (scales) for the milk container is soiled. | Remove shelf.Clean the shelf and the area underneath thoroughly. | |
| Display screen "Overvoltage or under-voltage". | Voltage too high or too low. Contact electricity or grid provider. Have the power supply checked by an expert. | ||
| Display screen "Let appliance cool down". | Appliance is too hot. Switch off appliance for 30 minutes. | ||
| Display screen "Error: E0510". The appliance has encountered an error. | Proceed according to the display screen. | ||
| Display screen "Fill bean container". Despite the bean container being full, the appliance is not grinding the coffee beans. | Beans are not falling into the grinding unit (beans that are too oily may stick to the bean container). | Gently tap the bean container. Possibly change the type of coffee. When the bean container is empty, wipe it with a dry cloth. | |
| Display screen "Remove brewing unit and clean by hand". | Brewing unit soiled. Clean the brewing unit. | ||
| Too much ground coffee in the brewing unit. | Clean the brewing unit.Add no more than two level measuring spoons of ground coffee. | ||
| The brewing unit mechanism is stiff. | Clean the brewing unit. | ||
| Display screen "Refill with still water or remove filter". | Water tank wrongly inserted. Insert water tank correctly. | ||
| Float is stuck in the water tank. Remove the tank and clean thoroughly. | |||
| New water filter not rinsed according to instructions, or water filter spent or defective. | Rinse the water filter according to the instructions and then switch on, or use a new water filter. | ||
| Air in the water filter. Immerse the water filter in water until no more air bubbles escape; insert the filter again. | |||
| Display screen "Clean trays and replace" | Drip tray and filter is soiled and wet. | Clean and dry the drip tray and filter thoroughly. | |
| Outlet in the drip tray is blocked. Thoroughly clean outlet. | |||
| The siphon is blocked. Thoroughly clean siphon. | |||
| Display screen "Insert trays" despite being inserted. | Inside of appliance (tray holder) is soiled. | Clean the inside. | |
| The coffee residue container was not fully inserted. | Push the coffee residue container all the way in. | ||
| The water tank is not filled automatically. | Float is stuck in the water tank. Remove the tank and clean thoroughly. | ||
| Tap turned off. Turn on the tap. | |||
| The water tank is not inserted correctly. | Insert the water tank to the stop. | ||
| Filter on Aqua-Stop blocked. Clean the filter on the Aqua-Stop regularly. See installation instructions. | |||
| Display screen "Switch off appliance" Appliance is too warm. Allow the appliance to cool down. | |||
| Display screen "Contact after-sales service" | The appliance has encountered an error. | Please contact the hotline. | |
| If you are unable to solve the problem, always call the hotline. | |||
Technical data AQUA-STOP guarantee
| Electrical connection(voltage - frequency) | 220-240 V ~,50 / 60 Hz |
| Power rating 1600 W | |
| Maximum static pump pressure 19 bar | |
| Maximum capacity of the water tank (without filter) | 2,4 l |
| Maximum capacity of the coffee bean container | 500 g |
| Length of the power cable 1,7 m | |
| Dimensions (H x W x D) | 455 x 590 x 444 mm |
| Weight, empty 22-23 kg | |
| Type of grinder Ceramic | |
In addition to warranty claims against the vendor based on the purchase agreement and to our appliance warranty, we will provide compensation under the following conditions:
1 If water damage is caused due to a fault in our Aqua-Stop system, we will compensate domestic customers for the damage caused.
2 The liability guarantee is valid for the service life of the appliance.
3 It is a prerequisite of all warranty claims that the appliance with Aqua-Stop must have been installed and connected correctly in accordance with our instructions; this also includes a correctly fitted Aqua-Stop extension (genuine accessories). Our warranty does not cover defective feed lines or fittings leading to the Aqua-Stop connection at the tap.
4 Appliances with Aqua-Stop do not need to be supervised during operation, nor secured afterwards by turning off the tap.
The tap only needs to be turned off if you are away from home for a long period, e.g. for several weeks' holiday.
- Table of contents
- Intended use 3
- Important safety information 3
- Environmental protection 4
- Familiarising yourself with your appliance 5
- Switching the appliance on and off 9
- Setting up the appliance 10
- Water filter 11
- Fill bean container 12
- Preparing beverages 13
- Individual beverages 17
- Child lock 18
- Basic settings 19
- Daily care and cleaning 22
- Service programmes 25
- Emptying programme 27
- Simple troubleshooting 28
- Technical data 30
- AQUA-STOP guarantee 30
- Intended use
- ⚠️ Important safety information
- ⚠ Warning – Danger of electric shock!
- ⚠ Warning – Hazard due to magnetism!
- ⚠ Warning – Risk of suffocation!
- ⚠ Warning – Risk of burns!
- ⚠ Warning – Risk of injury!
- ⚠ Warning – Risk of fire!
- ⚠ Warning – Risk of harm to health!
- Environmental protection
- Saving energy
- Environmentally-friendly disposal
- Familiarising yourself with your appliance
- Included in delivery
- Assembly and components
- Symbols
- Colours and display
- Colours
- Appearance
- Automatic door opening
- Additional information i and i ®
- Accessories
- The following accessories can be ordered by contacting the after-sales service:
- Switching the appliance on and off
- Main switch
- Notes
- Hibernate mode
- Activating the appliance
- Setting up the appliance
- Initial settings
- Setting the water hardness
- Water filter
- Operation with or without a water filter
- Inserting the water filter
- Fill bean container
- Preparing beverages
- Beverage selection
- Aroma function "Extra strong"
- Preparing coffee using freshly ground beans
- Preparing two cups at the same time
- Preparing coffee using ground coffee
- Preparing a coffee with milk
- Using the milk container:
- Using a milk carton or other container:
- Preparing milk froth and warm milk
- Preparing hot water
- Setting the grinding level
- Warning - Risk of injury!
- Changing bean type
- Individual beverages
- Child lock
- Activating the child lock
- Prerequisite:
- Deactivating the child lock
- Basic settings
- Setting the milk container weight
- Messages
- Daily care and cleaning
- Daily maintenance
- Warning – Danger of electric shock!
- Caution!
- Cleaning the milk system
- Warning – Risk of burns!
- Cleaning the milk system automatically
- Cleaning the milk system manually
- Cleaning the milk container
- Cleaning the brewing unit
- Service programmes
- Cleaning
- Descaling
- Duration: approx. 21 minutes
- Cleaning and descaling
- Duration: approx. 26 minutes
- Fill the water tank with fresh water.
- Emptying programme
- Simple troubleshooting
Brand : GAGGENAU
Model : CM470112
Category : Coffee maker