
SES 1710BK - Coffee maker SENCOR - Free user manual and instructions
Find the device manual for free SES 1710BK SENCOR in PDF.


| Product Type | Espresso Machine |
| Brand | Sencor |
| Model | SES 1710BK |
| Power Supply | 220–240 V ~ 50 Hz |
| Rated Power Input | 960–1,140 W |
| Water Tank Capacity | 1.5 L |
| Noise Level | 75 dB(A) |
| Filter Types | Stainless steel for 1 cup (7 g) and 2 cups (14 g) |
| Milk Frothing | Swivel steam nozzle with removable milk frothing attachment |
| Cup Warming Plate | Top surface for preheating cups |
| Automatic Shut-off | After 25 minutes of inactivity or 3 minutes continuous pump run |
| Safety Features | Thermal fuse, overheat protection, auto shut-off |
| Cleaning and Descaling | Regular descaling with 8% vinegar solution or citric acid (2 tsp per 0.5 L water) |
| Removable Parts | Water tank, drip tray, grate, portafilter, filters, milk frothing attachment |
| Housing Material | Plastic (black) |
| Dimensions (approx.) | Not specified in manual |
| Weight (approx.) | Not specified in manual |
| Warranty | Refer to vendor's warranty card |
Frequently Asked Questions - SES 1710BK SENCOR
User questions about SES 1710BK SENCOR
0 question about this device. Answer the ones you know or ask your own.
Ask a new question about this device
Download the instructions for your Coffee maker in PDF format for free! Find your manual SES 1710BK - SENCOR and take your electronic device back in hand. On this page are published all the documents necessary for the use of your device. SES 1710BK by SENCOR.
USER MANUAL SES 1710BK SENCOR
natural_image
Black SENCOR coffee maker with two cups, no visible text or symbols on the device itself.EN • Espresso Machine
Translation of the original manual
EN
Espresso Machine
Important safety instructions
READ CAREFULLY AND STORE FOR FUTURE USE.
■This appliance may be used by children 8 years of age and older and by persons with physical or mental impairments or by inexperienced persons, if they are properly supervised or have been informed about how to use the product in a safe manner and understand the potential dangers.
■ Children must not play with the appliance. Cleaning and maintenance performed by the user must not be performed by unsupervised children.
■Before connecting the appliance to a power socket, check that the rated voltage on its rating label matches the electrical voltage in the power socket.
- Connect the appliance only to a properly grounded socket. For safety reasons, we do not recommend using multi-socket adapters or extension cords.
■This appliance is designed for household use only. It is not intended for use in locations such as:
– staff kitchens in stores, offices and other workplaces;
- hotel or motel rooms and other living areas;
-agriculturalfarms;
- bed and breakfast establishments.
- Do not place the appliance on window sills, kitchen sink drainboards or unstable surfaces. Always place it on a stable, even and dry surface.
- Do not place the appliance on or near an electrical or gas stove, or in the vicinity of an open flame.
■ Never use the appliance in the near vicinity of a bath, shower or swimming pool.
■ Use the appliance only for the purposes for which it was designed.
- Only use the appliance with the original accessories that came with it.
■ To ensure sufficient air circulation, free space of at least 15 cm must be maintained around and above the appliance when it is running.
- Only use the top surface of the appliance for warming cups. Do not use it as a place for placing items.
Fill the water tank with clean cold water. Do not pour hot water or other liquids into it or place any items inside it.
■ Before turning on the appliance, check that:
- the drip tray together with the grate is installed in position;
- the water tank is filled with a sufficient amount of water and is properly installed in position. The water level must not exceed the water level mark.
Before you begin brewing coffee, check that the portafilter is properly attached to the brew head. Pressure is created in the portafilter during the coffee steaming process, so do not move it while it is running. Otherwise, this could result in a dangerous situation.

Attention:
Incorrect use may lead to injuries.
When operating the appliance, be especially careful to avoid scalding by hot water or steam.
Regularly inspect the water level in the water tank when using the appliance. When the water level falls below the minimum water level mark, add water. Before adding water, first turn the appliance off and disconnect it from the power socket.
To protect the pump from damage, the appliance is equipped with a built-in thermal fuse that will disengage it when it runs empty. In the event that such a situation occurs, disconnect the power cord from the power socket and allow the appliance to cool down for at least 30 minutes. Then you may continue using it.
- Accessible surfaces of the appliance are hot during its use and afterwards as a result of residual heat. Do not touch hot surfaces.
- Always turn off the appliance and disconnect it from the power socket when not using it, when leaving it without supervision, before disassembling or assembling it, before filling up the water tank, and before moving or cleaning it. Allow the appliance to cool down before cleaning or moving it. Do not move the appliance with a coffee cup located on the drip tray grate or with cups located on the cup warming surface.
- Keep the appliance and its accessories in clean condition. Clean and maintain it according to the instructions in chapter Cleaning and maintenance. Never wash the appliance under running water or submerge it in water or another liquid.
■ Make sure that the power cord does not come into contact with a hot surface and prevent the power plug from coming into contact with water.
- Disconnect the appliance from the power socket by pulling on the plug, never pulling on the power cord. Otherwise, this could damage the power cord or the socket.
In the event that the power cord is damaged, have it repaired at a professional service centre to prevent causing a dangerous situation. It is forbidden to use the appliance if it has a damaged power cord.
To avoid the danger of injury by electrical shock, do not repair the appliance yourself or make any adjustments to it. Have all repairs performed at an authorised service centre. By tampering with the appliance, you risk voiding your legal rights arising from unsatisfactory performance or quality warranty.
A
EN
Espresso Machine
User's manual
- Prior to using this appliance, please read the user's manual thoroughly, even in cases, when one has already familiarised themselves with previous use of similar types of appliances. Only use the appliance in the manner described in this user's manual. Keep this user's manual in a safe place where it can be easily retrieved for future reference.
- We recommend saving the original cardboard box, packaging material, purchase receipt and responsibility statement of the vendor or warranty card for at least the duration of the legal liability for unsatisfactory performance or quality. In the event of transportation, we recommend that you pack the appliance in the original box from the manufacturer.
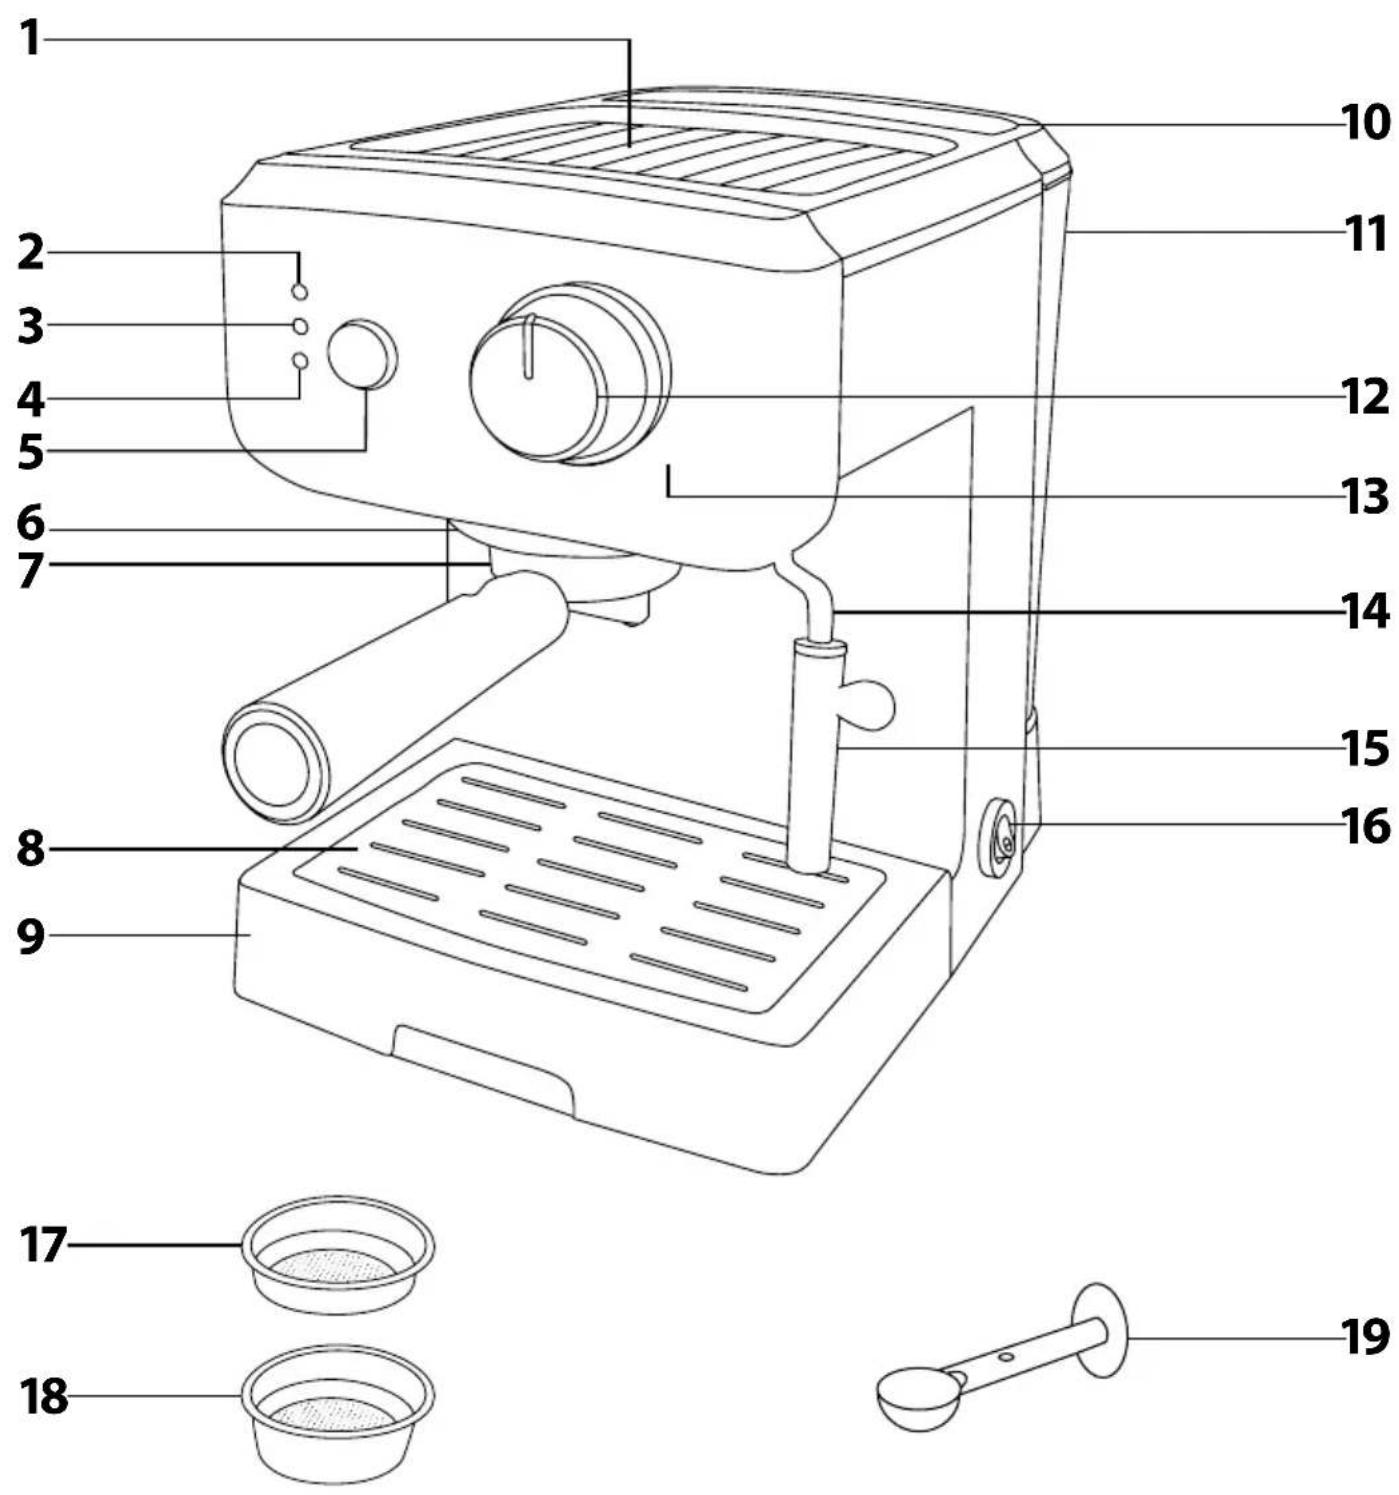
DESCRIPTION OF THE APPLIANCE
A1 Cup warming plate
A2 Power indicator light
A3 Coffee brewing water temperature indicator
A4 Steam release water temperature indicator
A5 Coffee brewing and steam release mode toggle button
A6 Brew head
A7 Portafilter with coffee spout
A8 Removable grate
A9 Removable drip tray
A10 Tilt-down lid with handle
A11 1.5-litre removable water tank
A12 Selection knob, 3 options
- brew coffee, stand by mode
● and steam release
A13 Boiler (not shown)
A14 Swivel steam nozzle
A15 Removable milk frothing attachment
A16 ON/OFF switch
A17 Stainless steel filter for 1 cup of coffee
A18 Stainless steel filter for 2 cups of coffee
A19 Coffee measuring cup with tamper
BEFORE FIRST USE OF THE APPLIANCE
- Remove all packaging materials, protective film, promotional tags or labels from the appliance.
- Install the appliance on an even, dry and clean surface. Take the water tank A11 out of the appliance and rinse it out with clean water with the addition of a small amount of neutral dishwashing detergent. Then rinse it out thoroughly using clean water, dry it and put it back in its place.
- Take out the removable drip tray A9 with grate A8, wipe with a dampened textile, wipe dry and insert it back into the bottom part of the appliance.
- Wash the portafilter A7, coffee measuring cup A19 and the stainless steel filters A17 and A18 under clean running water with an addition of kitchen detergent. Then rinse with clean water and wipe dry.
- Wipe the outer surface of the appliance with a lightly dampened cloth and then wipe it thoroughly dry.
- Prior to brewing the first cup of coffee, run the appliance empty for approximately 60 seconds, i.e. with the water tank A11 filled with water but without coffee tamped in the filter. This will clean out the inner components and the brew head A6. A sufficiently large container must be placed underneath the portafilter A7 for the hot water to flow into. Instructions for starting the appliance are provided in chapter Operating the appliance.
OPERATING THE APPLIANCE
1. FILLING THE WATER TANK
1.1 Grasp the water tank A11 by the handle A10. Lift it up and remove it from the rear part of the appliance.
1.2 Fill it up with cold water up to the maximum water mark, insert it back into the appliance and tilt down the lid with handle A10. The water tank A11 must be securely seated in place in order for water to be pumped out of it into the boiler A13.
Note:
The water that you pour into the water tank A11 should ideally be at room temperature (approximately 25 °C). Water that is too cold, could negatively affect the final taste of the coffee beverage.

Attention:
The water tank A11 has a maximum capacity of 1.5 litres of water. Do not overfill it.
Never fill the water tank A11 with warm water, hot water or sparkling water, or other liquids such as, for example, milk. Do not fill the water tank A11 when it is inserted in the appliance. There is a danger of splashing the appliance or overfilling the water tank A11.
1.3 Do not leave any remaining water in the water tank A11 for longer than one day. For brewing quality fresh coffee, it is necessary to use fresh water. Otherwise, the resulting flavour of the coffee beverage may be negatively affected.
2. TURNING ON THE APPLIANCE
2.1 Connect the power cord plug to a power socket. Make sure that the water tank A11 is filled with fresh water, that the drip tray A9 and grate A8 are installed in their place and that the knob A12 is set to the stand-by mode position.
2.2 To turn on the appliance, set the switch A16 to the ON position. Indicator A2 will be lit.
2.3 Underneath the brew head A6 place a cup into which hot water will flow. Make sure the button A5 is in the pressed out position that is intended for the coffee brewing mode. Set the knob A12 to the coffee brewing position. As soon as water starts flowing out of the brew head A6, set the knob A12 back to the stand-by mode position. This step is performed after the appliance is turned on to pump water from the water tank A11 into the boiler A13. In the boiler A13, water is heated to the optimal coffee brewing temperature.
3. PRE-HEATING THE APPLIANCE AND CUPS
3.1 Preparing a quality cup of espresso requires that the appliance, portafilter A7, filter A17 or A18, and cups are preheated. This is done in the following way.
3.2 Place empty coffee cups upside down on to surface A1 and allow them to warm up.
3.3 Select filter A17 or A18 and insert it into the portafilter A7 so that it securely slides in along the entire perimeter. Insert the portafilter A7 underneath the brew head A6 so that the handle is pointing to the left. This position is marked with "INSERT" on the front panel of the appliance. To fasten the portafilter A7 to the brew head A6, turn the handle to the right to the "LOCK" position.
3.4 Wait until indicator A3 is lit, and set knob A12 again to the coffee brewing mode position. Hot water will start flowing out of the spout on the portafilter A7 into the cup located under the spout. When the indicator A3 turns off, set the knob A12 back to the stand-by mode position. Remove the cup containing the hot water. Now the pre-heating process is finished.
4. BREWING COFFEE
4.1 Take the portafilter A7 out of the appliance and dry the filter with a paper towel.
4.2 Place the portafilter A7 on to an even surface and pour the corresponding amount of ground coffee into the filter. The one-cup coffee filter A17 is filled with a single level measuring cup A19 of coffee. The two-cup coffee filter A18 is filled with double the amount of coffee. One level measuring cup A19 is equivalent to 7 g of ground coffee. Spread the coffee out evenly inside the filter and gently tamp it down with the flat end of the measuring cup A19.
4.3 Thoroughly clean ground coffee remains from the edges of the filter A17 or A18. Insert the portafilter A7 underneath the brew head A6 so that the handle is pointing to the left. This position is marked with "INSERT" on the front panel of the appliance. To fasten the portafilter A7 to the brew head A6, turn the handle to the right to the "LOCK" position.
4.4 Place one or two preheated cups underneath the portafilter A7. Make sure that the cups are located underneath the spout.
4.5 When the indicator A3 is lit, set knob A12 to the coffee brewing mode position. Within a few moments, coffee will start flowing into the cups.
Note:
The indicator A3 may turn off while the coffee is being extracted. This signals a decline in the water temperature in the boiler A13. The indicator A3 will light up again as soon as the boiler A13 heats the water up to the ideal coffee brewing temperature.
Once the required amount of coffee is in the cup, set the knob A12 to the standby mode position. This completes the coffee extraction process. The extraction time for a cup of espresso should be between 20 and 30 seconds and the volume should be approximately 20 to 30 ml.
Note:
Make sure that button A5 is in the brew coffee position. If button A5 is set to the steam release position, the espresso machine will not dispense coffee.
4.6 If you do not fill the filter with ground coffee, you may simply pour just hot water, for example for tea, hot chocolate, etc.
4.7 Before you start brewing another cup of coffee, first remove used coffee grounds, clean out the filter according to the instructions contained in chapter Maintenance and cleaning and pour out the water from the drip tray A9. When returning the drip tray A9 to its place, push it all the way against the back wall of the appliance.

Attention:
The water contained in the drip tray A9 is hot. When handling the drip tray A9, pay extra attention.
During operation, regularly check the water level in the water tank A11 and make sure that it does not fall below the minimum water level mark.
5. USING THE NOZZLE TO FROTH MILK AND HEAT WATER
5.1 Prepare some cooled semi-skimmed or full-fat milk and the container in which you will froth the milk. During the milk frothing process, its volume expands, therefore fill the container to no more than 13 of its capacity.
5.2 Set the nozzle A14 to such a position that the milk frothing process is comfortable.
5.3 Make sure that the knob A12 is set to the stand-by mode position. Press button A5 and wait until indicator A4 lights up. This signalises that the water in the boiler A13 has reached the optimal steam generation temperature. This temperature is higher than for brewing coffee.
5.4 Place the container with milk underneath the nozzle A14. Submerge the nozzle A14 just beneath the surface of the milk and set the knob A12 to the steam release position. The nozzle A14 will start releasing steam. Initially a small amount of hot water may be released. Hold the container slightly tilted to ensure that the nozzle A14 remains constantly submerged just under the surface of the milk. The milk will circulate in the container, it will heat up and increase in volume. Milk froth will start to form on the surface of the milk. When the bottom of the container heats up so that it is hot to touch, stop the milk frothing by turning the knob A12 to the stand-by mode position. When steam stops being created, remove the container. Using a swirling motion, whip the froth into the heated milk.

Attention:
The nozzle A14 must remain submerged during the entire frothing process. Otherwise hot milk may splash out.
5.5 Pour the frothed milk into freshly brewed coffee and use a spoon to add the milk froth. The recommended milk and coffee ratio for preparing cappuccino coffee is 13 espresso, 13 warm milk and 13 milk froth. To prepare caffè latte, use 13 espresso, 23 warm milk and approximately 1 cm of milk froth.
5.6 After using the hot steam release function, it is necessary to drain the remaining water from the boiler A13; this will prevent the subsequently brewed coffee from being steamed with water that is too hot. Push out button A5 to the coffee brewing position. Underneath the spout of the portafilter A7, place a cup into which the hot water will be drained from the boiler A13, and set the knob A12 to the coffee brewing position. Wait until the indicator A3 turns off. Then set the knob A12 back to the stand-by mode position. The boiler A13 will heat the new batch of water up to the optimal coffee brewing temperature. This is signalised by the indicator A3 being lit.
5.7 When you have finished using it, clean out the nozzle A14 and the milk frothing attachment A15 according to the instructions in chapter Cleaning and maintenance.
5.8 After removing the attachment A15, the nozzle A14 may be used in the same way to heat water for tea, hot chocolate, etc. When heating water, submerge the nozzle A14 at least 5 cm under the water level.
6. TURNING OFF THE APPLIANCE
6.1 When you have finished using the appliance, turn it off by setting the switch A16 to the OFF position.
Note:
The appliance will turn off automatically after 25 minutes of inactivity or when the pump runs non-stop for 3 minutes in the coffee brewing mode.
BASIC GUIDELINES AND RECOMMENDATIONS FOR BREWING QUALITY COFFEE
- Always brew coffee in a clean espresso machine. A dirty appliance can negatively impact the taste of the coffee beverage. Instructions for cleaning and removing limescale deposits are found in chapter Cleaning and maintenance.
- For brewing quality coffee, it is necessary to use fresh drinking water. Do not use warm, heated, distilled, mineral or sparkling water. Do not leave water in the water tank A11 for longer than one day.
- Brew coffee from pre-ground coffee that is intended for espresso machines or using freshly ground coffee beans. When using ground coffee beans, it is important to correctly set the grinding fineness. Coffee beans need to be ground to a fine texture but not too fine. If the ground coffee feels like fine flour when sifted between the fingers then the coffee will be brewed for too long and the resulting beverage will be too dark and bitter, or the filter may become clogged. If the coffee beans are ground too coarsely, the brewing process will be too fast and the resulting beverage will have a watery taste and bland aroma.
- Select coffee beans, among others according to the roasting date marked on the package. We recommend consuming freshly roasted coffee beans within 3 weeks of the roasting date. To shorten the storage time, purchase it in smaller packages. Store it in a cool, dark and dry location, ideally in an air-tight container.
- When using pre-ground coffee, store it in an enclosed container, in dry and cool conditions. Do not place it in a refrigerator or freezer. Consume within a week of opening it.
CLEANING AND MAINTENANCE
- Prior to cleaning the appliance, turn it off by setting the switch A16 to the OFF position, disconnect it from the power socket and allow it to cool down.
- For cleaning, do not use cleaning products with an abrasive effect, solvents, etc. that could damage the appliance. No part of this appliance is intended for washing in a dishwasher.
CLEANING THE FILTERS, PORTAFILTER AND BREW HEAD
- Release the portafilter A7 by turning the handle to the left. Remove it from the brew head A6 and move it above a rubbish bin. Turn the portafilter A7 so that the filter with used coffee grounds points downwards. Use a teaspoon to remove the coffee grounds. Avoid coming into contact with the surface of the filter or portafilter A7 as they may still be hot. Prior to removing the filter from the portafilter A7, cool it down under cold running water. Then rinse the filter and the portafilter A7 under clean running water and dry them thoroughly.
- If you used coffee that was ground too finely, then the holes in the filter may have become clogged. To clean them out, use a thin needle.
- Remove ground coffee remains from the brew head A6 using a damp wiping cloth.

Attention:
The brew head A6 remains hot after use due to residual heat. Allow it to cool down before cleaning it.
CLEANING THE DRIP TRAY
- The drip tray A9 needs to be emptied and washed every time the appliance is used.
- First remove the grate A9 from the drip tray A8 and then remove the water. Wash the drip tray A9 and the grate A8 in warm water with neutral kitchen detergent. Then rinse both parts under running water, wipe dry and return to their place.
CLEANING THE NOZZLE AND THE MILK FROTHING ATTACHMENT
- It is necessary to thoroughly clean the nozzle A14 and the attachment A15 after every use.
Take off the attachment A15, rinse under hot running water and wipe dry. - Thoroughly clean the nozzle A14 using a dampened cloth. In the event that there are dried milk residues on the nozzle A14, submerge it into a container with hot water to allow them to soak away. In the event that the dried milk residues clog the steam exhaust outlet, clean it out using a needle. Finally, clean the nozzle A14 using a dampened cloth, wipe dry and install it on to the attachment A15.
CLEANING THE OUTER CASE
- Wipe the outer surface of the appliance using a lightly dampened cloth and wipe dry.
REMOVING LIMESCALE DEPOSITS
- It is necessary to regularly remove limescale deposits from the appliance. Limescale deposits may negatively affect the quality of the brewed coffee and the lifetime of the appliance.
- In the case of daily use of the appliance, we recommended to remove the limescale deposits:
– once per month in areas with hard and very hard water; - once every 2 to 3 months in areas with soft and medium soft water.
- To remove limescale deposits, use a solution of 8% white vinegar and water (recommended dilution ratio of 1:2). Instead of the water and vinegar solution, it is possible to use citric acid or a limescale remover intended for espresso type machines. The recommended dosage for citric acid is 2 teaspoons per 0.5l of water. Dose the limescale remover according to the manufacturer's instructions.
- Fill the water tank A11 with the solution all the way up to the maximum level mark. Connect the appliance to a power socket. Attach the portafilter A7 to the brew head A6. Place a sufficiently large container under the brew head A6 and the nozzle A14. Allow the majority of the solution to flow through the brew head A6 and allow the remainder to flow through the nozzle A14.
■ After using the solution, rinse out the water tank A11 using clean water and allow clean water to flow through the appliance once or twice.

Attention:
Do not forget to regularly check the water level in the water tank A11 and in the drip tray A9.
TECHNICAL SPECIFICATIONS
Rated voltage range....220–240 V
Rated frequency....50 Hz
Rated power input 960-1 140 W
Noise level 75 dB(A)
The declared noise emission level of the appliance is 75 dB(A), which represents a level A of acoustic power with respect to a reference acoustic power of 1 pW.
We reserve the right to change text and technical specifications.
INSTRUCTIONS AND INFORMATION REGARDING THE DISPOSAL OF USED PACKAGING MATERIALS
Dispose of used packaging material at a site designated for waste in your municipality.
DISPOSAL OF USED ELECTRICAL AND ELECTRONIC EQUIPMENT
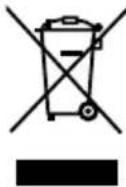
This symbol on products or original documents means that used electric or electronic products must not be added to ordinary municipal waste. For proper disposal, renewal and recycling hand over these appliances to determined collection points. Alternatively, in some European Union states or other European countries you may return your appliances to the local retailer when buying an equivalent new appliance.
Correct disposal of this product helps save valuable natural resources and prevents potential negative effects on the environment and human health, which could result from improper waste disposal. Ask your local authorities or collection facility for more details.
In accordance with national regulations penalties may be imposed for the incorrect disposal of this type of waste.
For business entities in European Union states
If you want to dispose of electric or electronic appliances, ask your retailer or supplier for the necessary information.
Disposal in other countries outside the European Union
This symbol is valid in the European Union. If you wish to dispose of this product, request the necessary information about the correct disposal method from the local council or from your retailer.

This product meets all the basic requirements of EU directives related to it.
- EN • Espresso Machine
- EN
- Espresso Machine
- Important safety instructions
- READ CAREFULLY AND STORE FOR FUTURE USE.
- Attention:
- User's manual
- DESCRIPTION OF THE APPLIANCE
- BEFORE FIRST USE OF THE APPLIANCE
- OPERATING THE APPLIANCE
- FILLING THE WATER TANK
- Note:
- TURNING ON THE APPLIANCE
- PRE-HEATING THE APPLIANCE AND CUPS
- BREWING COFFEE
- USING THE NOZZLE TO FROTH MILK AND HEAT WATER
- TURNING OFF THE APPLIANCE
- BASIC GUIDELINES AND RECOMMENDATIONS FOR BREWING QUALITY COFFEE
- CLEANING AND MAINTENANCE
- CLEANING THE FILTERS, PORTAFILTER AND BREW HEAD
- CLEANING THE DRIP TRAY
- CLEANING THE NOZZLE AND THE MILK FROTHING ATTACHMENT
- CLEANING THE OUTER CASE
- REMOVING LIMESCALE DEPOSITS
- TECHNICAL SPECIFICATIONS
- INSTRUCTIONS AND INFORMATION REGARDING THE DISPOSAL OF USED PACKAGING MATERIALS
- DISPOSAL OF USED ELECTRICAL AND ELECTRONIC EQUIPMENT
- For business entities in European Union states
- Disposal in other countries outside the European Union
Brand : SENCOR
Model : SES 1710BK
Category : Coffee maker