Guide 35 - Bag Salewa - Free user manual and instructions
Find the device manual for free Guide 35 Salewa in PDF.


| Product Type | Backpack |
| Brand | Salewa |
| Model | Guide 35 |
| Volume | 35 liters |
| Weight | Approx. 1200 g |
| Dimensions | 62 x 30 x 22 cm |
| Material | Nylon 210D with PU coating |
| Back System | Dry Back padding with mesh |
| Closure | Top lid with drawstring and buckle |
| Hip Belt | Removable, padded hip belt |
| Hydration System | Compatible with 3L hydration bladder |
| Ice Axe Loops | 2 ice axe loops with elastic cord |
| Compression Straps | Side compression straps |
| Pockets | Top pocket, front zip pocket, hip belt pockets |
| Rain Cover | Included |
| Intended Use | Alpine climbing, hiking, mountaineering |
| Care Instructions | Hand wash with mild soap, air dry |
| Warranty | 2 years limited warranty |
Frequently Asked Questions - Guide 35 Salewa
User questions about Guide 35 Salewa
0 question about this device. Answer the ones you know or ask your own.
Ask a new question about this device
Download the instructions for your Bag in PDF format for free! Find your manual Guide 35 - Salewa and take your electronic device back in hand. On this page are published all the documents necessary for the use of your device. Guide 35 by Salewa.
USER MANUAL Guide 35 Salewa
natural_image
Abstract geometric shape resembling a stylized arrow or chevron on dark background (no text or symbols)SALEWA
BACKPACK MANUAL
OVERVIEW GUIDE
GUIDE 45 / GUIDE 35
Congratulations on your purchase of a SALEWA Pack.
We want to be sure that you understand and utilize your new SALEWA pack in the best way.
Following you will find a description of all functions the Pack is offering.

natural_image
Black and gold backpack with yellow accents, no visible text or symbols1145 Guide 45 0900 black


natural_image
Black hiking gear with attached backpack and shoulder strap (no visible text or symbols)1146 Guide 35 0900 black

MOUNTAINEERING
CONTACT-FIT CARRYING SYSTEM

ANATOMICALLY SHAPED BACK PADDING
Creates optimal contact between pack and user, ensuring an evenly distributed load. Perfect fit makes it well suited for Alpine use
ERGONOMIC BACK PANEL
An ISB board serves to stabilize the back and can be removed if needed to cut additional weight

LOAD CONTROL STRAPS
Ensure optimal back fit
PADDED SHOULDER STRAPS AND COMFORTABLE BACK PADDING
Increase comfort even on lengthy tours
REMOVABLE HIPBELT
Ensures the best possible comfort when wearing a climbing harness
FEATURES

Height adjustable hood

natural_image
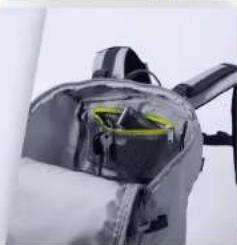
Close-up of a dark gray backpack with attached yellow and green straps (no visible text or symbols)Inner pocket for values
natural_image
Close-up of a gray backpack with a green-labeled pocket, no visible text or symbolsCompartment for shovel and probe

natural_image
Close-up of a dark gray safety gear with yellow accents and black accessories (no visible text or symbols)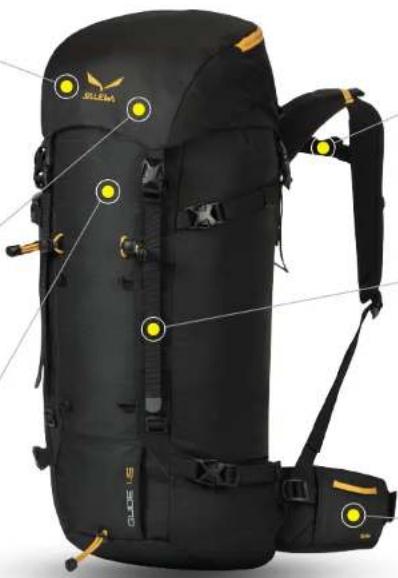
natural_image
Black and yellow photo of a rugged ski gear with attached straps and yellow warning symbols (no text or labels visible)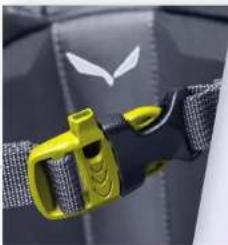
natural_image
Close-up of a yellow and black car seatbelt buckle with a white logo on the side (no text or symbols visible)Alarm whistle
Good for emergencies, or to simply draw attention to yourself.
To remove the front webbing, simply unlock the buckle and thread the webbing through the male buckle part. The webbing now pulls out easily from the bottom through the laser cut.
Detachable front webbings
natural_image
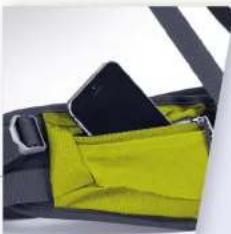
Close-up of a yellow and black car seatbelt with a zipper, no visible text or symbolsHip belt pocket
Valuables such as money, camera and mobile are well taken care of here.
FEATURES

Detachable hood
If you want to save weight or to have more headspace when climbing, you can remove the hood. Open the two buckles at the front and the two at the back of the hood connecting it.

natural_image
Close-up of a yellow and gray safety vest with a black buckle (no visible text or symbols)Parallel ski attachment
Insert one ski in the lower loop on the side of the pack or, if not present, on the lower side compression strap. Wrap the upper side compression strap around the ski and pull it tight. Do the same with the other ski, on the other side of the pack.

natural_image
Person in full-body suit with yellow safety harness, holding a device (no visible text or symbols)
natural_image
Black and white photo of a modern ski gear backpack with yellow warning points and attached straps (no visible text or symbols)AquaGuard Zipper
Welded water-repellent zipper.

natural_image
Close-up of a yellow and black belt buckle (no text or symbols visible)Load control strap
Pull the load control straps tight to stabilize your pack.

natural_image
Close-up of a dark safety harness with attached straps and chains (no visible text or symbols)Material loop on hip belt
Attaching your gear like carabiners, Quickdraws and icescrews, quickly and safely.
FEATURES

Rope fastener
Next to the pack opening you can find the rope compression strap. To secure your rope, wrap the straps around it, hook it into the sewn-in loops next to the opening and lash it down tight.

natural_image
Back view of a gray safety gear with yellow straps and 'SALEWA' branding (no additional text or symbols visible)Side zipper access
For quick and easy access into the main compartment without having to open the top.

natural_image
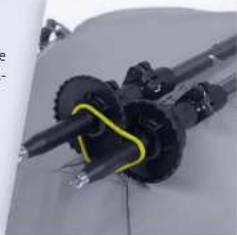
Close-up of a gray backpack with a yellow zipper and black cushion, no visible text or symbolsLower pole fixation
Thread the pole tip through the webbing loop down to the basket.
natural_image
Close-up of a mechanical assembly with black components and yellow tape, no visible text or symbols
natural_image
Black and white photo of a SKR mountain backpack with yellow safety tags and attached straps (no visible text or symbols)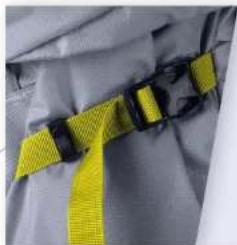
natural_image
Close-up of a yellow and black safety belt buckle (no text or symbols visible)Side compression strap
These straps allow you to cinch in your pack for a more stable carry. They also serve as attachment options for external gear.

natural_image
Close-up of mechanical components with yellow and black clamps, no visible text or symbolsIce axe/ Pole fastening
Fixed in place, the ice axe is safely stored away and can be retrieved just as quickly
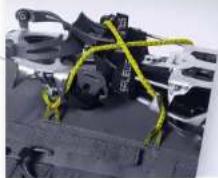
Tie on points for multiple u
Use these flexible gear loops to attach bulky itemsthe elastic with the cord stopper.
FEATURES

Sternum Strap
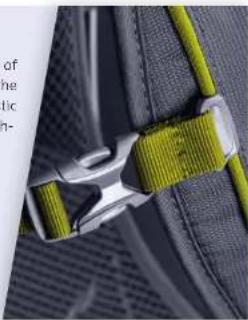
Slide the strap in the middle of your sternum to stabilize the pack to your body. The elastic strap promotes effective breathing and a snug fit.
natural_image
Close-up of a yellow and silver belt buckle securing a dark textured surface (no text or symbols visible)Removeable hip belt
The hip belt is easy to remove. Unthread the strap, grab the hip belt with one hand and slide your other hand between the pack body and hip belt to release the velcro. Thread the webbings, if existing. Pull the hip belt out.

natural_image
Close-up of a dark gray athletic backpack with yellow accents and black straps (no visible text or symbols)

natural_image
Close-up of a yellow and black mechanical component attached to a gray vehicle (no visible text or symbols)Hydration System Exit
Place the hydration system in the elastic pouch on the back of your pack. Fasten the hydration system either with the sewn in hangers or velcro. Thread the hose through the hydration exit and secure it underneath the routers on the shoulder straps. SALEWA packs can house a hydration system up to 3L.

natural_image
Close-up of a person wearing a black safety helmet with a yellow visor, standing on a chair (no visible text or symbols)Removable ISB board
To strip down your pack and make it lighter, you can remove the ISB (Internal Stabilization Board). Find the ISB compartment, unfasten the Velcro connection between. Grab the pack at the bottom with one hand and pull out the ISB. When reinserting, make sure that the aluminium frame faces in the right direction.
GENERAL INFORMATION

1. | MAIN BENEFITS
We seek to design the best-possible solutions for mountain enthusiasts based on our philosophy of creating strong & light products.
We understand our users' needs and provides the right features and benefits for them to enjoy their adventures:
Strength & durability
Our design team carefully analyses the exact functions of each part of a backpack to define performance requirements, select an optimum combination of materials and engineer the strongest gear for the longest use.
Lightweight design
Our sophisticated design solutions use the best materials to minimize weight. Lightweight fabrics, buckles, straps and accessories also help keep weight down.
Optimal load distribution
SALEWA trekking backpacks are fitted with Custom FIT and Custom FIT PRO carrying systems. Their easy-adjust torso lengths, mean that even heavy loads can be carried comfortably for long periods. For optimal load distribution, ensure that the carrying system is properly adjusted, including the load control straps. In addition, make sure your pack is set up correctly, both horizontally and vertically.
Ventilation
Sweating cools down the body via evaporation. Conventional backpacks stop this happening as their back panels prevent the ventilation sweat requires to evaporate. The wet back panels mean you get chilled. All SALEWA backpack back panels are designed to ensure good ventilation.
2. | CARRYING SYSTEMS
SALEWA has two different carrying systems. Depending on size and area of use, its backpacks are equipped with an AIR FIT or a CONTACT FIT system. Our AIR FIT system maximizes ventilation and minimizes the backpack surface in contact with the body; the CONTACT FIT system keeps the load bary-centre of the backpack close to the body for maximum control on ascents and provides good ventilation through its air channels.
GENERAL INFORMATION

How to get the best fit:
- Loosen all straps (shoulder straps, load control straps, waist belt, compression straps) before you load the pack.
- If your backpack has a back regulation system, follow the instructions in the table to identify your torso length and set the correct back length.
| torso measurement | fixed back length size | CUSTOM FIT PRO back length male | CUSTOM FIT PRO back length female |
| 38/40cm | SHORT | SHORT | |
| 40/45cm SHO | |||
| 45/50cm | REGULAR | MEDIUM LARGE | |
| 50/53cm LARGE | |||
- Pull in the waist belt so that it sits just above the pelvis. Make sure that your iliac crest is centred between the waist belt padding. Close the buckles. Secure the loose ends of the straps.
- Tighten (but don't overtighten) the shoulder straps until the carrying system meets the back. The attachment point of the shoulder straps should be about one inch below the seventh vertebra (C7). If necessary, readjust the back length.
- If your pack has them, tighten the load control straps at the top of the shoulder straps.
- Close and adjust the length of the chest (sternum) strap, and make sure it sits at the right height (at your sternum). A snug fit will help stabilise the pack. Take care not to create pressure points.
- Check the load control straps again and ensure that your shoulder straps fit snugly around your shoulders.
We recommend that you never pack more than 70% of your pack's volume. The extra room will come in useful if you have to unpack the contents and quickly pack them again.
- Space is limited, so it makes sense to pack systematically. This also makes your pack easier to carry. We recommend packing as follows: store lighter items, such as your sleeping bag and reserve clothes at the bottom; keep heavy items such as your cooking equipment or tent in the area of your upper back.
- Store valuable item such as documents, money, keys etc. in the dedicated pocket.
- Pack items you want close to hand at the top or in outside pockets: extra clothing, water bottle, maps, compass, snacks, etc.
- Fasten longer items, such as tent poles or trekking poles, to the side of the pack using the compression straps – and store the loose ends away in the side pockets. If required, large and bulky items (sleeping mat, tent, etc.) can be attached on the outside using compression straps.
- Store your cooking equipment, food, spare clothing and other items in the main compartment. Keep your most frequently used gear close to the top. Less frequently used kit (e.g. bivouac sack) can stay at the bottom.
- The separate bottom compartment is meant for your lighter items, such as your sleeping bag or spare base layers.
5. | CARE AND MAINTENANCE
Backpacks do not need much care and maintenance. Stains can be cleaned off with water. Lubricate the zippers occasionally with silicone or oil. Although, if you use your pack in dusty areas, don't use silicone or oil as they attract dust. If your zippers stick, clean them with an old toothbrush.
6. | CONTACT
Got a question? Need a suggestion?
Please contact us at: www.salewa.it/it/contacts/
- OVERVIEW GUIDE
- GUIDE 45 / GUIDE 35
- MOUNTAINEERING
- CONTACT-FIT CARRYING SYSTEM
- ANATOMICALLY SHAPED BACK PADDING
- ERGONOMIC BACK PANEL
- LOAD CONTROL STRAPS
- PADDED SHOULDER STRAPS AND COMFORTABLE BACK PADDING
- REMOVABLE HIPBELT
- FEATURES
- Detachable hood
- Parallel ski attachment
- AquaGuard Zipper
- Load control strap
- Material loop on hip belt
- Rope fastener
- Side zipper access
- Lower pole fixation
- Side compression strap
- Ice axe/ Pole fastening
- Tie on points for multiple u
- Sternum Strap
- Removeable hip belt
- Hydration System Exit
- Removable ISB board
- GENERAL INFORMATION
- | MAIN BENEFITS
- Strength & durability
- Lightweight design
- Optimal load distribution
- Ventilation
- | CARRYING SYSTEMS
- How to get the best fit:
- | CARE AND MAINTENANCE
- | CONTACT
Brand : Salewa
Model : Guide 35
Category : Bag