CD12PW - Humidifier ElectriQ - Free user manual and instructions
Find the device manual for free CD12PW ElectriQ in PDF.


| Product Type | Compressor Dehumidifier |
| Model | CD12PW |
| Dehumidifying Capacity | 12 L/day (at 30°C, 80% RH) |
| Tank Capacity | 2.5 litres |
| Dimensions (W x D x H) | 290 x 200 x 520 mm |
| Weight | 9 kg |
| Power Supply | 220-240 V ~ 50 Hz |
| Power Consumption | 180 W |
| Running Current | 0.8 A |
| Refrigerant | R290, 50 g |
| Airflow | 125 m³/h |
| Humidity Range Setting | 35% – 80% RH (in 5% increments) |
| Fan Speeds | 1 |
| Filters | Optional Carbon (ACFIL-CDPX) and HEPA (HEPA-CDPX) |
| Control Type | Digital with Smart App (Tuya Smart) |
| Timer | 1 – 24 hours (start/stop) |
| Display | Digital humidity indicator |
| Drainage Options | 2.5L tank or continuous gravity drain |
| Mobility | Castors |
| IP Rating | IPX1 |
| Global Warming Potential (GWP) | 3 |
| Recommended Operating Temperature | 5°C – 35°C |
Frequently Asked Questions - CD12PW ElectriQ
User questions about CD12PW ElectriQ
0 question about this device. Answer the ones you know or ask your own.
Ask a new question about this device
Download the instructions for your Humidifier in PDF format for free! Find your manual CD12PW - ElectriQ and take your electronic device back in hand. On this page are published all the documents necessary for the use of your device. CD12PW by ElectriQ.
USER MANUAL CD12PW ElectriQ
natural_image
Line drawing of a portable air purifier with control panel and wheels (no text or symbols)COMPRESSOR DEHUMIDIFIER
WITH DIGITAL HUMIDISTAT
AND SMART APP CONTROL
CD12PW – 12 Litres per day
Thank you for choosing electriQ.
Please read this user manual before using this innovative dehumidifier and keep it safe for future reference
Visit our page www.electriQ.co.uk for our entire range of Intelligent Electricals
CONTENTS
SAFETY INSTRUCTIONS 2
VISUAL SAFETY GUIDE 4
INFORMATION ON INDOOR POLLUTANTS 4
APPLIANCE DIAGRAM 5
FEATURES 6
INSTALLATION 6
FITTING THE OPTIONAL FILTERS 6
CONTROL PANEL 7
QUICK REFERENCE GUIDE 9
OTHER FEATURES AND INDICATORS 10
POSITIONING THE DEHUMIDIFIER 11
WATER DRAINAGE 12
SETTING UP THE WIFI APP 13
CONNECTING USING QUICK CONNECTION 16
CONNECTING USING AP MODE 17
CONTROLLING YOUR DEVICE THROUGH THE APP 18
SMART SCENES 20
AUTOMATION 21
CONNECTION TROUBLESHOOTING 22
CARE AND MAINTENANCE 23
TROUBLESHOOTING 24
TECHNICAL DATA 25
SUPPORT 26
SAFETY INSTRUCTIONS
- Carefully read the instructions before operating the unit.
- This appliance is for indoor use only and is only intended for use in a domestic environment or similar. Any other use is not recommended by the manufacturer and may cause fire, electrical shocks or other injury to user or property.
- Rating: This unit must be only connected to a 220-240 V / 50 Hz earthed outlet.
- Installation must be in accordance with regulations of the country where the unit is used.
- If you are in any doubt about the suitability of your electrical supply have it checked and if necessary, modified by a qualified electrician.
- This dehumidifier has been tested and is safe to use. However, as with any electrical appliance - use it with care.
- Disconnect the power before dismantling, assembling or cleaning.
- Avoid touching any moving parts of the appliance.
- Never insert fingers, pencils or any other objects though the guard.
- This appliance is not intended for use by persons (including children) with reduced physical, sensory or mental capabilities. It is also not intended for use by those with a lack of experience and knowledge, unless they have been given supervision or instruction concerning the use of the appliance by a person responsible for their safety.
- Do not leave children unsupervised with this appliance.
- Do not clean the unit by spraying it or immersing it in water.
- Never connect the unit to an electrical outlet using an extension cord. If a power outlet is not available, one should be installed by a qualified electrician.
- Never operate this appliance if the power cord or plug is damaged.
- Ensure the power cord is not stretched or exposed to sharp objects/edges.
- A damaged power supply cord should be replaced by the manufacturer or a qualified electrician in order to avoid a hazard.
- Any service other than regular cleaning or filter replacement should be performed by an authorised service representative. Failure to comply could result in a voided warranty.
- Do not use the appliance for any purpose other than its intended use.
- Do not tilt the unit while in use. The unit is design to work only in a vertical position.
- This dehumidifier must always be stored and transported upright, otherwise irreparable damage may be caused to the compressor; if in doubt we suggest waiting at least 24 hours before starting the unit following transportation.
- Avoid restarting the dehumidifier unless 5 minutes have passed since being turned off. This prevents damage to the compressor.
- Never use the plug as a switch to start or stop the dehumidifier. Use the provided ON/OFF button located on the control panel.
• Always place the unit on a dry and stable surface.
- The appliance should not be installed in laundry or wet rooms where the humidity is higher than 85% RH.
- Do not dry laundry above the unit to prevent water entering the dehumidifier. Place the laundry at least 1 meter away from your dehumidifier.
- Before moving the appliance the water tank should be emptied.
- The handle on the appliance is designed to aid in its movement and
should not be used to support the full weight of the dehumidifier. When carrying the unit, it should be kept upright and sufficiently supported from its base.
- The handle should not be used if there are any signs of damage to its fixings.
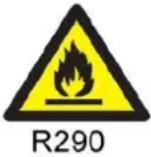
- The appliance must be placed in a room without sources of ignition (for example: open flames, an operating gas appliance or an operating electric heater).
• R290 refrigerant gas complies with European environmental directives.
- R290 has a low GWP (Global Warming Potential) of 3.
- The CD12PW contains about 50g of R290 refrigerant gas.
- Do not use or store the appliance in an unventilated space with an area smaller than 4m^2 per unit.
- If the appliance is installed, used or stored in an unventilated room, the room must be such as to prevent stagnation of possible leaks of refrigerant gas as there could be a danger of fire or explosion should the refrigerant come into contact with electric heaters, stoves or other sources of ignition.
• Refrigerant gas may be odourless.
- Do not use the product and contact the retailer for advice, if damage has occurred to the unit which may have compromised the refrigerant system.
- Any repairs or maintenance must only be carried out on the unit by a suitably qualified engineer. Before opening and servicing the unit the authorized engineer must be in possession of a copy of the manufacturer's service manual and must follow the safety information contained within it to ensure all hazards are minimized.
• The refrigerant system should not be
perforated or punctured.
- Do not place the unit next to heat sources (e.g. electrical fires, fireplaces, etc.)
- Avoid mishandling the dehumidifier. Dropping, throwing the unit can cause damage to its internals and increases the risks of operating it.
- Do not store or use gasoline, petrol, paint, solvents or other flammable vapours or liquids in the vicinity of this dehumidifier or any other appliance.
- This dehumidifier must not be used in spaces where there is a high concentration of gases, solvent or other volatile organic compounds; in very dusty environments; in any domestic, commercial or industrial environment where the air composition is flammable.
- Due to continuous product development the layout and availability of features within the app may vary.
ENERGY SAVING AND UNIT SAFETY PROTECTION TIPS
- Do not cover or restrict the airflow from the outlet or inlet grills. Do not operate and follow troubleshoot procedure if the self-opening louvers do not open on power on.
- For maximum performance the minimum distance from a wall or objects should be 20 cm
- Keep the filters or grills of the unit clean. Under normal conditions, filters or grills should only need cleaning once every three weeks (approximately).
- Since the filters remove airborne particles, more frequent cleaning maybe necessary, depending on the air quality. Vacuum both the mesh and optional filters and wash the mesh filters with hot soapy water and dry them before placing them back in the unit.
VISUAL SAFETY GUIDE WHERE OR WHEN NOT TO USE YOUR DEHUMIDIFIER
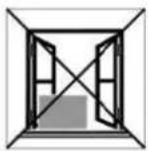
Exposed to the weather outdoors
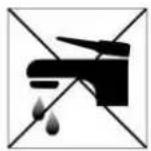
Near water

If the power cable wires are frayed or cut
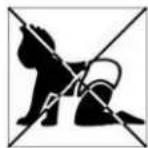
Where small children may be left unattended
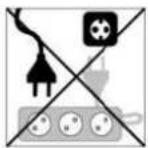
If an extension lead may become overloaded
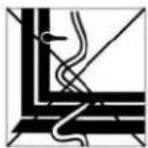
Where the power cable may be damaged
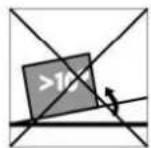
On a slope or uneven surface

Where there is risk of fire or close to a naked flame
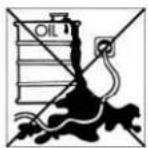
Where it may be damaged by chemicals
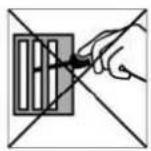
Where there is a risk or interference by foreign objects
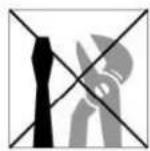
This product is not made for DIY repair
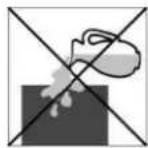
If there is a risk of water falling on the unit
INFORMATION ON INDOOR POLLUTANTS
VOC (Volatile Organic Compound): VOCs come from motor vehicle exhausts, gasoline vapour, pollutants such as formaldehyde, ammonia and many other common and chemical solvents such as paints and glues, or can be a by-product of mould growth. VOCs cause irritation to the eyes and or nose as well as causing headaches, nausea and even potential damage to the central nervous system. Pressed wood furniture, newly decorated rooms, paint and cleaning solvents are common sources of VOCs.
Mould / Fungus: These can affect our respiratory system and cause allergic reactions, like a runny nose, eye and throat irritation, headaches, fatigue and aggravation of asthma. Other indoor pollutants include bacteria, viruses, dust mites and pollen.
Emissions from electronic office equipment: Many studies, including those from EPA and the University of California Berkley, have reported that emissions from office equipment such as computers and printers, include VOCs, ultra-fine particles and ozone. These emissions have been proven to have a negative effect on the health of many people which can be reduced by using an air purifier.
Using HEPA and Carbon filters: An effective HEPA filter is absolutely necessary to remove particles, even at a microscopic level; it ensures that the particles are not spread.
The carbon filter will absorb unpleasant odours and reduce the VOC content in the air.
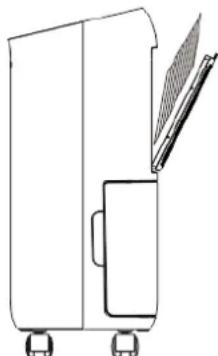
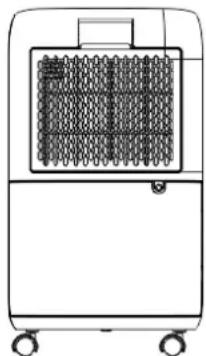
APPLIANCE DIAGRAM
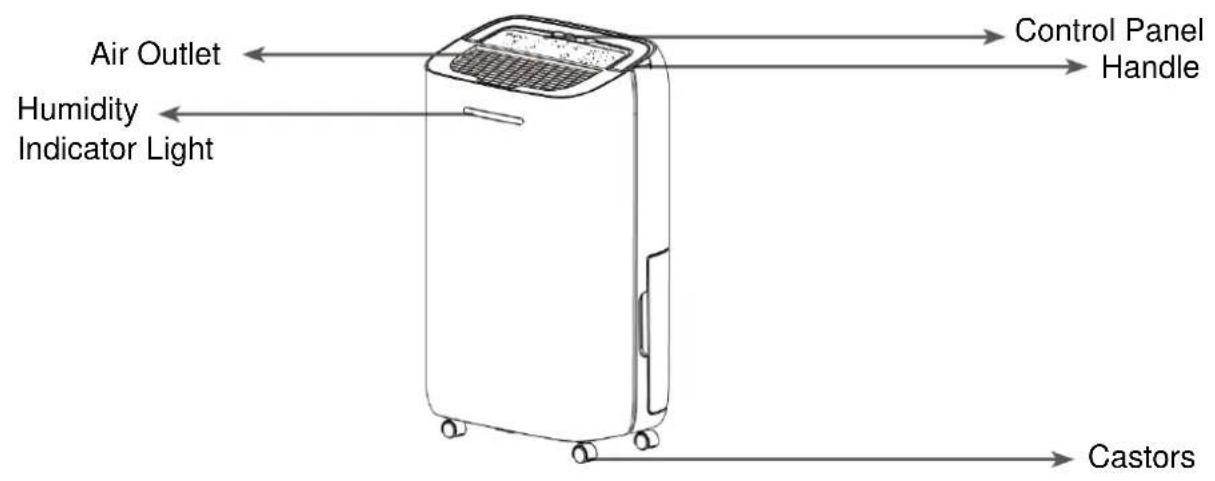
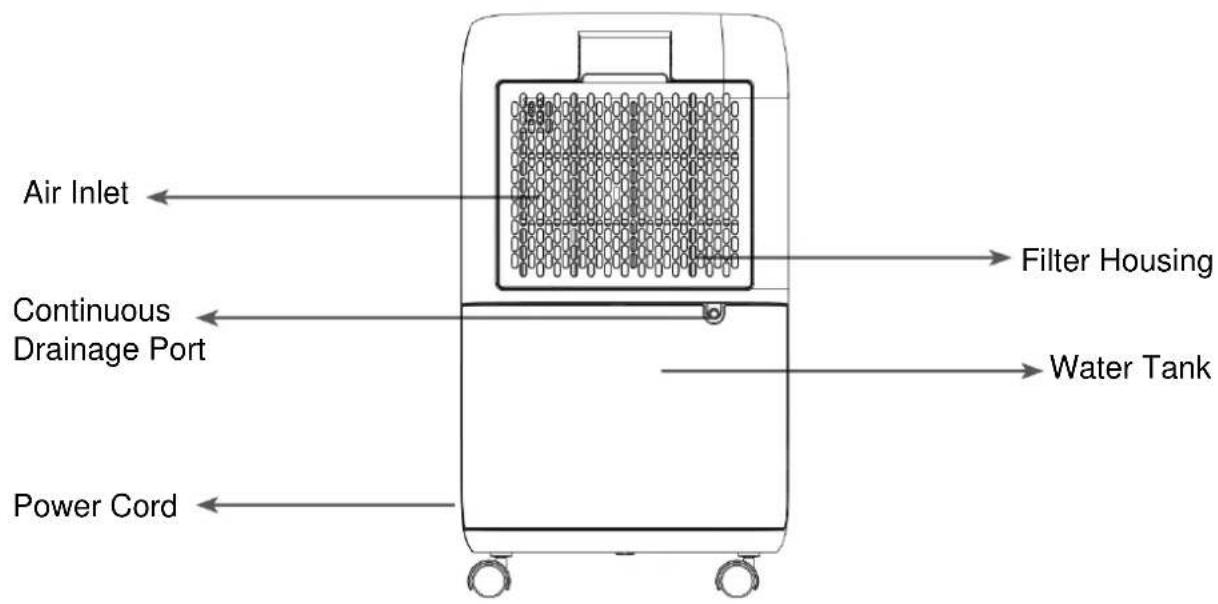
OPTIONAL FILTERS
natural_image
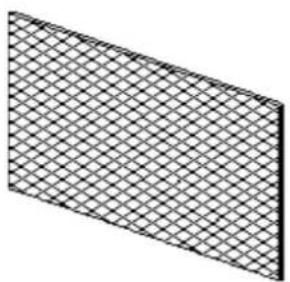
Isometric view of a rectangular grid pattern with no text or symbolsCARBON FILTER
Replacement filters are available from the retailer under code: ACFIL-CDPX
natural_image
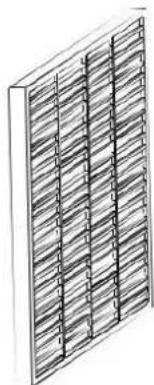
Isometric line drawing of a grid-patterned panel or panel (no text or symbols)HEPA FILTER (NOT SUPPLIED)
Filters are available from the retailer under code: HEPA-CDPX
Note: Diagrams are for illustrative purposes only. The design of the parts may vary from what is shown.
FEATURES
Your dehumidifier belongs to the electriQ dehumidifier range featuring power saving logic.
- Easy to use controls
- Cost effective way to combat mould, condensation and damp
- Optional HEPA and Carbon filters for air purification
- Dries laundry more efficiently than a tumble dryer
- Designed to complement any modern space
- Castors for improved mobility
- Intelligent CPU controlled digital humidistat with 35-80% RH and room humidity display
- 24 hours start / stop timer
- Tank operation or permanent drainage option with splash proof tank
- Tank full alarm & auto-stop function
- App control, allowing the unit to be remote scheduled and settings to be changed from Android and IOS – great for caravans, holiday homes, museums, children rooms, offices etc.
The CD12PW dehumidifier uses compressor technology to extract water from the environment.
Compressor dehumidifiers are ideal for normal domestic or office environments which are heated during the winter months and maintain a temperature above 12-15°C.
This dehumidifier is easy to move around on castors and is designed to extract unwanted humidity while saving money due to its power saving logic. It features an intelligent humidistat where the desired relative humidity can be adjusted in increments of 5% between 35 and 80% ensuring the air in your room is not too dry and that power is not wasted.
INSTALLATION
Remove any water from within the water tank before starting the unit. In order to save energy do not open windows or doors while the unit is running. Place the unit on a hard / flat surface. On first use run the unit continuously for 24 hrs.
TO REDUCE NOISE LEVELS: Place a piece of carpet or a rubber mat under the unit to reduce any vibrations while the unit is running.
FITTING THE OPTIONAL FILTERS
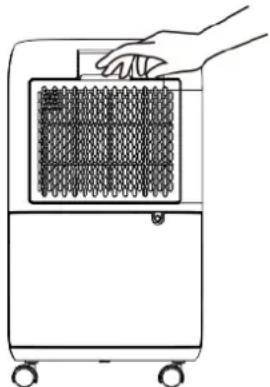
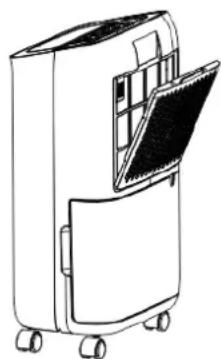
The optional filters can be placed in the appliance before use. The optional HEPA filter is fitted into the rear of the filter housing. The optional Carbon filter is placed between the unit and the filter housing.
natural_image
Line drawing of a hand holding a grid-patterned air conditioner unit (no text or symbols)Unclip the filter housing.
natural_image
Line drawing of a portable air purifier with open lid and wheels (no text or symbols)Remove the filter housing and fit the HEPA filter. (If required)
natural_image
Line drawing of a suitcase with wheels and a folded paper or scroll on the side (no text or symbols)Refit the filter housing and place the Carbon filter in position. (If required)
natural_image
Line drawing of a portable air conditioner unit with wheels and a grid-patterned chamber (no text or symbols)Ensure the filter housing is securely fastened into position.
CONTROL PANEL
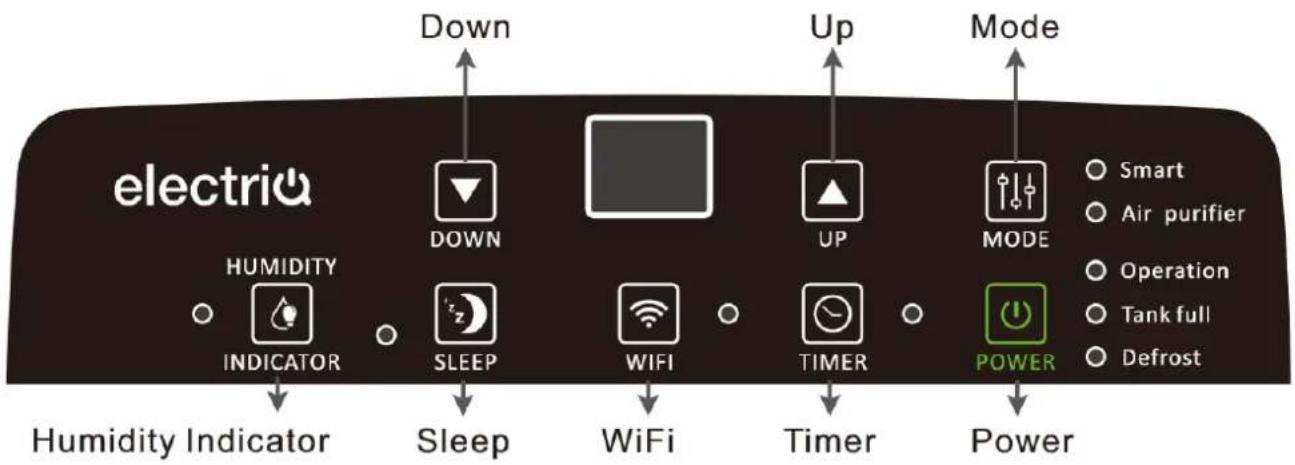
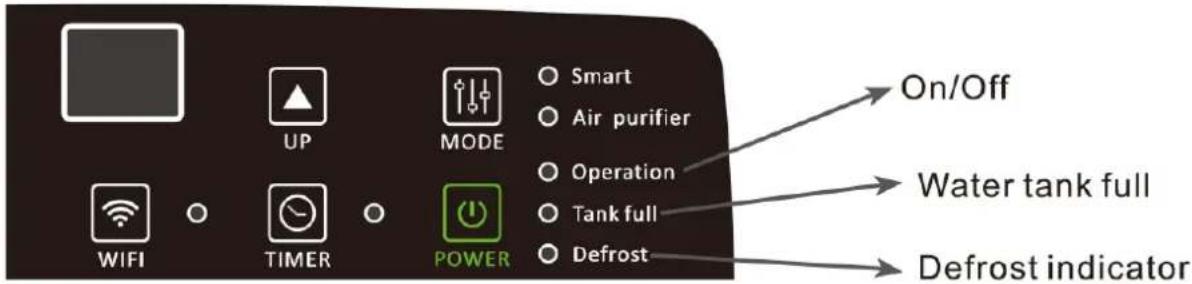
 POWER POWER | POWER ButtonTurn the appliance on/off |
 MODE MODE | MODE ButtonSelect the function of the unit between: SMART and FAN modes. The LED's next to the button will show which mode is selected.SMART MODE: The unit will default to SMART mode the first time it is switched on and remains in this mode until another program is chosen. In smart mode it will default to aim for a relative humidity of 50-55%.AIR PURIFIER: Only the fan will run and water is not extracted. To be used in conjunction with the optional filters. It can also be run without the filters to work as a fan. |
 UP / DOWN UP / DOWN | HUMIDITY SETTINGPress the UP and DOWN buttons to select the desired relative humidity level, the default relative humidity is 55%. When a relative humidity of 35% is selected, the compressor will not stop until the water tank is full. |
HUMIDITY INDICATOR INDICATOR | HUMIDITY INDICATOR ButtonWhen the appliance is started, the indicator light will turn on automatically. The indicator light colour will change according to the humidity conditionRED: High humidity, RH≥70%ORANGE: Above ideal humidity, 70%> RH ≥60%GREEN: Ideal humidity, RH<60%The "Humidity Indicator" button can be pressed to turn on/off the indicator light.Note: It can take around 2 minutes after the humidity has changed into a different colour bracket for the indicator will change the colour e.g. if humidity drops to 55% may take 2 minutes before the indicator changes to green.TIMER ButtonPress the TIMER button to program the timer. When the timer is activated the "TIMER" light will be illuminated. Before programming the timer, ensure the timer function has not been activated (the light must be off). The following timer programs are available.DELAYED POWER-ON FUNCTION: With the appliance in stand-by, press the TIMER button, then use the UP and DOWN buttons to set in how many hours time you require the unit to start (0~24 hours).DELAYED POWER-OFF FUNCTION: While the appliance is running with the desired settings, press the TIMER button, then use the UP and DOWN buttons to set in how many hours time you require the unit to stop (0~24 hours). |
 | WIFI ButtonPress and hold the WiFi button to activate the WiFi function, or to change between WiFi connection methods. See the WiFi connection section for further information. |
 | SLEEP ButtonPress the SLEEP button to enter sleep mode. The Sleep indicator will illuminate, and all other lights will turn off. To exit Sleep mode, press the SLEEP button again. |
 | INTELLIGENT DEFROSTThe appliance will defrost automatically when the coil sensor detects that the internal temperature is too low. During defrosting the indicator will light up.Once the defrost cycle has finished, the appliance will return to the mode that was previously operating. |
 | TANK-FULLWhen the water tank is full, the TANK FULL indicator light will flash, and the unit will stop operating. Once emptied and replaced, the appliance will resume operation. |
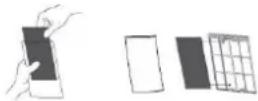 | OPTIONAL CARBON AND HEPA FILTERS (Air purification function)Insert the filters into the filter housing. It is suggested to hoover the filters every 2-3 weeks and change them every 3-6 months as this will help to ensure the room is kept fresh and odour free. |
The led indicator performs the following functions:
- When the unit is plugged in, it will indicate the humidity level of the room.
- When the UP and DOWN buttons are pressed, it will indicate the desired humidity currently set.
- When the timer is programmed will show the duration.
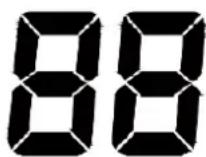
Notes: When humidity level is outside the normal operational parameters will show LO/HI. If ambient humidity is lower than 20%, it will show "LO" If ambient humidity is higher than 90%, it will show "HI".
QUICK REFERENCE GUIDE
Power Button: Press to turn the dehumidifier on and off.
Timer: Press the timer button, then use the the timer (1-24 hrs, start/ stop timer).

buttons to adjust the duration of
If set while the unit is running: The number will represent the number of hours the unit will operate before turning off. This will not be affected if the unit enters defrost mode or the tank is emptied and reinserted.
If set while the unit is in standby: the set number represents the period in hours after which the unit will start. To cancel start / stop mode press the timer key again.
natural_image
Two hand-drawn buttons with triangular and inverted symbols, no text or labels presentUp and Down Buttons: During the High or Low modes when the unit is displaying the current relative humidity, these buttons can be used to adjust the desired humidity level. The desired relative humidity can be set between 35 and 80% in 5% increments.
SMART Mode: This is designed for maximum convenience and defaults to the ideal domestic environment humidity level of 50-55% while saving electricity. This is the default mode and is recommended for most users.
During operation the compressor will operate until the desired humidity is reached and then will stop. The fan moves the air around the room ensuring the entire air in the room is processed and humidity correctly measured.
To achieve drier air, or while drying laundry use the DOWN button to select a lower desired humidity (e.g. 35-45%).
LAUNDRY MODE: When drying clothes it is advised for the dehumidifier to operate continuously with maximum water extraction until the water tank is full. Set the unit to the Smart mode, and set the desired humidity level between 35%-50%. 35% is very dry and is hardly achievable in a UK domestic environment. As such the unit will work until the water tank is full when set to 35%. Do not place clothes directly over any of the vents on the dehumidifier. Make sure that there is nothing blocking the hot air exhaust air flow and for best results place the laundry within 1.5 meters of the dehumidifier.
NOTES:
- If a permanent drainage pipe is fitted the unit will not stop operating. Setting the desired humidity to around 35% is good for laundry mode, a quick drying boost, or in emergencies. It is not recommended for long normal operation in a domestic or office environment.
- To allow more moisture in the air, press the up button and set to a higher desired humidity (e.g. 60-70%).
- We recommend setting the Humidity to 50-55%. This is great for domestic operation and dry storage.
- Setting the humidity to 60% is great for personal comfort and applications where 50% RH is considered too dry.
- Setting the humidity to 70% is ideal for unoccupied properties or where an economical run is needed without the need to reduce the humidity further.
OTHER FEATURES AND INDICATORS
TANK FULL LIGHT
When the water tank is full, removed or incorrectly inserted the unit will stop dehumidifying, the red tank full light will illuminate and the unit will beep. Empty the tank and reinsert it correctly to resume operation.
AUTO DEFROST
When frost builds up on the evaporator coils, the compressor will cycle off and the unit will go in to defrost mode. Following completion of the defrost mode, the unit will return to the previously operating settings.
- When the unit is running in a room with a temperature between 5 °C and 12°C, it will enter defrost mode roughly every 30 minutes.
- When the unit is running in a room with a temperature between 12^ C and 20^ C, it will enter the defrost mode roughly every 45 minutes.
HUMIDISTAT CONTROL AND FAN/COMPRESSOR OPERATION
- When the humidity of the room is 2% lower than the desired humidity the compressor will turn off automatically but the fan will continue to operate to ensure that the air within the room is not stale. The unit will use only a minimal amount of energy in fan mode.
- When the humidity of the room is equal to or higher than the desired humidity the compressor will restart after a 3 minutes delay to protect the compressor.
AUTO-RESTART
If the unit stops unexpectedly due to the power cut, it will restart with the previous function selected automatically when the power resumes, and the 3 minute compressor protection has elapsed.
POWER
After the unit has stopped, to protect the compressor it is not recommended to resume operation for at least 10 minutes. Operation can resume after this period lapses. When the unit is restarted there is a 3 minute delay before compressor will start.
LIGHTWEIGHT PORTABLE DESIGN ON CASTORS
The dehumidifier is built to be compact and lightweight. The castors on the bottom of the unit make it easy to move from room to room.
Your dehumidifier contains an advanced micro-CPU controlled device which is capable of self-diagnostics. The LCD display may also show the error and protections codes.
POSITIONING THE DEHUMIDIFIER
A badly positioned dehumidifier will have little effect. In positioning the dehumidifier please ensure circulation of air in not restricted around the unit.
Allow at least 20 cm space around the unit. This dehumidifier is designed only for indoor residential or small office applications and any commercial or industrial use will invalidate the warranty.
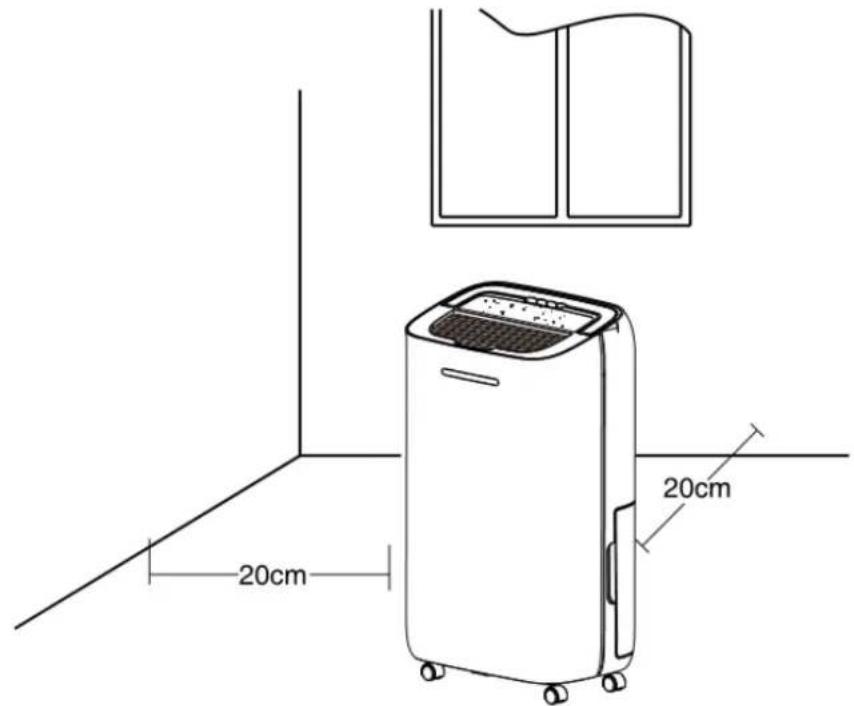
Use in an enclosed area for maximum efficiency. Close all doors, windows to create an effective operating environment. Do not use outdoors.
Your electriQ dehumidifier will begin to protect your space from the harmful effects of excessive moisture as soon as it is turned on. Excess moisture is dispersed throughout your home. For this reason, the dehumidifier should be positioned in a central and clear location so that it can draw this moist air towards it from all over the home. A warm hallway or landing is an excellent position for your dehumidifier. If possible, leave interior doors ajar to allow air circulation.
Alternatively, if you have a serious problem in one area you can begin by positioning the dehumidifier there and moving it to a more central location at a later date. For the most effective use, run your dehumidifier with external doors and windows kept closed. Please note the unit should not be placed directly against a radiator or other heat source.
Before moving the appliance the water tank should be emptied. The handle on the appliance is designed to aid in its movement and should not be used to support the full weight of the dehumidifier. When carrying the unit, it should be kept upright and sufficiently supported from its base. The handle should not be used if there is any signs of damage to its fixings.
When positioning your electriQ dehumidifier, ensure that it is placed clear of any obstacle that may limit the air movement. Place the dehumidifier on a flat dry surface.
Note: Do not force castors to move over carpet or uneven surfaces, nor move the unit with water in the tank as it may tip over and spill water.
WATER DRAINAGE
When the water tank is full, the unit will stop automatically. When this happens the TANK FULL light will illuminate on the control panel.
NOTE: Only empty the water tank when it is full or before moving or storing the unit.
There are two ways to dispense collected water.
1. USE THE TANK
When the tank is full, the unit will automatically stop running, and the Tank Full indicator will flash. Slowly pull out the tank. Grip the tank by its handle securely, and carefully pull it out. Empty the water tank and reinsert it into the dehumidifier. The tank must be in place and securely seated for the dehumidifier to operate again. The dehumidifier will re-start when the tank is restored to its correct position.
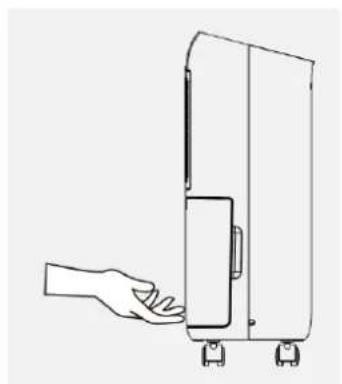
natural_image
Line drawing of a hand opening a suitcase with wheels, no text or symbols present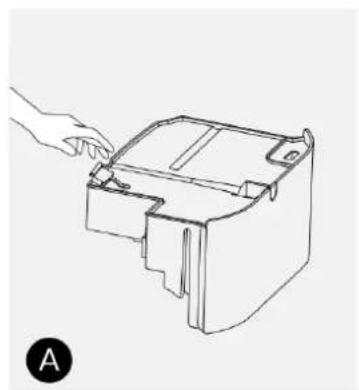
natural_image
Line drawing of a hand inserting a plastic bag into a container (no text or symbols)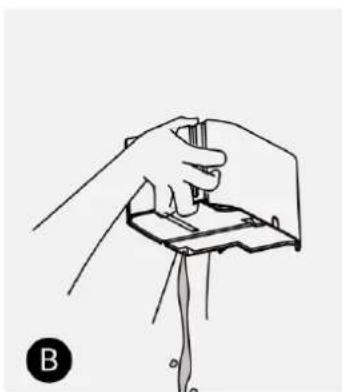
natural_image
Illustration of a hand holding a small object over a device, with no visible text or symbolsNOTES:
When you remove the water tank, do not touch sensors or any parts which are situated behind tank. Doing so may damage the product. Be sure to push the tank gently all the way into the unit. Banging the bucket against anything or failing to push it in securely into place may cause the unit not to operate.
Do not remove any parts from the water tank or tank enclosure. The water full sensor will no longer be able to detect the water level correctly and water may leak from the water tank.
2. CONTINUOUS DRAINAGE
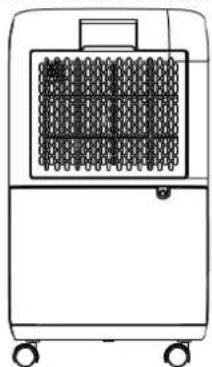
Water can be automatically plumbed in or drained into a sink, a larger container or through the wall into an outside drain by attaching a pipe to the unit (10 mm internal diameter) (not included). Insert the pipe into the drain outlet at the back of the unit as shown here.
natural_image
Line drawing of a portable air conditioner unit with wheels and internal grid pattern (no text or symbols)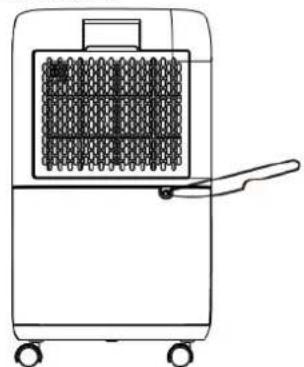
natural_image
Line drawing of a portable air conditioner unit with wheels and a handle (no text or symbols)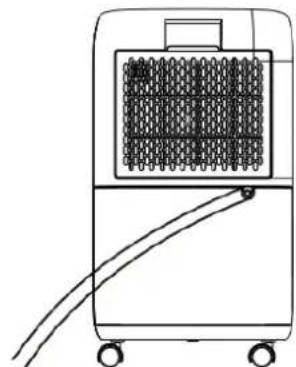
natural_image
Line drawing of a portable industrial device with cooling unit and connecting cables (no text or symbols)Make sure the connection between pipe and the drain outlet is tight and does not leak. Then direct the pipe to a suitable drainage point. This unit uses gravity to dispose of water hence the drain should be lower than the water outlet on the unit. Put the tank back. Be sure to run the water pipe downward and to let the water flow out smoothly. Do not kink or bend the pipe.
The permanent drain can be used in conjunction with a water pump (e.g. when draining from a cellar) to lift the water upwards.
SETTING UP THE WIFI APP
This is designed as a general guide to the setup. There may be differences in the interface and features available due to product development and features of the model.
BEFORE YOU START
- Ensure your router provides a standard 2.4ghz connection.
- If your router is dual-band ensure that both networks have different network names (SSID). The provider of your router / Internet service provider will be able to provide advice specific to your router.
- Place the dehumidifier as close as possible to the router during setup.
- Once the app has been installed on your phone, turn off the data connection, and ensure your phone is connected to your router via WiFi.
DOWNLOAD THE APP TO YOUR PHONE
Download the "TUYA SMART" app, from your chosen app store, using the QR codes below, or by searching for the app in your chosen store.

Android
IOS

CONNECTION METHODS AVAILABLE FOR SETUP
The smart device has two different setup modes, CF (Quick Connection) and AP (Access Point). The quick connection is a quick and simple way to set the unit up. AP connection uses a direct local WiFi connection between your phone and the dehumidifier to upload the network details.
Before starting the setup, please ensure that your dehumidifier is in the correct standby mode for the connection type you are attempting, the display your dehumidifier will indicate this.
To activate Wifi on the unit, press and hold the WIFI button for 5 seconds while the unit is in standby.
CHANGING BETWEEN CONNECTION MODES / WIFI RESET
To change the unit between the two connection types, hold the WIFI button for 3 seconds. The connection mode is signified by the frequency of the flashing WiFi light. This will also remove any previous WiFi configuration.
| Connection Type | Frequency of Flashes |
| CF (Quick Connection) | Flashes twice per second |
| AP (Access Point) | Flashes once per second |
REGISTER THE APP
1. Press on the register button at the bottom of the screen.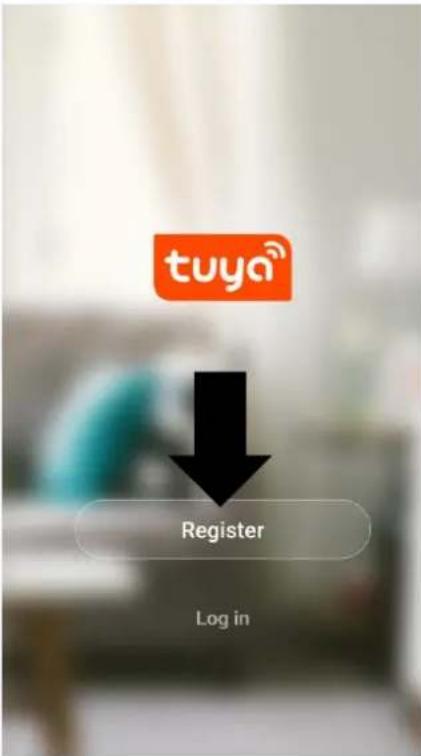 | 2. Read the Privacy policy and press the Agree Button.Privacy PolicyPrivacy Policy of Tuya Smart PlatformUpdate date: 2018.4Come into force date: 2018.5So you have purchased our TuyaSmart device hardware and are starting to use the TuyaSmart device software and all its functionalities! Any information you share with us (e.g. for creating a Tuya Account) will help us to provide you with services related to TuyaSmart device and to improve them to make them even better. We explain here our ways of collecting and using information, and how we protect your privacy. In th policy, "personal data" means inf that can be used to identify an ind either from that information and that information and other inform  Disagree Agree Disagree Agree | 3. Enter your email address or phone number and press continue to register.RegisterUnited Kingdom +44Mobile number/EmailContinue |
| 4. A verification code will be sent by the method selected in step 3. Enter the code into the app.<Verification CodeVerification code has been sent to: Resend(57s)1 2 3 -4 5 6 ,7 8 9x. 0 √ | 5. Type in the password you would like to create. This needs to be 6-20 characters, with letters and numbers.<Set PasswordPassword must contain 6-20 letters and numbers  | 6. The app is now registered. It will automatically log you in following registration. |
Privacy Policy of Tuya Smart Platform
Verification Code
| 1 | 2 | 3 | - |
| 4 | 5 | 6 | , |
| 7 | 8 | 9 | ✕ |
| . | 0 | _ | ✕ |
Set Password
SETTING UP YOUR HOME WITHIN THE APP
TUYA is designed so it can work with a large number of compatible smart devices within your home. It can also be set up to work with multiple devices within different houses. As such, during the setup process the app requires that different areas are created and named to allow easy management of all your devices. When devices are then added, they are assigned to one of the rooms you have created.
CREATING ROOMS
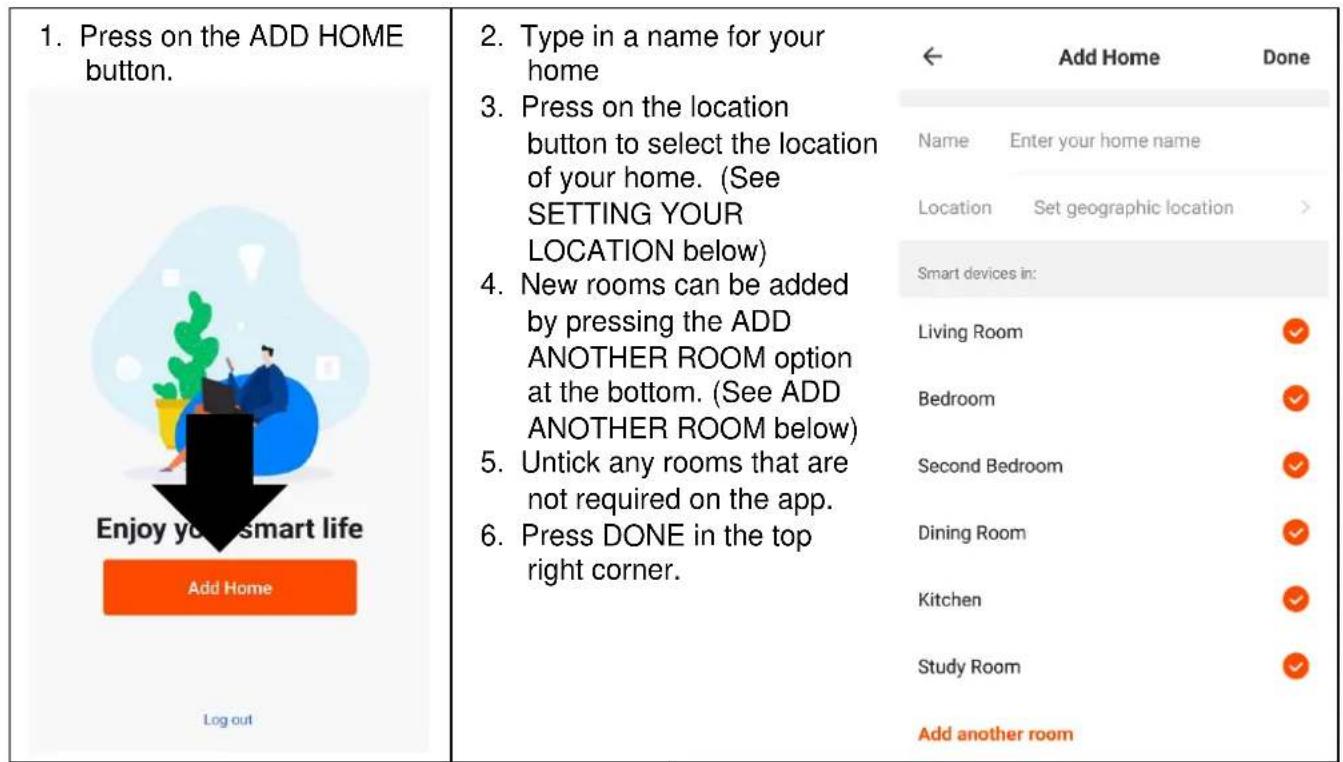
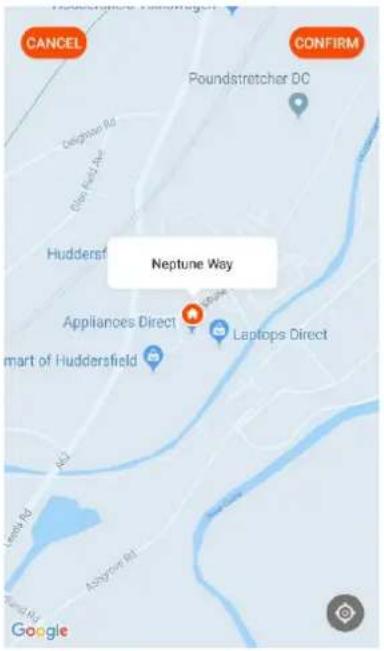
Use your finger to move the orange HOME symbol.
When the symbol is in the approximate location of your home, press the confirm button in the top right corner.
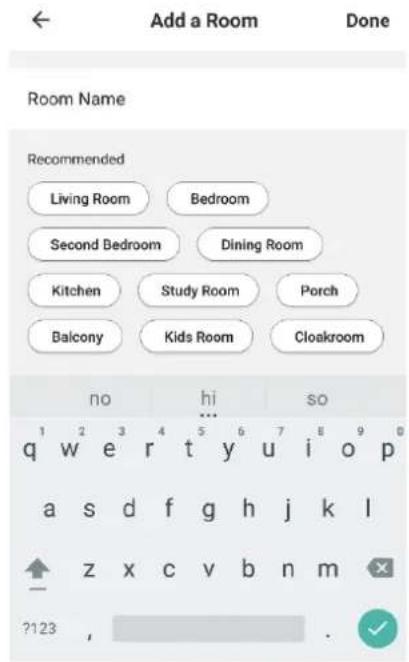
ADD ANOTHER ROOM
Type in the name of the room, and press Done in the top right corner
CONNECTING USING QUICK CONNECTION
Before initiating the connection, make sure the unit is in standby mode, with the WiFi light flashing twice per second. If not, follow the instructions for changing the connection mode. Ensure your phone is connected to the WiFi network. (We advise turning mobile data off during setup)
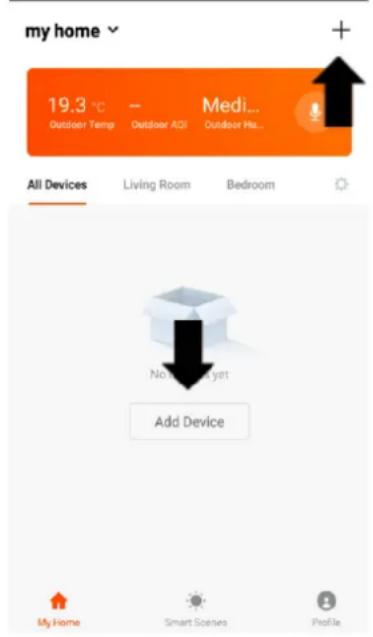
- Open app and press "+" to add device, or use the add device button
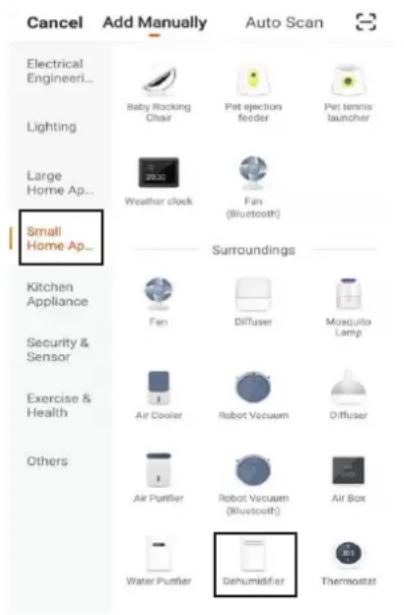
- Select the type of device as "Dehumidifier" in the Small Home Appliance tab.
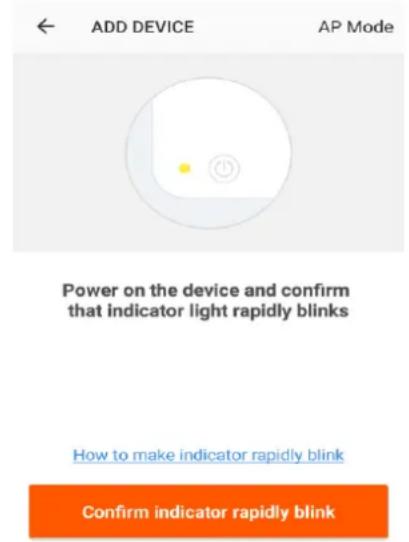
- Ensure the WiFi light on the dehumidifier is flashing twice per second, then press on the orange button at the bottom of the screen to confirm.
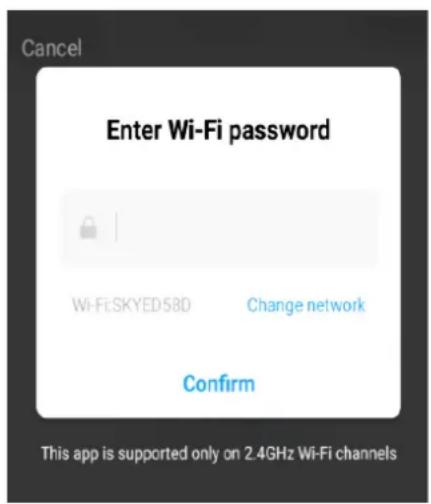
- Enter your WiFi password and press confirm.
- This will then transfer the settings to the dehumidifier. Wait for this to complete. If this fails, retry. If still unsuccessful please review the troubleshooting section for further help.
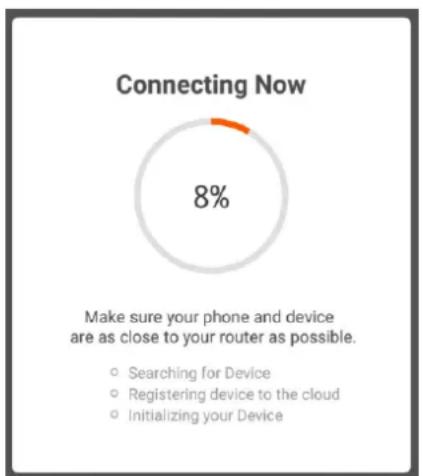
pie
Connecting Now | Category | Value (%) | |---|---| | Searching for Device | 0 | | Registering device to the cloud | 0 | | Initializing your Device | 0 |CONNECTING USING AP MODE (ALTERNATIVE METHOD)
Before initiating the connection, make sure the unit is in standby mode, with the WiFi light flashing once per second. If not, follow the instructions for changing the connection type. Ensure your phone is connected to the WiFi network. (We advise turning mobile data off during setup)
- Open app and press “+” to add device, or use the add device button
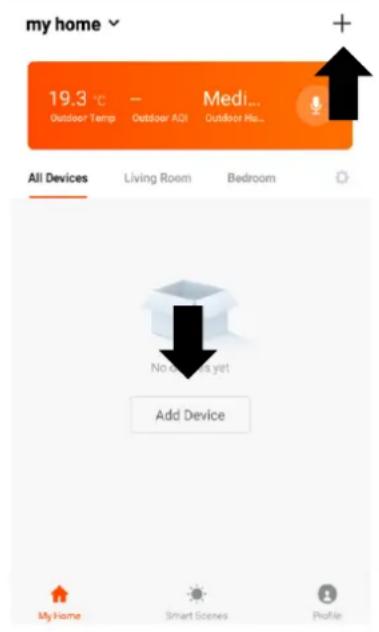
- Select the type of device as "Dehumidifier"
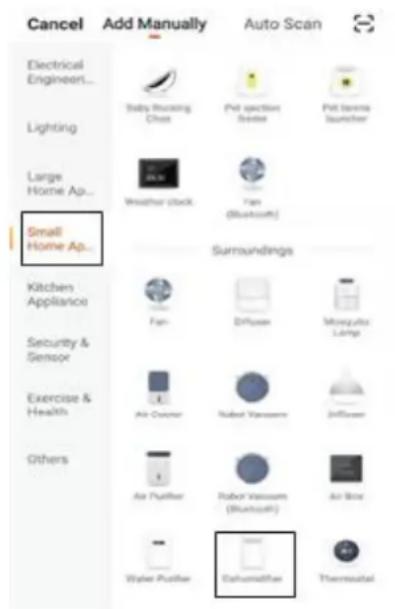
- Press on the AP mode button in the top right of the screen.
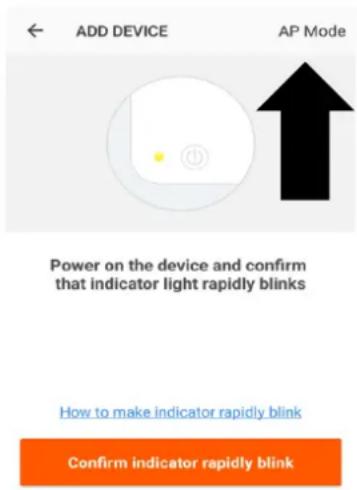
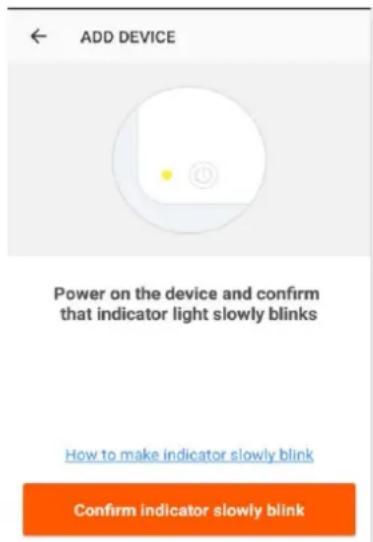
- Ensure the WiFi light on the dehumidifier is slowly flashing (once per second), then press on the orange button at the bottom of the screen to confirm
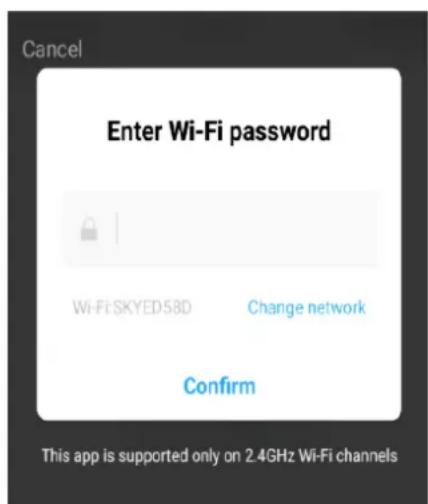
- Enter your WiFi password and press confirm.
- Go to network settings in your phone and connect to the "SmartLife xxx" connection. There is no password to enter. Then return back to the app to complete setup.
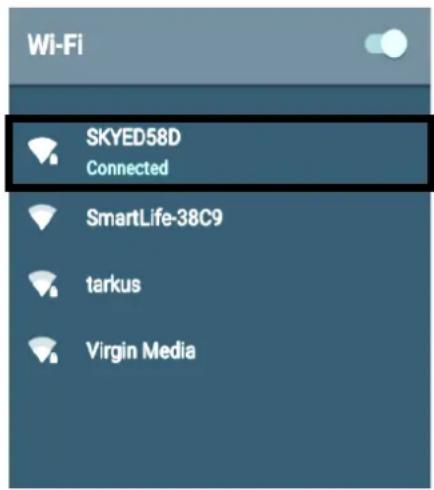
This will then transfer the settings to the dehumidifier. Once the connection process has completed, go back to the network settings on your phone to ensure your phone has reconnected to your WiFi router.
CONTROLLING YOUR DEVICE THROUGH THE APP
THE HOME SCREEN
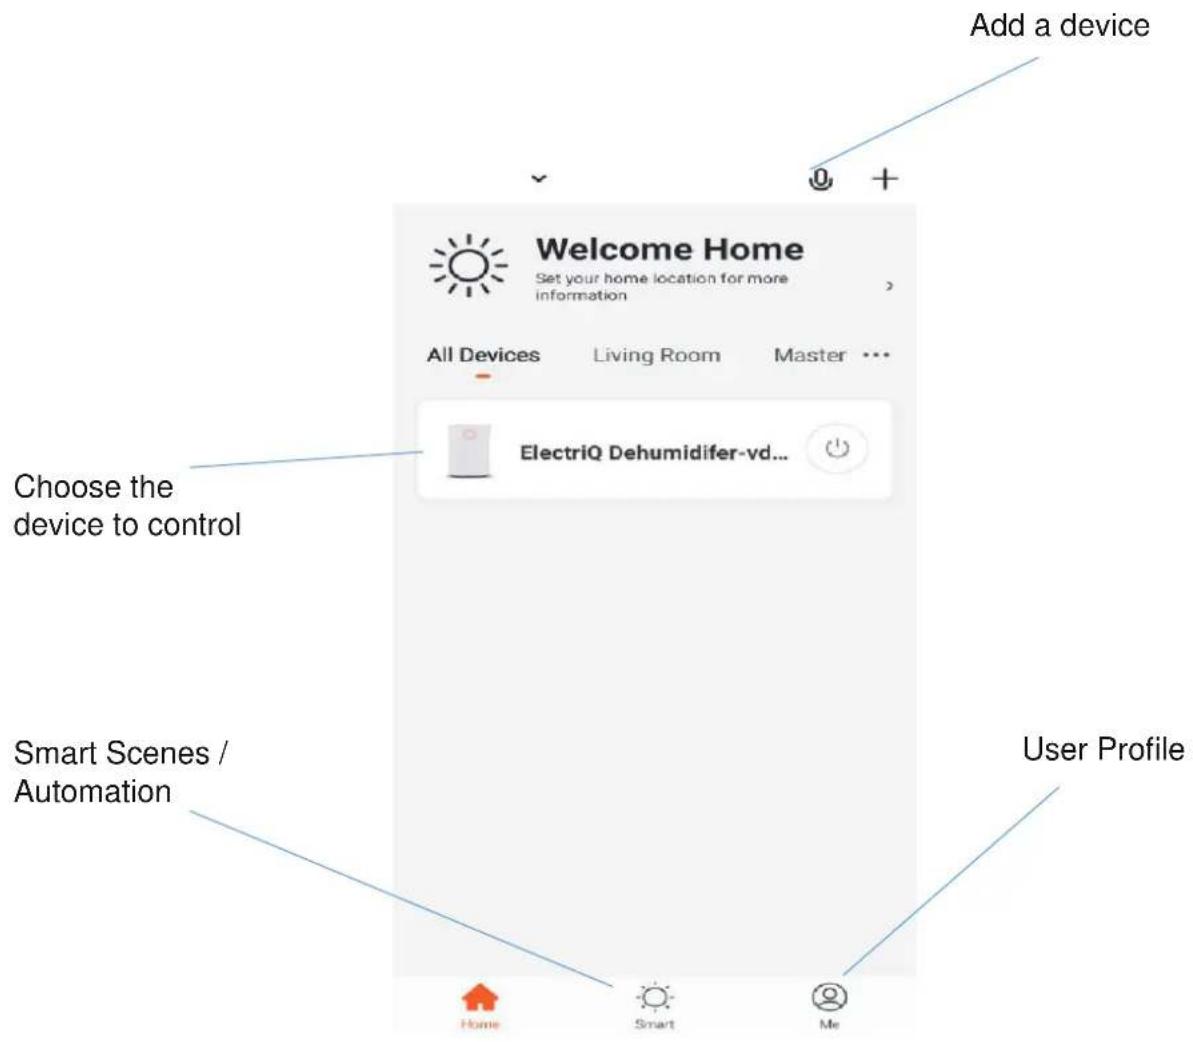
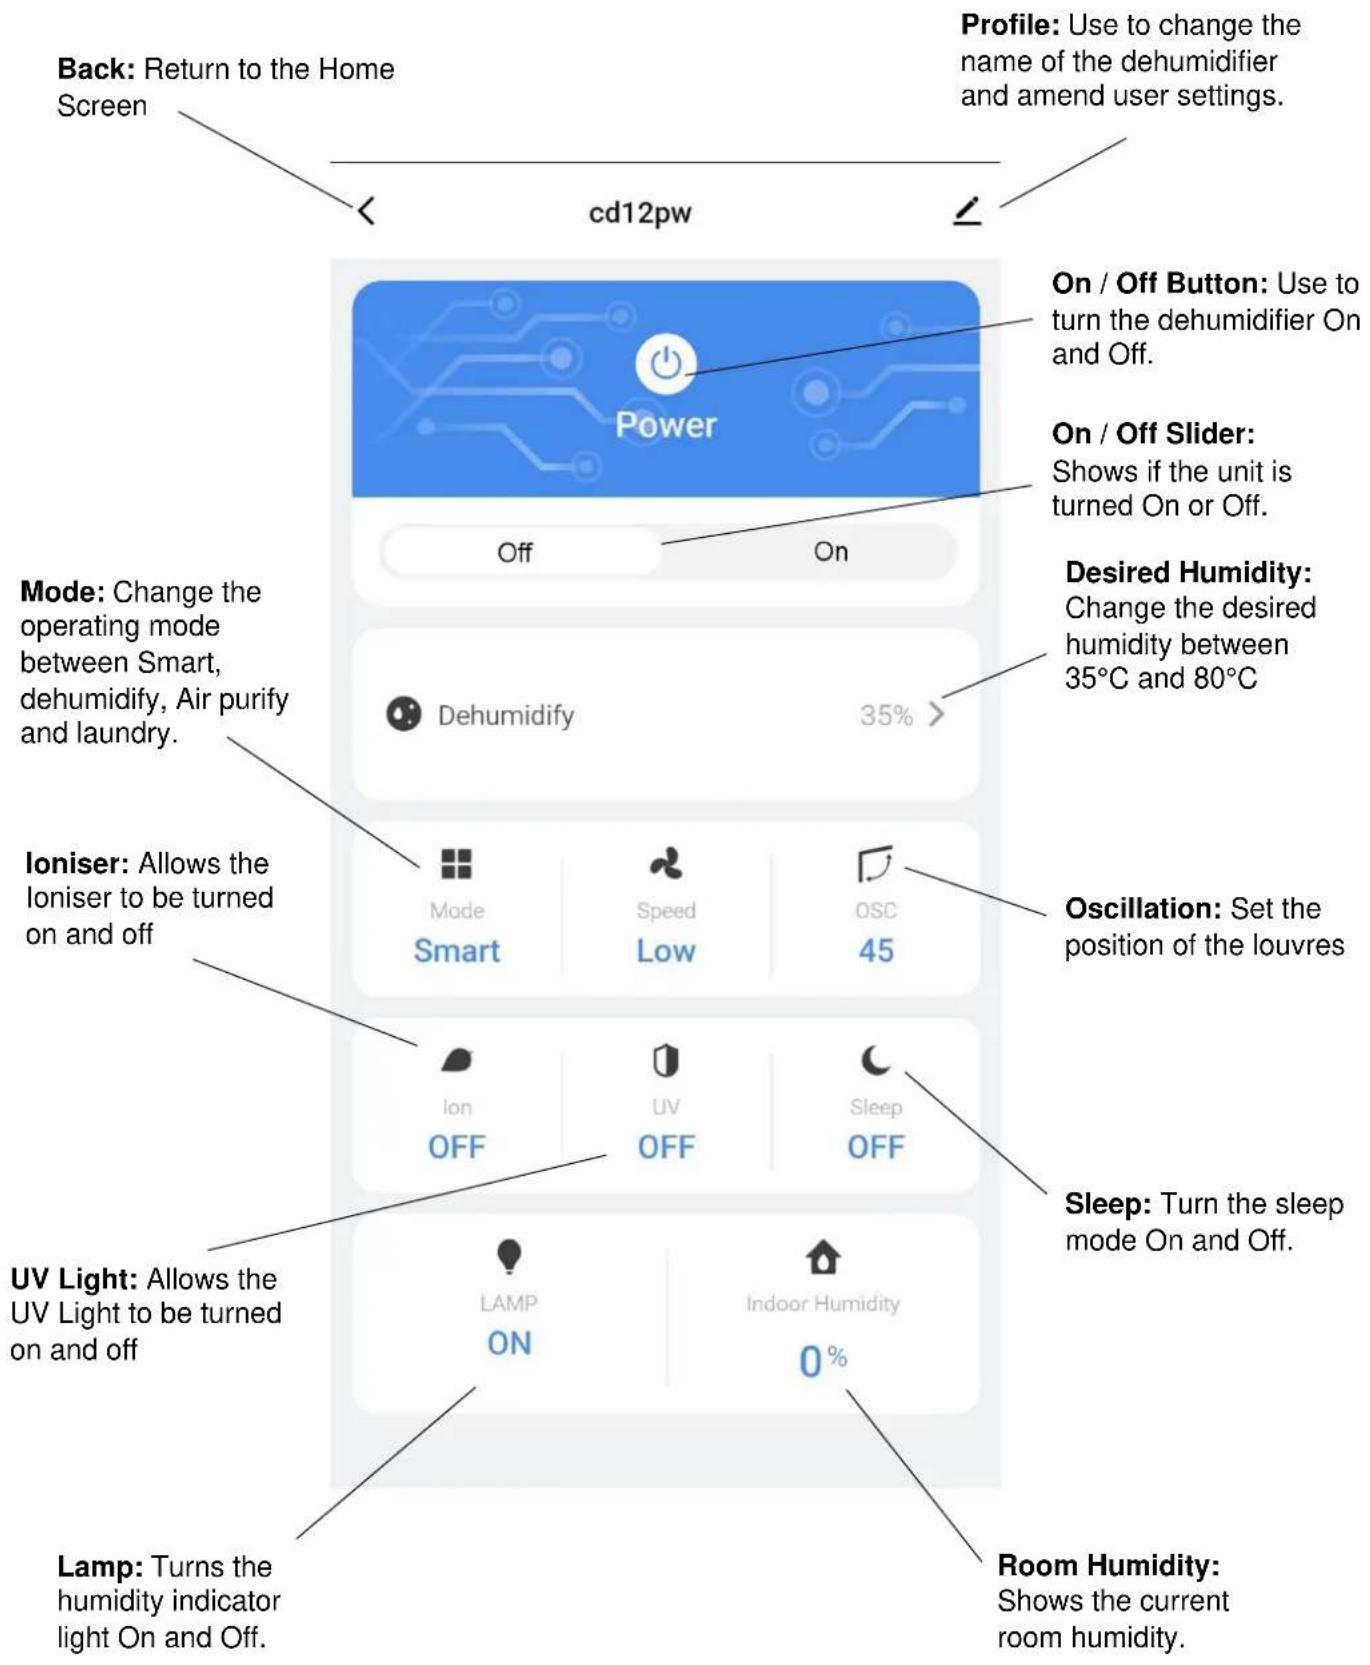
DEVICE SCREEN
The device screen is the main control screen for the dehumidifier, providing access to the controls to amend the functions of the dehumidifier
SMART SCENES
Smart Scenes is a powerful tool providing the option to customise the operation of the dehumidifier based both on conditions within the room and outside influences. This gives the user the option of specifying much more intelligent actions. These are split into two categories Scene and Automation.
SCENE
Scene allows for a one-touch button to be added to the Home screen. The button can be used to change a number of settings in one go and can change all the settings within the unit. A number of scenes can easily be set up, allowing the user to easily change between a number of preset configurations.
Below is an example of how to set up a scene:
- Press on the Smart Scene tab at the bottom of the Home screen
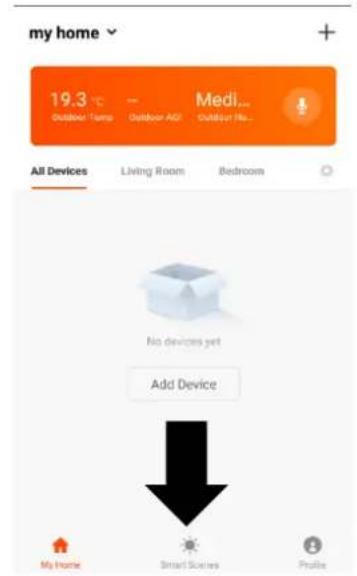
- Press on the Plus in the top right corner to add a smart scene.
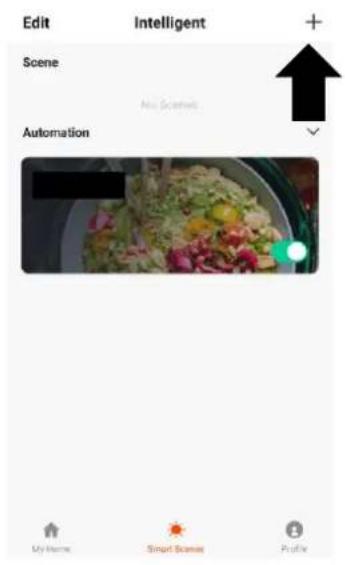
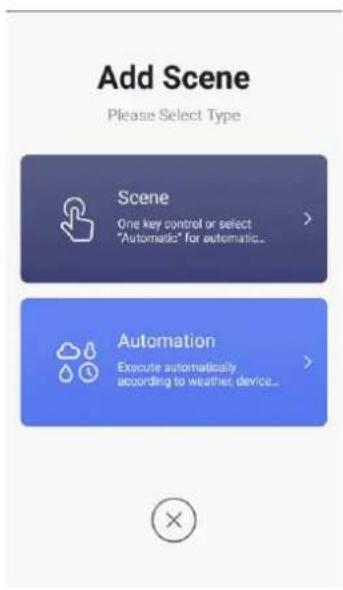
- Select Scene to create a new Scene
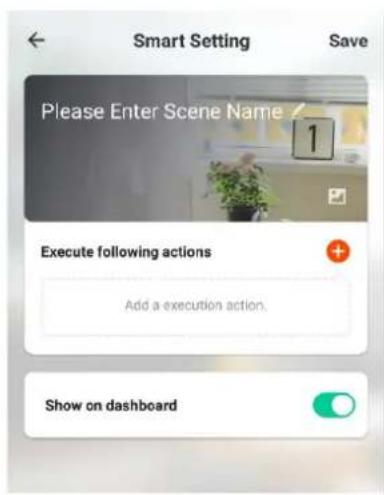
- Press the Pen next to "Please Enter Scene Name" to input the name for your Scene
Show on Dashboard: Leave this on if you require the scene to be displayed as a button on the Home Screen
Press the Red Plus to add the action required. Then select the dehumidifier from the list of devices.
- Chose the function, set the value for the function, and then press the back button in the top right corner, to return to the previous screen.
| ← | Select Function |
| Set Humidity | > |
| Wind Speed | > |
| Lock | > |
| Shake | > |
| 定时 | > |
| Power | > |
| Mode | > |
- Once all the functions required have been added, press the Save button in the top right corner to finalise and save your new Scene
AUTOMATION
Automation allows an automatic action to be set up for the device. This can be triggered by the Time, indoor temperature, humidity of the room, weather conditions, and a range of other influences.
1. Press on the Smart Scene tab at the bottom of the Home screen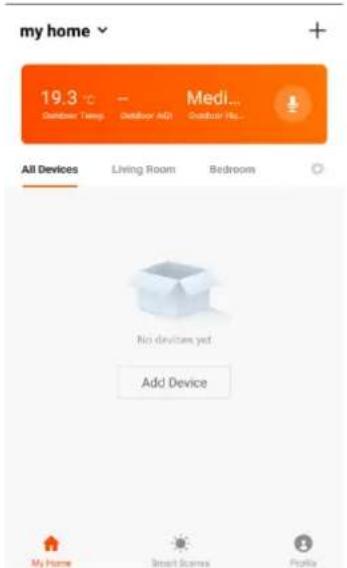 | 2. Press on the Plus in the top right corner to add a smart scene.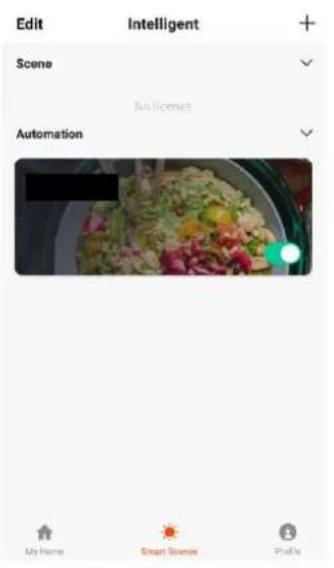 | 3. Select Automation to create a new Automation Scene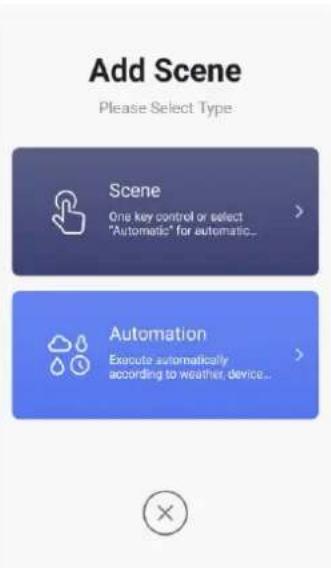 |
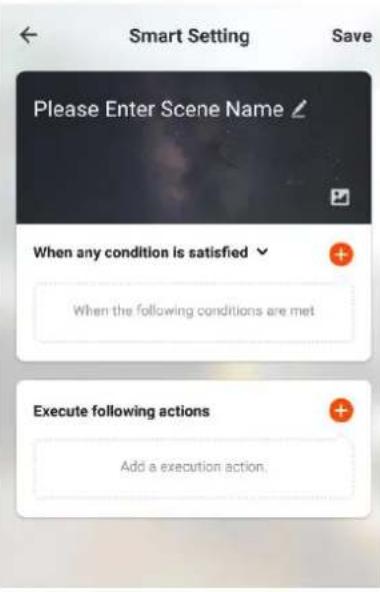 | 4. Setup is very similar to the scene setup on the previous page, and includes an extra section for specifying a trigger for the scene to start.Press the Pen next to “Please Enter Scene Name” to input the name for your ScenePress the Red Plus next to “When any condition is satisfied” to add the triggerPress the Red Plus next to “Execute following actions” to add the action required. Then select the dehumidifier from the list of devices. | 5. Select the condition when the automation should start.A number of triggers can be combined.<Select ConditionSelect Condition for TaskTemperature >Humidity >Weather >PM2.5 >Air Quality >Sunrise/Sunset > |
| 6. Chose the function, set the value for the function, and then press the back button in the top right corner, to return to the previous screen. | 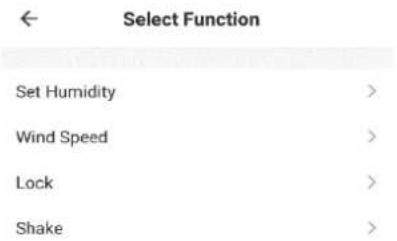 | 7. Once all the functions required have been added, press the Save button in the top right corner to finalise and save your new scene.The automation is now set up, it can be turned on and off using the toggle on the image shown on step 2. |
| Select Condition | |
| Select Condition for Task | |
| Temperature | > |
| Humidity | > |
| Weather | > |
| 12.5 | > |
| Quality | > |
| Unrise/Sunset | > |
DEVICE DETAILS SCREEN
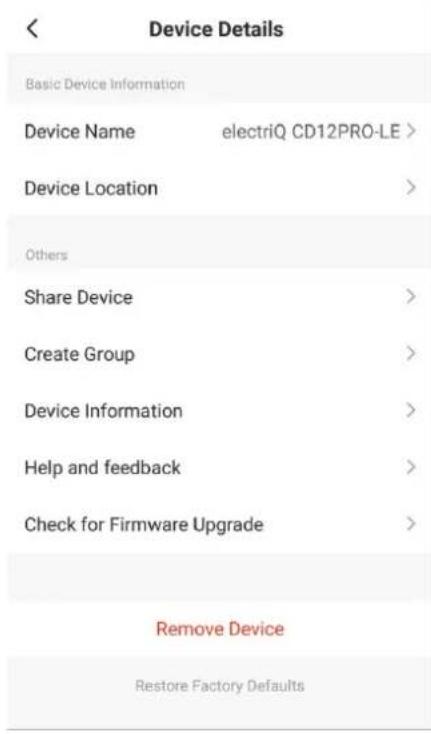
The device details screen gives you the option to edit the details for the device, and use some of its additional features. The device details screen can be accessed from the device screen by pressing on the symbol in the top right hand corner.
CHANGING THE NAME OF YOUR DEVICE
The top option within this allows you to change the name of the device to something relevant to the use of the product, such as "Living Room Dehumidifier". Within the menu, you also have the option of setting up a pattern lock or change your password.
DEVICE SHARING
This allows you to share access to the controls of your dehumidifier with friends and family.
3
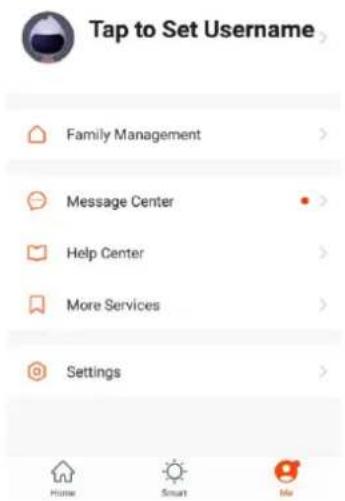
PROFILE TAB
The Profile tab allows you to make changes to the app, such as setting up a username and editing or adding rooms.
Within the Profile tab, you are also able to change settings related to the app itself.
CONNECTION TROUBLESHOOTING
- Check whether the device is powered on and is in the correct standby mode, if not please refer to the CHANGING BETWEEN CONNECTION MODES section on page 12.
- Ensure the wifi password has been entered into the app correctly (Case sensitive)
- Check that the phone is connected to the wifi you are connecting the device to.
- Ensure the network you are connecting it to is 2.4Ghz (5Ghz wifi networks are not supported), and that there is a strong wifi signal to the item.
- If your router is dual band, ensure that the 2.4ghz network has a different network name (SSID). Further advice on changing router settings will be available from your Internet service provider / Router manufacturer.
- Check the settings on the router. Encryption should be WPA2-PSK and authorisation type should be set to AES
- Try using the alternative connection method. i.e. If connection is failing when attempting to connect through CF mode, try AP mode.
CARE AND MAINTENANCE
Always shut off the unit and unplug from the mains before cleaning or performing any maintenance. When it is not in use for long periods it is advisable to remove the plug from the power socket. Do not use chemical solvents (such as benzene, alcohol or gasoline) as they may cause irreversible damage to the unit.
natural_image
Line drawing of a hand placing a grid on a portable air conditioner unit (no text or symbols)1. CLEAN THE GRILLE AND CASE
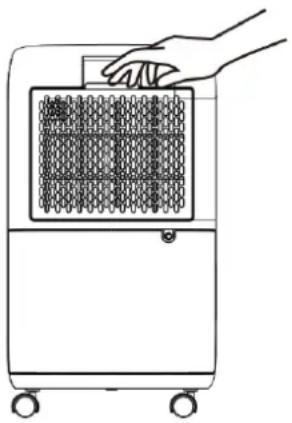
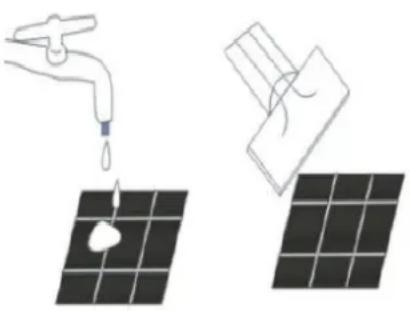
Use water and a mild detergent to clean the washable mesh filter. Do not use bleach or abrasives. Do not splash water directly onto the main unit. Doing so may cause an electrical shock and can lead to the insulation to deteriorate, or cause the unit to rust. The air intake and outlet grilles get soiled easily, so use a vacuum attachment or soft brush to clean. Wipe the dehumidifier body with a soft damp cloth or kitchen towel.
natural_image
Illustration showing a faucet spraying water onto a solar panel, and a hand holding a tool interacting with the panel (no text or symbols)Remove the filter housing. If the optional filters are fitted, remove them from the frame and hoover gently approximately every 2-3 weeks.
If the mesh filter is dirty hoover it, if it is heavily soiled wash it with warm soapy water and dry thoroughly before reinserting it in the unit. When filter cleaning is finished and filters are dry placed them back into the unit. The optional filters should be replaced every 3 – 6 months.
NOTE: While the HEPA and Carbon filters are optional, never run the unit without the mesh filter housing correctly inserted.
2. CLEAN THE WATER TANK
Every few weeks, clean the tank to prevent growth of mould, mildew and bacteria. Partially fill the tank with clean water and add a little mild detergent. Swish it around and than empty the tank and rinse.
NOTE: Do not use a dishwasher to clean the tank. After cleaning and drying, the tank must be reinserted securely into dehumidifier in order to restart operation.
END OF SEASON MAINTENANCE
- Empty and clean the water tank.
- Clean the unit and the filters as per cleaning procedure above.
- Coil the power cord on the special cord storage rest at the back of the unit.
- Cover the unit and keep it in a dry place.
TROUBLESHOOTING
| Issue | Cause | Solution |
| Hot or cold air being produced | Normal Operation | When the unit is in dehumidifying mode it absorbs humid air from room and freezes it to reduce the humidity.During the cold cycle there should be cold air coming out of the unit During the defrost cycle hot dry air should be coming out of the outlet grill. |
| Unit does not operate | Is the plug properly inserted in the socket? | Insert the plug into the socket and ensure the socket is switched on. |
| Does the tank full indicator is red? | Tank full, float displaced or tank not properly inserted.Empty tank, check float and make sure tank is properly inserted in unit. | |
| Front louvres do not open | Louvre motor is blocked | Check if anything is blocking the louvreTry to move the louvres gently up and down while the unit is off. If the above fails return the unit to service centre |
| Dehumidifier does not extract water | Is the unit set to a humidity level lower than the humidity of the room? | Set the humidity level on the humidistat below the current humidity reading. |
| Is the temperature too low for water extraction to be efficient? | Increase temperature in the room or reposition the unit. | |
| Is any intake grill or outlet blocked? Is the unit too close to walls. | Remove obstructions and restart the unit.Ensure a distance of at least 20 cm between the unit & walls | |
| Airflow seems weak | Are the filters dirty or clogged? | Please service the filters regularly as per the user manual. |
| Unit is noisy during operation | Is the unit on an uneven surface? | Please place on flat horizontal surface. Where possible this should be soft such as rubber or carpet to prevent vibrations. |
| Is filter clogged? | Please service the filters regularly as per user manual. | |
| E3 or E4 | Humidity sensor error | Use the unit within the prescribed humidity range. Unplug the unit, rest and plug it back in. If error repeats, call the service centre. |
| E1 or E2 | Temperature sensor error | Use the unit within the prescribed temperature range.Unplug the unit, rest and plug it back in. If error repeats, call the service centre. |
| E5 or E6 | Abnormal Coil sensor temperature or current | Use the unit within the prescribed humidity and temperature range. Unplug the unit, rest and plug it back in. If error repeats, call the service centre. |
| Defrost light on and unit stops regularly | Unit is defrosting | Allow the unit to automatically defrost. The protection will clear after the unit self defrosts. Increase the temperature in the room if this repeats too often |
| Tank full red light | Water tank full notification | Tank is full or is not in the right position-- Empty the tank and replace in the right position. |
| Any other malfunctions will need to be reported to electriQ service centre. Do not attempt unauthorised repairs as these may invalidate the warranty. | ||
FREQUENTLY ASKED QUESTIONS
Why doesn't the dehumidifier seem to extract much water if the temperature is low?
This is a compressor dehumidifier which works best in temperatures above 15^ C. If the temperature is low and the air is dryer than the setting on the humidistat the unit will not extract water. If you want to use a dehumidifier for outside buildings, unheated properties, boats or garages please check our desiccant range.
Why doesn't the unit work /or stops suddenly?
The water tank may be full or displaced. To rectify: empty the tank and carefully place the tank back in the unit. Also the unit may be running in dehumidifying mode with a low room temperature. Please check if the room temperature is lower than 5^ C. If so, the unit will stop working while in dehumidifying mode. (unit may be defrosting).
The ambient operating range is between 5^ C and 35^ C with a relative humidity ranging from 30% to 80%. For maximum efficiency use the unit between 15^ C and 32^ C.
Sometimes cold and/or hot air comes out from the air outlet grill, why?
When the unit is in dehumidifying mode it absorbs humid air from room and freezes it to reduce the humidity.
During the cold cycle there should be cold air coming out of the unit. During the hot cycle hot dry air should be coming out of the outlet grill.
TECHNICAL DATA
| Model | CD12PW-V2 |
| Voltage | 220-240V~50Hz |
| Dehumidifying capacity | 12 L / day(at 30°C / 80%RH) |
| Fan Speeds | 1 |
| Power Consumption | 180W |
| Running Amps | 0.8 Amps |
| Tank Capacity | 2.5 litres |
| Desired Humidity Range | 35 – 80% |
| IP Rating | IPX1 |
| Refrigerant | R290, 50 grams |
| Airflow m3/h | 125 |
| High / Low Pressure | 3.2/0.7MPa |
| Filters | Carbon (Optional)HEPA (Optional) |
| Dimensions mm (WxDxH) | 290 x 200 x 520 |
| Weight kgs | 9 |
| GWP | 3 |
   | |
electriQ UK SUPPORT
www.electriQ.co.uk/support
Please, for your own convenience, make these simple checks before calling the service line.
- Has the unit been standing upright for at least 2 hours?
- Is the unit plugged into the mains?
- Is the fuse OK?
- Switch the unit off and wait three minutes to see if the issue is resolved. Restart the unit.
- Check if the water tank is full.
- Was the troubleshooting guide followed?
If the unit still fails to operate call: 0330 390 3061 or complete the online form
Office hours: 9AM - 5PM Monday to Friday
Unit J6, Lowfields Business Park,
Lowfields Way, Elland
West Yorkshire, HX5 9DA
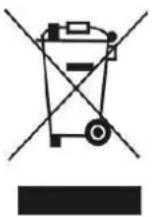
Recycling facilities are now available for all customers at which you can deposit your old electrical products. Customers will be able to take any old electrical equipment to participating sites run by their local councils. Please remember that this equipment will be further handled during the recycling process, so please be considerate when depositing your equipment. Please contact the local council for details of your local household waste recycling centres.
DECLARATION OF CONFORMITY
Hereby, electriQ declares that this Portable air conditioner is in compliance with Directive 2014/53/EU. The full text of the EU declaration of conformity is available at the following internet address: https://www.electriQ.co.uk/content/declaration-of-conformity
- COMPRESSOR DEHUMIDIFIER
- WITH DIGITAL HUMIDISTAT
- AND SMART APP CONTROL
- CONTENTS
- SAFETY INSTRUCTIONS
- ENERGY SAVING AND UNIT SAFETY PROTECTION TIPS
- VISUAL SAFETY GUIDE WHERE OR WHEN NOT TO USE YOUR DEHUMIDIFIER
- INFORMATION ON INDOOR POLLUTANTS
- FEATURES
- INSTALLATION
- FITTING THE OPTIONAL FILTERS
- QUICK REFERENCE GUIDE
- NOTES:
- OTHER FEATURES AND INDICATORS
- TANK FULL LIGHT
- AUTO DEFROST
- HUMIDISTAT CONTROL AND FAN/COMPRESSOR OPERATION
- AUTO-RESTART
- POWER
- LIGHTWEIGHT PORTABLE DESIGN ON CASTORS
- POSITIONING THE DEHUMIDIFIER
- WATER DRAINAGE
- USE THE TANK
- CONTINUOUS DRAINAGE
- SETTING UP THE WIFI APP
- BEFORE YOU START
- DOWNLOAD THE APP TO YOUR PHONE
- CONNECTION METHODS AVAILABLE FOR SETUP
- CHANGING BETWEEN CONNECTION MODES / WIFI RESET
- REGISTER THE APP
- Privacy Policy of Tuya Smart Platform
- Verification Code
- Set Password
- SETTING UP YOUR HOME WITHIN THE APP
- CREATING ROOMS
- ADD ANOTHER ROOM
- CONNECTING USING QUICK CONNECTION
- CONNECTING USING AP MODE (ALTERNATIVE METHOD)
- CONTROLLING YOUR DEVICE THROUGH THE APP
- DEVICE SCREEN
- SMART SCENES
- SCENE
- AUTOMATION
- DEVICE DETAILS SCREEN
- CHANGING THE NAME OF YOUR DEVICE
- DEVICE SHARING
- PROFILE TAB
- CONNECTION TROUBLESHOOTING
- CARE AND MAINTENANCE
- CLEAN THE GRILLE AND CASE
- CLEAN THE WATER TANK
- END OF SEASON MAINTENANCE
- FREQUENTLY ASKED QUESTIONS
- Why doesn't the unit work /or stops suddenly?
- Sometimes cold and/or hot air comes out from the air outlet grill, why?
- electriQ UK SUPPORT
- www.electriQ.co.uk/support
- Please, for your own convenience, make these simple checks before calling the service line.
- DECLARATION OF CONFORMITY
Brand : ElectriQ
Model : CD12PW
Category : Humidifier