
Econo - Motorcycle helmet Sena - Free user manual and instructions
Find the device manual for free Econo Sena in PDF.


| Product Type | Motorcycle Helmet with Bluetooth |
| Brand | Sena |
| Model | Econo |
| Helmet Style | Open-Face |
| Bluetooth Version | 3.0 |
| Intercom Range | Up to 800 meters (880 yards) |
| Intercom Type | One-to-One |
| Audio Features | Stereo Music, FM Radio, Voice Prompts |
| Mobile Phone Pairing | Up to 2 phones simultaneously |
| Controls | Jog Dial (rotate, press, hold) |
| Charging Time | Approximately 3 hours |
| Charging Method | USB Power & Data Cable (5V input) |
| Battery Level Indication | 4 flashes (70-100%), 3 flashes (30-70%), 2 flashes (0-30%) |
| Other Functions | Speed Dial, VOX Phone, Voice Dial, FM Radio Seek |
| Firmware | Upgradeable via Sena Device Manager |
| Shell Material | Not specified; clean with soft cloth and water |
| Inner Lining | Removable, washable by hand at max 30°C (86°F) |
| Safety | Fit properly, fasten chinstrap, regular inspection |
| Package Contents | Helmet, Helmet Pouch, USB Power & Data Cable, Reflex Stickers (4) |
Frequently Asked Questions - Econo Sena
User questions about Econo Sena
0 question about this device. Answer the ones you know or ask your own.
Ask a new question about this device
Download the instructions for your Motorcycle helmet in PDF format for free! Find your manual Econo - Sena and take your electronic device back in hand. On this page are published all the documents necessary for the use of your device. Econo by Sena.
USER MANUAL Econo Sena
natural_image
Line drawing of a helmet with internal components and no visible text or symbolsECONO
BLUETOOTH® HELMET
USER'S GUIDE
RIDE CONNECTED
Blast your favorite tunes, talk over the intercom with your buddies, hear directions from your GPS and more, all through your Econo Bluetooth® Open-Face Helmet. With built-in Bluetooth® capabilities, HD Intercom, technology has never felt so minimal or freeing.
Bluetooth® 3.0

800 meters (880 yards)

One-to-One Intercom

Versatile Jog Dial

FM Radio

Firmware Upgradeable
GETTING STARTED
-
Update this product for free with the latest firmware to fully enjoy the new advanced features built into this product. Visit sena.com to see how to update your product.
-
Users can follow Sena on Facebook, YouTube, Twitter and Instagram to receive the most up to date information on products, helpful tips and all other announcements regarding Sena products.
TABLE OF CONTENTS
1. ABOUT THE ECONO BLUETOOTH HELMET
7
1.1 General Information 7
1.2 Product Details 8
1.2.1 Bluetooth System Button 9
1.3 Package Contents 9
1.4 Wearing the Helmet 9
1.4.1 Putting on the Helmet 9
1.4.2 Removing the Helmet 10
1.4.3 Removing Shield Visor 10
1.4.4 Installing Shield Visor 11
1.4.5 Removing Cheek Pad 11
1.4.6 Installing Cheek Pad 12
1.4.7 Removing Inner Pad 12
1.4.8 Installing Inner Pad 13
1.4.9 Removing Sun Visor 13
1.4.10 Detachable Inner Parts 14
1.5 Pre-Ride Helmet Inspection 14
1.5.1 Checking the Exterior 14
1.5.2 Checking the Chinstrap 14
2. GETTING STARTED: BLUETOOTH SYSTEM 15
2.1 Powering On and Off 15
2.2 Charging 16
2.3 Checking the Battery Level 17
2.4 Volume Adjustment 17
2.5 Downloadable Sena Software 17
2.5.1 Sena Device Manager 17
3. PAIRING THE BLUETOOTH SYSTEM WITH OTHER BLUETOOTH DEVICES 18
3.1 Mobile Phone Pairing 18
3.2 Second Mobile Phone Pairing 19
4. MOBILE PHONE USAGE 19
4.1 Making and Answering Calls 19
4.2 Speed Dialing 20
4.2.1 Assigning Speed Dial Presets 20
4.2.2 Using Speed Dial Presets 20
5. STEREO MUSIC 21
5.1 Playing Music with Bluetooth Devices 21
6. BLUETOOTH INTERCOM 21
6.1 Intercom Pairing 21
6.2 Two-Way Intercom 22
7. USING THE FM RADIO 22
7.1 FM Radio Operation 22
8. GENERAL SETTINGS 23
8.1 Function Priority 23
8.2 Configuration Menu 23
8.2.1 Assigning Speed Dial 24
8.2.2 VOX Phone (Default: Enable) 24
8.2.3 Voice Prompts (Default: Enable) 24
8.2.4 Delete All Pairings 25
8.3 Firmware Upgrades 25
- TROUBLESHOOTING 25
9.1 Fault Reset 25
9.2 Factory Reset 25
10. MAINTENANCE AND CARE 26
10.1 Outer Shell 26
10.2 Inner Lining 26
10.3 Storing the Helmet 26
QUICK REFERENCE 27
1. ABOUT THE ECONO BLUETOOTH HELMET
1.1 General Information
This product is a motorcycle helmet.
Do not use it for any other purpose than riding a motorcycle. If you use the helmet for anything else, it may not provide sufficient protection in an accident.
No helmet can protect the wearer against all possible impact scenarios.
For maximum protection, the helmet must fit properly on the head and its retention strap securely fastened under the chin. With the retention system comfortably but firmly adjusted, the helmet should allow sufficient peripheral vision when secured. If the helmet is too large, it may move on your head while riding. If the helmet can be removed when pulled from the back in an upward and forward direction, it's not fitted properly. This could cause the helmet to obstruct your vision while riding or come off in an accident, resulting in personal injury or death. Please refer to Section 1.4: "Wearing the Helmet" for more details about properly securing and wearing your helmet.
The contents of this helmet User's Guide are subjected to change without notice. Its illustration may differ from the actual product. The copyrights for the User's Guide belong to Sena Technologies, Inc. Reproduction or copying of the User's Guide without permission is strictly prohibited.
1.2 Product Details
Left
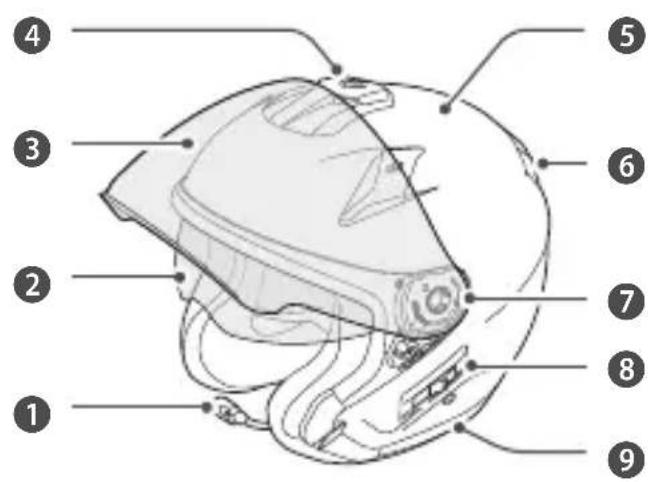
No. Name
① Microphone
② Sun Visor
③ Shield Visor
④ Top Vent
⑤ Shell
⑥ Rear Vent
⑦ Shield Ratchet
⑧ Sun Visor Lever
9 Rubber Trim
Top
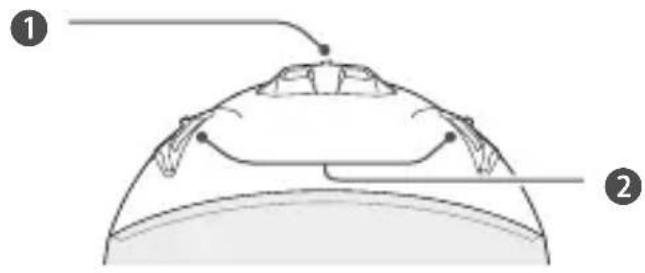
No. Name
① Top Vent
②Side Vent
Right
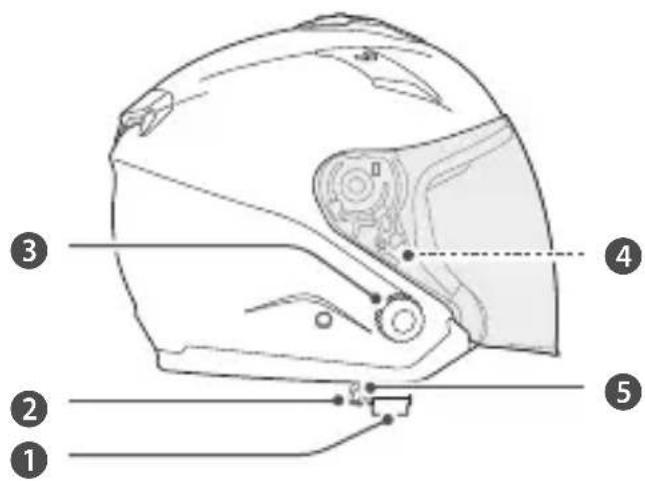
No. Name
① Chinstrap
DC Power
Charing &
Firmware
Upgrade Port
③Jog dial
4 Speaker
⑤ Status LED
2
1.2.1 Bluetooth System Button
Rotate/Rotate while Pressing
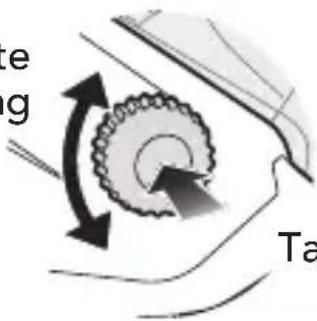
Tap/Press and Hold
1.3 Package Contents
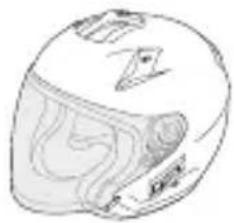
natural_image
Line drawing of a helmet with visible tracks and front lamps (no text or symbols)Econo Helmet
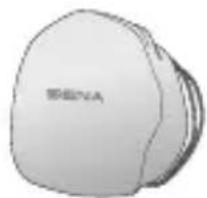
natural_image
3D rendered model of a white helmet or cap with no visible text or symbolsHelmet Pouch
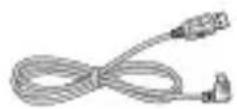
USB Power & Data Cable
Reflex Stickers (4)
1.4 Wearing the Helmet
1.4.1 Putting on the Helmet
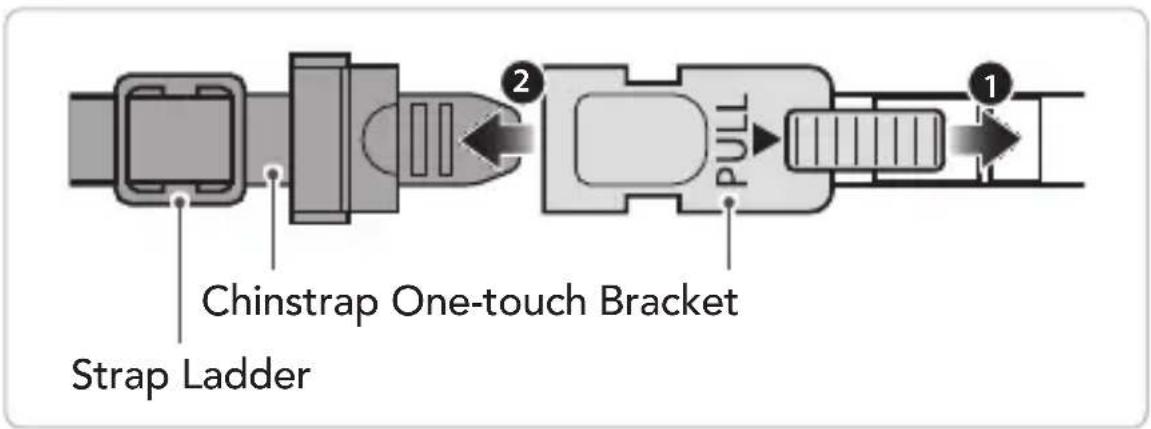
- Unfasten the chinstrap by using the retention system.
- Expand the helmet opening with your hand, and slide your head into the helmet.
- To fasten the chinstrap as tight as possible without causing you pain.
1.4.2 Removing the Helmet
- Fasten the chinstrap by using the retention system.
- Gently pull the padded chinstrap outward and slide the helmet off your head.
Note: Fastening the chinstrap after removing the helmet will help avoid scratching surfaces it's placed upon.
Quick-release retention system
1.4.3 Removing Shield Visor
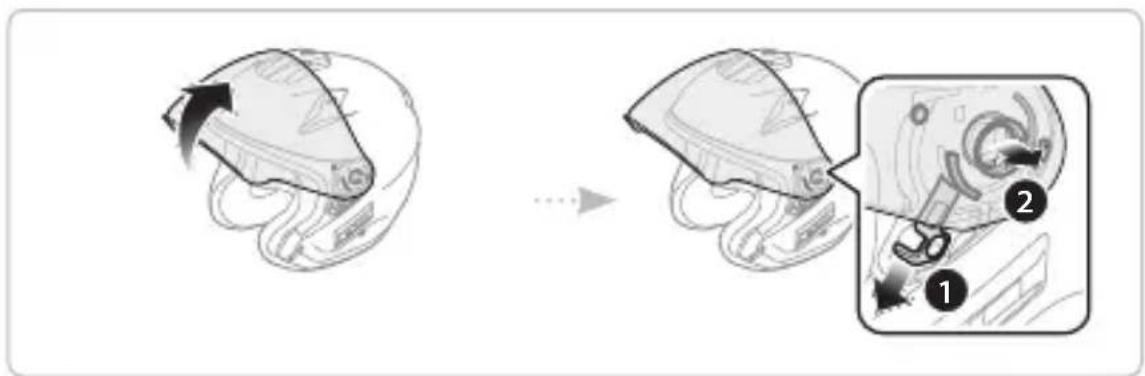
- Open a shield visor to fully opened position.
- Pull the trigger down and pull out the shield visor at the same time.
- Repeat the process on the other side.
1.4.4 Installing Shield Visor
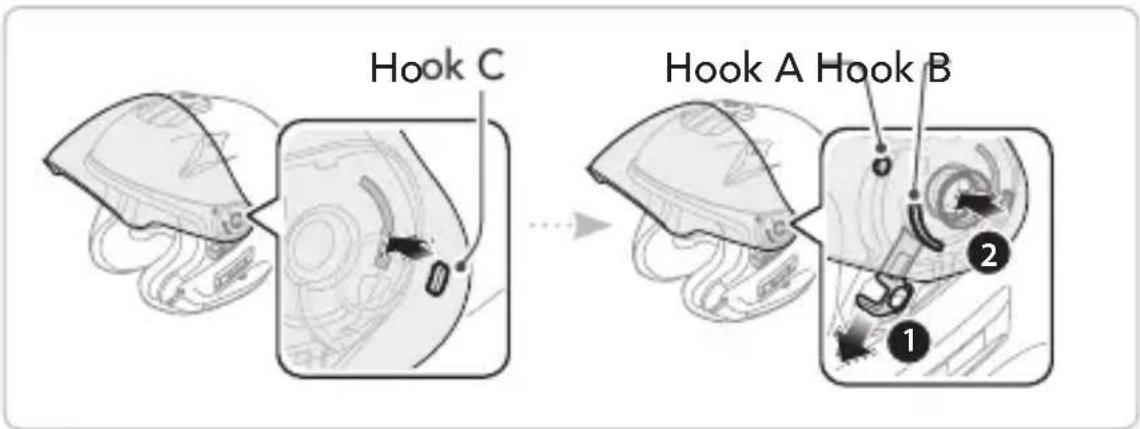
- Open a shield visor to fully opened position, and insert hook C.
- Pull the trigger down and insert hook A and hook B.
- Repeat the process on the other side.
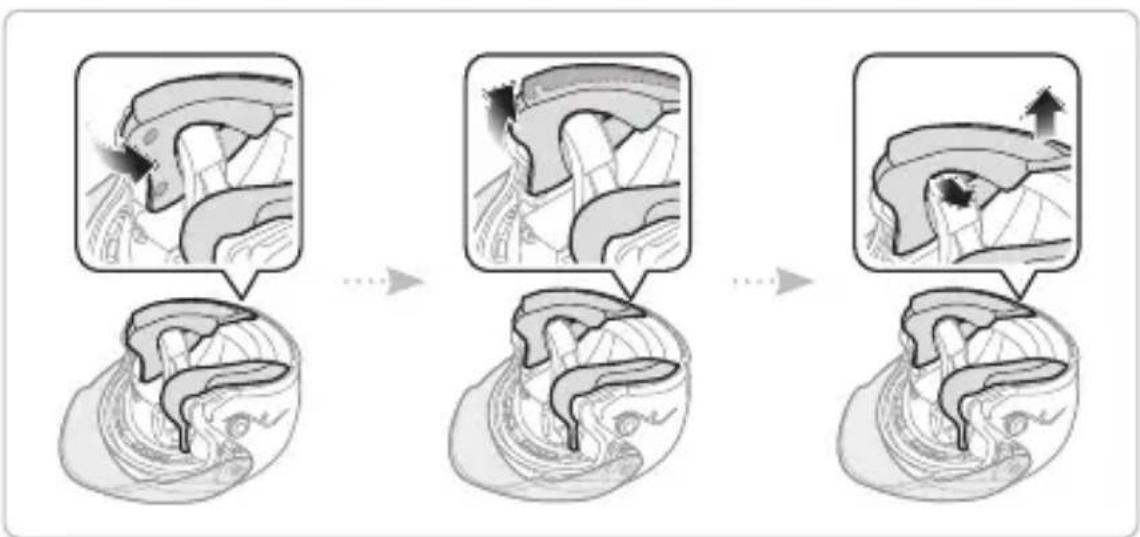
1.4.5 Removing Cheek Pad
flowchart
graph LR
    A["Step 1: Visual deformation"] --> B["Step 2: Internal organs with directional arrows"]
    B --> C["Step 3: Structural changes and movement"]
    C --> D["Step 4: Informational changes with directional arrows"]
- Remove the three snaps of the cheek pad from the helmet.
- Remove a lower portion of a cheek pad from a bracket.
- Pull the rear of the cheek pad off the helmet.
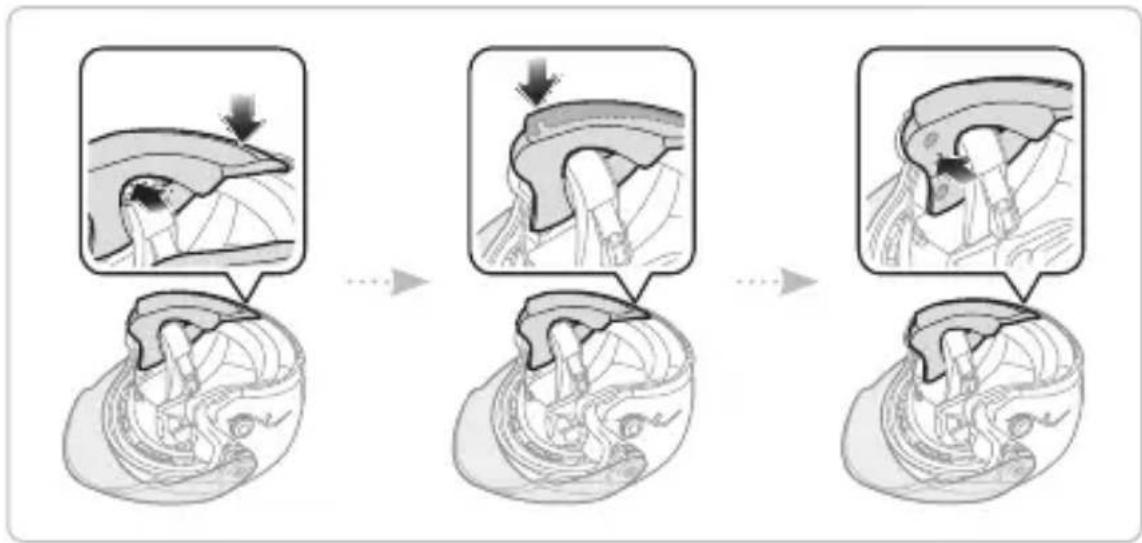
1.4.6 Installing Cheek Pad
flowchart
graph LR
    A["Initial procedure"] --> B["Step 1: Surgical procedure"]
    B --> C["Step 2: Surgery"]
    C --> D["Step 3: Surgery"]
    D --> E["Final procedure"]
- Pass a chinstrap through holes of cheek pad, insert the plastic plate of cheek pad into a space between shell and EPS.
- Insert the cheek pad plastic plate a bracket.
- Clip the three snaps of the cheek pad to the three snaps of helmet.
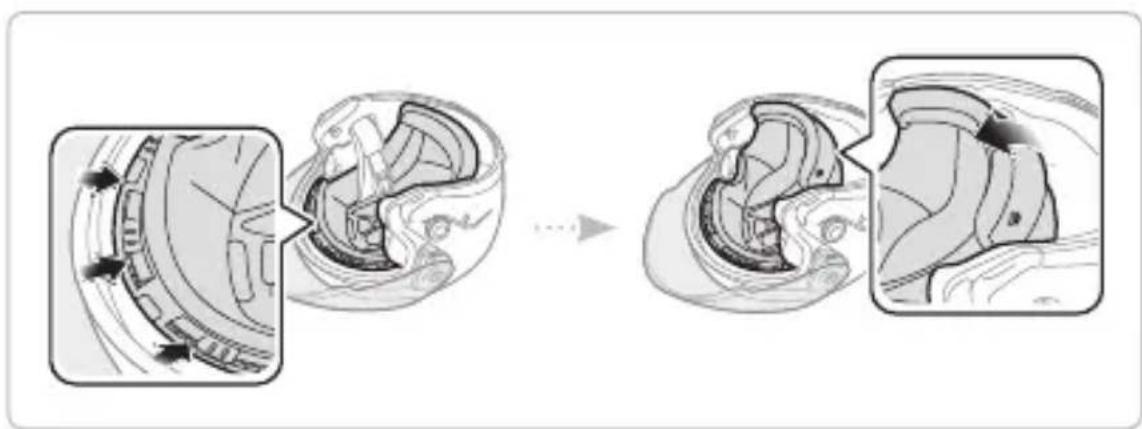
1.4.7 Removing Inner Pad
natural_image
Diagram showing a mechanical assembly process with cross-sectional views of a component (no text or labels)- Hold near a plate and pull out plate.
- To remove a rear center pad, release two hooks of center pad bracket.
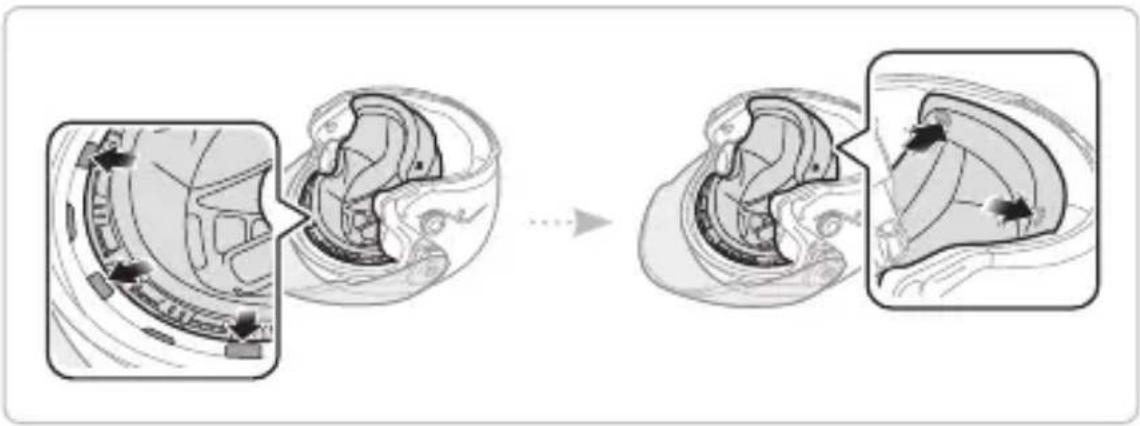
1.4.8 Installing Inner Pad
natural_image
Diagram showing a mechanical assembly process with three stages of a component, no text or symbols present.- Insert a plastic plate to the front center pad.
- Insert the two snaps of rear neck pad until you hear a click.
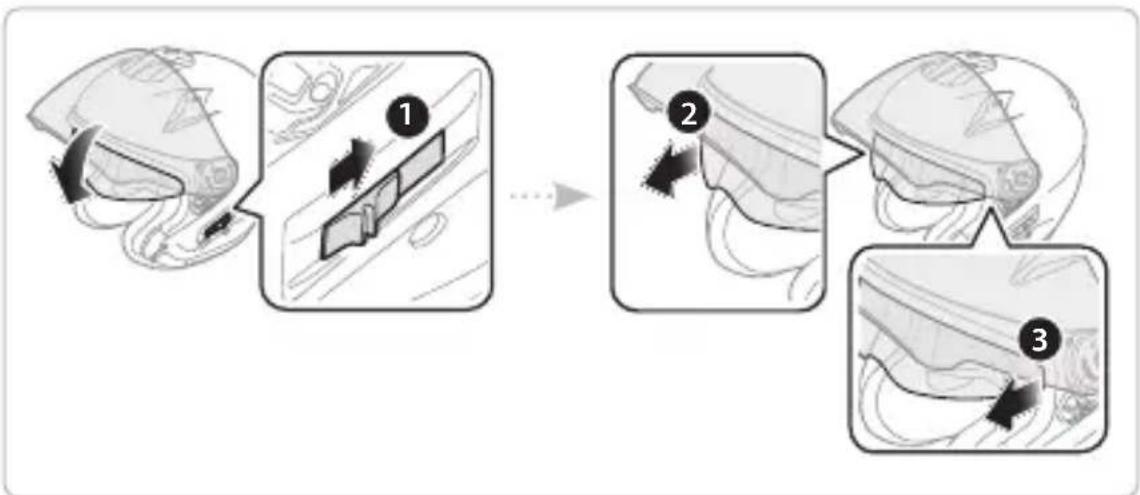
1.4.9 Removing Sun Visor
flowchart
graph TD
    A["Step 1: Surgical Tool"] --> B["Step 2: Laparoscopic Placement"]
    B --> C["Step 3: Laparoscopic Placement"]
- Slide the sun visor lever in the direction of the arrow so that the sun visor is lowered.
- Hold your hand near the hook of the visor and pull it in the direction of the arrow.
- Repeat the process on the other side.
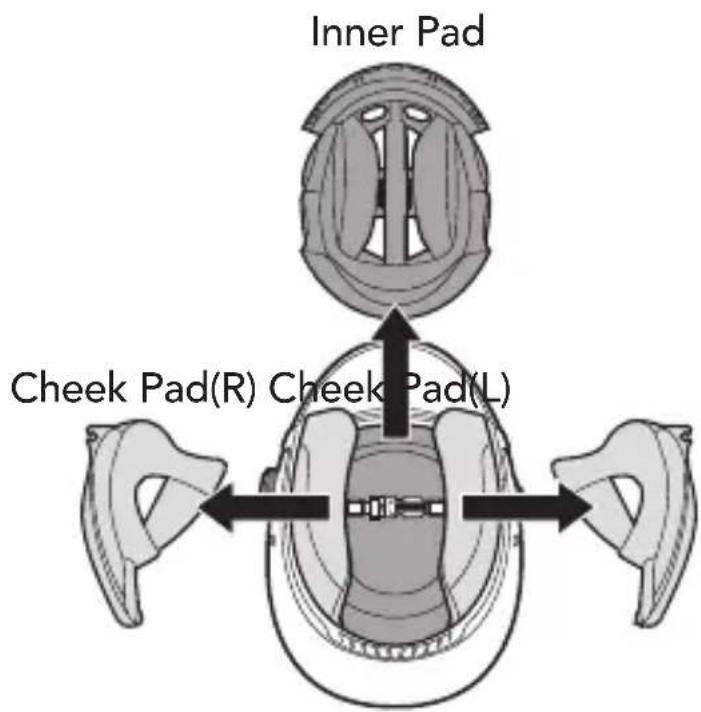
1.4.10 Detachable Inner Parts
1.5 Pre-Ride Helmet Inspection
1.5.1 Checking the Exterior
Check the helmet regularly for damage. Small, superficial scratches will not impair the helmet's protective qualities. In the case of more serious damage (cracks, dents, flaking and cracking paint, etc.), the helmet should no longer be used.
1.5.2 Checking the Chinstrap
-
Ensure that the chinstrap is properly routed under your chin.
-
To test the chinstrap tension, slip your index finger under the chinstrap and pull. If the chinstrap is loose under the chin, it needs to be tightened. If the chinstrap loosens when you pull on it, the helmet is not properly fitted. Undo the chinstrap completely and try fastening it again, then repeat the test.
- If you are unable to fasten the chinstrap so that it fits firmly against the chin, check that your helmet is still the right size for you.
Note: Repeat the test after each adjustment.
CAUTION: Never ride with the chinstrap unfastened or incorrectly adjusted. The chinstrap should fit correctly and should not become loose when pulled. The fastener is not correctly closed if the chinstrap becomes loose when pulled.
2. GETTING STARTED: BLUETOOTH SYSTEM
2.1 Powering On and Off
- Power On
Rotate while pressing the Jog dial clockwise for 1 second.
• Power Off Press and hold the Jog dial for 5 seconds.
2.2 Charging
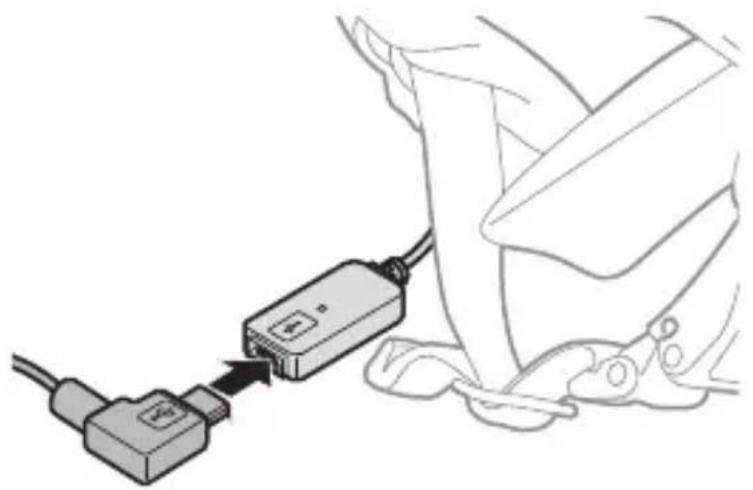
The Bluetooth system can be charged using many common methods via the supplied USB power & data cable: the Econo is compatible with 5 V input USB-charged devices only.
natural_image
Illustration of a cable connector being inserted into a device, showing cable routing and cable attachment (no text or symbols)Depending upon the charging method, the Bluetooth system will be fully charged in about 3 hours.
Note:
- Please make sure to take off your helmet while charging. The Bluetooth system automatically turns off during charging.
- Any 3rd party USB charger can be used with Sena products if the charger is approved by either the FCC, CE, IC or other locally approved agencies that Sena accepts.
2.3 Checking the Battery Level
When the headset is powering on, the red LED flashes rapidly indicating the battery level.
4 flashes = High, 70 \~ 100%
3 flashes = Medium, 30 \~ 70%
2 flashes = Low, 0 \~ 30%
2.4 Volume Adjustment
You can raise or lower the volume by rotating the Jog dial. Volume is set and maintained independently at different levels for each audio source (i.e. phone, intercom), even when the Bluetooth system is rebooted.
• Volume up/down Rotate the Jog dial clockwise or counterclockwise.
2.5 Downloadable Sena Software
2.5.1 Sena Device Manager
The Sena Device Manager allows you to upgrade the firmware and configure its settings directly from your PC or Apple computer. For more information on downloading the Sena Device Manager, please visit sena.com.
3. PAIRING THE BLUETOOTH SYSTEM WITH OTHER BLUETOOTH DEVICES
Before using the Bluetooth system with other Bluetooth devices for the first time, they'll need to be "paired". This enables them to recognize and communicate with one another whenever they're within range. The Bluetooth system can pair with multiple Bluetooth devices such as mobile phone, MP3 player, GPS or Sena SR10 Two-Way Radio Adapter via Mobile Phone Pairing, Second Mobile Phone Pairing. The Bluetooth system can also be paired with another Sena headset or Bluetooth system.
3.1 Mobile Phone Pairing
- Turn off the Bluetooth system.
- Rotate while pressing the Jog dial clockwise for 5 seconds.
- Rotate the Jog dial until you hear the voice prompt, "Phone pairing". Search for Bluetooth devices on your mobile phone.
- Select the Econo in the list of the devices detected on the mobile phone. Enter 0000 for the PIN. Some mobile phones may not ask for the PIN.
3.2 Second Mobile Phone Pairing
Pairing with Additional Mobile Phone, GPS, MP3 Players or Sena SR10 Two-way Radio Adapter.
- Turn off the Bluetooth system.
- Rotate while pressing the Jog dial clockwise for 5 seconds.
- Rotate the Jog dial until you hear the voice prompt, "Second mobile phone pairing". Search for Bluetooth devices on your mobile phone.
- Select the Econo in the list of the devices detected on the mobile phone. Enter 0000 for the PIN. Some mobile phones may not ask for the PIN.
4. MOBILE PHONE USAGE
4.1 Making and Answering Calls
- Answering/Ending a call Tap the Jog dial.
- Rejecting a call Press and hold the Jog dial for 1 second.
- Make a Call with Voice dialer Rotate while pressing the Jog dial clockwise.
4.2 Speed Dialing
4.2.1 Assigning Speed Dial Presets
You need to assign speed dial numbers before using the speed dial. Speed Dial Presets could be assigned in the settings menu.
4.2.2 Using Speed Dial Presets
- Rotate while pressing the Jog dial counterclockwise.
- Rotate the Jog dial to navigate between the menus. You will hear voice prompts for each menu item.
- Tap the Jog dial to select a voice menu among the followings:
(1) Last number redial (4) Speed dial 3
(2) Speed dial 1 (5) Cancel
(3) Speed dial 2
-
To redial the last number called, tap the Jog dial when you hear a voice prompt saying "Last number redial".
-
To call one of the speed dials, tap the Jog dial when you hear the voice prompt, "Speed Dial (#)".
-
If you want to exit the speed dial immediately, rotate the Jog dial until you hear a voice prompt saying "Cancel", and tap the Jog dial.
5. STEREO MUSIC
5.1 Playing Music with Bluetooth Devices
- Play or Pause music
Press and hold the Jog dial for 1 second. - Track forward/back
Rotate while pressing the Jog dial clockwise or counterclockwise.
6. BLUETOOTH INTERCOM
6.1 Intercom Pairing
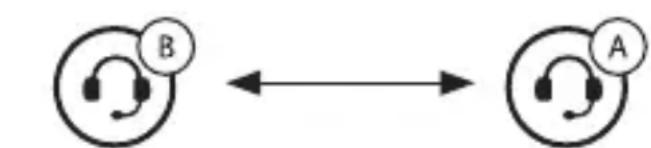
The Bluetooth system can only have an intercom conversation with Bluetooth system, Sena headset or helmet.
flowchart
graph LR
    A["Node A"] <--> B["Node B"]
Intercom friend B YOU
- Turn off the two Bluetooth system (A and B) that you would like to pair with each other.
- Rotate while pressing the Jog dial clockwise for 5 seconds.
- Rotate the Jog dial until you hear the voice prompt, "Intercom pairing".
- Simply tap the Jog dial of any one of the two Bluetooth system A or B and wait until the intercom connection is automatically established.
6.2 Two-Way Intercom
You can start/end an intercom conversation with one of any intercom friends by tapping the Jog dial.
- Staring/Ending Two-way Intercom Tap the Jog dial.
7. USING THE FM RADIO
7.1 FM Radio Operation
- Start or Stop the FM radio Press and hold the Jog dial for 3 seconds.
- Seek up/down the radio channel Rotate while pressing the Jog dial clockwise or counterclockwise.
8. GENERAL SETTINGS
8.1 Function Priority
The Bluetooth system operates in the following order of priority:
(highest) Mobile phone Bluetooth Intercom FM Radio (lowest) Bluetooth stereo music
A lower priority function is always interrupted by a higher priority function.
8.2 Configuration Menu
You can set the configuration of the Bluetooth system by the voice menu instruction described below.
- Power off the Bluetooth system.
- Rotate while pressing the Jog dial clockwise for 5 seconds until you hear a voice prompt, "Configuration menu".
| Configuration Setting Enable/Disable or Execute | |
| Phone Pairing None | |
| Second Mobile Phone Pairing None | |
| Intercom Pairing None | |
| Speed Dial Execute | |
| VOX Phone Enable/Disable | |
| Voice Prompts Enable/Disable | |
| Delete All Pairings Execute | |
| Factory Reset Execute | |
| Exit configuration Execute | |
8.2.1 Assigning Speed Dial
- To assign a phone number as a speed dial, rotate the Jog dial until you hear a voice prompt, "Speed dial".
- Tap the Jog dial, and you will hear a voice prompt, "Speed dial one" and "Phone connected".
- Rotate the Jog dial to select one of three speed dial numbers by hearing voice prompt, "Speed dial (#)".
- Call a phone number you want to assign and you will hear a voice prompt, "Save speed dial (#)".
The phone number is automatically assigned to the selected speed dial number. Then the phone call will hang up immediately.
- To exit the menu, rotate the Jog dial clockwise or counter clockwise until you hear a voice prompt, "Cancel", and tap the Jog dial to confirm. You will then hear a voice prompt "Cancel".
8.2.2 vOX Phone (Default: Enable)
If this feature is enabled, you can answer incoming calls by voice. When you hear a ringtone for an incoming call, you can answer the phone by saying a word such as "Hello" loudly or by blowing air into the microphone. VOX Phone is temporarily disabled if you are connected to intercom. If this feature is disabled, you have to tap the Jog dial to answer an incoming call.
8.2.3 voice Prompts (Default: Enable)
You can disable voice prompts by configuration setting, but the following voice prompts are always on.
- Voice prompts for configuration setting menu
- Voice prompts for factory reset
- Voice prompts for speed dial
- Voice prompts for FM radio functions
8.2.4 Delete All Pairings
To delete all Bluetooth pairing information. rotate the Jog dial until you hear a voice prompt, "Delete all pairings", and tap the Jog dial to confirm.
8.3 Firmware Upgrades
The Bluetooth system supports firmware upgrades. You can update the firmware using the Sena Device Manager. Please visit Sena Bluetooth website at sena.com to check the latest software downloads.
9. TROUBLESHOOTING
9.1 Fault Reset
When the Bluetooth system is not working properly, you can easily reset the unit. When the USB charging & data cable connects a power supply to the system, the system will automatically be turned off and a fault reset will occur.
9.2 Factory Reset
If you want to restore the headset to factory default settings, use the Factory Reset in the configuration menu. The headset automatically restores the default settings and turns off.
10. MAINTENANCE AND CARE
10.1 Outer Shell
Use a soft cloth and a small amount of water to remove bugs from the exterior.
Note: Never use gasoline, diesel fuel, thinners or solvents to clean the helmet. These substances can cause serious damage to the helmet, even though the resulting damage may not be visible. The full safety function of the helmet can then no longer be guaranteed.
10.2 Inner Lining
The inner lining of the helmet is completely removable. Its headliner can be washed by hand using mild soap at a maximum temperature of 30^ C ( 86^ F). Allow the lining to dry at room temperature.
10.3 Storing the Helmet
Store the helmet in a dry, dark, well-ventilated location, out of the reach of children and animals. Always position the helmet so that it cannot fall to the floor. Damage that occurs in this way is not covered by the warranty.
QUICK REFERENCE
| Type Operation Button | Command | |
| Basic Function | Power on | Rotate while pressing the Jog dial clockwise for 1 second |
| Power off | Press and hold the Jog dial for 5 seconds | |
| Volume adjustment | Rotate the Jog dial | |
| Mobile Phone | Answer & end phone call | Tap the Jog dial |
| Voice dial | Rotate while pressing the Jog dial clockwise | |
| Speed dial | Rotate while pressing the Jog dial counterclockwise | |
| Reject incoming call | Press and hold the Jog dial for 1 second | |
| Intercom | Start/End Intercom | Tap the Jog dial |
| Music | Play/Pause | Press and hold the Jog dial for 1 second |
| Track forward/back | Rotate while pressing the Jog dial clockwise/counterclockwise | |
| FM Radio | FM radio on/off | Press and hold the Jog dial for 3 seconds |
| Seek up/down | Rotate while pressing the Jog dial clockwise/counterclockwise | |
| Configuration Menu | 1. Turn off the Bluetooth system2. Rotate while pressing the Jog dial clockwise for 5 seconds | |
SENA
Copyright © 2019 Sena Technologies, Inc. All rights reserved.

© 1998–2019 Sena Technologies, Inc. All rights reserved.
Sena Technologies, Inc. reserves the right to make any changes and improvements to its product without providing prior notice.

Sena™ is a trademark of Sena Technologies, Inc. or its subsidiaries in the USA and other countries. SF1™, SF2™, SF4™, SFR™, SRL™, Momentum™, Momentum INC™, Momentum Lite™, Momentum Pro™, Momentum INC Pro™, Cavalry™, 30K™, 20S EVO™, 20S™, 10S™, 10C™, 10C PRO™, 10U™, 10Upad™, 10R™, 3S™, SMH5™, SMH5-FM™, SMH5 MultiCom™, SMH10™, SMH10R™, SPH10™, SPH10H-FM™, Savage™, Prism Tube WiFi™, Prism™, Bluetooth Audio Pack for GoPro®, R1™, RC3™, RC4™, Handlebar Remote™, Wristband Remote™, PowerPro Mount™, Powerbank™, FreeWire™, WiFi Docking Staion™, +mesh™, Econo™, SR10™, SM10™, X1™, Expand™, Tufftalk™, Tufftalk Lite™, Tufftalk M™ are trademarks of Sena Technologies, Inc. or its subsidiaries. These trademarks may not be used without the express permission of Sena.

GoPro® is a registered trademark of Woodman Labs of San Mateo, California. Sena Technologies, Inc. ("Sena") is not affiliated with Woodman Labs, Inc. The Sena Bluetooth Pack for GoPro® is an aftermarket accessory specially designed and manufactured by Sena Technologies, Inc. for the GoPro® Hero3 and Hero4 allowing for Bluetooth capabilities.
The Bluetooth ^® word mark and logos are owned by the Bluetooth SIG, Inc. and any use of such marks by Sena is under license. iPhone ^® and iPod ^® touch are registered trademarks of Apple Inc.
Address: 152 Technology Drive Irvine, CA 92618
- ECONO
- BLUETOOTH® HELMET
- RIDE CONNECTED
- GETTING STARTED
- TABLE OF CONTENTS
- ABOUT THE ECONO BLUETOOTH HELMET
- GETTING STARTED: BLUETOOTH SYSTEM 15
- PAIRING THE BLUETOOTH SYSTEM WITH OTHER BLUETOOTH DEVICES 18
- MOBILE PHONE USAGE 19
- STEREO MUSIC 21
- BLUETOOTH INTERCOM 21
- USING THE FM RADIO 22
- GENERAL SETTINGS 23
- General Information
- Product Details
- Left
- No. Name
- Top
- Right
- 2
- Bluetooth System Button
- Package Contents
- Wearing the Helmet
- Putting on the Helmet
- Removing the Helmet
- Quick-release retention system
- Removing Shield Visor
- Installing Shield Visor
- Removing Cheek Pad
- Installing Cheek Pad
- Removing Inner Pad
- Installing Inner Pad
- Removing Sun Visor
- Detachable Inner Parts
- Pre-Ride Helmet Inspection
- Checking the Exterior
- Checking the Chinstrap
- GETTING STARTED: BLUETOOTH SYSTEM
- Powering On and Off
- Charging
- Note:
- Checking the Battery Level
- Volume Adjustment
- Downloadable Sena Software
- Sena Device Manager
- PAIRING THE BLUETOOTH SYSTEM WITH OTHER BLUETOOTH DEVICES
- Mobile Phone Pairing
- Second Mobile Phone Pairing
- MOBILE PHONE USAGE
- Making and Answering Calls
- Speed Dialing
- Assigning Speed Dial Presets
- Using Speed Dial Presets
- STEREO MUSIC
- Playing Music with Bluetooth Devices
- BLUETOOTH INTERCOM
- Intercom Pairing
- Two-Way Intercom
- USING THE FM RADIO
- FM Radio Operation
- GENERAL SETTINGS
- Function Priority
- Configuration Menu
- Assigning Speed Dial
- vOX Phone (Default: Enable)
- voice Prompts (Default: Enable)
- Delete All Pairings
- Firmware Upgrades
- TROUBLESHOOTING
- Fault Reset
- Factory Reset
- MAINTENANCE AND CARE
- Outer Shell
- Inner Lining
- Storing the Helmet
- QUICK REFERENCE
- SENA
Brand : Sena
Model : Econo
Category : Motorcycle helmet