
Five - Pregnant SONOS - Free user manual and instructions
Find the device manual for free Five SONOS in PDF.


| Product Type | Hi-fi wireless speaker |
| Dimensions (W x H x D) | 14.33 x 8.03 x 6.06 in (364 x 203 x 154 mm) |
| Weight | 14 lb (6.36 kg) |
| Power Supply | Auto-switching 100-240 V ~ 50-60 Hz, 2.3 A AC universal input |
| Amplifier | Six Class-D digital amplifiers |
| Drivers | 3 tweeters, 3 mid-woofers (phased speaker array) |
| Wireless Connectivity | WiFi 802.11a/b/g/n 2.4 or 5 GHz; Bluetooth Low Energy (setup only) |
| Ethernet Port | 10/100 Mbps |
| Audio Input | 3.5 mm line-in (auto-detecting) |
| Stereo Pairing | Yes, with two Fives; orientation sensing for automatic channel separation |
| Home Theater | Can be used as rear surrounds with Sonos Arc/Beam |
| Touch Controls | Volume, play/pause, next/previous (configurable) |
| Status Light | Indicates speaker status; can be turned off in room settings |
| Humidity Resistance | Designed for high-humidity environments (e.g., bathroom); not waterproof |
| Operating Temperature | 32° to 104° F (0° to 40° C) |
| Storage Temperature | -4° to 158° F (-20° to 70° C) |
| Finish | White matte or black matte with graphite grille |
| Package Contents | Sonos Five, power cord, Quickstart Guide |
| Cleaning Instructions | Clean with dry soft cloth; do not use household cleaners or solvents |
| Safety Warnings | Do not use near water, unplug during storms, only use supplied power cord |
Frequently Asked Questions - Five SONOS
User questions about Five SONOS
0 question about this device. Answer the ones you know or ask your own.
Ask a new question about this device
Download the instructions for your Pregnant in PDF format for free! Find your manual Five - SONOS and take your electronic device back in hand. On this page are published all the documents necessary for the use of your device. Five by SONOS.
USER MANUAL Five SONOS
No part of this publication may be reproduced or transmitted in any form or by any means, electronic or mechanical, including but not limited to photocopying, recording, information retrieval systems, or computer network without the written permission of Sonos, Inc. Sonos and all other Sonos product names and slogans are trademarks or registered trademarks of Sonos, Inc. Sonos Reg. U.S. Pat. & Tm. Off.
Sonos products may be protected by one or more patents. Our patent-to-product information can be found here:
sonos.com/legal/patents
AirPlay®, Apple Music™, FairPlay®, iPad®, iPhone®, iPod®, Tunes®, and OS X®, are trademarks of Apple Inc., registered in the U.S. and other countries.
Works with Apple Airplay.
"Made for iPod", "Made for iPhone", and "Made for iPad" mean that an electronic accessory has been designed to connect specifically to iPod, iPhone, or iPad, respectively, and has been certified by the developer to meet Apple performance standards. Apple is not responsible for the operation of this device or its compliance with safety and regulatory standards. Please note that the use of this accessory with iPod, iPhone, or iPad may affect wireless performance.
Windows® is a registered trademark of Microsoft Corporation in the United States and other countries.
Android ^TM is a trademark of Google, Inc.
Manufactured under license from Dolby Laboratories. Dolby, Dolby Atmos, Dolby Audio, Pro Logic, and the double-D symbol are trademarks of Dolby Laboratories.
Amazon, Kindle, Kindle Fire, Echo, Alexa, and all related logos are trademarks of Amazon.com, Inc. or its affiliates.
Google and Google Home Mini are trademarks of Google LLC.
Bluetooth® is a registered trademark of Bluetooth SIG, Inc.
The terms HDMI and HDMI High-Definition Multimedia Interface, and the HDMI logos are trademarks or registered trademarks of HDMI Licensing LLC in the United States and other countries.
Sonos uses MSNTP software, which was developed by N.M. Maclaren at the University of Cambridge.
© Copyright, N.M. Maclaren, 1996, 1997, 2000; © Copyright, University of Cambridge, 1996, 1997, 2000.
All other products and services mentioned may be trademarks or service marks of their respective owners.
March 2022
©2004-2022 by Sonos, Inc. All rights reserved.
The Sonos Home Sound System
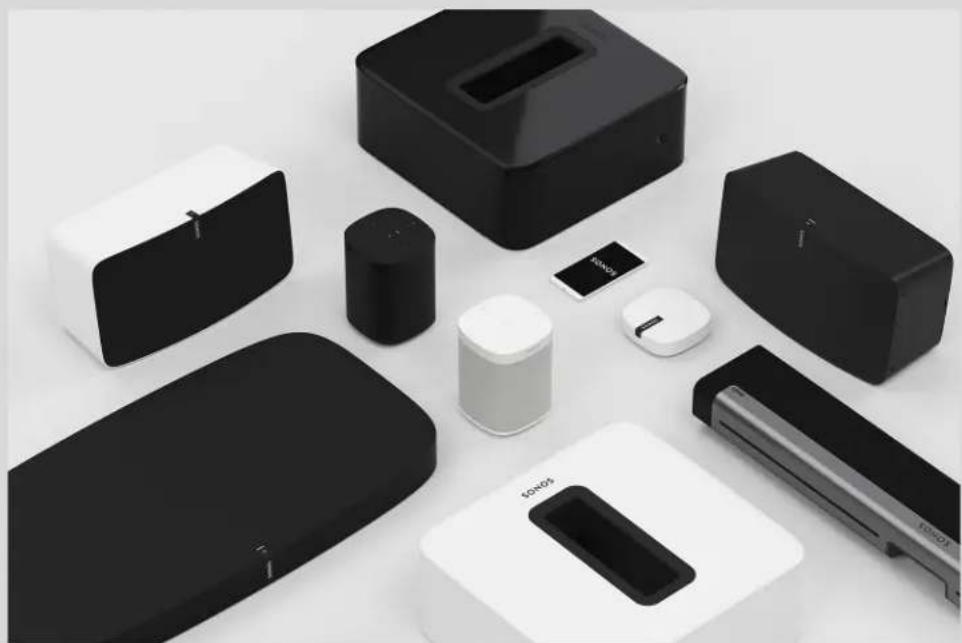
Sonos is the wireless home sound system that fills as many rooms as you want (up to 32) with music, movies and TV. Listen in any room or every room—play a movie in the living room, a podcast in the kitchen, or the same song everywhere. Explore our products to find out more.
- Free Sonos app guides you through setup and provides music control for everyone in the house on all their devices—phones, tablets, and computers.
- Easy access to all the music you love—streaming services, podcasts and internet radio.
- Mix and match products to build a home sound system that fits your lifestyle.
natural_image
Product display of various electronic devices including a black and white modular device, a smartphone, and a digital camera (no visible text or symbols)Getting started
Here's what you'll need:
- WiFi—have your network name and password ready.
- Mobile device—connected to the same WiFi. You'll use this for setup.
- Sonos S2 app—you'll use it to set up and control your Sonos system—choose what to play, where to play it, and how loud. Install the app on the mobile device you're using for setup. (If you're upgrading from the Sonos S1 app, you can remove S1 from your device after you upgrade.)
- A Sonos account—If you don't have an account, you'll create one during setup. Learn more about Sonos accounts.
Note: Get more information about the latest Sonos system requirements.
New to Sonos?
Download the app from the app store on your mobile device. Open the app and we'll guide you through setup.
Once your Sonos system is set up, you can use your computer to control the music, too. Get the app for your PC or Mac at www.sonos.com/support.
Get more information about the latest system requirements and compatible audio formats.
Setup options
Setting up Sonos on your home WiFi is the answer for most homes.
If your WiFi is slow, doesn't reach all the rooms where you want to use Sonos, or is already in high demand you can connect a Sonos product to your router with an Ethernet cable to create a separate wireless network just for your Sonos system.
Note: Your Sonos products and the mobile device with the Sonos app need to be on the same WiFi network.
You can switch between wired and wireless setup if something changes in your home. Learn more about setting up your Sonos products.
Already have Sonos?
You can easily add a new Sonos product anytime—just plug it in, open the Sonos app on your mobile device, and tap 📋 > System > Add Product.
Add a different Sonos system
Sonos allows quick and easy access to any Sonos system. When you add another Sonos system in the app, it will automatically connect as you move from one place to another so you can enjoy Sonos at home, at a friend's, or at your vacation house without missing a beat.
Learn more about connecting to an existing Sonos system in a different location.
Learn more about setting up a new Sonos system in a new location.
Sonos accounts
During setup you'll create a Sonos account that you'll use to manage and expand your Sonos system—both in the app and on www.sonos.com.
If you need to verify your user ID, change a password, or transfer your account to a different email address, open the app on your mobile device and tap ➕ Account.
If Account isn't available, your system needs to be updated.
Learn more about Sonos accounts.
Parental controls
You can restrict access to explicit music.
Open the app on your mobile device and tap ⚙ > System > Parental Controls.
Sign into your Sonos account to set filter options.
Note: You can also limit the maximum volume for a room. For more information, see Set max volume.
Explore our products
Sonos products work together seamlessly. It's easy to add speakers and expand your system as your home changes.
Speakers for your music
The perfect wireless speaker for any room in your home. You can even stereo pair two speakers (same model) in a room—turn each one into separate left and right channels for wider, bigger, and deeper sound.
- Roam, Roam SL, and Move: durable smart speaker for indoor and outdoor listening.
• One: smart speaker with built-in voice control. - One SL: compact speaker to use as a stereo pair or as surrounds for your home theater.
- Five: biggest home speaker with boldest sound.
Speakers for your TV
Sonos products for your TV provide full-theater sound and play music too. Enhance your home theater experience by adding a Sub, a pair of surrounds, or both.
- Arc and Arc SL: premium smart soundbar for TV, movies, music, gaming, and more. Place on furniture or wall mount.
- Beam and Beam (Gen 2): smart compact soundbar, perfect for small to medium-sized rooms. Place on furniture or wall mount.
- Playbase: widescreen sound and music streaming, created especially for TVs on stands or furniture. Low profile design practically disappears under your TV.
- Playbar: powerful soundbar, perfect for use above or below wall-mounted TVs, or lay it flat on a table or console.
- Sub: add dramatically deeper bass to any Sonos speaker, for home theater and music.
Stereo upgrades
Convert existing speakers, stereos, and home theater into music streaming systems with an amplifier.
- Amp: versatile amplifier for powering all your entertainment.
- Port: flexible streaming component for your stereo or receiver.
Accessories
Find the perfect accessory for your Sonos system on our website.
- If your existing WiFi isn't reliable enough for streaming music, you can purchase a Sonos Boost.
- Wall mount kits or stands tailored to perfectly fit your Sonos products.
- Turntables to bring vinyl to your Sonos system.
- Cables and more.
Sonos S2 app
Download the app on your mobile device. You'll use it to set up and control your Sonos system. If you're upgrading from the Sonos S1 app, you can remove S1 from your device after you upgrade.
Note: Products released after May 2020 are only compatible with S2. If you have both older and newer products, you can unplug your older products, or upgrade them; or you can create two separate systems—one running S2 with products that are S2 compatible and another running S1 with products that are not. Learn more.
Things you can do:
- Discover and play music—explore internet radio, browse and search for music.
- Add music and voice services—keep your music together and add voice for touch-free play.
- Sonos playlists—save songs to a playlist so you can listen to them anytime.
- Play music anywhere—group rooms to send the same music everywhere, or listen to different music in each room.
SONOS USER GUIDE
Mobile app controls
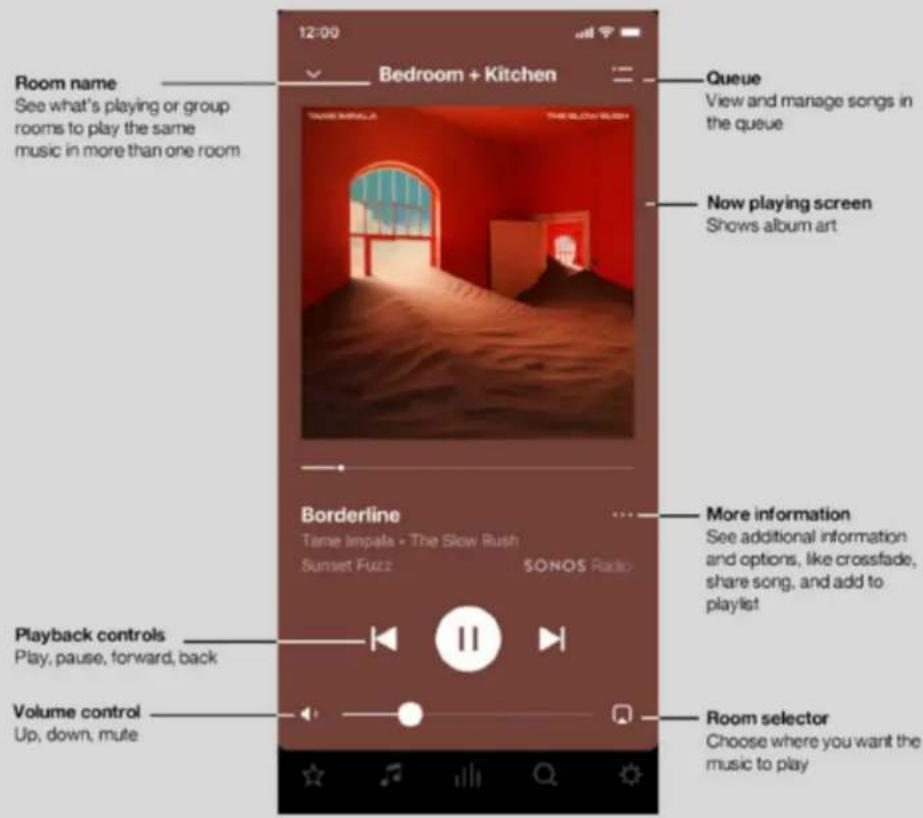
Note: You can skip through content by tapping ∪ or ⬇ (available only with certain services). Tap an icon to find and play music.

natural_image
Four white icons on black background: star, musical note, vertical bar, and search sun (no text or symbols)


My Sonos
A space to save and play your favorite music and collections so you always know where to find the music you love.
Browse
Browse through music services, your music library, and music on your mobile device. When you find music you like, start playing it in any room.
System
See what's playing in your rooms. Group rooms to play the same music in different rooms or everywhere.

Search Search your music sources.
Settings
Add music and voice services, set alarms, go to Sonos Tips and System Settings.
Queue controls
When you play a song, it's automatically added to your music queue. You can control how the music plays in the queue.
- Shuffle—change the song order.
- Repeat—repeat all songs, or tap again to repeat the song that's playing.
- Crossfade - fades out the current song while fading in the next song to create a smooth transition between songs.
- Save—save the queue as a Sonos playlist so you can listen to it again later. Learn more.
When you add songs to the queue while browsing, you can choose:
- Play Now
- Play Next
- Add to End of Queue
- Replace Queue
Learn more about using the queue.
Mac/PC controls
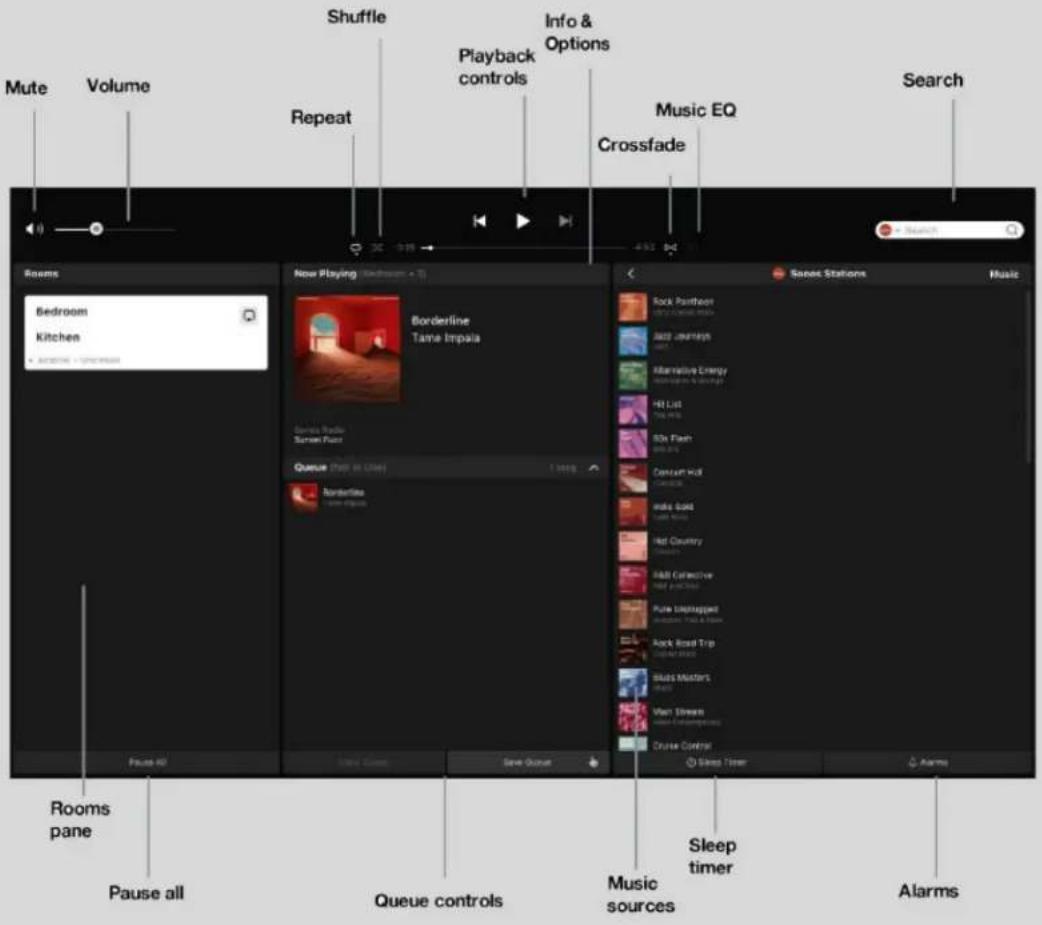

Play / Pause Toggles between playing and pausing.
Sonos speakers are designed to be always on; they use minimal power when there's no audio playing.

Next / Fast Forward Jumps to the next song.
Click and hold to fast forward through the current song.

Previous / Rewind
Jumps to the beginning of the current song; click twice to play the previous song.
Click and hold to rewind the current song.

Skip Forward Skips forward a few seconds (available only with certain services).

Skip Backward
Skips backward a few seconds (available only with certain services).
SONOS USER GUIDE

Repeat Repeats songs in the queue.
The indicator brightens when the control is activated.

Shuffle Changes the order of the songs in the queue.
Turn it off to return the songs to their original playback order. If you turn it on again you get a different mix.
The indicator brightens when the control is activated.

Crossfade Fades out the current song while fading in the next song to create a smooth transition between songs.
The indicator brightens when the control is activated.
Sonos S1 Controller app
This original Sonos app can be downloaded on your mobile device to control your older products. Products released after May 2020 aren't compatible with the S1 Controller app. If you have both older and newer products, you can unplug your older products, or upgrade them; or you can create two separate systems—one running S2 with products that are S2 compatible and another running S1 with products that are not. Learn more.
Things you can do:
- Discover and play music—explore internet radio, browse and search for music.
- Add music and voice services—keep your music together and add voice for touch-free play.
- Sonos playlists—save songs to a playlist so you can listen to them anytime.
- Play music anywhere—group rooms to send the same music everywhere, or listen to different music in each room.
Mobile app controls
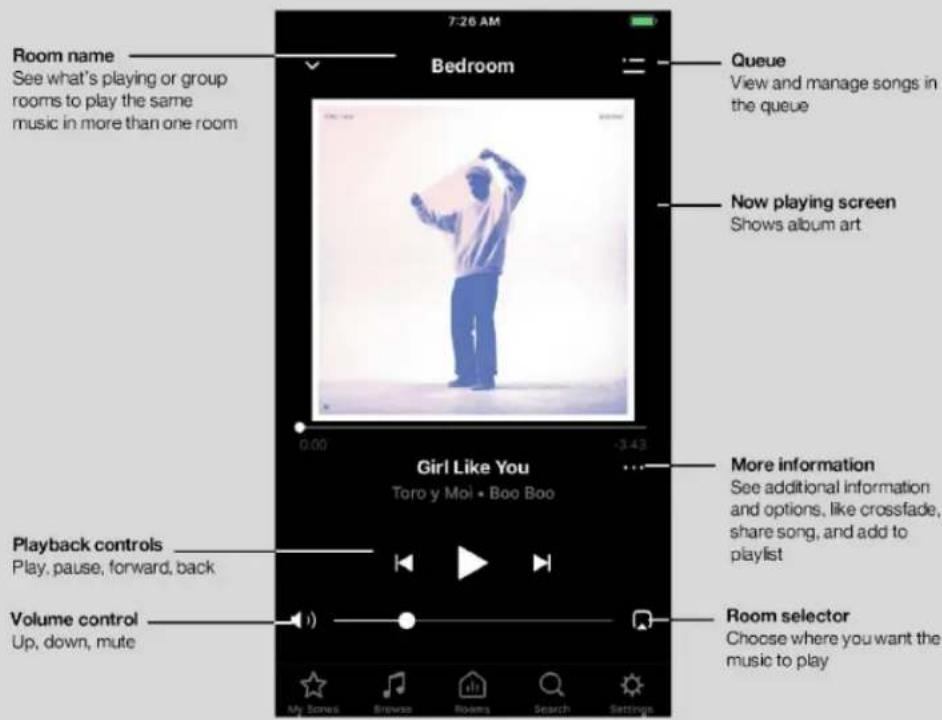
Note: You can skip through content by tapping ∪ or ⏻ (available only with certain services).
Tap an icon to find and play music.


My Sonos
A space to save and play your favorite music and collections so you always know where to find the music you love.
Browse
Browse through music services, your music library, and music on your mobile device. When you find music you like, start playing it in any room.
Rooms
See what's playing in your rooms. Group rooms to play the same music in different rooms or everywhere.
Search Search your music sources.
Settings
Add music and voice services, set alarms, go to Help & Tips, and System Settings.
Queue controls
When you play a song, it's automatically added to your music queue. You can control how the music plays in the queue.
- Shuffle—change the song order.
- Repeat—repeat all songs, or tap again to repeat the song that's playing.
- Crossfade - fades out the current song while fading in the next song to create a smooth transition between songs.
- Save—save the queue as a Sonos playlist so you can listen to it again later. Learn more.
When you add songs to the queue while browsing, you can choose:
- Play Now
- Play Next
- Add to End of Queue
- Replace Queue
Learn more about using the queue.
Mac/PC controls
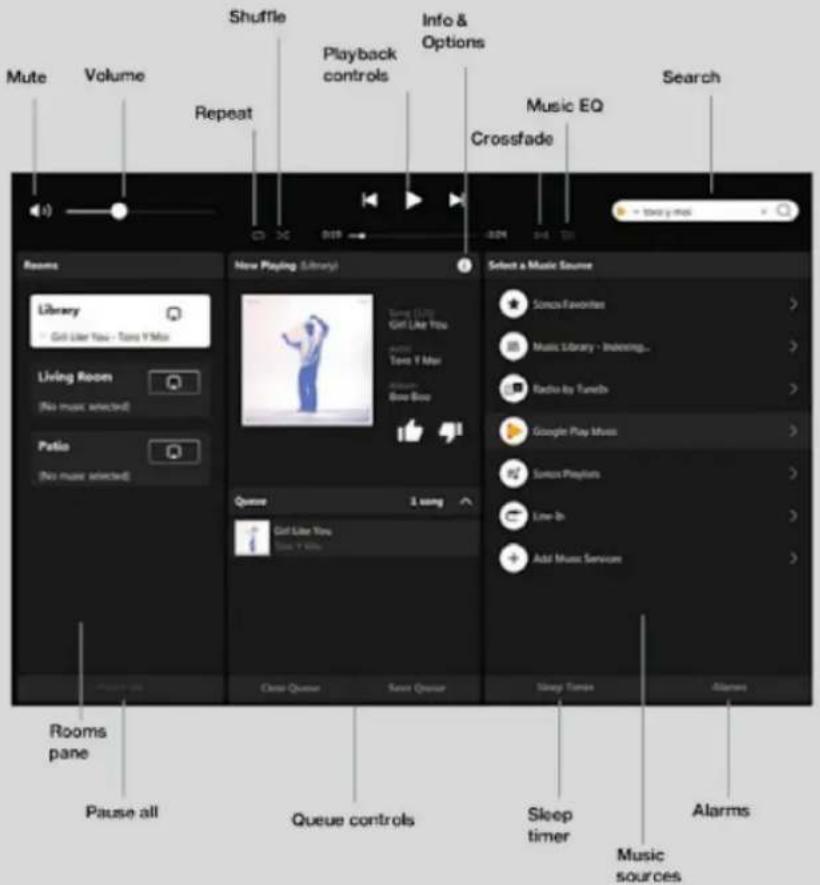

Play / Pause Toggles between playing and pausing.
Sonos speakers are designed to be always on; they use minimal power when there's no audio playing.

Next / Fast Forward Jumps to the next song.
Click and hold to fast forward through the current song.

Previous / Rewind
Jumps to the beginning of the current song; click twice to play the previous song.
Click and hold to rewind the current song.

Fast Forward Skips forward a few seconds (available only with certain services).

Rewind Skips backward a few seconds (available only with certain services).
SONOS USER GUIDE

Repeat Repeats songs in the queue.
The indicator brightens when the control is activated.

Shuffle Changes the order of the songs in the queue.
Turn it off to return the songs to their original playback order. If you turn it on again you get a different mix.
The indicator brightens when the control is activated.

Crossfade Fades out the current song while fading in the next song to create a smooth transition between songs.
The indicator brightens when the control is activated.
Roam
Sonos Roam is the portable smart speaker for listening at home and on the go.
- Enjoy up to 10 hours of continuous playback on a single charge—when it's time to recharge, connect the included cable to a USB power source (7.5W minimum; 10W recommended), place Roam on a compatible Qi wireless charger, or magnetically snap Roam to its custom wireless charger (sold separately).
• Lightweight, durable, waterproof design is ideal for the beach, pool parties, and more. - Stream content over WiFi or Bluetooth®.
-
Easy voice control with Amazon Alexa and Google Assistant built right in.
-
Set up and control with the Sonos app (for Android and iOS).
- Compatible with your other S2 Sonos speakers for multi-room listening.
- See Getting started when you're ready to add Roam to your Sonos system.
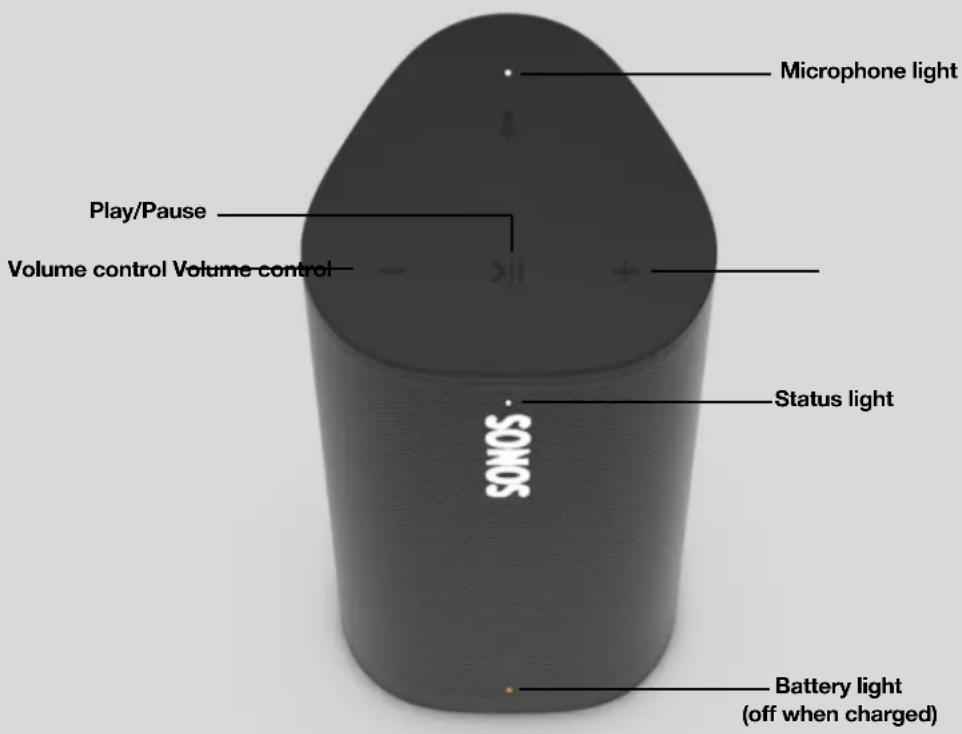
SONOS USER GUIDE
Power/Bluetooth button
Controls and lights
| + - | Volume control Volume up (+); Volume down (-)Note: Press and hold to quickly change the volume. | |
| >II | Playback control and Sound Swap | Press once to play or pause audio.Press and hold to group with other speakers.Continue holding the button down to move the sound to and from your nearest Sonos speaker.Double press for next track.Triple press for previous track.Note: You can't skip forward or go back when listening to a radio station. |
| [5528] | Microphone Press the microphone button to turn the microphone on or off.If you have a voice assistant, voice control is on when the light is on—when the light is off, voice control is off. | |
| Status light Indicates the speaker's status. | Solid white: on.Blinking blue: Bluetooth pairing mode.Solid blue: connected with device via Bluetooth.Flashing orange: if the product gets too hot, the status light flashes orange and the product chirps 3 times. Move the product to a cooler location, away from direct sunlight.Learn more | |
| Battery light Indicates the battery status. | Blinking orange: low battery.Solid orange: charging. The light may stay on for several minutes depending on how low the battery is. The battery will continue to charge when the light turns off.Learn moreNote: Roam's remaining battery life is always visible in the Sonos app.Battery Saver: To save battery life, you can set Roam to power off automatically instead of going to sleep. Go to [A246] > System, and choose Roam. It won't appear in the Sonos app until it's powered back on.Learn more | |
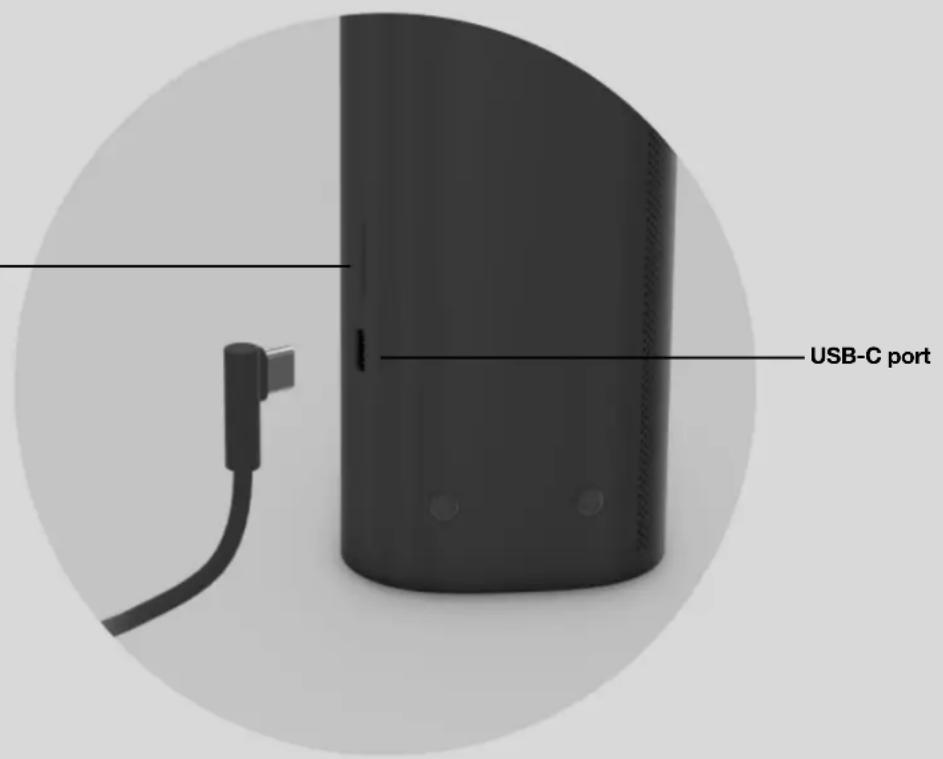
Back
| USB-C port Use the included cable to connect a compatible 7.5W minimum (10W recommended) USB-A power source. | |
| Power/Bluetooth button | Power on/sleep: Press (less than 1 second). To wake Roam up, press any button or start playback from the app. Bluetooth: Press and hold for about 2 seconds until you hear the pairing tone (the second one), then release. The status light blinks blue and Roam is ready to pair. Power off: Long press (5 seconds). |
Charging
| USB-C to USB-A Use the included cable to connect a compatible 7.5W | ||
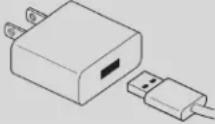 | minimum (10W recommended) USB-A power source.(Optional Sonos 10W USB Power Adapter sold separately.)Note: Roam's remaining battery life is visible in the Sonos app. | |
| Sonos Wireless Charger(sold separately) | Just place Roam on the smooth, magnetized side of the charger for easy recharging—no extra wires or cables needed. | |
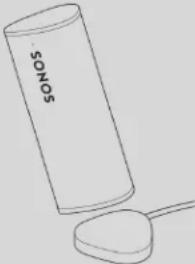 | ||
Location and usage guidelines
You can use your speaker just about anywhere. Here are a few things to keep in mind:
- When the microphone is on, Roam tunes itself with automatic Trueplay™ for amazing sound no matter where you are and what you're listening to.
- You can place Roam next to a wall or on a shelf—for best performance, leave at least 1" (2.5 cm) space around the back of the speaker.
- Roam's durable design includes silicone end caps to protect the speaker if it's dropped or bumped.
- For optimal performance, avoid placing Roam in direct sunlight.
- Roam can be placed horizontally or vertically. When vertical, Roam takes up barely any room. Position it horizontally for added stability on uneven surfaces.
Waterproof design
Roam has an IP67 rating—it's dustproof and waterproof and can be submerged 1 meter for up to 30 minutes. If Roam gets saturated with water, you can dry it off this way:
- Flush Roam with tap water, then give it a quick shake.
- Place the speaker vertically for a few seconds until it drains, then place it face down (logo side down) on a dry towel for a few minutes.
- Start playing some audio to assist with drainage.
Note: Don't play audio when Roam is immersed in water.
Automatic Trueplay™
Auto Trueplay tuning optimizes the sound for wherever you are and whatever you're listening to. Your speaker's microphone is used to detect the environment so auto Trueplay can make periodic tuning adjustments to deliver the best sound.
Microphone on/off
The microphone is used for voice control, and for automatic Trueplay tuning. Press ↓ to turn the microphone on or off—the microphone LED light will let you know when your voice assistant is listening.
When the microphone light is on,
- If you have a voice assistant, voice control is on and your voice assistant is ready to respond.
- Auto Trueplay tuning is enabled so Roam can automatically adjust its sound for your surroundings.
When the microphone light is off,
- If you have a voice assistant, voice control is off—your voice assistant is not listening.
• Automatic Trueplay tuning is disabled.
Bluetooth pairing
- Turn Bluetooth on in your device settings.
- Press and hold the power button on Roam for about 2 seconds until you hear the pairing tone (the second one), then release.
The status light blinks blue and Roam is ready to pair.
- Choose Roam from the list of available devices in your Bluetooth settings.
Your device will automatically connect to Roam next time.
Accessories
For add-ons tailored to perfectly fit your Roam, see Accessories on our website.
Specifications
Sonos Roam
Feature Description
| Audio | |
| Amplifier Two Class-H digital amplifiers. | |
| Tweeter One tweeter offers crisp high frequencies. | |
| Mid-Woofer One mid-woofer ensures faithful playback of mid-range vocal frequencies. | |
| Adjustable EQ Use the Sonos S2 app to adjust bass, treble, and loudness. | |
| Microphone array | Far-field microphone array uses advanced beam forming and multi-channel echo cancellation so your voice assistant can be readily activated. |
| Software | |
| Sonos S2 Set up and control Roam with the latest generation of the Sonos app. | |
| Apple AirPlay 2 Works with AirPlay 2 on Apple devices iOS 11.4 and higher. | |
| Voice Works with Amazon Alexa and Google Assistant. | |
| Automatic TrueplayTM | This tuning technology uses spatial awareness to smartly adjust the sound for the speaker's orientation (vertical/horizontal), location, and the content that's playing. Works on WiFi and Bluetooth. Microphone must be on. |
| Sound Swap To group Roam with other | Sonos speakers, press and hold the Play/Pause button for 1 second.To move the sound to or from Roam, continue holding the button down. |
| Details | |
| IP Rating | IP67 (speaker can be submerged in 1m of water for up to 30 minutes) |
| Dimensions (H x W x D) | 6.61 x 2.44 x 2.36 in (168 x 62x 60 mm) |
| Weight | .95 lb. (.43 kg) |
| Memory | 1GB SDRAM; 4GB NV |
| CPU | Quad Core; 1.3 GHz A-53 |
| Operating Temperature | 41° to 95° F (5° to 35° C) |
| Storage Temperature | -4° to 145° F (-20° to 63° C) |
| Package Contents | Sonos Roam, USB cable (3.9 ft/ 1.2 m), and Quickstart guide |
Feature Description
Power & Connectivity
WiFi Connects to WiFi network with any 802.11a/b/g/n/ac 2.4 or 5 GHz broadcast-capable router
Bluetooth Bluetooth 5.0 supports audio streaming from your smartphone and other devices
Inputs USB-C for charging
Battery 18 Wh battery provides up to 10 hours of continuous playback on a single charge
Recharging
Recharge with the included USB-C cable connected to a USB power adapter (7.5W (5V/1.5A) minimum; 10W recommended), a wireless Qi charger, or the Sonos Roam Wireless Charger..
Charging Time 0% to 50% in 1 hour on USB; 2 hours wirelessly
* Specifications subject to change without notice.
Important safety information
Please read these instructions and heed all warnings. Keep them in a convenient location and make sure everyone in the household is aware of them.
Important: Do not connect the USB cable to Roam while using the NFC tag.
- Read these instructions.
- Keep these instructions.
- Heed all warnings.
- Follow all instructions.
- Clean with a damp or dry soft cloth. Do not use household cleaners or solvents as they may damage the finish on your Sonos products.
- Do not block any ventilation openings. Install in accordance with the manufacturer's instructions.
- Do not install near any heat sources such as radiators, heat registers, stoves, or other apparatus that produce heat.
- Protect the power cable from being walked on or pinched, particularly at plugs, convenience receptacles, and the point where they exit from the apparatus.
- Only use attachments/accessories specified by the manufacturer.
- Unplug this apparatus during lightning storms or when unused for long periods of time.
SONOS USER GUIDE
- Refer all servicing to Sonos qualified service personnel. Servicing is required when the apparatus has been damaged in any way, such as power-supply cable or plug is damaged, liquid has been spilled or objects have fallen into the apparatus, the apparatus has been exposed to rain or moisture, does not operate normally, or has been dropped.
- The Mains plug should be readily available to disconnect the equipment.
- Roam meets IP67 water resistance levels.
Roam SL
Sonos Roam SL is the essential portable speaker for listening at home and on the go.
- Enjoy up to 10 hours of continuous playback on a single charge—when it's time to recharge, connect the included cable to a USB power source (7.5W minimum; 10W recommended), place Roam SL on a compatible Qi wireless charger, or magnetically snap Roam SL to its custom wireless charger (sold separately).
- Lightweight, durable, waterproof design is ideal for the beach, pool parties, and more.
-
Stream over WiFi at home—connect to Bluetooth anywhere else.
-
Set up and control with the Sonos app (for Android and iOS).
- Compatible with your other S2 Sonos speakers for multi-room listening.
- See Getting started when you're ready to add Roam SL to your Sonos system.
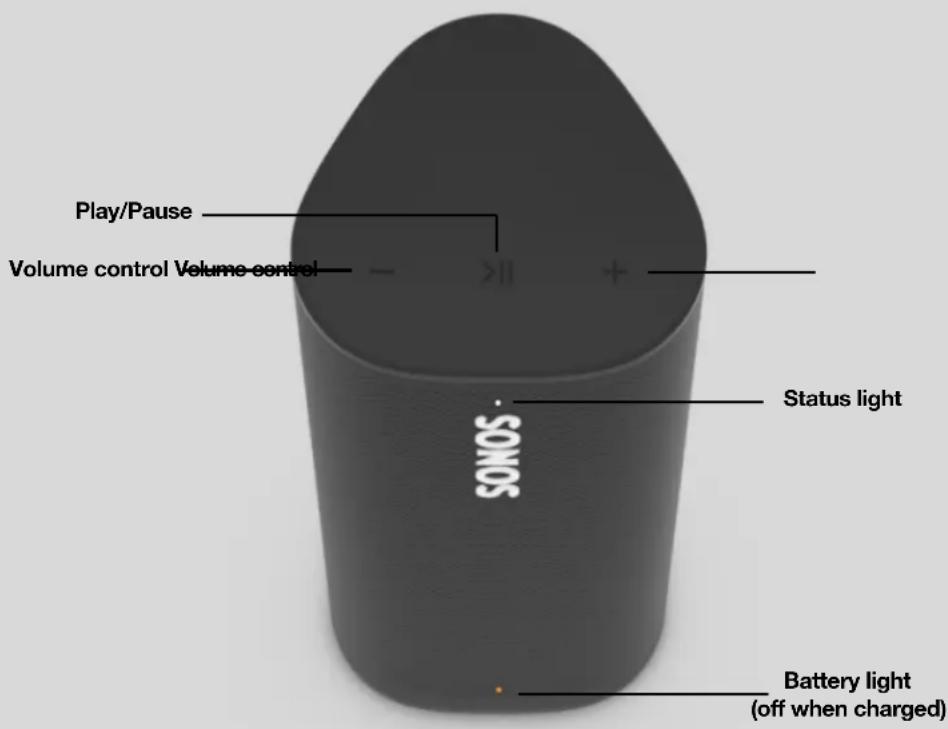
SONOS USER GUIDE
Power/Bluetooth button
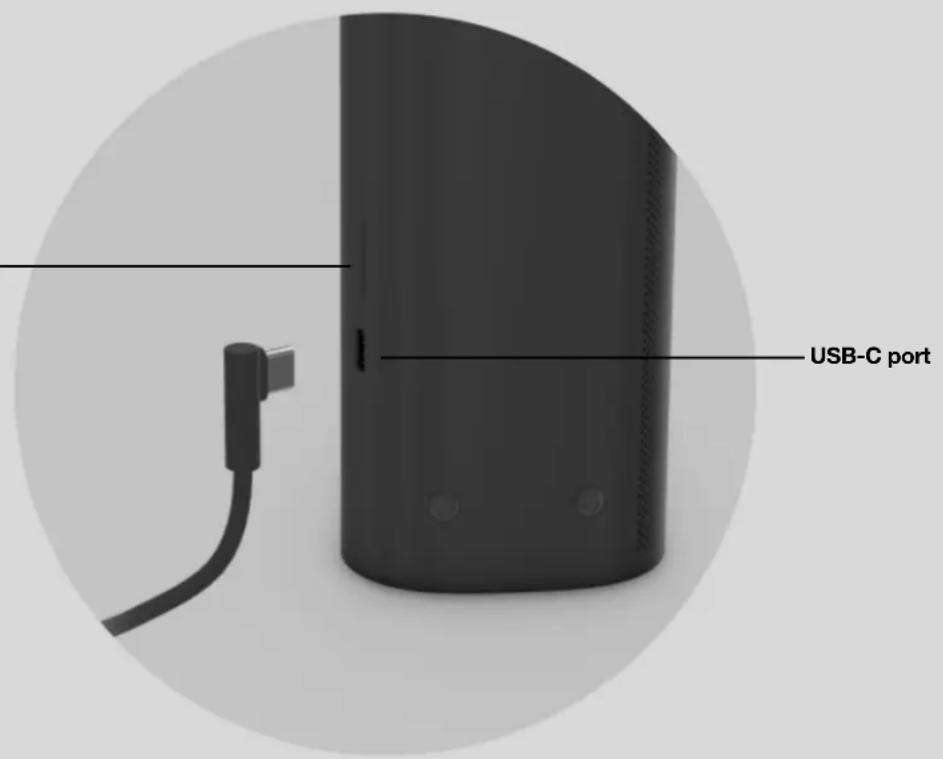
Controls and lights
| + - | Volume control Volume up (+); Volume down (-)Note:Press and hold to quickly change the volume. | |
| >II | Playback control | • Press once to play or pause audio.• Press and hold to group with other speakers.• Double press for next track.• Triple press for previous track.Note:You can't skip forward or go back when listening to a radio station. |
| Status light Indicates the speaker's status. | • Solid white: on.• Blinking blue: Bluetooth pairing mode.• Solid blue: connected with device via Bluetooth.• Flashing orange: if the product gets too hot, the status light flashes orange and the product chirps 3 times. Move the product to a cooler location, away from direct sunlight.Learn more | |
| Battery light Indicates the battery status. | • Blinking orange: low battery.• Solid orange: charging. The light may stay on for several minutes depending on how low the battery is. The battery will continue to charge when the light turns off.Learn moreNote:Roam's remaining battery life is always visible in the Sonos app.Battery Saver:To save battery life, you can set Roam SL to power off automatically instead of going to sleep. Go to System, and choose Roam SL. It won't appear in the Sonos app until it's powered back on.Learn more | |
Back
| USB-C port Use the included cable to connect a compatible 7.5Wminimum (10W recommended) USB-A power source. | |
| Power / Bluetooth button | Power on/sleep: Press (less than 1 second). To wake Roam SL up, press any button or start playback from the app.Bluetooth: Press and hold for about 2 seconds until you hear the pairing tone (the second one), then release. The status light blinks blue and Roam SL is ready to pair.Power off: Long press (5 seconds) |
Charging
| USB-C to USB-A Use the included cable to connect a compatible 7.5W | ||
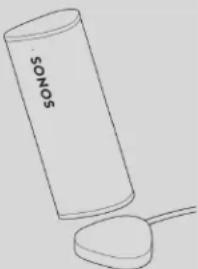
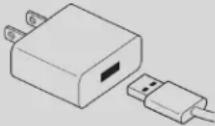 | minimum (10W recommended) USB-A power source.(Optional Sonos 10W USB Power Adapter sold separately.)Note: Roam SL's remaining battery life is visible in the Sonos app. | |
| Sonos Wireless Charger(sold separately) | Just place Roam SL on the smooth, magnetized side of the charger for easy recharging—no extra wires or cables needed. | |
 | ||
Location and usage guidelines
You can use your speaker just about anywhere. Here are a few things to keep in mind:
- You can place Roam SL next to a wall or on a shelf—for best performance, leave at least 1" (2.5 cm) space around the back of the speaker.
- Roam SL's durable design includes silicone end caps to protect the speaker if it's dropped or bumped.
- For optimal performance, avoid placing Roam SL in direct sunlight.
- Roam SL can be placed horizontally or vertically. When vertical, Roam SL takes up barely any room. Position it horizontally for added stability on uneven surfaces.
Waterproof design
Roam SL has an IP67 rating—it's dustproof and waterproof and can be submerged 1 meter for up to 30 minutes. If Roam SL gets saturated with water, you can dry it off this way:
- Flush Roam SL with tap water, then give it a quick shake.
- Place the speaker vertically for a few seconds until it drains, then place it face down (logo side down) on a dry towel for a few minutes.
- Start playing some audio to assist with drainage.
Note: Don't play audio when Roam SL is immersed in water.
Bluetooth pairing
- Turn Bluetooth on in your device settings.
- Press and hold the power button on Roam SL for about 2 seconds until you hear the pairing tone (the second one), then release.
The status light blinks blue and Roam SL is ready to pair.
- Choose Roam SL from the list of available devices in your Bluetooth settings.
Your device will automatically connect to Roam SL next time.
Accessories
For add-ons tailored to perfectly fit your Roam SL, see Accessories on our website.
Specifications
Sonos Roam SL
Feature Description
Audio
Amplifier Two Class-H digital amplifiers.
Tweeter One tweeter offers crisp high frequencies.
Mid-Woofer One mid-woofer ensures faithful playback of mid-range vocal frequencies.
Adjustable EQ Use the Sonos S2 app to adjust bass, treble, and loudness.
Software
Sonos S2 Set up and control Roam SL with the latest generation of the Sonos app.
Apple AirPlay 2 Works with AirPlay 2 on Apple devices iOS 11.4 and higher.
Details
IP Rating IP67 (speaker can be submerged in 1m of water for up to 30 minutes)
Dimensions (H x W x D)
6.61 x 2.44 x 2.36 in (168 x 62x 60mm)
Feature Description
Weight.95 lb. (.43 kg)
Memory 1GB SDRAM; 4GB NV
CPU Quad Core; 1.3 GHz A-53
Operating Temperature 41° to 95° F (5° to 35° C)
Storage Temperature -4° to 145° F (-20° to 63° C)
Package Contents Sonos Roam SL, USB cable (3.9 ft/ 1.2 m), and Quickstart guide
Power & Connectivity
| WiFi | Connects to WiFi network with any 802.11b/g/n/ac 2.4 or 5 GHz broadcast-capable router |
| Bluetooth | Bluetooth 5.0 supports audio streaming from your smartphone and other devices |
| Inputs USB-C for charging | |
| Battery 18 Wh battery provides up to 10 hours of continuous playback on a single charge | |
| Recharging Recharge with the included USB-C cable connected to a USB power adapter (7.5W (5V/1.5A) minimum; 10W recommended), a wireless Qi charger, or the Sonos Roam Wireless Charger.. | |
| Charging Time 0% to 50% in 1 hour on USB; 2 hours wirelessly | |
* Specifications subject to change without notice.
Important safety information
Please read these instructions and heed all warnings. Keep them in a convenient location and make sure everyone in the household is aware of them.
Important: Do not connect the USB cable to Roam SL while using the NFC tag.
- Read these instructions.
- Keep these instructions.
- Heed all warnings.
- Follow all instructions.
- Clean with a damp or dry soft cloth. Do not use household cleaners or solvents as they may damage the finish on your Sonos products.
- Do not block any ventilation openings. Install in accordance with the manufacturer's instructions.
- Do not install near any heat sources such as radiators, heat registers, stoves, or other apparatus that produce heat.
- Protect the power cable from being walked on or pinched, particularly at plugs, convenience receptacles, and the point where they exit from the apparatus.
- Only use attachments/accessories specified by the manufacturer.
- Unplug this apparatus during lightning storms or when unused for long periods of time.
- Refer all servicing to Sonos qualified service personnel. Servicing is required when the apparatus has been damaged in any way, such as power-supply cable or plug is damaged, liquid has been spilled or objects have fallen into the apparatus, the apparatus has been exposed to rain or moisture, does not operate normally, or has been dropped.
- The Mains plug should be readily available to disconnect the equipment.
- Roam SL meets IP67 water resistance levels.
Move
Move is the durable, battery-powered smart speaker for indoor and outdoor listening.
- Rechargeable battery lasts up to 10 hours. Easily recharge by just setting Move on the charging base—no plugs or extra wires required. For power on the go, use a compatible USB-C charger.
- Weatherproof design is ideal for barbecues, pool parties, and more.
- Stream content over WiFi or Bluetooth®.
- Easy voice control with Amazon Alexa and Google Assistant built right in.
- Compatible with all your other Sonos speakers for multi-room listening.
- Works with either Sonos S2 or Sonos S1 (for Android and iOS).
- See Getting started when you're ready to add Move to your Sonos system.
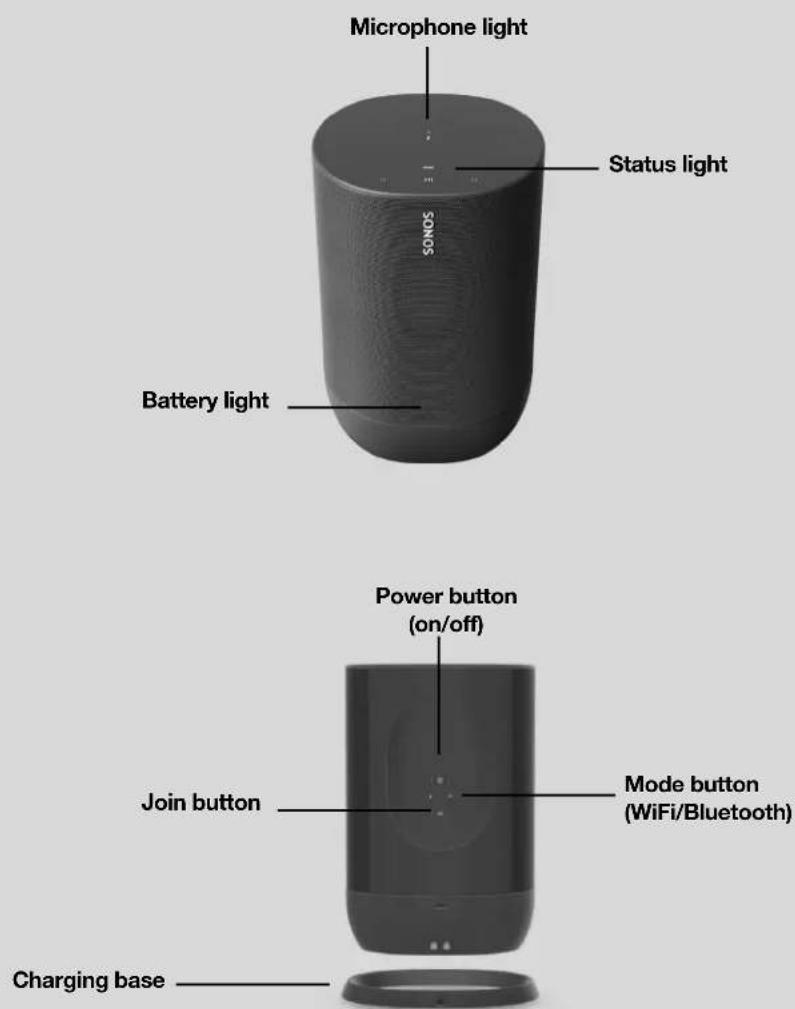
Controls and lights
| :: | Volume control | • Touch and hold to quickly change the volume:• Volume up (right); Volume down (left). |
| >|| | Play/Pause | • Press once to play or pause music.• Press and hold to add the music that's playing in another room. |
| :: >|| :: | Next/Previous | • Swipe right across the touch controls to skip to the next song.• Swipe left to go to the previous song.Note: You can't skip forward or go back when listening to a radio station. |
| Microphone indicator | Tap the microphone light to turn the microphone on or off.• When the light is on, auto Trueplay tuning is enabled. If you have a voice service set up, voice control is also on.• When the light is off, voice control and auto Trueplay are off. | |
| Status light Indicates the speaker's status. Learn moreIf the light is distracting, you can turn it off in your room's settings. | ||
| Battery light Indicates the battery status. | • Blinking orange: low battery.• Solid orange: charging. The light may stay on for several minutes depending on how low the battery is. The battery will continue to charge when the light turns off.Learn moreNote: Move's remaining battery life is always visible in the Sonos app.Battery Saver: To save battery life, you can set Move to power off automatically instead of going to sleep. Go to > System, and choose Move. It won't appear in the Sonos app until it's powered back on.Learn more | |
Note: If you don't want anyone (like a child) to control playback or change the volume using the speaker touch controls, you can disable them in the room's settings.
Back
| Join button Press to connect to your Sonos system during setup. | |
| USB-C port Use a compatible USB-C charger for charging on the go.·USB port may also be used for diagnostic purposes.(It can’t stream large data files, like some music files).Note: USB-C cable not included. | |
| Power button Press to power on; short press to put to sleep; long press (5 seconds) to power off.If Move is off the charging base, it goes to sleep to save battery when you’re not using it. Just press the power button to wake it up. | |
| Bluetooth/WiFi toggle button | Toggles between Bluetooth and WiFi. Use WiFi for setup; stream content over WiFi or Bluetooth®. |
| Handle Allows for easy lifting and carrying so you can take the speaker wherever you go. | |
Charging
| Charging base(included) | Just set Move on the charging base for easy recharging—no extra wires or cables needed.Make sure the speaker is seated properly in the base and the charging contacts are touching.Charging base is for indoor use only—be sure to keep it dry.Note:Move’s remaining battery life is always visible in the Sonos app. |
| AC power 100-240 VAC, ~50/60 Hz, 1.2 A. Output: 18.0 VDC,2.5 A, 45.0W | |
| USB port forcharging on the go | Use a compatible USB-C charger (type C PD power with 45W, 20V/2.25A) |
Select a location
You can put your speaker just about anywhere. Here are a few guidelines:
- Move is made to give you powerful sound anywhere—auto Trueplay tuning periodically balances the sound for wherever you are and whatever you're listening to. The microphone has to be on for automatic tuning so if you don't leave the microphone on all the time, turn it on for a few minutes whenever you move your speaker so it can automatically adjust the sound for your new surroundings.
- Move sounds great even when placed next to a wall or on a shelf. For best performance, leave at least 1" (2.5 cm) space around the back of the speaker.
- It's ultra durable. With a tough outer shell and IP56 rating, Sonos Move is built to withstand falls, bumps,
SONOS USER GUIDE
moisture, dust, UV rays, and extreme temperatures. Just don't leave it out in a soaking rain storm, and remember that the charging base that's included is for indoor use only.
- Don't use or store your Sonos Move upside down.
Automatic Trueplay™
You can put Sonos Move just about anywhere. Auto Trueplay tuning optimizes the sound for wherever you are and whatever you're listening to. Your speaker's microphone is used to detect the environment so auto Trueplay can make periodic tuning adjustments to deliver the best sound.
If you don't want the microphone on all the time, be sure to turn it on whenever you move the speaker. Your Sonos Move starts retuning when you pick it up, and continues to adjust the sound for a few minutes after you place it in a new location.
Microphone on/off
The microphone is used for voice control, and for auto Trueplay tuning. Touch ↓ to turn the microphone on or off.
When the microphone light is on,
- If you have a voice assistant, voice control is on and your voice assistant is ready to respond.
- Auto Trueplay tuning is enabled so Move can automatically adjust its sound for your surroundings.
When the microphone light is off,
- If you have a voice assistant, voice control is off.
• Auto Trueplay tuning is disabled.
Switch modes
Set Move up on your WiFi, then use the mode switch on the back of Move to switch between Bluetooth and WiFi. When you use Bluetooth for the first time, you'll need to pair Move with your device. Once paired, they'll reconnect automatically next time.
Bluetooth pairing
- Turn Bluetooth on in your device settings.
- Press the mode button on the back of Move to switch to Bluetooth.
- Choose Move from the list of available devices in your Bluetooth settings. If it's not there, press and hold the mode button and choose Move from the list when it appears.
You'll hear a confirmation tone when your device is paired with Move. They'll automatically connect next time you switch Move to Bluetooth.
Accessories
For add-ons tailored to perfectly fit your Move, see Accessories on our website.
Specifications
Sonos Move
Feature Description
| Audio | |
| Amplifier Two Class-D digital amplifiers. | |
| TweeterOne tweeter creates a crisp and accurate high frequency response. | |
| Mid-Woofer One mid-woofer ensures the faithful playback of mid-range vocal frequencies plus deep, rich bass. | |
| Microphones • Far-field microphone array. | |
| • Microphone LED, hard-wired to the voice microphones for extra privacy control so you're always aware when the microphone is active. | |
| Voice Control Integrated voice control. | |
| Networking* | |
| Wireless Connectivity | Connects to WiFi network with any 802.11a/b/g/n 2.4 or 5 GHz broadcast-capable router |
| General | |
| Power Supply | Charging base:100-240 VAC, ~50/60 Hz, 1.2 A. Output: 18.0 VDC, 2.5 A, 45.0 WUSB port: USB type C PD power with 45W, 20V/2.25A. |
| Battery pack Capacity: 2420-2500maH | Replacement: Visit our website www.sonos.com for more information.Disposal: Check with your local waste or recycling company to determine the proper disposal method in your area. |
| Dimensions (H x W x D) 9.44 x 6.29 x 4.96 in (240 x 160 x 126 mm) | |
| Weight 6.61 lb (3.0 kg) (including the battery) | |
| Operating Temperature | 32° to 113° F (0° to 45° C) |
| Storage Temperature | -13° to 158° F (-25° to 70° C) |
| Humidity Resistant | Move meets IP56 water and dust resistance levels. Just don't leave it out in a soaking rainstorm.Note: The charging base included with Move is for indoor use only. |
| Product Finish | Black with black grille |
| Package Contents | Sonos Move, charging base, and Quickstart guide. |
* Specifications subject to change without notice.
Charging base
| Charging base | Just set Move on the charging base for easy recharging.Charging base is for indoor use only—be sure to keep it dry.Note:Move’s remaining battery life is always visible in the Sonos app. |
| AC power 100-240 VAC, ~50/60 Hz, 1.2A. Output: 18.0 VDC, 2.5 A, 45.0 W | |
| Average active efficiency | 90.1% |
| Efficiency at low load (10%) | 85.3% |
| No-load power consumption | 0.07W |
| Charging contacts Make sure the speaker is seated properly in the base and the charging contacts are touching. | |
Important safety information
Please read these instructions and heed all warnings. Keep them in a convenient location and make sure everyone in the household is aware of them.
Caution: Danger of explosion if battery is incorrectly replaced. Replace only with the same or equivalent type.
- Read these instructions.
- Keep these instructions.
- Heed all warnings.
- Follow all instructions.
- Clean only with dry soft cloth. Household cleaners or solvents can damage the finish on your Sonos products.
If the charging base leaves a mark on wood furniture, remove with wood polish. - Do not block any ventilation openings. Install in accordance with the manufacturer's instructions.
- Do not install near any heat sources such as radiators, heat registers, stoves, or other apparatus that produce heat.
- Do not expose batteries (battery pack or batteries installed) to excessive heat such as sunshine or fire.
- Protect the power cable from being walked on or pinched, particularly at plugs, convenience receptacles, and the point where they exit from the apparatus.
- Only use attachments/accessories specified by the manufacturer.
SONOS USER GUIDE
-
Unplug this apparatus during lightning storms or when unused for long periods of time.
-
Refer all servicing to Sonos qualified service personnel. Servicing is required when the apparatus has been damaged in any way, such as power-supply cable or plug is damaged, liquid has been spilled or objects have fallen into the apparatus, the apparatus has been exposed to rain or moisture, does not operate normally, or has been dropped.
-
The Mains plug should be readily available to disconnect the equipment.

- Warning: Move meets IP56 water resistance levels. To reduce the risk of fire or electric shock, don't expose this apparatus to a soaking rain storm.
One
Sonos One has Amazon Alexa and Google Assistant built right in so you can use your voice to start and control the music on Sonos—
- Perfect fit for shelves, counters, and snug spaces or mounted to a wall, ceiling or speaker stand.
- Touch controls let you adjust volume, play and pause, or skip through songs.
- Pair two Sonos Ones for left-right stereo sound, or use two Sonos Ones as rear surrounds for your home theater.
- Works with either Sonos S2 or Sonos S1 (for Android and iOS).
- See Getting started when you're ready to add a Sonos One to your system.
Note: Over time we'll add more voice services and skills. Voice control is not supported in every country yet—this feature will be available as soon as Sonos and a voice service launch together in your region.
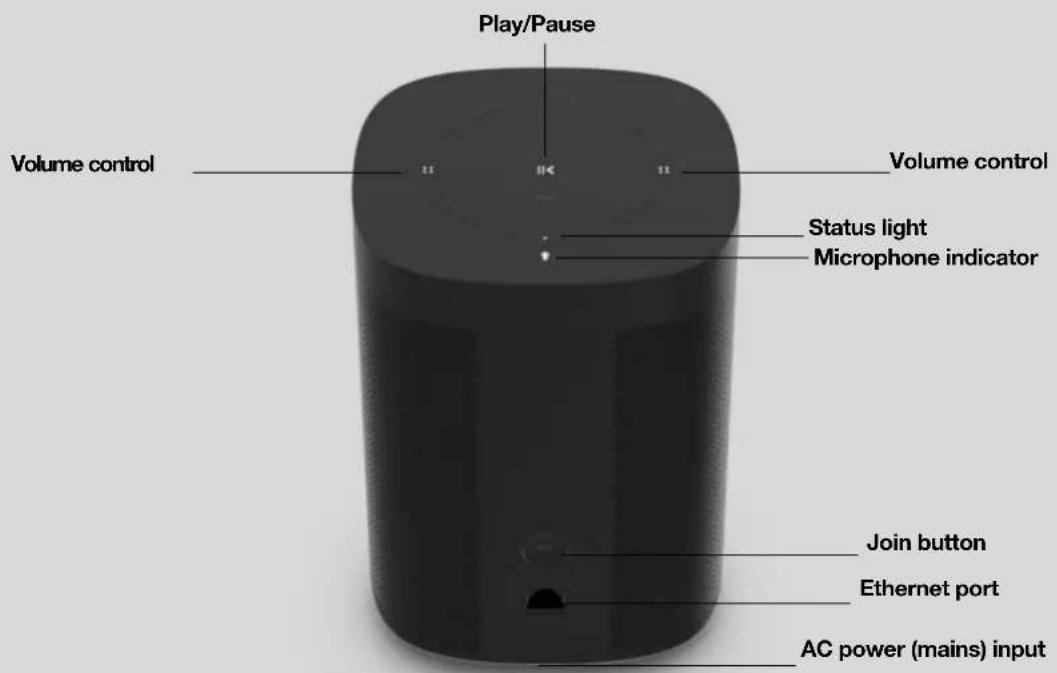
Controls and lights
| :: | Volume control | • Touch and hold to quickly change the volume:• Volume up (right); Volume down (left).Note: You can also use the Sonos app, voice control, or your TV remote. |
| >|| | Play/Pause | • Press once to play or pause music.• Press and hold to add the music that's playing in another room. |
| :: >|| :: | Next/Previous | • Swipe right across the touch controls to skip to the next song.• Swipe left to go to the previous song.Note: You can't skip forward or go back when listening to a radio station. |
| Microphone indicator | • Tap the microphone light to turn the microphone on or off.• When the light is on, voice control is on and you can use voice commands.• When the light is off, voice control is off.Note: If the light is off, you can press and hold the Microphone indicator to talk to your voice service. Release the button to turn voice control off again. | |
| Status light Indicates the status. Learn more | ____If the light is distracting, you can turn it off in your room's settings. | |
Note: If you don't want anyone (like a child) to control playback or change the volume using the speaker touch controls, you can disable them in the room's settings.
Connector panel
| Join button Press to connect during setup. | |
| Ethernet port Use an Ethernet cable if you want to connect to a router,computer, or network-attached storage (NAS) device(optional). | |
| AC power (mains) input | Use only the supplied power cord (using a third-partypower cord will void your warranty).Note: Insert the power cord firmly until it is flush withthe bottom of the speaker. |
Select a location
You can put your speaker just about anywhere. Here's a few guidelines:
- Sonos One sounds great even when placed next to a wall or on a shelf. For best performance, leave at least 1" (2.5 cm) space around the back of the speaker.
- It's humidity-resistant so you can use it in the bathroom.
- It's not water-resistant so don't put it near water or leave it in the rain.
Speaker mounts and stands
For wall mount kits or stands, tailored to perfectly fit your Sonos products, see Accessories on our website.
Microphone on/off
Touch ↓ to turn the microphone on and off. (If you don't have a voice service installed, the microphone is inactive.)
When the microphone light is on, voice control is on and your voice assistant is ready to respond. When the microphone light is off, voice control is off.
Note: If you've installed a voice service and the microphone is off, you can still use voice commands. Just press and hold ↓ —no need to start with a wake word. When you release the microphone button, voice control turns off again.
Specifications
Feature Description
Audio
Amplifier Two Class-D digital amplifiers.
TweeterOne tweeter creates a crisp and accurate high frequency response.
Mid-Woofer One mid-woofer ensures the faithful playback of mid-range vocal frequencies plus deep, rich bass.
Stereo Pair
Turn two speakers into separate left and right channel speakers to create wider, deeper sound.
Home Theater Add two speakers as surrounds for a true surround sound experience.
Microphones • Far-field microphone array.
- Microphone LED, hard-wired to the voice microphones for extra privacy control so you're always aware when the microphone is active.
Voice Control Integrated voice control.
Feature Description
| Networking* | |
| Wireless Connectivity | Using Sonos S2: Connects to WiFi network with any 802.11a/b/g/n 2.4 or 5 GHz broadcast-capable router.Using Sonos S1: Connects to WiFi network with any 802.11b/g 2.4 GHz broadcast-capable router. 802.11n only network configurations are not supported—you can either change the router settings to 802.11b/g/n or connect a Sonos product to your router. |
| Ethernet Port One 10/100Mbps Ethernet port. You can plug a Sonos product directly into your router if your WiFi is unstable. | |
| General | |
| Power Supply Auto-switching 100 - 240V ~ 50-60 Hz 1A AC universal input | |
| Dimensions (H x W x D) 6.36 x 4.69 x 4.69 in. (161.45 x 119.7 X 119.7 mm) | |
| Weight 4.08 lb (1.85 kg) | |
| Operating Temperature 32° to 104° F (0° to 40° C) | |
| Storage Temperature -4° to 158° F (-20° to 70° C) | |
| Humidity Resistant | Designed to withstand high-humidity, like in a bathroom with a running shower. (It is not waterproof or water-resistant.) |
| Product Finish White with white grille; black with black grille | |
| Package Contents Sonos One, power cord, and Quickstart Guide. | |
| * Specifications subject to change without notice. | |
Important Safety Information
- Read these instructions.
- Keep these instructions.
- Heed all warnings.
- Follow all instructions.
- Do not use this apparatus near water.
- Clean only with dry soft cloth. Household cleaners or solvents can damage the finish on your Sonos components.
- Do not block any ventilation openings. Install in accordance with the manufacturer's instructions.
- Do not install near any heat sources such as radiators, heat registers, stoves, or other apparatus that produce heat.
- Protect the power cable from being walked on or pinched, particularly at plugs, convenience receptacles, and the point where they exit from the apparatus.
- Only use attachments/accessories specified by the manufacturer.
- Unplug this apparatus during lightning storms or when unused for long periods of time.
- Refer all servicing to Sonos qualified service personnel. Servicing is required when the apparatus has been damaged in any way, such as power-supply cable or plug is damaged, liquid has been spilled or objects have fallen into the apparatus, the apparatus has been exposed to rain or moisture, does not operate normally, or has been dropped.
- The Mains plug should be readily available to disconnect the equipment.

-
Warning: To reduce the risk of fire or electric shock, do not expose this apparatus to rain or moisture.
-
Do not expose apparatus to dripping or splashing and do not place objects filled with liquids, such as vases, on the apparatus.
One SL
The speaker for stereo pairing and home theater surrounds.
- Compact design fits just about any space.
- Touch controls let you adjust volume, play and pause, or skip through songs.
- Pair with a Sonos One or another One SL for left-right stereo sound, or use a pair as rear surrounds for your home theater.
- Set up and control with the Sonos app (for Android and iOS).
- See Getting started when you're ready to add a Sonos One SL to your system.
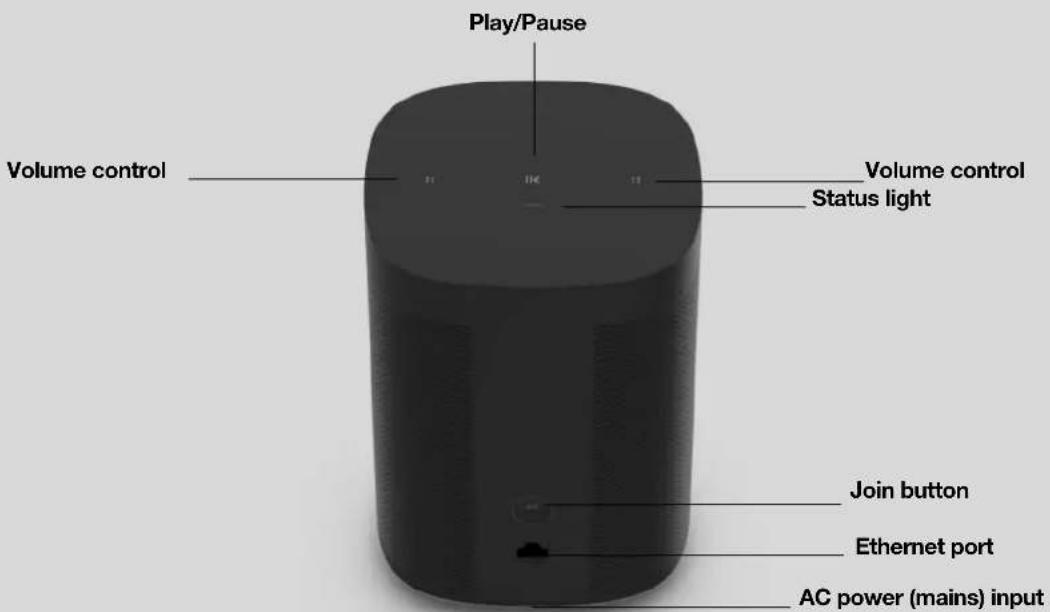
Controls and lights
| :: | Volume control | • Touch and hold to quickly change the volume:• Volume up(right);Volume down(left). |
| >|| | Play/Pause | • Press once to play or pause music.• Press and hold to add the music that’s playing in another room. |
| :: >|| :: | Next/Previous | • Swipe right across the touch controls to skip to the next song.• Swipe left to go to the previous song.Note:You can’t skip forward or go back when listening to a radio station. |
| Status light Indicates the status.Learn more | ____If the light is distracting, you can turn it off in your room’s settings. | |
Note: If you don't want anyone (like a child) to control playback or change the volume using the speaker touch controls, you can disable them in the room's settings.
Connector panel
| Join button Press to connect during setup. | |
| Ethernet port Use an Ethernet cable if you want to connect to a router,computer, or network-attached storage (NAS) device (optional). | |
| AC power (mains) input | Use only the supplied power cord (using a third-party power cord will void your warranty).Note: Insert the power cord firmly until it is flush with the bottom of the speaker. |
Select a location
You can put your speaker just about anywhere. Here's a few guidelines:
- Sonos One SL sounds great even when placed next to a wall or on a shelf. For best performance, leave at least 1" (2.5 cm) space around the back of the speaker.
- It's humidity-resistant so you can use it in the bathroom.
- It's not water-resistant so don't put it near water or leave it in the rain.
Speaker mounts and stands
For wall mount kits or stands, tailored to perfectly fit your Sonos products, see Accessories on our website.
Specifications
Feature Description
Audio
Amplifier Two Class-D digital amplifiers.
TweeterOne tweeter creates a crisp and accurate high frequency response.
Mid-Woofer One mid-woofer ensures the faithful playback of mid-range vocal frequencies plus deep, rich bass.
Stereo Pair Turn two speakers into separate left and right channel speakers to create wider, deeper sound.
Home Theater Add two speakers as surrounds for a true surround sound experience.
Networking\*
| Wireless Connectivity | Using Sonos S2: Connects to WiFi network with any 802.11a/b/g/n 2.4 or 5 GHz broadcast-capable router.Using Sonos S1: Connects to WiFi network with any 802.11b/g 2.4 GHz broadcast-capable router. 802.11n only network configurations are not supported—you can either change the router settings to 802.11b/g/n or connect a Sonos product to your router. |
Ethernet Port One 10/100Mbps Ethernet port. You can plug a Sonos product directly into your router if your WiFi is unstable.
General
Power Supply Auto-switching 100 - 240V \~ 50-60 Hz 1A AC universal input
Dimensions (H x W x D) 6.36 x 4.69 x 4.69 in. (161.45 x 119.7 X 119.7 mm)
Weight 4.08 lb (1.85 kg)
Operating Temperature 32° to 104° F (0° to 40° C)
Storage Temperature -4° to 158° F (-20° to 70° C)
Humidity Resistant Designed to withstand high-humidity, like in a bathroom with a running shower. (It is not waterproof or water-resistant.)
Product Finish White with white grille; black with black grille
Package Contents Sonos One SL, power cord, and Quickstart Guide.
* Specifications subject to change without notice.
Important Safety Information
- Read these instructions.
- Keep these instructions.
3.Heed all warnings. - Follow all instructions.
- Do not use this apparatus near water.
- Clean only with dry soft cloth. Household cleaners or solvents can damage the finish on your Sonos components.
- Do not block any ventilation openings. Install in accordance with the manufacturer's instructions.
- Do not install near any heat sources such as radiators, heat registers, stoves, or other apparatus that produce heat.
- Protect the power cable from being walked on or pinched, particularly at plugs, convenience receptacles, and the point where they exit from the apparatus.
- Only use attachments/accessories specified by the manufacturer.
- Unplug this apparatus during lightning storms or when unused for long periods of time.
- Refer all servicing to Sonos qualified service personnel. Servicing is required when the apparatus has been damaged in any way, such as power-supply cable or plug is damaged, liquid has been spilled or objects have fallen into the apparatus, the apparatus has been exposed to rain or moisture, does not operate normally, or has been dropped.
- The Mains plug should be readily available to disconnect the equipment.

-
Warning: To reduce the risk of fire or electric shock, do not expose this apparatus to rain or moisture.
-
Do not expose apparatus to dripping or splashing and do not place objects filled with liquids, such as vases, on the apparatus.
Five
The high-fidelity speaker for superior sound—
- Three woofers provide deep bass within a sealed architecture that eliminates reverb and echo. Two side tweeters create an ultra wide soundstage while a center tweeter optimizes vocal playback.
- Use the line-in port to connect your turntable or another device—simple control with the Sonos S2 app or Apple AirPlay 2.
- Versatile design with smart orientation sensing. Pair two speakers horizontally and Five automatically separates the left and right channels for impressive stereo sound. When paired vertically, each smartly adjusts to mono for more detailed stereo separation and an even wider soundstage.
- Pair two Fives for left-right stereo sound or use two Fives as rear surrounds for your home theater.
- Set up and control with the Sonos app (for Android and iOS).
- See Getting started when you're ready to add a Five to your Sonos system.
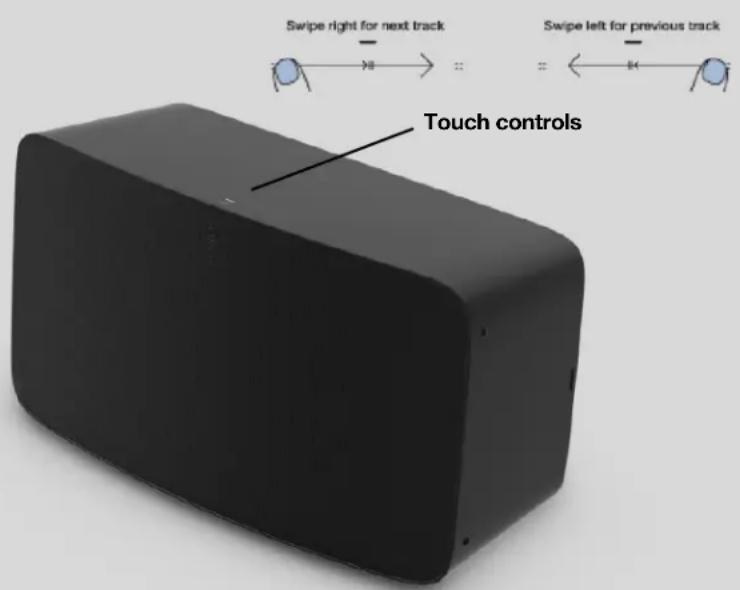
Note: The front grille is not removable. Tampering with the grille may result in damage to your Five.
Controls and lights
| :: | Volume control Touch and hold to quickly change the volume:• Volume up (right)• Volume down (left) | |
| >|| | Play/Pause | • Press once to play or pause music.• Press and hold to add the music that's playing in another room. |
| :: >|| :: | Next/Previous song | • Swipe right across the touch controls to skip to the next song.• Swipe left to go to the previous song.Note: You can't skip forward or go back when listening to a radio station. |
| Status light Indicates the status. Learn more ____If the light is distracting, you can turn it off in your room's settings. | ||
Note: If you don't want anyone (like a child) to control playback or change the volume using the speaker touch controls, you can disable them in the room's settings.
Connector panel
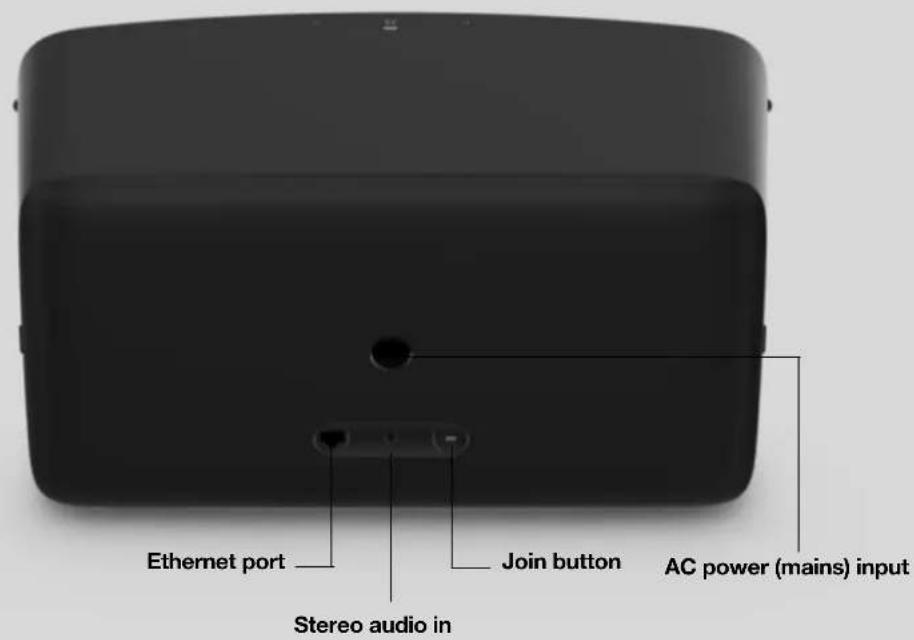
Join button Press to connect during setup.
Ethernet port Use an Ethernet cable if you want to connect to a router, computer, or network-attached storage (NAS) device (optional).
AC power (mains) input Use only the supplied power cord (using a third-party power cord will void your warranty). Note: Insert the power cord firmly until it is flush with the bottom of the speaker.
Stereo audio in (3.5mm / 1/8") Use to connect external music players.
Select a location
You can put your speaker just about anywhere. For maximum performance, we have a few guidelines:
- The Five is a substantial and powerful speaker and should be placed on a flat surface that is robust and durable enough to properly support it. Make sure Five's rubber feet sit completely on the flat surface.
- Allow at least 2" perimeter all around Five including its power cord.
- For a single Five speaker we recommend positioning the speaker horizontally to enable stereo sound.
SONOS USER GUIDE
- Place Five across the room from where you'll be listening (at or close to your ear height for best results).
- For stereo pair placement information, see Stereo pairs.
- The Five is humidity resistant so you can use it in the bathroom; however it is not water resistant so don't position it near water or leave it outside during a rain storm.
Speaker mounts and stands
For wall mount kits or stands, tailored to perfectly fit your Sonos products, see Accessories on our website. Follow the instructions in the kit.
Line-in
Connect an external source like a phono preamp (your tumtable may have a built-in phone preamp), or other audio device. Learn more.
Specifications
Feature Description
Audio
Amplifier Six Class-D digital amplifiers perfectly tuned to match the six dedicated speaker drivers and the acoustic architecture.
Tweeter Three tweeters create the crispest and clearest high-frequency response.
Mid-Woofer Three mid-woofers ensure you'll hear the faithful playback of mid-range vocal frequencies plus deep, rich bass—without distortion, even at high volumes.
Phased Speaker Array (three drivers on top and three on the bottom) Creates a wide stereo soundstage that directs the sound left, right, and center.
Stereo Pair Turn two speakers into separate left and right channel speakers to create wider, deeper sound.
Home Theater Add two speakers as surrounds for a true surround sound experience.
Networking\*
Wireless Connectivity Connects to WiFi network with any 802.11a/b/g/n 2.4 or 5 GHz broadcast-capable router.
Bluetooth Low Energy (BLE) Temporarily connects to your mobile device for first-time set up.
Ethernet Port One 10/100Mbps Ethernet port. You can plug a Sonos product directly into your router if your WiFi is unstable.
Feature Description
General
Power Supply Auto-switching 100 - 240 V \~ 50-60 Hz 2.3 A AC universal input.
Audio Line-In Auto-detecting 3.5 mm audio line-in connection.
Dimensions (W x H x D) 14.33 x 8.03 x 6.06 in. (364 x 203 x 154 mm)
Weight 14 lb / 6.36 kg
Threaded Mount None
Operating Temperature 32° to 104° F (0° to 40° C)
Storage Temperature -4^ to 158^ F ( -20^ to 70^ C)
Humidity Resistant
Designed to withstand high-humidity, like in a bathroom with a running shower. (It is not waterproof or water-resistant.)
Product Finish White matte or black matte exposure, graphite grille
Package Contents Five, power cord, and Quickstart Guide.
* Specifications subject to change without notice.
Important Safety Information
- Read these instructions.
- Keep these instructions.
3.Heed all warnings. - Follow all instructions.
- Do not use this apparatus near water.
- Clean only with dry soft cloth. Household cleaners or solvents can damage the finish on your Sonos components.
- Do not block any ventilation openings. Install in accordance with the manufacturer's instructions.
- Do not install near any heat sources such as radiators, heat registers, stoves, or other apparatus that produce heat.
- Protect the power cable from being walked on or pinched, particularly at plugs, convenience receptacles, and the point where they exit from the apparatus.
- Only use attachments/accessories specified by the manufacturer.
- Unplug this apparatus during lightning storms or when unused for long periods of time.
- Refer all servicing to Sonos qualified service personnel. Servicing is required when the apparatus has been damaged in any way, such as power-supply cable or plug is damaged, liquid has been spilled or objects have fallen into the apparatus, the apparatus has been exposed to rain or moisture, does not operate normally, or has been dropped.
- The Mains plug should be readily available to disconnect the equipment.

-
Warning: To reduce the risk of fire or electric shock, do not expose this apparatus to rain or moisture.
-
Do not expose apparatus to dripping or splashing and do not place objects filled with liquids, such as vases, on the apparatus.
Arc
The premium smart soundbar for TV, movies, music, and more—
• 3D sound with Dolby Atmos.
- Eleven high-performance drivers, including custom elliptical woofers and angled side tweeters for rich bass and clear dialogue.
- Arc's advanced processing creates five phased-array channels that deliver sound to your ears from all directions.
- Quick and easy setup, with only one cable to connect to your TV. Elegant design discreetly mounts to the wall or sits on a credenza beneath the TV.
- Expandable. Add a Sub and a pair of Sonos speakers (Sonos One or Sonos Five), for 5.1 surround sound. For more information, see Sonos home theater.
- Set up and control with the Sonos app (for Android and iOS).
- See Getting started when you're ready to add Arc to your Sonos system.
Controls and lights
Swipe, touch, tap, or ask—with Sonos Arc you've got choices on how to control sound.
- Use the touch controls—touch or swipe across the controls.
- Voice control—set it up and use your voice to turn the TV on or off, adjust the volume, or play music.
- Use the Sonos S2 app.
- Use your TV remote control.
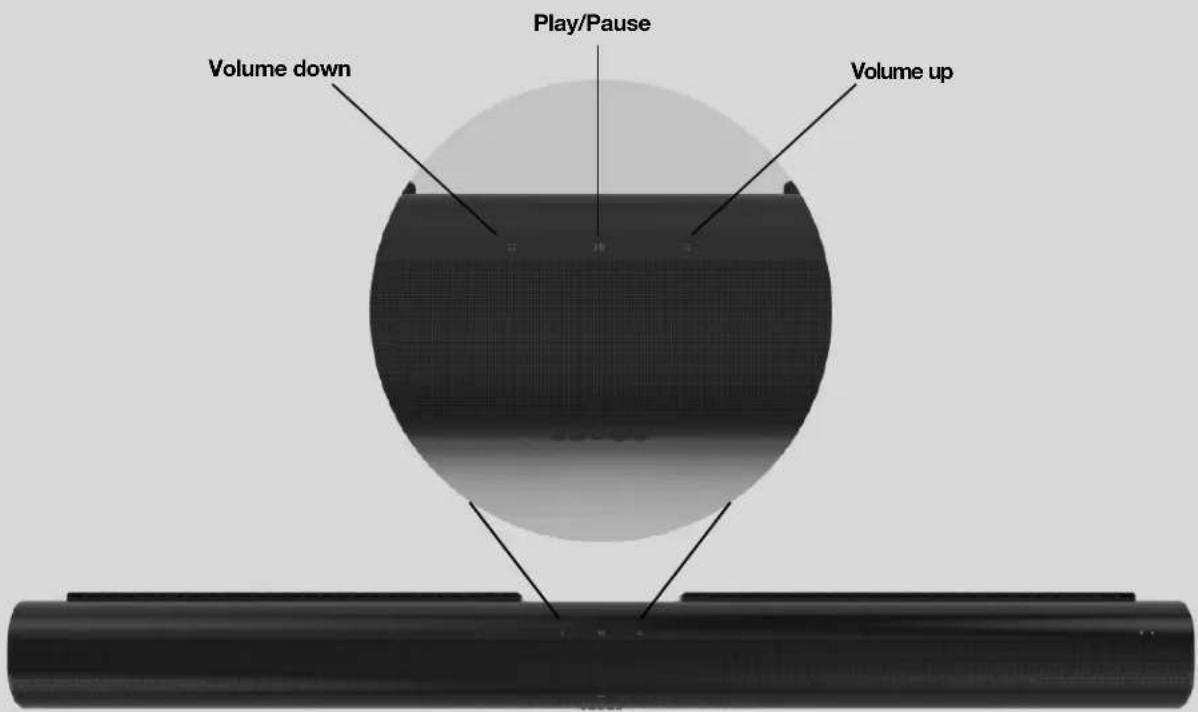
| :: | Volume control Touch for small adjustments or touch and hold to quickly change the volume:• Volume up (right)• Volume down (left)Note: You can also use the Sonos app, voice control, or your TV remote. | |
| >|| | Play/Pause Touch to play or pause sound. | |
| :: >|| :: | Next/Previous (Music only) | • Swipe right across the touch controls to skip to the next song.• Swipe left to go to the previous song.Note: You can't skip forward or go back when listening to a radio station. |

Microphone indicator
- Tap the microphone light to turn the microphone on or off.
- When the light is on, voice control is on and you can use voice commands.
- When the light is off, voice control is off.
Note: If the light is off, you can press and hold the Microphone indicator to talk to your voice service. Release the button to turn voice control off again.
Status light Indicates the status. Learn more
Connector panel
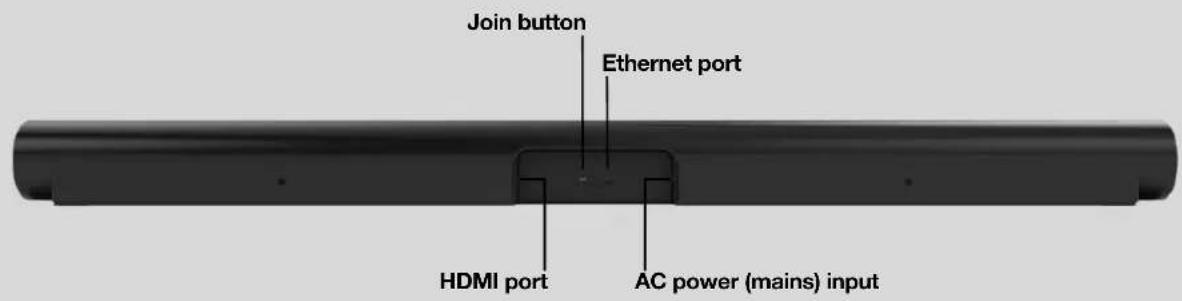
AC power (mains) input Use only the supplied power cord (using a third-party
power cord will void your warranty).
Note: Insert the power cord firmly until it is flush with the speaker.
Join button Press to connect during setup.
Ethernet port Use an Ethernet cable if you want to connect to a router, computer, or network-attached storage (NAS) device (optional).
HDMI port Use to connect Sonos Arc to your TV.
Select a location
You can wall mount Sonos Arc under your TV or place it on a credenza.
Place on a credenza
- Place horizontally on a stable and level surface.
- Keep 4.0" (102 mm) space (minimum) between the top of Sonos Arc and the bottom of your TV (if placing Arc below the TV).
- Don't place vertically or on its side.
- Make sure the touch controls are facing up.
Wall mount
To put Sonos Arc on a wall, see Wall mount.
Connect the cables
Before you start
- Disconnect existing home theater or surround sound equipment from your TV.
- Connect any external devices, like a cable box or DVD player, directly to your TV.
- Turn your TV on.
Connect the power cord
- Insert the power cord firmly into Arc's power port until it's fully connected.
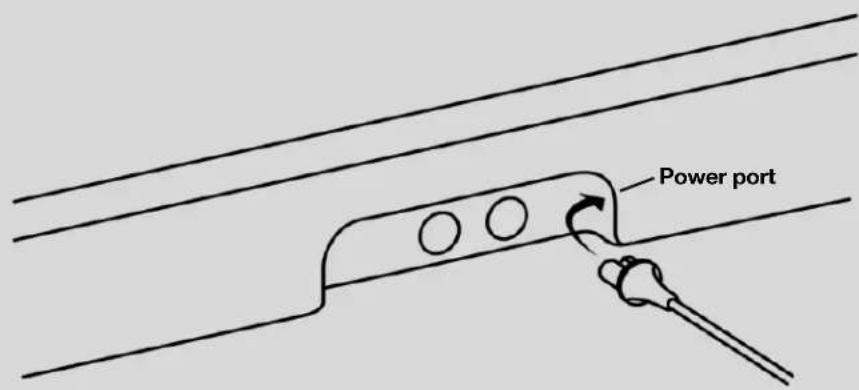
- Plug the other end into a power outlet.
Caution: Use only the supplied power cord (using a third-party power cord will void your warranty).
Connect Sonos Arc to your TV
Use the HDMI cable to connect the soundbar to your TV. If your TV doesn't have an ARC or eARC port, you'll need to use the optical adapter too (the app guides you through it during setup).
- Fully insert the HDMI cable into Arc's HDMI port.
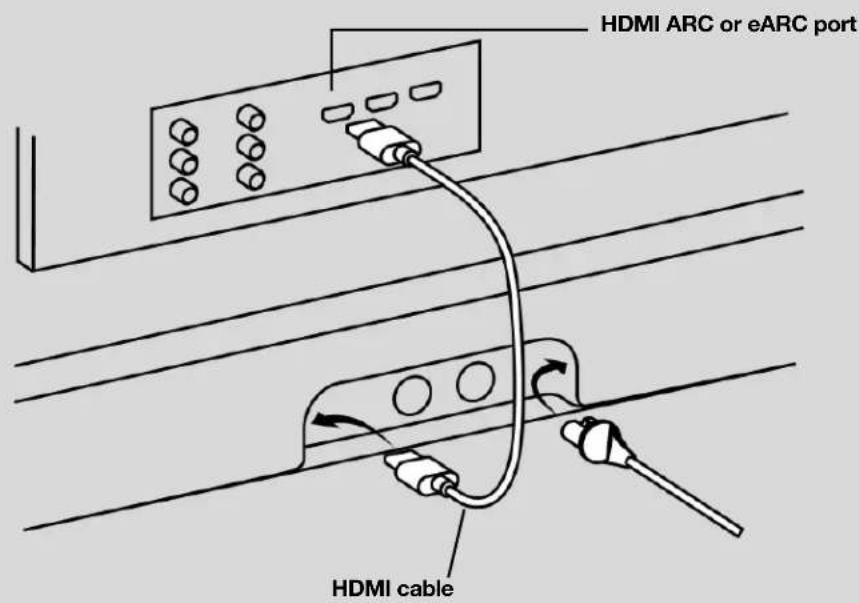
-
Connect the HDMI cable to your TV:
-
If your TV has an HDMI ARC or eARC port, plug the HDMI cable directly into the TV port labeled ARC, eARC, or ARC/eARC.
- If your TV doesn't have an HDMI ARC port, you'll need to connect the optical audio adapter (included) to your TV's Digital audio out instead.
HDMI ARC or eARC
HDMI ARC is a special port that looks like a standard HDMI port—it may be on the back or side of your TV. The ports look similar, but the ARC port will be labeled ARC, eARC, or ARC/eARC. If you connect Sonos Arc to a standard HDMI port instead, you won't hear any sound.
Note: For TVs that don't have an ARC port, use the optical audio adapter (included) to connect Sonos Arc to your TV's Digital audio out.
Digital audio out
If your TV doesn't have an HDMI ARC or eARC port, you'll use the optical audio adapter (included) to connect to your TV's digital audio out port.
- Remove the protective cap from the adapter.
- Attach the optical adapter to the HDMI cable.
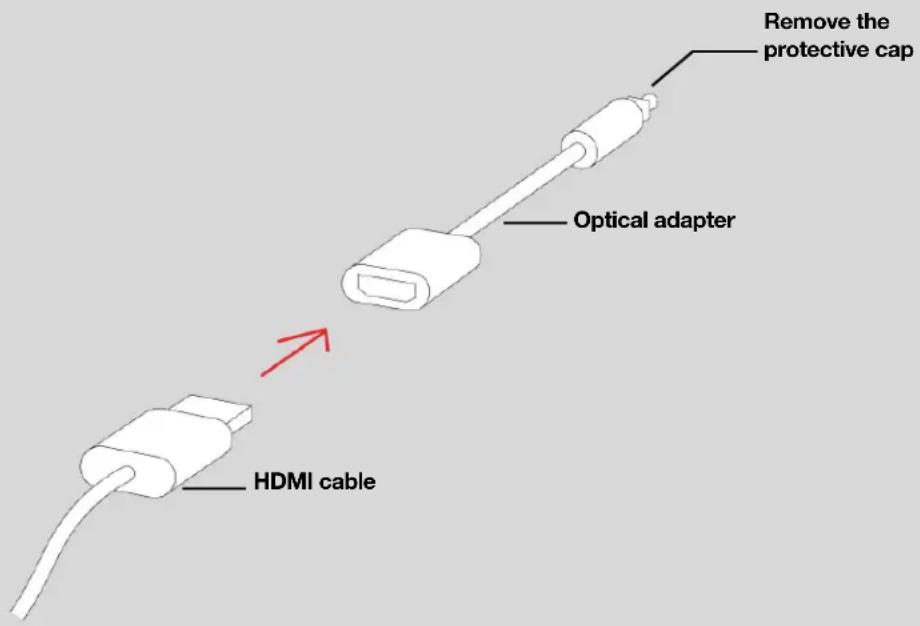
- Connect the optical adapter to the TV's optical digital OUT port.
Note: The optical adapter's port is "D-shaped"—make sure the connector aligns correctly into the port. Inserting the adapter incorrectly may damage the cable.
If you don't have the free Sonos app, download it from the app store. You'll need it to set up and control your Sonos system. See Getting started.
Microphone on/off
Touch ↓ on your Sonos Arc to turn the microphone on and off. (If you don't have a voice service installed, the microphone is inactive.)
When the microphone light is on, voice control is on and your voice assistant is ready to respond. When the microphone light is off, voice control is off.
Note: If you've installed a voice service and the microphone is off, you can still use voice commands. Just press and hold ↓ —no need to start with a wake word. When you release the microphone button, voice control turns off again.
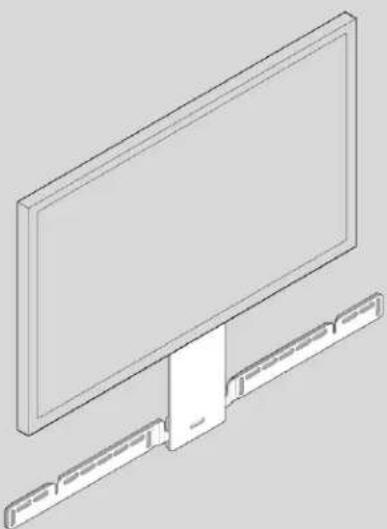
Wall mount
Guidelines
- Use the Sonos Arc wall mount kit. You can buy it on www.sonos.com. Follow the instructions in the kit.
- Keep 4.0" (102 mm) space (minimum) between Sonos Arc and your TV.
- Make sure the touch controls are facing up.
- For best sound quality, keep both ends of Arc at least 1' (30cm) from a wall or other obstruction.
Mount kit contents
• Wall mount bracket
- Positioning guide (don't discard—it may look like packing material)
- 2 knobs
- 6 wall anchors
- 6 screws
Note: Don't discard the positioning guide. It may look like packing material.
natural_image
Line drawing of a monitor mounted on a stand with a separate bracket (no text or symbols)- If your TV is wall-mounted, place the positioning guide against the wall, aligning the top edge with the bottom of your TV. There should be 5.5" (140 mm) between the top of the wall mount bracket and the TV.
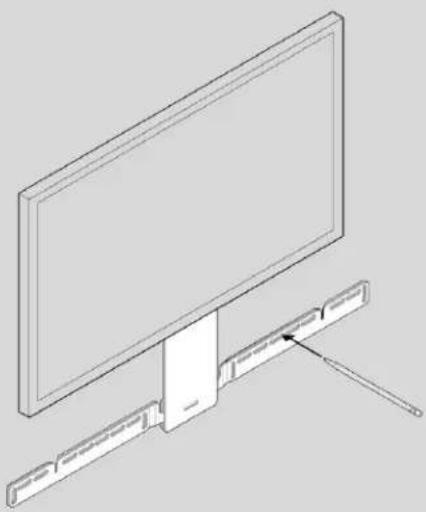
natural_image
Line drawing of a flat-screen monitor mounted on a stand, with no text or symbols present.- Mark the screw locations and remove the guide. Refer to Wall mounting information for placement help.
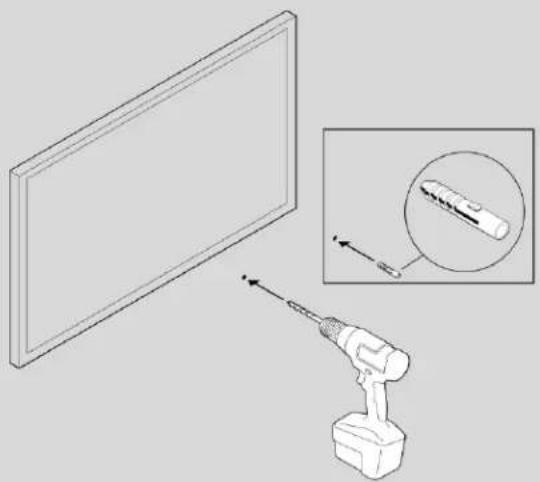
natural_image
Illustration of a screwdriver and its magnified view of a screwdriver (no text or symbols present)- If you're using the included wall anchors, use a 5/16" drill bit to drill the pilot holes and then insert the wall anchors. Don't use the anchors if you're drilling into wood or plastic.
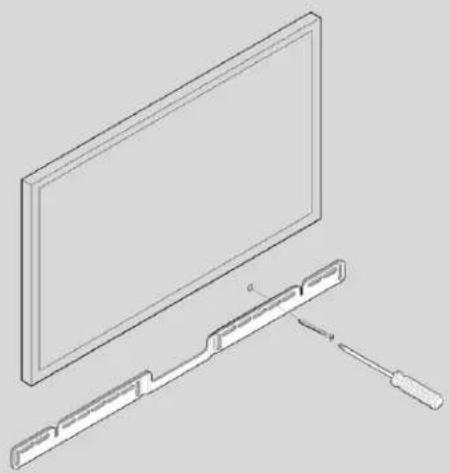
natural_image
Technical line drawing of a monitor and its viewing rod assembly (no text or symbols)- Position the wall mount bracket over the marked screw locations, using a level to confirm accuracy. Use a Phillips-head screwdriver or a power drill to screw the bracket to the wall, making sure the arrows in the center are pointing up.
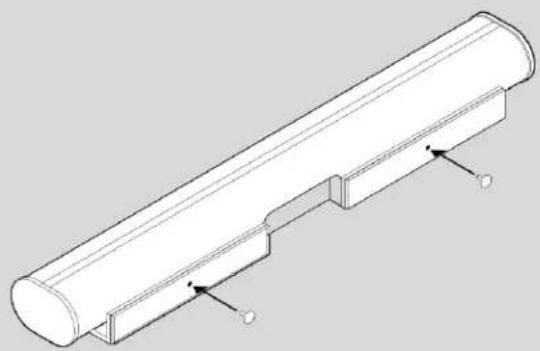
natural_image
Technical line drawing of a cylindrical mechanical component with mounting brackets and internal features (no text or symbols)- Screw the 2 knobs into the back of the soundbar until they are fully tightened.
natural_image
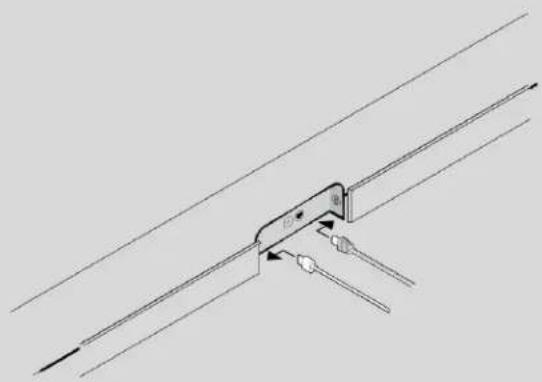
Pure technical line drawing of a mechanical bracket or clamp assembly without any text, numbers, or symbols- Connect the power and HDMI cables to the back of the soundbar.
Note: If you're connecting the cables to the TV at this time, be sure to plug the HDMI cable into the HDMI ARC or eARC port on your TV.
natural_image
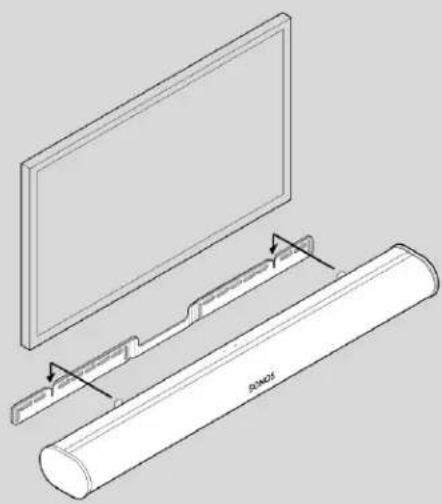
Technical line drawing of a cylindrical component with a flat panel and a labeled section (no text or symbols present)- Slide the soundbar down so the knobs fit into the slots on the wall bracket. Make sure the touch controls are facing up, and the soundbar is fully seated.
Wall mounting information
Wall Material Pre Drill Use Wall Anchors Use Screws
| Wood Stud 1/8" / 3 mm bit | No | 2 |
| Drywall (no stud) 5/16" / 8 mm bit Yes 6 | ||
| Plaster 5/16" / 8 mm bit | No, requires toggle bolt (not included) | 2-6 |
Concrete or Brick 5/16" / 8 mm bit Yes 2-6
Specifications
Feature Description
| Audio | |
| Amplifier Eleven Class-D digital amplifiers. | |
| Elliptical Woofer | Eight full-range woofers ensure you'll hear the faithful playback of mid-range vocal frequencies plus deep, rich bass. |
| Tweeter | Three silk dome tweeters create a crisp and clear high-frequency response. |
| Microphones | Four microphone array.LED hard-wired to voice microphones for privacy control so you know when the microphone is active. |
| Voice Control | Integrated voice control. |
| System Requirements | TV with HDMI ARC or optical digital audio output, broadband internet, and the Sonos S2 app. |
| Networking* | |
| Wireless Connectivity | Connects to WiFi network with any 802.11 b/g/n, 2.4 GHz broadcast-capable router. |
| Ethernet Port | One 10/100 Mbps Ethernet port. You can wire directly to your router if your WiFi is unstable. |
| General | |
| Power Supply | Auto-switching 100-240 V, 50-60 Hz 3.5 A AC universal input. |
| Dimensions (H x W x D) | 3.4 x 45 x 4.5 in. (87 x 1141.7 x 115.7 mm) |
| Weight | 13.78 lb (6.25 kg) |
| Operating Temperature | 32°F to 104°F (0°C to 40°C) |
Feature Description
Storage Temperature -4°F to 122°F (-20°C to 50°C)
Control Use your remote control, voice, touch controls, or the Sonos S2 app.
Supported Devices Connects to TV with HDMI cable (with or without an attached optical
adapter). Plays sources connected to the TV, including cable boxes and game consoles.
Package Contents
Sonos Arc, AC power cord, HDMI cable, optical audio adapter, Quickstart Guide.
* Specifications subject to change without notice.
Important Safety Information
- Read these instructions.
- Keep these instructions.
3.Heed all warnings. - Follow all instructions.
If your product is wallmounted:
- Improper or inadequate wallmount installation could cause your device to fall, resulting in personal injury.
- Never hang from the Sonos product or the wall bracket.
-
Once wall-mounted, periodically check to ensure screws remain securely tightened.
-
Do not use this apparatus near water.
- Clean only with dry soft cloth. Household cleaners or solvents can damage the finish on your Sonos components.
- Do not block any ventilation openings. Leave a recommended space of 4" (10cm) around the unit. Install in accordance with the manufacturer's instructions.
- Do not install near any heat sources such as radiators, heat registers, stoves, or other apparatus that produce heat.
- Protect the power cable from being walked on or pinched, particularly at plugs, convenience receptacles, and the point where they exit from the apparatus.
- Only use attachments/accessories specified by the manufacturer.
- Unplug this apparatus during lightning storms or when unused for long periods of time.
- Refer all servicing to Sonos qualified service personnel. Servicing is required when the apparatus has been damaged in any way, such as power-supply cable or plug is damaged, liquid has been spilled or objects have fallen into the apparatus, the apparatus has been exposed to rain or moisture, does not operate normally, or has been dropped.
- The Mains plug should be readily available to disconnect the equipment.

-
Warning: To reduce the risk of fire or electric shock, do not expose this apparatus to rain or moisture.
-
Do not expose apparatus to dripping or splashing and do not place objects filled with liquids, such as vases, on the apparatus.
Arc SL
The premium smart soundbar for TV, movies, music, and more—
• 3D sound with Dolby Atmos.
- Eleven high-performance drivers, including custom elliptical woofers and angled side tweeters for rich bass and clear dialogue.
- Arc SL's advanced processing creates five phased-array channels that deliver sound to your ears from all directions.
- Quick and easy setup, with only one cable to connect to your TV. Elegant design discreetly mounts to the wall or sits on a credenza beneath the TV.
- Expandable. Add a Sub and a pair of Sonos speakers (Sonos One or Sonos Five), for 5.1 surround sound. For more information, see Sonos home theater.
- Set up and control with the Sonos app (for Android and iOS).
- See Getting started when you're ready to add Arc SL to your Sonos system.
Controls and lights
Swipe, touch, or tap—with Sonos Arc SL you've got choices on how to control sound.
- Use the touch controls—touch or swipe across the controls.
- Use the Sonos S2 app.
- Use your TV remote control.
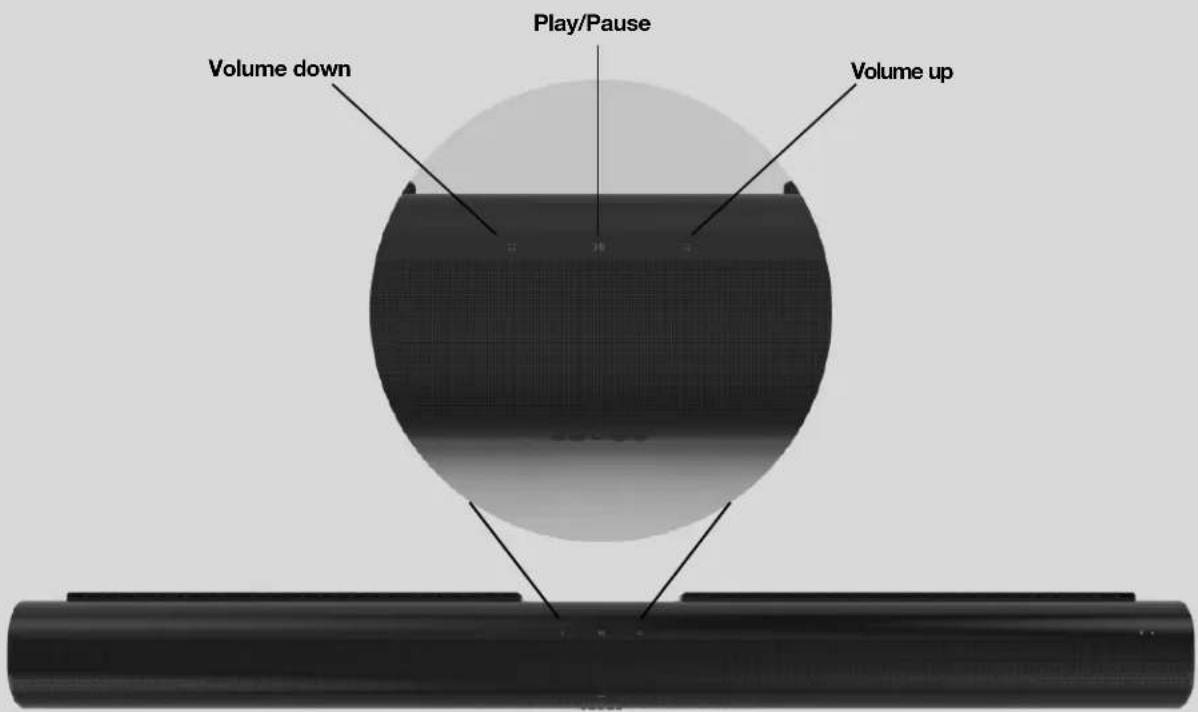
| :: | Volume control Touch for small adjustments or touch and hold to quickly change the volume:• Volume up (right)• Volume down (left)Note: You can also use the app, a voice assistant, or your TV remote control. | |
| >|| | Play/Pause Touch to play or pause sound. | |
| :: >|| :: | Next/Previous (Music only) | • Swipe right across the touch controls to skip to the next song.• Swipe left to go to the previous song.Note: You can't skip forward or go back when listening to a radio station. |
| Status light Indicates the status. Learn more | ____ | |
Connector panel
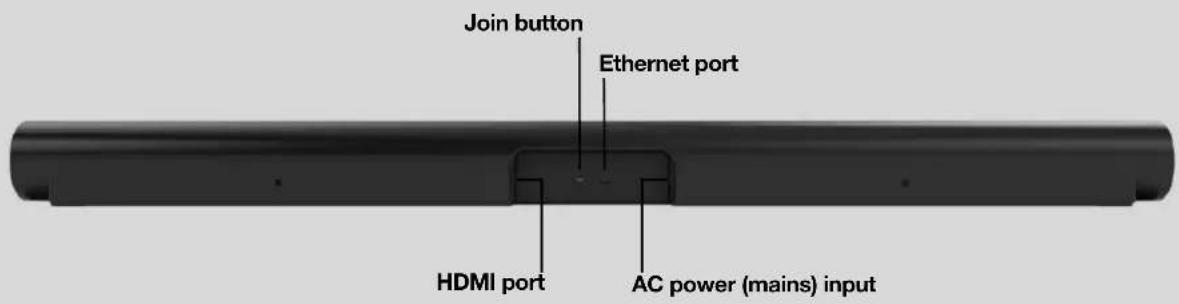
AC power (mains) input Use only the supplied power cord (using a third-party power cord will void your warranty). Note: Insert the power cord firmly until it is flush with the speaker.
Join button Press to connect during setup.
Ethernet port Use an Ethernet cable if you want to connect to a router, computer, or network-attached storage (NAS) device (optional).
HDMI port Use to connect Sonos Arc SL to your TV.
Select a location
You can wall mount Sonos Arc SL under your TV or place it on a credenza.
Place on a credenza
- Place horizontally on a stable and level surface.
- Keep 4.0" (102 mm) space (minimum) between the top of Sonos Arc SL and the bottom of your TV (if placing Arc SL below the TV).
- Don't place vertically or on its side.
- Make sure the touch controls are facing up.
Wall mount
To put Sonos Arc SL on a wall, see Wall mount.
Connect the cables
Before you start
- Disconnect existing home theater or surround sound equipment from your TV.
- Connect any external devices, like a cable box or DVD player, directly to your TV.
- Tum your TV on.
Connect the power cord
- Insert the power cord firmly into Arc SL's power port until it's fully connected.
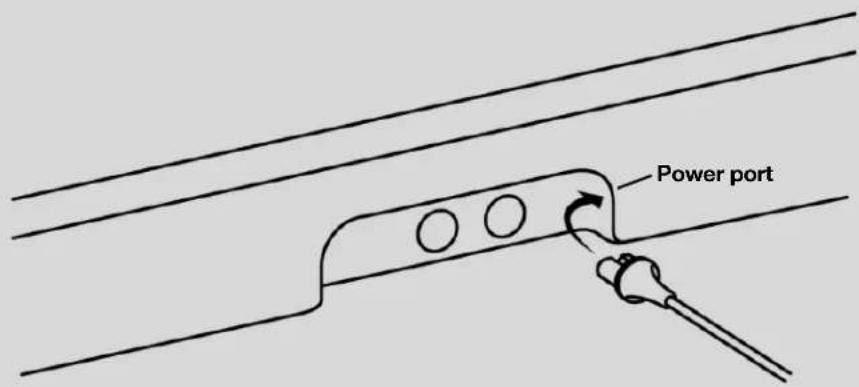
SONOS USER GUIDE
- Plug the other end into a power outlet.
Caution: Use only the supplied power cord (using a third-party power cord will void your warranty).
Connect Sonos Arc SL to your TV
Use the HDMI cable to connect the soundbar to your TV. If your TV doesn't have an Arc or eArc port, you'll need to use the optical adapter too (the app guides you through it during setup).
- Fully insert the HDMI cable into Arc SL's HDMI port.
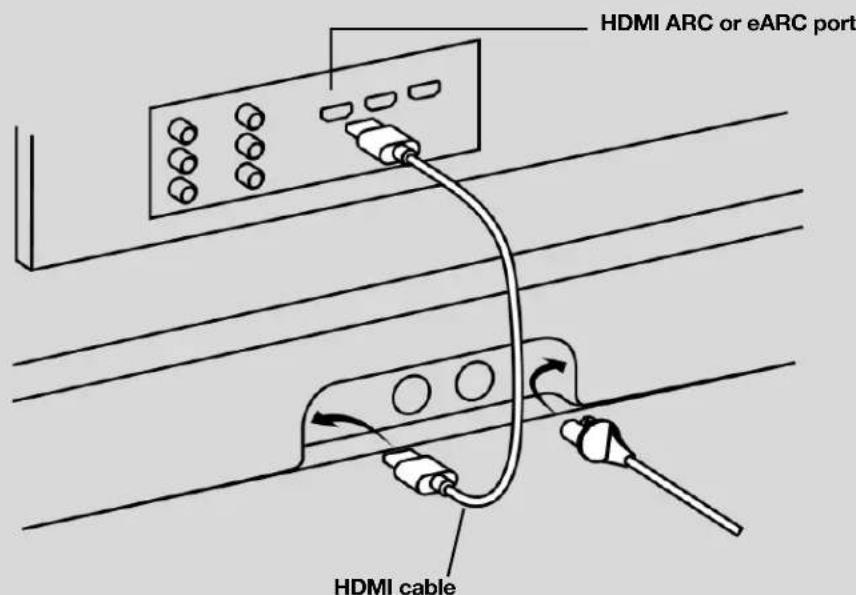
-
Connect the HDMI cable to your TV:
-
If your TV has an HDMI Arc or eArc port, plug the HDMI cable directly into the TV port labeled Arc, eArc, or Arc/eArc.
- If your TV doesn't have an HDMI Arc port, you'll need to connect the optical audio adapter (included) to your TV's Digital audio out instead.
HDMI Arc or eArc
HDMI Arc is a special port that looks like a standard HDMI port—it may be on the back or side of your TV. The ports look similar, but the Arc port will be labeled Arc, eArc, or Arc/eArc. If you connect Sonos Arc SL to a standard HDMI port instead, you won't hear any sound.
Note: For TVs that don't have an Arc port, use the optical audio adapter (included) to connect Sonos Arc SL to your TV's Digital audio out.
Digital audio out
If your TV doesn't have an HDMI Arc or eArc port, you'll use the optical audio adapter (included) to connect to your TV's digital audio out port.
- Remove the protective cap from the adapter.
- Attach the optical adapter to the HDMI cable.
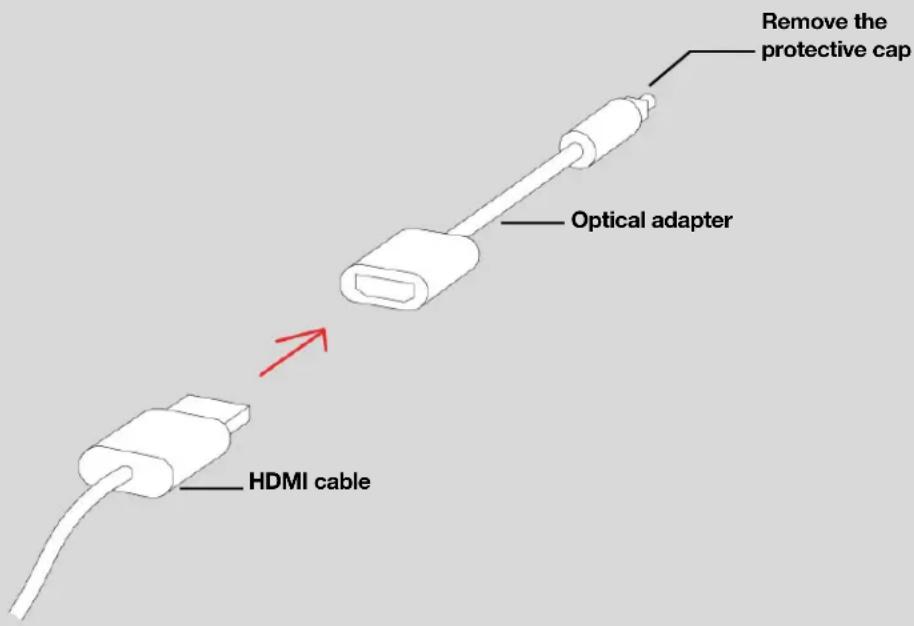
- Connect the optical adapter to the TV's optical digital OUT port.
Note: The optical adapter's port is "D-shaped"—make sure the connector aligns correctly into the port. Inserting the adapter incorrectly may damage the cable.
If you don't have the free Sonos app, download it from the app store. You'll need it to set up and control your Sonos system. See Getting started.
Wall mount
Guidelines
- Use the Sonos Arc SL wall mount kit. You can buy it on www.sonos.com. Follow the instructions in the kit.
- Keep 4.0" (102 mm) space (minimum) between Sonos Arc SL and your TV.
- Make sure the touch controls are facing up.
- For best sound quality, keep both ends of Arc SL at least 1' (30cm) from a wall or other obstruction.
Mount kit contents
• Wall mount bracket
- Positioning guide (don't discard—it may look like packing material)
SONOS USER GUIDE
- 2 knobs
- 6 wall anchors
- 6 screws
Note: Don't discard the positioning guide. It may look like packing material.
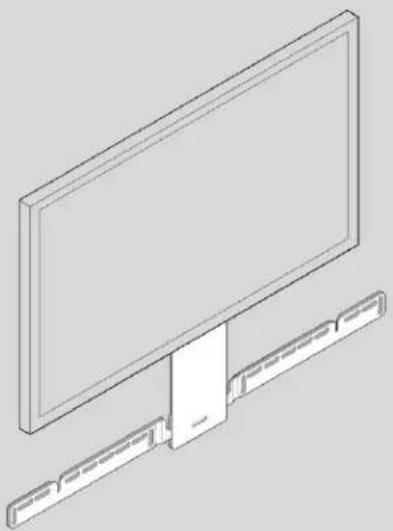
natural_image
Technical line drawing of a monitor mounted on a stand with a separate panel attachment (no text or symbols)- If your TV is wall-mounted, place the positioning guide against the wall, aligning the top edge with the bottom of your TV. There should be 5.5" (140 mm) between the top of the wall mount bracket and the TV.
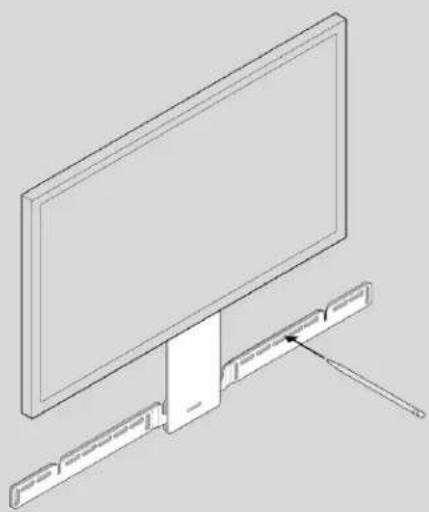
natural_image
Line drawing of a monitor mounted on a stand with a cable, no text or symbols presentSONOS USER GUIDE
- Mark the screw locations and remove the guide. Refer to Wall mounting information for placement help.
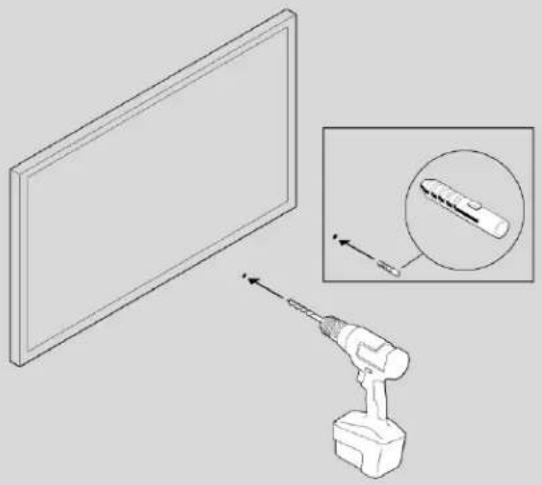
natural_image
Diagram showing a mounted power tool and a screen with an inset close-up of a cylindrical component (no text or symbols)- If you're using the included wall anchors, use a 5/16" drill bit to drill the pilot holes and then insert the wall anchors. Don't use the anchors if you're drilling into wood or plastic.
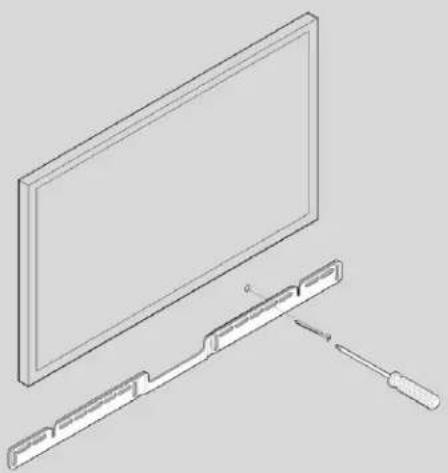
natural_image
Technical line drawing of a monitor and its rear panel assembly (no text or symbols)- Position the wall mount bracket over the marked screw locations, using a level to confirm accuracy. Use a Phillips-head screwdriver or a power drill to screw the bracket to the wall, making sure the arrows in the center are pointing up.
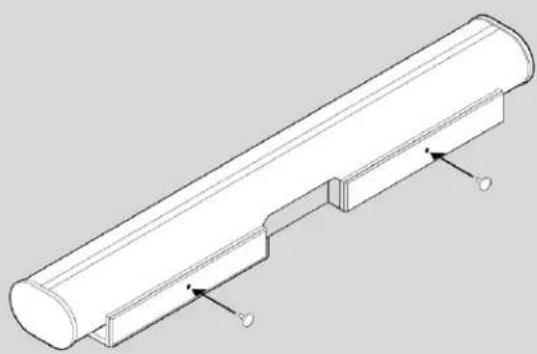
natural_image
Technical line drawing of a cylindrical mechanical component with mounting brackets and a side gap (no text or symbols)- Screw the 2 knobs into the back of the soundbar until they are fully tightened.
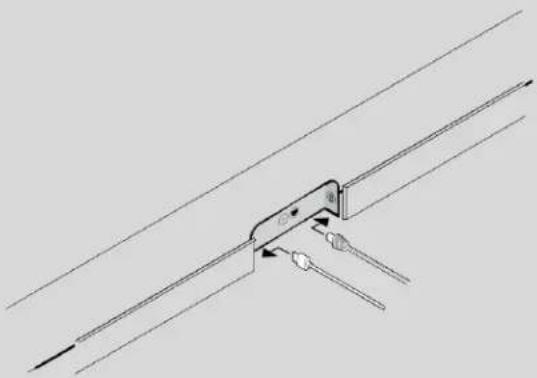
natural_image
Technical line drawing of a mechanical bracket or clamp assembly (no text or symbols)- Connect the power and HDMI cables to the back of the soundbar.
Note: If you're connecting the cables to the TV at this time, be sure to plug the HDMI cable into the HDMI Arc or eArc port on your TV.
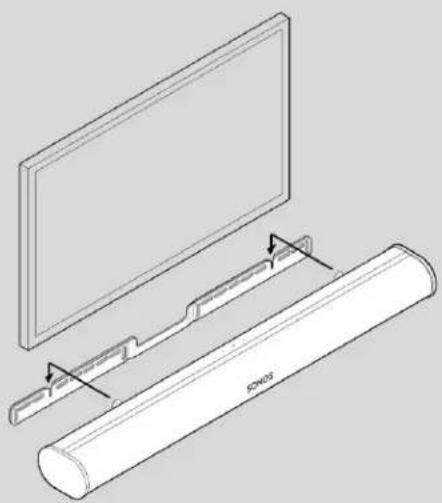
natural_image
Technical line drawing of a cylindrical component with a flat panel and a labeled section (no text or symbols present)- Slide the soundbar down so the knobs fit into the slots on the wall bracket. Make sure the touch controls are facing up, and the soundbar is fully seated.
Wall mounting information
Wall Material Pre Drill Use Wall Anchors Use Screws
| Wood Stud 1/8" / 3 mm bit | No | 2 |
| Drywall (no stud) 5/16" / 8 mm bit Yes 6 | ||
| Plaster 5/16" / 8 mm bit | No, requires toggle bolt (not included) | 2-6 |
Concrete or Brick 5/16" / 8 mm bit Yes 2-6
Specifications
Feature Description
| Audio | |
| Amplifier | Eleven Class-D digital amplifiers. |
| Elliptical Woofer | Eight full-range woofers ensure you’ll hear the faithful playback of mid-range vocal frequencies plus deep, rich bass. |
| Tweeter | Three silk dome tweeters create a crisp and clear high-frequency response. |
Feature Description
| System Requirements | TV with HDMI Arc SL or optical digital audio output, broadband internet, and the Sonos S2 app. |
| Networking* | |
| Wireless Connectivity | Connects to WiFi network with any 802.11 b/g/n, 2.4 GHz broadcast-capable router. |
| Ethernet Port | One 10/100 Mbps Ethernet port. You can wire directly to your router if your WiFi is unstable. |
General
Power Supply Auto-switching 100-240 V, 50-60 Hz 3.5 A AC universal input.
Dimensions (H x W x D) 3.4 x 45 x 4.5 in. (87 x 1141.7 x 115.7 mm)
Weight 13.78 lb (6.25 kg)
Operating Temperature 32^ F to 104^ F ( 0^ C to 40^ C)
Storage Temperature -4^ F to 122^ F ( -20^ C to 50^ C)
Control Use your remote control, voice, touch controls, or the Sonos S2 app.
Supported Devices Connects to TV with HDMI cable (with or without an attached optical adapter). Plays sources connected to the TV, including cable boxes and game consoles.
Package Contents Sonos Arc SL, AC power cord, HDMI cable, optical audio adapter, Quickstart Guide.
* Specifications subject to change without notice.
Important Safety Information
- Read these instructions.
- Keep these instructions.
- Heed all warnings.
- Follow all instructions.
If your product is wallmounted:
- Improper or inadequate wallmount installation could cause your device to fall, resulting in personal injury.
- Never hang from the Sonos product or the wall bracket.
-
Once wall-mounted, periodically check to ensure screws remain securely tightened.
-
Do not use this apparatus near water.
- Clean only with dry soft cloth. Household cleaners or solvents can damage the finish on your Sonos components.
- Do not block any ventilation openings. Leave a recommended space of 4" (10cm) around the unit. Install in accordance with the manufacturer's instructions.
- Do not install near any heat sources such as radiators, heat registers, stoves, or other apparatus that produce heat.
- Protect the power cable from being walked on or pinched, particularly at plugs, convenience receptacles, and the point where they exit from the apparatus.
- Only use attachments/accessories specified by the manufacturer.
- Unplug this apparatus during lightning storms or when unused for long periods of time.
- Refer all servicing to Sonos qualified service personnel. Servicing is required when the apparatus has been damaged in any way, such as power-supply cable or plug is damaged, liquid has been spilled or objects have fallen into the apparatus, the apparatus has been exposed to rain or moisture, does not operate normally, or has been dropped.
- The Mains plug should be readily available to disconnect the equipment.

-
Warning: To reduce the risk of fire or electric shock, do not expose this apparatus to rain or moisture.
-
Do not expose apparatus to dripping or splashing and do not place objects filled with liquids, such as vases, on the apparatus.
Beam (Gen 2)
The compact smart soundbar for TV, music and more—
- Five class-D digital amplifiers perfectly tuned to the drivers and soundbar's unique acoustic architecture deliver vibrant bass, crystal clear dialogue, and a panoramic soundstage.
- Feel sound all around you with the spacious 3D experience of Dolby Atmos.
- Stream music, radio, podcasts, and audiobooks over WiFi when the TV is off.
- Effortless setup with just two cables and smart Trueplay™ tuning.
- Flexibility to expand your system over time and enjoy true surround sound and multi-room listening. For more information, see Sonos home theater.
- Set up and control with the Sonos app (for Android and iOS).
- See Getting started when you're ready to add Beam (Gen 2) to your Sonos system.
Controls and lights
Swipe, touch, tap, or ask—with Sonos Beam you've got choices on how to control sound.
- Your existing TV remote
- Beam's touch controls
- Your voice (when a voice service is set up)
- Sonos S2 app
• AirPlay 2 on Apple devices iOS 11.4 and higher
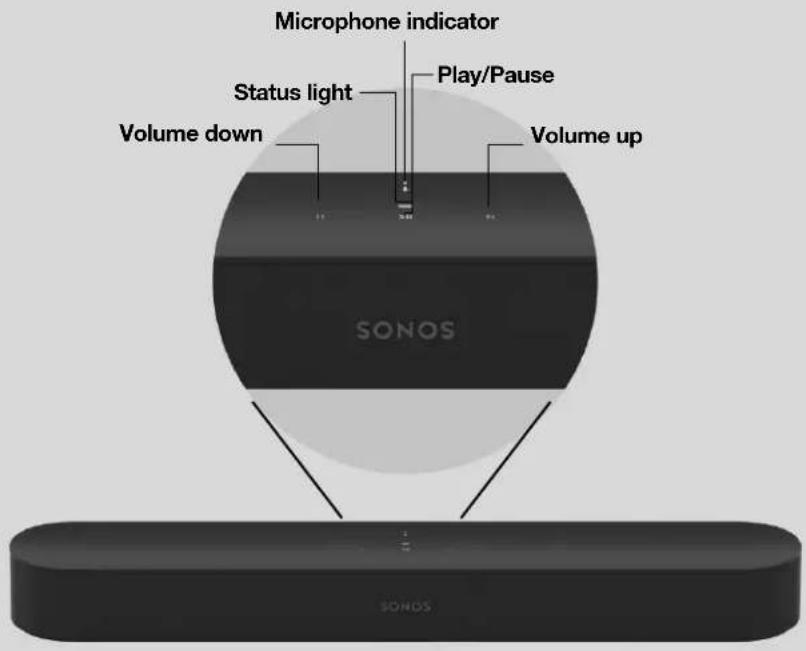
| :: | Volume control Touch for small adjustments or hold to quickly adjust the volume:• Volume up (right)• Volume down (left)Note: You can also use the Sonos app, voice control, or your TV remote. | |
| >|| | Play/Pause | • Touch to play or pause. Hold to group with other rooms and products in your Sonos system. |
| :: >|| :: | Next/Previous (Music only)Microphone indicator light | • Swipe right across the touch controls to skip to the next song.• Swipe left to play the previous song.Note: You can't skip forward or go back when listening to a radio station.Tap the microphone light to turn the microphone on or off. The light is hardwired to the microphones for privacy control.When the light is on, voice control is on and you can use voice commands.When the light is off, voice control is off.Note:If the light is off, you can press and hold the Microphone indicator to talk to your voice service. Release the button to turn voice control off again. |
| Status light Indicates the status. Learn more | ____ | |
Note: If you want to disable Beam's touch controls so playback and volume can't be controlled from the speaker, go to Settings > System in the Sonos app and choose Beam.
Connector panel
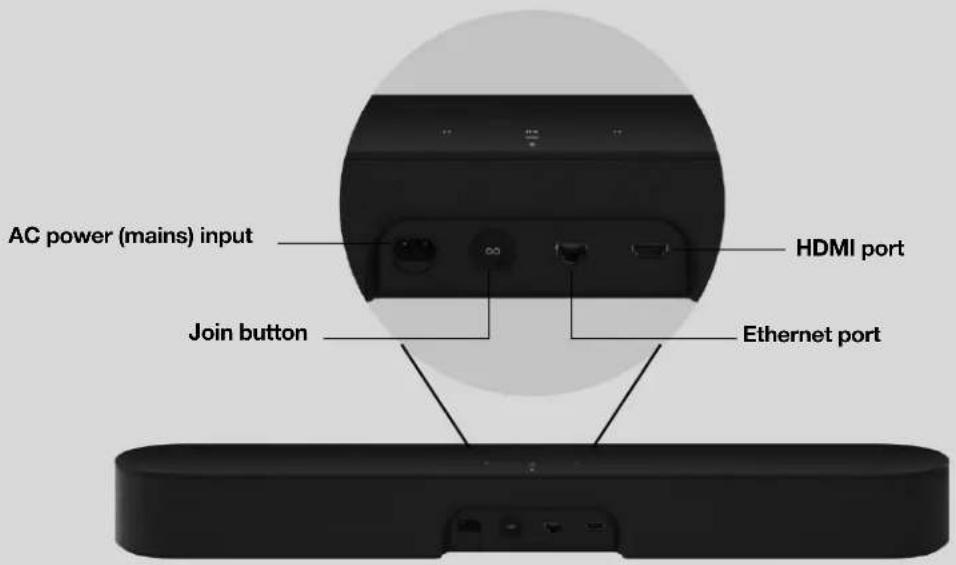
| AC power (mains) input Use only the supplied power cord (using a third-party power cord will void your warranty).Note: Insert the power cord firmly until it is flush with the soundbar. |
Join button Press to connect during setup.
Ethernet port Use an Ethernet cable if you want to connect Beam to your Local Area Network (LAN).
HDMI port Use to connect the soundbar to your TV.
Select a location
You can wall mount Beam above or below your TV or place it on a credenza.
Place on a credenza
- Place horizontally on a stable and level surface at least 2" (50 mm) from the TV.
- Don't place vertically or on its side.
- Don't block the TV's IR sensor.
- If put on a shelf, place at the front and keep 2" (minimum) clearance on both sides for best sound quality.
- Keep 1" (25 mm) space (minimum) above Beam so you can reach the touch controls.
- For best sound quality, keep both ends of Beam at least 1" (30 cm) from a wall or other obstruction.
Wall mount
You can secure the soundbar to a wall with a compatible wall mount. We recommend the custom-designed Sonos Beam Wall Mount. See Wall mount for more information.
Connect the cables
Before you start
- Disconnect existing home theater or surround sound equipment from your TV.
- Connect any external devices, like a cable box or DVD player, directly to your TV.
- Turn your TV on.
Connect the power cord
- Insert the power cord firmly into Beam's power port until it is fully connected.
- Plug the other end into a power outlet.
Caution: Use only the supplied power cord (using a third-party power cord will void your warranty).
Connect Beam to your TV
Use the HDMI cable to connect the soundbar to your TV. If your TV doesn't have an ARC or eARC port, you'll need to use the optical adapter too (the app guides you through it during setup).
SONOS USER GUIDE
- Fully insert the HDMI cable into Beam's HDMI port.
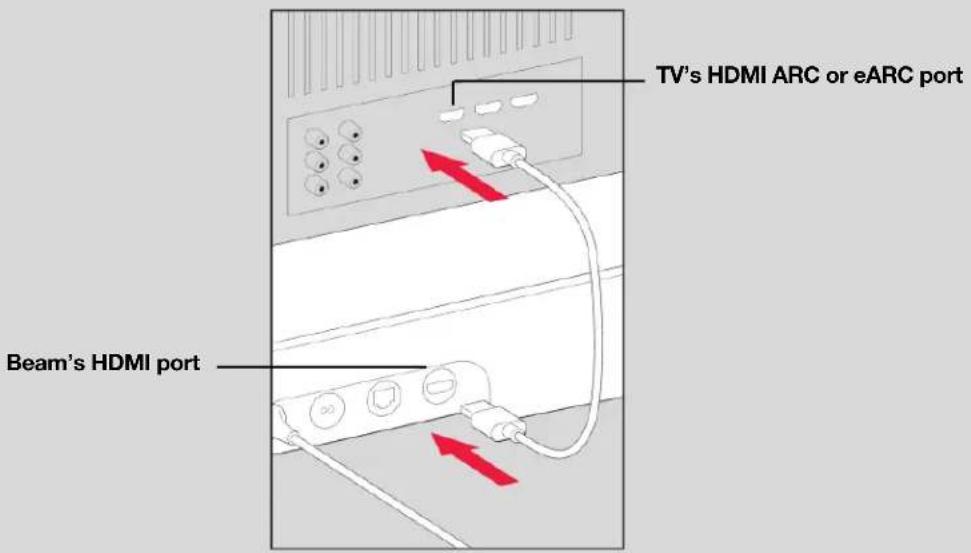
-
Connect the HDMI cable to your TV:
-
If your TV has an HDMI ARC or eARC port, plug the HDMI cable directly into the TV port labeled ARC, eARC, or ARC/eARC.
- If your TV doesn't have an HDMI ARC port, you'll need to connect the optical audio adapter (included) to your TV's Digital audio out instead.
HDMI ARC or eARC
HDMI ARC is a special port that looks like a standard HDMI port—it may be on the back or side of your TV. The ports look similar, but the ARC port will be labeled ARC, eARC, or ARC/eARC. If you connect Sonos Beam to a standard HDMI port instead, you won't hear any sound.
Note: For TVs that don't have an ARC port, use the Sonos Optical Audio Adapter (included) to connect Beam to your TV's Digital audio out.
Digital audio out
If your TV doesn't have an HDMI ARC or eARC port, you'll use the Sonos Optical Audio Adapter (included) to connect to your TV's digital audio out port.
- Remove the protective cap from the adapter.
SONOS USER GUIDE
- Attach the optical adapter to the HDMI cable.
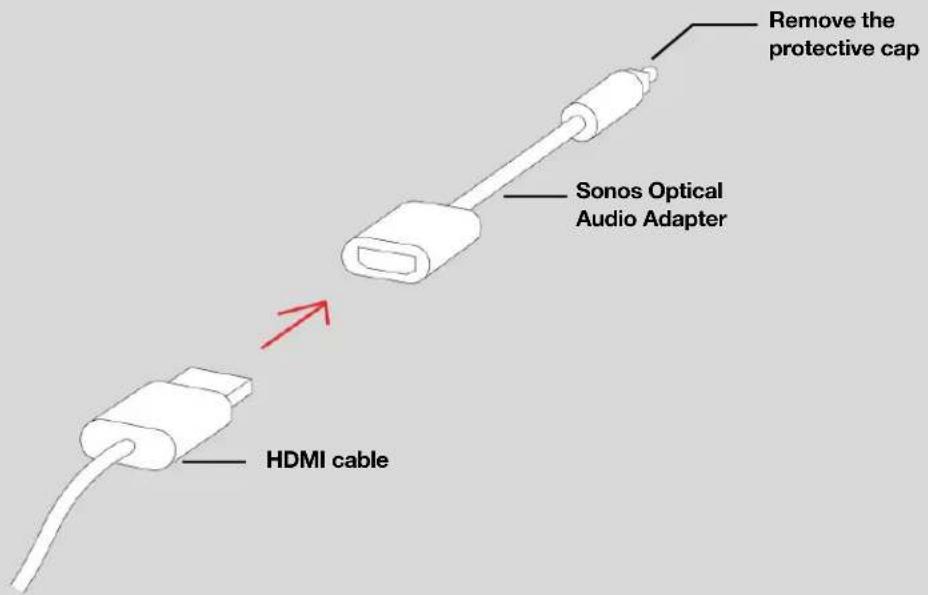
- Connect the optical adapter to the TV's optical digital OUT port.
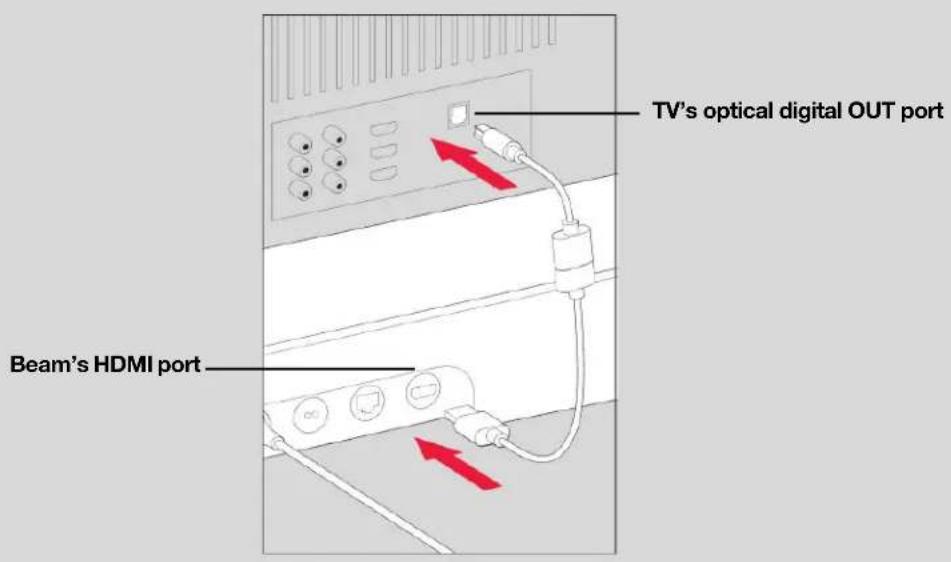
SONOS USER GUIDE
Note: The optical adapter's port is "D-shaped"—make sure the connector aligns correctly into the port. Inserting the adapter incorrectly may damage the cable.
If you don't have the free Sonos app, download it from the app store. You'll use it to set up and control your Sonos system. See Getting started.
Microphone on/off
Touch ↓ on your Beam to turn the microphone on and off. (If you don't have a voice service installed, the microphone is inactive.)
When the microphone light is on, voice control is on and your voice assistant is ready to respond. When the microphone light is off, voice control is off.
Note: If you've installed a voice service and the microphone is off, you can still use voice commands. Just press and hold ↓ —no need to start with a wake word. When you release the microphone button, voice control turns off again.
Wall mount
Guidelines
- Use the Sonos Beam Wall Mount kit. You can buy it on www.sonos.com. Follow the instructions in the kit.
- Keep 1" (25 mm) space (minimum) above Beam so you can reach the touch controls.
- If you're mounting above the TV, make sure you can reach the touch controls.
- For best sound quality, keep both ends of Beam at least 1' (30 cm) from a wall or other obstruction.
Mount kit contents
- Wall mount bracket
- 4 wall anchors
- 4 wall screws
- 2 screws
Note: Don't discard the template. It may look like packing material.
SONOS USER GUIDE
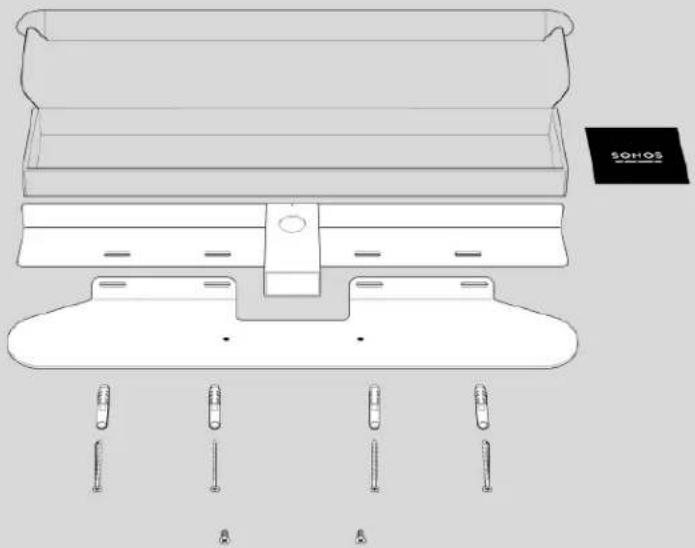
natural_image
Technical line drawing of a mechanical assembly with mounting brackets and screw holes (no text or symbols)- Tape the cardboard template to the wall above or below your TV. Use a level. Keep 1" (25 mm) space (minimum) for access to Beam's touch controls. (Don't install Beam vertically.)
- Mark the center of the mounting holes and remove the template.
SONOS USER GUIDE
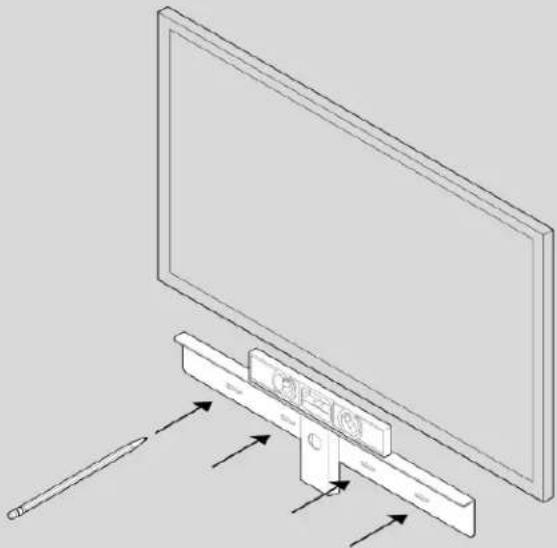
natural_image
Diagram of a flat-screen monitor mounted on a stand with directional arrows indicating motion (no text or symbols)- Use a 5/16" drill bit to drill pilot holes (see Wall mounting information).
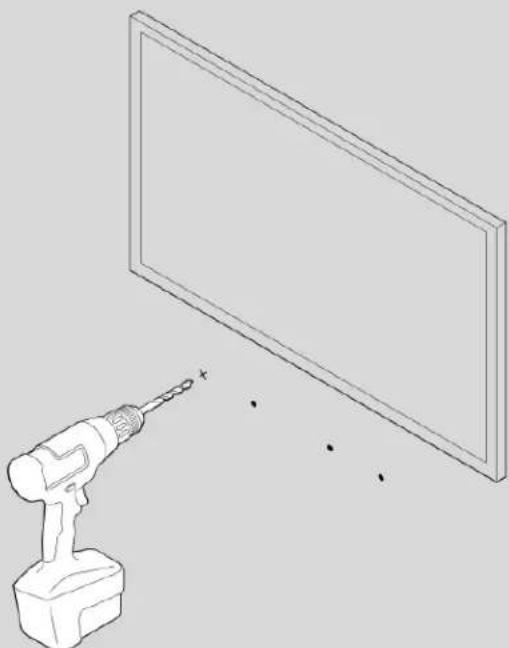
natural_image
Line drawing of a power tool next to a blank screen, no text or symbols present- Insert and secure the wall anchors (don't use the anchors if drilling into wood).
SONOS USER GUIDE
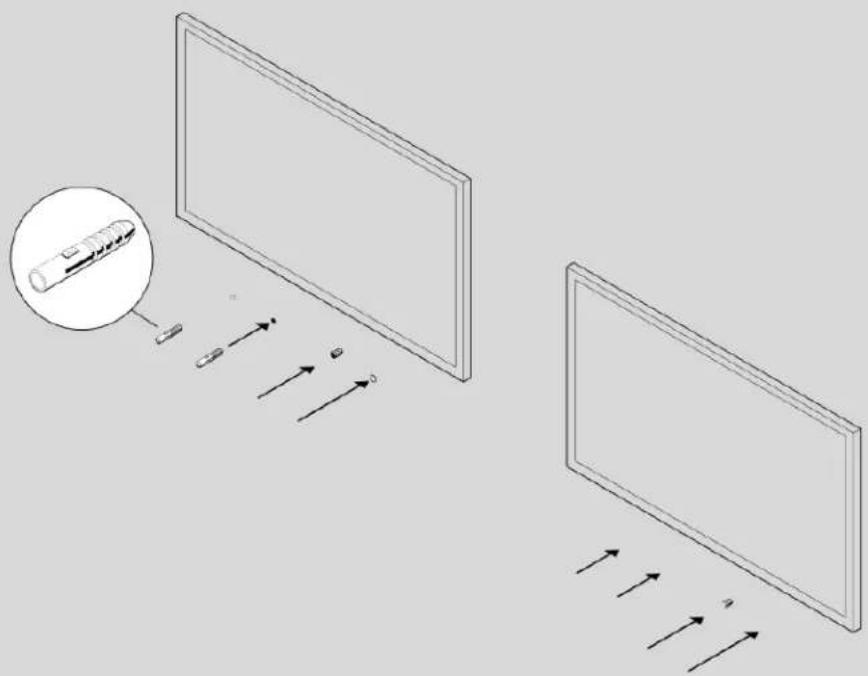
natural_image
Diagram showing two screens with arrows indicating light rays, one with a magnified inset of a device (no text or symbols present)- Place the bracket on the wall and loosely tighten the wall screws to secure the bracket. Check with a level and then tighten the screws.
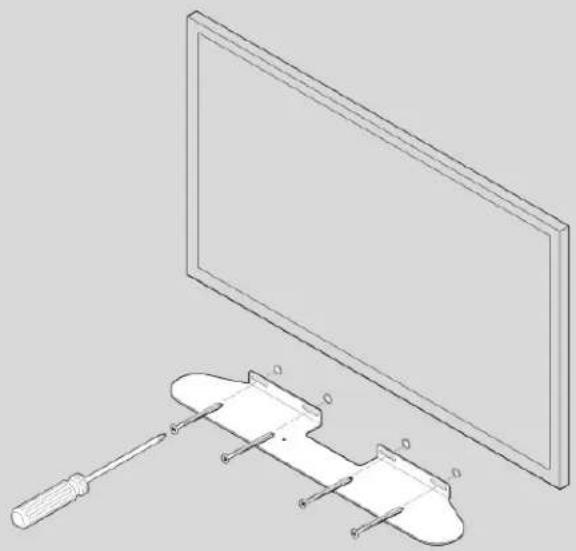
natural_image
Technical line drawing of a screwdriver and a flatboard assembly (no text or symbols)SONOS USER GUIDE
- Connect the power and HDMI cables to Beam.
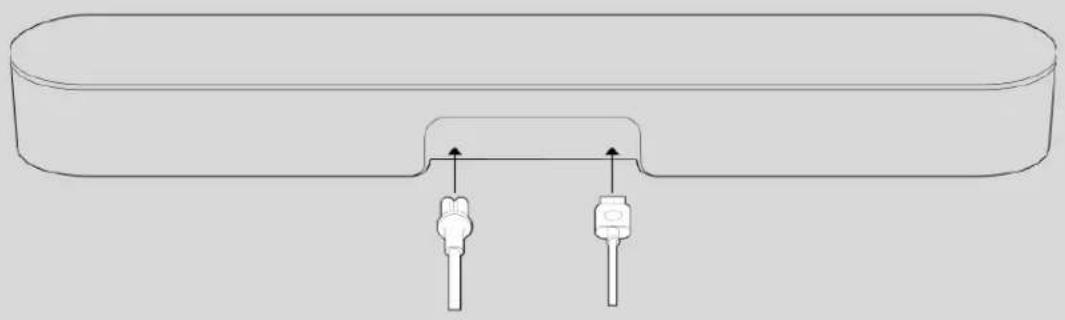
natural_image
Pure technical line drawing of a mechanical component with two inserted pins (no text or symbols)- Place Beam on the bracket.
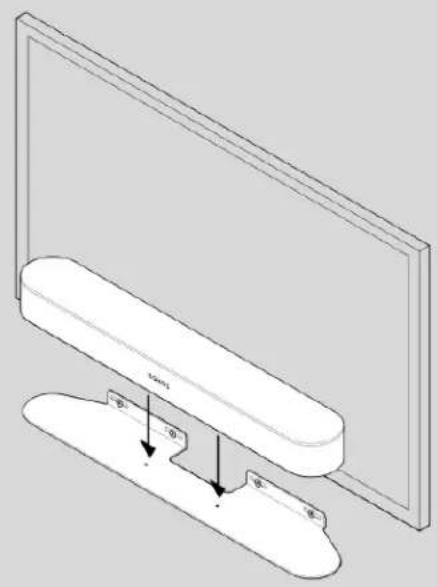
- Insert and tighten Beam to the bracket using the mounting screws.
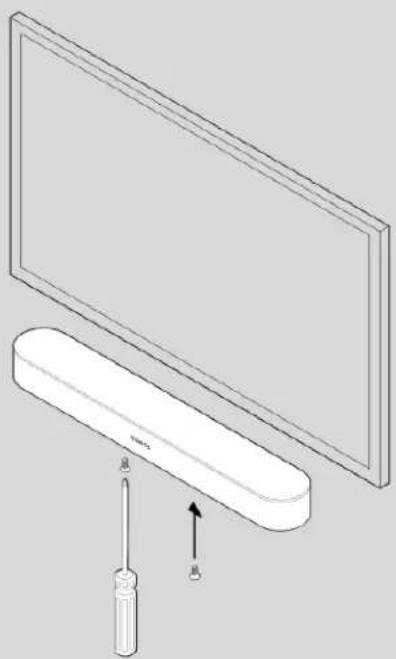
natural_image
Illustration of a flat-screen monitor with screwdriver and cable, showing internal components (no text or symbols)Wall mounting information
Wall Material Pre Drill Use Wall Anchors Use Screws
| Wood Stud 1/8" / 3 mm bit | No Yes |
| Drywall (no stud) 5/16" / 8 mm bit Yes Yes | |
| Hard wallboard or double board 5/16" / 8 mm bit Yes Yes | |
| Plaster 5/16" / 8 mm bit | No, requires toggle bolt Yes |
| Concrete or Brick 5/16" / 8 mm bit Yes Yes |
Specifications
| Feature | Description |
| Audio | |
| Amplifier | Five Class-D digital amplifiers. |
| Woofers | Four full-range woofers ensure you’ll hear the faithful playback of mid-range vocal frequencies plus deep, rich bass. |
| Tweeters | One tweeter creates crisp high frequencies and clear dialogue. |
| Adjustable EQ Use the Sonos app to adjust bass, treble, and loudness. | |
| Microphone array | Five far-field microphone array uses advanced beam forming and multi-channel echo cancellation so your voice assistant can be readily activated.Microphone light is hard-wired to voice microphones for privacy control so you know when the microphones are on or off. |
| System Requirements | TV with HDMI ARC / eARC port or optical digital audio output, broadband internet, and the Sonos app. |
| Software | |
| Sonos S2 Set up and control with the latest generation of the Sonos app (for Apple or Android devices). | |
| Apple AirPlay 2 Works with AirPlay 2 on Apple devices iOS 11.4 and higher. | |
| Voice Works with Amazon Alexa and Google Assistant. | |
| Dolby Atmos Maps specific sounds in 3D space for a 360^ effect. | |
| TrueplayTM Dynamically tunes the speaker to the unique acoustics of the room (iOS device required). | |
| Speech Enhancement Turn on in the app to make TV dialogue even clearer. | |
| Night Sound Turn on in the app to reduce the intensity of loud TV sound effects. | |
| General | |
| Dimensions (H x W x D) 2.70 x 25.63 x 3.94 in. (68.6 x 651 x 100 mm) | |
| Colors | Black, white |
| Finish Matte | |
| Weight | 6.2 lb (2.8 kg) |
| Speaker Status Light | Located above the logo; displays the speaker's connection to WiFi, indicates when the volume is muted, and signals errors. |
| Microphone Light | Located on the top panel; hardwired to the microphone array for privacy control so you always know when the microphones are on or off. When the light is off, the microphones are off. |
| Operating Temperature | 32^ to 104^ ( 0^ to 40^ ) |
| Storage Temperature | -4^ to 122^ ( -20^ to 50^ ) |
| Control | Use your TV remote control, voice, touch controls or the Sonos app. |
| CPU | Quad Core; 1.4 GHz A-53 |
| Memory | 1GB SDRAM; 4GB NV |
| Mounting Threaded mount 0.5 in. (12.7 mm) / 10-32 threaded mounting socket | |
Feature Description
| Package Contents | Beam (Gen 2), AC power cord (6 ft/2m), HDMI cable (4.9 ft/1.5m), Sonos Optical Audio Adapter, Quickstart Guide. |
Power & Connectivity
| Power Supply Auto-switching 100-240 V, 50-60 Hz 2.5A AC universal input. |
| WiFi Connects to WiFi network with any 802.11b/g/n, 2.4 GHz broadcast-capable router. 802.11n only network configurations are not supported—you can either change the router settings to 802.11 b/g/n or connect a Sonos product to your router. |
| HDMI ARC / eARC Use the included HDMI cable to connect to your TV's HDMI eARC or HDMI ARC port. |
| Optical | Use the included Sonos Optical Audio Adapter to connect the soundbar to your TV if you don't have an HDMI ARC port. |
Ethernet One port for hardwiring to your router (optional).
Infrared Receiver Syncs with your TV remote for streamlined control.
Supported Devices Connects to TV with HDMI cable (with or without an attached optical adapter). Plays sources connected to the TV, including cable boxes and game consoles.
* Specifications subject to change without notice.
Important Safety Information
- Read these instructions.
- Keep these instructions.
- Heed all warnings.
- Follow all instructions.
-
If your product is wallmounted:
-
Improper or inadequate wallmount installation could cause your device to fall, resulting in personal injury.
- Never hang from the Sonos product or the wall bracket.
-
Once wall-mounted, periodically check to ensure screws remain securely tightened.
-
Do not use this apparatus near water.
- Clean only with dry soft cloth. Household cleaners or solvents can damage the finish on your Sonos components.
8.Do not block any ventilation openings. Install in accordance with the manufacturer's instructions. - Do not install near any heat sources such as radiators, heat registers, stoves, or other apparatus that produce heat.
- Protect the power cable from being walked on or pinched, particularly at plugs, convenience receptacles, and the point where they exit from the apparatus.
- Only use attachments/accessories specified by the manufacturer.
- Unplug this apparatus during lightning storms or when unused for long periods of time.
- Refer all servicing to Sonos qualified service personnel. Servicing is required when the apparatus has been damaged in any way, such as power-supply cable or plug is damaged, liquid has been spilled or objects have fallen into the apparatus, the apparatus has been exposed to rain or moisture, does not operate normally, or has been dropped.
- The Mains plug should be readily available to disconnect the equipment.

-
Warning: To reduce the risk of fire or electric shock, do not expose this apparatus to rain or moisture.
-
Do not expose apparatus to dripping or splashing and do not place objects filled with liquids, such as vases, on the apparatus.
Beam
The smart, compact soundbar for your TV—
- Play anything—music, TV, movies, podcasts, radio, audiobooks, and video games.
- Perfect size to wall-mount above or below your TV, or place on a credenza.
- Great for small to medium-sized rooms.
- Microphone on/off so you can use it hands-free.
- Quick and easy setup, with only one cable to connect to your TV.
- Expandable. Add a Sub and two Sonos speakers, like Play:1s, for 5.1 surround sound. For more information, see Sonos home theater.
• Works with either Sonos S2

or Sonos S1

(for Android and iOS).
- See Getting started when you're ready to add a Beam to your Sonos system.
Controls and lights
Swipe, touch, tap, or ask—with Beam you've got choices on how to control sound.
- Use the touch controls—touch or swipe across the controls.
- Voice control—set it up and use your voice to turn the TV on or off, adjust the volume, or play music.
- Use the app.
- Use your TV remote control.
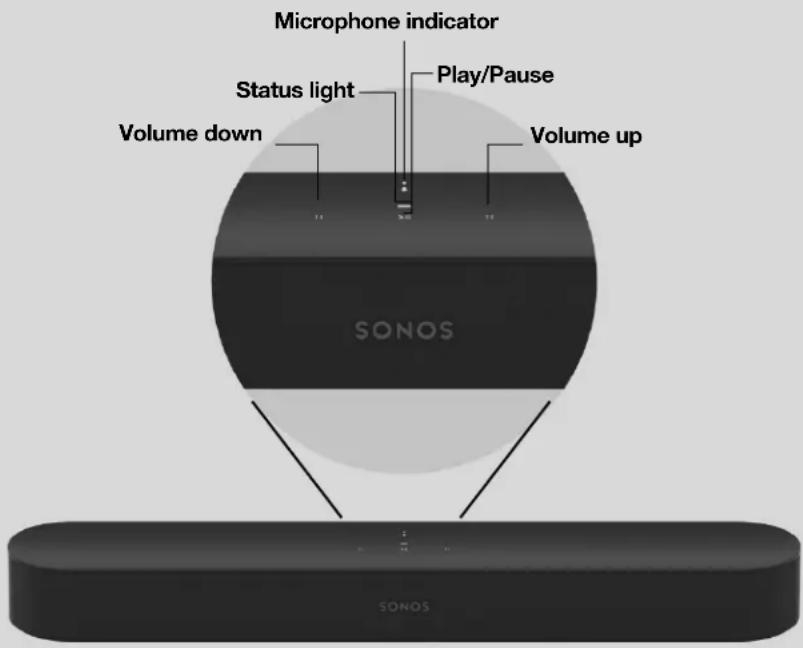
| :: | Volume control Touch for small adjustments or touch and hold to quickly change the volume:• Volume up (right)• Volume down (left)Note: You can also use the Sonos app, voice control, or your TV remote. | |
| >|| | Play/Pause Touch to play or pause sound. | |
| :: >|| :: | Next/Previous (Music only) | • Swipe right across the touch controls to skip to the next song.• Swipe left to go to the previous song.Note: You can't skip forward or go back when listening to a radio station. |
| Microphone indicator | • Tap the microphone light to turn the microphone on or off.• When the light is on, voice control is on and you can use voice commands.• When the light is off, voice control is off.Note: If the light is off, you can press and hold the Microphone indicator to talk to your voice service. Release the button to turn voice control off again. | |
| Status light Indicates the status. Learn more | If the light is distracting, you can turn it off in your room's settings. | |
Note: If you don't want anyone (like a child) to control playback or change the volume using the speaker touch controls, you can disable them in the room's settings.
SONOS USER GUIDE
Connector panel
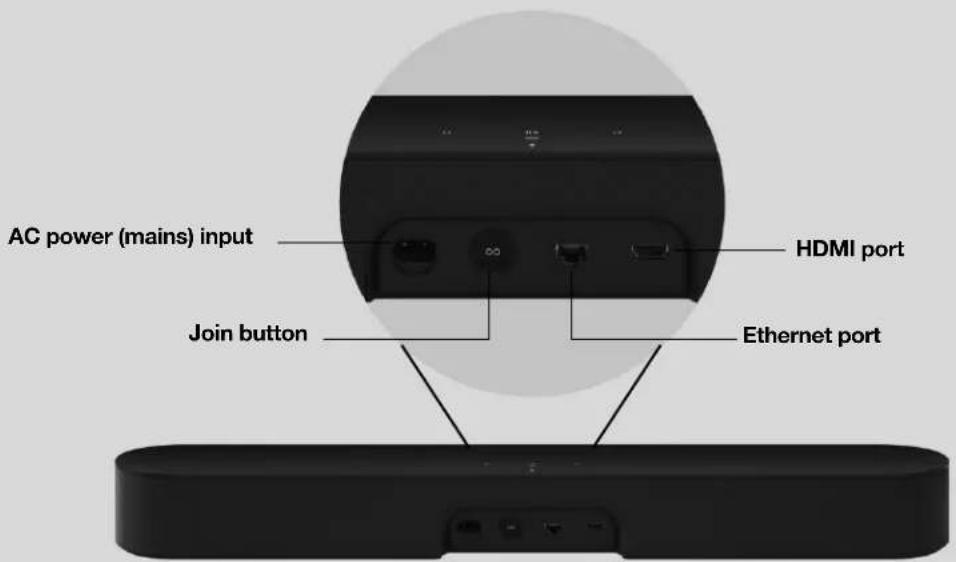
AC power (mains) input Use only the supplied power cord (using a third-party power cord will void your warranty). Note: Insert the power cord firmly until it is flush with the speaker.
Join button Press to connect during setup.
Ethernet port Use an Ethernet cable if you want to connect to a router, computer, or network-attached storage (NAS) device (optional).
HDMI port Use to connect the soundbar to your TV.
Select a location
You can mount Beam to a wall above or below your TV or place it on a credenza.
Place on a credenza
- Place horizontally on a stable and level surface at least 2" (50mm) from the TV.
- Don't place vertically or on its side.
- Don't block the TV's IR sensor.
- If put on a shelf, place at the front and keep 2" (minimum) clearance on both sides for best sound quality.
- Keep 1" (25mm) space (minimum) above Beam so you can reach the touch controls.
- For best sound quality, keep both ends of Beam at least 1' (30cm) from a wall or other obstruction.
Wall mount
To put Beam on a wall, see Wall mount.
Connect the cables
Before you start
- Disconnect existing home theater or surround sound equipment from your TV.
- Connect any external devices, like a cable box or DVD player, directly to your TV.
Connect the power cord
- Insert the power cord firmly into Beam's AC (mains) power port until it is fully connected.
- Plug the other end of the power cord into an AC (mains) power source.
Caution: Use only the supplied power cord (using a third-party power cord will void your warranty).
Connect Beam to your TV
Use the HDMI cable to connect the soundbar to your TV. You may need the optical adapter too (the app lets you know).
- Fully insert the HDMI cable into Beam's HDMI port.
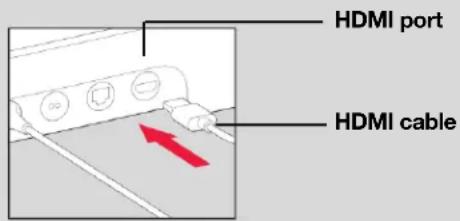
SONOS USER GUIDE
-
Connect the HDMI cable to your TV. You have two choices:
-
If your TV has an HDMI ARC port, connect the HDMI cable directly to the TV's HDMI ARC port.
- If your TV doesn't have an HDMI ARC port, attach the optical adapter to the HDMI cable and connect it to the TV's optical digital OUT port.
If your TV has an HDMI ARC port
HDMI ARC is a special port that looks like a standard HDMI port. Although they look the same, if you connect to a standard HDMI port, you won't hear sound.
- On your TV's audio OUT panel, look for an HDMI ARC port.
It may be on the back or side of your TV.
You'll know it's an ARC port if you see the word "ARC" on the label.
- Connect the HDMI cable to the TV's HDMI ARC port.
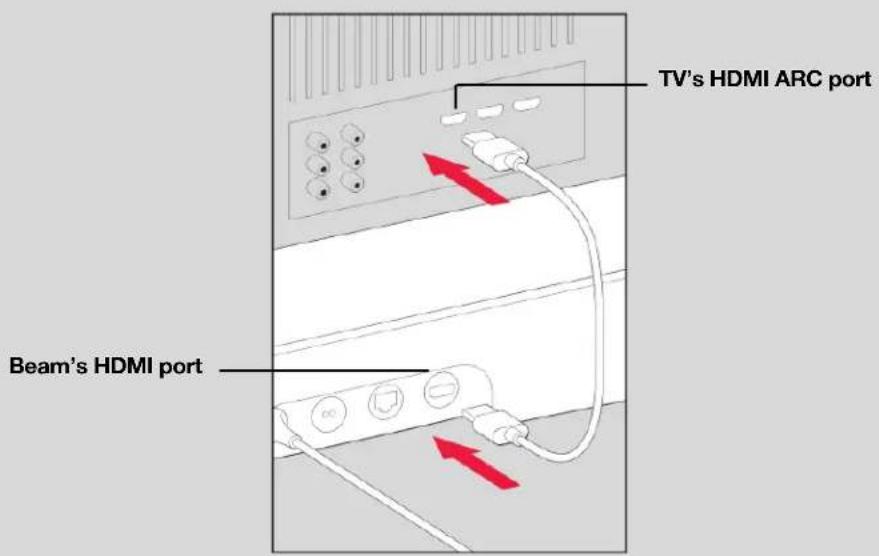
Note: If you can't find the word "ARC" on the label, it isn't the correct port. See If your TV doesn't have an HDMI ARC port.
SONOS USER GUIDE
If your TV doesn't have an HDMI ARC port
You'll need the optical audio adapter.
- Remove the protective cap from the optical adapter.
- Attach the optical adapter to the HDMI cable.
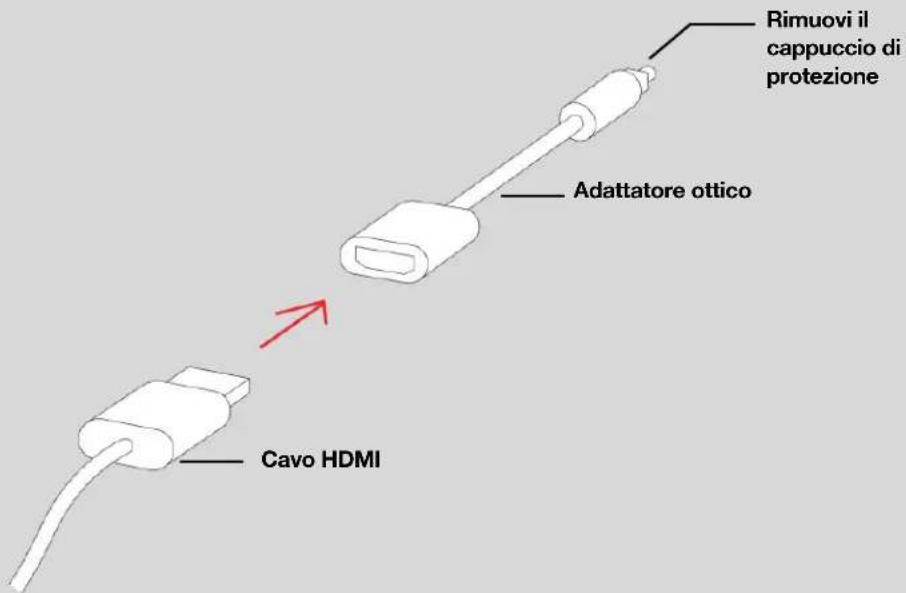
- Connect the optical adapter to the TV's optical digital OUT port.
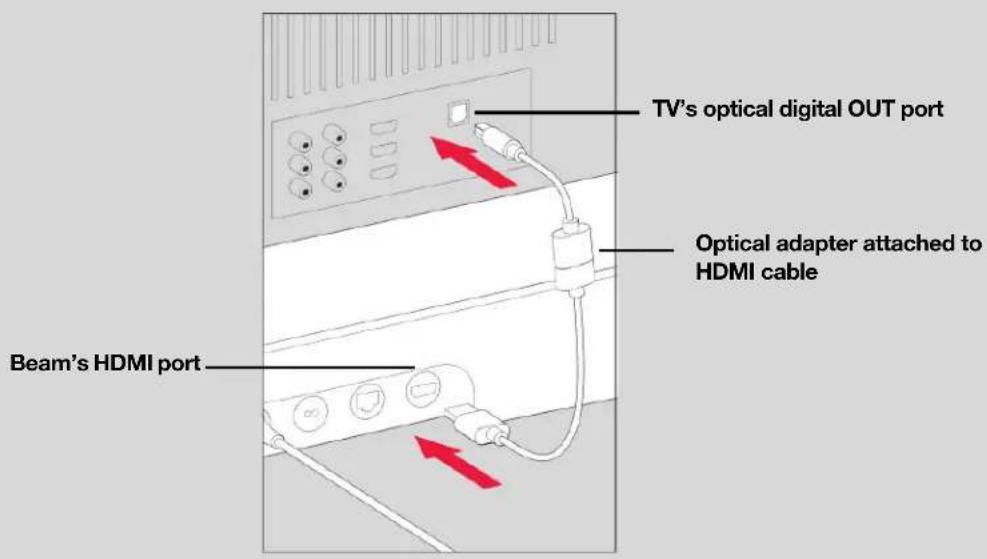
Note: The optical adapter's port is "D-shaped"—make sure the connector aligns correctly into the port. Inserting the adapter incorrectly may damage the cable.
If you don't have the app, download it from the app store. You'll use it to set up and control your Sonos system. See Getting started.
Microphone on/off
Touch ↓ to turn the microphone on and off. (If you don't have a voice service installed, the microphone is inactive.)
When the microphone light is on, voice control is on and your voice assistant is ready to respond. When the microphone light is off, voice control is off.
Note: If you've installed a voice service and the microphone is off, you can still use voice commands. Just press and hold ⚡ —no need to start with a wake word. When you release the microphone button, voice control turns off again.
Wall mount
Guidelines
- Use the Beam wall mount kit. You can buy it on www.sonos.com. Follow the instructions in the kit.
- Keep 1" (25mm) space (minimum) above Beam so you can reach the touch controls.
- If you're mounting above the TV, make sure you can reach the touch controls.
- For best sound quality, keep both ends of Beam at least 1' (30cm) from a wall or other obstruction.
SONOS USER GUIDE
Mount kit contents
- Wall mount bracket
- 4 wall anchors
- 4 wall screws
- 2 screws
Note: Don't discard the template. It may look like packing material.
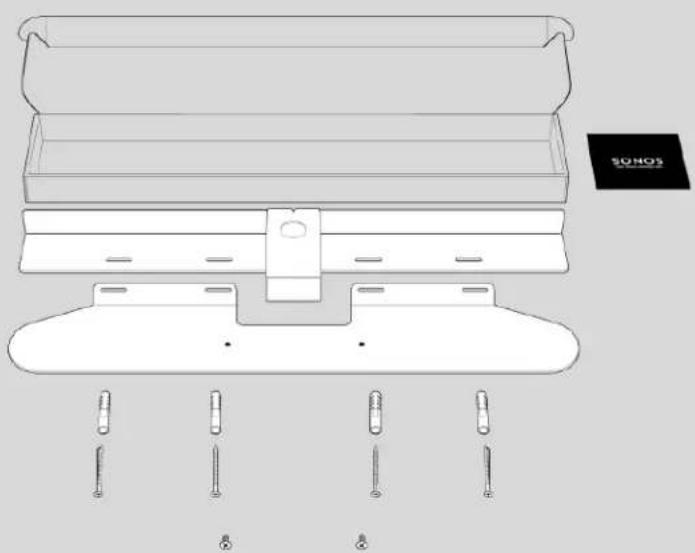
natural_image
Technical line drawing of a mechanical assembly with mounting brackets and screw holes (no text or symbols)- Tape the cardboard template to the wall above or below your TV. Use a level. Keep 1" (25mm) space (minimum) for access to Beam's touch controls. (Don't install Beam vertically.)
- Mark the center of the mounting holes and remove the template.
SONOS USER GUIDE
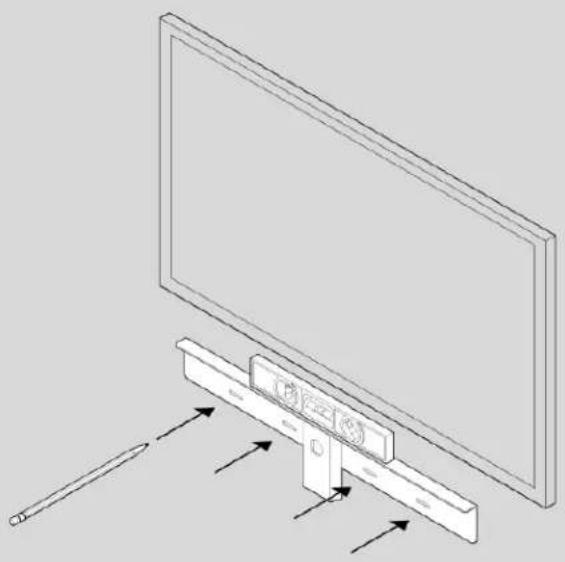
natural_image
Diagram of a flat-screen monitor mounted on a stand with directional arrows indicating motion (no text or symbols)- Use a 5/16" drill bit to drill pilot holes (see Wall mounting information)
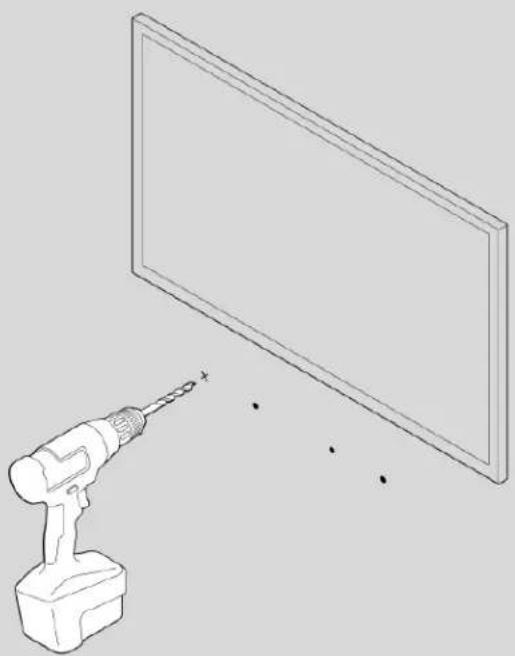
natural_image
Illustration of a power tool and a blank screen with dots, no text or symbols present- Insert and secure the wall anchors (don't use the anchors if drilling into wood).
SONOS USER GUIDE
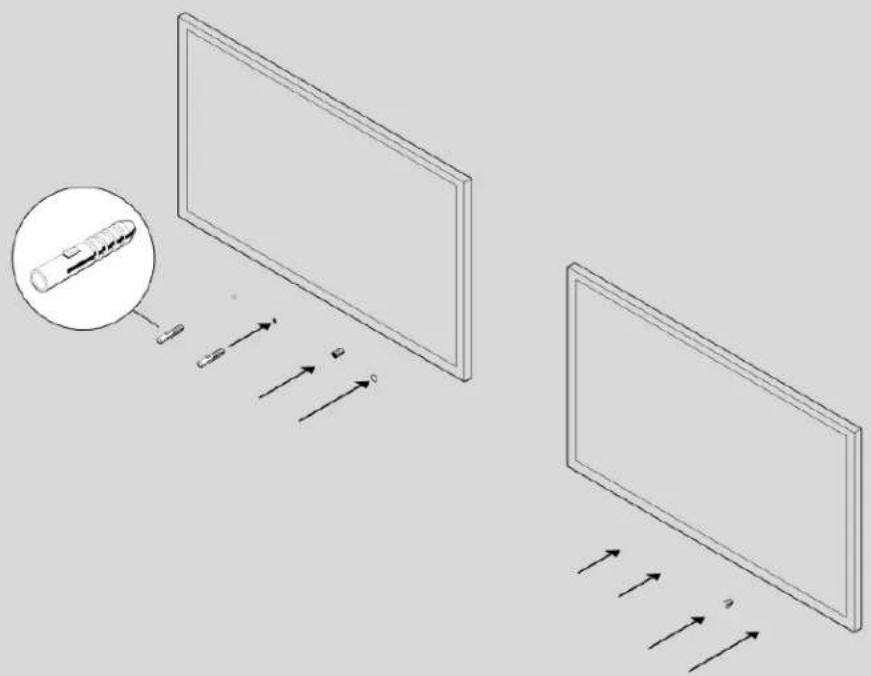
natural_image
Diagram showing two screens with arrows indicating light rays, one with a magnified inset of a device (no text or symbols present)- Place the bracket on the wall and loosely tighten the wall screws to secure the bracket. Check with a level and then tighten the screws.
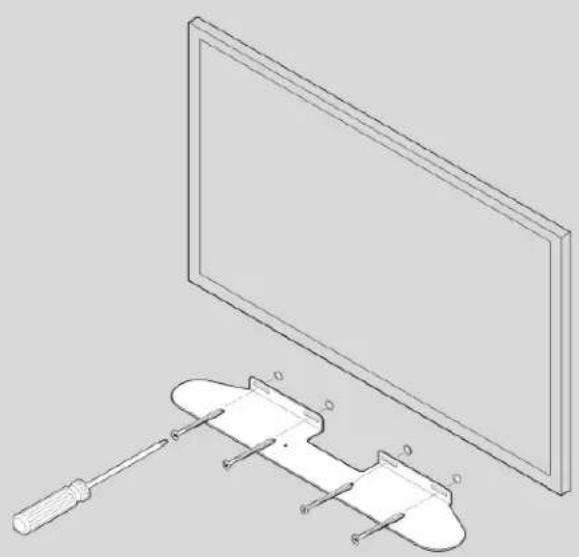
natural_image
Technical line drawing of a screwdriver and a flat-screen monitor assembly (no text or symbols)SONOS USER GUIDE
- Connect the power and HDMI cables to Beam.
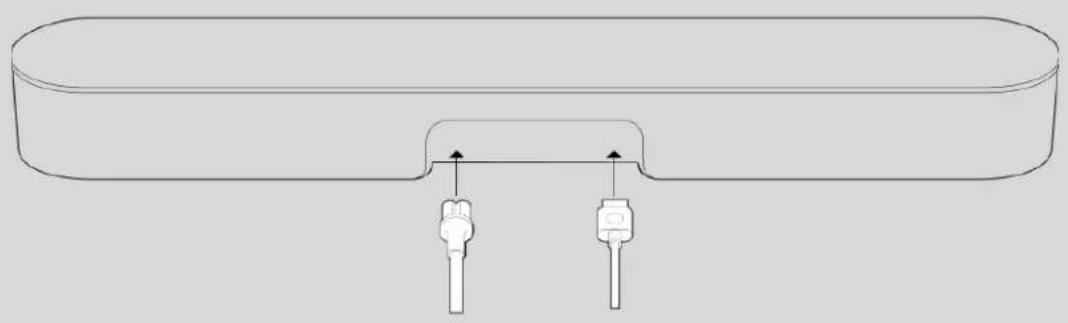
natural_image
Technical line drawing of a mechanical component with two inserted pins (no text or symbols)- Place Beam on the bracket.
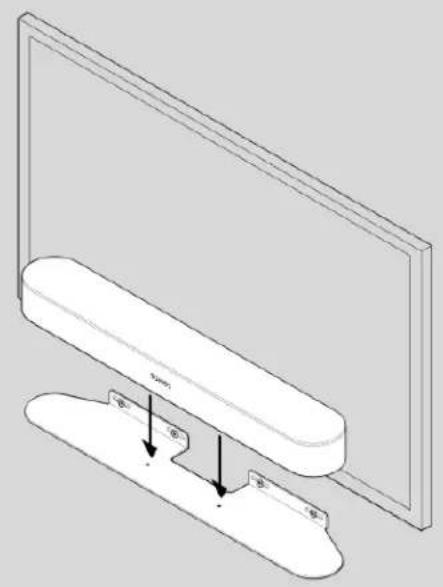
natural_image
3D diagram of a device with a curved panel and two labeled components, showing directional arrows (no text or symbols)SONOS USER GUIDE
- Insert and tighten Beam to the bracket using the mounting screws.
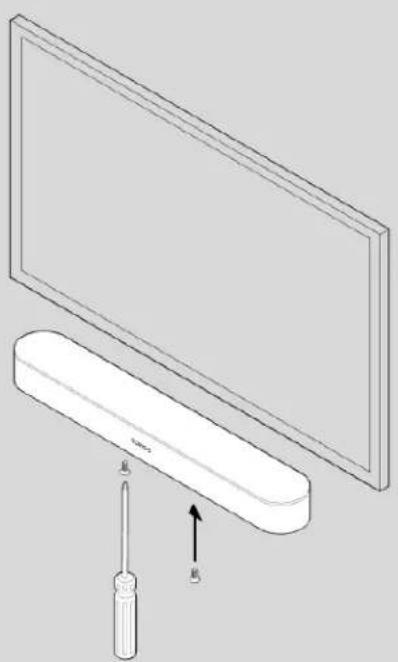
natural_image
Diagram of a monitor with a screwdriver inserted, showing an open panel and a cable (no text or symbols present)Wall mounting information
Wall Material Pre Drill Use Wall Anchors Use Screws
| Wood Stud 1/8" / 3 mm bit | No Yes |
| Drywall (no stud) 5/16" / 8 mm bit Yes Yes | |
| Hard wallboard or double board 5/16" / 8 mm bit Yes Yes | |
| Plaster 5/16" / 8 mm bit | No, requires toggle bolt Yes |
| Concrete or Brick 5/16" / 8 mm bit Yes Yes |
Specifications
| Feature | Description |
| Audio | |
| Amplifier | Five Class-D digital amplifiers. |
| Elliptical Woofer | Four full-range woofers ensures you'll hear the faithful playback of mid-range vocal frequencies plus deep, rich bass. |
| Tweeter | One tweeter creates a crisp and clear high-frequency response. |
SONOS USER GUIDE
| Feature | Description |
| Microphones | Five far-field microphone array uses for advanced beam forming and multichannel echo cancellation.LED hard-wired to voice microphones for privacy control so you know when the microphone is active. |
| Voice Control Integrated voice control. | |
| System Requirements | TV with HDMI ARC or optical digital audio output, broadband internet, and the Sonos app. |
| Networking* | |
| Wireless Connectivity | Using Sonos S2: Connects to WiFi network with any 802.11 b/g/n, 2.4 GHz broadcast-capable router.Using Sonos S1: Connects to WiFi network with any 802.11b/g 2.4 GHz broadcast-capable router. 802.11n only network configurations are not supported—you can either change the router settings to 802.11b/g/n or connect a Sonos product to your router. |
| Ethernet Port One 10/100 Mbps Ethernet port. You can plug a Sonos product directly into your router if your WiFi is unstable. | |
| General | |
| Power Supply Auto-switching 100-240 V, 50-60 Hz 2.5A AC universal input. | |
| Dimensions (H x W x D) 2.68 x 25.63 x 3.94 in. (68 x 651 x 100 mm) | |
| Weight 6.2 lb (2.8 kg) | |
| Operating Temperature 32°F to 104° F (0°C to 40°C) | |
| Storage Temperature -4°F to 122° F (-20°C to 50°C) | |
| Control Use your remote control, voice, touch controls or the Sonos app. | |
| Supported Devices Connects to TV with HDMI cable (with or without an attached optical adapter). Plays sources connected to the TV, including cable boxes and game consoles. | |
| Package Contents | Beam, AC power cord, HDMI cable, optical adapter, Quickstart Guide. |
* Specifications subject to change without notice.
Important Safety Information
- Read these instructions.
- Keep these instructions.
- Heed all warnings.
- Follow all instructions.
-
If your product is wallmounted:
-
Improper or inadequate wallmount installation could cause your device to fall, resulting in personal injury.
- Never hang from the Sonos product or the wall bracket.
-
Once wall-mounted, periodically check to ensure screws remain securely tightened.
-
Do not use this apparatus near water.
- Clean only with dry soft cloth. Household cleaners or solvents can damage the finish on your Sonos components.
8.Do not block any ventilation openings. Install in accordance with the manufacturer's instructions. - Do not install near any heat sources such as radiators, heat registers, stoves, or other apparatus that produce heat.
- Protect the power cable from being walked on or pinched, particularly at plugs, convenience receptacles, and the point where they exit from the apparatus.
- Only use attachments/accessories specified by the manufacturer.
- Unplug this apparatus during lightning storms or when unused for long periods of time.
- Refer all servicing to Sonos qualified service personnel. Servicing is required when the apparatus has been damaged in any way, such as power-supply cable or plug is damaged, liquid has been spilled or objects have fallen into the apparatus, the apparatus has been exposed to rain or moisture, does not operate normally, or has been dropped.
- The Mains plug should be readily available to disconnect the equipment.

-
Warning: To reduce the risk of fire or electric shock, do not expose this apparatus to rain or moisture.
-
Do not expose apparatus to dripping or splashing and do not place objects filled with liquids, such as vases, on the apparatus.
Amp
Amp features a built-in state-of-the-art digital amplifier that can power large or small speakers so you can enjoy superior audio in any room.
- Power your bookshelf, floor-standing, in-wall, and in-ceiling speakers.
- Connect to your TV to create the ultimate entertainment system.
- Stream everything you love with the Sonos app and AirPlay.
- Plug in any audio device, like a turntable or a phone, and listen out loud.
- Works with either Sonos S2 or Sonos S1 (for Android and iOS).
- See Getting started when you're ready to add Amp to your Sonos system.
Controls and lights
Swipe, touch, or tap—with Amp you've got choices on how to control the sound.
- Use the touch controls on Amp.
- Use our app.
- Use your TV remote control.
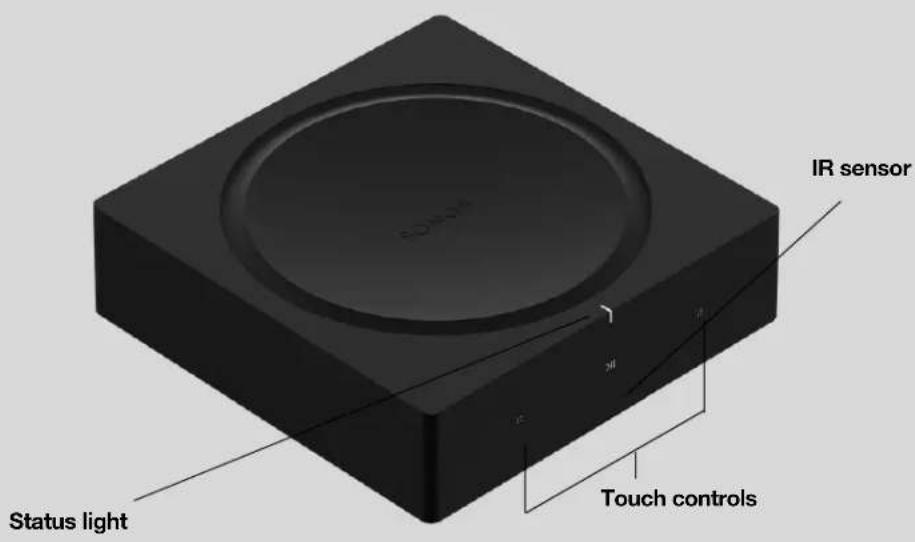
| Status light Indicates the status. Learn more ____If the light is distracting, you can turn it off in your room's settings. | ||
| :: | Volume control Touch for small adjustments or touch and hold to quickly change the volume:Volume up(right)Volume down(left)Note: You can also use our app or your remote control. | |
| >|| | Play/Pause Touch to play or pause sound.TV—When the TV is on, touch >II to toggle the sound on and off.Music—When the TV is off, touch >II to pause or restart music. | |
| :: >|| :: | Next/Previous (Music only) | Swipe right across the touch controls to skip to the next song.Swipe left to go to the previous song.Note: You can't skip forward or go back when listening to a radio station. |
| IR sensor The IR (InfraRed) sensor receives signals sent by a remote control. | ||
Note: If you don't want anyone (like a child) to control playback or change the volume using the speaker touch controls, you can disable them in the room's settings.
Connector panel
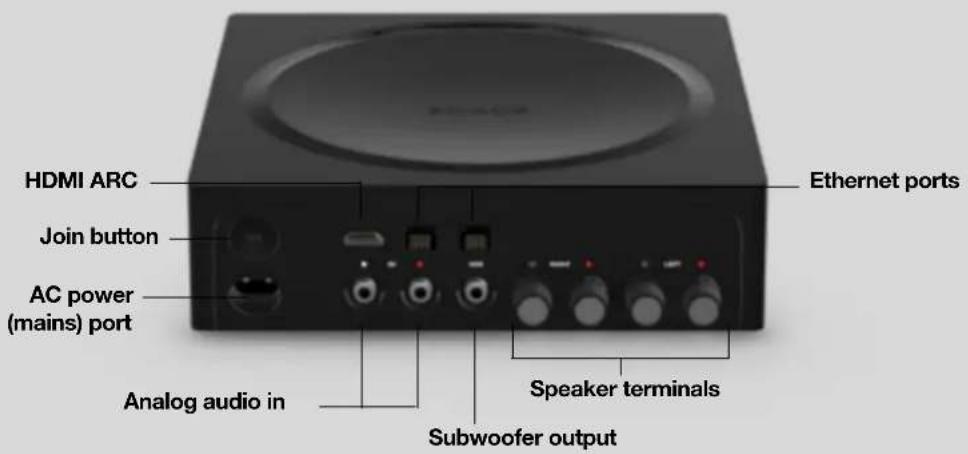
| HDMI ARC Use an HDMI cable to connect Amp to your TV's HDMI ARC port. | |
| Join button Press to connect during setup. | |
| AC power (mains) port Use only the supplied power cord (using a third-party power cord will void your warranty).Note: Insert the power cord firmly. | |
| Analog audio in Use a standard RCA audio cable to connect Amp's analog audio inputs to the audio outputs from a separate audio component, such as a turntable or a portable music player. | |
| Ethernet ports (2) Use an Ethernet cable if you want to connect to a router, computer, or network-attached storage (NAS) device (optional). | |
| Subwoofer outputNote: If you disconnect your subwoofer, make sure to also disconnect the subwoofer's cable from the Amp output. | Connect a powered subwoofer to this output using a standard RCA cable. The system will detect when a cable is connected to the subwoofer output and adjust the crossover frequency automatically. |
| Speaker terminals Use high-quality speaker wire to connect your speakers to Amp. | |
What can you do with Amp?
Play music through your favorite speakers
Connect your favorite bookshelf, floor-standing, in-wall, or in-ceiling speakers to Amp to stream all the music you love. Connect a turntable, stereo, or portable music player and play the sound on any Sonos speaker.
Enhance your TV sound
Connect Amp to your TV to create the ultimate entertainment system.
- Use Amp and a pair of 3rd-party speakers to create two front audio channels.
- Use Amp with third-party speakers to add surround sound if you already have a Sonos home theater speaker (Beam, Playbase, Playbar, or another Amp) connected to your TV.
(For even deeper sound, add a Sonos Sub or connect a third-party subwoofer.)
See Connect Amp to your TV for setup information.
Select a location
You can place Amp just about anywhere—in an electronics rack, on a shelf, or on a credenza with your TV.
Rack mounted
- Amp mounts perfectly in any electronics rack.
- Place two Amps side by side in a 2U rack.
- Place four Amps in a 3U rack.
Placed on a credenza
- Place horizontally on a stable and level surface at least 3 in / 50 mm from the TV.
- Don't block the TV's IR sensor.
- If put on a shelf, place at the front and keep 3" (minimum) clearance on all sides.
- Don't block the front of Amp so you can reach the touch controls.
Connect the cables
Attach desired speakers
Your speakers' power rating should be at least 125W for 8 ohm speakers, and at least 200W for 4 ohm speakers. Do not connect speakers rated at less than 4 ohm.
Note: Amp can drive speakers with nominal impedance above 4 ohms. Two pairs of 8 ohm speakers wired in parallel are also supported. Don't wire your speakers in series because it will result in poor sound quality.
- Remove the cap from the banana plug to reveal the connection hole.
- Insert the stripped end of the speaker wire into the hole, then return the cap to the banana plug to secure the connection.
Note: Connect the red (+) and black (-) terminals from each speaker to the corresponding banana plug and terminal on Amp. Mismatching of polarities will result in weak central sound and a distorted sense of sound direction. - Insert the banana plug into the proper speaker terminal on the back of Amp.
- Repeat to install the other speaker wires.
Connect the power cord
Attach the power cord and plug in Amp.
You'll use our app to set up and control your Sonos system. If you don't have the Sonos app, download it from your app store. See Controls and lights.
Connect Amp to your TV
Use an HDMI cable to connect Amp to your TV. When connected, Amp creates two front audio channels and plays your TV sound through your favorite non-Sonos speakers.
Note: You may need the optical adapter too (the app lets you know).
- Fully insert the HDMI cable into Amp's HDMI port.
- Connect the HDMI cable to your TV. You have two choices:
- If your TV has an HDMI ARC port, connect the HDMI cable directly to the TV's HDMI ARC port.
- If your TV doesn't have an HDMI ARC port, attach the optical adapter to the HDMI cable and connect it to the TV's optical digital OUT port.
If your TV has an HDMI ARC port
HDMI ARC is a special port that looks like a standard HDMI port. Although they look the same, if you connect to a standard HDMI port, you won't hear sound.
-
On your TV's audio OUT panel, locate the HDMI ARC port.
It may be on the back or side of your TV. Look for the port with "ARC" on the label. -
Connect the HDMI cable to the TV's HDMI ARC port.
Note: If you can't find a port with the word "ARC" on the label, your TV doesn't have an HDMI ARC port. See If your TV doesn't have an HDMI ARC port.
If your TV doesn't have an HDMI ARC port
You'll need the optical audio adapter.
- Remove the protective cap from the optical adapter.
- Attach the optical adapter to the HDMI cable.
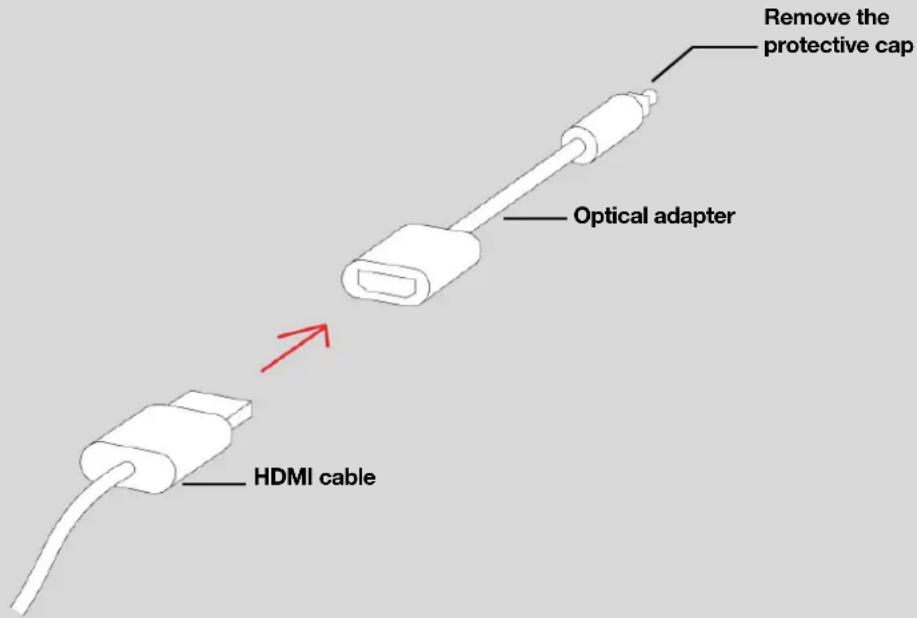
- Connect the optical adapter to the TV's optical digital OUT port.
Note: The optical adapter's port is "D-shaped"—make sure the connector aligns correctly into the port. Inserting the adapter incorrectly may damage the cable.
You'll use our app to set up and control your Sonos system. If you don't have the Sonos app, download it from your app store. See Controls and lights.
Line-in
Connect an external source like a phono preamp (your turntable may have a built-in phone preamp), or other audio device. Learn more.
Change from stereo to mono
Amp plays audio in stereo by default. You can change the sound settings for the room associated with the Amp so that it plays in two mono channels when playing music. Learn more.
Specifications
Feature Description
| Audio | |
| Amplifier Class-D digital amplifier | |
| Amplifier power 125W/Ch into 8 ohms | |
| Speaker Connections Banana plugs (2) | |
| Line-In Sources Supported | Audio device with analog RCA output or optical output (optical adapter required). TV device with HDMI ARC or optical output (optical adapter required). |
Subwoofer Output Auto-detecting RCA type, adjustable crossover
| Networking | |
| Wireless Connectivity | Using Sonos S2: Connects to WiFi network with any 802.11 b/g/n, 2.4 GHz broadcast-capable router.Using Sonos S1: Connects to WiFi network with any 802.11b/g 2.4 GHz broadcast-capable router. 802.11n only network configurations are not supported—you can either change the router settings to 802.11b/g/n or connect a Sonos product to your router. |
| Ethernet Ports | Dual Ethernet ports can connect Amp to a wired home network and allow for connection of additional Sonos players. |
General
System Requirements Passive speakers with speaker wire, broadband internet, and Sonos app.
Power Supply Auto-switching 100-240V, 50-60 Hz AC universal input.
Controls Touch interface with volume up/down, previous/next song and play/pause.
Status indicator Light indicates Amp status.
Dimensions (H x W x D) 2.52 x 8.54 x 8.54 in. (64 x 217 x 217 mm)
Weight 4.6 lbs. (2.1 kg)
Operating Temperature 32^ F to 104^ F ( 0^ C to 40^ C)
Storage Temperature -4°F to 122°F (-20°C to 50°C)
Feature Description
Product Finish Black
Package Contents
Sonos Amp, Sonos banana plugs (2), AC power cord, and Quickstart Guide.
* Specifications subject to change without notice.
Important Safety Information
- Read these instructions.
- Keep these instructions.
- Heed all warnings.
- Follow all instructions.
- Do not use this apparatus near water.
- Clean only with dry soft cloth. Household cleaners or solvents can damage the finish on your Sonos components.
- Do not block any ventilation openings. Install in accordance with the manufacturer's instructions.
8.Do not install near any heat sources such as radiators, heat registers, stoves, or other apparatus that produce heat. - Protect the power cable from being walked on or pinched, particularly at plugs, convenience receptacles, and the point where they exit from the apparatus.
- Only use attachments/accessories specified by the manufacturer.
- Unplug this apparatus during lightning storms or when unused for long periods of time.
- Refer all servicing to Sonos qualified service personnel. Servicing is required when the apparatus has been damaged in any way, such as power-supply cable or plug is damaged, liquid has been spilled or objects have fallen into the apparatus, the apparatus has been exposed to rain or moisture, does not operate normally, or has been dropped.
- The Mains plug should be readily available to disconnect the equipment.

-
Warning: To reduce the risk of fire or electric shock, do not expose this apparatus to rain or moisture.
-
Do not expose apparatus to dripping or splashing and do not place objects filled with liquids, such as vases, on the apparatus.
Port
The versatile streaming component for your stereo or receiver.
- Plug in the audio equipment you already own and listen out loud.
- Stream everything you love using the Sonos app and AirPlay2.
- Use line-in to connect your turntable, or play music straight from a friend's phone on your stereo.
- 12 V trigger automatically turns your amplifier on and off.
• Works with either Sonos S2

or Sonos S1

(for Android and iOS).
- See Getting started when you're ready to add Port to your Sonos system.
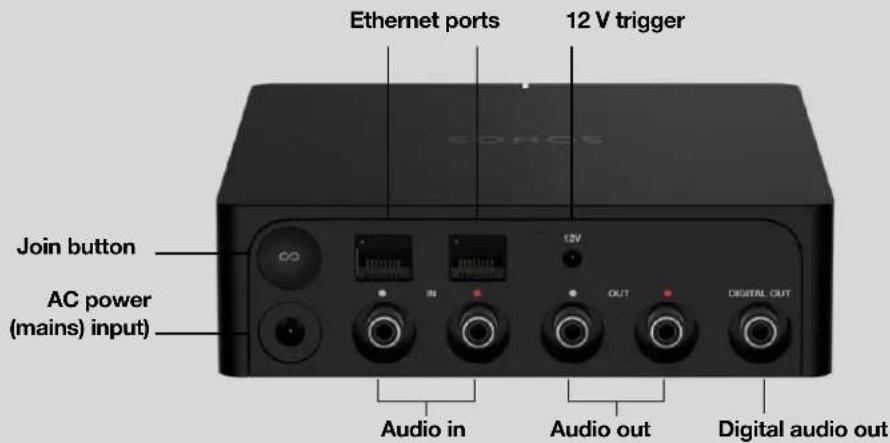
Controls and lights
Status light Indicates the product's status. Learn more
If the light is distracting, you can turn it off in your room's settings.
Connector panel
Join button Press to connect during setup.
Ethernet ports (2) Use an Ethernet cable to connect to a router, computer, or additional network device like a network-attached storage (NAS) device. LED indicators:
- Flashing Green (network activity)
- Yellow (link connection)
| 12 V trigger Use a stereo or 3.5 mm to 3.5 mm cable to wake your third-party amplifier whenever Sonos starts playing audio. Note: Read the guide that came with your amplifier for details on the use of 12V trigger input. | |
| AC power (mains) input | Use only the included power supply (using a third-party power supply will void your warranty). |
| Analog audio in Use a standard RCA audio cable (included) to connect Port's analog audio inputs to the audio outputs from a separate audio component, like a pre-amplified turntable. | |
| Analog audio out Use a standard RCA audio cable (included) to connect Port's analog audio outputs to the audio inputs on your amplified audio component. | |
| Digital audio out Use a digital coaxial cable to connect Port's coaxial digital audio output to the audio inputs on your amplified audio component. | |
Select a location
You can place Port just about anywhere—in an electronics rack, on a shelf, or on a credenza with your audio/video receiver (AVR).
Rack mounted
Port fits perfectly in any electronics rack using a third-party shelf. You can fit 3 units across a standard rack and take up only 1 rack unit of vertical space.
Placed on a credenza
- Place horizontally on a stable and level surface.
- If you put it on a shelf, for best performance place it at the front and leave at least 2" space all around.
Connect the cables
Connect the power cord
Attach the power cord and plug in your Port.
If you're connecting to powered speakers
You may need a Y-adapter audio cable (one 1/8" stereo miniplug to dual RCA male connectors) to connect powered speakers to the audio outputs on the Sonos product. If your speakers have a male 1/8" stereo plug, you'll need to attach a female-to-female coupler between the speaker plug and the Y-adapter audio cable.
If you don't have the Sonos app, download it from the app store on your mobile device. You'll use it to set up and control your Sonos system.
If you're connecting to an audio/video receiver (AVR) or amplifier
- If you have digital inputs on your AVR or amplifier, you can use a digital coaxial cable to connect Port's
SONOS USER GUIDE
digital output to the digital input on the receiver.
- If you have analog inputs on your AVR or amplifier, use a standard RCA audio cable to connect Port's analog audio output to the audio inputs on the receiver.
- Select the proper input channel on the receiver. See Control volume from your AVR or amplifier to adjust volume settings.
If you don't have the app, download it from the app store on your mobile device. You'll use it to set up and control your Sonos system.
If you're connecting to a computer
You'll need a stereo mini to RCA Y-adapter audio cable (one 1/8" stereo miniplug to dual RCA male connectors) to connect from Port's analog audio output to your computer's audio input.
If you don't have the app, download it from the app store on your mobile device. You'll use it to set up and control your Sonos system.
Line-in
Connect an external source like a phono preamp (your turntable may have a built-in phone preamp), or other audio device. Learn more.
Line-out
Control volume from your AVR or amplifier (Fixed line-out level)
Set Port's line-out level to Fixed if you want to control the volume exclusively from your AVR or amplifier. You won't be able to use the Sonos app to adjust the volume or equalization settings.
Go to settings and choose Fixed for the Line-Out Level.
Control the volume from Sonos (Variable line-out level)
When Port's line-out level is set to Variable, you can use the Sonos app to adjust the volume.
- Adjust your AVR or amplifier's volume to your typical listening volume.
- Make sure the line-out level is set to Variable. If it's not, you'll need to change it:
- Go to settings and choose Variable for the Line-Out Level.
- Use the Sonos app to adjust the volume so you can hear music on your Sonos system. It may need to be turned up fairly high.
- Readjust the volume on your AVR or amplifier so it falls within your typical listening range.
Use Sonos to control the volume on your home theater or amplifier
When Port's line-out level is set to Pass-Through, Port stays at a fixed volume and sends volume commands to your amplifier. You can control volume using the Sonos app, a universal remote, or your voice if you have a voice assistant enabled.
- Go to settings and choose Pass-Through for the Line-Out Level.
Note: Make sure your amplifier supports Pass-Through. If you set the line-out level to Pass-Through and your amplifier doesn't support it, you won't be able to control the volume.
Change from stereo to mono
Port plays audio in stereo by default. You can change the sound settings for the room associated with the Port so that it plays in two mono channels when playing music. Learn more.
Specifications
Feature Description
| Audio | |
| Sound Quality THD+N<0.009%, 20 Hz-20 kHz | |
| Line In Analog (RCA), auto-detecting | |
| Line Out Analog (RCA), digital (coaxial) | |
| Networking* | |
| Wireless Connectivity | Using Sonos S2: Connects to WiFi network with any 802.11a/b/g/n 2.4 or 5 GHz broadcast-capable router.Using Sonos S1: Connects to WiFi network with any 802.11b/g 2.4 GHz broadcast-capable router. 802.11n only network configurations are not supported—you can either change the router settings to 802.11b/g/n or connect a Sonos product to your router. |
| Ethernet port Two 10/100 Mbps Ethernet ports to connect to a wired home network. | |
| General | |
| Power Supply | Auto-switching 100 - 240 V, 50-60 Hz AC universal input.Output: 12.0 VDC, 1.0 A, 12.0 WAverage active efficiency: 84.2%Efficiency at low load (10%): 78.7%No-load power consumption: 0.06 W |
| Dimensions (H x W x D) 1.6 x 5.4 x 5.4 in. (41 x 138 x 138 mm) | |
| Weight 1lb (.47 kg) | |
| Operating Temperature 32° to 104° F (0° to 40° C) | |
| Storage Temperature -4° to 158° F (-20° to 70° C) | |
| Product Finish | Black |
| Package Contents | Port, power supply, RCA cable, and Quickstart Guide. |
* Specifications subject to change without notice.
Important Safety Information
- Read these instructions.
- Keep these instructions.
3.Heed all warnings. - Follow all instructions.
- Do not use this apparatus near water.
- Clean only with dry soft cloth. Household cleaners or solvents can damage the finish on your Sonos components.
- Do not block any ventilation openings. Install in accordance with the manufacturer's instructions.
- Do not install near any heat sources such as radiators, heat registers, stoves, or other apparatus that produce heat.
- Protect the power cable from being walked on or pinched, particularly at plugs, convenience receptacles, and the point where they exit from the apparatus.
- Only use attachments/accessories specified by the manufacturer.
- Unplug this apparatus during lightning storms or when unused for long periods of time.
- Refer all servicing to Sonos qualified service personnel. Servicing is required when the apparatus has been damaged in any way, such as power-supply cable or plug is damaged, liquid has been spilled or objects have fallen into the apparatus, the apparatus has been exposed to rain or moisture, does not operate normally, or has been dropped.
- The Mains plug should be readily available to disconnect the equipment.

-
Warning: To reduce the risk of fire or electric shock, do not expose this apparatus to rain or moisture.
-
Do not expose apparatus to dripping or splashing and do not place objects filled with liquids, such as vases, on the apparatus.
Sub
Sonos Sub takes your audio experience to the next level—
- Instantly adds a dimension of deep bass impact to your audio listening experience.
- Pair Sub (Gen 3) with any other Sub and feel the bass from every corner of the room.
- Allows placement anywhere because it's wireless and compact—position it vertically or horizontally on any floor surface.
- The top of the acoustic slot doubles as a handle so you can lift it.
- Sub (Gen 3) is compatible with Sonos S2 only (for Android and iOS).
- See Getting started when you're ready to add a Sub to your Sonos system.
Note: Sonos Sub is designed for use with most Sonos speakers, except Sonos Connect, Port and Move. Make sure you set up at least one speaker before adding Sub.
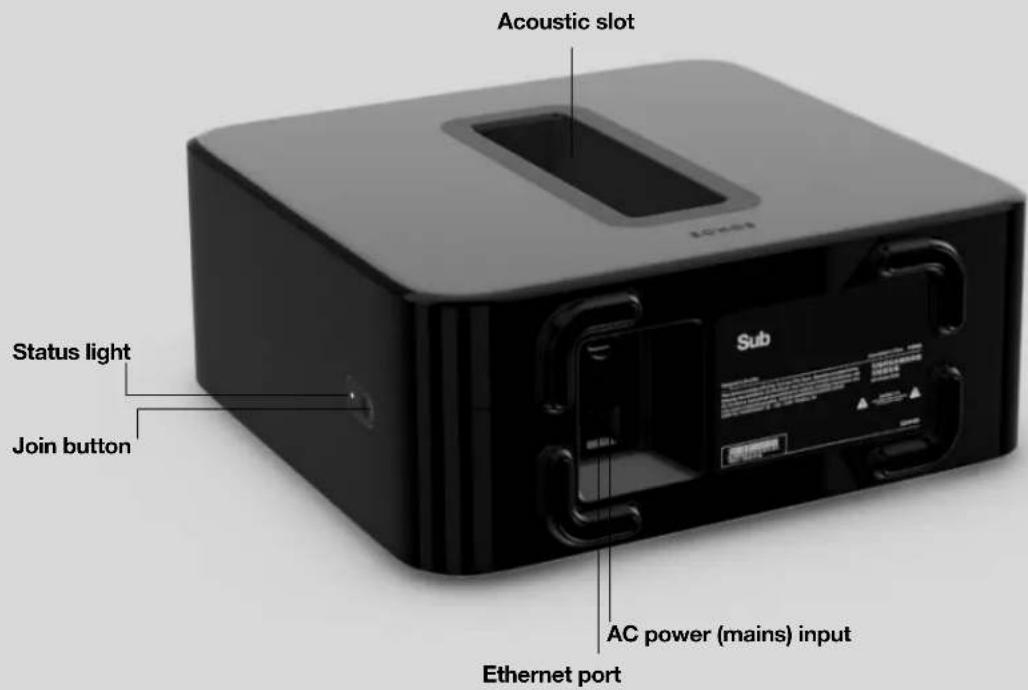
Controls and lights
| Join button Press to connect during setup. | |
| Status light Indicates the status. Learn more | ____If the light is distracting, you can turn it off in your room's settings. |
Connector panel
| Ethernet port Use an Ethernet cable to connect Sub to your home network. |
| AC power (mains) input Use only the supplied power cord to connect to a power outlet (using a third party power cord will void your warranty). Be sure to use the proper power adapter for your country. Push the power cord firmly into Sub until it is flush with the surface. |
Select a location
Choose a location—it's designed to provide optimal sound wherever you place it.
- Use the acoustic slot as a handle to lift Sub out of the box. You should always bend your knees when lifting heavy objects to avoid undue stress on your back.
- Make sure at least one side of the slot is free from obstruction. If you place it vertically against a wall, don't block the front opening. If you place Sub horizontally on the floor, don't put anything on top of it.
- Sub is designed to sit on the floor. You can place it in a corner, against the wall, behind, under, or next to any piece of furniture on any kind of floor surface.
- Position Sub either vertically or horizontally. If you're going to use it horizontally, you can attach permanent felt feet (available upon request, contact Sonos Support). See Attach feet (optional) for more information.
Make sure at least one side of the rectangular opening (acoustic slot) is unobstructed.
- If you place Sub vertically flush against a wall, don't block the front acoustic slot.
- If you place Sub horizontally on the floor, don't put anything on top of it. Leave at least 1" clearance along the top of Sub if placing under furniture.
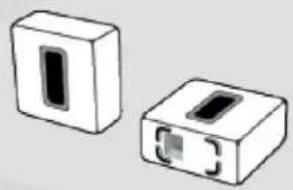
natural_image
Two 3D-rendered rectangular electronic components with internal slots, no text or symbols visibleNote: Sub contains strong magnets. Don't place it near equipment that is sensitive to magnetic fields.
Attach feet (optional)
If you're placing Sub horizontally on a floor, you can attach permanent felt feet (available upon request, contact Sonos Support) to protect your floor. If you're putting it on a rug or using it vertically, no need to adhere the felt feet.
Note: The felt feet are not removable—a strong adhesive will keep them permanently attached to Sub.
-
Lay Sub down so the Sonos logo is facing down. Make sure you adhere the felt feet to the side that doesn't have the Sonos logo.
-
Place the enclosed guide on one corner of the unit and fold the flaps over the edge.
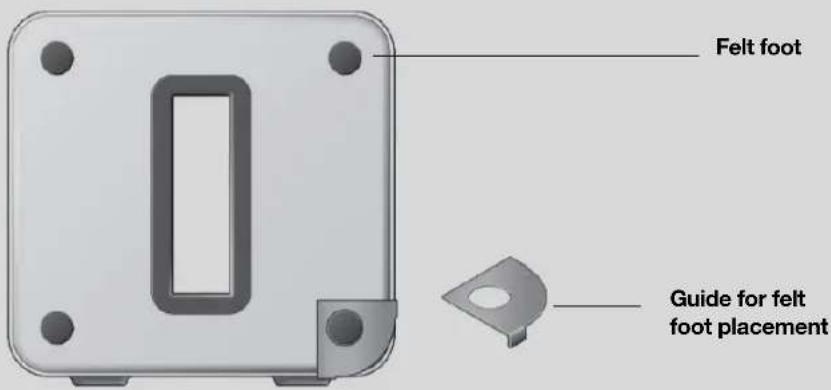
- Peel the backing off one of the feet.
- Press the felt foot (sticky side down) onto the unit inside the circular portion of the guide.
- Attach the other 3 felt feet the same way.
Connect the cables
Attach the power cord and plug in Sub. Be sure to push the power cord firmly into Sub until it is flush with the surface.
If you don't have the app, download it from the app store. You'll use it to set up and control your Sonos system. See Getting started. Make sure you set up at least one speaker before adding Sub.
Note: After Sub is paired with a Sonos speaker, you won't see it displayed separately in ||. Any changes you make to that Sonos speaker (volume, mute, music selection) will also affect Sub.
Sub settings
Sub's settings are set during the initial setup process, but you can make changes anytime.
- Go to the sound settings for the room that's associated with your Sub.
It appears as room (+Sub) in your list of rooms.
- TapSub Audio.
-
Choose one of the following options:
-
Sub: Choose On or Off to turn the sound from Sub on and off.
- Sub Level: Use the slider to increase or decrease volume. (You can use this setting to match the subwoofer level to the level of your main speakers.)
SONOS USER GUIDE
- Phase Control: Choose 0^ or 180^ to set the phase control for your Sonos Sub or third-party subwoofer. This can help integrate your subwoofer with other speakers in the room. (You'll see this setting when you pair a Sonos Sub or third-party subwoofer with a Sonos Amp or Connect:Amp.)
- Crossover Frequency: Adjust the frequency at which the sound transitions to the subwoofer. By default this is 80 Hz.
You may wish to choose a different crossover frequency if:
- The main speakers sound distorted at high volumes—moving to a smaller speaker size setting can help.
- Your attention is drawn to Sub's location while listening to music—moving to a larger speaker size setting can help.
| 1 Compact 110 Hz | |
| 2 100 Hz | |
| 3 90 Hz | |
| 4 Bookshelf / Ceiling 80 Hz | |
| 5 70 Hz | |
| 6 Floor 60 Hz | |
| 7 50 Hz |
- Recalibrate Sub. If you move your Sub to another location, purchase new speakers, or just want to adjust the sound after initial setup, you can recalibrate Sub (Android devices only).
- Select the size of your stereo speakers (Connect:Amp only).
- Press Play ▶ to compare the volume of two test sounds, A and B, and then select No Difference, A is louder or B is louder.
- Press Play ▶ to listen to a test sound, and then select the level you prefer.
Pair Sub with a different speaker
You can easily pair Sub with a different Sonos speaker (except the Sonos Connect).
If you're moving Sub to a new room, wait for the status light to stop flashing after you plug it back in.
- Go to the sound settings for the room that's associated with your Sub.
It appears as room (+Sub) in your list of rooms.
-
Remove Sub.
-
You can pair Sub with a different Sonos product or choose not to use Sub right now. It will appear in as Sub (unused) until you pair it with another Sonos speaker.
Specifications
Feature Description
| Audio | |
| Amplifier Two Class-D digital amplifiers. | |
| Speakers | Two force-canceling speakers positioned face-to-face for deeper, richer sound and zero cabinet buzz or rattle. |
| Dual Acoustic Ports Tuned to enhance Sub performance. | |
| Frequency Response Plays down to 25 Hz. | |
| All Digital Sound | All filter settings, active equalization, and time alignment are done digitally through state-of-the-art DSP (Digital Signal Processing) circuitry for zero-loss audio quality and energy. |
| Automatic Equalization | The system automatically adjusts audio settings across all connected components. |
| Networking* | |
| Ethernet Port | One 10/100 Mbps Ethernet port. You can plug a Sonos product directly into your router if your WiFi is unstable. |
| Wireless Connectivity | Connects to WiFi network with any 802.11a/b/g/n 2.4 or 5 GHz broadcast-capable router. |
| General | |
| Power Supply Auto-switching 100-240 V, 50-60 Hz 2 A AC universal input. | |
| Dimensions (H x D x W) 15.3 x 6.2 x 15.8 in. (389 x 158 x 402 mm) | |
| Weight | 36.3 lb (16 kg) |
| Operating Temperature 32° F to 104° F (0° C to 40° C) | |
| Storage Temperature -4° F to 158° F (-20° C to 70° C) | |
| Multiple Orientations | Stand upright or lay flat for flexible placement. |
| Rubber and Felt Feet | Built-in rubber feet; optional felt feet. |
| Supported Devices | Sub is designed for use with most Sonos speakers, except Sonos Connect, Port and Move. |
| Package Contents | Sonos Sub, power cord, and Quickstart Guide. |
* Specifications subject to change without notice.
Important Safety Information
- Read these instructions.
- Keep these instructions.
- Heed all warnings.
- Follow all instructions.
- Do not use this apparatus near water.
- Clean only with dry soft cloth. Household cleaners or solvents can damage the finish on your Sonos components.
- Do not block any ventilation openings. Install in accordance with the manufacturer's instructions.
- Do not install near any heat sources such as radiators, heat registers, stoves, or other apparatus that produce heat.
- Protect the power cable from being walked on or pinched, particularly at plugs, convenience receptacles, and the point where they exit from the apparatus.
- Only use attachments/accessories specified by the manufacturer.
- Unplug this apparatus during lightning storms or when unused for long periods of time.
- Refer all servicing to Sonos qualified service personnel. Servicing is required when the apparatus has been damaged in any way, such as power-supply cable or plug is damaged, liquid has been spilled or objects have fallen into the apparatus, the apparatus has been exposed to rain or moisture, does not operate normally, or has been dropped.
- The Mains plug should be readily available to disconnect the equipment.

-
Warning: To reduce the risk of fire or electric shock, do not expose this apparatus to rain or moisture.
-
Do not expose apparatus to dripping or splashing and do not place objects filled with liquids, such as vases, on the apparatus.
Boost
For when existing WiFi isn't reliable enough for streaming music—
- Boost broadcasts 360^ signals through walls and ceilings for flawless coverage.
- Streams without interference in the most challenging WiFi environments.
- Bypasses your WiFi to create a separate high-performance wireless network just for Sonos speakers.
- Works with either Sonos S2 or Sonos S1 (for Android and iOS).
When to use a Boost
- Your WiFi is slow or temperamental, or your network is already in high demand with streaming video, gaming, and internet usage.
- WiFi doesn't reach all the rooms where you want to use Sonos. Extend the range of your Sonos system by placing a Boost in between the Sonos speaker that's out of reach and the rest of the Sonos system.
- Your network is 5 GHz only (not switchable to 2.4 GHz).
- Your router supports only 802.11n (you can't change the settings to support 802.11b/g/n).

Controls and lights
| Join button Press to connect during setup. | |
| Status light Indicates the status. Learn more | ____If the light is distracting, you can turn it off in your room’s settings. |
Connector panel
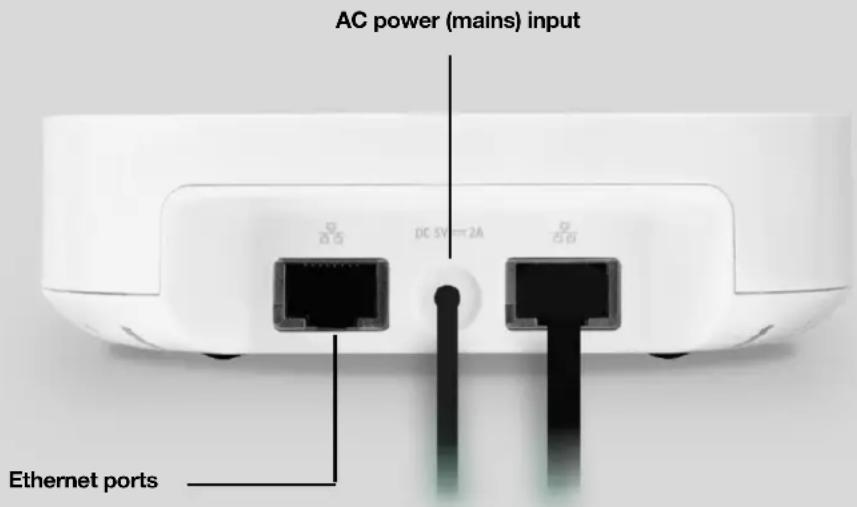
| Ethernet ports (2) Use an Ethernet cable if you want to connect to a router,computer, or network-attached storage (NAS) device(optional). |
| AC power (mains) input Use only the supplied power cord (using a third-partypower cord will void your warranty).Note: Be sure to use the proper power adapter foryour country. |
Select a location
If you purchased a Boost to replace a Sonos product that's connected to your router, first add the Boost to your Sonos system, then plug it into your router and move the one that was originally wired.
If you purchased a Boost to extend the range of your Sonos system, place the Boost in between the Sonos speaker that's out of reach and the rest of the Sonos system.
Wall mounting
- Choose a location that's close to an electrical outlet (power cord length is 6 ft. / 1.8m), away from heat sources, hidden wiring, gas lines, etc.
- Drive an American standard #6 round head screw (metric, M3.5 round head screw) into the wall, leaving a gap between the wall and the screw head (approximately 0.13 in / 3.3mm).
Note: Pan head screws will also work. - Place the Boost on the wall and slide straight down, allowing the screw head to slip behind the smaller end of the keyhole slot on the back of the Boost.
Specifications
Feature Description
Ethernet Connection 2-port switch, 10/100 Mbps, auto MDI/MDIX
Network Bridging 2-port switch allows a connection to your network or to other Sonos speakers. Extend the range of SonosNet—use a Boost to extend the SonosNet signal to areas that cannot reach the rest of the Sonos system.
Wireless Connectivity Works on SonosNet™, a secure AES encrypted, peer-to-peer wireless mesh network dedicated exclusively for Sonos to reduce WiFi interference
Power Supply Auto-switching 100 - 240 V \~ 50-60 Hz 0.3 A AC universal input. Output: 5.0 V, 2.0 A, 10.0 W Average active efficiency: 79.1% No-load power consumption: 0.03 W
Dimensions (H x W x D) 1.3 x 4.5 x 4.5 in. (33 x 115 x 115 mm)
Weight 0.42 lb (.191 kg)
Recommended Mounting Screw American standard #6 round head screw; Metric M3.5 round head screw
Operating Temperature 32^ F to 104^ F ( 0^ C to 40^ C)
Finish White/high quality polycarbonate material
Package Contents Sonos Boost, power cord, Ethernet cable, and Quickstart Guide.
* Specifications subject to change without notice.
Important Safety Information
- Read these instructions.
- Keep these instructions.
3.Heed all warnings. - Follow all instructions.
- Do not use this apparatus near water.
- Clean only with dry soft cloth. Household cleaners or solvents can damage the finish on your Sonos components.
- Do not block any ventilation openings. Install in accordance with the manufacturer's instructions.
- Do not install near any heat sources such as radiators, heat registers, stoves, or other apparatus that produce heat.
- Protect the power cable from being walked on or pinched, particularly at plugs, convenience receptacles, and the point where they exit from the apparatus.
- Only use attachments/accessories specified by the manufacturer.
- Unplug this apparatus during lightning storms or when unused for long periods of time.
- Refer all servicing to Sonos qualified service personnel. Servicing is required when the apparatus has been damaged in any way, such as power-supply cable or plug is damaged, liquid has been spilled or objects have fallen into the apparatus, the apparatus has been exposed to rain or moisture, does not operate normally, or has been dropped.
- The Mains plug should be readily available to disconnect the equipment.

-
Warning: To reduce the risk of fire or electric shock, do not expose this apparatus to rain or moisture.
-
Do not expose apparatus to dripping or splashing and do not place objects filled with liquids, such as vases, on the apparatus.
Play:5
Our biggest home speaker with the boldest sound—
- Hardware and software custom-designed by Sonos to produce pure, immersive sound that's crystal clear at any volume.
- Powered by three tweeters and three mid-woofers, each with a dedicated amplifier, perfectly tuned to match the speakers and acoustic architecture.
- Pair two Play:5s for left-right stereo sound, or use two Play:5s as rear surrounds for your home theater.
- Works with either Sonos S2 or Sonos S1 (for Android and iOS).
- See Getting started when you're ready to add a Play:5 to your Sonos system.
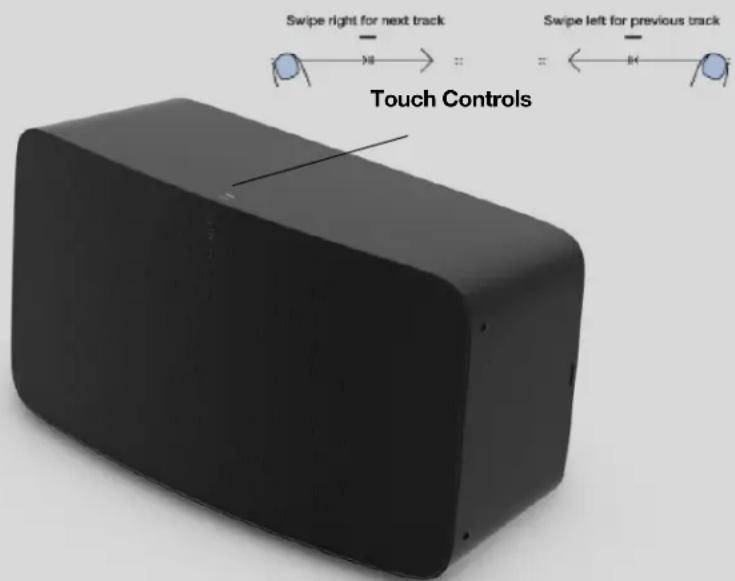
Note: The front grille is not removable. Tampering with the grille may result in damage to your Play:5.
Controls and lights
| :: | Volume control Touch and hold to quickly change the volume:• Volume up (right)• Volume down (left) | |
| >|| | Play/Pause | • Press once to play or pause music.• Press and hold to add the music that's playing in another room. |
| :: >|| :: | Next/Previous song | • Swipe right across the touch controls to skip to the next song.• Swipe left to go to the previous song.Note: You can't skip forward or go back when listening to a radio station. |
| Status light Indicates the status. Learn more ____If the light is distracting, you can turn it off in your room's settings. | ||
Note: If you don't want anyone (like a child) to control playback or change the volume using the speaker touch controls, you can disable them in the room's settings.
Connector panel
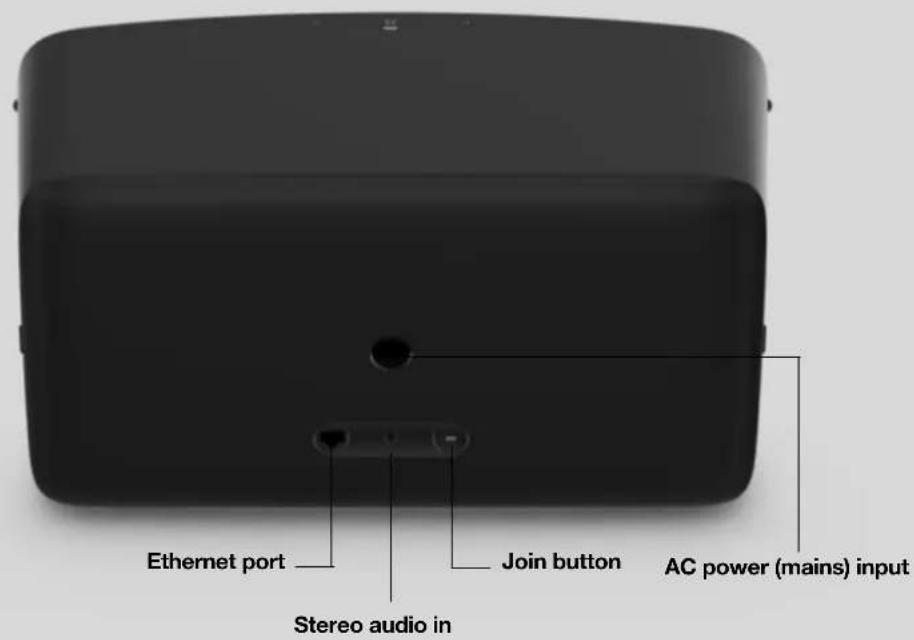
Join button Press to connect during setup.
Ethernet port Use the supplied Ethernet cable if you want to connect to a router, computer, or network-attached storage (NAS) device (optional).
AC power (mains) input Use only the supplied power cord (using a third-party power cord will void your warranty). Note: Insert the power cord firmly until it is flush with the bottom of the speaker.
Stereo audio in (3.5mm / 1/8") Use to connect external music players.
Select a location
You can put your speaker just about anywhere. For maximum performance, we have a few guidelines:
- The Play:5 is a substantial and powerful speaker and should be placed on a flat surface that is robust and durable enough to properly support it. Make sure the Play:5's rubber feet sit completely on the flat surface.
- Allow at least 2" perimeter all around the Play:5 including its power cord.
SONOS USER GUIDE
- For a single Play:5 speaker we recommend positioning the speaker horizontally, enabling stereo sound over a wide sound stage. (A single Play:5 speaker positioned in vertical mode is a mono speaker—there is no stereo separation.)
- Place the Play:5 across the room from where you'll be listening (at or close to your ear height for best results).
- For stereo pair placement information, see Stereo pairs.
- The Play:5 is humidity resistant so you can use it in the bathroom; however it is not water resistant so don't position it near water or leave it outside during a rain storm.
Speaker mounts and stands
For wall mount kits or stands, tailored to perfectly fit your Sonos products, see Accessories on our website. Follow the instructions in the kit.
Line-in
Connect an external source like a phono preamp (your turntable may have a built-in phone preamp), or other audio device. Learn more.
Specifications
Feature Description
Audio
Amplifier Six Class-D digital amplifiers perfectly tuned to match the six dedicated speaker drivers and the acoustic architecture.
Tweeter Three tweeters create the crispest and clearest high-frequency response.
Mid-Woofer Three mid-woofers ensure you'll hear the faithful playback of mid-range vocal frequencies plus deep, rich bass—without distortion, even at high volumes.
Phased Speaker Array (three drivers on top and three on the bottom) Creates a wide stereo soundstage that directs the sound left, right, and center.
Stereo Pair Turn two speakers into separate left and right channel speakers to create wider, deeper sound.
Home Theater Add two speakers as surrounds for a true surround sound experience.
Networking\*
Wireless Connectivity Connects to your home WiFi network with any 802.11b/g/n router.
802.11n only network configurations are not supported—you can either change the router settings to 802.11b/g/n or connect a Sonos product to your router.
Feature Description
Ethernet Port One 10/100Mbps Ethernet port. You can plug a Sonos product directly into your router if your WiFi is unstable.
General
Power Supply Auto-switching 100 - 240V \~ 50-60 Hz 2.3A AC universal input.
Audio Line-In Auto-detecting 3.5mm audio line-in connection.
Dimensions (W x H x D) 14.33 x 8.03 x 6.06 in. (364 x 203 x 154 mm)
Weight 14 lb / 6.36 kg
Threaded Mount None
Operating Temperature 32° to 104° F (0° to 40° C)
Storage Temperature -4^ to 158^ F ( -20^ to 70^ C)
Humidity Resistant
Designed to withstand high-humidity, like in a bathroom with a running shower. (It is not waterproof or water-resistant.)
Product Finish White matte or black matte exposure, graphite grille
Package Contents Play:5, power cord, Ethernet cable, and Quickstart Guide.
* Specifications subject to change without notice.
Important Safety Information
- Read these instructions.
- Keep these instructions.
3.Heed all warnings. - Follow all instructions.
- Do not use this apparatus near water.
- Clean only with dry soft cloth. Household cleaners or solvents can damage the finish on your Sonos components.
- Do not block any ventilation openings. Install in accordance with the manufacturer's instructions.
- Do not install near any heat sources such as radiators, heat registers, stoves, or other apparatus that produce heat.
- Protect the power cable from being walked on or pinched, particularly at plugs, convenience receptacles, and the point where they exit from the apparatus.
- Only use attachments/accessories specified by the manufacturer.
- Unplug this apparatus during lightning storms or when unused for long periods of time.
- Refer all servicing to Sonos qualified service personnel. Servicing is required when the apparatus has been damaged in any way, such as power-supply cable or plug is damaged, liquid has been spilled or objects have fallen into the apparatus, the apparatus has been exposed to rain or moisture, does not operate normally, or has been dropped.
- The Mains plug should be readily available to disconnect the equipment.

-
Warning: To reduce the risk of fire or electric shock, do not expose this apparatus to rain or moisture.
-
Do not expose apparatus to dripping or splashing and do not place objects filled with liquids, such as vases, on the apparatus.
Playbar
Home theater soundbar and streaming music speaker in one—
- Sophisticated 9-speaker design.
- Simple two-cord setup. One for power. One for your TV.
- Mount horizontally above or below the TV or place flat on a TV stand.
- Easily expandable. Add a Sub and two Sonos speakers for 5.1 surround sound. For more information, see Sonos home theater.
- Works with either Sonos S2 or Sonos S1 (for Android and iOS).
- See Getting started when you're ready to add a Playbar to your Sonos system.
- Works with either Sonos S2 or Sonos S1 (for Android and iOS).
- See Getting started when you're ready to add a Playbar to your Sonos system.
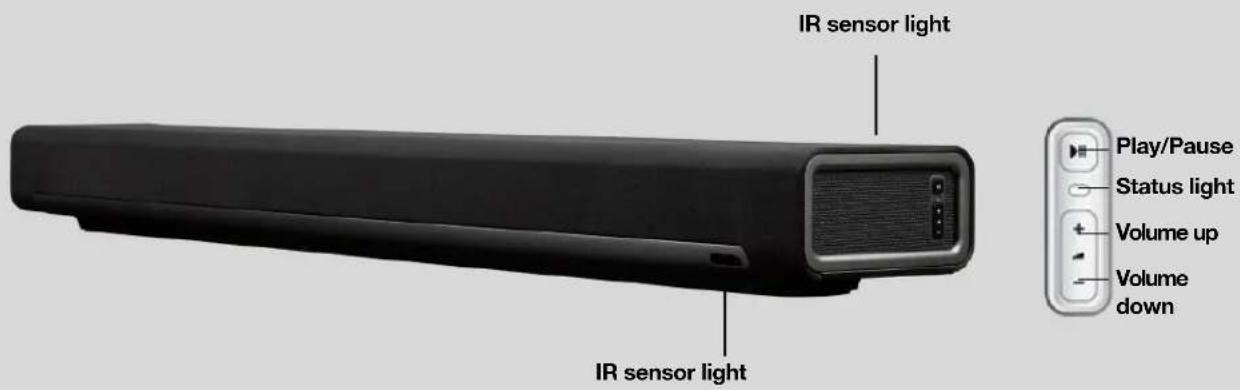
Note: The grille cloth is not removable. Tampering with the cloth may damage your Playbar.
Controls and lights
| + - | Volume up (+)Volume down (-) | Press to adjust the volume.Note: You can also use the app and remote control. |
| >|| | Play/Pause | Press once to play or pause music.Press twice to skip to the next song (if applicable to the selected music source).Press three times to go back to the previous song.Press and hold to add the music playing in another room.Note: You can't skip forward or go back when listening to a radio station. |
| Status light Indicates the status. Learn more ____If the light is distracting, you can turn it off in your room's settings. | ||
| IR sensor light The IR (InfraRed) sensor receives signals sent by a remote control.When the Playbar receives a volume or mute command, the IR light displays momentarily. You can adjust this setting so the light never displays in the room's settings. | ||
Connector panel
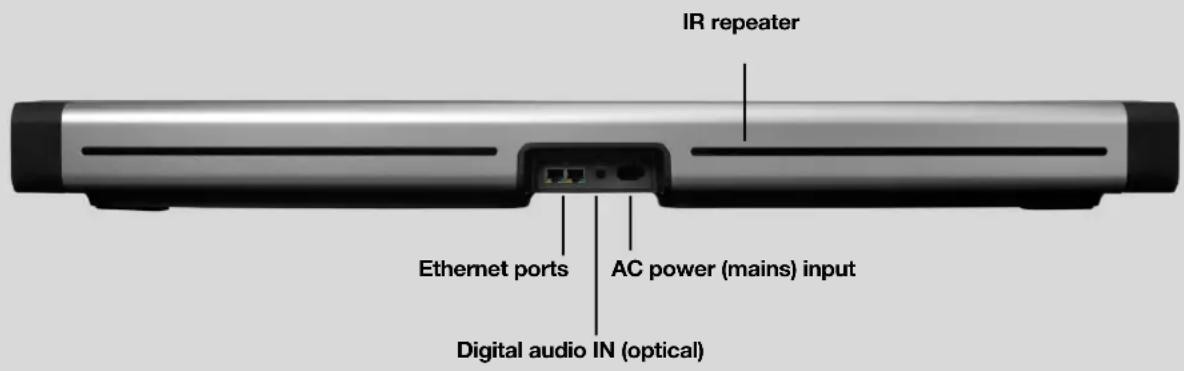
Ethernet ports (2) Use the supplied Ethernet cable if you want to connect to a router, computer, or network-attached storage (NAS) device (optional).
Digital audio IN (optical) Use an audio optical cable to connect the Playbar to your TV.
AC power (mains) input Use only the supplied power cord (using a third-party power cord will void your warranty). Note: Insert the power cord firmly until it is flush with the speaker.
IR repeater Allows the commands from your remote control to reach your TV if the Playbar is positioned in front of the TV.
This setting is on by default, but can be turned off in the room's settings.
Select a location
You can mount the Playbar to a wall above or below your TV or place it on a credenza.
Placed on a credenza
- Place horizontally on a stable and level surface at least 2" (50mm) from TV.
- Don't place vertically or on its side.
- Don't block the TV's IR sensor.
- For best sound quality, place with the connector panel toward the TV (Sonos logo is closer to TV).
- Don't place in a cabinet or on a shelf.
- Keep both ends of the Playbar at least 1' (30cm) from a wall or other obstruction.
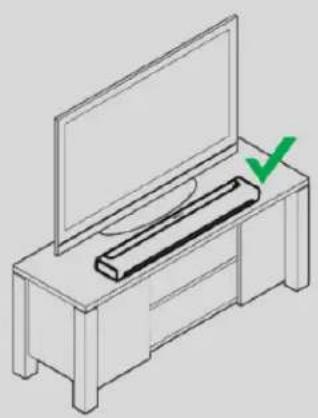
natural_image
Line drawing of a TV setup with a monitor and a box, marked with a green checkmark (no text or symbols)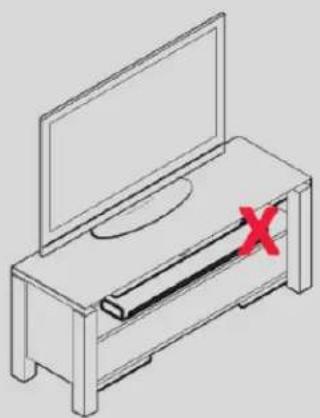
natural_image
Isometric line drawing of a TV setup with a monitor and a cable, marked with a red X (no text or symbols)Wall mounted
To put Playbar on a wall, see Wall mount.
Connect the cables
Before you start
- Disconnect existing home theater or surround sound equipment from your TV.
- Connect any external devices, like a cable box or DVD player, directly to your TV.
Connect the soundbar to your TV
- Remove the protective cap from each end of the optical audio cable.
- Connect the optical audio cable from your TV's digital audio OUT (optical) to the Playbar's digital audio IN (optical). Don't twist or bend the cable.
Note: The Playbar's digital audio IN port and the optical cable are 'D-shaped' — make sure the connector aligns correctly into the port.
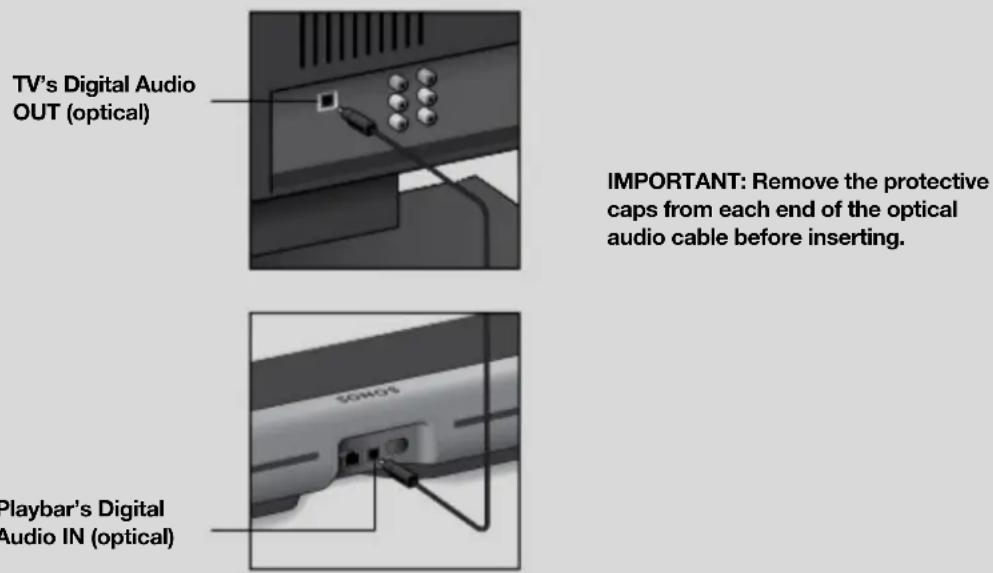
Connect the power cord
Attach the power cord and plug in the Playbar. Push the power cord in firmly until it is flush with the surface.
If you don't have the app, download it from the app store. You'll use it to set up and control your Sonos system. See Getting started.
Wall mount
You can mount Playbar to a wall above or below a wall-mounted TV. Use the Playbar wall mount kit. You can buy it on www.sonos.com. Follow the instructions in the kit.
Caution: Don't use any other hardware to mount the Playbar.
Guidelines
- When mounting below a TV, keep 1" (25mm) space (minimum) between Playbar and TV.
- When mounting above a TV, keep 2" (50mm) space (minimum) between Playbar and TV.
SONOS USER GUIDE
- Preserve audio quality: make sure the connector panel faces away from the TV.
- Keep both ends of the Playbar at least 1 ft. (30cm) from a wall or other obstruction.
Note: Connect the power and audio cables to the Playbar before mounting to the wall.
What you need
- Masking tape
- Pointed tool (like an awl)
• Phillips head screw driver
• Power drill with Phillips head attachment
Note: There are 2 spare screws (and anchors) included in the kit. Use these to provide additional reinforcement if you'd like.
- Tape the template to the wall above or below your TV. Use a level.
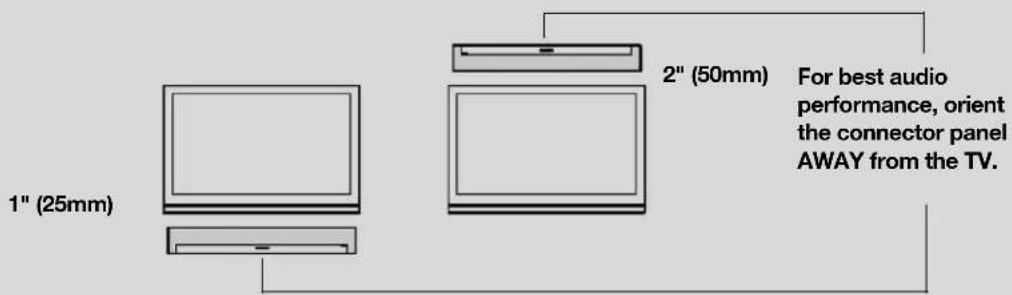
SONOS USER GUIDE
- Use a pointed tool to pierce through the template and mark the mounting holes. Mark closer to the corners of the holes.
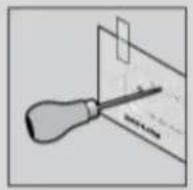
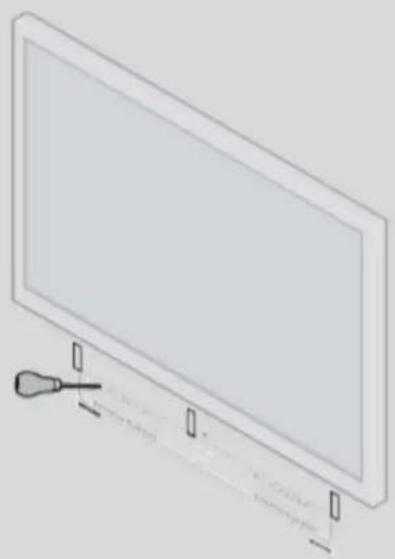
natural_image
Illustration of a flat-screen monitor with a cable attachment at the bottom (no text or symbols visible)- Remove the template.
- Drill pilot holes.
Wall mounting information
Wall Material Pre Drill Use Wall Anchors Use Screws
| Wood Stud 1/8" (3 mm) bit | No Yes |
| Drywall (no stud) 3/16" (4.5 mm) bit Yes Yes | |
| Hard wallboard or double board 3/16" (4.5 mm) bit Yes Yes | |
| Plaster 1/4" (6.5 mm) bit Yes Yes | |
| Concrete or Brick 1/8" (3 mm) bit Yes Yes | |
| 5. Insert and secure the wall anchors (don’t use the anchors if drilling into wood). | |
SONOS USER GUIDE
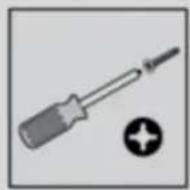
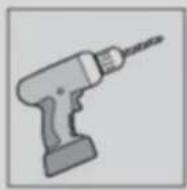
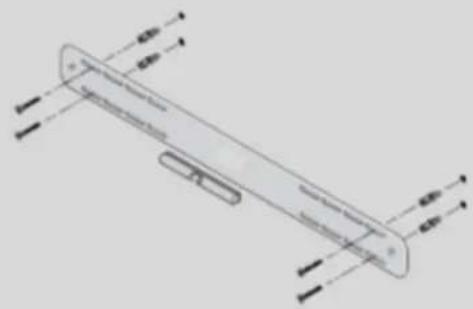
- Place the bracket on the wall and loosely tighten the screws to secure the bracket. Check with a level and then tighten the screws.
- Hang the Playbar securely on the bracket pegs.
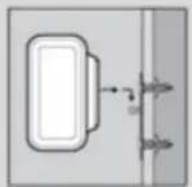
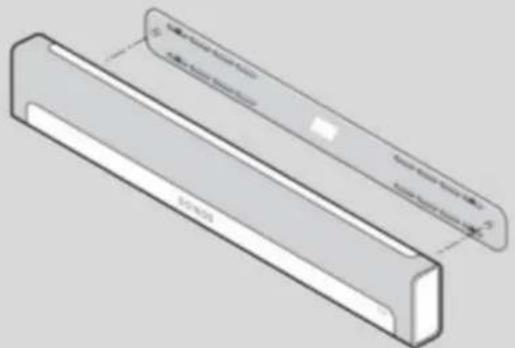
natural_image
3D diagram of a rectangular mechanical part with two flanged ends, no text or symbols presentSpecifications
Feature Description
| Audio | |
| Amplifier Nine Class-D digital amplifiers perfectly tuned to match the nine dedicated speaker drivers and the acoustic architecture. | |
| Tweeter Three tweeters create the crispest and clearest high-frequency response. | |
| Mid-Woofer Six mid-woofers give you the full range of sound effects and music from the left and right channels, and crisp, clear dialog from the center. Mid-woofers act together as a phased speaker array so what you hear matches what you see on screen. | |
| System Requirements | TV with optical audio output, broadband Internet, and a Sonos app. Internet-connected TV not required. |
| Networking* | |
| Wireless Connectivity Connects to your home WiFi network with any 802.11b/g/n router.802.11n only network configurations are not supported—you can either change the router settings to 802.11b/g/n or connect a Sonos product to your router. | |
| Ethernet Port (2) | Two 10/100 Mbps Ethernet ports. You can plug a Sonos product directly into your router if your WiFi is unstable. |
| General | |
| Power Supply Auto-switching 100-240 V, 50-60 Hz 2A AC universal input. | |
| Dimensions (H x W x D) | 3.35" (H) x 35.43" (W) x 5.51" (D), 8 5mm (H) x 900 mm (W) x 140 mm (D) |
| Weight 11.9 lb (5.4 kg) | |
| Operating Temperature 32°F to 104° F (0°C to 40°C) | |
| Storage Temperature | -4°F to 158°F (-20°C to 70°C) |
| Multiple Orientations | Mount Playbar on the wall either above or below your TV, or lay flat on your TV table. |
| Control | Use your remote control, voice, touch controls or the Sonos app. |
| Supported Devices | Playbar connects to your TV using a single optical cable and plays all sources connected to the TV, including cable boxes and game consoles. |
| Package Contents | Playbar, AC power cord, optical audio cable, and Quickstart Guide. |
* Specifications subject to change without notice.
Important Safety Information
- Read these instructions.
- Keep these instructions.
- Heed all warnings.
- Follow all instructions.
If your product is wallmounted:
- Improper or inadequate wallmount installation could cause your device to fall, resulting in personal injury.
- Never hang from the Sonos product or the wall bracket.
-
Once wall-mounted, periodically check to ensure screws remain securely tightened.
-
Do not use this apparatus near water.
- Clean non-fabric portions only with a dry soft cloth. Household cleaners or solvents can damage the finish on your Sonos products. Keep the fabric free from dust, pet hair, and other fine particles. Use a vacuum with a hose or non-moving bristle attachment to clean the fabric. Do not vacuum with a rotating bristle attachment. A lint brush can be used to smooth out visible lines in the fabric. Do not clean fabric with a lint roller.
- Do not block any ventilation openings. Install in accordance with the manufacturer's instructions.
- Do not install near any heat sources such as radiators, heat registers, stoves, or other apparatus that produce heat.
- Protect the power cable from being walked on or pinched, particularly at plugs, convenience receptacles, and the point where they exit from the apparatus.
- Only use attachments/accessories specified by the manufacturer.
- Unplug this apparatus during lightning storms or when unused for long periods of time.
- Refer all servicing to Sonos qualified service personnel. Servicing is required when the apparatus has been damaged in any way, such as power-supply cable or plug is damaged, liquid has been spilled or objects have fallen into the apparatus, the apparatus has been exposed to rain or moisture, does not operate normally, or has been dropped.
- The Mains plug should be readily available to disconnect the equipment.

-
Warning: To reduce the risk of fire or electric shock, do not expose this apparatus to rain or moisture.
-
Do not expose apparatus to dripping or splashing and do not place objects filled with liquids, such as vases, on the apparatus.
Playbase
Full-theater sound and music streaming for TVs on stands and furniture—
- Slim tabletop design practically disappears under your TV.
- Securely supports TVs up to 75 lb (34 kg).
- Simple two-cord setup. One for power. One for your TV.
- Easily expandable. Add a Sub and two Sonos speakers for 5.1 surround sound. For more information, see Sonos home theater.
- Works with either Sonos S2 or Sonos S1 (for Android and iOS).
- See Getting started when you're ready to add a Playbase to your Sonos system.
Play and control your music using the Sonos app or the touch controls.
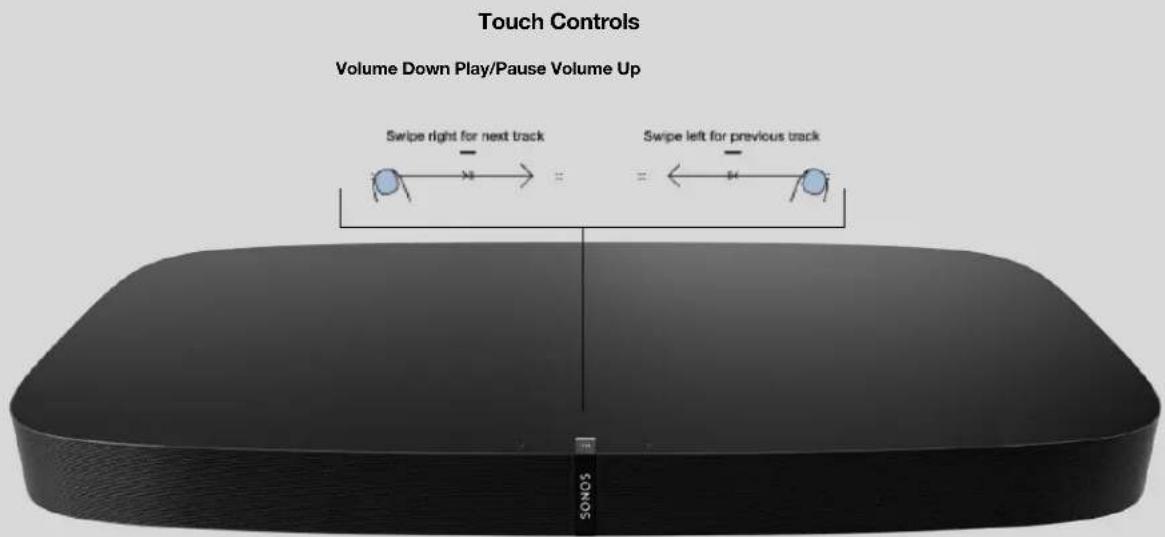
Controls and lights
| :: | Volume control | • Touch and hold to quickly change the volume:• Volume up (right); Volume down (left). |
| >|| | Play/Pause Press to play or pause sound. | |
| :: >|| :: | Next/Previous song | • Swipe right across the touch controls to skip to the next song.• Swipe left to go to the previous song.Note: You can’t skip forward or go back when listening to a radio station. |
| Status light Indicates the status. Learn more ____If the light is distracting, you can turn it off in your room’s settings. | ||
| IR sensor light The IR (InfraRed) sensor receives the signals sent by a remote control. When the Playbase receives a volume or mute command, the IR signal light displays momentarily. | ||
Note: If you don't want anyone (like a child) to control playback or change the volume using the speaker touch controls, you can disable them in the room's settings.
Connector panel
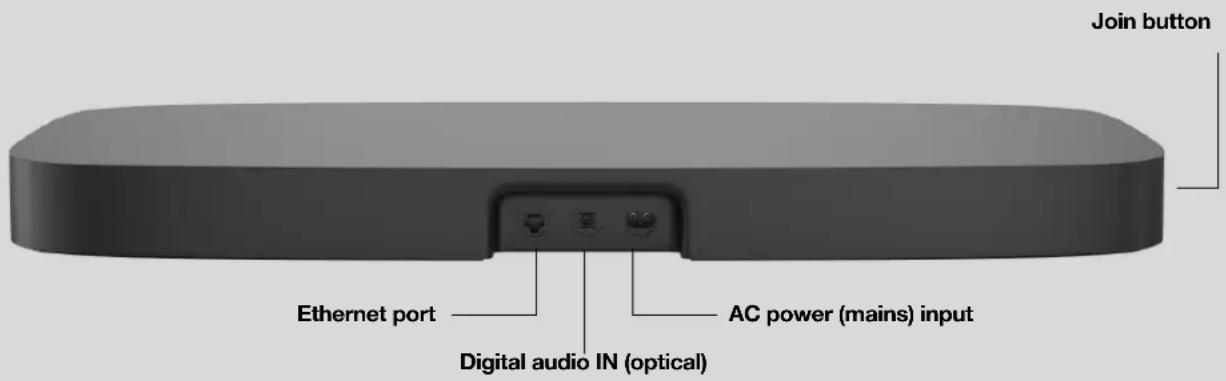
| Ethernet port Use the supplied Ethernet cable if you want to connectto a router, computer, or network-attached storage(NAS) device (optional). You should only use this port toplug in either the Playbase, Sonos Bridge, or SonosBoost. |
| Digital audio IN (optical) Use an audio optical cable to connect the Playbase toyour TV. |
| AC power (mains) input Use only the supplied power cord (using a third-partypower cord will void your warranty).Note: Insert the power cord firmly until it is flush withthe speaker. |
| Join button Press to connect during setup. |
Select a location
You can place the Playbase under your TV or on a shelf.
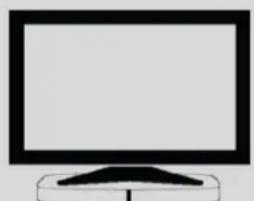
natural_image
Simple line drawing of a computer monitor with a stand (no text or symbols)Under TV with single foot stand
- Lift the TV and put Playbase under it with the Sonos logo facing front.
- Make sure the TV stand rests completely on the Playbase with no overhang.
- Your TV should not weigh more than 75 lb (34 kg)
- Allow at least 1" between Playbase and other surfaces, like walls or cabinets.
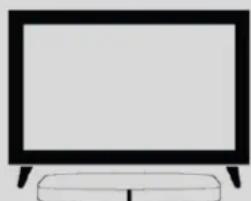
natural_image
Simple line drawing of a flat-screen monitor with legs and a base (no text or symbols)Under TV with split foot stand
- Playbase accommodates most TVs with separate feet near the edges of the screen. It fits securely between the feet, below the screen.
- Feet must be at least 2.3" (58mm) tall to allow for Playbase clearance.
- If the feet are too close together or they're not quite high enough, don't try to force your Playbase to fit.
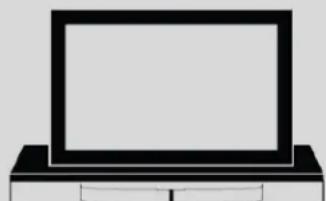
natural_image
Simple line drawing of a laptop computer with blank screen and base (no text or symbols)On a TV cabinet shelf
- For the best sound, place Playbase toward the front of the furniture but DON'T let it hang over the edge.
- Allow at least 2" all around the Playbase.
Note: Don't place objects lighter than 5 lb (2.3 kg) on top of your Playbase or the sound may send them flying.
Connect the cables
- Disconnect existing home theater or surround sound equipment from your TV.
- Connect any external devices, like a cable box or DVD player, directly to your TV.
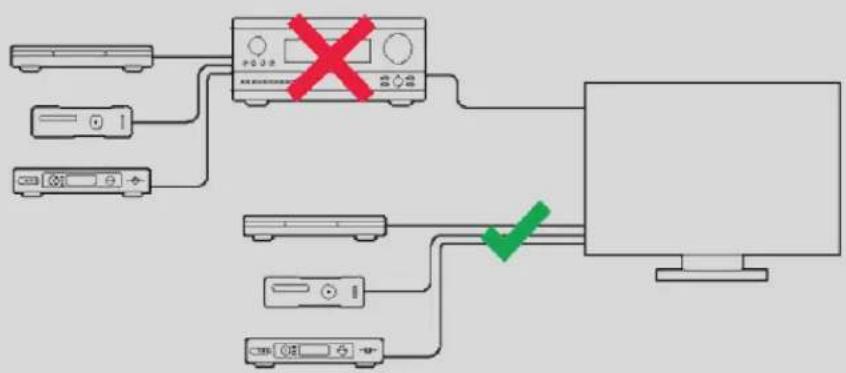
flowchart
graph TD
    A["Device 1"] --> B["Switch"]
    C["Device 2"] --> B
    D["Device 3"] --> B
    B --> E["Computer"]
    F["Device 4"] --> E
    G["Device 5"] --> E
    H["Device 6"] --> E
    I["Device 7"] --> E
    J["Device 8"] --> E
    style B stroke:#ff0000,stroke-width:2px
    style E stroke:#000,stroke-width:2px
Connect Playbase to your TV
- Remove the protective cap from each end of the optical audio cable.
- Connect the optical audio cable from your TV's digital audio OUT (optical) to the Playbase's digital audio IN (optical). Don't twist or bend the cable.
SONOS USER GUIDE
Note: The Playbase's digital audio IN port and the optical cable are 'D-shaped'—make sure the connector aligns correctly into the port.
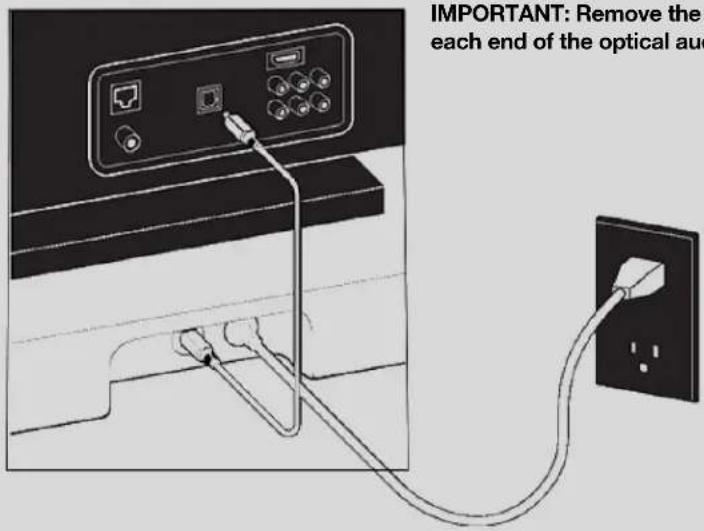
Connect the power cord
Attach the power cord and plug in the Playbase. Push the power cord firmly into the Playbase until it is flush with the surface.
If you don't have the app, download it from the app store. You'll use it to set up and control your Sonos system. See Getting started.
Specifications
Feature Description
Audio
Amplifier Ten Class-D digital amplifiers.
Speakers Ten amplified speaker drivers—six midrange and three tweeters and one woofer.
System Requirements
TV with optical audio output, broadband Internet, and the Sonos app.
Feature Description
Networking\*
Wireless Connectivity Connects to your home WiFi network with any 802.11b/g/n router. 802.11n only network configurations are not supported—you can either change the router settings to 802.11b/g/n or connect a Sonos product to your router.
Ethernet Port One 10/100 Mbps Ethernet port. You can plug a Sonos product directly into your router if your WiFi is unstable.
General
Power Supply Auto-switching 100 - 240V \~ 50-60 Hz 2.3 A AC universal input.
Dimensions (H x W x D) 2.20 x 28.35 x 14.96 in. (56 x 720 x 380 mm)
Weight 21.5 lb (9.8 kg)
Operating Temperature 32°F to 104°F (0°C to 40°C)
Storage Temperature -4^ F to 158^ F ( -20^ C to 70^ C)
Control Use your remote control, voice, touch controls or the Sonos app.
Supported Devices
Playbase connects to your TV using a single optical cable and plays all sources connected to the TV, including cable boxes and game consoles.
Package Contents Playbase, AC power cord, Ethernet cable, optical audio cable, and Quickstart Guide.
* Specifications subject to change without notice.
Important Safety Information
- Read these instructions.
- Keep these instructions.
- Heed all warnings.
- Follow all instructions.
- Do not use this apparatus near water.
- Clean only with dry soft cloth. Household cleaners or solvents can damage the finish on your Sonos components.
- Do not block any ventilation openings. Install in accordance with the manufacturer's instructions.
- Do not install near any heat sources such as radiators, heat registers, stoves, or other apparatus that produce heat.
- Protect the power cable from being walked on or pinched, particularly at plugs, convenience receptacles, and the point where they exit from the apparatus.
- Only use attachments/accessories specified by the manufacturer.
- Unplug this apparatus during lightning storms or when unused for long periods of time.
- Refer all servicing to Sonos qualified service personnel. Servicing is required when the apparatus has been damaged in any way, such as power-supply cable or plug is damaged, liquid has been spilled or objects have fallen into the apparatus, the apparatus has been exposed to rain or moisture, does not operate normally, or has been dropped.
- The Mains plug should be readily available to disconnect the equipment.

-
Warning: To reduce the risk of fire or electric shock, do not expose this apparatus to rain or moisture.
-
Do not expose apparatus to dripping or splashing and do not place objects filled with liquids, such as vases, on the apparatus.
Accessories
Find the perfect accessory for your Sonos system—tailored to perfectly fit your Sonos products.
- Sonos Stand
- Sonos Shelf
• Wall Mount for Arc
• Wall Mount for Beam
• Wall Mount for Playbar - Sonos Architectural by Sonance speakers
For the full selection of Sonos-compatible stands, wall mounts, and cables, see Accessories on our website.
Sonos Stand
A set of custom-designed stands for Sonos One and Play:1 provide an elegant solution for placing your home theater surrounds.
- Indentation in the stem hides the speaker's power cable for simple cable management.
- Perfect height for home theater surrounds.
- Dimensions (H x W x D): 32.98 x 11.81 x 11.81 in. (837.8 x 300 x 300 mm)
• Weight: 12.3 lbs (5.58 kg) for the pair; 6.15 lbs (2.8 kg) each
- Solid construction. The base has increased structural stability to eliminate wobbling, and bumpers secure your speakers in place
What's in the box?
The kit contains a pair of Sonos stands. Each stand assembly includes:
- Base
- Stem
- Speaker platform
- Speaker platform bottom cover
- Stem top cap
- Mounting kit with 4 screws (2 silver, 2 black)
Note: Sonos speakers sold separately.
What you'll need
• Phillips-head screwdriver
Assembling your Sonos Stand
- Take everything out of the box and place the base in the packaging slot to stabilize it for the next few steps. Unplug your Sonos speaker, and thread the speaker end of the power cord through the opening in the base.
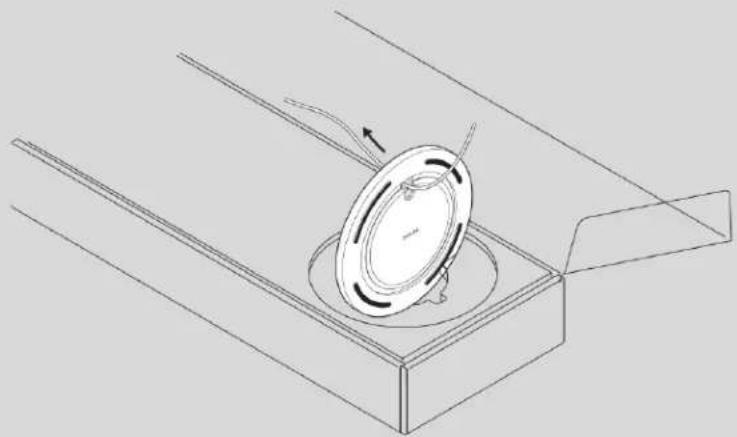
natural_image
Technical line drawing of a mechanical component with a circular housing and directional arrow (no text or symbols)- Insert the stem snugly into the base, using the alignment pins to position the power cord channel either in the front or back. Use the 2 black screws and a Phillips-head screwdriver to attach the base.
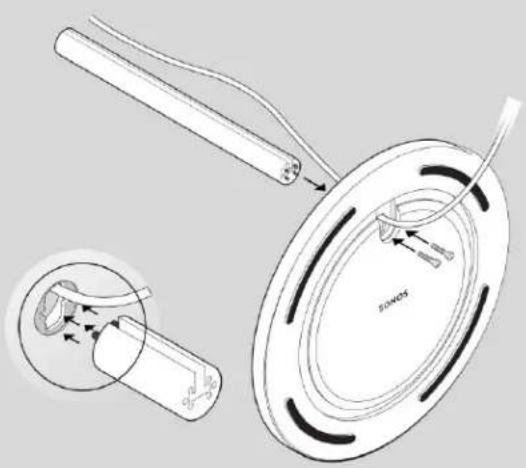
SONOS USER GUIDE
- Route the speaker's power cord through the speaker platform.
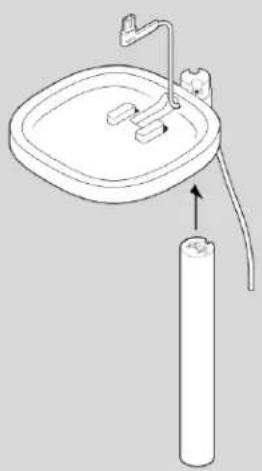
natural_image
Line drawing of a sink with a water tap and a vertical cylinder attached to the sink (no text or symbols)- Use the 2 silver screws to attach the speaker platform to the top of the stem, threading the power cable carefully. Snap the bottom plate on with the power cable channel in the back, and mount the platform on the stem.
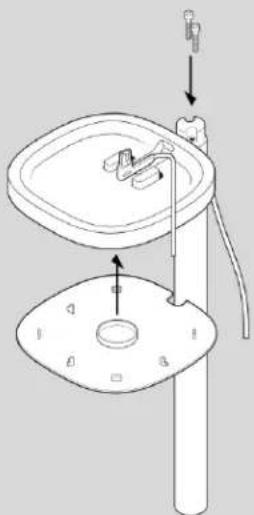
natural_image
Technical line drawing of a mechanical device with a central component and base plate (no text or symbols)SONOS USER GUIDE
- Plug the power cord back into the speaker and place on the top mount, pulling any extra cable down from the top. Tighten the screws and attach the top cap with the notch facing toward the speaker.
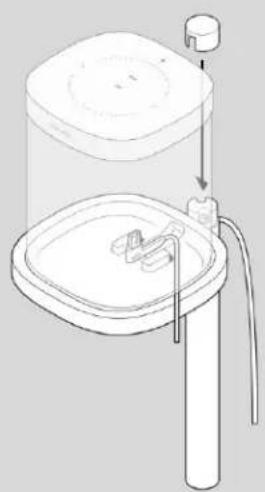
natural_image
Line drawing of a water dispenser with a lid, base, and piping (no text or symbols)- Press the power cord into the stem, working from top to bottom. Pull the excess cable down from the base.
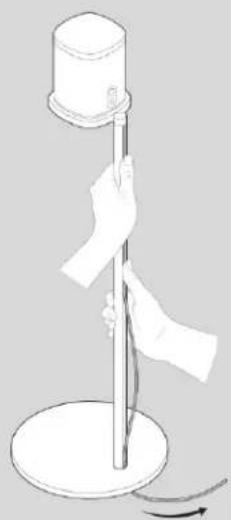
natural_image
Illustration of a hand holding a vertical pole with a curved arrow indicating rotation (no text or symbols)SONOS USER GUIDE
- Tilt the stand forward slightly to wrap the excess cord around the bottom of the base. Plug the speaker's power cable into the wall and enjoy the music!
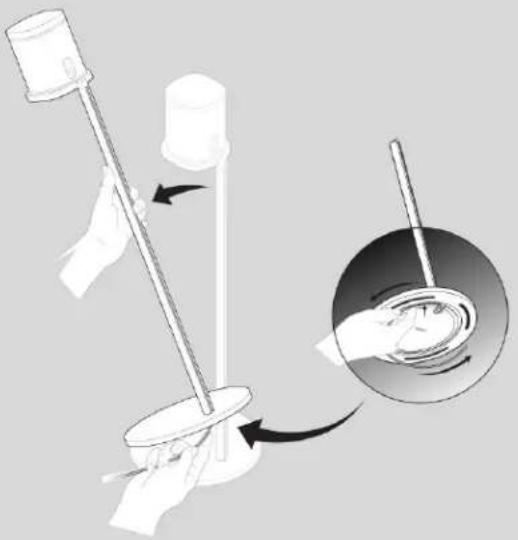
natural_image
Illustration of a mechanical device with rotating shaft and base, showing motion direction (no text or symbols)Sonos Shelf
The easy-to-install shelf for Sonos One and Play:1 securely holds your speaker in place—its space-saving design provides a designated space for your speaker.
- Designed to support up to 8 lbs (3.6 kg)
- Dimensions (H x W x D): 0.89 x 10.23 x 6.29 in. (22.7 x 260 x 160 mm)
• Weight: 1 lb (0.45 kg)
What's in the box?
- Top shelf
- Wall bracket
- Bottom cover
- Mounting kit
Note: Sonos speakers sold separately.
SONOS USER GUIDE
What you'll need
- Pencil
• Phillips-head screwdriver - Power drill (if needed for installation location)
- Level
Assembling your Sonos Shelf
- Place the wall bracket against the wall and mark the screw holes. (Make sure the black bracket foam ring is face up.)
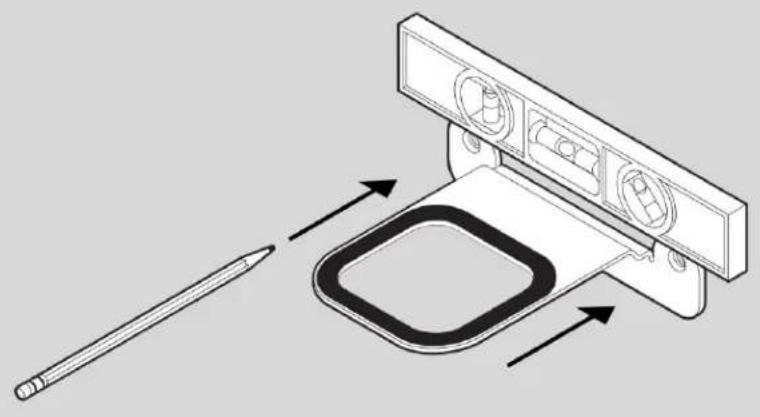
natural_image
Diagram of a device with a pencil and a rectangular component, showing directional arrows (no text or symbols)SONOS USER GUIDE
- If using wall anchors, use a 5/16" drill bit to drill 2 pilot holes and then insert the wall anchors. Refer to the wall mounting information below for guidelines. Otherwise skip this step.
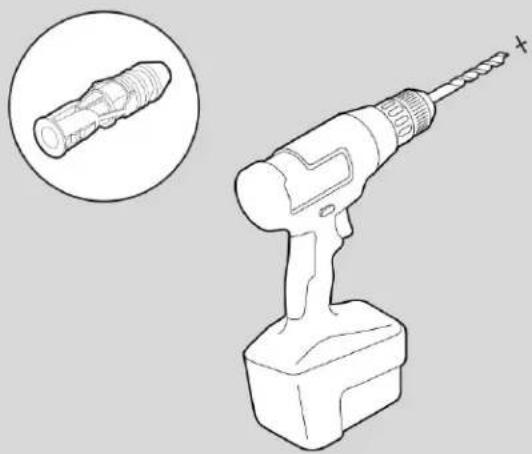
natural_image
Line drawing of a drill bit with a magnified inset showing the internal structure (no text or symbols)WALL MATERIAL
PRE-DRILL
USE WALL ANCHORS
USE SCREWS
Wood stud 1/8" / 3 mm bit No Yes
Drywall (no stud) 5/16" / 8 mm bit Yes Yes
Hard wallboard or double 5/16" / 8 mm bit Yes Yes
board
Plaster 5/16" / 8 mm bit Yes Yes
Concrete or Brick 5/16" / 8 mm bit Yes Yes
SONOS USER GUIDE
- Use a Phillips-head screwdriver or a power drill to screw the bracket to the wall.
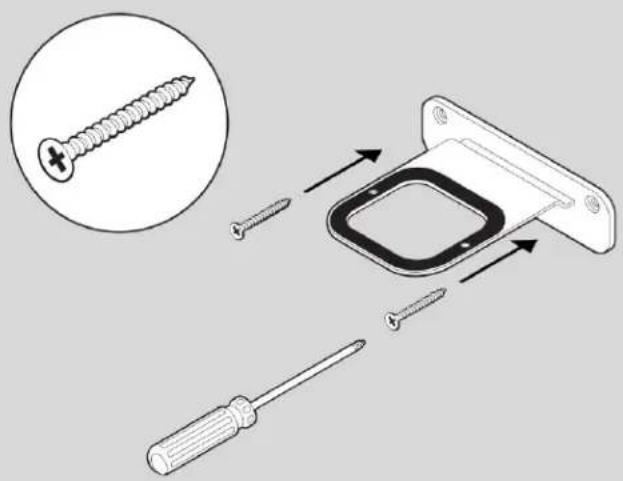
- Position the shelf the way you want it (supports left or right speaker placement). Press the shelf firmly on to the wall bracket until it snaps into place (both front and back).
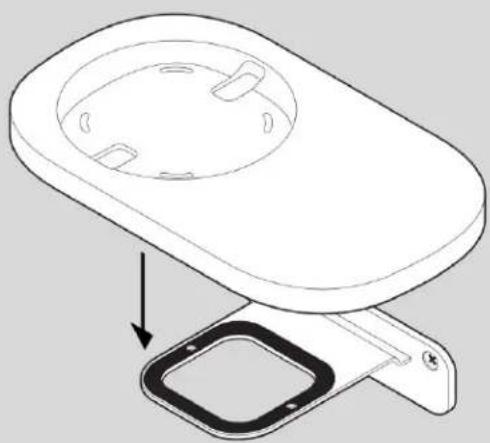
natural_image
Technical line drawing of a mechanical device with a circular top component and a square base component, showing internal features (no text or symbols)SONOS USER GUIDE
- Route the speaker's power cord through the shelf opening. (You'll wrap the cord around the bottom of the shelf after it's assembled.)
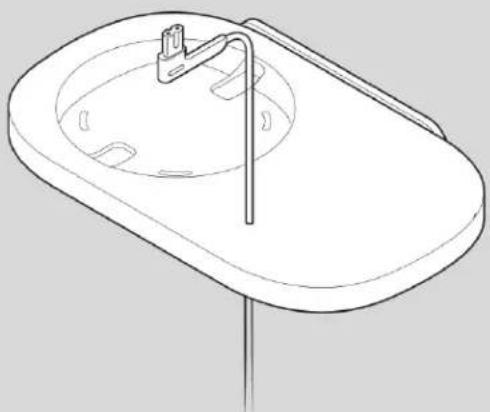
natural_image
Line drawing of a simple sink with faucet and handle (no text or symbols)- Press the bottom cover firmly onto the shelf until it snaps into place, carefully aligning the pins. Plug the power cord into the speaker and place the speaker on top of the shelf.
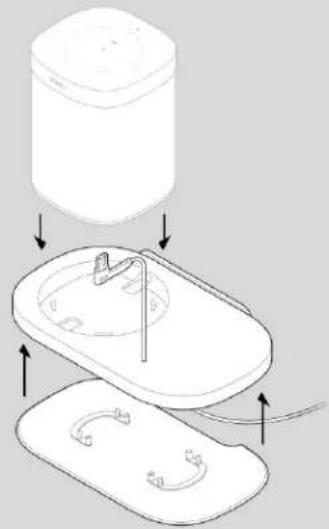
natural_image
Diagram showing three steps of a device with a central component and surrounding components (no text or symbols)SONOS USER GUIDE
- Wrap the excess power cord around the bottom of the shelf.
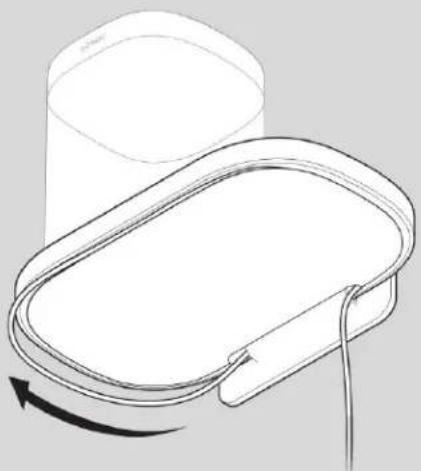
natural_image
Line drawing of a device with a curved handle and arrow indicating rotation (no text or symbols)- Your shelf assembly is complete—time to play some music!
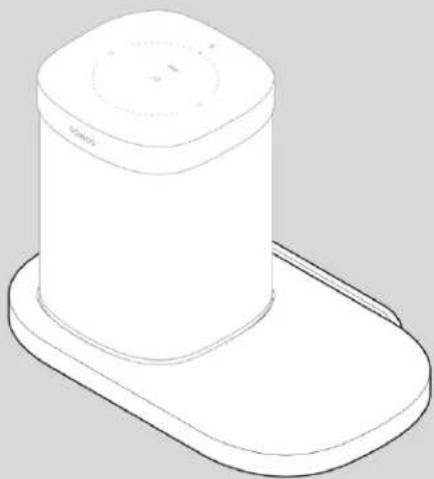
natural_image
Line drawing of a cylindrical object with a flat base, no text or symbols presentWall Mount for Arc
See Wall mount for more information.
Wall Mount for Beam
See Wall mount for more information
Wall Mount for Playbar
See Wall mount for more information
Sonos Architectural by Sonance speakers
Sonos Architectural by Sonance speakers include exclusively-designed audio enhancements when used with a Sonos Amp. These enhancements include:
- Trueplay tuning (not applicable to outdoor speakers)
- Custom EQ settings
- Gain adjustment
• Dynamic bass extension
• Signal limiting/loudspeaker protection
To unlock Sonos audio enhancements
After you install your Sonos Architectural speakers and set up Amp, go to the settings for the room associated with these speakers and select Detect Sonos Architectural.
Other accessories
For a full selection of wall mounts, stands, and cables, tailored to perfectly fit your Sonos products, see Accessories on our website.
Rooms
Everyone in the house can listen to something different, or you can group Sonos products together to play the same music. If you have a home theater speaker, you can send the TV sound to other rooms, too.
Tap I on a mobile device to see what's playing in each room. To change what's playing, tap a room, and choose different content from Browse, Search, or My Sonos. If any rooms are missing, go to 🙏 > Support > Find Missing Products and we'll help you find them (available only with the Sonos S2 app). Learn more.
Select ☐ to play the same music in more than one room. With the Sonos S2 app, you can also save a group of rooms to easily select it again later.
If you're near a speaker, press and hold the > button to easily add the music from another room. If different content is playing in different rooms, just press and hold > until you hear the sound you want.
Room Settings
You can customize Sonos products for your surroundings.
| Room Name If you move your speaker to a new room, you can change its name in your room's settings. |
| Turn off WiFi You can turn off your speaker's WiFi when it's connected to your network with an Ethernet cable.This reduces power consumption and can improve connectivity for some wired speakers.For products like Amp, Port, Connect, and Connect:Amp, turning off WiFi can reduce the internal temperature when they're placed in a rack or stacked.Learn more |
| EQ Sonos products ship with preset equalization settings.You can change the sound settings (bass, treble, balance, or loudness) to suit your personal preferences.Learn more |
| Trueplay Trueplay analyzes the surroundings in a room and then adjusts each woofer and tweeter to provide you with the best sound for that room.Learn more |
| Volume Limit You can set a maximum volume for each room.Learn more |
| Status Light There's a status light on each product. If the light is distracting, you can turn it off in your room's settings.If it ever flashes orange, you canget more informationabout the LED states. |
SONOS USER GUIDE
| Touch Controls You can disable the touch control buttons on your speaker. You may want to do this to prevent a child or curious pet from accidentally adjusting playback or volume.Learn more |
| Battery Saver To save battery life, you can set your portable speaker to power off automatically instead of going to sleep. It won't appear in the Sonos app until it's powered back on. |
| Height Audio When listening to Dolby Atmos audio through Sonos Arc or Arc SL, you can adjust the level of the height audio channels.Learn more |
| Line-In You can connect an audio device like a turntable, stereo, or MP3 player to a Play:5, Amp, Connect, or Connect:Amp and stream the audio to Sonos.Learn more |
Stereo pairs
Pair two Sonos speakers in the same room for a wider, stereo experience. One speaker serves as the left channel and one serves as the right channel.
Note: The Sonos speakers in a stereo pair must be the same type.
Get more information about stereo pairs.
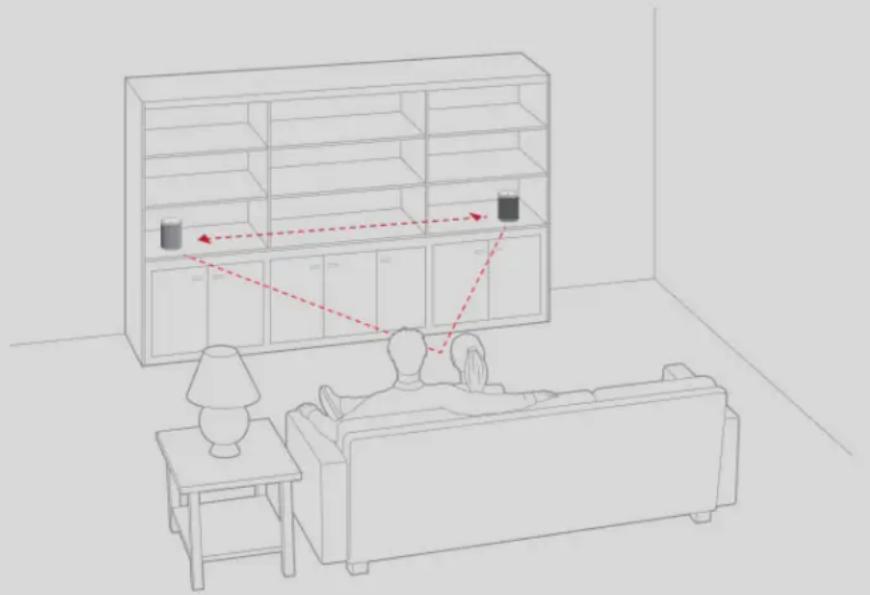
natural_image
Line drawing of a living room with a sofa, lamp, and wall-mounted shelf (no text or symbols)Sonos home theater
Sonos products for your TV provide full-theater sound and play music too. Create a home theater system by adding a pair of rear surrounds and a Sub.
- Arc and Arc SL: premium smart soundbar for TV, movies, music, gaming, and more. Place on furniture or wall mount.
- Beam and Beam (Gen 2): compact soundbar with voice control, perfect for small to medium-sized rooms. Place on furniture or wall mount.
- Playbase: widescreen sound and music streaming, created especially for TVs on stands or furniture. Low profile design practically disappears under your TV.
- Playbar: powerful soundbar, perfect for use above or below wall-mounted TVs, or lay it flat on a table or console.
- Amp: versatile amplifier for powering all your entertainment.
- Sub: add dramatically deeper bass to any Sonos speaker, for home theater and music.
Surround speakers
It's easy to turn two Sonos speakers (same model) or two of your favorite non-Sonos speakers (with Amp or Connect:Amp) into separate right and left channels for your home theater. Get more information about surrounds.
Surround settings
When you add your speakers as surrounds, surround sound is optimized for your room. You can adjust these settings:
| Surrounds | Turn surround sound On or Off. |
| TV Level Adjust surround volume for TV audio. | |
| Music Level Adjust surround volume for music. | |
| Music Playback | Ambient (subtle) or Full (louder, full range). Doesn't apply to Dolby Atmos Music playback. |
| Balance Surround Speakers | Manually balance your surround speakers. |
Home theater settings
Use the Sonos app to adjust sound settings or change the way your home theater speaker works with your TV.
TV dialog settings If the TV audio is out of sync with the video, you can adjust the audio delay (lip sync) in your room's settings. Learn more
Group audio delay If you notice audio issues when playing to a group, you can adjust this setting. Learn more.
| TV autoplay TV Autoplay—if music or other content is playing when you turn on your TV, the audio automatically switches to TV audio (default). If you don’t want this to happen, turn off TV Autoplay in your room’s settings.Ungroup on Autoplay—if your home theater speaker is grouped with other products when you turn on the TV, it automatically drops from the group (default). If you don’t want this to happen, turn off Ungroup on Autoplay in your room’s settings. | |
| Speech enhancement | Makes TV dialog easier to hear.Learn more |
| Night sound Enhances quiet sounds and reduces the intensity of loud sounds.Turn on to reduce the volume while still experiencing proper balance and range.Learn more | |
| Remote control setup During setup, you’ll program a remote control. You can program a different remote control any time.Learn more | |
Play music
There are lots of ways to get the music playing on Sonos—choose whichever control works best in the moment.
- The Sonos app. The free Sonos app is the easiest way to play anything and everything on Sonos. Simply open the app, tap 🎯 and choose from the list of music sources.
- Voice commands. If you have a voice-enabled Sonos speaker, add a voice service and use your voice to play and control the music.
- Controls on the speaker. If you're near a speaker, you can use the speaker controls to adjust volume, stop the music, or change the song.
- Another streaming app. Control Sonos directly from a different app (like Spotify, Pandora, or Pocket Casts). Just open the app and connect to a Sonos room or group to start the music.
- Airplay 2. Use AirPlay 2 to stream music, movies, podcasts, and more directly from your favorite apps to your Sonos speakers. Listen to Apple Music on your Sonos One. Watch a YouTube or Netflix video and enjoy the sound on Sonos.
When you find music you love, add it to My Sonos in the mobile app so it's easy to play again. You can save, play, and manage your favorite music and playlists all in one place. Learn more.
Music sources
Sonos gives you easy access to all the music you love—play your favorite artist's newest single from Spotify, your favorite playlist from your Android phone, a local news radio station, and much more.
- Sonos Radio HD: select from exclusive high-definition content. Learn more
- Music services: explore and manage your music services—add your own or try something new. Learn more
- Stored on your mobile device: play music you've downloaded to your phone or tablet (Android only). Learn more
- Stored on your computer: play music stored on your computer or any Network-Attached Storage (NAS) device. Learn more
- Imported playlists: Sonos is compatible with iTunes playlists, as well as M3U, WPL and PLS playlist files created with third-party software. Learn more
- Other audio devices: play music from a turntable or other external audio device. Learn more
Volume control
Control the volume on your Sonos system several different ways—whatever works best in the moment.
- Speaker touch controls: when you're near a speaker, adjust the volume or stop the music using the touch controls on the speaker.
- The app: slide the volume control up or down. If products are grouped, you can adjust the volume for the whole group or for individual speakers.
- Your voice: if you have a voice-enabled Sonos product, use your voice to turn adjust the volume or stop the music.
- The buttons on your mobile device: turn on hardware volume control in your settings if you want to use the buttons on your mobile device to control the volume on Sonos even when you're not in the app.
Voice services
Use your voice to control your whole Sonos system with any voice-enabled Sonos product—play and control content, turn the volume up and down, and more.
- Amazon Alexa: you'll need the Sonos app and the Alexa app with the Sonos skill enabled. You'll make some changes in both apps during setup. Learn more
- Google Assistant: you'll need the Sonos app and the Google Assistant app. You'll make some changes in both apps during setup. Learn more
- Siri: you'll need the Apple Home app. Add your AirPlay 2-compatible Sonos speakers to the Apple Home app and then use an iPhone, iPad, or Apple TV to ask Siri to play music (currently limited to Apple Music). Learn more
Note: Voice control isn't supported in every country yet—this feature will be available as soon as Sonos and a voice service launch together in your region.
Alarms and sleep timer
Wake to music you love by setting an alarm with a favorite song, station or playlist. Learn more.
- Wake up to different songs, radio stations or playlists on different days.
- Have your favorite songs rocking when you come home from work.
- Schedule Sonos to play for a few hours every night you're on vacation.
Want to catch a few more z's? Turn on Snooze Alerts when you set an alarm.
Sleep timer
Love to fall asleep to music? Sonos can shut off automatically. Tap the song title on the Now Playing screen to set a sleep timer. Learn more.
SONOS USER GUIDE
Sonos system updates
Sonos regularly adds new features so your listening experience is always improving. You can set your Sonos speakers to update automatically in the background so you always have the latest features without interrupting your listening. Learn more.
Have a new router or network password?
If you have a wireless setup (no Sonos product connected to your router):
After you install a new router or change your network password, update your Sonos system with the new network information. Just open the Sonos app and we'll walk you through it.
If you have a wired setup (there's a Sonos product connected to your router):
You don't have to do anything when you install a new router (as long as you connect a Sonos product to it) or when you change your password. Your Sonos products will continue to work as before.
Product guide feedback?
We'd love to hear from you! We'll read your feedback carefully and use it to help us improve our product guides. Write to us at: docfeedback@sonos.com
If you're having a problem with your Sonos system, please contact Customer Care at www.sonos.com/support.
Need more help?
Get some simple tips for getting the most out of your speakers.
• Using Sonos S2, tap ⚙ > Support.
• Using Sonos S1, tap ⚙ > Help & Tips.
Visit our Frequently Asked Questions (FAQ) pages at www.sonos.com/support.
- sonos.com/legal/patents
- The Sonos Home Sound System
- Getting started
- New to Sonos?
- Setup options
- Already have Sonos?
- Add a different Sonos system
- Sonos accounts
- Parental controls
- Explore our products
- Speakers for your music
- Speakers for your TV
- Stereo upgrades
- Accessories
- Sonos S2 app
- Things you can do:
- SONOS USER GUIDE
- Mobile app controls
- My Sonos
- Browse
- System
- Queue controls
- Mac/PC controls
- Sonos S1 Controller app
- Rooms
- Settings
- Roam
- Location and usage guidelines
- Waterproof design
- Automatic Trueplay™
- Microphone on/off
- Bluetooth pairing
- Specifications
- Sonos Roam
- Feature Description
- Power & Connectivity
- Important safety information
- Roam SL
- Sonos Roam SL
- Audio
- Software
- Details
- Move
- Select a location
- Switch modes
- Sonos Move
- One
- Speaker mounts and stands
- Stereo Pair
- One SL
- Networking\*
- General
- Five
- Connector panel
- Line-in
- Humidity Resistant
- Arc
- Controls and lights
- Microphone indicator
- Place on a credenza
- Wall mount
- Connect the cables
- Before you start
- Connect the power cord
- Connect Sonos Arc to your TV
- HDMI ARC or eARC
- Digital audio out
- Guidelines
- Mount kit contents
- Wall mounting information
- Arc SL
- Connect Sonos Arc SL to your TV
- Beam (Gen 2)
- Connect Beam to your TV
- Beam
- If your TV has an HDMI ARC port
- If your TV doesn't have an HDMI ARC port
- Amp
- What can you do with Amp?
- Play music through your favorite speakers
- Enhance your TV sound
- Rack mounted
- Placed on a credenza
- Attach desired speakers
- Connect Amp to your TV
- Change from stereo to mono
- Port
- If you're connecting to powered speakers
- If you're connecting to an audio/video receiver (AVR) or amplifier
- If you're connecting to a computer
- Line-out
- Control volume from your AVR or amplifier (Fixed line-out level)
- Control the volume from Sonos (Variable line-out level)
- Use Sonos to control the volume on your home theater or amplifier
- Sub
- Attach feet (optional)
- Sub settings
- Pair Sub with a different speaker
- Boost
- When to use a Boost
- Wall mounting
- Play:5
- Playbar
- Wall mounted
- Connect the soundbar to your TV
- What you need
- Playbase
- Connect Playbase to your TV
- System Requirements
- Supported Devices
- Sonos Stand
- What's in the box?
- What you'll need
- Assembling your Sonos Stand
- Sonos Shelf
- Assembling your Sonos Shelf
- WALL MATERIAL
- PRE-DRILL
- USE WALL ANCHORS
- USE SCREWS
- Wall Mount for Playbar
- Sonos Architectural by Sonance speakers
- To unlock Sonos audio enhancements
- Other accessories
- Room Settings
- Stereo pairs
- Sonos home theater
- Surround speakers
- Surround settings
- Home theater settings
- Play music
- Music sources
- Volume control
- Voice services
- Alarms and sleep timer
- Sleep timer
- Sonos system updates
- Have a new router or network password?
- Product guide feedback?
- Need more help?
Brand : SONOS
Model : Five
Category : Pregnant