
Barista Max EM5300 - Coffee maker SUNBEAM - Free user manual and instructions
Find the device manual for free Barista Max EM5300 SUNBEAM in PDF.


| Product Type | Espresso Machine & Coffee Maker |
| Model | Barista Max EM5300 |
| Brand | Sunbeam |
| Dimensions (W x D x H) | Approximately 30 x 25 x 35 cm |
| Weight | Approximately 5 kg |
| Power Supply | 220-240 V, 50-60 Hz, 1350 W |
| Pump Pressure | 15 bar |
| Water Tank Capacity | 1.4 L |
| Bean Hopper Capacity | 250 g |
| Milk Frother | Integrated steam wand for manual frothing |
| Grinder Type | Integrated conical burr grinder |
| Grind Settings | Adjustable, multiple levels |
| Programmable Functions | Single and double shot, steam, hot water |
| Display | Button control panel with indicators |
| Material | Stainless steel and plastic |
| Cleaning & Maintenance | Removable drip tray, cleaning cycle, descaling indicator |
| Safety Features | Auto shut-off, overheat protection |
| Spare Parts Availability | Replacement filters, gaskets, and accessories available |
| Repairability | Modular design for easy servicing |
| Included Accessories | Portafilter, tamper, milk jug, measuring scoop |
Frequently Asked Questions - Barista Max EM5300 SUNBEAM
User questions about Barista Max EM5300 SUNBEAM
0 question about this device. Answer the ones you know or ask your own.
Ask a new question about this device
Download the instructions for your Coffee maker in PDF format for free! Find your manual Barista Max EM5300 - SUNBEAM and take your electronic device back in hand. On this page are published all the documents necessary for the use of your device. Barista Max EM5300 by SUNBEAM.
USER MANUAL Barista Max EM5300 SUNBEAM
BARISTA MAX ESPRESSO MACHINE WITH INTEGRATED GRINDER
User Guide
EM5300
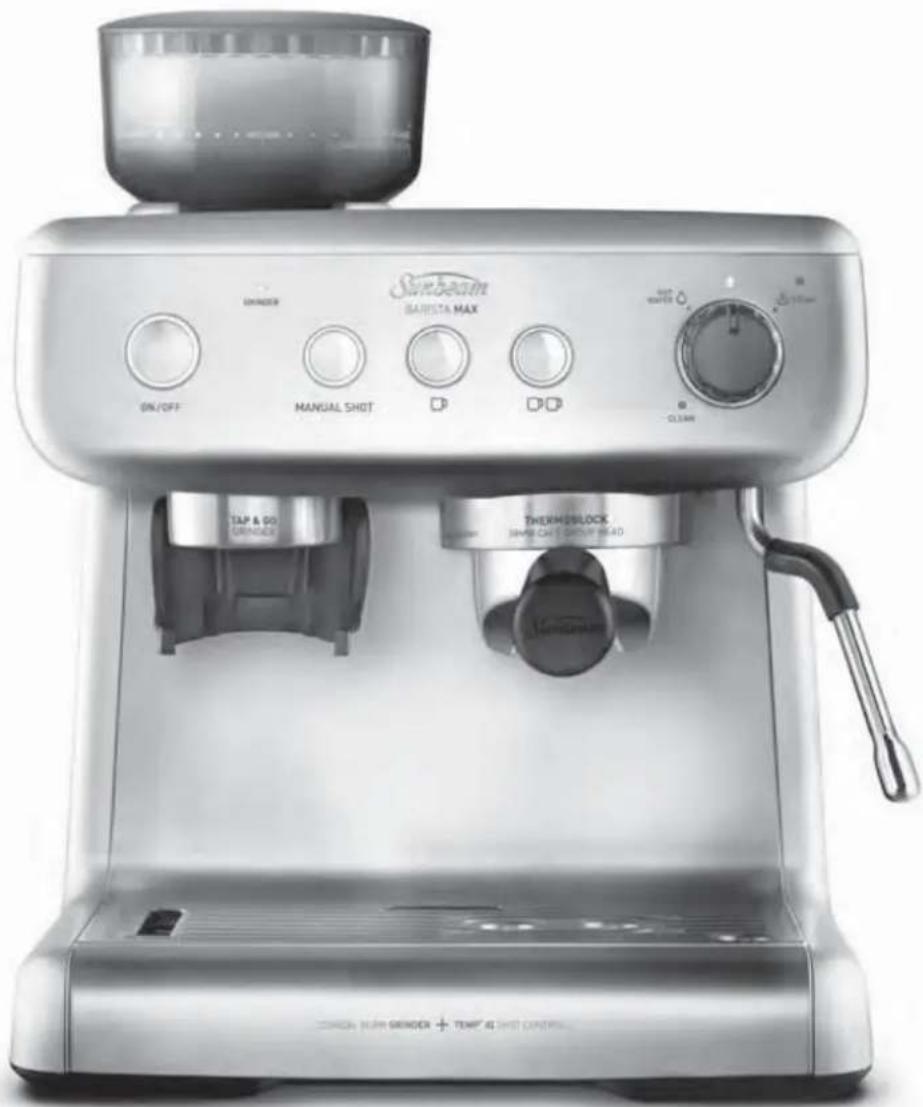
natural_image
Exterior view of a Sanbetu coffee machine (no signage or text visible on the device itself)Contents
2 - 3 Sunbeam's Safety Precautions
4 - 6 Features of your Sunbeam Barista Max
7 More Details about your Sunbeam Barista Max
8 - 9 Before First Use of the Barista Max
10 - 13 Barista Max Coffee Making Guide
14 Tips for Grinding & Tamping
15 Tips for Perfect Espresso Extraction
16 - 17 Tips for Milk Texturing
18 - 19 Coffee Styles to Try
20 - 21 Customisable - Shot Volumes
22 Customisable - Extraction Temperature
23 Customisable - Extraction Pre-infusion Profile
23 Restore All Default Settings
24 - 26 Care & Cleaning - Espresso Machine
27 - 29 Care & Cleaning - Grinder
30 - 31 Descaling Cycle - Espresso Machine
32 - 35 Troubleshooting Guide - Espresso Machine
36 - 37 Troubleshooting Guide - Grinder
38 Warranty
39 Accessories Available for Purchase
Sunbeam's Safety Precautions
FOR YOUR SUNBEAM ESPRESSO MACHINE WITH INTEGRATED GRINDER:
• Always place the unit on a flat, level surface.
- Do not operate whilst placed in a cabinet.
- Do not operate without water in reservoir.
Fill Water Reservoir with only clean and cold water. Observe the maximum filling volume is 2.8 litres.
- Check the Bean Hopper for the presence of foreign objects before using.
- Do not pour water or any other liquid into the Bean Hopper or Grinder.
- Do not attempt to re-grind ground coffee.
- Do not remove the Group Handle during the espresso pour or water flow as the unit is under pressure. Removing the Group Handle during either of these operations can lead to a scalding or injury.
- The Steam and Hot Water Wand becomes very hot during texturing milk and water flow. This may cause burns in case of contact, therefore avoid any direct contact with the Steam Wand.
- Do not allow the Power Cord to come into contact with the hot parts of the machine, including the Warming Plate & Steam Wand.
- Do not place hands directly under the steam, hot water or espresso pour as this can lead to a scalding or injury.
- The temperature of accessible surfaces may be high when the appliance is operating. Even after use, the heating element surface is subject to residual heat after use.
- Always operate the Grinder with the Bean Hopper inserted in the Grinder.
- Always switch off and unplug at power outlet before cleaning the Espresso Machine and integrated Grinder
- Children should not perform cleaning and user maintenance without supervision.
- Always switch off and unplug at power outlet if there is any problem during the grinding or coffee making process.
- Do not place your hand in or near the Burrs while the Grinder is in operation.
- Always switch off and unplug at power outlet before touching any part of the Grinder that moves during use.
- Do not use an appliance for any purpose other than its intended use. Injury could occur from misuse.
Sunbeam's Safety Precautions
Sunbeam is very safety conscious when designing and manufacturing consumer products, but it is essential that the product user also exercise care when using an electrical appliance. Listed below are precautions which are essential for the safe use of an electrical appliance:
- Read carefully and save all the instructions provided with an appliance.
- Always turn the power off at the power outlet before you insert or remove a plug. Remove by grasping the plug - do not pull on the cord.
- Turn the power off and remove the plug when the appliance is not in use and before cleaning.
- Do not use your appliance with an extension cord unless this cord has been checked and tested by a qualified technician or service person.
- Always use your appliance from a power outlet of the voltage (A.C. only) marked on the appliance.
- This appliance is not intended for use by persons (including children) with reduced physical, sensory or mental capabilities, or lack of experience and knowledge, unless they have been given supervision or instruction concerning use of the appliance by a person responsible for their safety.
- Children should be supervised to ensure that they do not play with the appliance.
- The temperature of accessible surfaces may be high when the appliance is operating.
- Never leave an appliance unattended while in use.
-
Do not place on top of any other appliance.
-
Do not use an appliance for any purpose other than its intended use.
- Do not place an appliance on or near a hot gas flame, electric element or on a heated oven.
- Do not let the power cord of an appliance hang over the edge of a table or benchtop or touch any hot surface.
- Do not operate any electrical appliance with a damaged cord or after the appliance has been damaged in any manner. If damage is suspected, return the appliance to the nearest Sunbeam Appointed Service Centre for examination, repair or adjustment.
- For additional protection, appliance should be supplied through a residual current device (RCD) having a rated residual operating current not exceeding 30 mA;
- Do not immerse the appliance in water or any other liquid unless recommended.
- Appliances are not intended to be operated by means of an external timer or separate remote control system.
- This appliance is intended to be used in household and similar applications such as: staff kitchen areas in shops, offices and other working environments; farm houses; by clients in hotels, motels and other residential type environments; bed and breakfast type environments.
If you have any concerns regarding the performance and use of your appliance, please visit the Sunbeam Website or contact Sunbeam Consumer Care - details are on the back page. Ensure the above safety precautions are understood.
Important Instructions - retain for future use
Features of your Sunbeam Barista Max
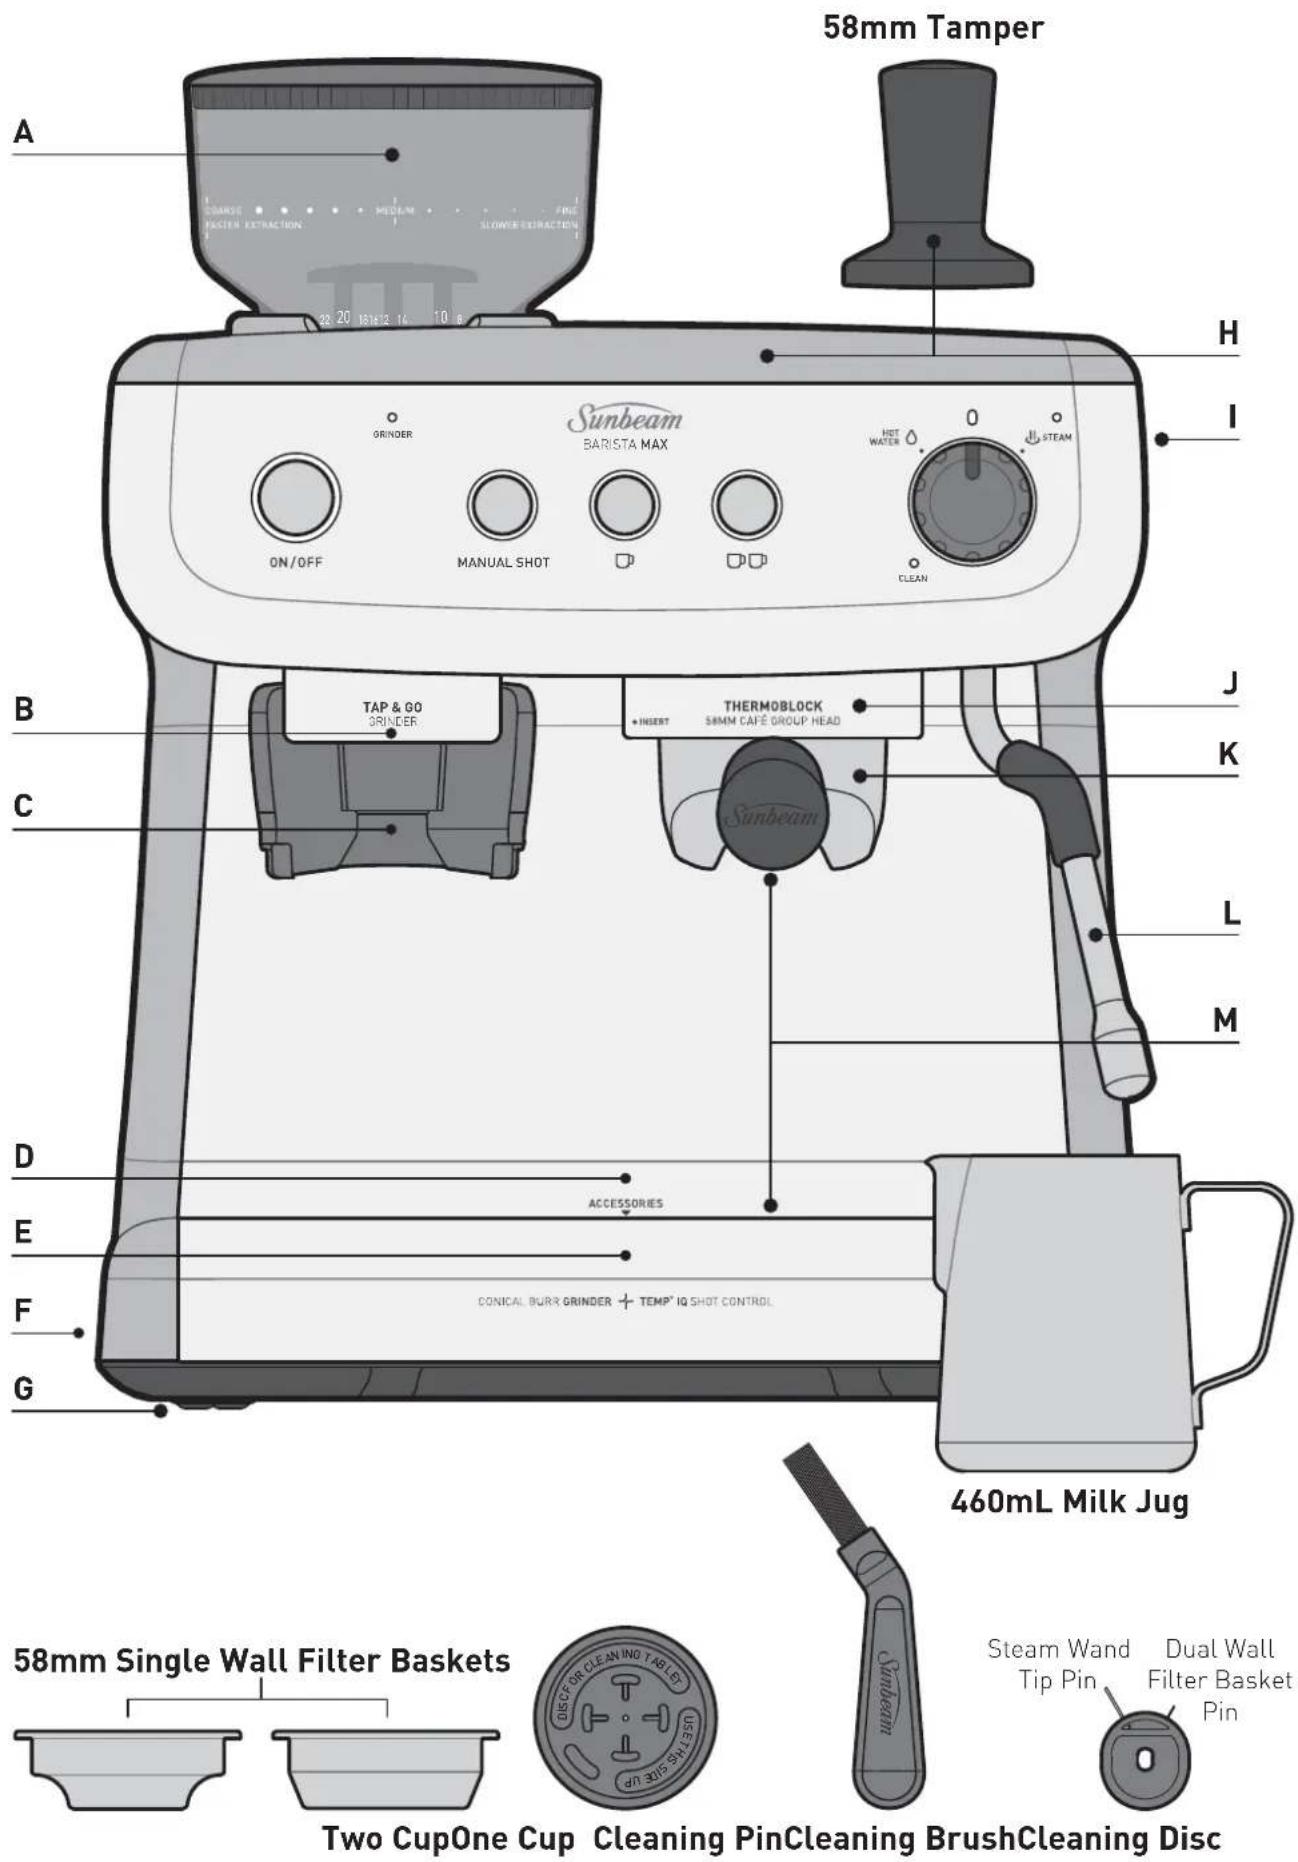
Features of your Sunbeam Barista Max
A. Removable Bean Hopper
The removable 250g capacity Bean Hopper features 30 easily adjustable Grind Settings. Turn the Hopper from coarse to fine to adjust the Grind Setting & maximise the taste of your espresso.
B. Illuminated Grind Area
LED illumination starts when grinding begins. The coffee grinds are illuminated as they are delivered directly into the Filter Basket. The light automatically fades when grinding is complete.
C. Tap & Go™ Grinding Cradle
The unique Tap & Go™ Grinding Cradle holds the Group Handle to provide seamless one-touch on-demand grinding. This helps you to control the amount of coffee grinds straight into the Filter Basket.
D. Accessories Storage Home
Area behind the Drip Tray, for storing the One & Two Cup Filter Baskets, Cleaning Disc, Cleaning Brush & Cleaning Pin.
E. Removable Drip Tray, Grill & Grind Bin
Includes a Water Level Indicator which floats through the Stainless Steel Grill to indicate when the tray is full of water & requires emptying.
A removable Grind Bin for collecting overflowed coffee grinds, separate from the water, is located in the Drip Tray. Simply remove the Grind Bin & discard grinds as required.
F. Cord Storage
Conveniently stow excess cord by pushing the cord inside the machine to keep benchtop tidy.
G. Non-slip Feet
The non-slip silicone feet ensure that the Barista Max remains stable on the benchtop during use.
H. Warming Plate with Tamper Home
Preheats cups & glasses which helps to retain the essential characteristics of true espresso aroma & a rich, sweet taste.
Tamper home located on the top of the Warming Plate for convenient access & storage.
I. Removable 2.8L Water Reservoir
Push back the lid & fill with cold water, or remove the Water Reservoir by opening the Lid, lifting upwards using the Handle located inside.
J. Group Head - 58mm Commercial Size
The wider size allows more even extraction of the tamped coffee grinds.
K. Group Handle - 58mm Commercial Size
The wider size ensures the coffee grinds are more evenly spread, and easier to tamp.
L. Steam & Hot Water Wand
Ball joint movement with silicone cover, allows movement of the Steam Wand to desired position without burning fingers.
M. Extra Tall Cup Height
A large 105mm space for extracting coffee directly into tall mugs & glasses.
Features of your Sunbeam Barista Max
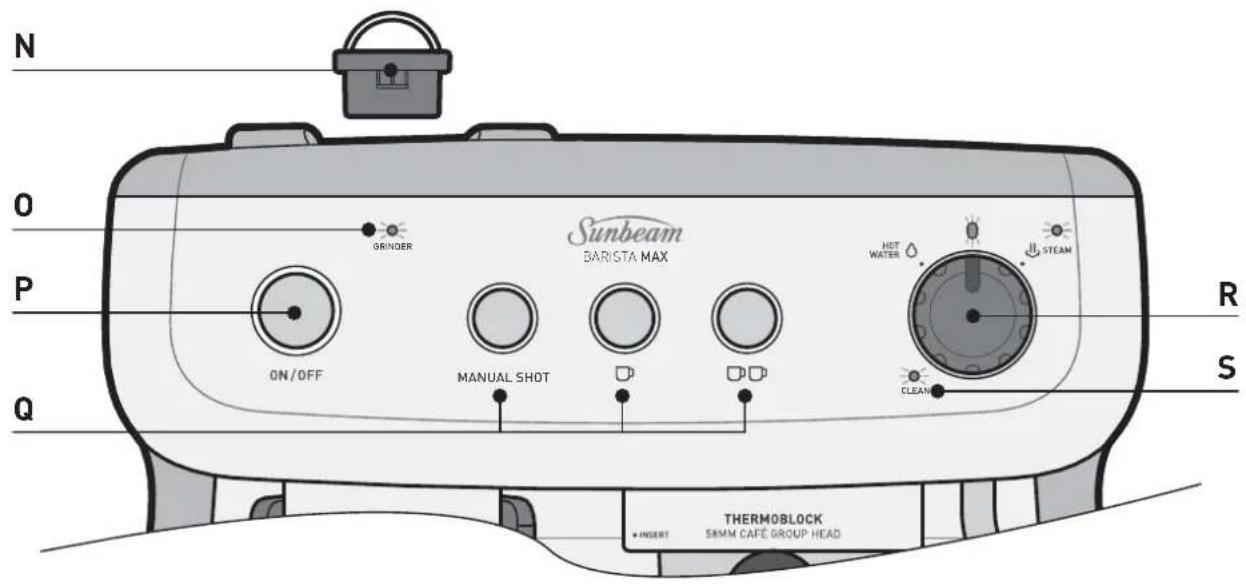
N. Removable Top Burr
Easily removable by lifting the Burr handles when cleaning. (For more information, see pages 28-29)
0. GRINDER Light

Fully illuminated white when ready. Flashes whilst attempting to grind to indicate the Hopper Gates are not completely open.

Fully illuminated red when Grinder Motor is in protection mode. (For more information, see page 36)
P. ON/OFF Button & Light
Press button to turn on the machine. The ON/OFF LIGHT will illuminate & pulse to indicate it is heating up. The ON/OFF LIGHT stays fully illuminated when ready. The machine will automatically enter sleep mode after 20 minutes, the ON/OFF LIGHT will stop illuminating.
Q. Espresso Extraction Buttons
MANUAL SHOT Button
Allows for shot volumes in addition to one & two shot presets. Press button to start extraction, when desired pour volume is reached press button again to stop. Automatically stops after 200mL
ONECUPButton
Pours 1 shot of espresso - 30mL then automatically stops.
TWO CUP Button
Pours 2 shots of espresso - 60mL then automatically stops.
R. DIAL Features & Lights

DIAL Light

Fully illuminated when ready. Flashes when DIAL needs to be returned to the vertical position.

Steam Light

Fully illuminated when ready to steam. Flashes when warming up to steam temperature & when cooling down (purging water) to espresso temperature.
d _2 STEAM
Use to heat & texture milk.
HOT WATER
Pours 200mL then automatically stops. Use for long black coffee, hot drinks such as tea, instant soups and to warm cups prior to making espresso.
S. CLEAN Light
Fully illuminated blue when a cleaning cycle for the Group Head & Shower Head is required. (For Cleaning Cycle information, see page 25)
More Details about your Sunbeam Barista Max
Temp° IQ Shot Control™
Optimum temperature

The Temp° IQ Shot Control™ is an exclusive technology developed by Sunbeam for your Barista Max. This 3 way system delivers the accurate & stable water temperature that is needed for consistently great tasting coffee.
• Thermoblock Technology
The Thermoblock ensures fast heat up, and precise water temperature for the best espresso extraction & milk steaming. Only the required amount of water is heated for speed and efficiency. The Thermoblock heats water so that espresso extracts at 92°C for the optimum extraction of oils from the tamped coffee grinds. Temperatures above or below will result in burnt/bitter or weak tasting espresso.
- Advanced PID Controller
The PID monitors and controls the Thermoblock to ensure water is always delivered to tamped coffee grinds at the precise temperature needed.
- Gentle Pre-infusion
Small amounts of water are gently introduced onto the tamped coffee grinds prior to the steady flow of water, for a richer flavoured espresso. (For different Pre-infusion profiles, see page 23)
Café 58mm
Group Head & Handle
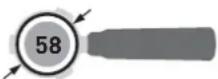
Extract the maximum amount of flavour
The Group Head and the Group Handle are commercial sized, 58mm, just like local café.
- The wider size ensures the coffee grinds are more evenly spread in the Filter Baskets. The coffee grinds are easier to fill, tamp and remove after use.
- The 58mm Group Handle allows a more even extraction of the tamped coffee grinds, resulting in a true café tasting coffee.
Tap&Go™
Integrated Grinder
Easy on-demand grinding experience
- Tap&Go™ Technology
The Tap&Go™ on-demand grinding technology developed by Sunbeam delivers coffee grinds directly into the Group Handle with one touch. Simply push down on the Group Handle to activate the Grinder.
- Conical Burr Grinder
The integrated Grinder offers all-in-one grinding experience. The hardened Stainless Steel Conical Burr achieves consistent grind particle sizes, which minimises heat transfer & reduces friction due to its gentle & slow rotation.
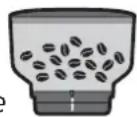
- Bean Hopper
The 250g Hopper features anti-spill gates which prevents coffee beans from escaping onto the benchtop when removing. The on-board Grinder offers all-in-one grinding experience with Grinder integrated in the Espresso Machine.
Auto Shot & Customisable Volumetric Control
Right quantity of espresso in your cup
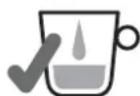
- Auto Shot is the easiest way to create a great espresso. Press the ONE or TWO CUP BUTTONS to pour the right amount.
- All Extraction Buttons can be customised to deliver the shot volumes preferred. For more information, see pages 20-21.
Customisable
Extraction Temperature
Temperature just like you want
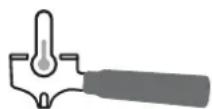
- The Barista Max allows water temperature to be changed from the recommended 92°C (in 2°C increments) to cater for personal preferences. (For more information, see page 22)
Before First Use of the Barista Max
Step 1. Remove Packaging
- Ensure all packaging has been removed.
Important: Remove the red plug found at the base of the Water Reservoir.
Step 2. Position Machine
- Ensure the machine is positioned onto a dry, stable, flat & horizontal benchtop.
Step 3. Wash & Dry Parts
- Wash the parts listed below in warm water with a mild detergent: Stainless Steel Milk Jug Stainless Steel One Cup Filter Basket Stainless Steel Two Cup Filter Basket Hardened Stainless Steel Top Burr Water Reservoir Group Handle Bean Hopper Tamper
- Rinse & allow thorough air drying.
Step 4. Place Accessories
- Accessories Storage Home behind the Drip Tray for the Cleaning Brush & Cleaning Pin. On the left is storage space for nesting the Cleaning Disc, One & Two Cup Filter Baskets. - Insert the Grind Bin in the space provided on the left side of the Drip Tray.
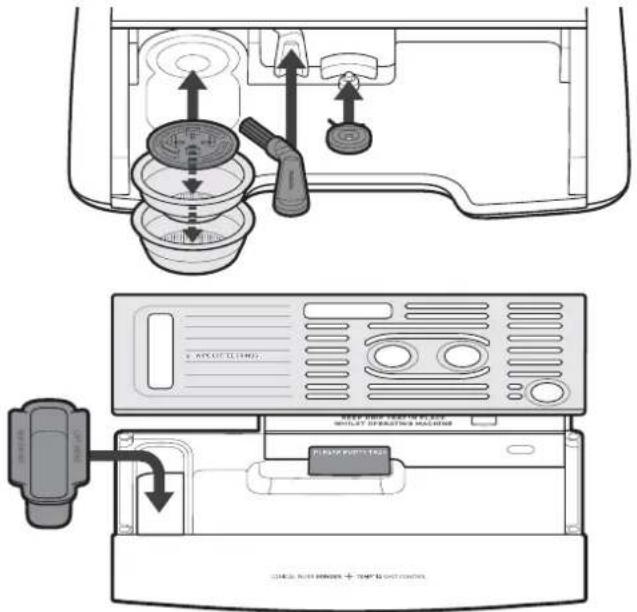
- Place the Tamper in the detail provided on the Warming Plate.
Step 5. Insert Parts into the Grinder
- Removable Top Burr
- Using the two handles insert the Top Burr into the Grinder Collar. - The arrows on the Top Burr should align to arrows on the Grinder Collar. - When correctly seated, the Top Burr will be flush with the surface of the Grinder Collar.
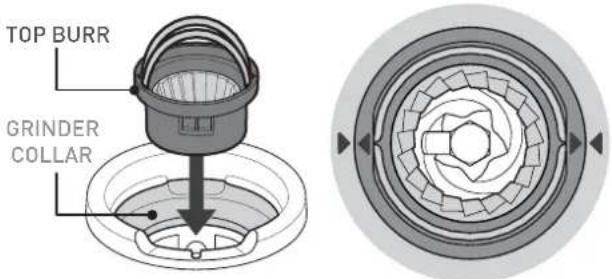
- Place handles down, one on each side.
- Removable Bean Hopper
- Align the Hopper Guide with the red Grinder Interlock. - Insert Bean Hopper into the Grinder Collar. - Lightly pushing down, turn the Bean Hopper in a clockwise direction to lock the Hopper into place. - This opens the Hopper Gates (to release coffee beans onto the Burrs). At Grind Setting 30, Hopper Gates are fully open.
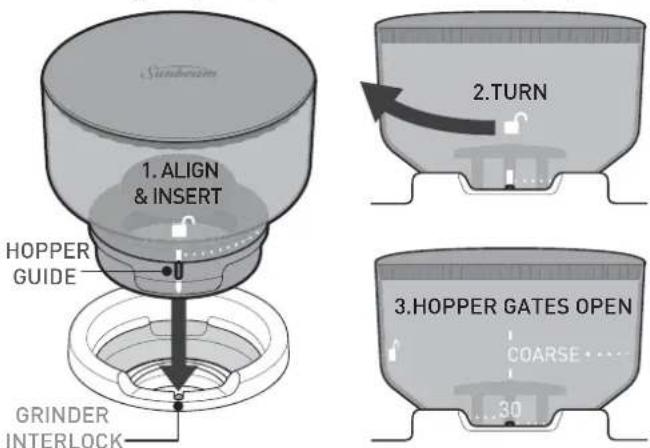
- Continue to turn the Bean Hopper in a clockwise direction to set the Grind Setting. - As a starting point for espresso extraction try Grind Setting 20. (Further Grind Setting adjustment might be required, see information on pages 14-15). - Fill the Bean Hopper with freshly roasted coffee beans.
Before First Use of the Barista Max
Step 6. Preparing to Prime Machine
Important: This priming step must be completed prior to first use.
- Fill Water Reservoir
- Open the Lid and lift upwards using the Handle inside.
- Fill with cold water from the tap.
- Insert the Water Reservoir into position & close the Lid.
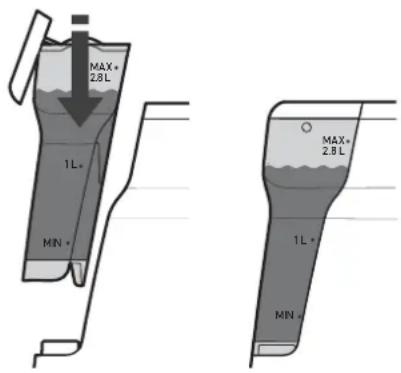
Note: Make sure that the Water Reservoir is clean & free of any debris, as any fine particles can block the water flow.
- Power
- Ensure that the Steam & Hot Water DIAL is in the vertical position.
- Insert the Power Plug into a 230-240V AC power outlet & switch the power on.
- Press the ON/OFF BUTTON to turn on the machine.
- The ON/OFF LIGHT will illuminate & pulse to indicate the Thermoblock is heating up.
- The GRINDER LIGHT will be fully illuminated from turn on.
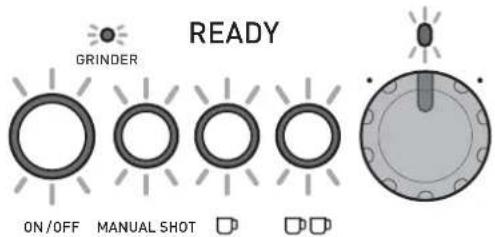
- When the ON/OFF, EXTRACTION BUTTONS & DIAL LIGHTS are all fully illuminated, the machine is in the READY state for EXTRACTION & DIAL features.
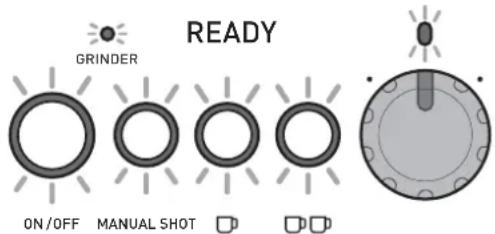
- Insert Group Handle
- Insert the Two Cup Filter Basket in the Group Handle.
- Align the Group Handle with the 'INSERT' position located on the left of the Group Head.
- Insert the Group Handle flat against the Group Head, then turn the Group Handle right all the way to the centre position.
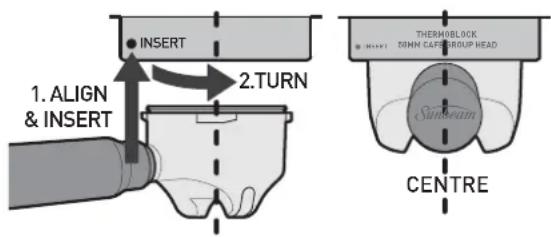
Note: Turning the Group Handle to the centre position might be tight for the first few uses.
Step 7. Prime Espresso Machine
- Press the TWO CUP BUTTON & water should start flowing from the Group Head.
- Allow water to run through until it stops.
- The machine will return to the READY state.
Note: For the first few seconds the Pump will make a louder than usual noise as it begins pumping the water through.
- Position Steam Wand over the Drip Tray.
- Turn DIAL to HOT WATER.
- Allow water to run through for 20 sec.
- Return DIAL to vertical position.
- The machine will return to the READY state.
- Now the Espresso Machine should be thoroughly primed.
- Wash Group Handle & Filter Basket in warm water & dry before making your first coffee.
- If water is not flowing from the Group Head or Steam Wand, repeat Step 7.
- If water is still not running through, contact Sunbeam Customer Care. Details are on the back page.
Barista Max Coffee Making Guide
- Check Water & Beans
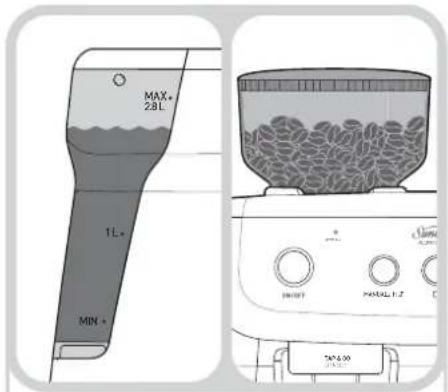
Barista Tip: For best espresso results, use filtered water & freshly roasted coffee beans.
- Start Up
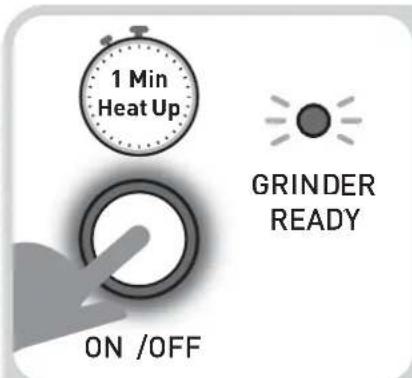
Press ON/OFF BUTTON, LIGHT pulses = heating up. GRINDER LIGHT fully illuminated = Grinder ready to use.
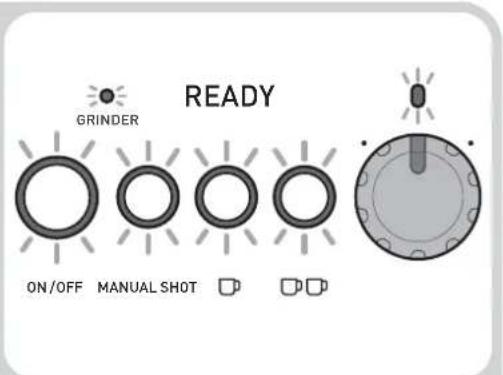
ON/OFF, EXTRACTION BUTTONS & DIAL LIGHTS all fully illuminated = Espresso Machine ready to use.
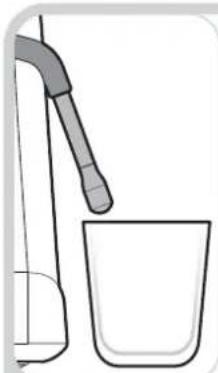
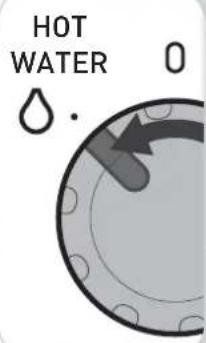
- Warm Cup - by Hot Water
natural_image
Simple line drawing of a laboratory setup with a beaker and a pipette (no text or symbols)Place cup on benchtop and position Steam Wand. Turn DIAL to HOT WATER.
natural_image
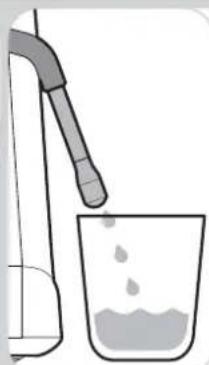
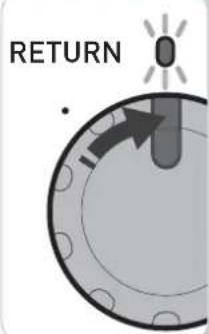
Simple line drawing of a laboratory setup with a beaker, thermometer, and liquid being poured into a beaker (no text or symbols)Quarter fill cup with hot water. Return DIAL to vertical position.
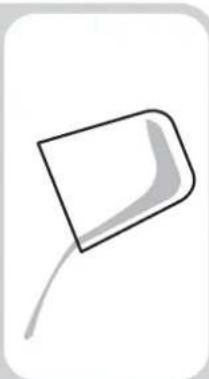
natural_image
Simple line drawing of a rounded rectangular object with a curved line extending from its side (no text or symbols)Empty cup after 20-30 sec.
OR by Warming Plate
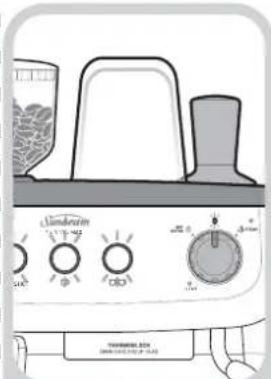
natural_image
Illustration of a kitchen blender with control knobs and a hand holding a tray (no text or symbols)Cup can be warmed on the top of the machine when it is ON.
- Select Filter Baskets
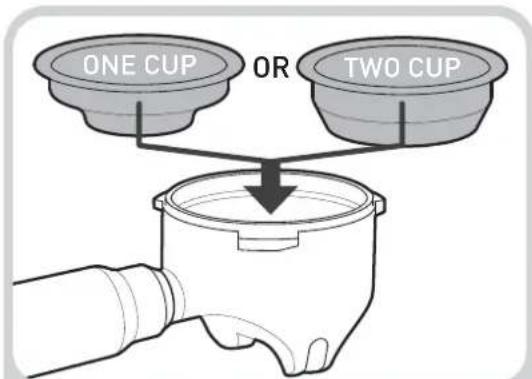
Select either:
- One Cup Filter Basket.
- Two Cup Filter Basket.
- Warm Group Head, Handle & Filter Basket

Press ONE CUP BUTTON.
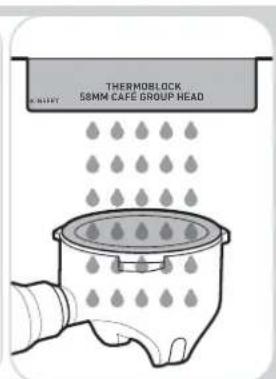
Hold Group Handle under Group Head while water flows.
natural_image
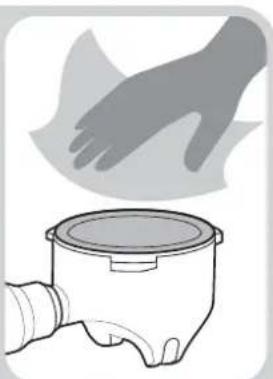
Illustration of a hand cleaning a clean surface next to a pipe fitting (no text or symbols)Wipe Filter Basket with a dry cloth.
Barista Max Coffee Making Guide
- Dose Coffee Grinds
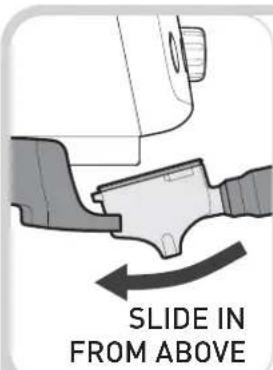
Insert Group Handle into Grinding Cradle.
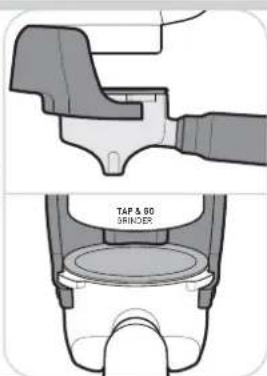
Group Handle will sit flat, unsupported, in the Grinding Cradle.
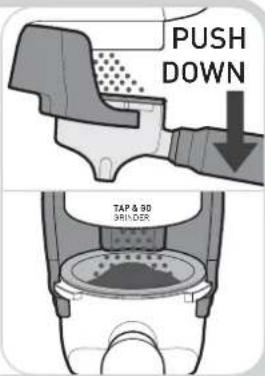
Push down Group Handle to grind into Filter Basket.
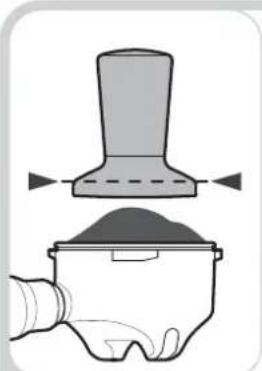
- Tamp
natural_image
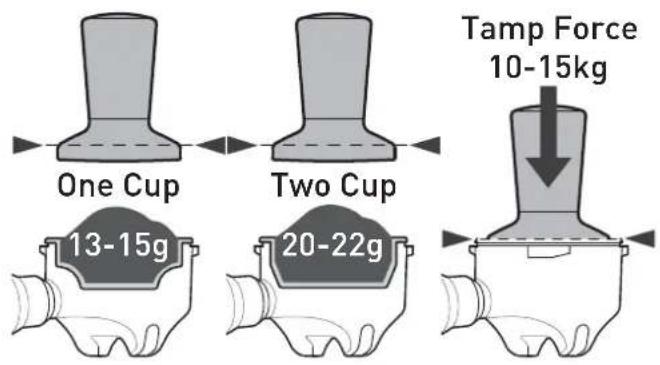
Illustration of a mechanical device with a top component and a base component, no text or symbols present.- One Cup = 13-15g coffee grinds.
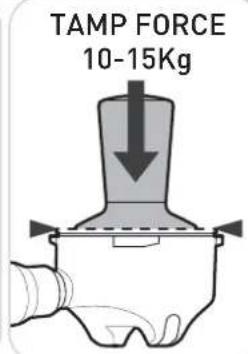
- Two Cup = 20-22g coffee grinds. Evenly tamp (press) grinds to level indicated.
-
Position Cup
-
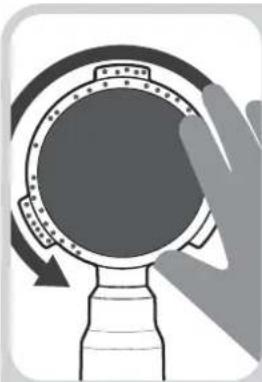
Wipe Excess Grinds
natural_image
Illustration of a hand holding a circular mechanical component with a ring and base (no text or symbols)Wipe away any excess grinds to clear edges.
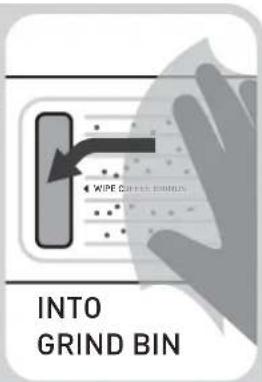
Wipe fallen grinds on the Drip Tray into the Grind Bin.
- Insert Group Handle
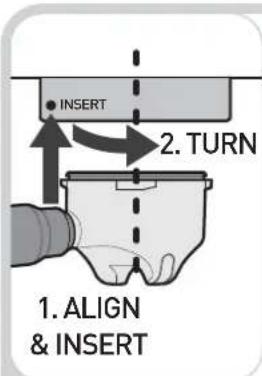
Keep Group Handle flat, align, insert & turn into Group Head.
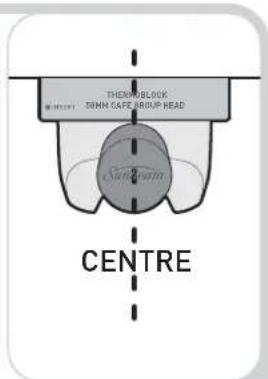
Group Handle should be in the centre position.
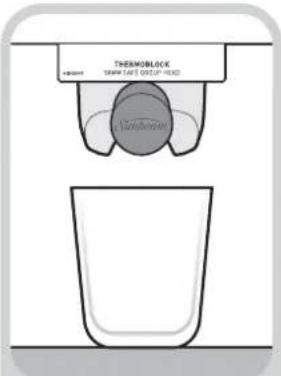
Position cup on Drip Tray, under Group Handle.
- Espresso Extraction
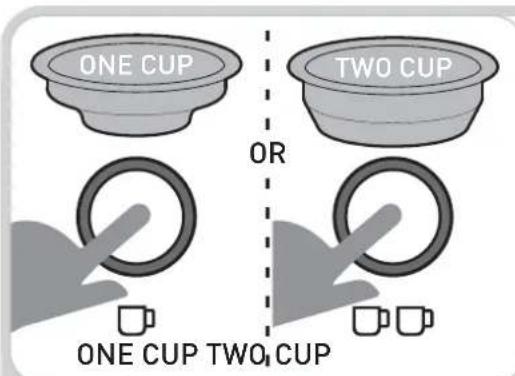
Press either:
- ONE CUP BUTTON = 30mL shot.
- TWO CUP BUTTON = 60mL shot.
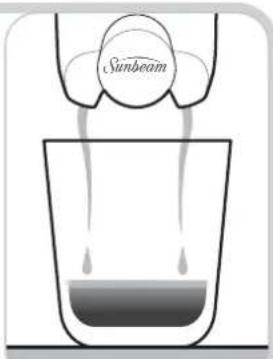
Extraction begins and will automatically stop.
- Remove Coffee Cake
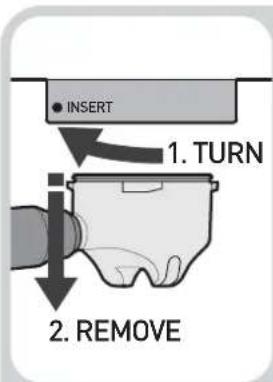
Turn Group Handle and remove from Group Head.
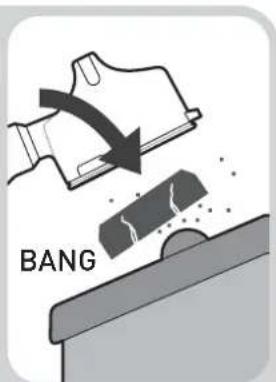
Remove spent (used) coffee cake from Group Handle.
Barista Max Coffee Making Guide
13. Prep Milk Jug 14. Before Texturing Milk
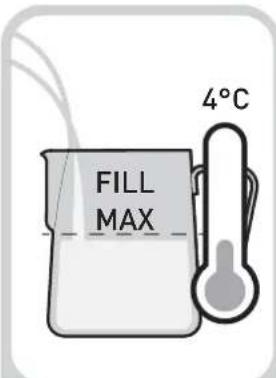
Fill Jug with cold milk just below the bottom of the spout.
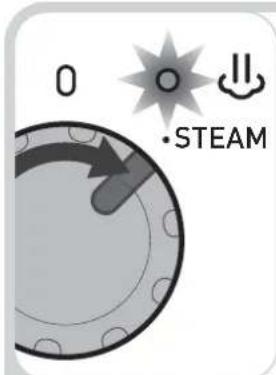
Turn DIAL to STEAM. STEAM LIGHT flashes = heating up.
natural_image
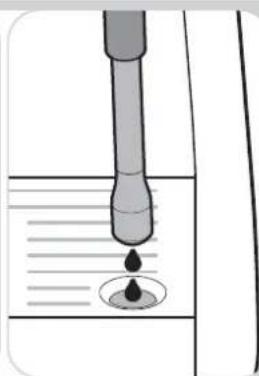
Diagram of a droplet being poured into a container with liquid (no text or symbols)Some water may come out of the Steam Wand.
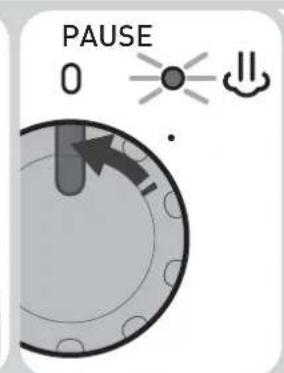
STEAM LIGHT is ON = steam ready. Pause steam by returning DIAL.
Barista Tip:
For best milk texturing results, ensure steam has first heated up (STEAM LIGHT fully ON). You will hear the Pump start.
15. Position Steam Wand 16. Start Texturing Milk
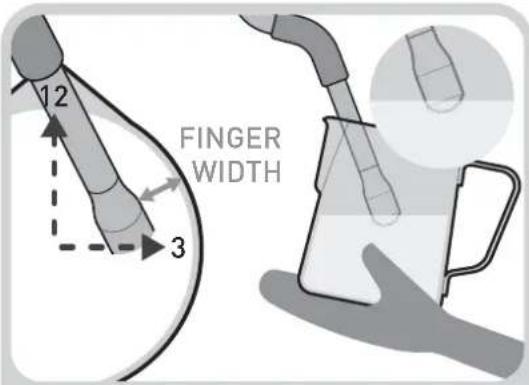
Insert Steam Wand Arm at 12 o'clock. Tip at 3 o'clock, finger width from edge and just below the surface of the milk.
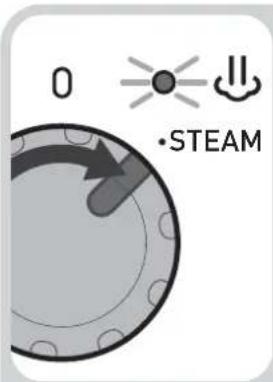
Turn DIAL back to STEAM position to start texturing milk.
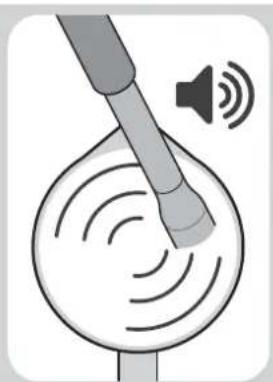
natural_image
Illustration of a speaker emitting sound waves into a circular device (no text or symbols)Texturing makes a smooth hissing noise.
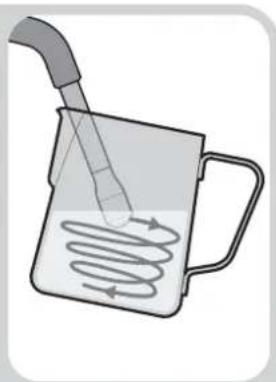
natural_image
Illustration of a pipette dispensing liquid into a beaker with a coiled spring (no text or symbols)Check milk is moving in a whirlpool action.
17. Milk Texturing
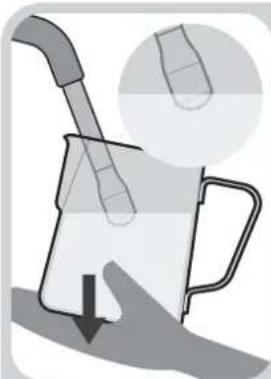
natural_image
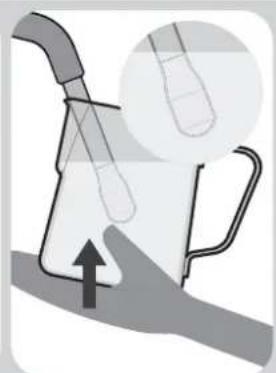
Illustration of a mug with a handle and arrow indicating downward motion (no text or symbols)As milk level rises, lower Jug to keep Tip just below surface.
natural_image
Illustration of a hand holding a mug with a pen inserted, showing a finger pressing down (no text or symbols)When desired microfoam achieved, immerse Steam Wand half way.
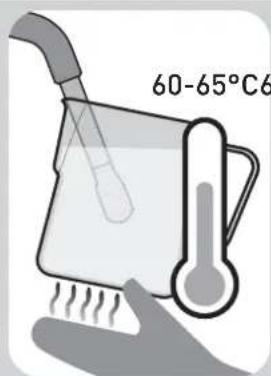
Milk ready when Milk Jug base is too hot to touch for 3 sec.
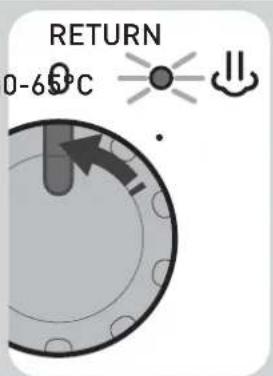
Return DIAL to vertical position.
natural_image
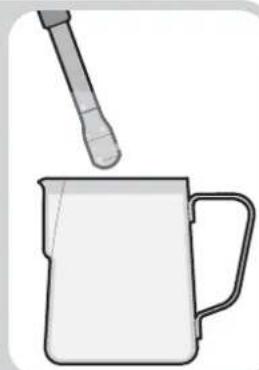
Simple line drawing of a mug with a dropper above it (no text or symbols)Remove Jug from Steam Wand.
Barista Max Coffee Making Guide
18. Purge & Clean Steam Wand
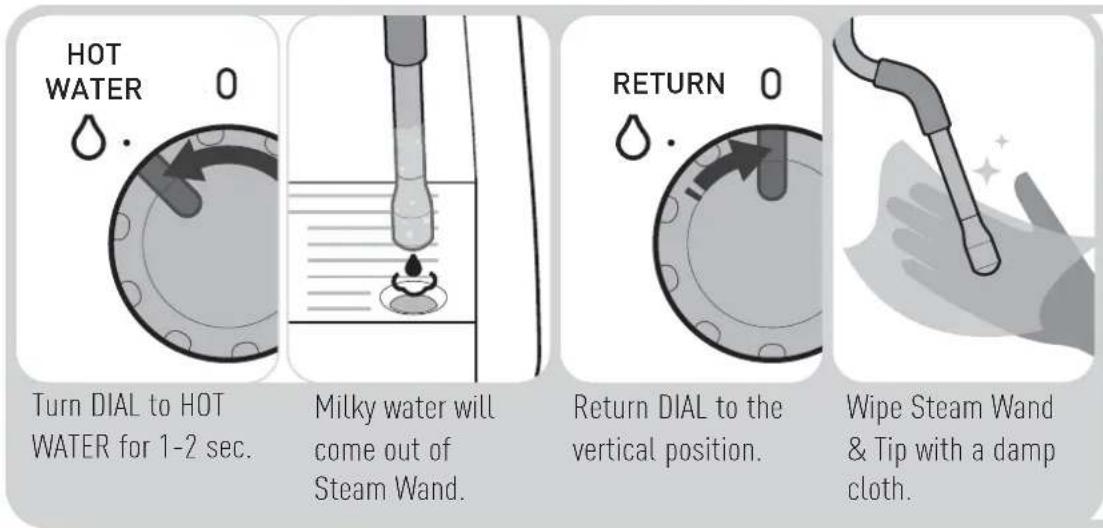
Turn DIAL to HOT
WATER for 1-2 sec.
Milky water will
come out of
Steam Wand.
Return DIAL to the vertical position.
Wipe Steam Wand & Tip with a damp cloth.
Barista Tip:
To keep optimum Steam Wand performance, always purge & clean the Steam Wand after texturing milk.
19. Milk Finishing Touches 20. Thermoblock Auto Purge
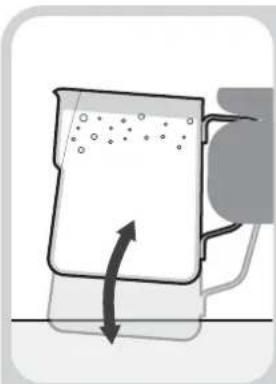
natural_image
Simple line drawing of a mug with liquid and an arrow indicating rotation (no text or symbols)Tap Jug to release larger air bubbles.

natural_image
Simple illustration of a teardrop-shaped object with three curved arrows indicating rotation or cycle (no text or symbols)Swirl Jug to blend milk and create a silky texture.
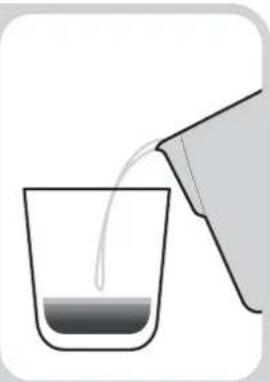
natural_image
Simple line drawing of a glass pouring liquid into a beaker (no text or symbols)Pour milk in one steady motion.
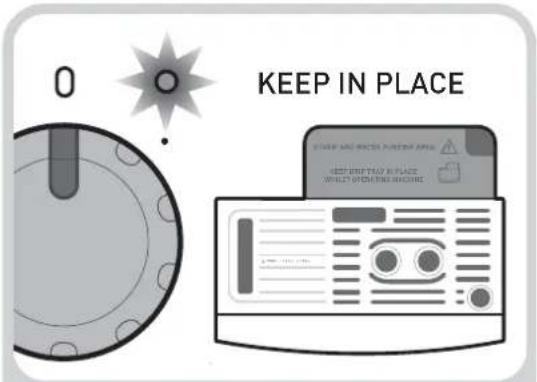
When cooling to espresso temperature, STEAM LIGHT flashes and water purges into Drip Tray. Keep Drip Tray in place.
21. Wash Parts
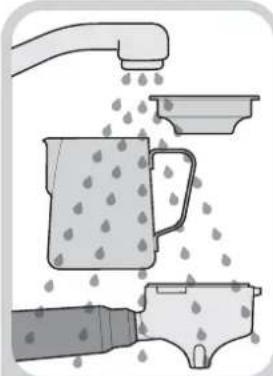
natural_image
Illustration of a kitchen cleaning process showing a drain, cup with liquid, and tool (no text or symbols)Wash parts with warm water.
22. Drip Tray Clean Up
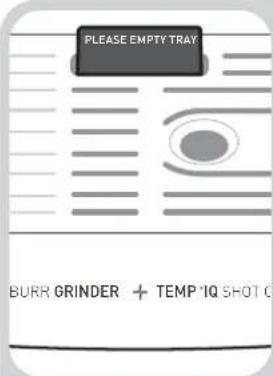
Check if Drip Tray needs emptying.
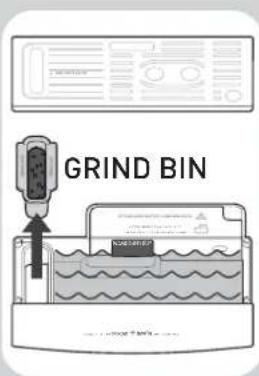
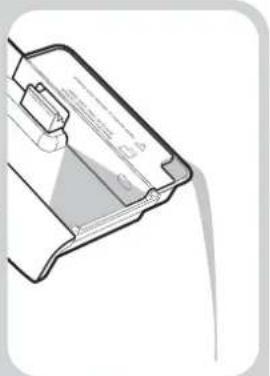
Remove Drip Tray Grill and separate Grind Bin from Drip Tray.
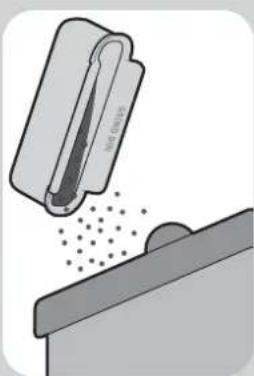
natural_image
Illustration of a mechanical component emitting particles from a surface, with no visible text or symbols.Empty coffee grinds and wash Grind Bin in warm water.
natural_image
Technical line drawing of a mechanical component or bracket (no text or symbols visible)Empty water from Drip Tray and wash in warm water.
Tips for Grinding & Tamping
1. Coffee Beans
For optimum flavour & extraction:
- Buy freshly roasted coffee beans in small 250g batches to reduce the storage time.
- Use within two weeks of opening.
-Store coffee beans in a dry, airtight container. Place in a cool dark cupboard.
Important: Old coffee beans, no matter the Grind Setting, will have a fast extraction and will produce an under extracted tasting espresso.
2. Grind Setting
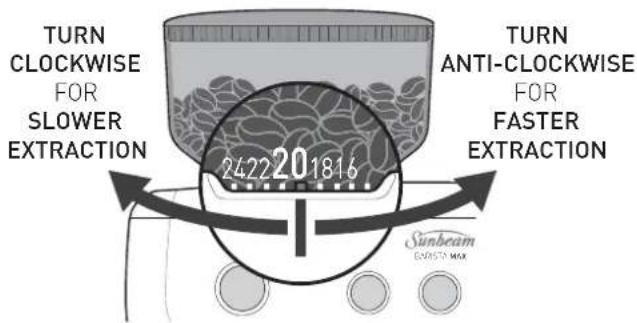
You may need to vary the Grind Setting when using different coffee beans and depending on bean freshness. The range of 30 Grind Settings allows for precision adjustment, controlling the grind size & ultimately the characteristics of the resulting extraction.
It may take several incremental adjustments before you reach your optimum Grind Setting. Dial in Grind Setting based on pour time & taste see Espresso Extraction Guide.
Barista Tip:
After adjusting the Grind Setting it is important to purge (for 1-2 sec) a small amount of coffee grinds from the Grinder. This removes the coffee grinds of the previous Grind Setting; ensuring the next espresso extraction is made entirely of the coffee grinds from the new Grind Setting.
- Smaller number settings deliver finer coffee grinds & a slower extraction.
- Larger number settings deliver coarser coffee grinds & a faster extraction.
3. Filter Baskets
- Single Wall Filter Baskets
These work with freshly ground coffee grinds and are supplied with the Barista Max.
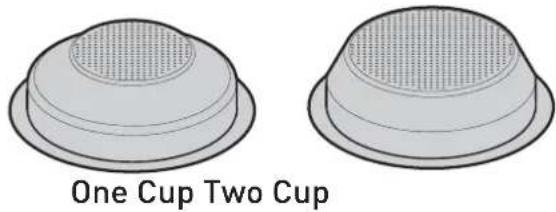
Note: Pre-ground coffee grinds are too coarse to use with Single Wall Filter Baskets.
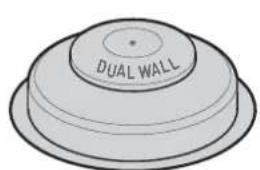
• Dual Wall Filter Baskets
These work best with pre-ground coffee grinds, but can also be used for freshly ground coffee grinds.
natural_image
Illustration of a dual-wall plastic housing (no text or symbols)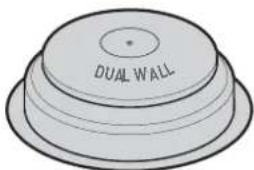
One Cup Two Cup
These are available for purchase from Sunbeam. Details are on the back page.
4. Grind Dosage & Tamp Force
For best results, the amount of coffee grinds dosed should remain consistent.
Note: It is normal for the correct dose of coffee grinds to appear overfilled in the Filter Basket before tamping.
Evenly tamp (press) coffee grinds to the level indicated, with firm force 10-15kg.
Tips for Perfect Espresso Extraction
The way the espresso pours will tell you everything.
1. Extraction Time
Extraction time is a good indicator of the quality of the pour. The optimum time per shot varies between types & freshness of coffee beans. However, in general, the pour time should be between 20-30 seconds for both One & Two Cup shots.
2. Type of Extraction
- Optimum Extraction
A quality pour has a steady flow with a consistency similar to that of warm honey. The resulting crema is dark golden. The sweetest flavours & oils have been extracted creating a rich tasting espresso.
- Under Extraction
The pour is fast & light in colour, the resulting crema is thin with a creamy light brown colour which quickly dissipates. This occurs when too little of the essential
oils, flavours & colours from the coffee grinds have been extracted. This creates a sour tasting espresso.
• Over Extraction
There may be no pour, or it may be slow & drip throughout the entire pour. The resulting crema is very dark. This occurs when too much of the essential oils, flavours & colours from the coffee grinds have been extracted. This creates a bitter tasting espresso.
3. Look for Colour Change
The optimum shot contains 3 elements:
Heart: At the base - starts out dark brown.
Body: Blends with the heart - becomes a rich caramel with reddish reflections.
Crema: The layer on top of the body - dark golden.

4. Espresso Extraction Guide
This guide will help to improve espresso extraction, to achieve great tasting coffee, every time.
| UNDER EXTRACTION OPTIMUM EXTRACTION OVER EXTRACTION | |||
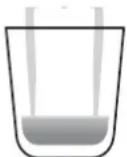 | 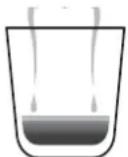 | 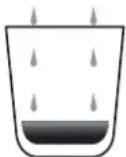 | |
| Pour*^ | Extraction too fastPours for under 15 sec | Steady-flow extractionPours for 20-30 sec | Extraction too slowPours for over 35 sec |
| Colour | Pale brownCrema-light brown | Rich caramelCrema-dark golden | Very dark brownCrema-dark brown |
| Taste | Sour, acidic, watery | Rich, sweet, vibrant | Bitter, dry, grainy |
| Grind Size^^ | Too coarseUse a finer grind | Just right | Too fineUse a coarser grind |
| Dosage | Not enough grindsUse more grinds | One Cup = 13-15gTwo Cup = 20-22g | Too many grindsUse less grinds |
| Tamp | Not enough tamp forceTamp firmer | Just right-firm force10-15Kg of force | Too much tamp forceTamp lighter |
* If using pre-ground coffee grinds, use Dual Wall Filter Baskets.
^ Ensure coffee beans or pre-ground grinds are fresh.
^^ Old coffee beans no matter the Grind Setting will have a fast extraction and will produce an under extracted tasting espresso.
Tips for Milk Texturing
Milk texturing is the steaming of milk.
Key Elements of Textured Milk
Milk that has been textured correctly has a thick, rich microfoam with a silky sheen. Texturing involves both heating and aerating milk using steam. Vital elements include positioning of the Steam Wand, when to adjust the Milk Jug position and reaching the correct temperature. Use the below steps to help you create café-style microfoam.
1. Fill Milk Jug
Add cold milk around 4°C into a chilled clean Stainless Steel Jug.
Fill to the bottom of the spout.
Note: The volume of milk will increase or 'stretch' during texturing, so don't overfill the Jug.
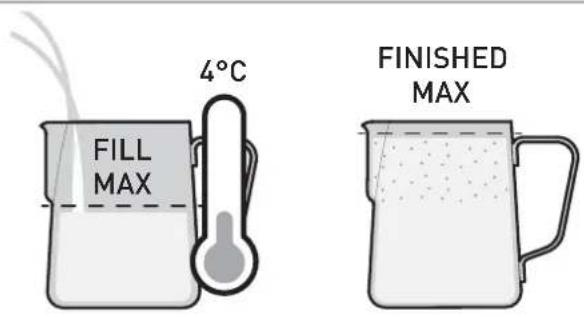
A larger capacity Milk Jug is available for purchase from Sunbeam. Details are on the back page.
2. Steam Warm Up
Turn DIAL to STEAM. For best milk texturing results every time, allow steam to heat up. Steam is ready when STEAM LIGHT is fully ON. You will also hear the Pump start. Pause steam by returning DIAL to the vertical position.
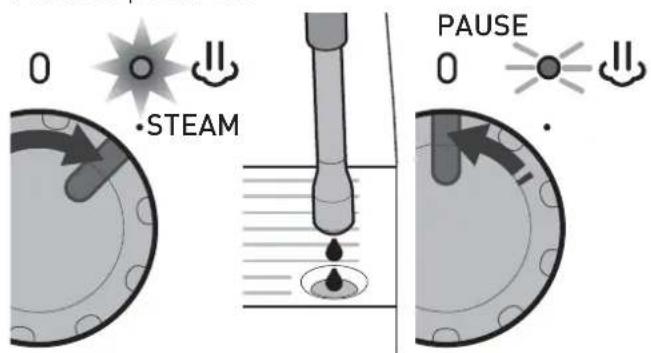
3. Position
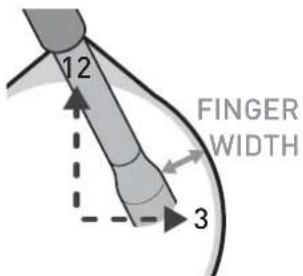
Place the Steam Wand Arm in the Jug spout at the 12 o'clock position, with the Steam Wand Tip in the milk at the 3 o'clock position, a finger width away from the edge of the Jug. Keep Steam Wand Tip just under the surface of the milk. Turn DIAL back to STEAM position to start texturing. A whirlpool action should be created in the Jug.
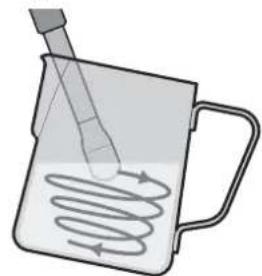
natural_image
Illustration of a pipette dispensing liquid into a mug with swirling arrows (no text or symbols)4. Sound
How air is introduced to the milk determines the consistency of the foam. If large gulps of air are added to the milk, the foam will have large bubbles. Introducing air to the milk in a controlled, gentle fashion indicated by a gentle hissing sound, will ensure the milk has fine aerated microfoam.
Barista Tip: Milk Texturing Sounds
• Gurgling - Tip not deep enough, raise Jug.
- Smooth Hissing - Just right for latte.
- Screeching - Tip too deep, lower Jug.
5. Keeping Steam Tip Position
As the steam heats & textures the milk, the milk will stretch causing the level of the milk in the Jug to rise. As this happens follow the level of the milk by lowering the Jug, keeping the Steam Wand Tip just below the surface.
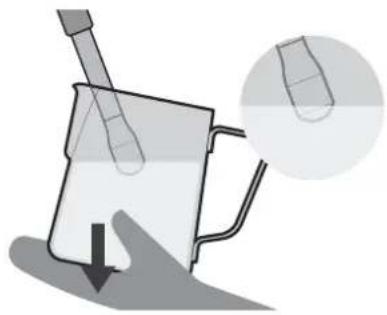
natural_image
Illustration of a mortar or scraper with a handle and shadow, showing a downward force (no text or symbols)Note: Some adjustments to technique will be required when using non-dairy milk.
Tips for Milk Texturing
6. Amount of Foam
Create the amount of microfoam you want. Cappuccinos traditionally have more microfoam than flat whites. (See Coffee Styles to Try, pages 18-19)
7. Immerse Tip
After creating the desired amount of foam, immerse the Steam Wand half depth way into the milk. This heats all the milk and pulls in milk instead of air. This ensures the milk & foam are blended together, making it denser & smoother.
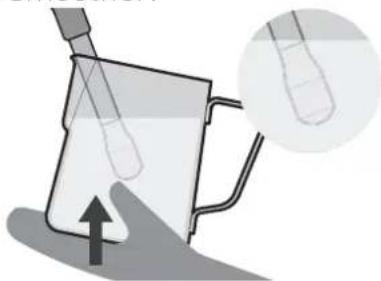
natural_image
Illustration of a laboratory setup with a beaker and test tube, showing fluid flow direction (no text or symbols)8. Correct Temperature
An indication of reaching correct milk temperature is when the Milk Jug base can only be touched comfortably for approximately 3 seconds.
Barista Tip: Milk Temperature
- Under - If not heated long enough, it will be warm with little texture.
- Optimum - See below table.
• Over - If heated for too long it will start to boil around 72^ C and will have a burnt taste with all texture lost.
| MILK | TEMPERATURE |
| Full & Skim 60-65 | °C |
| Almond | 55-65°C |
| Soy 55-60 | °C |
| Coconut | 65-70°C |
Note: Above recommendations might vary from one milk brand to another and depending on your taste preference.
9. Purging the Steam Wand
When correct milk temperature has been reached, turn the DIAL to the vertical position and remove the Jug from the Steam Wand. Place Milk Jug to one side. Place the Steam Wand over the Drip Tray. Turn the DIAL to the HOT WATER position for a few seconds, then return the DIAL to the vertical position. This will remove any milk that has been sucked into the Steam Wand Tip.
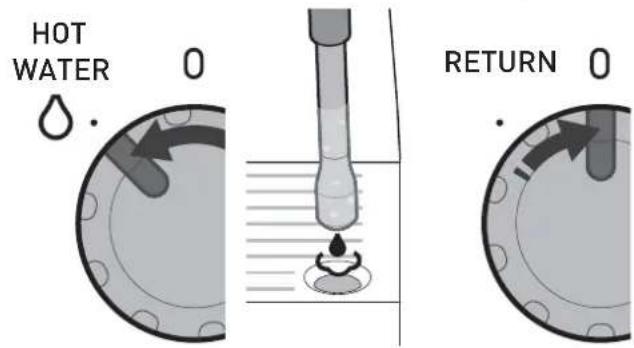
10. Wipe Steam Wand
Wipe the Steam Wand Arm & Tip with a clean damp cloth to remove any milk residue.
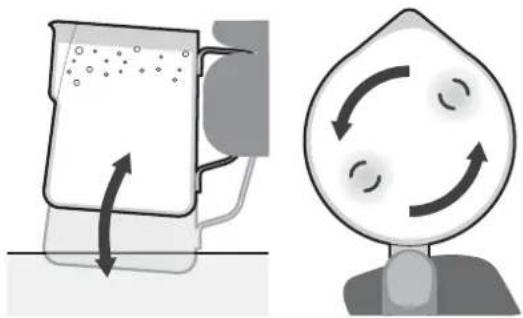
11. Tap & Swirl the Jug
Gently tapping the Jug on the benchtop helps to release larger trapped air bubbles. Swirling helps the milk & froth to combine for an even consistency & a silky appearance.
natural_image
Illustration of a mixing bowl and its circular motion diagram (no text or symbols)12. The Finishing Touches
Pour from the Milk Jug into your cup in one steady motion.
Coffee Styles to Try

natural_image
Simple line drawing of a beaker with liquid inside (no text or symbols)Espresso (Short Black)
Espresso is a concentrated, full bodied coffee with a stable layer of crema on top. An espresso is the foundation of all café coffee.
- Espresso glass (90mL)
- Single or double shot of espresso (30mL-60mL)

natural_image
Simple line drawing of a U-shaped container with liquid inside (no text or symbols)Ristretto
A ristretto is an extremely short espresso, distinguished by its intense flavour, aftertaste and its thin crema on top.
- Espresso cup (30mL)
• Half a single shot of espresso (15mL)
natural_image
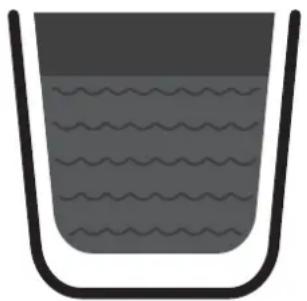
Simple illustration of a container with wavy liquid and a U-shaped tube (no text or symbols)Long Black (Americano)
A standard espresso with hot water added. The hot water is added first so that the crema is maintained.
- Cup (190mL)
• Hot Water (to preference) - Single or double shot of espresso (30mL-60mL)
natural_image
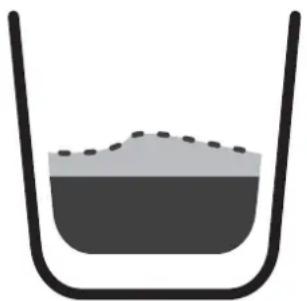
Simple line drawing of a container with liquid and particles inside, no text or symbols presentCon Panna
Con Panna, Italian for 'with cream', made up of an espresso topped with lightly whipped cream. It can also be dusted with cinnamon or drinking chocolate.
- Cup (190mL)
- Single or double shot of espresso (30mL-60mL)
- Lightly whipped cream - dusted cinnamon.
natural_image
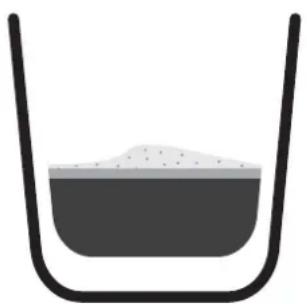
Simple line drawing of a container with liquid inside, no text or symbols presentMacchiato
Macchiato, Italian for 'to stain or mark'. Traditionally served as a standard espresso with a dash of cold or textured milk & a small dollop of textured foam into the middle of the crema.
- Espresso glass (90mL)
- Single or double shot of espresso (30mL-60mL)
- Dash of cold or textured milk & small dollop of textured foam.
Coffee Styles to Try
natural_image
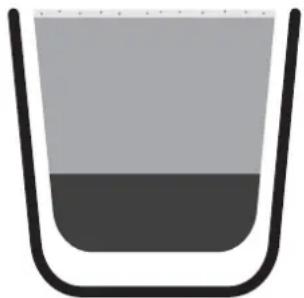
Simple illustration of a U-shaped container filled with liquid, no text or symbols presentFlat White
An espresso with textured milk & a thin layer of textured foam milk on top. The wider cup will create the slim layer of foam, the signature of the flat white.
- Wide cup (190mL)
- Single or double shot of espresso (30mL-60mL)
- Textured milk & foam.
natural_image
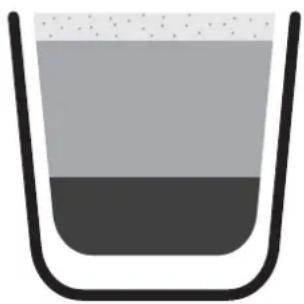
Simple illustration of a U-shaped container filled with liquid, no text or symbols presentLatte
An espresso with textured milk & a finger width layer of textured foam milk on top. The narrower cup will create the thicker layer of foam.
- Glass or Cup (220mL)
- Single or double shot of espresso (30mL-60mL)
- Textured milk & foam.
natural_image
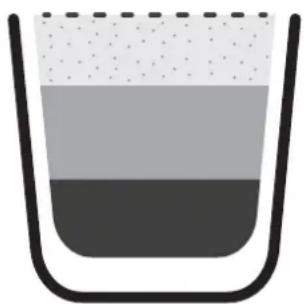
Simple illustration of a beaker with liquid and bubbles, no text or symbols presentCappuccino
An espresso with 13 steamed textured milk, topped with 13 creamy foam & a dusting of chocolate.
- Cup (190-240mL)
- Single or double shot of espresso (30mL-60mL)
- 13 Textured milk, 13 textured foam - dusted with chocolate.
natural_image
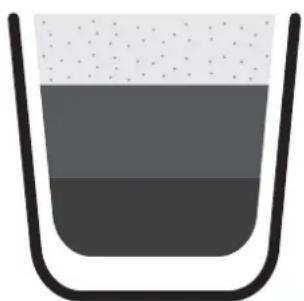
Simple illustration of a U-shaped container filled with liquid, no text or symbols presentMocha
Made in a similar way to a cappuccino but with the addition of drinking chocolate. Simply stir the chocolate into the espresso prior to adding the steamed textured milk & foam.
- Cup or tall glass (190-240mL)
- Single or double shot of espresso (30mL-60mL)
- Drinking chocolate (to preference)
- 13 Textured milk, 13 textured foam.
natural_image
Simple line drawing of a beaker with liquid inside, no text or symbols presentBabyccino
Steamed textured milk with a layer of foamed milk. It can also be dusted with chocolate.
- Small cup (90mL)
- No shot of espresso
- Textured milk & textured foam - dusted with chocolate.
Customisable - Shot Volumes
The Barista Max features Auto Shot Volumetric Control.
It extracts just the right amount of espresso then automatically stops.
ONE CUP - Pours 1 shot of espresso = 30mL TWO CUP - Pours 2 shots of espresso = 60mL MANUAL SHOT - Pours up to = 200mL
At any point during espresso extraction you can stop the pour by pressing the same button again.
You can adjust the default shot volumes to suit how you like your coffee.
Note: Maximum allowed shot volumes:
ONE CUP BUTTON 100mL
TWO CUP BUTTON 200mL
MANUAL SHOT BUTTON 400mL
Preparing to Customise Shot Volume(s)
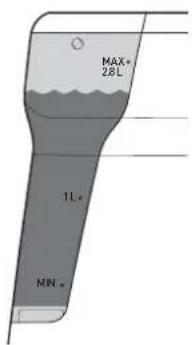
- Check Water Reservoir
- Ensure there is enough water in the Reservoir.
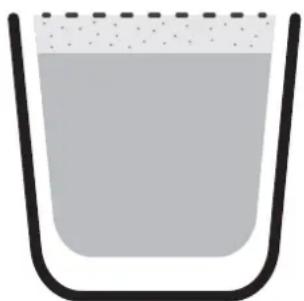
- Check Power
Ensure that:
- The Power Plug is inserted into the outlet & switched on.
- The DIAL is in the vertical position.
- The machine is on and in the READY state.
Customise - One Cup Shot Volume
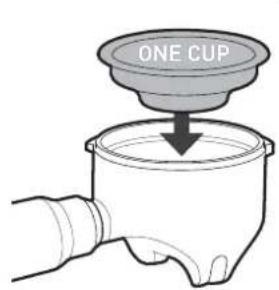
- Insert One Cup Filter Basket into the Group Handle.
- Dose with coffee grinds then tamp.
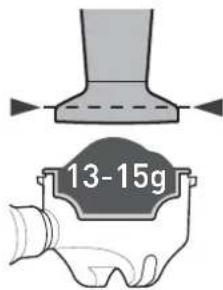
- Insert Group Handle into the Group Head.
- Press & hold the ONE CUP BUTTON for 4 seconds.
- The ONE CUP LIGHT will flash to indicate it is in custom mode.
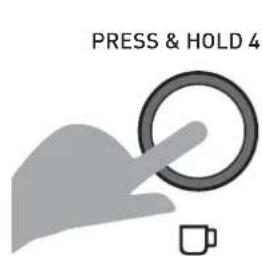

natural_image
Simple graphic of a sun with rays and a mug, no text or symbols present.- Espresso will start to pour.
- When you reach your desired 1 shot volume, press the ONE CUP BUTTON.
- The espresso pour will stop.
- The machine will beep & the ONE CUP LIGHT will stop flashing.
- The new ONE CUP espresso shot volume has been saved.
- The machine will return to the READY state.
Customisable - Shot Volumes
Customise - Two Cup Shot Volume
- Insert Two Cup Filter Basket into the Group Handle.
- Dose with coffee grinds then tamp.
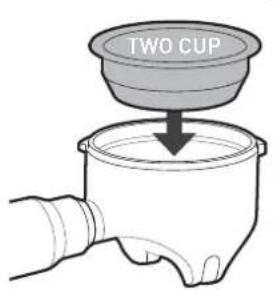
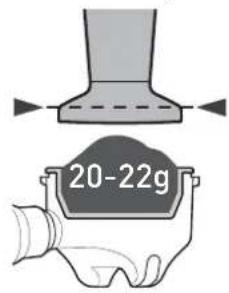
- Insert Group Handle into the Group Head.
- Press & hold the TWO CUP BUTTON for 4 seconds.
- The TWO CUP LIGHT will flash to indicate it is custom mode.
PRESS & HOLD 4 SEC

natural_image
Silhouette of a hand interacting with a circular ring and two small cups (no text or symbols)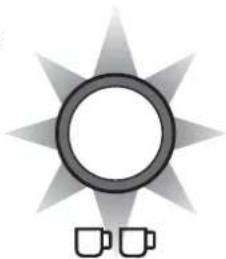
natural_image
Simple graphic of a sun with a partial circle and two cups below (no text or symbols)- Espresso will start to pour.
- When you reach your desired 2 shots volume, press the TWO CUP BUTTON.
- The espresso pour will stop.
- The machine will beep & the TWO CUP LIGHT will stop flashing.
- The new TWO CUP espresso shot volume has been saved.
- The machine will return to the READY state.
Restore - All Default Shot Volumes
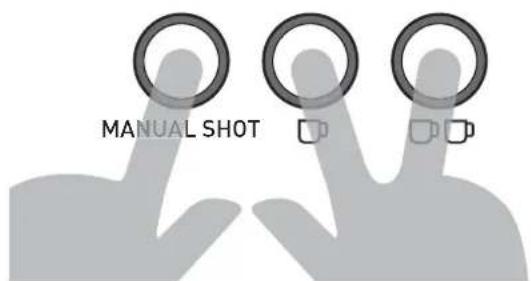
- Press & hold all 3 EXTRACTION BUTTONS at the same time for 4 seconds.
PRESS & HOLD TOGETHER 4 SEC
Customise - Manual Shot Volume
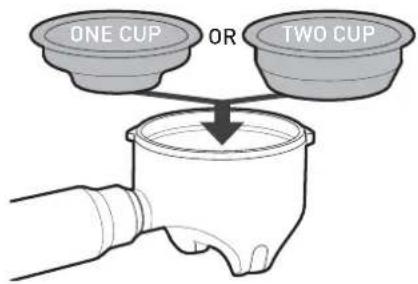
- Insert your desired Filter Basket into the Group Handle.
- Dose with coffee grinds then tamp.
- Insert Group Handle into the Group Head.
- Press & hold the MANUAL SHOT BUTTON for 4 seconds.
- The MANUAL SHOT LIGHT will flash to indicate it is in custom mode.
PRESS & HOLD 4 SEC

- Espresso will start to pour.
- When you reach your desired shot volume, press the MANUAL SHOT BUTTON.
- The espresso pour will stop.
- The machine will beep & the MANUAL SHOT LIGHT will stop flashing.
- The new MANUAL SHOT espresso volume has been saved.
- The machine will return to the READY state.
- The machine will beep and all 3 EXTRACTION BUTTON LIGHTS will flash together.
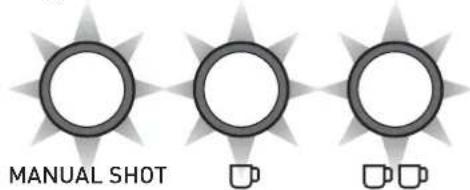
- The default espresso volumes have been restored.
- The machine will return to the READY state.
Customisable - Extraction Temperature
The Thermoblock heats water so that espresso extracts at 92°C. For the best tasting espresso, balancing bitterness and acidity.
You can adjust the water temperature used for espresso extraction, in 2°C increments between 88°C - 96°C, to cater for different types of roasted coffee beans and for personal preference.
- Higher temperatures increase bitterness and decrease acidity.
- Lower temperatures decrease bitterness and increase acidity.
- Check Power
Ensure that:
- The Power Plug is inserted into the outlet & switched on.
- The DIAL is in the vertical position.
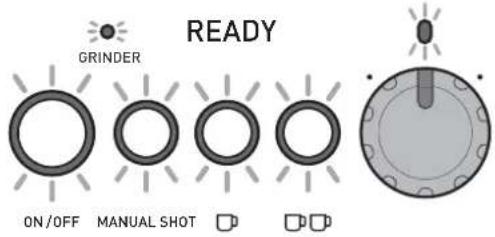
- The machine is on and in the READY state.
- Access Extraction Temperature Custom Mode
- Simultaneously press & hold the ON/OFF & ONE CUP BUTTONS for 4 seconds. The machine will beep and the ON/OFF LIGHT begins to flash.
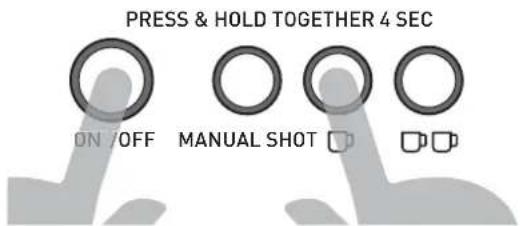
Note: The ON/OFF LIGHT will continue to flash to indicate you are in a custom mode.
Important: If no buttons are pressed within 1 minute of entering a custom mode, the machine will exit and go back to the READY state.
- Adjusting Extraction Temperature
The combination of EXTRACTION LIGHTS illuminated signals the temperature selected. The default setting is:
- 92°C = ONE CUP LIGHT illuminated.

- To adjust extraction temperature press:
- MANUAL SHOT BUTTON = minus button.
- TWO CUP BUTTON = plus button.

- 94°C = ONE & TWO CUP LIGHTS illuminated.

- 96°C = TWO CUP LIGHT illuminated.

- 90°C = MANUAL SHOT & TWO CUP LIGHTS illuminated.

- 88°C = MANUAL SHOT LIGHT illuminated.

- Confirm Extraction Temperature
- Press the ON/OFF BUTTON to save your selection. The machine will beep & exit the custom mode.
- The machine will return to the READY state.
Customisable - Extraction Pre-infusion Profile
You can select from three Pre-infusion Profiles to cater for personal preferences.
- Gentle Pre-infusion: Small defined amounts of water are introduced into the tamped coffee grinds, gently adding moisture to bloom the coffee grinds in preparation for a steady water flow. For a balanced tasting espresso. This is the default profile setting.
- Distinct Pre-infusion: A single distinct dose of water is released into the tamped coffee grinds, followed by a brief rest period, then a steady water flow. For a more bright tasting espresso.
- Constant Pre-infusion: Delivers a constant, steady water flow from start to finish. For a more sharp tasting espresso.
- Access Pre-infusion Custom Mode
- The machine is ON and in the READY state.
- Simultaneously press & hold the ON/OFF, ONE & TWO CUP BUTTONS for 4 seconds. The machine will beep and the ON/OFF LIGHT begins to flash.
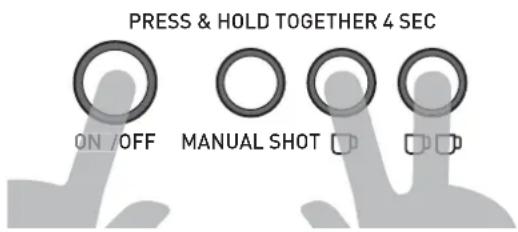
- Selecting Pre-infusion Profiles
The EXTRACTION LIGHT illuminated signals the Pre-infusion Profile selected.
The default setting is:
- Gentle = ONE CUP BUTTON. The ONE CUP LIGHT is illuminated.
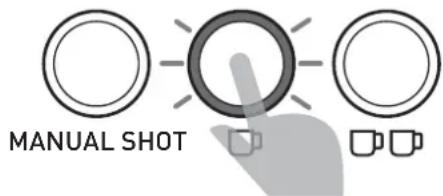
- To select a Pre-infusion Profile press:
- Distinct = TWO CUP BUTTON. The TWO CUP LIGHT will illuminate.
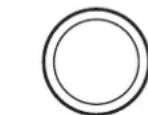
MANUAL SHOT


□□
- Constant = MANUAL SHOT BUTTON. The MANUAL SHOT LIGHT will illuminate.
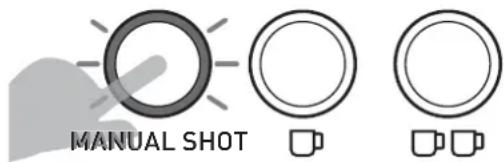
- Confirm Pre-infusion Profile
- Press the ON/OFF BUTTON to save your selection. The machine will beep & exit the custom mode.
- The machine will return to the READY state.
You can easily reset all settings to the factory defaults.
-The machine is on and in the READY state.
- Press & hold the ON/OFF & all 3 EXTRACTION BUTTONS at the same time for 4 seconds.
PRESS & HOLD TOGETHER 4 SEC

ON/OFF

MANUAL SHOT

□

□ □
- The machine will beep and the ON/OFF, EXTRACTION BUTTONS & DIAL LIGHTS will all flash together three times.
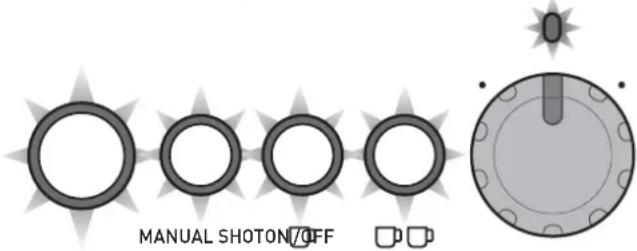
- All default settings have been restored.
- The machine will return to the READY state.
Care & Cleaning - Espresso Machine
The espresso making process involves extracting oils out of coffee grinds. Deposits of grinds & oils build up over time, affecting the taste of the coffee & operation of the Espresso Machine.
Purging water through the Group Head & Steam Wand, before & after making each coffee, is the easiest way to keep your Espresso Machine clean. (See Coffee Making Guide pages 10-13)
Cleaning Accessories & Removable Parts
- Clean partsin warm water with a mild detergent, rinse & dry.
Note: Do not use alkaline cleaning agents, abrasives or metal scourers, as these will scratch the surfaces of parts.
Dishwasher Safe parts:
- Stainless Steel Milk Jug
- Stainless Steel Drip Tray Grill
- Stainless Steel One Cup Filter Basket
- Stainless Steel Two Cup Filter Basket
- Cleaning Disc
Dishwasher Safe TOP SHELF ONLY parts:
- Hardened Stainless Steel Top Burr
- Grind Bin
NON Dishwasher Safe parts:
- Water Reservoir
- Group Handle
- Bean Hopper
- Drip Tray
- Tamper
- Cleaning Pin
- Cleaning Brush
Cleaning Warming Plate & Exterior
- When Required
Wipe over the machine with a soft damp cloth with a mild detergent and wipe dry.
CAUTION: To prevent damage to the appliance do not use alkaline cleaning agents, abrasives or metal scourers.
WARNING: Do not immerse the machine in water.
Cleaning Drip Tray & Grind Bin
- When Required
Empty if the red Water Level Indicator appears through the Stainless Steel Grill, otherwise water will overflow.
Note: Over time it is normal for the inside of the Drip Tray & Grind Bin to be stained by the oils in the coffee grinds.
- Weekly
Clean in warm water with a mild detergent, rinse & dry.
Cleaning Group Handle & Filter Basket
- Every Time
Wash after each use by rinsing them with warm water under the tap.
- Regular Intervals
In warm soapy water using a mild detergent, rinse & dry.
Cleaning Shower & Group Head
- Every Time
Run water through before making an espresso. (See Coffee Making Guide pages 10)
- Weekly
- Purge water through the Group head by pressing the ONE CUP BUTTON.
- Allow water to run through until it stops.
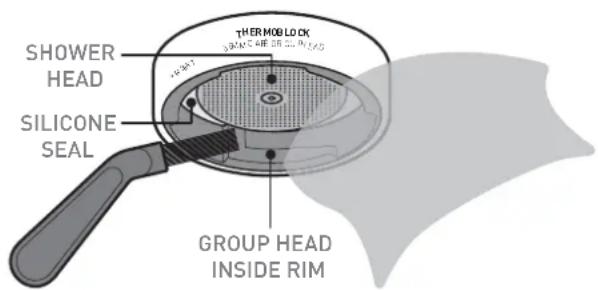
- With the Cleaning Brush remove any coffee grinds from around the Group Head inside rim and Silicone Seal. Wipe the Shower Head with a damp cloth.
Cleaning Tablet
Sunbeam Espresso Machine Cleaning Tablets (EM0020) are available for purchase from Sunbeam. Details are on the back page.
Care & Cleaning - Espresso Machine
Cleaning Cycle
The CLEAN LIGHT will illuminate blue to indicate a Cleaning Cycle is required. The Cleaning Cycle takes approximately 7 minutes to complete.
• Preparing for Cleaning Cycle
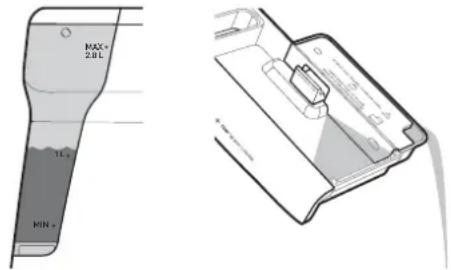
- Ensure there is at least 1 Litre of water in the Reservoir.
- Empty the Drip Tray & replace.
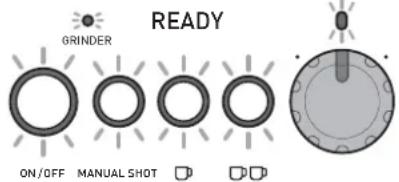
- The machine is on and in the READY state.
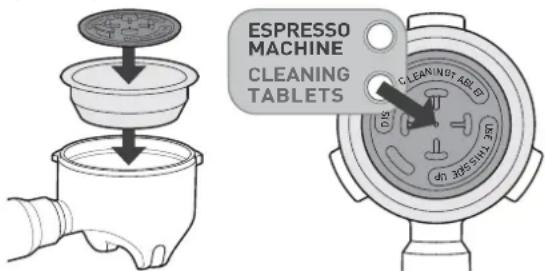
- Place the Two Cup Filter Basket & the Cleaning Disc into the Group Handle.
- Place one Sunbeam Cleaning Tablet in the middle of the Cleaning Disc in the space provided.
- Insert Group Handle into the Group Head.
- Start the Cleaning Cycle
- Simultaneously press & hold the ON/OFF & MANUAL SHOT BUTTONS for 4 seconds. The machine will beep and the Cleaning Cycle will start.
PRESS & HOLD TOGETHER 4 SEC
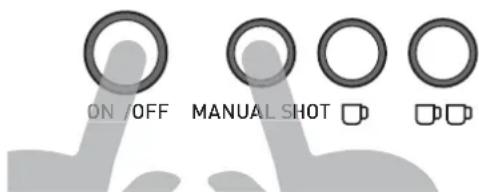
Note: The Cleaning Cycle can be exited at any point by pressing the ON/OFF BUTTON.
- The ON/OFF & CLEAN LIGHTS will flash during the cleaning cycle.
- Water will purge into the Drip Tray and small amounts of water will pour from the Group Handle spouts.
- Cleaning Cycle Complete
- The machine will beep and the ON/OFF & CLEAN LIGHTS will stop flashing.
- The machine will return to the READY state.
- Remove the Group Handle from the Group Head. Check tablet has been dissolved.
Note: If the tablet has not been dissolved, insert the Group Handle back into the Group Head, empty the Drip Tray & replace. Repeat the 'Start the Cleaning Cycle' section
- Cleaning Cycle Clean Up
- Purge the Group Head by pressing the ONE CUP BUTTON and water should flow.
- Allow water to run through until it stops.
- Wash the Drip Tray, Group Handle & Cleaning Disc in warm water with a mild detergent, rinse & dry.
Group Head Silicone Seal
A Silicone Seal is located in the Group Head and creates a seal against the Filter Basket when making an espresso.
Important: When not being used, we recommend not to leave the Group Handle inserted into the Group Head, as this will reduce the life of the Silicone Seal.
Over time this Seal loses its elasticity and may require replacement. The seal may need replacing when watery espresso leaks from around the Group Handle during extraction, or if the Group Handle is loose when fully turned to the centre position.
Note: Contact Sunbeam should you think that the Group Head Seal needs replacing. Do not attempt to change the Silicone Seal without first consulting Sunbeam.
Care & Cleaning - Espresso Machine
Cleaning Steam Wand
- Every time
- After texturing milk purge the Steam Wand by turning the DIAL to HOT WATER for just 1-2 seconds.
- Wipe the Steam Wand with a damp cloth. (See Coffee Making Guide page 13)
• 2-3 Months
- Soak the Steam Wand overnight in the Milk Jug with warm water & one Sunbeam Cleaning Tablet.
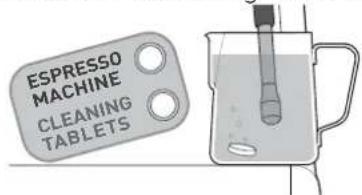
- In the morning remove the Jug and rinse ensuring that all traces of the solution have been removed.
- Wipe Steam Wand with a damp cloth ensuring that all traces of the cleaning tablet have been removed.
- Run Hot Water through the Steam Wand for 40 seconds.
- Unblocking Steam Wand
If the Steam Wand Tip becomes clogged with milk residue:
- Insert the thicker 'STEAM' Cleaning Pin up the Steam Wand Tip hole and remove.
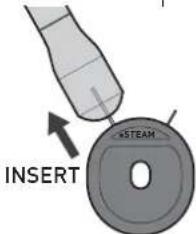
- Run Hot Water through the Steam Wand for 40 seconds.
- Steam Wand Remains Blocked:
- Unscrew the Steam Wand Tip and soak overnight in the Milk Jug with warm water & one Sunbeam Cleaning Tablet.
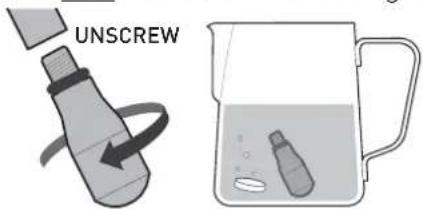
- In the morning rinse the Jug & Steam Wand Tip under running water ensuring all traces of the cleaning tablet have been removed.
- Use the thicker 'Steam' Cleaning Pin to clean the Steam Wand Tip.
- Ensure red O-ring is present & undamaged.
- Screw the Steam Wand Tip back into the Steam Wand Arm.
- Run Hot Water through the Steam Wand for 40 seconds.
Cleaning Filter Baskets
• 2-3 Months
- Soak the Filter Basket(s) overnight in the Milk Jug with warm water & one Sunbeam Cleaning Tablet.
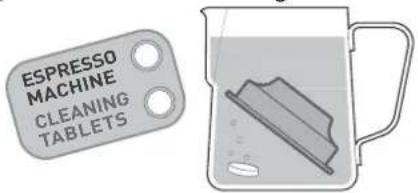
- In the morning rinse the Jug & Filter Basket(s) under running water ensuring all traces of the cleaning tablet have been removed.
- Place a Filter Basket into Group Handle (without coffee grinds) and insert into Group Head.
- Press the ONE CUP BUTTON.
- Allow water to run through until it stops.
- Unblocking Dual Wall Filter Baskets
If the Dual Wall Filter Basket (not supplied with the Barista Max) becomes clogged with coffee grinds:
- Insert the thinner 'FILTER' Cleaning Pin in the exit hole and remove.
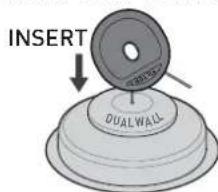
- Place Filter Basket into Group Handle (without coffee grinds) and insert into Group Head.
- Press the ONE CUP BUTTON.
- Allow water to run through until it stops.
- Repeat if needed.
Care & Cleaning - Grinder
Conical Burrs are used to grind coffee beans to a suitable size for espresso extraction. Deposits of grinds & oils build up over time, affecting the taste of the espresso & operation of the integrated Grinder.
Cleaning Grinding Cradle & Grind Outlet
- Weekly
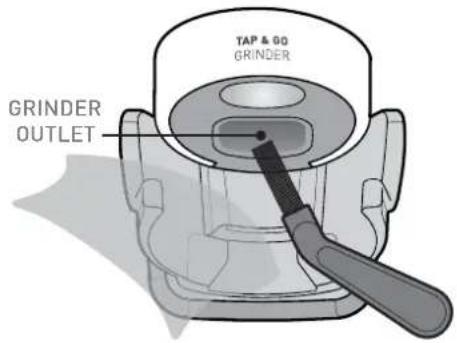
Remove any coffee grinds from the Grinding Cradle & Grind Outlet with the Cleaning Brush and wipe with a damp cloth, wipe dry.
Cleaning the Bean Hopper
• 2-3 Months
If the Grinder is used frequently (everyday), the Bean Hopper needs to be cleaned to ensure best performance.
CAUTION: To prevent damage to the appliance do not use alkaline cleaning agents, abrasives or metal scourers.
WARNING: Do not immerse the machine in water.
• Preparing to Clean Bean Hopper
- Turn off the machine, switch off & unplug at power outlet.
- Make note of the current Grind Setting (to use as the starting point after cleaning).
- Remove and Clean Bean Hopper
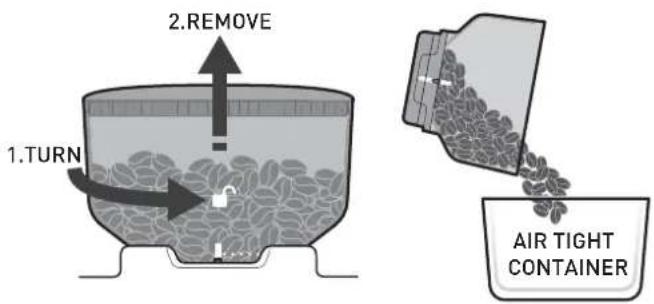
- Turn Bean Hopper fully anti-clockwise, to close the Hopper Gates and unlock the Bean Hopper.
- Remove the Bean Hopper from the Grinder Collar and store any remaining beans in an airtight container to preserve their freshness.
- Wash the Bean Hopper in warm soapy water, then rinse & dry. Let the Bean Hopper stand to allow thorough air drying before replacing.
- Replace Bean Hopper
- Ensure the Grinder Collar is clear of coffee beans or grinds.
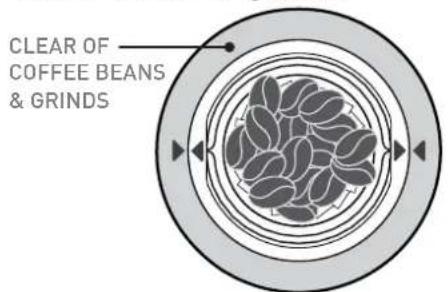
Note: Coffee grinds caught under the Top Burr may prevent the Bean Hopper from seating correctly. If this happens grind off excess coffee beans, see page 28.
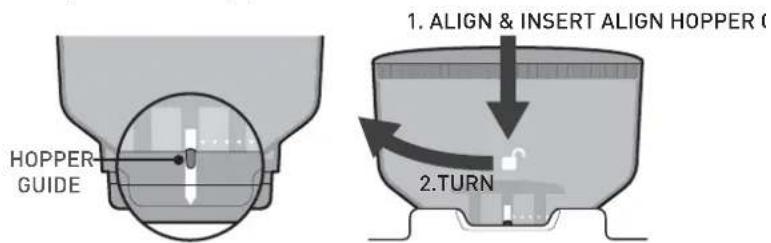
- Ensure the Hopper Guide is aligned with the vertical white lines on the Hopper base.
- Align & insert the Bean Hopper into the Grinder Collar and firmly pushing down turn clockwise to lock into place and open the Hopper Guide.
- Reset to the Grind Setting noted prior to cleaning.
Note: After cleaning, the optimum Grind Setting may have changed. To find the optimum Grind Setting use the information on pages 14-15.
Care & Cleaning - Grinder
Cleaning & Unblocking Grinder Burrs, Collar, Grind Chamber and Outlet
• 1-2 Months
If the Grinder is used frequently (everyday), the Burrs need to be cleaned to ensure best performance of the integrated Grinder. Regular cleaning helps the Burrs achieve consistent grinding results, which is especially important when grinding coffee beans for espresso.
- Grind Off Excess Coffee Beans
- The machine is on and in the READY state.
- Make note of the current Grind Setting (to use as the starting point after cleaning).
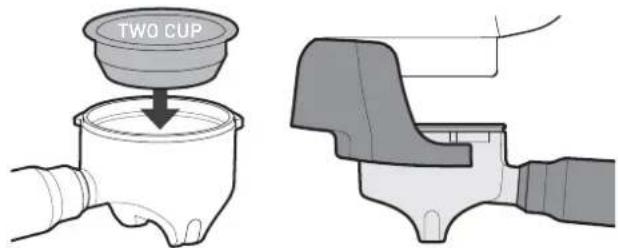
- Insert Two Cup Filter Basket into the Group Handle.
- Insert Group Handle into Grinding Cradle.
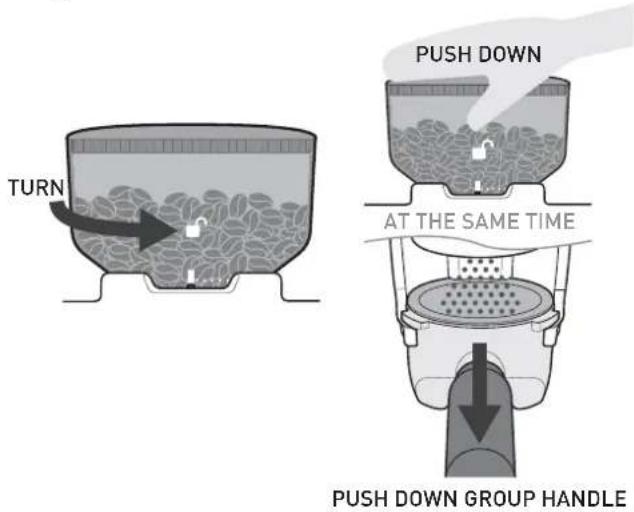
- Turn Bean Hopper fully anti-clockwise to close the Hopper Gates and unlock the Bean Hopper. The Bean Hopper will pop up slightly.
- Place your hand on top of the Bean Hopper and push down lightly. At the same time push down the Group Handle to activate the Grinder. Continue grinding until no more coffee grinds are emitted from the Grinder.
- Remove the Group Handle and dispose of the waste grinds as these will be too coarse for espresso coffee.
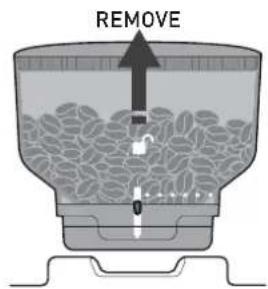
- Remove the Bean Hopper from the Grinder Collar and store any remaining coffee beans in an airtight container to preserve their freshness.
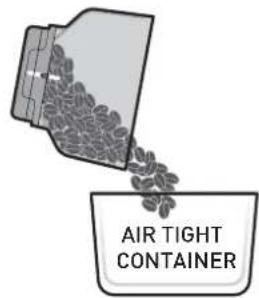
• Preparing to Clean
- Turn off the machine, switch off & unplug at power outlet.
CAUTION: Care should be taken when cleaning Grinder Burrs as they are sharp.
- Cleaning Top Burr
- Fold the two handles up and lift the Top Burr from the Grinder Collar.
- Wash the Top Burr in warm soapy water with a mild detergent, rinse & dry.
Note: Spots & marks on the surface of the Burrs are part of the hardening process (for extra-long life). These marks do not affect the performance of the Grinder or the taste of the espresso.
- Cleaning & Unblocking Bottom Burr and Grind Chamber
- Use the Cleaning Brush or a Vacuum Cleaner to thoroughly clear the parts and surfaces in the Grind Chamber of fine coffee grinds. A damp cloth can be used to wipe the inside of the Grind Collar.
- Allow thorough air drying.
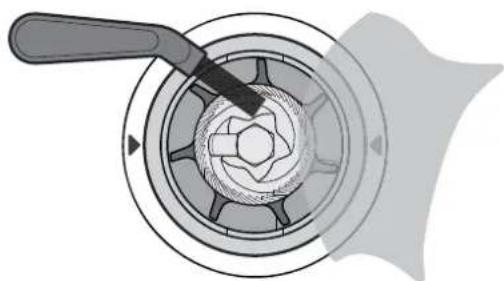
natural_image
Diagram of a mechanical component with a tool inserted, showing a circular gear-like structure (no text or symbols)Care & Cleaning - Grinder
WARNING: Do not pour water or any other liquid into the Grind Chamber.
• Cleaning & Unblocking Grind Outlet
- Feed the Cleaning Brush up into the Grind Outlet from below, wiping & brushing the inside surfaces.
- If the Grind Outlet is clear the bristles will be visible inside the Grind Chamber.
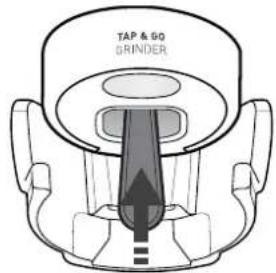
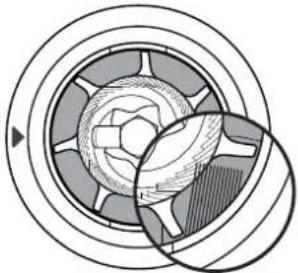
natural_image
Technical diagram of a mechanical bearing assembly (no text or labels)- Replace Top Burr
- Ensure the dot on the Top Cover aligns with the dot on the Grinder Collar.
- Using the two handles insert the Top Burn into the Grinder Collar.
- The arrows on the Top Burr should align to arrows on the Grinder Collar.
- When correctly seated, the Top Burr will be flush with the surface of the Grinder Collar.
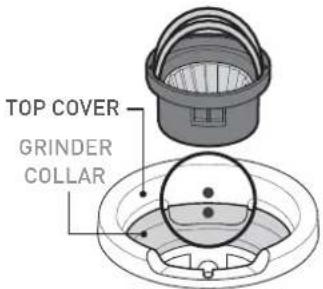
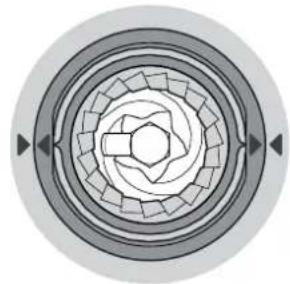
natural_image
Circular diagram with concentric rings and radial arrows, no text or symbols present- Place handles down, one on each side.
- Replace Bean Hopper
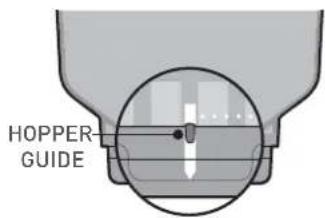
- Ensure the Hopper Guide is aligned with the vertical white lines on the Hopper base.
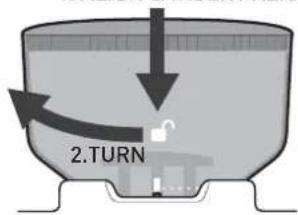
- Align & insert the Bean Hopper into the Grinder Collar and firmly pushing down turn clockwise to lock into place and open the Hopper Guide.
- Reset to the Grinder Setting noted prior to cleaning.
- Refill the Bean Hopper with coffee beans.
Note: After cleaning, the optimum Grind Setting may have changed. To find the optimum Grind Setting use the information on pages 14-15.
Adjusting Bottom Burr
The Conical Burrs are made of hardened Stainless Steel for extra-long life. However, after prolonged use, the Bottom Burr may require adjustment to compensate for wear.
If the coffee grinds are too coarse when the Grind Setting is below 2 and the espresso is consistently under extracted, the Bottom Burr may need adjusting.
Contact Sunbeam (details are on the back page) should you think that the Bottom Burn needs adjustment.
Prior to contacting Sunbeam Customer Care, please ensure that you are using freshly roasted beans and that the Top Burr is seated correctly.
Important: Old coffee beans, no matter the Grind Setting, will have a fast extraction and will produce an under extracted tasting espresso.
Important: If the Top Burr is not seated correctly the Grinder will produce coarse coffee grinds. Grind off excess coffee beans and clean the Top Burr & Grind Chamber.
Note: Sunbeam Customer Care may determine that Bottom Burr adjustment shims are required. Do not attempt to add shims without first consulting Sunbeam.
- ALIGN & INSERT ALIGN HOPPER GUIDE
Descaling Cycle - Espresso Machine
After continued use, your Espresso Machine may develop a build-up of mineral deposits and therefore require occasional descaling.
We recommend descaling your Espresso Machine every 4-6 months, although this period will depend on the hardness of water and frequency of use.
Descaling Solution
You have 3 options:
A. Sunbeam Espresso Machine Descaling Tablets (EM0010).
or
B. Sunbeam Liquid Descaler (KE0100).
or
C. White vinegar & warm water.
A & B descaling solutions are available for purchase from Sunbeam. Details are on the back page.
Descaling Cycle
The Descaling Cycle takes approximately 10 minutes to complete.
Important: If the Descaling Cycle is not completed or stopped part way through any of the Descaling Steps, then you will need to start the Descaling Cycle again from the beginning.
Preparing for Descaling Cycle
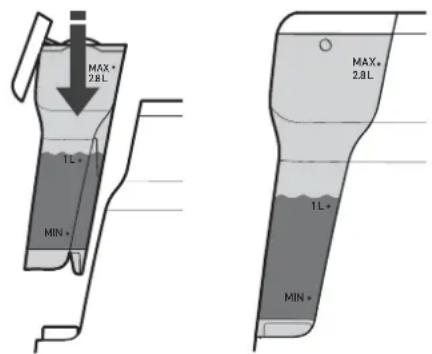
• Fill Water Reservoir with Solution
A. Fill Water Reservoir with 1 Litre of warm water. Add one Sunbeam Descaling Tablet. Allow tablet to fully dissolve.
or
B. In an empty Water Reservoir add half a cap full of Sunbeam Liquid Descaler. Fill Water Reservoir with 1 Litre of warm water. Allow solution to mix thoroughly.
or
C. In an empty Water Reservoir add 1½ tablespoons of white vinegar. Fill Water Reservoir with 1 Litre of warm water. Allow solution to mix thoroughly.
- Insert the Water Reservoir into position.
- Place Containers
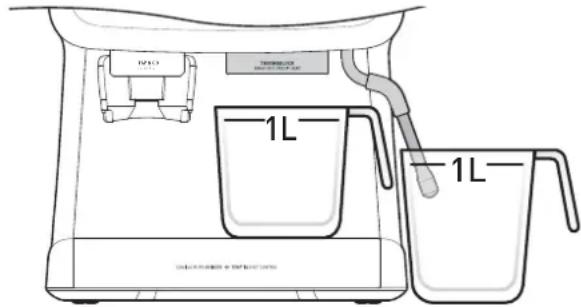
- Place a 1 Litre container under Group Head and another 1 Litre container under the Steam Wand.
- Check Power
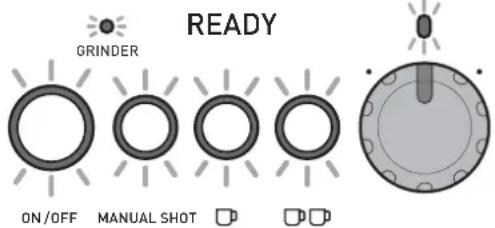
Ensure that:
- The Power Plug is inserted into the outlet & switched on.
- The DIAL is in the vertical position.
- The machine is on and in the READY state.
- Access the Descaling Cycle
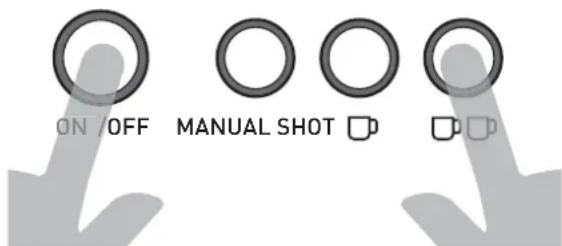
- Simultaneously press & hold the ON/OFF & TWO CUP BUTTONS for 4 seconds. The machine will beep and a flashing light combination between the ON/OFF & STEAM LIGHTS begins.
PRESS & HOLD TOGETHER 4 SEC
Note: The ON/OFF LIGHT will continue to flash until completion of the Descaling Cycle.
Important: If Descaling Step 1 is not started within 1 minute of entering the Descaling Cycle, the machine will exit the Descaling Cycle and go back to the READY state.
Important: The Descaling Cycle can be exited at any point by pressing the ON/OFF BUTTON.
Step 1. Start Descaling Cycle
- Turn the DIAL to the STEAM position.
- The STEAM LIGHT will now be fully illuminated.
- The Pump will start and hot water will run from the Group Head & Steam Wand. Over a 2 minute period the Pump will make different noises.
- When hot water has stopped being released from the Group Head & Steam Wand, this step is finished.
- To indicate the machine has finished this step the machine will beep, the STEAM LIGHT will stop being illuminated and the DIAL LIGHT will now start to flash.
- Turn the DIAL to the vertical position.
- The DIAL LIGHT will now be fully illuminated.
- Move to Step 2.
Step 2. Preparing for Purge
Important: There is a maximum of 5 minutes allowed to complete this step before the Descaling Cycle will exit.
- The Steam Wand & Group Head now need to be purged clean with fresh water to remove descaling solution.
- Rinse Water Reservoir
- Remove the Water Reservoir and rinse thoroughly under running water, ensuring that all traces of the descaling solution have been removed.
- Fill Water Reservoir
- Fill the Water Reservoir to the '1 Litre' line with cold water from the tap and insert into position.
- Empty Containers
- Empty water from the containers and replace.
- Move to Step 3.
Step 3. Start Purge
- Turn the DIAL to the STEAM position.
-
The STEAM LIGHT will now be fully illuminated.
-
The Pump will start and hot water will run from the Group Head & Steam Wand. Over a 2 minute period the Pump will make different noises.
- When hot water has stopped being released from the Group Head & Steam Wand, the Descaling Cycle is complete.
Descaling Cycle Complete
- To indicate the completion of the Descaling Cycle the machine will beep and the ON/OFF LIGHT will stop flashing.
- The STEAM LIGHT will stop being illuminated and the DIAL LIGHT will now start to flash to prompt the return of the DIAL to the vertical position.
- Turn the DIAL to the vertical position.
- The machine will return to the READY state.
Descaling Cycle Clean Up
- Empty water from the containers and clean, ensuring that all traces of the descaling solution have been removed.
Troubleshooting Guide - Espresso Machine
| PROBLEM Possible Cause What To Do | ||
| Group Handle is tight to turn in the Group Head | The Group Head Silicone Seal is new and needs bedding in. | Keep using. This Seal will bed in during the first few uses and become easier to turn. |
| Too many coffee grinds used Dose less coffee grinds. | ||
| Group Handle is loose or comes off during espresso extraction | Group Handle is not attached correctly or has not been tightened sufficiently. | Ensure all three tabs of the Group Handle are fully inserted into the Group Head and rotated to the centre position. See Coffee Making Guide, page 11. |
| No Filter Basket inserted in the Group Handle. | Ensure a Filter Basket is inserted into the Group Handle before using in the Group Head. | |
| Group Head Silicone Seal is damaged or worn. | See Care & Cleaning, page 25. Contact Sunbeam Customer Care. | |
| Espresso squirts or trickles down the side of the Group Head during extraction | Coffee grind is too fine. Change to a coarser Grind Setting. | |
| Too many coffee grinds used. | Dose less coffee grinds. | |
| Coffee grinds tamped too hard. | Apply less force during tamping. | |
| Top edge of Filter Basket has not been cleaned of loose coffee grinds. | Wipe around top edge of the Filter Basket before inserting into Group Head. See Coffee Making Guide, page 11. | |
| Group Head inside rim, Silicon Seal or Shower Head is dirty. | Clean the parts with the Cleaning Brush and damp cloth. See Care & Cleaning, page 24. | |
| Group Head Silicone Seal is damaged or worn. | See Care & Cleaning, page 25. Contact Sunbeam Customer Care. | |
| Espresso is too cold | Coffee beans being stored in the fridge or freezer. | Store coffee beans in a dry, airtight container. Place in a cool dark cupboard. |
| Custom extraction temperature being used. | Use the default 92°C extraction temperature. See Customisable - Extraction Temperature, page 22 | |
| Cup or glass was cold prior to espresso pour. | Pour hot water from the Steam Wand into the cup before extracting espresso. See Coffee Making Guide, page 10. | |
| Group Head or Handle not warmed before use. | Hold the Group Handle under the Group Head and press the ONE CUP BUTTON. Allow water to run through. See Coffee Making Guide, page 10. | |
Troubleshooting Guide - Espresso Machine
| PROBLEM Possible Cause What To Do | ||
| No espresso pours | No water in the Water Reservoir. | Fill reservoir with water. Prime water through the Group Head, press the ONE CUP BUTTON. Allow water to run through. |
| Coffee grind is too fine. Change | to a coarser Grind Setting. | |
| Too many coffee grinds used. | ose less coffee grinds. | |
| Coffee grinds tamped too hard. | Apply less force during tamping. | |
| Custom shot volume being used. | Reset to the default shot volumes.See Customisable - Shot Volumes Temperature, pages 20-21 | |
| The Filter Basket is blocked. | See Care & Cleaning, pages 24 & 26. | |
| Group Head is dirty. A Cleaning | Cycle is required.See Cleaning Cycle, page 25. | |
| Group Head is blocked. A Descaling Cycle is required.See Descaling Cycle, pages 30-31. | ||
| Espresso pours out in drips (Over Extracted) | Coffee grinds are too fine. Change to a coarser Grind Setting. | |
| Too many coffee grinds used. | ose less coffee grinds. | |
| Coffee grinds tamped too hard. | Apply less force during tamping. | |
| Espresso Machine has scale build up. | A Descaling Cycle is required.See Descaling Cycle, pages 30-31. | |
| Espresso does not have any crema, or crema is thin (Under Extracted) | Coffee beans are old or dry. Use freshly roasted coffee beans.See Tips for Grinding, page 14. | |
| Coffee grinds too coarse. Change to a finer Grind Setting. | ||
| Not enough coffee grinds used. | Dose more coffee grinds. | |
| Grinds not tamped (compacted) enough. | Tamp more firmly. See Espresso Extraction Guide section, page 15. | |
| Espresso shot volume too much or too little | Custom shot volumes being used. | Restore to default shot volumes or change your custom shot volume(s). See Customisable - Shot Volumes, page 21 |
| Espresso tastes bitter | Type of coffee beans being used. | Try different brands of coffee beans. |
| Custom extraction temperature being used. | Use the default 92°C extraction temperature. See Customisable - Extraction Temperature, page 22 | |
| Steam function has been used just before extracting espresso. | Allow time for water to purge the Thermoblock and cool down before extracting espresso. The STEAM LIGHT should have finished flashing. | |
Troubleshooting Guide - Espresso Machine
| PROBLEM Possible Cause What To Do | ||
| Spent (used) coffee cake is wet | A little water will remain on top of the used coffee cake. | Rest Group Handle on the Drip Tray for 5 sec to allow the water to dissipate before disposing cake. |
| Too many coffee grinds used. | Dose less coffee grinds. | |
| Dual Wall Filter Baskets being used. | Dual Wall Filter Baskets will keep the coffee cake wetter than Single Wall Filter Baskets. | |
| Espresso pours into cup unevenly | Uneven tamping. | Ensure coffee grinds are tamped evenly. |
| Obstruction in the Group Head or Handle. | Check there is nothing obstructing the Group Head or Handle & clean. | |
| Pump makes an unusual noise | No water in the reservoir. Fill | reservoir with water.Let the machine return to the READY state if it is cooling down after steam. Prime water through the Group Head, press the ONE CUP BUTTON. Allow water to run through. |
| Water Reservoir is not correctly positioned. | Insert the Water Reservoir into the back of the unit. | |
| Red Plug from the packaging may still be inserted. | Remove the red packaging plug found at the base of the Water Reservoir. | |
| New Pre-infusion Profiles has been selected. | Different Pre-infusion Profiles make different noise at the start of an espresso extraction. See Customisable - Pre-infusion Profiles, page 23. | |
| Water around Drip Tray area or on benchtop | Water overflowing from Drip Tray. | Empty if the red Water Level Indicator appears through the Drip Tray Stainless Steel Grill. |
| Drip Dray not present when Thermoblock is auto purging. | Keep Drip Tray in place, when cooling to espresso temperature. The STEAM LIGHT flashes and water purges into Drip Tray. See Coffee Making Guide, page 13. | |
Troubleshooting Guide - Espresso Machine
| PROBLEM Possible Cause What To Do | ||
| Milky coffee is too cold | Milk may not be heated enough. | Ensure that milk is heated properly during texturing, but be sure not to heat too much and boil the milk. See Tip for Milk Texturing, pages 16-17. |
| No steam from the Steam Wand | Steam Wand Tip is blocked. See Care & Cleaning, page 26. | |
| No water in the Water Reservoir. | Fill reservoir with water. Run hot water through the Steam Wand to ensure water flows. | |
| Espresso Machine has scale build up. | A Descaling Cycle is required. See Descaling Cycle, pages 30-31. | |
| Steam Wand making a screeching noise | Steam Wand Tip too deep. | Lower Milk Jug. Ensure the Steam Wand Tip is positioned correctly when texturing. See Tip for Milk Texturing, pages 16-17. |
| Not enough foam when texturing | Milk is not fresh. Ensure the milk being used is fresh. | |
| Milk temperature is too warm. | Ensure you start texturing with milk that is around 4°C. | |
| Type of Milk Jug being used. For best texturing results use a chilled Stainless Steel Milk Jug. | ||
| Milk has been boiled. Start again with fresh, chilled milk. Heat till the Milk Jug can only be held for approximately 3 second, 60-65°C. | ||
| The milk is making bubbles rather than microfoam. | Ensure the Steam Wand Tip is positioned correctly when texturing. Tap the Jug on the benchtop when finished to release trapped air bubbles. See Tip for Milk Texturing, pages 16-17. | |
| Milk is not taking in enough air. | Keep the Steam Wand Tip just under the surface of the milk. This will help introduce air into the milk to create microfoam. | |
Troubleshooting Guide - Grinder
| PROBLEM Possible Cause What To Do | ||
| Optimum Grind Setting is producing an under extracted espresso | New Burrs are bedding in. This is normal for the first few uses. | Turn the Bean Hopper clockwise in small increments to a finer Grind Setting to keep an optimum espresso extraction. Use the information on pages 14-15 to help. |
| Beans are losing freshness. | ||
| Not enough coffee grinds used. | Dose more coffee grinds. | |
| Grinds not tamped (compacted) enough. | Tamp more firmly. See Espresso Extraction Guide section, page 15. | |
| GRINDER LIGHT does not illuminate after pressing ON/OFF BUTTON | The machine is not plugged into the power outlet. | Insert in the Power Plug into power outlet & switch on. |
| The Bean Hopper is not seated correctly & not activating the red Interlock Pin. | Turn the Bean Hopper in a clockwise direction to lock into place. See Care & Cleaning, page 29. | |
| GRINDER LIGHT flashes when trying to grind beans. | Hopper Gates are closed or not fully open. | Turn the Bean Hopper in a clockwise direction to a Grind Setting between 30-0 to fully open the Hopper Gates. See Removable Bean Hopper section, page 8. |
| GRINDER LIGHT illuminated red | Grinder Motor in protection mode to prevent overheating. Grinder has been used for long periods in a short space of time. | Leave the Grinder for 5 minutes. The GRINDER LIGHT will illuminate white to indicate normal use can be resumed. |
| No coffee grinds coming from the Grinder Outlet | No coffee beans in the Bean Hopper. | Fill the Bean Hopper with freshly roasted coffee beans. |
| Hopper Gates are closed or not fully open. | Turn the Bean Hopper in a clockwise direction. At Grind Setting 30, Hopper Gates are fully open. See Removable Bean Hopper section, page 8. | |
| The Grind Chamber or Outlet is blocked. | Grinder needs cleaning. See Care & Cleaning, pages 28-29. | |
| Coffee grinds are coarse when on a fine Grind Setting | Grind Setting not correct. Adjust | the Grind Settings by turning the Bean Hopper. See Tips for Grinding, & Extraction, pages 14-15. |
| Top Burr not seated correctly. Coffee beans or grinds are caught around & under the Top Burr. | Top Burr needs cleaning. See Care & Cleaning, pages 28-29. | |
| Bottom Burrs needs adjusting. | See Adjusting the Bottom Burr section on, page 29. | |
Troubleshooting Guide - Grinder
| PROBLEM Possible Cause What To Do | ||
| Espresso is under extracted even with a fine coffee grind | Not enough coffee grinds used. | Dose more coffee grinds. |
| Beans are too old. | Use freshly roasted beans. Old coffee beans, no matter the Grind Setting, will have a fast extraction and will produce an under extracted tasting espresso. | |
| Bottom Burrs needs adjusting. | See Adjusting the Bottom Burr section, page 29. | |
| Grind Setting cannot be adjusted | The Bean Hopper is not seated correctly. | Remove the Bean Hopper & replace. See Replace Bean Hopper section, page 27. |
| Coffee beans or grinds are caught around the Top Burr or Grinder Collar. | Remove the Bean Hopper & Top Burr. Use the Cleaning Brush or Vacuum Cleaner as necessary to clear loose coffee beans or grinds. See Replace Bean Hopper section, page 27. | |
| Bean Hopper cannot be locked into position | Grinder Collar not aligned to the Top Cover. | Ensure the dot on the Top Cover aligns with the dot on the Grinder Collar. See Replace Top Burr section, page 29 |
| Coffee beans or grinds are caught in the Top Burr or Grinder Collar. | Remove the Bean Hopper & Top Burr. Use the Cleaning Brush or Vacuum Cleaner as necessary to clear loose coffee beans or grinds. See Replace Bean Hopper section, page 27. | |
| The Top Burr is not seated correctly. | Make sure the Top Burr is correctly aligned and that the two handles are placed one on each side. See Replace Top Burr section, page 29. | |
| Top Burr does not sit in the Grinder Collar correctly | Grinder Collar not aligned to the Top Cover. | Ensure the dot on the Top Cover aligns with the dot on the Grinder Collar. See Replace Top Burr section, page 29. |
| Coffee beans or grinds are caught around & under the Top Burr | Remove the Top Burr and replace the Bean Hopper. Hold the Bean Hopper down with your hand, do not turn. Insert the Group Handle into the Grinding Cradle and push down to activate the Grinder. The coffee grinds will fall out the Grind Outlet. | |
| The Top Burr is not seated correctly. | Make sure the Top Burr is correctly aligned and that the two handles are placed one on each side. See Replace Top Burr section, page 29 | |

This Sunbeam product is covered by a 12 month replacement or repair warranty, which is in addition to your rights under the Australian Consumer Law (if your product was purchased in Australia) or New Zealand Consumer Guarantees Act (if your product was purchased in New Zealand).
Upon receipt of your claim, Sunbeam will seek to resolve your difficulties or, if the product is defective, advise you on how to obtain a replacement or refund.
To assist us in managing warranty claims, we recommend you register your product as soon as practicable after purchase by creating a MySunbeam account on our website and uploading a copy of your original receipt.
In order to make a claim under our warranty, you must have the original proof of purchase documentation for the product and present it when requested (if not already uploaded to our website).
Should your product develop any defect within 12 months of purchase because of faulty materials or workmanship, we will replace or repair it, at our discretion, free of charge. A product presented for repair may be replaced by a refurbished product of the same type rather than being repaired. Refurbished parts may be used to repair the product.
Our replacement or repair warranty only applies where a defect arises as a result of faulty material or workmanship during the warranty period. Your warranty does not cover misuse or negligent handling (including damage caused by failing to use the product in accordance with this instruction booklet), accidental damage, or normal wear and tear.
Your warranty does not:
• cover freight or any other costs incurred in making a claim, consumable items, accessories that by their nature and limited lifespan require periodic renewal (such as filters and seals) or any consequential loss or damage; or
• cover damage caused by:
- power surges, power dips, voltage supply problems, or use of the product on incorrect voltage;
- servicing or modification of the product other than by Sunbeam or an authorised Sunbeam service centre;
- use of the product with other accessories, attachments, product supplies, parts or devices that do not conform to Sunbeam specifications; or
- exposure of the product to abnormally corrosive conditions; or
- extend beyond 3 months if the product is used in commercial, industrial, educational or rental applications.
The benefits given to you by our warranty are in addition to other rights and remedies under law in relation to the product.
In Australia our goods come with guarantees that cannot be excluded under the Australian Consumer Law. You are entitled to a replacement or refund for a major failure and for compensation for any other foreseeable loss or damage. You are also entitled to have the goods repaired or replaced if the goods fail to be of acceptable quality and the failure does not amount to a major failure.
Our goods also come with guarantees that cannot be excluded under the New Zealand Consumer Guarantees Act.
If your warranty claim is not accepted, we will inform you and if requested to do so by you, repair the product provided you pay the usual charges for such repair. You will also be responsible for all freight and other costs.
Should your product require repair or service after the warranty period, contact your nearest Sunbeam service centre. For a complete list of Sunbeam's service centres, visit our website or call our customer care line for advice on: 1300 881 861 in Australia, or 0800 786 232 in New Zealand.
Should you experience any difficulties with your product during the warranty period, please contact Sunbeam Customer Care:
Australia
www.sunbeam.com.au
1300 881 861
Units 5 & 6,
13 Lord Street,
Botany NSW 2019
Australia
New Zealand
www.sunbeam.co.nz
0800 786 232
Level 6, Building 5,
Central Park,
660–670 Great South Road
Greenlane, Auckland
New Zealand
Accessories Available for Purchase
CONTACT SUNBEAM CUSTOMER CARE:
AUS: 1300 881 861 NZ: 0800 786 232
58mm Filter Baskets
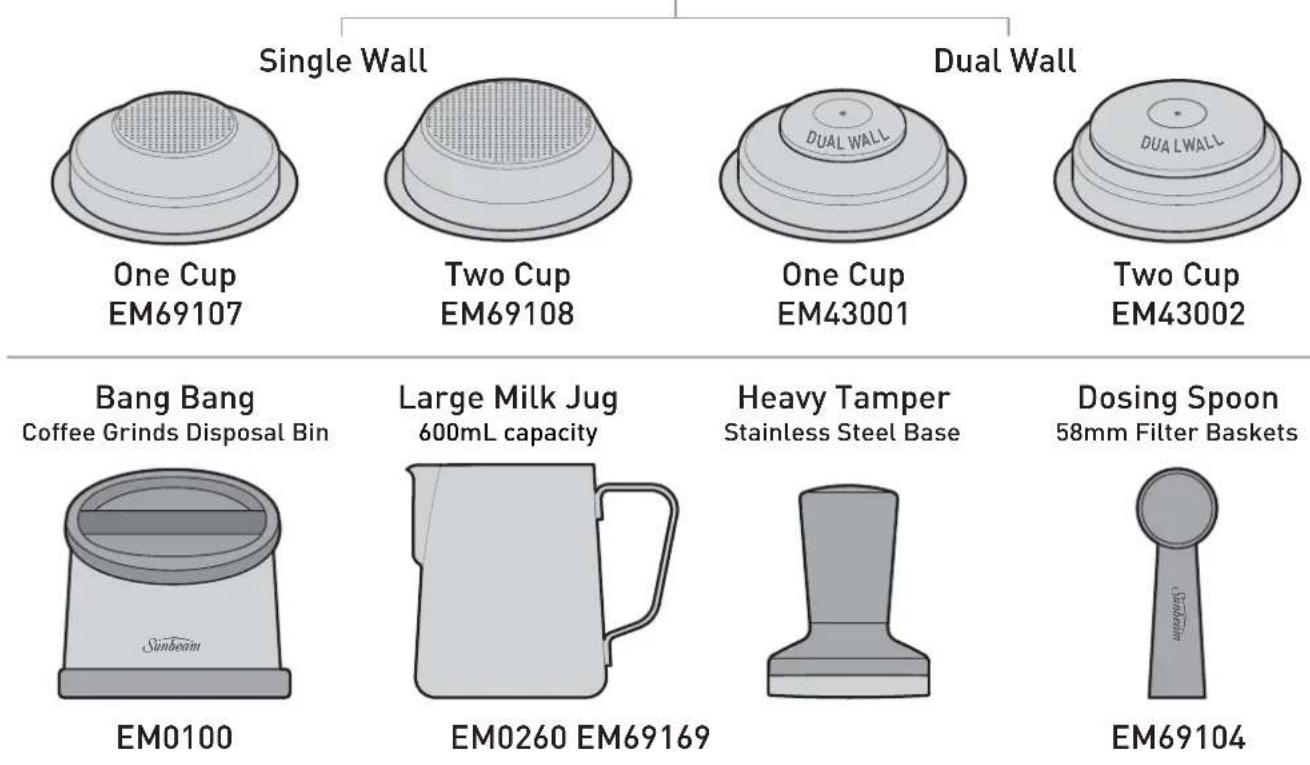
Cleaning & Descaling
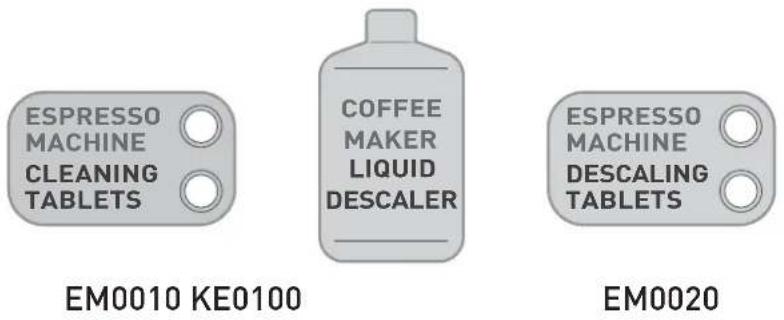
Visit Sunbeam website to see full Espresso Machine range & accessories available.
www.sunbeam.com.au
www.sunbeam.co.nz
Sunbeam
Need help with your appliance?
Contact our Customer Care Team or visit our website for information & tips on getting the most from your appliance.
AUSTRALIA
Visit: www.sunbeam.com.au
Phone: 1300 881 861
Mail: Units 5 & 6, 13 Lord Street, Botany NSW 2019
NEW ZEALAND
Visit: www.sunbeam.co.nz
Phone: 0800 786 232
Mail: Level 6, Building 5, Central Park, 660–670 Great South Road, Greenlane, Auckland

Sunbeam Corporation PTY LTD | ACN 000 006 771
Sunbeam is a registered trade mark.
Sunbeam Corporation is a division of Newell Brands.
Due to continued product improvements, product illustrations & photographs in this User Guide may differ slightly from the actual product.
- BARISTA MAX ESPRESSO MACHINE WITH INTEGRATED GRINDER
- Contents
- Sunbeam's Safety Precautions
- FOR YOUR SUNBEAM ESPRESSO MACHINE WITH INTEGRATED GRINDER:
- Important Instructions - retain for future use
- Features of your Sunbeam Barista Max
- Removable Bean Hopper
- Illuminated Grind Area
- Tap & Go™ Grinding Cradle
- Accessories Storage Home
- Removable Drip Tray, Grill & Grind Bin
- Cord Storage
- Non-slip Feet
- Warming Plate with Tamper Home
- Removable 2.8L Water Reservoir
- Group Head - 58mm Commercial Size
- Group Handle - 58mm Commercial Size
- Steam & Hot Water Wand
- Extra Tall Cup Height
- Removable Top Burr
- GRINDER Light
- ON/OFF Button & Light
- Espresso Extraction Buttons
- MANUAL SHOT Button
- ONECUPButton
- TWO CUP Button
- DIAL Features & Lights
- DIAL Light
- Steam Light
- d _2 STEAM
- HOT WATER
- CLEAN Light
- More Details about your Sunbeam Barista Max
- Temp° IQ Shot Control™
- • Thermoblock Technology
- - Advanced PID Controller
- - Gentle Pre-infusion
- Café 58mm
- Group Head & Handle
- Tap&Go™
- Integrated Grinder
- - Tap&Go™ Technology
- - Conical Burr Grinder
- - Bean Hopper
- Auto Shot & Customisable Volumetric Control
- Customisable
- Extraction Temperature
- Before First Use of the Barista Max
- Step 1. Remove Packaging
- Step 2. Position Machine
- Step 3. Wash & Dry Parts
- Step 4. Place Accessories
- Step 5. Insert Parts into the Grinder
- - Removable Top Burr
- - Removable Bean Hopper
- Step 6. Preparing to Prime Machine
- - Fill Water Reservoir
- - Power
- - Insert Group Handle
- Step 7. Prime Espresso Machine
- Barista Max Coffee Making Guide
- Prep Milk Jug 14. Before Texturing Milk
- Barista Tip:
- Position Steam Wand 16. Start Texturing Milk
- Milk Texturing
- Purge & Clean Steam Wand
- Milk Finishing Touches 20. Thermoblock Auto Purge
- Wash Parts
- Drip Tray Clean Up
- Tips for Grinding & Tamping
- Coffee Beans
- Grind Setting
- Filter Baskets
- Grind Dosage & Tamp Force
- Tips for Perfect Espresso Extraction
- Extraction Time
- Type of Extraction
- - Optimum Extraction
- - Under Extraction
- • Over Extraction
- Look for Colour Change
- Espresso Extraction Guide
- Tips for Milk Texturing
- Key Elements of Textured Milk
- Fill Milk Jug
- Steam Warm Up
- Position
- Sound
- Barista Tip: Milk Texturing Sounds
- Keeping Steam Tip Position
- Amount of Foam
- Immerse Tip
- Correct Temperature
- Barista Tip: Milk Temperature
- Purging the Steam Wand
- Wipe Steam Wand
- Tap & Swirl the Jug
- The Finishing Touches
- Coffee Styles to Try
- Espresso (Short Black)
- Ristretto
- Long Black (Americano)
- Con Panna
- Macchiato
- Flat White
- Latte
- Cappuccino
- Mocha
- Babyccino
- Customisable - Shot Volumes
- Preparing to Customise Shot Volume(s)
- - Check Water Reservoir
- - Check Power
- Customise - One Cup Shot Volume
- Customise - Two Cup Shot Volume
- Restore - All Default Shot Volumes
- Customise - Manual Shot Volume
- Customisable - Extraction Temperature
- - Access Extraction Temperature Custom Mode
- - Adjusting Extraction Temperature
- - Confirm Extraction Temperature
- Customisable - Extraction Pre-infusion Profile
- Care & Cleaning - Espresso Machine
- Cleaning Accessories & Removable Parts
- Cleaning Warming Plate & Exterior
- - When Required
- Cleaning Drip Tray & Grind Bin
- - Weekly
- Cleaning Group Handle & Filter Basket
- - Every Time
- - Regular Intervals
- Cleaning Shower & Group Head
- Cleaning Tablet
- Cleaning Cycle
- • Preparing for Cleaning Cycle
- - Start the Cleaning Cycle
- - Cleaning Cycle Complete
- - Cleaning Cycle Clean Up
- Group Head Silicone Seal
- Cleaning Steam Wand
- • 2-3 Months
- - Unblocking Steam Wand
- - Steam Wand Remains Blocked:
- Cleaning Filter Baskets
- - Unblocking Dual Wall Filter Baskets
- Care & Cleaning - Grinder
- Cleaning Grinding Cradle & Grind Outlet
- Cleaning the Bean Hopper
- • Preparing to Clean Bean Hopper
- - Remove and Clean Bean Hopper
- - Replace Bean Hopper
- Cleaning & Unblocking Grinder Burrs, Collar, Grind Chamber and Outlet
- • 1-2 Months
- - Grind Off Excess Coffee Beans
- • Preparing to Clean
- - Cleaning Top Burr
- - Cleaning & Unblocking Bottom Burr and Grind Chamber
- • Cleaning & Unblocking Grind Outlet
- - Replace Top Burr
- Adjusting Bottom Burr
- Descaling Cycle - Espresso Machine
- Descaling Solution
- Descaling Cycle
- Preparing for Descaling Cycle
- - Place Containers
- - Access the Descaling Cycle
- Step 1. Start Descaling Cycle
- Step 2. Preparing for Purge
- - Rinse Water Reservoir
- - Empty Containers
- Step 3. Start Purge
- Descaling Cycle Complete
- Descaling Cycle Clean Up
- Your warranty does not:
- • cover damage caused by:
- Australia
- New Zealand
- Accessories Available for Purchase
- Sunbeam
- Need help with your appliance?
Brand : SUNBEAM
Model : Barista Max EM5300
Category : Coffee maker