
Cyclo 215 - Bike computer MIO - Free user manual and instructions
Find the device manual for free Cyclo 215 MIO in PDF.


| Product Type | GPS bike computer (Cyclo 215) |
| Dimensions | Approx. 90 x 60 x 20 mm (3.5 x 2.4 x 0.8 in) |
| Weight | Approx. 90 g (3.2 oz) |
| Power Supply | Internal rechargeable lithium-ion battery, 5 V DC / 1.0 A via micro-USB |
| Battery Life | Up to 12 hours typical use (GPS on, backlight moderate) |
| Water Resistance | IPX5 (protected against water jets) |
| Display | 2.7-inch (6.8 cm) color touch screen, 262k colors |
| GPS | Built-in high-sensitivity GPS receiver, updates position every second |
| Wireless Connectivity | ANT+ (compatible with heart rate monitor, speed/cadence sensor) |
| Maps | Preloaded street maps with turn-by-turn navigation, POIs |
| Navigation Features | Address search, POI search, tracks, Surprise Me route generator, back-to-start |
| Training Features | Dashboard screens with customizable data fields (speed, distance, cadence, heart rate, etc.) |
| Storage | Internal memory for maps, tracks, history; connect to PC as mass storage |
| Software | Supports CycloAgent for data sync and updates; MioShare for sharing routes |
| Care and Cleaning | Wipe with soft, lint-free cloth; avoid sharp objects; keep away from extreme temperatures |
| Safety Precautions | Do not disassemble battery; use only specified power adapter; avoid immersion |
| Spare Parts & Repairability | Non-user-replaceable battery; no spare parts available; contact authorized service for repairs |
| Regulatory | CE, WEEE; model number N506 |
Frequently Asked Questions - Cyclo 215 MIO
User questions about Cyclo 215 MIO
0 question about this device. Answer the ones you know or ask your own.
Ask a new question about this device
Download the instructions for your Bike computer in PDF format for free! Find your manual Cyclo 215 - MIO and take your electronic device back in hand. On this page are published all the documents necessary for the use of your device. Cyclo 215 by MIO.
USER MANUAL Cyclo 215 MIO
User Manual
Cyclo™ 215 Series
Welcome
Thank you for purchasing this Mio. Please read this manual carefully before using your Mio for the first time. Keep this manual in a safe place and use as your first point of reference.
Important information for using the manual
It is important to understand the terms and typographical conventions used in this manual.
Bold — Components or items displayed on screen, including buttons, headings, field names and options.
Italics — Indicates the name of a screen.
Disclaimer
Not all models are available in all regions.
Depending on the specific model purchased, the colour and look of your device and accessories may not exactly match the graphics shown in this document.
Mio operates a policy of ongoing development. Mio reserves the right to make changes and improvements to any of the products described in this document without prior notice. Mio does not warrant that this document is error-free. The screenshots and other presentations shown in this manual may differ from the actual screens and presentations generated by the actual product. All such differences are minor and the actual product will deliver the described functionality as presented in this User Manual in all material respects.
Copyright
© MiTAC Digital Technology Corporation. Mio is either a registered trademark or trademark of MiTAC Digital Technology Corporation and is used under licence by Mio Technology Limited. All rights reserved.
All other trademarks and registrations are the property of their respective owners.
ANT+™ trademark of Dynastream Innovations Inc. or its subsidiaries.
Revision: R00 (10/2018)
Contents
Welcome....2
Knowing your device....4
Accessories....4
Getting started 5
Charging the battery 5
Performing the initial start-up....5
Connecting your device to the computer....5
Installing the device....6
Mounting the device on your bike 6
Installing the sensors on your bike 6
Putting on the heart rate monitor....7
Operating basics....8
Using the POWER button....8
Using the touch screen 9
Main menu 9
Keyboard screen....10
Viewing Dashboard screens 11
Starting navigation 12
Using the Navigate wizard 12
Navigating to Home....12
Finding the location by Address....13
Searching for a POI 13
Tracks 13
Searching for a location from the map screen....13
Searching for a location using GPS coordinates....14
Other navigating options....14
Surprise Me™ 15
Viewing the History....15
Viewing the summary of recorded data 15
Managing data on the device 16
CycloAgent™ 16
Customising your device....16
Profiles 16
Routing....17
Dashboard 17
Sensors....17
Where Am I 18
Manage 18
Maps....18
System 18
Product Info 19
For more information 20
Online support 20
Caring for your Mio....20
Resetting the device 20
Troubleshooting....20
What is GPS? 20
IPX5 21
Safety precautions....21
Regulatory information 21
End user license agreement 22
Knowing your device
Note: This device is ANT+ certified. Visit www.thisisant.com/directory for a list of compatible products and apps.
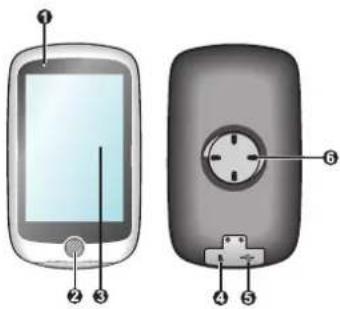
① Status indicator
- Glows in amber: battery charging.
- Glows in green: battery full.
• Flashes in green: when the backlight is turned off.
2 POWER button
Turns your device on and off.
3 Touch screen
• Displays the output of your device.
- Tap the screen with your finger to select menu commands or enter information.
4 Memory card slot
This function is reserved for debugging purposes only.
5 Micro-USB connector
Connects the USB cable.
6 Bike mount socket
For the device mount.
Accessories
Your device comes with the following accessories. To use your device on a bike, ensure you use the specific bike mount kit that came with your device. Mio may provide optional accessories for specific models. Please visit Mio website (www.mio.com) for information.
- USB cable
- Bike mount kit
• Heart rate belt* (ANT+TM sensor)
• Speed and cadence sensor kit* (ANT+TM sensor)
*May be sold separately and used for Cyclo 215 HC only
Note: Depending on the specific model purchased, the colour and look of your device and accessories may not exactly match the graphics shown in this document.
Getting started
Charging the battery
Your device has an internal battery that may not be fully charged when you purchase it. You should charge the battery for at least 8 hours before you start using it for the very first time.
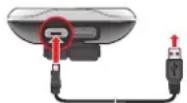
To charge the battery, use the supplied USB cable to connect the device to a computer, USB charger or power adapter.
CAUTION:
For optimal performance of the lithium battery, note the following:
- Do not charge the battery where the temperature is high (e.g. in direct sunlight).
- Failure to follow the battery usage instructions could cause damage to your device, battery and even bodily injury or property damage and will void the warranty.
- When storing the product for a long period of time, charge the battery to 50% – 80% capacity to prevent excess discharge.
Performing the initial start-up
- Mount the device and accessories on to your bike. For more information, see the "Installing the device" section.
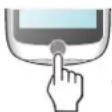
- Press and hold the POWER button for 3 seconds to turn your device on.
3 SEC
- Follow the prompts to personalise your device, including:
- Select your preferred language.
- Set the date and time.
- Set the units format.
-
Create your user profile.
Note: You can change these settings while using the device by tapping Main menu > Settings. -
Activate the map.
Enter the Startup Key (which is printed on the bottom of the box) and then tap OK to unlock your device. You will only have to do this the first time you use the device.
- Once your device is turned on, it will search for satellite signals automatically. This may take several seconds depending on the location.
When GPS is fixed, the GPS signal icon ( ) on the screen indicates the GPS status.
Note: Depending on your device model, it will also automatically scan and pair the accessories (for heart rate monitor and cadence/speed sensor only) with the device. You can also scan the accessories manually while using the device by tapping Main menu > Settings > Sensors.
Connecting your device to the computer
- Turn on the computer.
- Turn on your device.
- Connect the Micro-USB end of the USB cable to the back of your device and the other end to a USB port on your computer.
- Select the desired connection type from the pop-up message window:
- Connect to PC: Your device will be recognised as two external mass-storage drives: Mio_system and Mio_data. You can use Windows File Explorer to copy/move the files from the computer to your device. A USB Connection screen appears to prevent you from using your device.
DO NOT delete any files that are pre-installed on the device. Deleting the files can cause the device to crash. Mio is not responsible for product quality caused by file deletion.
- Charge only: You will be able to continue using your device with the battery in charging mode via the computer.
Installing the device
Mounting the device on your bike
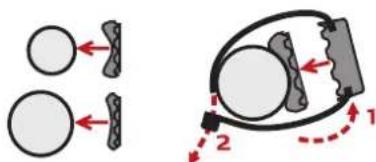
The bike mount kit includes two types of rubber pads, allowing you to attach the bike mount to your bike securely.
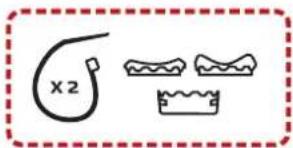
- Select the rubber pad that best fits the handle bars on your bike and then attach it using the two plastic straps.
- Align the latch on the back of the device with the slot on the bike mount, and then rotate the device clockwise to lock the device to the bike mount. You can choose to mount the device on the handlebar (a) or on the stem (b). See the following figure for the examples of mounting the device.
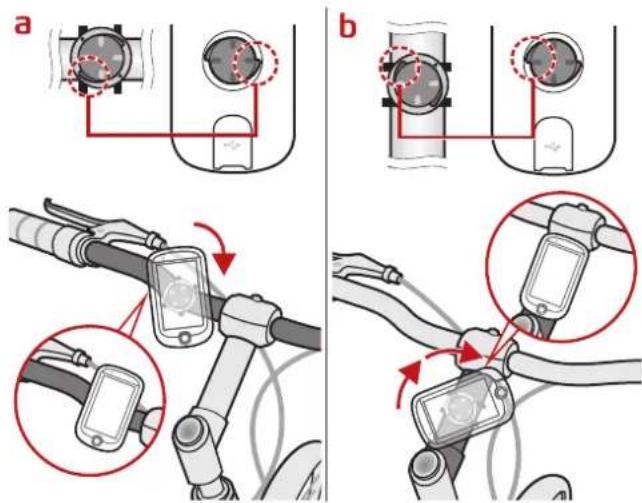
- To remove the device from the bike mount, rotate it counter-clockwise.
Installing the sensors on your bike
- Follow the instruction below to install the cadence/speed sensor kit on your bike.
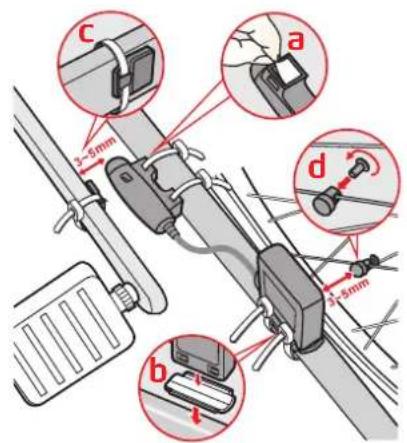
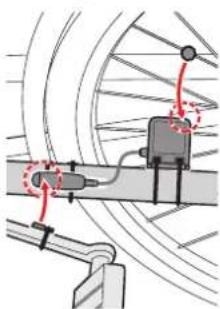
- Ensure that the magnets are aligned with the sensing area on the sensors.
natural_image
Mechanical linkage diagram showing a motor and cable assembly (no text or labels)- When done, you can manually pair the sensor with your device by tapping Main menu > Settings > Sensors > Cadence/Speed.
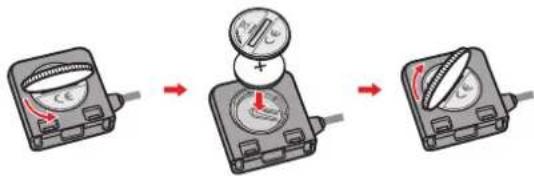
The cadence sensor contains a replaceable CR2032 battery. Follow the instructions below to replace the battery:
- Locate the battery cover on the back of the sensor, and then twist the cover anticlockwise (e.g. by using a coin) to remove the cover and battery.
- Insert the new battery into the battery chamber and replace the cover.
- Twist the cover clockwise (e.g. by using a coin) to close the cover.
Putting on the heart rate monitor
Note: Please note the heart rate monitor is not a medical device and its readings are not a substitute for obtaining measurements that require medical precision. It is strongly recommended to consult a doctor if you have a pacemaker or other implemented devices before using the heart rate monitor.
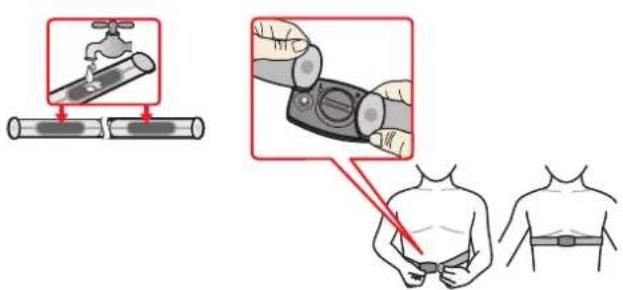
- Before using the heart rate monitor, wet the contacts on the back of the chest strap.
Note: If possible, you can also use an electrolyte gel (usually available in local sports stores) to ensure good contact. - Adjust the elastic strap so it's snug while you are putting it on. Ensure that you can take a good deep breath after putting on the strap.
- Follow the instructions below to wrap the strap around your back, and then secure it on the other side with the buckle.
Putting on the heart rate monitor is like wearing a belt around your lower chest.
- When done, you can manually pair the monitor with your device by tapping Main menu > Settings > Sensors > Heart rate.
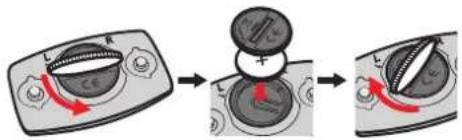
The heart rate monitor contains a replaceable CR2032 battery. Follow the instructions below to replace the battery:
- Locate the battery cover on the back of the monitor, and then twist the cover anticlockwise (e.g. by using a coin) to remove the cover and battery.
- Insert the new battery into the battery chamber and replace the cover.
- Twist the cover clockwise (e.g. by using a coin) to close the cover.
Operating basics
Using the POWER button
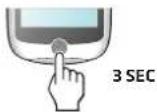
- Turning on the device
Press and hold the POWER button for 3 seconds to turn on your device.
• Turning off the backlight
You can set the device to turn off the backlight automatically to reduce the battery consumption: Main menu > Settings > System > Screen > Backlight Timer.
Resume using the device to turn on the backlight.
- Turning off the device
Press and hold the POWER button for 3 seconds to pop up the Power Off/Cancel screen. Choose Power Off to turn off the device or Cancel to continue operating the device.
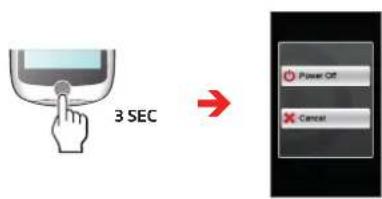
Note: Press and hold the POWER button for 5 seconds to power off the device if it is not responding.
Your device will automatically turn off after 10 minutes (by default) of inactivity. The Power Off/Cancel screen will pop up and the device will be turned off if you do not make a selection.
Note: You can change the auto power off setting by tapping Main menu > Settings > System > Screen > Auto Power Off Timer.
• Navigating through the screens
While the device is turned on and you are navigating through the menu screens, press the POWER button briefly to return to the previous screen.
Using the touch screen
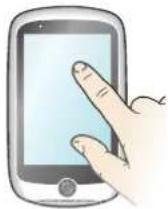
To operate your device, touch the screen with your finger. You can perform the following actions:
- Tap
Quick touch the screen once to open menus or select onscreen button/option.
- Drag
While navigating on the map, tap and hold on the screen without releasing your finger to move the map to the desired position.
Unlocking the screen
Your device will automatically lock the screen after 30 seconds (by default) of inactivity. When the screen is locked, press the POWER button briefly to unlock the screen.
Note: You can change the screen lock setting by tapping Main menu > Settings > System > Screen > Screen Lock Timer.
Main menu
The Main menu is your starting place for various tasks, providing quick access to applications and settings. Tap a button to start a task or open another menu.
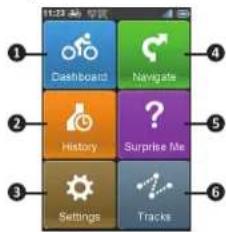
No. Description
The Dashboard displays the view of functions, including the navigation and training screens.
2 Your trip/training can be saved in the history records. When your ride is finished, you can check the history data such as date/time, distance, speed, altitude, etc.
There are various customisation options available to enhance your riding experience. You can customise the system settings, user profiles and more.
4 Start to plan your route by selecting the locations, such as home, address, tracks, POI, etc.
5 Based on distance or time, the device will plan 3 routes for you to choose from.
6 Tracks are the recorded routes that give the best experience for cycling provided by other users and official institutes.
System icons
Various System icons on the title bar at the top of the screen provide the status information of your device. Depending on your settings, the icons may be different to provide various information of your device. Please note that these icons will not be always displayed during your trip/training.

No. Icon Description
| 1 | Time display Displays the current time. The device will automatically set the correct time based on the current GPS fixes. |
| 2 | User profile / / / / / / / / / / / / / / / / / / / / / / / / / / / / / / / / / / / / / / / / / / / / / / / / / / / / / / / / / / / / / / / / / / / / / / / / / / / / / / / / / / / / / / / / / / / / / / / / / / / / |
| 3 | Heart rate Depending on your model, the icon will display when the sensor is paired with the device. |
| 4 | Cadence/Speed The icon is not displayed when not activated in the Sensors setting. |
| 5 | Speed The icon is greyed out when activated, but not paired with the device. The icon is white when the connection is made, or blinking when the pairing is in progress. |
| 6 | Recording status : The device is recording your trip/training. : Recording has been paused. |
| 7 | GPS signal The GPS signal icon indicates the GPS status. A bar shows the strength of the GPS signal being received; the more bars the stronger the signal. |
| 8 | Battery status The Battery icon indicates the remaining battery power. |
Keyboard screen
The Keyboard screen will display when you are required to enter text, such as when searching for a street name. Search results will be listed in matching order, with the closest matches appearing on the screen. The Keyboard screen can display with various layouts depending on the information you need to enter.
Example: entering the street name while searching for an address
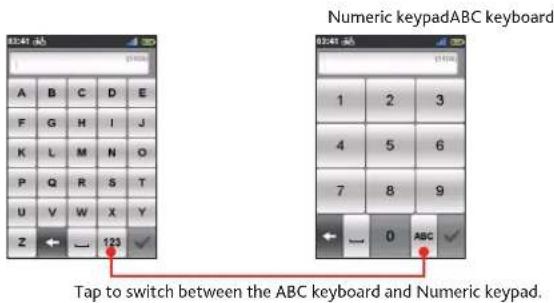
How do I enter characters/numbers?
- Tap the keys to enter letters or numbers.
The keyboard features the "Predictive text" technology that allows addresses to be searched easily and quickly. As you enter a letter of an address, your device will compare all possible combinations against the maps.
- Tap to delete the character.
- When done, tap.
Changing the keyboard layout
The device supports Russian, Bulgarian, and Greek keyboard for local users. You can enable (or disable) the desired keyboard from Main menu > Settings > System > Keyboard.
Viewing Dashboard screens
Note: The screenshots and other presentations shown in the following sections may differ from the actual screens and presentations generated by the actual product.
The Dashboard provides the extended screens that can be used to assist you in your travels and trainings. The layout of the dashboard screens can be customised to display the information (e.g. speed, distance, time, calories, etc.) you want to know.
Depending on your device model, certain information may not be available on the Dashboard screens. To learn how to customise the Dashboard screens, see "Dashboard" in the "Customising your device" section.
• To access the Dashboard, tap from the Main menu screen.
- The Dashboard function is made of screens placed next to each other.
Tap /◀ to change between the Dashboard screens.
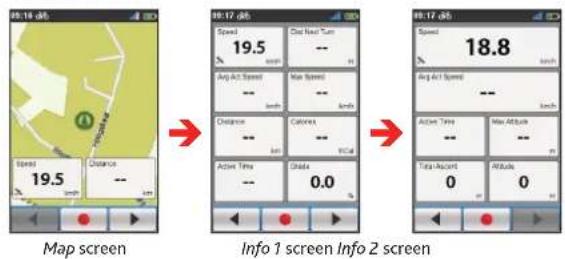
- When the navigation is in progress, you can record the data by tapping

Note: When you are recording the route, the recorded track will be displayed as red on the map.
During recording, you can stop/pause it by tapping and then selecting the Stop/Pause option when prompted; otherwise, select Cancel to continue recording.
- From the Navigation screen, you will be directed to your destination by visual instructions.
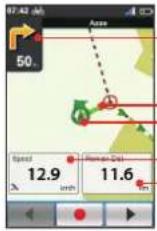
Direction and distance of next turn
- Current route - Current position
-Current speed -Distance to go
Navigation screen
Tap on the Navigation screen briefly to display the onscreen buttons.
- Tap /+to zoom in/out the map.
- You can navigate the map anywhere by dragging and then moving the map. While navigating the map, tap 📋 display your current position on the centre of the map.
- Tap anywhere on the Navigation screen to display more buttons.
- Tap to stop navigation.
- Tap to avoid a certain distance of route ahead.
Starting navigation
Using the Navigate wizard
Your device is equipped with maps that provide street-level detail for navigation, including POIs (Point of Interest) such as bike stores, restaurants, points of emergency, and more. The Navigate wizard allows you to search the location easily.
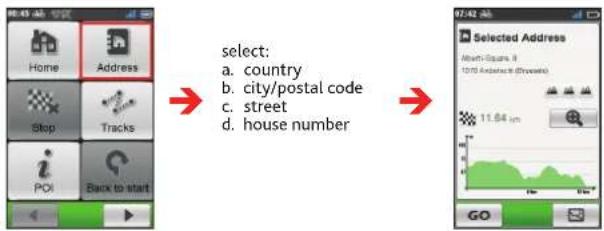
By using the Navigate wizard, there are several ways to select your destination. For example, you can tap the Address button to find the location by searching for an address.
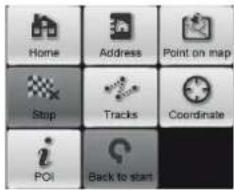
-
To access the Navigate wizard, tap from the Main menu screen.
-
Select the desired navigation function.
-
When searching is complete, the Searching Result screen displays the information of the route (e.g. the total distance, elevation plot, and more).
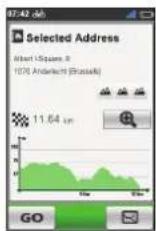
Searching Result screen
-
From the Searching Result screen, you can do one of the following:
-
Tap GO to start navigating.
-
Tap to display the route to the destination.
-
Tap / zoom/ou the elevation plot. Tap the Left/Right button to scroll through the plot when it is zoomed in.
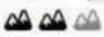
• Judge the difficulty level of the route by the icon:



Navigating to Home
Setting up your Home location
If you have not set an address as Home, the first time you try to navigate to Home you will be prompted to search for an address using the Home setup wizard.
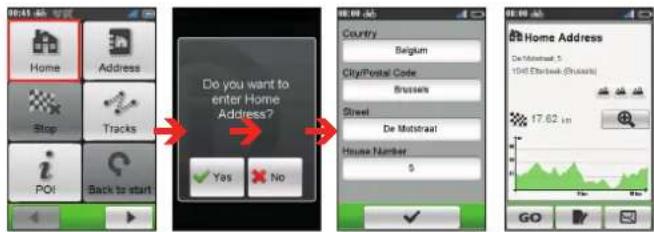
Once your home location has been set on the device, simply tap GO on the screen and you will be directed to Home quickly.
Editing the Home location
- On the Home Address screen, tap
- You can change the home location by searching for an address.
Finding the location by Address
Searching for a POI
POI (Point of Interest) is a named site, feature, landmark or public venue which can be displayed as an icon on the map. POIs are grouped by category, such as bike stores, restaurants, shopping centres, and more.
The POI(s) that you have searched previously will be displayed when you tap i from the Navigate screen. Simply tap the searched POI or tap New to find the other POIs.
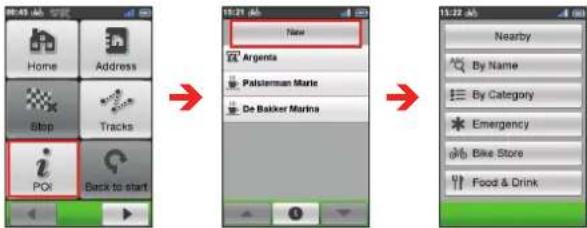
- Tap the Nearby button and then select Nearby or City:
• Nearby: Search for the POIs around your current position.
• City: Search for the POIs in the selected city.
-
Find a POI by:
-
keyword
- category
• emergency/bike store/food and drink
Tracks
Tracks are the recorded routes that give the best experience for cycling provided by other users and official institutes. If there is no track downloaded, you can download tracks from MioShare™ at: http://mioshare.com
- Tap Tracks on the Navigate screen and then you can navigate and choose from individual tracks downloaded to your device.
- Tap / ◀ to display more information of the track.
- Select the Nearby mode (☐) to navigate to the nearest point of your track, or Back-to-Start mode (☐) to navigate to the starting point of your track. Tap GO to start navigating.
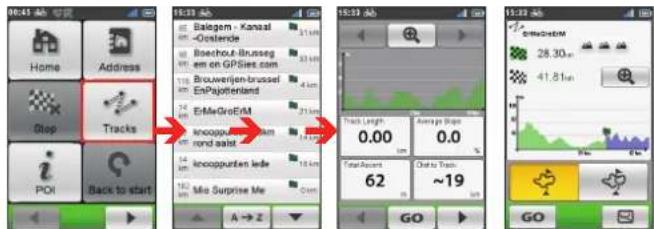
Note: Tap the Sort by button at the bottom of the screen to change the sorting order of the entries: A→B y n→A : distance from the current location; : by distance.
Searching for a location from the map screen
You can set the destination simply by pointing to it on the map screen.
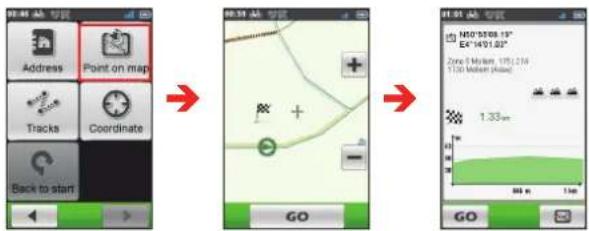
Searching for a location using GPS coordinates
You can manually input the coordinates of your target destination. Tap the Latitude and Longitude fields to enter the coordinates of the location.
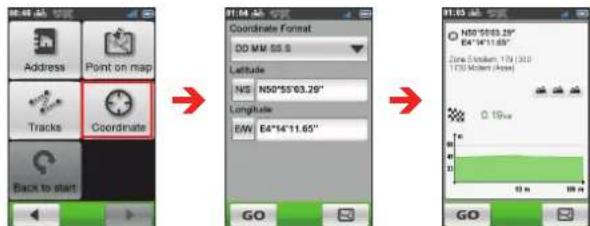
Note: Tap the Coordinate format option to change the input method for the Latitude/Longitude coordinate.
Note: Tap NIS change between North and South; tap to EAW change between East and West.
Other navigating options
Going back to start
Note: This feature is only available when the recording is in progress.
The Back to start function enables the device to navigate you back to the starting point after you have reached the destination or completed your ride.
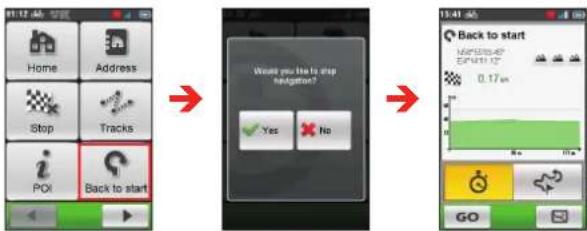
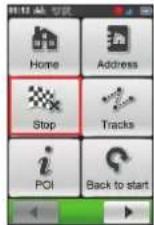
Stopping navigation
To stop navigation for your ride, tap on the Navigate screen.
Surprise Me™
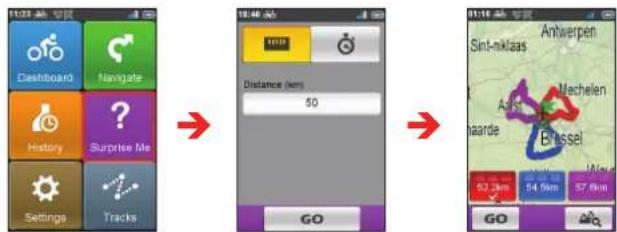
The device features the Surprise Me™ function that will offer you up to three exciting routes around your location. If you've already taken a route from the same location, the device will try to propose you different routes, based on the possible and available roads around your current location. This way you will always be offered different routes to choose.
Tap from the Main menu screen.
You can:
- Generate the route by Distance mode ( ) or Time mode ( ).
- Assign the desired amount of distance/time to ride in the Distance/Time field.
While generating the routes using Time mode, you can set the estimated average speed of your trip in the Average Speed field. The device will calculate the estimated distance of it.
- On the Searching Result screen, select one route (by colour buttons) and then tap GO to start navigating.
To view the general information of the generated routes, tap
Viewing the History
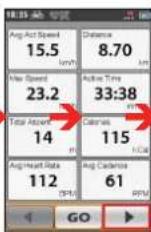
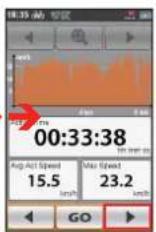
Your device will automatically save the history as the timer starts. Information in History includes date, time, distance, average speed, altitude, and more.
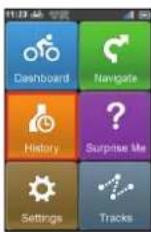
- To view the history data, tap 📋 from the Main menu screen and then select an entry from the list.
- Tap / to view details of the trip (or training).
- Tap GO to start navigating.
Viewing the summary of recorded data
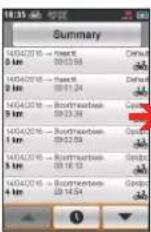
On the History screen, tap the Summary button to view statistics about the recorded data over a defined period of time based on the user profile.
- Change the filter option by tapping All Recordings or Odometer. Note: When the Odometer is selected, it displays all the training data existing on the device even if the recording is not used.
- Tap the following button to decide what data to summarise: Totals, Year, Month, Week or Day.
Managing data on the device
Customising your device
CycloAgent™
CycloAgent™ is a tool for synchronising data between your Cyclo™ device and the MioShare™ website, and for managing and updating your Cyclo device via your computer.
Note: Make sure that you have an active Internet connection for this feature. Please make sure of the stable Internet connection and bandwidth for the possible large file of the map update.
Visit the MioShare website (http://www.mioshare.com/help) to download CycloAgent.
For the detailed information on using CycloAgent, refer to the CycloAgent documentation.
Sharing your experience on the Internet
By using MioShare, you can easily share your experiences with other cyclists around the world through the Internet when your device is connected to the computer. For more information, visit: http://mioshare.com/
Note: Depending on your Mio model, certain setting options may not be available.
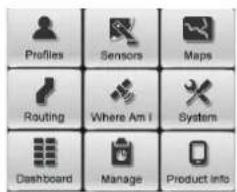
There are various customisation options available to enhance your navigation and cycling experience. With the Settings menu, you will be able to customise your device such as the system settings, sensor settings, user profiles, map settings, and more.
• To access the Settings menu, tap the Main menu screen.

- Tap / to scroll through the Settings menu screens.
- While changing the settings, the check mark ( ) next to the option button indicates the setting status.
Example: : on/enabled
/ : off/disabled
- When the settings have been changed, tap at the bottom of the screen to complete and return to the previous screen.
Profiles
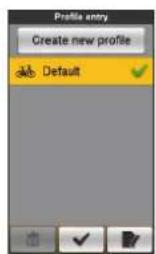
The Profile entry screen displays the existing profile(s).
- You can set up to 6 profiles on the device.
- Tap Create new profile and enter the personal data (including Name, Birth date, Weight, Gender, and profile Type) to create a new profile entry.
Note: You can select the profile Type as City bike, Mountain bike, Race bike or Running. The system will create different routes depending on the profile type. For example, Mountain bike will use unpaved routes which will be avoided by using Race bike.
- Select an existing profile entry and then do one of the following:
- Tap to Edit the name of the entry.
- Tap to delete the entry.
Routing
This setting allows you to set the routing preference by selecting Prefer, Allow or Try to avoid in each route option.
The available options may be different depending on the selected routing type:
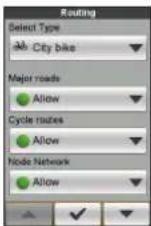
| Options\Routing type | City bike Mountain bike | Race bike Run & Walk |
| Major roads V V V V | ||
| Cycle routes V V V | ||
| Node network V V V | ||
| Unpaved roads V V V | ||
| Cobblestone V V V V | ||
| Ferries V V V V | ||
| Walking routes V |
Dashboard
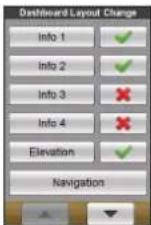
In the Dashboard Layout Change screen, you can change the layout of the following screens:
• Information screen 1, 2, 3 & 4
- Elevation screen
- Navigation
- Map screen
• History screen
To change the screen layout:
- Tap the corresponding button in the Dashboard Layout Change screen.
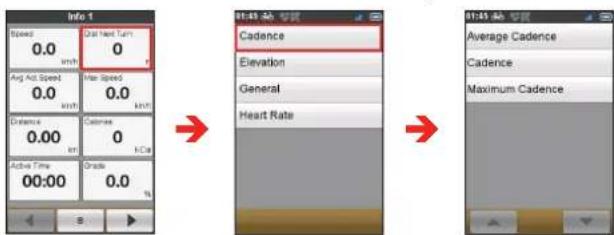
- Tap the number displayed at the bottom of the screen indicates the data fields (e.g. speed, distance, time, calories, etc.) included in the target screen.
-
Tap the numeric button and then select from the available number of data fields to display.
-
You can also change what data fields are displayed by tapping on each individual data field and then select the desired option in the list.
Sensors
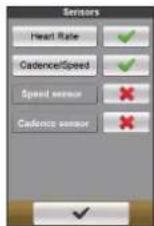
By default, the Cyclo device will automatically detect the sensors and enable the available sensor options.
You can manually tap the desired sensor option and the Cyclo device will start pairing for the sensor.
Once the connection is made, the / / / icon will display in the title bar. The sensor ID will be displayed in the Connected Sensor ID field.
The next time you start pairing to a sensor, it will automatically pair to the last sensor paired. To connect to a new sensor, tap Pair new sensor.
Where Am I
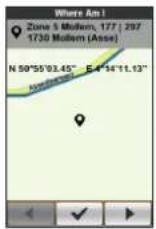
The Where AMI screen displays your current GPS position with the coordinates info in map view. When tapping, you can see the number of satellites, your current position, and the strength of the signals.
Manage
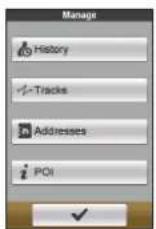
This setting allows you to manage the recorded data on the device, including: History, Tracks, Addresses, and POI. To manage the data:
- Tap the corresponding button in the Manage screen.
- Select the desired entry and then do one of the following:
- Tap to Edit the name of the entry.
- Tap to delete the entry.
Maps
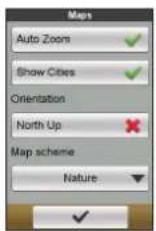
- Auto Zoom: Enable or disable automatic zooming during navigation.
If selected, the Map screen will automatically zoom in or out, depending on your speed, to allow optimal viewing of your route.
• Show Cities: Display or hide the current city name on the navigation screen. - Orientation: Enable or disable displaying North at the top of the map screen.
- Map scheme: Select the preferred map display style.
System
Screen
- Brightness: Drag the slider to the left to decrease the screen brightness or to the right to increase the screen brightness.
Note: You can also decrease/increase the screen brightness by tapping
Note: To increase your battery life during a ride, make sure the screen brightness is turned down to reduce the battery consumption.
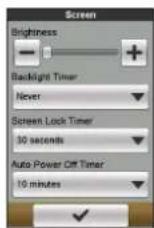
- Backlight Timer: Tap the option to select how long (from 15 seconds to Never) the display screen remains lit after you press the POWER button.
- Screen Lock Timer: Tap the option to select how long of inactivity (from 5 seconds to Never) will lock the device screen.
- Auto Power Off Timer: Tap the option to select how long of inactivity (from 10 minutes to Never) will turn off the device automatically.
Alerts
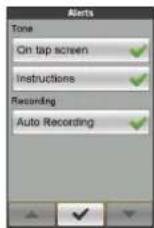
- On tap screen: Enable or disable the feedback sound while tapping on the screen.
- Instructions: Enable or disable the sound while getting instructions.
• Auto Recording: When disabled, a message will display asking if you want to start recording when movement is detected.
Date & Time
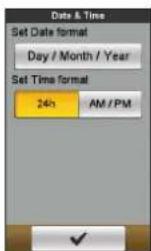
The device will display the date and time based on the current GPS location. The Date & Time screen lets you set the date/time format.
- Set Date format: Tap the button to select the displayed date format: Day/Month/Year, Month/Day/Year or Year/Month/Day.
- Set Time format: You can set the displayed time format as 12-hour or 24-hour by tapping the 24h or AM/PM button.
Units
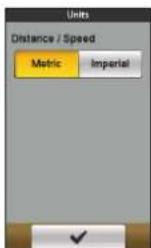
The Units screen lets you select Metric or Imperial according with your preferences.
Keyboard
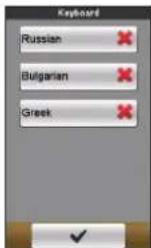
The device provides Russian, Bulgarian, and Greek keyboard for local users.
From the Keyboard screen, tap on the keyboard you want to use.
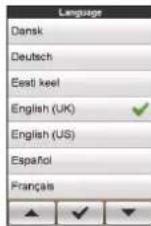
Language
You can select the preferred language displayed for the menus and other interface features while operating the device.
From the Language screen, tap on the language you want to use.
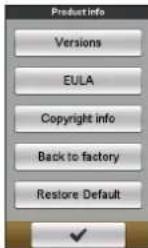
Product Info
The Product Info screen provides the general information of the device, including software and ROM versions, the End User License Agreement, and copyright information.
- You can reset the device to the factory default settings by tapping Back to factory. When you select the function, all of the recorded data on the device will be cleared.
- You can also just restore factory default settings by tapping Restore Default, allowing you to restore default settings but will not delete the recorded data.
For more information
Online support
For 24/7 help and support with Mio products, visit our Technical Support website at: www.mio.com
Caring for your Mio
Taking good care of your Mio will ensure trouble-free operation and reduce the risk of damage to your Mio:
- Keep your Mio away from excessive moisture and extreme temperatures.
- Avoid exposing your Mio to direct sunlight or strong ultraviolet light for extended periods of time.
- Do not place anything on top of your Mio or drop objects on your Mio.
- Do not drop your Mio or subject it to severe shock.
- Do not subject your Mio to sudden and severe temperature changes. This could cause moisture condensation inside the unit, which could damage your Mio. In the event of moisture condensation, allow your Mio to dry out completely before use.
- The screen surface can easily be scratched. Avoid touching it with sharp objects. Non-adhesive generic screen protectors designed specifically for use on portable devices with LCD panels may be used to help protect the screen from minor scratches.
- Never clean your Mio when it is turned on. Use a soft, lint-free cloth to wipe the screen and the exterior of your Mio.
- Do not use paper towels to clean the screen.
- Never attempt to disassemble, repair or make any modifications to your Mio. Disassembly, modification or any attempt at repair could cause damage to your Mio and even bodily injury or property damage and will void any warranty.
- Do not store or carry flammable liquids, gases or explosive materials in the same compartment as your Mio, its parts or accessories.
- Do not expose your Mio to extreme heat or direct sunlight for prolonged periods. Overheating may damage your Mio.
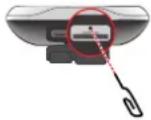
Resetting the device
Occasionally, you may need to perform a hardware reset when your Mio stops responding; or appears to be "frozen" or "locked-up." Insert a small rod, such as a straightened paperclip, into the reset button of your device.
Troubleshooting
| Problem Solution | |
| Your Mio does not turn on when using battery power. | The remaining battery power may be too low to run your Mio. Charge the battery. |
| Screen responds slowly. Make sure that your Mio is not running out of battery power. If the problem still persists, restart your Mio. | |
| Screen freezes. Restart your Mio. | |
| Screen is hard to read. Make sure that the backlight of the display is set to a high-enough brightness. | |
| Cannot establish a connection with a computer. | Make sure that your Mio and your computer are both turned on before trying to establish a connection.Make sure that the cable is securely plugged into the USB port on your computer and on your Mio. Connect the USB cable directly to your computer — do not run the cable through a USB hub.Restart your Mio before connecting the cable. Always disconnect your device before you restart your computer. |
Note: If you encounter a problem you cannot solve, contact an authorised service centre for assistance.
What is GPS?
The Global Positioning System (GPS) is available at any time, free of charge, and is accurate to within 5m (15ft). GPS navigation is made possible by a network of satellites that orbit the Earth at around 20,200km (12,552mi). Each satellite transmits a range of signals which are utilised by GPS receivers, such as
your Mio, to determine an exact location. Although a GPS receiver can detect signals from up to 12 satellites at any time, only four signals are required to provide a position or "GPS fix" (latitude and longitude), for vehicle navigation systems.
Your Mio receives GPS signals via the internal GPS antenna. To guarantee the optimum GPS signal strength, ensure your Mio is outdoors or in a vehicle outdoors, and has an unobstructed view of the sky. GPS reception is not usually affected by weather, however, very heavy rain or snow may have a negative effect on your reception.
CAUTION:
- It is your sole responsibility to place, secure and use your Mio in a manner that will not cause accidents, personal injury or property damage. Always observe safe driving practices.
- On main roads, the distance to an exit calculated by your Mio may be further than the distance shown on road signs. Road signs show the distance to the start of an exit while your Mio shows the distance to the next intersection, i.e., the end of the exit ramp or road. To prepare to exit a road, always follow distance information on road signs.
- Mio products are designed to be used as an aid to safer driving. Mio does not condone speeding or any other failure to comply with your local traffic laws. It is your responsibility to drive within the posted speed limit at all times and to drive in a careful manner. Mio accepts NO liability whatsoever for you receiving any speeding fines or points on your license through using this device. Mio does not guarantee the accuracy of the data contained within this database either expressed or implied. In the event you receive a fine or any other penalty for speeding or contravention of any traffic law, or are involved in an accident, Mio is not responsible for any damages of any type. In some countries the data information regarding speed limits may conflict with local law and/or regulations. It is your responsibility to make sure that your use of the data is in compliance with local laws and/or regulations. Usage is at your own risk.
- Do not operate the device while driving or riding a bike. Using this product does not change the requirement for a driver or a bike rider to take full responsibility for his or her behaviour. This responsibility includes observing all traffic rules and regulations in order to avoid accidents, personal injury or property damage.
IPX5
The IPX5 is a European system of test specification standards for classifying the degrees of protection provided by the enclosures of electrical equipment. An IPX5 designation means that the unit is protected against water jets but NOT against immersion in water or water-pressure such as washing the unit with running water. Because of possible user-resealing error, this product is not warranted against waterproof housing leakage or any resulting damage. Please make sure the waterproof cover is tightly closed before using the product.
Safety precautions
About charging
- This product is intended to be supplied by a LISTED Power Unit marked with "LPS", "Limited Power Source" and output rated +5 V dc / 1.0 A.
- Use a specified battery in the equipment.
About the battery
- Use a specified battery in the equipment.
CAUTION: This unit contains a non-replaceable internal Lithium Ion battery. The battery can burst or explode, releasing hazardous chemicals. To reduce the risk of fire or burns, do not disassemble, crush, puncture or dispose of in fire or water.
- Important instructions (for service personnel only)
- Caution: Risk of explosion if battery is replaced by an incorrect type. Dispose of used batteries according to the instructions.
- Replace only with the same or equivalent type recommended by the manufacturer.
- The battery must be recycled or disposed of properly.
- Use the battery only in the specified equipment.
Regulatory information
For regulatory identification purposes, Mio Cyclo 215 series is assigned a model number of N506.
Marking labels located on the exterior of your device indicate the regulations that your model complies with. Please check the marking labels on your device and refer to the corresponding statements in this section. Some notices apply to specific models only.

Products with the CE marking comply with the Radio Equipment Directive (RED) (2014/53/EU), the Electromagnetic Compatibility Directive (2014/30/EU) and the Low Voltage Directive (2014/35/EU) - issued by the Commission of the European Community. Compliance with these directives implies conformity to the following European Standards:
• EN 301 489-1
• EN 301 489-3
• EN 55022
• EN 55024
• EN 61000-3-2
• EN 61000-3-3
• EN 300 440-1
• EN 300 440-2
• IEC 60950-1/A1:2009
The manufacturer cannot be held responsible for modifications made by the User and the consequences thereof, which may alter the conformity of the product with the CE Marking.
Declaration of Conformity
Hereby, MiTAC declares that this N506 is in compliance with the essential requirements and other relevant provisions of Directive 2014/53/EU.
WEEE

This product must not be disposed of as normal household waste, in accordance with the EU directive for waste electrical and electronic equipment (WEEE - 2012/19/EU). Instead, it should be disposed of by returning it to the point of sale or to a municipal recycling collection point.
End user license agreement
You should read the following terms and conditions of this Agreement ("Agreement") carefully before using this Mio Cyclo device, its accessories and any other accompanying items ("Product") that includes licensed products, including but not limited to software, digital map data or other data and services ("Software") licensed by MiTAC Europe Limited, company number 4214164, registered address in Spectrum House, Beehive Ring Road, London Gatwick Airport, RH6 0LG, United Kingdom and MiTAC Benelux NV, company number 0450804332, registered address in Zone 5 Mollem 318, 1730 Mollem, Asse, Belgium, URL: eu.mitac.com ("Mio") to be used only, as set forth below. For any further information on Product or support, consult URL: www.mio.com/support.
IF YOU DO NOT AGREE TO THE TERMS OF THIS END USER LICENSE AGREEMENT, PLEASE DO NOT USE THIS PRODUCT AND DO NOT COPY ANY SOFTWARE INSTALLED THEREIN. IN SUCH CASE, PROMPTLY CONTACT MIO OR ANY AUTHORIZED DEALER FOR INSTRUCTIONS TO RETURN THE UNUSED PRODUCT WITH ALL ACCOMPANYING ITEMS. SHOULD YOU HAVE PAID FOR THE PRODUCT OR THE SOFTWARE, MIO OR ANY AUTHORIZED DEALER MAY REFUND THE PURCHASE PRICE PROVIDED THAT YOU PROVIDE A VALID AND ACCEPTED PROOF OF PURCHASE AND PROOF OF PAYMENT.
ANY USE OF THE PRODUCT OR SOFTWARE WILL CONSTITUTE YOUR ACCEPTANCE OF THIS AGREEMENT.
GRANT OF LICENSE: This Agreement grants you a non-exclusive and revocable license to use the Software installed on the hardware device or any other storage medias (on only one hardware device at a time), for your internal business purposes or personal use.
This Agreement does not imply or grant you any rights to future updates or upgrades of the Software unless expressly instructed by Mio in writing. Any updates or upgrades are governed by this Agreement and may be subject to additional payments and other conditions.
You may copy Software or any supporting and accompanying documentation ("Documentation") for backup or archive purposes only and for the support of use of the Software as permitted hereunder. All such copies must reproduce and include all copyright notices and any other proprietary rights notice appearing on the Software and Documentation.
The Documentation may contain mulNotele versions of this Agreement, including but not limited to mulNotele translations and mulNotele media versions. Even if you receive mulNotele versions of this Agreement, you are licensed to use only one copy of the Software.
THE SOFTWARE LICENSED HEREUNDER MAY CONTAIN DEFECTS. YOU ARE ADVISED NOT TO RELY ON THIS SOFTWARE, TO SAFEGUARD IMPORTANT DATA, TO USE CAUTION AND NOT TO RELY IN ANY WAY ON
THE CORRECT FUNCTIONING OR PERFORMANCE OF THE SOFTWARE AND ACCOMPANYING MATERIALS.
The software is not designed or licensed for use in mission-critical applications, or in hazardous environments, requiring fail-safe controls, including without limitation operation of nuclear facilities, aircraft navigation or communication systems, air traffic control, or life support or weapons systems.
To the maximum extent permitted by applicable law, the Software is provided to you "AS IS AND WITH ALL FAULTS", and Mio, its suppliers and licensors hereby disclaim any warranty, express or implied (either in fact or by operation of law), with respect to the Software, either as to merchantability, fitness for particular purpose, or any other matter. You acknowledge and agree that the Software has not been tested or certified by any government agency or industry regulatory organization or any other third party organization. In no event shall Mio, its suppliers and licensors be held liable for, liabilities or obligations for damages, including but not limited to special, indirect, or consequential damages or loss of use, revenue, or profits in connection with or arising out of this Agreement or any breach of this Agreement by Mio, its suppliers or licensors or the existence, furnishing, functioning, or any use of the Software. Any other representations or warranties made by any person, including employees or representatives of Mio, its suppliers and licensors, which are inconsistent herewith shall be disregarded by you and shall not be binding upon Mio, its suppliers and licensors, if any product model or sample was shown to you, such model or sample was used merely to illustrate the general type and quality of the product and not to represent that the Software would necessarily conform with such model or sample. NO ORAL OR WRITTEN ADVICE OR INFORMATION PROVIDED BY MIO, ITS SUPPLIERS AND LICENSORS OR ON THEIR BEHALF SHALL CREATE A WARRANTY OR IN ANY WAY INCREASE THE SCOPE OF THIS LIMITED WARRANTY, AND YOU ARE NOT ENTITLED TO RELY ON ANY SUCH ADVICE OR INFORMATION.
Any liability of Mio, its suppliers and licensors towards you shall be void if any damage to the Product is caused by accident, transportation, neglect or misuse, alteration (which shall include, but not be limited to, any deviation from the specifications), any unauthorized modification or enhancement of the Product, failure to maintain a suitable operating environment, or the use of the Product for other than the specific purpose for which it was designed.
In no event shall Mio, its suppliers and licensors be liable for any third party materials, database and/or their content including the GUI and all other implications arising from such error or malfunction related to database.
Provision of the Product under this Agreement shall not create any obligation for Mio, its suppliers and licensors to continue to develop, productize, support, repair, offer for sale or in any other way continue to provide or develop software either to you or to any other party.
RESTRICTIONS: You are not permitted to: analyze, modify, translate, adapt, reverse engineer, decompile, disassemble, or otherwise reduce the Software to a perceivable form; create derivative works based on the Software or any part thereof, or attempt to increase the functionality of the Software in any manner; copy or download the Software (except for backup purposes as stated above), reproduce through any electronic or mechanical means, and distribute copies – any unauthorized copying is expressly prohibited; rent, lend, resell, distribute, sublicense or otherwise transfer rights to the Software, in any other way than assigning the Product in meeting with below conditions; remove or obscure any copyright or proprietary notices or labels in the Software; perform, broadcast, display or present the Software in public.
The Software is the confidential information of Mio, its suppliers and licensors. You are not allowed to disclose the Software to third parties.
The removal or obscuring of any copyright, trademark notice or restrictive legend of Mio, its suppliers and licensors is not allowed.
ASSIGNMENT: Provided the transferee agrees to the terms of this Agreement, transfer of the Product may be allowed. Such transfer must include all copies of the Software and Documentation without restriction. It also includes all prior versions, updates and upgrades of the Software.
EXPORT RESTRICTIONS: You accept to comply with all applicable international or national laws (of the European Union, the United States of America or other) that apply to the Product, including the Software and the Documentation, and shall not export or re-export the Product, the Software and the Documentation (or any copies thereof) or any product utilizing the Product, the Software or the Documentation in violation of any applicable laws or regulations to any person or entity in any country subject to such restrictions, including but not limited to Cuba, Iran, Libya, North Korea, Sudan and Syria, or to any person or entity, wherever located, who intends to export or re-export to such country. For
further information in relation to this restriction, please seek advice from the relevant governmental agencies.
INTELLECTUAL PROPERTY RIGHTS: Mio or its suppliers or licensors, own all intellectual property rights in and to the Product, the Software and the Documentation, and any copies thereof. Except as expressly provided herein, this Agreement does not grant you any rights to patent, copyrights, trade secret, trademarks, or any other intellectual property rights.
TERMINATION: This Agreement is effective as of the date of its acceptance until expired or terminated according to the terms of this Agreement. You may terminate this Agreement at any time by destroying the Product, the Software and the Documentation together with all copies and merged portions in any form. This Agreement may be terminated immediately by Mio for any reason, including but not limited to any failure to comply with any term or condition of this Agreement. In such event, you must destroy the Product, the Software and the Documentation together with all copies and merged portions in any form. In addition, this Agreement shall terminate immediately upon the termination of the agreement between Mio and any third-party from whom Mio licenses Software. All rights granted to you by this Agreement shall cease upon termination including, but not limited to, all licenses granted hereunder.
GOVERNING LAW: This Agreement shall be governed by the laws of England.
LIMITED WARRANTY; LIMITED LIABILITY: All warranties and limitations of liability applicable to the Product, the Software and the Documentation are as stated on the limited warranty provisions as provided by the limited warranty statement to this Product or in the manual regarding the Product or Software ("Limited Warranty"). Such warranties and limitations of liability are entirely incorporated herein by this reference.
EXCEPT AS PROHIBITED BY LAW, MIO AND ITS SUPPLIERS OR LICENSORS SHALL HAVE NO LIABILITY FOR ANY INDIRECT, SPECIAL, CONSEQUENTIAL, PUNITIVE OR INCIDENTAL DAMAGES OF ANY KIND, OR LOSS OF INFORMATION OR DATA, ARISING FROM OR IN CONNECTION WITH THE USE OR PERFORMANCE OF THE PRODUCT, SOFTWARE AND DOCUMENTATION. THIS LIMITATION SHALL APPLY EVEN IF ANY REMEDY FAILS OF ITS ESSENTIAL PURPOSE.
SEVERABILITY: In the event any provision of this Agreement is found to be invalid, illegal or unenforceable, the remaining provisions shall be still valid, legal and enforceable without being affected or impaired in any way and a valid,
legal and enforceable provision of similar intent and economic impact shall be substituted therefore.
ENTIRE AGREEMENT: This Agreement sets forth the entire understanding and agreement between you and Mio with respect to the Product, the Software and the Documentation, and supersedes all prior agreements and communications, whether orally or written thereof.
- User Manual
- Welcome
- Important information for using the manual
- Disclaimer
- Copyright
- Contents
- Knowing your device
- Accessories
- Getting started
- Charging the battery
- CAUTION:
- Performing the initial start-up
- Connecting your device to the computer
- Installing the device
- Mounting the device on your bike
- Installing the sensors on your bike
- Putting on the heart rate monitor
- Operating basics
- Using the POWER button
- • Navigating through the screens
- Using the touch screen
- - Tap
- - Drag
- Unlocking the screen
- Main menu
- No. Description
- System icons
- Keyboard screen
- How do I enter characters/numbers?
- Changing the keyboard layout
- Viewing Dashboard screens
- Starting navigation
- Using the Navigate wizard
- Navigating to Home
- Setting up your Home location
- Editing the Home location
- Finding the location by Address
- Searching for a POI
- Tracks
- Searching for a location from the map screen
- Searching for a location using GPS coordinates
- Other navigating options
- Going back to start
- Stopping navigation
- Surprise Me™
- Viewing the History
- Viewing the summary of recorded data
- Managing data on the device
- Customising your device
- CycloAgent™
- Sharing your experience on the Internet
- Profiles
- Routing
- Dashboard
- Sensors
- Where Am I
- Manage
- Maps
- System
- Screen
- Alerts
- Date & Time
- Units
- Keyboard
- Language
- Product Info
- For more information
- Online support
- Caring for your Mio
- Resetting the device
- What is GPS?
- IPX5
- Safety precautions
- About charging
- About the battery
- Regulatory information
- Declaration of Conformity
- WEEE
- End user license agreement
- THE CORRECT FUNCTIONING OR PERFORMANCE OF THE SOFTWARE AND ACCOMPANYING MATERIALS.
Brand : MIO
Model : Cyclo 215
Category : Bike computer