
E-Punk - Scooter RAZOR - Free user manual and instructions
Find the device manual for free E-Punk RAZOR in PDF.


| Product Type | Electric Mini Bike / Scooter |
| Brand | Razor |
| Model | E-Punk |
| Recommended Age | 8 years and older |
| Maximum Rider Weight | 120 lb (54 kg) |
| Maximum Speed | Approximately 9 mph (14 km/h) |
| Range per Charge | Up to 40 minutes of continuous ride time |
| Battery Type | Sealed lead-acid, rechargeable |
| Battery Voltage | 12V |
| Battery Capacity | 6Ah |
| Charger | Razor recommended charger with overcharge protection |
| Initial Charge Time | 12 hours |
| Recharge Time | Up to 12 hours (green light may appear earlier) |
| Motor Type | Rear hub motor |
| Brake System | Hand brake with motor cut-off switch |
| Throttle Type | Push-button throttle on right handlebar |
| Front Tire | Pneumatic, Schrader valve (inflate to PSI on sidewall) |
| Rear Wheel | Hub motor wheel, no tire replacement specified (see manual) |
| Frame Material | Steel (assumed based on typical Razor products) |
| Assembly Required | Yes, adult assembly (approx. 12 minutes) |
| Tools Included | 5 mm and 6 mm Allen wrenches |
| Warranty | 90 days limited warranty against manufacturing defects |
| Recommended Use | Flat, dry surfaces; avoid inclines, wet conditions, and traffic |
| Safety Gear | Helmet, elbow pads, kneepads recommended; wear athletic shoes |
| Product ID Location | Under rear frame, on charger, and on box UPC |
Frequently Asked Questions - E-Punk RAZOR
User questions about E-Punk RAZOR
0 question about this device. Answer the ones you know or ask your own.
Ask a new question about this device
Download the instructions for your Scooter in PDF format for free! Find your manual E-Punk - RAZOR and take your electronic device back in hand. On this page are published all the documents necessary for the use of your device. E-Punk by RAZOR.
USER MANUAL E-Punk RAZOR
natural_image
Razor e-dot bike with visible wheels and front-mounted head (no text or symbols on body)OWNER'S MANUAL
Read and understand this entire manual before allowing child to use this product! For assistance contact Razor. DO NOT RETURN TO STORE.
NOTE: Manual illustrations are for demonstration purposes only. Illustrations may not reflect exact appearance of actual product. Specifications subject to change without notice.
Please have your product along with the 19 character product I.D. code with you before contacting Razor for warranty assistance and/or replacement parts. Product I.D. Code: ____ - ____ - ____


CONTENTS
Safety Warnings 1-2
Before You Begin....3
Assembly and Set-Up 4-5
Charging the Battery 5
Pre-Ride Checklist and Usage....6
Repair and Maintenance....7-10
Troubleshooting Guide 11
E-Punk Parts 12
Warranty and Contact Information 14
SAFETY WARNINGS
This manual contains many warnings and cautions concerning the consequences of failing to maintain, inspect or properly use your E-Punk. Because any incident can result in serious injury or even death, we do not repeat the warning of potential serious injury or death each time such a possibility is mentioned.
WARNING: Riding an electric E-Punk does present potential risks and caution is required. Like any riding product, an electric E-Punk has inherent hazards associated with its use (for example, falling off or riding it into a hazardous situation). Like any riding product, the electric E-Punk can and is intended to move and it is therefore, of course, possible to lose control or otherwise get into dangerous situations. Both children, and adults responsible for supervising them, must recognize that if such things occur, a rider can be seriously injured or die even when using safety equipment and other precautions. RIDE AT YOUR OWN RISK AND USE COMMON SENSE.
This manual contains important safety information. It is your responsibility to review this information and make sure that all riders understand all warnings, cautions, instructions and safety topics, and assure that young riders are able to safely and responsibly use this product. Razor recommends that you periodically review and reinforce the information in this manual with younger riders, and that you inspect and maintain your child's E-Punk to ensure their safety.
WARNING: PARENTAL AND ADULT RESPONSIBILITY AND SUPERVISION IS NECESSARY: Because products, like electric E-Punk, can and do present potential hazards plainly associated with their use, it is well recognized THE NEED FOR EXERCISE OF PARENTAL RESPONSIBILITY IN SELECTING RIDING PRODUCTS APPROPRIATE TO THE AGE OF A CHILD, OR PARENTAL SUPERVISION IN SITUATIONS IN WHICH CHILDREN OF VARIOUS AGES MAY HAVE ACCESS TO THE SAME RIDING PRODUCTS, IS IMPORTANT. Not every product is appropriate for every age or size of child, and different age recommendations are found within this category of product which are intended to reflect the nature of the hazards and the expected mental or physical ability, or both, of a child to cope with the hazards.
The recommended minimum rider age is 8 and older. Any rider unable to fit comfortably on the E-Punk should not attempt to ride it. A parent's decision to allow his or her child to ride this product should be based on the child's maturity, skill and ability to follow rules. Razor emphasizes that adults are strongly advised not to disregard Razor's recommendations or permit younger children to ride the E-Punk.
Keep this product away from small children and remember that it is intended for use only by persons who are, at a minimum, completely comfortable and competent while operating the E-Punk.
Persons with any mental or physical conditions that may make them susceptible to injury, impair their physical dexterity or mental capabilities to recognize, understand, and follow safety instructions and to be able to understand the hazards inherent in E-Punk use, should not use or be permitted to use products inappropriate for their abilities. Persons with heart conditions, head, back or neck ailments (or prior surgeries to these areas of the body), or pregnant women, should be cautioned not to operate such products.
DO NOT EXCEED THE WEIGHT LIMIT OF 120 lb (54 kg). Rider weight does not necessarily mean a person's size is appropriate to fit or maintain control of the E-Punk.
CHECK AND MAINTAIN E-PUNK CONDITIONS
Before use, check to confirm that covers and guards are in place and in serviceable condition. Check that the brake is functioning properly, that the front tire is inflated properly and has sufficient tread remaining and that the rear wheel is free of flat spots from wear. Always inspect product before riding and regularly maintain it. Replace worn or damaged parts immediately. Check brake for proper function. When you squeeze the lever, brake should provide positive braking action. The E-Punk should be maintained and repaired in accordance with the manufacturer's specifications, using only the manufacturer's authorized replacement parts, and should not be modified from the manufacturer's original design and configuration.
ACCEPTABLE RIDING PRACTICES AND CONDITIONS
Always check and obey any local laws or regulations which may affect the locations where the electric E-Punk may be used. Keep safely away from cars and motor vehicle traffic at all times. Only use where allowed and with caution.
Do not activate the push-button throttle unless you are on the product and in a safe, outdoor environment suitable for riding.
The normal powered top speed of this product will be approximately 9 mph (14 km/h), which can be affected by conditions, such as rider weight, inclines and battery charge level. Avoid excessive speeds that can be associated with downhill rides.
Maintain a hold on the handlebars at all times. Do not touch the brake or motor on your product when in use or immediately after riding, as these parts can become very hot.
Ride defensively. Watch out for potential obstacles that could catch your wheel or force you to swerve suddenly or lose control. Be careful to avoid pedestrians, skaters, skateboards, scooters, bikes, children or animals who may enter your path, and respect the rights and property of others.
The electric E-Punk is intended for use on flat, dry surfaces, such as pavement or level ground, without loose debris, such as sand, leaves, rocks or gravel. Wet, slick, bumpy, uneven or rough surfaces may impair traction and contribute to possible accidents. Do not ride your product in mud, ice, puddles or water. Watch out for potential obstacles that could catch your wheel or force you to swerve suddenly or lose control. Avoid sharp bumps, drainage grates, and sudden surface changes.
Do not attempt or do stunts or tricks on your electric E-Punk. The E-Punk is not made to withstand abuse from misuse, such as jumping, curb grinding or any other type of stunts. Racing, stunt riding, or other maneuvers also enhance risk of loss of control, or may cause uncontrolled rider actions or reactions.
Never allow more than one person at a time to ride the E-Punk.
Do not ride at night or when visibility is limited.
Never use near steps or swimming pools.
Do not allow hands, feet, hair, body parts, clothing, or similar articles to come in contact with moving parts or wheels while the motor is running.
Do not touch hot brake or electric motor when in use or immediately after riding.
Never use headphones or a cell phone to talk or text when riding.
SAFETY WARNINGS
Never hitch a ride with a vehicle.
Do not ride your product in wet or icy weather and never immerse the E-Punk in water, as the electrical and drive components could be damaged by water or create other possibly unsafe conditions. Never risk damaging surfaces, such as carpet or flooring, by use of an electric E-Punk indoors.
PROPER RIDING ATTIRE
Always wear proper protective equipment, such as an approved safety helmet (with chin strap securely buckled), elbow pads and kneepads. A helmet may be legally required by local law or regulation in your area. A long-sleeved shirt, long pants, and gloves are recommended. Always wear athletic shoes (lace-up shoes with rubber soles) and keep shoelaces tied and out of the way of the wheels, motor and drive system. Never ride barefooted or in sandals.
USING THE CHARGER
The charger supplied with the electric product should be regularly examined for damage to the cord, plug, enclosure and other parts. In the event of such damage, the E-Punk must not be charged until the charger has been repaired or replaced.
Use only with the recommended charger.
Use caution when charging.
The charger is not a toy. Charger should be operated by an adult.
Do not operate charger near flammable materials.
Unplug charger and disconnect from product when not in use.
Always disconnect from the charger prior to wiping down and cleaning your product with damp cloth.
FAILURE TO USE COMMON SENSE AND HEED THE ABOVE WARNINGS FURTHER INCREASES RISK OF SERIOUS INJURY. USE AT YOUR OWN RISK AND WITH APPROPRIATE AND SERIOUS ATTENTION TO SAFE OPERATION. USE CAUTION.
BEFORE YOU BEGIN
Remove contents from box. Remove the separators that protect the components from damage during shipping. Inspect the contents of the box for scratches in the paint, dents or kinked cables that may have occurred during shipping. Because the E-Punk was 95 percent assembled and packed at the factory, there should not be any problems, even if the box has a few scars or dents.
MAKE SURE POWER IS TURNED "OFF" BEFORE CONDUCTING ANY ASSEMBLY OR MAINTENANCE PROCEDURES.
□ Estimated Assembly and Set-Up Time
Razor recommends assembly by an adult. Allow up to 12 minutes for assembly, not including initial charge time. Allow up to 12 hours for charge (see page 5 for charging information).
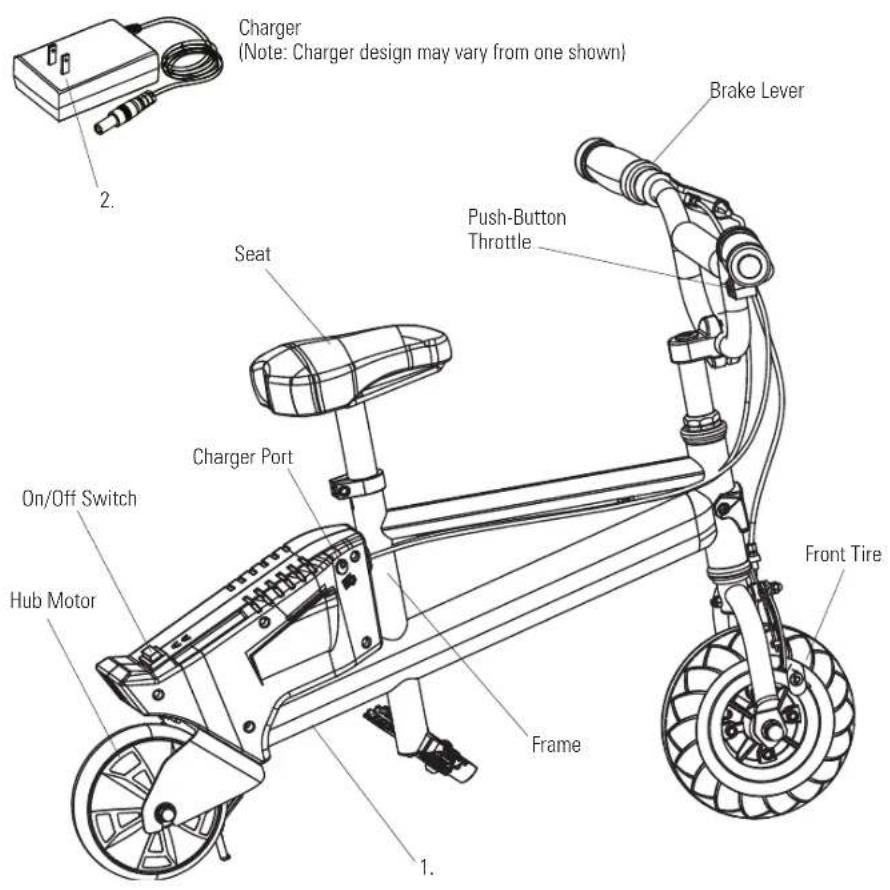
Required Tools

5 mm Allen Wrench
6 mm Allen Wrench
(Included)
WARNING:
DO NOT USE NON-RAZOR PRODUCTS WITH YOUR RAZOR ELECTRIC PRODUCT. The E-Punk has been built to certain Razor design specifications. The original equipment supplied at the time of sale was selected on the basis of its compatibility with the frame, fork and all other parts. Certain aftermarket products may not be compatible and will void the warranty.
Product ID Locations:
(See locations to the left)
- Under the rear frame
- Charger
- UPC Side of Box (Not Shown)
Plastic Bag Contents:
- Charger
- Allen Wrenches
- Owner's Manual
ASSEMBLY AND SET-UP
□ Attaching the Handlebars
Tool Required: 6 mm Allen Wrench

natural_image
Mechanical assembly diagram showing a rotating lever mechanism (no text or symbols)1 Using the 6 mm Allen wrench, remove the steering bolt from the handlebar unit.

natural_image
Mechanical assembly diagram showing a bolted joint inserted into a pipe with a downward arrow indicating force (no text or symbols present)2 With a twisting motion, push and twist to slide the handlebars onto the fork.

natural_image
Mechanical assembly diagram showing a bolt and nut assembly with a directional arrow (no text or labels)Note: The assembly and adjustment should not pass the safety line.

natural_image
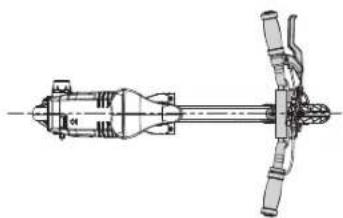
Mechanical assembly diagram showing a hand operating a cylindrical device with a curved arrow indicating rotation (no text or symbols present)3 With the front wheel pointed straight ahead and the handlebars square to the front wheel, tighten both bolts on the clamp with a 6 mm Allen wrench. Tighten securely.
natural_image
Technical line drawing of a mechanical assembly with no visible text or symbolsNote: The head stem must be parallel to the center of the frame after it is locked.
□ Attaching the Seat
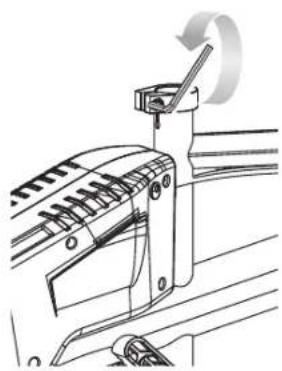
Tool Required: 5 mm Allen Wrench
natural_image
Technical line drawing of a mechanical component with a rotating arrow (no text or symbols)1 Loosen the bolt from the collar clamp.

natural_image
Diagram of a hammer tool with a rotating base and adjustment mechanism (no text or symbols)2 Install seat into the collar clamp. Tighten the bolt with a 5 mm Allen wrench. Tighten securely.

natural_image
Simple line drawing of a mechanical component with no text or symbolsNote: The assembly and adjustment should not pass the safety line.
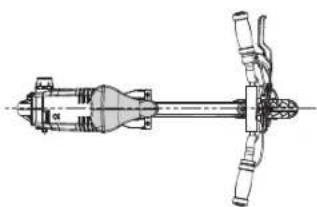
natural_image
Technical line drawing of a mechanical assembly with no visible text or symbolsNote: The seat must be parallel to the center of the frame after it is locked.
WARNING: Do not attempt to thread the stem into the front fork thread.
Note: Make sure any cables/wires are out of the way before inserting the stem into the fork.
WARNING: Failure to properly tighten the collar clamp may allow the handlebars to dislodge while riding and may cause you to lose control and fall. When correctly tightened, the handlebars will not rotate out of alignment with the front wheel under normal circumstances.
Note: The cable and wire assembly from the handlebar must not wrap around the steering tube or handlebar. Sharp bends or twisting of the brake cable can cause the brakes to malfunction.
ASSEMBLY AND SET-UP
□ Inflating the Tire
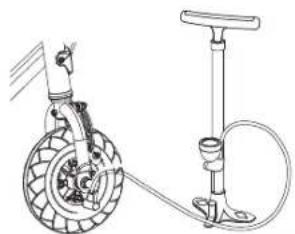
The front tire is inflated when shipped, but it invariably may lose some pressure between the point of manufacturing and your purchase. Always inflate tire to the correct PSI before first time use.
Lower air pressure can result in a shorter ride time.
Periodically check front tire. Reinflate when needed.
natural_image
Diagram of a bicycle tire and hand pump assembly (no text or labels)1 Using a bicycle-style tire pump equipped for a Schrader-type valve, inflate the front tire to the correct PSI indicated on the sidewall of the tire.
WARNING:
Do not use the electric product for the first time until you have inflated the tire to the correct PSI. Failure to do so may damage your electric product and void your warranty.
WARNING:
Do not over inflate, as this could damage the tire or wheel.
Note: The pressure air supplies found at gasoline stations are designed to inflate high-volume automobile tires. If you decide to use such an air supply to inflate your electric product tire, first make sure the pressure gauge is working, then use very short bursts to inflate to the correct PSI. If you inadvertently over-inflate the tire, release the excess pressure immediately.
CHARGING THE BATTERY
Your electric product may not have a fully charged battery; therefore you must charge the battery prior to use.
- Initial charge time: 12 hours.
- Recharge time: up to 12 hours, even if the light turns green. Recommended maximum charging time is 24 hours.
• Always charge the battery immediately after riding. - Fully charge battery before storing for extended periods of time.
- Unplug charger from the wall outlet when not in use.
-
Failure to recharge battery periodically may result in a battery that will not accept a charge.
-
Make sure the power is turned OFF when product is not in use. If the ON/OFF switch is left on for an extended period of time, the battery may reach a stage at which it will no longer hold a charge.
- To ensure long battery life, never store the product in freezing or below freezing temperatures! Freezing will permanently damage the battery.
- Run time: Up to 40 minutes of continuous ride time. Run time may vary depending on riding conditions, rider weight, climate, and/or proper maintenance.
- Constant starting and stopping may shorten ride time.
- Battery life can vary depending on proper maintenance and usage of the product.
Charger

natural_image
Simple line drawing of a rectangular device with a coiled cable and connector (no text or symbols)Note: Make sure power is turned OFF when product is not in use. If the ON/OFF switch is left on for an extended period of time, the battery may reach a stage at which it will no longer hold a charge.
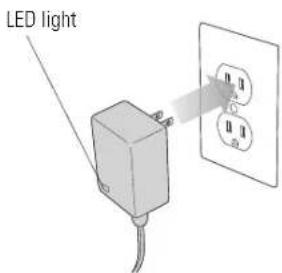
1 Plug the charger plug into wall outlet. The light on the charger should be green.
Note: If green light (LED) does not turn on, try a different outlet.

natural_image
Technical line drawing of a mechanical assembly with no visible text or symbols2 Plug the charger into the charger port. Make sure the power is in the OFF position. The light on the charger should turn red during charging. The light will turn green again when charging is complete.
WARNING: Use ONLY
with the recommended charger. Batteries are only to be charged under adult supervision. The charger is not a toy. Always disconnect the charger before wiping down and/or cleaning the electric product with a damp cloth.
The charger supplied with the electric product should be regularly examined for damage to the cord, plug, enclosure and other parts. In the event of such damage, the electric product must not be charged until it has been repaired or replaced.
Chargers have built-in overcharge protection to prevent battery from being overcharged.
Note: If the charger gets warm during regular use, this is a normal response and is no cause for concern. If your charger does not get warm during use, it does not mean that it is not working properly.
Wall outlet - Green (stand by) Wall outlet and unit - Red (charging) Wall outlet and unit - Green (charged)
Note: Continue charging unit even if light turns green prior to 12 hours.
WARNING: Battery charge can deplete over time. Periodically recharge battery when not in use.
PRE-RIDE CHECKLIST

Brake
Check the brake for proper function. When you squeeze the lever, the brake should provide positive braking action. When you apply the brake with the throttle on/engaged, the brake cut-off switch should cut power to the motor.

Wheels
Periodically inspect the wheels for excess wear. Practice riding only in wide open areas clear from curbs, parking blocks and other obstacles. Impacting the wheels against any hard surface can damage the wheels. Wheels are not covered under your limited warranty.

Tire
Periodically inspect the tire for excess wear and replace as needed. Regularly check the tire pressure and inflate as needed.

Frame, Fork and Handlebars
Check for cracks or broken connections. Although broken frames are rare, it is possible for an aggressive rider to run into a curb or object and wreck and bend or break a frame. Get in the habit of inspecting your product on a regular basis.

Hardware/Loose Parts
Before every ride, check all parts, such as nuts, bolts, cables, fasteners, etc., to ensure they are secure and assembled correctly. There should not be any unusual rattles or sounds from loose parts or broken components. If the product is damaged, do not ride. Reference "Safety Warnings" on page 1 of this manual.

Safety Gear
Always wear proper protective equipment, such as an approved safety helmet (with chin strap securely buckled), elbow pads, and kneepads. A helmet may be legally required by local law or regulation in your area. A long-sleeved shirt and long pants are recommended. Always wear shoes and keep shoelaces tied and out of the way of the wheels and motor. NEVER RIDE BAREFOOTED OR IN SANDALS.

Laws and Regulations
Always check and obey any local laws or regulations.

Insurance
Do not assume that your existing insurance policies necessarily provide coverage for electric product use. Check with your insurance company for information regarding insurance.
USAGE
□ Starting the E-Punk
Do not activate the push-button throttle unless you are on the product and in a safe, outdoor environment suitable for riding.
To start the unit, turn the power switch "ON". Put kickstand up. Place both hands on the handlebars. Press the push-button throttle with right hand.
Note: Keep both feet on the foot pegs when unit is in motion.

□ Stopping the E-Punk
To stop the unit, release the push-button throttle and apply the brake until the unit comes to a complete stop. Razor recommends that you practice applying the brake at various speeds and in an open area free from obstructions before riding your product around others.

Note: As an additional safety feature, this product is designed to cut power to the motor when the hand brake is applied.
Note: Practice riding only in wide open areas clear from curbs, parking blocks and other obstacles. Impacting the wheels against any hard surface can damage the wheels. Wheels are not covered under the limited warranty.
WARNING:
When riding, both feet must be placed securely on foot pegs.
REPAIR AND MAINTENANCE
Turn power "OFF" before beginning repair or maintenance:
- Read the instructions
- Remove charger plug
-
Turn the power off
-
Secure the product under repair
• Exercise caution around exposed parts -
Contact Razor customer service if unsure about any repair or maintenance
• Repair and maintenance should be performed by an adult only.
□ Adjusting the Brakes
Tool Required: 10 mm Wrench

natural_image
Line drawing of a mechanical clamp or lever mechanism (no text or symbols)
natural_image
Mechanical assembly diagram showing a wrench and rotating component (no text or symbols)B

natural_image
Technical line drawing of a mechanical assembly with labeled components A and D (no text or symbols beyond labels)1 To adjust brake cable play, thread the brake lever adjuster in or out 1/4 to 1/2 turn until the desired brake adjustment is attained. Most adjustments are complete at this step. If brake still needs further adjustment, proceed to step 2.
2 If brake is too tight or loose, use a 10 mm wrench to adjust the brake cable accordingly.
3 Inspect the brake pads (A) for proper alignment against the wheel or excess wear. To realign brake pads, loosen the fixing nut (B) and adjust the pad to contact the rim. Re-tighten and readjust as needed. Verify proper brake function prior to riding the E-Punk.
□ Front Tire Replacement
Tools Required: Two (2) 16 mm Wrenches

natural_image
Mechanical diagram of a tire assembly with wrench and wrench tool (no text or labels)
1 Using two (2) 16 mm wrenches, loosen the axle bolt. Remove wheel and install replacement wheel. (Note the sequence of the hardware)
Note: Front wheel
hardware sequence
Right Side (Push-Button Throttle)
8-4 Spacer
Fork
8-3 Washer
8-2 Spring Washer
8-1 M10 Locknut
Middle
8-5 Front Axle Bolt
Left Side (Brake)
8-4 Spacer
Fork
8-3 Washer
8-2 Spring Washer
8-1 M10 Locknut
REPAIR AND MAINTENANCE
☐ Hub Motor/Battery Replacement
Tool Required: Phillips Screwdriver
natural_image
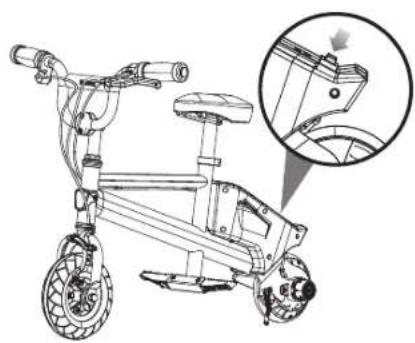
Line drawing of a multi-wheeled bicycle with a close-up inset showing the wheel assembly detail (no text or symbols)1 Power switch in OFF position.

natural_image
Diagram showing a bicycle and its side mirror assembly (no text or labels)2 Rotate onto handlebars.

natural_image
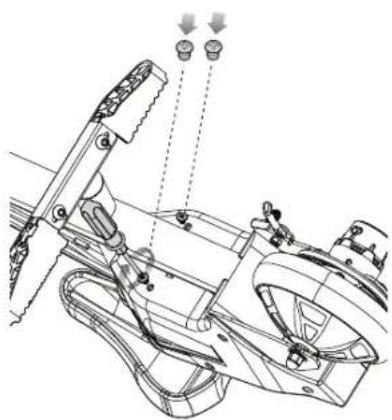
Technical line drawing of a mechanical assembly with no visible text or symbols3 Using a Phillips screwdriver remove the two (2) large screws underneath the battery cover.
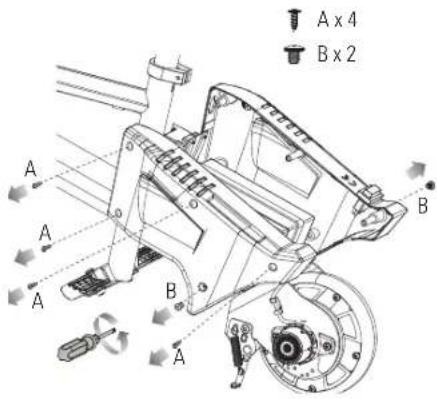
4 Using a Phillips screwdriver remove the six (6) screws and remove the battery cover. (Note: There are two (2) sizes of screws, A-Small, B-Large)

5 Disconnect the battery wire connector from the control module and carefully remove the battery. Note: If only replacing battery, install new battery and reverse steps 3-5.
Need Help? Visit our website for replacement parts, product support, a list of authorized service centers in the US and customer service contact information at www.razor.com. Please have the product I.D. code (located on the white label of your product) available for better assistance. Additional Customer Service contact information is listed at the back of this manual.
REPAIR AND MAINTENANCE
☐ Hub Motor/Battery Replacement Cont'd
Tools Required: Phillips Screwdriver and Two (2) 13 mm Wrenches, awl for opening wire prongs.

natural_image
Technical line drawing of a vehicle chassis with battery pack and brake assembly (no text or symbols)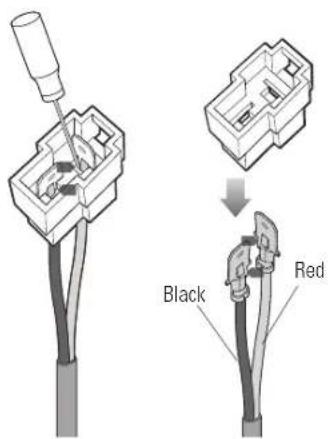
6 Remove motor cable wires from connector using an awl.
natural_image
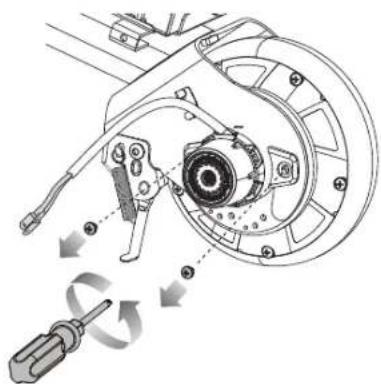
Mechanical assembly diagram showing a brake caliper and gear mechanism with no visible text or symbols7 Remove two (2) motor housing screws using the Phillips screwdriver.
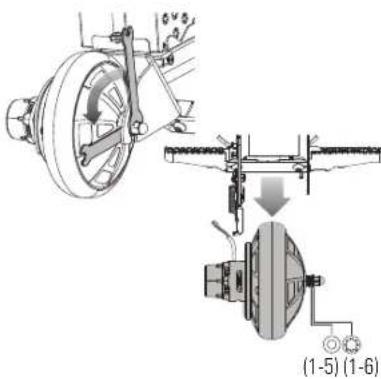
8 Using a 13 mm wrench, loosen the outside locknut (1-7). Use a 13 mm wrench to prevent the inside nut (1-4) from turning. Remove wheel/hub motor.
natural_image
Technical line drawing of a mechanical assembly with no visible text or symbols9 To install the replacement wheel/hub motor, reverse steps 3 through 8.

natural_image
Diagram showing a bicycle with wheels and a car on its side, illustrating the cycle of motion (no text or symbols present)10 Rotate back to upright position.
Note: When re-inserting the motor wires into the connector, make sure the red wire connects to the yellow wire and the black wire connects to the blue wire.
Note:
Motor Control Module
Red Yellow
Black Blue
Note: Rear wheel/motor hardware sequence.

Left Side
1-1 Phillips Screws (x2)
1-2 Motor Housing
Right Side
1-3 Spacer
1-4 Nut
Frame
1-5 Flat Washer
1-6 Lock-Washer
1-7 Locknut
REPAIR AND MAINTENANCE
□ Cleaning Your E-Punk
Wipe with a damp cloth to remove dirt and dust. Do not use industrial cleaners or solvents as they may damage the surfaces. Do not use alcohol, alcohol-based or ammonia-based cleaners as they may damage or dissolve the plastic components or soften the decals or decal adhesive.
□ Battery Care and Disposal
Do not store in freezing or below freezing temperatures. To properly maintain your battery and ensure maximum battery life, carefully read the "Charging the Battery" section on page 5 of this owner's manual.

CONTAINS SEALED LEAD-ACID BATTERY. BATTERY MUST BE RECYCLED.
Disposal: Your Razor product uses a sealed lead-acid battery which must be recycled or disposed of in an environmentally safe manner. Do not dispose of a lead-acid battery in a fire. The battery may explode or leak. Do not dispose of a lead-acid battery in your regular household trash. The incineration, land filling or mixing of sealed lead-acid batteries with household trash is prohibited by law in most areas. Return exhausted batteries to a federal or state approved lead-acid battery recycler or a local seller of automotive batteries. If you live in Florida or Minnesota, it is prohibited by law to throw away lead-acid batteries in the municipal waste stream.
□ Charger
The charger supplied with the electric product should be regularly examined for damage to the cord, plug, enclosure and other parts and in the event of such damage, the product must not be charged until it has been repaired or replaced.
Use ONLY with the recommended charger.
Wheels
Wheels and drive system are subject to normal wear and tear. It is the responsibility of the user to periodically inspect wheels for excess wear and replace hub motor components as required.
□ Replacement Parts
The most frequently requested replacement parts are available for purchase at some Razor retail partners. For the complete selection of replacement parts visit shop.razor.com.
Repair Centers
For a list of authorized Razor repair centers:
- Check online at www.razor.com.
• Additional Customer Service contact information is listed on the back of this manual.

In the US and Canada only:
For more information regarding recycling of rechargeable batteries, call toll free
1-800-822-8837, or visit
http://www.call2recycle.org

WARNING: If a battery
leak develops, avoid contact with the leaking acid and place the damaged battery in a plastic bag. Refer to the disposal instructions at left. If acid comes into contact with skin or eyes, flush with cool water for at least 15 minutes and contact a physician.

WARNING: Battery
posts, terminals and related accessories contain lead and lead compounds. Wash your hands after handling.
TROUBLESHOOTING GUIDE
*Product(s) should be turned OFF and fully charged prior to doing any Troubleshooting.
NOTE: All troubleshooting steps should be performed by an adult only.
Problem Possible Cause Solution
| Does not work out of the box Loose connection(s) Check for loose connections/wires inside the battery box. | |
| No longer works Loose connection(s) | Check for loose connections/wires inside the battery box. |
| No lights on charger | Check power to wall outlet and/or try a different outlet. |
| Undercharged battery | Check lights on charger:Plugged into wall - GreenPlugged into wall & product - Red (charging)Plugged into wall & product - Green (charging complete)No lights/Blinking lights - Replace Charger |
| Battery will not hold a charge | With no weight on the product, lift up back end; manually (and carefully) spin rear wheel and press the push-button throttle to engage the motor. If motor engages - replace battery. |
| Short run time/runs slow Riders weight | Do not exceed 120 lb (54 kg) maximum weight limit. |
| Riding conditions | Use only on flat, dry surfaces. Avoid inclines and areas with heavy debris. |
| Battery not fully charged | Charge product for a full 12 hours. |
| Old/damaged battery | Replace battery. |
| Charge battery at least once a month when not in use. | |
| Do not store product in freezing or below freezing temperatures. Freezing will permanently damage the battery and greatly reduce ride time. | |
| Refer to page 5 for charging information. | |
Runs intermittently Loose connection(s) Check the wires around the throttle and connectors inside the battery box.
Replace push-button throttle.
For more troubleshooting tips, a list of available replacement parts or to locate an authorized Service Center in your area, visit our website at www.razor.com or call toll free +1 866-467-2967 to speak to a live Customer Service Representative.
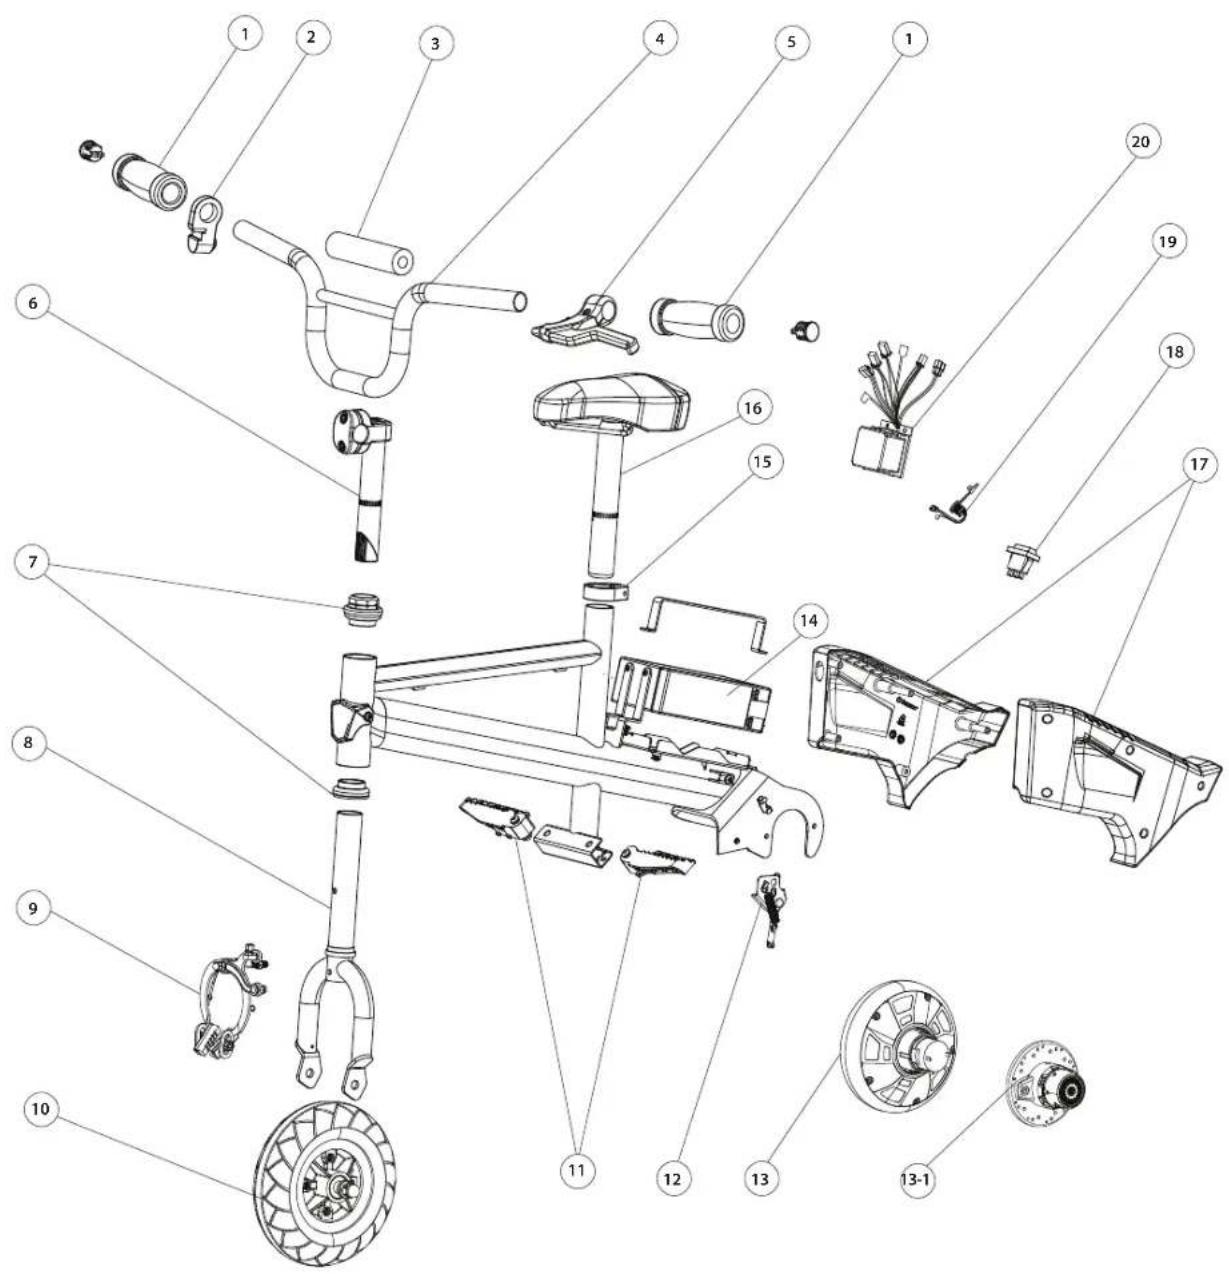
E-PUNK ELECTRIC MINI BIKE PARTS
Keep your electric product running for years with genuine Razor parts. Visit our website or e-mail us for more information on spare part availability. (Specifications subject to change without notice.)
- Handlebar Grips (Right/Left)
- Push-Button Throttle
- Handlebar Pad
- Handlebar
- Brake Lever Assembly
- Handlebar Stem
- Headset (Upper/Lower)
-
Front Fork
-
Front Caliper Brake With Brake Pads
- Front Wheel Complete
- Foot Pedal (Left/Right)
- Kickstand
- Rear Wheel with Hub Motor Complete 13-1. Motor Cover
- Battery (12V 6Ah)
-
Seat Clamp
-
Seat & Seat Post
- Battery Cover (Right/Left)
- On/Off Switch
- Charger Port
- Control Module
NOTICE: INSURANCE
YOUR INSURANCE POLICIES MAY NOT PROVIDE COVERAGE FOR ACCIDENTS INVOLVING THE USE OF THIS SCOOTER/ELECTRIC RIDE-ON PRODUCT. TO DETERMINE IF COVERAGE IS PROVIDED, YOU SHOULD CONTACT YOUR INSURANCE COMPANY OR AGENT.
FCC COMPLIANCE
This device complies with Part 15 of the FCC Rules. Operation is subject to the following two conditions: (1) This device may not cause harmful interference, and (2) this device must accept any interference received, including interference that may cause undesired operation.
Note: This equipment has been tested and found to comply with the limits for a Class B digital device, pursuant to part 15 of the FCC Rules. These limits are designed to provide reasonable protection against harmful interference in a residential installation. This equipment generates, uses and can radiate radio frequency energy and, if not installed and used in accordance with the instructions, may cause harmful interference to radio communications. However, there is no guarantee that interference will not occur in a particular installation. If this equipment does cause harmful interference to radio or television reception, which can be determined by turning the equipment off and on, the user is encouraged to try to correct the interference by one or more of the following measures:
- Reorient or relocate the receiving antenna.
- Increase the separation between the equipment and receiver.
- Connect the equipment into an outlet on a circuit different from that to which the receiver is connected.
- Consult the dealer or an experienced radio/TV technician for help.
WARNING: Changes or modifications to this product not expressly approved by Razor USA LLC, could void the user's authority to operate the equipment.
WARRANTY
Razor Limited Warranty
The manufacturer warranties this product to be free of manufacturing defects for a period of 90 days from date of purchase. This Limited Warranty does not cover normal wear and tear, tire, tube or cables, or any damage, failure or loss caused by improper assembly, maintenance, storage or use of the Razor E-Punk.
This Limited Warranty will be void if the product is ever:
• used in a manner other than for recreation or transportation;
- modified in any way;
- rented.
The manufacturer is not liable for incidental or consequential loss or damage due directly or indirectly to the use of this product.
Razor does not offer an extended warranty. If you have purchased an extended warranty, it must be honored by the store at which it was purchased.
For your records, save your original sales receipt with this manual and write the serial number below.
CUSTOMER SERVICE CONTACT INFORMATION
Need Help? Visit our website for replacement parts, product support, a list of authorized service centers in the US and customer service contact information at www.razor.com. Please have the product I.D. code (located on the white label of your product) available for better assistance. Additional Customer Service contact information is listed below:
AMERICAS
Razor USA LLC
P.O. Box 3610
Cerritos, CA 90703
USA
+1 866 467 2967
Monday - Friday
8:00 AM - 5:00 PM Pacific Time
customersupport@razorusa.com
EUROPE, MIDDLE EAST, AFRICA
Razor USA LLC (Europe)
Handelsweg 2
2742 RD Waddinxveen
Netherlands
+44 (0) 120 267 2702
info@razoreu.com
ASIA
Razor USA LLC (Asia)
P.O. Box 3610
Cerritos, CA 90703
USA
+81 50 7579 6622
info@razor-asia.com
DISTRIBUTED IN THE UK AND IRELAND BY:
Re:creation Limited
2 Meadows Business Park
Station Approach, Blackwater
Camberley, Surrey GU17 9AB
United Kingdom
+44 (0) 118 973 6222 Tel
+44 (0) 118 973 6220 Fax
sales@recreationltd.co.uk
DISTRIBUTED IN AUSTRALIA BY:
Funtastic Limited
Suite 2.01, Level 2
315 Ferntree Gully Road
Mount Waverley Vic 3149,
Australia
+1 800 244 543
info@funtastic.com.au
IMPORTED IN JAPAN BY B-PLUS ASIA CORP.
Razor USA LLC
THE RIRSTIK COMPANY
Kurokawa 3-1, Asaoku,
Kawasaki, Kanagawa
215-0035 JAPAN
+81 (0) 44 328 9067
info@razor-asia.com
Printed in China for Razor USA LLC.
Copyright © 2003-2018 Razor USA, LLC. All rights reserved. Razor® and the Razor logo design are among the registered trademarks of Razor USA LLC in the United States and/or select foreign countries. E-Punk logo design is a trademark of Razor USA LLC.

- OWNER'S MANUAL
- CONTENTS
- SAFETY WARNINGS
- Keep this product away from small children and remember that it is intended for use only by persons who are, at a minimum, completely comfortable and competent while operating the E-Punk.
- CHECK AND MAINTAIN E-PUNK CONDITIONS
- ACCEPTABLE RIDING PRACTICES AND CONDITIONS
- PROPER RIDING ATTIRE
- USING THE CHARGER
- BEFORE YOU BEGIN
- MAKE SURE POWER IS TURNED "OFF" BEFORE CONDUCTING ANY ASSEMBLY OR MAINTENANCE PROCEDURES.
- □ Estimated Assembly and Set-Up Time
- WARNING:
- Product ID Locations:
- Plastic Bag Contents:
- ASSEMBLY AND SET-UP
- □ Attaching the Handlebars
- □ Attaching the Seat
- □ Inflating the Tire
- CHARGING THE BATTERY
- WARNING: Use ONLY
- PRE-RIDE CHECKLIST
- Brake
- Wheels
- Tire
- Frame, Fork and Handlebars
- Hardware/Loose Parts
- Safety Gear
- Laws and Regulations
- Insurance
- USAGE
- □ Starting the E-Punk
- □ Stopping the E-Punk
- REPAIR AND MAINTENANCE
- Turn power "OFF" before beginning repair or maintenance:
- □ Adjusting the Brakes
- □ Front Tire Replacement
- Right Side (Push-Button Throttle)
- Middle
- Left Side (Brake)
- ☐ Hub Motor/Battery Replacement
- ☐ Hub Motor/Battery Replacement Cont'd
- Note:
- Left Side
- Right Side
- Frame
- □ Cleaning Your E-Punk
- □ Battery Care and Disposal
- □ Charger
- □ Replacement Parts
- Repair Centers
- TROUBLESHOOTING GUIDE
- E-PUNK ELECTRIC MINI BIKE PARTS
- FCC COMPLIANCE
- WARRANTY
- Razor Limited Warranty
- CUSTOMER SERVICE CONTACT INFORMATION
- AMERICAS
- EUROPE, MIDDLE EAST, AFRICA
- ASIA
- DISTRIBUTED IN THE UK AND IRELAND BY:
- DISTRIBUTED IN AUSTRALIA BY:
- IMPORTED IN JAPAN BY B-PLUS ASIA CORP.
Brand : RAZOR
Model : E-Punk
Category : Scooter