
Hamburg 990 DAB - Gps BLAUPUNKT - Free user manual and instructions
Find the device manual for free Hamburg 990 DAB BLAUPUNKT in PDF.


| Product Type | GPS Navigation with DAB+ Radio |
| Display | 7-inch Touchscreen, 800x480 pixels |
| Dimensions (approx.) | 180 x 110 x 20 mm |
| Weight (approx.) | 250 g |
| Power Supply | 12V Car Adapter (cigarette lighter) |
| Battery | Built-in rechargeable Li-ion battery |
| Navigation Software | TomTom-based with voice guidance |
| Map Coverage | Preloaded maps with lifetime updates |
| Radio | DAB+ Digital Radio with FM tuner |
| Bluetooth | Hands-free calling and audio streaming |
| Traffic Information | Real-time traffic (online/radio) |
| Lane Guidance | Lane information and signposts |
| Speed Limit Alerts | Visual and audio warnings |
| Points of Interest | Built-in POI database with quick search |
| Multipoint Routing | Plan routes with multiple waypoints |
| Off-Road Mode | Straight-line navigation without roads |
| Maintenance | Clean with a soft, dry cloth; avoid liquids |
| Safety | Do not operate while driving; mount securely |
| Spare Parts & Repairability | Contact Blaupunkt service center; no user-serviceable parts |
| General Information | 85-page manual; supports multiple languages |
Frequently Asked Questions - Hamburg 990 DAB BLAUPUNKT
User questions about Hamburg 990 DAB BLAUPUNKT
0 question about this device. Answer the ones you know or ask your own.
Ask a new question about this device
Download the instructions for your Gps in PDF format for free! Find your manual Hamburg 990 DAB - BLAUPUNKT and take your electronic device back in hand. On this page are published all the documents necessary for the use of your device. Hamburg 990 DAB by BLAUPUNKT.
USER MANUAL Hamburg 990 DAB BLAUPUNKT
MULTIMEDIA NAVIGATION
SERIES 990 DAB

Enjoy it.
Table of contents
1 Getting started....5
1.1 Initial set-up....5
1.2 Screen controls....6
1.2.1 Using the buttons and other controls....7
1.2.2 Using the cursor 8
1.2.3 Using the keyboard....8
1.2.4 Using touch gestures....10
1.2.5 Manipulating the map .... 10
1.3 Navigation view.... 12
1.3.1 Streets and roads....14
1.3.2 GPS position markers....15
1.3.3 Turn preview and next street....15
1.3.4 The planned route....16
1.3.5 Manoeuvre icons....16
1.3.6 Lane information....18
1.3.7 Signposts ....18
1.3.8 Junction view....18
1.3.9 Tunnel view 19
1.3.10 Motorway services....19
1.3.11 3D object types ....20
1.3.12 Traffic events....20
1.4 Navigation menu....21
2 Warnings and safety information....24
3 Using the navigation....25
3.1 Selecting a destination....25
3.1.1 Using combined search....25
3.1.2 Selecting an address....28
3.1.2.1 Entering an address....28
3.1.2.2 Selecting a town centre....30
3.1.2.3 Selecting the midpoint of a street....31
3.1.2.4 Selecting an intersection in a town....32
3.1.2.5 Using the postcode to select a destination....33
3.1.3 Selecting a Place of Interest....33
3.1.3.1 Using Quick search categories 34
3.1.3.2 Searching by category 35
3.1.3.3 Searching by name....37
3.1.3.4 Finding help nearby 39
3.1.4 Selecting a Saved Location .... 40
3.1.5 Selecting a History item....41
3.1.6 Selecting a saved route 42
3.1.7 Entering coordinates 43
3.1.8 Selecting a location on the map ....44
3.1.9 Planning a Multipoint Route ....45
3.2 Checking route information and alternatives.... 46
3.3 Checking Traffic Events.... 47
3.4 Editing the route.... 49
3.4.1 Setting a new starting point ....49
3.4.2 Adding an additional destination....50
3.4.3 Modifying the list of destinations....51
3.4.4 Saving the planned route....51
3.4.5 Deleting the planned route....52
3.4.6 Selecting a route alternative when planning the route....52
3.4.7 Selecting a route alternative for an existing route....53
3.4.8 Setting a detour....54
3.4.9 Pausing guidance....55
3.5 Saving a location 55
3.5.1 Editing a saved location....56
3.6 Running a Simulation....57
3.7 Off-road navigation....58
3.7.1 Switching to off-road navigation....58
3.7.2 Selecting the destination in off-road mode....58
3.7.3 Navigating in off-road mode....58
4 Reference guide ....60
4.1 Concepts....60
4.1.1 2D/3D GPS reception ....60
4.1.2 Natural and TTS voices....60
4.1.3 Alert Points 60
4.1.4 Route calculation and recalculation....61
4.1.5 Smart Zoom....61
4.1.6 Speed limit warning....61
4.1.7 Historical traffic 62
4.1.8 Real-time traffic 62
4.1.9 Intelligent navigation 63
4.1.9.1 Congestion detour on highways....63
4.1.9.2 Real-time alternative routes....64
4.1.9.3 Parking around destination....64
4.1.9.4 Hints upon detour....64
4.2 Useful Information menu....65
4.2.1 Weather 66
4.2.2 Where Am I....66
4.2.3 Trip Monitor 67
4.3 Settings menu....68
4.3.1 Route preferences settings ....70
4.3.1.1 Vehicle profile....70
4.3.1.2 Route Planning Method types....72
4.3.1.3 Navigation Mode....73
4.3.1.4 Road types....73
4.3.2 Sound settings ....74
4.3.3 Warnings settings....76
4.3.4 Navigation View settings 77
4.3.5 Regional settings 79
4.3.6 Display settings....80
4.3.7 Traffic settings....80
4.3.8 Weather settings....81
4.3.9 Trip Monitor settings....81
5 Troubleshooting....82
5.1 GPS signal cannot be received....82
5.2 Address cannot be found....82
5.3 The calculated route is not optimal.... 82
5.4 Disabling the speed limit warning 83
5.5 Keyboard buttons are greyed out....83
5.6 The map is hidden behind an image of a junction.... 84
6 Copyright note 85
1 Getting started
Blaupunkt is optimised for in-car or pedestrian use. You can use it easily by tapping the screen buttons and the map with your fingertips.
When you start using the product, you can download new maps in the next.
1.1 Initial set-up
When using the navigation software for the first time, an initial set-up process starts automatically.
Select
- Select your preferred language, then tap to confirm your selection. Later you can change it in Regional settings (page 79).

- Read the end-user licence agreement, and tap ____ if you agree with the terms of use.

Next
- The Configuration Wizard starts. Tap to continue.
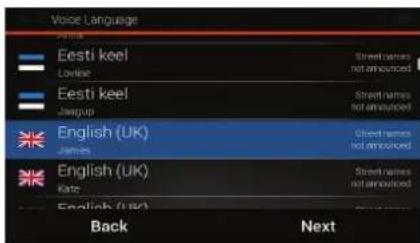
- Select the language and speaker used for voice guidance messages. Later you can
change it in Regional settings (page 74). Tap
Next

to continue.
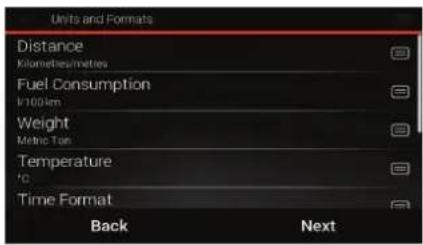
- If needed, modify the time format and unit settings. Later you can change them in
Regional settings (page 79). Tap

to continue.
- If needed, modify the default route planning options. Later you can change them in
Route Preferences (page 70). Tap

to continue.

- The initial set-up is now complete, tap to enter the Navigation view.

1.2 Screen controls
The following sections describe the functionality and use of buttons, sliders, and other screen controls in Blaupunkt.
1.2.1 Using the buttons and other controls
To operate Blaupunkt, tap the buttons on the touch screen.
| Type | Example | Description | Function |
| Button |  | Opens a new screen where you can set a parameter. | Tap it once. |
| Button with value |  | Displays the current value of a field or setting where the value can be changed. After the change, the new value is shown on the button. | Tap it once. |
| Icon |  | Provides additional information, for example traffic summary or itinerary. | Tap it once to open a screen with additional information or options. |
| List |  | Shows multiple options. | Grab the list anywhere and slide your finger up or down. Depending on the speed of sliding, the list scrolls fast or slow, only a bit or till the end. |
| Switch | 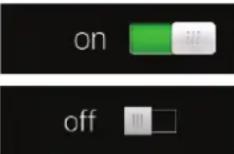 | Shows whether a feature is enabled when there are only two choices. | Tap it to turn the switch on or off. |
| Slider |  | When a feature can be set to different values in a range, Blaupunkt shows an indicator on a gauge that displays and sets the value. | Drag the handle to move the slider to its new position.Tap the slider where you want the handle to appear. |
| Virtual keyboard | 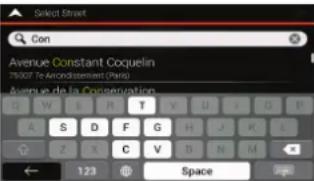 | Used to enter text and numbers. | Each key is a touch screen button. |
The Navigation menu may contain several menu items on one or more pages.
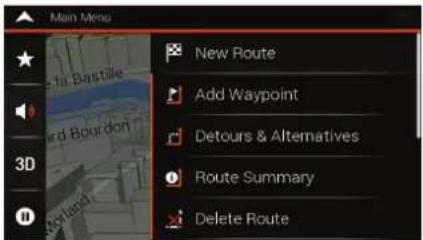
You need to confirm selections or changes only if the application needs to be restarted, if it needs to perform a major reconfiguration, or if you are about to lose some of your data or settings. Otherwise, Blaupunkt saves your selections and applies the new settings without confirmation as soon as you use the controls.
1.2.2 Using the cursor
You can select a map location in the following ways:
- By tapping the map when navigating
- By tapping the map when you are asked to confirm the destination at the end of a search.
When a map location is selected, the cursor ( ) appears at the selected point on the map.
The location of the cursor can be used as the destination of the route, you can search for Places around it, or you can add this location to your saved locations.
You can also select some of the objects on the map. If you tap the map at the icon of a Place, the object is selected, and you can get information about this object or you can use it as a route point.
1.2.3 Using the keyboard
You can type with your fingertips on the screen keyboards and you can switch between various keyboard layouts, for example English, Greek or numerical. Only those keyboard buttons are active that can be used to type a name that is available on the map. The other keys are greyed out.
| Action | Function |
| Switching to another keyboard layout, for example from an English keyboard to a Greek keyboard | Tap  and select the new keyboard layout from the list. and select the new keyboard layout from the list. |
| Correcting your entry on the keyboard |  Tap to remove the unnecessary character(s). Tap and hold the button to delete several characters or the entire input string. Tap to remove the unnecessary character(s). Tap and hold the button to delete several characters or the entire input string. |
| Entering a space, for example between a first name and a family name or in multi-word street names | Space Tap the button at the bottom centre of the screen. |
| Entering upper and lower case letters | By default, when entering a text, the first character appears in upper case while the rest of the text is in lower case. Tap to enter an upper case letter or tap it twice to turn on Caps Lock. Tap again to use lower case letters. |
| Entering numbers and symbols | 123 Tap to switch to a keyboard offering numbers and symbols. |
| Finalising the keyboard entry |  Tap Tap |
| Starting a search for a keyboard entry |  Tap Tap |
| Hiding the keyboard |  Tap Tap |
1.2.4 Using touch gestures
You usually need to tap the screen only once. However, some useful features can be accessed with other gestures. See the table below.
| Action | Function |
| Tapping and holding the screen | Tap and keep pressing the following buttons to reach extra functions: Tap and hold the following button on list and menu screens to show the Navigation view:  Tap and hold any of the following buttons on the Navigation view to rotate, tilt, or scale the map continuously: Tap and hold any of the following buttons on the Navigation view to rotate, tilt, or scale the map continuously:  Tap and hold the following button on keyboard screens to quickly delete several characters: Tap and hold the following button on keyboard screens to quickly delete several characters:  |
| Dragging | Drag the screen in the following cases: To move the handle on a slider. To scroll a list: grab the list anywhere and slide your finger up or down. Depending on the speed of the sliding, the list scrolls faster or slower, only a bit or till the end. To move the map in map browsing mode: grab the map, and move it in the desired direction. |
| Using pinch zoom | Use pinch zoom on the Navigation view to zoom in and out by moving two fingers in a pinch gesture. |
1.2.5 Manipulating the map
If you tap the map anywhere during navigation, the map stops following the current position (the blue arrow is not locked in a fix position on the screen anymore) and control buttons appear to help you modify the map view.
You can perform the following actions on the map:
| Action | Button(s) | Function |
| Checking location information | No buttons | The top section of the Navigation view shows information about the selected point (the cursor). |
| Moving the map by dragging | No buttons | Move the map in any direction: tap and hold the map and move your finger towards the direction you want to move the map. |
| Zooming in and out |  | Change how much of the map is displayed on the screen.Blaupunkt uses maps that let you examine the locations at various zoom levels, always with optimised content. It always displays street names and other text with the same font size, never upside-down, and you only see the streets and objects that you need.Map scaling has a limit in 3D map view mode. If you zoom out further, the map switches to 2D view mode.Tap once to modify the view in a large step, or tap and hold the button to modify it continuously and smoothly. |
| Tilting up and down |  | Change the vertical view angle of the map in 3D mode.Tap once to modify the view in a large step, or tap and hold the button to modify it continuously and smoothly. |
| Rotating left and right |  | Changes the horizontal view angle of the map.Tap once to modify the view in a large step, or tap and hold the button to modify it continuously and smoothly. |
| Changing 2D, 3D, or 2D North up views |  | Switch between the 3D perspective, 2D Heading up, and 2D North up map view modes. In Heading up mode the map is rotated so its top always points in the current driving direction. This is the default orientation in 3D map view mode. In North up mode, the map faces North. |
| Checking the compass | The direction of the compass shows North. | |
| Selecting additional options | [cxhc] | Open a list of additional features like saving a location, or searching for Places around the cursor. |
| Selecting a destination | Select as Destination | Select the cursor location as a new destination. The route is automatically calculated. |
1.3 Navigation view
The navigation view is the main screen of Blaupunkt that shows the planned route on a map. Blaupunkt works with digital maps which are not simply the computerised versions of traditional paper maps. Similarly to paper road maps, the 2D mode of digital maps shows you streets and roads. Elevation is also illustrated in colour.
The navigation view displays the following screen buttons, data fields, and route information on the map during navigation:

Note! Some buttons, fields, or icons may not be available in your product version.
| Number | Name | Description |
| 1 | Current position marker | The current position is displayed as a blue arrow by default. When there is no GPS position, the current position marker is transparent and it shows your last known position. See page 15. |
| 2 | GPS position | The dot near the arrow shows the GPS position as perceived by the GPS receiver. See page 15. |
| 3 | Planned route | The planned route is displayed as an orange line. |
| 4 | Data fields | Three data fields show the following information:The estimated time of the arrival at the destination.The remaining time of the trip.The remaining distance to the destination.Tap this area to access the Trip Computer screen with additional information about the current trip on a dashboard.You can change the default values in Settings (page 77) or by tapping and holding the area where the data fields appear.If you have not selected a destination, you can see your heading instead of the three data fields. |
| 5 | Next turn preview | It shows the type of the next manoeuvre and its distance. See page 15. |
| 6 | Second next turn preview | It shows the type of the second next manoeuvre if it is near the first one. See page 15. |
| 7 | Next street | It displays the name of the next street. See page 15.If you have not selected a route destination, you can see nearby house numbers, if they are available. |
| 8 | Parking around destination | It appears near the destination. By tapping it, you can check the available parking facilities around your destination. See page 64. |
| 9 | Destination menu | It appears near the destination. By tapping it, you can check the trip summary, find Places around your final destination, save the current location, switch to pedestrian navigation or suspend the navigation. |
| 10 | Traffic | It shows traffic-related information. See page 47. |
| 11 | Lane information | On multi-lane roads, it shows the lanes ahead and their directions. The highlighted arrows represent the lanes and direction you need to take. See page 18. |
| 12 | Alert point warning | It shows the type of the alert points when approaching Alert Points like school zones or railroad crossings. You must make sure that using this feature is legal in the country where you intend to use it. See page 76. |
| 13 | Speed limit warning | It shows the current speed and the speed limit when speeding. See page 76. |
| 14 | Signpost | It shows the available destinations and the road numbers. See page 18. |
| 15 | Motorway services | By tapping it, you can check the details of the next few service stations (petrol stations, restaurants) when travelling on a motorway. See page 19. |
| 16 | Navigation menu | By tapping it, you can open the Navigation menu, where you can reach other parts of Blaupunkt . |
| 17 | Street name | It shows the current street name. By tapping it, you can open the Where Am I screen. See page 66. |
| 18 | 3D objects | They display hills, mountains, roads, landmarks, and buildings in 3D. |
If you are approaching a motorway exit or a complex intersection and the needed information exists, the map is replaced with a 3D view of the junction. See page 18.

When entering a tunnel, the map is replaced with a generic tunnel image. See page 19.

1.3.1 Streets and roads
Blaupunkt shows the streets similarly to paper road maps. Their width and colours correspond to their importance; you can easily tell a motorway from a small street.
1.3.2 GPS position markers
When your GPS position is available, Blaupunkt marks your current position. By default, this marker is a blue arrow. The dot near the arrow shows the GPS position as perceived by the GPS receiver.
The exact location of the current position marker depends on the vehicle type used for route calculation and the navigation mode. Both can be set in Route preferences (page 70).
- If you choose pedestrian and/or off-road navigation, the position marker is at your exact GPS position. The direction of the icon shows your current heading.
- In all other cases, the position marker may not show your exact GPS position and heading. If roads are near, the GPS position is locked on the road and aligned to the nearest road to suppress GPS position errors, and the direction of the icon is aligned to the direction of the road.
1.3.3 Turn preview and next street
When navigating a route, the top section of the Navigation view shows information about the next route event (manoeuvre) and the next street or the next town.

There is a field in the top left corner displaying the next manoeuvre. Both the type of the manoeuvre (turn, roundabout, exiting motorway, and so on) and its distance from the current position are displayed.
A smaller icon shows the type of the second next manoeuvre if it is near the first one. Otherwise, only the next manoeuvre is displayed. Tap the icon of the actual manoeuvre to open the itinerary screen.
1.3.4 The planned route
The planned route is the currently navigated route. Whenever the destination is set, the route is active until you delete it, reach your destination or suspend navigation. Blaupunkt displays the route in the following ways:
| Symbol | Name | Description |
 | Current GPS position and starting point | It is your current position displayed on the map.In pedestrian mode it is the GPS position.If a vehicle is selected for route calculation and roads are near, the arrow jumps to the nearest road.Normally, if GPS position is available, the route starts from the current position. If there is no valid GPS position, Blaupunkt uses the last known position as the starting point. |
 | Waypoint (intermediate destination) | It is an intermediate destination of the route before reaching the final destination. |
 | Destination (end point) | It is the final destination of the route. |
| Route colour | The route always stands out with its colour on the map, both in daytime and night colour modes. | |
| Streets and roads that are excluded from the navigation | You can choose whether you want to use or avoid certain road types (page 70). However, when Blaupunkt cannot avoid such roads, the route includes them and shows them in a colour that is different from the route colour. | |
| Streets and roads that are affected by traffic events | Road segments may be affected by traffic events. These streets and roads are displayed in a different colour, and small symbols displayed along the route show the type of the traffic event. |
1.3.5 Manoeuvre icons
During navigation the next manoeuvre is displayed in the top left corner. Most of the manoeuvre icons are intuitive. The following table lists some of the frequently shown route events:
| Icon | Function |
 | Turn left. |
 | Turn right. |
 | Turn back. |
 | Bear right. |
 | Turn sharp left. |
 | Keep left. |
 | Continue straight in the intersection. |
 | Enter the roundabout and take the first exit (next manoeuvre). |
 | Enter the roundabout (second next manoeuvre). |
 | Enter the motorway. |
 | Exit the motorway. |
 | Board the ferry. |
 | Leave the ferry. |
 | Approaching a waypoint on the right. |
 | Approaching the destination. |
1.3.6 Lane information
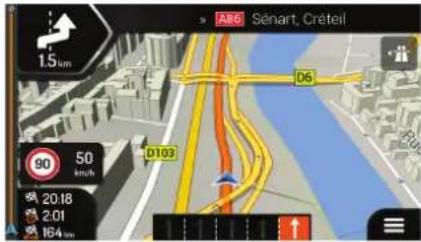
When navigating on multi-lane roads, it is important to take the appropriate lane in order to follow the planned route. If lane information is available in the map data, Blaupunkt displays the lanes and their directions using small arrows at the bottom of the map. Highlighted arrows represent the lanes and the direction you need to take.
1.3.7 Signposts
If necessary information is available, Blaupunkt displays signposts at the top of the map. The colour and style of the signposts are similar to the real ones you can see above roads or by roadsides. They show the available destinations and the road numbers.
All signposts look similar when cruising (when there is no planned route). During navigation only the signpost that points to the lane(s) to be taken is highlighted; all the others are darker.
If you want to hide the currently displayed signposts, tap any of them and the normal Navigation view returns until new signpost information is received.

You can modify the signpost settings in (page 77).
1.3.8 Junction view
If you are approaching a motorway exit or a complex intersection and the needed information exists, the map is replaced with a 3D view of the junction. The lanes you need to take are displayed with arrows. At the top of the screen, road signs show you additional information.
If you want to hide the currently displayed junction and return to the Navigation view, tap the picture.
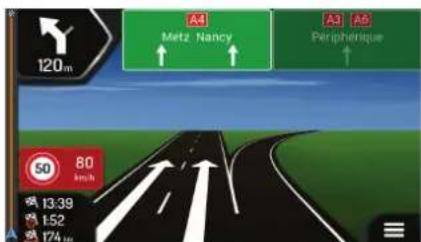
Junction view can be turned off in

See page 77.
1.3.9 Tunnel view
When entering a tunnel, the map is replaced with a generic tunnel image so that surface roads and buildings cannot distract you.
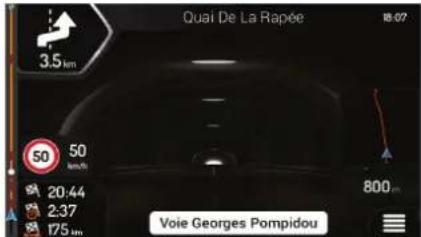
The top-down overview of the tunnel displayed in a separate window helps you orientate yourself. The remaining distance in the tunnel is also displayed.
After leaving the tunnel, the original map view returns.
Tunnel view can be turned off in

See page 77.
1.3.10 Motorway services
When you are driving on a motorway, the button appears at the top right corner of the Navigation view. Tap it to open a panel with the details of the next few service stations (petrol stations, restaurants).


Tap any of them to display the exit area on the map. You can now easily add this service station as a waypoint to your route if necessary.
If you want to display other types of Places at the next few service stations, you can change
the icons in
See page 77.
1.3.11 3D object types
Blaupunkt supports the following 3D object types:
| Type | Description |
| 3D terrain | Blaupunkt displays 3D hills and mountains in the Navigation view, and illustrates them by colouring and shading on the 2D map. |
| Elevated roads | Elevated roads are complex intersections and vertically isolated roads (such as overpasses or bridges) displayed in 3D. |
| 3D landmarks | Landmarks are 3D representations of prominent or well-known objects. |
| 3D buildings | 3D buildings are block representations of full town building data containing actual building sizes and positions on the map. |
1.3.12 Traffic events
Road segments affected by traffic events are displayed in a different colour on the map.
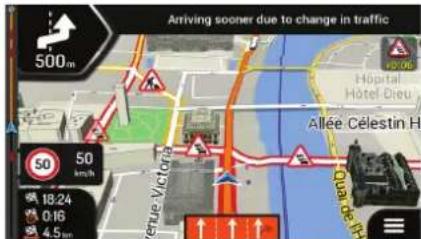
The following icons may appear at the top right corner of the screen:
| Button | Description |
 | It is displayed when traffic events are not received. |
 | It is displayed when traffic events are received but they do not affect the planned route. |
 | It shows the type of the next traffic event with the expected delay. |
 | It shows the type of the next traffic event if it does not cause any delay or the delay is not known. |
For more information, see page 47.
1.4 Navigation menu
On the Navigation view, tap

You can see the following menu options when you are navigating without a planned route:
| Button | Function |
| [TT40] New Route | Select your destination by entering an address or its coordinates, or by selecting a Place, a Saved Location, or a Saved Route. You can also look up your recent destinations from the History. |
| [8861] Multipoint Route | Build your route from one or more route points. You can also plan a route independently of your current GPS position by setting a new starting point. |
| [ZWBA] Traffic | Check the traffic events affecting your route, or view historical traffic data. |
| [AWAS] Jseful Information | Access additional options and check navigation-related information. |
| [kHWT] Settings | Customise the way the navigation software works. |
| [VZYX] About | The About section provides you with product information. Read the Software and Database End User License Agreement, or check the map and other contents of the application. You can also access program usage statistics. |
| [COAA] Exit | Stop the navigation and exit the software. |
With a planned route, the following menu options are also available:
| Button | Function |
 | Add an intermediate destination to your route. |
 | See route alternatives to avoid parts of the route, or to avoid a specific road from your planned route. |
 | View the route in its full length on the map and check route parameters and route alternatives. Tap to access additional options, like Simulation or Route Preferences. |
 | Delete your route. |
 | Delete the next waypoint or the whole route. It is displayed if there is a multipoint route. |
In the navigation menu, you have the following additional options:
| Button | Function |
 | Open the Saved Locations screen where you can save a location as a favourite destination or edit a saved location. |
 | Set the volume or mute the navigation. |
 | Switch to 2D (2D), 2D North up (1) view or back to 3D mode. |
 | Suspend navigation. |
 | Resume navigation. |
 | Check those notifications that contain important information but do not require immediate action from the users. If there are no notifications, this icon is not displayed. |
 | The Menu button appears when the Navigation view is displayed. Tap it to open the Navigation menu. |
 | The More button appears on the screen to display additional features. Tap it to open the list of additional features on certain screens. |
 | Tap the Back button to return to the previous screen. You can also press and hold this button to quickly return to the Navigation view from any other screen. |
2 Warnings and safety information
The navigation system helps you find your way to your destination with the built-in GPS receiver. Blaupunkt does not transmit your GPS position; others cannot track you.
It is important to look at the display only when it is safe to do so. If you are the driver of the vehicle, we recommend that you plan and review your route before you start your journey. Plan the route before your departure and stop if you need to change the route.
You must follow the traffic rules. If you deviate from the planned route, Blaupunkt changes the instructions accordingly.
3 Using the navigation
By default, Blaupunkt calculates routes using the road network of the maps provided with the product.
You can select the destination and start navigating to it right away (normal navigation) if you need a route for immediate navigation.
You can also plan a route independently of your current GPS position even without GPS reception. To achieve this, you need to set a new starting point in the Multipoint Route menu. It also suspends guidance so that the route is not recalculated when a new position is received. See Page 49.
You can plan routes with multiple destinations by selecting a first and a second destination and adding it to your route. You can add as many destinations to your route as you like. See Page 45.
You can also use Blaupunkt for off-road navigation. See page 58.
3.1 Selecting a destination
You can choose your destination by selecting one of the following options:
- Using combined search to search among different destination types at once, see page 25
- Entering a full address or a part of an address, for example a street name without a house number, see page 28
- Selecting a Place as your destination, see page 33
- Selecting a previously saved location as your destination, see page 40
- Selecting a location from the History of previously used destinations, see page 41
- Selecting a previously saved route, see page 42
- Entering the coordinate of the destination, see page 43
- Selecting a location on the map, see page 44
- Planning a multipoint route, see page 45.
3.1.1 Using combined search
There are several ways to select your destination. You can initiate a separate search for addresses, Places, saved locations, or recent destinations, but the fastest way to search for any of these is to use combined search.
Perform the following steps to use combined search:

- Tap
on the Navigation view to access the Navigation menu.
- Tap

- Tap
You can see the input field at the top of the screen. Right search area, the town around which the search is carried out.
The default search area is the area where you are located. For a local search, skip the next step.

- (optional) To search in a different area, tap the input field with the search area, and start entering the name of the new search area on the keyboard.
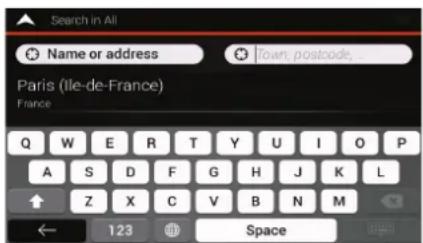
You only need to enter a few letters to get a result. The most likely result appears below the input field as you enter new letters.
a. If the new search area is in a different country, start entering the country and the town. It is usually enough to type the first few letters of the country or town and conventional abbreviations can also be used.
b. Tap

to see the whole list of the matching results.
- With the proper search area displayed, start entering the name, address, or category of the destination you are looking for.

- Tap

to switch to the result screen. You can see all the results in or type. Addresses, Places, Place categories, Saved locations, are mixed in one list. You can immediately select the result youination or narrow the list of results for only one type (for

on the right side of the list and then tap the corresponding of search results by type (the number on the related icon matching results):

- Tap to see the list of recent destinations with a matching name or address.

- Tap to see the list of your saved locations with a matching name.

- Tap to see the list of matching addresses.

- Tap to see the list of matching Place category names. Scroll the list and select one of the categories. You get the list of Places in that category ordered by their distance from your current position.

- Tap to see the list of matching Places ordered by their distance from your current location.
- (optional) If your product contains Places from different data providers, you can further narrow the list by showing the results from one provider only. Look for the provider logos. Tap one of them to see Places from that provider.
Tip!
To search for an intersection in the combined search, enter the names of the streets connected by the '&' sign. You do not need to use spaces before and after the separator character. For example you can find the intersection of
Collins Street and Douglas Avenue by entering strings, like "Collins St & Douglas Ave", "Collins & Douglas", "Col&Doug", etc. The more precise the input string is, the fewer false results are expected. If you enter "Collins St&", you get all the intersections of Collins Street and you can select the appropriate one from the result list.
- Once the destination is selected, a full screen map appears with the selected point in the middle. If necessary, tap the map somewhere else to modify the destination. The

cursor ( ) appears in the new location.
- Check the settings for road types and change them if necessary.

Select as Destination
- Tap
destination.
to confirm the destination, or tap

lect a different
- The route is calculated and the map appears showing the entire route, where you can
check route information and route alternatives. Tap to modify the route parameters, or tap Start Navigation to start your journey.

3.1.2 Selecting an address
If you know at least a part of the address, this is the quickest way to select your destination. Using the same screen, you can find an address by entering the following information:
• The exact address, including the house number, see page 28
• The centre of a town, see page 30
• The midpoint of a street, see page 31
• An intersection, see page 32
- Any of the above, starting the search with the postal code, see page 33.
3.1.2.1 Entering an address
To enter an address as the destination, perform the following steps:
- Tap

on the Navigation view to access the Navigation menu.
- Tap
and

- By default, Blaupunkt proposes the country and town where you are (or in case there is no valid GPS position, the country and town of the last known position). If necessary, change the country, by performing the following steps:
a. Tap the Country field.
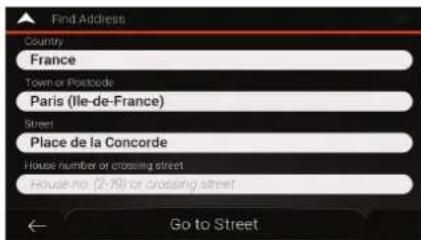
b. In the Select Country screen, you can immediately select a country from the list below the input field or start entering the first few letters of the country on the keyboard.
c. Tap list.

to open the list of results and select a country from the
- If necessary, select a new town by performing the following steps:
a. Tap the Town or Postcode field.
b. (optional) On the Town of Postcode screen, you can select a town from the list of suggestions.
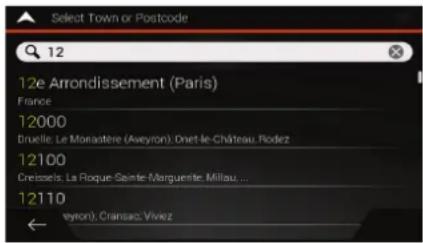
c. Otherwise, start entering the first few letters of the town. The names that match the string appear in a list.
d. To open the list, tap

and select the town.

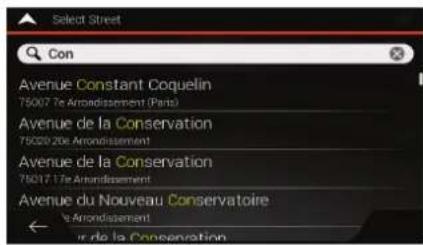
- Enter the street name by performing the following steps:
a. Tap the Street name field.
b. (optional) On the Select Street screen, you can immediately select a street from the list of suggestions.

c. Otherwise, start entering the street name on the keyboard. The names that match the string appear in a list.
d. Tap list.

to open the list of results. Select the street from the

-
A full screen map appears with the selected point in the middle. If necessary, tap the map somewhere else to modify the destination. The cursor ( ) appears at the new location.
-
Check the settings for road types and change them if necessary.

Select as Destination
-
Tap to confirm the destination. You can also select a nearby point on the map or tap to select a different destination.
-
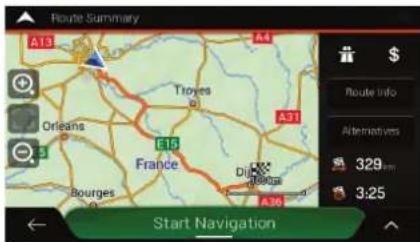
The route is calculated and the map appears showing the entire route, where you can
check route information and route alternatives. Tap to modify the route parameters, or tap Start Navigation to start your journey.
3.1.2.2 Selecting a town centre
The town centre is not the geometric centre of the town but an arbitrary point the map creators have chosen. In towns and villages, it is usually the most important intersection and in larger towns, it is one of the important intersections.
- Go to


ntry as described
earlier (page 28), if necessary.
- If necessary, select a new town by performing the following steps:
a. Tap the Town or Postcode field.
b. (optional) On the Town of Postcode screen, you can select a town from the list of suggestions.

c. Otherwise, start entering the first few letters of the town. The names that match the string appear in a list.
d. To open the list, tap and select the town.


- Tap This way the centre of the displayed town becomes the destination of the route.
3.1.2.3 Selecting the midpoint of a street
To navigate to the midpoint of a street without entering the house number, perform the following steps:

-
Go to ____ and select the country and town as described earlier. The Select Street screen appears.
-
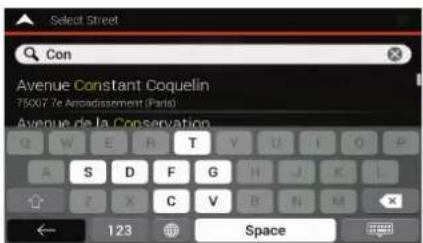
Enter the street name by performing the following steps:
a. Tap the Street name field.
b. (optional) On the Select Street screen, you can immediately select a street from the list of suggestions.

c. Otherwise, start entering the street name on the keyboard. The names that match the string appear in a list.
d. Tap list.

to open the list of results. Select the street from the


Go to Street
- Instead of entering the house number, tap street is selected as the destination.
The midpoint of the
3.1.2.4 Selecting an intersection in a town
To navigate to an intersection, perform the following steps:

- Go to
described earlier.
htry and city as
- Enter the street name by performing the following steps:
a. Tap the Street name field.
b. (optional) On the Select Street screen, you can immediately select a street from the list of suggestions.

c. Otherwise, start entering the street name on the keyboard. The names that match the string appear in a list.
d. Tap list

to open the list of results. Select the street from the

- Tap the House number or crossing street field and browse the list of crossing streets or start entering the street name in the field. Select one from the list.
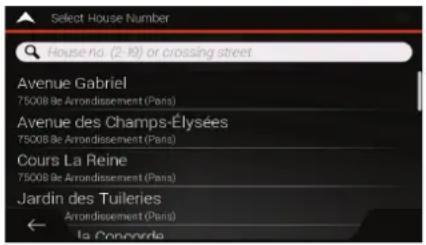
3.1.2.5 Using the postcode to select a destination
You can also select any kind of destination by entering the postal code instead of the city name. To select the postal code, perform the following steps:
- Go to

New Route

Address
Intry as described
earlier (page 28), if necessary.
- Tap the Town or Postcode field.
- Enter the postcode by performing the following steps:

a. Tap
to open the numeric keypad.
b. Start entering the postal code.
c. Tap

to open the list of results.
d. Find the place you need.

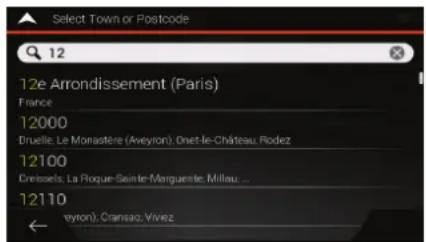
- Continue the search as described previously (page 28).
3.1.3 Selecting a Place of Interest
You can search for Places of Interest (Places) in the

menu.
Using the same screen, you can find a Place by selecting one of the following options:
- Finding frequently searched types of Places with the Quick search categories, see page 34
• Searching for a Place by its name, see page 37
• Searching for a Place by its category, see page 35
In case of emergency, you can also find help nearby, see page 39
3.1.3.1 Using Quick search categories
The Quick search feature helps you quickly find the most frequently selected types of Places. Perform the following steps:
- Tap

on the Navigation view to access the Navigation menu.
- Tap
and


The following Quick search categories appear:
: If a planned route exists, petrol stations are searched
: If a planned route exists, accommodation is searched on.

: If a planned route exists, restaurants are searched along
: If a planned route exists, parking lots are searched around
If there is no planned route (destination is not selected), the search is carried out around the current position. If the current position is not available either (no GPS signal), places are searched around the last known position.
- Tap any of the quick search buttons to get an instant list of Places.
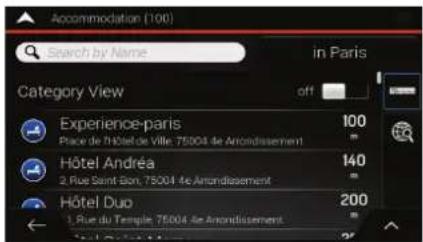
- The Places in the list can be ordered by their distance from the current or last known position, from the destination, or by the length of the necessary detour. If you need to
reorder the list, tap 🌐. To filter the list of results by providers, tap 🐐 and then the provider logo on the right side of the screen.
Search By Name
- (optional) If needed, tap
to further filter the list of results.
-
Browse the list and tap one of the list items. A full screen map appears with the selected point in the middle. The name and address of the Place is displayed at the top of the screen.
-
Tap

to see the details of the selected Place, or to save the location. If there is a number saved for this Place, you can make a call to that number by tapping button at the bottom.

-
If necessary, tap the map somewhere else to modify the destination. The cursor ( ) appears at the new location.
-
Check the settings for road types and change them if necessary.

Select as Destination
- Tap

to confirm the destination. You can also select a nearby point
on the map or tap
to select a different destination.
- The route is calculated and the map appears showing the entire route, where you can
check route information and route alternatives. Tap

to modify the route
parameters, or tap
Start Navigation
to start your journey.

3.1.3.2 Searching by category
To search for Places by their categories and subcategories, perform the following steps:
- Tap

on the Navigation view to access the Navigation menu.
- Tap

and
- Tap

- Select the area around which you would like to search for the Place by tapping
Around Here
By default, the search area is around the current position (or if it is not available, around the last known position). In this case, the following result list is ordered by the distance from this position.
Along Route
- Tap ____ to search along the planned route, and not around a given point. This is useful when you search for a later stopover that results in a minimal detour only, such as searching for upcoming petrol stations or restaurants. (The result list is ordered by the length of the necessary detour.)
Around Destination
- Tap to search for a place around the destination of the planned route. (The result list is ordered by the distance from the destination.)
In a Town
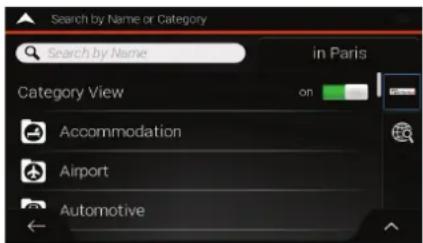
- Tap ____ to search for a place within a selected town. (The result list is ordered by the distance from the centre of the selected town.)

In a Town
- (optional) If you have selected ____ select the town to search in.

- Select one of the main Place categories (for example, Accommodation), then browse the subcategories (for example, Hotel or Motel) to find your destination.
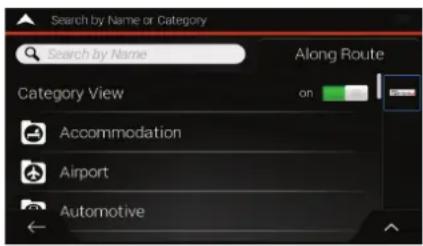
- You can turn the Category View off at any level to list all Places around the selected location or along the route.

-
(optional) The Places in the list can be ordered by the following criteria:
-
Name
• Their distance from the current or last known position
• Their distance from the selected town
• Their distance from the destination
• The length of the necessary detour.
Tap to reorder the list.

To filter the list of results by providers, tap right side of the screen.
and then the provider logo on the
- Browse the list and tap one of the list items. A full screen map appears with the selected point in the middle. The name and address of the Place is displayed at the top of the screen.
- The process continues the same way as in case of any other search for Places. See page 34.
3.1.3.3 Searching by name
To search for a Place by name, browse the various Place categories, or use the mixture of the two search types, perform the following steps:
- Tap

on the Navigation view to access the Navigation menu.
- Tap

and

- Tap

to open the Search By Name or Category window.
- Select the area around which you would like to search for the Place. By default, the search area is around the current position (or if it is not available, around the last known position). In this case, the result list is ordered by the distance from this
position. Tap
to select one of the following search areas:
- Tap

to search for a place within a selected town. (The distance from the centre of the selected town.)
Around Destination
- Tap 📂 to search for a place around the destination of the planned route. (The result list is ordered by the distance from the destination.)
Along Route
- Tap using the route to search along the planned route, and not around a given position. This is useful when you search for a later stopover that results in a minimal detour only, such as searching for upcoming petrol stations or restaurants. (The result list is ordered by the length of the necessary detour.)

- (optional) If you have selected

select the town to search in.
You can search for the name of a Place in all categories by performing the following steps:

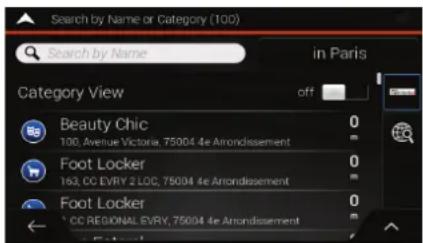
Using the keyboard, start entering the name of the Place or
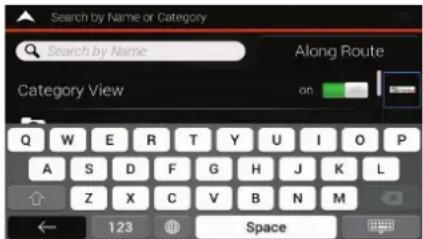

- After entering a few letters, tap to open the list of Places or Place categories with names containing the entered character sequence.
-
Browse the list, if necessary, and tap the desired list item. A full screen map appears with the selected point in the middle. The name and address of the Place is displayed at the top of the screen.
-
The process continues the same way as in case of any other Places search. See page 34.
3.1.3.4 Finding help nearby
To quickly search for nearby assistance, perform the following steps:
- Tap

on the Navigation view to access the Navigation menu.
- Tap

and


Places in the following pre-set search categories can be searched for around the current position (or around the last known position if the current position is not available):

- Tap any of the quick search buttons to get an instant list of those types of Places.

-
(optional) The Places in the list can be ordered by the following criteria:
-
By their distance from the current or last known position
- By name.
Tap

to reorder the list.
-
Browse the list and tap one of the list items. A full screen map appears with the selected point in the middle. The name and address of the Place is displayed at the top of the screen.
-
The process continues the same way as in case of any other Places search. See page 34.
3.1.4 Selecting a Saved Location
To select a location that you have already saved (page 55), perform the following steps:

- Tap
on the Navigation view to access the Navigation menu.

New Route
and

Saved Location
-
Tap
-
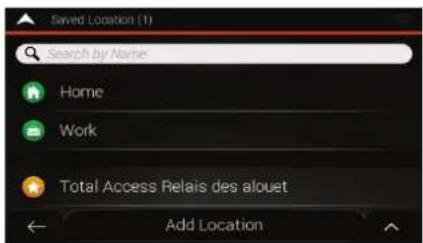
The list of saved locations is displayed. It contains two pre-set categories: Home and Work.
-
Tap the location that you want to set as your destination. If necessary, browse the list to see more results.
-
(optional) If needed, tap

to enable the editing option so that you can rename the of them.
-
After you have selected a saved location as the destination, a full screen map appears with the selected point in the middle.
-
If necessary, tap the map somewhere else to modify the destination. The cursor ( ) appears in the new location.

- Check the settings for road types and change them if necessary.


- Tap
to confirm the destination. You can also select a nearby point
on the map or tap

to select a different destination.
- The route is calculated and the map appears showing the entire route, where you can
check route information and route alternatives. Tap to modify the route parameters, or tap Start Navigation to start your journey.

3.1.5 Selecting a History item
The destinations that you have used earlier appear in the History list. Smart History offers these locations from your previous destinations, using parameters like the current time of day, the day of week, and the current location. The more you use the navigation software, the better it can guess your desired destination. To select a History item, perform the following steps:
- Tap

on the Navigation view to access the Navigation menu.
- Tap

Two of the Smart History Items are displayed in the New access. You can select one of them as your destination.


- To open all the history items, tap
The list of recent destinations
appears. The list begins with the three most likely destinations that are selected based on your previous routes (Smart History). The rest of the destinations are ordered by the time they were last selected. If necessary, scroll the list to see earlier destinations.
-
Select a destination from the list.
-
A full screen map appears with the selected point in the middle. If necessary, tap the
map somewhere else to modify the destination. The cursor ( ) appears at the new location.
- Check the settings for road types and change them if necessary.
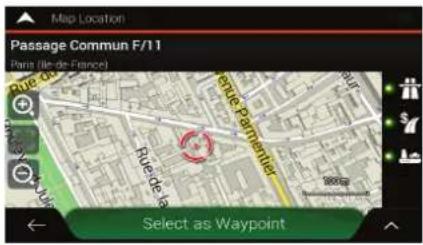
Select as Destination
-
Tap to confirm the destination. You can also select a nearby point on the map or tap to select a different destination.
-
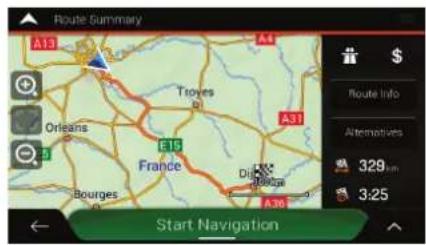
The route is calculated and the map appears showing the entire route, where you can check route information and route alternatives. Tap to modify the route Start Navigation parameters, or tap to start your journey.
3.1.6 Selecting a saved route
The routes that you have saved earlier appear in a list. To select a previous route, perform the following steps:
- Tap

on the Navigation view to access the Navigation menu.
- Tap

and

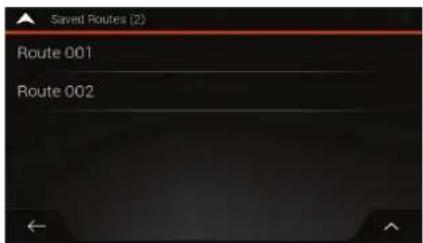
- The list of saved routes appears. If necessary, scroll the list to see earlier routes.
- Select a route and the Multipoint Route screen appears. If necessary, modify the saved
route. Otherwise, tap

- The route is calculated and the map appears showing the entire route, where you can


3.1.7 Entering coordinates
To select a destination by entering its coordinates, perform the following steps:
- Tap

on the Navigation view to access the Navigation menu.
- Tap

and
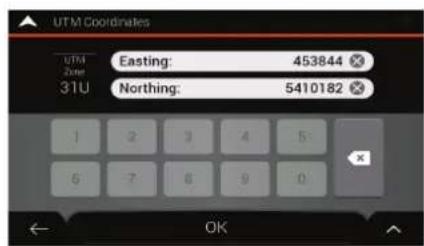
- You can enter the latitude and longitude values in any of the following formats: decimal degrees, degrees and decimal minutes, or degrees, minutes and decimal seconds.
Tap


(optional) If necessary, tap coordinate in UTM format.

then

Tip!
-
A full screen map appears with the selected point in the middle. If necessary, tap the map somewhere else to modify the destination. The cursor ( ) appears at the new location.
-
Check the settings for road types and change them if necessary.
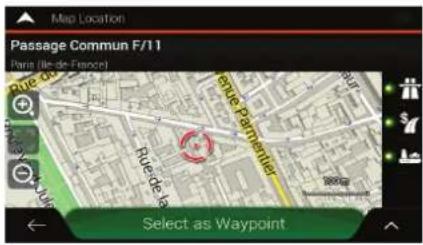
Select as Destination
- Tap
on the map or tap

to confirm the destination. You can also select a nearby point
to select a different destination.
- The route is calculated and the map appears showing the entire route, where you can
check route information and route alternatives. Tap

to modify the route
Start Navigation
parameters, or tap
to start your journey.

3.1.8 Selecting a location on the map
To select a map location, perform the following steps:
- Locate your destination on the map. Move and scale the map as necessary.


-
Tap the location that you want to select as your destination. The cursor ( ) appears there.
-
(optional) If needed, tap location.

to list the Places near the selected point or to save this

Tip!
If you already have a planned route, tap add the selected location to your route.

and

Select as Destination
-
Tap to select the cursor as the destination.
-
The route is calculated and the map appears showing the entire route, where you can
check route information and route alternatives. Tap to modify the route
Start Navigation
parameters, or tap to start your journey.

3.1.9 Planning a Multipoint Route
To build your route destination-by-destination, perform the following steps:

- Tap on the Navigation view to access the Navigation menu.


- There is only one line in the list of route points, the starting point of the route, which is normally the current GPS position.
Destination
-
Tap to select the destination.
-
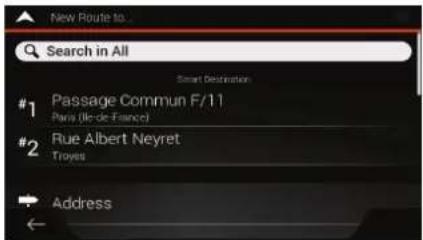
The New Route to... screen appears, where you can select the destination of the route the same way as described in the previous sections.
Select as Destination
- When the selected location appears on the map, tap returns. If needed, you can add further intermediate
and the list

- To add more route points, tap
change the final destination. The Add to Route... menu appears again, where you can select the new route point the same way as you have set the destination before.
- (optional) Tap

to optimise the whole route or the order of waypoints. You can stinations.
- When you have added all the route points, tap route is automatically calculated.
Calculate Route
and the planned
3.2 Checking route information and alternatives
To get a map overview of the planned route and check different parameters of the planned route, perform the following steps:

- Tap
on the Navigation view to access the Navigation menu.

- In the Navigation menu, tap
The planned route is displayed in its full length on the map with the following additional information:
• The total length of route
• The total time of route.
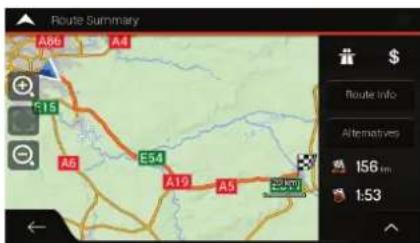
By tapping
Route Info
you can check detailed information about the route. If
All
you tap
on the right side of the screen, you can narrow the route how only motorway sections or toll roads.



By tapping ____, your can see a list of route alternatives and select the most suitable route.


- Tap on the Route Summary screen to carry out additional actions, for example edit your route preferences or display the itinerary.
3.3 Checking Traffic Events
Offline statistical traffic information (historical speed information or traffic patterns) can be taken into account in the route calculation based on the time of day and the day of week if suitable data can be found on the device. In addition, real-time traffic information can help you avoid current traffic events like temporary road closures or traffic jams caused by an accident. Both functions are subject to data availability.
For information on traffic icons, see page 20.
Road segments affected by traffic events are displayed in a different colour on the map, and small symbols above the road show the nature of the event.
To check the traffic summary, perform the following steps:
- On the Navigation view, tap the traffic icon in the corner (for example, +0.01) to open
the Traffic Summary screen, or tap

and

to open

- If there is at least one significant event on the planned route, a description is displayed
about the next event. Tap

to see the list of all events.

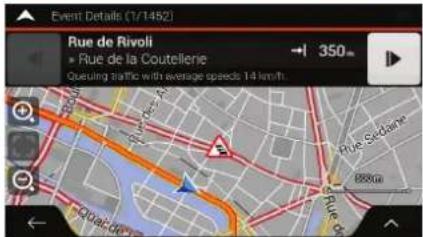
- Tap any of the list items to see its details and to display the affected road segment in its full length on the map.
To display real-time traffic information on the map, perform the following steps:
- On the Navigation view, tap the traffic icon (for example,

summary screen and tap

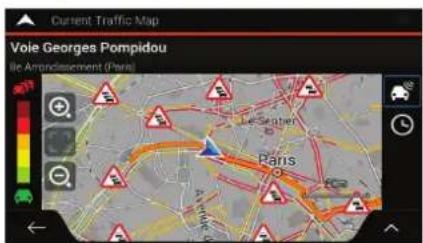
- Tap to display real-time traffic information on the map. A 2D map is displayed with road segments coloured by the impact on the traffic flow.

- Tap to display historical traffic information. A 2D map is displayed with road segments coloured by the likely density of the traffic in the given period. The information relevant for the current period is shown when you open the screen. If necessary, you can browse the map for a better view of certain road segments. Modify the day of week and the time of day to see the desired period.


3.4 Editing the route
When navigation has already started, there are several ways to modify the planned route. You have the following options:
- Setting a new starting point, see page 49
- Adding an additional destination, see page 50
- Modifying the list of destinations, see page 51
- Saving the planned route, see page 51
- Deleting the planned route, see page 52
- Selecting a route alternative when planning the route, see page 52
- Selecting a route alternative for an existing route, see page 53
• Pausing guidance, see page 55.
3.4.1 Setting a new starting point
For normal navigation, all routes are calculated from the current position. You can pause navigation to check future routes, simulate them or see their length in time and distance. Then you can set the starting point of the route to a location other than the current GPS position.

-
Tap on the Navigation view to access the Navigation menu.
-
In the Navigation menu, tap


- The first line from the bottom is the start of the route, normally the current GPS
Current GPS Position Set Start Point position. Tap, select, and confirm your action at the warning message.

- The Change Start to... screen appears. Select the starting point of the route the same way you select a destination.

Set Start Point
- You can see the new starting point on the map. Tap and the Multipoint Route screen appears where you can continue adding a destination to your route.
Calculate Route
- Tap to continue. The map returns with a transparent position marker (showing that there is no GPS reception). If a planned route already exists, it is now recalculated starting from the selected location.


- To return to normal navigation, tap
3.4.2 Adding an additional destination
If you already have a planned route and you select a new destination as described in the above sections, the route to the previous destination is deleted and a new route is calculated.
To add a new intermediate destination to the planned route, perform one of the following actions:
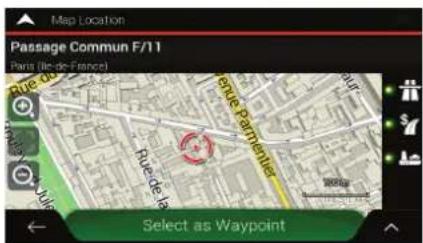
- Tap the map anywhere to browse it. After selecting the location on the map, tap
and to add the selected location to your route as an intermediate destination. The other destinations of the route remain intact.
Select as Waypoint

- Tap on the Navigation view and tap your route as described on page 45.

Multipoint Route
3.4.3 Modifying the list of destinations
To edit your route, perform the following steps:

- Tap
on the Navigation view to access the Navigation menu.
- In the Navigation menu, tap
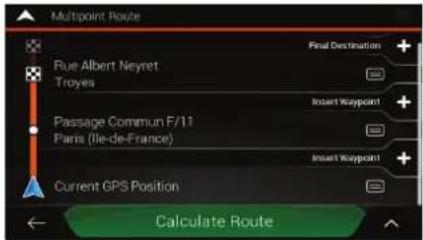
You have the following options on this screen:

- Tap to delete all the destinations, or optimise the waypoints or the route.
- Tap the name of the intermediate destination to move it up or down in the list, to save the location, or to delete it from the list.
- If you have a route with at least one intermediate destination, you can delete the
waypoint from the list right from the Main menu. Tap confirm the deletion.

then
3.4.4 Saving the planned route
To save the planned route, perform the following steps:
- Select a destination as described earlier and tap
- Tap

and

- Type in a name and tap


- The route is saved and it is available in
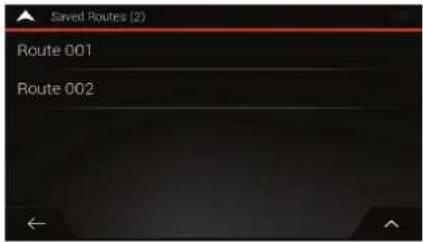
By selecting a previously saved route, Blaupunkt recalculates the route using the saved destination and/or the waypoints.
3.4.5 Deleting the planned route
You have the following two options to delete the navigated route:
- If you already have a planned route and you select a new destination as described in the above sections, the route to the previous destination is automatically deleted and a new route is calculated.
• In the Navigation menu, tap

no waypoints, the planned route is deleted after a confirmation. If you have waypoints, you can choose to delete the whole route, or only the next waypoint.
3.4.6 Selecting a route alternative when planning the route
To select from different route alternatives or change the route planning method after you have selected a new destination, perform the following steps:
- Select a destination as explained earlier, and go to the route confirmation screen.
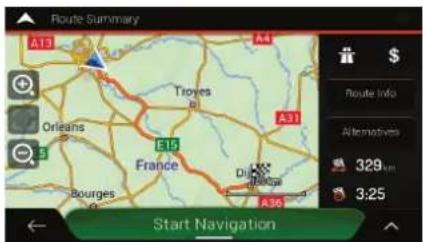
Alternatives
2. Tap
- You can see the basic details of route alternatives. Tap any of them to see it on the map.


- To view more suggestions, tap and scroll down for other alternative routes with different route planning methods.

Select
- Select one of the route alternatives and tap
to return to the
Start Navigation
previous screen. Blaupunkt recalculates the route. Tap your journey. The orange line now shows the new planned route.
to start
3.4.7 Selecting a route alternative for an existing route
To recalculate the planned route with a different route planning method and to compare different route alternatives, perform the following steps:

-
Tap on the Navigation view to access the Navigation menu.
-
You can access the list of route alternatives from the Navigation menu in one of the following ways:


Alternative Routes
Alternatives
- You can see the basic details of a few route alternatives. Tap any of them to see it on the map.

If there are suitable alternatives calculated with the route planning method that is selected in Route preferences (page 70), they are shown on top of the list. Routes with other route planning methods are shown at the bottom of the list.
- If there are more than a few suggestions, you can tap down for routes.

and scroll
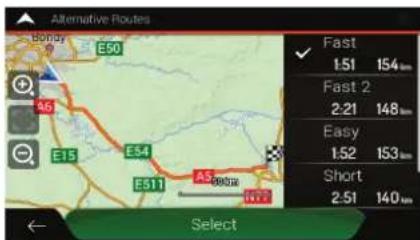
- Select one of the route alternatives and tap

to return to the
previous screen. Blaupunkt replaces the original route. Tap start your journey. The orange line now shows the new planned route.
Start Navigation
to
3.4.8 Setting a detour

- Tap on the Navigation view to access the Navigation menu.

- In the Navigation menu, tap .
You can set up a detour for your route in the following ways:

- Tap 2.8 well special sections to open a list of special sections of the planned route such as stretches of motorway, toll road or ferry trips. Tap any of these items on the itinerary to avoid a special section.

- Tap 3+ Avoid specific road to open the full list of roads on the planned route. Tap any of these items on the itinerary to avoid that specific road.

- Tap 3.1 Void Route Ahead to avoid a part of the planned route that is right ahead of you on the itinerary. You can set the distance for which you want to avoid the road ahead.
- Tap
route,
to delete all detours that you have set up for the planned
3.4.9 Pausing guidance
When you are driving a planned route but you do not need guidance for a certain part of the route, you can suspend it and continue when it is needed again.
In the Navigation menu, tap

to suspend guidance.
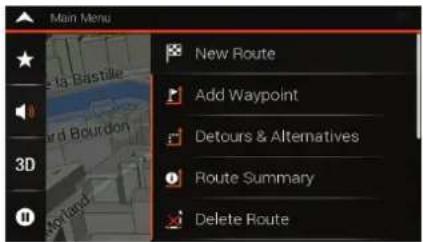
Tap

to resume guidance.
3.5 Saving a location
To add any location to the saved locations (the list of frequently used destinations), perform the following steps:
-
Select a destination as described before. It can be an address, a Place, any location on the map, a previously used destination from History, and so on.
-
When the map appears with the selected location in the middle, tap


- Tap

- (optional) Using the keyboard, you can change the name offered for the Saved Location.
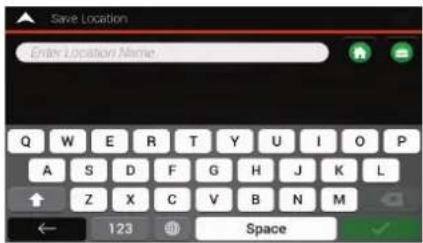
- Tap

to save the location.
To add your home and work address to the saved locations, perform the following steps:
- On the Navigation view, tap


New Route

Saved Location
- Tap
or


your selection.
- You can search for the address as described on page 25.
Planning a route to one of the saved locations is described on page 40.
3.5.1 Editing a saved location
To edit a location that you have already added as a Saved Location, perform the following steps:
- On the Navigation view, tap


New Route

Saved Location
- The list of Saved locations is displayed.
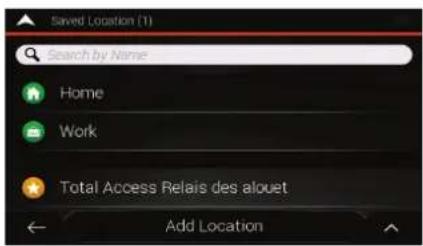
- Tap

and
- Tap the location you want to edit, tap

and enter the name of the
location on the keyboard, then tap

Note!
In Saved Locations, Home and Work cannot be renamed. To change your

home or work location, tap confirm the address change.
- Tap
Done
Adding a location to the list of saved locations is described on page 55.
3.6 Running a Simulation
To run a simulated navigation that demonstrates the planned route, perform the following steps:
- Tap

on the Navigation view to access the Navigation menu.
- In the Navigation menu, tap


- Tap


- Tap
The simulation starts from the starting point of the route and able planned route using a realistic speed.
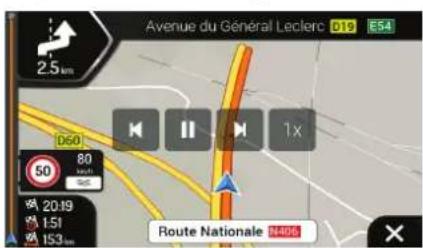
(optional) You have the following controls during the simulation (the control buttons disappear after a few seconds but you can open them again if you tap the map):
Jump to the next route event (manoeuvre).
Pause the simulation.


• Jump to the previous route event (manoeuvre).
- Tap to increase the speed of the simulation to 4, 8 or 16 times faster. Tap again to return to normal speed.


5. Tap

to stop the simulation.
3.7 Off-road navigation
When first started, Blaupunkt calculates routes using the road network of the maps provided with the product. If you want to disregard roads during navigation, you can switch to off-road mode, for example when driving in a desert.
3.7.1 Switching to off-road navigation
To switch to off-road navigation, perform the following steps:
- On the Navigation view, tap


Settings

Route Preferences
2. Tap
Navigation Mode On-road
and select
Off-road
Most of the procedures described for on-road navigation also apply to off-road navigation. However, there are some that are not available in this navigation mode. For example:
- You cannot open the itinerary as you have no manoeuvres just route points and straight lines between them.
- There are no route alternatives and route planning method.
• Vehicle settings are disabled.
3.7.2 Selecting the destination in off-road mode
Selecting a destination (waypoint or final destination) is the same as described in the previous sections. The only difference is that route points are linked to form a route with straight lines regardless of the road network and traffic regulations.
3.7.3 Navigating in off-road mode
The real difference between on-road and off-road modes is the navigation itself. When you are on the Navigation view with an off-road route:
- Your position and heading is not aligned to the nearest road.
- There is no turn-by-turn navigation, just a recommended direction.
You can see an orange line drawn between your current position and the next destination to reach. The Turn Preview field in the top left corner shows a compass with your bearing and the distance of the next destination.
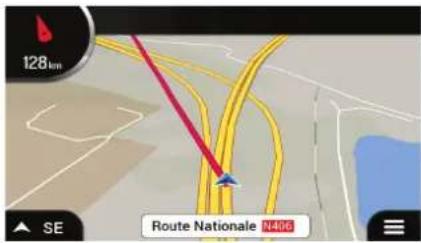
When you reach the final destination, the navigation ends.

4 Reference guide
The following sections describe the different concepts and menu screens of Blaupunkt.
4.1 Concepts
The following sections describe and explain navigation-related concepts.
4.1.1 2D/3D GPS reception
The GPS receiver uses satellite signals to calculate its (your) position and needs at least four signals to give a three-dimensional position, including elevation. Because the satellites are moving and because objects can block the signals, your GPS device might not receive four signals. If three satellites are available, the receiver can calculate the horizontal GPS position but the accuracy is lower and the GPS device does not give you elevation data; only 2D reception is possible.
Several factors have an impact on the deviation between your real position and the one given by the GPS device. For example, signal delay in the ionosphere or reflecting objects near the GPS device have a different and varying impact on how accurately the GPS device can calculate your position.
4.1.2 Natural and TTS voices
Natural voices are the traditional type of voice instructions. Every phrase that occurs in voice guidance messages is recorded in a studio with a real person. The advantage of pre-recorded voice is that it sounds really natural, but the range of instructions that can be given this way is limited. Location-specific information such as street names cannot be announced.
TTS technology provides a machine-generated way to give voice instructions. The advantage of TTS is that it can announce street names, traffic events, route summary, and traffic rules.
4.1.3 Alert Points
The following warning types are available:
- Audio warning: beeps are played (if the voice guidance language that you selected is a natural voice) or the type of the alert can be announced (TTS voice) while you are approaching one of these points, and an extra alert warns you if you exceed the given speed limit while approaching.
- Visual warning: the type of the Alert Point, its distance and the related speed limit appear on the Navigation view while you are approaching one of these locations.
For some of the Alert Points, either the enforced or expected speed limit is available. For these points, the audio alert can be different if you are below or above the given speed limit.
- Only when speeding: The audio alert is only played when you exceed the given speed limit.
- When approaching: The audio alert is always played when approaching one of these Alert Points. In order to draw your attention, the alert is different when you exceed the speed limit.
4.1.4 Route calculation and recalculation
A route is a sequence of route events, that is, manoeuvres (for example, turns and roundabouts) to reach the destination. The route contains one starting point and one or more destinations. The starting point is the current (or last known) position by default. If you need to see a future route, the starting point can be replaced with any other given point. See page 49.
Once the destination has been selected, Blaupunkt calculates the route based on your preferences. These preferences are the route planning method, the vehicle type, and the road types used or avoided when calculating the route. For detailed information on all the preferences, see Route preferences settings, page 70.
Real-time traffic events are also taken into account, which sometimes greatly modify the route. See page 62.
Blaupunkt automatically recalculates the route if you deviate from the proposed itinerary.
If traffic services are enabled, Blaupunkt considers real-time dynamic traffic information in route calculation and may also recalculate the route if the traffic situation changes during navigation.
Intelligent data (captured historical speed information based on probe data) is used for optimal routing depending on the day of the week and time of day. Route segments where traffic flow is typically slow at the given time of day and day of the week are avoided if a suitable alternative can be found. When calculating the optimal route, the data relevant for the time of the estimated arrival of the vehicle at the given route point is taken into account. As a result, Blaupunkt may suggest a different route during the weekday rush hours, especially in major cities with frequent traffic jams. See page 62.
4.1.5 Smart Zoom
Smart Zoom provides the following features:
- While following a route: When approaching a turn, it zooms in and raises the view angle to let you easily recognise your next manoeuvre. If the next turn is at a distance, it zooms out and lowers the view angle to be flat so you can see the road in front of you.
- While driving without a planned route: Smart Zoom zooms in if you drive slowly and zooms out when you drive at a high speed.
4.1.6 Speed limit warning
Maps may contain information about the speed limits of the road segments. Blaupunkt is able to warn you if you exceed the current limit. This information may not be available for your region, or may not be fully correct for all roads on the map.
The maximum speed set in the vehicle profile (page 70) is also used for this warning. Blaupunkt alerts you if you exceed the pre-set value even if the legal speed limit is higher.
Speed warning can be fine-tuned in Warnings. See page 76.
You can also set the relative speed tolerance above which the application initiates the warning.
The following warning types are available:
- Audio warning: You receive a verbal warning when you exceed the speed limit with the given percentage.
- Visual warning: The current speed limit is shown on the map when you exceed it (for
example 50).
You can also choose to see the speed limit sign on the map all the time.
4.1.7 Historical traffic
If statistical traffic information is stored with the map data, Blaupunkt can take them into account when planning a route. In normal cases, these statistics help you avoid usual traffic jams on the given day of week in the given hour but in some cases like on public holidays that fall on normal weekdays, they can be misleading. You can enable or disable this feature in Traffic settings. See page 80.

4.1.8 Real-time traffic
Real-time traffic information can provide you with the current status of the traffic. Route calculation can avoid road blocks or unexpected traffic jams caused by an accident.
The following data sources are available:
- Online traffic:
Online traffic can provide you with the real-time status of the traffic if an active Internet connection is available.
The application automatically takes account of the traffic events received. You do not need to set anything in Blaupunkt.
When Blaupunkt receives traffic information that may affect your route, it warns you that it is recalculating the route. The navigation continues with a new optimal route considering the most up-to-date traffic conditions.
For information on traffic icons, see page 20.
To fine-tune this service, you have the following options in Traffic settings (page 80):
- Set the minimum amount of time that you think is worth saving at the cost of a detour.
- Instruct Blaupunkt to have you confirm the new planned route before it takes effect.

Note!
If there are traffic events on the planned route that the application has not

bypassed, the +0:01 icon opens the list of significant traffic events to let you quickly check them.
4.1.9 Intelligent navigation
With the help of intelligent navigation, the planned route can adapt to traffic and other changes during navigation. The following sections describe these features.
4.1.9.1 Congestion detour on highways
Blaupunkt may offer a detour when you slow down on a highway due to a traffic jam. The Potential congestion detour window appears and shows the length and duration of the detour.

You can ignore this message and keep the original route by tapping

you can check the suggested route by tapping

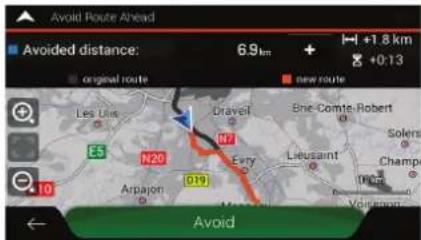
By tapping the plus/minus signs, you can increase or decrease the distance to avoid on the highway.
You can accept the recommended detour by tapping

4.1.9.2 Real-time alternative routes
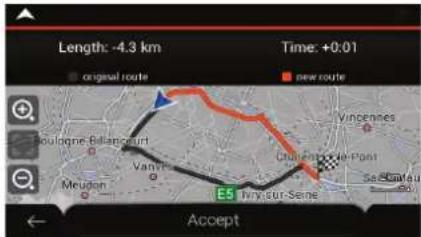
Blaupunkt may offer an alternative route on normal roads in case of a traffic jam. The possible alternative route window appears and shows the length and duration of the detour.


flowchart
graph TD
    A["You can ignore this message and keep the original route by tapping"] --> B["Preview"]
    B --> C["Accept"]
    C --> D["Recommended detour by tapping"]
    E["You can check the suggested route by tapping"] --> B
    F["You can accept the"] --> B
    G["You can accept the"] --> B
    H["Dismiss"] --> B
4.1.9.3 Parking around destination
If you leave the planned route by exiting a motorway, Blaupunkt tries to guess the reason for
making a detour. By tapping P, you can open a top-down map with the recommended parking Places around the destination. By tapping the arrows on the sides, you can switch between the recommended parking facilities.
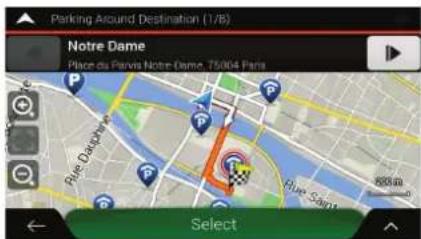

flowchart
graph LR
    A["Select"] --> B["Park Here"]
    style A fill:#90EE90,stroke:#333
    style B fill:#00FF00,stroke:#333
4.1.9.4 Hints upon detour
If you leave the planned route by exiting a motorway, Blaupunkt tries to guess the reason for making a detour. The Reason for detour window appears and shows available petrol stations, restaurants or other Places around the current position. Also, if there are avoidable parts of
the original route ahead (like a tunnel, a toll road or a ferry), you can find them in the list, in case you want to bypass them.

By tapping one of the Places, Blaupunkt creates a waypoint and navigates you to the
selected place. You can ignore them by tapping

4.2 Useful Information menu

The Useful Information menu provides various additional functions. It can be found in the Navigation menu.
| Button | Description |
 Weather Weather | Shows the weather forecast near your current position, along your route, around your destination, and at your saved locations. See page 66. |
| [DYD4] Where Am I? | Shows information on the current position (latitude, longitude, nearest town, next crossing street, and so on) or the last known position if GPS reception is not available. See page 66. |
 Help Nearby Help Nearby | Offers assistance near your current position. See page 39. |
| [5025] Country Information | Offers a list of countries with useful driving information about the selected country (for example speed limits, maximum blood alcohol level). |
 Trip Monitor Trip Monitor | Shows statistical data of your trips, like the start time, end time and average speed, see page 67. Track logs, the sequence of the positions given by the GPS receiver, can be saved together with the trip logs. They can later be displayed on the map.Shows the exact sunrise and sunset times for all your route points. |
 | Shows the GPS Information screen with satellite position and signal strength information. |
4.2.1 Weather
The Weather menu shows the weather in the following locations:

| Button | Description |
| Current Position | Shows the current temperature of the current position. By tapping it, you can check the weather forecast 7 days ahead. |
| Marseille | Shows the current temperature of the waypoint if you have any waypoints along your route. By tapping it, you can check the weather forecast 7 days ahead. |
| Weather at Destination | Shows the expected temperature at the time of the arrival at the destination. By tapping it, you can check the weather forecast 7 days ahead. |
| Weather Along Route | By tapping it, you can check the current temperature of the towns along your route. |
| Saved Weather Locations | You can add different locations to this menu and check their weather forecast. |
By tapping

you can select Weather Settings. See page 81.
4.2.2 Where Am I
This screen contains information about the current position (or about the last known position if GPS reception is not available). You can access it the following two ways:
- By going to the Navigation menu and tapping

and

Where Am I?

- By tapping the current street name if it is displayed below the current position marker on the map.

The following information is shown on the Where Am I screen:
- Address details (when available) of the current position
• Latitude and Longitude (coordinate of the current position in WGS84 format) - The nearest town
• Next crossing road/street
• Previous crossing road/street.
You can also perform some actions on this screen.
Tap and Save Location to add the current position to the saved locations and to check the country information.
You can also search for assistance near your current position. Tap to open a new screen for quick search and select a category. For detailed information, see page 39.
4.2.3 Trip Monitor
Trip Monitor logs information about your route.
Start New Recording and stop it by tapping
Stop Recording
By tapping ▲ on the Trip Monitor screen, you can select the following options:
| Button | Function |
 | By selecting a recorded trip, you can delete, rename, or change the colour of the recorded route. |
 | You can export all logs into the sdmmc folder. |
 | You can access the Trip Monitor Settings, where you can enable saving the trip logs automatically or you can save the trip logs manually. See page 81. |
By tapping your recorded trip on the Trip Monitor screen, you can check information such as time, speed, altitude and distance.

By tapping ■ on the Trip Data Details screen, you can view the trip on the map, export track logs, and check the elevation and speed profiles.
4.3 Settings menu
You can configure the navigation settings, and modify the behaviour of Blaupunkt, by tapping

Scroll down to view more options.

Note!
Changing some of these settings may not have an effect in your current region if the map data do not contain the required information.
The Settings menu provides the following options:
| Button | Function |
 | Select the type of vehicle you are driving, the road types used in route planning, and the route planning method. |
 | Adjust the different sound volumes. |
 | Enable and set up warnings for speed limit, Alert Points (such as speed cameras). |
 | Fine-tune the appearance of the Navigation view or adjust how the software helps you navigate with different kinds of route-related information on the Navigation view. |
 | Change the voice guidance language, set the time zone, the measurement units, the time and date formats, and customise the application for your local language. |
 | Enable or disable menu animations. |
 | Enable or disable traffic information and modify detour settings. |
 | Enable the online weather forecast and the automatic download of weather information. |
 | Turn the automatic trip log saving on or off and check the current size of the trip database. |
 | Modify the basic software parameters set during the initial set-up process. See page 5. |
4.3.1 Route preferences settings
The following settings determine how routes are calculated:
| Button | Function |
| Vehicle | Set the type of vehicle you want to use to navigate the route. Based on this setting, some of the road types can be excluded from the route, or some of the restrictions may not be taken into account in route calculation. See page 70.Edit the parameters of the vehicle profile. See page 70. |
| Route Planning Method | Optimise the route calculation for different situations and vehicle types by changing the planning method. See page 72. |
| Navigation Mode On-road | Select on-road or off-road navigation. See page 58. |
| Road types | Select your preferred road types for the route. See page 73. |
4.3.1.1 Vehicle profile
You can select the following vehicle types:
| Button | Description |
 Car Car | Manoeuvre restrictions and directional constraints are taken into account when planning a route.Roads are used only if access for cars is allowed.Private roads and resident-only roads are used only if they are inevitable to reach the destination.Walkways are excluded from routes. |
 Pedestrian Pedestrian | Neither manoeuvre restrictions nor directional constraints are taken into account when planning a route.Roads are used only if access for pedestrians is allowed.Controlled-access roads are excluded from routes.A private road is used only if the destination is there.Speed limits are not used in route calculation and an average walking speed is used when calculating the estimated time of arrival. |
 Bicycle Bicycle | Manoeuvre restrictions and directional constraints (if they are applied to bicycles in the map data) are taken into account when planning a route.Roads are used only if access for bicycles or pedestrians is allowed.Controlled-access roads are excluded from routes.A private road is used only if the destination is there.Speed limits are not used in route calculation and an average cycling speed is used when calculating the estimated time of arrival. |
 Bus Bus | Manoeuvre restrictions and one-way streets are taken into account when planning a route.Roads are used only if access for buses is allowed.Private roads, resident-only roads and walkways are excluded from routes. |
 Taxi Taxi | Manoeuvre restrictions and one-way streets are taken into account when planning a route.Roads are used only if access for taxis is allowed.Private roads, resident-only roads and walkways are excluded from routes. |
 Lorry Lorry | Manoeuvre restrictions and one-way streets are taken into account when planning a route.Roads are used only if access for lorries is allowed.Private roads, resident-only roads and walkways are excluded from routes.U-turns are excluded from routes (turning back on a divided road is not considered as a U-turn).If the map contains data on dimension, weight and freight restrictions, they can also be taken into account when planning a route. |
Creating a profile makes it possible to set up vehicle parameters used in route planning. You can have several profiles for the same vehicle.
To add a new vehicle profile, perform the following steps:
Vehicle
Add Profile
- Tap
browse the list of vehicles, and tap
- Select the vehicle type and set the parameters below. Depending on the vehicle type, some parameters may not be available in the list.
You can set the following parameters:
| Button | Function |
| Name | Rename the profile for something meaningful, for example John's car. |
| Max. Speed | Set the maximum speed you travel at. |
| Fuel Consumption Urban | Enter the average consumption of your vehicle in built-up areas. The unit for consumption can be set in Regional Settings. |
| Fuel Consumption Rural | Enter the average consumption of your vehicle on highways. The unit for consumption can be set in Regional Settings. |
| Engine Type | Select the engine and fuel type of your vehicle. It helps estimate the CO_2 emission. |
To reset all vehicle profiles to their default settings, tap


Reset All
4.3.1.2 Route Planning Method types
You can select from the following route planning method types:
| Button | Description |
| Fast | Gives a quick route if you can travel at or near the speed limit on all roads. Usually, the best selection for fast and normal cars. |
| Easy | Results in a route with fewer turns and no difficult manoeuvres. With this option, you can make Blaupunkt take, for example, the motorway instead of a series of smaller roads or streets. |
| Short | Gives a short route to minimise the travel distance. Usually optimal for pedestrians, cyclists or slow vehicles. Searching for a short route regardless of the speed, this route type is rarely optimal for normal vehicles. |
| Green | Gives a quick but fuel-efficient route based on the fuel consumption data. Travel cost and CO_2 emission calculations are estimations only. They cannot take elevations, curves and traffic conditions into consideration. |
| Economical | For vehicle types where Green routing is not available, this method combines the benefits of Fast and Short. Blaupunkt calculates as if it were calculating the Fast route, but it takes other roads as well to save fuel. |

Note! Depending on the vehicle type, some methods may not be available.
4.3.1.3 Navigation Mode

flowchart
graph TD
    A["On-road"] --> B["Off-road"]
    B --> C["Navigation Mode On-road"]
    style A fill:#000,stroke:#000,color:#fff
    style B fill:#000,stroke:#000,color:#fff
    style C fill:#000,stroke:#000,color:#fff
4.3.1.4 Road types
To let the route fit your needs, you can also set which road types are to be considered for or to be excluded from the route.
Excluding a road type is a preference. It does not necessarily mean total prohibition. If your destination can only be accessed using some of the excluded road types, they are used only as much as necessary. In this case, a warning icon is shown on the Route information screen, and the part of the route not matching your preference is displayed in a different colour on the map.
The following road types are available:
| Button | Description |
| [YXVA] Motorways | You might need to avoid motorways when you are driving a slow car or you are towing another vehicle. |
 Road With Period Charge Road With Period Charge | Charge roads are pay roads where you can purchase a pass or vignette to use the road for a longer period of time. They can be enabled or disabled separately from toll roads. |
| [K6T3] Road With Per-use Toll | Per-use toll roads are pay roads where there is a per-use charge in the routes by default. If you disable toll roads, Blaupunkt plans the best toll-free route. |
| [S4TZ] Ferries | Blaupunkt includes ferries in a planned route by default. However, a map does not necessarily contain information about the accessibility of temporary ferries. You might also need to pay a fare on ferries. |
| [CKBW] Car Shuttle Trains | Car shuttle trains are used to transport vehicles for a relatively short distance and they usually connect places that are not easily accessible on a road, for example, in Switzerland. |
| [H3K5] Unpaved Roads | Blaupunkt excludes unpaved roads by default. Unpaved roads can be in a bad condition and you usually cannot reach the speed limit on them. |
4.3.2 Sound settings
You can modify the following settings:
| Button | Function |
 | Adjust the volume of the guidance sounds (verbal instructions) or mute it. |
 | Adjust the volume of the non-verbal alert sounds (beeps) or mute it. |
 | Turn off the attention tone preceding verbal instructions or adjust its volume. |
 | Adjust the volume or mute the sound played when pressing the button. |
You have the following options for each sound type:
| Button | Function |
| Volume slider | Adjust the volume of the related sound. |
 | Mute the related sound. The slider becomes inactive. Tap again to re-enable it. |
| Button | Function |
| Voice guidance | Disable verbal instructions. This function is enabled by default. |
| Announce Streets and Roads in Native Language Area | Choose from the following options:Announce the street names in the native language area of the selected voice guidance language.Announce the road numbers only.Announce the manoeuvres only. |
| Announce Streets and Roads in Foreign Language Area | Street names sound correct only if you use a native voice profile for the country. Choose from the following options:Try to read the street names in a foreign country.Announce the road numbers only.Announce the manoeuvre only. |
| Early Indication of Manouevres | Set whether you want an immediate announcement for the next manoeuvre after each turn, or it is enough to receive the information when the turn is near. |
| Verbosity Level | Set the verbosity of the voice instructions, that is how much they tell and how often they speak.Minimal: the voice instruction is given once right before the next manoeuvre.Medium: the voice instruction is given when approaching the next manoeuvre and it is repeated right before the manoeuvre.Verbose: the voice instruction is given first relatively far from the next manoeuvre, it is repeated when approaching the next turn, and it is repeated again right before the actual manoeuvre. |
| Announce Route Summary | Allow reading out a quick summary of the route whenever a route is calculated. |
| Announce Country Info | Allow reading out information about the country you have entered, when you cross country borders. |
| Announce Traffic Info | Allow reading out real-time traffic messages. |
| Announce System Messages | Allow announcing system messages. |
4.3.3 Warnings settings
You can enable and modify the following settings:
| Button | Description |
| Speed Limit | Blaupunkt is able to warn you if you exceed the current speed limit. This information may not be available in your region, or may not be fully correct for all roads on the map.The maximum speed set in the vehicle profile is also used for this warning. Blaupunkt alerts you if you exceed the pre-set value even if the legal speed limit is higher.This setting lets you decide whether you wish to receive visible and/or audible warnings.The following warning types are available:Visual warning: the current speed limit is shown on the map when you exceed it.Audio and Visual warning: besides the current speed limit being shown on the map, you also receive a verbal warning when you exceed the speed limit with the set percentage.If you prefer to see the speed limit sign on the map all the time (normally, it is shown only if you exceed the limit), you can set it here.You can also set the relative speed above which the application initiates the warning by adjusting a slider. The value can be different within and outside towns. |
| Alert Points | Tap it to receive a warning when approaching Alert Points like school zones or railroad crossings. You must make sure that using this feature is legal in the country where you intend to use it.You can set the warning type for the different Alert Point categories (alert types) individually. The following warning types are available:Visual warning: the type of the Alert Point, its distance, and the related speed limit appear on the Navigation view while you are approaching one of these locations.Audio and Visual warning: besides the visual alert, beeps are played (when using a natural voice) or the type of the alert is announced (in case of a TTS voice) while you are approaching one of these points, and an extra alert warns you if you exceed the given speed limit while approaching.For some of the Alert Points, the enforced or expected speed limit is available. For these points, the audio alert can be different if you are below or above the given speed limit.Only when speeding: The audio warning is only played when you exceed the given speed limit.When approaching: The audio warning is always played when approaching one of these Alert Points. In order to draw your attention, the audio alert is different when you exceed the speed limit. |
| Permanently Confirm Attention Notes | If this setting is on, you will be asked to confirm the general attention message shown at startup only once. This does not affect the specific warnings that you can set up on this screen. |
4.3.4 Navigation View settings
These settings allow you to fine-tune the appearance of the Navigation view. You can also adjust how the software helps you navigate with different kinds of route-related information on the Navigation view.
Map Appearance
Tap to adjust the navigation view to your needs, choose suitable colour themes from the list for both daytime and nighttime use, show or hide 3D buildings, landmarks, and manage your Place visibility sets (which Places to show on the map).
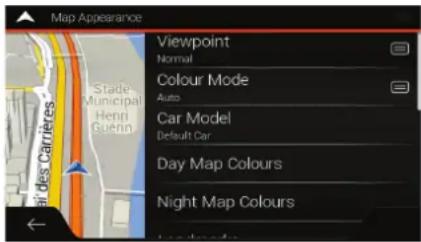
You can modify the following settings:
| Button | Function |
| Viewpoint Normal | Adjust the basic zoom and tilt levels to your needs. Three levels are available. |
| Colour Mode Auto | Switch between daytime and night colour modes or let the software switch between the two modes automatically a few minutes before sunrise and a few minutes after sunset. |
| Day Map Colours | Select the colour scheme used in daytime mode. Daytime colours are bright and similar to paper road maps. |
| Night Map Colours | Select the colour scheme used in night mode. Night colours are darker to keep the average brightness of the screen low. |
| Landmarks | Show or hide 3D landmarks (3D representations of prominent or well-known objects). |
| Buildings | Show or hide 3D city models (3D block representation of full city building data containing actual building size and position on the map). |
| 3D terrain | Show or hide the 3D elevation of the terrain. |
| Track Logs | Turn on Track Logs to show them on the map or turn them off. |
| Place Markers | Select which Places to show on the map while navigating. Too many Places make the map crowded so it is a good idea to keep as few of them on the map as possible. Tap the name of the Place category to show/hide it or to open the list of its subcategories. |
You can modify the following additional settings on the Navigation View screen:
| Data Fields | If you are navigating with a planned route, you can set three data fields to be displayed on the Navigation view. You can choose from the time of arrival at destination, distance to destination, time to destination, time of arrival at waypoint, distance to waypoint, time to waypoint, heading, or altitude. Without a planned route, there is only one data field that can be set to show the heading or the altitude. |
| Route Progress Bar | Turn the Route Progress Bar on or off. If turned on, an orange line is displayed on the side of the screen, and a blue arrow on it shows your progress. |
| Offer Motorway Services | Turn it on to get motorway service information (for example petrol stations, restaurants) or turn it off if you do not need it. |
| Services Displayed | Select the service types displayed for the motorway exits. Choose from the Places categories. |
| Automatic Overview | Zoom out and show an overview of the surrounding area if the next manoeuvre is far and you are driving on a motorway. When you get close to the event, the normal map view returns. |
| Signposts | Whenever adequate information is available, lane information similar to the real ones on road signs above the road is displayed at the top of the map. Tap it to turn this feature on or off. |
| Junction View | If you are approaching a motorway exit or a complex intersection and the needed information exists, the map is replaced with a 3D view of the junction. Tap it to turn this feature on or let the map be displayed for the whole route. |
| Tunnel View | When entering tunnels, the surface roads and buildings can be disturbing. Tap it to show a generic picture of a tunnel instead of the map. A top-down overview of the tunnel and the remaining distance are also displayed. |
| Offer Congestion Detour on Highways | In certain situations, Blaupunkt offers a detour when there is a traffic jam on a highway. See page 63. |
| Offer Real Time Alternative Routes | In certain situations, Blaupunkt offers an alternative route when there is a traffic jam on the road. See page 64. |
| Offer Parking Around Destination | In certain situations, Blaupunkt offers parking Places when you approach your destination. See page 64. |
| Offer Hints Upon Detour | In certain situations, Blaupunkt offers different route alternatives when you leave the planned route and suddenly exit the motorway. See page 64. |
4.3.5 Regional settings
You can modify the following settings:
| Button | Description |
| Language | It displays the current written language of the user interface. Tap it to select a new language from the list of available languages. The application restarts after you change this setting and confirm it. |
| Voice Language | It shows the current voice guidance profile. Tap it to select a new profile from the list of available languages and speakers. Tap any of these to hear a sample voice prompt. Just tap  when you have selected the new spoken language.Different voice profiles are capable of different levels of service:Natural Voice (street names not announced): These pre-recorded sounds can only tell you basic information about turns and distances.TTS Voice (street names announced): These computed voices can read out complex instructions, street names or system messages. when you have selected the new spoken language.Different voice profiles are capable of different levels of service:Natural Voice (street names not announced): These pre-recorded sounds can only tell you basic information about turns and distances.TTS Voice (street names announced): These computed voices can read out complex instructions, street names or system messages. |
| Units and Formats | You can set the measurement units and time/date format to be used. Blaupunkt may not support all the listed units in some voice guidance languages. |
| Time Zone | By default, the time zone is taken from the map information and adjusted by your current location. Here you can manually set the time zone and the daylight saving time. |
4.3.6 Display settings
You can modify the following settings:
| Button | Function |
| Menu Animation | When animation is turned on, buttons on menus and keyboard screens, and screen transitions are animated. |
4.3.7 Traffic settings
You can modify the following settings:
| Button | Function |
| Traffic | Enable or disable the Traffic reception that can receive real-time traffic information. The rest of the buttons below are all related to the Traffic function and are available only if the receiver is enabled. |
| Data source Radio & Online | Select what data source you want to use for receiving real-time traffic information:• Online: uses an Internet connection. |
| Use Real-time Traffic | Tap it if you want to use real-time traffic information to avoid road blocks or unexpected traffic jams. |
| Show Traffic Info Color And Icon | If you want to see traffic events (for example closures, accidents, lane restrictions) on the map, you can choose to show the events with a different colour or to display an icon too. This feature can also be disabled. |
| Show Free Traffic Flow As Well | Receive information about normal traffic as well, not just special conditions or events. |
| Use Historical Traffic | Enable or disable historical traffic data and traffic patterns. This locally stored information can be very useful in normal circumstances but for example on public holidays it may be better to turn it off in order not to take account of normal weekday traffic jams. |
| Offer detour if it saves at least: 5 minutes | Set the minimum amount of time that you think is worth saving at the cost of making a detour.For example, in the figure below, the orange route shows a traffic event that causes a 30-minute delay. The blue route is a detour that is 15 minutes longer than the original route (not counting the traffic jam). If you set the Offer detour feature to 10 minutes, Blaupunkt recalculates the route because it saves 15 minutes, which is more than the 10 minutes you set. If you set it to 20 minutes, the original route is kept because the detour would save you only 15 minutes. Calculations are based on information received about traffic events. Calculations are based on information received about traffic events. |
| Confirm Detours Manually | Enable or disable the manual confirmation of every recalculation due to traffic events. |
4.3.8 Weather settings
This setting allows you to enable or disable online weather forecast and the automatic download of the weather forecast. Automatic download requires a small amount of frequent data traffic.
4.3.9 Trip Monitor settings
Trip logs contain useful information about your recorded trips. You can enable and modify the following settings:
| Button | Description |
| Enable auto-saving | Trip monitor can record statistical data of your trips. If you need these logs later, you can let the application save them automatically for you. |
| Save track log | Track logs, the sequence of the positions given by the GPS receiver, can be saved together with trip logs. They can later be displayed on the map. You can let the application save track logs whenever it saves a trip. |
| Trip database size | This is not a button. This line shows the current size of the trip database, the sum of all trip and track logs saved. |
5 Troubleshooting
This section offers possible solutions to issues that may occur during the operation of Blaupunkt.
5.1 GPS signal cannot be received
Issue: The current location is not available, because GPS signal cannot be received.
Cause 1: GPS signal is weak or may not be available if you are between tall buildings, in garages or tunnels as the signal weakens or distorts as it travels through solid material.
Solution 1: Go to a place where there is a clear sight of the sky or at least a bigger part of the sky is visible.
Cause 2: It may take several minutes to receive GPS signals when first using Blaupunkt, or when your last known position is farther away from your current position.
Solution 2: Wait a few minutes for the GPS signal.
5.2 Address cannot be found
Issue: Blaupunkt cannot find the address you entered.
Cause: The digital map data may not include every single address.
Solution 1: If the house number is not known or Blaupunkt cannot find it, select only the street name. This way, Blaupunkt will navigate you to the midpoint of the street, where you can find the exact address more easily.
Solution 2: Search for another address that is close to the destination.
Solution 3: Search for the coordinates or a nearby Place of Interest.
5.3 The calculated route is not optimal
Issue: The planned route is too long or includes several minor roads.
Cause: In

Settings

Route Preferences
method is not set to
the optimal parameter.
Solution: Select your preferred route planning method by performing the following steps:
- Tap


- Tap
Route Planning Method
and select your preferred route, for example


See Page 72.

5.4 Disabling the speed limit warning
Issue: The speed limit warning is signalling even when the actual speed limit is kept.
Cause: The speed limit in the digital map data might differ from the actual speed limit of your current location.
Solution: Disable the speed warning by performing the following steps:
- Tap


Settings

Warnings
- Tap

Warn When Speeding Audio and Visual
5.5 Keyboard buttons are greyed out
Issue: Some keyboard buttons are greyed out and cannot be used.

Cause: Blaupunkt has a smart keyboard for address search, which means that only those buttons are active that can be used to type a name that is available on the map.
Solution: Check if you entered the name correctly. If the name is correct, then the address you are looking for is not available in the digital map data.
5.6 The map is hidden behind an image of a junction
Issue: The map is not visible because it is hidden behind an image of a junction.

Cause: If you are approaching a motorway exit or a complex intersection and the needed information exists, the map is replaced with a 3D view of the junction. The lanes you need to take are displayed with arrows.
Solution: If you want to hide the currently displayed junction and return to the Navigation view, tap the picture. To turn off this feature, perform the following steps:
- Tap


Settings

Navigation View
- Tap
Now the junction view will not appear again.
6 Copyright note
The product and the information contained herein are subject to change without prior notification.
This manual may not, in whole or in part, be reproduced or transmitted in any form either electronically or mechanically, including photocopying and recording, without the express written consent of Blaupunkt.
© 2006 – 2019 TomTom. All rights reserved. This material is proprietary and the subject of copyright protection, database right protection and other intellectual property rights owned by TomTom or its suppliers. The use of this material is subject to the terms of a license agreement. Any unauthorized copying or disclosure of this material will lead to criminal and civil liabilities.
All rights reserved.



- MULTIMEDIA NAVIGATION
- SERIES 990 DAB
- Table of contents
- Getting started....5
- Warnings and safety information....24
- Using the navigation....25
- Reference guide ....60
- Getting started
- Initial set-up
- Select
- Next
- Screen controls
- Using the buttons and other controls
- Using the cursor
- Using the keyboard
- Using touch gestures
- Manipulating the map
- Navigation view
- Streets and roads
- GPS position markers
- Turn preview and next street
- The planned route
- Manoeuvre icons
- Lane information
- Signposts
- Junction view
- Tunnel view
- Motorway services
- 3D object types
- Traffic events
- Navigation menu
- Warnings and safety information
- Using the navigation
- Selecting a destination
- Using combined search
- Selecting an address
- Entering an address
- Select as Destination
- Selecting a town centre
- Selecting the midpoint of a street
- Go to Street
- Selecting an intersection in a town
- Using the postcode to select a destination
- New Route
- Address
- Selecting a Place of Interest
- Using Quick search categories
- Search By Name
- Start Navigation
- Searching by category
- Around Here
- Along Route
- Around Destination
- In a Town
- Searching by name
- Finding help nearby
- Selecting a Saved Location
- Selecting a History item
- Selecting a saved route
- Entering coordinates
- Selecting a location on the map
- Planning a Multipoint Route
- Destination
- Calculate Route
- Checking route information and alternatives
- Route Info
- All
- Checking Traffic Events
- Editing the route
- Setting a new starting point
- Set Start Point
- Adding an additional destination
- Select as Waypoint
- Multipoint Route
- Modifying the list of destinations
- Saving the planned route
- Deleting the planned route
- Selecting a route alternative when planning the route
- Alternatives
- Tap
- Selecting a route alternative for an existing route
- Setting a detour
- Pausing guidance
- Saving a location
- Editing a saved location
- Done
- Running a Simulation
- Tap
- Off-road navigation
- Switching to off-road navigation
- Selecting the destination in off-road mode
- Navigating in off-road mode
- Reference guide
- Concepts
- 2D/3D GPS reception
- Natural and TTS voices
- Alert Points
- Route calculation and recalculation
- Smart Zoom
- Speed limit warning
- Historical traffic
- Real-time traffic
- Intelligent navigation
- Congestion detour on highways
- Real-time alternative routes
- Parking around destination
- Hints upon detour
- Useful Information menu
- Weather
- Where Am I
- Trip Monitor
- Settings menu
- Route preferences settings
- Vehicle profile
- Vehicle
- Add Profile
- Route Planning Method types
- Navigation Mode
- Road types
- Sound settings
- Warnings settings
- Navigation View settings
- Map Appearance
- Regional settings
- Display settings
- Traffic settings
- Weather settings
- Trip Monitor settings
- Troubleshooting
- GPS signal cannot be received
- Address cannot be found
- The calculated route is not optimal
- Disabling the speed limit warning
- Keyboard buttons are greyed out
- The map is hidden behind an image of a junction
- Copyright note
Brand : BLAUPUNKT
Model : Hamburg 990 DAB
Category : Gps