
Moover - Electric scooter METZ - Free user manual and instructions
Find the device manual for free Moover METZ in PDF.


| Product Type | Electric scooter (e-scooter) |
| Model | Metz Moover |
| Weight | approx. 16 kg |
| Dimensions (roadworthy) | 119 x 51 x (99-116) cm (L x W x H adjustable) |
| Dimensions (folded small) | 100 x 26 x 64 cm |
| Motor | Brushless DC motor, 250 W continuous rated power |
| Battery | Lithium-ion, 210 Wh, 36 V |
| Charging Time | Up to 4 hours |
| Range | 15-20 km (at 85 kg rider, full battery, new) |
| Maximum Total Weight | 110 kg (vehicle + rider + cargo) |
| Minimum Age | 14 years |
| Driving Modes | Standard (max 20 km/h) and Walking Pace (max 6 km/h) |
| Brakes | Mechanical disc brakes, front (left lever) and rear (right lever) |
| Tire Size | ETRTO 50-203 |
| Tire Pressure | 2.0-4.0 bar (30-55 psi) |
| Display | Speed, battery charge (10 bars), trip meter, mode indicator |
| Lighting | LED front spotlight and rear light, battery powered |
| Folding Mechanism | Yes, for storage and transport (two folding positions) |
| Handlebar Height Adjustment | Quick clamp with safety bolts, adjustable to approx. 99-116 cm |
| Safety Features | Bell, parking support, brake test during startup, automatic motor cut-off when brake applied |
| Maintenance Intervals | Every 300-500 km or 3-6 months; first inspection after 200 km |
| Warranty | 24 months (subject to conditions) |
| Country of Origin | Germany (Metz mecatech GmbH) |
Frequently Asked Questions - Moover METZ
User questions about Moover METZ
0 question about this device. Answer the ones you know or ask your own.
Ask a new question about this device
Download the instructions for your Electric scooter in PDF format for free! Find your manual Moover - METZ and take your electronic device back in hand. On this page are published all the documents necessary for the use of your device. Moover by METZ.
USER MANUAL Moover METZ

www.metz-moover.de
Dear customer
Thank you for choosing a Metz "Made in Germany" quality product.
We are pleased to welcome you as a customer.
To begin with, we would like to provide you with some important information on your new Metz moover. This will help you use the technology better and avoid risks.
Please read through these operating instructions carefully and keep them safe.
Your electrically-assisted scooter can be handed over to you in a completely pre-assembled state or not completely mounted and adjusted. Please contact your specialist dealer for this important work or follow the instruction in the “Assembly” chapter on page 3.
It is assumed that the users of this Metz moover have fundamental and sufficient knowledge on how to deal with scooters. They are not instructions to teach you how to drive.
All persons that
- use
- repair or maintain
- clean
• or dispose of the Metz moover
must fully acknowledge and understand the content and meaning of these operating instructions. If you have other questions or have not fully understood something, please ask a Metz moover specialist dealer for your own safety.
All the information in these operating instructions refer to the setup, technology and care and maintenance. Please observe this information, a lot of it is safety related - non-observance of this information can result in serious accidents and economic losses.
We have described the most important points due to the complex technology of a modern Metz moover.
The instructions apply to the Metz moover indicated on the envelope that was given to you.
Before you drive on public roads, please gather information about the respectively valid national regulations.
Always be aware that driving the Metz moover can harbour certain risks. As a driver you are particularly vulnerable. Always be aware that you are not as protected as you would be in a car. You do not have an airbag or body work. Nevertheless, you are faster than a pedestrian in other areas of the road. Pay particular attention to other road users.
First a few pointers for the persons driving that must also be observed:
- Always wear an adapted and suitable bicycle helmet and use it on every journey!
- Gather information on the correct fit of the helmet in the helmet manufacturer's instructions.
- Always wear bright clothing or sportswear with reflective elements while driving; it is important TO BE SEEN.
- Wear appropriate shoes. Your shoes must have anti-slip soles.
- Never drive without holding onto the handlebar!
• Always drive by placing both hands on the handles. - Never drive with headphones
- Do not use the telephone
- Never drive if you are not able to fully control your journey. This holds particularly true if you consumed medication, alcohol or other drugs.

Cont-d on C4

If you unfolded this page while reading, you will recognise the component that you are currently gathering information about.
Components


natural_image
Three black headphones, a smartphone, and a bottle with a diagonal line crossing them (no text or symbols)- Adapt your driving style according to the requirements, if the road is wet or slippery. Drive slowly and apply brakes carefully and in good time because the braking distance will be significantly longer.
- Adapt your speed to your driving abilities.
Even if you have experience with scooters and similar products, please read the chapter: "Before the first ride" and carry out important checks as described in the chapter "Before each ride"!
Please note that as a road user, you are exposed to particular dangers with the Metz moover.
Protect yourself and others by driving in a safe and responsible manner.
Please note that with a Metz moover you are significantly faster than with a scooter without an electric drive. Other road uses may judge this incorrectly. Only use your Metz moover for its intended purpose. In case of uncertainties regarding purpose of the Metz moover, please contact your specialist dealer.
Information for parents and guardians:
The minimum age to drive a Metz moover is 14.
As a guardian you are responsible for the activities and safety of your child. This includes responsibility toward the technical condition of the Metz moover and how it is adapted to the driver. Similarly, you must be sure that the child knows how to handle the Metz moover in a safe manner. Make sure that you child has learned and understood how to use his/her Metz moover in a safe and responsible manner in the surroundings in which it is used.
Do not allow your children to use the Metz moover without supervision and detailed instructions. Familiarise the children with the risks associated with the use of electrical devices.
Contents
Introduction Components
Contents 1
Legal Notice 1
Safety instructions 2
Information on electrics and electronics 3
Installation 3
Assemble handlebar 3
Before the first ride 5
Before every ride 6
If you have fallen 6
Statutory provisions 7
Intended Use 7
Initial start-up 8
Adjusting the handlebar height 8
Maximum pullout height 9
Minimum pullout height 9
Folding mechanism 10
Folding the Metz moover together 10
Unfolding the Metz moover
Electrical system
Switching on the electrical system
Display
Battery 15
Battery charger 16
Motor
Driving the Metz moover
Driving modes
Start-up 18
Safe driving 18
C2 Indicating the change of direction 18
C3 Safe steering 19
Safe braking 19
Actuating the hand pedal 19
Issuing warning signs 19
Parking 20
Mounted accessories 20
Lighting system 20
Compatible accessories 20
Service and maintenance 21
Screws and torque wrench 21
Bolted connections 22
Rims/tyres 22
Brakes 23
Inspection and care 23
Inspection: Deadlines and work 23
Transport 26
Wear and tear and warranty 26
Replacement of components 27
Ban on tuning 28
Technical data 29
Warranty and liability in case of defects 29
Warranty conditions 29
Environmental tips 30
Inspections 31
Handover documentation C5
Metz moover identification C6
Comments C7
Legal Notice
Contact for service requests:
Should any problems arise when using the product, contact your specialist dealer or the manufacturer immediately.
Content and illustrations:
Veidt Anleitungen
Legal assessment by a law firm specialised in commercial legal protection.
These operating instructions cover the requirements and scope of action in accordance with DIN EN 15194.
In the event of delivery or usage outside the above-mentioned areas, the vehicle must be provided by the manufacturer with the necessary instructions.
© Duplication, reprinting and translation as well as any commercial use (whether in whole or in part, in print or by electronic means) is only permitted with the prior written permission of the Veidt Anleitungen company.
Metz EN edition 1.0 March 2018
Safety instructions
Carefully read through all warnings and information in these operating instructions prior to operating the Metz moover. Always keep the operating instructions close to the Metz moover so that they are always accessible.
Before your first ride on the Metz moover, it is imperative that you read through the chapters on "Before your first ride" and "Before each ride"!
If you give your Metz moover to a third party, you must enclose these operating instructions as well. Please ensure secure and tight fit of the quick clamp on the steering column each time your Metz moover was left unattended, even if it was just for a short time. Regularly check the tight fit of the bolted connections and components.
In these instructions, you will find five different types of information. The first will provide you with important information about your new Metz moover and its use, the second will indicate possible damage to property and the environment, and the third will warn you against possible falls and severe damages, even physical injuries. The fourth requests you to maintain the correct torque so that the parts do not come loose or break. The fifth reminds you of the importance of carefully reading through the supplied operating and assembly instructions.
If you see these symbols, it means that there is always a risk that the hazard described will occur! The area that the corresponding warning applies to is shown with a grey background.
The notes are designed as follows:

Note: This symbols provides you with information on how to handle the product or points out a respective section of the operating instructions that you should pay attention to.
particular a

Caution: This symbol warns you against misconduct, which can result in damages to property and the environment.

Danger: This symbol indicates a possible danger for your life or health, if the appropriate calls for action are not satisfied or if the inappropriate regulatory re met.

Important bolted connection: In this case, it is important to maintain a precise torque while tightening. The correct tightening torque is either illustrated on the
component or you will find it in the corresponding text section. You must use torque wrench to maintain an accurate tightening torque. If you do not have a torque wrench, please allow this work to be carried out by the specialist dealer. Parts that are not tightened correctly can come loose or break! This can result in severe falls!

Operating instructions: Read all the instructions provided with the vehicle. If you are uncertain about any of the issues in this manual, please contact your spe-
cialist dealer or ask a dealer for help with your Metz moover.

The modern Metz moover technology is high-tech! Work carried out on the vehicle requires special knowledge, experience and special tools! Do not perform any
work on the Metz moover yourself! Take your Metz moover to a specialist workshop for repairs, maintenance and servicing!
Information on electrics and electronics

Information on the operation, maintenance and care as well as technical data can be found in these inns and online on the website of the five component manufacturer.

The electrical system of your Metz moover is very powerful. Please always contact your specialist dealer
for any questions regarding repairs or if you have a question or problems or discover a defect. The lack of expertise can lead to serious accidents and damages!

Prior to performing any work on your Metz moover, switch off the electrical system.

If your Metz moover does drive off immediately although an error message was not displayed, check
whether both brake levers are in the home position! Motor power is not transmitted if the brake lever is actuated!
Installation

Your electrically assisted scooter was not delivered in a fully assembled and set-up condition. The han-
dlebar was dismantled for lack of space. This work is relevant to safety. Please contact your specialist dealer for the safe assembly of the handlebar.

You need to use a torque wrench, if you want to assemble the handlebar yourself! While tightening the screws,
it is imperative to comply with the exact torque of 5 Nm.
Assemble handlebar
- Remove all packaging.
- Loosen the hook-and-loop fastener of the transport safety device.

natural_image
Technical line drawing of a mechanical assembly with no visible text or symbols- Place the cable clip with the clearance hole, which the cables run through, onto the handlebar mount of the stem. Position it onto the thread hole front right in the direction of travel.
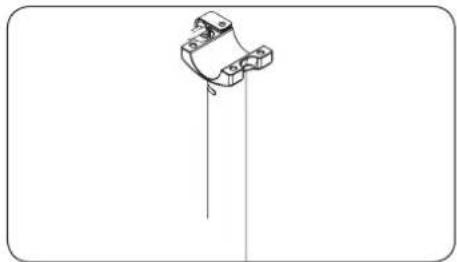
natural_image
Pure technical line drawing of a mechanical component without any text, numbers, or symbols- Place the handlebar with the clamp plate into the stem mount.

natural_image
Technical line drawing of a mechanical assembly with no visible text or symbols-
Position the handlebar in the middle of the clamp. Make sure that all cables and wires are positioned correctly. They must not be clamped or buckled. The cables must not wind around the handlebar. They must allow for all necessary steering movements.
-
Insert the screws provided through the four drill holes of the clamp plate. Use your hand to fasten them with a few rotations so that they cannot fall down.

natural_image
Technical line drawing of a mechanical assembly with no visible text or symbols- Then use an Allen key to gently tighten the screws. The handlebar should still be capable of movement.
- In the clamp, align the handlebar in the centre and in the driving position. The inscription on the handlebar shows you how the handlebar is positioned in the clamp.
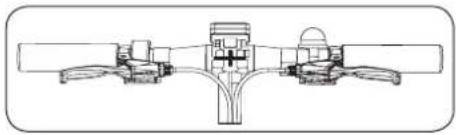
natural_image
Technical line drawing of a mechanical assembly with no visible text or symbols
The brake levers must be set up (by rotating the handlebar in its clamp) so that the hands as a straight exten-
sion of the arms can safely and reliably operate the brake levers.
- Tighten the screw that fastens the metal clamp with the cables using a torque of 5 Nm.
- Now tighten the second screw on the front (in the direction of travel) of the handlebar clamp so that the whole length of the gap between the upper and lower part of the clamp has the same width.

- Tighten both of the other screws uniformly and alternately with a torque of 5 Nm.
Quick start

In this section you will be provided with important information and instructions so that you can safely use
your Metz moover as quickly as possible.

Always apply the brakes of your Metz moover prior to positioning one foot on the step.
First read through all the safety instructions.
All necessary installation steps must be completed prior to the initial start-up.
Find out about the legal provisions that apply to you.
Perform all safety inspections as described in the "Before each ride" section on page 6.
Read the information on charging the battery in the "Charging the battery" chapter on page 16.
• Fully charge the battery.
To start the system, press the ⏻ button until the moover switches on. This is located on the frame to the left above the front wheel.

Before the first ride

natural_image
Technical line drawing of a mechanical assembly with no visible text or symbols- The switching on routine of the display will begin once the system has been switched on.
- Apply both brakes as soon as the word "TEST" appears on the display.
- First of all, only place the foot of your standing leg on the step.
- Release the brakes and get the scooter moving by pushing your other leg (swinging leg) off the ground.
- As soon as you have reached a speed of 3 km/h in the standard mode or 2 km/h in the walking speed mode, you can position your swinging leg onto the step as well. Carefully push the hand pedal down with your right thumb. This activates motor support.
- The scooter will continue to drive as long as the hand pedal is gently moved. All you need to do is move your thumb during the ride. The motor switches off once the hand pedal lever is no longer moved.

Carefully read through all warnings and information in these operating instructions prior to operating the
Metz moover.
Adjust the handlebar to a height that you find safe and comfortable. It is imperative to pay attention to the correct fit of all quick clamps and fasteners. (see also "Adjust handlebar height" chapter on page 8).

Familiarise yourself with the new Metz moover in a protected area. Learn the allocation of the brake
handles of the front (left brake handle) and rear wheel brake (right brake handle)

Modern brake systems can have a significantly stronger and different brake action than usual! Prior to
starting a journey, practice using the brakes in a safe, unused area! Please note that if it is wet or if the vehicle is used on a slippery ground the effect of the brakes can be dangerously different than usual. Adapt your driving style to longer braking distances and a slippery ground.
Ensure that you Metz moover is ready for operation and check the following points:
- The height, fastening, alignment and maximum pullout of the handlebar column
- Secure positioning of the wheels
• Functionality of the brakes
Alternately apply the handbrakes and push the Metz moover forwards. If the handbrake is applied it must block the rear wheel, and if the front wheel brake is applied it must cause the rear wheel to lift off the ground. In this case, the steering mechanism must not rattle or allow for backlash.
- Zero backlash of the folding joint of the handlebar column.
- To do so, place one hand around the folding joint so that you clasp both the upper and lower part. Forcefully move the steering column back and forth. Movement must not be noticeable between both parts of the folding joint.
- Tyre pressure (front wheel and rear wheel 2.0-4.0 bar / 30-55 psi)
• Tight fit of all screws and nuts
• Anti-slip cover of the step
• Functionality of the bell
• Functionality of the lighting
• State of charge of the battery for the planned journey
First lift your Metz moover forwards and then back with a slight lift and allow it drop to the ground from a height of approx. 10 cm. If you notice a rattling or other unusual noises, have these checked and rectified by a specialist dealer before you drive off.
Check the tyres and rims. Look for damages, tears and deformations, penetrated foreign objects, e.g. glass splinters or sharp rocks. Do not drive off if you find any cuts, tears or holes! First have our Metz moover examined in a specialist workshop.
Before every ride
Regularly check the basic function of your Metz moover (see page 5 "Before your first journey").

If you are not sure whether your Metz moover is in a good technical state, do not use it, instead take it to your
specialist dealer for the purposes of verification.

Frame, steering column, suspension, step and other safety-related parts such as brakes, wheels and
the folding mechanism are subject to wear and tear which can impair the operational safety of these parts. If you discover that any components are deformed or partially broken, replace them immediately.
If the operating and service life of the components has been exceeded, it could result in sudden failure. This can lead to falls and serious injuries.

After a fall, or if your Metz moover was knocked over, you must perform these tests prior to continuing your journey!
If you have fallen
Check the entire Metz moover for changes after a fall. These could include dents or tears in the frame or brackets, as well as deformed components.

Bent or deformed components made of aluminium are difficult to straight-en after a fall. Do not try and straight-
en these components. It may result in a com- ponent failure. This could result in falls and severe injuries.
If you notice a change on your Metz moover, do NOT continue your journey. Take your Metz moover to a specialist dealer, describe your fall and have your Metz moover checked.
Statutory provisions

Find out about the applicable legal practice prior to using your Metz moover.
Different national regulations apply in part to the technical equipment, e.g. lighting system and the mandatory possession of a driver's licence when operating an electrically-assisted scooter.
The Metz moover can only be used on public roads if it corresponds to the respectively applicable requirements and if the driver has the necessary driver's licence.
Intended Use

Metz moovers are only to be used as a means of transport for one single person. Driving with a second per-drawing a trailer is not permitted and sult in a fall and serious injuries.

The minimum age to drive a Metz moover is 14.

The maximum permissible total weight is 110 kg. This is composed of the weight of the vehicle, driver and
Intended use also includes compliance with the operating, maintenance and servicing conditions. You will find them on page 21.
If it is equipped, as prescribed in the national legislation, the Metz moover can be used on streets and surfaced roads.
The manufacturer and merchant are not responsible for use that is contrary to the intended use.
This is particularly applicable to non-compliance with the safety instructions and the resulting damages. The same applies to:
- Use in the area
• Overloading (max. permissible total weight: 110 kg) - Improper removal of damages
- Driving through water puddles
- Drawing of trailers
Metz moovers are not designed for extreme loads, e.g. driving across steps or jumps, tricks or aerobatic manoeuvres.
Initial start-up
Adjusting the handlebar height

The steering column is adjustable in height and also easily adjusted after releasing the quick clamp.
The quick clamps are devices that can fasten components in lieu of a bolted connection. The operation takes place via two elements: Use the quick-release lever to generate the necessary clamping force and use the adjusting nut to regulate how firmly it is clamped. This setting is carried out when the quick-release lever is opened.

The quick clamp closes with the correct holding force, if the counterpressure can be felt from the middle leverage and the force of the ball of the end of the leverage is needed to ely close the lever.

- The quick clamp must be firmly closed before you drive off. - Check the correct fit of the quick o, even if the Metz moover was parked ended even for a short period.
- In a closed condition, the quick-release lever must lie as close as possible to the steering column. Then it cannot be opened by a contact during the journey.
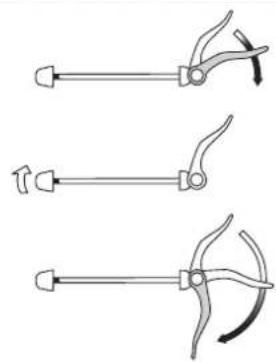
natural_image
Three types of clamps with different blade shapes and handles, shown in line drawings without any text or symbols.Loosen the adjusting nut
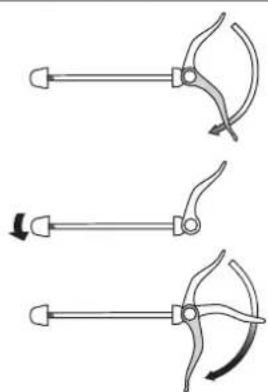
natural_image
Three sequential diagrams showing a clamp tool with curved blades and arrows indicating motion (no text or symbols)Tighten the adjusting nut

To safely use the Metz moover, the steering column must be in the stop position and the quick clamp must d.
Adjusting it to you body height:
- Release the quick clamp.
- Stand on the centre of the step with one leg and hold both handles.
- Now adjust the height of the steering column. The suitable stop position is achieved, once your arms are bent at slightly less than 90 degrees.
- Now close the quick clamp.

Never release the clamping screws below the shaft of the handlebar. These are only used to position the steering and not to adjust the height.
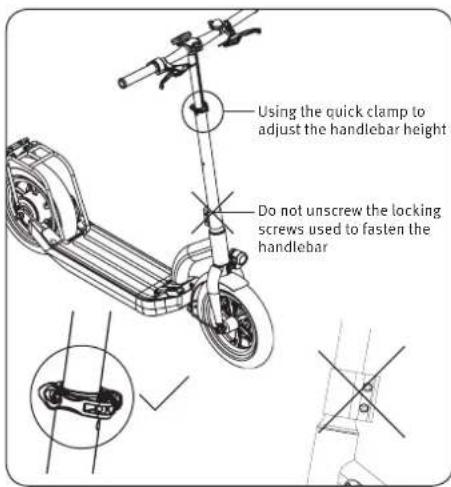
Maximum pullout height

Only pull the steering column upwards until the safety bolts click into place in the stop position. The steermn must never be pulled out further's point. The steering column must not ged or extended!

Minimum pullout height

The lowest position is achieved once the safety bolts snap into place in the lower stop position.
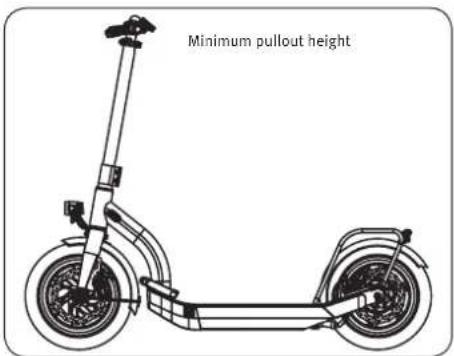
Folding mechanism

The Metz moover can be folded together for storage and better transport.
natural_image
Technical line drawing of a scooter chassis with visible wheels, suspension components, and suspension rings (no text or labels)Folding the Metz moover together
- Stand in front of the Metz moover and open the quick clamp on the steering column ^① .
- Press the safety bolts in and push the steering column downwards 2 into the lower stop position. If the steering column is already in the lower stop position => step 3.
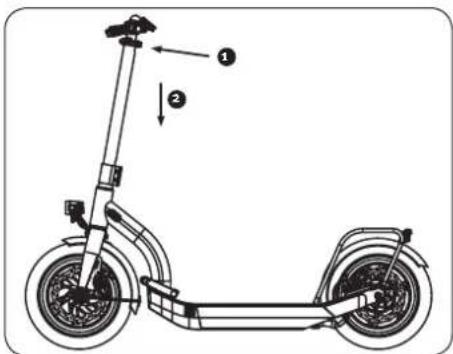
- After that press the safety bolts ③ back into the lower stop position and once again push the steering column a little further down up to the stop ④.
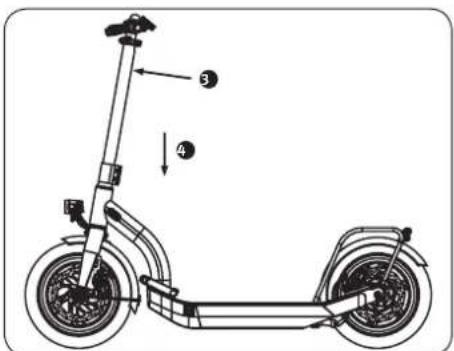
Open the safety bolts and slide in the steering column up to stop

This position must only be used when folding the moover! It is NOT suitable for driving. If this position of ring column is used for driving, it can falls or serious injuries.
- Close the quick clamp again.
A Fold "flat"

You can also fold your Metz moover even if the steering column is not inserted. This just means it will be longer when it is folded.
B Fold "small"

You Metz moover is significantly smaller in this folding position but slightly higher compared to a transversely posi-
tioned handlebar.
You can significantly reduce the height of the folded moover, if you skip step 4 and leave the handlebar in the drive position. The moover is significantly lower in this folding position but slightly higher than with a rotated handlebar.
- Stand in front of the Metz moover and open the quick clamp on the steering column ^① .
- Press the safety bolts in and push the steering column downwards ⚙ into the lower stop position. If the steering column is already in the lower stop position => step 3.

- After that press the safety bolts ③ back into the lower stop position and once again push the steering column a little further down up to the stop ④.

Open the safety bolts and slide in the steering column up to stop

This position must only be used when folding the moover! It is NOT suitable for driving. If this position of ring column is used for driving, it can falls or serious injuries.
- Turn the handlebar by 90 degrees in the clockwise direction. Close the quick clamp again.

natural_image
Line drawing of a scooter with visible suspension and wheel assembly (no text or symbols)Turn the handlebar and close the quick clamp.
- Hold the steering column of the Metz moover. Pull and hold the cover of the clamping lever ⑤ in the direction of the front tyres. By doing this, you release the safety device of the clamping lever.

natural_image
Technical line drawing of a mechanical component with no visible text or symbols- Pull the clamping lever ⑥ back until it is positioned on the step.
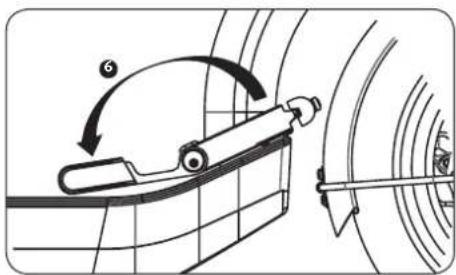
natural_image
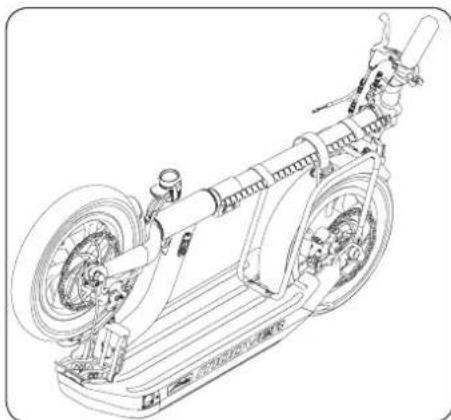
Diagram of a mechanical device with a rotating lever and curved guide mechanism (no text or symbols)- Tilt the steering column towards the rear wheel until it is positioned on the luggage rack.

natural_image
Line drawing of an electric scooter with a side-mounted battery pack and wheels (no text or symbols)Tilting the steering column
- After than fasten the steering column to the luggage rack. To do so, guide the strap of the fastening belt into the closing device and tighten the belt. The steering column must then be positioned close to the luggage rack and it can now be used as a carrying handle.
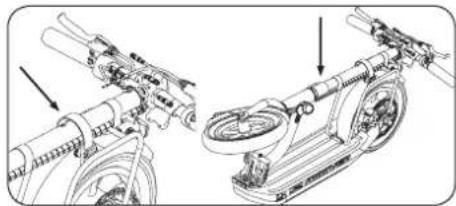
natural_image
Mechanical assembly diagram showing two connected robotic arms with labeled components (no text or symbols present)Unfolding the Metz moover
- Open the fastening strip by pressing the lever of the closing device against the fastening strip. At the same time, pull the plastic strap out of the clasp.

natural_image
Technical line drawing of a mechanical assembly with hoses and tubing (no text or symbols)i Always secure the fastening strip once the moover has been unfolded. Always insert it into the clasp prior to driving.
- Place it near your Metz moover. Pull the steering column ④ foward/up until the front wheel ② is positioned firmly on the ground and the folding joint is closed.
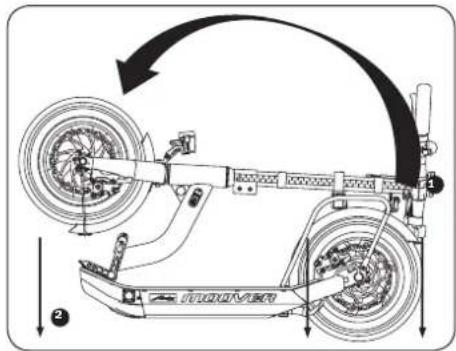

natural_image
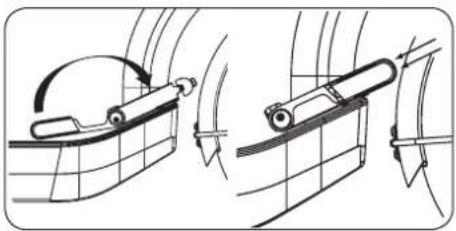
Technical line drawing of a mechanical assembly with no visible text or symbols- Pull the clamping lever 1 forward without applying much force until just before its end position. Pull the safety devices forward toward the front wheel and move the clamping lever into its end position. After releasing the safety device, perform a check to see whether it is in the correct position.
natural_image
Technical line drawing of two mechanical components with curved surfaces and internal brackets (no text or symbols)Make sure the fixation of the clamping lever in the closing mechanism is secure and free of clearance. Lack of fastening tension can result in severe falls and accidents.
- Open the quick clamp. If the moover was folded in the small position, turn the handlebar to the drive position.
- Slightly pull out of the handlebar.


natural_image
Line drawing of a scooter with visible suspension and wheel assembly (no text or symbols)- Adjust the handlebar to a position that you find safe and comfortable. See page 8.
- Close the quick clamp again.
Electrical system
The following components make up the electrical system:
- Display
- Battery and charger
- Motor
Switching on the electrical system
To switch on the electrical system, press the button until the display and lighting switch on. The button is located on the left side to the frame. To switch it off, press the same button until the system, display and lighting switch off. The rear light may remain lit in the parking light function but will switch of automatically later on.

Display
Switching the display on and off

The display is automatically started once the electrical system has been switched on. As soon as the electri-
cal system is switched off, the display will be switched off as well.
1

Test display
2

Welcome
3

Soft ware version
4

Display total kilometres
□

Display maximum speed in the selected driving mode (standard mode 20 km/h – or walking pace mode 6 km/h)
6

Brake test

The switching on routine is only continued once the brakes are actuated.
7

Display:
- Current speed
- Trip meter (tr)
- Battery charge status
Functional overview

1. Speed display
Shows the current speed.
2. Charge status display
Shows the battery charge status.
10 bars = battery is fully charged
1 bar = battery needs to be charged
3. Trip meter display
Shows the total kilometres travelled.
To reset the trip meter, pull the brakes and simultaneously press the hand pedal for approx. 3 seconds ("full throttle") until the word "RESET" appears on the display. Then release the brakes and hand pedal. The trip meter is then reset and "tr o.o km" is shown on the display.
Battery

The battery of your Metz moover is firmly fitted and CANNOT be removed. It is located in the central
carrier of the moover, below the step. Please always contact your specialist dealer for any questions regarding the repair of your battery or if you have a question or problems or dis-
cover a defect. The lack of expertise can lead to serious accidents and damages!

Safety instructions
Only charge your battery with the specified battery charger. There is a re if you use another battery charger.
- Avoid any severe impacts. It could result in fluid escaping the battery, fire and explosion.
- Do not apply excessive force on to the moover. If the battery is deformed, it may damage the integrated protective mechanism. It could result in fire and explosion.
- Do not use the battery if it is damaged. The liquid contained can escape and in the event of eye contact, it could result in the loss of sight!
- Never open the battery. This can cause a short-circuit. Any warranty or guarantee claim will be void if the battery is opened.
- Do not store or carry the moover with metal objects that could short-circuit the battery, e.g. office clips, nails, screws, keys, and coins. A short-circuit can result in burns or fire.
- Keep the moover away from heat, e.g. even excessive solar radiation and fire. There is risk of explosion.
-
Protect the battery against water and other liquids. In the event of contact, it may result in damages to the protective circuit and the protective mechanism of the battery. This can result in fire and explosion.
-
Do not clean the moover with a high pressure cleaner. To clean the moover, use a damp cloth and gentle cleaning agents.
- If you use the battery incorrectly, liquid may escape from it. This can result in skin irritations and burns. Avoid contact but in the event of contact, rinse the liquid off with plenty of water. In case of contact with the eyes, seek medical attention.
- If steam escapes in the event of incorrect use or damages, supply fresh air and seek medical attention if you have any complaints.
- Avoid a total discharge of the battery. This can result in irreversible cell damage.
- The battery is exclusively permitted for use with the Metz electric rear-wheel drive. There is a risk of injury and fire in the event of incorrect use or mishandling. The Metz company is not liable for damages caused by improper use.
Use and storage of the battery

You can use your Metz moover at temperatures between -10 and +40 degrees Celsius.
Store the battery/Metz moover in a dry and well-ventilated place. Temperatures between 5 °C to 35 °C are recommended.
If you do not require the battery/Metz moover for a longer period of time, e.g. a period of 3 – 6 months during winter, then best store the battery/Metz moover with a charger status of 40 – 60%. This results in a slower ageing of the battery than if it is fully charged. Check this charger status every 12 weeks and charge if necessary.
Make sure that the battery is not discharged for a longer period because a total discharge can result in irreversible cell damage.
In the event of a deep discharge: If the battery is discharged, it must be charged within 2 – 3 days in order to avoid a total discharge.
Battery charger

Observe the instructions on the battery charger prior to charging the battery.
- Only use the battery charger in dry rooms and never cover it during operation. Else there is a risk of a short-circuit or fire.
- Do not charge the battery immediately after a journey as it may still be warm.
- Switch the electrical system off prior to charging the battery.
- Pay attention to the supply voltage when connecting the battery charger! The voltage of the power source must conform to the specifications on the type plate of the battery charger.
- If you clean the battery charger, always disconnect it from the power source.
- Once the charge process is complete, the battery charger must be disconnected from the power supply.

For safety reasons the battery charger must be placed on a dry and non-flammable substrate during the
charge process.

A faulty battery must not be charged or used. The battery may feel warm during charging. In doing so, a tem-
perature of maximum 45^ C is still considered to be acceptable. If the temperature is higher, the charge process is automatically interrupted.
Charge the battery

Please note that in the event of a sudden change in temperature from cold to warm may it result in the for-
mation of condensation on the contacts of the charging socket. Avoid doing so by storing your Metz moover where you charge it. Only use the specified battery charger or one that was approved by the manufacturer to charge your device.

It is best to charge the battery in a warm environment than a cold one. The approved charging tempera-
tures are between 0 and +40 degrees Celsius.
If it is particularly cold, it is advantageous to store and charge the vehicle in a warm environment because this shortens the charge time.
The connector for the charging cable is located on the front on the left side of the step.

natural_image
Technical line drawing of a car's side profile showing structural components and a valve (no text or symbols)Charging socket with cover
- Take the cover off the charging socket.

natural_image
Technical line drawing of a ship's bow and hull (no text or symbols)- Insert the charging cable into the socket.
- As soon as the battery charger is connected to the powerless moover, the LED on the battery charger will turn red and the battery is charged. Furthermore, the display of the moover is activated. The word "Load" as well as the battery symbol will be shown on the display. The word "Full" will be shown on the display as soon as the battery is almost full. This means that just 1 - 4% of the charge is missing and the moover can be used as if it were fully charged. The
red indicator on the battery charger will first switch to green if the battery is fully charged.

If the LED on the battery charger flashes from red to green, it means that the battery is either too cold or too warm and cannot be charged yet. Disconnect the charging cable from the socket and wait until the battery has reached an appropriate temperature.
Motor
The motor of the Metz moover is integrated in the rear wheel. It is a brushless direct current motor with a continuous rated power of 250 watt.
Please bear in mind that the motor of your Metz moover can heat up during a longer ascent. Do not touch the motor, there is a risk of burns.
Driving the Metz moover

Practice handling and driving with your Metz moover in a calm and safe location prior to using it on public
roads.
Driving modes

The Metz moover has two different driving modes. In the standard mode a maximum speed of 20 km/h can
be achieved. In doing so, motor support is enabled as of 3 km/h. In the so-called walking pace mode, a maximum speed of 6 km/h is achieved with motor support that is enabled as of 2 km/h.

If the hand pedal is activated at a speed of more than 3 km/h, the drive will be activated. The degree of
support depends on the position of the hand pedal. If the hand pedal is pressed even further, greater support is generated. An easy, permanent movement of the hand pedal in the driving mode is sufficient to maintain the support. As soon as you stop moving the hand pedal whilst driving or if you have reached the maximum speed, the drive switches itself off. The support is automatically reactivated as soon as the speed has dropped below maximum speed and you actuate the hand pedal again.

The walking pace mode can also be used if you push the moover, e.g. out of an underground car park or across
a pedestrian bridge.
Switching the driving modes
- Switch on the moover. Get it ready to start. The normal driving display must be visible. The display must show 0 km/h.
- Hold the hand pedal to the end stop until the driving mode switches from e.g. 20 km/h to 6 km/h.
- Completely release the hand pedal.
- Now the selected driving mode is active. This mode will remain even once switched off and switched on again.
- To return to the standard mode, repeat the steps as described above.

Always apply the brakes of your Metz moover prior to positioning one foot on the step.

natural_image
Illustration of a hand holding a handheld device with wires (no text or symbols)Motor support is only provided if you actuate the hand pedal (and have reached a speed of more than 3 km/h in the standard mode or 2 km/h in the walking pace mode). If you do not use the hand pedal, support is not provided by the motor. The support provided by the motor stops once 20 km/h has been reached in the standard mode or 6 km/h in the walking pace mode.
Start-up
- Hold both grips and pull the brake lever.
- First of all, only place the foot of your standing leg on the step.
- Release the brakes and get the scooter moving by pushing your other leg (swinging leg).
- As soon as you have reached a speed of 3 km/h in the standard mode or 2 km/h in the walking speed mode, you can position your swinging leg onto the step as well. Carefully push the hand pedal down with your right thumb. This activates motor support.
- The scooter will continue to drive as long as the hand pedal is gently moved. All you need to do is move your thumb during the ride. The motor switches off once the lever of the hand pedal is held or no longer moved.
Safe driving

Always drive by placing both hands on the handles. Exception: To indicate a change of direction.
Always drive in a careful and anticipative manner. The Metz moover is an unusual appearance for other motorists and cyclists.

Please note that if you use the moover on a slippery or unpaved road (e.g. due to rain, snow or sand),
there is a risk that the driver wheel of your Metz moover may spin or skid.
Indicating the change of direction

Gather information about which valid national regulations are applicable to you that can be applied.
In the following there will be a description on how to change direction.
In order to change direction while driving, drive on the edge of the road with the scooter. Tread on the pavement. Change directions as if you were a pedestrian. Then place the moover back on the road when it is safe and suitable to do so and continue your journey.

Please note that driving safety is significantly impaired, if while standing on the scooter you take your hands
of the handlebar! Only do this if you feel confident while driving the moover.
Safe steering
Never lean too far into the corner. There is a risk that the Metz moover may lose grip and the rear wheel breaks away. Never speed up in the corner. Only accelerate as soon as you are no longer in an inclined position.
Safe braking

Avoid sudden and very strong brake actions. This could result in falls and accidents.
Only apply brakes with approx. 80% of the rear wheel brake (right brake lever) and approx. 20% of the front wheel brake (left brake lever). Support the braking process by gently shifting your weight back. Always brake before turning a corner instead of in the corner. When braking in an inclined position, the wheels of your scooter may break out.

The tyres lose grip if the ground is wet. This increases the brake path and the braking behaviour changes.
Drive with an anticipative manner and apply the brakes in good time. If the ground is wet, apply the brakes very carefully.
Actuating the hand pedal

Carefully increase the speed. First practice how to steer and brake in a safe manner.
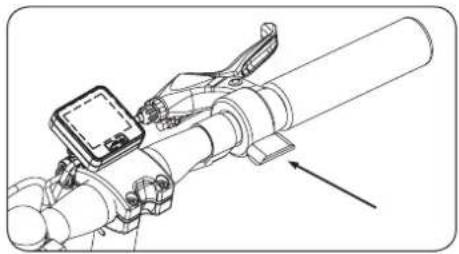
The hand pedal is located on the right handle. By pressing the lever with the thumb, you are increasing the power of the motor. As soon as you release the thumb from the lever, the motor support will stop. The power of the motor support depends on how far in you have pressed the hand pedal. (ECO / SPORT / POWER).
natural_image
Technical line drawing of a mechanical device with a mounted sensor and lever mechanism (no text or symbols)
The hand pedal must only be actuated if you have reached a speed of at least 3 km/h in the standard mode
or 2 km/h in the walking pace mode. If it is pressed at a lower speed, the drive will be not activated. The message "Pedal" will appear on the display. In this case, release the hand pedal completely and then press it again.
Issuing warning signs
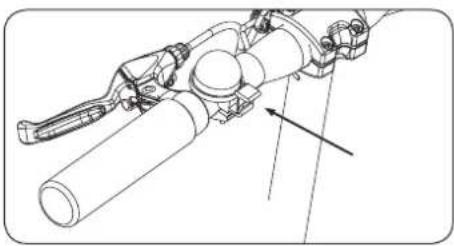
A bell is integrated next to the left handle.
natural_image
Technical line drawing of a mechanical device with no visible text or symbolsParking
The Metz moover has integrated parking support. The moover can be parked by easily folding it in and out with your foot.

natural_image
Technical line drawing of mechanical components and assembly (no text or symbols)Parking position Driving position

If you drive with a folded out parking support, it may result in a fall or serious accidents.
Therefore, always fold in the parking support before driving.
Mounted accessories
Lighting system
The spotlight must be set so that the centre of the light cone is 5 metres in front of the outlet from the spotlight and only half as high as the spotlight. The lighting of your moover is powered by the battery. It corresponds to the state of the art of technology and uses LEDs as the light source. These modern illuminants cannot be replaced individually.

Regularly clean the reflectors and spotlights. It is suitable to use warm water and cleaning agents or deter-
gents. Maintain the contact points using suitable spray oil.

A functioning lighting system is vitally important! Have a specialist dealer carry out the assembly, in-
spection and repairs.
Compatible accessories
Compatible accessories, e.g. locks, bags, battery chargers etc. can be found on our website: www.metz-moover.de.
Service and maintenance

Faulty or worn components of your Metz moover can result in injuries, property damages as well as serious
falls and injuries.

Allow a specialist dealer to regularly examine your Metz moover. If he/she detects damages or worn parts,
they will be able to advise you during the selection. Never repair the vehicle yourself.

The good and safe functioning of your Metz moover is only guaranteed if you use suitable and approved spare
parts for the replacement of components. Gather information about suitable material from the manufacturer or specialist dealer.

Safety-related parts that are either faulty or worn muts only be replaced with original spare parts of the man-
ufacturer or other parts that have been approved by the manufacturer. This is usually a prerequisite. In the event of other components, the warranty and guarantee claim of the manufacturer may become void if unauthorised spare parts are used.

You may lose the loss of function if you use spare parts that are not original or correct. Tyres with bad grip or operational safety, brake pads with a bad frictional coefficient or incorrectly installed or badly constructed light-weight parts can result in accidents with severe consequences. The same applies to improper assembly!
Screws and torque wrench

When working on the Metz moover, make sure that all screws are tightened using the correct torque. The
torque required for fastening is printed on many components.
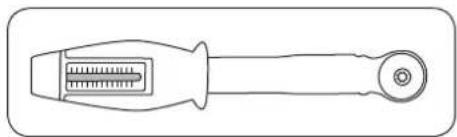
A Newton metre (Nm) is indicated and applied with a torque wrench. It is best to use a torque wrench that shows you when you have reached the set tightening torque. Otherwise screws may tear off or break. If you do not have a torque wrench, please have this work carried out by the specialist dealer!
A table with the general values for tightening torques for bolted connections can be found at the end of this section.
natural_image
Line drawing of a mechanical tool with a handle and circular end cap (no text or symbols)Torque wrench
- Maintenance and cleaning on opened, live parts must only be performed by the specialist dealer!
- If you clean the Metz moover, make sure that you do not touch or connect to any of the contacts as a result of it. If these parts are live, you may get injured and damage the battery.
- Cleaning the vehicle with a high pressure cleaning can damage the electrical system. The high pressure can also cause the cleaning liquid to penetrate sealed parts and thus, damage them.
- Avoid damaging the cables and electrical components. If a damage occurred, the Metz moover must not be used until it has been examined by a specialist dealer.

Prior to performing any work on your Metz moover, switch off the electrical system.
Bolted connections
Bolted connection Thread Tighten-
ing torque (Nm)
| Stem, handlebar clamping | M5 | 5 |
| Hand pedal clamping M4 3 | ||
| Brake lever clamping M6 6-8 | ||
| Handles M4 3 | ||
| Steering column clamp/quick clamp | M5 Knurled | |
| screw | ||
| easily | ||
| hand-tight | ||
| (quick clamp | ||
| opened) | ||
Steering column fixation M6 15-20
Axle nuts, front M10 20-30
Axle nuts, rear M12 20-30
Disc brake caliper Tektro M6 6-8
Brake disc Tektro M5 5
Luggage rack M5 5-6
General tightening torques for bolted connections
| The following tightening torques apply to the bolted connections: | ||||
| Dimensions | Screw quality embossing Unit | |||
| 8.8 | 10.9 | 12.9 | ||
| M 4 | 2.7 | 3.8 | 4.6 | Nm |
| M 5 | 5.5 | 8.0 | 9.5 | Nm |
| M 6 | 9.5 | 13.0 | 16.0 | Nm |
| M 8 | 23.0 | 32.0 | 39.0 | Nm |
| M 10 | 46.0 | 64.0 | 77.0 | Nm |
Rims/tyres

Brake system and brake pads: Replace worn off brake pads in good time! Make sure that the brakes and scs are clean and free of grease!
Regularly clean the brake area according to the inspection schedule, page 31.

The rims are highly stressed and safety-related components. They are subject to wear caused by driving. If
you notice any damages, no longer drive with those rims. Have them examined and replaced by a specialist dealer. A rim that is weakened due to wear can result in a fall and serious accidents.

Regularly examine the tyres of your Metz moover as well. The permissible minimum and maximum pressure is
indicated on the side of the tyres. Please comply with those values, else the tyres may break off the rims or burst!
If different pressure specifications are indicated on the rims and tyres, then the lower maximum and higher minimum pressure applies.

Example of a pressure specification

Tyres are wear parts. Regularly check the pressure, profile and condition of the tyres. Not all tyres are suitable
for the intended use. Allow the specialist dealer to advise you during the selection of tyres.
Brakes

Your Metz moover is equipped with mechanical disc brakes.

Brakes and brake systems are safety-related components. They must be regularly maintained. This re-
quired specialised knowledge and special tools. Allow a specialist dealer to perform all necessary work on your Metz moover. Work that is not performed properly or professionally can jeopardise the operational safety of the Metz moover!

Brake discs and brake pads are particularly subject to wear. Allow a dealer to regularly examine the safe-
ty-related components for wear and tear and have them replaced, if necessary.

Do not touch the brake discs when it rotates or directly after applying the brakes. There is a risk of injuries and
burns.
Inspection and care

The modern Metz moover is very powerful. It must be regularly maintained. This required specialised
knowledge and special tools. Allow a specialist dealer to perform the necessary work on your Metz moover!
The following applies to the permanently safe function and compliance with warranty claims:
- Clean your Metz moover after each journey and check it for damages.
- Have a specialist dealer carry out the inspections.
- Check your Metz moover in intervals of approximately 300 to 500 km or three to six months.
- Mend any damages to paint work.
- Replace faulty and worn parts.
Inspection: Deadlines and work

The first as well as all other regular inspections are particularly important for the trouble-free and safe ing of your Metz moover! Bolted con- can loosen. Therefore, have a spe- aler perform the first inspection.
The following inspection schedule describes the general services. Skipping maintenance work can jeopardise the seller's liability, if the errors could actually have been avoided during maintenance.
| Up to/after 200km | 1st year 2nd year 3rd year annually | annually annually annually annually annually annually annually | ||||||||
| Functional test of the lighting and bell, replace if necessary | ||||||||||
| Functional test of all switches and levers | ||||||||||
| Functional test of the display including the readouts | ||||||||||
| Test the handles for tight fit and damages, replace if necessary | ||||||||||
| Adjust the spotlights | ||||||||||
| Check the handlebar fastening for tight fit | ||||||||||
| Check the play of the steering head; adjust if necessary | ||||||||||
| Check the function of the front-wheel brake; adjust or replace if necessary | ||||||||||
| Check the function of the rear-wheel brake, adjust or replace if necessary | ||||||||||
| Check Bowden cables for tearing or damages; replace if necessary | ||||||||||
| Check tyres for damages; replace if necessary | ||||||||||
| Check clearance of the wheels | ||||||||||
| Check tight fit and wear and tear of the quick clamp | ||||||||||
| General screw checks, pay attention to tight fit and damages | ||||||||||
| Up to/after 200km | 1st year 2nd year 3rd year annually | annually annually annually annually annually annually annually | |||||||||
| Check cable harness and cabling for damage | |||||||||||
| Check battery charger for function | |||||||||||
| Check checking function | |||||||||||
| Check frame for damage (e.g. tears) | |||||||||||
| Check anti-slip strips on the step | |||||||||||
| Check tight fit and wear and tear of the folding mechanism; adjust if necessary | |||||||||||
| Careful functional check of all systems while driving | |||||||||||
| Visual final inspection of paint work and installed accessories | |||||||||||

The recommended tyre pressure is 2.0 to 4.0 bar
Lubrication

Working on the Metz moover requires expert knowledge, special tools and experience! This also apwork that appears to be easy, e.g. lun. Have all the work performed or ex-by a specialist dealer!
Transport

With the car
You can transport your Metz moover with the car. Thanks to the folding mechanism,oter usually fits in the boot. Make sure that trical system is switched off.

With the train
Prior to commencing your journey find out about using buses and trains. Make sure electrical system is switched off.

With the aeroplane
Transport with the aeroplane is not possible because the battery has a capacity than 100 watt hours. Thus, it is considered hazardous good. Airlines will not transport ice.
Wear and tear and warranty
Please note that the components of the Metz moover are subject to a higher degree of wear and tear, as this is the case with a scooter without additional drive. The reasons for this are higher vehicle weight and the higher average speed that is achieved with the drive. This higher degree of wear and tear is not a material defect and shall not be covered by warranty. Typical components that this applies to:
- Tyres
- Brake pads
- Drive components
Even the normal wear of the step is not covered by warranty.
The battery is subject to ageing and is therefore considered to a wear part. Please note that the battery loses range depending on the age and service life. Please bear this in mind while planning journeys and if necessary, have the battery replaced by your specialist dealer.
Replacement of components
Category 1/2 components
The following components of the Metz moover can only be replaced with original components. All components can be purchased directly at Metz.
| Component cat. | Manufacturer | Metz article number |
| 1/2 |
Handlebar Metz 917710096.A1
Hand pedal Metz 917960111.A1
Brake handle Metz 917960388.A1
Display Metz 917960092.A1
Steering column Metz 917960138.A1
Bracket Metz 917960337.A2
Running wheel, Tektro 917920267.A1 rim
Brake disc Tektro 917960396.A1
Brake calliper Tektro 917960396.A1
Brake pad Metz 917960396.A1
On/off button Metz 917960302.A2
Folding mechanism kit Metz 917000099.A1
Charging socket Metz 917960189.A1
Front cover Metz 917110020.A1
Step Metz 917000118.A1
| Component cat. | Manufacturer | Metz article number |
| 1/2 |
| Mudguard, front Metz according to colour |
| Mudguard, rear | Metz according to colour |
| Rear wheel, rim | Metz 917960283.A1 |
| incl. motor |
| Motor controller Metz 917960407.A1 |
| Battery | Metz 917960084.A1 |
| Battery charger | MDA 917960216.A1 |
Category 3 components
The following components are not Metz-specific components. In the event of an exchange, these must meet the requirements according to the table.
| Component cat. 3 | Requirements | Metz article number |
| Tyres | ETRTO 50-203 bearing load min. 55kg | 190805020 |
| Front light | 6V DC voltage RTA (German road traffic act) approval | 917960068.A1 |
| Rear light | 6V DC voltage RTA approval integrated reflector | 917960068.A1 |
Guidelines for component replacement for CE-marked e-bikes/pedelecs with assisted pedalling up to 25 km/h
Category 1
Component that may only be replaced following the approval of the vehicle manufacturer/system provider
- Motor
- Sensors
• Electronic control - Electrical cables
- Operating unit on the handlebar
- Display
- Battery pack
- Battery charger
Category 2
Component that may only be replaced following the approval of the vehicle manufacturer
- Frames
- Running wheel for the hub drive
- Brake system
- Brake pads (caliper brakes)
- Luggage rack
(Luggage racks determine the load distribution on the wheel. Both negative and positive changes could potentially result in a different driving behaviour, than implied by the manufacturer)
Category 3
Component that may be replaced following the approval of the vehicle or component manufacturer
- Running wheel without hub motor (if the ETRTO is maintained)
- Rim band (Rim bands and rims must be tuned to one another. Changed combinations can cause the rim band to slip and thus, result in hose defects).
- Tyres (the greater acceleration, additional weight and dynamic cornering require tyres that are approved for use for the e-bike. In doing so, it is important to ensure the ETRTO is complied with).
- Brake cables/brake lines
- Brake pads (Disc brakes, roll brakes, drum brakes)
- Handlebar stem unit (provided the train and/or cable lengths do not need to be changed. A change of the seating position in terms of the consumer must be possible within the original train lengths. Furthermore, this significantly changes the load distribution on the wheel and could result in critical steering features).
- Spotlight (The lighting system is designed for a specific voltage that must be adapted to the battery of the vehicle. Furthermore, the electromagnetic compatibility (EMC) must be guaranteed, whereby the spotlight can account for part of the potential jamming)
Category 4
Components that do not require special approval.
- Steering head
- Mudguards
(if the widths are not smaller than the series/original parts and the distance to the tyres amounts to min. 10 mm)
- Tube with the same design type and same valve
- Rear light
- Reflector
- Spoke reflector
- Stands
- Handles with screw clamping
* Information on category 3: An approval of a component manufacturer can only take place if the component was sufficiently examined in advance according to its designated purpose and corresponding standards and a risk analysis was performed. Version 14-06-2016
Source: www.ziv-zweirad.de, contents changes for Metz moover
Ban on tuning
Do not carry out any technical changes to your Metz moover. Any form of manipulation to enhance performance or increase the speed can result in serious legal and safety-related consequences.
Possible legal consequences:
- The Metz moover may become liable to mandatory registration and insurance. All legal requirements regarding equipment and STVZO [Road Traffic Licensing Regulations] become applicable.
- Any liability, warranty claims and guarantee on the manufacturer's part shall become invalid.
- Criminal consequences are not excluded. For example, the facts of negligent bodily injury may be applied.
• Termination of insurance.
• Possible technical consequences: - Technical changes impair the function and can result in defects or even break the components.
- The motor and battery are overloaded and overheated. Consequence: Irreparable damages and risk of fire.
- The brakes are put under more strain. Consequence: Malfunction, overheating, faster wear and tear.
Technical data
Weight: approx. 16 kg
Dimensions: 119 cm x 51 cm x (99 cm - 116 cm) roadworthy 100 cm x 26 cm x 64 cm folded small
Motors: Brushless direct current motor 250 W continuous rated power
Battery: Lithium ion battery, capacity 210 Wh
Voltage: 36 Volt
Charging time: up to 4 hours
Range: 15 – 20 km / with a driver's weight of 85 kg and a new, fully charged battery
Operating voltage: 36 Volt
Permissible total weight: max. 110 kg
The A-evaluated emission sound pressure level in the driver's ears is less then 70 dB(A).
Warranty and liability in case of defects

Legal warranty regulations apply
Warranty conditions
- The warranty conditions solely apply to purchases made in the Switzerland and Austria.
- In other countries, the warranty regulations of the respective country or warranty regulations of the seller shall apply.
- The following conditions are only valid for private use.
- The warranty period - 24 months - begins upon the conclusion of the purchase contract or the day on which the device is delivered to the buyer (end consumer).
- Warranty claims can only be asserted when accompanied by proof of purchase date in the form of the original sales receipt issued automatically by the seller.
- We ask you to return defective devices together with the purchase receipt either via the specialist dealer or directly to the company Metz mecatech GmbH - Central Customer Services - Ohmstraße 55, 90513 Zirndorf, Germany in a safe and secure manner with a detailed description of the complaint. Outward and return shipping is at the risk of the buyer.
- The warranty is based on devices which become defective due to a recognised error in fabrication or the materials used and which are subsequently repaired or replaced, should repairing the device entail disproportionate expense. Further liability, particularly for damage which did not arise on the basis of the device itself, is excluded. This shall not apply in the case of intentional acts or gross negligence for which the assumption of liability is mandatory. Warranty services do not extend the warranty period and replaced or improved parts do not establish a new warranty period.
Environmental tips
- Improper handling and interventions by the buyer or third parties cause warranty obligations and all other claims to expire. The warranty furthermore excludes damage or faults caused by non-compliance with the instruction manual, mechanical damage, force majeure or water/lightning etc.. Furthermore, the warranty does not cover wear, consumption or excessive use.
This particularly affects the following parts: Fixed batteries, contacts, connection cables Drive components and delay devices such as tyres, lighting and contact points of the drivers with the Metz moover are subject to wear and tear due to normal use and the same applies to the battery.
- These warranty conditions do not affect the buyer's warranty claims against the seller.

In the event of a defect/liability case please contact your specialist dealer or our service department (tel: +49-
911-9706-175/ email: support@metz-moover.de). Keep all purchasing receipts and proof of inspection as proof.
General care and cleaning agents
During the care and cleaning of your Metz moover please make sure your protect the environment. Therefore, if possible use biodegradable cleaning agents for the purposes of care and cleaning. Make sure that no cleaning agents enter the sewage water system.
Tyres and hoses
Tyres and hoses are not considered residual or commercial waste and must be disposed of at a collection station nearby.
Packaging material
Dispose of the packaging material of the moover in the waste paper container or in suitable recycling bins.
Batteries
The Metz moover batteries must be treated as hazardous goods and are therefore subject to a very particular labelling requirement. They must be disposed of via a specialist dealer or manufacturer.

flowchart
graph TD
    A["Recycle"] --> B["Recycle"]
    B --> C["Recharge"]
    C --> D["Discharge"]
    D --> E["Recycle"]
    style A fill:#f9f,stroke:#333
    style B fill:#ccf,stroke:#333
    style C fill:#cfc,stroke:#333
    style D fill:#fcc,stroke:#333
    style E fill:#ffc,stroke:#333
Inspections
Service intervals
| Handover inspection: Completed on: |
| Date, signature Merchant stamp |
| Inspection (2nd year) |
| Completed on: |
| Mileage: |
| Date, signature Merchant stamp |
| Inspection (up to/after 200 km) |
| Completed on: |
| Mileage: |
| Date, signature Merchant stamp |
| Inspection (3rd year) |
| Completed on: |
| Mileage: |
| Date, signature Merchant stamp |
| Inspection (1st year) |
| Completed on: |
| Mileage: |
| Date, signature Merchant stamp |
| Inspection (annual) |
| Completed on: |
| Mileage: |
| Date, signature Merchant stamp |
| Inspection (annual)Completed on:____Mileage:____________Date, signature Merchant stamp |
| Inspection (annual)Completed on:____________Mileage:____________Date, signature Merchant stamp |
| Inspection (annual)Completed on:____Mileage:____________Date, signature Merchant stamp |
| Inspection (annual)Completed on:____________Mileage:____________Date, signature Merchant stamp |
| Inspection (annual)Completed on: |
| Mileage: |
| Date, signature Merchant stamp |
Handover documentation
You Metz moover can be handed over in different assembly conditions.
Depending on where you purchases it, it is important to first carry out the assembly and adjusting work. We recommend having this safety-related work performed by a specialist. Please read the “Assembly” chapter, if you would like to assemble it yourself.
Scope of delivery:
□ Metz moover
Battery charger
□ Operating Instructions
□ Declaration of conformity
□ Moody licence
Functional check for the following components:
☐ Running wheels: tight fit, true running, correct air pressure
☐ All screws: tight fit, correct tightening torque
□ Brake system
□ Lighting system
□ Display tight fit and correct connection
☐ Folding mechanism: Can be folded without problems, cable guide of the brakes and power supply
□ Battery charger
☐ The following attachments are mounted and tested separately:
□ Test drive of the mechanic/acceptance
□ Instructing the customer about the moover
□ Front-wheel brake handle right
□ Front-wheel brake handle left
Handed over by (merchant stamp):
Date Signature of mechanic/merchant
The highest permissible gross weight for this vehicle amounts to 110 kg. The vehicle weighs 16 kg. A total of 94 kg can be added.
Customer/Recipient/Owner
Name ____
Address ____
Postcode, town ____ ____
Email ____
Purchasing date Signature recipient/owner

If the moover was handed over in a pre-assembled state with these operating instructions, it is important to read and follow the steps in the Assembly section. The aforementioned checks and restrictions must be carried out and
complied with by the owner!
Metz moover identification
Manufacturer Metz mecatech
Brand Metz
Model moover
Colour ____
Frame number ____
Special equipment ____
Own comments
Please unfold!
Observe the Metz moover identification and handover document
Product identification sticker
Metz mecatech GmbH
Ohmstraße 55
90513 Zirndorf
Germany
Tel.: +49-911-9706-175

- Dear customer
- All persons that
- Information for parents and guardians:
- Contents
- Legal Notice
- Safety instructions
- Information on electrics and electronics
- Installation
- Assemble handlebar
- Quick start
- Before the first ride
- Before every ride
- If you have fallen
- Statutory provisions
- Intended Use
- Initial start-up
- Adjusting the handlebar height
- Maximum pullout height
- Minimum pullout height
- Folding mechanism
- A Fold "flat"
- B Fold "small"
- Unfolding the Metz moover
- Electrical system
- Switching on the electrical system
- Speed display
- Charge status display
- Trip meter display
- Battery
- Use and storage of the battery
- Battery charger
- Charge the battery
- Motor
- Driving the Metz moover
- Driving modes
- Switching the driving modes
- Start-up
- Safe driving
- Indicating the change of direction
- Safe steering
- Safe braking
- Actuating the hand pedal
- Issuing warning signs
- Parking
- Mounted accessories
- Lighting system
- Compatible accessories
- Service and maintenance
- Screws and torque wrench
- Rims/tyres
- Brakes
- Inspection and care
- Inspection: Deadlines and work
- Lubrication
- Transport
- With the car
- With the train
- With the aeroplane
- Wear and tear and warranty
- Replacement of components
- Category 1/2 components
- Category 3 components
- Guidelines for component replacement for CE-marked e-bikes/pedelecs with assisted pedalling up to 25 km/h
- Category 1
- Category 2
- Category 3
- Category 4
- Ban on tuning
- Technical data
- Warranty and liability in case of defects
- Warranty conditions
- Environmental tips
- General care and cleaning agents
- Tyres and hoses
- Packaging material
- Batteries
- Inspections
- Handover documentation
- Scope of delivery:
- Functional check for the following components:
- Customer/Recipient/Owner
- Metz moover identification
- Own comments
- Please unfold!
Brand : METZ
Model : Moover
Category : Electric scooter