
TX-6610 - GPON Terminal TP-LINK - Free user manual and instructions
Find the device manual for free TX-6610 TP-LINK in PDF.


| Product Type | GPON Terminal (ONT) |
| Brand | TP-Link |
| Model | TX-6610 |
| Standards | ITU-T G.984.1/2/3/4, IEEE 802.3/3u/3ab, 802.1p/q |
| Downstream Rate | Up to 2.488 Gbps |
| Upstream Rate | Up to 1.244 Gbps |
| Ports | 1 x Gigabit Ethernet RJ45 (10/100/1000), 1 x GPON SC/UPC |
| LED Indicators | Power, GPON, LOS, LAN |
| Power Supply | External 12V DC adapter (included) |
| Dimensions | Approx. 140 x 100 x 30 mm (estimated) |
| Weight | Approx. 200 g (unit only, estimated) |
| Operating Temperature | 0°C to 40°C (32°F to 104°F) |
| Storage Temperature | -40°C to 70°C (-40°F to 158°F) |
| Humidity | 10% – 90% (non-condensing) |
| GPON Class | Class B+, distance up to 20 km |
| Wavelength | Tx: 1310 nm, Rx: 1490 nm |
| Security & Emission | FCC Class B, CE |
| Management | Web-based GUI (default IP 192.168.1.1) |
| Maintenance | Keep dry and clean; avoid moisture and heat |
| Package Contents | TX-6610 unit, power adapter, RJ45 cable, Quick Installation Guide, Resource CD |
Frequently Asked Questions - TX-6610 TP-LINK
User questions about TX-6610 TP-LINK
0 question about this device. Answer the ones you know or ask your own.
Ask a new question about this device
Download the instructions for your GPON Terminal in PDF format for free! Find your manual TX-6610 - TP-LINK and take your electronic device back in hand. On this page are published all the documents necessary for the use of your device. TX-6610 by TP-LINK.
USER MANUAL TX-6610 TP-LINK
natural_image
Black TP-LINK wireless device with ventilation grille and power control panel (no visible text beyond branding)COPYRIGHT & TRADEMARKS
Specifications are subject to change without notice. TP-LINK ^® is a registered trademark of TP-LINK TECHNOLOGIES CO., LTD. Other brands and product names are trademarks or registered trademarks of their respective holders.
No part of the specifications may be reproduced in any form or by any means or used to make any derivative such as translation, transformation, or adaptation without permission from TP-LINK TECHNOLOGIES CO., LTD. Copyright © 2013 TP-LINK TECHNOLOGIES CO., LTD. All rights reserved.
http://www.tp-link.com
FCC STATEMENT
FC
This equipment has been tested and found to comply with the limits for a Class B digital device, pursuant to part 15 of the FCC Rules. These limits are designed to provide reasonable protection against harmful interference in a residential installation. This equipment generates, uses and can radiate radio frequency energy and, if not installed and used in accordance with the instructions, may cause harmful interference to radio communications. However, there is no guarantee that interference will not occur in a particular installation. If this equipment does cause harmful interference to radio or television reception, which can be determined by turning the equipment off and on, the user is encouraged to try to correct the interference by one or more of the following measures:
- Reorient or relocate the receiving antenna.
- Increase the separation between the equipment and receiver.
- Consult the dealer or an experienced radio/ TV technician for help.
- Connect the equipment into an outlet on a circuit different from that to which the receiver is connected.
This device complies with part 15 of the FCC Rules. Operation is subject to the following two conditions:
1) This device may not cause harmful interference.
2) This device must accept any interference received, including interference that may cause undesired operation.
Any changes or modifications not expressly approved by the party responsible for compliance could void the user's authority to operate the equipment.
CE Mark Warning
CE
This is a class B product. In a domestic environment, this product may cause radio interference, in which case the user may be required to take adequate measures.

- When product has power button, the power button is one of the way to shut off the product; when there is no power button, the only way to completely shut off power is to disconnect the product or the power adapter from the power source.
- Don't disassemble the product, or make repairs yourself. You run the risk of electric shock and voiding the limited warranty. If you need service, please contact us.
● Avoid water and wet locations.
This product can be used in the following countries:
| AT | BG | BY | CA | CZ | DE | DK | EE |
| ES | FI | FR | GB | GR | HU | IE | |
| LT | LV | MT | NL | NO | PL | PT | RO |
| RU | SE | SK | TR | UA |
IT
DECLARATION OF CONFORMITY
For the following equipment:
Product Description: 1-Port Gigabit GPON Terminal
Model No.: TX-6610
Trademark: TP-LINK
We declare under our own responsibility that the above products satisfy all the technical regulations applicable to the product within the scope of Council Directives:
Directives 2004 / 108 / EC, Directives 2006 / 95 / EC, Directives 2011/65/EU
The above product is in conformity with the following standards or other normative documents:
EN 55022:2010
EN 55024:2010
EN 61000-3-2:2006+A1:2009+A2:2009
EN 61000-3-3:2008
EN 60950-1:2006+A11: 2009+A1:2010+A12:2011
The product carries the CE Mark:

Person responsible for making this declaration:

Yang Hongliang
Product Manager of International Business
Date of issue: 2013
CONTENTS
Package Contents ....1
Chapter 1. Product Overview....2
1.1 Product Overview ...... 2
1.2 Main Features....2
1.3 Panel Layout....3
1.3.1 The Front Panel 3
1.3.2 The Back Panel....4
Chapter 2. Connecting the ONT....5
2.1 System Requirements 5
2.2 Installation Environment Requirements....5
2.3 Connecting the ONT 5
Chapter 3. Quick Installation Guide....7
3.1 TCP/IP Configuration....7
3.2 Quick Installation Guide....8
Chapter 4. Configuring the ONT....10
4.1 Login....10
4.2 Status....10
4.3 Network Setting 12
4.3.1 PON Certification 12
4.3.2 VLAN Setting.... 13
4.3.3 LAN Setting....13
4.4 Management....14
4.4.1 User Management 14
4.4.2 Firmware Upgrade 15
4.4.3 Factory Defaults 16
4.4.4 Reboot....17
Appendix A: Specifications....18
Appendix B: Configuring the PC....20
Appendix C: Troubleshooting 24
Appendix D: Technical Support 27
Package Contents
The following contents should be found in your package:
One TX-6610 1-Port Gigabit GPON Terminal
One Power Adapter for TX-6610 1-Port Gigabit GPON Terminal
▶ Quick Installation Guide
One RJ45 cable
One Resource CD for TX-6610 1-Port Gigabit GPON Terminal, including this User Guide
Note:
Make sure that the package contains the above items. If any of the listed items are damaged or missing, please contact your distributor.
Chapter 1. Product Overview
Thank you for choosing the TX-6610 1-Port Gigabit GPON Terminal.
1.1 Product Overview
TP-LINK's TX-6610 is a next-generation Gigabit Passive Optical Network (GPON) terminal, ideal for Fiber to The Home solution. It's an incredibly robust device allowing users to access high-speed internet connections via its GPON port and share it with a Gigabit Ethernet port. With the transmission rates of up to 2.488Gbps, one GPON port and one Gigabit Ethernet port, the TX-6610 provides high-performance forwarding capabilities to ensure smooth VoIP, HD video streaming experiences.
1.2 Main Features
Complies with ITU G.984.1, ITU G.984.2, ITU G.984.3 and ITU G.984.4 provides users comprehensive GPON network compatibility
➢ Downstream rates of up to 2.488Gbps and upstream rates up to 1.244Gbps
▶ Gigabit port ensures rapid transfer speeds
➢ Quality of Service control for traffic prioritization and bandwidth management
▶ Quick and hassle-free installation
➢ Intelligent power-saving method
1.3 Panel Layout
1.3.1 The Front Panel
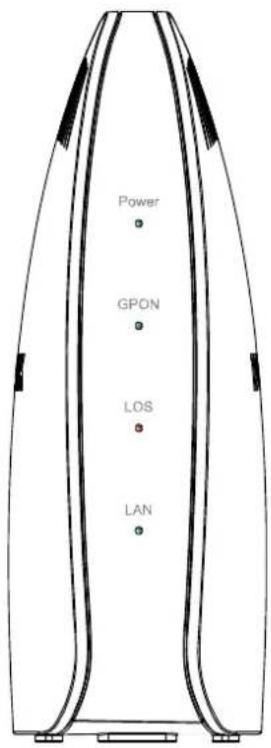
Figure 1-1
The GPON Terminal's LEDs are located on the front panel. They indicate the device's working status. For details, please refer to LED Explanation.
LED Explanation:
| Name Status Indication | ||
| Power | On | The ONT is powered on. |
| Off | The ONT is off. | |
| GPON | On | The ONT has connected to the OLT. |
| Flash | The ONT is trying to set up a connection to the OLT. | |
| Off | The ONT has not connected to the OLT. | |
| LOS | On | The Rx optical power of the ONT is abnormal. |
| Flash | The Rx optical power of the ONT is lower than the optical receiver sensitivity. | |
| Off | The Rx optical power of the ONT is normal. | |
| LAN | On | There is a device connected to this LAN port. |
| Flash | The device is sending or receiving data over this LAN port. | |
| Off | There is no device connected to this LAN port. | |
1.3.2 The Back Panel
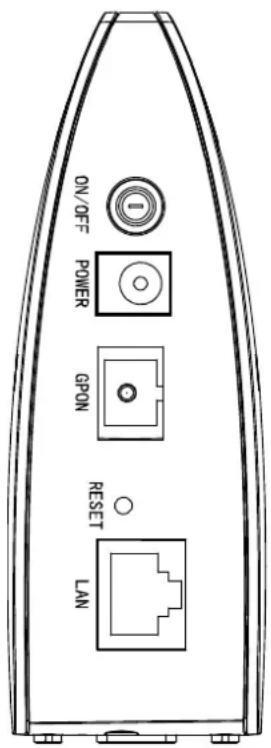
Figure 1-2
ON/OFF: The switch for the power.
POWER: The Power plug is where you will connect the power adapter.
GPON: The GPON is where you will connect the fiber.
➢ RESET: There are two ways to reset the ONT's factory defaults.
Method one: With the ONT powered on, use a pin to press and hold the Reset button for at least 5 seconds. And the ONT will reboot to its factory default settings.
Method two: Restore the default setting from "Management → Factory Defaults" of the ONT's Web-based utility.
LAN: Through the port, you can connect the ONT to your PC or the other Ethernet network devices.
Chapter 2. Connecting the ONT
2.1 System Requirements
Broadband Internet Access Service (GPON).
PCs with a working Ethernet Adapter and an Ethernet cable with RJ45 connectors.
▶ TCP/IP protocol on each PC.
Web browser, such as Microsoft Internet Explorer, Mozilla Firefox or Apple Safari.
2.2 Installation Environment Requirements
The Product should not be located where it will be exposed to moisture or excessive heat.
➢ Place the ONT in a location where it can be connected to the various devices as well as to a power source.
Make sure the cables and power cord are safely placed out of the way so they do not create a tripping hazard.
The ONT can be placed on a shelf or desktop.
Keep away from the strong electromagnetic radiation and the device of electromagnetic sensitive.
2.3 Connecting the ONT
Before installing the device, please make sure your broadband service provided by your ISP is available. If there is any problem, please contact your ISP. Before cable connection, cut off the power supply and keep your hands dry. You can follow the steps below to install it.
Step 1: Connect the fiber. Plug one end of the fiber into the GPON port on the rear panel of TX-6610, and insert the other end into the wall socket.
Step 2: Connect the Ethernet cable. Attach one end of a network cable to your computer's Ethernet port or a regular hub/switch port, and the other end to the LAN port on the TX-6610.
Step 3: Power on the computers and LAN devices.
Step 4: Attach the power adapter. Connect the power adapter to the power connector on the rear of the device and plug in the adapter to an electrical outlet or power extension. The electrical outlet shall be installed near the device and shall be easily accessible.
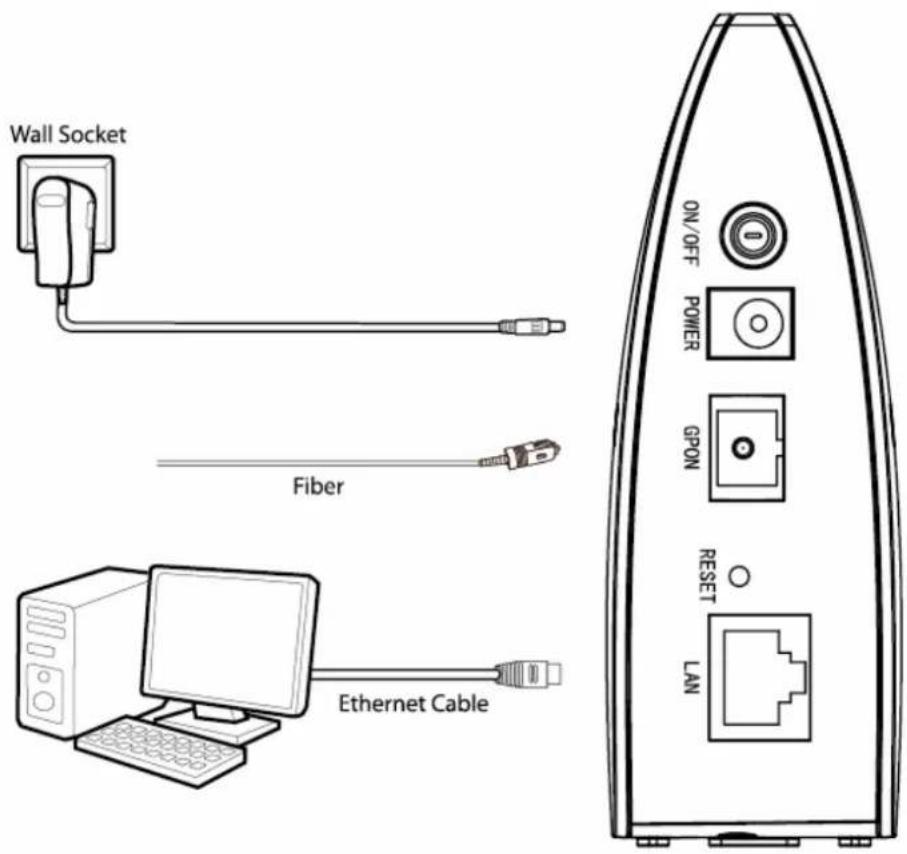
Figure 2-1
Chapter 3. Quick Installation Guide
3.1 TCP/IP Configuration
The default IP address of the TX-6610 1-Port Gigabit GPON Terminal is 192.168.1.1. And the default Subnet Mask is 255.255.255.0. These values can be changed as you desire. In this guide, we use all the default values for description.
Connect the local PC to the LAN/WAN port of the Router. And then you can configure the IP address for your PC in the following way.
Obtain an IP address automatically
1) Set up the TCP/IP Protocol in "Obtain an IP address automatically" mode on your PC. If you need instructions as to how to do this, please refer to Appendix B: Configuring the PC.
2) Then the built-in DHCP server will assign IP address for the PC.
Now, you can run the Ping command in the command prompt to verify the network connection. Please click the Start menu on your desktop, select run tab, type cmd or command in the field and press Enter. Type ping 192.168.1.1 on the next screen, and then press Enter.
If the result displayed is similar to the screen below, the connection between your PC and the router has been established.
Pinging 192.168.1.1 with 32 bytes of data:

Reply from 192.168.1.1: bytes=32 time<1ms TTL=64
Reply from 192.168.1.1: bytes=32 time<1ms TTL=64
Reply from 192.168.1.1: bytes=32 time<1ms TTL=64
Reply from 192.168.1.1: bytes=32 time<1ms TTL=64

Ping statistics for 192.168.1.1:
    Packets: Sent = 4, Received = 4, Lost = 0 (0% loss),
Approximate round trip times in milli-seconds:
    Minimum = 0ms, Maximum = 0ms, Average = 0ms
Figure 3-1
If the result displayed is similar to the screen shown below, it means that your PC has not connected to the router.
Pinging 192.168.1.1 with 32 bytes of data:

Request timed out.

Request timed out.

Request timed out.

Request timed out.

Ping statistics for 192.168.1.1:
    Packets: Sent = 4, Received = 0, Lost = 4 (100% loss),
Figure 3-2
You can check it following the steps below:
1) Is the connection between your PC and the router correct?
The LEDs of LAN port which you link to the device and the LEDs on your PC's adapter should be lit.
2) Is the TCP/IP configuration for your PC correct?
If the router's IP address is 192.168.1.1, your PC's IP address must be within the range of 192.168.1.2 \~ 192.168.1.254.
3.2 Quick Installation Guide
With a Web-based utility, it is easy to configure and manage the TX-6610 1-Port Gigabit GPON Terminal. The Web-based utility can be used on any Windows, Macintosh or UNIX OS with a Web browser, such as Microsoft Internet Explorer, Mozilla Firefox or Apple Safari.
- To access the configuration utility, open a web-browser and type the default address http://192.168.1.1 in the address field of the browser.

Figure 3-3
After a moment, a login window will appear, similar to the Figure 3-4. Enter admin for the User name and Password, both in lower case letters. Then click the OK button or press the Enter key.
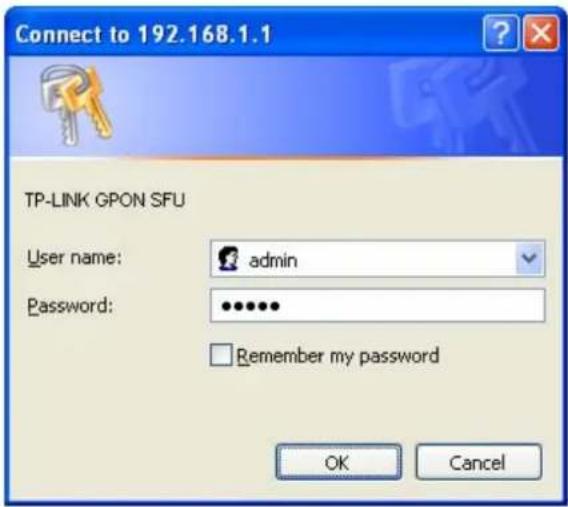
Figure 3-4
Note:
1) Do not mix up the user name and password with your ONT account user name and password which are needed for PPP connections.
2) If the above screen does not pop up, it means that your Web-browser has been set to a proxy. Go to Tools menu→Internet Options→Connections→LAN Settings, in the screen that appears, cancel the Using Proxy checkbox, and click OK to finish it.
- After your successful login, you will see the Login screen as shown in Figure 3-5. Click "Network Setting"→"PON Certification" to complete the PON setting. You are required to enter GPON Password or GPON SN or both provided by your ISP to pass the OLT
authentication. For details, please consult your ISP. Click Save to make your settings take effect.
PON Certification
GPON Password
GPON Password(Notice: Maximum 10 ASCII characters)
Old Password:
(0)characters
New Password:
Save
GPON SN
GPON SN(Notice: Must be 16 Hexadecimal Numbers)
Old SN:
54505C4CC17D01DC
New SN:
Save
Figure 3-5
- Run the dialing software to connect to the Internet. For details, please refer to T1 in Troubleshooting.
Chapter 4. Configuring the ONT
This chapter will show each Web page's key function and the configuration way.
4.1 Login
After your successful login, you will see the five main menus on the left of the Web-based utility. On the right, there are the corresponding explanations and instructions.
Status
Network Setting
Management
The detailed explanations for each Web page's key function are listed below.
4.2 Status
Choose "Status", you can see the corresponding information about System Status, LAN, PON and Statistics.
| System Status | |||
| System Status ONU Type: 1GE SFU GPON System UP Time: 0:5:42:49(dd hh:mm:ss) Firmware Version: 3.1.1.1 build 130912 Rel.38624n Hardware Version: TX-6610 v2 3.1.1.1 | |||
| LAN IP Address: 192.168.1.1 Subnet Mask: 255.255.255.0 MAC Address: 00:11:22:33:44:55 LAN Status: Connected LAN Model: 100Mbps full duplex Flow Control: Off | |||
| PON Access Mode: GPON ONU ID: 255 Authentication: Fiber disconnected Upstream FEC: Off Downstream FEC: Off Temperature: 54.31 °C Voltage: 3240 mV Bias Current: 0.00 mA TX Power: -- dBm RX Power: -- dBm | |||
| Statistics Type PON OMCI LAN RX Packets 0 0 13675 TX Packets 0 0 2186 Drop Packets N/A N/A 10 Error Packets N/A N/A 0 | |||
| Refresh |
Figure 4-1
System Status: Here shows the system information of the ONT.
LAN: The current port status of the ONT.
PON: Here shows the ONT's current GPON module information.
Statistics: Here you can view the statistics of the ONT.
Click Refresh to update this page.
4.3 Network Setting
Choose "Network Setting", there are three submenus under the main menu. Click any one of them, and you will be able to configure the corresponding function.
Network Setting
PON Certification
Vlan Setting
LAN Setting
4.3.1 PON Certification
Choose "Network Setting"→"PON Certification", the GPON Configuration screen will appear on the page as shown in Figure 4-2. You are required to enter the GPON Password or GPON SN or both to pass the OLT authentication before you connect to the Internet. For details, please consult your ISP.
PON Certification
GPON Password
GPON Password(Notice: Maximum 10 ASCII characters)
Old Password:
(0)characters
New Password:
Save
GPON SN
GPON SN(Notice: Must be 16 Hexadecimal Numbers)
Old SN:
54504C4722334455
New SN:
Save
Figure 4-2
GPON Password
Old Password: Displays the factory default password.
New Password: Enter the password provided by your ISP.
Click Save to make the settings take effect.
GPON SN
Old SN: Displays the factory default SN.
New SN: Enter the SN provided by your ISP.
Click Save to make the settings take effect.
4.3.2 VLAN Setting
Choose "Network Setting"→"VLAN Setting", the VLAN Setting screen will appear on the page as shown in Figure 4-3.
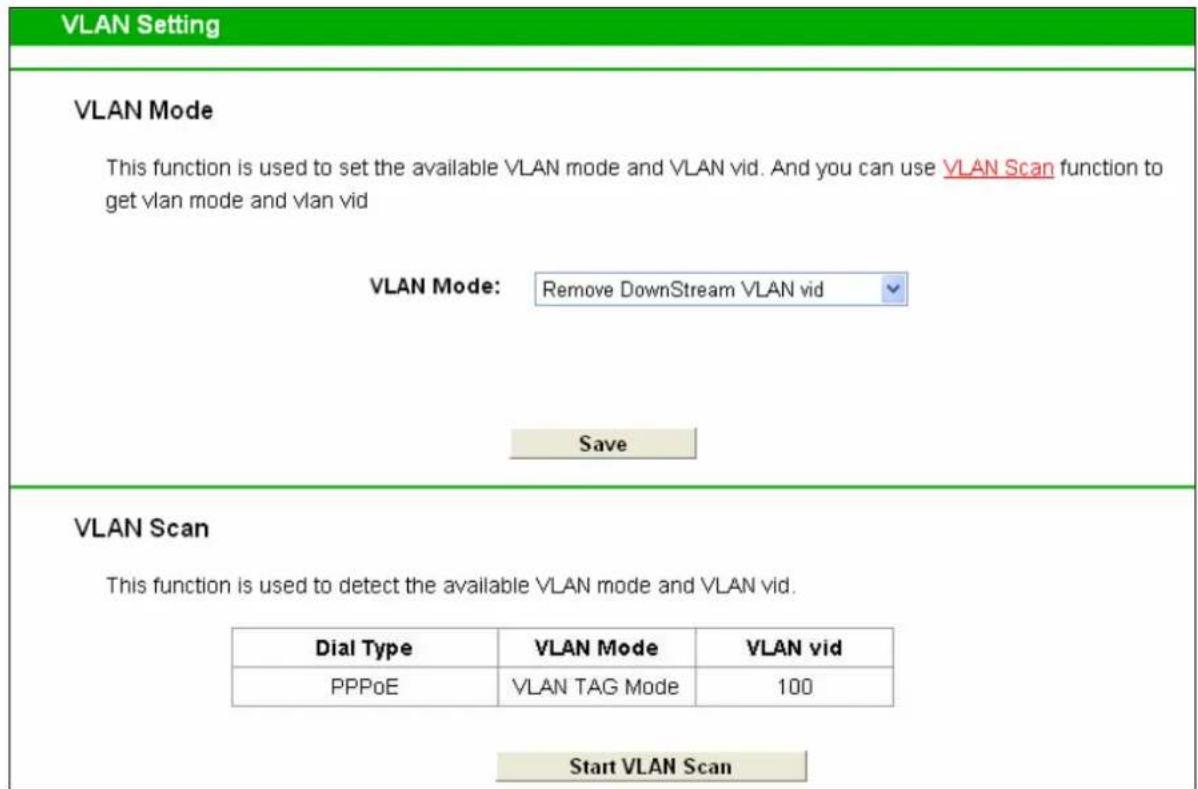
Figure 4-3
VLAN Mode: Select your desired VLAN Mode from the dropdown list.
Click the Start VLAN Scan button to search for available VLAN Mode and VLAN vid.
4.3.3 LAN Setting
Choose "Network Setting"→"LAN Setting" menu and you will see the LAN screen as shown in Figure 4-4. You can change the LAN IP address on this page.
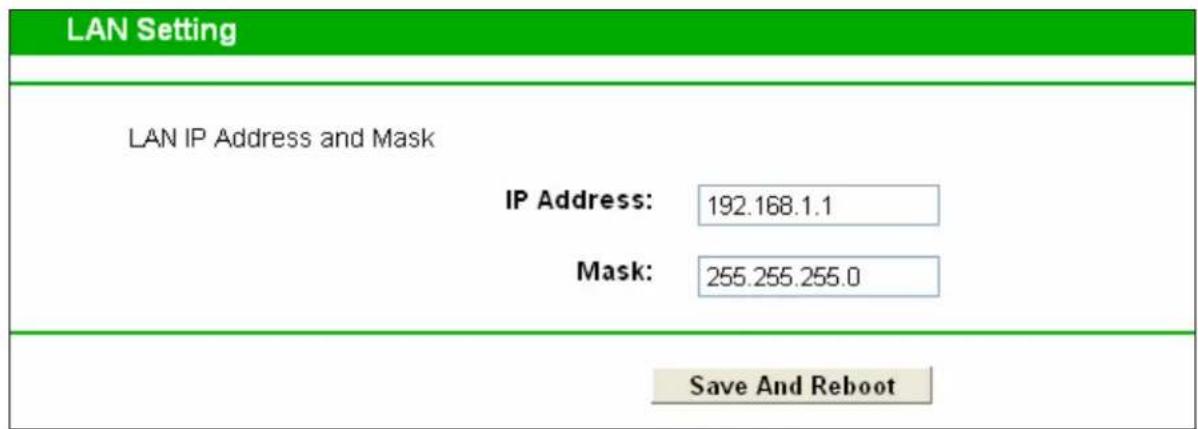
Figure 4-4
IP Address: Enter the ONT's local IP Address, then you can access to the Web-based Utility via the IP Address, the default value is 192.168.1.1.
Subnet Mask: Enter the ONT's Subnet Mask, the default value is 255.255.255.0.
Click Save And Reboot to make the settings take effect.
Note:
If you change the IP Address of LAN, you must use the new IP Address to log in the ONT.
4.4 Management
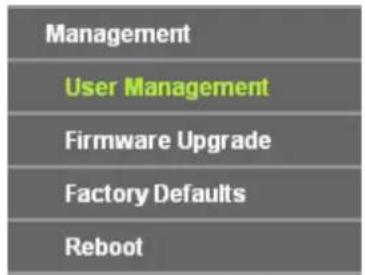
Choose menu "Management", and you will see the submenus under the main menu: User management, Firmware Upgrade, Factory Defaults and Reboot. Click any one of them, and you will be able to configure the corresponding function. The detailed explanations for each submenu are provided below.
4.4.1 User Management
Choose menu "Management" → "User Management", and then you can change the factory default user name and password of the ONT in the next screen as shown in Figure 4-5. TX-6610 provides two users: admin/admin and user/user. Both can be used to log in the management page.
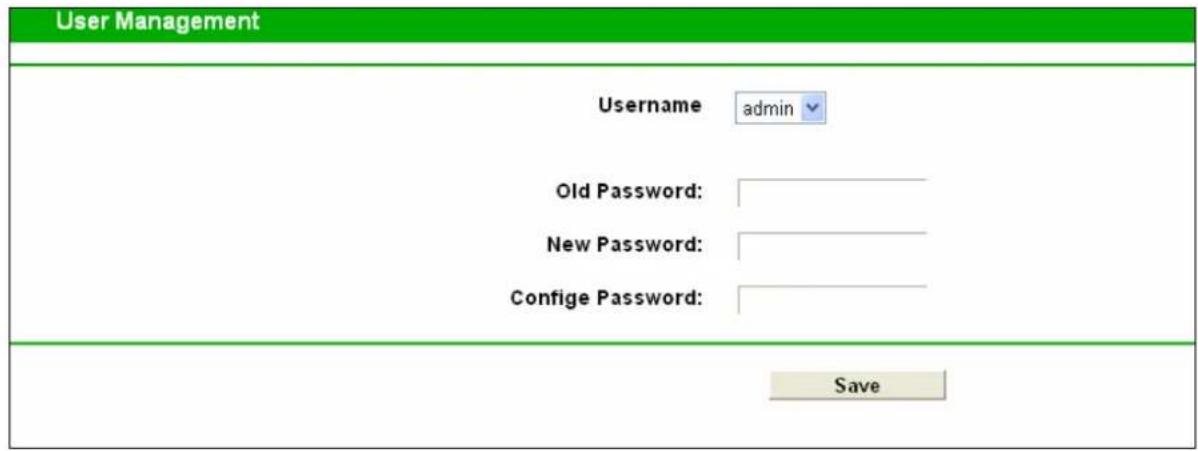
Figure 4-5
It is strongly recommended that you should change the factory default user name and password of the ONT, because all users who try to access the ONT's Web-based utility will be prompted for the ONT's default user name and password.

Note:
1) The new user name and password cannot exceed 14 characters in length and not include any spaces. Enter the new Password twice to confirm it.
2) If you use the "user" to log in the ONT's management page, only the Status and Statistics page will you see, as shown in Figure 4-6.
| System Status | |||
| Network Setting Management | System Status | ||
| ONU Type: | 1GE SFU GPON | ||
| System UP Time: | 0.542 48(dd hh:mm:ss) | ||
| Firmware Version: | 3.1.1.1 build 130912 Rel 38824n | ||
| Hardware Version: | TX-6610 v2 3.1.1.1 | ||
| LAN | |||
| PON | |||
| Statistics | |||
| Type | PON | OMCI LAN | |
| RX Packets | 0 | 0 13675 | |
| TX Packets | 0 | 0 2186 | |
| Drop Packets | N/A N/A | N/A 10 | |
| Error Packets | N/A N/A | N/A 0 | |
Figure 4-6
4.4.2 Firmware Upgrade
Choose menu "Management" → "Firmware Upgrade", and then you can update the latest version of firmware for the ONT on the following screen.
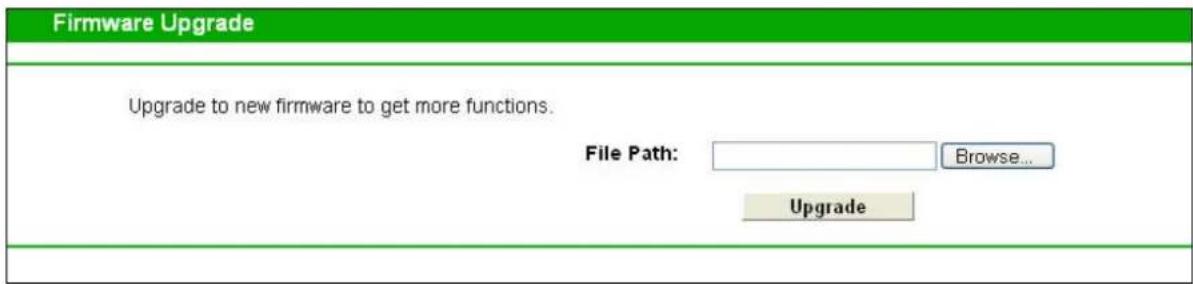
Figure 4-7
To upgrade the ONT's firmware, follow the instructions below:
1) Download a most recent firmware upgrade file from our website (www.tp-link.com).
2) Type the path and file name of the update file into the "File Path" field. Or click the Browse button to locate the update file.
3) Click the Upgrade button.
4) The ONT will reboot while the upgrading has been completed.

Note:
1) New firmware versions are posted at http://www.tp-link.com and can be downloaded for free. There is no need to upgrade the firmware unless the new firmware has a new feature you want to use. However, when experiencing problems caused by the ONT rather than the configuration, you can try to upgrade the firmware.
2) When you upgrade the ONT's firmware, you may lose its current configurations, so before upgrading the firmware please write down some of your customized settings to avoid losing important settings.
3) Do not turn off the ONT or press the Reset button while the firmware is being upgraded. Loss of power during the upgrade could damage the ONT.
4) The firmware version must correspond to the hardware.
5) The upgrade process takes a few moments and the ONT restarts automatically when the upgrade is completed.
4.4.3 Factory Defaults
Choose menu "Management" → "Factory Defaults" and then and you can restore the configurations of the ONT to its factory defaults on the following screen.
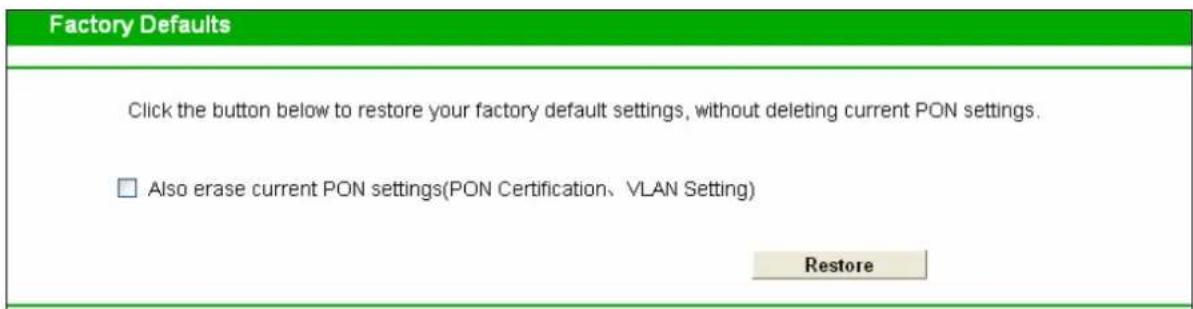
Figure 4-8
Also erase current PON settings: Check this box, the current PON settings will be deleted when you restore the configurations of the ONT to its factory defaults.
Click the Restore button to reset all configuration settings to their default values.
• The default User Name: admin
• The default Password: admin

Note:
All changed settings will be lost when defaults are restored.
4.4.4 Reboot
Choose menu "Management" → "Reboot" and then you can click the Reboot button to reboot the ONT via the next screen.
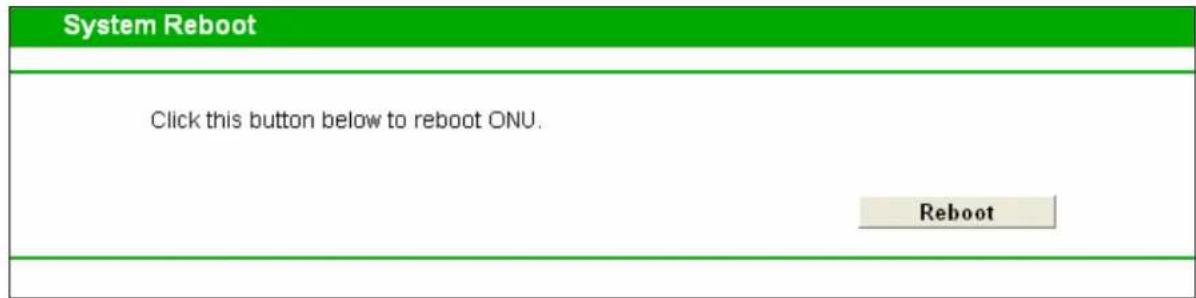
Figure 4-9
Appendix A: Specifications
| General | |||
| Standards and Protocols | 802.3, 802.3u, 802.3ab, 802.1p, 802.1q, ITU-T G.984.1, G.984.2, G.984.3, G.984.4 | ||
| Safety & Emission FCC, CE | |||
| Ports | One 10/100/1000M Auto-Negotiation RJ45 port (Auto MDI/MDIX) One SC/UPC (GPON) port | ||
| LEDs Power, GPON, LOS, LAN | |||
| Network Medium | 10Base-T | UTP category 3, 4, 5 cable (maximum 100m) | |
| EIA/TIA-568 100Ω STP (maximum 100m) | |||
| 100Base-TX | UTP category 5, 5e cable (maximum 100m) | ||
| EIA/TIA-568 100Ω STP (maximum 100m) | |||
| 1000Base-TX | UTP category 5e, 6 cable (maximum 100m) | ||
| EIA/TIA-568 100Ω STP (maximum 100m) | |||
| GPON Class B+ | G.652 single mode fiber (maximum 20km) | ||
| GPON Parameter | Interface | SC/UPC | |
| Distance | 20km | ||
| Date Rate | Downstream | 2.488Gbps/s | |
| Upstream | 1.244Gbps/s | ||
| Wavelength | Tx | 1310nm | |
| Rx | 1490nm | ||
| Transmitter | DFB Laser | ||
| Receiver | APD-TIA | ||
| Tx Power | 0.5dBm~5dBm | ||
| Rx Sensitivity | ≤-27dBm | ||
| System Requirement Internet Explorer 5.0 or later, Netscape Navigator 6.0 or later | |||
| Win 9x/ ME/ 2000/ XP/ Vista/ 7/8 | ||
| Physical and Environment | ||
| Working Temperature | 0°C ~ 40°C | |
| Working Humidity 10% ~ 90% RH (non-condensing) | ( non-condensing) | |
| Storage Temperature | -40°C ~ 70°C | |
| Storage Humidity 5% ~ 90% RH (non-condensing) | ( non-condensing) | |
Appendix B: Configuring the PC
In this section, we'll introduce how to install and configure the TCP/IP correctly in Windows XP. First make sure your Ethernet Adapter is working, refer to the adapter's manual if necessary.
1. Configure TCP/IP component
1) On the Windows taskbar, click the Start button, and then click Control Panel.
2) Click the Network and Internet Connections icon, and then click on the Network Connections tab in the appearing window.
3) Right click the icon that showed below, select Properties on the prompt page.
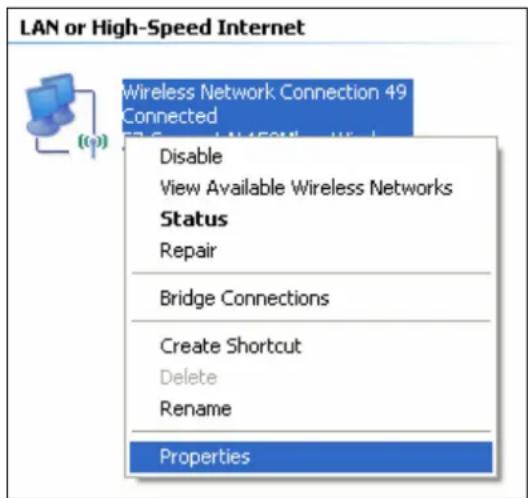
Figure B-1
4) In the prompt page that showed below, double click on the Internet Protocol (TCP/IP).
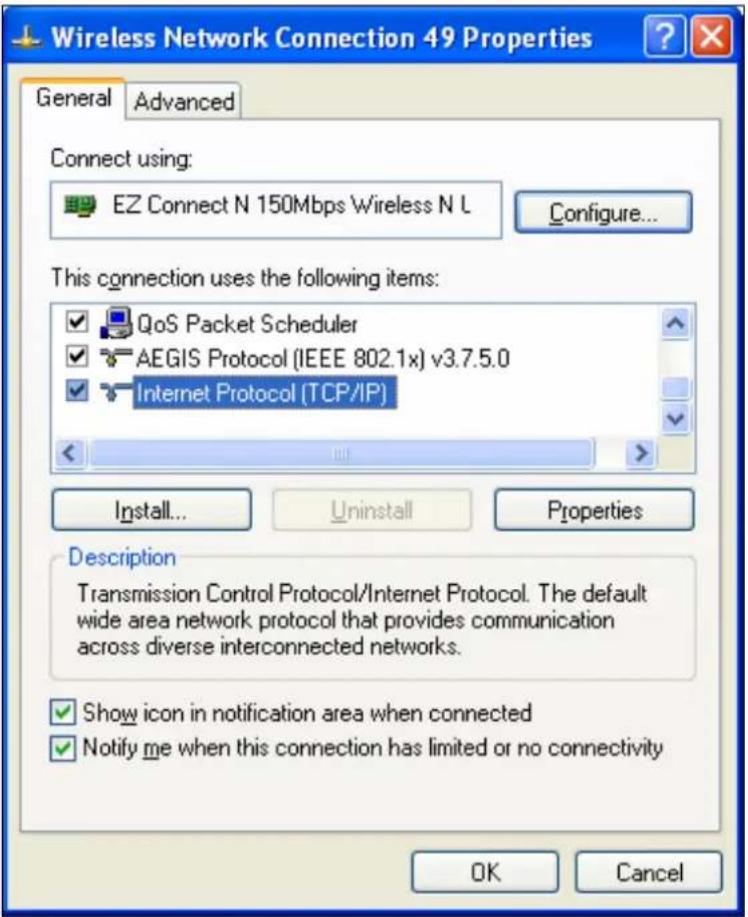
Figure B-2
5) The following TCP/IP Properties window will display and the IP Address tab is open on this window by default.
Now you have two ways to configure the TCP/IP protocol below:
Setting IP address automatically
Select Obtain an IP address automatically, Choose Obtain DNS server automatically, as shown in the Figure below:
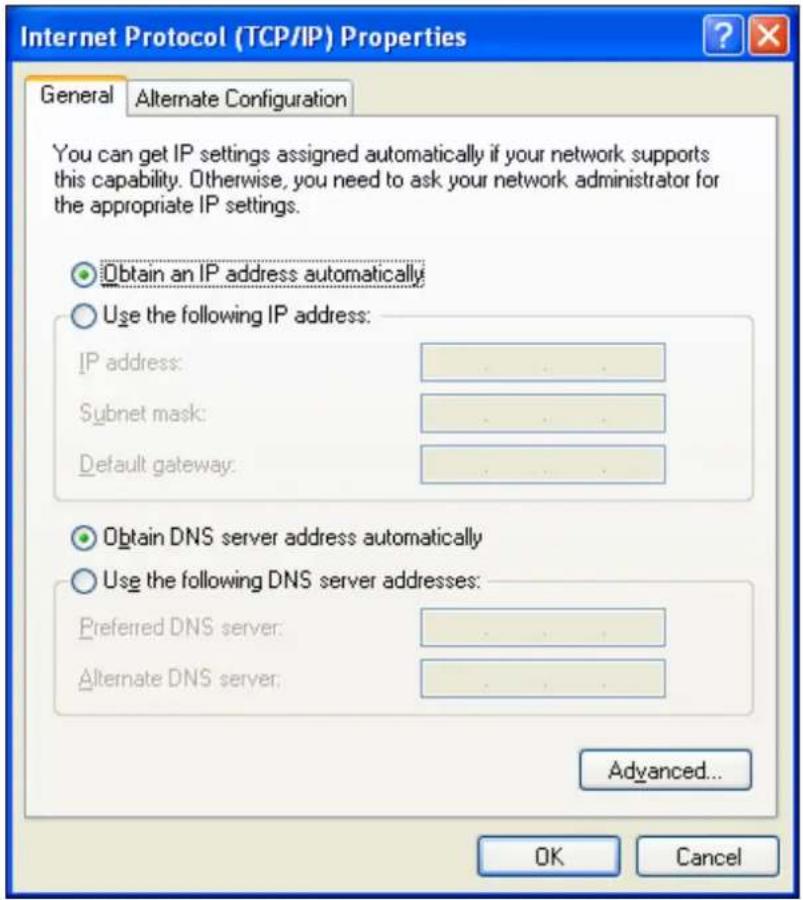
Figure B-3
Note:
For Windows 98 OS or before, the PC and Router may need to be restarted.
Setting IP address manually
1 Select Use the following IP address radio button. And the following items available
2 If the modem router's LAN IP address is 192.168.1.1, specify the IP address as 192.168.1.x (x is from 2 to 254), and the Subnet mask as 255.255.255.0.
3 Type the modem router's LAN IP address (the default IP is 192.168.1.1) into the Default gateway field.
4 Select Use the following DNS server addresses. In the Preferred DNS Server field you can enter the same value as the Default gateway or type the local DNS server IP address.
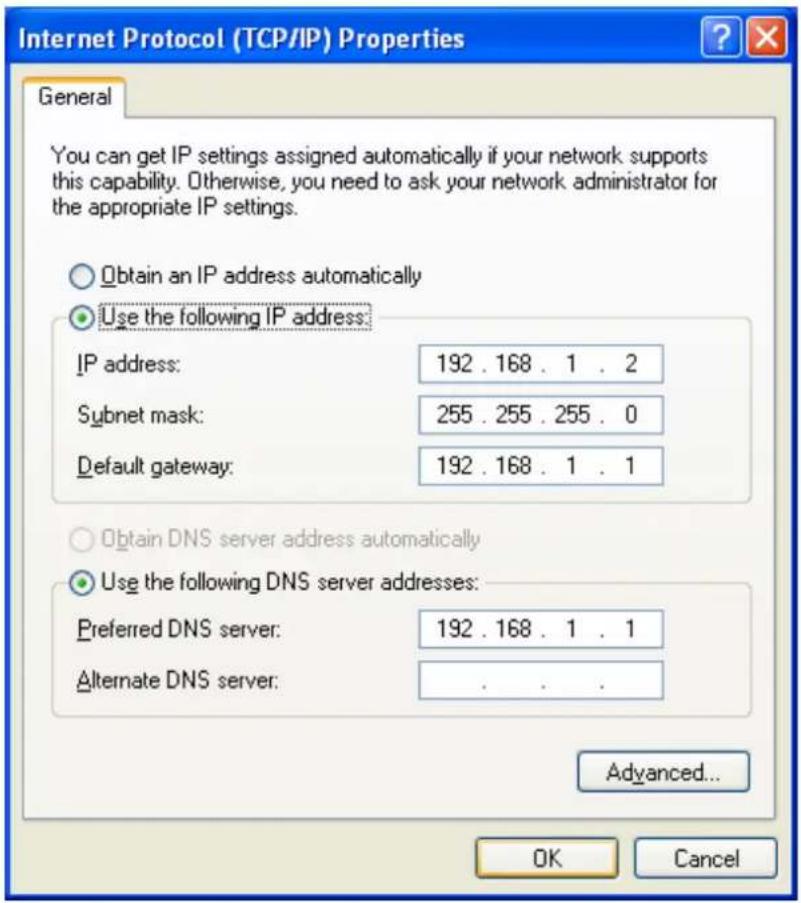
Figure B-4
Now:
Click OK to keep your settings.
Appendix C: Troubleshooting
T1. How to connect to the Internet?
To connect to the Internet, please run the dialing software such as WinPoet or EnterNet to do the virtual dialing as the following described.
For Mac OS X
1) Click the Apple icon on the upper left corner of the screen.
2) Go to "System Preferences -> Internet & Wireless -> Network" and then select Ethernet.
3) In the Con-figure IPv4 box, select Create PPPoE Service.
4) Type a Service Name to identify your connection.
5) Enter the User name and Password given by your ISP and then click Apply and Connect.
For Windows 7
1) Click Start -> Control Panel.
2) Click Network and Sharing Center.
3) Click Set up a new connection or network.
4) Click Connect to the Internet and then click Next.
5) Click Broadband (PPPoE).
6) Enter the User name and Password given by your ISP, and type a Connection name to identify your connection, and then click Connect.
For Windows XP
1) Click "Start → All Programs → Accessories → Communications → New connection wizard" to launch the wizard. Then click Next.
2) Select Connect to the Internet and then click Next.
3) Select Set up my connection manually and then click Next.
4) Select Connect using a broadband connection that requires user name and password and then click Next.
5) Type an ISP Name to identify your connection and then click Next.
6) Enter the User name and Password given by your ISP and then click Next.
7) Select Add a shortcut to this connection to my desktop for convenience and then click Finish.
8) The shortcut icon of this connection will appear on your desktop. Double-click the icon to run the dialing software and then click Connect.
For Windows 8
1) Move your mouse to the lower right corner and you will see the Search icon in the Popups.
2) Go to Apps, type Control Panel in the search box and press Enter.
3) Go to "Control Panel -> Network and Internet -> Connect to the Internet".
4) Click Broadband (PPPoE).
5) Enter the User name and Password given by your ISP, and type a Connection name to identify your connection, and then click Connect.
T2. How can I restore my ONT's configuration to its factory default settings?
Once the ONT is reset, the current settings will be lost and you will need to reconfigure it. We strongly suggest you back up the current settings before resetting the ONT.
With the ONT powered on, use a pin to press and hold the RESET button on the rear panel for 5 seconds before releasing it.
T3. What can I do if I forget my ONT's password?
Reset the ONT first and then use the default user name and password: admin/admin.
T4. How can I assign an IP address to my computer?
For Mac OS X
1) Click the Apple icon on the upper left corner of the screen.
2) Go to "System Preferences -> Network".
3) Select Airport on the left menu bar, and then click Advanced or wireless configuration; or select Ethernet for wired configuration.
4) In the Con-figure IPv4 box under TCP/IP, select Manually and then enter 192.168.1.x into the IP Address field, 255.255.255.0 into the Subnet mask filed. Click Apply to save the settings.
For Windows 7
1) Click "Start -> Control Panel -> Network and Internet -> View network status -> Change adapter settings".
2) Right-click Wireless Network Connection (or Local Area Connection), and then click Properties.
3) Select Internet Protocol Version 4 (TCP/IPv4), and then click Properties.
4) Select Use the following IP address and then enter 192.168.1.x into the IP address field, 255.255.255.0 into the Subnet mask filed. Then click OK.
For Windows XP
1) Click "Start -> Control Panel -> Network and Internet Connections -> Network Connections".
2) Right-click Wireless Network Connection (or Local Area Connection), and then click Properties.
3) Select Internet Protocol (TCP/IP), and then click Properties.
4) Select Use the following IP address and then enter 192.168.1.x into the IP address field, 255.255.255.0 into the Subnet mask filed. Then click OK.
For Windows 8
1) Move your mouse to the lower right corner and you will see the Search icon in the Popups.
2) Go to Apps, type Control Panel in the search box and press Enter.
3) Go to "Control Panel -> View network status and tasks -> Change adapter settings".
4) Right-click Ethernet, select Properties. Then double-click Internet Protocol Version 4 (TCP/IPv4).
5) Select Use the following IP address and then enter 192.168.1.x into the IP address field, 255.255.255.0 into the Subnet mask filed. Then click OK.
T5. What can I do if I cannot access the Internet?
1) Check to see if all the connectors are connected well, including the Fiber line, Ethernet cables and power adapter, based on the LEDs described previously.
2) Check to see if the ONT is registered correctly based on the GPON LED described previously and Authentication status in System Status page. If not, please enter the GPON SN or GPON Password described in step 2 again and wait for approximately 2 minutes or try to unplug the fiber and then connect it again. If the problem still exists, please consult your ISP to make sure if you have entered the correct GPON SN or GPON Password.
3) Check to see if the dialing software used in step 3 is installed correctly and make sure the account username and password are correct.
4) If you still cannot access the Internet, please restore your ONT to its factory default settings and reconfigure it by following the instructions in this QIG.
5) Please feel free to contact our Technical Support if the problem still exists.
Note:
For more details about Troubleshooting and Technical Support contact information, please log on to our Technical Support website:
http://www.tp-link.com/en/support
Appendix D: Technical Support
Technical Support
■ For more troubleshooting help, go to:
http://www.tp-link.com/en/support/faq
■ To download the latest Firmware, Driver, Utility and User Guide, go to:
http://www.tp-link.com/en/support/download
■ For all other technical support, please contact us by using the following details:
Global
Tel: +86 755 2650 4400
Fee: Depending on rate of different carriers, IDD.
E-mail: support@tp-link.com
Service time: 24hrs, 7 days a week
USA/Canada
Toll Free: +1 866 225 8139
E-mail: support.usa@tp-link.com (USA) support.ca@tp-link.com (Canada)
Service time: 24hrs, 7 days a week
Turkey
Tel: 0850 7244 488 (Turkish Service)
Fee: Depending on rate of different carriers.
E-mail: support.tr@tp-link.com
Service time: 09:00 to 21:00, 7 days a week
Ukraine
Tel: 0800 505 508
Fee: Free for Landline; Mobile: Depending on rate of different carriers
E-mail: support.ua@tp-link.com
Service time: Monday to Friday, 10:00 to 22:00
Brazil
Toll Free: 0800 608 9799 (Portuguese Service)
E-mail: suporte.br@tp-link.com
Service time: Monday to Friday, 09:00 to 20:00;
Saturday, 09:00 to 15:00
Indonesia
Tel: (+62) 021 6386 1936
Fee: Depending on rate of different carriers.
E-mail: support.id@tp-link.com
Service time: Monday to Friday, 09:00 to 12:00,
13:00 to 18:00 *Except public holidays
Australia/New Zealand
Tel: NZ 0800 87 5465 (Toll Free)
AU 1300 87 5465 (Depending on 1300 policy.)
E-mail: support.au@tp-link.com (Australia)
support.nz@tp-link.com (New Zealand)
Service time: 24hrs, 7 days a week
Germany/Austria
Tel: +49 1805 875 465 (German Service)
+49 1805 TPLINK
+43 820 820 360
Fee: Landline from Germany: 0.14EUR/min.
Landline from Austria: 0.20EUR/min.
E-mail: support.de@tp-link.com
Service time: Monday to Friday, 09:00 to 12:30 and
13:30 to 18:00. GMT+1 or GMT+2 (DST in
Germany) *Except bank holidays in Hesse
Singapore
Tel: +65 6284 0493
Fee: Depending on rate of different carriers.
E-mail: support.sg@tp-link.com
Service time: 24hrs, 7 days a week
UK
Tel: +44 (0) 845 147 0017
Fee: Landline: 1p-10.5p/min, depending on the
time of day. Mobile: 15p-40p/min, depending on your mobile network.
E-mail: support.uk@tp-link.com
Service time: 24hrs, 7 days a week
Italy
Tel: +39 023 051 9020
Fee: Depending on rate of different carriers.
E-mail: support.it@tp-link.com
Service time: Monday to Friday, 09:00 to 13:00; 14:00 to 18:00
Malaysia
Toll Free: 1300 88 875 465
Email: support.my@tp-link.com
Service time: 24hrs, 7 days a week
Poland
Tel: +48 (0) 801 080 618
+48 223 606 363 (if calls from mobile phone)
Fee: Depending on rate of different carriers.
E-mail: support.pl@tp-link.com
Service time: Monday to Friday, 09:00 to 17:00.
GMT+1 or GMT+2 (DST)
France
Tel: 0820 800 860 (French service)
Fee: 0.118 EUR/min from France
Email: support.fr@tp-link.com
Service time: Monday to Friday, 09:00 to 18:00
*Except French Bank holidays
Switzerland
Tel: +41 (0) 848 800 998 (German Service)
Fee: 4-8 Rp/min, depending on rate of different time.
E-mail: support.ch@tp-link.com
Service time: Monday to Friday, 09:00 to 12:30 and 13:30 to 18:00. GMT+1 or GMT+2 (DST)
Russian Federation
Tel: 8 (499) 754 5560 (Moscow NO.)
8 (800) 250 5560 (Toll-free within RF)
E-mail: support.ru@tp-link.com
Service time: From 09:00 to 21:00 (Moscow time)
*Except weekends and holidays in RF
- COPYRIGHT & TRADEMARKS
- FCC STATEMENT
- FC
- CE Mark Warning
- CE
- DECLARATION OF CONFORMITY
- CONTENTS
- Package Contents ....1
- Chapter 1. Product Overview....2
- Chapter 2. Connecting the ONT....5
- Chapter 3. Quick Installation Guide....7
- Chapter 4. Configuring the ONT....10
- Appendix A: Specifications....18
- Appendix B: Configuring the PC....20
- Appendix C: Troubleshooting 24
- Package Contents
- Note:
- Chapter 1. Product Overview
- Product Overview
- Main Features
- Panel Layout
- The Front Panel
- The Back Panel
- Chapter 2. Connecting the ONT
- System Requirements
- Installation Environment Requirements
- Connecting the ONT
- Chapter 3. Quick Installation Guide
- TCP/IP Configuration
- Quick Installation Guide
- PON Certification
- GPON Password
- GPON SN
- Chapter 4. Configuring the ONT
- Login
- Status
- Network Setting
- PON Certification
- VLAN Setting
- LAN Setting
- Management
- User Management
- Firmware Upgrade
- To upgrade the ONT's firmware, follow the instructions below:
- Factory Defaults
- Reboot
- Appendix B: Configuring the PC
- Configure TCP/IP component
- Setting IP address automatically
- Setting IP address manually
- Appendix C: Troubleshooting
- T1. How to connect to the Internet?
- For Mac OS X
- For Windows 7
- For Windows XP
- For Windows 8
- T2. How can I restore my ONT's configuration to its factory default settings?
- T3. What can I do if I forget my ONT's password?
- T4. How can I assign an IP address to my computer?
- T5. What can I do if I cannot access the Internet?
- Appendix D: Technical Support
- Technical Support
- Global
- USA/Canada
- Turkey
- Ukraine
- Brazil
- Indonesia
- Australia/New Zealand
- Germany/Austria
- Singapore
- UK
- Italy
- Malaysia
- Poland
- France
- Switzerland
- Russian Federation
Brand : TP-LINK
Model : TX-6610
Category : GPON Terminal