
KS-27A - Heating appliance Toyotomi - Free user manual and instructions
Find the device manual for free KS-27A Toyotomi in PDF.


| Product Type | Portable kerosene heater |
| Brand | Toyotomi |
| Model | KS-27A |
| Heat Rating | 2,470 kcal/h (9,800 BTU/h) |
| Fuel Type | Water-clear kerosene only |
| Fuel Tank Capacity | 5.9 liters |
| Burning Time per Tank | Approximately 21 hours (depends on wick setting and fuel quality) |
| Dimensions (W x H x D) | 440 x 440 x 470 mm |
| Weight | 7.7 kg |
| Wick Type | Glass fiber wick (genuine Toyotomi KS-27A replacement) |
| Ignition | Manual with match |
| Flame Adjustment | Wick adjuster knob (clockwise to raise, counterclockwise to lower) |
| Extinguishing | Turn wick adjuster knob counterclockwise until stop; manual shutoff for emergencies |
| Safety Features | Automatic extinguisher, manual shutoff, safety guard, drip tray, heat chamber handle |
| Minimum Clearance | 90 cm (3 feet) from walls, furniture, and combustible materials |
| Ventilation Requirement | Well-ventilated area; for small rooms, keep door open or window at least 25.4 mm |
| Maintenance | Wick inspection and cleaning (burn dry), periodic wick replacement |
| Storage | Drain fuel tank, clean wick, store in original carton or plastic bag in dry place |
| Warranty | Refer to manufacturer; manual includes parts replacement instructions |
Frequently Asked Questions - KS-27A Toyotomi
User questions about KS-27A Toyotomi
0 question about this device. Answer the ones you know or ask your own.
Ask a new question about this device
Download the instructions for your Heating appliance in PDF format for free! Find your manual KS-27A - Toyotomi and take your electronic device back in hand. On this page are published all the documents necessary for the use of your device. KS-27A by Toyotomi.
USER MANUAL KS-27A Toyotomi
natural_image
Technical line drawing of a toyotom device with labeled components (no text or symbols beyond branding)IMPORTANT
READ AND UNDERSTAND INSTRUCTIONS BEFORE USING HEATER.
RETAIN INSTRUCTIONS FOR FUTURE REFERENCE.
CONTENTS
| SAFETY TIPS | 1 | ASSEMBLY AND OPERATION | 6 |
| FUEL GUIDE | 3 | CARE AND MAINTENANCE | 10 |
| OPERATING CONTROLS AND FEATURES | 4 | REPLACEMENT OF PARTS | 11 |
| SPECIFICATIONS | 5 | STORAGE | 13 |
| COMPONENT PARTS | 5 | TROUBLESHOOTING | 14 |
Congratulations; you are ready to begin enjoying the benefits of one of the most advanced kerosene heaters ever made. TOYOTOMI, the leader in kerosene heater technology, has tested and refined the KS-27A to assure you of long-term safety and satisfaction. Please study the following instructions, use and care for your heater carefully, and it will serve you well for many years.
SAFETY TIPS
BEFORE OPERATING YOUR HEATER, PLEASE review these safety tips:
WARNING
RISK OF EXPLOSION
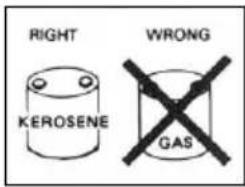
- Never use any fuel other than water-clear kerosene.
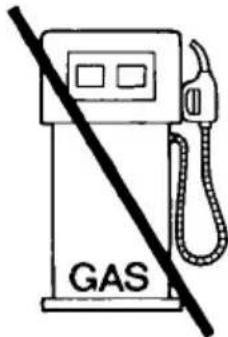
Never use gasoline. Use of gasoline can lead to uncontrollable flames resulting in destructive fire. Even kerosene contaminated with small amounts of gasoline, or similarly volatile materials, can be hazardous. Never use a can for kerosene that has previously been used for gasoline, paint thinner, or solvents. - Never refill heater fuel tank when heater is operating or still hot. To do so may cause a "flash back" of flame to the fuel container, resulting in injury to yourself and your property.
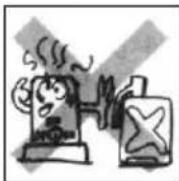
- Never use heater in areas where flammable vapors or gases may be present.
Especially avoid use of heater where gasoline, naphtha, acetone or other volatile solvents are in the air, or whose containers are open. Such vapors could be ignited by the heater, resulting in fire and/or explosion.
- Never fill heater fuel tank in living space. Fill heater tank outdoors. Never overfill your heater. Always replace heater tank cap securely after refueling. Spillage of kerosene produces strong odor which is hard to remove. Spillage on carpet can be ignited if match or some other ignition source contacts it.
- Never store or transport kerosene in other than a metal or plastic container that is (1) acceptable for kerosene, (2) non-red in color, and (3) clearly marked, "KEROSENE". Never store kerosene in the living space. Picking up a gasoline can by mistake when fueling is a major cause of heater fires.
WARNING
RISK OF BURNS OR FIRE
- Observe the heater carefully for 15-20 minutes after start-up. Problems of improper adjustment of wick height or improperly seated heat chamber should become evident during this warm up period.
NOTE: Carefully follow the instructions for lighting and adjusting the flame.
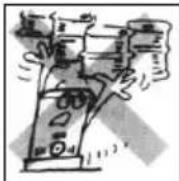
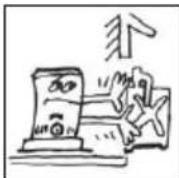
- Due to high surface temperatures, keep away from children, furniture and clothing.
- Do not operate heater without protective guards completely attached.
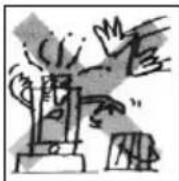
- Do not use heater to heat or boil water or as a cooking appliance. Do not place cooking utensils, tea kettles or any other object on top of heater while in operation.
- To avoid possible burns or fire, do not move, refuel or attempt to service your heater while it is burning or still hot. If the heater is dropped while it is burning, fuel spillage and flames outside the heater may occur.
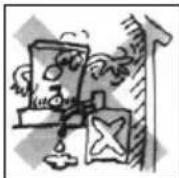
- Do not operate heater less than 90cm (3 feet) from walls, draperies, clothing, or furniture. The operation of any heating appliance too close to such materials could cause them to ignite, possibly resulting in a serious fire.
- To avoid unstable burning, do not operate your heater in areas exposed to strong drafts. Do not operate heater in high-traffic areas such as doorways or hallways where it may be touched, jarred or tipped accidentally.
- Do not operate heater in direct sunlight to avoid overheating, which may cause abnormal flame behavior. Do not allow room temperature to go above 30^ C. If the room temperature exceeds 30^ C the flame may increase, thereby producing smoke.
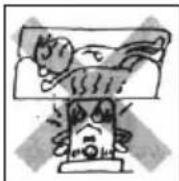
- Before going out, or at bedtime, turn the heater off, making sure the wick is in its lowest position (see Extinguishing the Flame on page 9) and flame is completely extinguished.
WARNING
RISK OF INDOOR AIR POLLUTION
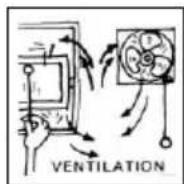
Use heater only in well-ventilated areas. People with breathing problems should consult a physician before using the heater.
"In a house of typical construction, that is, one that is not of unusually tight construction due to heavy insulation and tight seals against air infiltration, an adequate supply of air for combustion and ventilation is provided through infiltration. However, if the heater is used in a small room where less than 200 cubic feet (5.7m ^3 ) of air space is provided for each 1000 Btu per hour of heater rating (considering the maximum burner adjustment), the door(s) to adjacent room(s) should be kept open or a window to the outside should be opened at least 25.4mm to guard against potential buildup of indoor air pollution. Do not use the heater in a bathroom or any other small room with the door closed."

FUEL GUIDE
The TOYOTOMI KS-27A is designed for use with high-quality kerosene only. Use of low-quality kerosene will cause wick performance to drop, leading to "low flame" and "odor problem" conditions.
Purchase only kerosene in non-red cans reserved exclusively for kerosene and marked accordingly with the word "KEROSENE". Always store your kerosene in a separate area from where you store gasoline for your power equipment, to avoid accidental use of gasoline in your heater.
What to Buy...
ALWAYS: Crystal clear, colorless, high quality KEROSENE.
ALWAYS: Kerosene free of contaminants, water or cloudiness.
NEVER: Gasoline, alcohol, white gas, camp stove fuel or additives.
NEVER: Yellow or sour-smelling fuel.
How to Use It...
ALWAYS: Fill heater away from living quarters when heater is cool; use siphon.
ALWAYS: Check wick frequently for tar build-up. (Rapid, heavy build-up may indicate poor quality or deteriorated fuel.)
ALWAYS: Watch fuel gauge to avoid over-filling heater.
How to Store It...
ALWAYS: In a clean container, clearly marked KEROSENE.
ALWAYS: AWAY FROM direct sunlight, heat sources or extreme temperature changes.
NEVER: In a glass container, or one that has been used for other fuels.
NEVER: For longer than 6 months. (Begin each heating season with fresh kerosene; discard at the end of the season.)
Why It is Important...
Pure, clean kerosene is essential for safe and efficient heater operation. Poor quality or contaminated kerosene can cause:
Low flame
● Excess tar deposits on the wick
● Reduced wick life
- Odor, smoke
● Difficulty in igniting or extinguishing flame
Use of a highly volatile flammable fuel such as gasoline can produce uncontrollable flames, creating a severe fire hazard.
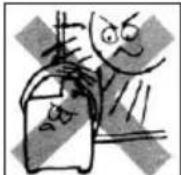
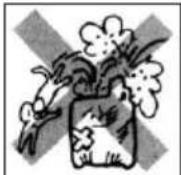
CAUTION
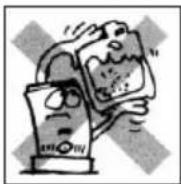
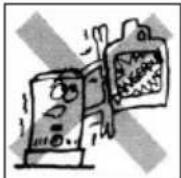
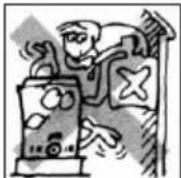
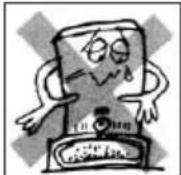
Flames observed emerging from the heater body are a clear indication that fuel is dangerously contaminated with gasoline or other highly flammable material. If this occurs,
a. Never attempt to move the heater.
b. Call the Fire Department.
c. Use only a class "B" fire extinguisher.
d. Never throw water directly on a burning heater.
OPERATING CONTROLS AND FEATURES
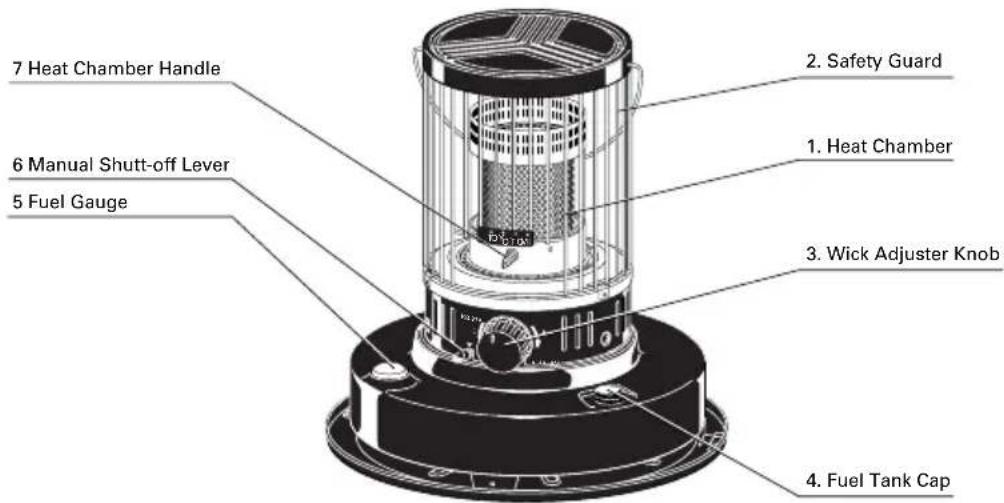
-
Heat Chamber: Permits adjustment of heat output without increasing unwanted combustion materials or reducing combustion efficiency. This feature increases comfort and convenience while maximizing fuel savings.
-
Safety Guard: Extensive grillework covers the hot surfaces of the heater, greatly reducing the possibility of accidental contact burns.
-
Wick Adjuster Knob: Used to raise and lower wick for heat output adjustment. To extinguish flame turn knob counterclockwise.
-
Fuel Tank Cap: Covers filling port of fuel tank.
NOTE: Wipe away any spilled kerosene from tank after filling.
- Fuel Gauge: Indicates fuel level in tank.
NOTE: Never fill beyond black line.
- Manual Shutoff: Used to rapidly retract wick and extinguish flame.
NOTE: To avoid odor and smoke, do not use routinely to turn heater off. This manual shutoff is not effective when gasoline, gasoline-contaminated kerosene, or other highly flammable fuels are used in the heater.
- Heat Chamber Handle: Used to check and insure proper seating of the heat chamber after ignition. Improper seating of the heat chamber will cause erratic flame and smoke.
SPECIFICATIONS
TOYOTOMI Portable Kerosene Heater Model KS-27A
Heat rating 2,470kcal/9,800BTU/h
Fuel tank capacity 5.9 lit
Burning time/tank* 21 Hours
Size(W x H x D) 440 x 440 x 470mm
Weight 7.7kg
* Depending on wick setting, condition and fuel quality.
COMPONENT PARTS
| REF# | PART NAME |
| 1. Guard assembly2. Carrying handle3. Top plale4. Heat chamber assembly5. Glass cylinder6. Push ring7. Cross pin8. Guard retainer9. Screw10. Wick adjuster with pendulum assembly11. Pendulum assembly12. Wick adjuster knob13. Screw 1A14. Wing nut15. Wick sleeve16. Glass fiber wick17. Rubber packing18. Fuel tank assembly19. Fuel gauge20. Fuel tank cap21. Primary air tube cover22. Screw E23. Reflector24. Under Outer Cover25. Drip tray26. Manual fuel siphon | |
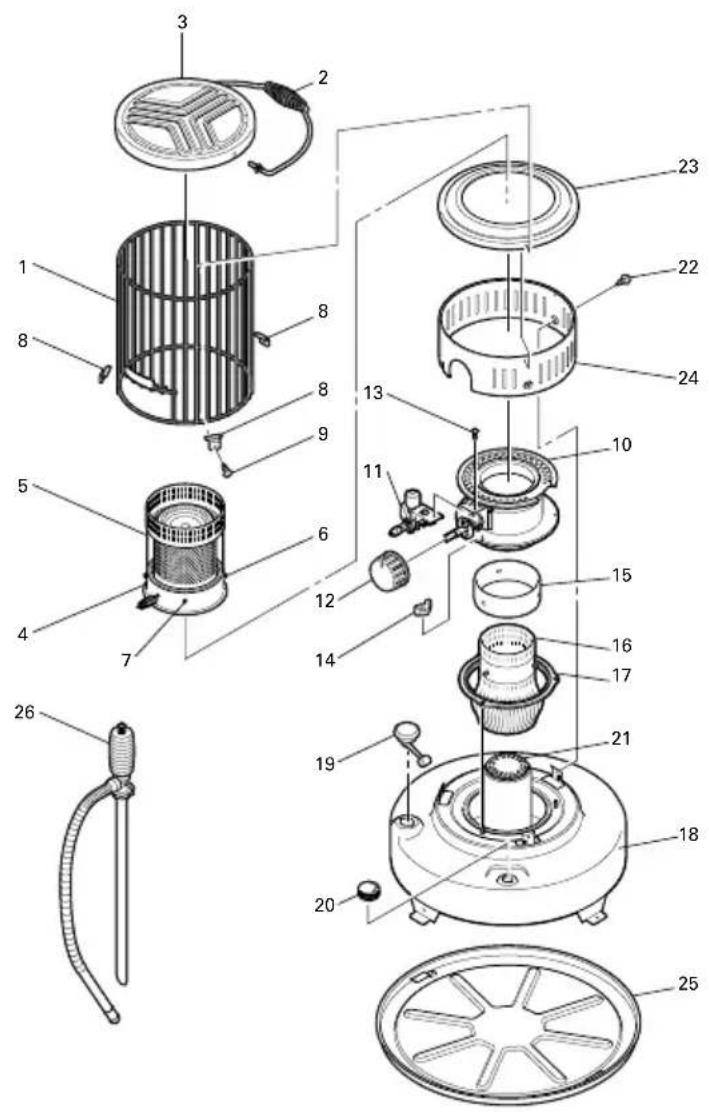
ASSEMBLY AND OPERATION
INSPECTION AND ASSEMBLY
NOTE: Save the shipping carton and packing materials for future storage of your heater.
1. REMOVE PACKING MATERIALS
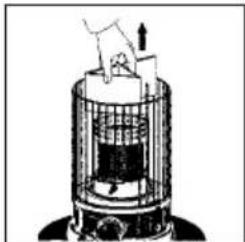
Remove all packing materials from your heater and install the guard as follows:
CAUTION: Risk of burns. Do not operate heater without guard completely attached.
a) Remove the carrying handle, top plate and packing materials. b) Replace the top plate and carrying handle.
natural_image
Diagram of a mechanical device with a piston and housing, no visible text or symbols2. INSTALL DRIP TRAY
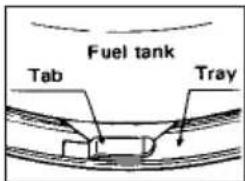
NOTE: DO NOT operate your heater without the drip tray.
Place the drip tray on the floor.
● Place the heater on the drip tray.
● Turn the heater clockwise until the feet slide into their tabs.
3. CHECK SCREWS
Make sure that the three (3) screws around the guard above the fuel tank are tight.
FUELING
WARNING: Use only water-clear Kerosene.
Never use gasoline or other flammable liquids.
ALWAYS extinguish heater before refill heater fuel tank.
Fuel heater outside the living area.
-
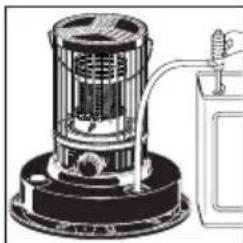
Insert the straight tube of the manual fuel siphon into the kerosene container Remove the fuel tank cap on the heater, and insert the siphon's flexible hose into the fuel tank opening.
-
Turn the air vent knob on the top of the siphon clockwise to close the air vent.
-
To start the flow of kerosene, squeeze the bulb of the siphon vigorously six or seven times. Once the flow begins, it is no longer necessary to squeeze the bulb. To avoid overfilling the tank, watch the fuel gauge. As the indicator enters the red zone, stop the flow by turning the air vent knob counterclockwise.
NOTE: Be especially careful to avoid overfilling the tank with very cold kerosene; otherwise overflow might occur when the fuel warms up.
- Remove the siphon carefully, allowing the excess kerosene to drain from the tube back into container. Replace the fuel tank cap and tighten it securely. Be sure to wipe away any spilled kerosene from tank or other heater parts.
CHECK BEFORE LIGHTING
- LOCATE YOUR HEATER AWAY FROM WALLS AND AVOID DRAFTS
Allow at least three (3) feet of clearance between the heater and walls, curtains, shelving or other combustible materials. Do not operate your heater in drafty areas or locations where opening doors may create gusts of air. Drafts or strong air currents may make flame unstable and affect heater performance.
- LEVEL THE HEATER
The heater should be operated on a firm, level floor.
NOTE: If your heater is not level, change locations. Do not attempt to prop it up with books or other objects. An unlevel heater may burn with an uneven flame.
USE KEROSENE ONLY
natural_image
Technical line drawing of a portable air conditioner unit with cooling fan and base (no text or symbols)LIGHTING
NOTE: When you first use your new heater, ignite it out of the living area of your house, either in a garage or an outside area protected from strong drafts. Burn it for about 15 minutes to remove all of the protective oil present on the burner parts. If this 15 minute "burn-in" is done inside, some objectionable odor will be observed. This procedure is necessary ONLY THE FIRST TIME you ignite your heater.
NOTE: If you have fueled your heater for the first time, or if you are refueling it after it has been out of fuel for a long time, you will need to wait about thirty (30) minutes for the wick to become fully saturated before lighting. Failure to allow enough time for the wick to become fully saturated may cause permanent damage to the wick when it is lighted.
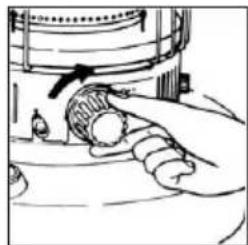
- Turn the wick adjuster knob clockwise until it stops. This raises the wick to its maximum height. As the wick rises within the heater, the wick adjuster knob turns with some resistance and makes a sound like the winding of a clock. Once the wick has reached its proper height, the automatic extinguisher is fully engaged. The wick adjuster knob will now move freely left or right to adjust the flame.
2. LIGHTING
Tilt the heat chamber and touch the match to the top of the wick. Do not allow burned parts of the match to fall or remain on the wick.
- Be sure that heat chamber is properly seated by moving the wire heat chamber handle left and right.
NOTE: An improperly seated heat chamber can cause high flame, smoke, and potential damage to the heater itself. Proper seating of the heat chamber is essential for good performance. Do not leave the heater until you have determined that the flame is burning normally, as described in the following section.
natural_image
Illustration of a hand holding a mechanical component with a tool, no visible text or symbols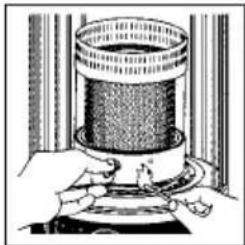
natural_image
Illustration of hands holding a cylindrical object with a mesh inside, next to a small electronic device (no text or symbols visible)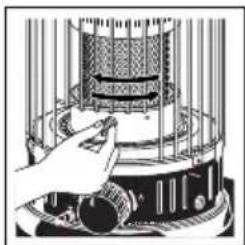
natural_image
Illustration of a hand operating a cylindrical device with a mesh chamber (no text or symbols visible)ADJUSTING THE FLAME
-
After lighting, wait for the heat chamber to reach operating temperature. This will take ten (10) minutes, after which the flame will be visible through the glass cylinder.
-
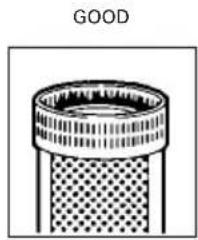
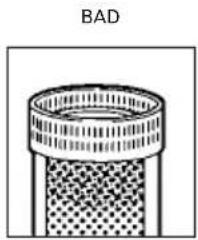
CHECK THE FLAME LENGTH
After (5) minutes, the entire heat chamber should be glowing red.
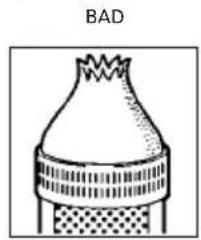
TOO HIGH Produces smoke and soot
natural_image
Simple line drawing of a cylindrical object with a textured base and top, labeled 'GOOD' above (no other text or symbols)CORRECT Most efficient combustion
natural_image
Cross-sectional diagram of a cylindrical container with a textured inner layer and top label 'BAD' (no other text or symbols)TOO LOW Produces odor
If necessary, raise or lower the wick by turning the wick adjuster knob to produce the proper flame condition.
NOTE: Do not operate your heater with wick set TOO LOW or TOO HIGH. Doing so will decrease combustion efficiency and increase production of unwanted emissions. When operating heater, be sure wick is high enough to keep the primary heat chamber heated to a uniform red glow from top to bottom.
NOTE: Always observe the heater closely for the first 15-20 minutes after it is lighted to be sure it is properly adjusted.
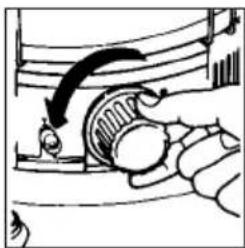
EXTINGUISHING THE FLAME
-
Turn the wick adjuster knob counterclockwise until it stops. Within a few moments, the flame will be completely extinguished and the heater will be off.
-
Make sure the flame is out completely.
-
Do not try to relight the heater for at least three (3) minutes after turning it off, as this may cause smoke and odor.
natural_image
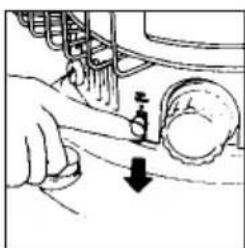
Diagram of a mechanical assembly with a rotating component and a curved arrow indicating motion (no text or symbols)MANUAL SHUTOFF
When quick shutoff is necessary, push the manual shutoff down.
NOTE: For routine turn-off, DO NOT use the "Manual Shutoff" or activate the "Automatic Extinguisher" by jarring the heater. These methods may cause unwanted odor, soot and smoke. Only the wick adjuster knob should be used for normal shutoff.
natural_image
Hand operating a mechanical component with a downward arrow indicating motion (no text or symbols present)CARE AND MAINTENANCE
As with any good appliance, preventive as well as corrective maintenance is occasionally required. Please read the following section carefully in order to enjoy the greatest benefits from your heater.
INSPECTION OF THE WICK
NOTE: One of the simplest but also the most important components of your heater is the wick.
With proper attention, the wick will last at least one heating season and, depending on the quality of the fuel used, possibly longer, it helps to perform routine maintenance operations on the wick.
-
Indications that the wick may need attention are:
-
low flame
● tar deposit on the top edge of the wick
● difficulty in turning the wick adjuster knob
● a flickering or dying flame -
Clean the wick by burning dry as follows:
1) When the fuel gauge indicates empty, but the heater is still burning, raise the wick to its highest position and allow the flame to consume the remaining fuel in the tank.
NOTE: Burning the wick dry can at times create odors. For the burning dry procedure, remove your heater from the living area of your house into a well-ventilated area such as a garage or even a sheltered area outside. If you burn the wick dry outside, be sure that the heater is not exposed to strong drafts during the procedure.
2) After the heater has cooled completely, remove the heater cover as described in items 1 and 2 of the next section.
3) Remove any residue from the wick with a small brush such as an old toothbrush. Cinders or soot in the burner around the wick may be vacuumed away. Be careful when removing such material from the wick with a brush, to do so gently so as not to tear the top surface of the wick.
4) Remove any tar deposits on the top of wick adjuster and primary air tube using a scraper.
NOTE: When good wick performance is no longer achieved by the burning dry process, it may be necessary to replace the burned wick with a new one.
5) Before reassembling the heater, take a few minutes to wipe the parts with a soft cotton cloth or paper towels.
6) Reassemble the heater, following directions in item 11 of the next section.
NOTE: If the flame is still low after cleaning the wick, the wick may contain some water. It is then necessary to replace the wick and empty all kerosene from the fuel tank. Dry the tank thoroughly and refill with fresh, pure kerosene.
REPLACEMENT OF PARTS
REPLACING THE WICK
USE ONLY GENUINE TOYOTOMI "KS-27A" REPLACEMENT WICK. SUBSTITUTE WICKS CAN SEVERELY REDUCE PERFORMANCE AND SAFETY.
WARNING: Before disassembling your heater, allow it to cool completely.
-
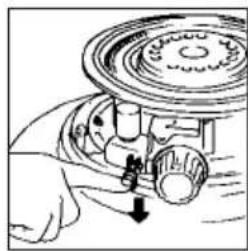
Release the automatic extinguisher by pushing the manual shutoff down.
-
Remove the three (3) screws and lift cover off.
-
Remove the three (3) wing nuts around the wick adjuster. Lift the wick adjuster off the heater while moving it slightly back and forth.
-
Slide two fingers between the orange band on the wick and the silver wick sleeve attached to the wick adjuster. Lift the pins in the wick off the slots in the wick sleeve. After lifting all three (3) pins off the slots, fold the wick and remove it. Leave the wick sleeve in place.
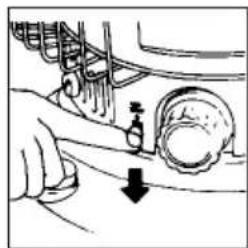
natural_image
Line drawing of a hand operating a mechanical device with a downward arrow indicating motion (no text or symbols)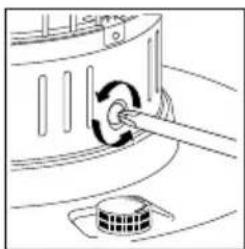
natural_image
Line drawing of a mechanical device with a rotating knob and base mount (no text or symbols)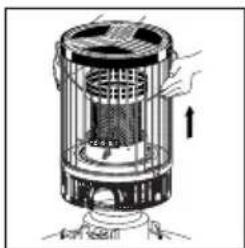
natural_image
Cross-sectional diagram of a mechanical device with internal components and directional arrows (no text or symbols)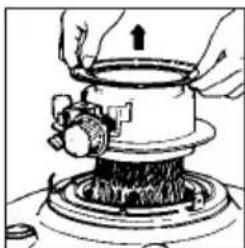
natural_image
Illustration of hands operating a mechanical device with a valve and base (no text or symbols)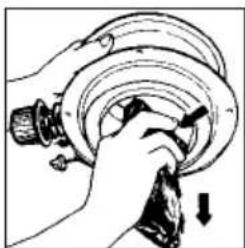
natural_image
Hand holding a mechanical component with a downward arrow indicating motion (no text or symbols)-
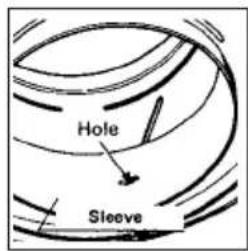
Place the wick adjuster on its side. Next, line up the three (3) openings in the wick adjuster: 1) the holes in the sleeve, 2) the diagonal slots in the fixed part of the wick adjuster, and 3) the slots in the moving part of the wick adjuster controlled by the wick adjuster knob.
-
Fold the new wick in quarters and insert it into the wick adjuster from wick adjuster bottom. Place one of the pins in one of the lined-up openings. If you experience difficulty, gently turn the wick adjuster knob clockwise. Then insert the two other pins, turning the wick adjuster knob if necessary. Do not bend the sleeve.
-
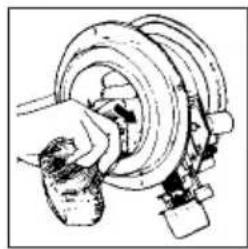
Finally, gently press the wick, all along its circumference, against the adjuster to insure that it is firmly in place.
-
Lower the wick adjuster into the fuel tank, guiding the tail of the wick so it fits over the primary air tube and evenly into place.
Point the wick adjuster knob to the front of the heater. Insure that the wick adjuster is centered over the studs on the fuel tank.
NOTE: The space between the wick adjuster and the primary air tube should be even all around.
NOTE: Make certain the top of the wick adjuster and the top of primary air tube are the same height. If they are uneven, the flames tend to be uneven, too.
-
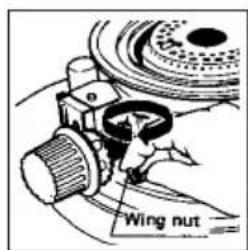
Tighten the three (3) wing nuts around the wick adjuster.
-
Engage the automatic extinguisher by turning the manual shutoff clockwise into vertical position. Turn the wick adjuster knob to be sure the wick moves smoothly up and down.
natural_image
Mechanical assembly diagram showing a hand operating a rotating component (no text or symbols visible)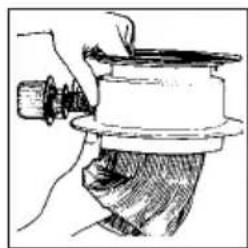
natural_image
Illustration of a hand operating a mechanical device with a cylindrical component (no text or symbols visible)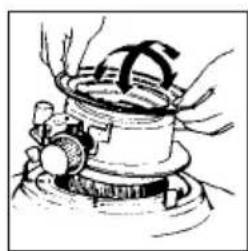
natural_image
Illustration of hands operating a mechanical device with no visible text or symbols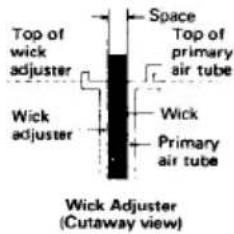
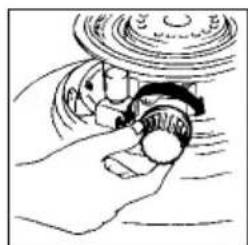
natural_image
Illustration of a hand operating a mechanical device with rotating components (no text or symbols)AFTER REPLACING THE WICK, CHECK THE OPERATION OF THE AUTOMATIC EXTINGUISHER.
Wick height on position should be 8mm when wick adjuster knob is turned fully clockwise. Be sure to check.
NOTE: If wick does not move smoothly and easily, or wick height on position is not in the range of 7-9mm do not use heater. Disassemble and repeat items 5 through 10.
NOTE: If any ragged edges appear on the top of the wick, trim them with a scissors carefully. DO NOT cut the body of the wick.
-
Replace the heater cover on the fuel tank and secure it into position with three (3) screws.
-
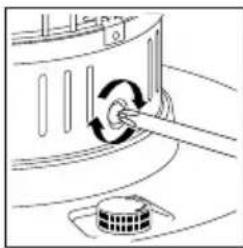
Once again, check the proper operation of the automatic extinguisher.
NOTE: Before lighting a new wick for the first time, turn the wick to its lowest position and allow the wick to saturate with kerosene for about thirty (30) minutes.
natural_image
Mechanical assembly diagram showing a hand operating a rotating component with a downward arrow indicating motion (no text or symbols present)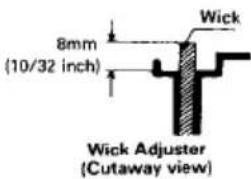
natural_image
Diagram of a mechanical device with a rotating knob and base, no text or symbols presentSTORAGE
At the end of each heating season, or when you do not plan to use your heater for an extended period of time, the following procedures are recommended.
1. CLEAN WICK AND HEATER
Follow directions in "INSPECTION OF THE WICK".
2. DRAIN FUEL TANK
After you have burned your heater dry, a small amount of kerosene will remain in the fuel tank. It should be removed in order to avoid contamination when the heater is refueled at a later date. To do this, remove the fuel cap, tip the heater toward you and insert a small syringe into the bottom-most portion of the fuel tank. Empty the tank completely before storage.
3. STORE HEATER
The original shipping carton is the best place to store your heater. If you do not have original packing materials, cover the heater with a large plastic bag and store in a dry place.
TROUBLESHOOTING
| PROBLEM | CAUSE | SOLUTION | PAGE |
| Wick fails to ignite | Out of fuel | Check fuel gauge; add fuel if necessary. | 7 |
| Water in kerosene/poor quality kerosene | Drain tank. Install new wick. Refill with fresh and clean kerosene. | 11 | |
| Smoke or odor | Heat chamber tilted or improperly seated | Move wire handle until heat chamber is properly seated and moves smoothly left and right. | 8 |
| Wick set too high | Reduce wick height by turning wick adjuster knob counterclockwise. | 9 | |
| Dirty wick | Clean wick as described under "Care and Maintenance". | 10 | |
| Drafts | Relocate heater. | 2 | |
| Contaminated fuel/poor quality kerosene | Drain tank and rinse with clean kerosene. Install new wick and refill with fresh and clean kerosene. | 10 11 | |
| Flickering, dying or low flame | Dirty wick | Clean wick as described under "Care and Maintenance". If necessary, install new wick. | 10 11 |
| Water in kerosene/poor quality kerosene | Drain tank and rinse with clean kerosene. Install new wick and refill with fresh, clean kerosene. | 10 11 | |
| Wick too low to sustain good flame | Replace wick. | 9 11 | |
| Wick adjuster knob is hard to turn | Dirty wick | Clean wick as described under "Care and Maintenance". | 10 |
| Poor quality kerosene | Drain tank and rinse with clean kerosene. Install new wick and refill with fresh, clean kerosene. | 10 11 | |
| Damaged mechanism | Contact your dealer for service. | ||
| Flame too high | Fuel contaminated with gasoline or other highly flammable material | IMMEDIATELY shut off heater. Inspect all components for damage. Drain tank and rinse with clean kerosene. Install new wick and refill tank with fresh, clean kerosene. | 9 10 11 |
TOYOTOMI
TOYOTOMI CO., LTD.
5-17, Momozono-cho, Mizuho-ku, Nagoya, Japan
Rev. 07/03
Printed in Japan 0538000902
- SAFETY TIPS
- WARNING
- RISK OF EXPLOSION
- RISK OF BURNS OR FIRE
- RISK OF INDOOR AIR POLLUTION
- FUEL GUIDE
- CAUTION
- OPERATING CONTROLS AND FEATURES
- SPECIFICATIONS
- COMPONENT PARTS
- ASSEMBLY AND OPERATION
- INSPECTION AND ASSEMBLY
- REMOVE PACKING MATERIALS
- INSTALL DRIP TRAY
- CHECK SCREWS
- FUELING
- CHECK BEFORE LIGHTING
- LIGHTING
- LIGHTING
- ADJUSTING THE FLAME
- EXTINGUISHING THE FLAME
- MANUAL SHUTOFF
- CARE AND MAINTENANCE
- INSPECTION OF THE WICK
- REPLACEMENT OF PARTS
- REPLACING THE WICK
- STORAGE
- CLEAN WICK AND HEATER
- DRAIN FUEL TANK
- STORE HEATER
- TOYOTOMI
Brand : Toyotomi
Model : KS-27A
Category : Heating appliance