
DAB-38 - Radio DENVER - Free user manual and instructions
Find the device manual for free DAB-38 DENVER in PDF.


| Product Type | DAB+/DAB FM Radio |
| Brand | Denver |
| Model | DAB-38 |
| Radio Bands | DAB (Band III) and FM (87.5–108 MHz) |
| Display | LCD with station info, time, and DLS text |
| Aerial | Telescopic, swivel base |
| Power Source | AC adapter (supplied) or batteries (not included) |
| AC Adapter Input | 100–240 V AC, 50/60 Hz |
| Battery Type | 3 x AA (LR6) batteries (not included) |
| Speaker | Built-in mono speaker |
| Headphone Output | 3.5 mm stereo jack |
| AUX Input | 3.5 mm stereo jack for external audio sources |
| Presets | Up to 10 presets for each DAB and FM band |
| Alarm Clock | Two independent alarms with radio or buzzer wake-up |
| Sleep Timer | 15, 30, 45, 60, or 90 minutes |
| Equalizer Modes | Normal, Classic, Jazz, Pop, Rock |
| DRC (Dynamic Range Compression) | On/Off |
| Backlight Levels | Three levels for On and Standby separately |
| Auto Update for Time | From DAB, FM, both, or manual |
| Factory Reset | Yes, via menu option |
| Dimensions (approx.) | 200 x 120 x 80 mm |
| Weight (approx.) | 0.5 kg |
| Safety Features | Overload protection, non-exposed to rain or moisture |
| Care and Cleaning | Wipe with dry cloth only; unplug before cleaning |
| Included Accessories | AC adapter, user manual |
| Warranty | Refer to manufacturer’s warranty conditions |
| Environment | Indoor use only; keep away from heat sources and water |
Frequently Asked Questions - DAB-38 DENVER
User questions about DAB-38 DENVER
0 question about this device. Answer the ones you know or ask your own.
Ask a new question about this device
Download the instructions for your Radio in PDF format for free! Find your manual DAB-38 - DENVER and take your electronic device back in hand. On this page are published all the documents necessary for the use of your device. DAB-38 by DENVER.
USER MANUAL DAB-38 DENVER
denver-electronics.com
Instruction manual
DAB+/DAB FM Radio
DENVER DAB-38

natural_image
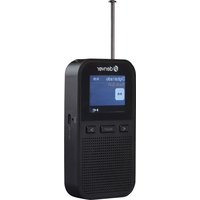
Black-and-white photo of a vintage-style portable radio with a digital display showing '2023' and control buttons (no readable text beyond branding)COPYRIGHT DENVER ELECTRONICS A/S
www.denver-electronics.com
www.facebook.com/denverelectronics
IMPORTANT SAFETY INFORMATION


This symbol indicates that there are important operating and maintenance instructions in the literature accompanying this unit.

This symbol indicates that dangerous voltage constituting a risk of electric shock is present within this unit.
Read these instructions.
Keep these instructions.
Heed all warnings.
Follow all instructions.
Do not use this apparatus near water.
Clean only with a dry cloth.
Do not block any ventilation openings.
Install in accordance with the manufacturer's instructions.
Do not install or operate near any heat sources such as radiators, stoves, or other apparatus that produce heat.
Unplug this apparatus during lightning storms or when unused for long periods of time.
Refer all servicing to qualified service personnel. Servicing
is required when the apparatus has been damaged in any way, such as the power-supply cord or plug is damaged, liquid has been spilled or objects have fallen into the apparatus, the apparatus has been exposed to rain or moisture, does not operate normally, or has been dropped.
Warning: To reduce the risk of fire or electrical shock, do not expose this product to rain or moisture. The product must not be exposed to dripping and splashing and no object filled with liquids such as a vase of flowers should be placed on the product.
No naked flame sources such as candles should be placed on the product.
Batteries (a battery pack or installed batteries) shall not be subject to excessive heat such as sunshine, fire or the like.
Caution: Changes or modifications not expressly approved by the manufacturer could void the user's authority to operate this device.
Caution: Usage of controls or adjustments or performance of procedures other than those specified herein may result in hazardous exposure.

To prevent possible hearing damage, do not listen at high volumes for long periods.
IMPORTANT
This equipment generates, uses and can radiate radio frequency energy and, if not installed and used in accordance with the instructions, may cause harmful interference to radio communication. However, this is no guarantee that interference will not occur in a particular installation. If this equipment does cause harmful interference to radio or television reception, which can be determined by turning the equipment off and on, the user is encouraged to try to correct the interference by one of the following measures:
ELECTRICAL INFORMATION
Use this appliance only with the supplied AC Adapter. Using non-approved power supplies will void the warranty.
PRELIMINARIES
LOCATION
Place the unit on dry stable surface away from heat and damp and where it is unlikely to fall or be knocked over.
GETTING STARTED
DAB/FM AERIAL
Before using your radio for DAB or FM reception, always fully extend the telescopic aerial.
The telescopic aerial has a swivel base to enable it to be adjusted to different positions for the clearest sound.
CONTROLS AND CONNECTIONS
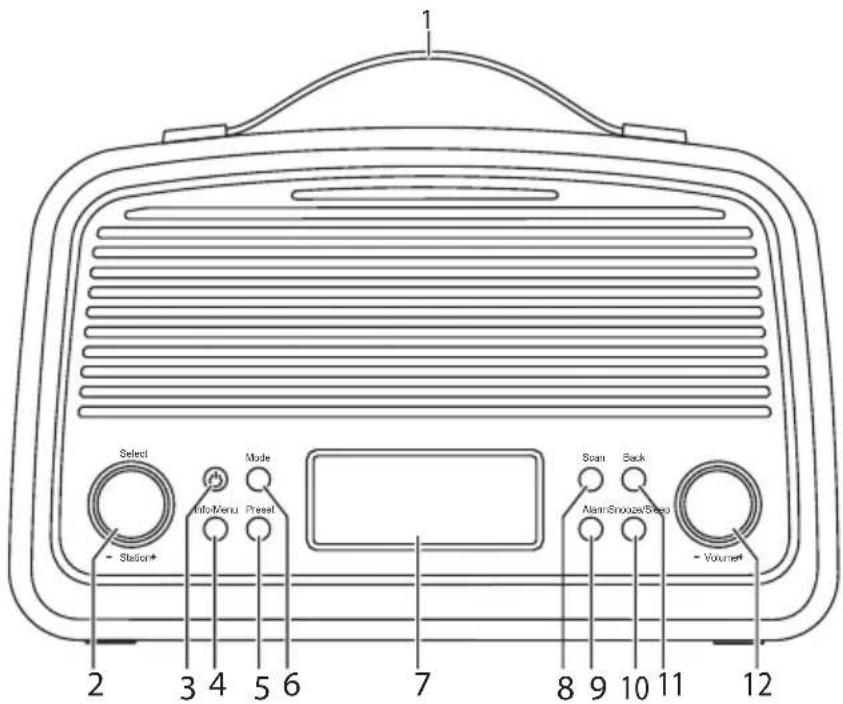
FRONT VIEW
Handle1.
Select/Station control2.
Standby button3.
Info/Menu button4.
Preset button5.
Mode button6.
Display7.
Scan button8.
Alarm button9.
Snooze/Sleep button10.
Back button11.
Volume control12.
BACK VIEW
- DAB/FM Aerial
- DC In jack
- Headphone jack
- Aux In jack
- Battery cover (Batteries not included)

ENG-3
POWER CONTROL
STANDBY CONTROL
Switching the radio on:
◦ button to switch on the radio.
The radio will re-tune to the last station playing.
Setting the radio to Standby:
- button to set the radio to Standby.
The time and date will be displayed.
NOTE:- The ⏻ button functions as a Power ON/ Off button during battery operation - the display will switch off completely when set to Standby and Alarm and Sleep function are disabled.
INITIAL SCAN
When your radio is switched on for the first time it will scan all usable stations and store them alphanumerically - 1 Radio, 2 Radio, AA Radio, AB Radio... The initial scan will take a few minutes. After the scan, the number of stations found will be displayed, and the radio will play the first station in the sequence.
Note: If no stations are found, switch the radio off and move it to a location with a stronger signal. When you switch the radio back on it will automatically repeat the scan process.
SELECTING A DAB STATION
After scanning, the stations are stored in an alphanumeric station list.
To select another station:
list.
displayed.
The radio will re-tune to the new station.
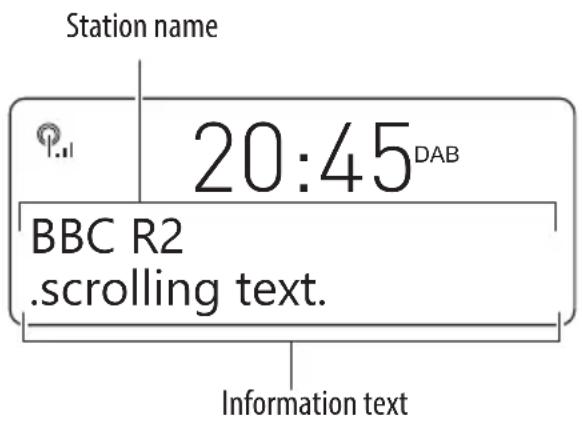
The display will show the station name and DLS scrolling information text.

ADJUSTING THE VOLUME
To adjust the volume:
The volume level will be displayed on a bargraph.
DAB/FM BANDS
Your radio can also receive FM band radio stations.
To change between the DAB and FM bands:
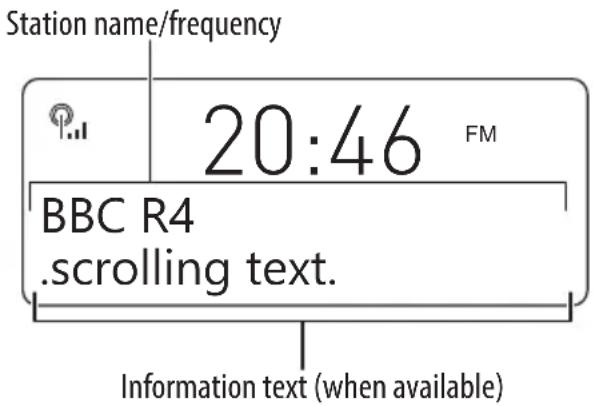
The radio will change band and the station name (DAB) or tuned frequency (FM) will be shown on the display.
FM RECEPTION
The station name and RDS information text will be displayed. If RDS data is not available, the station frequency will be displayed.
To scan for FM stations:
Tuning will stop automatically when the next station is reached. reached.
To change the scan direction:
scan up the band or anti-clockwise to scan down the band.
To manually tune to FM stations:
STEREO/MONO RECEPTION
Setting to mono mode may improve sound quality in areas where a weak aerial signal results in a high level of background noise.
To switch between Stereo and Mono:
The sound will switch between stereo and mono.
AUX INPUT
The AUX IN input may be used to connect sound sources with a Line or Headphone analogue output to play through your unit. These may include -
Connecting to the AUX IN jack
personal audio player and the AUX IN jack on the back panel.
Playing the AUX source
'AUX IN' will be displayed.
If there is no sound or if the volume level is not loud enough, you may need to increase the volume setting on your personal audio player/computer.
DAB & FM PRESETS
Your radio can store up to 10 of your favourite stations as presets on both the DAB and FM bands.
To store a preset:
Tune to the sta
'Preset Store' will be displayed with a preset number to store. If a station is already stored in this preset number, the station details will be shown.
turn the Select/Station control to change the preset number displayed.
displayed, press the Select/Station control.
When you store a preset, the preset number and 'stored' will be displayed to confirm the number you selected.
To recall a preset:
Preset 1 will be displayed.
stations you have stored.
When you find the preset number you want, press the Select/Station control.
The radio will tune to the selected preset station.
The preset playing will be displayed.

20:47
FM
Preset Store

20:47
FM
Stored

20:48
FM
Preset Recall
<1: BBC Radio 1>

20:48
FM
BBC R1
.scrolling text.
DAB SETTINGS MENU
DAB SETTINGS MENU
A complete map of the menu is shown on the next page.
To enter the DAB Settings Menu
The menu will be displayed.
available options.
Station control.
Choose the 'System' menu option to open the sub-menu of system options shown on the menu map.
Full Scan: Select Full Scan to re-scan the entire DAB band and refresh the station list.
and refresh the station list.
Manual Tune: Manual tuning enables you to search the band manually by pressing the Tune + or Tune - button to step through the multiplex numbers and check if any have usable signal strength on a bargraph display. Manual tuning is not necessary in normal operation where scanning will have established a station list of usable scanning will have established a station list of usable stations.
DRC: DRC is Dynamic Range Compression. Enabling DRC may improve the sound of DAB radio when listening in a noisy room.
Prune: If your station list includes stations that you can no longer receive (you may have moved to a different area), you can select the 'Prune' option to remove them and clean up the Station List.
System>Equaliser: You can change the equaliser setting to change the tone of the radio sound. Choose from Normal, Classic, Jazz, Pop or Rock settings.
System>Time: Select the time option to open the following sub-menus for setting the clock manually and changing time and date display options.
System>Time>Set Time/Date: This option may be useful if you are in an area where it is not possible to receive DAB radio broadcasts. You can set both the time and date manually.
System>Time>Auto update: This option sets how the clock locates time and date information. You can choose to update from either DAB or FM radio or both. You can also disable Auto update if you prefer to retain manual clock settings.
System>Time>Set 12/24 hour: Choose this option to display the time in 12 hour (with a.m. and p.m. indicators) or 24 hour formats.
System>Time>Set date format: Choose this option to change the date format from DD/MM/YYYY to MM/DD/YYYY.
System>Backlight: This option enables you to set the display brightness. Two separate options are available - display brightness when the radio is On and also when set to Standby. Choose from the three available levels.
System>Factory reset: Select the 'Yes' sub-option to reset all the settings of your radio to factory original settings. The station list will also be cleared and any stored preset memories will be erased. After a factory reset the radio will re-scan the band and renew the station list.
System>Software upgrade: This is not a user feature. If you select this option in error, disconnect power or remove batteries, wait for a minute then re-connect power.
System>SW Version: This option will display the version number of the control software currently installed in your radio. This will be helpful to a technician who is servicing the radio.
USING THE ALARMS
SETTING THE ALARMS
You can set two completely separate alarm times (ALARM 1 and ALARM 2) and activate either or both of them to wake you with radio or a buzzer. You can also pre-set the station preset and volume settings that the alarms will wake you with.
Setting the alarm times:
when set to Standby).
to set Alarm 2.
In the examples to follow, Alarm 1 is to be set.
'Alarm 1 Setup' will appear on the display.
Select/Station control if you want to set Alarm 1.
'Alarm 1 Wizard' will appear on the display.
The alarm is now set in the sequence shown in the next column.
NOTE: Press the Alarm button at any time to exit alarm setting, leaving the settings unchanged.
*NOTE:- When changing the Alarm radio preset setting, choose the Last listened' option to wake to the last station you played before setting the radio to Standby.
To make a change to a setting:
Turn the Select/Station control to step through the options available for a setting (or times when clock setting).
Select/Station control to confirm the setting and move on to the next setting in the sequence.
Repeat the previous two steps to change each setting as required.
ALARM SETTING SEQUENCE

flowchart
graph TD
    A["Alarm 1 Time\nSet the alarm hours, then minutes"] --> B["Alarm 1 Duration\nSet the duration of the alarm"]
    B --> C["Alarm 1 wake-up mode (Source)\nChoose from DAB,FM, Buzzer"]
    C --> D["Alarm 1 preset*\nChoose a preset for radio alarm modes"]
    D --> E["Alarm 1 Repeat\nSet the alarm\nDaily, Once, Weekends or Weekdays"]
    E --> F["Alarm 1 Date\nOption appears if Repeat is set 'Once'"]
    F --> G["Alarm 1 Volume\nSet the volume for Alarm 1"]
    G --> H["Alarm 1 On/Off\nChoose to set Alarm 1 On or off"]
    H --> I["Alarm Saved\nThe alarm settings have been saved"]
Saving alarm settings:
Your alarm settings are automatically saved when you complete the last setting and press theSelect/Station control.
The display will confirm with the words 'Alarm saved'.
Alarm repeat:
The alarm(s) will repeat according to the Alarm Repeat setting you made when setting the alarm. setting you made when setting the alarm.
Once - The alarm will sound only once. If this setting has been chosen, an extra option is added for you to set the date that you want the alarm to sound.
USING THE ALARMS
SETTING THE ALARM TO WAKE YOU
To check if the alarms are set:
check that the Alarm 1 and/or Alarm 2 symbols are displayed as required.
To switch the alarms on or off:
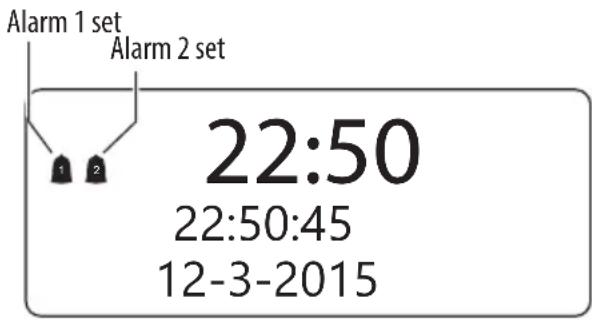
The radio will switch off and the time and date will be displayed with the Alarm Symbol(s).
'Alarm Saved' will be displayed control to save the settings.
WHEN THE ALARM WAKES YOU
When the alarm sounds you can choose to set snooze, which will reset the alarm for a further 5 minutes, or to switch it off.
To set snooze:
The alarm will stop and the alarm indicator and the snooze time will count down on the display. After 5 minutes the alarm will sound again.
To switch off the alarm:

The unit will set to Standby.
SLEEP FUNCTION
You can set the Sleep timer to play music for a set period while you are falling asleep.
To set the sleep timer:
22:51
Classic FM
Vaughan Williams

The sleep time will be displayed.
Select/Station control to step through the sleep time options of 15 minutes, 30 minutes, 45 sleep time options of 15 minutes, 30 minutes, 45 minutes, 60 minutes, 90 minutes or OFF (sleep off).
The Sleep time will be displayed and music will continue to play for the time you selected, then the unit will set to Standby.
HEADPHONES
There is a headphone output socket on the back panel of the radio. If headphones are connected to this socket for private listening, the speakers will cut out automatically.
FACTORY RESET
DAB is a terrestrial system and frequencies in different areas vary. If you move the radio to another part of the country, performing a scan may not be enough to reprogram the radio you may need to reset the radio.
Factory reset is an option available from the Settings menu.
Factory reset is an option available from the Settings menu.
To restore the factory settings
The Radio will now re-start and scan the DAB broadcast stations in your area.
After reset all settings are returned to the factory defaults and any stored presets are erased.
TROUBLESHOOTING
Poor quality radio reception
The aerial signal may not be adequate. Try adjusting the aerial position while watching the signal strength on the bargraph. Signal strength can be displayed by tuning to aDAB station and pressing the Info/Menu button until the signal strength bargraph is displayed.
Few DAB stations are available after moving area
The radio should be reset to renew the station list. Refer to the 'Factory Reset' section on page 9.
Poor quality FM reception
If you are listening to a station with a weak signal, try setting to mono reception.
CARE AND MAINTENANCE
After using your radio
Set the radio to Standby or switch it off.
Unplug the radio from the mains if you are leaving it unattended for a long period (holidays etc).
Care and cleaning
All care and cleaning operations should be carried out with the unit unplugged from the mains power.
Occasionally wipe the cabinet with a lint free duster. Never clean the unit with liquids or solvents.
ALL RIGHTS RESERVED, COPYRIGHT DENVER ELECTRONICS A/S
DENVER®
www.denver-electronics.com

Electric and electronic equipment contains materials, components and substances that can be hazardous to your health and the environment, if the waste material (discarded electric and electronic equipment) is not handled correctly.
Electric and electronic equipment is marked with the crossed out trash can symbol, seen below. This symbol signifies that electric and electronic equipment should not be disposed of with other household waste, but should be disposed of separately.
All cities have established collection points, where electric and electronic equipment can either be submitted free of charge at recycling stations and other collection sites, or be collected from the households. Additional information is available at the technical department of your city.
Imported by:
DENVER ELECTRONICS A/S
Omega 5A. Soeften
DK-8382 Hinnerup
Denmark
www.facebook.com/denverelectronics


- Instruction manual
- DAB+/DAB FM Radio
- DENVER DAB-38
- IMPORTANT SAFETY INFORMATION
- IMPORTANT
- ELECTRICAL INFORMATION
- PRELIMINARIES
- LOCATION
- GETTING STARTED
- DAB/FM AERIAL
- CONTROLS AND CONNECTIONS
- FRONT VIEW
- BACK VIEW
- POWER CONTROL
- STANDBY CONTROL
- INITIAL SCAN
- SELECTING A DAB STATION
- ADJUSTING THE VOLUME
- DAB/FM BANDS
- FM RECEPTION
- STEREO/MONO RECEPTION
- AUX INPUT
- Connecting to the AUX IN jack
- DAB & FM PRESETS
- To store a preset:
- To recall a preset:
- DAB SETTINGS MENU
- USING THE ALARMS
- SETTING THE ALARMS
- Setting the alarm times:
- To make a change to a setting:
- Saving alarm settings:
- Alarm repeat:
- SETTING THE ALARM TO WAKE YOU
- WHEN THE ALARM WAKES YOU
- SLEEP FUNCTION
- HEADPHONES
- FACTORY RESET
- TROUBLESHOOTING
- Poor quality radio reception
- CARE AND MAINTENANCE
- After using your radio
- Care and cleaning
Brand : DENVER
Model : DAB-38
Category : Radio