
OHM888VD - Uncategorized CLARION - Free user manual and instructions
Find the device manual for free OHM888VD CLARION in PDF.


| Product Type | Overhead Monitor DVD Player |
| Brand | Clarion |
| Model | OHM888VD |
| Screen Size | 8" diagonal |
| Display Type | WVGA LCD TFT active matrix |
| Resolution | 800 x 480 pixels |
| Aspect Ratio | 16:9 or 4:3 selectable |
| Video System | NTSC, PAL, AUTO |
| Viewing Angle (up/down/left/right) | 45° / 55° / 65° / 65° |
| Display Angle Adjustment | Vertical, up to 150° maximum |
| Disc Formats Supported | DVD, DVD-R/RW, CD, CD-R/RW, MP3 CD |
| Audio Output | Dolby Digital downmix to stereo, IR wireless headphones |
| Video Inputs | 2 A/V (RCA) inputs |
| Video Output | 1 A/V (RCA) output |
| Dome Light | 2W white LED, switchable (ON/OFF/door-activated) |
| Power Supply | 12V DC (10V-16V), negative ground |
| Operating Current | <1.3A |
| Current Consumption (standby) | <6mA |
| Max Current Consumption | <1.8A |
| Weight | 4.313 lbs (1.95 kg) |
| Operating Temperature | -5°C to 55°C |
| Storage Temperature | -20°C to 70°C |
| Remote Control Battery | CR2025 lithium battery |
| Headphones Included | 1 pair IR wireless headphones (2 AAA batteries) |
| Installation | Roof mount, replaces dome light |
Frequently Asked Questions - OHM888VD CLARION
User questions about OHM888VD CLARION
0 question about this device. Answer the ones you know or ask your own.
Ask a new question about this device
Download the instructions for your Uncategorized in PDF format for free! Find your manual OHM888VD - CLARION and take your electronic device back in hand. On this page are published all the documents necessary for the use of your device. OHM888VD by CLARION.
USER MANUAL OHM888VD CLARION
Thank you for purchasing this Clarion product.
- Please read this owner's manual in its entirety before operating this equipment.
• After reading this manual, keep it handy, such as in your glove compartment.
• Save your sales receipt. Your sales receipt is essential for warranty service.
Content
1. FEATURES ....3
Image features .... 3
DVD video features....4
Other features 4
2. PRECAUTIONS....5
Operating 5
General 5
Maintenance....5
Installation....6
3. CONTROLS....7
Monitor closed....7
DVD drive slot 8
Monitor open 9
Remote control.... 10
4. OPERATIONS....12
Opening the monitor.... 12
Closing the monitor 12
Handling discs.... 13
Turning the player on 13
Turning the player off 13
Changing the image aspect ratio 13
Playing a disc (DVD or CD).... 13
Using headphones 14
Playing DVDs.... 15
Playing audio CDs.... 19
Playing MP3s 20
Care and maintenance....21
Changing the battery in the remote control 22
5. INSTALLATION AND WIRING ....23
What is included in the box 23
Tools and additional components.... 23
Before you begin....23
Mounting and wiring precautions 24
Installation procedure.... 24
Wiring diagram....27
6. SETTING PREFERENCES ......28
Accessing the on-screen display menus.... 28
Example: Setting parental control 28
General setup page.... 29
Speaker setup page 29
Preference page....30
7. TROUBLESHOOTING ....31
8. GLOSSARY....33
9. SPECIFICATIONS....34
WARNING
The Clarion OHM888VD / OHM1088VD / OHM1588VD overhead monitor players are designed strictly for rear-seat entertainment. Viewing the monitor while operating a motor vehicle can result in serious injury and/or property damage. Clarion is not responsible for any injury and/or property damage as a result of the improper use or viewing of the monitor.
The Clarion OHM888VD / OHM1088VD / OHM1588VD overhead monitor players are engineered with advanced technological designs and components to combine flexibility with reliability, and expandability for the best picture quality and ease-of-use.
Flexibility
Designed primarily for rear seat entertainment, the audio from a OHM888VD / OHM1088VD / OHM1588VD can be enjoyed privately through wireless headphones and/or incorporated into any head unit.
Reliability
High-grade electronic components and heightened electronic connections provide years of service in extremely harsh, mobile environments.
Expandability
The player's built-in audio/video (A/V) connectors allow you to add multiple A/V sources.
Image features
- Flip-down thin film transistor (TFT) active matrix display with screen width that depends on the model:
| OHM888VD: | 8.0" |
| OHM1088VD: | 10.2" |
| OHM1588VD: | 15.4" |
• WVGA LCD with 16:9 or 4:3 aspect ratios
- Screen resolution depending on the model:
OHM888VD: 800 x 480 pixels
OHM1088VD: 800 x 480 pixels
OHM1588VD: 1280 x 800 pixels
• NTSC, AUTO and PAL support
- Wide viewing angle (up/down/left/right) for all three models:
OHM888VD and OHM1088VD: 45/55/65/65
OHM1588VD: 10/30/40/40
- Manual display angle adjustment: vertically adjustable up and down with a maximum angle of 150 degrees
• Adjustable color, contrast brightness, and hue (PAL) or tint (NTSC) - On-screen display (OSD) of configuration options
DVD video features
DVD drive that supports the following formats:


DVDs
12cm
Video
Cl2sm
Audio
CDs
12cm
MP3
CDs
12cm
- Playback of CDs with two recorded sessions (one audio and one data).
• Multi-sound (②): DVD audio that supports up to eight languages per film. - Multi-angle function (☐): for DVDs that provide multiple views of the same scene.
- Subtitles (z): support up to 32 languages.
• The playback of MP3 music files stored on a CD-R/CD-RW/DVD disc. - Region number assigned based on the sales area; region number is indicated on the box as follows:


Other features
- Roof mounting
• Automotive start-up protection
• 2 audio/video inputs and 1 audio/video output - White LED built-in dome light
• Built-in IR transmitter for IR wireless headphones - IR remote control
- Slot-in DVD mechanism
2. PRECAUTIONS
Failure to observe these precautions may damage your car, the monitor, or the video source, and may void the warranty.
For questions or problems not covered in this manual, contact your local Clarion Dealer.
Operating
- Do not operate this product in ways other than those described in this manual. Failure to follow instructions may void the warranty.
- Do not use the unit with the ignition off. This could drain the car's battery.
- If the internal temperature of the vehicle is extremely high (over 50 degrees Celsius), let the unit cool down a bit before you use it.
- If the temperature in the car is very low (below -5 degrees Celsius), starting the unit right after you start the car with its heater running may cause moisture to form on the LCD. Turn the unit off immediately! Failure to do so may cause an electrical short. Allow about one hour for the condensation to dissipate before using the unit.
- In extremely cold temperatures the picture may appear dark and move slowly. The display returns to normal when the temperature rises.
- When using the system, make sure you are seated with your seat belt fastened. Otherwise, you may hit your head on the unit if the driver breaks suddenly. In an accident, injuries can be more severe if your seat belt is not fastened.
- Before leaving the car, eject the DVD disc and store it separately away from direct sunlight. Heat and humidity can damage DVD discs causing them not to play.
General
- Do not leave the monitor extended when you're not using it. Direct sunlight can cause the monitor to malfunction.
- Do not hang onto or hang items from the overhead monitor.
- Do not pour liquid into the unit or poke foreign objects into the DVD drive slot. Water, humidity, and foreign objects may damage internal circuitry.
- If the unit becomes wet, turn off all power and ask your authorized Clarion Dealer to clean or service the unit.
- Do not drop the unit or hit the LCD panel with a hard object. You may cause permanent damage.
- If the LCD breaks, avoid touching the glass and fluid. If you do touch the fluid, clean it off your body and/or clothes with plenty of water, and then get medical attention.
Maintenance
- Do not clean the surface of the LCD with chemical solvents or corrosive detergent. Permanent damage to the screen may result.
- Do not disassemble or modify this unit. You may damage the monitor, void the warranty, and suffer electric shock.
Installation
Installation of mobile audio and video components requires experience with a variety of mechanical and electrical procedures. Although this manual provides general installation and operation instructions, it does not show the exact installation methods for your particular vehicle.
If you do not have the required knowledge, experience, and/or tools to successfully complete the installation, consult an authorized Clarion Dealer about professional installation options.
Monitor closed
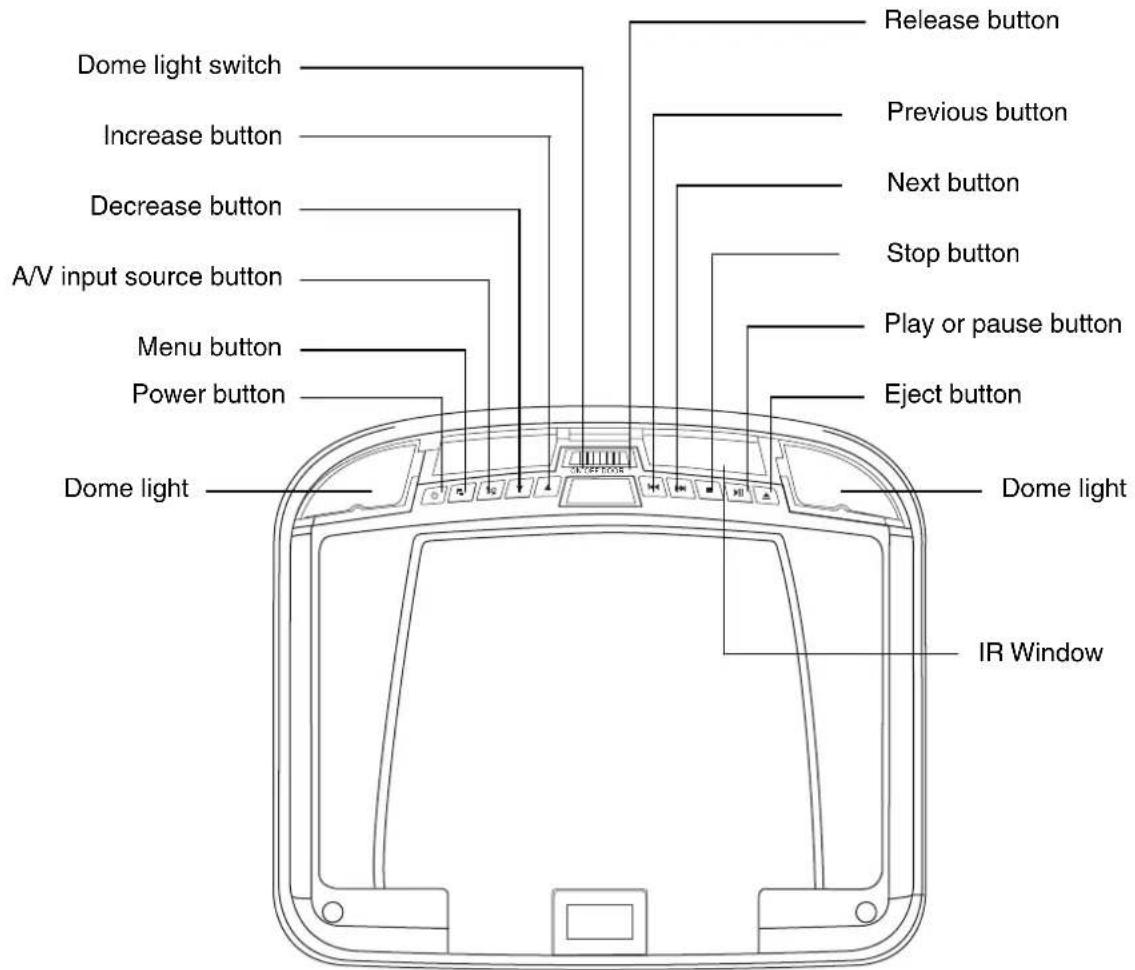
Looking up from directly below at the player with the LCD panel closed
Quick reference to controls with monitor closed
Audio/video input Source (A/V) Selects the video input source: DVD-IN, AV IN1 or AV IN2
▼Decrease button (-) Reduces a value in a menu, such as the volume.
Dome light Provides an interior light for the vehicle.
Dome light switch Configures the dome light: ON, OFF or door activated. To manually turn the light on or off, move this switch to the ON or OFF positions. In the door-activated position, the dome light turns on and off when you open and close the car door.
Note:
The dome light switch works only when the green dome light wire is connected to the door sensor and the polarity switch is set correctly. See the vehicle's wiring manual for connection details.
▲Eject button
Ejects the disc.
(EJECT)
▲Increase button (+) Increase a value in a menu, such as the volume.
IR window Receives infrared (IR) signals from the remote control and sends IR signals to the headphones.
Menu button
Opens the Display menu. Press again to sequentially select each menu item.
(MENU)
Fast Forward button
Skips to the next chapter on a DVD or track on a CD.
(FF) Press and hold to fast forward at 2x, 4x, 8x, 16x and 32x speeds.
▶Play/pause button (PLAY)
Plays or pauses the disc.
Power button
Turns power to the player on and off.
(POWER)
Rewind (fast reverse)
button
Skips to the previous chapter on a DVD or track on a CD.
(REW)
Press and hold to fast reverse at 2x, 4x, 8x, 16x and 32x speeds.
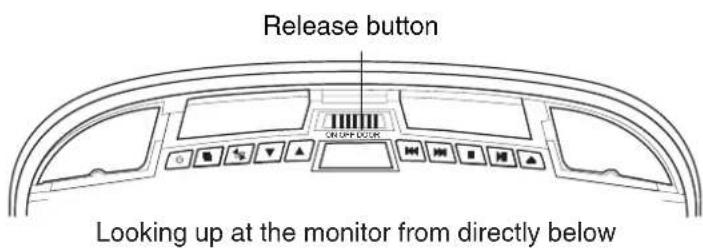
Release button Opens the LCD panel.
■Stop button (STOP)
Press once to stop playback. Then, to resume where the player left off, press the play/pause button.
Press this button twice to fully stop playback. Then, to start playing at the beginning of the disc, press the play/pause button.
DVD drive slot
Back seat
Insert DVD and CD discs into this slot
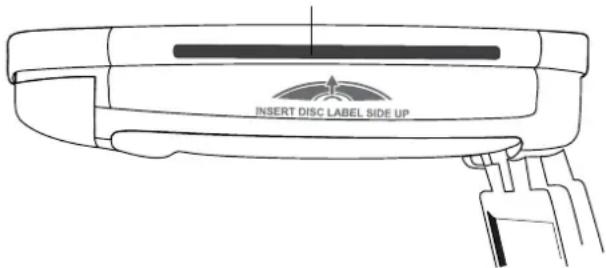
Front of the car
View of the player from the front seat, passenger's side
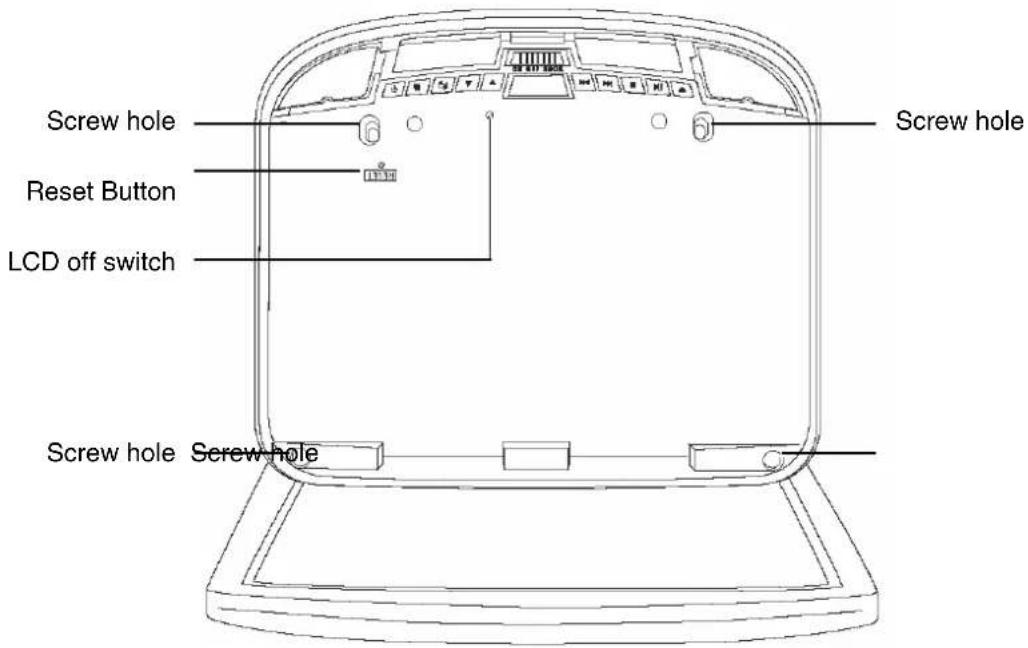
Looking up from directly below at the player with the LCD panel open
Quick reference to controls with monitor open
LCD off switch Turns off the LCD screen.
Reset button Press with a pencil or other narrow-tipped tool to return all setup options to their factory default values.
Screw holes Used to attach the player to the mounting plate.
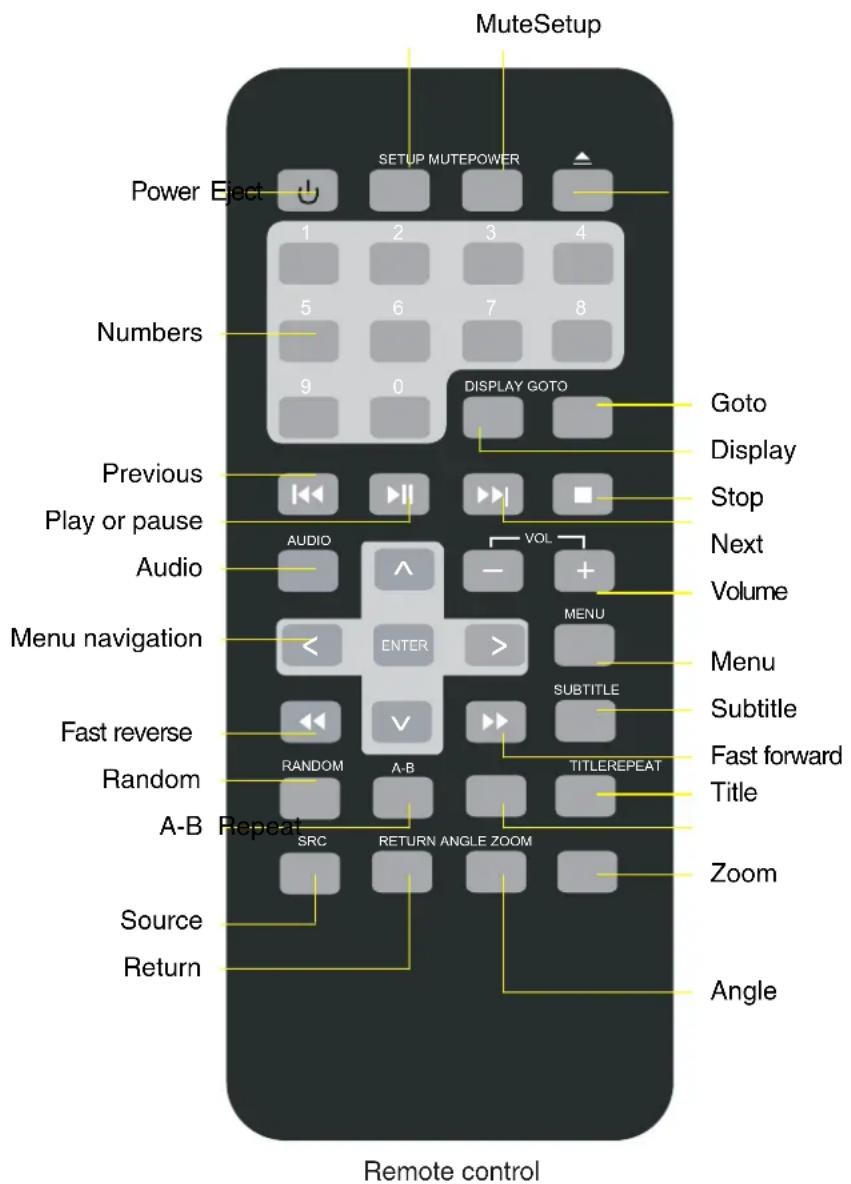
Quick reference to remote control
A-B Repeats playback from previously identified points A to B Angle Changes a scene angle when playing back a DVD that includes multiple scene angles.
Arrows Selects options on DVD menu and values on Display menu.
Audio DVD: Changes the language during playback. For a VCD/CD: Changes audio channel (left, right, stereo) during playback.
DISPLAY Displays playback information: title, chapter, track and time.
ENTER Accepts settings selected using the arrow keys.
▲Eject Ejects the current disc in the slot.
▶Fast forward Speeds playback forward at 2x, 4x, 8x, 16x and 32x speeds.
| Goto | Starts playback at the selected chapter, track or time. |
| Menu | Displays the DVD's main menu. Press and hold to view the Display menu. |
| Mute | Disables and enables sound. |
| ▶Next | Jumps to next chapter on a DVD or to next track on a CD. |
| Numbers | Used to directly enter track numbers and to configure some options. |
| ▶Play or pause | Starts and stops playback of a DVD or CD. |
| Power | Turns the player on and off. |
| Previous | Jumps to previous chapter on a DVD or previous track on a CD. |
| Random | Plays back chapters or tracks in random order. |
| Repeat | Alternates among repeat options. For a DVD: 1x Chapter, 2x Title, 3x All. For a CD: 1x Track, 2x All. |
| Return | Single press returns to main menu; second press returns to last position of playback. |
| ◀Rewind (fast reverse) | Fast reverses playback at 2x, 4x, 8x, 16x and 32x speeds. |
| Setup | Accesses the setup menu used to modify player options. |
| Source | Selects the video input source: DVD-IN, AV IN1 and AV IN2. |
| ■Stop | Stops playback. Then press the play/pause or ENTER buttons to resume playing back at last position. Press the stop button twice to fully stop playback, then press the play or ENTER buttons to start playing back at the beginning of the DVD. |
| Subtitle | Turns pre-recorded subtitles on and off. |
| Title | Displays the DVD's title menu. |
| Volume) | Decreases and increases the volume. |
| Zoom | Zooms in when viewing a movie or photographs. As you press ZOOM, the player alternates among the available zoom settings (2x, 3x, 4x, 1/2x, 1/4x and normal). |
4. OPERATIONS
The monitor and DVD player provide the video; headphones provide the audio. The unit receives power from the power connector used for the car's dome light, which the unit replaces.
Opening the monitor
- Press the release button to open the overhead monitor screen.
- Gently swing the LCD down and adjust the angle for viewing.
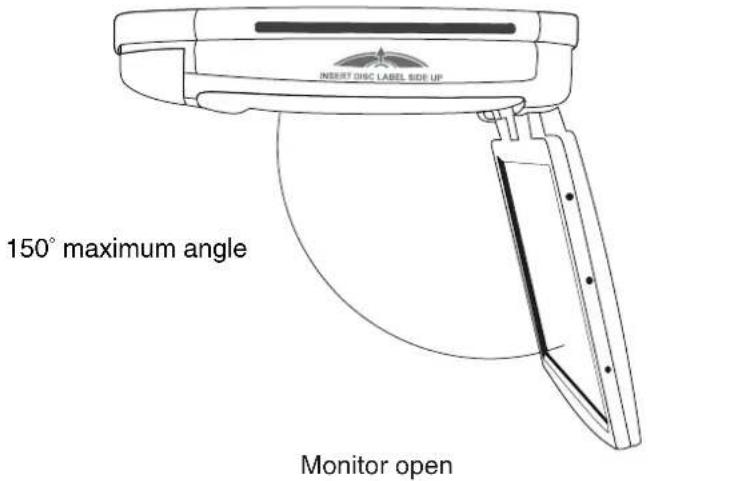
CAUTION The LCD opens to a maximum angle of 150 degrees. Do not attempt to open it further.
The monitor turns on automatically when you fully open it (assuming the ignition switch is on or in the ACC position).
Closing the monitor
Gently push the back side of the LCD until it clicks into the overhead housing. The monitor turns off automatically when you return it to the closed position.
Note:
When closing the LCD panel, do not let cords or other items get caught between the LCD and the overhead housing. Doing so can seriously damage the TFT screen.
For safety, close the LCD panel when you are not using it.
Handling discs
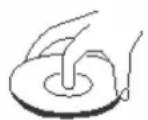
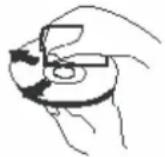
• To keep a disc clean, do not touch the play side (non-label side).
- Do not attach sticky notes to or put tape on a disc.
- Keep discs away from direct sunlight and heat.
- Store discs in a protective disc case.
• Before playback, wipe the disc outwards from the center with a clean cloth.

Turning the player on
- Turn the ignition to either ACC or ON.
- Press the power button ( ) on the player or on the remote.
- If no disc is in the drive, it displays: "NO DISC."
- To change input sources, press SRC and alternate among A/V input sources: DVD-IN, AV IN1 (first additional audio-video source) and AV IN2 (second audio-video source). Additional AV sources must be connected.
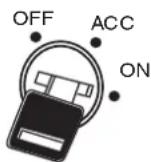
Note:
You cannot insert a DVD into the slot if you've selected an alternate audio-video source (AV IN1 or AV IN2).
Turning the player off
To turn the power off, press the power button (☐).
If a CD or DVD is playing when you turn the power off and back on again, the player continues playback from where you stopped.
Note:
Once the player is turned off, you cannot eject a DVD or CD left in the slot.
Changing the image aspect ratio
A common display setting to change is screen mode, which controls the aspect ratio used to display images.
Do not leave the headphones in a place that is subject to direct sunlight or extreme temperatures.
An IR receiver in the headphones that is exposed to direct sunlight for an extended period of time may cause poor sound quality. Let the headphones cool off before you use them.
Playing a disc (DVD or CD)
- Put the headphones on your head and turn the headphone power on.
- Assuming the power is on, insert a DVD into the player.
The player displays "Loading."
- Aim the remote control directly at the IR receiver on the player and press the play/pause button (▶) or press ENTER (on the remote).
Using the remote control
- Use the remote control only inside the vehicle.
• Use the remote control no further than five feet (three meters) from the sensor. - Direct sunlight (or a very bright light) reduces sensitivity to remote signals. Do not use the player in direct sunlight.
- Any object that comes between the infrared sensor and the remote control may disrupt reception.
Controlling playback
• To pause and resume, press the play/pause button (▶II).
• To stop playback, press the stop button (■).
If you press the stop button (■) and then press the play/pause button (▶) again, playback begins from the beginning of the last chapter played, not the last exact location when you interrupted playback.
• To play back the previous track or chapter, press the previous button (◀).
• To play back the next track or chapter, press the next button (▶).
• To remove the CD or DVD, press the eject button (▲).
- To mute the sound, press the MUTE button on the remote. Press this button again to enable sound again.
Using headphones
To hear the audio requires headphones.
WARNING
Do not use the headphones while driving. Simultaneously usage of two overhead monitors in the same vehicle could cause distorted sound on your ear phones. We recommend using only one OHM in case of headphone usage.
Headphone components
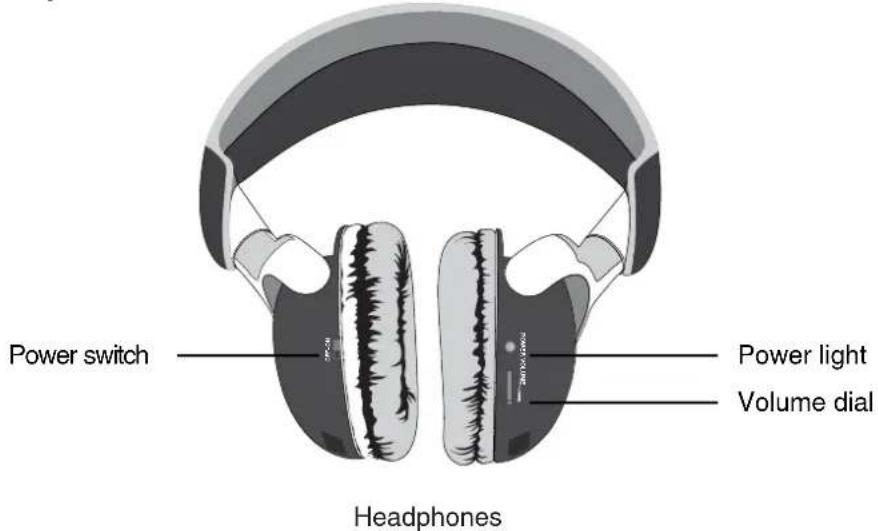
Installing batteries in the headphones
If this is the first time you're using the system, install batteries in the headphones. Change the batteries when you begin to hear distorted audio that cuts in and out.
- Rotate the left earpiece so the battery cover is accessible.
- Slide the battery cover down.
- If replacing the batteries, remove the discharged batteries.
- Insert the new AAA batteries according to the polarity marked inside the battery compartment.
- Slide the battery cover back into place.
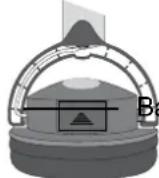
Close-up of the left earpiece
Battery cover Battery installed
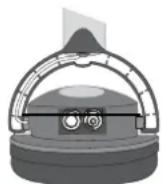
Close-up with batteries installed
Setting the volume
The volume control is on the headphones. Turn the volume dial up or down.
Note:
Some noise may be audible depending on the type of encoder software used while recording. This noise is not caused by the OHM888VD / OHM1088VD / OHM1588VD.
Direct sunlight and temperature extremes
Do not leave the headphones in direct sunlight or extreme temperatures.
Playing DVDs
Accessing the root menu
A DVD is divided into titles and chapters. The root menu shows the contents of the disc. Some DVDs only allow you to select disc playback options from the DVD root menu. To access the root menu of the DVD, press the MENU button during playback.
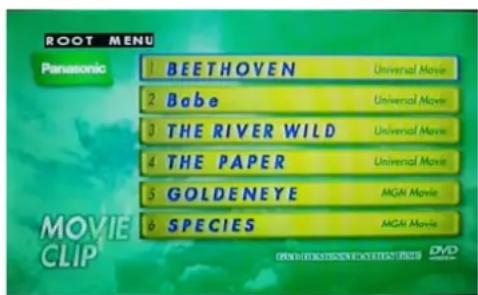
DVD root menu
Status information
To view status information about the current viewing session, press the DISPLAY button continuously to cycle through the following information.
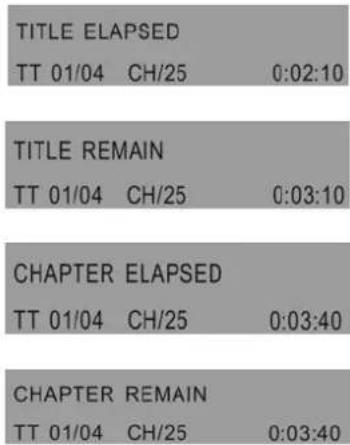
Status information
Changing languages
Note:
All audible languages must be pre-recorded on the DVD. Some DVDs only allow language access through the DVD menu.
- To change the audible language, press the AUDIO button on the remote. The player displays the current language number and name, and the total number of languages available.
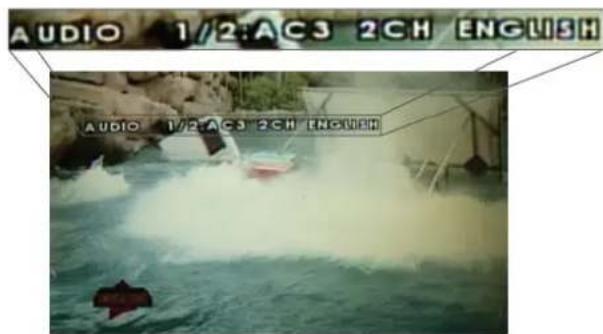
Sample language option
• To cycle through all available languages, continue pressing the AUDIO button. The audio information disappears automatically if you wait three seconds.
Using subtitles
Language subtitles are normally off.
Note:
Subtitles must be on the DVD. Some DVDs only allow subtitle access through the DVD menu.
- To turn subtitles on, press the SUBTITLE button. The player displays the current language number and name, and the total number of languages for which subtitles are available.
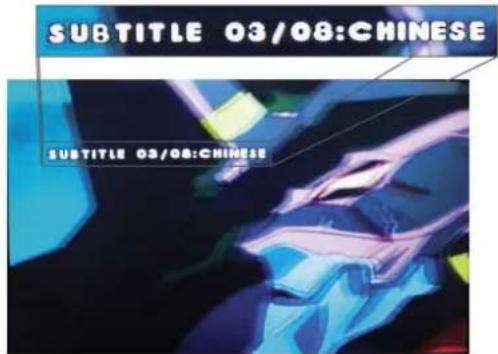
Sample subtitle option
- If the DVD provides subtitles in multiple languages, continue pressing the SUBTITLE button to change the subtitle language.
- To turn subtitles off, press the SUBTITLE button until the screen displays "subtitle off." The display of the subtitle options disappears automatically if you wait for three seconds.
Repeating DVD chapters and titles
To repeat a chapter, title or both, during playback continue pressing REPEAT to alternate among options.
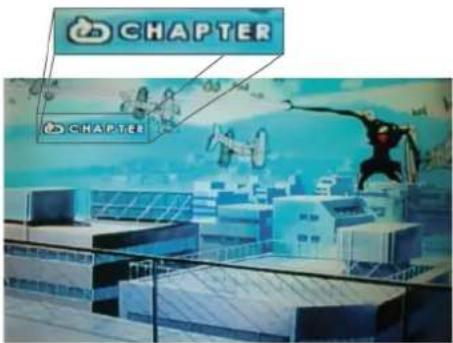
Sample repeat option
• Chapter repeats the current chapter.
• Title repeats the current title.
• All repeats all chapters and titles.
- Off resumes normal playback.
Repeating favorite sections
To repeat a favorite section you must first mark where it begins and ends.
- Play back the DVD.
- To identify the beginning of your favorite section (point A), press the A-B button when the section starts playing back.
- To identify the end of your favorite section (point B), press the A-B button again when play back reaches the end of the section.
To repeat this section, press the A-B button on the remote.
To cancel the repeat playback and resume normal playback, press the A-B button again.
Changing viewing angle
Note:
Multiple angles must be pre-recorded on the DVD. Look for the multiple angles icon (☐) on the jacket of the DVD.
- To cycle through the available viewing angles, press the ANGLE button on the remote while playing back the DVD.
The player displays the current angle number and the total number of angles available.
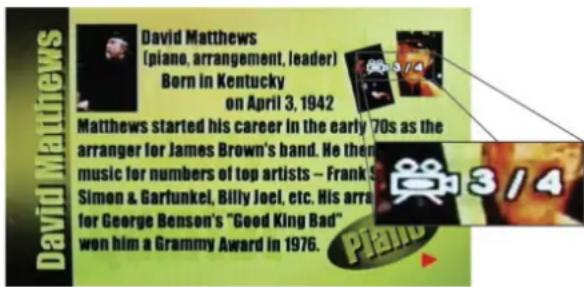
Sample angle options
• To change the angle, press the ANGLE button again.
- To return to normal viewing, press the ANGLE button again.
Zooming in and out
- To zoom in (enlarge) the image when watching a DVD, press ZOOM during playback. As you press ZOOM on the remote, the player alternates among the available zoom settings (2x, 3x, 4x, 1/2x, 1/4x and normal).
- To zoom in when viewing photographs (JPEG/JPG images) stored on a disc, press ZOOM on the remote, then press (▶) or (◀) to alternate among zoom settings (2x, 3x, 4x, 1/2x, 1/4x and normal).
Adjusting picture quality
- Press and hold the MENU button on the remote for more than one second (may require as many as three seconds).
The player displays the "Operation Menu."
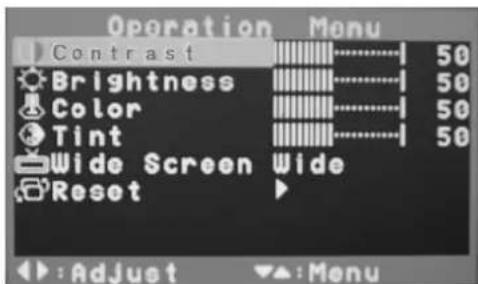
Setup options
- Press the MENU button again to alternate among the available options:
| Contrast | Adjusts the differences between the light and dark areas of the image. |
| Brightness | Makes the whole image lighter or darker. |
| Color | Adjusts color based on the color spectrum. |
| Wide Screen | Selects the aspect ratio (width vs. height) of the image. Options are Wide (16:9) and Normal (4:3) for the OHM888VD and OHM1088VD. The OHM1588VD provides two additional options: Panorama and Zoom. |
| Wide stretches images horizontally so they fit the entire screen. This may distort the images slightly. Normal mode displays without distortion, but the image does not fill the entire screen. | |
| On the OHM1588VD, Panorama expands the left and right sides of the image. Zoom expands images horizontally and displays them to fit the entire screen. The expansion ration increases towards the right and left edges of the screen. | |
| Reset | Returns all menu values to their default settings. |
- Press the left (<) and right (>) arrows on the remote to change the values of selected options.
Playing audio CDs
Displaying CD information
To display the playing time and current track, press DISPLAY on the remote during CD playback.
Continue pressing DISPLAY on the remote to view the disc type, current time, current track number, and total number of tracks.
Repeating CD tracks
To repeat a track or the entire CD, press REPEAT on the remote during playback.
To cycle through the available options, continue pressing REPEAT.
- Track repeats the current track.
• All repeats the current CD.
- Off resumes normal playback.
Repeating favorite sections
To repeat a favorite section you must first mark where it begins and ends.
- Play back the CD.
- To identify the beginning of your favorite section (point A), press the A-B button on the remote when the section starts playing back.
- To identify the end of your favorite section (point B), press the A-B button again when play back reaches the end of the section.
To repeat this section, press the A-B button on the remote.
To cancel the repeat playback and resume normal playback, press the A-B button again.
Playing MP3s
MP3, a format for storing digital audio, compresses each audio track with little loss of audio quality. The result takes up much less disc space than the track would without MP3 compression. The OHM888VD / OHM1088VD / OHM1588VD player supports CD-R/RW and DVD-R discs that contain music MP3 files.
MP3 icons


This icon in front of an item identifies a folder.
This icon in front of an item identifies the item as an MP3 file.
Procedure
- Insert a CD that contains MP3 files into the player.
The player displays the MP3 menu. - To select the folders and tracks to play, press the DISPLAY button on the remote. The player displays the folder structure.
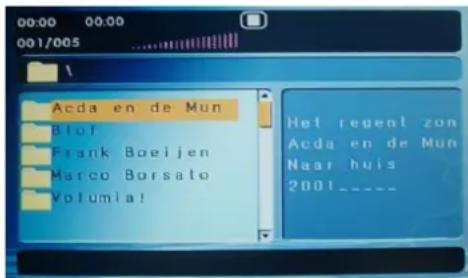
MP3 folder structure with selected folder highlighted
-
To choose a folder from the list, press the up and down arrow keys on the remote.
-
Press the ENTER button on the remote.
The player displays the contents of the selected folder.
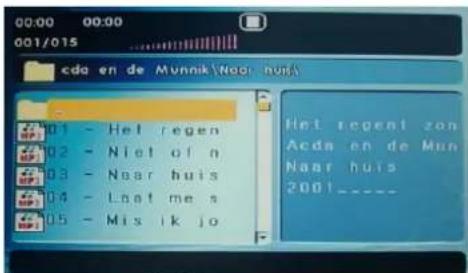
- To select the MP3 file, press the up and down buttons on the remote.
- To play the file, press the ENTER button on the remote.
MP3 controls
• To play back to the next MP3 file, press the next button (▶).
• To play back the previous MP3 file, press the previous button (◀)
Repeating MP3s
To repeat a single MP3 file, press the REPEAT button on the remote. To cycle through all the following settings, continue to press REPEAT.
- Repeat single repeats the current file.
- Repeat all repeats the contents of the current folder.
• Repeat off turns off repeat and resumes normal playback.
Care and maintenance
Cleaning the monitor
• Use a clean, soft, dry cloth to gently wipe dust and dirt from the screen.
- Do not use benzene, thinner, car cleaner, or other cleaners. These substances may damage the monitor system or cause the paint to peel.
• The surface of the LCD can be easily scratched. Do not rub it with anything abrasive.
Servicing the monitor
In the event that trouble arises, never open the monitor case, disassemble the player or attempt to repair it yourself. The internal parts are not serviceable by the user. Opening any components will void the warranty. All warranty service should be performed by an authorized Clarion service center.
CAUTION!
Changes or modifications to this product not approved by the manufacturer will void the warranty and will violate CE approval.
Cleaning the remote control
Use only a clean, soft, damp cloth to clean the remote control. Do not use lighter fluid, methyl alcohol or other solvents.
Cleaning discs
Before playing a disc, wipe it outwards from the center with a clean, soft cloth.
OHM888VD / OHM1088VD / OHM1588VD
Changing the battery in the remote control
The battery needs changing when the buttons on the remote stop working or when you have to move closer and closer to the player for the remote to work
Precautions
- Dispose of used batteries properly.
- Do not dispose of used batteries throwing them into fire. If you do so, they may explode.
- Do not short the positive (+) and negative (-) terminals.
- Keep the battery and its holder away from young children. They may choke on the battery while attempting to swallow or chew on it.
Procedure
Note:
The battery type must be CR2025. Do not replace with any other battery type.
- Turn the remote up-side-down.
- Simultaneously slide the battery latch in the direction of the arrow and pull the battery holder out of the slot.
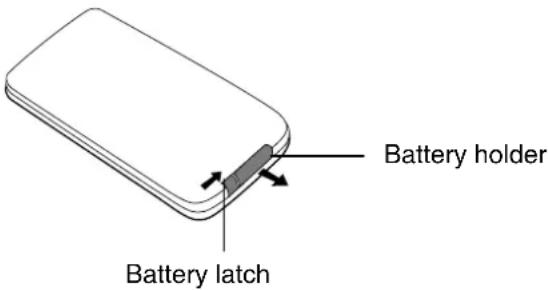
Removing the battery holder
- Remove the old battery.
- Place the new lithium battery in the slot with the plus (+) side up.
- Push the battery holder back into the slot until it locks in place.
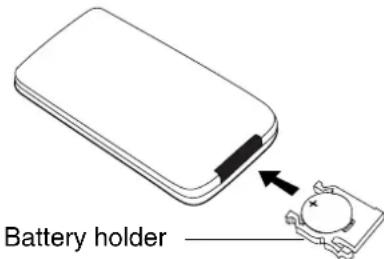
Inserting the holder with the battery into the remote control
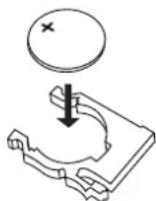
Battery with the plus side up
5. INSTALLATION AND WIRING
Do not attempt to install or service your player yourself. Installation and servicing require experience in electronic equipment and automotive accessories. If you do not have the knowledge or experience this installation may be dangerous and could expose you to the risk of electric shock or other hazards.
Read these instructions and precautions carefully. Improper installation can damage the monitor and the vehicle.
What is included in the box
In addition to this manual, the box contains:
- 1 Player
• 1 IR remote control with battery
• 1 Audio/video RCA cable - 6 ST4.2 x 16/ 10 ST4.2 x 16/ 6 ST4.2 x 16 screws
• 4 CM 4 x 10/8 CM 4 x 8/4 CM 4 x 8 screws
• 1 Metal mounting plate - 1 Rubber gasket
- 1 Warranty card
• 2 Earphones and 4 AAA batteries (OHM1588VD/OHM1088VD)
• 1 Earphone and 2 AAA batteries (OHM888VD)
Note:
Use only the contents of this package to install and use the DVD player. Using accessories not provided with this player may damage the player.
Tools and additional components
You will need a Phillips-head screwdriver when mounting the player in the vehicle.
Before you begin
- Verify that the vehicle electrical components function, including: power windows, power door locks, air conditioning, lights, etc.
- Identify the polarity of the dome light circuit and set the switch on the bottom of the overhead monitor housing.
- Test fit the location of the overhead monitor system to ensure it will not interfere with the operation of the vehicle.
- If applicable, verify that the monitor, when mounted, will not interfere with the operation of the sun roof.
- Carefully mark the location with masking tape.
- Lower the vehicle's headliner down to see if a roof support beam is available to screw the mounting bracket to. If a support beam is not available, use a 3/4-inch piece of plywood cut to the appropriate size. Attach the plywood to the roof of the vehicle using silicone. Allow for adequate drying time.
- Determine the location of any additional audio/video sources.
- Disconnect the negative battery terminal before making any wiring connections.
CAUTION
Do not open the case. There are no serviceable parts inside. If you drop anything into the unit during installation, consult with your Clarion Dealer or an authorized Clarion service center.
Mounting and wiring precautions
The OHM888VD / OHM1088VD / OHM1588VD should be mounted in the ceiling of the vehicle. The front panel controls should be easily accessible from the rear seat. In addition:
• This unit is exclusively for vehicles with a negative ground, 12V power supply.
- This unit may be in installed with additional mobile audio components, such as a digital camera.
• Always use great care when attaching anything to a vehicle! Check clearances on both sides of the planned installation before drilling any holes or installing any screws.
- A good chassis ground connection is critical to minimize resistance and avoid noise problems. Use the shortest wire possible and securely connect it to the car chassis and the source unit ground.
- When routing RCA cables, keep them away from the power cables and output speaker wires, engine, exhaust system, etc. Heat may damage wires.
- If the fuse should blow, make sure that all connections are correct, the cables have not caused a short circuit, and no wires are damaged. Then replace the fuse with a new fuse of the same amperage value as the original fuse. When replacing a fuse, never let the battery side touch any metal part or any other wire.
- Never let disconnected cables or terminals touch metal on the car or any other conducting material.
- To prevent short circuits, do not remove the caps from unused terminals or from the ends of unconnected cables.
• Insulate unconnected wires with vinyl tape or other similar material.
WARNING!
To prevent short circuits during installation, disconnect the vehicle's negative (-) battery lead before making any power connections.
Installation procedure
The OHM888VD / OHM1088VD / OHM1588VD replace the car's dome light. This section provides basic tips and techniques to aid the installation. These are not vehicle specific, but should be used as guidelines for performing the installation.
Set the polarity switch
- Determine the polarity of the power system in the car. This information should be on a vehicle-specific diagram.
- Locate the polarity switch on the back of the player (the side that will be attached to the ceiling).
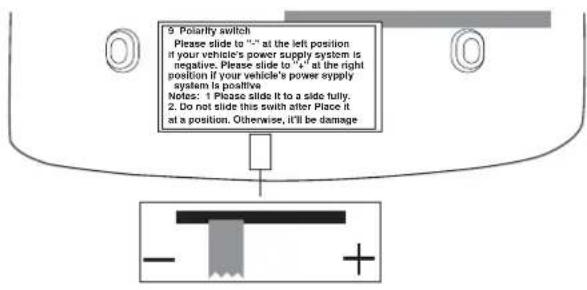
Back of the player
- If the vehicle's power supply requires negative polarity, slide this switch to the negative (-) position. Otherwise, slide this switch to the positive (+) position.
CAUTION
Make sure the switch is fully to one side or the other. Do not attempt to configure this switch once the player is in position.
- Cut a one-inch hole in the headliner along the backside of the ceiling bracket for the cables to pass through.
Install the ceiling bracket and cables
-
Disconnect and remove the original dome light.
-
Screw the metal mounting plate to the beam or plywood using the six ST4.2 x 16 screws.
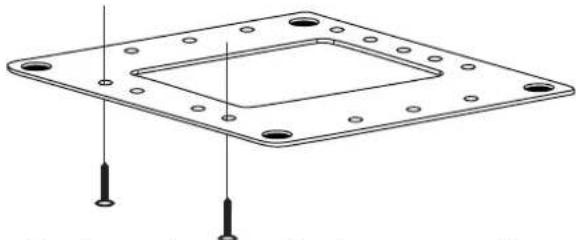
natural_image
Technical line drawing of a square flange with bolt holes and two mounting holes, shown without any text or symbols.Metal mounting plate showing screw positions
Note:
Do not cover the original dome light opening.
Connect cables
-
Pull out the original dome light's power wire and signal/power cable through the original dome light opening.
-
Place the rubber gasket on the player.
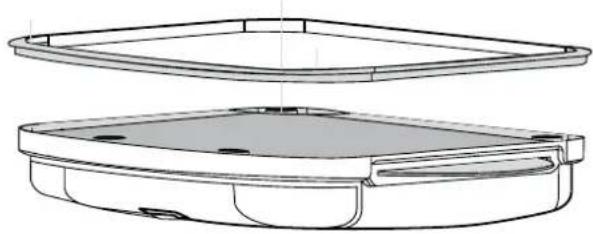
natural_image
Technical line drawing of a dual-tiered plastic enclosure or tray (no text or symbols)Placing the rubber gasket on the player
-
Route the cables through the hole to the location of any audio/video sources.
-
Identify the dome light wires in the vehicle and connect them to the corresponding
dome light wire on the overhead monitor system.
-
Plug in any audio/video source cables.
-
Plug in the power harness into the overhead monitor system in the following order: ground wire, battery wire, ACC wire and door wire.
Note:
Do not forget to connect the red ACC wire to the ignition switch.
If you do not connect this wire, the battery charge may drain off prematurely.
Install the monitor
- Carefully hold the overhead monitor up to the metal mounting plate.
- Screw in the four CM 4 x 8 screws making sure the wires are not in the way.
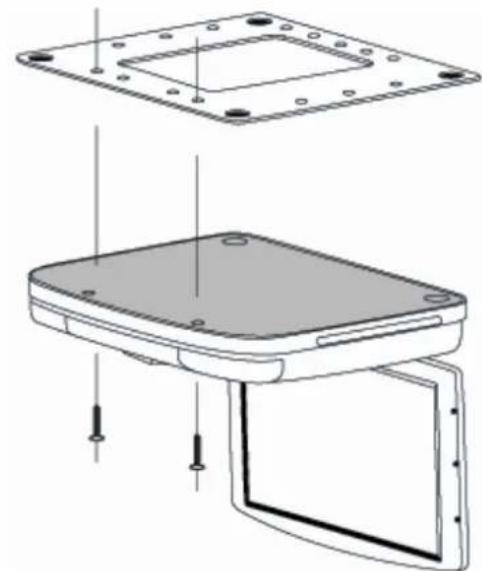
natural_image
Technical line drawing of a mechanical assembly with mounting holes and internal components (no text or symbols)Mounting the player
- Reconnect the battery.
- Check the car's brake lights, blinkers, wiper, etc. to ensure they are working properly.
Wiring diagram
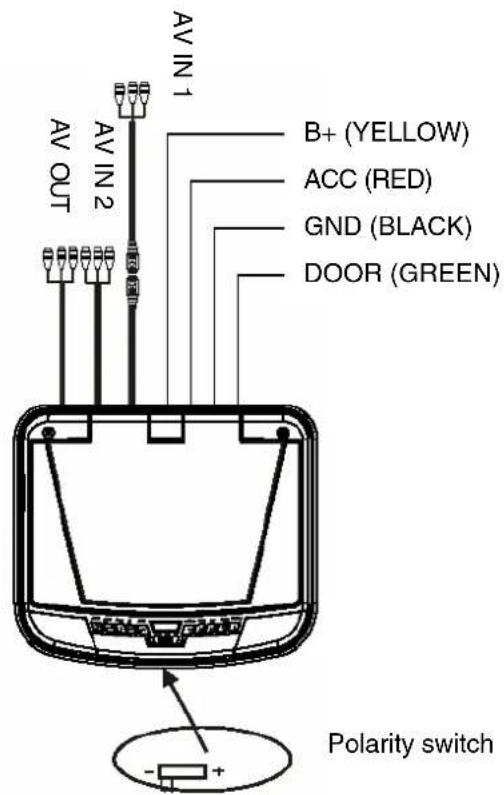
Top of the unit showing cable connections
6. SETTING PREFERENCES
Accessing the on-screen display menus
- Press SETUP on the remote to access the OSD menus. The main Display menu appears.
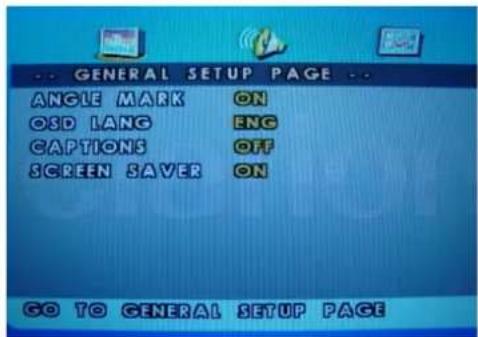
General setup page
- Press ◀ (left arrow) and ▶ (right arrow) to alternate among three option pages: GENERAL SETUP PAGE, SPEAKER SETUP PAGE and PREFERENCE PAGE.
Note:
To access the PREFERENCE PAGE the DVD slot must be empty. Eject any DVD or CD in the drive.
- Press ENTER to select the option you wish to change.
- Press ENTER to confirm your selection.
- Press SETUP to exit the on-screen display menus.
Example: Setting parental control
- Press SETUP, then press ▶ (right arrow) to display the PREFERENCE PAGE.
The system displays the OSD menu.
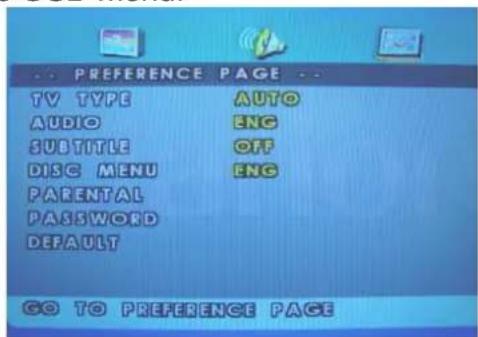
Preference page
- Press ▼ five times to select Parental.
- Press ▶ to increase and ◀ to decrease the level of parental control between "1" and "8" with "8" providing the most control.
- Press ENTER to save this preference.
The player prompts you for the password.
- Type the password (refer to page 30) and press ENTER again to confirm the
password.
- Press SETUP to exit the on-screen display menus.
General setup page
This page controls standard DVD options.
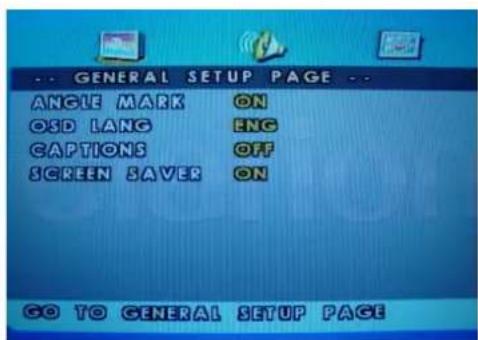
General setup page
Setting Value and Description
ANGLE MARK Turns multiple-angle feature on and off. Multiple angles must be pre-recorded on the DVD. To determine if the DVD supports multiple angles, look for the multiple-angle symbol on the disc jacket (B).
ON Enables the use the ANGLE button to select a different angle for the current scene.
OFF Disables the ANGLE button.
OSD LANG Selects the language for the on-screen display menus.
ENGLISH, FRENCH, SPANISH, ITALIAN
CAPTIONS Turns captions on and off.
ON Enables captions.
OFF Disables captions.
SCREEN Turns the screen saving feature on and off.
SAVER ON Enables the screen saver feature.
OFF Disables the screen saver feature.
Speaker setup page
This page controls speaker options.
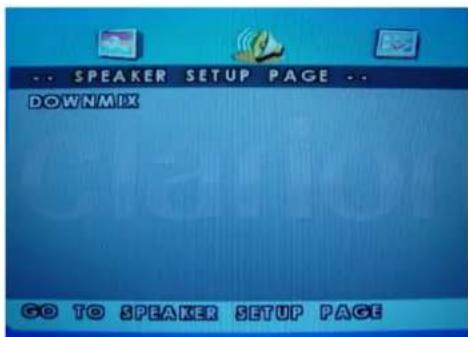
Speaker page
DOWNMIX Applies to Dolby digital sound. You cannot change this option, which is permanently set to output stereo signals, that is the player outputs audio to both the left and right channels of the output RCA jacks.
Preference page
This page controls system-wide preferences.
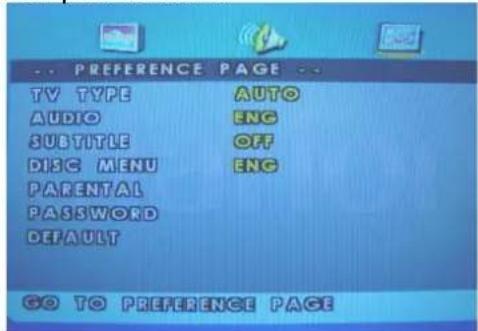
Preference page
TV TYPE Selects the TV system. Changing this option also changes the RCA AV output.
PAL For Europe and Asia AUTO
NTSC For the United States
AUDIO Selects the audible language for the DVD audio track.
ENGLISH, FRENCH, SPANISH, GERMAN, RUSSIAN
SUBTITLE Selects the language for subtitles.
ENGLISH, FRENCH, SPANISH, GERMAN, RUSSIAN
OFF Turns subtitles off.
DISC MENU Selects the language to display the contents of the current disc.
ENGLISH, FRENCH, SPANISH, GERMAN, RUSSIAN
PARENTAL Restricts movie viewing to appropriate ages.
1 (KID SAF) Material is safe for children.
2 (G) Material is safe for general audiences.
3 (PG) Parental guidance suggested.
4 (PG 13) Some material unsuitable for children under 13.
5 (PGR) Some material unsuitable for children under 17.
6 (R) Some material unsuitable for children under 17.
7 (NC 17) Not recommended viewing for children under 17.
8 (ADULT) Only for adults due to the graphic content. This is the default setting.
Note:
After setting parental control, the player prompts you for the system password.
PASSWORD Lets you change the four-digit password using the number keys on the remote. The default password is 3308, but it no longer works once you change the password.
DEFAULT Resets all values to their factory defaults.
7. TROUBLESHOOTING
If operations freeze, the screen goes blank, or the player otherwise does not function properly, try turning it off and back on again. If it still does not respond, press the reset switch on the front panel.
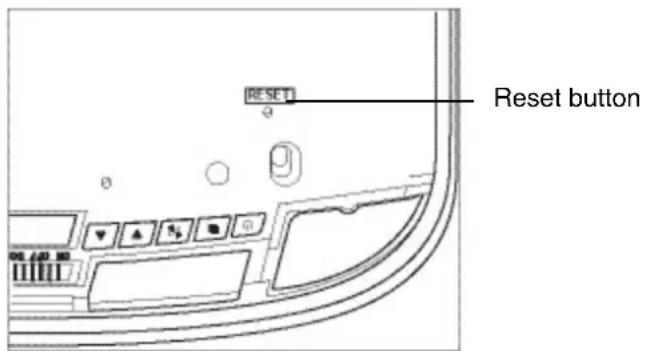
Player with the monitor open
Player does not turn on
- The car's ignition may be off. Turn on the ignition to the ACC (Accessory) position.
• The player may not be on. Turn the player's power on. - There may be condensation in the player. Wait for about one hour or until the condensation evaporates.
- A fuse may be blown. Check the fuses at the end of the monitor installation cables and on the vehicle.
- The player may be disconnected. Check all connections. See the installation instructions.
- The remote control battery may require changing.
- Dirt may be covering the remote's infrared lens. Clean the lens with a soft damp cloth.
Player is on but won't play the disc
- The disc may be inserted incorrectly. Reinsert the disc with the label side up (facing the ceiling of the car).
• The disc format may not be supported. The player supports these formats:

DVDs
12cm
Video
CDs
12cm
Audio
CDs
12cm
MP3
CDs
12cm
• The disc may be dirty or scratched. Clean or replace the disc.
The player suddenly stops working
- There is an error in the player. Turn the player off and on again. If it still doesn't respond, press the RESET button.
The player works erratically
- The remote control battery needs replacing.
- The IR window on the player or remote control is dirty. Clean the IR windows with a soft damp cloth.
• The connections are loose. Check and tighten all connections.
The picture occasionally skips
- The disc is dirty or scratched. Clean or replace the disc.
The picture is blurred
- You may be passing near a high voltage wire, transformer, aircraft or other source of electrical interference. The picture will improve when you move away from the source interference.
The picture is very dark
- The temperature in the car is very low. At low temperatures LCD screen display dark pictures. The picture will improve as the temperature rises.
- The brightness is set too high. Adjust it lower. Press the MENU button on the remote or on the player.
No sound can be heard from the IR wireless headphones
- The headphones are not turned on.
- The battery in the headphones is low. Replace the battery.
- An object is blocking the transmission of the infrared signal from the player to the headphones or the headphones are beyond the reach of the IR signal. The IR receiver on the headphones must be in direct line of sight of the IR transmitter on the player.
- Simultaneously usage of two overhead monitors in the same vehicle could cause distorted sound on your ear phones. We recommend using only one OHM in case of headphone usage.
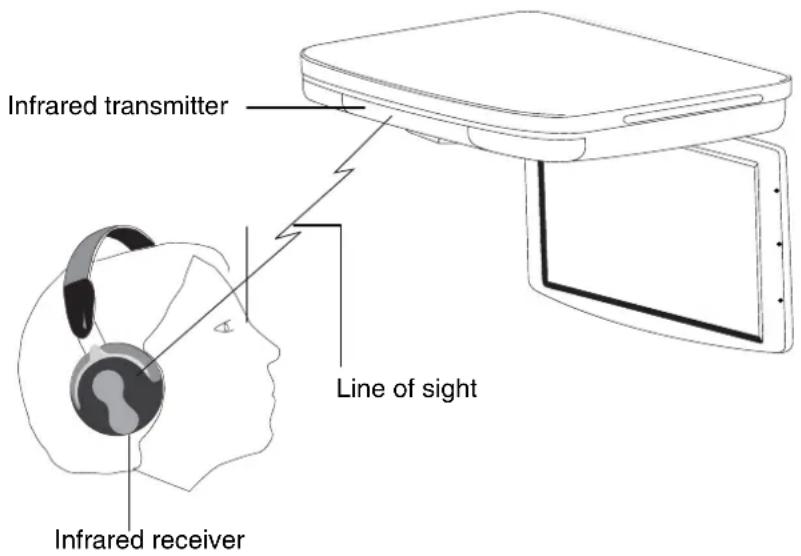
IR line of sight from the player to the headphones
8. GLOSSARY
Active matrix: A flat panel display technology that produces a brighter and sharper display and a broader viewing angle than passive matrix panels. Each pixel has its own thin film transistor (TFT) and is sometimes called a “TFT screen.”
Aspect ratio: The comparison of the width to the height of an object.
Audio/video (A/V) source: Any additional audio and/or video device that has a composite
RCA output, such as a game player, VCR, digital camera, etc.
CD: Compact Disc.
CD-R/RW: CD Read/Read and Write.
Display angle: The extent to which the LCD screen can be opened (150 degrees).
Dolby Digital: The marketing name for the audio compression technologies developed by Dolby Laboratories.
DVD: Digital Video Disc or Digital Versatile Disc.
DVD-R: DVD Read only.
DVD-RW: DVD Read and Write.
JPEG/JPG: Joint Pictures Expert Group, the committee that developed the standards for compressing graphics, especially photographs.
IR: infrared.
NTSC: National TV Standards Committee, the group that developed the television standards used in the United States.
LCD: Liquid Crystal Display, the technology used for laptop and other small computer monitors.
MP3: MPEG Audio Layer-3, a standard for sound compression without sacrificing quality.
OSD: on-screen display.
PAL: The primarily European standard for displaying analog television signals.
Pixel: Short for picture element, the smallest point on a graphic image or monitor.
Thin file transistor (TFT): The display technology in which thin films are deposited during the manufacturing process to create metallic contacts.
SRC: Source.
VCD: Video CD, the standard for storing video on a CD.
Viewing angle: Pre-recorded alternative angles for individual scenes.
WVGA: Wide Angle Video Array, the number of pixels in each direction that can be displayed on a monitor.
9. SPECIFICATIONS
| OHM888VD | OHM1088VD | ||
| Power supply (car battery) 12V DC (10V-16V) | |||
| Test voltage 14V, negative ground | |||
| Operating current <1.3A <1.5A | |||
| Current consumption <6mA | |||
| Max current consumption <1.8A <2A | |||
| Mechanism Manual open and close | |||
| Video system Auto, NTSC and PAL | |||
| Screen | 8" diagonal | 10.2" diagonal | 15.4" diagonal |
| Resolution | 800 x 480 | 1280x800 | |
| Display angle | Vertical adjustable up and down; maximum angle 150° | ||
| Viewing angle(up/down/left/right) | 45/65/65/65 | 10/30/40/40 | |
| Weight | 4.313 lbs (1.95 kg) | 4.959 lbs (2.25kg) | |
| Video signal | 1Vp-p, 75-Ohm load | ||
| Operating temperature | -5 ~ 55°C | ||
| Storage temperature | -20 ~ 70°C | ||
| Dome light | 2W | ||
Note:
For the sake of technical improvements, this technical data and the design of the equipment may change without prior notice.
Clarion Europa GmbH
Hessenring 19-21, D-64546 Moerfelden-Walldorf
All Rights Reserved. Copyright © 2008: Clarion Co., Ltd Printed in China / In China gedruckt / Отпечатано в Китае Impreso en China / Stampato in Cina / Imprimé en Chine
- Content
- FEATURES ....3
- PRECAUTIONS....5
- CONTROLS....7
- OPERATIONS....12
- INSTALLATION AND WIRING ....23
- SETTING PREFERENCES ......28
- TROUBLESHOOTING ....31
- GLOSSARY....33
- SPECIFICATIONS....34
- WARNING
- Flexibility
- Reliability
- Expandability
- Image features
- DVD video features
- Other features
- PRECAUTIONS
- Operating
- General
- Maintenance
- Installation
- Monitor closed
- Quick reference to controls with monitor closed
- Note:
- DVD drive slot
- Quick reference to controls with monitor open
- Quick reference to remote control
- OPERATIONS
- Opening the monitor
- Closing the monitor
- Handling discs
- Turning the player on
- Turning the player off
- Changing the image aspect ratio
- Playing a disc (DVD or CD)
- Using the remote control
- Controlling playback
- Using headphones
- Installing batteries in the headphones
- Setting the volume
- Direct sunlight and temperature extremes
- Playing DVDs
- Accessing the root menu
- Status information
- Changing languages
- Using subtitles
- Repeating DVD chapters and titles
- Repeating favorite sections
- Changing viewing angle
- Zooming in and out
- Adjusting picture quality
- Playing audio CDs
- Displaying CD information
- Repeating CD tracks
- Playing MP3s
- MP3 icons
- Procedure
- MP3 controls
- Repeating MP3s
- Care and maintenance
- Cleaning the monitor
- Servicing the monitor
- CAUTION!
- Cleaning the remote control
- Cleaning discs
- Changing the battery in the remote control
- Precautions
- INSTALLATION AND WIRING
- What is included in the box
- Tools and additional components
- Before you begin
- CAUTION
- Mounting and wiring precautions
- WARNING!
- Installation procedure
- Set the polarity switch
- Install the ceiling bracket and cables
- Connect cables
- Install the monitor
- Wiring diagram
- SETTING PREFERENCES
- Accessing the on-screen display menus
- Example: Setting parental control
- General setup page
- Setting Value and Description
- ENGLISH, FRENCH, SPANISH, ITALIAN
- Speaker setup page
- Preference page
- TROUBLESHOOTING
- Player does not turn on
- Player is on but won't play the disc
- The player suddenly stops working
- The player works erratically
- The picture occasionally skips
- The picture is blurred
- The picture is very dark
- No sound can be heard from the IR wireless headphones
- GLOSSARY
- SPECIFICATIONS
- Clarion Europa GmbH
Brand : CLARION
Model : OHM888VD
Category : Uncategorized