
Vortex Mini Flanger - Guitar effect TC ELECTRONIC - Free user manual and instructions
Find the device manual for free Vortex Mini Flanger TC ELECTRONIC in PDF.


| Product Type | Guitar Flanger Effect Pedal |
| Brand | TC Electronic |
| Model | Vortex Mini Flanger |
| Bypass Mode | True Bypass with Analog Dry-Through |
| Controls | SPEED, DEPTH, FEEDBACK |
| Input Connector | 1/4" mono TS (unbalanced) |
| Output Connector | 1/4" mono TS (unbalanced) |
| Input Impedance | 1 MΩ |
| Output Impedance | 100 Ω |
| Power Supply | 9V DC, centre negative, >100 mA (not included) |
| Battery Option | None |
| Dimensions (W x D x H) | 48 x 48 x 93 mm (1.9 x 1.9 x 3.7 inches) |
| Weight | Approx. 0.2 kg |
| USB Port | Mini-B for TonePrint editing and firmware updates |
| Signal Circuitry | Analog dry-through (wet signal digitized) |
| Special Features | TonePrint support, two flanger modes (Classic and Tape), True Bypass |
| Chassis Material | Metal |
| Cleaning Instructions | Clean only with a dry cloth |
| Safety Warnings | Do not expose to rain or moisture; service by qualified personnel only |
| Compliance | FCC Class B, Canadian ICES-003 |
Frequently Asked Questions - Vortex Mini Flanger TC ELECTRONIC
User questions about Vortex Mini Flanger TC ELECTRONIC
0 question about this device. Answer the ones you know or ask your own.
Ask a new question about this device
Download the instructions for your Guitar effect in PDF format for free! Find your manual Vortex Mini Flanger - TC ELECTRONIC and take your electronic device back in hand. On this page are published all the documents necessary for the use of your device. Vortex Mini Flanger by TC ELECTRONIC.
USER MANUAL Vortex Mini Flanger TC ELECTRONIC
Vortex Mini Flanger
Manual - 2014-05-26
Table of contents
Important safety instructions 3
Before you begin 6
About this manual 7
Getting support 7
About this pedal 8
Vortex Mini Flanger 9
True Bypass 9
TonePrint 10
What are TonePrints? 11
Transferring TonePrints to your pedal
using the TonePrint app 11
Editing TonePrints with TonePrint Editor 12
Setup 13
Ready... 14
Set... 14
Play! 14
Inputs, outputs and controls 15
Power / Switching the effect on and off 16
Footswitch 16
Audio in and out 16
Effect controls 17
Maintenance 18
Updating the firmware 19
Frequently asked questions 20
Frequently asked questions about
TonePrint pedals 21
Links 22
TonePrint resources 23
Support resources 23
TC Electronic on... 23
Technical specifications 24
Important safety instructions
Vortex Mini Flanger - Manual (2014-05-26)
- Read these instructions.
- Keep these instructions.
- Heed all warnings.
- Follow all instructions.
- Do not use this apparatus near water.
- Clean only with a dry cloth.
- Do not block any ventilation openings. Install in accordance with the manufacturer's instructions.
- Do not install near any heat sources such as radiators, heat registers, stoves, or other apparatus (including amplifiers) that produce heat.
- Do not defeat the safety purpose of the polarized or grounding-type plug. A polarized plug has two blades with one wider than the other. A grounding-type plug has two blades and a third grounding prong. The wide blade or the third prong is provided for your safety. If the provided plug does not fit into your outlet, consult an electrician for replacement of the obsolete outlet.
- Protect the power cord from being walked on or pinched, particularly at plugs, convenience receptacles, and the point where they exit from the apparatus.
- Only use attachments/accessories specified by the manufacturer.
- Use only with a cart, stand, tripod, bracket, or table specified by the manufacturer, or sold with the apparatus. When a cart is used, use caution when moving the cart/apparatus combination to avoid injury from tip-over.
-
Unplug this apparatus during lightning storms or when unused for long periods of time.
-
Refer all servicing to qualified service personnel. Servicing is required when the apparatus has been damaged in any way, such as power-supply cord or plug is damaged, liquid has been spilled or objects have fallen into the apparatus, the apparatus has been exposed to rain or moisture, does not operate normally, or has been dropped.
Caution
You are cautioned that any change or modifications not expressly approved in this manual could void your authority to operate this equipment.
Service
All service must be performed by qualified personnel.
Warning
To reduce the risk of fire or electric shock, do not expose this apparatus to rain or moisture and objects filled with liquids, such as vases, should not be placed on this apparatus.
Do not install this device in a confined space.
EMC/EMI
Electromagnetic compatibility/
Electromagnetic interference
This equipment has been tested and found to comply with the limits for a Class B digital device, pursuant to part 15 of the FCC rules.
These limits are designed to provide reasonable protection against harmful interference in residential installations. This equipment generates, uses and can radiate radio frequency energy and, if not installed and used in accordance with the instructions, may cause harmful interference to radio communications. However, there is no guarantee that interference will not occur in a particular installation.
If this equipment does cause harmful interference to radio or television reception, which can be determined by turning the equipment off and on, the user is encouraged to try to correct the interference by one or more of the following measures:
- Reorient or relocate the receiving antenna.
- Increase the separation between the equipment and receiver.
- Connect the equipment into an outlet on a circuit different from that to which the receiver is connected.
- Consult the dealer or an experienced radio / TV technician for help.

tc electronic
Important safety instructions
For customers in Canada
This Class B digital apparatus complies with Canadian ICES-003.
Explanation of graphic symbols

The lightning bolt triangle is used to alert the user to the presence of uninsulated “dangerous voltages” within the unit’s chassis that may be of sufficient magnitude to constitute a risk of electric shock to humans.

The exclamation point triangle is used to alert the user to presence of important operating and service instructions in the literature accompanying the product.
Before you begin

tc electronic
Before you begin
About this manual
This manual will help you learn understanding and operating your TC product.
To get the most from this manual, please read it from start to finish, or you may miss important information.
This manual is only available as a PDF download from the TC Electronic website.
Of course, you can print this manual, but we encourage you to use the PDF version, which has both internal and external hyperlinks. For example, clicking the logo in the upper left corner of each page will take you back to the table of contents.
To download the most current version of this manual, visit
tcelectronic.com/support/manuals/
Getting support
If you still have questions about the product after reading this manual, please get in touch with TC Support:
tcelectronic.com/support/
Enjoy your TC product!
About this pedal
Thank you for spending your hard-earned money on this TC Electronic product! We have done our best to ensure that it will serve you for many years to come, and we hope that you will enjoy using it.
Vortex Mini Flanger
An endless list of immortal artists have used a flange effect to create magic. From The Beatles and Pink Floyd to Van Halen, Metallica and the Red Hot Chili Peppers: With Vortex Mini Flanger, all those sounds are yours for the rocking.
From subtle "woosh" to 747 landing
Vortex Mini Flanger offers two modes:
- A classic pedal flanger sound capable of giving you everything from subtle chorus tones to classic Van Halen jet flanger swoosh and
- tape mode, which gives you the psychedelic sound of the original flange tones of Jimi Hendrix and Led Zeppelin. And it does fantastic "through zero" sounds, too!
Famous flange flavors
Vortex takes the great pioneers of the Sixties and Seventies and adds a set of deep controls, allowing you to sculpt and time your flange sounds with great precision. Essential for quickly dialing through the rich history of flange pioneers such as Hendrix and Van Halen and sculpting your own twisted sounds.
True Bypass
Here at TC, we have a simple philosophy: When you are using one of our products, you should hear something great – and if you don't, you shouldn't hear it at all. This is why this pedal sports True Bypass. When it is bypassed, it is really off and has zero influence on your tone, resulting in optimum clarity and zero loss of high-end.
You will also be delighted to hear (literally) that this TC Electronic effect pedal will let your dry, unprocessed sound pass without ever converting it to digital – keeping your original tone pure and without any latency. This feature is called analog dry-through.
TonePrint
This TC Electronic product supports TonePrints. To learn more about TonePrints, go to tcelectronic.com/toneprint/
What are TonePrints?
When you look at your TC Electronic effect pedal, you'll only see a few knobs. Actually, for some pedals, it's just one knob. So – one knob, one function, right?
Actually, there's a lot more to it than meets the eye.
Star-tweaked signature sounds
When TC Electronic builds an effect pedal, the relationship between its controls and many parameters "under the hood" are defined by developers, musicians and product specialists who live and breathe sound. This gives you an excellent starting point: a great-sounding pedal with well-balanced controls.
But wouldn't it be cool to have world-famous guitar players – guys like Paul Gilbert, Guthrie Govan, John Petrucci or Steve Vai – virtually rewire your reverb pedal, defining what should happen “behind the scenes”?
And how about doing this yourself?
This is exactly what TonePrint allows you to do.
TC Electronic is working with top guitar players who explore a pedal's hidden tonal potential, redefining the controls and creating their personal TonePrints. And we are making these custom TonePrints available to you. Uploading them to your pedal is really easy (see "Transferring TonePrints to your pedal using the TonePrint app") – and with the amazing TonePrint Editor, you can even create your own signature pedal, tweaked specifically to your liking.
You can change the TonePrint in your pedal as often as you like, and the best part:
It's totally free.
Transferring TonePrints to your pedal using the TonePrint app
Being able to virtually rewire your TC Electronic effect pedal wouldn't be much use if you needed a lot of extra equipment to do it. This is why we created the TonePrint app. The TonePrint app is free software for popular smartphones that allows you to "beam" new TonePrints right into your effect pedal whenever and wherever you feel like it.
Obtaining the TonePrint app
If you own an iPhone, you can download the TonePrint app from Apple's App Store.
If you own an Android phone, you will find the TonePrint app on Google Play.
Once you have the app, no additional downloads or in-app purchases are required. You can access all available TonePrints from within the app, and all TonePrints are free.
Transferring TonePrints to your pedal – step by step
- Launch the TonePrint app on your smartphone.
- Find the TonePrint you want to use. You can browse TonePrints by Artist or Product (i.e., pedal type). You will also find Featured TonePrints.
- Plug your guitar or bass into your TonePrint pedal.
- Turn your TonePrint pedal on.
- Turn up the volume on your instrument and set the pickup selector to one pickup.
- Hold the speaker of your smartphone next to the chosen pickup and touch "Beam to pedal".
Editing TonePrints with TonePrint Editor
The TonePrint app allows you to use TonePrints created by your favorite guitar and bass players. But this is only the start. Using TC's TonePrint Editor, you can create your very own signature pedal sounds.
TonePrint Editor features
- Use TonePrint Editor to build your own custom sounds.
- Enjoy complete control over all effect parameters and effect behavior – it's your vision, your sound.
- Customize knob function and knob range to suit your needs and sounds.
- Audition your sonic creations in real-time live – make changes on the fly and listen to results immediately.
- Works with both PC and Mac.
Last but not least...
- TonePrint Editor is absolutely free!
Obtaining TonePrint Editor
If you want to use TonePrint Editor for your Windows or OS X computer, download it from
tcelectronic.com/toneprint-editor/
If you want to use TonePrint Editor on your Apple iPad, download it from Apple's App Store.
Please note that version 2.0 or higher of the TonePrint Editor is required for working with TC Electronic Mini pedals. Version 2.0 has a Library function that allows you to access and use Tone-Prints even without an Internet connection.
Obtaining the TonePrint Editor manual Download the TonePrint Editor manual from
tcelectronic.com/toneprint-editor/support/
If you open the manual for TonePrint Editor in Adobe Reader, you can click on interface sections to jump directly to the sections of the manual you are interested in.
Setup
Ready...
Your TC Electronic effect pedal box should contain the following items:
- Your TC Electronic effect pedal
- 2 rubber feet for "non-velcro" pedalboard mounting
- 1 TC Electronic sticker
- 1 leaflet about TC's guitar FX product range
Inspect all items for signs of transit damage. In the unlikely event of transit damage, inform the carrier and supplier.
If damage has occurred, keep all packaging, as it can be used as evidence of excessive handling force.
Set...
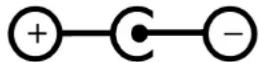
- Connect a 9 V power supply with the following symbol to the DC input socket of your TC Electronic effect pedal.
This product has no battery compartment. A power supply is required for operating this product.
This product does not come with a power supply.
- Plug the power supply into a power outlet.
- Connect your instrument to the in jack on the right side of the pedal using a 14 " jack cable.
- Connect the out jack on the left side of the pedal to your amplifier using a 14 " jack cable.
Play!
Inputs, outputs and controls
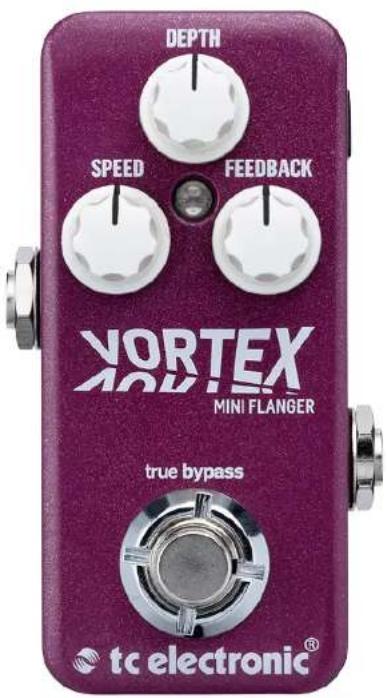
Vortex Mini Flanger
Power / Switching the effect on and off
Power input
To power up your pedal, connect a power supply to its power input socket.
The power input socket of your TC Electronic effect pedal is a standard 5.5 / 2.1 mm DC plug (centre = negative).
Your TC Electronic effect pedal requires a 9 V power supply providing 100 mA or more (not supplied).
To minimize hum, use a power supply with isolated outputs.
Footswitch
- To turn the effect on, tap the footswitch.
- To turn the effect off, tap the footswitch again.
Audio in and out
Audio input
The audio input on the right side of this pedal is a standard 14 " jack (mono/TS).
- Connect your guitar to the audio input on the right side of your pedal using a regular 14 " mono cable.
Audio output
The audio output on the left side of this pedal is a standard 14 " jack (mono/TS).
- Connect the audio output of your pedal to the next device in the signal chain using a regular 14 " mono cable.
USB port
Use the standard Mini-B USB port on your TC Electronic effect pedal to connect your pedal to a computer. This will allow you to load TonePrints into the pedal or create your own TonePrint using TC's TonePrint Editor. For more information, see "TonePrint".
If there should be firmware updates for this pedal, they can also be installed using the USB port – see "Updating the firmware".
Effect controls
Please note that the knob assignments on your TC Electronic effect pedal are the default assignments. Using the TonePrint Editor, you can rewire all knobs so they control one or several parameters of your choice. For more information, see the TonePrint Editor manual.
SPEED knob – Flanger speed control
Use the SPEED knob to control the speed of the flanger effect - from slow smooth "Hi-Fi" to much more significant "Leslie" types at high speeds.
DEPTH knob - Depth control
Use the DEPTH knob to set the intensity of the modulation effect. The more you turn the knob clock-wise, the more “out of tune” the modulated part of the signal will be.
FEEDBACK knob – Feedback control
Use the FEEDBACK knob to control the amount of feedback of the short modulated delay that generates the flanging effect.
- Turn the knob clockwise to get positive feedback. This is a more traditional, studio-type feedback.
- Turn the knob counter-clockwise to get negative feedback. Setting the knob to a negative value gives more extreme and "tube-like" sounds.
- The middle position is neutral, generating no feedback.
Please note that very high settings might introduce internal feedback, resulting in a squealing noise that in most cases is unwanted in flanging effects.
Maintenance
Updating the firmware
TC may provide updates for the built-in software of your pedal, the firmware. Updating your TC pedal's firmware requires...
- a computer running Microsoft Windows or OS X with a standard USB interface
– the specified DC power supply for your pedal.
Preparing the firmware update
- Download the newest firmware from the "Support" page for your TC pedal. There are up-daters
- for Microsoft Windows (these are ZIP archives containing the firmware installer) and
- for OS X (these are disk image files containing the firmware installer).
- Unplug all cables (including the power supply) from your TC pedal.
- Connect the pedal to your computer using a USB cable.
- Press and hold the footswitch on your TC pedal. If your TC pedal has more than one footswitch, press and hold the leftmost foot-switch.
– Insert the DC power supply plug. - The LED on your pedal should turn green. If your TC pedal has more than one LED, the leftmost LED should turn green. This indicates that the pedal is ready to receive the software update.
- Release the footswitch.
- Your TC pedal will now be recognized as an updatable device.
Applying the firmware update
- Quit all MIDI-related applications (e.g. your DAW) on your computer and launch the firmware updater you have downloaded in step 1.
- In the firmware updater app, select your TC pedal from the drop-down list under the "STEP 1" heading.
- When the "Update" button under the "STEP 2" heading turns green, click it.
The updated firmware will now be transferred to your TC pedal. Wait for the progress bar to reach 100%. When the update procedure is complete, the pedal will automatically restart.
Frequently asked questions
Vortex Mini Flanger - Manual (2014-05-26)

tc electronic
Frequently asked questions
Frequently asked questions about TonePrint pedals
"Are TonePrint pedals analog or digital?"
The dry signal of your guitar passes straight through this effect pedal and is in no way digitized. The “wet” signal is just added.
"Do the TonePrint pedals have balanced or unbalanced inputs/outputs?"
TonePrint pedals have unbalanced inputs and outputs. Use cables with TS jacks (i.e., standard instrument cables).
"Is it possible to run this TonePrint pedal in the effects loop of a tube amp?"
Yes. All TonePrint pedals have a very wide gain range and are designed to run at both instrument and line level. There are a few amps which are capable of running much hotter than regular +4 dBu line-level signals because of the way their effect loops are designed. With these amps, it might be possible to get the input to clip. But for 99 % of all amps, the TonePrint pedals will work just fine.
For additional information about your TC Electronic TonePrint effect pedal, please go to TC Electronic Support:
tcelectronic.com/support/
Links
tc electronic
TonePrint resources
- TonePrint: tcelectronic.com/toneprint/
- TonePrint products: tcelectronic.com/toneprint/toneprint-products/
- TonePrint app: tcelectronic.com/toneprint-app/
- TonePrint Editor: tcelectronic.com/toneprint-editor/
- TonePrint Editor manual: tcelectronic.com/toneprint-editor/support/
Support resources
- TC Electronic Support: tcelectronic.com/support/
- TC Electronic - product software: tcelectronic.com/support/software/
- TC Electronic – all product manuals: tcelectronic.com/support/manuals/
- TC Electronic user forum: forum.tcelectronic.com/
TC Electronic on...
- the web: tcelectronic.com/
- Facebook: facebook.com/tcelectronic
- Google Plus: plus.google.com/+tcelectronic/
- Twitter: twitter.com/tcelectronic
- YouTube: youtube.com/user/tcelectronic
Technical specifications
Vortex Mini Flanger - Manual (2014-05-26)
Please note that due to continuous development, the following specifications are subject to change without further notice.
| Bypass mode True Bypass | |
| Signal circuitry Analog dry-through | |
| Dimensions (width x depth x height) 48 x 48 x 93 mm – 1.9 x 1.9 x 3.7" | |
| Input connector Standard 1⁄4" jack – mono/TS | |
| Output connector Standard 1⁄4" jack – mono/TS | |
| Power input Standard 9 V DC, centre negative >100 mA (power supply not included) | |
| Battery option - | |
| Input impedance | 1 MΩ |
| Output impedance | 100 Ω |
| USB port | Mini USB connector for uploading and editing custom TonePrints and for software updates |
tc electronic Technical specifications
tc electronic
Vortex Mini Flanger - Manual (2014-05-26)
- Vortex Mini Flanger
- Table of contents
- Important safety instructions 3
- Before you begin 6
- About this pedal 8
- TonePrint 10
- Setup 13
- Inputs, outputs and controls 15
- Maintenance 18
- Frequently asked questions 20
- Links 22
- Technical specifications 24
- Important safety instructions
- Caution
- Service
- Warning
- EMC/EMI
- For customers in Canada
- Explanation of graphic symbols
- Before you begin
- tc electronic
- About this manual
- Getting support
- About this pedal
- From subtle "woosh" to 747 landing
- Famous flange flavors
- True Bypass
- TonePrint
- What are TonePrints?
- Star-tweaked signature sounds
- Transferring TonePrints to your pedal using the TonePrint app
- Obtaining the TonePrint app
- Transferring TonePrints to your pedal – step by step
- Editing TonePrints with TonePrint Editor
- TonePrint Editor features
- Obtaining TonePrint Editor
- Setup
- Ready...
- Set...
- Play!
- Inputs, outputs and controls
- Power / Switching the effect on and off
- Power input
- Footswitch
- Audio in and out
- Audio input
- Audio output
- USB port
- Effect controls
- SPEED knob – Flanger speed control
- DEPTH knob - Depth control
- FEEDBACK knob – Feedback control
- Maintenance
- Updating the firmware
- Preparing the firmware update
- Applying the firmware update
- Frequently asked questions
- Frequently asked questions about TonePrint pedals
- Links
- TonePrint resources
- Support resources
- TC Electronic on...
- Technical specifications
Brand : TC ELECTRONIC
Model : Vortex Mini Flanger
Category : Guitar effect