
OFC2000Ti - Heating appliance DIMPLEX - Free user manual and instructions
Find the device manual for free OFC2000Ti DIMPLEX in PDF.


| Product Type | Oil-filled radiator |
| Brand | Dimplex |
| Model | OFC2000Ti |
| Power | 2000 W |
| Voltage | 220-240 V ~ 50 Hz |
| Heating Elements | Oil-filled radiator with multiple fins |
| Thermostat | Adjustable thermostat with frost protection |
| Power Levels | 3 settings (low, medium, high) |
| Dimensions (W x D x H) | 600 x 250 x 400 mm |
| Weight | 12 kg |
| Safety Features | Overheat protection, tip-over switch |
| Cleaning | Wipe with a damp cloth, do not use abrasive cleaners |
| Maintenance | Check plug and cord regularly; no user-serviceable parts |
| Spare Parts Availability | Replacement thermostats, switches, and wheels available |
| Repairability Index | High (common components) |
| Energy Efficiency | Class C (typical for oil-filled heaters) |
| Noise Level | Silent (no fan) |
| Portability | Equipped with castors for easy movement |
| Color | White with grey accents |
| Certifications | CE, UKCA |
Frequently Asked Questions - OFC2000Ti DIMPLEX
User questions about OFC2000Ti DIMPLEX
0 question about this device. Answer the ones you know or ask your own.
Ask a new question about this device
Download the instructions for your Heating appliance in PDF format for free! Find your manual OFC2000Ti - DIMPLEX and take your electronic device back in hand. On this page are published all the documents necessary for the use of your device. OFC2000Ti by DIMPLEX.
USER MANUAL OFC2000Ti DIMPLEX
natural_image
Illustration of a white electric water heater with wheels and control panel (no text or symbols)OFC1500TI
OFC1000, OFC1500, OFC2000, OFC2500 OFC1000TI, OFC1500TI, OFC2000TI & OFC2500TI
08/35286/5 (UK)
Issue 5
natural_image
Circular diagram with radial lines and a central asterisk, no text or symbols present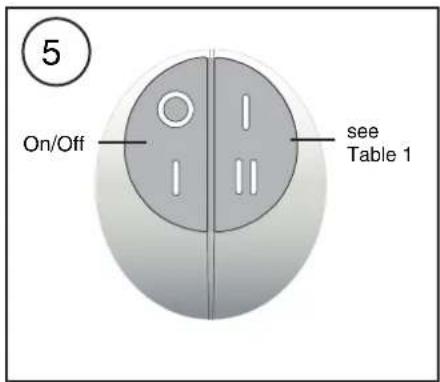
model Description
Watts
OFC1000 5 Fin, Thermostat, 2 Heat Settings, Neon 1000
OFC1000TI 5 Fin, Thermostat, 2 Heat Settings, Neon, Electronic Timer 1000
OFC1500 7 Fin, Thermostat, 2 Heat Settings, Neon 1500
OFC1500TI 7 Fin, Thermostat, 2 Heat Settings, Neon, Electronic Timer 1500
OFC2000 9 Fin, Thermostat, 2 Heat Settings, Neon 2000
OFC2000TI 9 Fin, Thermostat, 2 Heat Settings, Neon, Electronic Timer 2000
OFC2500 11 Fin, Thermostat, 2 Heat Settings, Neon 2500
OFC2500TI 11 Fin, Thermostat, 2 Heat Settings, Neon, Electronic Timer 2500
IMPORTANT SAFETY ADVICE

DO NOT COVER: The heater carries the warning symbol indicating that it must not be covered
DO NOT obstruct the air circulation around the radiator, for example with curtains or furniture, as this could cause overheating and a fire risk. See 'Positioning the Radiator'.
DO NOT use the heater in the immediate surroundings of a bath, a shower or a swimming pool.
DO NOT place the heater directly below a fixed socket outlet.
DO NOT USE the radiator if it has been dropped or damaged or the mains lead has been damaged, until it has been examined by a qualified engineer.
WARNING: In order to avoid a hazard due to inadvertent resetting of the thermal cut-out, this appliance must not be supplied through an external switching device, such as a timer, or connected to a circuit that is regularly switched on and off by the utility.
This appliance can be used by children aged from 8 years and above and persons with reduced physical, sensory or mental capabilities or lack of experience or knowledge if they have been given supervision or instruction concerning the use of the appliance in a safe way and understand the hazards involved. Children shall not play with the appliance. Cleaning and user maintenance shall not be made by children without supervision.
Children of less than 3 years should be kept away unless continuously supervised. Children aged from 3 years and less than 8 years shall only switch on/off the appliance provided that it has been placed or installed in its intended normal operating position and they have been given supervision or instruction concerning the use of the appliance in a safe way and understand the hazards involved. Children aged
from 3 years and less than 8 years shall not plug in, regulate and clean the appliance or perform user maintenance.
CAUTION: Some parts of this product can become very hot and cause burns. Particular attention has to be given where children and vunerable people are present.
Avoid use of an extension cord because the extension cord may overheat and cause risk of fire.
This heater is filled with a precise quantity of a special oil. Repairs requiring opening of the oil container are only to be made by the manufacturer or his service agent who should be contacted if there is an oil leak
When scrapping the heater, follow the regulations concerning the disposal of oil.
This radiator complies with stringent safety standards but to ensure efficient operation SURFACES OF THE RADIATOR WILL BECOME HOT AND CONTACT WITH THESE AREAS SHOULD BE AVOIDED, particularly between the fins.
The control panel area is designed to be cooler and allow safe operation of the controls at all times.
If young children, the aged or infirm are likely to be left in the vicinity of the heater, we advise that adequate precautions should be taken. We recommend that a guard be fitted to ensure contact with the heater is avoided and objects cannot be inserted into the product.
This radiator must be used on an AC \~ supply only and the voltage marked on the heater must correspond with the supply voltage.
DO ENSURE that the mains lead cannot be tripped over.
DO NOT operate the radiator with the mains lead overhanging the fins.
DO NOT USE THIS RADIATOR WHEN IT IS LYING ON ITS SIDES. If the radiator is tipped over, unplug it and allow it to cool before standing it back up.
If the mains lead is damaged, it must be replaced by the manufacturer or its service agent or a similarly qualified person in order to avoid a hazard.
General
The radiator is designed for operation on an AC electricity supply, and is suitable for use in domestic dwellings and similar indoor locations.
Always ensure that the appliance is stood on a firm, level base near to, but not directly beneath, a suitable fixed socket outlet.
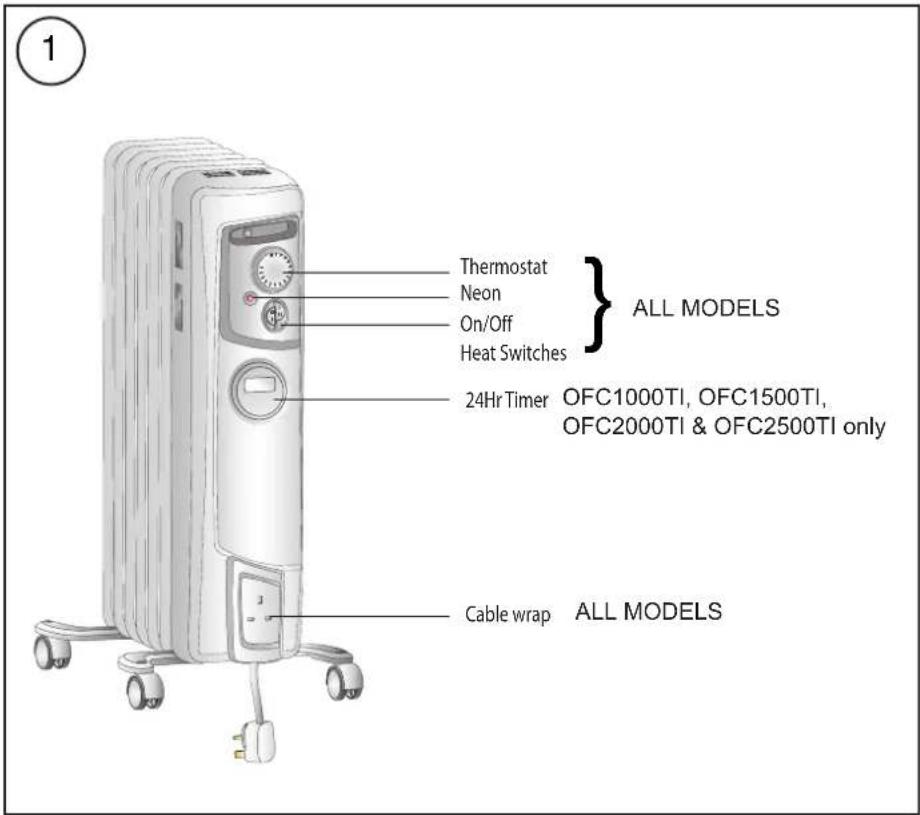
The radiator is fitted with castors and a handle for ease of movement. Selector switches provide a choice of heat output and an adjustable thermostat enables the room temperature to be controlled accordingly. It is supplied with a cord and plug ready for use.
The supply cord should be uncoiled before use (see 'Storage'). DO NOT pull the radiator along by the mains lead.
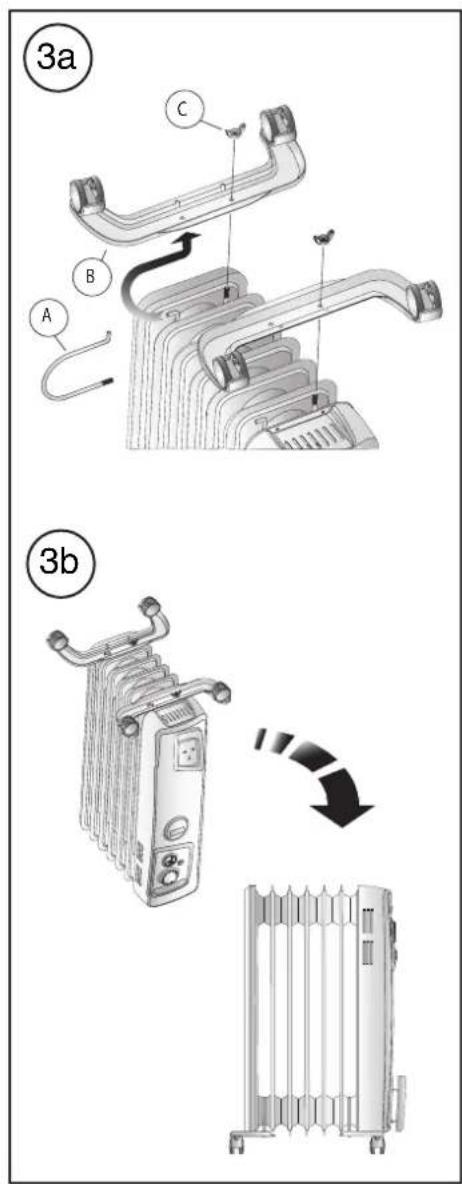
Important - The radiator must only be operated with the wheels and castors fitted and in the upright position as shown in Fig.1 and Fig.3B.
Warning – The heater complies with stringent safety standards but to ensure efficient operation SURFACES OF THE HEATER WILL BECOME HOT AND CONTACT WITH THESE AREAS SHOULD BE AVOIDED, particularly between the fins on the top and sides.
The control panel area is designed to be at a far lower temperature to allow the safe operation of the controls at any time.
Electrical
WARNING – THIS APPLIANCE MUST BE EARTHED
If the socket outlets in your home are not of the 13 amp BS1363 type they will not accept the plug connected to this heater, therefore cut off the plug. When cut off this plug can constitute a shock hazard if inserted into a socket outlet. It must therefore be disposed of safely.
Before wiring the appropriate plug please note that the wires in this mains lead are coloured in accordance with the following code:
GREEN/YELLOW : EARTH
BLUE : NEUTRAL
BROWN : LIVE
Connect the Green/Yellow wire to the terminal marked E or the earth symbol or coloured Green or Green/Yellow.
Connect the Brown wire to the terminal marked L or coloured Red.
Connect the Blue wire to the terminal marked N or coloured Black. DO NOT connect the Brown (Live) or the Blue (Neutral) wires to the Earth terminal of your 13 amp plug. If the terminals of the plug are unmarked or you are in any doubt, consult a qualified electrician.
Fitting the castors
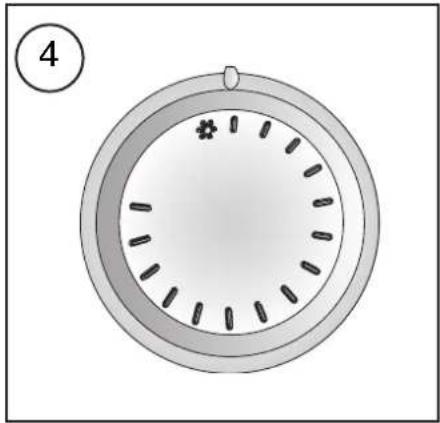
The castors can only be fitted between the outer fins (as shown in Fig. 2).
Turn the radiator upside down on a carpet or other soft surface to avoid damage
WARNING : THE RADIATOR IS HEAVY – ENSURE THAT IT IS SUPPORTED TO PREVENT IT FROM TOPPLING. Ask a second person to help with this if necessary. Locate the wire clamps and remove the winged nuts (see 'C') in Fig.3A. Insert the non threaded end of the wire clamp 'A' into one of the holes in the castor plate 'B' as shown in Fig.3A, at the same time tilting the opposite end of the plate slightly. Lower the castor plate and insert the threaded end of the clamp through the fins and over the boss and into the other hole in the castor plate. Place the winged nut 'C' on the thread and tighten it securely.
Repeat the process for the other castor bracket onto the last fin. Note: The 9 and 11 fin column radiator models - use straight castor brackets and must be fitted as shown in Fig.2.
Lift the radiator clear of the floor, then turn it back upright and stand it on its castors as shown in Fig.1 and Fig.3B. It is now ready for use.
Positioning the Heater
Select the position for the radiator ensuring there is clearance from any furniture and fittings of at least 300mm above the heater and 150mm each side. The radiator should only be operated on a flat stable surface.
Operation
IMPORTANT – Objects or clothing must not be placed on this heater. Before using the heater ensure that all warnings and instructions have been read carefully.
To bring the heater into use plug it in. Neon indicating lights located at the controls area will glow when the appliance is plugged into the mains.
Controls
Thermostat (see Fig.4)
The Thermostat (see Fig.4) controls the heat output according to the room temperature. This ensures that the heater will not produce heat unnecessarily when the room is warm. To set the temperature you require, turn the thermostat knob clockwise until the required setting is reached. Alternatively to heat a cold room quickly, turn the thermostat knob up fully. When the room has reached the desired temperature, turn the thermostat knob anti-clockwise until the thermostat just clicks off. The heater will now automatically operate at this temperature. The thermostat also has a frost protection setting marked “this setting is useful in areas such as garages, to prevent frost damage. If the thermostat is set to its minimum setting ‘the heater will cycle on and off to maintain a temperature of approximately 5° to help protect against frost.
Note - Should the heater fail to come on when the thermostat is at a low setting, this may be due to the room temperature being higher than the thermostat setting.
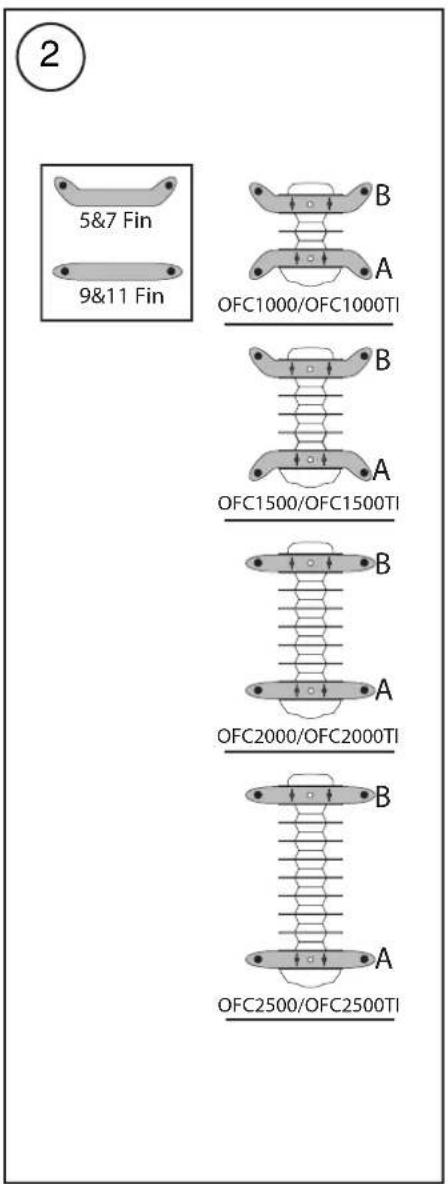
Heat Selector Switches (see Fig.5)
Selector switches located on the control panel provide a choice of heat output to suit varying conditions and for economy of operation.
Table 1
| Model | Switch ∥ | Switch ∥ |
| OFC1000/OFC1000TI 400W | 1000W | |
| OFC1500/OFC1500TI 700W | 1500W | |
| OFC2000/OFC2000TI 900W | 2000W | |
| OFC2500/OFC2500TI | 1100W | 2500W |
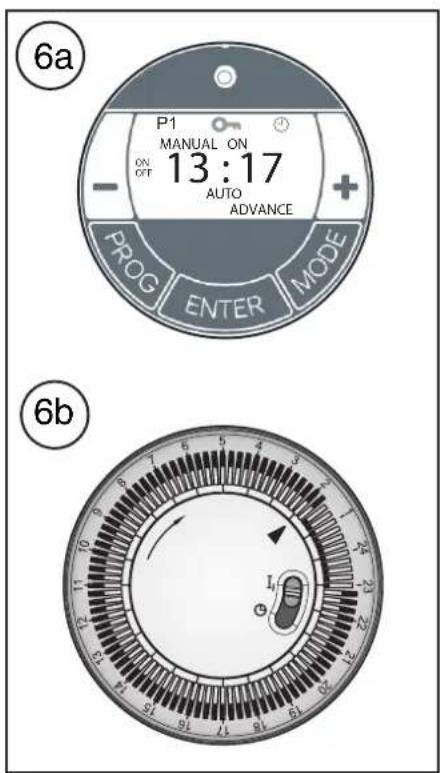
Digital Timer Operation (see Fig. 6a)
IMPORTANT: Remember to observe all safety warnings when operating the heater on auto setting, either attended or unattended.
The timer allows you to select 'AUTO' or 'MAN ON' by pressing the 'MODE' button until the required MODE appears at the bottom of the timer display.
'AUTO' MODE allows the heater to switch ON and OFF according to a set 24 Hour program period (see 'Setting Programs' section below).
'MAN ON' MODE allows power to the heater uninterrupted by the program settings.
Key Lock:
If 'ENTER' and 'MODE' are pressed within 1 second, the keys will be locked. The user will know the keys are locked as the lock symbol '0-' will be displayed on the top left hand corner of the screen. To unlock the keypad, press 'ENTER' and then 'MODE' within 1 second.
Initial Operation
For initial use, plug the heater into a regular household power point and turn the power on. The timer is now ready to be set up for use.
Setting Current Time
- Hold the 'PROGRAM' button until the clock symbol 🔒 appears on the screen. The user can now set the clock.
- The hour digit will flash. To adjust the hour use the '-' & '+' buttons. Confirm the hour digit by pressing 'ENTER'.
- Once 'ENTER' has been pressed the minutes will flash. To adjust the minutes use the '-' & '+' buttons. Confirm the minute digit by pressing 'ENTER'.
- The timer now returns to the default display.
- To reset incorrect time, repeat previous steps.
Once the correct time is set, a total of four ON/OFF time programs can be set for operation.
Setting Programmes
Press the 'PROGRAM' key to set the programs.
You are now setting the programs starting with P1 'ON'.
SETTING P1 ON TIME:
- To set the hour use the '-' & '+' buttons. Confirm the hour digit by pressing 'ENTER'.
- To set the minutes use the '-' & '+' buttons. Confirm the minute digit by pressing 'ENTER'.
Note: The minutes can only be set in 10 minute blocks in programme 'MODE'.
SETTING P1 OFF TIME:
- To set the hour use the '-' & '+' buttons. Confirm the hour digit by pressing 'ENTER'.
- To set the minutes use the '-' & '+' buttons. Confirm the minute digit by pressing 'ENTER'.
Repeat steps 1 to 4 to programme P2, P3 & P4. After programming P4 'OFF' you automatically exit to the default display.
At any time while programming the timer you can press the 'PROGRAM' button to exit to the default display.
Note: If the ‘ON’ time is the same as the ‘OFF’ time the appliance will ignore the program.
The Advance Function
When in 'AUTO' MODE, if the '+' button is pressed for longer than 2 seconds the programme will ADVANCE to the next setting programmed and will only revert back to the program when the subsequent programme time is reached. When the 'ADVANCE' function is running the 'ADVANCE' segment will be displayed on the LCD screen. If the '-' button is pressed when the 'ADVANCE' programme is running the 'ADVANCE' feature will be automatically cancelled and the programme will run as normal.
Note - Timer Memory Back Up Batteries - Once the heater has been left plugged in with the socket switched on for at least 72 hours the timer's memory back up batteries will be fully charged. Once the timer batteries are fully charged, if there is a power cut or if the heater is disconnected from the mains for less than six months, then the timer will continue to keep time & the settings in the memory will remain intact. If however the timer back up batteries have not been charged fully, or if the heater is deprived of power for longer than six months, then the time and the programme settings are likely to be lost and you may therefore need to reset the time and the programme before using the AUTO MODE again.
Electromechanical Timer Operation (selected models only, see Fig. 6b)
Setting the time of day
To set the time of day, rotate the timer dial clockwise (indicated by the arrow) until the correct time of day is opposite the reference mark ▶ (see Fig. 6b). The 24-hour clock is used ; e.g. time shown for 4 pm is '16' (16:00hrs).
Operation Modes
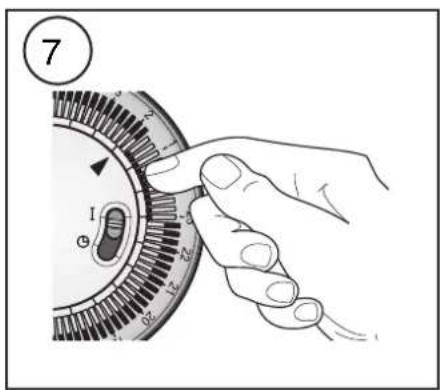
Set the operation mode using the slide switch on the timer (Fig. 7):
Position I - Manual operation
This setting allows power to the heater uninterrupted by the timer settings. The heat selector switch and thermostat will control the output (see 'Controls').
Position Ⓤ 'Auto' operation
This setting allows the heater to be switched ON and OFF according to a set 24 hour program period.
DO NOT disconnect this heater from the mains supply unless it is being taken out of use (e.g. in summer or for storage), otherwise the timer clock will stop.
Setting the 'Auto' ON and OFF times
To set the timer :
- Using your finger tip or the tip of a pencil, push in as many segments as necessary around the dial, according to the times you don't require heat – see Fig. 7. Each segment pushed in switches the heater OFF for that part of the hour. All other segments will be ON. For example, Fig. 7 shows the timer set to switch the heater OFF between 11pm and 1.45am
- You can select as many ON periods as you like, within the 24-hour day. The settings will repeat every day until changed.
- To change ON and OFF times, simply push in any 'ON' segments you wish to cancel and pull out new 'ON' segments as required.
Note: each segment represents 15minute period
Safety in use
This appliance incorporates a number of safety devices. In addition to the ‘Important Safety Advice’ section your attention is drawn to the following;
Tilt Switch
The tilt switch will prevent the heater from working if it is accidentally tipped over on its side.
If the radiator is tipped over while it is hot, disconnect the power and allow it to cool, then stand the radiator back upright. Reconnect the power - normal operation should be resumed.
Safety Overheat Protection
The heater is fitted with a thermal safety cut-out which will switch off the heater should it overheat for any reason. If the cut-out operates it is the result of abnormal overheating, and customer services should be contacted for further advice - see 'After Sales Service'.
Storage
If the radiator is not required for long periods, for example during the summer, it should be stored in a dry place and preferably covered to prevent the accumulation of dirt and dust. The supply cord should be neatly coiled around the cable wrap (see Fig. 1) and the plug should be inserted in to the plug pin holes provided in the cable wrap.
IMPORTANT
The heater must be kept plugged in at the mains to retain the time and the programmed settings. If unplugged from the mains, resetting the time and the programmed settings will be necessary.
Cleaning
WARNING - ALWAYS DISCONNECT THE POWER SUPPLY BEFORE CLEANING THE HEATER.
Do not use detergents, abrasive cleaning powder or polish of any kind on the body of the heater.
Allow the heater to cool, then wipe with a dry cloth to remove dust and a damp cloth (not wet) to clean off stains. Be careful not to allow moisture in to the heater.
Recycling
For electrical products sold within the European Community.
At the end of the electrical products useful life it should not be disposed of with household waste. Please recycle where facilities exist. Check with your Local
Authority or retailer for recycling advice in your country.
After Sales Service
Your product is guaranteed for 3 year from the date of purchase. After sales information or assistance with this product can be found on our website:
www.dimplex.co.uk/support.
Your rights under this guarantee are additional to your statutory rights, which in turn are not affected by this guarantee.
Please do not return a faulty product to us as this may result in loss or damage and delay in providing you with a satisfactory service.
If after following these steps your product still does not operate you should return it to your point of purchase.
Please retain your receipt as proof of purchase.
The fins of this heater is filled with a precise quantity of special oil. Repairs requiring opening of the oil container are only to be made by the manufacturer or its service agent. If an oil leak is suspected please contact your point of purchase. Regulations concerning the disposal of oil when scrapping the appliance must be followed.
- IMPORTANT SAFETY ADVICE
- General
- Electrical
- WARNING – THIS APPLIANCE MUST BE EARTHED
- GREEN/YELLOW : EARTH
- BLUE : NEUTRAL
- BROWN : LIVE
- Fitting the castors
- Positioning the Heater
- Operation
- Controls
- Thermostat (see Fig.4)
- Heat Selector Switches (see Fig.5)
- Digital Timer Operation (see Fig. 6a)
- Key Lock:
- Initial Operation
- Setting Current Time
- Setting Programmes
- SETTING P1 ON TIME:
- SETTING P1 OFF TIME:
- The Advance Function
- Electromechanical Timer Operation (selected models only, see Fig. 6b)
- Setting the time of day
- Operation Modes
- Position I - Manual operation
- Position Ⓤ 'Auto' operation
- Setting the 'Auto' ON and OFF times
- To set the timer :
- Safety in use
- Tilt Switch
- Safety Overheat Protection
- Storage
- IMPORTANT
- Cleaning
- WARNING - ALWAYS DISCONNECT THE POWER SUPPLY BEFORE CLEANING THE HEATER.
- Recycling
- After Sales Service
Brand : DIMPLEX
Model : OFC2000Ti
Category : Heating appliance