
ViewSync 3 - Wireless Presentation Unit VIEWSONIC - Free user manual and instructions
Find the device manual for free ViewSync 3 VIEWSONIC in PDF.


| Product Type | Wireless Presentation Gateway |
| Brand | ViewSonic |
| Model | ViewSync 3 (VS15180) |
| Dimensions | Approximately 120 mm x 100 mm x 30 mm (estimated) |
| Weight | Approximately 0.5 kg (estimated) |
| Power Supply | AC adapter (100-240V, 50/60Hz) with UK/EU/US plugs |
| Wireless Connectivity | 802.11 a/b/g/n dual-band (2.4GHz & 5GHz) |
| Wired Connectivity | Ethernet (100/1000 Mbps), HDMI, VGA, USB 2.0 |
| Video Output | VGA: up to 1366x768@60Hz; HDMI: up to 1080p@60Hz |
| Key Functions | WiFi Projection, Screen Mirroring (Miracast), DLNA Media Streaming |
| Supported OS for Projection | Windows 7/8/10, macOS, Android (via Miracast), iOS (via DLNA/ViewMedia) |
| Wireless Security | WPA/WPA2 encryption, configurable SSID and password |
| Remote Control | Infrared remote with effective range up to 7 meters |
| Package Contents | ViewSync 3 unit, AC adapter (UK/EU/US plugs), AutoProject Key (x2), Quick Installation Guide |
| Operating Temperature | 0°C to 35°C (32°F to 95°F) |
| Storage Temperature | Up to 50°C (122°F) |
| Certifications | FCC, CE, RoHS2 compliant |
| Warranty | 1 year limited labor warranty |
Frequently Asked Questions - ViewSync 3 VIEWSONIC
User questions about ViewSync 3 VIEWSONIC
0 question about this device. Answer the ones you know or ask your own.
Ask a new question about this device
Download the instructions for your Wireless Presentation Unit in PDF format for free! Find your manual ViewSync 3 - VIEWSONIC and take your electronic device back in hand. On this page are published all the documents necessary for the use of your device. ViewSync 3 by VIEWSONIC.
USER MANUAL ViewSync 3 VIEWSONIC
IMPORTANT: Please read this User Guide to obtain important information on installing and using your product in a safe manner, as well as registering your product for future service. Warranty information contained in this User Guide will describe your limited coverage from ViewSonic Corporation, which is also found on our web site at http://www.viewsonic.com in English, or in specific languages using the Regional selection box in the upper right corner of our website. "Antes de operar su equipo lea cu idadosamente las instrucciones en este manual"
Model No. VS15180
Thank you for choosing ViewSonic
With over 25 years as a world leading provider of visual solutions, ViewSonic is dedicated to exceeding the world's expectations for technological evolution, innovation, and simplicity. At ViewSonic, we believe that our products have the potential to make a positive impact in the world, and we are confident that the ViewSonic product you have chosen will serve you well.
Once again, thank you for choosing ViewSonic !
ViewSonic®

Compliance Information
Please read before proceeding
- Use only the batteries and power adapter provided by the manufacturer. The use of unauthorized accessories may void your warranty.
- Do not store your device in temperatures higher than 50^ (122°F).
- The operating temperature for this device is from 0^ (32°F) to 35^ (95°F).
FCC Notice
The following statement applies to all products that have received FCC approval. Applicable products bear the FCC logo, and/or an FCC ID in the format FCC ID: GSS-VS15180 on the product label. This device complies with part 15 of the FCC Rules. Operation is subject to the following two conditions: (1) This device may not cause harmful interference, and (2) This device must accept any interference received, including interference that may cause undesired operation. This mobiledevice has been tested and found to comply with the limits for a Class B digital device, pursuant to Part 15 of the FCC Rules. These limits are designed to provide reasonable protection against harmful interference in a residential installation. This equipment generates, uses and can radiate radio frequencyenergy and, if not installed and used in accordance with the instructions, may cause harmful interferenceto radio communications. However, there is no guarantee that interference will not occur in a particular installation. If this equipment does cause harmful interference to radio or television reception, which can be determined by turning the equipment off and on, the user is encouraged to try to correct the interference by one or more of the following measures
- Reorient or relocate the receiving antenna.
- Increase the separation between the equipment and receiver.
- Connect the equipment into an outlet on a circuit different from that to which the receiver is connected.
- Consult the dealer or an experienced radio/TV technician for help.
Changes or modifications not expressly approved by the party responsible for compliance could void theuser's authority to operate the equipment. The antenna(s) used for this transmitter must not be colocated or operating in conjunction with any otherantenna or transmitter.
The device was tested and complies to measurement standards and procedures specified in FCC OET Bulletin 65, Supplement C
FCC SAR Information
This equipment complies with FCC radiation exposure limits set forth for an uncontrolled environment. End users must follow the specific operating instructions for satisfying RF exposure compliance.
This transmitter must not be co-located or operating in conjunction with any other antenna or transmitter. This equipment should be installed and operated with a minimum distance of 20 centimeters between the radiator and your body.
The users manual or instruction manual for an intentional or unintentional radiator shall caution the user that changes or modifications not expressly approved by the party responsible for compliance could void the user's authority to operate the equipment.
CE Conformity for European Countries
CE The device complies with the EMC Directive 2014/30/EU and Low Voltage Directive 2014/35/EU, R&TTE Directive 1999/5/EC.
Following information is only for EU-member states:
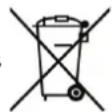
The mark shown to the right is in compliance with the Waste Electrical and Electronic Equipment Directive 2012/19/EU (WEEE).

The mark indicates the requirement NOT to dispose the equipment as unsorted municipal waste, but use the return and collection systems according to local law.
If the batteries, accumulators and button cells included with this equipment, display the chemical symbol Hg, Cd, or Pb, then it means that the battery has a heavy metal content of more than 0.0005% Mercury, or more than 0.002% Cadmium, or more than 0.004% Lead.
European Union Regulatory Conformance
The equipment complies with the RF Exposure Requirement 1999/519/EC, Council Recommendation of 12 July 1999 on the limitation of exposure of the general public to electromagnetic fields (0-300 GHz). This equipment meets the following conformance standards: EN301489-1, EN301489-17, EN55022/24, EN60950-1, EN300328, EN301893.
We, hereby, declare that this Wi-Fi radio is in compliance with the essential requirements and other relevant provisions of Directive 1999/5/EC.
Declaration of RoHS2 Compliance
This product has been designed and manufactured in compliance with Directive 2011/65/EU of the European Parliament and the Council on restriction of the use of certain hazardous substances in electrical and electronic equipment (RoHS2 Directive) and is deemed to comply with the maximum concentration values issued by the European Technical Adaptation Committee (TAC) as shown below:
| Substance | Proposed Maximum Concentration | Actual Concentration |
| Lead (Pb) 0.1% < 0.1% | ||
| Mercury (Hg) 0.1% < 0.1% | ||
| Cadmium (Cd) 0.01% < 0.01% | ||
| Hexavalent Chromium ( Cr^6+ ) 0.1% < 0.1% | ||
| Polybrominated biphenyls (PBB) 0.1% < 0.1% | ||
| Polybrominated diphenyl ethers (PBDE) 0.1% < 0.1% |
Certain components of products as stated above are exempted under the Annex III of the RoHS2 Directives as noted below:
Examples of exempted components are:
- Mercury in cold cathode fluorescent lamps and external electrode fluorescent lamps (CCFL and EEFL) for special purposes not exceeding (per lamp):
(1) Short length ( ≤ 500 mm): maximum 3.5 mg per lamp.
(2) Medium length (>500 mm and ≤1,500 mm): maximum 5 mg per lamp.
(3) Long length (>1,500 mm): maximum 13 mg per lamp.
-
Lead in glass of cathode ray tubes.
-
Lead in glass of fluorescent tubes not exceeding 0.2% by weight.
-
Lead as an alloying element in aluminium containing up to 0.4% lead by weight.
-
Copper alloy containing up to 4% lead by weight.
-
Lead in high melting temperature type solders (i.e. lead-based alloys containing 85% by weight or more lead).
-
Electrical and electronic components containing lead in a glass or ceramic other than dielectric ceramic in capacitors, e.g. piezoelectronic devices, or in a glass or ceramic matrix compound.
Copyright Information
Copyright © ViewSonic® Corporation, 2016. All rights reserved.
ViewSonic ^® , the three birds logo, OnView ^® , ViewMatch ^™ , and ViewMeter ^® are registered trademarks of ViewSonic ^® Corporation.
Disclaimer: ViewSonic® Corporation shall not be liable for technical or editorial errors or omissions contained herein; nor for incidental or consequential damages resulting from furnishing this material, or the performance or use of this product.
In the interest of continuing product improvement, ViewSonic® Corporation reserves the right to change product specifications without notice. Information in this document may change without notice.
No part of this document may be copied, reproduced, or transmitted by any means, for any purpose without prior written permission from ViewSonic® Corporation.
Product Registration
To meet your future needs, and to receive any additional product information as it becomes available, please register your product on the Internet at: www.viewsonic.com.
For Your Records
Product Name:
ViewSync 3
Wireless Presentation Gateway
Model Number:
VS15180
Document Number:
ViewSync 3_UG_ENG Rev. 1A 10-22-15
Serial Number:
Purchase Date:
Product disposal at end of product life
ViewSonic respects the environment and is committed to working and living green. Thank you for being part of Smarter, Greener Computing. Please visit ViewSonic website to learn more.
USA & Canada: http://www.viewsonic.com/company/green/recycle-program/
Europe: http://www.viewsoniceurope.com/uk/support/recycling-information/
Taiwan: http://recycle.epa.gov.tw/recycle/index2.aspx
Contents
Compliance Information
Please read before proceeding ....i
FCC Notice....i
FCC SAR Information......ii
CE Conformity for European Countries......ii
Following information is only for EU-member states: ......ii
European Union Regulatory Conformance....ii
Declaration of RoHS2 Compliance....iii
Copyright Information
Product Registration....iv
For Your Records....iv
Chapter 1: Product Introduction
1-1 Package Contents....1
1-2 Hardware Recommendation....1
1-3 Highlights....2
1-4 Remote Controller ....3
1-5 Hardware Setup/Installation .... 5
Chapter 2: ViewSync 3 administration setting
2-1 Connect to Web Configuration Menu ....6
2-2 Status & Info....7
2-3 Network Setting....8
2-4 Wireless Settings....10
2-5 WiFi connection setting....13
2-6 Projection Setting 14
2-7 Password Setting ....15
2-8 Firmware Upgrade....16
2-9 Restart....17
2-10 Logout ....18
2-11 OSD Menu....18
2-12 Network Setting....19
Chapter 3: WiFi Projection
3-1 Normal mode, user can freedom of playing 24
3-2 Moderator Mode....29
FAQ: 32
Windows 7....33
Windows 8....36
Chapter 4: Using ViewSync 3 on Screen Mirroring Mode
4-1 Switch ViewSync 3 to Screen Mirroring Mode (Android)....40
Chapter 5: Using ViewSync 3 on DLNA Media Streaming Mode
5-1 DLNA Media Streaming....41
Appendix A: Support resolution....43
Appendex B: ViewSync 3 Support Media Format ....43
Customer Support
Chapter 1: Product Introduction
Congratulations on your purchase of ViewSonic Wireless Presentation Gateway ViewSync 3.
This section introduces you to the ViewSync 3 (referred to as the ViewSync 3 in this user guide).
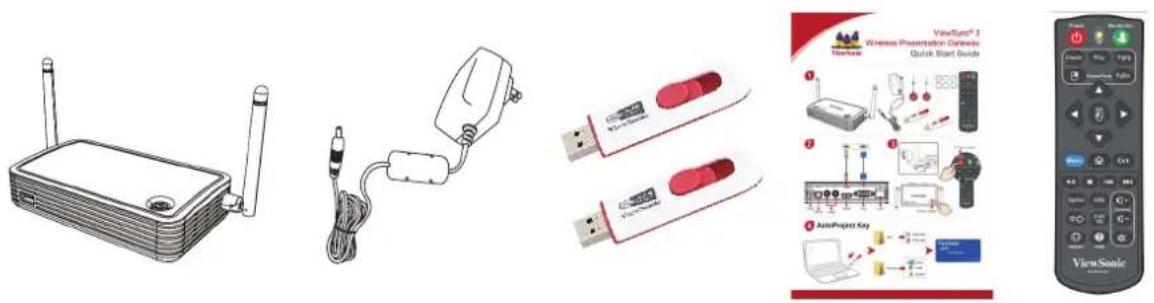
1-1 Package Contents
- ViewSync 3
- AC adapter with UK/EU/US plug
- AutoPorject Key x2
- Quick Installation Guide
1-2 Hardware Recommendation
ViewSync 3 supports real time WiFi Projection, Screen Mirroring (Miracast compatible) & DLNA Media streaming play back functions.
1. WiFi Presentation Mode (HDMI/VGA)
ViewSync 3 is designed to able to stream contents from PC (Windows 7 / Window 8 / Windows 10 / MacBook only) to your TV through this device.
PC or Notebook
• CPU: Core 2 Duo 2.0GHz or better
• Memory: 2.0 GB or better
• Network: 802.11g/n Wi-Fi and/or 100/1000 Mbps Ethernet
- Software: ViewSync 3 Utility. (windows 7 or later & MAC OS 7 or later)
2. Screen Mirroring
- Smart phone or Tablet that should be Miracast certified
- Android 4.2 OS or later
- Samsung / Sony (HDMI only)
3. DLNA Media Streaming (HDMI/VGA)
ViewSync 3 is designed to able to stream video/music/photo contents from PC (Windows 7 based), smart phone, and Tablet-PC to your TV through this device.
Smart phone
• CPU: 800 MHz or better
• Memory: 256 MB or better
• Network: 802.11g/n Wi-Fi or better
Tablet-PC
• CPU: 600 MHz or better
• Memory: 256 MB or better
• Network: 802.11g/n Wi-Fi or better
Recommend software
- Android OS: ViewMedia
- iOS: ViewMedia
1-3 Highlights
Thanks again for choosing the product. This product allows multiple users to connect to the same projector by wired or wireless network and avoiding the hassle of using VGA or HDMI cable.
Features
• 802.11 a/b/g/n Wireless compatibility
• 802.11n 2.4GHz & 5GHz dual band standards
• Supports both Wireless and Ethernet connectivity
• VGA or HDMI connections
- Wireless multimedia streaming up to Full HD 1080p
- PC content, movies, photo's apps and more all on your big screen
- Compatible with Windows, Apple and Android devices
• Network security
• USB display on Media Streaming mode
1-4 Remote Controller
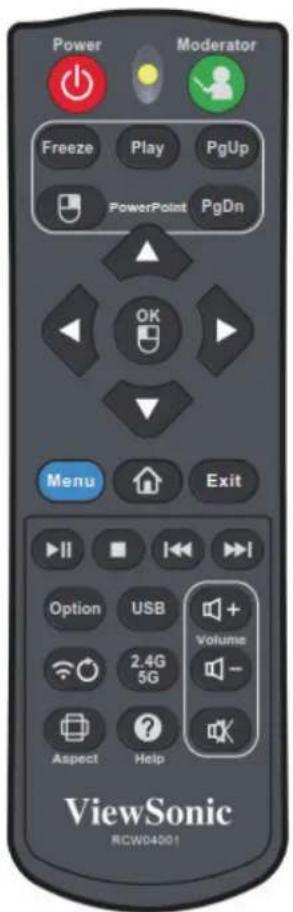
| No. | Button Description | |
| 1 |  | Power On/off the ViewSync 3 |
| 2 |  | Enable Moderator mode |
| 3 | 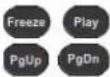 | WiFi projection use for PowerPoint use, page up/down, freeze, play by full screen |
| 4 |  | WiFi projection use as Mouse right button |
| 5 |  | Cursor control on Menu and WiFi projection as Mouse simulation. |
| 6 |  | Menu button |
| 7 |  | Main standby page |
| 8 |  | Exit menu , Stop WiFi Projection |
9 Multime  /back control /back control | ||
| 10 |  | Setting for Multimedia playback |
11 Enter U  media playback control media playback control | ||
| 12 |  | WiFi function refresh |
| 13 |  | 2.4G/5G wifi selection |
| 14 |  | Volume control |
| 15 |  | Aspect ratio chang(16:9/16:10/4:3) |
| 16 |  | Enter help standby page. |
Notes:
- Remote controller effective distance is 7 meters. This distance will be shortened in some environments, or when the battery is low.
- If there's strong light source near ViewSync 3 and / or remote controller, remote controller may not be able to function properly.
1-5 Hardware Setup/Installation
1. Connect your device
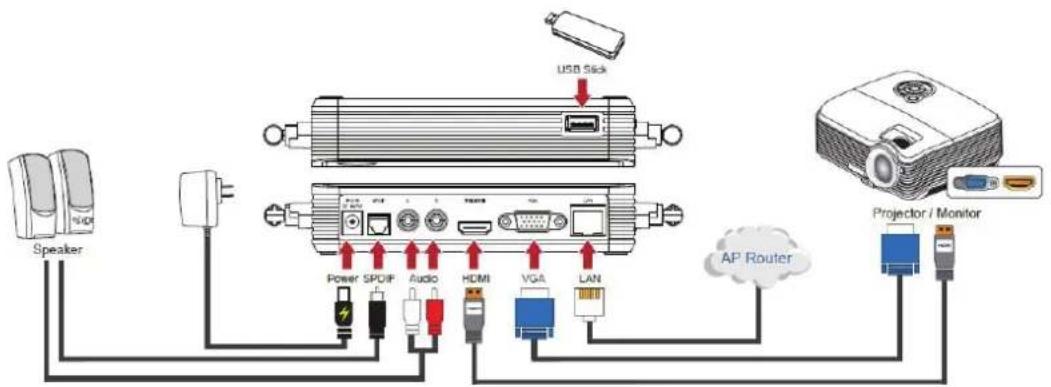
flowchart
graph TD
    A["Speaker"] --> B["Power SPDIF"]
    A --> C["Audio"]
    A --> D["HDMI"]
    A --> E["VGA"]
    A --> F["LAN"]
    B --> G["AP Router"]
    C --> G
    D --> G
    E --> G
    F --> G
    G --> H["Projector / Monitor"]
    H --> I["USB Slick"]
Note: HDMI and VGA can't be connected at the same time.
2. Connect power and push power button to turn on ViewSync 3.
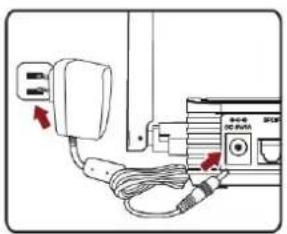
natural_image
Pure electrical circuit lines without any symbols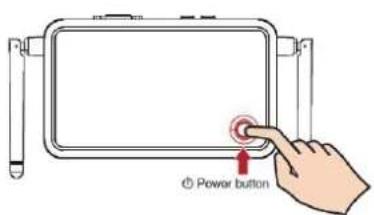
Wait a few seconds for the screen below to load, and then select your preferred mode.
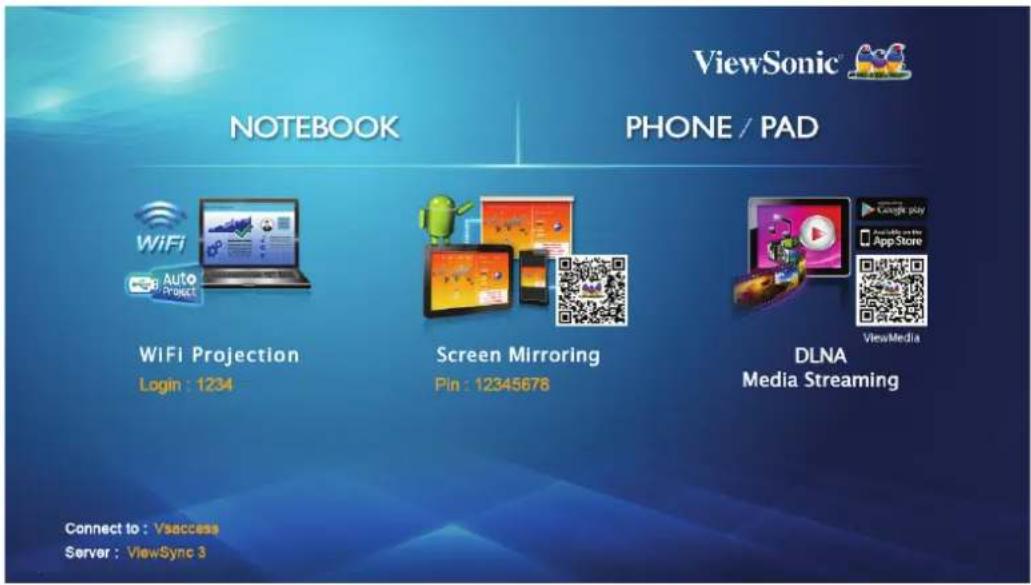
Chapter 2: ViewSync 3 administration setting
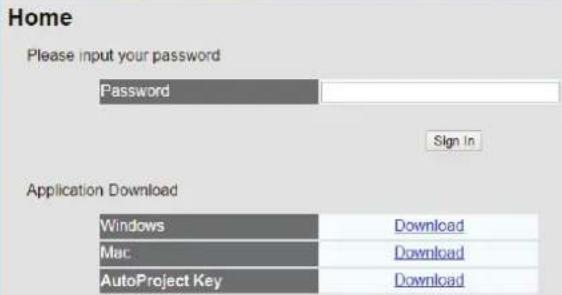
2-1 Connect to Web Configuration Menu
Please key IP address in browser, default is 192.168.59.254, or press Help button to get IP information Default pass word is "admin".

ViewSonic Wireless Presentation Gateway
Home
Please input your password
Password
Sign In
Application Download
Windows/Mac
Download
(Connect to internet to access this hyperlink.)
AutoProject Key
Download
(Connect to internet to access this hyperlink)
| Item Description | |
| Application download | Download application |
2-2 Status & Info
Displays system information, like system software version and IP address. Many useful information can be obtained here when you need help about system configuration and firmware upgrade.

ViewSonic Wireless Presentation Gateway
Status and Information
Home
Status & Info
Wireless Settings
Projection Setting
Password Settings
Firmware Upgrade
Restart
This page displays the general information and the status of the system
Version Information
| Firmware Version | 2.0.0.9 |
| Hardware Version | 1.00 |
| Network Status | |
| MAC Address | C4.01.42.00.11.CF |
| IP Address | 0.0.0.0 |
Wireless Status
| Wireless IP (WLAN IP) | 192.168.1.14 |
| Mode | Infrastructure (AP) |
| Device Name (SSID) | WPG400 942 |
| Channel | 11 |
| Security | WPA Key |
| Wireless MAC Address | 5C F3.70.04 16.47 |
2-3 Network Setting

ViewSonic Wireless Presentation Gateway
Network Settings
Home
Status & Info
Network Settings
Wireless Settings
Projection Setting
Password Settings
Configuration Tools
Restart
Set the IP Address of the system manually for getting IP Address from DHCP Server
IP Address Settings
Obtain an IP address automatically
- Use the following IP address

DNS Server
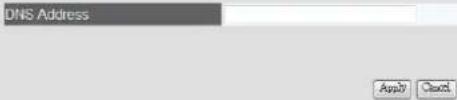
Displays and configures the network settings.

ViewSonic ^® Wireless Presentation Gateway
Network Settings
Set the IP Address of the system manually for getting IP Address from DHCP Server
IP Address Settings
Obtain an IP address automatically
- Use the following IP address
| IP Address | 195.168,09 | |
| Subnet Mask | 355,000 | |
| Gateway Address | 0.00 |
DNS Server


| Item Description | |
| Obtain an IP address Automatically | ViewSync 3 will obtain an IP address from DHCP server automatically. |
| Use the following IP Address | Set ViewSync 3 IP address manually. Fill the fields below to setup IP address. |
| DNS Server | Please input the IP address of the DNS (Domain Name Service) server. |
Click 'Apply' button to save the settings.
NOTE: When the configuration settings are changed, you must restart the network connection. You can restart the network connection by clicking "Restart" on the web configuration menu.
2-4 Wireless Settings
Configures wireless network settings.
1. 'Basic' Settings
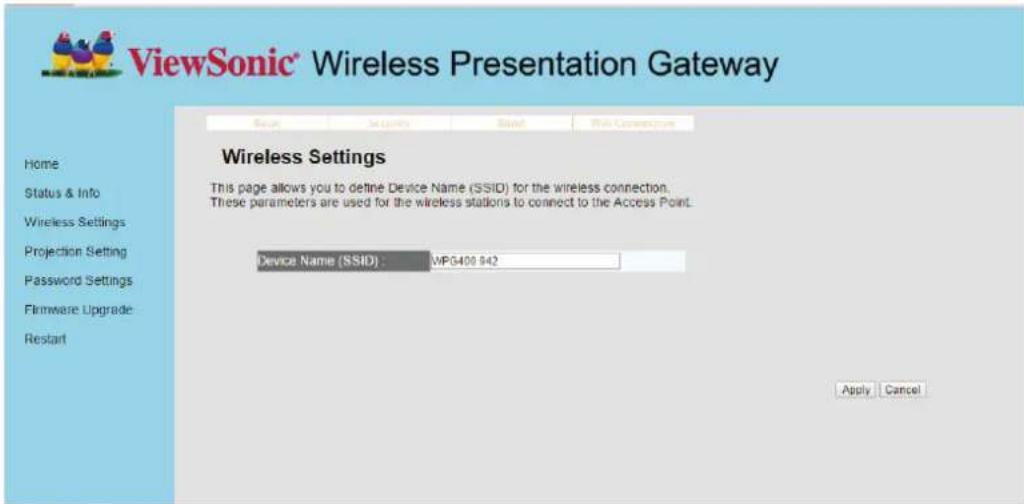
Displays and configures the wireless settings.
| Item Description | |
| Device Name (SSID) | Input the Device Name of presentation gateway here. Default is “ViewSync 3”. |
Click 'Apply' button to save the settings.
NOTE: When the configuration settings are changed, you must restart the network connection. You can restart the network connection by clicking "Restart" on the main menu.
2. "Security" Setting
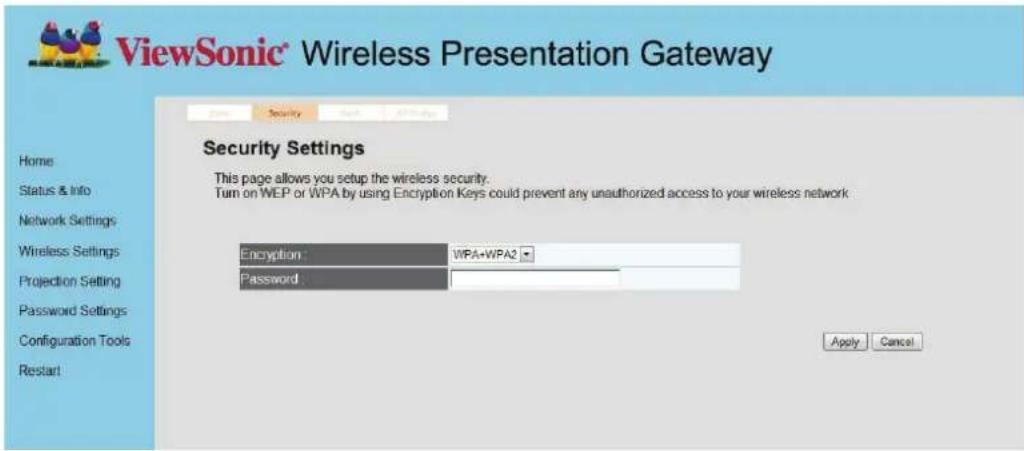
Encryption: Disabled
Disables wireless encryption.

Encryption: WPA +WPA2
Enable WPA + WPA2 encryption. Wireless clients must support WPA encryption and know the encryption passphrase you set here.
NOTE: When the configuration settings are changed, you must restart the network connection. You can restart the network connection by clicking "Restart" on the main menu.
3. Band Setting
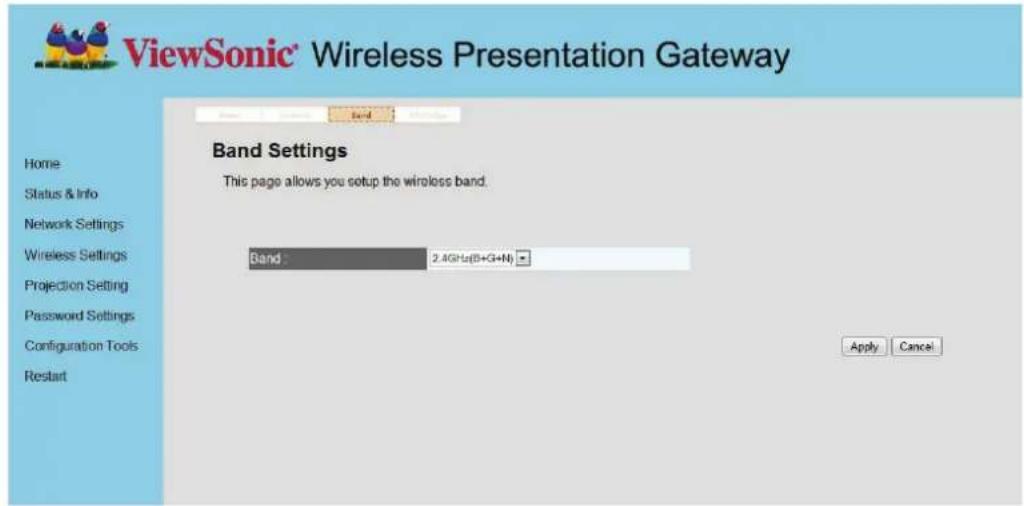
| Item Description | |
| Band Select the wireless band. Available options are:2.4GHz (B+G+N) - 802.11b, 802.11g, and 802.11n clients.5GHz - 802.11b, 802.11n clients. | |
2-5 WiFi connection setting
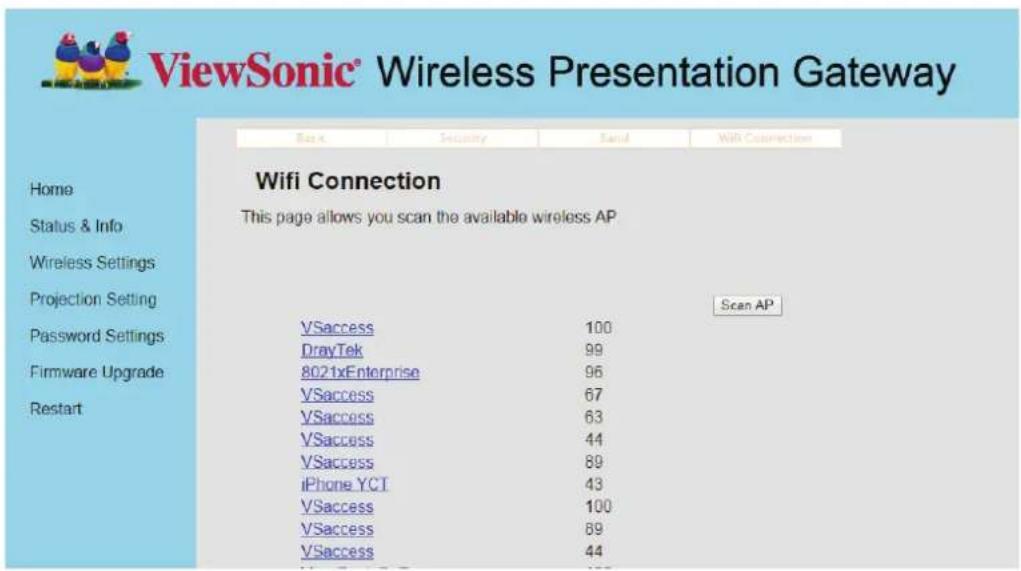
PS:
- If LAN cable was linked on ViewSync 3, LAN client mode is first priority, WiFi AP mode will be disable.
- If setup WiFi connection successful, ViewSync 3 will become WiFi Client mode. your PC or phone need to link the same WiFi AP router for WiFi projection or media streaming.
2-6 Projection Setting

ViewSonic Wireless Presentation Gateway
Projection Settings
Home
Status & Info
Wireless Settings
Projection Setting
Password Settings
Firmware Upgrade
Restart
You can adjust the screen resolution
OSD Menu Language Selection
HDMI Output Resolution
VGA Output Resolution
Login Code
OverWrite
English
HDMI Auto Detect
-
Disable ▼
Enable
Apply Cancel
Displays and configures the projection setting.
| OSD Menu Language Selection | English ▼ |
| HDMI Output Resolution | HDMI Auto Detect ▼ |
| VGA Output Resolution | |
| Login Code | Disable ▼ |
| OverWrite | Enable ▼ |
| Item Description | |
| InstructionPage LanguageSelection | Select the displaying language. |
| HDMI OutputResolution | Select HDMI output resolution for projection. |
| VGA OutputResolution | Select VGA output resolution for projection. |
| Login Code Enable | /disable Login code request |
| Over write User can | interrup and replace the current presenter |
NOTE: When the configuration settings are changed, you must restart the network connection. You can restart the network connection by clicking "Restart" on the main menu.
2-7 Password Setting
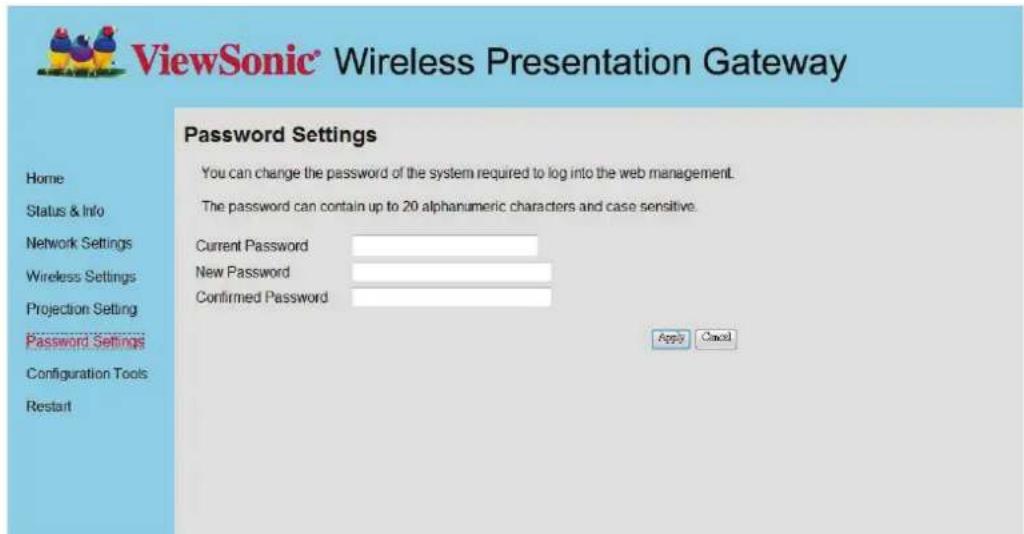
Displays and configures the password setting.
| Item Description | |
| Current Password Input current password here. Default pass word is “admin”. | |
| New Password /Confirmed Password | New Password: Enter new password.Confirmed Password: Confirmed the new entered password. |
Click 'Apply' button to save the settings.
NOTE: When the configuration settings are changed, you must restart the network connection. You can restart the network connection by clicking "Restart" on the main menu.
2-8 Firmware Upgrade

ViewSonic Wireless Presentation Gateway
Firmware Upgrade
This tool allows you to check the system's firmware update.
Home
Status & Info
Network Settings
Wireless Settings
Projection Setting
Password Settings
Configuration Tools
Restart
Check
Select 'Auto', ViewSync 3 will download and upgrade latest firmware automatically once ViewSync 3 connects to Internet.
If "Auto" upgrade fail, suggest using Manual Firmware upgrade, update process as following:
- Download the firmware by pressing "Manual" button or ViewSonic website.
- Rename file name to "install.img" if file name is difference.
- Copy "install.img" to the root directory of a USB flash.
- plug USB flash in ViewSync 3
- use remote control, Menu--> System -> USB upgrade.
- After upgrading, the system will reboot automatically. Please power off/power on the device after reboot.
Note:
It's recommended to use wired Ethernet connection to perform firmware upgrade. Before you update FW you must connect to Internet by Wireless or ethernet cable.
2-9 Restart
Restart ViewSync 3 when the device is not working properly or to apply changes made on web configuration menu.

ViewSonic Wireless Presentation Gateway
Home
Status & Info
Network Settings
Wireless Settings
Projection Setting
Password Settings
Configuration Tools
Restart
Firmware Upgrade
This tool allows you to check the system's firmware update.
Manual
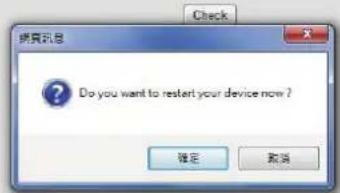
Click 'OK' to restart the ViewSync 3, or click 'Cancel' to abort.
2-10 Logout

ViewSonic Wireless Presentation Gateway
If you wish to logout from web configuration menu, click 'Logout'.
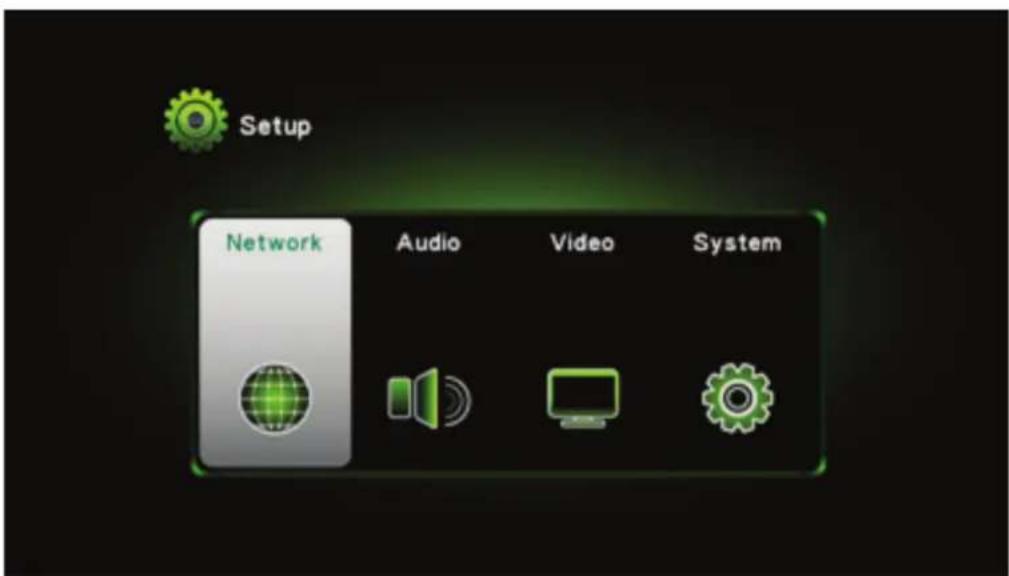
2-11 OSD Menu
Click "Menu" on remote control and will show below menu on the screen.
2-12 Network Setting
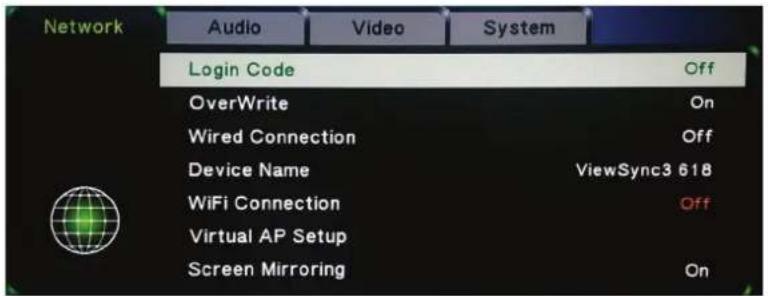
| Item Description | |
| Login Code Enable or | disable Login code request. |
| Overwrite | Enable or disable replace function by other users. if overwrite is enable, if you are presenting, you can be relabceable by other person. |
| Screen Mirroring | Enable or disable Screen Mirroring function, if AP mode meet stability issue due to wifi environment, we can disable this function to improve Wifi connection perfroamcne Radio Band 5G will make this item gray out to improve performance. |
Wired Connection
| Item Description | |
| Obtain an IP address Automatically | ViewSync 3 will obtain an IP address from DHCP server automatically. |
| Use the following IP Address | Set ViewSync 3 IP address manually. Fill the fields below to setup IP address. |
| DNS Server | Please input the IP address of the DNS (Domain Name Service) server. |
Device Name
| Item Description | |
| Device Name (SSID) | Input the Device Name of presentation gateway here. Default is ‘ViewSync 3”. |
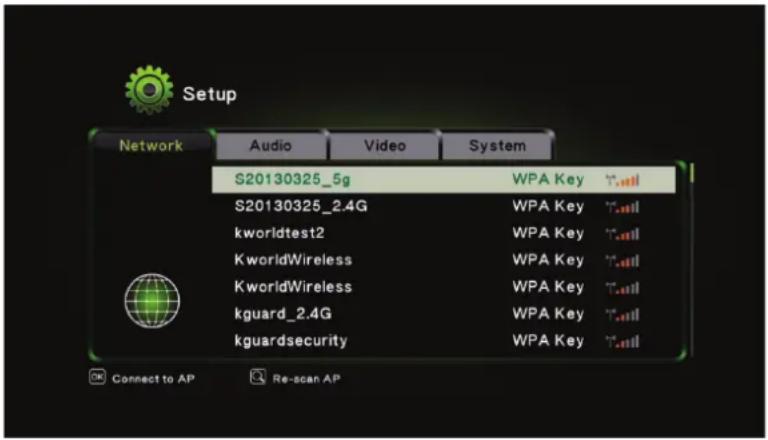
WiFi Connection
Click WiFi connection button. Then there will show the Wireless AP list on the screen. Please choose the AP you want to connect. The function is to connect to Internet via another Wireless AP.
Virtual AP Setup
| Item Description | |
| Radio Band | Set the Radio band to 2.4GHz or 5GHz. Please confirm your PC/NB support 5GHz before you set the radio band to 5GHz. |
| Security | Encryption: Disabled.Disables wireless encryption.Encryption: WPA +WPA2.Enable WPA + WPA2 encryption. Wireless clients must support WPA encryption and know the encryption passphrase you set here. |
| Region Choose your region. | |
| Save Change Save the configuration. | |
| Screen Mirroring | Enable or disable Screen Mirroring function, if AP mode meet stability issue due to wifi environment, we can disable this function to improve Wifi connection perfroamcne |
Network setting
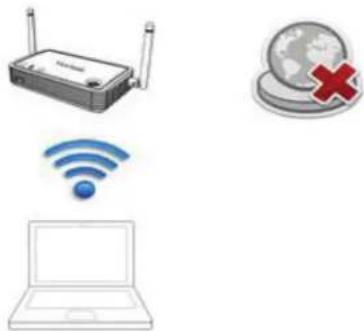
1. AP Mode
- Default setting, after factory reset will return to AP mode.
- User WiFi direct link to ViewSync 3, no internet access)
• Performance is better than Client mode.
natural_image
Illustration of wireless devices including a router, a globe with a cross symbol, and a laptop with Wi-Fi signal (no text or labels)-
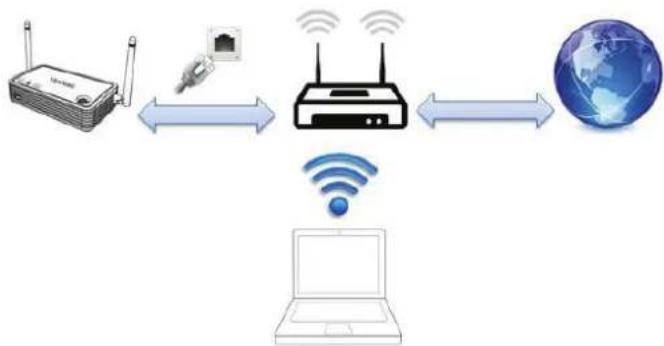
Client mode by LAN (priority higher then AP mode and WiFi Client mode)
-
Just plug in LAN cable will become client mode via LAN
- User links to ViewSync 3 via WiFi Router
flowchart
graph LR
    A["Wi-Fi Device"] <--> B["Router Network"]
    B <--> C["Global Globe"]
    D["Laptop"] -->|Wireless Signal| B
    style A fill:#f9f,stroke:#333
    style B fill:#ccf,stroke:#333
    style C fill:#cfc,stroke:#333
    style D fill:#fcc,stroke:#333
-
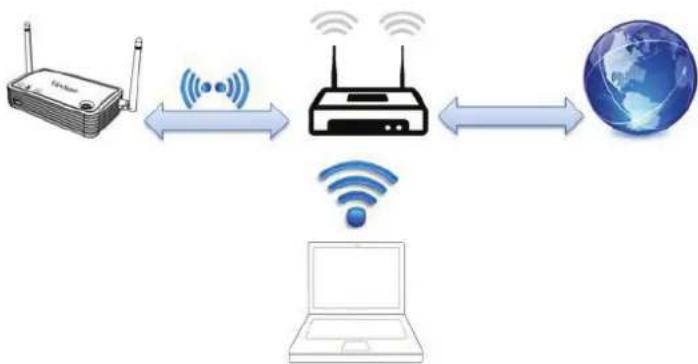
Client mode by WiFi
-
Setting WiFi Connection on Menu, MENU --> Network --> WiFi Connection --> On
- User links to ViewSync 3 via WiFi Router
flowchart
graph LR
    A["Router"] <--> B["Wireless Device"]
    B <--> C["Global Network"]
    D["Laptop"] -->|Wireless| B
    style A fill:#f9f,stroke:#333
    style B fill:#ccf,stroke:#333
    style C fill:#cfc,stroke:#333
    style D fill:#fcc,stroke:#333
Audio Setting
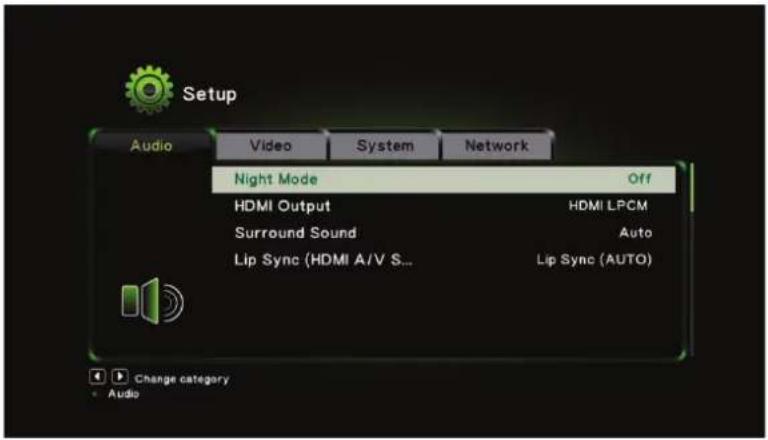
You can adjust the advanced audio setting such as Night mode, HDMI Audio output format, SPDIF output format, Surround sound setting and Lip Sync setting in this page.
Video Setting
You can adjust Aspect Ratio, TV out video format, and other video setting in the video setup page.
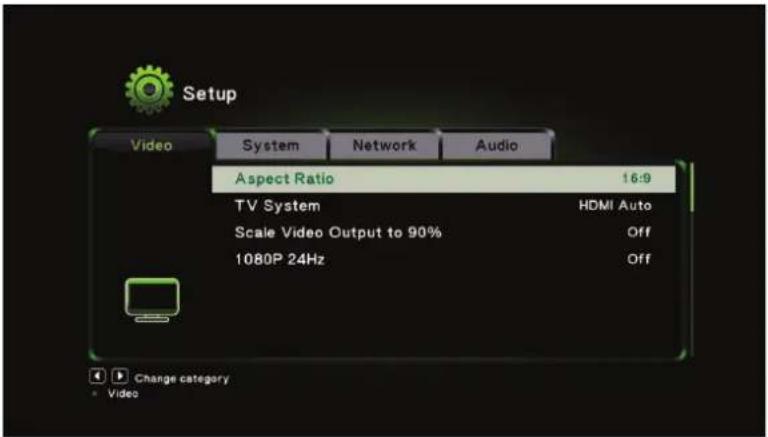
System Setting
You can set the OSD language, reset to Factory default, check the detail firmware version, and do the firmware upgrade in the system setup page.
Note:
- Main firmware version is shown on the startup screen.
- Language selection is for OSD menu only, not for startup page.
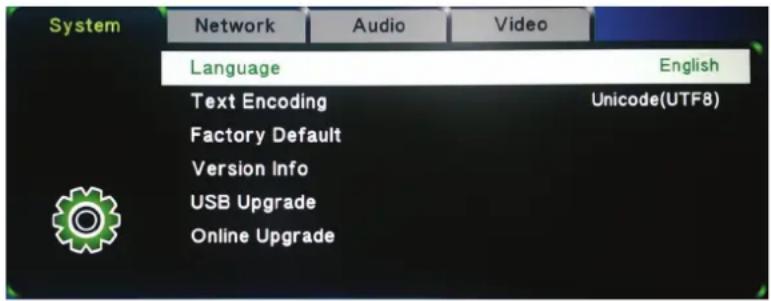
Chapter 3: WiFi Projection
3-1 Normal mode, user can freedom of playing
1. Method 1: AutoProject Key
1.1 Plug in AutoProject key, select AutoProject disk device
1.2 Same Rule on MAC user, software is on MAC folder
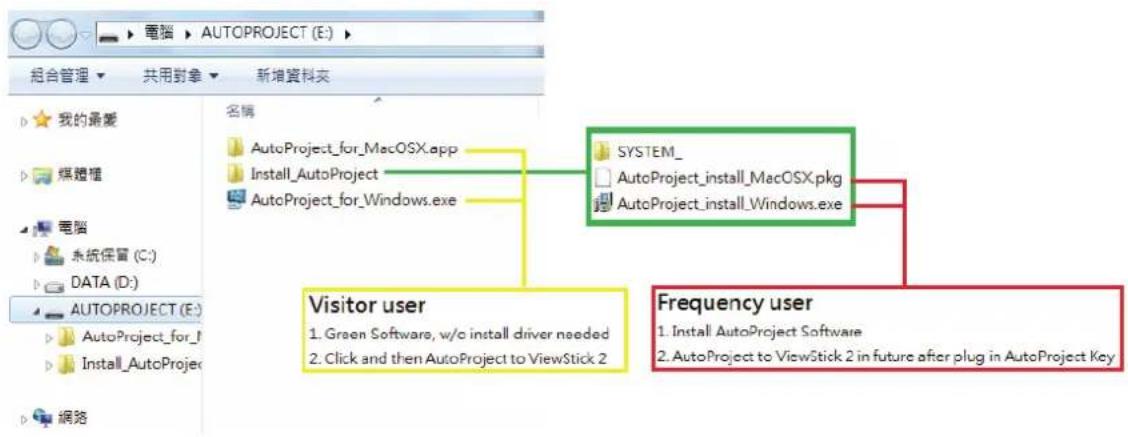
2. Method 2: Download Software from ViewSync 3 server
2.1 WiFi Link to ViewSync 3
2.2 Key in IP address on IE, will show download page as following (press ? on Remote to check IP address, if direct link to ViewSync 3, default IP is 192.168.59.254.)
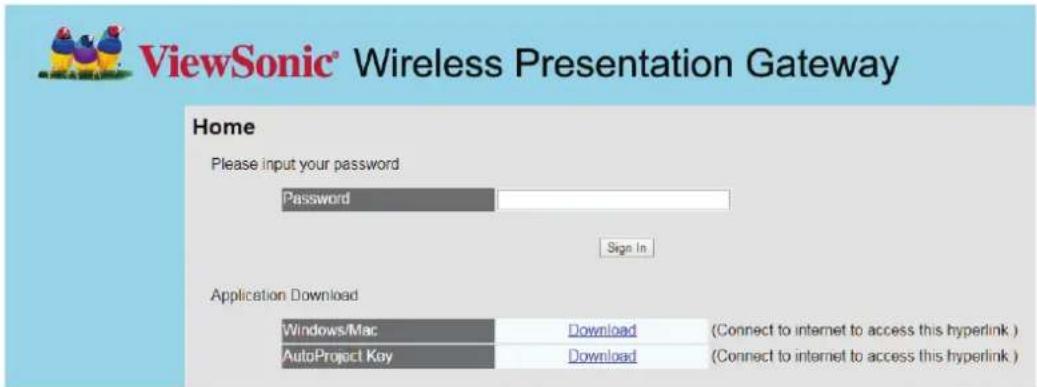
2.3 Download software base on OS
2.4 Unzip install software follow instruction
2.5 Perform AutoProject on desktop

2.5.1 Default setting (WiFi Direct link)
2.5.1.1 Select ViewSync 3
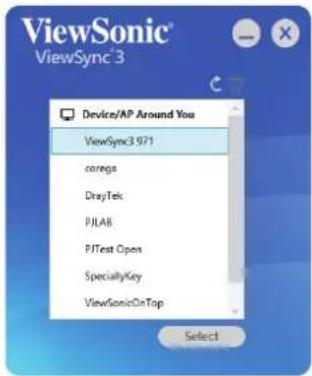
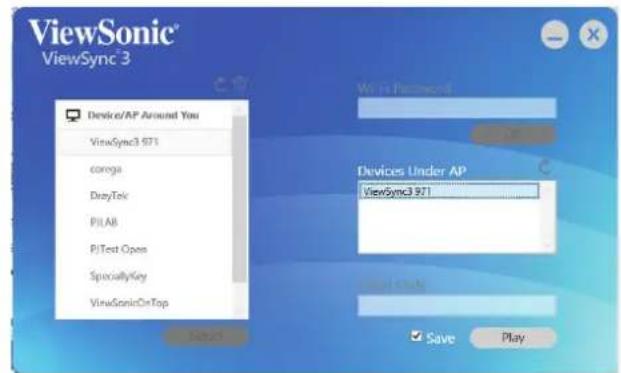
If ViewSync has set WPA security, it is needed to key password on step A.
If ViewSync 3 set Login code, it is needed to key Login code before Play to ViewSync 3 on step B
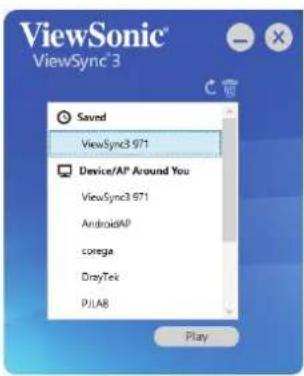
2.5.1.2 Next time, ViewSync 3 will be listed on Saved column, it will AutoProject to ViewSync directly
2.6 If ViewSync link to WiFi router by LAN or WiFi (Ex. link to Dreytek WiFi router").
2.6.1 Select DreyTek and select ViewSync 898. Click Play button
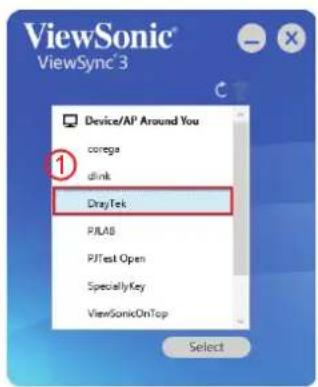
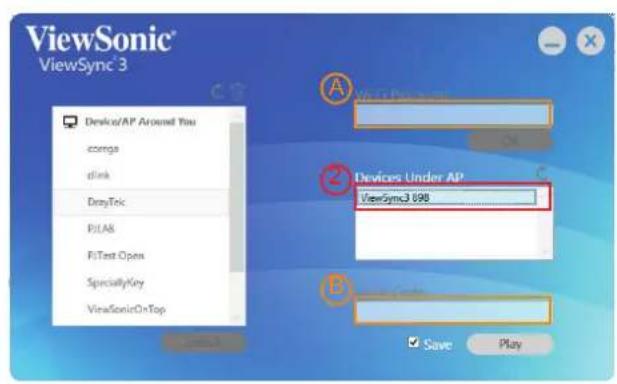
If DreyTek wifi router set WPA security, it is need to key password on step A.
If ViewSync 3 set Login code, it is needed to key Login code before Play to ViewSync 3 on step B
2.6.2 Next time, ViewSync 898 will be saved, it will auto select correct WiFi Router and link to ViewSync directly
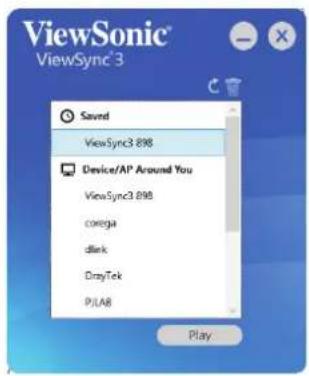
3. AutoProject software standby UI
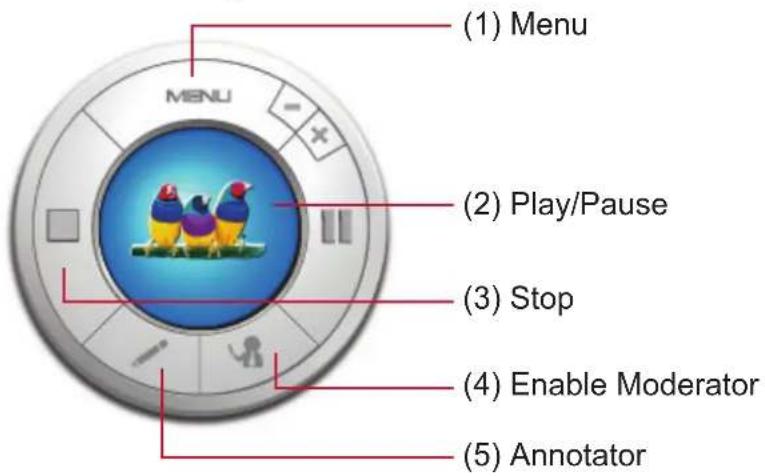
3.1 Menu
3.1.1 Display Mode: Mirror Mode / Extend Mode
3.1.2 HDMI/VGA resolution
3.1.3 Aspect Ratio: Auto / 4:3 / 16:9 / 16:10
3.1.4 Web Page: Click will link to Web page setting
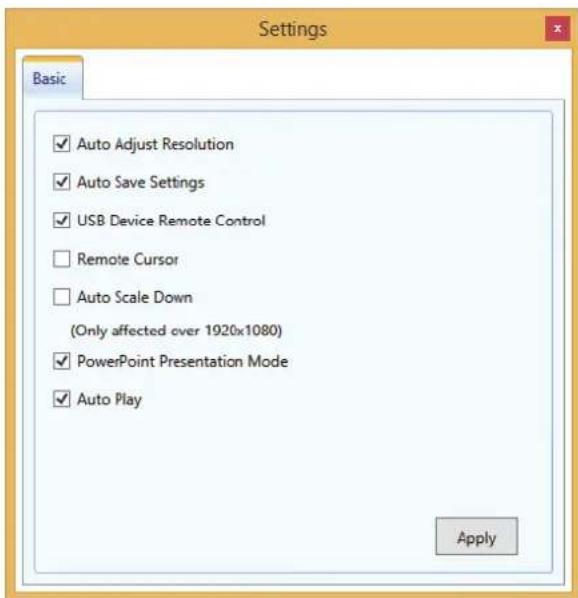
3.1.5 Setting:
3.1.5.1 Enable Auto adjust resolution ViewSync 3 software will auto adjust laptop resolution to match Display/Projector native resolution. If graphics card can not support, Laptop will keep original resolution.
3.1.5.2 Enable Auto Save Software will remember setting.
3.1.5.3 USB Keyboard/Mouse Back control: For Mirror mode only, if Keyboard and Mouse plug in ViewSync 3 USB port. It can back control computer who has projected to ViewSync 3.
3.1.5.4 Enable Remote Cursor (Disable Computer Mouse cursor) ViewSync 3 will generate a virtual cursor to replace original Mouse cursor. Cursor just is controlled by Mouse that plug-in ViewSync 3. Mouse in Computer can not move virtual cursor if this function is enable.
3.1.5.5 Enable Auto Scale Down If Laptop native resolution is over 1920x1080, please enable this function.
3.1.5.6 Power Point Presentation Mode To get better picture performance for the slide show.
3.1.5.7 AutoPlay Direct play after login.
3-2 Moderator Mode
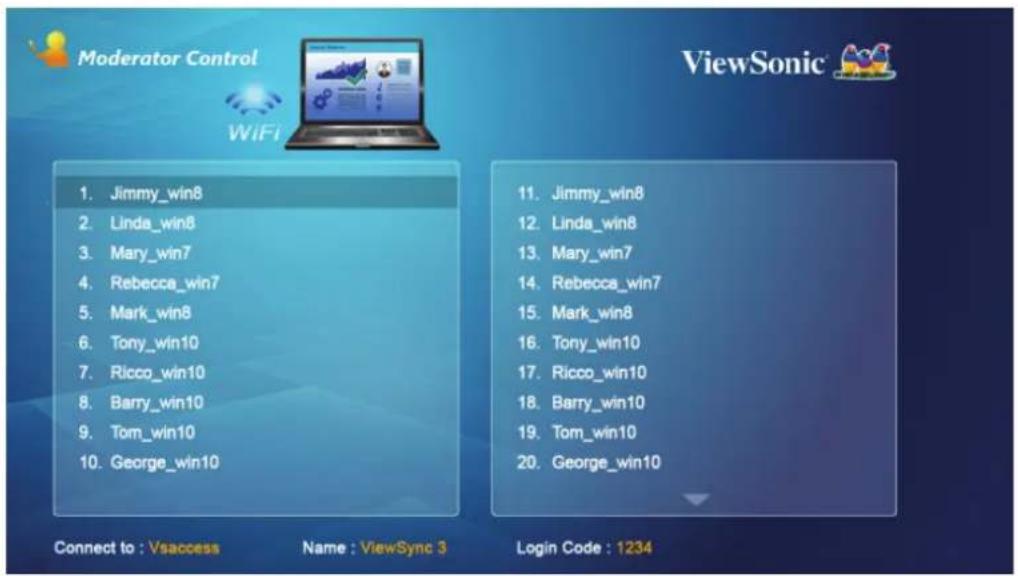
1. Moderator control by remote.
- Remote control design a Moderator button, press it will become Moderator Mode.
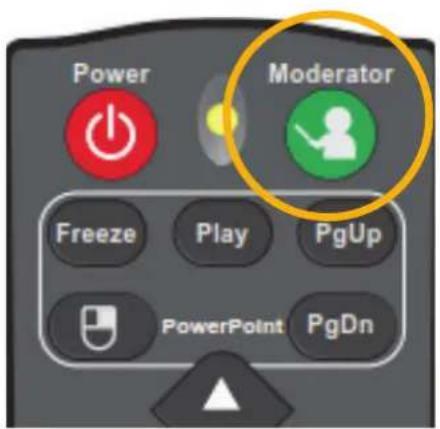
- All user will be standby and listed on the screen
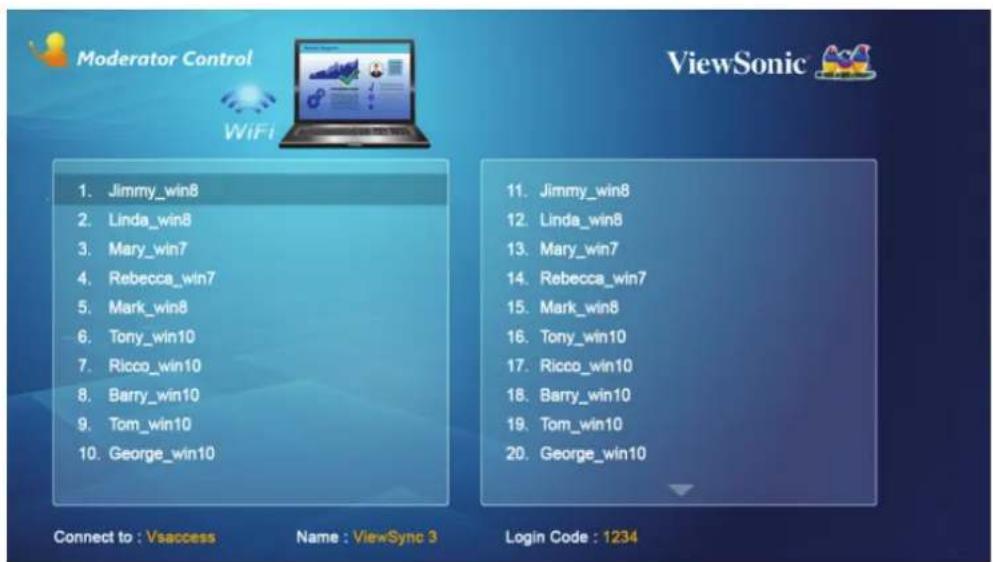
- Moderator can select attendee to project screen by remote directly.
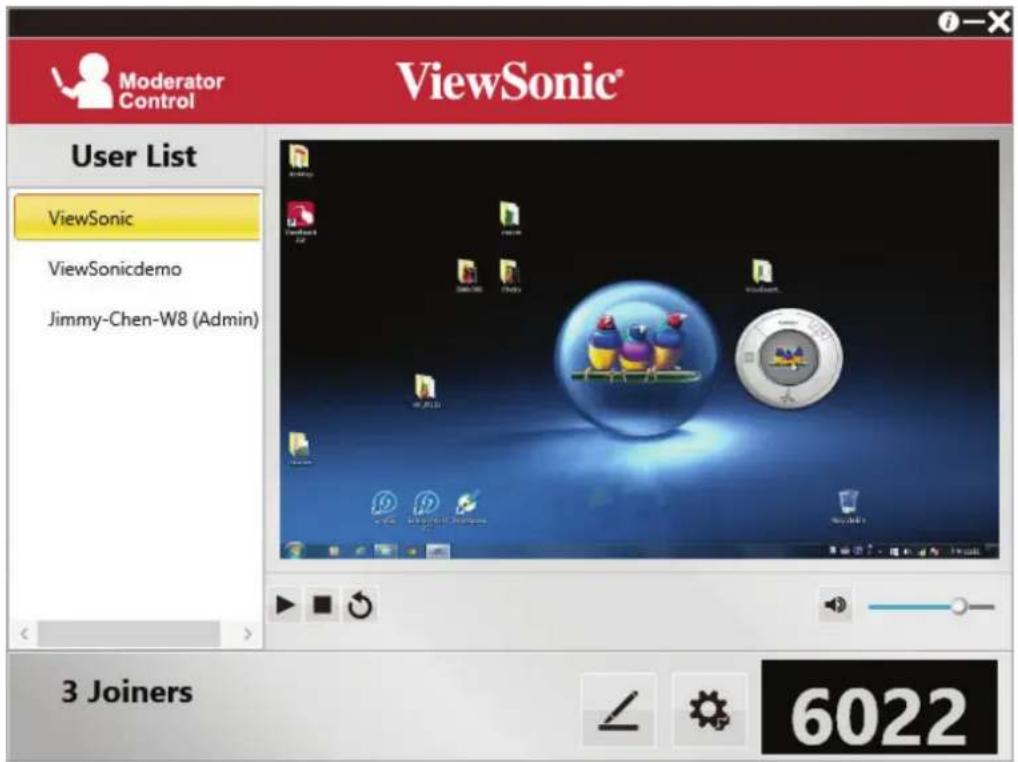
- Moderator control by Software.
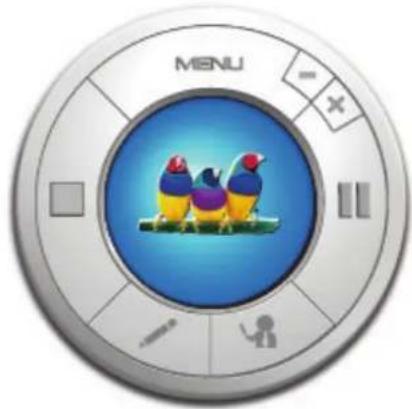
- Press 📁, Enable Moderator mode (just can enable Moderator when ViewSync 3 is on Standby status)
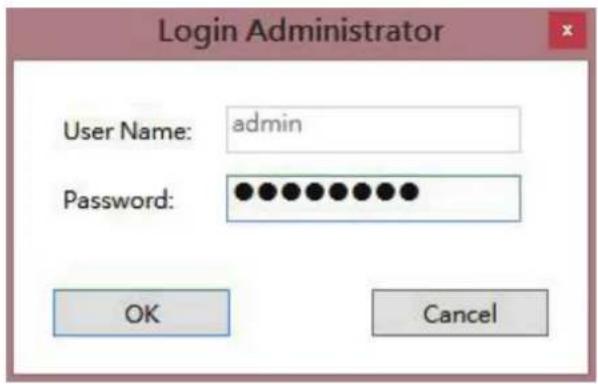
• Key in password, default password is "adminpwd"
- UI on the screen will be changed to Moderator
- Software UI will be changed as following, Moderator can select Attendee on User List, check screen status before projection.
FAQ:
- Question: if I lost AutoProject key. How to make New/Another AutoProject Key?
Answer:
- Download Software from
- Unzip to USB disk
-
Reanme USB disk name to "AutoProject"
-
Question: why can I not play screen
Answer:
- If Laptop native resolution over 1920x1080, please select "Enable Auto Scale down" on software setting of Menu.
- Question: when I install ViewSync 3 software, I meet the problem which show .Net Framework not ready
Answer: please follow the below process to enable it.
- Question: when I play screen to ViewSync3, I meet resolution is incorrection.
Answer: Please disable Auto Adjust resolution on setting of AutoProject software menu.
- Question: When I play screen to ViewSync 3, Screen is black
Answer: some of Notebook cannot support hardware encode, please disable Powerpoint mode on setting of AutoProject software menu.
- Question: when I switch to 5G or link to 5G wifi router. ScreenMirroring function is disable.
Answer: because ScreenMirroring must handshaking on 2.4G, so if ViewSync 3 change to 5G, ScreenMirroring will be disable, or please manual disable "ScreenMirroring" to get more stability when wifi link.
Windows 7
How To Install Microsoft .NET Framework 3.5.1 on Windows 7
Microsoft .NET Framework version 3.5.1 is included with Windows 7. Follow the steps below to enable it.
If you try to run .NET 3.5 installer downloaded from the Microsoft website on Window 7, you will receive the following error: You must use "Turn Windows features on or off" in the Control Panel to install or configure Microsoft .NET Framework 3.5 SP1. Instead of running the installer, follow instructions on this page.
Note: The same steps work for Windows 8 and Windows 10.
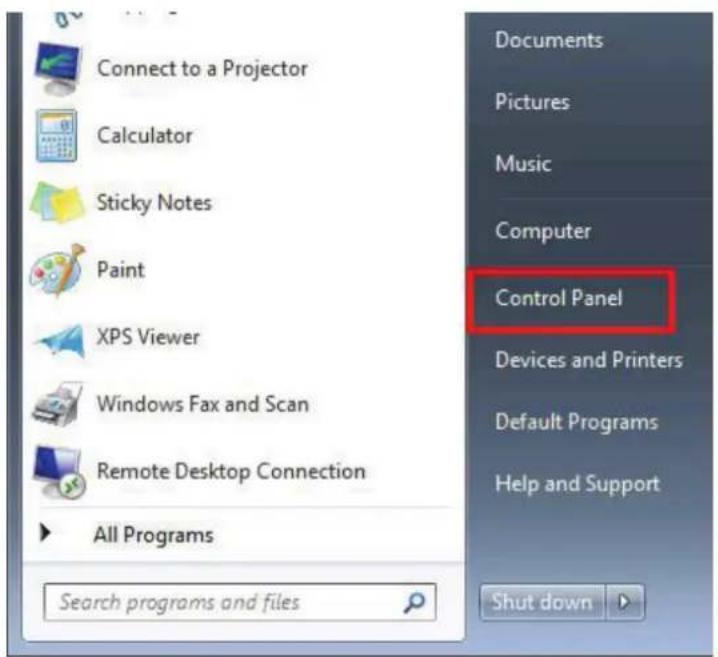
1. Click Start -> Control Panel
2. Click Programs
Adjust your computer's settings

System and Security
Review your computer's status
Back up your computer
Find and fix problems

Network and Internet
View network status and tasks
Choose homegroup and sharing options
Hardware and Sound
View devices and printers
Add a device

Programs
Uninstall a program
3. Click Turn Windows features on or off

Programs and Features
Uninstall a program

Turn Windows features on or off
View installed updates
Run programs made for previous versions of Windows
How to install a program
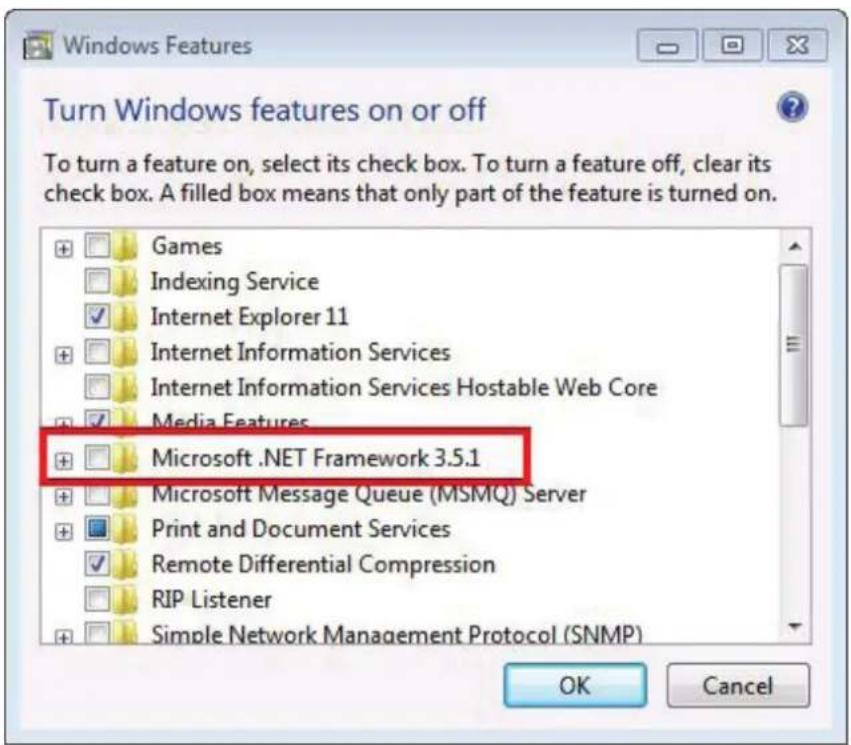
4. Click the checkbox next to Microsoft .NET Framework 3.5.1
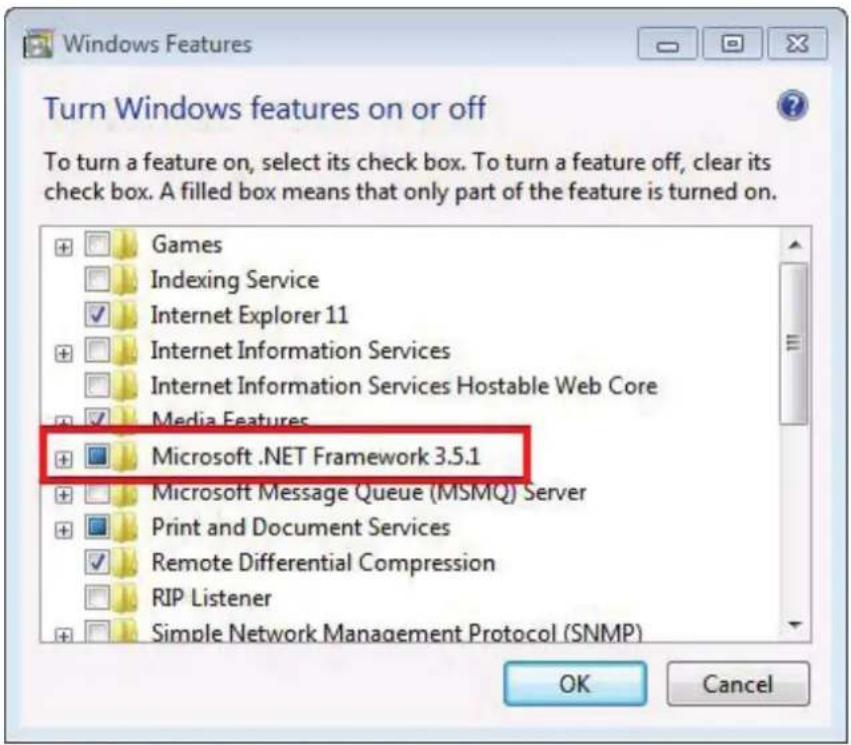
5. You will see the checkbox become filled
6. Click OK
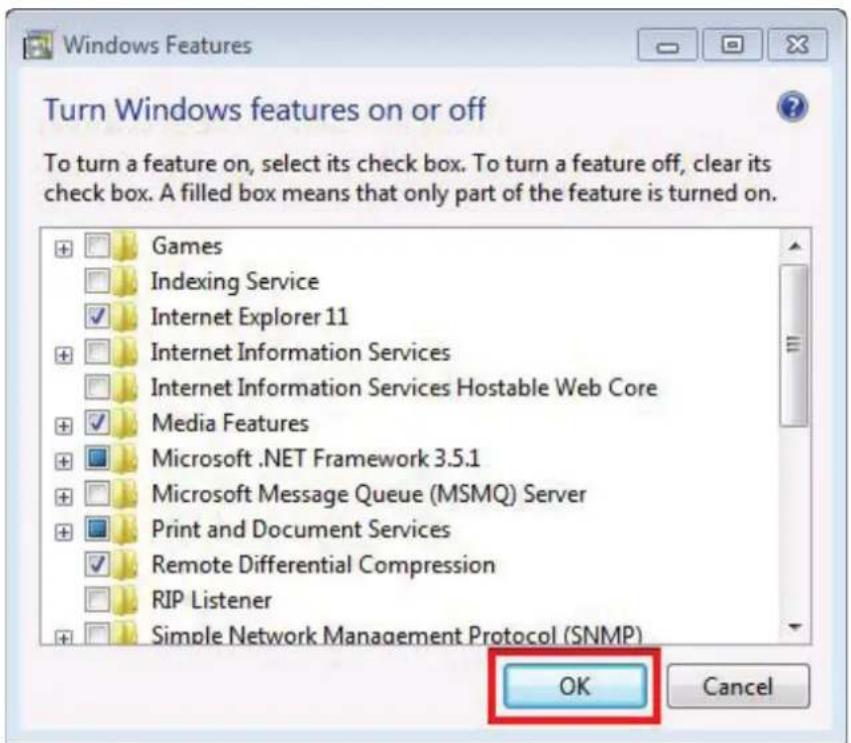
- Wait for Windows to complete the operation. If it asks you to connect to Windows Update to download required files, click Yes.
Windows 8
How to enable .NET Framework 3.5 on Windows 8 in Offline Mode Problem Description
Windows 8 does not include .NET 3.5 (include .NET 2.0 and 3.0) by default. But if the user is upgrading from Windows 7 to Windows 8, .NET Framework 3.5 is fully enabled. The user can make sure this feature is enabled by check in Program and Features.
These is list of steps that the user can do to check it :
Step 1:
Go to Settings. Choose Control Panel then choose Programs.
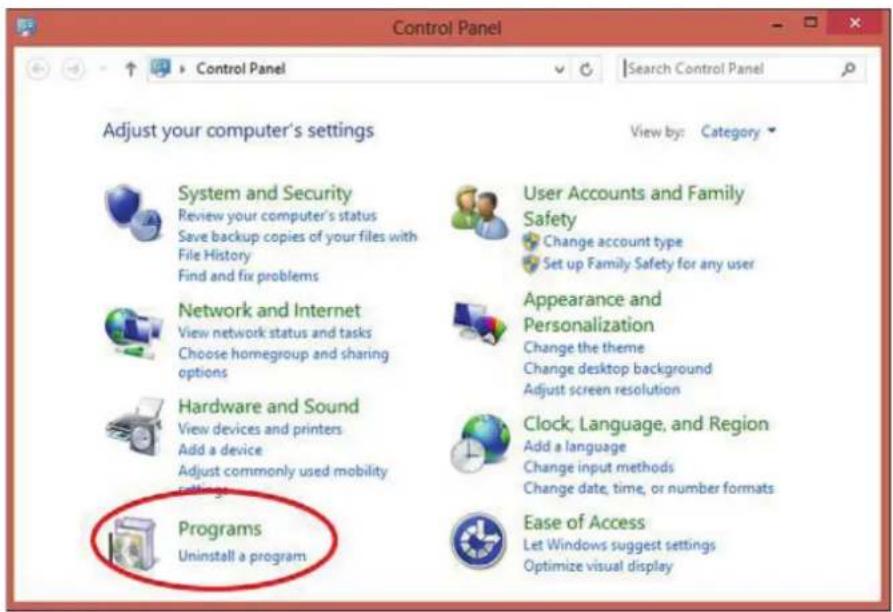
Step 2:
Click Turn Windows features on or off, and the user will see window as image below.
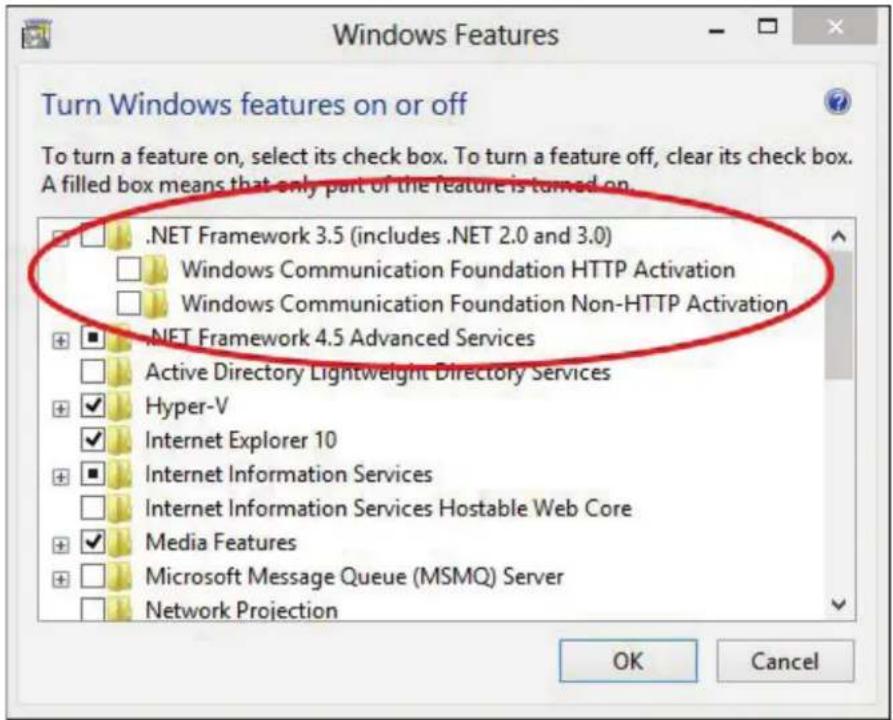
The User can enable this feature by click on .NET Framework 3.5 (include .NET 2.0 and 3.0) select it and click OK. After this step, it will download the entire package from internet and install the .NET Framework 3.5 feature.
But if the user does not have an internet connection, this steps can not be applied.
Solutions
The user still can enable this feature in offline mode if the user has Windows 8 DVD or ISO image.
How To Do
The following are the steps to enable .NET Framework 3.5 (include .NET 2.0 and 3.0) feature in offline mode :
Step 1:
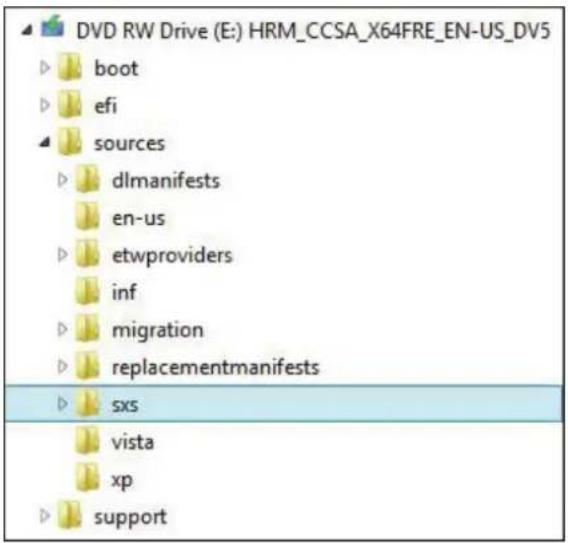
Insert Windows 8 DVD or mount ISO image. The source of this feature can be found in folder E:\sources\sxs. (In this case E: the user's drive letter on which the user has loaded Windows 8 Media.)
Step 2:
Open CMD.EXE with Administrative Privileges.
Step 3:
Run the following command Dism.exe /online /enable-feature /featurename:NetFX3 /All /Source:E:\sources\sxs /LimitAccess, and hit Enter.
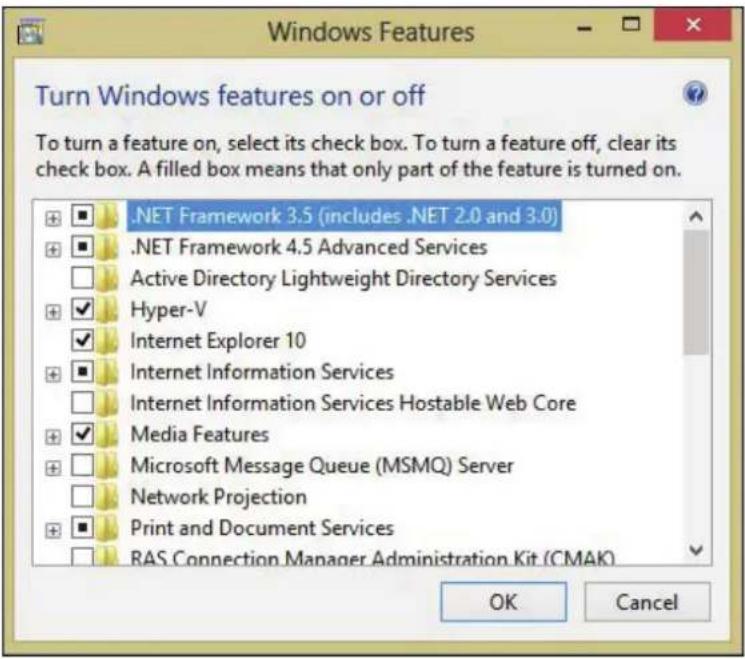
After completing the installation of .NET Framework 3.5 you can see that the feature is enabled.
Chapter 4: Using ViewSync 3 on Screen Mirroring Mode
4-1 Switch ViewSync 3 to Screen Mirroring Mode (Android)
- Scan the QR code from the screen to download instructions on how to use the screen mirroring mode
- Refer to this list of phones that support Miracast.
Miracast-compatible Phones (if your phone requests HDCP, please use the HDMI port)
HTC (Media Output)
- HTC New One
- Butterfly
Samsung (Screen Mirroring) / Android 4.1.1 (HDMI)
- Galaxy S3 / S4
• Galaxy Note 2 / Note 3
SONY (Screen Mirroring) / Android 4.0.4 (HDMI)
- Xperia T / TX
- Xperia Z
LG (Miracast) / Android 4.0.4
- Optimus G
Google / Android 4.2.1
- Nexus 4
SHARP (Wireless Output)
- SH-09D
- SH-10D
Remarked:
- Once connect to ViewSync 3 by Screen Mirroring(Miracast), ViewSync 3 wifi connection will be disconnected
- ScreenMirroring will be disable when ViewSync change to 5G or link to 5G wifi router because ScreenMirroring is only handshaking on 2.4G, so ScreenMirroring is enable on 2.4G of LAN client mode only.
Chapter 5: Using ViewSync 3 on DLNA Media Streaming Mode
5-1 DLNA Media Streaming
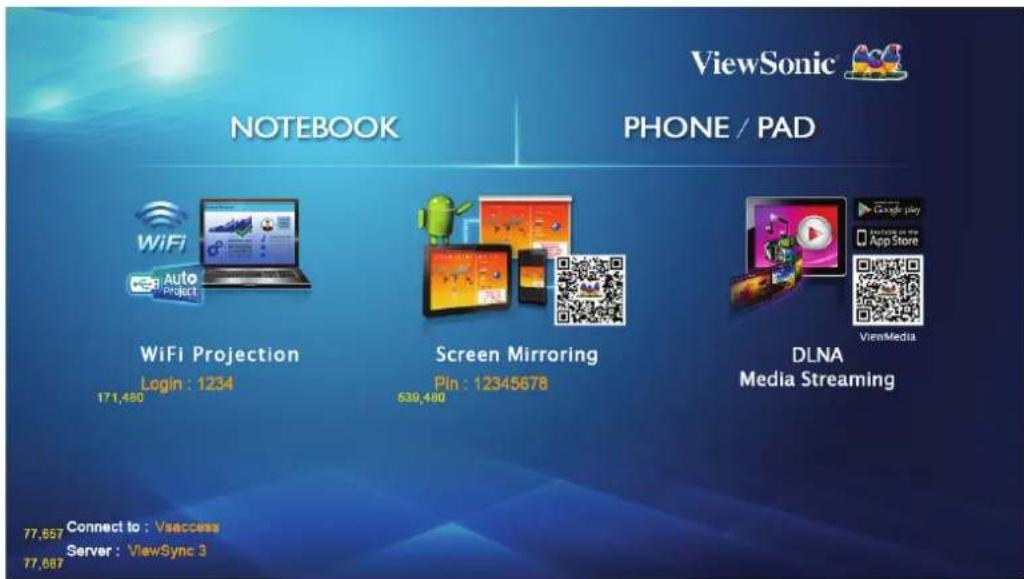
In Media Streaming, you can stream photo/music/video from your PC, Smartphone or tablet. Or play video/Music/photo form USB. Please follow the instruction to do media streaming. if Wifi Projection is playing, please don't use Media Streaming.
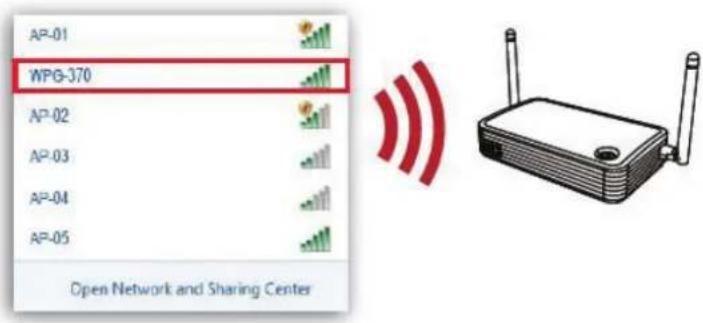
- Connect to ViewSync 3 in Wi-Fi AP list.
Wi-Fi Connect
-
Play media by WiFi streaming, we recommend software/AP as following: For more information Please check user manual of each software.
-
Android: ViewMedia
-
iOS: ViewMedia
-
Play media by USB
-
Plug in USB drive in to ViewSync 3
- Use remote select folder and delete content
- You can play Video, Photo or music that you select.
Appendix A: Support resolution
| Interface Output resolution | |
| VGA | 800x600@60Hz, 1024x768@60Hz, 1280x800@60Hz, 1280x1024@60Hz, 1366x768@60Hz |
| HDMI | NTSC, PAL, 480p, 576p, 720p@50Hz, 720p@60Hz, 1080i@50Hz, 1080i@60Hz, 1080p@50Hz, 1080p@60Hz |
Appendex B: ViewSync 3 Support Media Format
Video Format
| Format File extension | |
| AVI avi | |
| MPEG-1 mpg, mpeg | |
| MPEG-2 mpg, mpeg | |
| MPEG-TS m2t, tts | |
| MPEG-4 mp4, mp4v, mpeg4, m4v | |
| 3GP 3gp, 3gpp | |
| 3GP2 3g2, 3gpp2 | |
| MOV mov | |
| WMV wmv | |
| DVR-MS dvr, dvr-ms | |
Audio Format
| Format File extension | |
| MP3 mp3 | |
| LPCM pcm, wav, l16 | |
| WMA wma | |
| WAV wav | |
| MP4 mp4 | |
| AAC aac | |
| OGG ogg, oga, ogv |
Audio Format
| Format File extension | |
| GIF gif | |
| JPG jpg, jpeg | |
| BMP bmp | |
| PNG png |
Customer Support
For technical support or product service, see the table below or contact your reseller.
Note : You will need the product serial number.
| Country/Region | Website | T= TelephoneC = CHAT ONLINE | |
| AustraliaNew Zealand | www.viewsonic.com.au | AUS= 1800 880 818NZ= 0800 008 822 | service@au.viewsonic.com |
| Canada www.viewsonic.com | T (Toll-Free)= 1-866-463-4775T (Toll)= 1-424-233-2533 | service.ca@viewsonic.com | |
| Europe www.viewsoniceurope.com www.viewsoniceurope.com/uk/support/call-desk/ | |||
| Hong Kong www.hk.viewsonic.com T= 852 3102 2900 service@hk.viewsonic.com | |||
| India www.in.viewsonic.com T= 1800 419 0959 service@in.viewsonic.com | |||
| Korea ap.viewsonic.com/kr/ T= 080 333 2131 service@kr.viewsonic.com | |||
| Latin America(Argentina) | www.viewsonic.com/la/ | C=http://www.viewsonic.com/la/soporte/servicio-tecnico | soporte@viewsonic.com |
| Latin America(Chile) | www.viewsonic.com/la/ | C=http://www.viewsonic.com/la/soporte/servicio-tecnico | soporte@viewsonic.com |
| Latin America(Columbia) | www.viewsonic.com/la/ | C=http://www.viewsonic.com/la/soporte/servicio-tecnico | soporte@viewsonic.com |
| Latin America(Mexico) | www.viewsonic.com/la/ | C=http://www.viewsonic.com/la/soporte/servicio-tecnico | soporte@viewsonic.com |
| Nexus Hightech Solutions, Cincinnati #40 Desp. 1 Col. De los Deportes Mexico D.F.Tel: 55) 6547-6454 55)6547-6484Other places please refer to http://www.viewsonic.com/la/soporte/servicio-tecnico#mexico | |||
| Latin America(Peru) | www.viewsonic.com/la/ | C=http://www.viewsonic.com/la/soporte/servicio-tecnico | soporte@viewsonic.com |
| Macau www.hk.viewsonic.com T= 853 2870 0303 service@hk.viewsonic.com | |||
| Middle East ap.viewsonic.com/me/ Contact your reseller service@ap.viewsonic.com | |||
| Puerto Rico &Virgin Islands | www.viewsonic.com | T= 1-800-688-6688 (English)C = http://www.viewsonic.com/la/soporte/servicio-tecnico | service.us@viewsonic.comsoporte@viewsonic.com |
| Singapore/Malaysia/Thailand | www.viewsonic.com.sg T= 65 6461 6044 service@sg.viewsonic.com | ||
| South Africa ap.viewsonic.com/za/ Contact your reseller service@ap.viewsonic.com | |||
| United States | www.viewsonic.com | T (Toll-Free)= 1-800-688-6688T (Toll)= 1-424-233-2530 | service.us@viewsonic.com |
Limited Warranty
ViewSonic® Wireless Presentation Gateway
What the warranty covers:
ViewSonic warrants its products to be free from defects in material and workmanship, under normal use, during the warranty period. If a product proves to be defective in material or workmanship during the warranty period, ViewSonic will, at its sole option, repair or replace the product with a like product. Replacement product or parts may include remanufactured or refurbished parts or components.
How long the warranty is effective:
ViewSonic Wireless Presentation Gateway is warranted for 1 year for labor from the date of the first customer purchase.
Who the warranty protects:
This warranty is valid only for the first consumer purchaser.
What the warranty does not cover:
- Any product on which the serial number has been defaced, modified or removed.
- Damage, deterioration, failure, or malfunction resulting from:
a. Accident, abuse, misuse, neglect, fire, water, lightning, or other acts of nature, improper maintenance, unauthorized product modification, or failure to follow instructions supplied with the product.
b. Operation outside of product specifications.
c. Operation of the product for other than the normal intended use or not under normal conditions.
d. Repair or attempted repair by anyone not authorized by ViewSonic.
e. Any damage of the product due to shipment.
f. Removal or installation of the product.
g. Causes external to the product, such as electric power fluctuations or failure.
h. Use of supplies or parts not meeting ViewSonic's specifications.
i. Normal wear and tear.
j. Any other cause which does not relate to a product defect.
- Removal, installation, and set-up service charges.
How to get service:
- For information about receiving service under warranty, contact ViewSonic Customer Support (please refer to "Customer Support" page). You will need to provide your product's serial number.
- To obtain warranted service, you will be required to provide (a) the original dated sales slip, (b) your name, (c) your address, (d) a description of the problem, and (e) the serial number of the product.
- Take or ship the product freight prepaid in the original container to an authorized ViewSonic service center or ViewSonic.
- For additional information or the name of the nearest ViewSonic service center, contact ViewSonic.
Limitation of implied warranties:
There are no warranties, express or implied, which extend beyond the description contained herein including the implied warranty of merchantability and fitness for a particular purpose.
Exclusion of damages:
ViewSonic's liability is limited to the cost of repair or replacement of the product. ViewSonic shall not be liable for:
- Damage to other property caused by any defects in the product, damages based upon inconvenience, loss of use of the product, loss of time, loss of profits, loss of business opportunity, loss of goodwill, interference with business relationships, or other commercial loss, even if advised of the possibility of such damages.
- Any other damages, whether incidental, consequential or otherwise.
- Any claim against the customer by any other party.
Effect of local law:
This warranty gives you specific legal rights, and you may also have other rights which vary from local authority. Some local governances do not allow limitations on implied warranties and/or do not allow the exclusion of incidental or consequential damages, so the above limitations and exclusions may not apply to you.
Sales outside the U.S.A. and Canada:
For warranty information and service on ViewSonic products sold outside of the U.S.A. and Canada, contact ViewSonic or your local ViewSonic dealer.
The warranty period for this product in mainland China (Hong Kong, Macao and Taiwan Excluded) is subject to the terms and conditions of the Maintenance Guarantee Card.
For users in Europe and Russia, full details of warranty provided can be found in www.viewsoniceurope.com under Support/Warranty Information.
Wireless Presentation Gateway Warranty Term Template In UG
VSC_TEMP_2014
Mexico Limited Warranty
ViewSonic® Wireless Presentation Gateway
What the warranty covers:
ViewSonic warrants its products to be free from defects in material and workmanship, under normal use, during the warranty period. If a product proves to be defective in material or workmanship during the warranty period, ViewSonic will, at its sole option, repair or replace the product with a like product. Replacement product or parts may include remanufactured or refurbished parts or components & accessories.
How long the warranty is effective:
ViewSonic Wireless Presentation Gateway is warranted for 1 year for labor from the date of the first customer purchase.
Who the warranty protects:
This warranty is valid only for the first consumer purchaser.
What the warranty does not cover:
- Any product on which the serial number has been defaced, modified or removed.
- Damage, deterioration or malfunction resulting from:
a. Accident, misuse, neglect, fire, water, lightning, or other acts of nature, unauthorized product modification, unauthorized attempted repair, or failure to follow instructions supplied with the product.
b. Any damage of the product due to shipment.
c. Causes external to the product, such as electrical power fluctuations or failure.
d. Use of supplies or parts not meeting ViewSonic's specifications.
e. Normal wear and tear.
f. Any other cause which does not relate to a product defect. - Any product exhibiting a condition commonly known as "image burn-in" which results when a static image is displayed on the product for an extended period of time.
- Removal, installation, insurance, and set-up service charges.
How to get service:
For information about receiving service under warranty, contact ViewSonic Customer Support (Please refer to the attached Customer Support page). You will need to provide your product's serial number, so please record the product information in the space provided below on your purchase for your future use. Please retain your receipt of proof of purchase to support your warranty claim.
For Your Records
Product Name: ____ Model Number: ____
Document Number: Serial Number:
Purchase Date: ____ Extended Warranty Purchase? ____ (Y/N)
If so, what date does warranty expire?
- To obtain warranty service, you will be required to provide (a) the original dated sales slip, (b) your name, (c) your address, (d) a description of the problem, and (e) the serial number of the product.
- Take or ship the product in the original container packaging to an authorized ViewSonic service center.
- Round trip transportation costs for in-warranty products will be paid by ViewSonic.
Limitation of implied warranties:
There are no warranties, express or implied, which extend beyond the description contained herein including the implied warranty of merchantability and fitness for a particular purpose.
Exclusion of damages:
ViewSonic's liability is limited to the cost of repair or replacement of the product. ViewSonic shall not be liable for:
- Damage to other property caused by any defects in the product, damages based upon inconvenience, loss of use of the product, loss of time, loss of profits, loss of business opportunity, loss of goodwill, interference with business relationships, or other commercial loss, even if advised of the possibility of such damages.
- Any other damages, whether incidental, consequential or otherwise.
- Any claim against the customer by any other party.
- Repair or attempted repair by anyone not authorized by ViewSonic.
| Contact Information for Sales & Authorized Service (Centro Autorizado de Servicio) within Mexico: | |
| Name, address, of manufacturer and importers:México, Av. de la Palma #8 Piso 2 Despacho 203, Corporativo Interpalmas,Col. San Fernando Huixquilucan, Estado de MéxicoTel: (55) 3605-1099 http://www.viewsonic.com/la/soporte/index.htm | |
| NÚMERO GRATIS DE ASISTENCIA TÉCNICA PARA TODO MÉXICO: 001.866.823.2004 | |
| Hermosillo:Distribuciones y Servicios Computacionales SA de CV.Calle Juarez 284 local 2Col. Bugambilas C.P: 83140Tel: 01-66-22-14-9005E-Mail: disc2@hmo.megared.net.mx | Villahermosa:Compumantenimietnos Garantizados, S.A. de C.V.AV. GREGORIO MENDEZ #1504COL, FLORIDA C.P. 86040Tel: 01 (993) 3 52 00 47 / 3522074 / 3 52 20 09E-Mail: compumantenimientos@prodigy.net.mx |
| Puebla, Pue. (Matriz):RENTA Y DATOS, S.A. DE C.V. Domicilio:29 SUR 721 COL. LA PAZ72160 PUEBLA, PUE.Tel: 01(52).222.891.55.77 CON 10 LINEASE-Mail: datos@puebla.megared.net.mx | Veracruz, Ver.:CONEXION Y DESARROLLO, S.A DE C.V. Av. Americas # 419ENTRE PINZÓN Y ALVARADOFracc. Reforma C.P. 91919Tel: 01-22-91-00-31-67E-Mail: gacosta@qplus.com.mx |
| ChihuahuaSoluciones Globales en ComputaciónC. Magisterio # 3321 Col. MagisterialChihuahua, Chih.Tel: 4136954E-Mail: Cefeo@soluglobales.com | CuernavacaCompusupport de Cuernavaca SA de CVFrancisco Leyva # 178 Col. Miguel HidalgoC.P. 62040, Cuernavaca MorelosTel: 01 777 3180579 / 01 777 3124014E-Mail: aquevedo@compusupportcva.com |
| Distrito Federal:QPLUS, S.A. de C.V.Av. Coyoacán 931Col. Del Valle 03100, México, D.F.Tel: 01(52)55-50-00-27-35E-Mail : gacosta@qplus.com.mx | Guadalajara, Jal.:SERVICRECE, S.A. de C.V.Av. Niños Héroes # 2281Col. Arcos Sur, Sector Juárez44170, Guadalajara, JaliscoTel: 01(52)33-36-15-15-43E-Mail: mmiranda@servicrece.com |
| Guerrero AcapulcoGS Computación (Grupo Sesicomp)Progreso #6-A, Colo Centro39300 Acapulco, GuerreroTel: 744-48-32627 | Monterrey:Global Product ServicesMar Caribe # 1987, Esquina con Golfo PérsicoFracc. Bernardo Reyes, CP 64280Monterrey N.L. MéxicoTel: 8129-5103E-Mail: aydeem@gps1.com.mx |
| MERIDA:ELECTROSERAv Reforma No. 403Gx39 y 41Mérida, Yucatán, México CP97000Tel: (52) 999-925-1916E-Mail: rrrb@sureste.com | Oaxaca, Oax.:CENTRO DE DISTRIBUCION YSERVICIO, S.A. de C.V.Murguía # 708 P.A., Col. Centro, 68000, OaxacaTel: 01(52)95-15-15-22-22Fax: 01(52)95-15-13-67-00E-Mail. gpotai2001@hotmail.com |
| Tijuana:STDAv Ferrocarril Sonora #3780 L-CCol 20 de NoviembreTijuana, Mexico | FOR USA SUPPORT:ViewSonic Corporation14035 Pipeline Ave. Chino, CA 91710, USATel: 800-688-6688 (English); 866-323-8056 (Spanish);E-Mail: http://www.viewsonic.com |
Wireless Presentation Gateway Mexico Warranty Term Template In UG
VSC_TEMP_2014

natural_image
Three colorful bird illustrations perched on a branch against a red background (no text or symbols)ViewSonic®
- Thank you for choosing ViewSonic
- Compliance Information
- Please read before proceeding
- FCC Notice
- FCC SAR Information
- CE Conformity for European Countries
- Following information is only for EU-member states:
- European Union Regulatory Conformance
- Declaration of RoHS2 Compliance
- Copyright Information
- Product Registration
- For Your Records
- Product disposal at end of product life
- Contents
- Chapter 1: Product Introduction
- Chapter 2: ViewSync 3 administration setting
- Chapter 3: WiFi Projection
- Chapter 4: Using ViewSync 3 on Screen Mirroring Mode
- Chapter 5: Using ViewSync 3 on DLNA Media Streaming Mode
- Customer Support
- 1-1 Package Contents
- 1-2 Hardware Recommendation
- WiFi Presentation Mode (HDMI/VGA)
- PC or Notebook
- Screen Mirroring
- DLNA Media Streaming (HDMI/VGA)
- Smart phone
- Tablet-PC
- Recommend software
- 1-3 Highlights
- Features
- 1-4 Remote Controller
- Notes:
- 1-5 Hardware Setup/Installation
- Connect your device
- Connect power and push power button to turn on ViewSync 3.
- 2-1 Connect to Web Configuration Menu
- ViewSonic Wireless Presentation Gateway
- Home
- 2-2 Status & Info
- Status and Information
- 2-3 Network Setting
- Network Settings
- ViewSonic ® Wireless Presentation Gateway
- 2-4 Wireless Settings
- 'Basic' Settings
- "Security" Setting
- Encryption: Disabled
- Encryption: WPA +WPA2
- Band Setting
- 2-5 WiFi connection setting
- PS:
- 2-6 Projection Setting
- Projection Settings
- 2-7 Password Setting
- 2-8 Firmware Upgrade
- Firmware Upgrade
- Note:
- 2-9 Restart
- 2-10 Logout
- 2-11 OSD Menu
- 2-12 Network Setting
- Wired Connection
- Device Name
- WiFi Connection
- Network setting
- AP Mode
- Audio Setting
- Video Setting
- System Setting
- 3-1 Normal mode, user can freedom of playing
- Method 1: AutoProject Key
- Method 2: Download Software from ViewSync 3 server
- Perform AutoProject on desktop
- Default setting (WiFi Direct link)
- Select ViewSync 3
- Next time, ViewSync 3 will be listed on Saved column, it will AutoProject to ViewSync directly
- AutoProject software standby UI
- Menu
- Setting:
- 3-2 Moderator Mode
- Moderator control by remote.
- FAQ:
- Answer:
- Windows 7
- How To Install Microsoft .NET Framework 3.5.1 on Windows 7
- Click Start -> Control Panel
- Click Programs
- Click Turn Windows features on or off
- Click the checkbox next to Microsoft .NET Framework 3.5.1
- You will see the checkbox become filled
- Click OK
- Windows 8
- Step 1:
- Step 2:
- Solutions
- How To Do
- Step 3:
- 4-1 Switch ViewSync 3 to Screen Mirroring Mode (Android)
- HTC (Media Output)
- Remarked:
- 5-1 DLNA Media Streaming
- Wi-Fi Connect
- Appendex B: ViewSync 3 Support Media Format
- Limited Warranty
- ViewSonic® Wireless Presentation Gateway
- What the warranty covers:
- How long the warranty is effective:
- Who the warranty protects:
- What the warranty does not cover:
- How to get service:
- Limitation of implied warranties:
- Exclusion of damages:
- Effect of local law:
- Sales outside the U.S.A. and Canada:
- Mexico Limited Warranty
Brand : VIEWSONIC
Model : ViewSync 3
Category : Wireless Presentation Unit