
7673 - Car alarm GEMINI - Free user manual and instructions
Find the device manual for free 7673 GEMINI in PDF.


| Product Type | Car Alarm System |
| Brand | Gemini |
| Model | 7673 |
| Operating Voltage | 12V DC |
| Current Consumption (Standby) | < 10 mA |
| Siren Output | 120 dB |
| Remote Control Range | Up to 100 m (line of sight) |
| Number of Remote Controls Included | 2 |
| Shock Sensor | Dual-zone adjustable |
| Keyless Entry | Yes |
| Engine Immobilizer | Yes |
| Panic Button | Yes |
| Dimensions (Control Unit) | 120 x 70 x 25 mm |
| Weight (Control Unit) | 150 g |
| Operating Temperature | -20°C to +60°C |
| Maintenance | Keep remote clean; replace battery (CR2032) when range decreases |
| Safety | Over-current protection; shock sensor adjustable to prevent false alarms |
| Spare Parts Availability | Contact Gemini support or authorized dealers |
| Warranty | 1 year |
Frequently Asked Questions - 7673 GEMINI
User questions about 7673 GEMINI
0 question about this device. Answer the ones you know or ask your own.
Ask a new question about this device
Download the instructions for your Car alarm in PDF format for free! Find your manual 7673 - GEMINI and take your electronic device back in hand. On this page are published all the documents necessary for the use of your device. 7673 by GEMINI.
USER MANUAL 7673 GEMINI
No forest has been destroyed to produce this 100% recycled paper
by GEMINI Technologies S.p.A.
Via Luigi Galvani 12 - 21020 Bodio Lomnago (VA) - Italia
Tel. +39 0332 943211 - Fax +39 0332 948080
Web site: www.gemini-alarm.com - e-mail: info@gemini-alarm.com

GEMINI
ALARM SYSTEMS

CERMET
10.0000
CERTIFICATO
1
7673
MANUALE UTENTE END USER'S MANUAL
①
UK
F
D
E
P
CE
For all EU Countries
AC 2626 Rev. 01-10/04
UK
ALARM SYSTEM DESCRIPTION
Dear Customer, we recommend to read both carely this manual and entirely, so that ypu can acquaint yourself with and get the best operation results with the system and the functions.
Functions programming is easy and you can change the programmation anytime.
Below are described the alarm module fuctions:
- System arming and disarming by the automatic identifier "TAG" (art.7708).
• Anti-hijacking function (programmable). - Acoustic signalling (excludible by programming from arming/ disarming).
- Optictic signalling (excludible by programming from arming/disarming).
• Perimetric protection.
• Volumetric protection (excludible by arming).
• Electrical engine immobilizer. - Memoy Led.
- Electronic key for programming function, emergency unlock and total disarming of the alarm system.
OPERATING DESCRIPTION
COMPLETE ALARM ARMING
- Stop the vehicle engine by turning the ignition key to "OFF" position.
- Open the vehicle door, leave the cabin, close the door and press the lock button of the original radio control.
- Go away from the vehicle, bringing with you the TAG card.
- Not receiving the identifying code of the TAG card, the 7673 module will arm the alarm system, 8 seconds after the last reception.
- Arming will be indicated by a turn signals flashing and an acoustic signal.
- If the door is reopened within 8 seconds after closing, arming will be inhibited (the led will be constantly turned on) and normal procedure will restart after the door closing.
SYSTEM ARMED
When the alarm does not receive any more the TAG card code, the system is "armed", that is to say it is ready to detect eventual theft attempts.
This situation is indicated by intermittent flashing of the LED.
ALARM ARMING WITH SENSOR EXCLUSION
This function allows the user to arm the system, with volumetric protection (ultrasonic or over frequency, according to the choice) being excluded.
To de-activate this function, the system must be disarmed and the ignition key turned to "OFF"; then proceed as follows:
- Open the driver side door of the vehicle and keep it open.
- During the whole time the door is open, the Led will be constantly turned on and the alarm will be not armed, since the presence or not of the TAG is ignored.
PAG. 2
- Insert the electronic key in the specific receptcle.
- Exclusion of volumetric sensors will be indicated by two short simultaneous flashings of turn signals and LED
- Close the door, press the lock button of the original radio control and go away from the vehicle.
- Since the alarm is not receiving any more the TAG card code, it will be armed only with the perimetric protections
NOTE: sensor cutout is limited to a single alarm activation cycle.
ALARM AND ALARM CYCLES
Any occurred attempt will be indicated by the alarm with visual/acoustic signalling (turn signal flashing and siren).
For every input and every arming cycle, the alarm causes are limited to five cycles of 30 seconds each. The only alarm causes having no limits, are starting attempt (positive under key +15/54) and wire cutting.
After the alarm cause has been restored, there is a “neutral time” of 5 seconds, before a new signaling becomes possible.
ALARM DISARMING
Go close to the vehicle, so that the TAG can communicate again with the alarm. Once the communication between TAG and alarm is restored, the system will be disarmed; nevertheless the effective disarming will take place only when the driver side door will be open. Disarming will be indicated by 3 flashings of the turn signals and 3 acoustic signals.
NOTE : the system arming time depends on the TAG signal reception. Since the code transmission has a timer control, TAG constrains the disarming according to the signal reception by the alarm.
An alarm condition occurred, will be composed of five turn signal flashings and five acoustic signals. Look relative paragraphs for possible causes and signalling.
ALARM DISARMING WITH ELECTRONIC KEY (TOTAL DISARMING)
This kind of disarming has been conceived as an "EMERGENCY RELEASING"; it should be used only when the TAG card does not function or when vehicle maintenance is needed (in order to avoid possible continuous arming/disarming).
Switch "OFF" the TAG card (when on function in order to vehicle manaintenance it is necessary to do this)
- Open and close the driver side door.
- Wait until the alarm system is armed (indicated by led blinking).
- Put the electronic key in the receptacle.
• The alarm system disarms (total disarming).
In order to restore normal operation, proceed as described in next pharagrap.
ARMING AFTER A TOTAL DISARMING
When the alarm is switch off with the electronic key, TOTAL DISARMING, the alarm must be "wake up".
PAG. 3
In order to restore the normal operation of the alarm system, proceed as follows:
- Push the TAG button, until the LED is illuminated.
- Open and close the driver side door.
- Put twice the electronic key in the receptacle (alarm arming/disarming).
ALARM SIGNALLING DELAY
The system has a delay response of 15 seconds between the robbery detection and its signaling (optical/acoustical signals).
This delay, or pre-alarm, has been programmed to avoid involuntary but possible "false alarms" which can occur when the user opens the door or he enters in the vehicle, while the system is still armed (no transmission by the TAG card).
The pre-alarm condition will be indicated by the constant turning on of the led and, if the system remains armed 8 seconds after the attempt, a loud acoustic signal will be sent out. If the system has not been disarmed, within the pre-alarm period, usual optical/acoustical signals will be activated.
NOTE: during the pre-alarm signaling, the alarm cycle and the neutral time between two alarm signaling, just the reception of the TAG signal, will disarm the system without any door being open.
ALARM MEMORY
When disarming the alarm, if five turn signal flashes and five beep signals occur, it is possible to identify the cause generating the alarm condition.
To do this, turn the ignition key to "ON" and look at the vehicle status LED. The LED will be blink, shown the last alarm condition.
The cause of the alarm will indicate for five times, and this indication can be interrupted by turning the ignition key to "OFF" position.
The possible alarm signalling are indicated in the table below.
| LED SIGNAL | CAUSE OF THE ALARM |
| ★★★ | Absorption sensor |
| ★★★★★ | Positive under key (+15/54) |
| ★★★★★★ | Door switches |
| ★★★★★★★★ | Cut wires |
| ★★★★★★★★★ | Trunk, hood volumetric sensors |
| ★★★★★★★★★★★ | External magnetic contact |
| ● LED OFF (2 seconds) LED ON (400mS) | |
PROGRAMMING THE ALARM SYSTEM
Has been previously programmed with standard configuration during manufacturing procedure by Gemini.
The basic configuration can be modified in any moment and has the following programmable functions:
1 Acoustic signalling for arming and disarming (enabled).
2 Current absorption sensor (disabled).
3 Anti-hijacking function (disabled).
4. Optictic signalling for arming and disarming (enabled).
Cutting off the power supply of vehicle electrical equipment, no programmed functions are changed.
To modify the alarm programming, see at the indications reported below:
- With the alarm system disarmed and the driver side door closed, turn the ignition key in "ON" position.
• The LED will blink for a short time (about 1 second).
• During this period, insert the electronic key in the receptacle. - Starting of programming procedure is indicated by one high tone and two loud tones; if this does not occur, repeat the procedure from the beginning.
NOTE: this procedure must be carried out entirely. Indeed, by changing the position of the vehicle ignition key, the function is confirmed, while passing at the next one.
- In order to keep unchanged the operating state, turn the ignition key to "OFF" and then back to "ON". A loud acoustic signal will confirm the operation.
- To change the operating state, put once the electronic key in the specific receptacle.
• In both cases, the alarm will pass at the next function.
| FUNCTION STATE | |
| Acoustics signalling | Vehicle ignition key - Confirm Electronic key - Modify |
| Current absorption sensor | Vehicle ignition key - Confirm Electronic key - Modify |
| Anto-hijacking function | Vehicle ignition key - Confirm Electronic key - Modify |
| Optical signalling | Vehicle ignition key - Confirm Electronic key - Modify |
- Turn the ignition key to "OFF" (if not yet done, to keep unchanged the operating state).
- The end of this procedure will be indicated by two acoustic signals, one with loud tone and one with high tone.
LEARNING OF NEW CONTROL DEVICES
ATTENTION: in order to carry out successfully the operation, it is necessary to make the required electrical connections (door switch, bonnet switch and positive under key).
The alarm can save to memory a maximum number of 12 control devices, either electronic keys, TAG cards or magnetic contact (the later as a protection device).
Proceed as follows:
- With the alarm being disarmed, open and keep open the bonnet and the driver side door.
- Turn the ignition key to "ON".
ATTENTION: the following operations must be carried out within four seconds, otherwise the new device memorizing procedure will be invalidated.
- Turn the ignition key to "OFF".
Re-turn the ignition key to "ON" for three consecutive times (ignition key to "ON" and "OFF"), within the maximum time of four seconds, as mentioned before.
After the third commutation, let the ignition key to "ON".
- The alarm will indicate the procedure starting of new control device or magnetic contact learning, by two long turn signal flashes and two acoustic signals, one acute tone and the other loud tone.
ATTENTION: do not modify the bonnet position, otherwise instead of saving to memory new devices, deletion of existing ones in the alarm's memory will take place.
- Now the alarm is waiting for receiving the device code.
- Press introduce the electronic key in the specific receptacle, press the TAG card button or make the magnetic contact to transmit (bring near and then take away contact and magnet), according to the device to be saved to memory.
In all four cases, the alarm will indicate the new device learning, by one turn signal flashing and one acute tone signal.
- Repeat the procedure to save to memory other devices.
- Turn the ignition key to "OFF".
- The procedure completion will be indicated by one long turn signal flashing and one loud tone signal.
NOTE: Saving to memory the thirteenth device, has as a result the deletion of the first device installed in the location one of the alarm memory.
DELETION OF PROGRAMMED CONTROL DEVICES
ATTENTION: in order to carry out successfully the operation, it is necessary to make the required electrical connections (door switch, bonnet switch and positive under key).
The alarm is equipped with a deletion procedure of new control devices, either radio controlled, or electronic keys, TAG cards or magnetic contact (the later as a protection device).
Proceed as follows:
- With the alarm being disarmed, open and keep open the bonnet and the driver side door.
- Turn the ignition key to "ON".
ATTENTION: the following operations must be carried out within four seconds, otherwise the new device deletion procedure will be invalidated.
- Turn the ignition key to "OFF".
- Re-turn the ignition key to "ON" for three consecutive times (ignition key to "ON" and "OFF"), within the maximum time of four seconds, as mentioned before.
After the third commutation, let the ignition key to "ON".
- The alarm will indicate the procedure starting of new control device or magnetic or magnetic contact deletion, by two long turn signal flashes and two acoustic signals, one acute tone and the other loud tone.
- Close the bonnet.
• The led will be illuminated constantly.
- Keep the bonnet close till the moment, the complete deletion of devices via radio, will take place (after about four seconds).
NOTE: keeping the bonnet close for less than four seconds, the device deletion via radio will be unsuccessful.
- The procedure completion will be indicated by led's turning off, by one long turn signal flashing and one loud tone signal.
- Turn the ignition key to "OFF".
NOTE: the control device deletion does not imply any modification of programmed functions.
ANTI-HIJACKING FUNCTION
NOTE: activation of the anti-hijacking function does not mean the vehicle immobilization but the starting of the reception procedure and authentication of the radio code.
ATTENTION: We suggest to keep the TAG and the electronic key separately from the vehicle ignition key for safety reasons and to enable the anti-hijacking function to control the vehicle speed.
The system ref.7673 is equipped with the anti-aggression function.
This function is able to immobilize the engine in case of an aggression against the vehicle's owner.
The anti-aggression function is based on the use of an automatic transmitter, (called TAG, ref. 7708), whose code is saved in the system's memory.
The anti-robber function depends on the arming in the programming phase and the presence or absence of the positive under key.
When the engine is turned off and positive under key is not present, the module will be activated as an alarm siren and TAG will operate as a radio control.
When the vehicle is running or in any case when positive under key is present, not receiving the signal sent out from the TAG, the module will be activated with the anti-robber function, immobilizing the vehicle as described in next chapters.
In order to avoid involuntary activation of the anti-robber system and consequently the vehicle's immobilizing, you must pay attention to its state, when you are close to the vehicle.
The status "ON" of the TAG is signalled by a short flash of the Led, and the coded data from the TAG are transmitted to the system periodically.
VEHICLE RUNNING; USER AGGRESSION AND CAR HIJACKING
If the driver's door will be opened during the vehicle running and the vehicle will be stolen, the radio contact between the TAG transmitter and the system will be lost, (the TAG transmitter must be in the user's dress pocket).
Sixteen seconds after the opening of the driver's door the system's status Led will be lighted in order to signal the activation of the anti-aggression count-down. In this situation, for safety reasons, the car's running is not interrupted. After one minute from the opening of the driver's door the system will enable the vehicle's immobilization (in addition to the sirene sound for 2 minutes).
ATTENTION: For the correct work of the anti-aggression function, the user must hold the transmitter when the vehicle will be stolen.
INSTALLATION WITH CONNECTION OF THE ODOMETER SIGNAL
The vehicle will be immobilized when the vehicle is running and its speed will be near to 0 km/h.
The immobilization of the vehicle will be signalled by the flashing of the direction lights, (for about 3 hours).
INSTALLATION WITHOUT CONNECTION OF THE ODOMETER SIGNAL
The vehicle will be immobilized when the engine will be turned OFF for the first time. It will not be possible to start again the vehicle's engine.
The immobilization of the vehicle will be signalled by the flashing of the direction lights, (for about 3 hours).
SYSTEM DISARMING WITH TAG CARD
In order to disarm the engine's immobilization (and to start again the vehicle), it's mandatory to approach to the vehicle with the TAG card, (switched ON).
When the module recives again the TAG coded signal, it deactivates the anti-hijacking function and it stop turn signals flashes.
SYSTEM DISARMING WITHOUT TAG CARD
This procedure can be used if there are some problems with the TAG card or with the anti-hijacking function (ex. Damage or battery discharge of the TAG card with enabled anti-hijacking function and vehicle running).
It's possible to disarm the engine's immobilization with the following procedure:
- Insert the electronic key in the receptacle at the end of the anti-hijacking acoustic signalling (about two minutes).
• No optic/acoustic signalling will be indicated
BATTERY REPLACEMENT
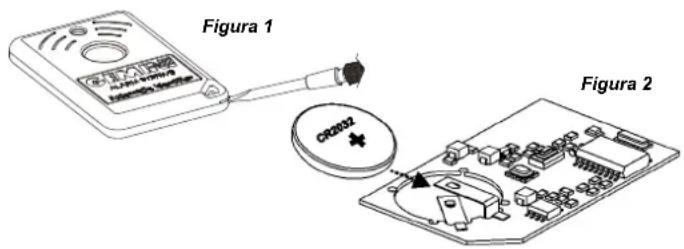
Open the TAG's plastic, making level with a screwdriver on the hole close to the slot. (Figure 1)
Remove the circuit and pull out the uncharged battery; position the charged battery, keeping the negative pole upwards. (Figure 2)
Remount all components, being sure that closure is correct and efficient.
:Note: in order to achieve longer life of the battery, it is suggested to turn off the device, when it is not used.
- UK
- ALARM SYSTEM DESCRIPTION
- OPERATING DESCRIPTION
- COMPLETE ALARM ARMING
- SYSTEM ARMED
- ALARM ARMING WITH SENSOR EXCLUSION
- ALARM AND ALARM CYCLES
- ALARM DISARMING
- ALARM DISARMING WITH ELECTRONIC KEY (TOTAL DISARMING)
- ARMING AFTER A TOTAL DISARMING
- ALARM SIGNALLING DELAY
- ALARM MEMORY
- PROGRAMMING THE ALARM SYSTEM
- LEARNING OF NEW CONTROL DEVICES
- DELETION OF PROGRAMMED CONTROL DEVICES
- ANTI-HIJACKING FUNCTION
- VEHICLE RUNNING; USER AGGRESSION AND CAR HIJACKING
- INSTALLATION WITH CONNECTION OF THE ODOMETER SIGNAL
- INSTALLATION WITHOUT CONNECTION OF THE ODOMETER SIGNAL
- SYSTEM DISARMING WITH TAG CARD
- SYSTEM DISARMING WITHOUT TAG CARD
- BATTERY REPLACEMENT
Brand : GEMINI
Model : 7673
Category : Car alarm