835 - Baby monitor Padwico - Free user manual and instructions
Find the device manual for free 835 Padwico in PDF.


| Product Type | Baby Monitor |
| Brand | Padwico |
| Model | 835 (BC-30D) |
| Frequency Band | 863-870 MHz |
| Operating Range | Up to 600 m in open space |
| Radiating Power | Low (10% of normal DECT, 50% of ECO DECT) |
| Night Light | Yes, with permanent ON and VOX modes |
| Out-of-Range Alert | Audio and visual (LED flashing) on parent unit after 2 minutes |
| LED Level Meter | Yes, on parent unit to indicate sound level |
| Low Battery Warning | Indicator flashing and alarm on both units |
| Microphone Sensitivity | Adjustable (Hi, Mid, Lo) on baby unit |
| Vibration Alert | Yes, on parent unit (selectable) |
| Charger Stand | Included for both units (intelligent rapid charger) |
| Rechargeable Battery | 3.7V Li-Polymer (installed in both units) |
| Power Supply | 6V DC via included AC adapters (2 provided) |
| Charging Time | Approximately 4 hours for full charge |
| Operating Temperature | 0°C to 40°C (32°F to 104°F) |
| Cleaning | Use a soft cloth with mild detergent; avoid abrasive cleaners |
| Safety | Not a medical device; adult supervision recommended |
| Standard Accessories | 2 x 6V AC adapters, 1 baby unit, 1 parent unit, 2 chargers, 2 Li-Polymer batteries (installed), user manual |
| Compliance | CE, R&TTE Directive 1999/5/EC, Low Voltage Directive 73/23/EEC, EMC Directive 89/336/EEC |
Frequently Asked Questions - 835 Padwico
User questions about 835 Padwico
0 question about this device. Answer the ones you know or ask your own.
Ask a new question about this device
Download the instructions for your Baby monitor in PDF format for free! Find your manual 835 - Padwico and take your electronic device back in hand. On this page are published all the documents necessary for the use of your device. 835 by Padwico.
USER MANUAL 835 Padwico
natural_image
Line drawing of a portable electronic device with a speaker grille and base mount (no text or symbols)
natural_image
Line drawing of a portable electronic device with a central oval panel and three circular buttons (no text or symbols)
Danska N2 - 10
Finska N11 - 19
Norska 20 - 28
Svenska 29 - 37
English 38 - 46

835 (BC-30D)_manual Page 03 | Aug 12, 2013
DK_Danish
835 (BC-30D)_manual Page 04 | Aug 12, 2013
natural_image
Line drawing of a mobile phone showing front panel and rear cover with a downward arrow indicating action (no text or symbols)STR∅MFORSYNING
natural_image
Diagram of a device with internal components and an arrow indicating direction (no text or symbols)
3

natural_image
Line drawing of a portable electronic device with a power cord and indicator lights (no text or symbols)835 (BC-30D)_manual Page 11 | Aug 12, 2013
FI_Finnish
835 (BC-30D)_manual Page 12 | Aug 12, 2013
natural_image
Line drawing of a mobile phone car with a partially open rear panel and a downward arrow indicating motion (no text or symbols)
natural_image
Diagram of a smartphone internal structure with labeled components and an arrow indicating motion (no text or symbols present)VIRRANSYÖTTÖ
natural_image
Line drawing of a portable electronic device with a power cord and cable (no text or symbols)VAUVAN LAITE
VANHEMPIEN LAITE

LATURI
natural_image
Illustration of three household appliances: a power cord, a flatboard with cable, and a portable air conditioner (no text or symbols)
natural_image
Illustration of three electronic devices labeled c, d, and f, showing different device configurations (no text or symbols present)18

VIANETSINTÄ
natural_image
Line drawing of a mobile phone showing front panel and rear cover (no text or symbols)STR∅MFORSYNING
- NBruk med Li-batteripakke
natural_image
Diagram of a device with internal components and an arrow indicating direction (no text or symbols)

natural_image
Line drawing of a portable electronic device with a power cord and attached cable (no text or symbols)835 (BC-30D)_manual Page 29 | Aug 12, 2013
SE\_Swedish
835 (BC-30D)_manual Page 30 | Aug 12, 2013
natural_image
Line drawing of a mobile phone car with a partially open rear panel and a downward arrow indicating motion (no text or symbols)
natural_image
Diagram of a smartphone internal structure with labeled components and an arrow indicating motion (no text or symbols present)STRÖMKÄLLA
- NBatteridrift litiumbatteri
natural_image
Line drawing of a portable electronic device with a power cord and control panel (no text or symbols)BABYENHET
FÖRÄLDRAENHET

LADDARE
natural_image
Illustration of various household appliances and devices, including a power plug, fan, and battery (no text or labels visible)FELSÖKNING
Thank you for purchasing our 835 baby monitor. Your unit has been manufactured and checked under the strictest possible quality control ensure that each monitor leaves the factory in perfect condition. If unlikely event you find any defects or have any problem, please contact your dealer, our branch or service center.
Please read this manual carefully to obtain maximum performance & extended service life from the unit.
Features
- Full digital technique operating in the 863-870MHz with zero interference
- Automatic search and hop to free channels
- Operating range of 600m in open space
- Low radiating power (only 10% of normal DECT and 50% of ECO DECT)
- Night light on baby unit
- Audio and visual alert for out-of-range on parent unit
- LED level meter on parent unit
- Low battery warning on both baby and parent unit
- Adjustable microphone sensitivity on baby unit
- Vibration alert on parent unit
- Charger stand and rechargeable Li battery for both units
WARNING
The 835 baby monitor should not be regarded as a medical device. Premature babies or those considered to be at risk should be under the supervision of your doctor or health personnel.
Direct supervision of your baby at a regular interval by a responsible adult is strongly recommended in addition to using the 835.
Eng
835 (BC-30D)_manual Page 39 | Aug 12, 2013
Eng
835 (BC-30D)_manual Page 40 | Aug 12, 2013

natural_image
Line drawing of a mobile phone showing front panel and rear cover (no text or symbols)POWER SUPPLY
- NOperation from Li battery pack
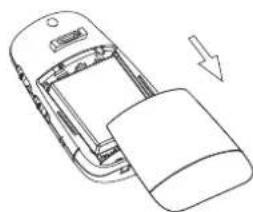
The Li polymer battery pack is already installed in the units. To exchange battery pack, press and open the battery cover in the direction as shown. Take out the battery pack and disconnect from socket ⑦.

natural_image
Diagram of a smartphone internal structure with an arrow indicating direction (no text or symbols present)
39
natural_image
Line drawing of a portable electronic device with ports and cables (no text or symbols)- NOperation from AC mains using the intelligent rapid charger
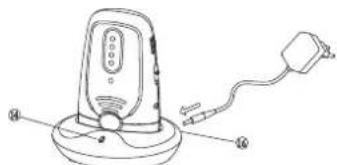
Connect the output plug of the supplied 6V AC adapter to the DC jack (10) of the rapid charger, make sure the polarity is correct, being switched off, place it into the rapid charger. The charging indicator will light up red. Adjust the position of unit in case the indicator does not light up. Once the battery is fully charged up (normally it takes around 4 hours), the indicator turns steady green. Now the switched on for operation. Either you can take it out or keep placing it in the rapid charger will cause no damage to the battery. In the latter case, when the battery is being consumed and voltage falls to a certain level, the rapid charger will automatically start charging up the battery again.
With
unit
Note: Before using the unit for the first time, charge up the Li batteries with the rapid charger for at least four hours. Besure to switch off the unit before charging.

CAUTION :
a. NBESURE NTHE NBATTERY NIN NTHE NUNIT NIS NRECHARGABLE N N NTYPE BEFORE NPLACING NIT NIN NTHE NRAPID NCHARGER, NOTHERWISE EXPLOSION MAY RESULT.
b. NBESURE THE BATTERY IS INSTALLED IN THE UNIT BEFORE PLACING IT IN THE RAPID CHARGER, OTHERWISE THE UNIT WILL NOT OPERATE NORMALLY.
c. NWHEN THE UNITS ARE NOT TO BE USED FOR A LONG TIME, THE LI BATTERY MAY RUN DOWN COMPLETELY. UNDER SUCH CIRCUM-STANCES, THE BATTERY CANNOT BE CHARGED NUP EVEN PLAC-ING IN THE CHARGER NSTAND. SLIDE OPEN THE NBATTERY DOOR AND DISCONNECT THE BATTERY FROM THE SOCKET. WAIT FOR 1 MINUTE, NC CONNECT NBACK NTHE NBATTERY NTO NSOCKET. NNOW NTHE BATTERY SHOULD BE ABLE TO CHARGE UP.
40

CONTROLS LAYOUT

① Microphone
② Transmit indicator
① Power On/Low battery indicator
④ Night light
⑤ Microphone sensitivity Hi - Mid - Lo switch
⑥ Power ON - OFF and night light switch
⑦ Battery connector socket
⑧ Speaker

41
⑨ LED level meter
⑩ Volume Control
Power ON - OFF and
vibration switch
⑰ Night light ON / VOX selector
⑰ Pairing button
⑭ Charging indicator
⑮ Charging pins
⑯ DC jack
OPERATION
Baby Unit
- Set the power ON/OFF switch ⑥ to ON position to turn on the unit. The power on indicator ③ will light up steady green.
- Place the unit about 1 m from the crib with the microphone 1 facing towards the baby.
- Adjust the microphone sensitivity using switch 5 such that the unit will be set to transmit whenever the microphone ① picks up a sound at your desirable loudness level. The unit will be most sensitive to sound when set to Hi position.
- Once the unit is in transmit mode, the transmit indicator 2 will light up red. The unit will return to standby mode a few seconds after the microphone 1 stops picking up any sound and the transmit indicator 2 will go off.
- Since this baby monitor is equipped with out of range alert function, the baby unit will transmit a signal to the parent unit at regular intervals even when the microphone ① does not pick up any sound. The transmit indicator ② will blink correspondingly.
- The night light ④ can be turned permanently ON by moving the power ON/OFF switch ⑥ to position. The night light can also be set to VOX (voice activated) using the selection switch ⑫ located inside the battery compartment. Under VOX mode, the night light will be switched on once the microphone ① detects a sound and automatically goes off a few seconds after the microphone ① stops picking up any sound.
- The condition of the battery is shown by the power on/battery low indicator 3. When the battery power is being consumed, the battery low indicator ③ will start flashing. Recharge the battery using the supplied stand.
fev
char
42

Parent Unit
- Set the power ON/OFF switch ⑪ to ON position to turn on the unit. The power on indicator ③ will light up steady green.
- Place this unit at a reasonable distance away from the baby unit to avoid feedback. Too close a distance will create a screeching sound at speaker ⑧.
- Once it receives a signal from the baby unit, the LEDs in the level meter will light up. The louder the baby's voice, the more number of LED will be lighted up. This feature is useful in case the parents prefer to turn down the speaker volume to keep the environment quiet.
- The speaker volume can be adjusted using the volume control ⑩
- This unit is equipped with a vibration alert. Set the power ON/OFF switch 11 to ||Q|| position. Once the received baby's voice is loud enough, the vibrator starts functioning. This feature is useful when the parent is working under very noisy environment (e.g. Vacuum cleaning). To save battery power, it is recommended not to use the vibration alert frequently.
- Once this unit is beyond the communication range of baby unit for over 2 minutes, an out-of-range alarm will be heard together with the LED level meter ⑨ starts flashing to alert the parents. The alarm will go off only when parent unit falls back within the communication range of baby unit.
N.B. This alarm will also be heard in case the baby unit is switched off, or its battery has run down, or its power is cut off. - The condition of the rechargeable battery pack is shown by the power on/battery low indicator ③. When the battery power is being consumed to below a destined level, the indicator ③ starts flashing and an alarm will be heard, reminding the parents to charge up the battery using the rapid charger.
- Both BU and PU can be carried around using the belt clip. To remove belt clip, follow diagram as shown.


43
PAIRING
In case the BU and PU cannot communicate with each other, probably pairing is lost. Perform following :
(a) Remove battery cover of both units, lift up the Li battery pack to expose the pairing button 13 (do not disconnect battery from socket 7). With some pointed object, press and hold the pairing button 13 while switch on the units.
(b) The power on indicator ③ should start flashing, indicating the units have entered pairing mode.
(c) Now release the pairing button ⑬ on both units.
(d) Press again the pairing button 13 on BU only, if pairing is successful, two beep tone will be heard in PU and the power on indicator 3 should stop flashing and light up steadily in both units.
(e) Switch off both units and then switch them on again, the baby monitor is now ready for operation.
44

PRECAUTIONS
- Use only the supplied AC adapters. Use of other AC adapters may cause damage to the unit.
- When not using the unit for a long period of time, remove all batteries from the units to avoid battery leakage.
- Disconnect the AC adapter from the wall outlet when the unit is not to be operated.
- The unit is best performed within a temperature range of ^ C to 40 ^ C (22 ^ F to 104 ^ F)
- Do not leave the unit expose to direct sunlight for a long time or near any heat source, moisture and excessive dust environment.
- When the unit cabinet become dirty, use detergent and clean with a soft cloth. Never use abrasive cleaner or chemical solvent.
- Do not open the cabinet, no serviceable part inside.
STANDARD ACCESSORIES
a. 6V AC adapter....2
b. Baby unit....1
c. Parent unit 1
d. Intelligent rapid charger 2
e. 3.7V Li Polymer rechargeable battery pack (installed in unit)....2
f. User manual....1

TROUBLE SHOOTING GUIDE
| Problem | Possible Causes | Solution |
| BU has no transmission | - Mic sensitivity is too low- Battery has run down | - Set the Mic Sensitivity switch to MIC Hi position- Recharge battery using charger stand |
| BU transmission always on | - The input sound level is to high | - Set the Mic Sensitivity switch to MIC Lo position or place the transmitter further away from the baby |
| Out of range alarm always on | - BU battery has run down- Distance between BU and PU exceeds the operating range | - Recharge battery using charger stand- Move the BU and PU closer together |
| Always showing low - battery alert- No battery inside unit | Battery has run down - Recharge battery using charger stand- Put battery back into battery compartment- Battery is damaged | - Replace with new battery |
| Battery life is short switched on - Switch | - Night light is permanently switched on- Vibration alert is off vibration alert | - Switch off night light or set to VOX operate |
| Communication distance is too short | - BU or PU battery has run down- Many steel structure between BU & PU | - Recharge battery using charger- Relocate PU & BU |
| PU & BU cannot communicate with each other | - Pairing is lost | - Perform pairing process |

ABOUT PADWICO
Do visit our website (www.padwico.com) to see more of our products.
The website also contains contact and download information. We hope you will find everything you need there.
To contact us, simply call the telephone number of the respective support department as shown on our website, www.padwico.com
ASSURANCE OF COMPLIANCE
This product complies with the essential requirements stipulated in "Article 3 in the R&TTE 1999 / 5/EC Directive" if it is used for its designated purpose and the following standards have been applied:
Safety of IT equipment
EN60065-1:2002+A12:2011
Electromagnetic compatibility
ETSI EN 301 489-1 V1.9.2 (2011-09) EN 301 489-3 V1.4.1 (2002-08)
Radio
ETSI EN 300 220-2 V2.4.1 (2012-05)
Health
ETSI EN 62311:2008
Additional information:
This product is adapted to the "Low Voltage Directive 73 / 23 / EC", "EMC Directive 89 / 336 / EC" and the "R&TTE Directive 1999 / 5 / EC (Annex II)" and is labelled with the respective CE marking.

P.Ottonson
Padwico / Sweden June 2013
R&TTE manufacturer representative

COUNTRIES WHERE THE R&TTE DIRECTIVE APPLIES
All member states of the EU, plus Switzerland CH
and Norway N

INFORMATION FOR USERS

In accordance with European Directives 2002/95/CE, 2002/96/CE and 2003/108/CE on the restriction of the use of dangerous substances in electric and electronic equipment as well as their waste disposal.
The barred symbol of the rubbish bin shown on the equipment indicates that, at the end of its useful life, the product must be collected separately from other waste.
Therefore, any products that have reached the end of their useful life must be given to waste disposal centres specialising in separate collection of waste electrical and electronic equipment, or given back to the retailer at the time of purchasing new similar equipment, on a one for one basis.
The adequate separate collection for the subsequent start-up of the equipment sent to be recycled, treated and disposal of in an environmentally compatible way contributes to preventing possible negative effects on the environment and health and optimises the recycling and reuse of components making up the apparatus.
Abusive disposal of the product by the user involves application of the administrative sanctions according to the laws in force.
Brand : Padwico
Model : 835
Category : Baby monitor