
TLP 350MV - Remote control Extron - Free user manual and instructions
Find the device manual for free TLP 350MV Extron in PDF.


| Product Type | Wall-mounted TouchLink Panel |
| Brand | Extron |
| Model | TLP 350MV |
| Display Size | 3.5 inch LCD touchscreen |
| Resolution | 320 x 240 pixels (typical) |
| Backlit Buttons | 8 programmable backlit push-buttons |
| Video Input | Composite video or S-video via BNC connectors |
| Encoder Knob | Rotary encoder for volume control or other functions |
| Motion Detector | Detects motion for wake-up/sleep mode |
| Light Sensor | Adjusts screen brightness and button backlighting |
| Power Supply | Power over Ethernet (PoE) or 12 VDC (external) |
| Power Consumption | PoE (IEEE 802.3af) or 12 VDC, <10W |
| Connectivity | RJ-45 Ethernet, BNC video inputs |
| Dimensions (H x W x D) | 4.5 x 6.5 x 1.5 in (11.4 x 16.5 x 3.8 cm) approx. |
| Weight | 0.5 lb (0.23 kg) approx. |
| Mounting | 3-gang mud ring or UL-certified junction box |
| Software | Extron GUI Configurator and Global Configurator |
| Reset Modes | 4 reset modes including factory defaults |
| Maintenance | Clean with dry cloth; avoid liquids |
| Compliance | UL listed when installed in junction box |
Frequently Asked Questions - TLP 350MV Extron
User questions about TLP 350MV Extron
0 question about this device. Answer the ones you know or ask your own.
Ask a new question about this device
Download the instructions for your Remote control in PDF format for free! Find your manual TLP 350MV - Extron and take your electronic device back in hand. On this page are published all the documents necessary for the use of your device. TLP 350MV by Extron.
USER MANUAL TLP 350MV Extron
The Extron ^® TLP 350MV is a wall-mounted TouchLink ^™ Panel that provides simple and versatile configuration and control for a range of IP Link ^® control systems.
Graphic and text objects are displayed on the screen. These objects have system control functions associated with them and the Touchpanel allows you to control those functions.
Two BNC connectors allow the screen to be used to preview composite video or S-video.
IMPORTANT: Refer to www.extron.com for the complete user guide and installation instructions before connecting the product to the power source.
NOTE: The RJ-45 output on the rear panel of the TLP 350MV must be connected to a network switch, hub, or router that is connected to an Ethernet LAN or the Internet. An Extron IP Link controller must also be connected to the same network. Suggested models include IPL T S series (for example, IPL T S4), IPL 250, IPL T CR48, or IPL T SFI244.
This guide provides basic instructions for experienced installers to mount and perform initial configuration on the TLP 350MV. Full instructions and reference material can be found in the TLP 350MV User Guide, which is available on the Extron Web site (www.extron.com).
TLP 350MV Front Panel Features
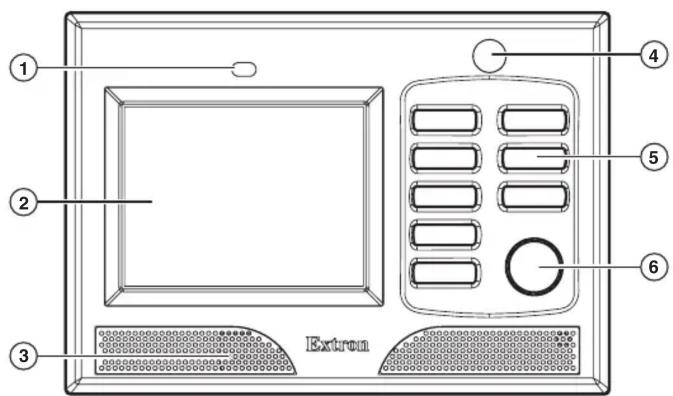
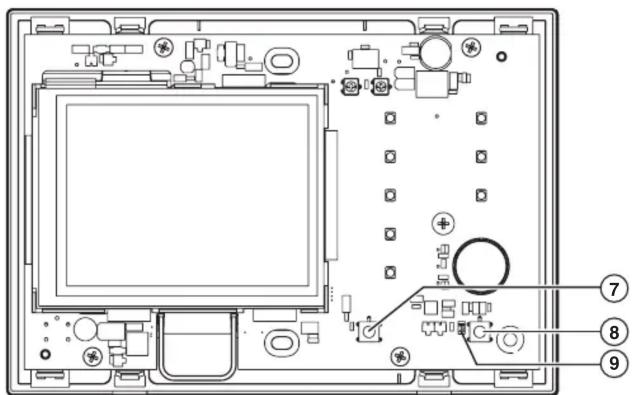
Figure 1. TLP 350MV Front Panel (left) and Front Panel with Bezel Removed to Show Recessed Buttons (right).
① Light sensor — monitors the level of ambient light and adjusts the screen brightness and button backlighting.
② 3.5 inch LCD screen — provides a graphical user interface with a pressable touch screen display.
③ Speaker — provides audible feedback.
④ Motion detector — detects movement in front of the panel. When no motion has been detected for a user-defined period of time, the unit goes into sleep mode, which shuts down the screen display and inactivates all the buttons. When motion is detected, these functions are restored.
⑤ Eight backlit push-buttons — can be configured to perform user-defined functions, using the Extron Global Configurator software.
⑥ Encoder knob — intended for volume control but it can be configured for other functions.
Two buttons and an LED are recessed behind the bezel. Remove the bezel using the Extron removal tool inserted into the tabs on the bottom of the panel, as shown in the figure at right.
⑦ Menu button — activates the on screen menus for calibrating and setting the unit.
⑧ Reset button — allows the unit to be reset in any of four different modes. See the "Reset Modes" section on the back page of this setup guide.
⑨ Reset LED — is visible only when the faceplate has been removed. It lights as an indicator for the reset modes.
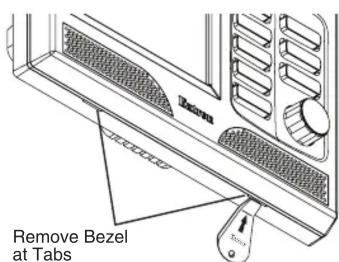
Extron Removal Tool
Mounting the TLP 350MV
Decide where to mount the TLP 350MV and whether to use a 3-gang mud ring or a 3-gang UL-certified junction box. The mounting instructions are slightly different depending on your choice:
Using a Mud Ring
- Use the template provided with the mud ring to mark the wall. For the mud ring provided, the hole must be 5 25/32 inches (14.68 cm) wide x 3 7/8 inches (9.83 cm) high.
- Cut a hole in the wall. To avoid making the hole too big, cut inside the lines you marked.
- Test the fit by inserting the mud ring into the hole in the wall. If necessary, use a rasp or file to enlarge the hole.
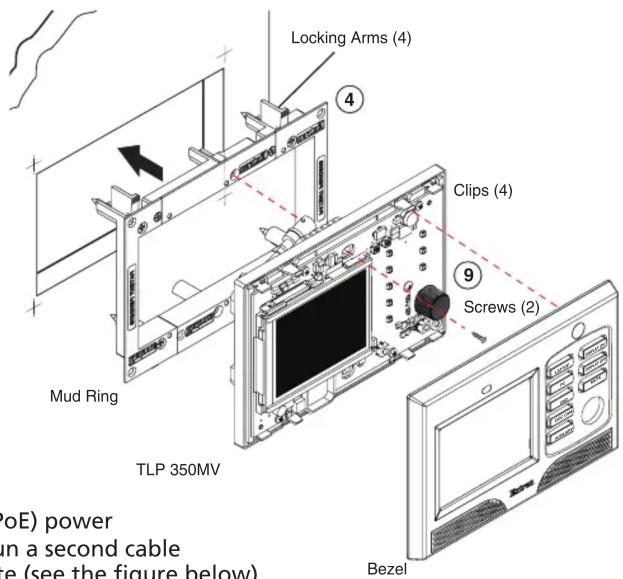
- Insert the mud ring into the hole and use a screw driver to turn and tighten the locking arms until they clamp the mud ring to the mounting surface. Do not overtighten.
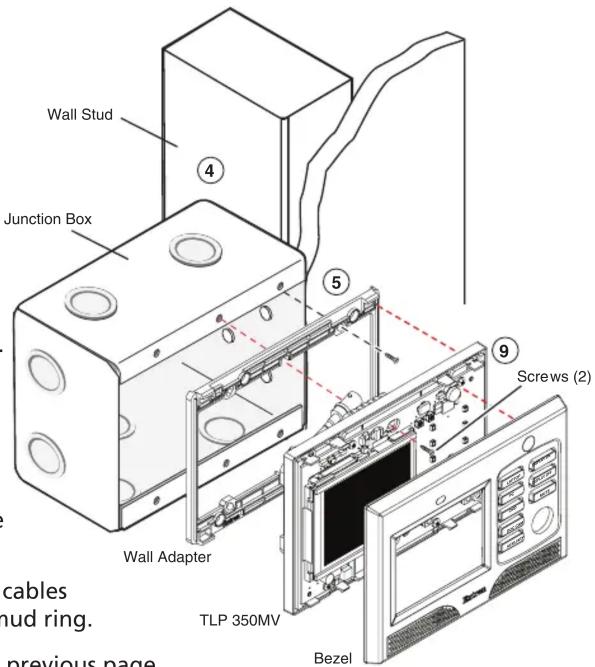
- Secure the wall adapter (provided) to the junction box, using the four screws (provided).
- Use the Extron removal tool provided to separate the bezel from the TLP 350MV (see figure on previous page).
- Extron recommends using the provided Power over Ethernet (PoE) power supply. Connect a network switch to the "LAN In" port and run a second cable from the "Pwr LAN Out" port to the Touch Panel mounting site (see the figure below).
CAUTION: Whether you use a PoE power supply or a 12 VDC power supply (not provided), you must read the caution in the Power Supply section of the TLP 350MV User Guide.
NOTE: If both a PoE power supply and a 12 VDC power supply are present, the unit will draw power from the PoE power supply only.
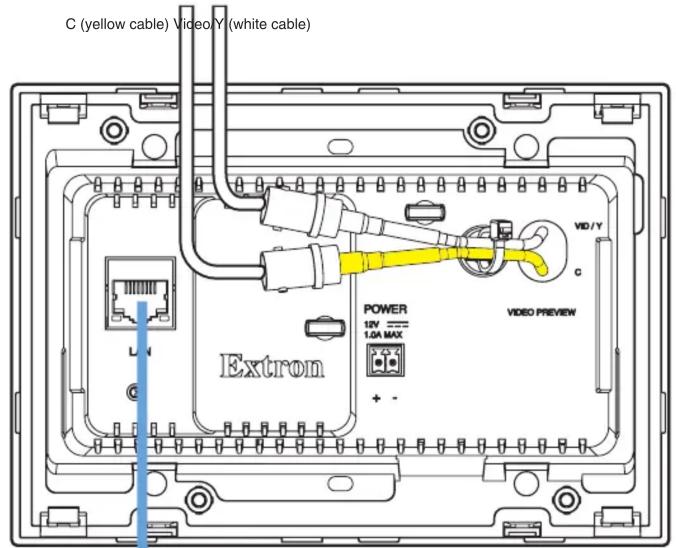
- Run video cables with to the mounting site. Leave enough slack in the cables to connect them to the TLP 350MV. Pull the cables through the mud ring. Connect the cables as shown in the diagram below.
- Plug the cables into the rear panel connectors of the TLP 350MV (refer the TLP 350MV User Guide).
- Secure the TLP 350MV to the mud ring using the two screws provided (top center and bottom center).
- Do not replace the bezel at this time. You will need access to the recessed Menu and Reset buttons to configure the unit.
Power over Ethernet (PoE) Power Supply
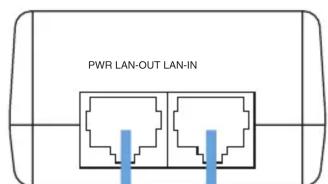
To Network SwitchTo TLP 350MV
Using a UL-Certified Junction Box
- Locate a wall stud and mark the position where the junction box will be placed. Use the size specifications provided by the manufacturer.
- Cut a hole in the wall. To avoid making the hole too big, cut inside the lines you marked in step 1.
- Test the fit by inserting the junction box into the hole in the wall. If necessary, use a rasp or file to enlarge the hole.
- Insert the junction box into the hole in the wall. Secure it to the stud using two screws or nails, as appropriate. The front edge of the junction box must be flush with the front surface of the wall.
- Secure the wall adapter (provided) to the junction box, using the four screws (provided).
- Connect a network switch to the "LAN In" port of the PoE power supply (provided). Run a second cable from the "Pwr LAN Out" port to the TLP 350MV mounting site (see the figure on the previous page).
- Run video cables to the mounting site. Leave enough slack in the cables to connect them to the TLP 350MV. Pull the cables through the mud ring.
- Connect the cables as shown in the diagram at the bottom of the previous page.
- Secure the TLP 350MV to the wall adapter. Two clips at the top and two at the bottom audibly click when the panel moves into place. You should also use the two screws provided (top center and bottom center).
- Do not replace the bezel at this time. You will need access to recessed the Menu and Reset buttons to configure the unit.
Configuring the TLP 350MV (Initial Setup)
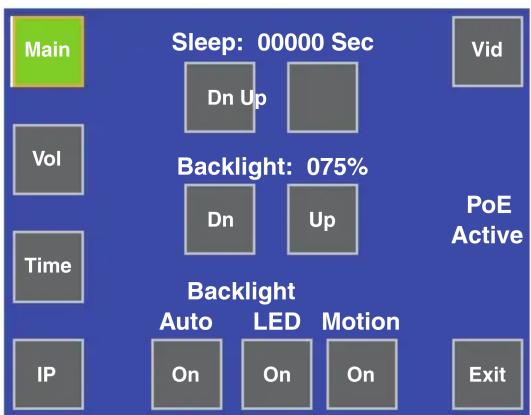
Before use, the TLP 350MV must be configured using the on-screen menus. There are five different screens (Main, Vol, Time, IP, and Vid) that can be selected by pressing the appropriate button at the edge of the Main screen. There is also an Exit button at the bottom left corner of the screen for leaving the menus.
NOTE: Only the Main screen provides links to the Vol, Time, IP, and Vid screens. All other screens have a link to return to the Main screen. After calibrating each group of settings, return to the Main screen to access the next screen.
Setup Menu
- Press the recessed Menu button on the front panel to activate the top-level menu screen. The menu opens at the Main Setup Page.
- Touch an area of the screen to bring it into focus and use the Up and Down buttons or the volume control knob to adjust the value. Some options have a single button and toggle between Off and On when the button is pressed.
Use the different menu pages to adjust the following options. For more details, see the user guide.
Main (shown at right) — Shows Power over Ethernet status and adjusts the Sleep timer, Backlight, Auto Backlight, and LED Backlight functions.
Vol — Adjusts the Master, Click (global button sounds), and Sounds ( playback .wav files) volume settings.
flowchart
graph TD
    A["Main"] --> B["Sleep: 00000 Sec"]
    B --> C["Dn Up"]
    C --> D["Backlight: 075%"]
    D --> E["Dn"]
    D --> F["Up"]
    F --> G["Backlight"]
    G --> H["Auto"]
    G --> I["LED"]
    G --> J["Motion"]
    H --> K["On"]
    I --> L["On"]
    J --> M["On"]
    N["Vid"] --> O["Backlight"]
    P["Vol"] --> Q["Backlight"]
    R["Time"] --> S["Backlight"]
    T["IP"] --> U["Backlight"]
    V["Exit"] --> W["Backlight"]
Time — Sets the correct time and date.
IP — Sets the IP address and the subnet mask, and enables or disables Dynamic Host Configuration Protocol.
Vid — Provides a small video preview window and the controls to calibrate video contrast, color, brightness, and tint.
Calibration Screen
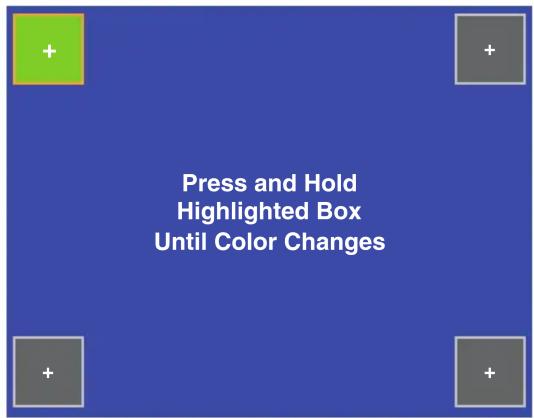
- Press the recessed Menu button on the front panel a second time to open the calibration screen. This screen adjusts the precision of the screen to the location of the finger touch.
- Press the green button until it changes color.
- Calibrate the next button. When all four points have been calibrated, the screen reopens to the main setup screen.
- Press Exit to close the on-screen menus.
- Reattach the bezel. Four clips, two at the top and two at the bottom, snap into place. (See the figure at the bottom of the first page.)
Reset Modes
The TLP 350 MV has four reset modes that can be initiated by pressing the Reset button:
Factory Firmware (Mode 1): Hold the Reset button while applying power to reset the unit back to the base firmware shipped with the unit.
Run/Stop Events (Mode 3): Hold the Reset button until the reset LED blinks once (3 seconds), then release and press Reset momentarily (less than 1 second) within 1 second. This mode turns events on or off.
Reset All IP Settings (Mode 4): Hold the Reset button until the reset LED blinks twice (6 seconds), then release and press Reset momentarily (less than 1 second) within 1 second. This mode resets the IP address, subnet, gateway, port mapping, and DHCP settings back to factory defaults. The reset LED blinks 4 times in quick succession, confirming the reset and turning events off. If necessary, reset the IP address, using ARP and the MAC address.
Reset Factory Defaults (Mode 5): Hold the Reset button until the reset LED blinks 3 times (9 seconds), then release and press Reset momentarily (less than 1 second) within 1 second. This mode causes a reset to factory defaults for everything except firmware.
NOTE: Refer the TLP 350MV User Guide (available at www.extron.com) for additional details.
Designing and Configuring the TLP 350MV Interface
Producing the graphical user interface (GUI) for the TLP 350MV requires two steps. You must first design the layout using the Extron GUI Configurator software. This allows you to design buttons, icons, text, and other objects and organize their layout on the screen.
Once the layout has been designed, use the Extron Global Configurator software to assign functions to each of the buttons.
NOTE: You must use Global Configurator 3.0.4 or a later version and GUI Configurator 1.1 or a later version to configure the TLP 350MV.
Both of these programs are on the DVD that is provided with the TouchLink Panel or can be downloaded (free of charge) to your PC from the Extron Web site (www.extron.com). For information about downloading and installing either program, consult the TLP 350MV User Guide, which can be downloaded from the Extron Web site.
To get started using either program, refer the TLP 350MV User Guide. Full instructions for the programs can be found in their help files, which can be opened from the Help menu of the programs.
| Extron USA - West Headquarters | Extron USA - East | Extron Europe | Extron Asia | Extron Japan | Extron China | Extron Middle East |
| +800.633.9876Inside USA/Canada Only | +800.633.9876Inside USA/Canada Only | +800.3987.6673Inside Europe Only | +800.7339.8766Inside Asia Only | +81.3.3511.7655+81.3.3511.7656 FAX | +400.883.1568Inside China Only | +971.4.2991800+971.4.2991880 FAX |
| +1.714.491.1500+1.714.491.1517 FAX | +1.919.863.1794+1.919.863.1797 FAX | +31.33.453.4040+31.33.453.4050 FAX | +65.6383.4400+65.6383.4664 FAX | +86.21.3760.1568+86.21.3760.1566 FAX |
Brand : Extron
Model : TLP 350MV
Category : Remote control